chromira prolab troubleshooting - zbe...chromira prolab troubleshooting troubleshooting guide...
TRANSCRIPT

Chromira ProLab Troubleshooting
Troubleshooting Guide
Chromira ProLab diagnostics and troubleshooting.
Notice: This document is frequently updated. Get the most current revision at www.zbe.com.
This version was last revised: 1/7/2010

Chromira ProLab Troubleshooting
ProLab Troubleshooting Guide Copyright 2010 Page 2 of 75
Table of Contents
1 CHROMIRA LAB SELF TESTS ....................................................................................................................5
1.1 ENVIRONMENT ............................................................................................................................................6
Chromira PR File................................................................................................................................................6
Emulsion File ......................................................................................................................................................7
Chromira Images ................................................................................................................................................7
Disk Space...........................................................................................................................................................7
Machine Type......................................................................................................................................................7
License ................................................................................................................................................................8
Lab Settings.........................................................................................................................................................8
1.2 PRINT ENGINE .............................................................................................................................................8
Imaging Head......................................................................................................................................................9
Air Pressure Sensor and Solenoid.....................................................................................................................10
Paper Sensor.....................................................................................................................................................11
Head Temperature ............................................................................................................................................12
1.3 PRINTER I/O ..............................................................................................................................................13
Printer IO..........................................................................................................................................................13
I/O Print Engine................................................................................................................................................14
I/O Paper Buffer (Buffer limit switches) ..........................................................................................................15
1.4 MOTORS IN THE PRINT ENGINE..................................................................................................................16
Paper Supply Motor ..........................................................................................................................................16
Paper Supply Spring Reference ........................................................................................................................17
Drum Motor ......................................................................................................................................................18
Drum Tension....................................................................................................................................................20
Drum Tension Motor.........................................................................................................................................20
Drum Tension Spring Reference .......................................................................................................................21
Head..................................................................................................................................................................22
Head Motor.......................................................................................................................................................22
Head Linear Encoder........................................................................................................................................22
Head Reference.................................................................................................................................................23
Pinch Roller Motor ...........................................................................................................................................23
Pinch Roller Reference .....................................................................................................................................24
Cutter Roller .....................................................................................................................................................24
Paper Buffer Exit Motor ...................................................................................................................................26
Paper Buffer Input Motor .................................................................................................................................27
Cross Cut Motor ...............................................................................................................................................28
Cross Cut Reference..........................................................................................................................................29
1.5 PROCESSOR ...............................................................................................................................................30
1.6 CONVEYOR IO...........................................................................................................................................33
I/O Conveyor.....................................................................................................................................................33
Conveyor Temperature .....................................................................................................................................34
1.7 CONVEYOR MOTORS .................................................................................................................................35
Processor Exit Rollers ......................................................................................................................................35
Conveyor Drive Rollers ....................................................................................................................................36
Rudder Roller....................................................................................................................................................37
Cutter Rollers....................................................................................................................................................38
Elevator Motor..................................................................................................................................................39
Elevator.............................................................................................................................................................39
Elevator Reference............................................................................................................................................40
Backprinter .......................................................................................................................................................41
2 GENERAL ERRORS .....................................................................................................................................44

Chromira ProLab Troubleshooting
ProLab Troubleshooting Guide Copyright 2010 Page 3 of 75
3 BALANCE ERRORS..................................................................................................................................... 47
4 TROUBLESHOOTING................................................................................................................................. 48
4.1 SOFTWARE TROUBLESHOOTING ................................................................................................................ 48
Known Software Bugs....................................................................................................................................... 48
4.2 MEDIA TRANSPORT PROBLEMS................................................................................................................. 49
Paper jams in Print Engine .............................................................................................................................. 49
Paper stalls or is delayed in Processor ............................................................................................................ 49
Paper stalls or is delayed in Dryer................................................................................................................... 49
Paper jams in Dryer ......................................................................................................................................... 50
Prints getting stuck in Dryer ............................................................................................................................ 50
Paper jams at entrance to Conveyor ................................................................................................................ 51
Paper gets stuck in Conveyor ........................................................................................................................... 52
Burnt Prints in Dryer........................................................................................................................................ 54
Processor runs in reverse direction, occasionally............................................................................................ 55
Folded Corners on Prints ................................................................................................................................. 55
Scratches on back of Trans prints .................................................................................................................... 55
Prints overlapping, causing PCC to eject them out the back ........................................................................... 55
Processor Gears breaking, Paper pulling tight in Processor........................................................................... 56
4.3 CUTTING PROBLEMS ................................................................................................................................. 57
Inconsistent Cutting - (Conveyor Cutter) ......................................................................................................... 57
Prints not cutting in PCC (nests going out back) ............................................................................................. 58
Prints not cutting in PCC (nests going into Sorter Shelf but not cutting)......................................................... 59
Prints cutting crooked (along 30” width)......................................................................................................... 60
Cross cut does not cut all the way across 30” width ........................................................................................ 60
Prints are cut in half or at random places........................................................................................................ 61
4.4 IMAGING PROBLEMS ................................................................................................................................. 62
White space next to large images that go to Hammock is being wasted........................................................... 62
Image Size Errors ............................................................................................................................................. 62
Thin White Line shows up along one edge of paper ......................................................................................... 62
Paper Fogging Problems (other than Cyan spots) ........................................................................................... 64
Back-printing shows through the front side of print......................................................................................... 65
Blurry images (bad loading)............................................................................................................................. 65
Faint Banding on light gradients...................................................................................................................... 65
“Rainbow”-colored artifacts on prints ............................................................................................................ 66
A Red, green, or blue artifact will not go away when balancing...................................................................... 66
Prints show light and dark wavy lines. ............................................................................................................. 67
4.5 MACHINE MALFUNCTIONS........................................................................................................................ 68
Paper de-threads from Print Engine without warning ..................................................................................... 68
Sorter won’t move............................................................................................................................................. 69
Cutter calibration images not printing ............................................................................................................. 69
Head too hot (over 65 degrees C)..................................................................................................................... 69
Processor won’t turn on in the morning or off at night.................................................................................... 70
Jobs emerge from the Conveyor sorted or cut incorrectly................................................................................ 70
Hard Disk on Computer fills up........................................................................................................................ 70
Prints going into Hammock not getting Back-Printed...................................................................................... 71
Drum errors intermittently ............................................................................................................................... 73
Drum moves violently or erratically................................................................................................................. 73
Data in back-printing is garbled ...................................................................................................................... 73
Major engine failures and multiple errors occur suddenly during printing..................................................... 73

Chromira ProLab Troubleshooting
ProLab Troubleshooting Guide Copyright 2010 Page 4 of 75
ICC Profile error box (permissions limited) .....................................................................................................74
Cannot control Air Solenoid (for Print Engine air supply) - always on ...........................................................74
Dryer heat falling while printing large orders..................................................................................................74
Processor Gears breaking.................................................................................................................................75
Cyan Fringes around Black Text or Image elements ........................................................................................75
Any Motor gets hot............................................................................................................................................75

Chromira ProLab Troubleshooting
ProLab Troubleshooting Guide Copyright 2010 Page 5 of 75
1 Chromira Lab
Self Tests
This Section lists the Self Tests that are run automatically when your Chromira5x30 ProLab starts up. If the system detects anything wrong with your machine during the Start-Up Self Test process, you will see an error box appear:
Clicking “Yes” will bring up the Chromira Lab Diagnostics Screen, or you can always click the Gear Button in the main window. Following is a list of these tests, and how they appear in the Diagnostics Screen when there is a related failure. Possible sources of any of these errors are also listed.

Chromira ProLab Troubleshooting
ProLab Troubleshooting Guide Copyright 2010 Page 6 of 75
1.1 Environment
“Environment” refers to the configuration of the computer which runs the Chromira 5x ProLab, and the software on it.
Chromira PR File The Chromira.PR file contains much of the configuration information for your Chromira ProLab. If this file is missing, you will be given the option of creating a new one. Creating a new Chromira.PR file will require some configuration settings for your Chromira ProLab to be re-established.
If the Chromira.PR file is missing, it will result in the a Missing PR File Error Box. It is recommended that you contact your ZBE Service Representative for a replacement PR
file.
If the Chromira.PR file is missing, the Self-Tests will appear with a note: “Unable to Read PR File, as well as an “Unable to load Emulsion” entry.
- Check that you can access the “C:\Chromira Lab” folder using the Network Neighborhood icon in Windows. This folder, from which the Chromira ProLab operates, must be accessible from the network.

Chromira ProLab Troubleshooting
ProLab Troubleshooting Guide Copyright 2010 Page 7 of 75
Emulsion File The Emulsion (.EMU) file stores calibration information for a given photographic paper printed in the Chromira. If the Emulsion file for the last material you selected was either not found, or is corrupted, you will see the this error in the Diagnostics.
Simply select a good Emulsion file (from the Preferences Menu) to continue printing.
- Check that you can access the “C:\Chromira Lab” folder using the Network Neighborhood icon in Windows. This folder, from which the Chromira ProLab operates, must be accessible from the network.
Chromira Images The Calibration Image files for your Chromira ProLab were not found on the disk drive. The recommended solution to this problem is to re-install the Chromira ProLab software.
- Check that you can access the “C:\Chromira Lab” folder using the Network Neighborhood icon in Windows. This folder, from which the Chromira ProLab operates, must be accessible from the network.
Disk Space Your computer’s disk drive is too full to continue printing. You will need to clear at least 2 GB for reliable printing.
Machine Type This should always be reported as Chromira 5x ProLab. If it is not, it is recommended that you re-install the software.

Chromira ProLab Troubleshooting
ProLab Troubleshooting Guide Copyright 2010 Page 8 of 75
License On Chromira 5x Pro Lab machines, this is reported as “Basic”.
Lab Settings The Chromiralab.ini file holds much of the configuration information for your Chromira ProLab. If this file is missing, you will be given the option of creating a new one. Creating a new chromiralab.ini file will require some configuration settings for your Chromira ProLab to be re-established, including:
- Cut Calibration
- Processor settings
- Densitometer Settings
- Conveyor Settings
1.2 Print Engine
The Print Engine refers to the dark cabinet in which the actual imaging of your files takes place. It is made up of three components:
- The Print Engine: Comprised of the Feed Roll, the Imaging Head, and the Drum and Pinch Roller, this is where the LED light exposes the paper to make prints.
- The Main Cutter: Cuts the individual pieces of paper from the paper roll after they have been imaged under the Imaging head. These pieces of paper, which may contain more than one printed image, are called “nests”.
- The Buffer: Transfers the “nests” from the Print Engine area into the Paper Processor.

Chromira ProLab Troubleshooting
ProLab Troubleshooting Guide Copyright 2010 Page 9 of 75
Imaging Head The Imaging head on Chromira 5x printers is a USB 2.0 device. If it is not identified by the system, this error will show up on the main status screen as:
This is because the system uses the Imaging Head interface to test parts of the Head Motor drive system.
In addition, the Diagnostics Screen will show more detailed information in both the Imaging Head and Head motor sections:
There will also be an error in the “Head” section, stating that No Air Pressure was detected.
This is due to the Air Pressure Sensor being a part of the Imaging Head assembly.
Check the following if the Head has not been detected:
- The main power to the printer has been turned off. Twist the large Red Button to restore power.
- Power Supply turned Off, or its AC Mains cable is unplugged in lower cabinet
- The Fuse in the Power Supply is blown. Check and replace the Fuse with one with the same rating.
- USB Cable unplugged at Head or at USB card in rear of PC computer in lower cabinet.
- Head Power Cable is unplugged, either at the Head itself, or on the Power Supply in lower cabinet.
- The small computer in the Head has crashed. Try turning Power off then on again (use large Red Button on front of machine) to restore operation.
- Head Cable is faulty.

Chromira ProLab Troubleshooting
ProLab Troubleshooting Guide Copyright 2010 Page 10 of 75
Air Pressure Sensor and Solenoid Chromira Printers all use an Air-Rail for the Imaging Head’s back-and-forth movement. This requires compressed air to be fed into the machine. The Air Pressure Sensor lets the computer know if the air pressure is high enough to safely move the Head (Severe Air-Rail damage will result if the Head is moved when there is no air pressure). The Air Solenoid turns the air flow off when the machine is idle, and on when the machine is printing.
For the Self Test, the computer will go through the following procedure
1. Turn the Air Solenoid on
2. Check that the Air Pressure Sensor reads a high-enough pressure.
3. Turn the Air Solenoid off.
If there is no air pressure during step 2, above, the following error will appear in the main windows status area:
The computer cannot test the Head Motor if there is no air. The Diagnostic Screen will show:
and further down in the list,
If this test fails, check the following:
- Air Compressor is turned on and functioning.
- All Air Hoses are connected all the way from the Compressor to the Chromira ProLab.
- All internal air hoses are connected.
- Air Solenoid: Try manually pressing the button on top of the Solenoid and listen for air flow. Air solenoid control can be tested from the Diagnostics screen, in the “Print Engine – Head” section. Check and un-check the Air Solenoid checkbox and listen for air hissing.
o If no air hissing is heard when clicking the checkbox, the Cable to the Air Solenoid may be disconnected or broken, or the Chromira Control Hub has failed.

Chromira ProLab Troubleshooting
ProLab Troubleshooting Guide Copyright 2010 Page 11 of 75
- If the Air-Solenoid is left in the locked-on position (knob on top of solenoid), the Self-Tests will issue a warning that the air can not be turned off.
Paper Sensor The Paper Sensor tells the Chromira computer where the edges of the paper are, so that images are positioned correctly. This sensor is not tested in the Self Tests, but is tested when you load paper and try to go Online for printing. If there is a problem, the following error will appear:
If this happens, check the following:
- The multi-colored wire from the Paper Sensor going to the Head circuit board is not disconnected or broken.
- That the Paper Sensor is positioned correctly on the Head assembly. It should be about 3/16” (5mm) above the surface of the Paper.
- Check the voltage output from the Paper Sensor in the “Print Engine – Imaging Head” Diagnostics screen:
o Check the box for “Paper Sensor” to turn it on. When the printer is properly loaded with paper, and the Sensor is over the paper, the “V Paper” reading should be above 2.8 volts. If the voltage reading is lower, the Sensor height should be adjusted.

Chromira ProLab Troubleshooting
ProLab Troubleshooting Guide Copyright 2010 Page 12 of 75
Head Temperature The Chromira 5x Head contains it’s own temperature control system. The Head Temperature should always be within one degree of 35.0°C (that is, 34.0 – 36.0).
- If the Head Temperature goes too high, check that the Fan on top of the Head is running.
o If the Fan is not running, check that it is plugged in on top of the Head (small white connector).
o If the Fan is plugged in and still not running. It should be replaced.
- If the Head Temperature is too low, even after the machine has been on for more than 10 minutes, the Head should be repaired by your ZBE Service Representative.

Chromira ProLab Troubleshooting
ProLab Troubleshooting Guide Copyright 2010 Page 13 of 75
1.3 Printer I/O
“Printer IO” refers to the Chromira Control Hub, also called the I/O Module, and all of the functions that it controls.
Printer IO If the Hub itself has failed, the Diagnostics will recognize this, and display in the Status area of the main screen:
The Diagnostics screen will indicate failures for all components connected to the Chromira Control Hub:
This can result from any of the following things:
- Power to the machine is turned off (Red Button pushed in).
- Power to the main Power Supply (in lower cabinet) is unplugged or switched off.
- Power Cable to main Power Supply has come loose from the bottom of Processor Control Box.
- The Power Cable from the Power Supply to the Control Hub is unplugged (at either end).
- The USB cable that goes from the Computer to the Control Hub’s USB connector is unplugged.
- The Fuse in the Power Supply has blown. Check the Fuse and replace it with one of an equal rating if it is blown.

Chromira ProLab Troubleshooting
ProLab Troubleshooting Guide Copyright 2010 Page 14 of 75
I/O Print Engine The “I/O Print Engine” component refers specifically to the module inside the Chromira Control Hub which reads various switches and Paper Sensors in the Print Engine. This I/O Module communicates with the Computer through the CAN Bus, just like all of the Motors, even though it is built into the Chromira Control Hub enclosure.
If the I/O Module fails its Self-Test, you will see the following error in the Diagnostics:
If the rest of the Motors in the Print Engine Section should indicate “OK”, and only the “I/O Print Engine” module and IO Paper Buffer modules show “IO Board Not Found”, check the following:
- If the I/O Module circuit board has recently been replaced, please check that its Node ID Switches are set correctly. For the Print Engine’s I/O Module, the Node ID must be set to “16”, and the bank of switches should all be “off”.
- The I/O Module may have failed or its computer has crashed. Please close the application, turn the main power off then back on again (use the Big Red Button), and re-start the application. If this error persists, the I/O Module’s circuit board should be replaced.

Chromira ProLab Troubleshooting
ProLab Troubleshooting Guide Copyright 2010 Page 15 of 75
I/O Paper Buffer (Buffer limit switches) The Paper Buffer in the Chromira 5x Pro Lab uses two switches to monitor the paper as the nests are fed into the Processor. These switches monitor the position of the Trap Door, which allows the Buffer to maintain a small loop of paper during printing operation. If this something is wrong, the Diagnostics will show:
Things to check if the Paper Buffer shows an error:
- Buffer Switch Cable unplugged at either end (at Control Hub or at right side of Buffer)
- Trap Door Stuck in the open position, or not closing all the way.
- A piece of paper has stuck in the Buffer and if holding the Trap Door open.
The procedure to check for proper operation of the Trap Door in the Buffer, is:
1. Remove the rear Panel from the Print Engine Cabinet. This is the panel directly opposite the one with the Computer Monitor mounted to it.
2. Remove the Light Trap Panel underneath the Blue Panel you just removed.
3. At the bottom of the Print Engine assembly, note the clear plastic Side Plate of the Buffer. Look up from underneath, and you will see a slightly-curved black metal guide that spans the width of the Buffer. This is the Trap Door.
4. Reach up and grasp the edge of the Trap Door that is closest to the Processor, and gently pull it downward.
5. Listen for the small click of the Trap Door Limit Switch as you move the Trap Door downward.
6. Very slowly return the Trap Door to its resting position, letting the springs pull the Door upward as you slowly release it. Check that the springs always have enough force to “click” the Switch right when the Trap Door is almost closed (in up-position).
7. Have an assistant verify that the Trap Door status reads properly on the Diagnostic Screen.
8. Replace the Light Trap and Blue Panels when finished.

Chromira ProLab Troubleshooting
ProLab Troubleshooting Guide Copyright 2010 Page 16 of 75
1.4 Motors in the Print Engine
This section describes the Motors that make the Print Engine do its job. Some motors also have other subsystems associated with them, like referencing and spring tension.
Paper Supply Motor The Paper Supply Motor keeps tension on the paper when the machine is loaded. This Motor drives a large spring that pulls on the Paper Feed Roll. The following message will appear in the Diagnostics if this motor does not operate correctly:
Paper Supply Motor Failed: Unable to Connect
For any motor that gives this message, please check: - Power to the machine is turned on (twist the big Red Button so that it pops out).
- The Motor’s Power/Data cable is connected at the Motor and at the Control Hub. Check that both connectors are tight and screwed into place.
- The Power Supply AC Mains Power Cable is connected and that the Power Supply switch is turned on.
- The Power Cable from the Power Supply to the Control Hub is plugged in and locked into place (at both ends).
- The USB cable that goes from the Computer to the Control Hub’s USB connector is plugged in at both ends.
- The CAN Bus Node ID is set incorrectly for this Motor. This will only be the cause if this Motor has just been replaced. Please refer to “TSD CL017 Motor Identification and Node Settings” for how to set this.
- Check if the Fuse in the Power Supply has blown. Replace it with one of an equal rating if it is blown.

Chromira ProLab Troubleshooting
ProLab Troubleshooting Guide Copyright 2010 Page 17 of 75
Paper Supply Spring Reference In order for the Paper Tension system to operate properly, the Paper Supply Spring must be referenced properly. This referencing procedure is how the computer tells when this spring has no tension on it. For the Referencing to complete properly, both the Paper Supply Motor and the Spring Encoder must operate correctly.
If this procedure fails, it is noted in the Diagnostics as (for example):
The text after the Paper Supply Spring Reference label will describe what happened. If this Test comes up with any errors, check the following:
- Spring Cage is installed and seated all the way against its Drive Sprocket. Thumbscrew is inserted and tightened all the way.
- Drive Chain from Tensioning Motor to Drive Sprocket is not broken or jammed.
- Any roll of paper that is loaded on the machine must not be threaded into the Print Engine over the Drum
- Spring Encoder is not plugged in, either at the Encoder itself or at the Control Hub.
- The small Drive Gears for the Spring Encoder are engaged, and stay engaged as the paper roll turns. Check this by turning the paper roll through at least one full turn, and checking for disengagement between the two gears.

Chromira ProLab Troubleshooting
ProLab Troubleshooting Guide Copyright 2010 Page 18 of 75
Drum Motor The Drum Drive system has three main components, the Drum Motor, the Drum Encoder, and the Controller. These three items must operate correctly for the Drum to function and for the Self Test to pass.
This picture shows the Drum Motor and the Drum Motor Control Module. The components shown are:
A: Drum Encoder Plug
B: Motor Power/Data Connector
C: Drum Motor Hall-Effect Sensor Cable
D: Drum Motor Amplifier (with fan and heatsink).
E: Drum Motor Winding Power Plug
This picture shows the Drum Encoder, Ring, and the Reference Flag:
The top of the Drum Encoder Reader Head is covered with black tape. Beneath this tape is a status LED that light Green when the Encoder is reading properly. This LED should always be Green, except when the Reference Flag pass next to the Reader Head, which should make the LED light Red or turn off for a moment.

Chromira ProLab Troubleshooting
ProLab Troubleshooting Guide Copyright 2010 Page 19 of 75
If the Motor Controller board is not present, unplugged, has failed, or is set to the wrong CAN Bus node number, the following will appear in Diagnostics:
Drum Motor Failed: Unable to Connect
For any motor that gives this message, please check: - Power to the machine is turned on (twist the big Red Button so that it pops out).
- The Motor’s Power/Data cable is connected at the Motor and at the Control Hub. Check that both connectors are tight and screwed into place.
- The Power Supply AC Mains Power Cable is connected and that the Power Supply switch is turned on.
- The Power Cable from the Power Supply to the Control Hub is plugged in and locked into place (at both ends).
- The USB cable that goes from the Computer to the Control Hub’s USB connector is plugged in at both ends.
- The CAN Bus Node ID is set incorrectly for this Motor. This will only be the cause if this Motor has just been replaced. Please refer to “TSD CL017 Motor Identification and Node Settings” for how to set this.
- Check if the Fuse in the Power Supply has blown. Replace it with one of an equal rating if it is blown.
If, during the Self-Tests, the Drum moves violently, and/or does not move at all, and the following appears in Diagnostics:
Please check:
- Drum Encoder is plugged in to the Motor Controller Board.
- Drum Encoder is aligned correctly. LED under black tape flap must be green as the drum is rotated through at least one full revolution. The LED may flash red or off as the Reference Flag moves past the Reader.
- All cabling is plugged into the Drum Motor controller.
o Power/CAN Connector
o Motor Power connector (green block at bottom end of Module)
o Hall-Effect Sensor Cable (small white block with multi-colored wires at edge of Module)
o Drum Encoder plug (near top of Module).

Chromira ProLab Troubleshooting
ProLab Troubleshooting Guide Copyright 2010 Page 20 of 75
Drum Tension This is a test of the Drum Tension system, which uses a Spring Tension Motor to drive a Spring Cage which is attached to the Drum. This allows the Drum to provide paper tension without the main Drum Motor doing all the hard work. If this system fails to reference for any reason, the following will appear on the main screen status display:
Drum Tension Motor If the Drum Tension Motor failed, Diagnostics will show:
Drum Tension Motor Failed: Unable to Connect
For any motor that gives this message, please check: - Power to the machine is turned on (twist the big Red Button so that it pops out).
- The Motor’s Power/Data cable is connected at the Motor and at the Control Hub. Check that both connectors are tight and screwed into place.
- The Power Supply AC Mains Power Cable is connected and that the Power Supply switch is turned on.
- The Power Cable from the Power Supply to the Control Hub is plugged in and locked into place (at both ends).
- The USB cable that goes from the Computer to the Control Hub’s USB connector is plugged in at both ends.
- The CAN Bus Node ID is set incorrectly for this Motor. This will only be the cause if this Motor has just been replaced. Please refer to “TSD CL017 Motor Identification and Node Settings” for how to set this.
- Check if the Fuse in the Power Supply has blown. Replace it with one of an equal rating if it is blown.

Chromira ProLab Troubleshooting
ProLab Troubleshooting Guide Copyright 2010 Page 21 of 75
Drum Tension Spring Reference If there was some other problem, you may see
in the Diagnostics. This white circle-indicators show that the Drum Motor was Not Tested. This indicates that something prevented the Drum Tensioning Motor and Spring from referencing properly. Check the following:
- The Drum’s Spring Cage is secure to the end of the Drum. Check this by simply grasping the Drum with one hand, and the outer plate of the Spring Cage with the other. Try to move these in opposite directions – they should feel connected as one solid unit. If not, screw in the Spring Cage, which has reverse threads, and re-try this Test.
- Check that the Drum’s movement is free. You will feel the gentle force of the Spring, but the movement should be smooth, free, and quiet. If not, check for obstructions.

Chromira ProLab Troubleshooting
ProLab Troubleshooting Guide Copyright 2010 Page 22 of 75
Head The Head Motor section deals with both the Head Motor itself, and the Head Linear Encoder. The Motor Moves the Head back and forth on the Air Rail, and the Linear Encoder is used to precisely lay the pixels down onto the paper as the Head Moves.
Head Motor If the Head Motor has failed such that the computer cannot recognize it, Diagnostics will show:
Head Motor Failed: Unable to Connect
For any motor that gives this message, please check the following. For other problems related to the Head Motor and the Head travel, please refer to the next item, Head Reference.
- Power to the machine is turned on (twist the big Red Button so that it pops out).
- The Motor’s Power/Data cable is connected at the Motor and at the Control Hub. Check that both connectors are tight and screwed into place.
- The Power Supply AC Mains Power Cable is connected and that the Power Supply switch is turned on.
- The Power Cable from the Power Supply to the Control Hub is plugged in and locked into place (at both ends).
- The USB cable that goes from the Computer to the Control Hub’s USB connector is plugged in at both ends.
- The CAN Bus Node ID is set incorrectly for this Motor. This will only be the cause if this Motor has just been replaced. Please refer to “TSD CL017 Motor Identification and Node Settings” for how to set this.
- Check if the Fuse in the Power Supply has blown. Replace it with one of an equal rating if it is blown.
Head Linear Encoder Problems with the Linear Encoder will show up during printing. If there are any failures, please check that the Linear Encoder is plugged into the Head Board.

Chromira ProLab Troubleshooting
ProLab Troubleshooting Guide Copyright 2010 Page 23 of 75
Head Reference If there are any errors (Red indicators) in the Head Reference section of the Diagnostics, the Limit Switches on the Air Rail were not read properly.
Some examples of the errors that can happen are:
Head Motor Error: No forward Move
Head Motor Error: No forward Move
Head Motor Error: No Move.
Check:
- The Limit Switches are plugged in at the top of the Head Motor (small white plug).
- The Limit Switches are not damaged.
- The connectors at each Limit Switch are attached securely.
- Manually turn the air pressure on and move the head by hand to each end of the Air Rail, and listen for the small click from each Limit Switch, or visually look at the Switch and the Striker on the Head assembly for proper engagement.
If the Head Reference section in Diagnostics shows as Not Tested (white indicator), check for problems with the Air Pressure (see section above).
Pinch Roller Motor The Pinch Roller Motor moves the Pinch Roller into, and away from, the surface of the main Drum. It does not rotate the Pinch Roller to drive the paper.
If the Pinch Roller Motor failed, Diagnostics will show:
Pinch Roller Motor Failed: Unable to Connect
For any motor that gives this message, please check: - Power to the machine is turned on (twist the big Red Button).
- The Motor’s Power/Data cable is connected at the Motor and at the Control Hub. Check that both connectors are tight and screwed into place.
- The Power Supply AC Mains Power Cable is connected and that the Power Supply switch is turned on.
- The Power Cable from the Power Supply to the Control Hub is plugged in and locked into place (at both ends).
- The USB cable that goes from the Computer to the Control Hub’s USB connector is plugged in at both ends.

Chromira ProLab Troubleshooting
ProLab Troubleshooting Guide Copyright 2010 Page 24 of 75
- The CAN Bus Node ID is set incorrectly for this Motor. This will only be the cause if this Motor has just been replaced. Please refer to “TSD CL017 Motor Identification and Node Settings” for how to set this.
- Check if the Fuse in the Power Supply has blown. Replace it with one of an equal rating if it is blown.
Pinch Roller Reference The Pinch Roller has one limit Switch on it that is used for referencing during Self Testing. If this Limit Switch is not found, the following error will result:
Check the following:
- The Limit Switch is plugged in to the Pinch Roller Motor (small white connector).
- The Limit Switch striker is being actuated by the Pinch Roller as the Pinch Roller moves in and out.
- The connectors at the Limit Switch body are attached securely.
Cutter Roller The Cutter Roller Motor drives the long roller that feeds the paper into the Cross Cutter.
If the Cutter Roller Motor failed, Diagnostics will show:
Cutter Roller Motor Failed: Unable to Connect
For any motor that gives this message, please check: - Power to the machine is turned on (twist the big Red Button so that it pops out).
- The Motor’s Power/Data cable is connected at the Motor and at the Control Hub. Check that both connectors are tight and screwed into place.
- The Power Supply AC Mains Power Cable is connected and that the Power Supply switch is turned on.
- The Power Cable from the Power Supply to the Control Hub is plugged in and locked into place (at both ends).
- The USB cable that goes from the Computer to the Control Hub’s USB connector is plugged in at both ends.
- The CAN Bus Node ID is set incorrectly for this Motor. This will only be the cause if this Motor has just been replaced. Please refer to “TSD CL017 Motor Identification and Node Settings” for how to set this.

Chromira ProLab Troubleshooting
ProLab Troubleshooting Guide Copyright 2010 Page 25 of 75
- Check if the Fuse in the Power Supply has blown. Replace it with one of an equal rating if it is blown.
Chromira ProLab Troubleshooting
ProLab Troubleshooting Guide Copyright 2010 Page 26 of 75
Paper Buffer Exit Motor The Paper Buffer Exit Motor drives the Paper Buffer Exit Roller, which moves in a continuous motion to feed paper from the Buffer into the Processor.
If the Paper Buffer Exit Motor failed, Diagnostics will show:
Paper Buffer Exit Motor Failed: Unable to Connect
For any motor that gives this message, please check: - Power to the machine is turned on (twist the big Red Button so that it pops out).
- The Motor’s Power/Data cable is connected at the Motor and at the Control Hub. Check that both connectors are tight and screwed into place.
- The Power Supply AC Mains Power Cable is connected and that the Power Supply switch is turned on.
- The Power Cable from the Power Supply to the Control Hub is plugged in and locked into place (at both ends).
- The USB cable that goes from the Computer to the Control Hub’s USB connector is plugged in at both ends.
- The CAN Bus Node ID is set incorrectly for this Motor. This will only be the cause if this Motor has just been replaced. Please refer to “TSD CL017 Motor Identification and Node Settings” for how to set this.
- Check if the Fuse in the Power Supply has blown. Replace it with one of an equal rating if it is blown.

Chromira ProLab Troubleshooting
ProLab Troubleshooting Guide Copyright 2010 Page 27 of 75
Paper Buffer Input Motor The Paper Buffer Input Motor drives portion of the Paper Buffer whose rollers move in step with the Drum’s sequential advances during printing.
If the Paper Buffer Exit Motor failed, Diagnostics will show:
Paper Buffer Input Motor Failed: Unable to Connect
For any motor that gives this message, please check: - Power to the machine is turned on (twist the big Red Button so that it pops out).
- The Motor’s Power/Data cable is connected at the Motor and at the Control Hub. Check that both connectors are tight and screwed into place.
- The Power Supply AC Mains Power Cable is connected and that the Power Supply switch is turned on.
- The Power Cable from the Power Supply to the Control Hub is plugged in and locked into place (at both ends).
- The USB cable that goes from the Computer to the Control Hub’s USB connector is plugged in at both ends.
- The CAN Bus Node ID is set incorrectly for this Motor. This will only be the cause if this Motor has just been replaced. Please refer to “TSD CL017 Motor Identification and Node Settings” for how to set this.
- Check if the Fuse in the Power Supply has blown. Replace it with one of an equal rating if it is blown.

Chromira ProLab Troubleshooting
ProLab Troubleshooting Guide Copyright 2010 Page 28 of 75
Cross Cut Motor The Cross Cut Motor drives the Cross Cutter head back and forth on its linear rail.
If the Cross Cut Motor failed, Diagnostics will show:
Cross Cut Motor Failed: Unable to Connect
For any motor that gives this message, please check: - Power to the machine is turned on (twist the big Red Button so that it pops out).
- The Motor’s Power/Data cable is connected at the Motor and at the Control Hub. Check that both connectors are tight and screwed into place.
- The Power Supply AC Mains Power Cable is connected and that the Power Supply switch is turned on.
- The Power Cable from the Power Supply to the Control Hub is plugged in and locked into place (at both ends).
- The USB cable that goes from the Computer to the Control Hub’s USB connector is plugged in at both ends.
- The CAN Bus Node ID is set incorrectly for this Motor. This will only be the cause if this Motor has just been replaced. Please refer to “TSD CL017 Motor Identification and Node Settings” for how to set this.
- Check if the Fuse in the Power Supply has blown. Replace it with one of an equal rating if it is blown.

Chromira ProLab Troubleshooting
ProLab Troubleshooting Guide Copyright 2010 Page 29 of 75
Cross Cut Reference Like the main Print Head, the Cross Cutter has a head that moves back and forth on its own rail in order to cut the nests from the main roll of paper. This system must be referenced so that the computer can run the Cross Cutter reliably from end-to-end.
If this Referencing Test fails, the main screen status area will show:
and the Diagnostics will show (for example):
Failures in the Cross Cutter Reference indicate that something prevented the Cut Head from moving, or a Limit Switch is damaged or unplugged. Check the following:
- There are no obstructions in the path of the Cross Cutter Head’s travel.
- There is no paper threaded through the Cutter during the Startup Self Tests process.
- Limit Switches are plugged into the Cross Cut Motor (small white plug on end of Motor)
- Limit Switches are not damaged or loose, and that wires are secure on each Switch body.

Chromira ProLab Troubleshooting
ProLab Troubleshooting Guide Copyright 2010 Page 30 of 75
1.5 Processor
The paper processor in the Chromira 5x Pro Lab interfaces to the computer via an RS-232 Link. The Self Test for the Processor tests whether the computer can “talk” to the Processor via this data link.
A failure will be indicated both on the main status screen of the application,
and in the Diagnostics as
If this Test fails, check:
- The RS-232 cable that runs from the rear of the Computer in the lower cabinet of the Print Engine, to the bottom of the Processor’s Electronics Control Box. The connectors at each end should always be screwed into place.
- The Com Port Settings are setup correctly in Windows. The settings are accessed in Windows through the Device Manager. How to check this:
1. Right-click on My Computer, and select “Manage”.
2. In the left-hand area of this window, click “Device Manager”
3. In the right-hand area of the window, find the entry for “Ports (COM & LPT)” and expand its listing by clicking the small “+”.
4. Find the “Communications Port (COM1)” entry and double-click it to bring up its properties.
5. In this Properties window, click the “Port Settings” Tab at the Top. The settings should match these:
Chromira ProLab Troubleshooting
ProLab Troubleshooting Guide Copyright 2010 Page 31 of 75
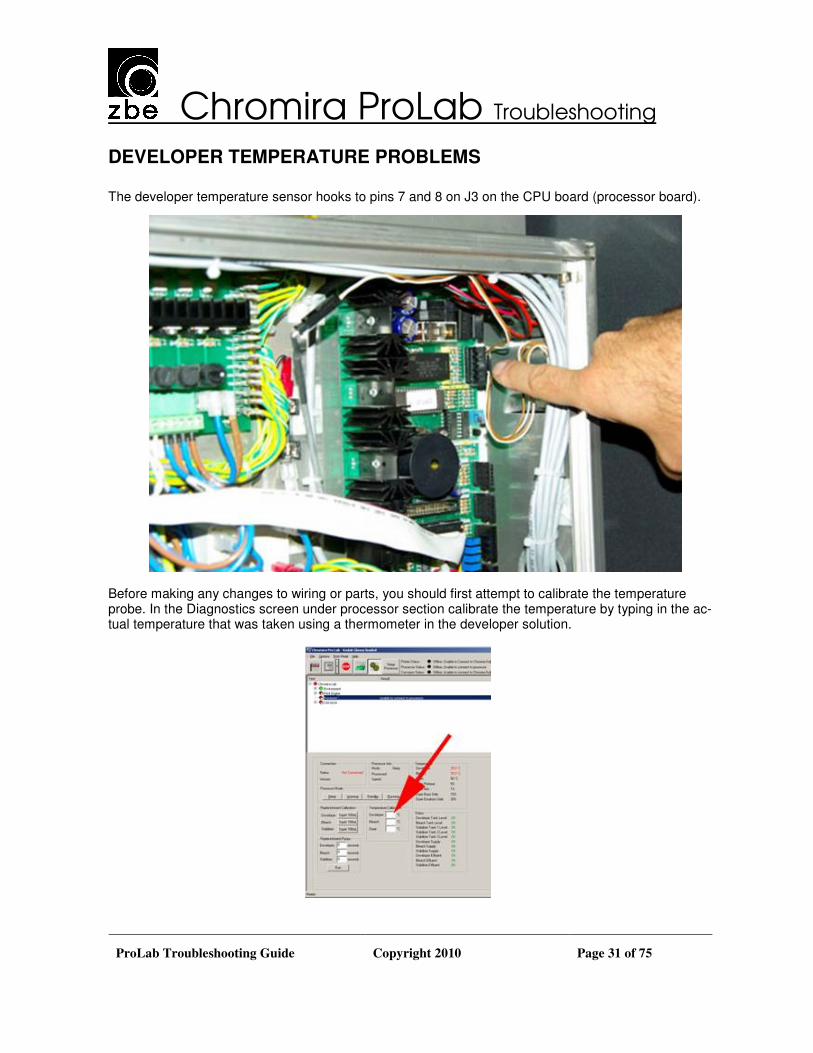
DEVELOPER TEMPERATURE PROBLEMS The developer temperature sensor hooks to pins 7 and 8 on J3 on the CPU board (processor board).
Before making any changes to wiring or parts, you should first attempt to calibrate the temperature probe. In the Diagnostics screen under processor section calibrate the temperature by typing in the ac-tual temperature that was taken using a thermometer in the developer solution.

Chromira ProLab Troubleshooting
ProLab Troubleshooting Guide Copyright 2010 Page 32 of 75
If the temperature you typed in the Temperature Calibration section is less than the set temperature (35°)you should be able to observe that the LED on the I/O board is illuminated. This indicates that the heating element is energized and should be heating the developer. If the LED is on and the developer is remaining cold, then check fuse F9.

Chromira ProLab Troubleshooting
ProLab Troubleshooting Guide Copyright 2010 Page 33 of 75
1.6 Conveyor IO
The Chromira 5x 30 Pro Lab’s Conveyor, also known as a “PCC” (Paper Cutter-Conveyor), serves to transport, cut and sort the processed prints as they emerge from the Dryer.
The Conveyor IO section deals with the Chromira Control Hub that is installed on the side of the Conveyor itself. Like its companion in the Print Engine, the Control Hub on the Conveyor controls various aspects of the machine’s operation, including reading switches, paper sensors, and driving the air solenoid bank which controls the pneumatic (air-actuated) systems of the Conveyor.
I/O Conveyor The Control Hub of the Conveyor also serves as the central connection point for all the motor in the Conveyor. If the Hub itself is not functional, every motor in the Conveyor will show as failed. The application will recognize this, and offer the following in the status display on the main screen:
The Diagnostics will display the Conveyor section like this:
If all or most of the Tests under “Conveyor” come up Red as shown above, check the following:
- The Main Power to the machine is turned on (large Red Button is not pressed in).
- Power Cable to Conveyor Power Supply is securely connected at the bottom of Processor Control Box.
- The USB Cable that goes from the rear of the Computer (in Printer’s lower cabinet) to the Conveyor’s Control Hub is not unplugged at either end, and is not pinched or damaged anywhere along it’s route through the chassis of the Chromira Lab.
- The DC Power Plug on the Control Hub is connected, both at the Conveyor Hub and at the main power supply in the Printer’s lower cabinet. The Power and

Chromira ProLab Troubleshooting
ProLab Troubleshooting Guide Copyright 2010 Page 34 of 75
USB cables are both bundled in the main “umbilical” cable harness that extends from the lower cabinet under the Printer, to the Processor electronics, to the Conveyor.
Conveyor Temperature The Conveyor system utilizes two sensors to monitor its temperature. This helps in maintaining the cut accuracy in the Conveyor’s Knife.
If these Sensors are disconnected or damaged, the machine will still operate normally (although Cutter Calibrations may need to be run more often). Since this is not a critical failure, the Diagnostics shows this as a warning (Yellow indicators):

Chromira ProLab Troubleshooting
ProLab Troubleshooting Guide Copyright 2010 Page 35 of 75
1.7 Conveyor Motors
There are five motors in the Conveyor module, which are described in the following several pages.
Processor Exit Rollers The Processor Exit Rollers are the two segmented foam rollers that accept the paper as it emerges from the Dryer into the Conveyor. The Processor Exit Roller Motor drives these Rollers through a Belt from underneath the Conveyor body. If this motor fails its Self-Test, the following will appear in the Diagnostics:
Processor Exit Roller Motor Failed: Unable to Connect
For any motor that gives this message, please check: - Power to the machine is turned on (twist the big Red Button so that it pops out).
- The Motor’s Power/Data cable is connected at the Motor and at the Control Hub. Check that both connectors are tight and screwed into place.
- The Power Supply AC Mains Power Cable is connected and that the Power Supply switch is turned on.
- The Power Cable from the Power Supply to the Control Hub is plugged in and locked into place (at both ends).
- The USB cable that goes from the Computer to the Control Hub’s USB connector is plugged in at both ends.
- The CAN Bus Node ID is set incorrectly for this Motor. This will only be the cause if this Motor has just been replaced. Please refer to “TSD CL017 Motor Identification and Node Settings” for how to set this.
- Check if the Fuse in the Power Supply has blown. Replace it with one of an equal rating if it is blown.

Chromira ProLab Troubleshooting
ProLab Troubleshooting Guide Copyright 2010 Page 36 of 75
Conveyor Drive Rollers The Conveyor Drive Rollers are the set of 20 rubber Wheels embedded in the Main Deck of the Conveyor. The Conveyor Drive Roller Motor drives these Rollers through a serpentine Belt from underneath the Conveyor body. If this motor fails its Self-Test, the following will appear in the Diagnostics:
Conveyor Drive Roller Motor Failed: Unable to Connect
For any motor that gives this message, please check: - Power to the machine is turned on (twist the big Red Button so that it pops out).
- The Motor’s Power/Data cable is connected at the Motor and at the Control Hub. Check that both connectors are tight and screwed into place.
- The Power Supply AC Mains Power Cable is connected and that the Power Supply switch is turned on.
- The Power Cable from the Power Supply to the Control Hub is plugged in and locked into place (at both ends).
- The USB cable that goes from the Computer to the Control Hub’s USB connector is plugged in at both ends.
- The CAN Bus Node ID is set incorrectly for this Motor. This will only be the cause if this Motor has just been replaced. Please refer to “TSD CL017 Motor Identification and Node Settings” for how to set this.
- Check if the Fuse in the Power Supply has blown. Replace it with one of an equal rating if it is blown.

Chromira ProLab Troubleshooting
ProLab Troubleshooting Guide Copyright 2010 Page 37 of 75
Rudder Roller The Rudder Roller is the single Roller that drives the Paper sideways until it is engaged in the main Cutter Rollers. The Rudder Roller Motor drives this Roller through a small set of gears. The Motor and Roller are in an assembly underneath the Conveyor body. If this motor fails its Self-Test, the following will appear in the Diagnostics:
Rudder Roller Motor Failed: Unable to Connect
For any motor that gives this message, please check: - Power to the machine is turned on (twist the big Red Button so that it pops out).
- The Motor’s Power/Data cable is connected at the Motor and at the Control Hub. Check that both connectors are tight and screwed into place.
- The Power Supply AC Mains Power Cable is connected and that the Power Supply switch is turned on.
- The Power Cable from the Power Supply to the Control Hub is plugged in and locked into place (at both ends).
- The USB cable that goes from the Computer to the Control Hub’s USB connector is plugged in at both ends.
- The CAN Bus Node ID is set incorrectly for this Motor. This will only be the cause if this Motor has just been replaced. Please refer to “TSD CL017 Motor Identification and Node Settings” for how to set this.
- Check if the Fuse in the Power Supply has blown. Replace it with one of an equal rating if it is blown.

Chromira ProLab Troubleshooting
ProLab Troubleshooting Guide Copyright 2010 Page 38 of 75
Cutter Rollers The Cutter Rollers are the set of precision Rollers that feed the Paper into the Conveyor’s Knife for final cutting. The Cutter Roller Motor drives the two Cutter Rollers through a Belt located on the end of the Knife Assembly. Likewise, the Cutter Roller Motor is mounted to the Knife Assembly, and is accessible from underneath the Conveyor. If this motor fails its Self-Test, the following will appear in the Diagnostics:
Cutter Roller Motor Failed: Unable to Connect
For any motor that gives this message, please check: - Power to the machine is turned on (twist the big Red Button so that it pops out).
- The Motor’s Power/Data cable is connected at the Motor and at the Control Hub. Check that both connectors are tight and screwed into place.
- The Power Supply AC Mains Power Cable is connected and that the Power Supply switch is turned on.
- The Power Cable from the Power Supply to the Control Hub is plugged in and locked into place (at both ends).
- The USB cable that goes from the Computer to the Control Hub’s USB connector is plugged in at both ends.
- The CAN Bus Node ID is set incorrectly for this Motor. This will only be the cause if this Motor has just been replaced. Please refer to “TSD CL017 Motor Identification and Node Settings” for how to set this.
- Check if the Fuse in the Power Supply has blown. Replace it with one of an equal rating if it is blown.

Chromira ProLab Troubleshooting
ProLab Troubleshooting Guide Copyright 2010 Page 39 of 75
Elevator Motor The “Elevator Motor” section deals with both the Elevator Motor, and the movable stack of Sorter Shelves, upon which the finished and cut prints are deposited after cutting in the Conveyor. There are also two Limit Switches which tell the computer when the Sorter Shelves have reached either end of their travel.
Elevator The Elevator Motor is located underneath the blue cover directly below the Elevator’s Sorter Shelves. If this motor fails its Self-Test, the following will appear in the Diagnostics:
Elevator Failed: Unable to Connect
For any motor that gives this message, please check: - Power to the machine is turned on (twist the big Red Button so that it pops out).
- The Motor’s Power/Data cable is connected at the Motor and at the Control Hub. Check that both connectors are tight and screwed into place.
- The Power Supply AC Mains Power Cable is connected and that the Power Supply switch is turned on.
- The Power Cable from the Power Supply to the Control Hub is plugged in and locked into place (at both ends).
- The USB cable that goes from the Computer to the Control Hub’s USB connector is plugged in at both ends.
- The CAN Bus Node ID is set incorrectly for this Motor. This will only be the cause if this Motor has just been replaced. Please refer to “TSD CL017 Motor Identification and Node Settings” for how to set this.
- Check if the Fuse in the Power Supply has blown. Replace it with one of an equal rating if it is blown.

Chromira ProLab Troubleshooting
ProLab Troubleshooting Guide Copyright 2010 Page 40 of 75
Elevator Reference The Elevator goes through a Self-Test like many of the other systems of the Chromira Lab. The Elevator’s Self-Test includes a “reference” procedure which tests that the Elevator can smoothly travel through its entire range of motion.
If this reference procedure fails, it will be indicated in the Diagnostics with a Red indicator:
If this test fails, please check the following:
- Loose or broken Limit Switch Wires. Check at both Limit Switches.
- Check Limit Switch Cable where it plugs into the elevator motor.
- Loose set screw on elevator motor sprocket, or elevator drive sprocket. Check that the Drive Sprocket is not able to rotate on the shaft to which it’s mounted.
- Elevator physically jammed. With the application closed (and the motor turned off), you should be able to slowly move the Elevator up and down through it’s entire range of motion.
- Elevator Drive Belts are loose and skipping. This will accompanied by a loud banging or vibrating noise. Tighten both belts if they show signs of skipping.
- The Limit Switches are out of adjustment, and are out of reach of the Striker that actuates then at both the top and bottom of travel.
- No communication with elevator motor. (see Elevator Motor test)

Chromira ProLab Troubleshooting
ProLab Troubleshooting Guide Copyright 2010 Page 41 of 75
Backprinter The Backprinter module is part of the Conveyor system but is controlled by its own communication link with the Computer. The Backprinter prints data on the reverse side of prints made by the Chromira ProLab.
While the Backprinter is not specifically tested during the Self-Tests, you can manually run it using the Diagnostics. Click on the “Test Print” Button in the screen under the “Conveyor” section in the Diagnostics:
You should hear the Backprinter make one line of print, a short “zipping” sound. If it does not, check the following:
- The Backprinter data cable is connected to the RS-232/USB Adapter located near the Conveyor’s Control Hub (but not part of it).
- The USB Cable is plugged all the way into the Adapter, and the other end is connected to the rear of the Computer.
- Check that the “RS232 USB Adapter” (or “USB Serial Adapter”) is shown in the Device Manager of the computer.
- The Backprinter Port and the COM Port to which the Backprinter is connected must match. The following page shows how to do this.

Chromira ProLab Troubleshooting
ProLab Troubleshooting Guide Copyright 2010 Page 42 of 75
Back Printer COM Port Setup
Open Device Manager by right-clicking on My Computer on the Windows Desktop, and click on “Manage”, as shown at right.
In this window, click “Device Manager” in the left hand area. Look for both the “Keyspan Serial Adapter” under Universal Serial Bus Controllers, and “Keyspan USB Serial Port (COM3)” under the “Ports (COM & LPT)” section.
Note the “COM” number, which is usually “3”.
Check the “Port” number in the “Back Printer” screen in the Chromira ProLab program’s Diagnostics:
This COM number must be the same as the one for the “USB Serial Port” that appears in Device Manager’s “Ports (COM & LPT)” section.
“Keyspan Serial Adapter” under Universal Serial Bus Controllers
“Keyspan USB Serial Port (COM3)” under “Ports (COM & LPT)”
Click “Device Manager”

Chromira ProLab Troubleshooting
ProLab Troubleshooting Guide Copyright 2010 Page 43 of 75
Cutter (also known as the Conveyor Knife)
The Conveyor’s Cutter can be tested using the screen that appears for the Conveyor section of Diagnostics.
DANGER: NEVER put your fingers near the Knife’s Blade when compressed air is connected to the Chromira ProLab.
• Click the “Cut With Sensors” for a full test of the Knife system, which includes the actuator Air Cylinder and the air solenoid that drives it, the Knife Blade itself, and the two Blade Position Sensors that detect whether the Blade has moved all the down, then up, in its travel.
• If the Knife movement does not look or sound normal, try clicking “Cut with Time”. If the Knife action now looks and sounds normal, then one of the Blade Position Sensors may be non-functional. Check that both of these sensors are plugged in, and that the large “I/O” Plug is fully seated in the Conveyor’s Control Hub.
• Check for small scraps of paper that have stalled inside the Knife’s cutting area. Using a flashlight will help in seeing into this rather tight space.

Chromira ProLab Troubleshooting
ProLab Troubleshooting Guide Copyright 2010 Page 44 of 75
2 General Errors
106 - Not enough disk space Not enough storage on Drive C: is available for the software to perform its work. This can also result in the following operational anomalies:
- Printer application shuts down or closes after power up of program. - Printer application shuts down or closes after a function has been selected.
Try the following if you see this error: - Empty the TagFileFinished under the C:\Chromira Lab folder, and in any Hot
folders on the Chromira PrloLab’s computer. - Clear the Tag files from the C:\Program Files\Workstation\Localhistory folder - Refer to Check computer disk space
123 - No reading from linear encoder The Linear Encoder is not being read by the computer. Please check the following is you get this error:
- The Linear Encoder is plugged in to the Head’s circuit board. - The Imaging Head is operational - The Linear Encoder Strip is tight across the length of the Air Rail. - The Linear Encoder Strip is not rubbing against the Head Carriage as the head
moves 124 - No reading from linear or head motor encoder This usually results from the Head Motor being completely unable to move. This may or may not be accompanied by a Head Motor – Unable to Connect message in the Chromira ProLab Diagnostics. Please check the following:
- Head Motor is able to connect. Check Diagnostics for an “Unable to Connect” message under the Head Motor listing.
- The Head Motor control board is not damaged. - The Fan on the Head Motor is running. If it is not, the motor controller may
temporarily overheat and prevent the Motor from moving. 125 - No reading from motor encoder The Head Motor can move, but its built-in Encoder is not reading properly. Check the following:
- Head Motor is able to connect. Check Diagnostics for an “Unable to Connect” message under the Head Motor listing.
- The Head Motor control board is not damaged.

Chromira ProLab Troubleshooting
ProLab Troubleshooting Guide Copyright 2010 Page 45 of 75
- The Fan on the Head Motor is running. If it is not, the motor controller may temporarily overheat and prevent the Motor from moving.
126 - Bad spot found in linear encoder; error in linear encoder strip This indicates that the computer found a location along the length of the Air Rail within which the Linear Encoder was not reading. This is most likely due to a severely damaged or dirty Linear Encoder Strip. Check the following:
- The Linear Encoder Strip is tight and not rubbing on the Head Carriage as the Head moves back and forth.
- The Linear Encoder Strip is not excessively dirty, or damaged. The lower portion of the Strip is made from clear plastic, and is flexible. Check that this lower portion in particular is not torn or missing a piece anywhere along the length of the Air Rail.
127 - Linear encoder error; both encoders have lost counts This rare error indicates that the encoder inside the Head Motor Encoder itself has become intermittent, and has lost its position enough for the Head to have hit one of the Limit Switches during operation, despite the Linear Encoder and Head Motor Encoder staying in sync. This will usually require replacement of the Head Motor. 128 – Linear encoder error; linear encoder has skipped counts 129 - Head motor encoder is not lined up; head motor encoder has lost counts The head motor and linear encoder have come out of sync with each other. This is normally caused by the head belt slipping on the motor pulley. If head belt is worn out, replace it. If head belt is loose, tighten it. (See TSD CL024 Head Belt Replacement)
- Replace head motor mount with SUB2095 which captures the Head Belt in the Motor Pulley and automatically tensions the Belt properly. This will increase Head Belt life considerably.
131 – Unable to load emulsion file The Emulsion (.EMU) file stores calibration information for a given photographic paper printed in the Chromira. If the Emulsion file for the last material you selected was either not found, or is corrupted, you will see the this error in the Diagnostics.
Please try the following:
- Select a good Emulsion file (from the Preferences Menu) to continue printing.
- Check that you can access the “C:\Chromira Lab” folder using the Network Neighborhood icon in Windows. This folder, from which the Chromira ProLab operates, must be accessible from the network.
138 – Insufficient air pressure

Chromira ProLab Troubleshooting
ProLab Troubleshooting Guide Copyright 2010 Page 46 of 75
The Chromira ProLab requires a compressed-air supply of 60PSI in order to print. If the compressed air is absent or not at a high-enough pressure, this error will result. If you see this error, check the following:
- Air Compressor is turned on and functioning.
- All Air Hoses are connected all the way from the Compressor to the Chromira ProLab.
- All internal air hoses are connected.
- Air Solenoid: Try manually pressing the button on top of the Solenoid and listen for air flow. Air solenoid control can be tested from the Diagnostics screen, in the “Print Engine – Head” section. Check and un-check the Air Solenoid checkbox and listen for air hissing.
o If no air hissing is heard when clicking the checkbox, the Cable to the Air Solenoid may be disconnected or broken, or the Chromira Control Hub has failed.
- If the Air-Solenoid is left in the locked-on position (knob on top of solenoid), the Self-Tests will issue a warning that the air can not be turned off.
145 – Errors found in .pr file Your Chromira.PR file has become corrupted or is from another type of Chromira printer which is not compatible with your Chromira ProLab. It is never recommended to copy a PR file from one Chromira to another.
It is recommended that you contact your ZBE Service Representative for a replacement PR file.
If the Chromira.PR file is missing, the Self-Tests will appear with a note: “Unable to Read PR File, as well as an “Unable to load Emulsion” entry.
167 – File cannot be printed; error loading image file From the Chromira ProLab’s Computer, check that you can access the path on your network where the image file is stored. Problems with this are usually associated with having to enter a password to make the Windows network connection between the Chromira ProLab and computer where your images are stored.

Chromira ProLab Troubleshooting
ProLab Troubleshooting Guide Copyright 2010 Page 47 of 75
3 Balance Errors
256 – Errors found in .emu file Your Emulsion file has become corrupted or is from another version of the software. Check or make note of the following:
- Make sure that the Computer from which you are running ChromiraBalance.exe, can access the C:\Chromira Lab folder on the Chromira ProLab’s computer. You must be able to access this via Network Neighborhood, even if it’s on the same computer.
- The Chromira.PR file has not been deleted, replaced, or altered (manually by using Notepad).
- The Drum Advance value has not been changed drastically by menually editing the Chromira.PR file.
- The version of ChromiraBalance.exe is compatible with your current Chromira ProLab software.

Chromira ProLab Troubleshooting
ProLab Troubleshooting Guide Copyright 2010 Page 48 of 75
4 Troubleshooting
4.1 Software Troubleshooting
Known Software Bugs This manual assumes software version 2.0a or later. If your software version is older than this, updating to the latest version is mandatory. Software support for other, obsolete, versions of any ZBE software is limited to 24 months after initial release of that version. Version 2.0a
Queued prints, “on hold”, submitted to hot folder from DP2, released manually, do not nest properly.
Chromira ProLab Troubleshooting
ProLab Troubleshooting Guide Copyright 2010 Page 49 of 75
4.2 Media Transport Problems
Paper jams in Print Engine Observe paper as travels through printer, cutter, buffer and into processor. In all paper jam situations, look for the leading edge of the paper – the piece of paper in the lead. That leading position will tell where the paper jam actually started.
General check: Remove printer covers and dark panels. Load printer with blown paper. Run 2 or 3 prints (calibration prints work fine). Watch machine action and look for the following:
- Cutter roller not turning. If Motor is turning, but Roller is not, the coupler between the two may be loose.
- Cutter clamp(s) not raising correctly after Cutter Head travels across paper width.
- Buffer rollers not turning. Observe buffer motors and rollers. Look for broken gears or a gear that turns, but the Roller to which they are attached do not.
- Obstruction at entrance to processor. Look for scraps of paper.
- Processor not turning on. Listen and observe the Processor Drive Motor starting and running when you start a print.
- Processor running in reverse direction (see previous item).
Paper stalls or is delayed in Processor This indicates that the paper is not being moved along with enough force at some point in its path through the Processor.
- Fully clean the Processor Racks, including the Rack Body as well as the top sections that are removable.
- Check for broken, loose, or missing gears in processor.
- Check processor racks for “Eccentric Bushing” modification.
Paper stalls or is delayed in Dryer See Next item: Paper Jams in Dryer. The causes of delays in paper path travel, and outright jams, are generally the same.

Chromira ProLab Troubleshooting
ProLab Troubleshooting Guide Copyright 2010 Page 50 of 75
Paper jams in Dryer In all paper jam situations, look for the leading edge of the paper – the piece of paper in the lead. That leading position will tell where the paper jam actually started.
If your prints are jamming in the Dryer, please check for the following:
- Misaligned First-Turn Paper Guide. Check that the trailing edge of this guide is about 1/8” (3.5mm) from the surface of the nearby roller.
- Transition Guide is misaligned. Check that this guide is as close to its mating roller as it can get without scraping on that roller.
- Springs on grey Rubber Input Rollers in dryer are not pressing them together, particularly if paper is lost/jammed in first input section of Dryer.
- Prints are not drying. Tacky prints can stick on paper guides. Check that paper is coming out dry.
- Loose or slipping drive sprockets. Turn the Dryer Drive Gear by hand and look for sprockets that spin without turning the rollers to which they are attached. Usually, a loose sprocket is fixed by tightening the small set screw in the side of its hub portion.
Prints getting stuck in Dryer After a Paper jam in the Dryer, upon opening the Dryer, the prints are not damaged, but just seem to be stopped in the path, and/or two or more prints are overlapping.
- Loose drive sprocket inside dryer. Check set screws on drive sprockets and for proper drive when turning dryer drive gear by hand.
- Prints are not drying thoroughly enough and may be sticking to paper guides. Make sure prints are dry. Try increasing the Dryer parameters for Emulsion Side heaters.
o This is done in the Options – Preferences screen for the Processor.

Chromira ProLab Troubleshooting
ProLab Troubleshooting Guide Copyright 2010 Page 51 of 75
Paper jams at entrance to Conveyor Paper emerges from the Dryer, and when entering the Conveyor, it crumples up at the Conveyor’s input area, or a corner is folded.
Causes and things to check:
- Conveyor Input Rollers are misaligned with the space between the Upper and Lower Decks of the Conveyor.
o Pull the Conveyor out, and feed a small piece of flat paper into the Conveyor’s Input Rollers while they are moving. Watch the paper as it goes into the narrow slot between the Upper and Lower Plates of the Conveyor. The paper should be just level with the top of the Lower Plate as it goes from the pinch of the Rollers into the narrow slot.
- Paper is damaged inside the Dryer before it emerges, and this damage causes jams at the entrance to Conveyor.
o Pull the Conveyor out, and let some prints emerge from the Dryer without the Conveyor in place. Check these prints for folded corners or other damage. If they are damaged, the problem is starting in the Dryer, or even earlier in the paper path (Processor, Print Engine).
- Top plate sagging into paper path.
o Steel Pivot Pin loose on top plate
o The screws holding pin block are loose.
- Input rollers to Conveyor not turning.
o Check for loose pulleys
o Loose drive belt from Motor to Rollers
o PCC Input Motor not turning.

Chromira ProLab Troubleshooting
ProLab Troubleshooting Guide Copyright 2010 Page 52 of 75
Paper gets stuck in Conveyor Prints that are coming into the Conveyor from the Dryer are getting stuck in the Conveyor. Please first check that the prints are coming into the PCC undamaged:
- Prints do not have dents or folds. - Prints are dry. - Prints are not overlapping or stuck together.
If any of the above are true, please refer to the items:
“Folded Corners on Prints” “Paper stalls or is delayed in Processor”, “Paper stalls or is delayed in Dryer”.
If the prints are in good shape, but still getting stuck in Conveyor, make a test image print, and watch it as it is transported, cut, and sorted in the Conveyor. Following a Nest through Conveyor’s Cutting and Sorting Procedure: The following outline describes the steps that each nest will go through when being cut into prints and sorted while in the Conveyor. At each step, if there is a problem, a description of what to check is given.
1. The nest enters the Conveyor slowly, fed by the Dryer and transported by the Conveyor Input Rollers. - If Paper jams here, then see item: “Paper jams at entrance to Conveyor”
2. As soon as the trailing edge of nest passes the Input Rollers, the Fence will pop
up, and the nest will be sped through the Conveyor until it hits the Fence. a. If the nest does not make it to the Fence:
i. Check for dirt, scraps or other debris in the Conveyor paper transport area.
ii. Check that the gap between the Upper and Lower Deck Plates is even from left to right (viewed from output slot). This gap should be 2mm – 2.5mm.
iii. If the material is Kodak Metallic paper, please contact your ZBE Service Representative for assistance.
continued…

Chromira ProLab Troubleshooting
ProLab Troubleshooting Guide Copyright 2010 Page 53 of 75
3. The Rudder Pinch Roller will pop downward to grab the nest for transport in the cross-direction (toward the Knife). The Top Deck Plate will then immediately pop up to allow the nest to move sideways into the cutter.
a. If the nest simply sits there a moment, then backs away from the Fence, the Fence drops, and the nest is spit out into the Hammock, the Fence Paper Sensor is not “seeing” the paper.
i. Check Fence Paper Sensor operation. b. The Fence-Up Sensor is not detecting that Fence has come up.
i. Check that the tab on the Fence Pivot Arm is engaging into the slot in the Fence-Up Sensor.
c. If the Paper stays in the Fence, but the Rudder Pinch Roller does not pop downward to contact the paper, the pneumatics for this are not functioning
i. Check the operation of the Rudder Pinch Roller ii. If the Rudder Pinch Roller comes down but the paper never moves
to the side, the Rudder Roller in the bottom of the Conveyor is not functioning. Check the operation of the Rudder Roller
4. The nest will be driven sideways into the cutter Feed and Comb Rollers, then on into the Knife.
a. If the nest moves to the side a couple inches, then reverses, backs up and the Fence Drops, the Knife Input Paper Sensor was unable to see the paper edge.
i. Check that the Comb Rollers are in full and firm contact with the Cutter Feed Roller.
ii. Check the Cutter Input and Output Paper Sensors continued…
Chromira ProLab Troubleshooting
ProLab Troubleshooting Guide Copyright 2010 Page 54 of 75
5. The nest will pause a moment with the leading edge in the Knife. The Backprinter (if used) will make a line of print, then the nest will continue through, and the Knife will make the first cut.
a. If the Knife Blade never makes a cut, the computer was unable to activate it.
i. Check the Knife Blade Actuation b. If the nest hesitates, then either backs out of the Knife and ejects into the
Hammock, or, the nest stalls in this location, and never moves, the Knife Feed Rollers may be jammed.
i. Remove the paper, and let the machine finish any remaining jobs. ii. Check that the Knife Feed Rollers are able to move in both the
Forward and Reverse directions, using the controls in the Conveyor Diagnostics Screen.
1. If the Rollers are able to move Forward, but make noise or stop while moving in the Reverse direction, please check the clearance between the Comb Roller and the Fixed Upper Deck.
iii. Check for a broken Knife Feed Roller Belt, or for loose Pulleys in the Knife Feed Roller Drive system.
6. The nest will continue to advance through the cutting process, with the finished cut prints emerging into the current Sorter Tower Shelf.
a. If the print snags on the edge of the hole going into the Shelf, the Elevator offset should be adjusted so that the hole in the Shelf Stack lines up with the hole in the Sorter Frame piece.
i. Adjust the Sorter Shelf offset. b. If a print stops while coming out into the Sorter Shelf, and appears
undamaged, please check the Knife Feed system as described in Step 5b, above.
Note: For any of the checkout procedures noted in this item, please refer to the document “TSD CL028 Conveyor Service Guide”
Burnt Prints in Dryer If a Print is stalled in the Dryer for a very long time, it may get scorched, in very rare conditions. If this happens, you must clean any rollers that have been contaminated with paper residue.

Chromira ProLab Troubleshooting
ProLab Troubleshooting Guide Copyright 2010 Page 55 of 75
Processor runs in reverse direction, occasionally Drive Motor on Processor has lost drive in one of its windings. This will cause the machine to run in the reverse direction at random. Paper jams will result is Processor is going the wrong way.
Causes and things to check:
- Broken, shorted or loose wire on Processor Drive Motor.
o Check that connectors at each end are plugged in firmly.
o Check for breaks in wire harness that goes from 4-pin connector on Processor Logic Board, out to the Drive Motor.
- Defective Processor Logic Board
o Replace Logic Board
Folded Corners on Prints Dinged or folded corners are indicative of the same types of problems that cause paper jams. Remove cover panels from machine, and try to determine where the corners are getting folded or dinged.
The most common causes are:
- Misaligned Paper Threading guide (Print Engine, Pinch roller to Main Cutter)
- Print Engine Frame to Processor Frame alignment is off (vertically).
- Processor Tank to Dryer (horizontal) alignment is off.
- Processor Pull-Out Section is not all the way engaged.
It is recommended to contact your ZBE Service Representative for assistance in these type of problems.
Scratches on back of Trans prints In operation (while printing), the main Cutter Feed Roller in Print Engine turns continuously. This was the design in first-generation Chromira ProLabs.
- Replace cutter roller with a new Rubber Roller. Note that this will require a software update.
Prints overlapping, causing PCC to eject them out the back See items: “Paper stalls or delayed in Processor”, and “Paper stalls or is delayed in Dryer”.

Chromira ProLab Troubleshooting
ProLab Troubleshooting Guide Copyright 2010 Page 56 of 75
Processor Gears breaking, Paper pulling tight in Processor As the print media moves from the Print Engine into the Processor, the tension between the two parts of the Chromira ProLab becomes very tight, as if the Print Engine is not feeding paper fast enough into the Processor to prevent it from pulling tight. As a result of this load, some Drive Gears in the Processor break.
- Verify the proper operation of the Buffer Trap Door Switches. If the Door-Open Switch is disconnected, the computer will think the Print Engine needs to slow down, and the paper will pull tight going into the processor.
- Check that the Paper Feed Roller Encoder Drive Gear is properly engaging the larger Gear on the Paper Roll spindle.
o Please refer to the item “Paper de-threads from Print Engine without warning” in Section “4.5 Machine Malfunctions”, for more details.
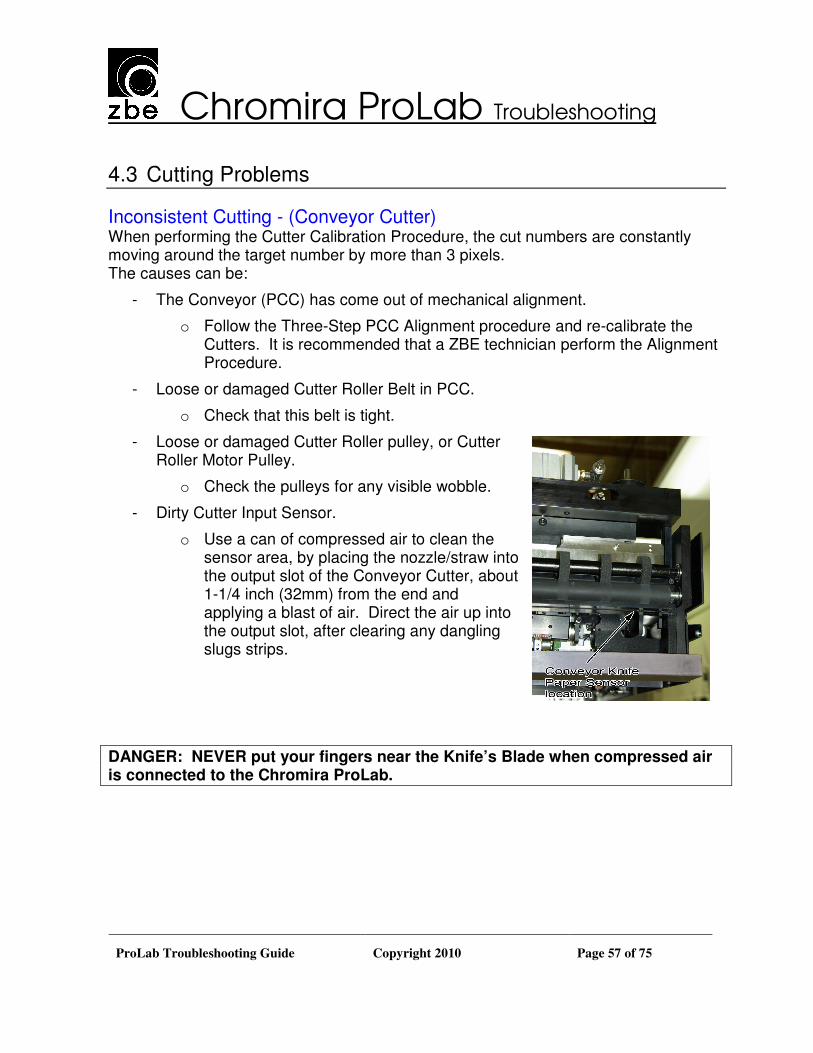
Chromira ProLab Troubleshooting
ProLab Troubleshooting Guide Copyright 2010 Page 57 of 75
4.3 Cutting Problems
Inconsistent Cutting - (Conveyor Cutter) When performing the Cutter Calibration Procedure, the cut numbers are constantly moving around the target number by more than 3 pixels. The causes can be:
- The Conveyor (PCC) has come out of mechanical alignment.
o Follow the Three-Step PCC Alignment procedure and re-calibrate the Cutters. It is recommended that a ZBE technician perform the Alignment Procedure.
- Loose or damaged Cutter Roller Belt in PCC.
o Check that this belt is tight.
- Loose or damaged Cutter Roller pulley, or Cutter Roller Motor Pulley.
o Check the pulleys for any visible wobble.
- Dirty Cutter Input Sensor.
o Use a can of compressed air to clean the sensor area, by placing the nozzle/straw into the output slot of the Conveyor Cutter, about 1-1/4 inch (32mm) from the end and applying a blast of air. Direct the air up into the output slot, after clearing any dangling slugs strips.
DANGER: NEVER put your fingers near the Knife’s Blade when compressed air is connected to the Chromira ProLab.

Chromira ProLab Troubleshooting
ProLab Troubleshooting Guide Copyright 2010 Page 58 of 75
Prints not cutting in PCC (nests going out back) The nests exit the dryer and enter the PCC normally. The PCC input sensors are working correctly. The fence comes up when the nest clears the PCC input sensors, and the nest is rapidly moved to the fence normally. The nest pauses, then moves back away from the fence, the fence drops, and the nest is ejected out the back.
Check for the following causes:
- The Fence Paper Sensor is not seeing paper as it moves into the Fence.
o The fence sensor is out of position
o The fence sensor setting in the ChromiraLab.ini file is not set correctly
o The fence sensor is defective. This is very rare.
o The paper is not traveling all the way to the fence sensor (Curly paper can cause this)
- Cross-Feed (“Rudder”) Roller not able to pull paper into cutter. (This pertains to nests that are to be cut in Conveyor Knife.)
o Rudder Roller Motor not working. Perform Rudder Roller Self Test.
o Rudder Roller Drive gears are damaged. Turn the Rudder Roller by hand from underneath the Conveyor, and check that both gears turn.
o Rudder Pinch Roller is not coming down all the way when actuated. Check for proper compressed air-pressure and the connection to the Conveyor.
- Main Cutter Feed Roller not able to Feed into Knife. (This pertains to nests that are to be cut in Conveyor Knife.)
o Check for broken Knife Feed Belt
o The Cutter Feed Motor not working. Perform the Cutter Feed Motor Self-Test
o Check that the “Comb” Roller is not locked in the disengaged position with a screw. Note that this is only likely if the Knife Module was just replaced.
- Occasionally one nest from a very long run is ejected out the back.
o Cause: Cutting and sorting didn’t keep up with printing. Known software issue.

Chromira ProLab Troubleshooting
ProLab Troubleshooting Guide Copyright 2010 Page 59 of 75
Prints not cutting in PCC (nests going into Sorter Shelf but not cutting) The nests exit the dryer and enter the PCC normally. The Conveyor “pretends” to cut the prints from each nest, but the nest emerges from the Knife in one piece, extending out beyond the end of the Sorter Shelf.
This may be accompanied by an error message about the Knife taking too long to make a cut.
o You can check this by going into the Diagnostics screen, under Conveyor. Click the Knife Blade Up and Down Buttons and listen for the Platen’s “snap” sound.
� If you do not hear the sound of the Knife moving:
• Check that you have air-pressure on the machine. See that the Gauge on the Conveyor’s Air Solenoid Manifold reads around 60 PSI.
• Try pressing the blue button on the Air Solenoid valve. The Blade should move down when you press it, and back up when you release it. If this happens, but the computer cannot control the solenoid using the Blade Up and Down buttons, check that the little Red LED on the Solenoid itself turns on when you click Down, and off when you click Up.
o If the LED responds, but the solenoid does not, the Solenoid is bad. Replace it, and check for excess water in your compressed air supply
• If the LED does not respond, check the wiring from the bottom of the Chromira Control Hub to the Solenoid, and the small plug in the top of the Solenoid. Replace the Hub if the wiring looks OK.
WARNIING: Keep all parts of your body away from the Knife when working on or around the Conveyor. The Knife Blade is very powerful and can crush fingers.

Chromira ProLab Troubleshooting
ProLab Troubleshooting Guide Copyright 2010 Page 60 of 75
Prints cutting crooked (along 30” width) This must be evaluated on prints that are a full 30” wide and not cut in the PCC.
To diagnose, it is necessary to make several prints of different lengths, all 30-inches wide.
If the cuts are all consistent, crooked by the same amount and in the same direction, the 30” cutter is crooked in it’s mounting.
- Please refer to “TSD CL030 Adjusting Chromira ProLab Cross Cutter Alignment” for instructions on how to check and correct this.
If the cuts are intermittent and tend to change position by more than 1mm, the prints are not being pulled tight during paper transport and cutting:
- The grip that the Cutter Feed Rollers have on the media is not firm enough to keep the paper tight during the cross-cut. Contact your ZBE service representative for assistance.
Cross cut does not cut all the way across 30” width Cross-Cut Head stops part of the way through a cut.
Possible causes:
- If Cross-Cut Motor is also getting a “thermal limit” message:
o Replace the Cross-Cut Motor.
- If the Cutter Head stops right when it gets to the beginning of the Paper Clamps:
o Close the ChromiraLab.exe application.
o Manually move the Cross-Cut Head across the paper path, with no paper loaded, and feel for any obstructions in the movement:
o Look for stray cutter slugs that may not have been properly deposited in the Scrap Bin.
o There will normally be a small ‘bump” in movement as the Cutter Head moves onto the black Paper Clamps, but it should not bind.
o If it does, back off the two Spring Plunger Screws on the Cutter Head.
o Feel for any roughness in the travel, or severe periodic binding.
o If any roughness or severe periodic binding is felt, check the cutter blades for excessive dust, or foreign matter between them.

Chromira ProLab Troubleshooting
ProLab Troubleshooting Guide Copyright 2010 Page 61 of 75
Prints are cut in half or at random places If the cuts are just slightly off, please refer to the item: Inconsistent Cutting - (Conveyor Cutter)
If cuts are being made in completely incorrect locations, like prints getting cut in half or thirds, this indicates that the Computer has lost track of the individual jobs going through the Chromira ProLab.
Check for the following:
- There are no extra programs running on the Chromira ProLab’s computer.
o Do not run WorkStream from this computer.
o Do not attempt to use this computer for anything other than running the Chromira ProLab, including photo editing, and any seemingly light tasks like e-mail or Web browsing.
- Check that the paper is traveling through the Chromira ProLab properly, and not stalling in the Processor or Dryer.
o See items: “Paper stalls or is delayed in Processor”, and “Paper stalls or is delayed in Dryer”, in the Media Transport section of this manual.

Chromira ProLab Troubleshooting
ProLab Troubleshooting Guide Copyright 2010 Page 62 of 75
4.4 Imaging Problems
White space next to large images that go to Hammock is being wasted No images are being printed on large areas of white space next to large images going into the Hammock. This is the normal operation of the Chromira ProLab. To eliminate this kind of waste, there are two options:
- Use the “Free Nesting” Option o This will likely require more manual cutting of finished prints, as this
places conservation of paper at a higher priority than automatic cutting. � The Free Nesting Option is in the main Options - Preferences
screen for the Printer. Refer to the User’s Manual for more information.
- Use a media of an appropriate width (for example, 20-inch paper if you are making many 16x20 inch prints.).
o This will require the use of a Core Adapter.
Image Size Errors Most aspects of print sizing are calibrated with the Cutter Calibration procedure, including the size of the image rendered on paper as well as the final cut size of the print.
- Run Cutter calibration prints and process. o If print sizing accuracy is inconsistent see “Inconsistent Cutting”
- If print width is incorrect check “Scale to Fit” checkbox. o Prints will be scaled to fit across 30” width and final print width will be
slightly smaller than requested print size.
Thin White Line shows up along one edge of paper This may happen just after loading the Chromira ProLab with paper. A thin white line that appears on one edge of the paper indicates that the paper’s left-to-right position along the Drum is changing as the material goes through the machine. This is usually caused by loading the paper unevenly or by a roll of paper that has “telescoped” slightly. To avoid this:
- Always make sure that the end of your roll of media is flat and not “telescoped”. Feeling along the layers of rolled-up paper at the end of the roll, make sure there aren’t any large ridges that you can feel.
- After you load the print media and the machine finishes it’s paper-loading movements, feel the tight-ness of the material in the span between the bottom of the roll and the corner roller. You should feel the same amount of looseness near each edge of the material’s width.

Chromira ProLab Troubleshooting
ProLab Troubleshooting Guide Copyright 2010 Page 63 of 75
Cyan fog or artifacts on paper If artifact is on the right side of the paper:
- Mark shows up as a general fog or wedge-shaped artifact. Light leak emanating from paper encoder mounted on paper core mount (left side of paper roll).
o This encoder is normally sealed with black tape, or on newer machines, the housing for the Spring Encoder is designed to more effectively block the light.
� Place tape over the body of the Spring Encoder, or contact your ZBE Service Representative for a replacement Spring Encoder Mount.
If the artifact is on the left side of the paper: - Mark shows up as a fuzzy spot or line
o This is coming from the Paper Sensor on Head. The Head may not be able to turn off the Paper Sensor.
� Please refer to the “Paper Sensor” item in the Self-Tests section of this manual for information on checking the Paper Sensor’s operation.
If the artifact is in the middle of paper (closer to left side): - Mark shows up as a fuzzy spot.
o This is caused by Paper Threading Sensor in the Threading Guide of the Print Engine.
� Update the software to the latest version. � Also, this Sensor should have an Infra-Red Filter over its face.
• To look for this: o Remove any photo paper from the machine. o Pull the Processor section out. o Open the rear light-trap panel. o Pull the Threading Guide open. The Threading
Guide Paper Sensor will be mounted “looking” through a hole in this Guide. The rectangular face of this Sensor should look black and shiny. If you see two small clear-plastic windows, the Infra-Red Filter is missing.
� Replace the Sensor or install a ZBE-supplied Infra-Red Filter.

Chromira ProLab Troubleshooting
ProLab Troubleshooting Guide Copyright 2010 Page 64 of 75
Paper Fogging Problems (other than Cyan spots) Paper fogging is caused by light entering the Print Engine Cabinet of the Chromira ProLab. In general, the best method for finding light leak locations, is:
- Make a large, uncut, light-colored print (about 30x40 inches in size), after leaving the machine idle long enough to allow fogging to happen.
- When the print is finished, unload the paper and remove the Loading Sleeve Panel from the Print Engine.
- Load an empty core, or a roll of blown paper, into the Paper Supply, but do not thread the paper.
- Place the large fogged print onto the drum as if loading the machine, with the bottom edge leading over the top of the Drum. Wrap the tail end around the Corner Roller, and around underneath the loaded empty core or blown paper roll.
- Look at where the fogged areas on your print are positioned. This usually gives a strong clue to where light is entering the cabinet.
If the fogged area is large and brown/red in color, room light (from fluorescent lights) is entering the cabinet. One of the most common causes of this, is light entering through the Loading Sleeves. The Loading Sleeves are designed to keep light out during the paper loading process, but are not intended to block light for long periods of time. Always keep the main grey Loading Door closed when not loading paper. If the fogged area is pure magenta in color, the light is likely coming from a Green LED on one of the electronics modules (Motor, Encoder, Control Hub, etc.) in the Print Engine. Unload the paper and check for LEDs glowing. Turn off the light in the room to make this easier.
- Each Motor in the Chromira ProLab has an LED on it which can be turned off. If a Motor has recently been replaced, its LED may have been left turned on. The glow from the LED will be coming from underneath the black cover over the motor’s electronics board. If you find a motor with a glowing LED, it can be turned off using switch #6 on the row of small Red switches visible through a cutout in the black electronics cover. Be careful if you toggle this switch, that you do not change any of the others, as you will change the Motor’s CAN Bud ID Number, and effectively disable that motor. The motor will work until you re-start the ChromiraLAB application software, so accidental changes to the switches may not be immediately evident. Change ONLY switch #6.
- The Chromira Control Hub also has a switch next to its four Status LEDs. Make sure these LEDs are all OFF. If not, simply flip this switch.
- Check that the cover black-out tape is secure over the top of the Drum Encoder Module (at left end of Drum). If it is not, you will see a Green LED.

Chromira ProLab Troubleshooting
ProLab Troubleshooting Guide Copyright 2010 Page 65 of 75
Back-printing shows through the front side of print Dot-matrix printing from the Back-printer shows through on the photographic image side of your prints. Check the following:
- The Back Printer Platen in the Conveyor is not fully engaging downward when back-printing takes place.
o In the Conveyor Diagnostics, click the “Backprinter Platen” check box. � The Platen should pop down, firmly against the surface of the
Lower Donveyor Deck. With the Platen down, feel it to see if it feels firmly pressed in place.
- This can also be due to a faulty Back-Printer Platen o The surface of the Platen is concave and not perfectly flat.
� Replace the Back Printer Platen.
• Please contact your ZBE Service Representative for assistance and a replacement part.
• Alternatively, you can remove back-printer platen and lap the bottom surface flat using 320-grit (or finer) sandpaper.
Blurry images (bad loading) If blurry portion of images is along one edge of paper or another, the paper has been loaded crooked onto the main Drum.
- Please review your paper loading procedure. If the entire image is blurry, the Lens on the Imaging Head may be out of focus.
- Adjust lens focus. Please contact your ZBE Service Representative for information on this procedure.
Faint Banding on light gradients If this happens in all prints:
- Update to latest Chromira Balance version or newer, or Chromira Expert Pro. If this appears only in images with a high amount of “film”-type grain:
- This effect is caused by the Bi-Cubic Interpolation which the Chromira ProLab uses when re-sizing images.
o Turn off image interpolation. o Re-size your images manually in your photo editing program.

Chromira ProLab Troubleshooting
ProLab Troubleshooting Guide Copyright 2010 Page 66 of 75
“Rainbow”-colored artifacts on prints
A Red, green, or blue artifact will not go away when balancing Prints show multi-colored swaths in random places. These swaths are 1 to 2 inches (2.5 – 5cm) in length, and about 1/10th inch (2mm) in width. Prints show a thin Red, Green, or Blue line that will not go away when balancing, no matter how many Scan cycles are run.
Example of “rainbow” artifacts
- There is foreign matter on the top of the Lens in the Head Assembly.
o Remove the Lens from the Head Plate (no need to remove the entire Head Assembly), and check that the top of the Lens is free of foreign matter, insects, etc.
� Please refer to your ZBE Service Representative before removing
the Lens from the Head. It must be done correctly to maintain proper focus.
� Look up into the Imaging Array area (where the top end of the Lens normally fits), and inspect the white Thermal Insulation for pieces that are about to become dislodged. Use a air-dusting can to clear dust and debris from this area. NEVER use compressed air from a compressor in this area!

Chromira ProLab Troubleshooting
ProLab Troubleshooting Guide Copyright 2010 Page 67 of 75
Prints show light and dark wavy lines. Prints show a wavy pattern, with light and dark “waves” separated by about 1cm (3/8 inch). The “waves” are about 5 - 8 cm (2 - 3 inches) long. The Picture below shows the problem, as it would appear on a solid gray area of a print:
- The Drum is being moved by an external force while the Head is printing. o If you recently had a paper jam, check that there are no loose pieces of
paper inside the Print Engine area (unload paper from the machine to check).
o Check that the Cutter Input Roller is not touching the Drum. � Remove Paper from machine. � In the diagnostics software, go into the Print Engine Section, and
select the Cross Cutter Roller Motor, and click “Forward” � Feel and look for any movement of the Drum.
o If your Chromira 5x Pro Lab is manufactured after March of 2009, and you’ve recently updated or re-installed your software, check that the setting for the Cutter Input Roller is set properly in the ChromiraLab.ini file.
� Open ChromiraLab.ini in Notepad. � Look for the line that is labeled “RubberCutterRoller”, and make
sure it reads: <RubberCutterRoller> 1 </RubberCutterRoller>
• The “1” indicates “yes”. � If you set your machine to enable the RubberCutterRoller, and it
does not have that type of Cutter Roller, your cross-cuts may be inconsistent.
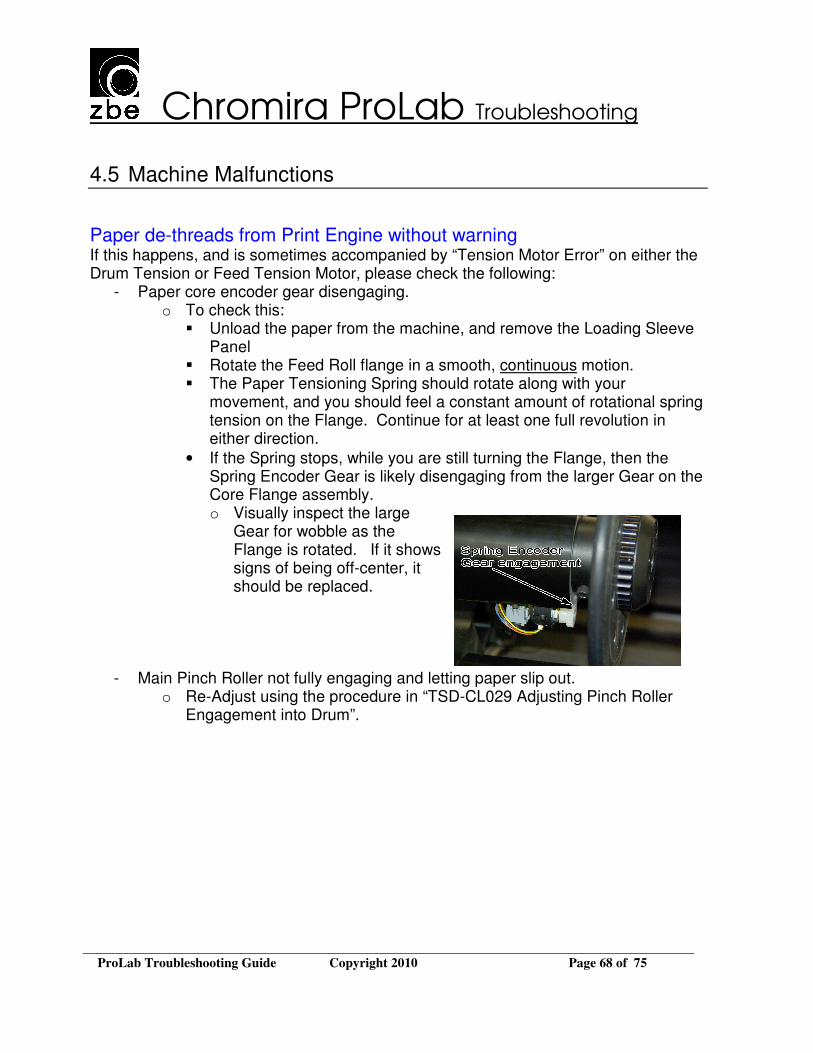
Chromira ProLab Troubleshooting
ProLab Troubleshooting Guide Copyright 2010 Page 68 of 75
4.5 Machine Malfunctions
Paper de-threads from Print Engine without warning If this happens, and is sometimes accompanied by “Tension Motor Error” on either the Drum Tension or Feed Tension Motor, please check the following:
- Paper core encoder gear disengaging. o To check this:
� Unload the paper from the machine, and remove the Loading Sleeve Panel
� Rotate the Feed Roll flange in a smooth, continuous motion. � The Paper Tensioning Spring should rotate along with your
movement, and you should feel a constant amount of rotational spring tension on the Flange. Continue for at least one full revolution in either direction.
• If the Spring stops, while you are still turning the Flange, then the Spring Encoder Gear is likely disengaging from the larger Gear on the Core Flange assembly. o Visually inspect the large
Gear for wobble as the Flange is rotated. If it shows signs of being off-center, it should be replaced.
- Main Pinch Roller not fully engaging and letting paper slip out. o Re-Adjust using the procedure in “TSD-CL029 Adjusting Pinch Roller
Engagement into Drum”.

Chromira ProLab Troubleshooting
ProLab Troubleshooting Guide Copyright 2010 Page 69 of 75
Sorter won’t move The Sorter never moves when it should be sorting your prints. Check the following:
- You have the Elevator (Sorter check-box is checked) enabled in the Preferences screen in the Chromira Lab application software.
- Sorter drive motor communication. o Run self test of sorter motor in Diagnostics window. Sorter shelf should
move through referencing procedure. � Please see the Elevator item in the Self-Tests section of this Guide
for more information.
Cutter calibration images not printing Nothing happens when you select a Cutter Calibration Print from the Calibration Print drop-down menu. Check the following:
- 30” paper not currently loaded. o Cutter calibration requires 30” paper.
- Calibration image files missing. o Check C:\Chromira Lab\Chromira Test Images folder. o If this folder is missing files, or absent altogether, the Self-Tests should
flag this as a warning. � Re-install the application.
Head too hot (over 65 degrees C) An error appears that the Imaging Head is too hot. Check the following:
- Fan on top of Imaging Head assembly is running.
o If not, check that it is plugged in (small white connector on top of Head assembly.
o If the Fan is plugged in, and the Imaging Head does not show an “Unable to Connect” error in Diagnostics, the fan is likely defective.
� Replace the Fan

Chromira ProLab Troubleshooting
ProLab Troubleshooting Guide Copyright 2010 Page 70 of 75
Processor won’t turn on in the morning or off at night Check that you are leaving the machine with the application software (ChromiraLab.exe) running.
- Check your settings for the Processor in the Preferences screen. - It is strongly recommended to leave the application program running overnight,
as this will allow the computer to monitor the Processor and to wake up in the morning.
Jobs emerge from the Conveyor sorted or cut incorrectly This can happen in rare cases when large numbers of small prints are run in a constant flow. The Conveyor loses pace with the jobs emerging from the Dryer.
- As a workaround, try: o Reduce the number of lines of print in your Back Printer settings - if the
system is allowed to catch up and allowed to print the leader it is ok again).
o Disable the Back Printer - If this does not correct the situation, or the problem starts immediately as soon
as work starts to reach the Conveyor, please refer to the item “Prints not cutting in PCC (nests going out back)”
Hard Disk on Computer fills up An error appears, stating that the Hard Disk C: is full.
- Check that the setting for “Render Images to Hard Disk” is turned off. This setting is found in the main Preferences window.
o This setting causes all prints that are imaged on paper to also be rendered as files on disk, which will fill large amounts of disk space quickly.

Chromira ProLab Troubleshooting
ProLab Troubleshooting Guide Copyright 2010 Page 71 of 75
Prints going into Hammock not getting Back-Printed This may happen in an intermittent fashion, where only some prints are Back-Printed correctly, and others are not.
- When two large images that are side-by-side on the paper are coming our into the Hammock, the machine is only able to back-print the one on the left. This is normal.
- If you hear the “zip” sound of the backprinter working, but do not see any text on the back of your prints, the Backprinter Platen may be inoperable.
o You can check this by going into the Diagnostics screen, under Conveyor. Click the Backprinter Platen Up and Down Buttons and listen for the Platen’s “snap” sound.
� If you do not hear the sound:
• Check that you have air-pressure on the machine. See that the Gauge on the Conveyor’s Air Solenoid Manifold reads around 60 PSI.
• Try pressing the blue button on the Air Solenoid valve. The platen should “snap.” If this happens, but the computer cannot control the solenoid using the Printer Platen Up and Down buttons, check that the little Red LED on the Solenoid itself turns on when you click Down, and off when you click Up.
o If the LED responds, but the solenoid does not, the Solenoid is bad. Replace it, and check for excess water in your compressed air supply
o If the LED does not respond, check the wiring from the bottom of the Chromira Control Hub to the Solenoid, and the small plug in the top of the Solenoid. Replace the Hub if the wiring looks OK.
This section continued on next page.

Chromira ProLab Troubleshooting
ProLab Troubleshooting Guide Copyright 2010 Page 72 of 75
- When a large print is hanging out of the back of the Conveyor, awaiting back-printing, the portion of the print still in the Conveyor is riding high up against the bottom of the Fixed Top Plate. In this position the paper is as far from the Fence Paper Sensor as it can get. If this Sensor is not adjusted properly, its reading can dip below the level at which it “sees” paper, thus “missing” the print.
o Test the operation of the sensor: � Go into the Conveyor Diagnostics screen and find the are marked
“Paper Sensors”. In that list, find the indicator for “Fence Sensor”, which will have a grey Indicator circle next to it.
� Facing the output of the Conveyor, insert a scrap piece of paper back into the narrow gap between the Conveyor’s Top and Bottom Decks, at a location between the first and second Foam Print Eject Rollers from the left end of the slot.
� The Fence Paper Sensor readout should light Green, indicating that the computer “sees” the paper.
� Move the tail end of the piece of paper up and down.
� While doing this, have an assistant watch the status of the Paper Sensor readout.
� If, while the paper is in place and you are moving the tail end up and down, the indicator ever flashes grey (“No Paper”), you must adjust the Fence Paper Sensor.
• Please refer to “TSD CL031 Adjusting Conveyor Fence Sensor” for the procedure on how to do this.

Chromira ProLab Troubleshooting
ProLab Troubleshooting Guide Copyright 2010 Page 73 of 75
Drum errors intermittently Drum Motor gives a Tracking Error every once in awhile.
- Drag from distorted cross-cut roller coating o Remove coating as workaround. o Replace Cutter Roller
� Please contact your ZBE Service Representative for assistance with this.
- The Spring Encoder is not reading the Paper Roll position reliably o Please refer to the item “Paper de-threads from Print Engine without
warning” for more information.
Drum moves violently or erratically Drum moves correctly most of the time, but occasionally lurches in position, starts oscillating back and forth, or makes a “ticking” sound as it moves. Please check the following:
- Check that the Drum movement is quiet, smooth, and solid: o Unload any paper from the Chromira ProLab, and remove the Load
Sleeve Panel o In the Diagnostics for “Print Engine”, click the “All Rollers in Printer,
Forward” button. This should start the Drum (and all other rollers), moving slowly in the forward direction.
o Carefully, resist the movement of the Drum. The force from the Drum should feel solid, with no lurches or loud ticking sounds.
� Be VERY careful not to get you hand or fingers under the Pinch Roller.
o If the force from the Drum is not smooth and quiet, the Drum Motor Rotor is mounted too far inward.
� Please contact your ZBE Service Representative for assistance.
Data in back-printing is garbled Check your settings for Backprinter data, especially after upgrading your software version.
Major engine failures and multiple errors occur suddenly during printing Power cord below processor came loose from movement of the tanks below getting tangled together
Chromira ProLab Troubleshooting
ProLab Troubleshooting Guide Copyright 2010 Page 74 of 75
ICC Profile error box (permissions limited) Check that your network permissions (from the Chromira computer) allow access to where the profiles are stored. (Consult your network administrator for specific instructions.)
Cannot control Air Solenoid (for Print Engine air supply) - always on This will show up as a warning in the Self-Tests. The Chromira will still work fine, but compressed air will be wasted as the computer cannot turn it off when the Chromira ProLab is idle. Check the Following:
- The Knob on top of the Air Solenoid is not locked in the “on” (down) position. o Twist the Knob to see if it pops up.
- Check the Air Solenoid operation from Diagnostics. o Refer to the item Air Solenoid in the Self-Tests section of this Guide.
Dryer heat falling while printing large orders The temperature reading in the Dryer falls when large prints are being dried in the Dryer. Prints emerge from Dryer not completely dry or are tacky to the touch.
- Increase Emulsion-Side pulsing values (for example, from “15” to “25” ) o This is done in the Options – Preferences screen for the Processor
settings.

Chromira ProLab Troubleshooting
ProLab Troubleshooting Guide Copyright 2010 Page 75 of 75
Processor Gears breaking. Upon pulling and examining the Racks in the Processor, you find some of the gears broken. This has several causes:
- Paper pulling tight in printer section. o The Print Engine is not keeping up with the speed of the Processor.
� Check the operation of the Buffer Trap-Door Switches.
• See item “Buffer IO in the Self-Tests” section of this Guide. - A very severe Paper Jam
o See the “Paper jams in Processor” item in this Guide - Wash Water being fed into the Chromira ProLab is extremely hot (hotter than
60°C). This is rare.
Cyan Fringes around Black Text or Image elements A very small amount of color fringing around black image elements is normal. If you suspect that your prints have an excessive amount of this fringing, the calibration of the affected Print Media may have a condition known as “D-Max Failure”.
- Lower the D-Max targets for Red in your Chromira Balance program in the Densitometer section, and run a couple Densitometer balance cycles.
If the problem persists, please contact your ZBE Service Representative for assistance with this.
Any Motor gets hot Motor body is hot (hotter than “warm”) to the touch
- If any motor gets hot, this means that it is experiencing too much physical resistance to its movement.
o Check the components that the particular motor is driving. Shut down the ChromiraLAB application, and look for:
� Physical obstructions � Metallic or black dust from nearby rotating components. � You may have to remove the motor to be able to rotate or move
the component that the Motor is driving. - In very rare cases, the electronics that control the motor are faulty.
o Replace the affected Motor Assembly. � This is extremely rare. If you remove the Motor to replace it, check
the component that it drives (roller, pulley, etc), for binding or sticky movement. If any abnormal resistance is felt, correct the mechanical problem, and re-install the same motor.