printmaking: starring textures and shapes · printmaking: starring textures and shapes derived from...
TRANSCRIPT

White on White Collagraph Printmaking: starring textures and shapesDerived from the Greek word koll or kola (meaning glue), collagraphy is a printmaking process invented and popularized in the 1930s by artists such as Pablo Picasso, Georges Braque, Juan Gris and the master printmaker Stanley William Hayter. Given that the materials required for collagraphy are extremely basic and uncomplicated, collagraphs are often referred to as "poor person's etchings."
In collagraphy, various thin materials are arranged as a collage and applied to a rigid surface. Then a print is taken from the collage. The finished piece can be inked or left white to showcase the textures and qualities of the paper used. The types of objects you can find, alter and combine to make a collagraph are limited only by the imagination!
GRADES 4-12 Note: instructions and materials are based upon a class size of 25 students. Adjust as needed.
Preparation
1. Provide each student with an 8" x 10" canvas panel.
2. Collect a number of fairly thin materials with textured surfaces, such as fabrics, cardboard, wire mesh, tooling foil, embossed wallpaper, pressed leaves, string, and other materials.
3. Provide small bowls of acrylic gel medium to use as glue and as a final coat for the plate.
4. Provide textured gel mediums such as Liquitex Glass Beads, Blended Fibers or Ceramic Stucco (optional).
5. Tear or cut printing paper into 10" x 12" pieces.
Process
1. Do a preliminary 8" x 10" sketch of your composition. Transfer this design to the canvas panel using a pencil. Decide which textures might be used in specific areas and gather the needed materials. Keep in mind that the higher the plane on the canvas, the more deeply embossed the print will be.
MaterialsBlick® Canvas Panels, 8" x 10" (07008-0810); one per student
Fabriano® Rosaspina™ Paper, White, 20" x 27" sheet, (10451-1020); share one among four students
Blick® Economy Golden Taklon, flat size 6, (05168-1006); one per student
Crescent® Regular Surface Matboard, Assorted Colors 20" x 32" (13007-); share one among six students
Blick® Artist's Acrylic Gel Medium, Pint (00623-1016); share two among class
Optional Materials
Liquitex® Texture Gels, (00609-)
Golden® Acrylic Gel Mediums, (00628-)
Blick® Palette Knife, 3" (03115-1003)
Darice® Hemp Twine, 20-lb, 400-ft (62985-1020)
Amaco® Wireform Mesh (33408-)
Blick® Easy-To-Cut Printing Blocks (40420-)
RGM Linoleum Knives (40202-)
Press:
Blick® 906 Etching Press, 48-lb (45013-0000)
Steel Bed Plate and Blanket, 12" x 26" (45013-1126)
Wool Pusher Blanket, 1/8" thick, 12" x 26" (46901-1026)
Wool Catcher Blanket, 1/16" thick, 12" x 26" (46901-1226)
Copyright © 2012Dick Blick Art Materials
All rights reserved
800-447-8192 DickBlick.com
1.
Process, continued
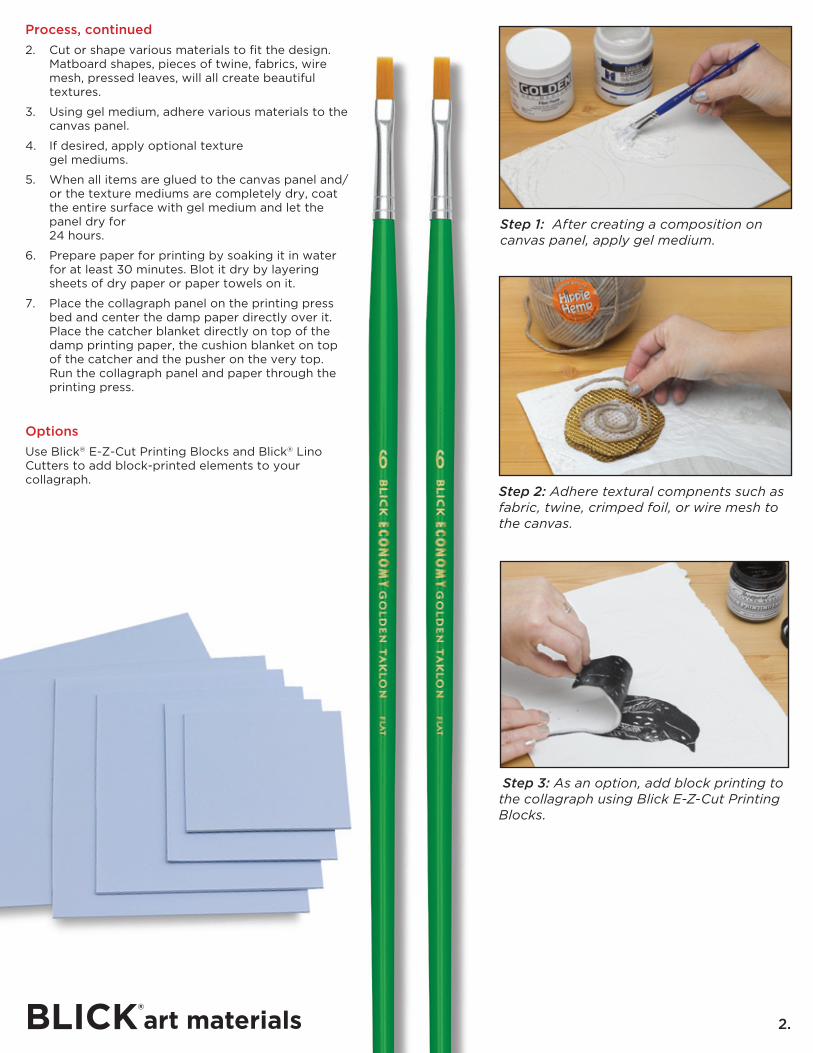
2. Cut or shape various materials to fit the design. Matboard shapes, pieces of twine, fabrics, wire mesh, pressed leaves, will all create beautiful textures.
3. Using gel medium, adhere various materials to the canvas panel.
4. If desired, apply optional texture gel mediums.
5. When all items are glued to the canvas panel and/or the texture mediums are completely dry, coat the entire surface with gel medium and let the panel dry for 24 hours.
6. Prepare paper for printing by soaking it in water for at least 30 minutes. Blot it dry by layering sheets of dry paper or paper towels on it.
7. Place the collagraph panel on the printing press bed and center the damp paper directly over it. Place the catcher blanket directly on top of the damp printing paper, the cushion blanket on top of the catcher and the pusher on the very top. Run the collagraph panel and paper through the printing press.
Options
Use Blick® E-Z-Cut Printing Blocks and Blick® Lino Cutters to add block-printed elements to your collagraph.
Step 1: After creating a composition on canvas panel, apply gel medium.
Step 3: As an option, add block printing to the collagraph using Blick E-Z-Cut Printing Blocks.
Step 2: Adhere textural compnents such as fabric, twine, crimped foil, or wire mesh to the canvas.
2.

3.800-447-8192 DickBlick.com
National Standards for Visual Arts Education
Content Standard #1 — Understanding and applying media, techniques and processesK-4 Students know the differences between materials, techniques, and processes.5-8 Students intentionally take advantage of the qualities and characteristics of art media,techniques, and processes to enhance communication of their experiences and ideas.9-12 Students apply media, techniques, and processes with sufficient skill, confidence, and sensitivity that their intentions are carried out in their artworks.
Content Standard #2 — Using knowledge of structures and functionsK-4 Students use visual structures and functions of art to communicate ideas5-8 Students select and use the qualities of structures and functions of art to improve communication of their ideas 9-12 Students evaluate the effectiveness of artworks in terms of organizational structures and functions.
Content Standard #4 Understanding the visual arts in relation to history and culturesK-4 Students use visual structures and functions of art to communicate ideas5-8 Students select and use the qualities of structures and functions of art to improve communication of their ideas 9-12 Students evaluate the effectiveness of artworks in terms of organizational structures and functions a variety of historical and cultural contexts in terms of characteristics and purposes of works of art.