notes: introduction to printmaking - amazon s3 · what is printmaking? printmaking – an image...
TRANSCRIPT
NOTES: INTRODUCTION TO
PRINTMAKING
4/30/13
WHAT IS PRINTMAKING?
Printmaking – an image made from a
surface being covered with ink and then
pressed onto another surface.
Printmaking is preferred to painting or
drawing if there is a need to make
multiple original copies of the same
image.
A BRIEF HISTORY OF PRINTMAKING
Printmaking originated in China around
105 C.E.
During the Gothic and Renaissance
periods of art, relief printing became
very popular in Europe.
Can you think of any reasons why this was a
popular art form at this time?

A BRIEF HISTORY OF PRINTMAKING
Contemporary artists
such as Pablo Picasso
and Henri Matisse
re-popularized the
technique in the early
20th century.
Pablo Picasso
"Tête de Femme"/"Portrait de
Jacqueline de face. II"
colorlinocut, IV.
http://www.boisseree.com/en/originalprint/originalprint.html
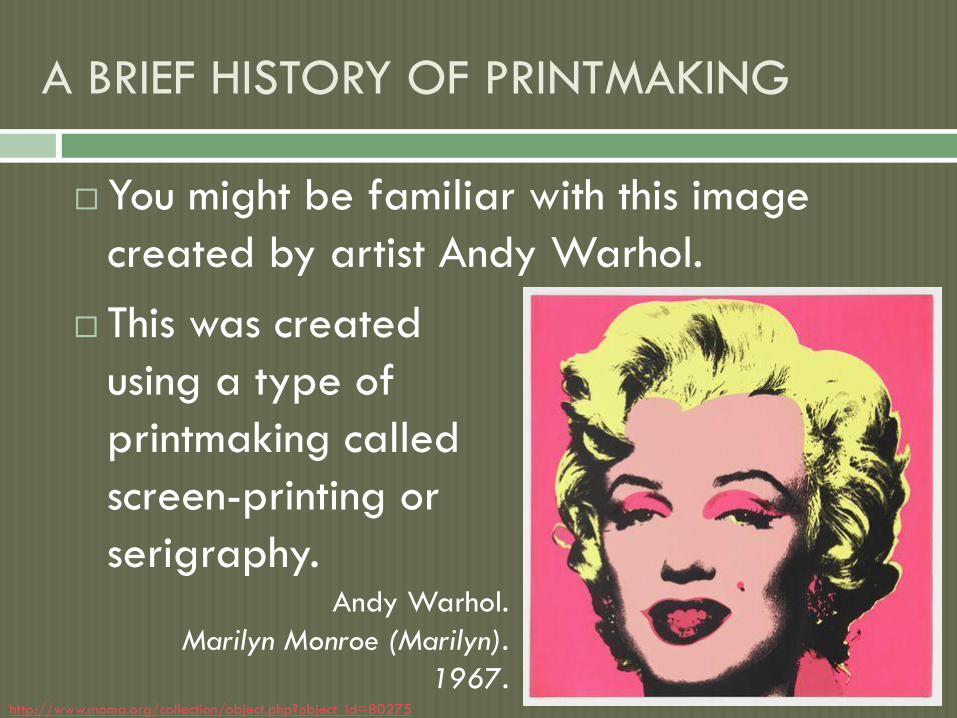
A BRIEF HISTORY OF PRINTMAKING
You might be familiar with this image
created by artist Andy Warhol.
http://www.moma.org/collection/object.php?object_id=80275
Andy Warhol.
Marilyn Monroe (Marilyn).
1967.
This was created
using a type of
printmaking called
screen-printing or
serigraphy.

TYPES OF PRINTMAKING

TYPES OF PRINTMAKING
There are four basic categories of
printmaking:
Relief – ink is applied to the raised
surface of the matrix.
woodcut
monoprint
linoleum block

TYPES OF PRINTMAKING
There are four basic categories of
printmaking:
Intaglio – ink is applied to the
recessed surface of the matrix.
aquatint
mezzotint
engraving
etching
drypoint
collagraph

TYPES OF PRINTMAKING
There are four basic categories of
printmaking:
Stencil – ink is pressed through a
prepared screen.
The most common stencil printing
technique is serigraphy or
silkscreen printing.
TYPES OF PRINTMAKING
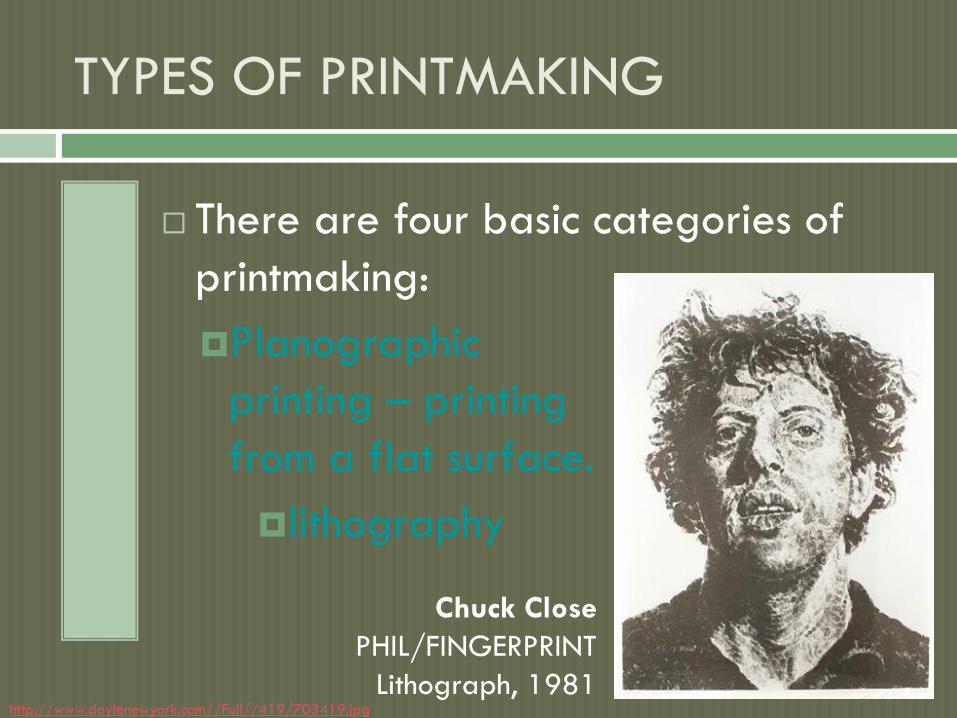
There are four basic categories of
printmaking:
Planographic
printing – printing
from a flat surface.
lithography
http://www.doylenewyork.com//Full//419/703419.jpg
Chuck Close
PHIL/FINGERPRINT
Lithograph, 1981
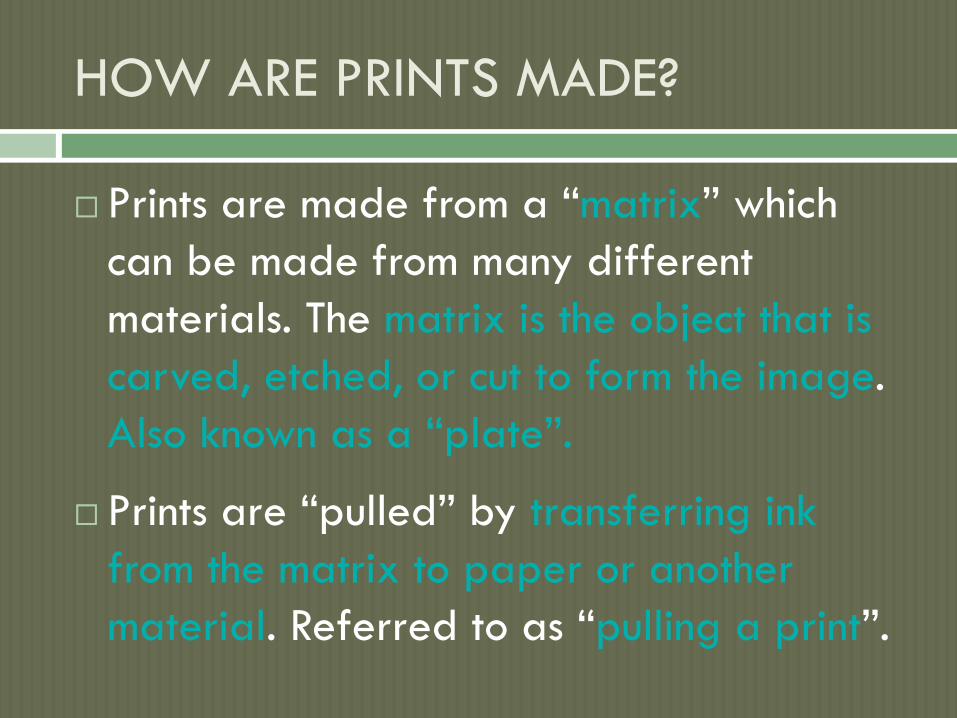
HOW ARE PRINTS MADE?
Prints are made from a “matrix” which
can be made from many different
materials. The matrix is the object that is
carved, etched, or cut to form the image.
Also known as a “plate”.
Prints are “pulled” by transferring ink
from the matrix to paper or another
material. Referred to as “pulling a print”.

WHAT WE ARE DOING
We will be creating prints using linoleum
and foam.
This is a form of relief printing.
Think of what we’re doing as creating a
big stamp.
We will print these “stamps” on paper to
create a limited edition of prints.
WHAT WE ARE DOING
Because the printing process can be
lengthy, at the same time we will also be
creating a stencil for serigraphy.
You will have the option of bringing your
own T-shirt or fabric item to print your
stenciled design.
Each process is different, but both
techniques are printmaking.

Drawing paper
Sheet linoleum or foam
Gouges and blades
Ink
Plexiglas
Brayer
Baren
TOOLS & MATERIALS
TOOLS & MATERIALS
Brayer- a hand roller used to spread ink in the
process of offsetting an image from a plate to
paper.
Baren - A hand tool used to apply pressure to
an inked plate to help transfer the image.
Gouge- A cutting tool for linoleum or wood
blocks.
https://sites.google.com/site/msgilbertart1/-printmaking-terms

PRINTMAKING TERMS

PRINT EDITIONS
The set of prints is called an “edition”.
A signed and numbered set of prints is
called a “limited edition”.

PRINTMAKING TERMS
Edition- the number of prints struck from one
plate, usually at the same time. Written as a
fraction.
https://sites.google.com/site/msgilbertart1/-printmaking-terms
Print # / # in edition Title Artist Signature

PRINTMAKING TERMS
Proof- A ‘working print’ or test print completed
prior to committing to an edition.
Multiple-layer prints- prints created by using
more than one plate and/or color of ink,
registered to place the layers exactly on top
of each other.
https://sites.google.com/site/msgilbertart1/-printmaking-terms
REGISTRATION
When you are making a multi-layer print,
it is important to align the paper and
printing elements the same way each time
so your image will line up. This is called
registration.
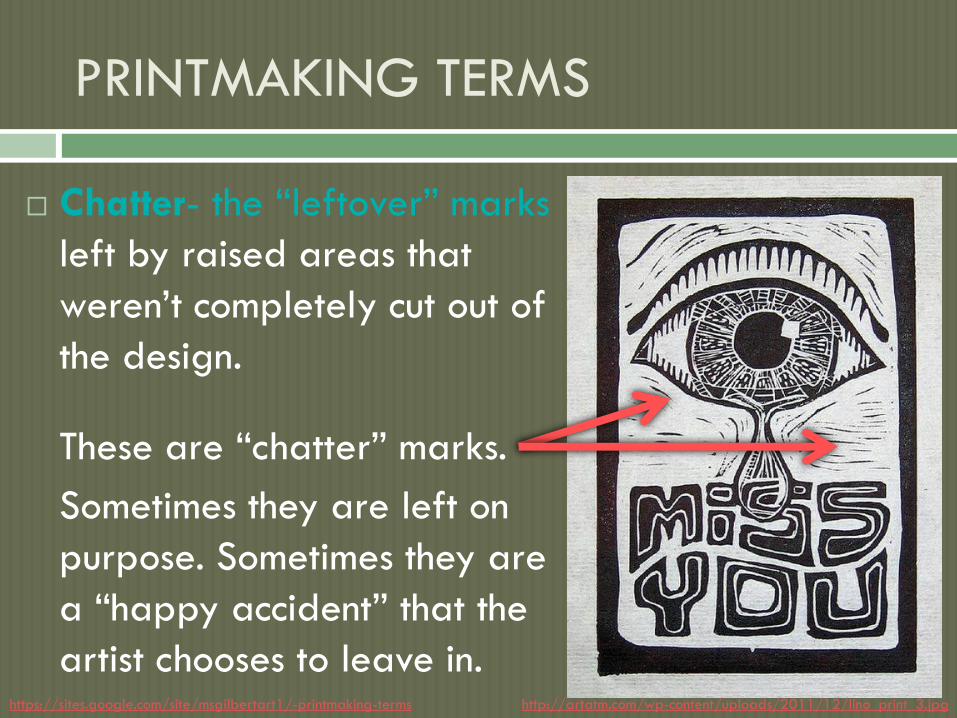
PRINTMAKING TERMS
Chatter- the “leftover” marks
left by raised areas that
weren’t completely cut out of
the design.
These are “chatter” marks.
Sometimes they are left on
purpose. Sometimes they are
a “happy accident” that the
artist chooses to leave in. https://sites.google.com/site/msgilbertart1/-printmaking-terms http://artatm.com/wp-content/uploads/2011/12/lino_print_3.jpg

Information and Image Sources:
Information:
http://www.slideshare.net/mrsbauerart/intro-to-printmaking
http://schutzart.blogspot.com/2011/10/block-reduction-
printmaking-with-grade.html
Vocabulary:
https://sites.google.com/site/msgilbertart1/-printmaking-terms
Images:
http://www.boisseree.com/en/originalprint/originalprint.html
http://www.moma.org/collection/object.php?object_id=80275
http://www.doylenewyork.com//Full//419/703419.jpg
http://artatm.com/wp-content/uploads/2011/12/lino_print_3.jpg
Single Color Printing
LINO BLOCK PRINT PROCESS

LINO BLOCK PRINT PROCESS
Create a design with positive and negative spaces
(think “printed” versus “not printed”).
Transfer the design to the lino block or foam.
Darken your lines with a sharpie (optional step).
Carve the design onto the block.
Carving produces “empty” spaces in the print.
The uncarved parts are the parts that get printed.
Roll ink onto the block with a brayer.
Press paper onto the inked surface using a baren.
Number all edition prints using the proper format.
(Reduction/Suicide Block Printing)
ADDITIONAL STEPS FOR
PRINTING MULTIPLE COLORS
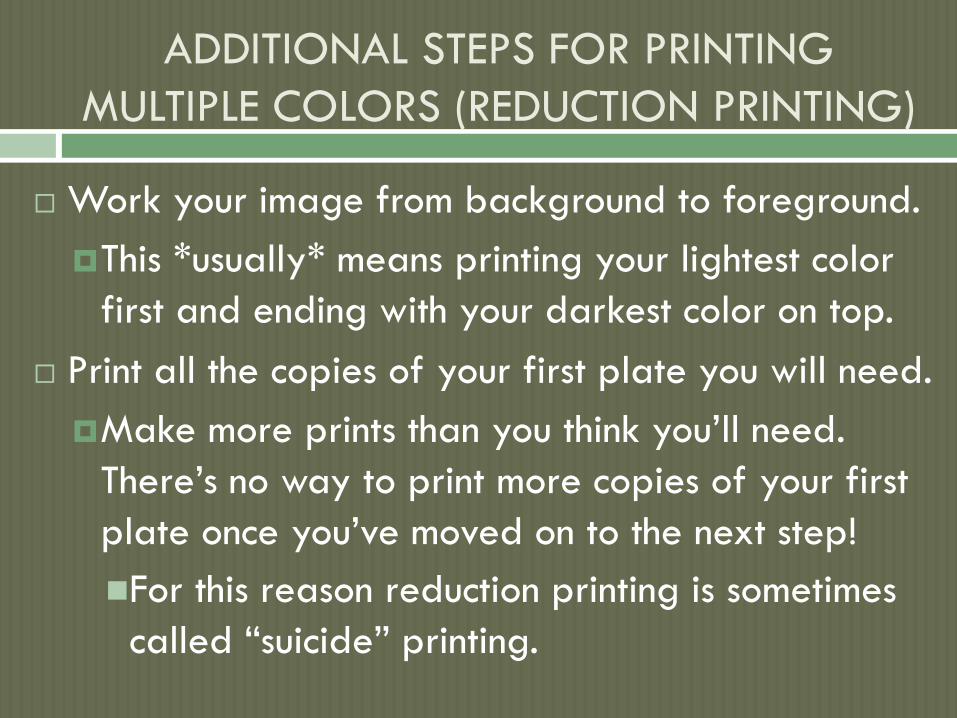
ADDITIONAL STEPS FOR PRINTING
MULTIPLE COLORS (REDUCTION PRINTING)
Work your image from background to foreground.
This *usually* means printing your lightest color
first and ending with your darkest color on top.
Print all the copies of your first plate you will need.
Make more prints than you think you’ll need.
There’s no way to print more copies of your first
plate once you’ve moved on to the next step!
For this reason reduction printing is sometimes
called “suicide” printing.
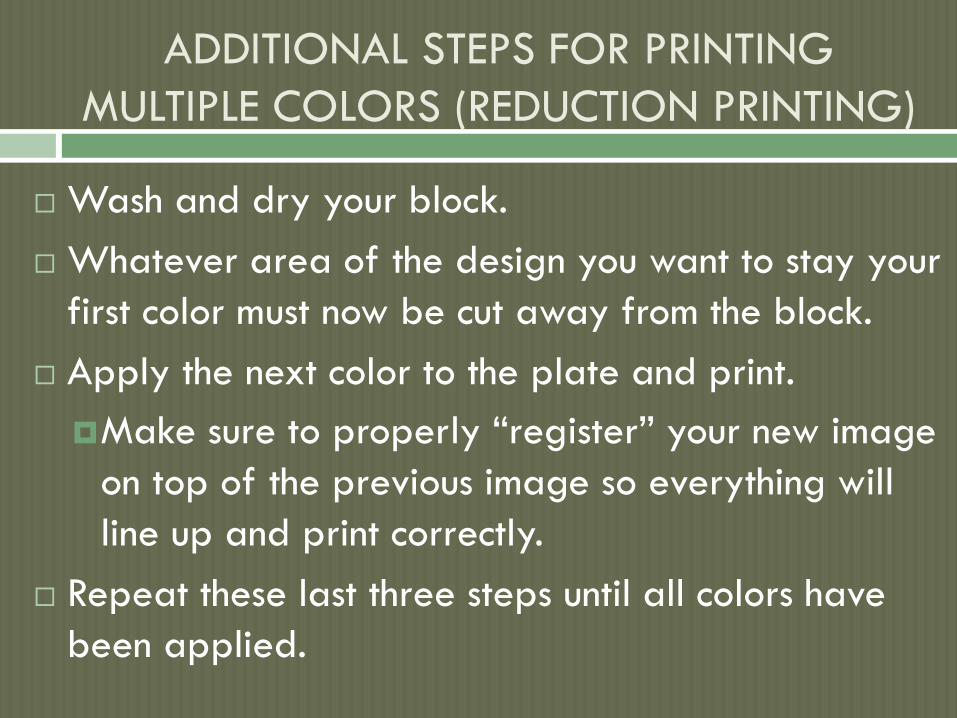
ADDITIONAL STEPS FOR PRINTING
MULTIPLE COLORS (REDUCTION PRINTING)
Wash and dry your block.
Whatever area of the design you want to stay your
first color must now be cut away from the block.
Apply the next color to the plate and print.
Make sure to properly “register” your new image
on top of the previous image so everything will
line up and print correctly.
Repeat these last three steps until all colors have
been applied.

(A.K.A. Silkscreen printing, single color)
SERIGRAPH PRINT PROCESS
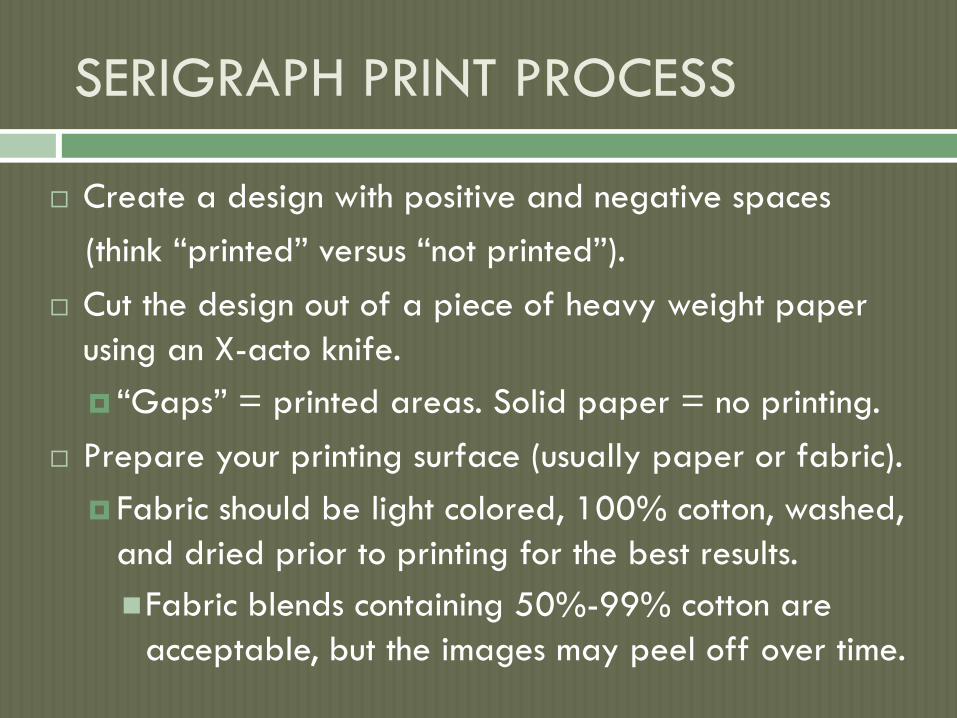
SERIGRAPH PRINT PROCESS
Create a design with positive and negative spaces
(think “printed” versus “not printed”).
Cut the design out of a piece of heavy weight paper
using an X-acto knife.
“Gaps” = printed areas. Solid paper = no printing.
Prepare your printing surface (usually paper or fabric).
Fabric should be light colored, 100% cotton, washed,
and dried prior to printing for the best results.
Fabric blends containing 50%-99% cotton are
acceptable, but the images may peel off over time.

SERIGRAPH PRINT PROCESS
Spread the paper or fabric smooth (no wrinkles)*.
Carefully arrange your stencil pieces on the paper/fabric.
Surround your stencil with scraps of paper to protect it
from the ink that might accidentally escape through other
parts of the screen.
Lay the screen over the paper stencil and pieces to hold
them down.
*NOTE: If your fabric is a garment, put a piece of
foamboard or cardboard inside the fabric.
This will keep the ink from bleeding through to the other
side of the garment.

SERIGRAPH PRINT PROCESS
Squirt a line of ink along the top inside side of the screen.
Have a partner hold the screen down firmly.
Use a squeegee to drag and squish the ink across the
screen.
Pull from top to bottom of your design and then again
from bottom to top with a steady, even pressure.
Before removing the screen, check your design to make
sure all areas have printed.
Carefully lift the screen off of the printing surface.
Scrape the leftover ink off the screen and return it to its
container.

SERIGRAPH PRINT PROCESS
Peel your paper stencil off of the back of the screen.
Gently wash the screen with soap and water and let it
air dry.
OPTIONAL STEPS FOR FABRIC:
If you printed a piece of fabric leave it on the
foam/cardboard to dry overnight.
Remove the foam/cardboard the next day.
Turn the garment inside out and iron the back side for
one minute, moving the iron often.
Wash and wear as normal (turn it inside out when
washing/drying to minimize cracking/peeling/fading).