principles of injection technique - becton dickinson - bd · pdf fileprinciples of . injection...
TRANSCRIPT

Principles of Injection Technique

References . . . . . . . . . . . . . . . . . . . . . 36Appendix . . . . . . . . . . . . . . . . . . . . . 37
• Needlestick Prevention - Needlestick Safety and Prevention Act - Types of Technologies
Introduction . . . . . . . . . . . . . . . . . . . . 4
Selection . . . . . . . . . . . . . . . . . . . . . . . 6• Selecting the Devices• Anatomy of the Needle• Anatomy of the Syringe• Guidelines for Needle and Gauge Selection
Preparation . . . . . . . . . . . . . . . . . . . . 16• Considerations Before Device Assembly• Preparing the Injection
Administration . . . . . . . . . . . . . . . . . 22• Skin Preparation• Injection Routes - Intramuscular - Subcutaneous - Intradermal
Disposal . . . . . . . . . . . . . . . . . . . . . . . 32• Safe Use and Disposal of Sharps • Selecting, Evaluating, and Using
Sharps Disposal Containers
Table of Contents
For information about other educational offerings, please contact the BD Education Center at 1-800-255-6334 or email [email protected].
The information in this manual has been compiled from BD experts and cited sources and is intended for use as a reference for proper injection technique. It is not intended as a substitute for medical education or training. The medical devices discussed in this manual should not be used by untrained individuals.

4
SelectionList three factors that need to be considered when selecting a syringe and needle for an injection .
PreparationDescribe the following components of medication preparation, assembling, preparing and checking .
AdministrationList the medication volumes that can safely be injected into the following areas: intramuscular, subcutaneous and intradermal .
DisposalDescribe the four safety performance criteria for sharps disposal containers .
IntroductionThe process for giving an injection includes some basic steps . This manual divides the injection process into four categories . Upon completion of this booklet, the participant should have an understanding of:
This booklet is intended to educate healthcare workers with information on how to prepare and administer skin injections safely and correctly.
The basic topics, standard for all injections, discussed in the following pages are:
• Assessment of Patient – This manual assumes that the healthcare worker has basic knowledge and education on proper patient assessment.
• Type of Injection • Site Selection • Selection and Assembly of Supplies
and Devices • Injection Administration • Safe Disposal of Waste Materials

Selection
Selecting the DevicesThere are many different syringes and needles, suiting many different procedures . It is important to choose the needles and syringes carefully according to the type of injection to be administered . For example, the length and gauge of needle and type of syringe must be suitable for the injection site, viscosity, and volume of medication . The size, age and condition of the patient are other key factors in the selection process .
76
Selection

The anatomy of the needle
8
Allows user to attach the needle to a syringe by either a luer lock or a luer slip connection. All safety-engineered needles are color coded to denote the gauge of the needle. (see chart on page 14 and 15). Designed to protect the user from accidental
needlestick injuries. Safety technology for injection needles includes retracting syringes, shielding needles and sliding sleeve syringes.
Made of stainless steel, which is siliconized to allow easier penetration, thus minimizing patient discomfort. Available in different lengths and gauges to suit individual clinical and patient needs.
There are three types of needle walls:
Regular Wall: This is the most common wall thickness. The thickness of the steel wall allows a good flow rate, and minimizes flexing when the needle is inserted into a vial stopper or patient.
Thin Wall: As shown in the diagram, the thin wall needle has a narrower steel wall, allowing a greater volume of fluid to pass through it. The flow rate is typically equivalent to that of a needle one gauge larger. This is especially important with very thin needles.
Extra Thin Wall: This has the thinnest steel wall, provides higher flow and requires less force to deliver medication.
Thin Wall
Extra Thin Wall
9
The sharpened angular tip at the end of the needle. There are typically four types of bevels used for skin injections.
Regular bevel: The most common bevel, used for a vast majority of applications. Typically used for intramuscular and subcutaneous injections.
Short bevel: The needlepoint geometry is designed to minimize unwanted injection depth, such as penetration through a vessel wall, and to obtain rapid withdrawal or dispersion of a fluid. Typically used for specialty applications such as arterial blood gas sampling and nerve blocks.
Intradermal bevel: The geometry of the tip is designed to allow for shallow and low angle insertion of the needle just below the epidermis. The fluid volume is typically very small and slowly administered. This unique needle bevel is used primarily for skin testing (e.g., allergy tests).
5-bevel: The two additional bevels create a flatter, thinner surface that has been shown to be less painful.*
Hub
Bevel Needle
Safety Mechanism
Product photo enlarged, not actual size
* Adapted from Hirsch L, Gibney M, Berube J, et al. Impact of a modified needle tip geometry on penetration force as well as acceptability, preference, and perceived pain in subjects with diabetes. J Diabetes Sci Technol. 2012;6(2):328-335. Study was not conducted on all needles sizes.
Regular Wall

1
3
4
5
6
2
10 11
Luer Lock Tip
Generally used for injections requiring a secure connection of the syringe to another device. The tip is threaded for a “locking” fit, and is compatible with a variety of needles, catheters and other devices.
Luer Slip Tip
A friction-fit connection that requires the clinician to insert the tip of the syringe into the needle hub or other luer connection in a push-and-twist manner. This will ensure a connection that is less likely to detach. Simply sliding the attaching device onto the syringe tip may not ensure a secure fitting.
Eccentric Luer Slip Tip
Allows for work requiring closer proximity to the skin. Generally used for venipunctures and aspiration of fluids. (Also see luer slip instructions above.)
Catheter Tip
Used for flushing (cleaning) catheters, gastrostomy tubes and other devices. Insert catheter tip securely into catheter or gastrostomy tube. If leakage occurs, refer to your facility’s guidelines.
Permanently Attached Needle
Most commonly found in insulin and ‘tuberculin’ syringes. Permanently attached needles, also known as integral needles, reduce the amount of medication waste and allow accurate mixing of different medications into one syringe.
The anatomy of the syringe
1. Stopper: Prevents leakage of medication around the plunger, and acts as an indicator for measuring the syringe’s contents (see diagram).
2. Scale Markings: Scale markings are typically in milliliter (mL) units. On insulin syringes, however, graduations are displayed in “units” based on the insulin concentration prescribed. (Example: U-100 means 100 units of insulin suspended within 1 milliliter of fluid. A 3/10 mL insulin syringe will accommodate up to 30 units when using U-100 insulin.)
3. Barrel: Reservoir for holding liquid, clearly graduated to allow accurate and visual measurement of the syringe’s contents.
4. Flanges: The “wings” that extend out from the side of the syringe barrel that provide an area or surface for the index finger and middle finger to grasp during aspiration or administration.
5. Plunger Rod: A piston-like device inside the barrel.
6. Thumb Press: Area where clinician presses to push plunger rod down into barrel to expel contents.
11.11.21.31.41.51.61.71.81.92
Align intended dosage here
1312
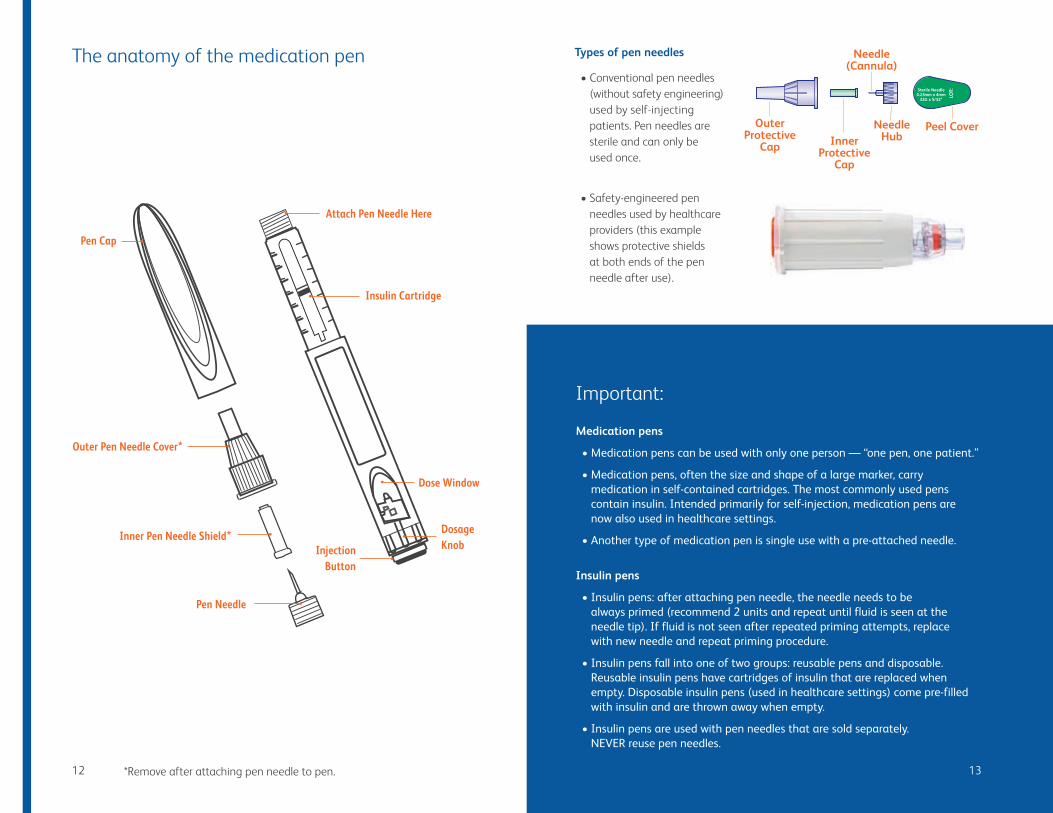
Peel Cover
Needle(Cannula)
InnerProtective
Cap
OuterProtective
Cap
NeedleHub
Injection Button
Dosage Knob
Pen Cap
Pen Needle
Inner Pen Needle Shield*
Dose Window
Attach Pen Needle Here
Insulin Cartridge
Outer Pen Needle Cover*
*Remove after attaching pen needle to pen .
Important:
Medication pens
• Medication pens can be used with only one person — “one pen, one patient.”
• Medication pens, often the size and shape of a large marker, carry medication in self-contained cartridges. The most commonly used pens contain insulin. Intended primarily for self-injection, medication pens are now also used in healthcare settings.
• Another type of medication pen is single use with a pre-attached needle.
Insulin pens
• Insulin pens: after attaching pen needle, the needle needs to be always primed (recommend 2 units and repeat until fluid is seen at the needle tip). If fluid is not seen after repeated priming attempts, replace with new needle and repeat priming procedure.
• Insulin pens fall into one of two groups: reusable pens and disposable. Reusable insulin pens have cartridges of insulin that are replaced when empty. Disposable insulin pens (used in healthcare settings) come pre-filled with insulin and are thrown away when empty.
• Insulin pens are used with pen needles that are sold separately. NEVER reuse pen needles.
Types of pen needles
• Conventional pen needles (without safety engineering) used by self-injecting patients . Pen needles are sterile and can only be used once .
• Safety-engineered pen needles used by healthcare providers (this example shows protective shields at both ends of the pen needle after use) .
The anatomy of the medication pen
15
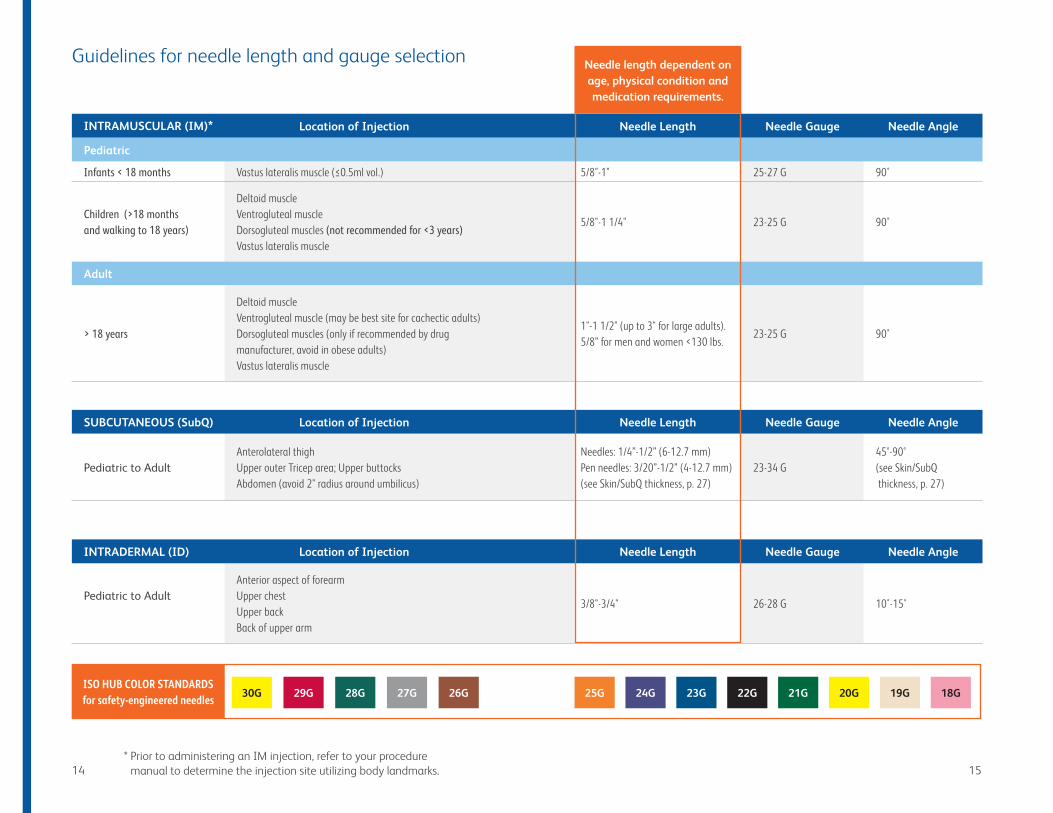
30G 29G 28G 27G 24G 23G 21G 20G 19G 18G26G 25G 22G
INTRAMUSCULAR (IM)* Location of Injection Needle Length Needle Gauge Needle Angle
Pediatric
Infants < 18 months Vastus lateralis muscle (≤0.5ml vol.) 5/8"-1" 25-27 G 90˚
Children (>18 months and walking to 18 years)
Deltoid muscle Ventrogluteal muscle Dorsogluteal muscles (not recommended for <3 years) Vastus lateralis muscle
5/8"-1 1/4" 23-25 G 90˚
Adult
> 18 years
Deltoid muscle Ventrogluteal muscle (may be best site for cachectic adults) Dorsogluteal muscles (only if recommended by drug manufacturer, avoid in obese adults) Vastus lateralis muscle
1"-1 1/2" (up to 3" for large adults). 5/8” for men and women <130 lbs.
23-25 G 90˚
SUBCUTANEOUS (SubQ) Location of Injection Needle Length Needle Gauge Needle Angle
Pediatric to AdultAnterolateral thigh Upper outer Tricep area; Upper buttocks Abdomen (avoid 2" radius around umbilicus)
Needles: 1/4”-1/2” (6-12.7 mm) Pen needles: 3/20”-1/2” (4-12.7 mm) (see Skin/SubQ thickness, p. 27)
23-34 G45°-90° (see Skin/SubQ thickness, p. 27)
INTRADERMAL (ID) Location of Injection Needle Length Needle Gauge Needle Angle
Pediatric to Adult Anterior aspect of forearm Upper chest Upper back Back of upper arm
3/8"-3/4" 26-28 G 10˚-15˚
14
Guidelines for needle length and gauge selection
* Prior to administering an IM injection, refer to your procedure manual to determine the injection site utilizing body landmarks .
Needle length dependent on age, physical condition and medication requirements.
ISO HUB COLOR STANDARDS for safety-engineered needles

It is strongly recommended that healthcare workers maintain and follow their facility’s guidelines for aseptic medication preparation and use safety-engineered devices to decrease the risk of a needlestick injury after use and minimize exposure to blood/body fluid .
17
Preparation
Considerations Before Device AssemblyThere are several factors that must be considered before gathering needles, syringes, and preparing the medication for administration . These factors include:
Medication
The Five Rights – To avoid medication errors, healthcare workers should always verify they are working with the:
In addition, a “Sixth” Right also helps to reduce medication errors: the right documentation .
Patient Assessment: Reassess patient for any changes in status .
• right medication• right dose
• right patient• right time
• right route of administration
Preparation

Assembling devices and equipment
In preparation for an injection, it is essential to assemble all the devices and equipment first at a clean work area . This generally includes:
• Medication order
• Alcohol swabs
• Sharps disposal container
• Medication
• Gloves
• Syringe and needle of appropriate size
18
Preparing the devices and equipment
1. After the equipment has been assembled, perform hand hygiene . Medications are usually supplied as a liquid in a single-dose ampule, vial or multi-dose vial . A single-dose vial is intended for use in a single patient . Do not administer medications from single-dose vials to multiple patients . A multi-dose vial contains more than one dose of medication . Multi-dose vials should be dedicated to a single patient whenever possible . If multi-dose vials are used, both the needle and syringe used to access the multi-dose vial must be sterile . Occasionally, they are supplied in a single-dose vial in powder form, which has to be reconstituted with either sterile water or saline .
2. Before opening, read the information on the syringe and needle packages . Verify that length and gauge are correct . Check that the seals have not been broken; sterility is assured only if the packages are unopened and undamaged .
3. Open the syringe and needle packages (Fig .1) . If the syringe and needle are not one unit, connect the syringe tip to the hub of the needle . Always ensure a secure connection between the needle and syringe . Avoid contamination by not touching the hub of the needle or tip of the syringe .
Proper Aseptic Technique:
Open the packages by holding the peel tabs, and peel them back only enough to expose the hub of the needle (Fig . 1) or the plunger rod of the syringe (Fig . 2) .
Fig.1
If presenting to a sterile field or performing a sterile transfer, be sure to peel the tabs back far enough to allow for easy access or release of the product . If necessary, you may open the packages but leave the products inside of them . Do not remove the syringe or needle from the sterile package and place on a non-sterile surface . This will reduce the likelihood of touch contamination . It will also reduce the potential for contamination of the fluid path .
Connect the hub of the needle to the tip of the syringe using a clockwise twisting motion (Fig . 3) . If using a luer slip tip syringe, be sure to apply force to the needle hub when twisting to ensure a secure fit .
Checking the medication
It is essential to:
1. Check medication against the medication order .
2. Check time and date the medication is to be given and that it is for the correct patient .
3. Check medication and diluent (if required) to ensure integrity (ie ., not cloudy or discolored, no particulate matter) .
4. Check expiration date and concentration of medication (Fig . 4) .
Passive recapping
If recapping is necessary for medication transport, it is preferred that clinicians use a one-handed technique .
The one-handed scoop technique uses the needle itself to pick up the needle shield, and then the shield is pushed up against a hard surface to ensure a tight fit onto the device .
If a hard surface is not available, when the cap covers the needle completely, use the other hand to secure the cap on the needle hub . Be careful to handle the cap at the bottom only (near the hub) .
Never use two hands to begin the needle recapping process (Fig . 5) .
Fig.2
Fig.3
Fig.4
Fig.5
Devices and equipment
19

VialA blunt fill needle is designed to reduce the potential for needlestick injuries .
20
Ampule A blunt filter needle prevents unwanted ampule particulates from entering the syringe .
For medication preparation. Not for skin injection.
For medication preparation. Not for skin injection.
* Though most diluents come in vials, they will occasionally be packaged in ampules. Please follow instructions accordingly.
From an ampule or a multi-dose vial
Vial Ampule
1. Read label on vial/ampule, confirm correct medication/fluid and concentration .
2. After removing vial cap, clean stopper with alcohol swab .
Tap head of ampule to unseat any fluid lodged at top .
3. Remove needle shield from a blunt fill needle .
Clean neck with alcohol swab; holding the head of the ampule with swab, snap the neck open . Discard ampule head and swab in sharps collector .
4.
Draw into the syringe a volume of air equal to the amount of medication/fluid needed . Being careful to avoid touching the needle on any surface (to maintain sterility), insert the needle into the stopper and inject air .
Remove needle shield from a blunt filter needle .
5. Hold vial upside down and draw back syringe plunger to correct dosage .
Tilt ampule down, and insert needle tip into opening . Draw back syringe plunger to correct dosage .
Clean the diluent and medication vial stoppers with an alcohol pad. Draw the diluent into the syringe as you would fill a syringe from a vial. Then inject diluent into powdered medication vial.* After passively recapping needle, invert vial until all powder is dissolved. Use caution when inverting vial; some medications should not be agitated vigorously. Clean vial stopper again, uncap needle and pierce stopper a second time to withdraw the prescribed dose.
6. Withdraw needle . Passively recap the needle, then remove and dispose properly; attach a hypodermic safety needle of appropriate size .
7. Gently tap side of syringe to dislodge air bubbles .
8. Gently depress plunger to expel air from syringe .
9. Recheck that correct dose has been drawn into syringe .
Filling the syringe
21

It is strongly recommended that healthcare workers maintain and follow their facility’s guidelines for aseptic medication preparation and use safety-engineered devices to reduce the risk of needlestick injury after use and to minimize exposure to blood/body fluid .
Injection Routes• Intramuscular• Subcutaneous• Intradermal
23
Administration
22
Administration
24
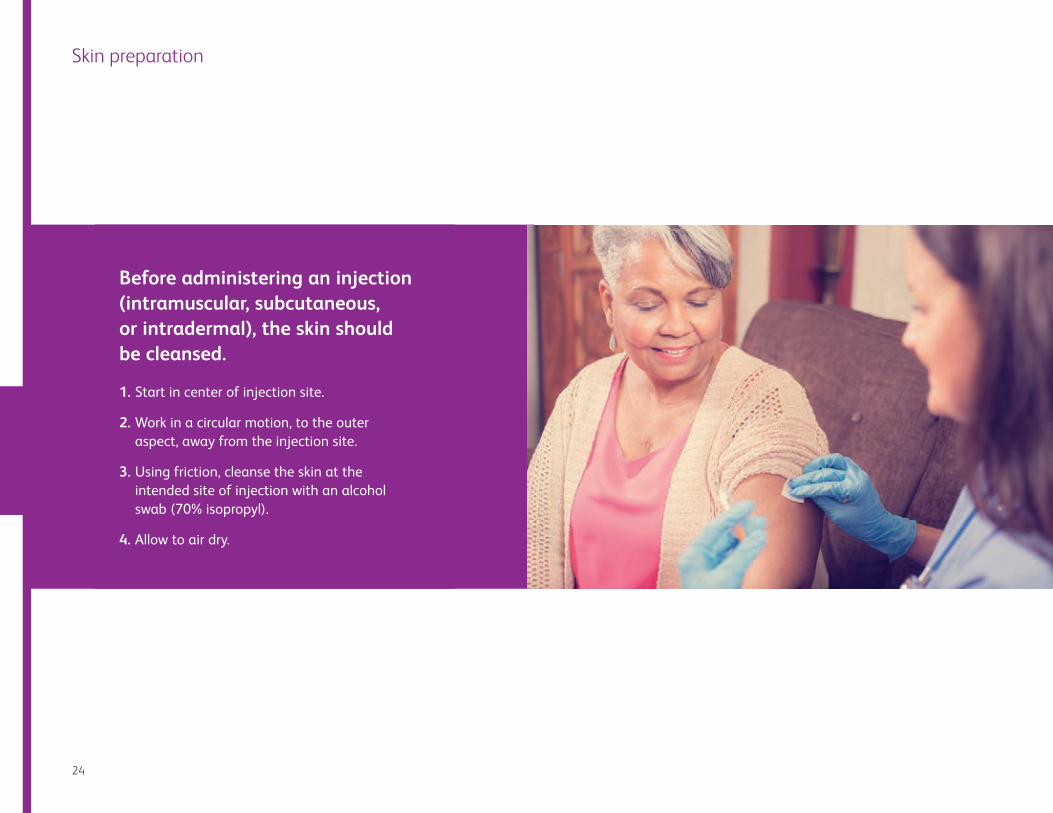
Skin preparation
Before administering an injection (intramuscular, subcutaneous, or intradermal), the skin should be cleansed.
1. Start in center of injection site.
2. Work in a circular motion, to the outer aspect, away from the injection site.
3. Using friction, cleanse the skin at the intended site of injection with an alcohol swab (70% isopropyl).
4. Allow to air dry.

dermis
subcutaneoustissue
muscle
Injection routes
Intramuscular (IM):
Subcutaneous (SubQ):
Intradermal (ID)
An injection into the muscle tissue (typically less than 3 mL). Large volumes require larger muscles (e.g., vastus lateralis), while smaller volumes (up to 1 mL) can be administered in smaller muscles (e.g., deltoid).
Muscle sites have a good blood supply, which helps the medication to be absorbed more rapidly than by the subcutaneous route. The intramuscular route is also used if a medication is likely to irritate subcutaneous tissue. Some of the drugs given by this route are antibiotics, vitamins, vaccines and fertility drugs.
An injection into the fatty layer which lies beneath the dermis. This route is used for small volume injections (≤1 mL) and when the medication is not likely to irritate or damage the subcutaneous tissue. The blood supply to the subcutaneous tissue is less than in muscle tissue; therefore, the absorption rate is generally slower than with IM injections. This is desirable for some medications (e.g., insulin).
An injection into the dermis. Only a very small volume of fluid is given (0.1 mL or less).
This route is used to test a patient’s sensitivity to allergens or for tuberculin testing.* It is also used for administering local anesthetics.
* Due to the risk of anaphylactic reaction, emergency medication and equipment should be available.
Before you start
Subcutaneous (SubQ):
Intradermal (ID)
Intramuscular (IM):
Intramuscular injections require identification of anatomical markers to assure proper placement. Important note: infants <18 months old should not receive an IM injection of >0.5 mL.
Vastus lateralis muscle: tolerates volumes up to 5 mL in adults. Maximum volume for ages between 3-13 years is 1.5 mL, 1 ½ - 3 years is 1 mL. <1 ½ years, 0.5 mL. Maximum needle length for children is 1 inch.
Deltoid muscle: used for volumes of ≤1mL in adults and 0.5 mL in children between 18 Risk: Proximal to the radial nerve and the brachial artery.
Ventrogluteal site: maximum volume is 3 mL in adults, 2mL for ages between 6-13 years, 1.5 mL for between 3-6 years, and 1 mL for ages between 1 ½ - 3 years. May be the safest and least painful IM injection site.
Dorsogluteal site: Not recommended unless required by drug manufacturer; do not use in children less than 3 years old. Maximum volume is 3 mL in adults, 2mL for ages between 6-13 years, and 1.5 mL for between 3-6 years. Risks: Proximal to the sciatic nerve, superior gluteal artery, and the possibility of injecting medication into the thick layer of subcutaneous tissue over the muscle.
Some patients (e.g., malnourished or elderly) may not have enough subcutaneous tissue for a SubQ injection. Check with prescriber to determine if an alternative route is acceptable.
Skin/Subcutaneous Thickness: Appropriate needle length and injection technique is dependent on the patient’s skin and subcutaneous fat thickness. Intramuscular injections can be avoided with the use of shorter needles.
Injection sites may have different absorption rates. With animal and human insulins, the abdomen has been shown to have the most rapid absorption, the upper arms intermediate, and the thigh and buttocks the slowest absorption. Rotating insulin injections within a site (at least 1” from previous injection) and using needles only once may avoid the development of lipodystrophy while maintaining a more predictable absorption.
If used, allow the alcohol from an alcohol swab to dry completely prior to injection.
Following administration, do not apply pressure or massage injection site.
Inject with the needle bevel up.
If a wheal, or bleb, does not appear during administration, the medication is being delivered into the subcutaneous tissue.
2726
dermis
subcutaneoustissue
muscle
dermis
subcutaneoustissue
muscle

Vastus lateralis muscleThe vastus lateralis site is located in the lateral middle third of the thigh between the greater trochanter and the knee. When injecting, lift the vastus lateralis muscle away from the bone. Note: the rectus femoris muscle is located in the anterior middle third of the thigh.
Ventrogluteal siteThe ventrogluteal site is located by placing the palm of the hand over the greater trochanter with the middle finger reaching toward the iliac crest and the index finger angled toward the anterior superior iliac spine, forming a ‘V.’ Inject within the center of the ‘V,’ below the anterior superior iliac crest.
Outer aspect of the upper thigh
Anterior aspect of the forearm Upper chest Upper back/Back of arm
Dorsogluteal siteThe dorsogluteal site is located above an imaginary line between the greater trochanter and the posterior superior iliac crest. The injection is administered laterally and superior to this imaginary line.
Deltoid muscle The thickest part of the deltoid muscle is located 1”-2” (1-3 fingerbreadths) below the lower edge of acromion process of the scapula over the midaxillary line.
Greater trochanter of femur
Lateral femoral condyle
middle third
of vastus lateralis muscle
Injection Site
Greater trochanter
Anterior superior iliac spine
Iliac crestInjection Site
Injection Site
Humerus
AxillaScapula
Clavicle Acromion process
Recommended Injection Technique (all sites)4- and 5mm (.157”-.2”) lengths should be inserted straight-in (90°) without a raised skin fold (skin pinch) in most patients. Young children and lean adults may also require a raised skin fold. 6mm (.24”) and longer: a raised skin fold should always be used. Thin patients may also require a 45° insertion with 6mm (.24”) and longer needles.
To avoid accidental needlestick - a raised skin fold should be wide (>1” between finger and thumb).
Injection sites (refer to pages 14 and15 for needle length)
Intramuscular (IM):
Subcutaneous (SubQ):
Intradermal (ID)
Posterior superior iliac spine
Greater trochanter
Injection Site
Imaginary line
2928
Outer aspect of the upper arm (not prefered site)
Abdomen — avoid injecting within 1-2" around the umbilicus
Upper buttocks

Spread the skin taut, and insert the needle with a darting motion at a 90° angle.
For IM injections of vaccines, aspiration of blood return is not recommended. If injecting Dorsugluteal Site Only: Pull back slightly on plunger. If blood appears in syringe, remove needle, dispose properly and prepare a new injection. Follow your facility’s protocol.
Inject medication slowly. Withdraw needle, and place sterile gauze firmly over site.
1 2 3 4
Engage safety mechanism on needle or syringe.
5
Insert the needle at a 90° or 45° angle.
Inject medication slowly. Withdraw needle, and place sterile gauze firmly over site.
1 2 3
Engage safety mechanism on needle or syringe.
4
If raised skin fold is used, avoid accidental needlesticks by maintaining a distance of >1” between your finger and thumb. Plus, the raised skin fold must be maintained throughout the injection until the needle is removed from the skin.
Spread the skin taut, and insert the needle tip at a 10-15° angle.
Inject medication slowly; a small fluid bleb (wheal) forms. If a wheal does not appear, it was administered in the subcutaneous tissue.
Withdraw needle, and place sterile gauze over site. Do not massage.
Engage safety mechanism on needle or syringe.
1 2 3 4
Dispose of properly. Record injection on medication administration record.
6
Dispose of properly. Record injection on medication administra-tion record.
5
Dispose of properly. Record injection on medication administra-tion record.
5
Please refer to hospital guidelines for Z track procedures.
90°90° Proper pinch
Improper pinch
Standard injection procedure
Intramuscular (IM):
Subcutaneous (SubQ):
Intradermal (ID)
3130
dermis
subcutaneoustissue
muscle

Each facility has its own policy and method for safe disposal of used needles, syringes, glass vials and ampules . To the extent consistent with a facility’s policies and the availability of proper disposal options, sharps should be disposed of as soon as possible after use . Universal precautions should always be applied .
Safe Use and Disposal of Sharps EquipmentSharps waste is a form of medical waste composed of used sharps, which include any device or object with the ability to puncture or lacerate the skin . Sharps waste is classified as biohazardous waste and must be carefully handled .
Common medical materials treated as sharps waste are:
33
Disposal
• Needles• Syringes• Glass (ampules)
• Vials (empty/partial)• Razor blades• Surgical blades
32
Disposal
34
Safe use and disposal of sharps
Care must be exercised during the use and disposal of sharps . Good practice in the disposal of sharps includes the following key points:
• All staff must dispose of sharps correctly .
• The person using the sharp is responsible for disposing of it in an approved sharps disposal container . The facility is responsible for ensuring the disposal of the container .
• The sharps container should be at the place where sharps are used so that they can be disposed of immediately after use .
• Sharps containers should NEVER be overfilled .
• Used needles should NEVER be recapped, cut or bent .
• All incidents or accidents involving needlestick injuries and/or accidents involving body fluids should be recorded and reported in line with local policies .
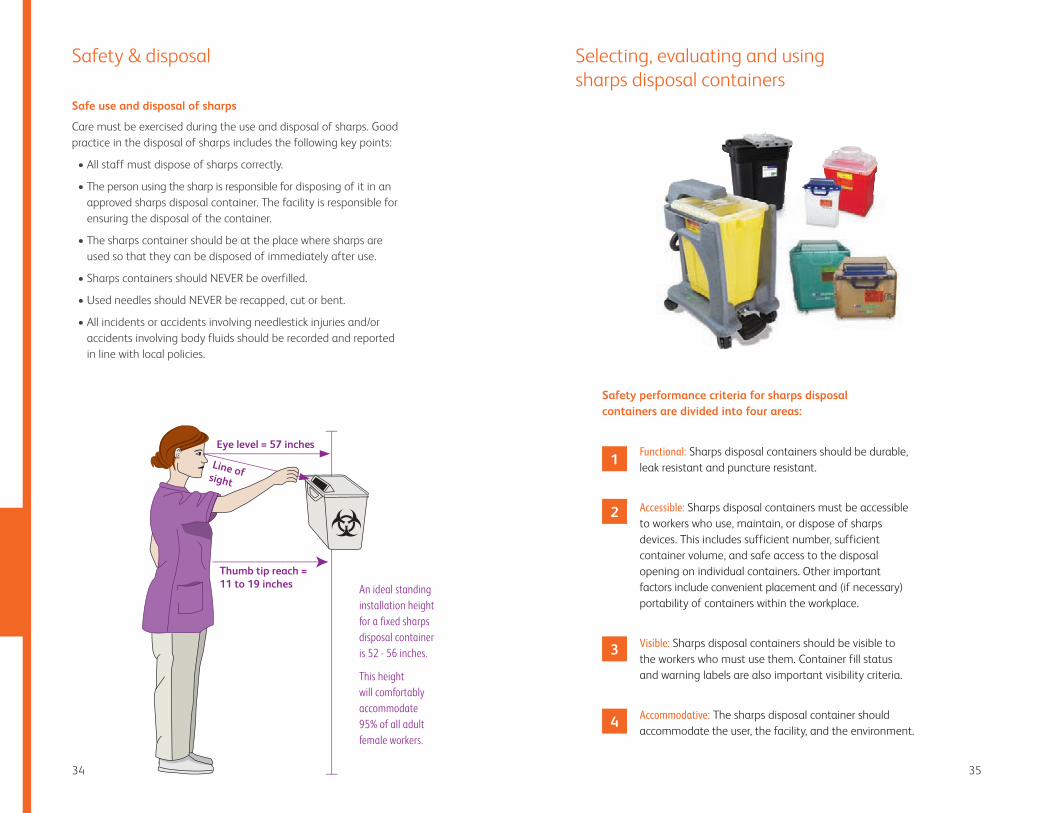
Eye level = 57 inches
Thumb tip reach = 11 to 19 inches
Line of sight
An ideal standing installation height for a fixed sharps disposal container is 52 - 56 inches.
This height will comfortably accommodate 95% of all adult female workers.
35
Selecting, evaluating and using sharps disposal containers
Functional: Sharps disposal containers should be durable, leak resistant and puncture resistant .
Accessible: Sharps disposal containers must be accessible to workers who use, maintain, or dispose of sharps devices . This includes sufficient number, sufficient container volume, and safe access to the disposal opening on individual containers . Other important factors include convenient placement and (if necessary) portability of containers within the workplace .
Visible: Sharps disposal containers should be visible to the workers who must use them . Container fill status and warning labels are also important visibility criteria .
Accommodative: The sharps disposal container should accommodate the user, the facility, and the environment .
Safety & disposal
Safety performance criteria for sharps disposal containers are divided into four areas:
1
2
3
4

36
References
37
Aronson R, Gibney MA, Oza K, Berube J, Kassler-Taub K, Hirsch L. Insulin pen needles: effects of extra-thin wall needle technology on preference, confidence, and other patient ratings. Clin Ther. 2013;35(7):923-933 e4.
Berman A, Snyder S. Skills in clinical nursing. 7th ed. Upper Saddle River, NJ: Prentice Hall; 2011.
Craven R, Himie C, Jensen S. Fundamentals of nursing: human health and function. 7th ed. Philadelphia, PA: Lippincott Williams & Wilkins; 2012.
Frid AH, Kreugel G, Grassi G, et al. New insulin delivery recommendations. Mayo Clin Proc. 2016;91(9):1231-1255.
Gibney M, Arce C, Byron K, et al. Skin and subcutaneous adipose layer thickness in adults with diabetes at sites used for insulin injections: implications for needle length recommendations. Curr Med Res Opin. 2010;26(6):1519-1530.
Hirsch L, Gibney M, Berube J, et al. Impact of a modified needle tip geometry on penetration force as well as acceptability, preference, and perceived pain in subjects with diabetes. J Diabetes Sci Technol. 2012;6(2):328-335.
Institute for Safe Medication Practices. The five rights. ISMP Safe Medication Alert. April 7, 1999.
Kroger T, Sumaya C, Pickering L, et al. General recommendations on immunization. MMWR. December 1, 2006;55(RR15):1-48.
Lo Presti D, Ingegnosi C, Strauss K. Skin and subcutaneous thickness at injecting sites in children with diabetes: ultrasound findings and recommendations for giving injection. Ped Diab 2012;13(7):525-33.
Potter P, Perry A, Stockert P, et al. Basic nursing. 7th ed. Mosby Inc., an affiliate of Elsevier; 2010.
Buchanan E, McKinnon B, Scheckelhoff D, et al. Principles of sterile product preparation. Bethesda, MD: American Society of Health-Systems Pharmacists; 2004.
Smith S, Duell D, Martin B. Photo guide of nursing skills. Upper Saddle River, NJ: Prentice Hall; 2001.
Springhouse Corporation. Nurse’s clinical guide: medication administration. Philadelphia, PA: Lippincott Williams & Wilkins; 2000.
Training for Development of Innovative Control Technologies Project. ©June 1993 – August 1998, Trauma Foundation Bldg. #1, Rm. #300, San Francisco General Hospital, 1001 Potrero Ave, San Francisco, CA 94110, http://www.tdict.org.
United States Department of Health and Human Services, Public Health Service, Centers for Disease Control and Prevention, National Institute for Occupational Safety and Health. Selecting, evaluating and using sharps disposal containers. Atlanta, GA: Centers for Disease Control and Prevention; January 1998: Publication 97-111.
Appendix
In November 2000, the Needlestick Safety and Prevention Act (NSPA) was signed into law, requiring that healthcare providers comply with a variety of actions designed to improve the occupational safety of clinicians. The law became effective in April 2001.
The law requires employers to evaluate, select, and use safety-engineered medical devices to eliminate or minimize occupational exposure to bloodborne pathogens. This would include all devices used for skin injections. Moreover, the law intends that frontline healthcare workers are to be part of the evaluation and selection process.
To better prepare clinicians to participate in the process, and to provide a safer work environment, the following pages are designed to explain the differences in the types of safety- engineered technologies available for hypodermic syringes and needles.
In addition to converting conventional devices to those with safety-engineered features, there are other steps clinicians can take to minimize the potential for needlesticks:
• Eliminate the unnecessary use of needles on “needleless” IV systems
• Implement safety-engineered prefilled syringes when possible
3938
Needlestick safety and prevention act

40 41
Safety-engineered device technologies
Retracting Syringe
• Syringe-based safety feature
• User retracts needle into syringe after use
• Devices are spring-activated or manually retracted
• Available with removable needles or permanently attached needles
Shown: BD Integra™ Syringe
Shielding Needle
• Needle-based safety feature
• Can be used with any conventional syringe
• Safety mechanism slides over needle after use
• Devices have assisted or fully manual activation
• Available with removable needles and permanently attached needles
Shown: BD SafetyGlide™ Needle
Pivoting Needle
• Needle-based safety feature
• Can be used with any conventional luer lock syringe
• Safety shield pivots around hub to lock onto needle
• Fully manual activation
• Available with removable needles
Shown: BD Eclipse™ Needle
Sliding Shield Syringe
• Syringe-based safety feature
• Sleeve slides over needle and locks
• Fully manual activation
• Available with removable needles or permanently attached needles
Shown: BD Safety-Lok™ Syringe
42
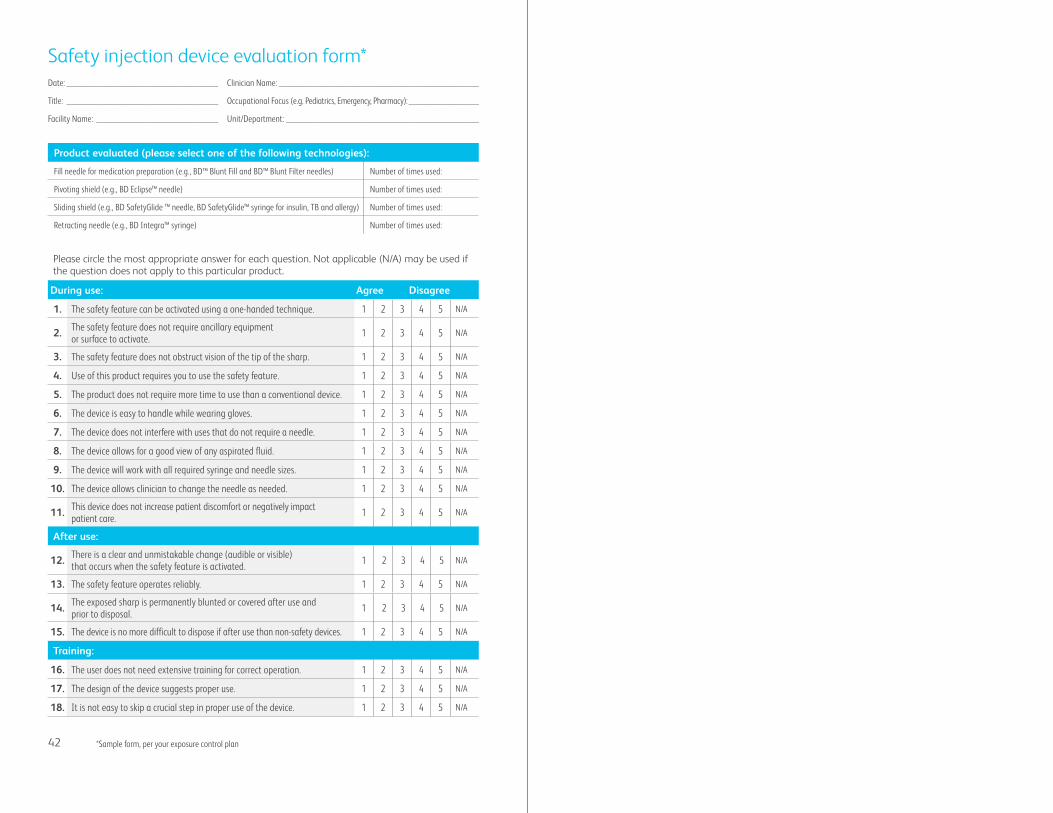
Please circle the most appropriate answer for each question . Not applicable (N/A) may be used if the question does not apply to this particular product .
During use: Agree Disagree
1. The safety feature can be activated using a one-handed technique. 1 2 3 4 5 N/A
2. The safety feature does not require ancillary equipment or surface to activate. 1 2 3 4 5 N/A
3. The safety feature does not obstruct vision of the tip of the sharp. 1 2 3 4 5 N/A
4. Use of this product requires you to use the safety feature. 1 2 3 4 5 N/A
5. The product does not require more time to use than a conventional device. 1 2 3 4 5 N/A
6. The device is easy to handle while wearing gloves. 1 2 3 4 5 N/A
7. The device does not interfere with uses that do not require a needle. 1 2 3 4 5 N/A
8. The device allows for a good view of any aspirated fluid. 1 2 3 4 5 N/A
9. The device will work with all required syringe and needle sizes. 1 2 3 4 5 N/A
10. The device allows clinician to change the needle as needed. 1 2 3 4 5 N/A
11. This device does not increase patient discomfort or negatively impact patient care. 1 2 3 4 5 N/A
After use:
12. There is a clear and unmistakable change (audible or visible) that occurs when the safety feature is activated. 1 2 3 4 5 N/A
13. The safety feature operates reliably. 1 2 3 4 5 N/A
14. The exposed sharp is permanently blunted or covered after use and prior to disposal. 1 2 3 4 5 N/A
15. The device is no more difficult to dispose if after use than non-safety devices. 1 2 3 4 5 N/A
Training:
16. The user does not need extensive training for correct operation. 1 2 3 4 5 N/A
17. The design of the device suggests proper use. 1 2 3 4 5 N/A
18. It is not easy to skip a crucial step in proper use of the device. 1 2 3 4 5 N/A
Safety injection device evaluation form*Date: _________________________________________
Title: _________________________________________
Facility Name: _________________________________
Product evaluated (please select one of the following technologies):
Fill needle for medication preparation (e.g., BD™ Blunt Fill and BD™ Blunt Filter needles) Number of times used:
Pivoting shield (e.g., BD Eclipse™ needle) Number of times used:
Sliding shield (e.g., BD SafetyGlide ™ needle, BD SafetyGlide™ syringe for insulin, TB and allergy) Number of times used:
Retracting needle (e.g., BD Integra™ syringe) Number of times used:
Clinician Name: ______________________________________________________
Occupational Focus (e.g. Pediatrics, Emergency, Pharmacy): ___________________
Unit/Department: ____________________________________________________
*Sample form, per your exposure control plan

BD, Franklin Lakes, NJ, 07417, USA
bd.com
© 2017 BD. BD and the BD Logo are trademarks of Becton, Dickinson and Company. BD-2125 (3/17)