preface - learning resource center -...
TRANSCRIPT

PREFACE The Integrated Science Student Worksheet and Maintenance Manual are primarily used as instructional materials by the participants of the Regional Out Training Workshop on the Use and Care of Science Equipment with Content Integration. This covers only the equipment for Integrated Science which was delivered to the public secondary schools who were beneficiaries of the Science Equipment Project implemented by the DepEd NSTIC.
The main content of the manual is focused on the above-mentioned science
equipment. The manual has two major components, namely: (1) the student worksheets that deal with the functionality of application of the science equipment on the laboratory activities; and (2) the maintenance aspect that presents the procedural steps in conducting simple maintenance of the science equipments for their sustainability. These components make the manual inclusive and comprehensive.
The first component which is the student worksheet is user-friendly and experiment
based. This will help facilitate the teaching-learning process. The manual was initially prepared by the NSTIC personnel and presented for further
suggestions and comments to the participants of the Regional Science Trainers and a representative from the Central Office. Finally, the Regional Science Supervisors, and the participants of the two-day Consultative Conference held in Lahug, Cebu City validated the contents of the manual.

ACKNOWLEDGEMENT The management and staffs of DepEd-National Science Teaching Instrumentation Center (NSTIC) would like to acknowledge and extend their heartfelt gratitude to the following persons for the publication of the Student Worksheet and Maintenance Manual in Science I (Integrated Science): Br. Armin A. Luistro FSC, Secretary of Education, for his vital leadership, encouragement and support of the Science Equipment Project. Hon. Yolanda S. Quijano, Undersecretary, Programs and Projects, Hon. Francisco M. Varela, Undersecretary for Finance and Administration and Hon. Rizalino D. Rivera, Undersecretary for Regional Operations, for their utmost support to the project. Dr. Lolita M. Andrada, BSE Director for the inputs of BSE through her representative. The Regional Directors for their continuous support and dedication. The Regional Science Supervisors, Division Science Supervisors, and Regional Trainers for their valuable contributions and suggestions of the contents of the manual. The personnel of the Research and Development and Production Divisions of NSTIC. With special recognition to Engr. Leo Navarro, Mr. Danilo Lisondra, Engr. Virgilio B. Agot and Mr. Nicolas Entrena for their conscientious efforts in the initial preparation and the edition of the Student Worksheet and Maintenance Manual for Integrated Science. Much more, their intellectual inputs to the participants regarding the use and care of science equipment with content integration during the Training of Trainers and the Consultative Conference both held at DepEd Ecotech Center, Sudlon, Lahug, Cebu City. The personnel of NSTIC Administrative Division for their cooperation and support in the preparation and completion of the manual.
NSTIC WRITING, EDITORIAL TEAM, and SUPPORT STAFF
Editorial Team : Dir. Raul C. La Rosa, Dr. Fernando T. Po, Engr. Reginald B. Luz
Roque Writing Team : Science I – Leo M. Navarro, Danilo R. Lisondra, Virgilio B. Agot Science II – Gilbert O. Laxina Jr., Jaymar N. Arioja Science III – Maria Tita V. Valenzona, Jocelyn D. Garciano, Ruben C. Zaragoza Science IV – Marvin S. Maquilas, Terencio G. Taneo, Alejandro B. Ybañez Administration and Finance Division : Engr. Reginald B. Luz Roque & Staff Production Division : Engr. Ruben C. Zaragoza and Staff Graphic Artist : Nicolas B. Entrena

Table of Contents
Page PART I Student Worksheets
I Measurement of Mass and Weight .......................................................... 1 II Volume Measurement – 1 ........................................................................ 5 III Volume Measurement – 2 ........................................................................ 7 IV Density of Matter ...................................................................................... 9 V Uniform Speed and Velocity ...................................................................... 12 VI Uniform Acceleration ................................................................................ 14 VII Free Fall ..................................................................................................... 16 VIII Capillarity and Surface Tension ................................................................. 18IX Newton’s First Law of Motion ................................................................... 20 X Newton’s Second Law of Motion ............................................................... 22 XI Newton’s Third Law of Motion .................................................................. 23 XII Momentum ................................................................................................ 24 XIII Factors Influencing Friction Force .............................................................. 26XIV Heat Transfer ............................................................................................. 29 XV Effect of Heat on Matter ............................................................................ 32 XVI Doing Work with Machines ....................................................................... 35 XVII Efficiency of a Machine .............................................................................. 38 XVIII Strength of Earthquakes ............................................................................ 40XIX Volcanoes of the Philippines ..................................................................... 45 XX Earth’s Formation of Rocks ........................................................................ 46 XXI Weather Observation ................................................................................ 52 XXII Constellations ............................................................................................ 63
XXIII The Telescope............................................................................................. 64 References ........................................................................ ........................................... 67Appendix A Glass Tube Preparation for Experiment Setup .......................................... 69 Appendix B Installation and Operation of a Bunsen Burner ......................................... 70 PART II Repair and Maintenance Manual
I Laboratory Glass Wares ............................................................................. 75 II Triple Beam Balance................................................................................... 78 III Terrestrial Globe ........................................................................................ 82 IV Aneroid Barometer .................................................................................... 84 V Digital Stopwatch ....................................................................................... 86 VI Seismograph Model ................................................................................... 87 VII Anemometer with Wind Vane ................................................................... 89 VIII Alcohol Burner ........................................................................................... 91 IX Bunsen Burner ........................................................................................... 92 X Celestial Globe Model ................................................................................ 93 XI Connecting Wires ...................................................................................... 94 XII Ring and Ball Apparatus ............................................................................. 95 XIII Solar System Model ................................................................................... 96 XIV Magnetic Compass .................................................................................... 97 XV Sun‐Earth‐Moon Model ............................................................................. 98 XVI Telescope ................................................................................................... 99
1
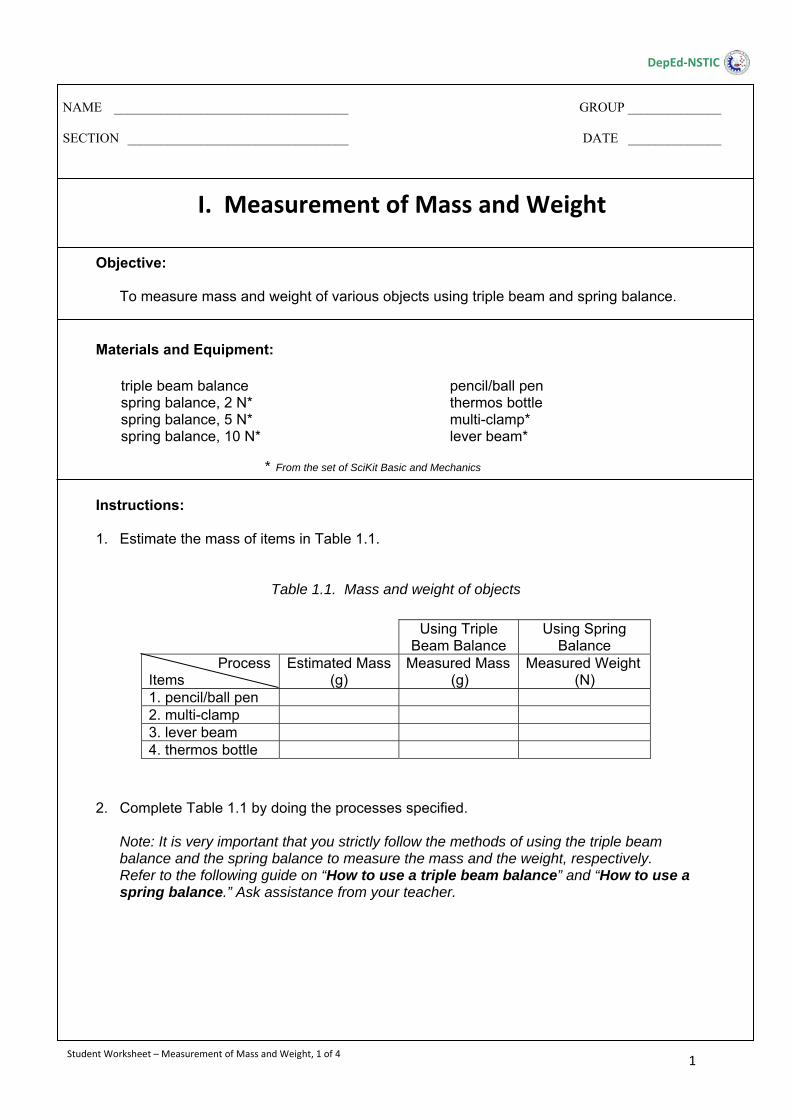
Objective: To measure mass and weight of various objects using triple beam and spring balance.
Materials and Equipment:
triple beam balance spring balance, 2 N* spring balance, 5 N* spring balance, 10 N*
pencil/ball pen thermos bottle multi-clamp* lever beam*
Instructions: 1. Estimate the mass of items in Table 1.1.
Table 1.1. Mass and weight of objects
2. Complete Table 1.1 by doing the processes specified.
Note: It is very important that you strictly follow the methods of using the triple beam balance and the spring balance to measure the mass and the weight, respectively. Refer to the following guide on “How to use a triple beam balance” and “How to use a spring balance.” Ask assistance from your teacher.
Using Triple Beam Balance
Using Spring Balance
Process Items
Estimated Mass (g)
Measured Mass (g)
Measured Weight (N)
1. pencil/ball pen 2. multi-clamp 3. lever beam 4. thermos bottle
I. Measurement of Mass and Weight
NAME ___________________________________ GROUP ______________
SECTION _________________________________ DATE ______________
DepEd‐NSTIC
Student Worksheet – Measurement of Mass and Weight, 1 of 4
* From the set of SciKit Basic and Mechanics
2
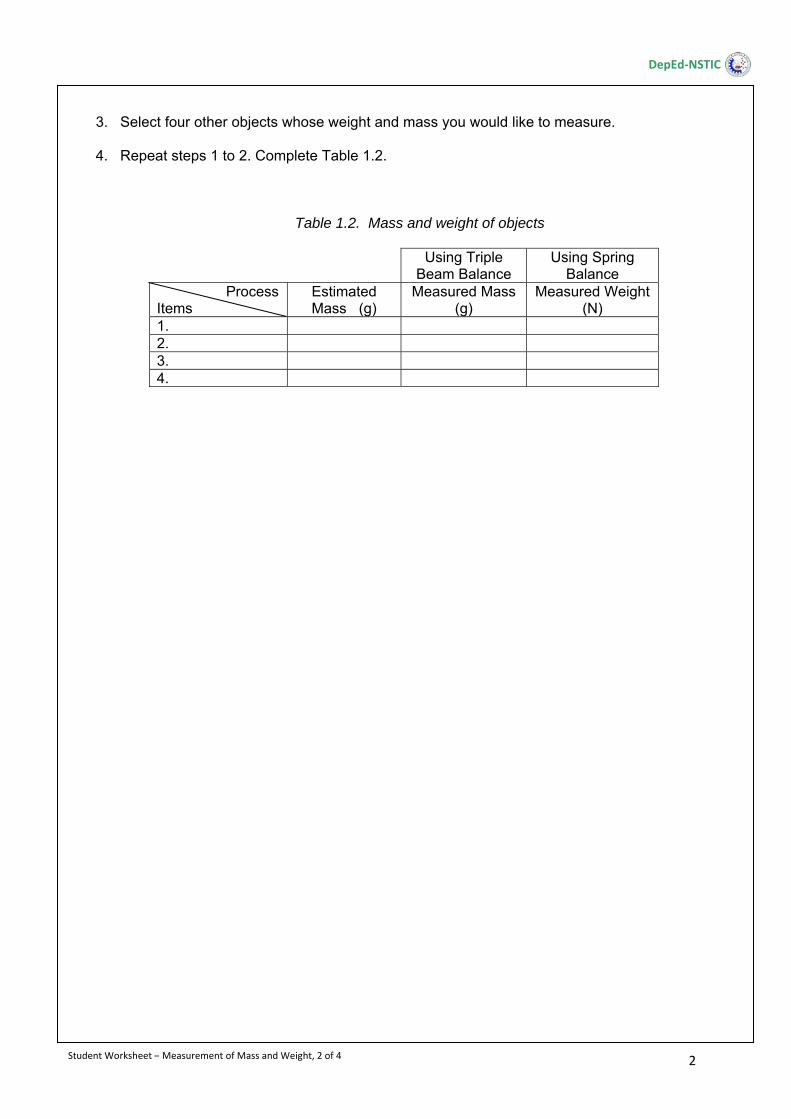
3. Select four other objects whose weight and mass you would like to measure. 4. Repeat steps 1 to 2. Complete Table 1.2.
Table 1.2. Mass and weight of objects
Using Triple Beam Balance
Using Spring Balance
Process Items
Estimated Mass (g)
Measured Mass (g)
Measured Weight (N)
1. 2. 3. 4.
Student Worksheet – Measurement of Mass and Weight, 2 of 4
DepEd‐NSTIC
3
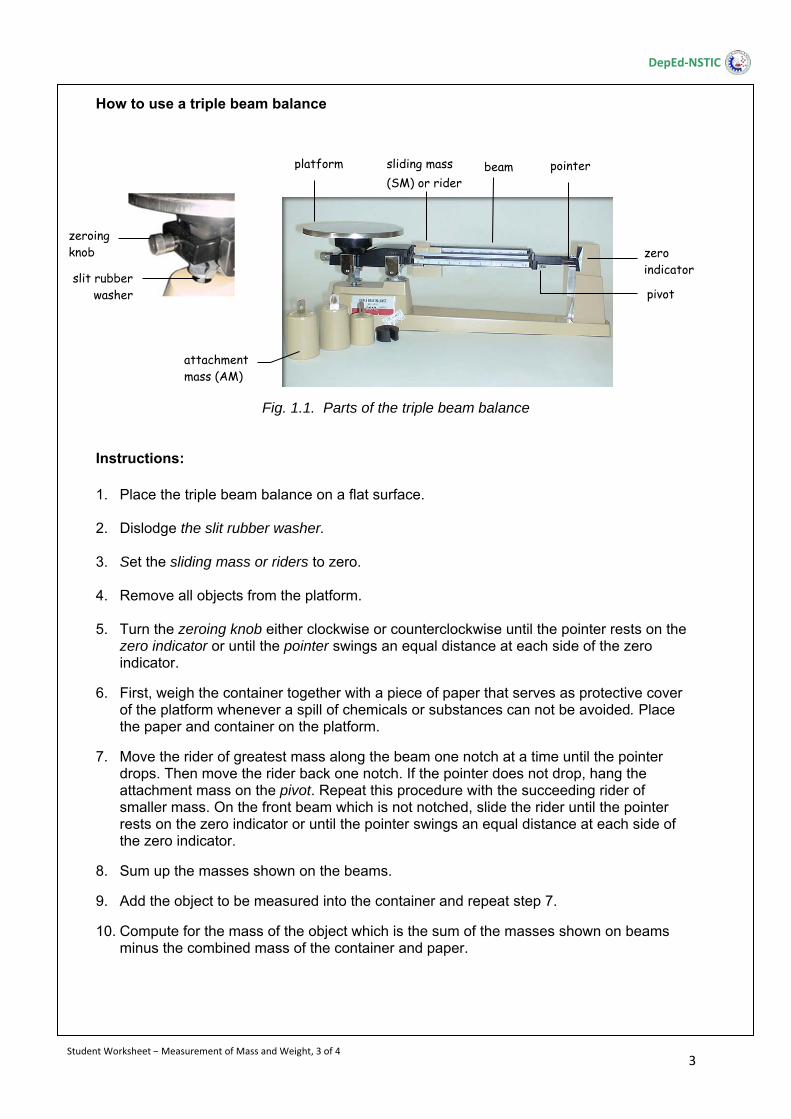
How to use a triple beam balance
Fig. 1.1. Parts of the triple beam balance Instructions: 1. Place the triple beam balance on a flat surface.
2. Dislodge the slit rubber washer.
3. Set the sliding mass or riders to zero.
4. Remove all objects from the platform.
5. Turn the zeroing knob either clockwise or counterclockwise until the pointer rests on the
zero indicator or until the pointer swings an equal distance at each side of the zero indicator.
6. First, weigh the container together with a piece of paper that serves as protective cover of the platform whenever a spill of chemicals or substances can not be avoided. Place the paper and container on the platform.
7. Move the rider of greatest mass along the beam one notch at a time until the pointer drops. Then move the rider back one notch. If the pointer does not drop, hang the attachment mass on the pivot. Repeat this procedure with the succeeding rider of smaller mass. On the front beam which is not notched, slide the rider until the pointer rests on the zero indicator or until the pointer swings an equal distance at each side of the zero indicator.
8. Sum up the masses shown on the beams.
9. Add the object to be measured into the container and repeat step 7.
10. Compute for the mass of the object which is the sum of the masses shown on beams minus the combined mass of the container and paper.
platform
slit rubber washer
sliding mass (SM) or rider
beam pointer
zero indicator
attachment mass (AM)
pivot
zeroing knob
Student Worksheet – Measurement of Mass and Weight, 3 of 4
DepEd‐NSTIC

4
Example. Measuring mass
Fig. 1.2. Position of sliding masses and attachment mass in a balance state to the combined mass of paper, container, and water
Table 1.3. Combined mass of paper, container, and water
How to use a spring balance in measuring weight 1. Set the spring balance to zero: a. Hold the spring balance on the outer tube in an upright position. Refer to Figure 1.3. b. Turn the zero adjustment knob until the zero mark is at the reference scale. 2. Hang the object on its hook as illustrated in Figure 1.4 and take the reading.
Object
Sliding Mass1 (SM-1)
g
Sliding Mass-2 (SM-2)
g
Sliding Mass-3 (SM-3)
g
Attachment Mass (AM)
g
Total Mass (SM-1+SM-2 +SM-3+AM)
g
(paper + container + water)
500 0 5 500 1005
SM-1 SM-2 SM-3
Fig. 1.4
Student Worksheet – Measurement of Mass and Weight, 4 of 4
AM
Fig.1.3. Spring balance
hanger
outer tube
hook
scale reading reference (tip of the outer tube)
zero adjustment knob
DepEd‐NSTIC
5
Objectives:
1. To measure the volume of liquid using a ruler. 2. To measure the volume of liquid using a graduated cylinder. 3. To distinguish between the precision and accuracy of measurements.
Materials and Equipment:
ruler or equivalent (e.g., meter stick) graduated cylinder, 100 mL** glass funnel
beaker, 250 mL medicine dropper water
Instructions:
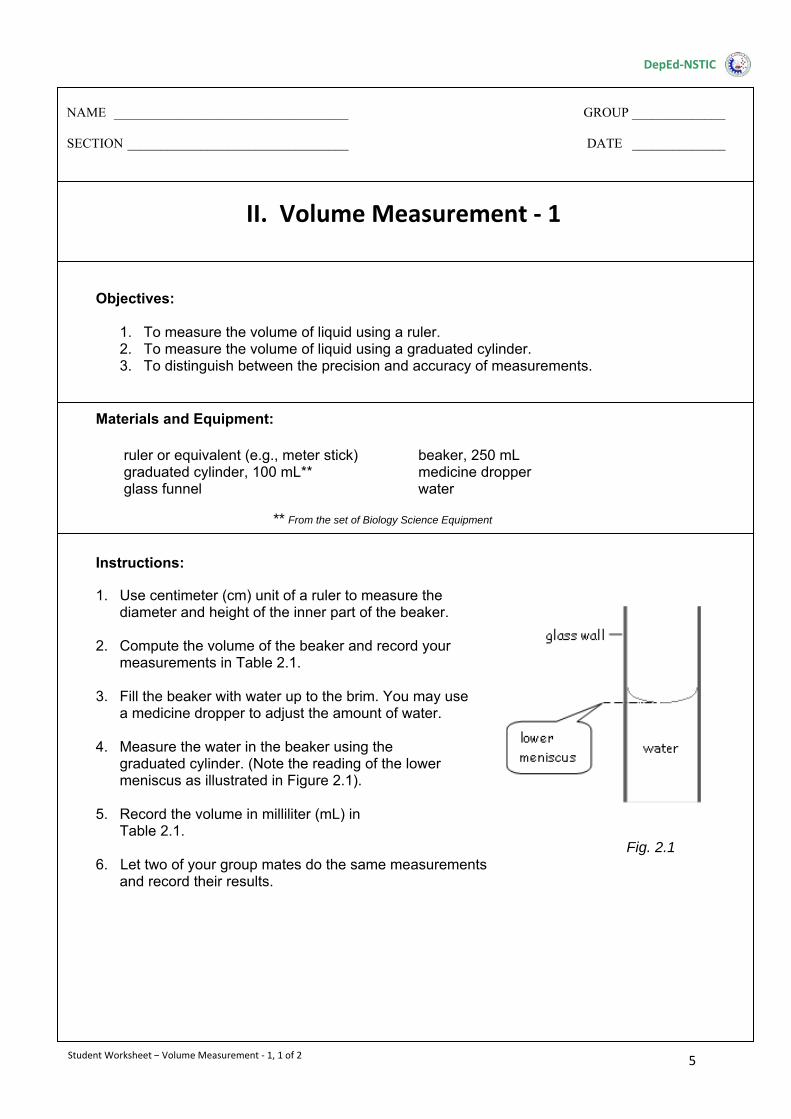
1. Use centimeter (cm) unit of a ruler to measure the diameter and height of the inner part of the beaker.
2. Compute the volume of the beaker and record your measurements in Table 2.1.
3. Fill the beaker with water up to the brim. You may use a medicine dropper to adjust the amount of water.
4. Measure the water in the beaker using the graduated cylinder. (Note the reading of the lower meniscus as illustrated in Figure 2.1).
5. Record the volume in milliliter (mL) in Table 2.1.
6. Let two of your group mates do the same measurements and record their results.
II. Volume Measurement ‐ 1
NAME ___________________________________ GROUP ______________
SECTION _________________________________ DATE ______________
DepEd‐NSTIC
Student Worksheet – Volume Measurement ‐ 1, 1 of 2
Fig. 2.1
** From the set of Biology Science Equipment
6
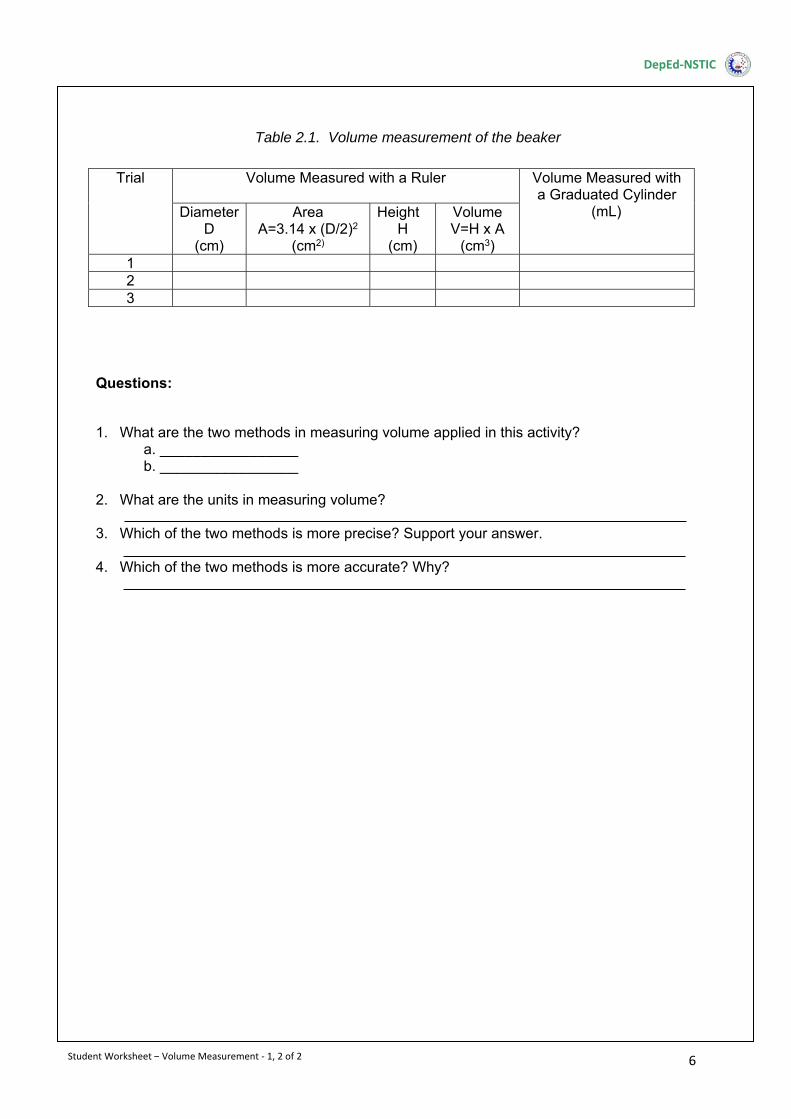
Table 2.1. Volume measurement of the beaker
Questions:
1. What are the two methods in measuring volume applied in this activity?
a. _________________ b. _________________
2. What are the units in measuring volume?
3. Which of the two methods is more precise? Support your answer.
4. Which of the two methods is more accurate? Why?
Trial Volume Measured with a Ruler
Volume Measured with a Graduated Cylinder
(mL)
DiameterD
(cm)
Area A=3.14 x (D/2)2
(cm2)
Height H
(cm)
Volume V=H x A
(cm3) 1 2 3
Student Worksheet – Volume Measurement ‐ 1, 2 of 2
DepEd‐NSTIC
7
Objectives:
1. To measure and compute the volume of regularly-shaped object by water displacement. 2. To measure the volume of irregularly-shaped object by water displacement.
Materials and Equipment:
graduated cylinder, 100 mL** ruler small metal ball*
water modeling clay
Instructions: A. Volume measurement of regularly-shaped object 1. Measure the diameter of the ball. Find the volume of the ball by using the formula Vsphere = πd3/6 where d is the diameter. 2. Measure again the volume of the ball by water displacement stated in steps 3 and 4. 3. Pour exactly 50 mL of water in the graduated cylinder. 4. Safely place the ball into the graduated cylinder by dropping it with the cylinder tilted about 45 degrees. Note the increase in the volume of the water. Subtract 50 mL from this volume to get the volume of the ball. 5. Record the data in Table 3.1.
Table 3.1. Volume of the metal ball
Object Volume Measured with a Ruler (cm3)
Volume by Water Displacement (mL)
metal ball
III. Volume Measurement ‐ 2
NAME ___________________________________ GROUP ______________
SECTION _________________________________ DATE ______________
DepEd‐NSTIC
Student Worksheet – Volume Measurement – 2, 1 of 2
* From the set of SciKit Mechanics, Freefall Apparatus
** From the set of Biology Science Equipment
8
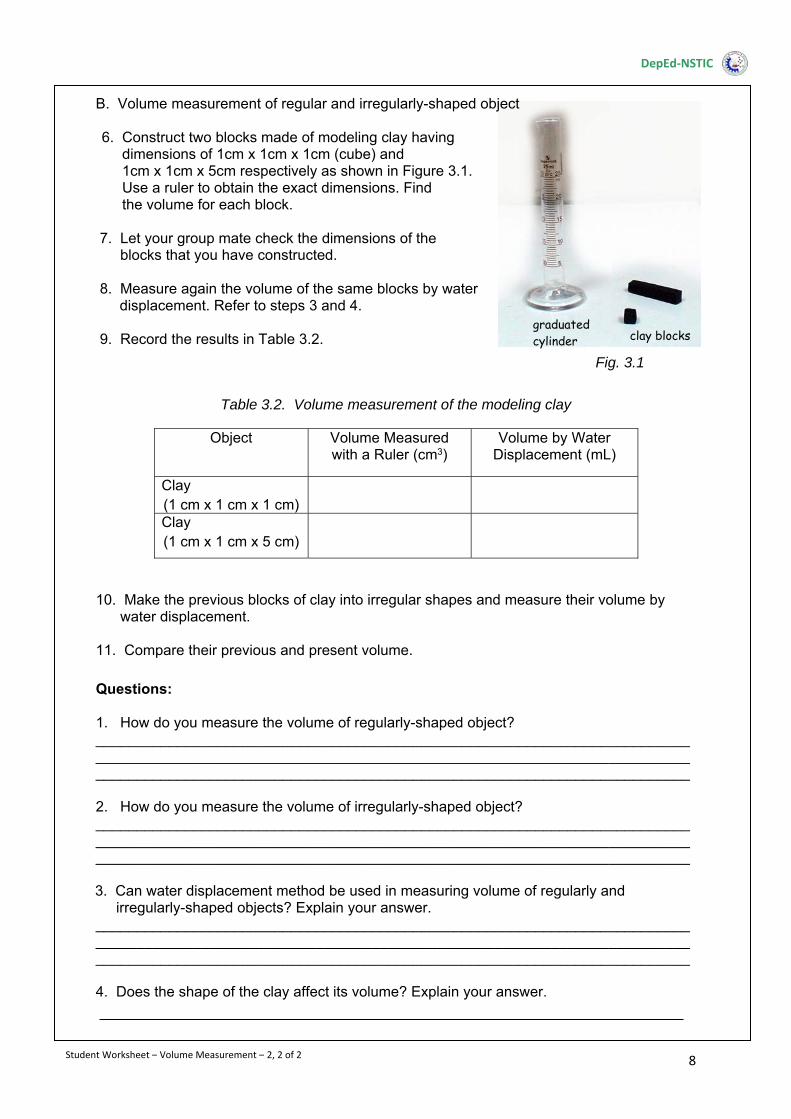
B. Volume measurement of regular and irregularly-shaped object 6. Construct two blocks made of modeling clay having dimensions of 1cm x 1cm x 1cm (cube) and 1cm x 1cm x 5cm respectively as shown in Figure 3.1. Use a ruler to obtain the exact dimensions. Find the volume for each block.
7. Let your group mate check the dimensions of the blocks that you have constructed.
8. Measure again the volume of the same blocks by water
displacement. Refer to steps 3 and 4. 9. Record the results in Table 3.2.
Table 3.2. Volume measurement of the modeling clay
Object Volume Measured with a Ruler (cm3)
Volume by Water Displacement (mL)
Clay (1 cm x 1 cm x 1 cm)
Clay (1 cm x 1 cm x 5 cm)
10. Make the previous blocks of clay into irregular shapes and measure their volume by water displacement. 11. Compare their previous and present volume. Questions:
1. How do you measure the volume of regularly-shaped object? ___________________________________________________________________________________________________________________________________________________________________________________________________________________________ 2. How do you measure the volume of irregularly-shaped object? ___________________________________________________________________________________________________________________________________________________________________________________________________________________________
3. Can water displacement method be used in measuring volume of regularly and irregularly-shaped objects? Explain your answer. _________________________________________________________________________ _________________________________________________________________________ _________________________________________________________________________ 4. Does the shape of the clay affect its volume? Explain your answer.
Student Worksheet – Volume Measurement – 2, 2 of 2
clay blocksgraduated cylinder
Fig. 3.1
DepEd‐NSTIC
9
beam balance
Objectives: 1. To measure and compute the densities of solids, liquids, and gases. 2. To compare the densities of various objects. 3. To explain why some objects sink while others float in water. 4. To discuss the use of a hydrometer.
Materials and Equipment:
bar magnet plastic housing from disposable ball pen graduated cylinder, 100 mL** balloon beam balance scale fresh water hydrometer salty water (400 g salt dissolved in 1600 g ruler water)
2 slender water containers at least 30 mm tall (e.g., pitcher or an improvised one
made of 2 L plastic cola bottle)
Instructions:
A. Density of Solid
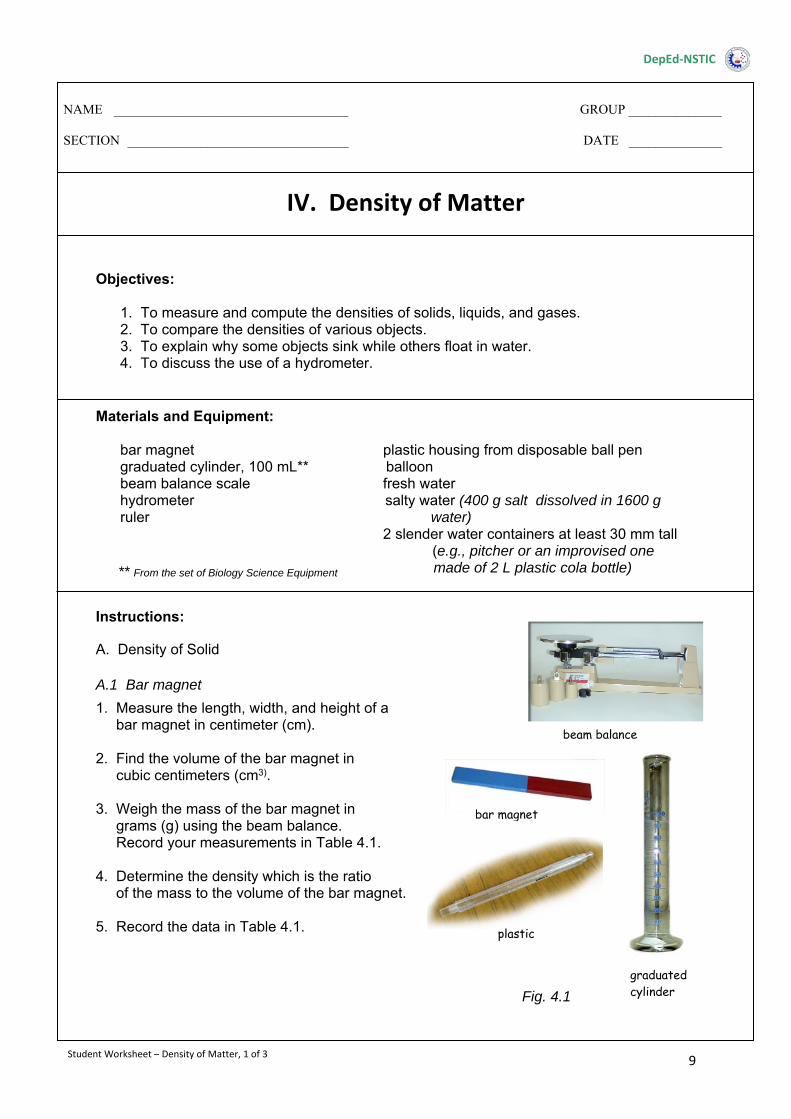
A.1 Bar magnet
1. Measure the length, width, and height of a bar magnet in centimeter (cm). 2. Find the volume of the bar magnet in cubic centimeters (cm3). 3. Weigh the mass of the bar magnet in grams (g) using the beam balance. Record your measurements in Table 4.1. 4. Determine the density which is the ratio of the mass to the volume of the bar magnet.
5. Record the data in Table 4.1.
IV. Density of Matter
NAME ___________________________________ GROUP ______________
SECTION _________________________________ DATE ______________
DepEd‐NSTIC
Student Worksheet – Density of Matter, 1 of 3
Fig. 4.1
plastic
bar magnet
graduated cylinder
** From the set of Biology Science Equipment
10
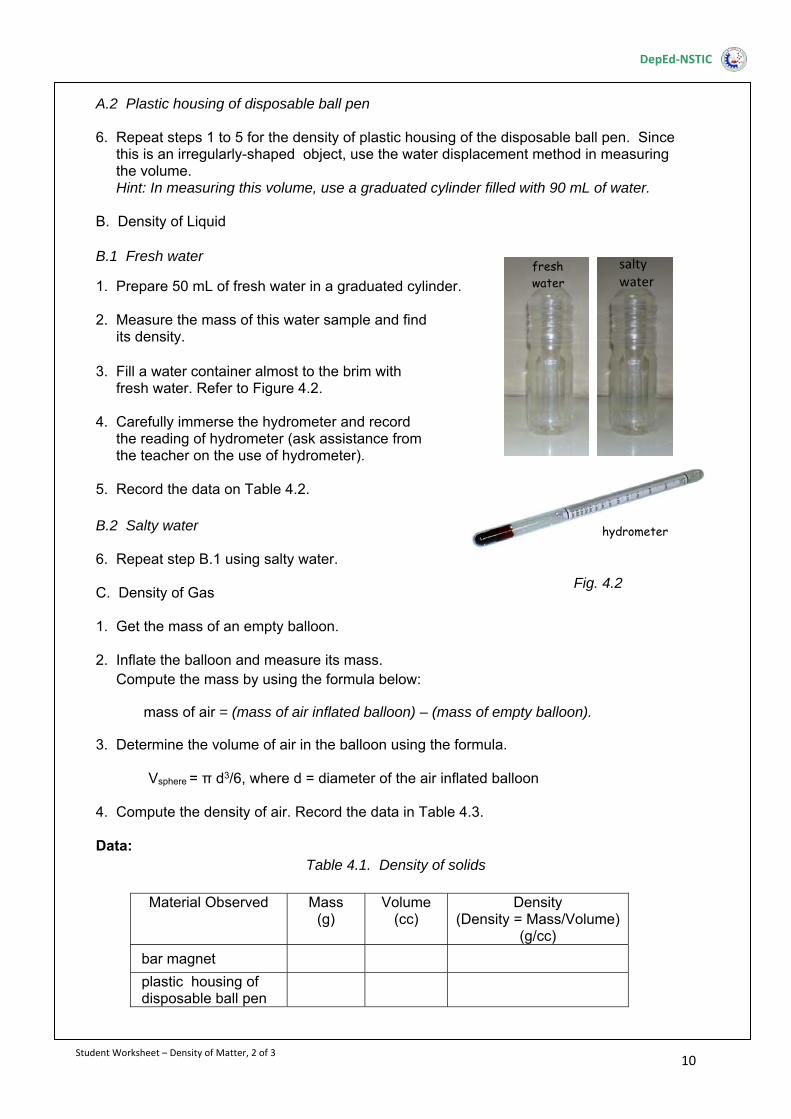
A.2 Plastic housing of disposable ball pen 6. Repeat steps 1 to 5 for the density of plastic housing of the disposable ball pen. Since this is an irregularly-shaped object, use the water displacement method in measuring the volume. Hint: In measuring this volume, use a graduated cylinder filled with 90 mL of water. B. Density of Liquid B.1 Fresh water
1. Prepare 50 mL of fresh water in a graduated cylinder.
2. Measure the mass of this water sample and find its density. 3. Fill a water container almost to the brim with fresh water. Refer to Figure 4.2.
4. Carefully immerse the hydrometer and record the reading of hydrometer (ask assistance from the teacher on the use of hydrometer).
5. Record the data on Table 4.2.
B.2 Salty water 6. Repeat step B.1 using salty water. C. Density of Gas 1. Get the mass of an empty balloon.
2. Inflate the balloon and measure its mass. Compute the mass by using the formula below:
mass of air = (mass of air inflated balloon) – (mass of empty balloon).
3. Determine the volume of air in the balloon using the formula. Vsphere = π d3/6, where d = diameter of the air inflated balloon
4. Compute the density of air. Record the data in Table 4.3.
Data:
Table 4.1. Density of solids
Material Observed Mass (g)
Volume (cc)
Density (Density = Mass/Volume)
(g/cc)
bar magnet
plastic housing of disposable ball pen
Fig. 4.2
Student Worksheet – Density of Matter, 2 of 3
fresh water
salty water
hydrometer
DepEd‐NSTIC
11
Table 4.2. Density of liquids
Table 4.3. Density of gas
Material observed Mass (g) Volume (cc) Density (g/cc)
air
Questions:
1. Compare the density of a bar magnet with that of fresh water. Which of the two objects
has a higher density? __________________. Does the bar magnet float in water? ____
2. Compare the density of a plastic housing of disposable ball pen with that of fresh water and salty water. Does plastic housing of a disposable ball pen float in fresh water? How about in salty water? _________________________________________________
3. How does the computed density in Table 4.2 compare to the hydrometer reading? ______________________________________________________________________ ______________________________________________________________________ ______________________________________________________________________ 4. What is the use of a hydrometer? ______________________________________________________________________ ______________________________________________________________________ ______________________________________________________________________
Material observed Mass (g)
Volume (cc)
Density (Density=Mass/Volume)
(g/cc)
Hydrometer Reading
fresh water salty water
Student Worksheet – Density of Matter, 3 of 3
DepEd‐NSTIC
12
Objectives: 1. To describe uniform speed. 2. To calculate average speed of a moving object. 3. To determine the direction of a moving object. 4. To differentiate uniform speed from uniform velocity.
Materials and Equipment:
2 stand bases* digital stopwatch 2 rails (rods undersized on ends)* meter stick motorized cart* magnetic compass dry cell, AA chalk
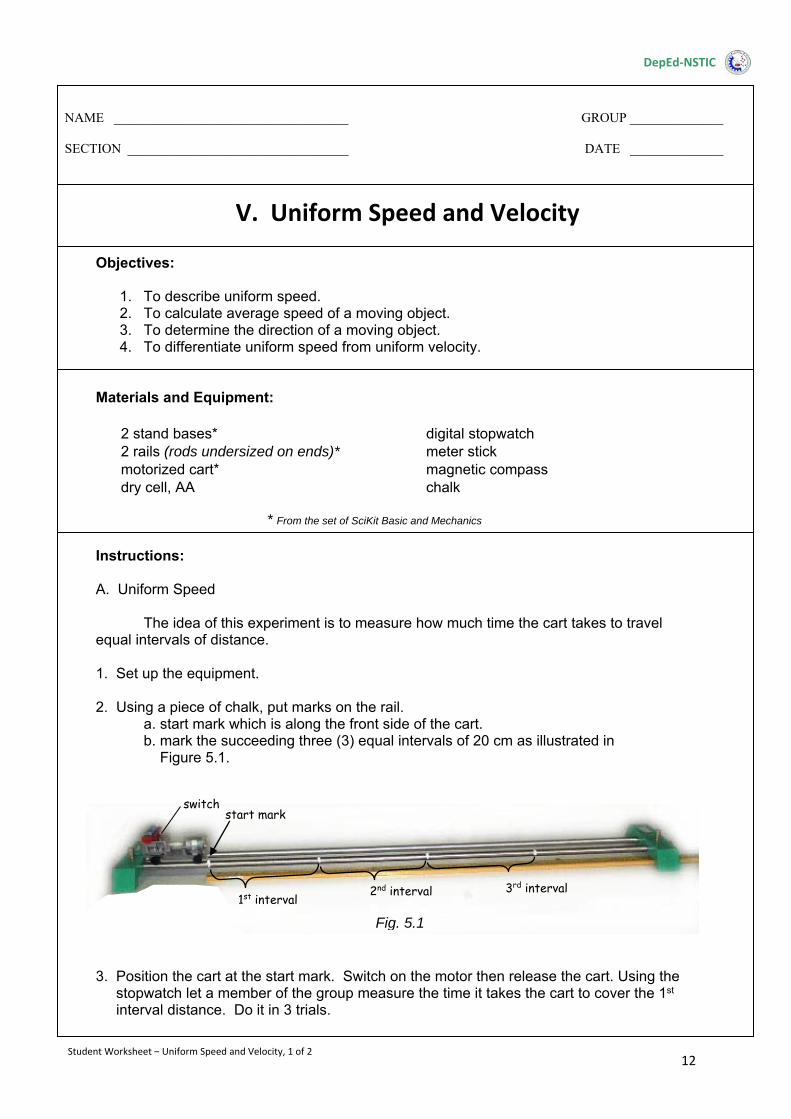
Instructions: A. Uniform Speed The idea of this experiment is to measure how much time the cart takes to travel equal intervals of distance. 1. Set up the equipment. 2. Using a piece of chalk, put marks on the rail. a. start mark which is along the front side of the cart.
b. mark the succeeding three (3) equal intervals of 20 cm as illustrated in Figure 5.1.
3. Position the cart at the start mark. Switch on the motor then release the cart. Using the stopwatch let a member of the group measure the time it takes the cart to cover the 1st interval distance. Do it in 3 trials.
V. Uniform Speed and Velocity
NAME ___________________________________ GROUP ______________
SECTION _________________________________ DATE ______________
DepEd‐NSTIC
Student Worksheet – Uniform Speed and Velocity, 1 of 2
switch start mark
1st interval
Fig. 5.1
2nd interval 3rd interval
* From the set of SciKit Basic and Mechanics
13
4. Compute for the quotient of the distance divided by time. 5. Repeat step 3 for the 2nd and 3rd intervals of distance. 6. Record all measurements in Table 5.1.
Table 5.1. Speed of the cart at every interval distance
Distance (cm)
Time (s) Distance / Time (cm/s)
Trial 1 Trial 2 Trial 3 Average 1st interval distance, 20 cm 2nd interval distance, 20 cm 3rd interval distance, 20 cm B. Velocity
The idea of this experiment is to measure how much time the cart takes to travel three equal intervals of displacement. 1. You may repeat the procedure of Part A or copy the measurements in Table 5.1 and reflect it in Table 5.2. However, this time, determine the direction of the cart using the magnetic compass. Is the cart moving towards the east, west, north, or south? 2. Record the direction in Table 5.2.
Table 5.2. Velocity of the cart at every interval distance
Displacement Time (s)
Displacement / Time, Direction
(cm/s) Distance (cm)
, Direction Trial
1 Trial
2 Trial
3 Average
1st interval distance, 20 cm ,
2nd interval distance, 20 cm , 3rd interval distance, 20 cm ,
Questions:
1. In Part A, how do you compare the time it takes for the cart to travel equal intervals of distance?
2. In the last column of Table 5.1, what do you call the quotient of distance divided by time? How are these quotients compared?
3. Does the cart move at uniform speed? _____. When can you say an object or a body is moving with uniform speed?
4. Compare Part A and Part B. How does uniform speed differ from uniform velocity?
Student Worksheet – Uniform Speed and Velocity, 2 of 2
DepEd‐NSTIC

14
dynamic cart
book
start mark
Objectives:
1. To describe uniform acceleration. 2. To calculate the speed of a moving object.
Materials and Equipment:
2 stand bases* meter stick 2 rails (rods undersized on ends)* dynamic cart B* digital stopwatch chalk
Instructions: The idea of this experiment is to measure how much time a cart takes to travel equal intervals of distance. 1. Prepare the setup as shown in Figure 6.1. Elevate one end of the rail about 3 cm by placing a book underneath the stand base. 2. Put the dynamic cart on the elevated end of the rail. Using a piece of chalk, put marks on the rail. a. start mark which is along the front side of the cart.
b. mark the succeeding three (3) equal intervals of 20 cm. 3. Hold the cart at the start mark then release. 4. Using the stopwatch let a member of the group measure the time it takes the cart to cover the first interval distance. Do it in three (3) trials. 5. Compute for the quotient of the distance divided by time.
VI. Uniform Acceleration
NAME ___________________________________ GROUP ______________
SECTION _________________________________ DATE ______________
DepEd‐NSTIC
Fig. 6.1
1st interval
Student Worksheet – Uniform Acceleration, 1 of 2
2nd interval 3rd interval
* From the set of SciKit Basic and Mechanics
15
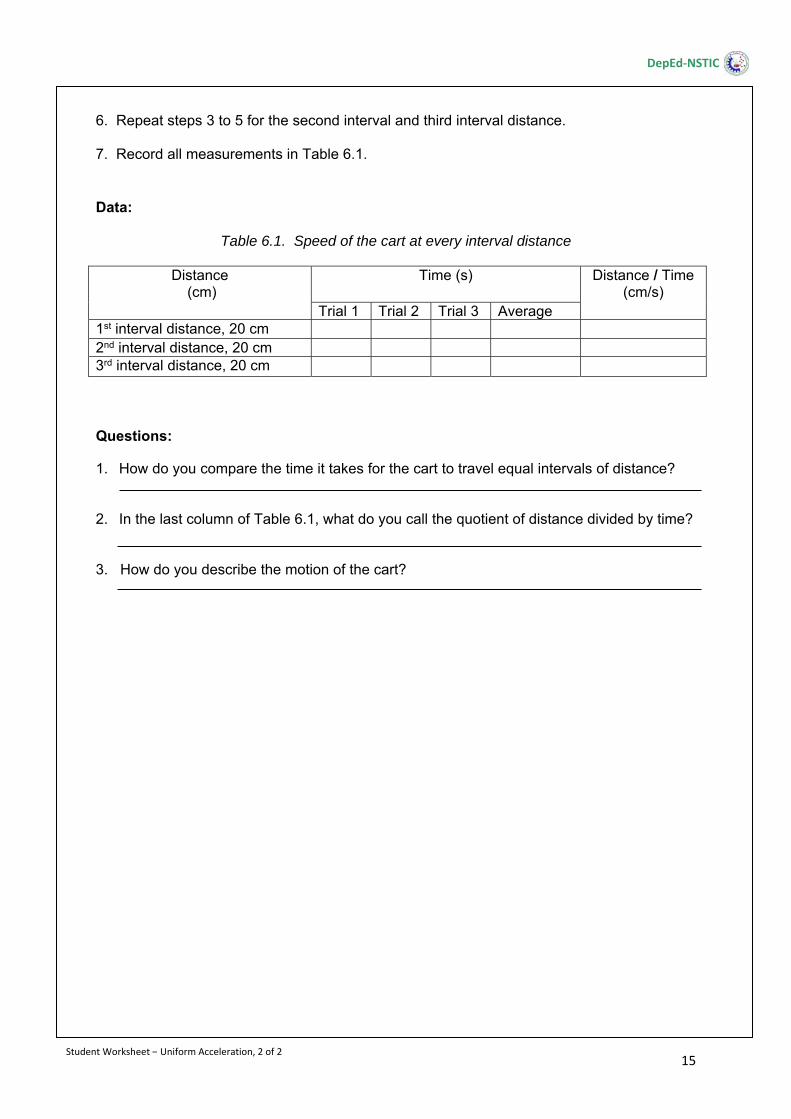
6. Repeat steps 3 to 5 for the second interval and third interval distance. 7. Record all measurements in Table 6.1. Data:
Table 6.1. Speed of the cart at every interval distance
Distance (cm)
Time (s)
Distance / Time (cm/s)
Trial 1 Trial 2 Trial 3 Average 1st interval distance, 20 cm 2nd interval distance, 20 cm 3rd interval distance, 20 cm Questions:
1. How do you compare the time it takes for the cart to travel equal intervals of distance?
2. In the last column of Table 6.1, what do you call the quotient of distance divided by time?
3. How do you describe the motion of the cart?
Student Worksheet – Uniform Acceleration, 2 of 2
DepEd‐NSTIC
16
Objectives:
1. To describe the effect of an object dropped at different heights. 2. To describe the motion of a free falling body. 3. To demonstrate the effect of air resistance.
Materials and Equipment: modeling clay, about the size of a match box
To be brought by each group: thin plastic sheet (from discarded plastic bag)
book (at least 15 mm thick) fine string or sewing thread, 1 m long
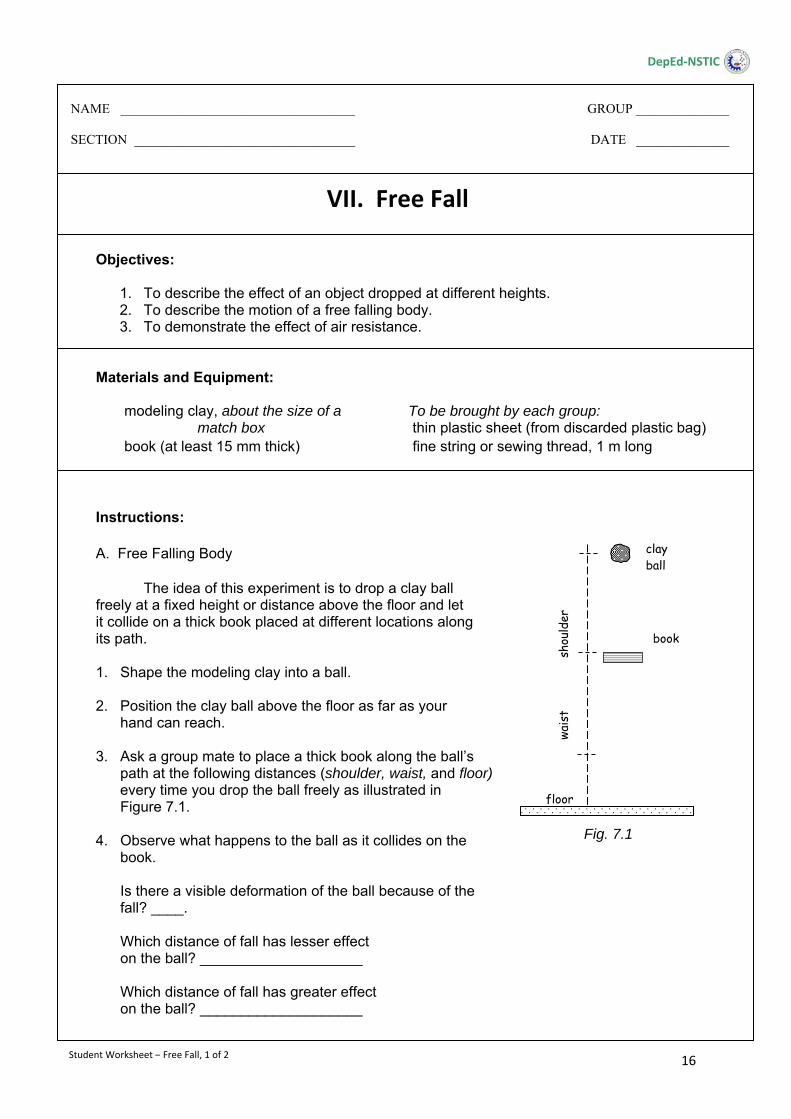
Instructions: A. Free Falling Body The idea of this experiment is to drop a clay ball freely at a fixed height or distance above the floor and let it collide on a thick book placed at different locations along its path. 1. Shape the modeling clay into a ball. 2. Position the clay ball above the floor as far as your hand can reach. 3. Ask a group mate to place a thick book along the ball’s path at the following distances (shoulder, waist, and floor) every time you drop the ball freely as illustrated in Figure 7.1. 4. Observe what happens to the ball as it collides on the book. Is there a visible deformation of the ball because of the fall? ____. Which distance of fall has lesser effect on the ball? ____________________ Which distance of fall has greater effect on the ball? ____________________
VII. Free Fall
NAME ___________________________________ GROUP ______________
SECTION _________________________________ DATE ______________
DepEd‐NSTIC
Student Worksheet – Free Fall, 1 of 2
floor
Fig. 7.1
wais
t s
houl
der
clay ball
book
17
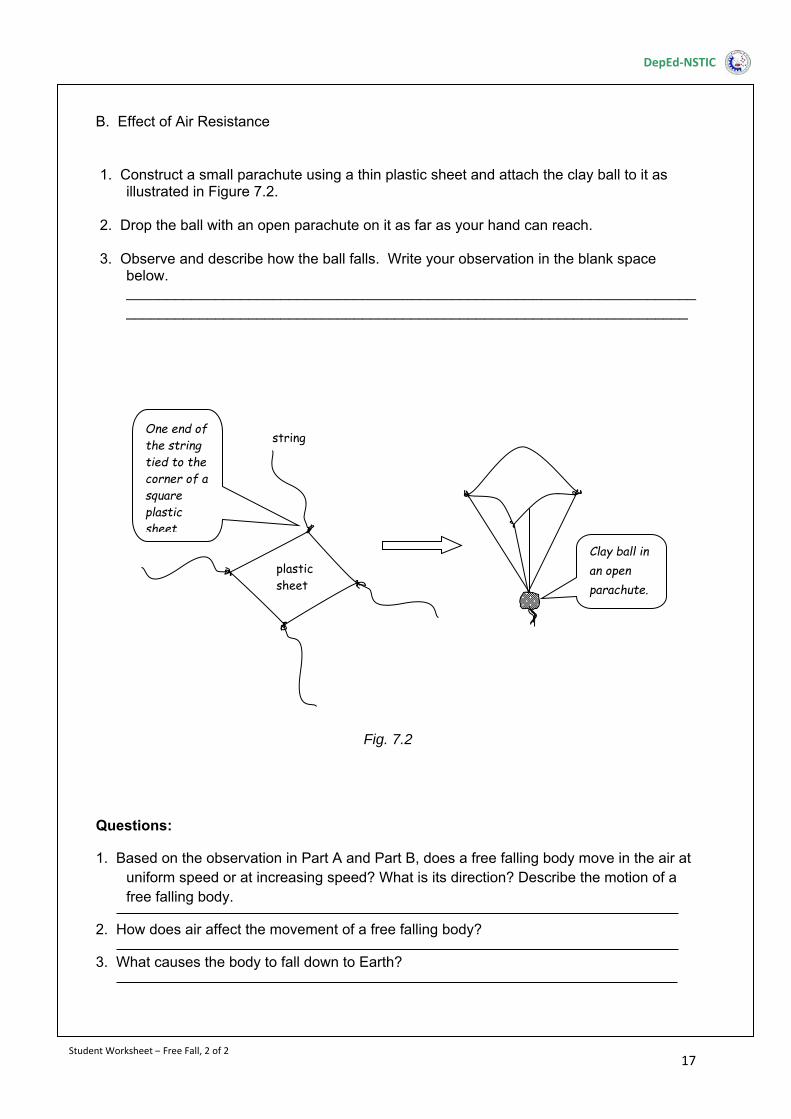
B. Effect of Air Resistance
1. Construct a small parachute using a thin plastic sheet and attach the clay ball to it as illustrated in Figure 7.2.
2. Drop the ball with an open parachute on it as far as your hand can reach. 3. Observe and describe how the ball falls. Write your observation in the blank space
below. ___________________________________________________________________________________________________________________________________________
Questions:
1. Based on the observation in Part A and Part B, does a free falling body move in the air at uniform speed or at increasing speed? What is its direction? Describe the motion of a free falling body.
2. How does air affect the movement of a free falling body?
3. What causes the body to fall down to Earth?
string
plastic sheet
One end of the string tied to the corner of a square plastic sheet.
Fig. 7.2
Clay ball in an open parachute.
Student Worksheet – Free Fall, 2 of 2
DepEd‐NSTIC

18
Objectives:
1. To relate capillarity to the size of a hole in the tube. 2. To cite other situations where capillarity takes place. 3. To explain why a needle floats on water.
Materials and Equipment:
glass tube, hematocrit needle glass tube, 6 mm hole diameter, 75 mm long clean cloth or tissue paper glass tube, 3 mm hole diameter, 75 mm long fresh water Petri dish colored water graduated cylinder, 10 mL
Instructions:
A. Capillarity
1. Fill the Petri dish with 10 mL colored water.
2. Dip one end of each of the three glass tubes having different hole sizes in the Petri dish with colored water as illustrated in Figure 8.1.
3. Compare and take note the heights of water in each tube.
Questions:
1. In which tube did the water rise the highest? Relate the level of water to the size of tubes.
2. What do you call of the spontaneous rise of liquid (like water) in a narrow tube or space? ____________________ 3. Cite a situation wherein you observe a liquid rising in a small tube.
VIII. Capillarity and Surface Tension
NAME ___________________________________ GROUP ______________
SECTION _________________________________ DATE ______________
DepEd‐NSTIC
Fig. 8.1
Student Worksheet – Capillarity and Surface Tension, 1 of 2
Petri dish
glass
tube
19
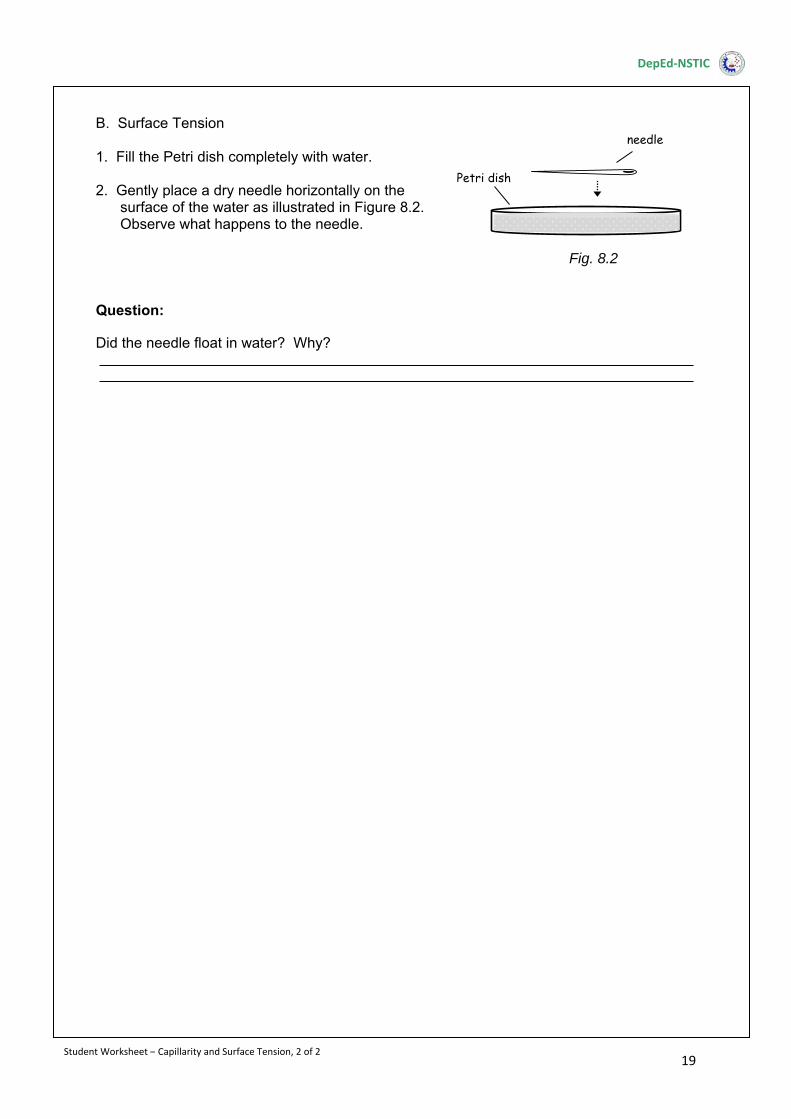
B. Surface Tension 1. Fill the Petri dish completely with water. 2. Gently place a dry needle horizontally on the surface of the water as illustrated in Figure 8.2. Observe what happens to the needle.
Question:
Did the needle float in water? Why?
Student Worksheet – Capillarity and Surface Tension, 2 of 2
DepEd‐NSTIC
Fig. 8.2
needle
Petri dish
20
Objective:
To describe Newton’s First Law of Motion on the Law of Inertia.
Materials and Equipment:
2 stand bases* match box 2 rails (rods undersized on ends)* modeling clay dynamic cart B*
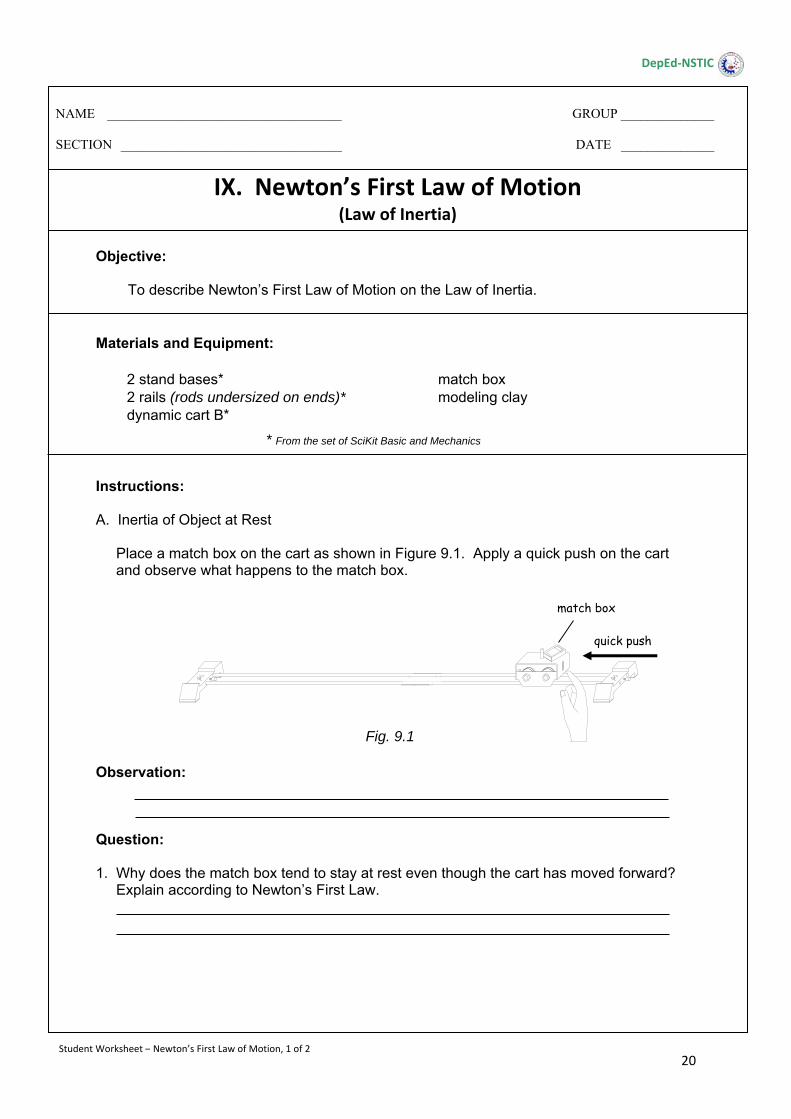
Instructions: A. Inertia of Object at Rest Place a match box on the cart as shown in Figure 9.1. Apply a quick push on the cart and observe what happens to the match box. Observation: Question: 1. Why does the match box tend to stay at rest even though the cart has moved forward? Explain according to Newton’s First Law.
IX. Newton’s First Law of Motion (Law of Inertia)
NAME ___________________________________ GROUP ______________
SECTION _________________________________ DATE ______________
DepEd‐NSTIC
Fig. 9.1
match box
quick push
Student Worksheet – Newton’s First Law of Motion, 1 of 2
* From the set of SciKit Basic and Mechanics
21
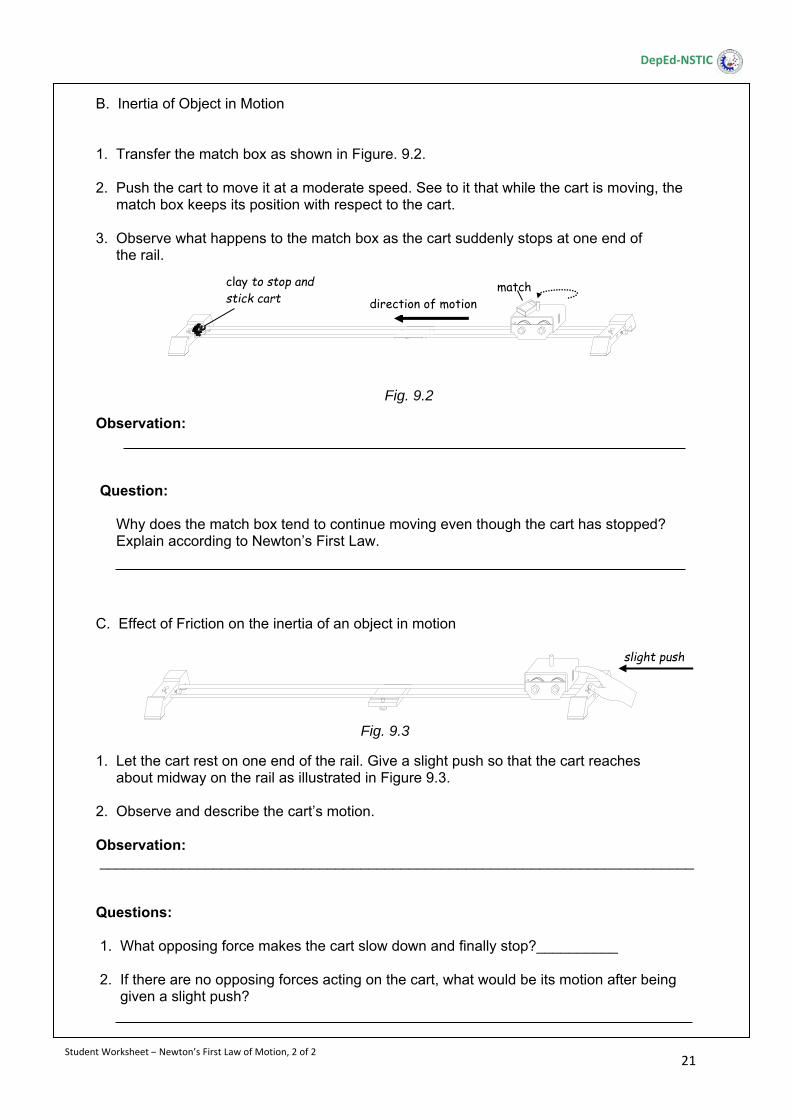
B. Inertia of Object in Motion 1. Transfer the match box as shown in Figure. 9.2. 2. Push the cart to move it at a moderate speed. See to it that while the cart is moving, the match box keeps its position with respect to the cart. 3. Observe what happens to the match box as the cart suddenly stops at one end of the rail. Observation: Question: Why does the match box tend to continue moving even though the cart has stopped? Explain according to Newton’s First Law. C. Effect of Friction on the inertia of an object in motion 1. Let the cart rest on one end of the rail. Give a slight push so that the cart reaches about midway on the rail as illustrated in Figure 9.3. 2. Observe and describe the cart’s motion. Observation: _________________________________________________________________________ Questions: 1. What opposing force makes the cart slow down and finally stop?__________ 2. If there are no opposing forces acting on the cart, what would be its motion after being given a slight push?
Fig. 9.2
direction of motion
clay to stop and stick cart
Fig. 9.3
slight push
match
Student Worksheet – Newton’s First Law of Motion, 2 of 2
DepEd‐NSTIC
22
Objective:
To illustrate Newton’s Second Law of Motion.
Materials and Equipment:
2 stand bases* dynamic cart B* 2 rails (rods undersized on ends)* spring balance, 2 N*
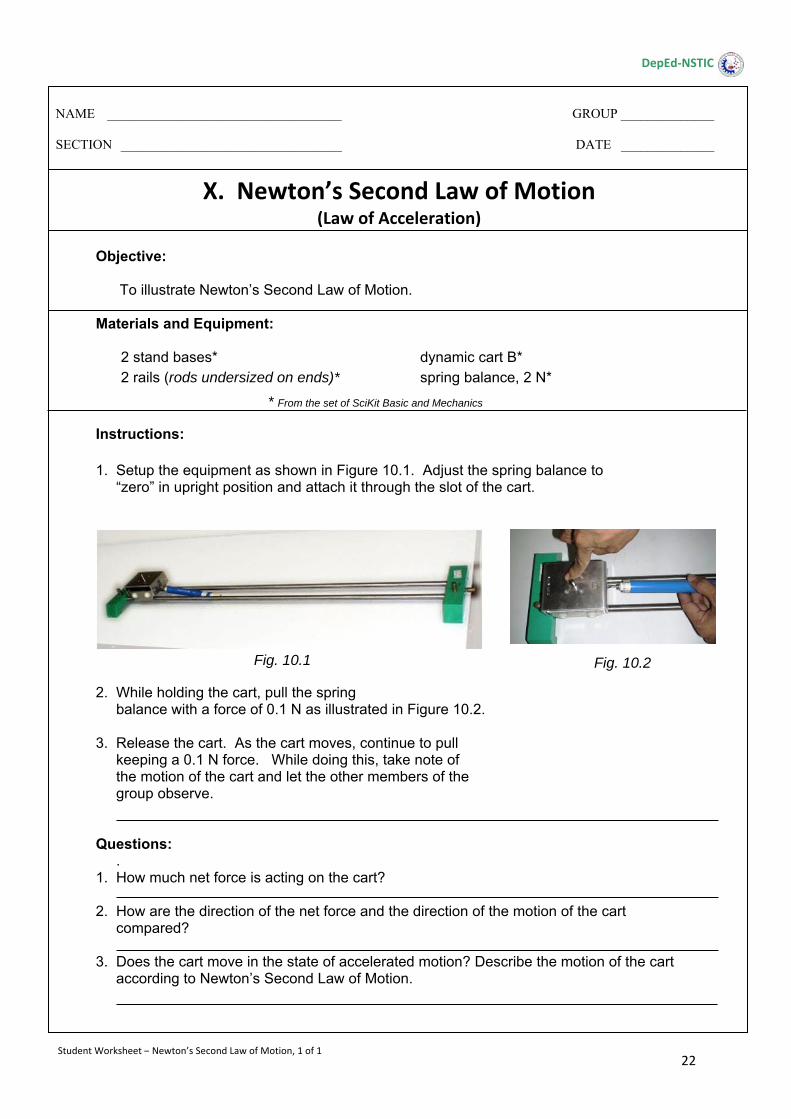
Instructions: 1. Setup the equipment as shown in Figure 10.1. Adjust the spring balance to “zero” in upright position and attach it through the slot of the cart.
2. While holding the cart, pull the spring balance with a force of 0.1 N as illustrated in Figure 10.2. 3. Release the cart. As the cart moves, continue to pull keeping a 0.1 N force. While doing this, take note of the motion of the cart and let the other members of the group observe. Questions: . 1. How much net force is acting on the cart? 2. How are the direction of the net force and the direction of the motion of the cart compared? 3. Does the cart move in the state of accelerated motion? Describe the motion of the cart according to Newton’s Second Law of Motion.
X. Newton’s Second Law of Motion (Law of Acceleration)
NAME ___________________________________ GROUP ______________
SECTION _________________________________ DATE ______________
DepEd‐NSTIC
Fig. 10.2 Fig. 10.1
Student Worksheet – Newton’s Second Law of Motion, 1 of 1
* From the set of SciKit Basic and Mechanics
23
Objectives:
1. To identify and describe action and reaction forces. 2. To state and explain Newton’s Third Law of Motion. Materials and Equipment:
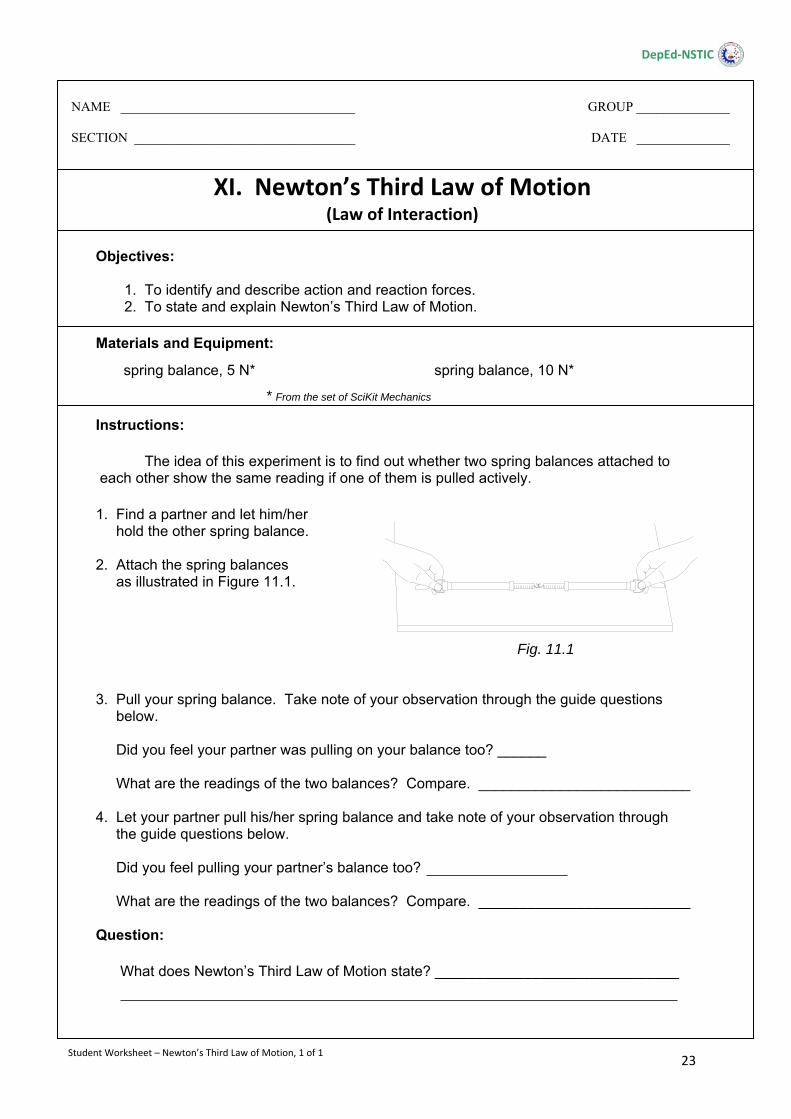
Instructions: The idea of this experiment is to find out whether two spring balances attached to each other show the same reading if one of them is pulled actively. 1. Find a partner and let him/her hold the other spring balance. 2. Attach the spring balances as illustrated in Figure 11.1. 3. Pull your spring balance. Take note of your observation through the guide questions below. Did you feel your partner was pulling on your balance too? ______ What are the readings of the two balances? Compare. __________________________
4. Let your partner pull his/her spring balance and take note of your observation through the guide questions below. Did you feel pulling your partner’s balance too? What are the readings of the two balances? Compare. __________________________ Question: What does Newton’s Third Law of Motion state? ______________________________
spring balance, 5 N* spring balance, 10 N*
XI. Newton’s Third Law of Motion (Law of Interaction)
NAME ___________________________________ GROUP ______________
SECTION _________________________________ DATE ______________
DepEd‐NSTIC
Student Worksheet – Newton’s Third Law of Motion, 1 of 1
Fig. 11.1
* From the set of SciKit Mechanics
24
Objective:
To relate magnitude of momentum of the object to its mass and velocity. Materials and Equipment:
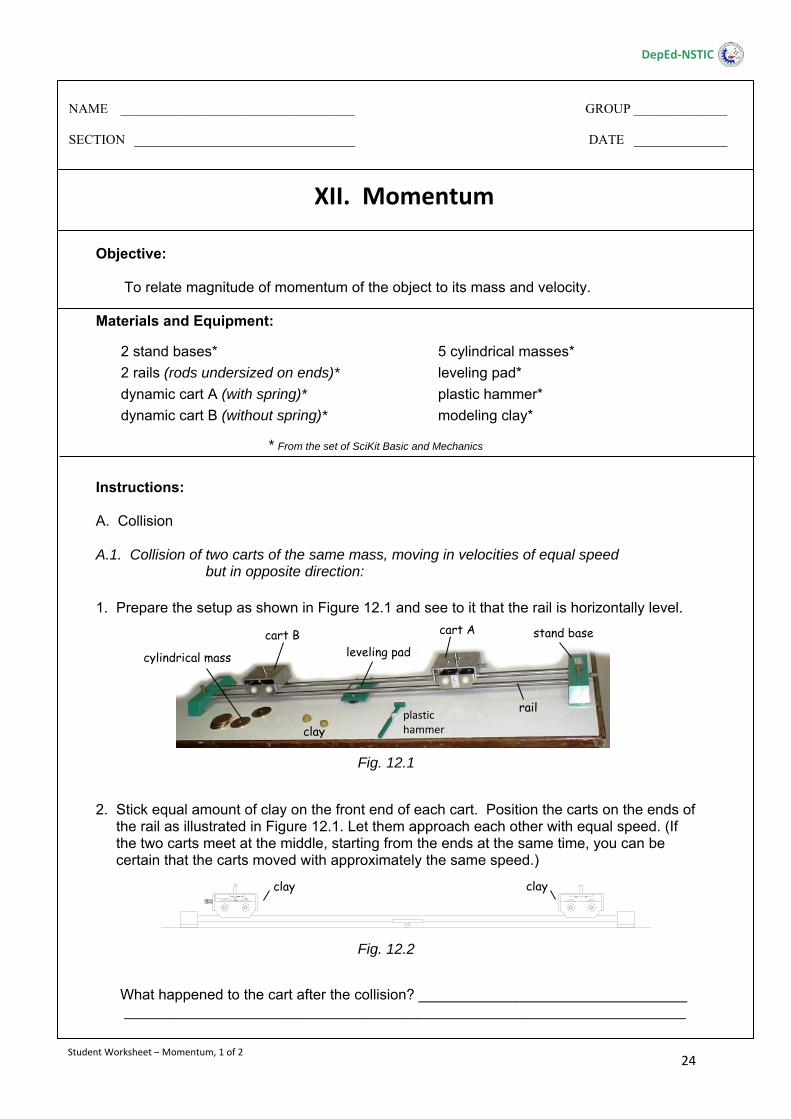
Instructions: A. Collision A.1. Collision of two carts of the same mass, moving in velocities of equal speed but in opposite direction: 1. Prepare the setup as shown in Figure 12.1 and see to it that the rail is horizontally level. 2. Stick equal amount of clay on the front end of each cart. Position the carts on the ends of the rail as illustrated in Figure 12.1. Let them approach each other with equal speed. (If the two carts meet at the middle, starting from the ends at the same time, you can be certain that the carts moved with approximately the same speed.) What happened to the cart after the collision? _________________________________ _____________________________________________________________________
2 stand bases* 5 cylindrical masses*
2 rails (rods undersized on ends)* leveling pad*
dynamic cart A (with spring)* plastic hammer*
dynamic cart B (without spring)* modeling clay*
XII. Momentum
NAME ___________________________________ GROUP ______________
SECTION _________________________________ DATE ______________
DepEd‐NSTIC
clay
Fig. 12.2
cart A cart B leveling pad
stand base
plastic hammer clay
cylindrical mass
rail
Student Worksheet – Momentum, 1 of 2
clay
Fig. 12.1
* From the set of SciKit Basic and Mechanics
25
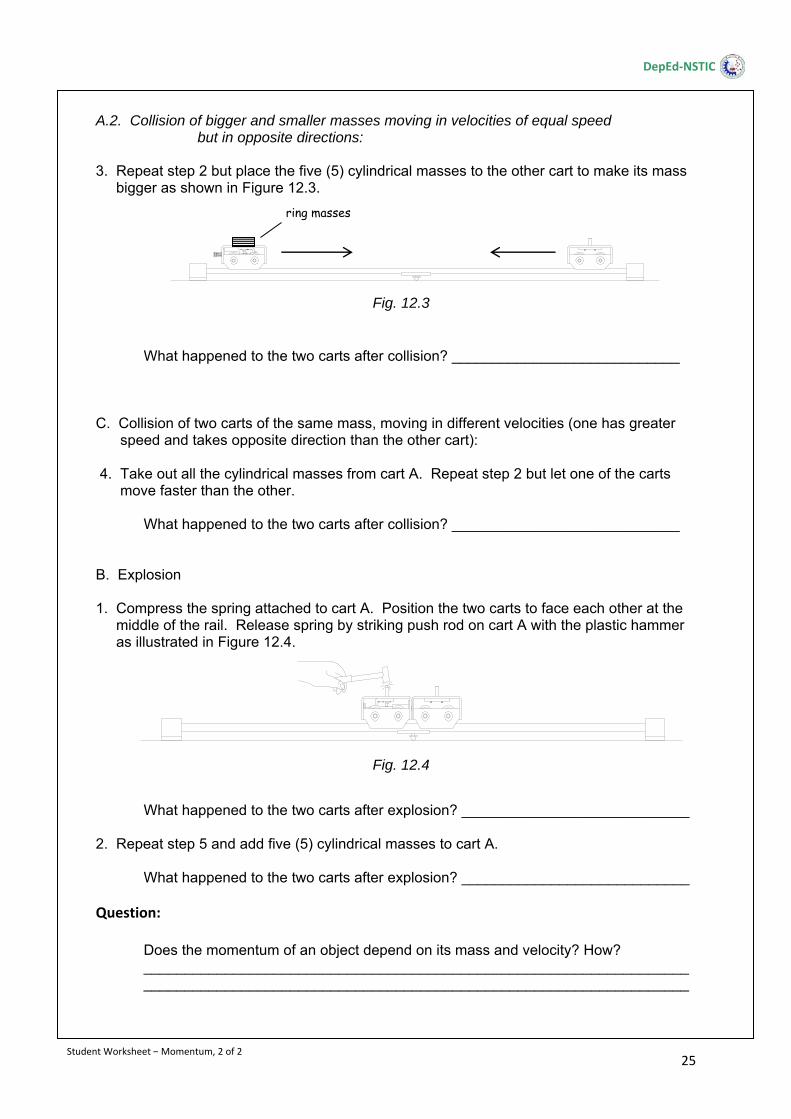
A.2. Collision of bigger and smaller masses moving in velocities of equal speed but in opposite directions: 3. Repeat step 2 but place the five (5) cylindrical masses to the other cart to make its mass bigger as shown in Figure 12.3. What happened to the two carts after collision? ____________________________ C. Collision of two carts of the same mass, moving in different velocities (one has greater speed and takes opposite direction than the other cart): 4. Take out all the cylindrical masses from cart A. Repeat step 2 but let one of the carts move faster than the other. What happened to the two carts after collision? ____________________________ B. Explosion 1. Compress the spring attached to cart A. Position the two carts to face each other at the middle of the rail. Release spring by striking push rod on cart A with the plastic hammer as illustrated in Figure 12.4.
What happened to the two carts after explosion? ____________________________
2. Repeat step 5 and add five (5) cylindrical masses to cart A.
What happened to the two carts after explosion? ____________________________ Question:
Does the momentum of an object depend on its mass and velocity? How? ___________________________________________________________________ ___________________________________________________________________
ring masses
Fig. 12.3
Fig. 12.4
Student Worksheet – Momentum, 2 of 2
DepEd‐NSTIC
29
Objectives:
1. To distinguish the three ways to transfer heat. 2. To identify heat conductors and insulators. 3. To describe the flow of heat.
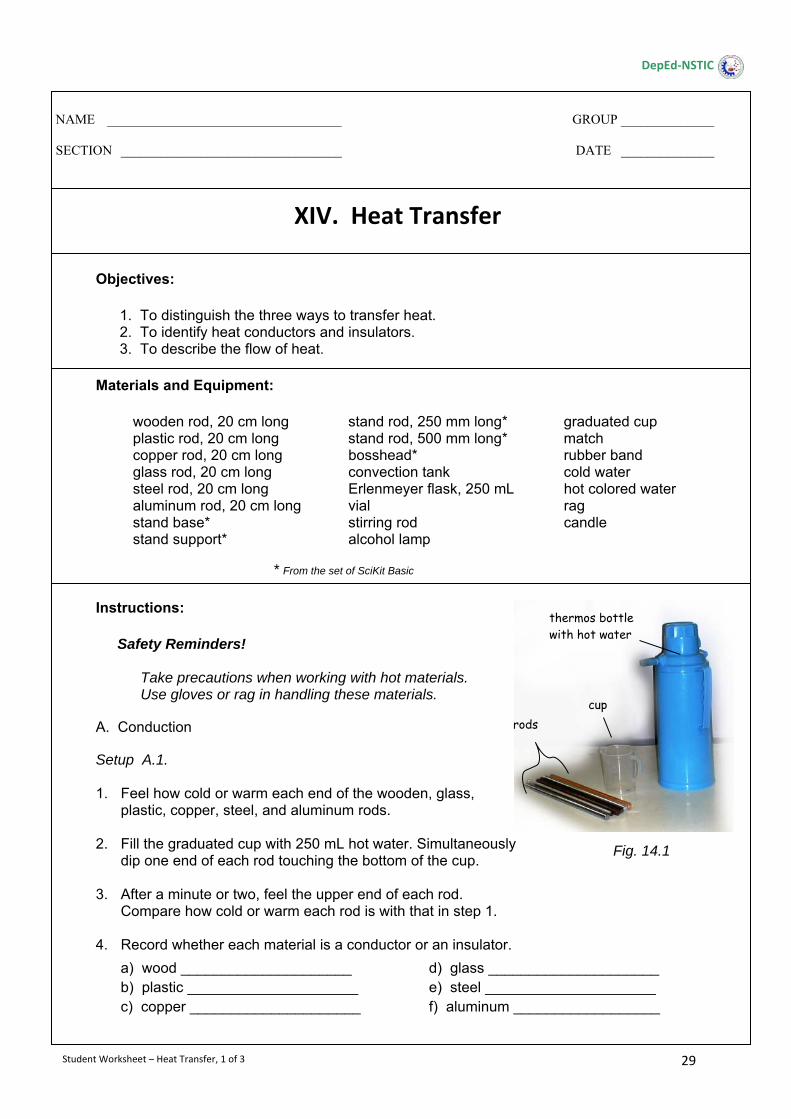
Materials and Equipment:
wooden rod, 20 cm long stand rod, 250 mm long* graduated cup plastic rod, 20 cm long stand rod, 500 mm long* match copper rod, 20 cm long bosshead* rubber band glass rod, 20 cm long convection tank cold water steel rod, 20 cm long Erlenmeyer flask, 250 mL hot colored water aluminum rod, 20 cm long vial rag stand base* stirring rod candle stand support* alcohol lamp
Instructions: Safety Reminders! Take precautions when working with hot materials. Use gloves or rag in handling these materials.
A. Conduction
Setup A.1.
1. Feel how cold or warm each end of the wooden, glass, plastic, copper, steel, and aluminum rods.
2. Fill the graduated cup with 250 mL hot water. Simultaneously dip one end of each rod touching the bottom of the cup.
3. After a minute or two, feel the upper end of each rod. Compare how cold or warm each rod is with that in step 1.
4. Record whether each material is a conductor or an insulator.
XIV. Heat Transfer
NAME ___________________________________ GROUP ______________
SECTION _________________________________ DATE ______________
DepEd‐NSTIC
rodscup
thermos bottle with hot water
Fig. 14.1
Student Worksheet – Heat Transfer, 1 of 3
a) wood _____________________ b) plastic _____________________ c) copper _____________________
d) glass _____________________ e) steel _____________________ f) aluminum __________________
* From the set of SciKit Basic
30
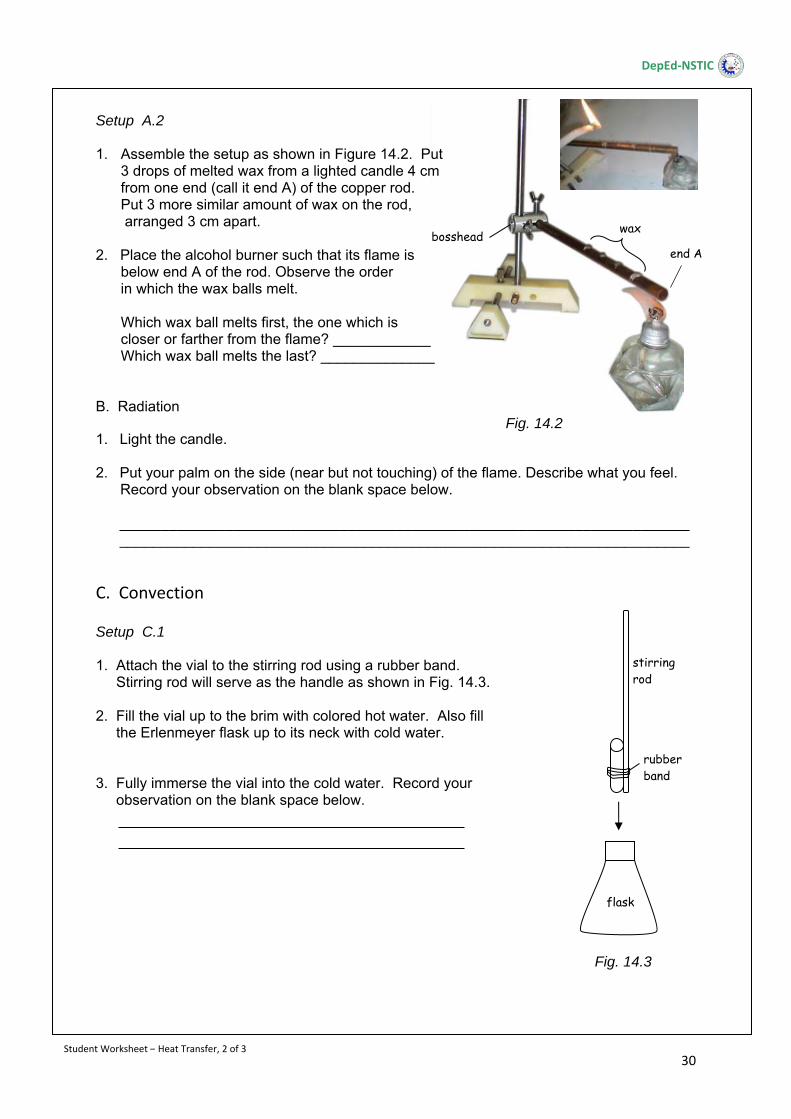
Setup A.2 1. Assemble the setup as shown in Figure 14.2. Put
3 drops of melted wax from a lighted candle 4 cm from one end (call it end A) of the copper rod. Put 3 more similar amount of wax on the rod, arranged 3 cm apart.
2. Place the alcohol burner such that its flame is below end A of the rod. Observe the order in which the wax balls melt. Which wax ball melts first, the one which is closer or farther from the flame? ____________ Which wax ball melts the last? ______________
B. Radiation
1. Light the candle.
2. Put your palm on the side (near but not touching) of the flame. Describe what you feel. Record your observation on the blank space below.
____________________________________________________________________________________________________________________________________________
C. Convection Setup C.1 1. Attach the vial to the stirring rod using a rubber band. Stirring rod will serve as the handle as shown in Fig. 14.3. 2. Fill the vial up to the brim with colored hot water. Also fill the Erlenmeyer flask up to its neck with cold water. 3. Fully immerse the vial into the cold water. Record your observation on the blank space below.
Fig. 14.2
end A
wax bosshead
Fig. 14.3
rubber band
Student Worksheet – Heat Transfer, 2 of 3
stirring rod
flask
DepEd‐NSTIC

31
Setup C.2
1. Prepare the convection tank as shown in Figure 14.4 (convection tank has two chambers with a slit on its middle wall).
2. Prepare about 175 mL cold water in an Erlenmeyer flask and the same amount of colored hot water in a graduated cup.
3. Quickly pour the cold water and colored hot water at the same time in each chamber of the convection tank. Record your observation on the space provided below. Questions:
1. What are the three ways to transfer heat? ____________________________________ How do they differ from each other?
2. How do they determine whether a material is a conductor or an insulator? Describe the procedure.
Student Worksheet – Heat Transfer, 3 of 3
colored hot water
cold water
DepEd‐NSTIC
convection tank
Fig. 14.4
32
Objectives:
1. To describe the volume of solid, liquid, and gas when heated. 2. To state the effect of heat on matter.
Materials and Equipment:
Instructions: A. Heat on Liquid
Safety Reminders! a. Use gloves or rag in handling hot objects. b. Never light an alcohol burner with another
alcohol burner.
1. Fill an Erlenmeyer flask with 250 mL hot water. Fill the beaker with 200 mL cold water.
2. Insert the glass tubing into the rubber stopper as shown in Figure 15.1. 3. Fill the test tube with colored water up to the brim and cover it with the rubber stopper-glass tubing assembly as shown in Figure 15.2. (This setup has to be air tight. See to it that the rubber stopper is properly fixed on the mouth of the test tube). 4. Dip the test tube in the flask containing hot water for a few minutes. Take note of the water level. Record your observation.
5. Dip the test tube in cold water. Take note of the water
level. Record your observation.
Observation:
test tube alcohol burner stand base* Erlenmeyer flask, 250 mL marking pen stand support* beaker, 250 mL hot water (in thermos bottle) bosshead* rubber stopper #1 with one hole cold water universal clamp* ring and ball apparatus matches rod, 500 mm long* glass tubing, 3 mm-diameter, 100 mm long
rod, 250 mm long*
XV. Effect of Heat on Matter
NAME ___________________________________ GROUP ______________
SECTION _________________________________ DATE ______________
DepEd‐NSTIC
Student Worksheet – Effect of Heat on Matter, 1 of 3
Fig. 15.2
water
test tube
Fig. 15.1
glass tubing
rubber stopper
*From the set of SciKit Basic
33
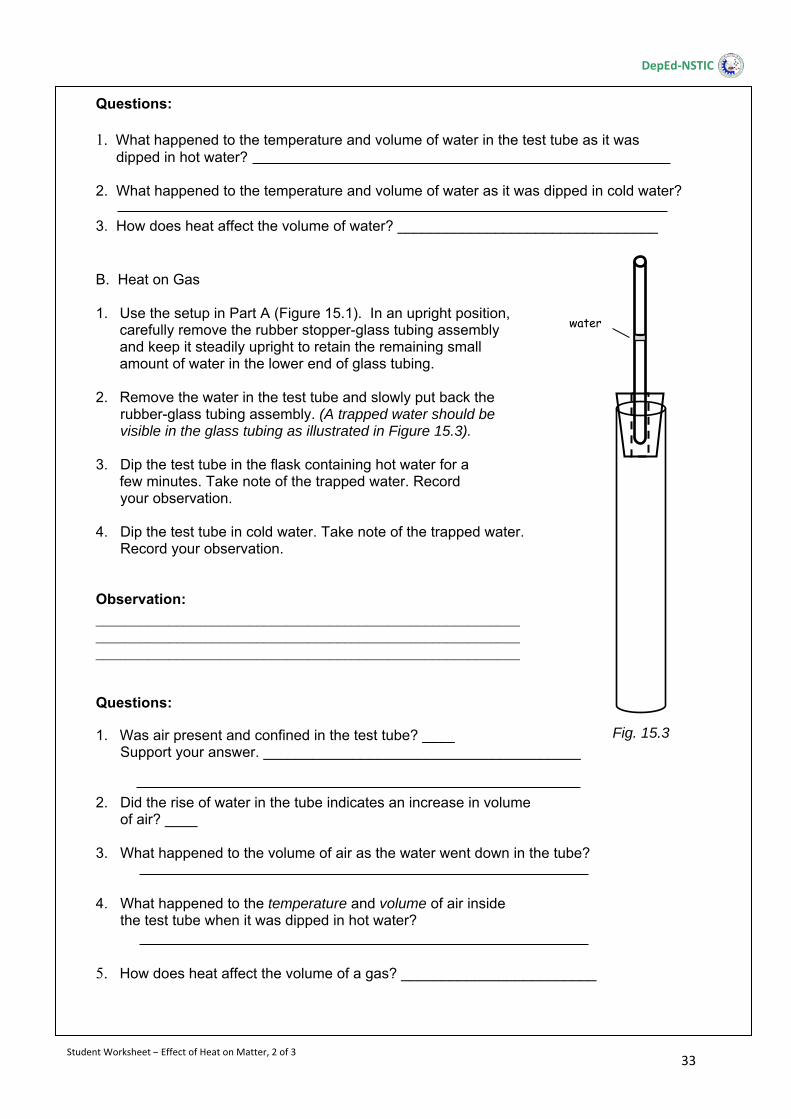
Questions: 1. What happened to the temperature and volume of water in the test tube as it was dipped in hot water? 2. What happened to the temperature and volume of water as it was dipped in cold water? 3. How does heat affect the volume of water? ________________________________ B. Heat on Gas 1. Use the setup in Part A (Figure 15.1). In an upright position,
carefully remove the rubber stopper-glass tubing assembly and keep it steadily upright to retain the remaining small amount of water in the lower end of glass tubing.
2. Remove the water in the test tube and slowly put back the rubber-glass tubing assembly. (A trapped water should be visible in the glass tubing as illustrated in Figure 15.3). 3. Dip the test tube in the flask containing hot water for a
few minutes. Take note of the trapped water. Record your observation.
4. Dip the test tube in cold water. Take note of the trapped water. Record your observation.
Observation: __________________________________________________________ __________________________________________________________ __________________________________________________________ Questions:
1. Was air present and confined in the test tube? ____ Support your answer. _______________________________________ 2. Did the rise of water in the tube indicates an increase in volume of air? ____ 3. What happened to the volume of air as the water went down in the tube? 4. What happened to the temperature and volume of air inside the test tube when it was dipped in hot water? 5. How does heat affect the volume of a gas? ________________________
Student Worksheet – Effect of Heat on Matter, 2 of 3
water
Fig. 15.3
DepEd‐NSTIC
34
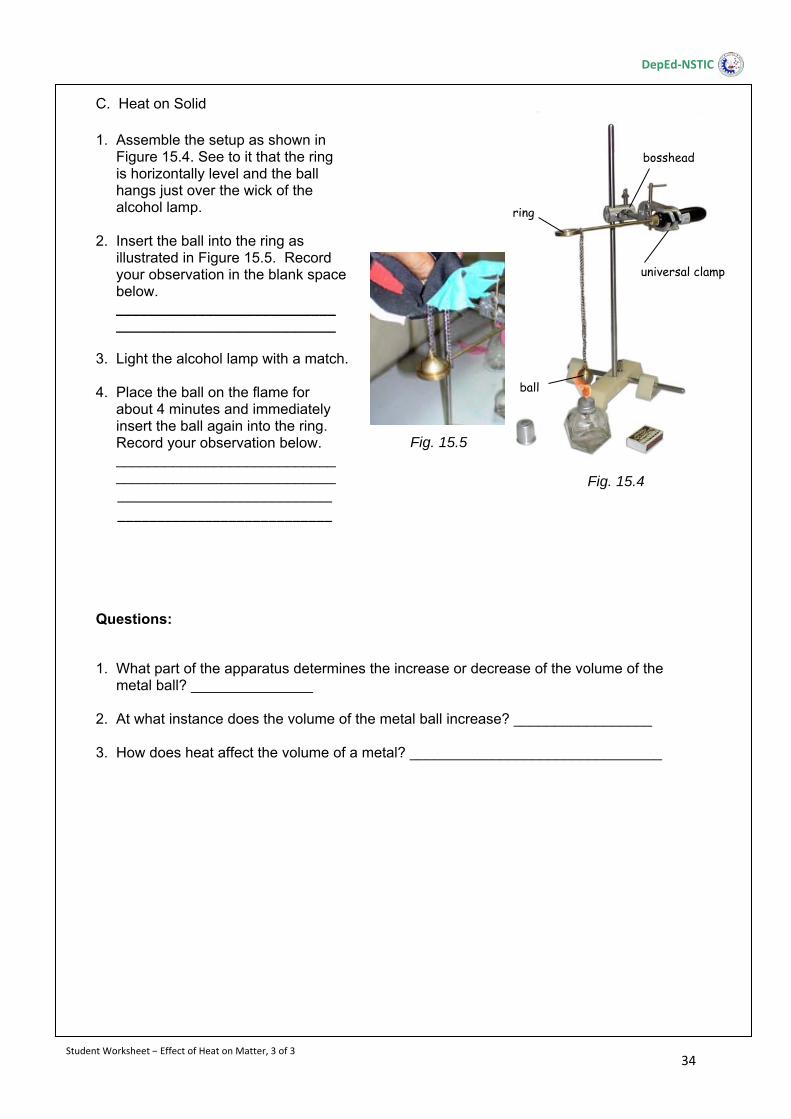
C. Heat on Solid 1. Assemble the setup as shown in Figure 15.4. See to it that the ring is horizontally level and the ball hangs just over the wick of the alcohol lamp. 2. Insert the ball into the ring as illustrated in Figure 15.5. Record your observation in the blank space below. ___________________________ ___________________________ 3. Light the alcohol lamp with a match. 4. Place the ball on the flame for about 4 minutes and immediately insert the ball again into the ring. Record your observation below. ___________________________ ___________________________ ___________________________ ___________________________
Questions:
1. What part of the apparatus determines the increase or decrease of the volume of the metal ball? _______________ 2. At what instance does the volume of the metal ball increase? _________________
3. How does heat affect the volume of a metal? _______________________________
bosshead
Student Worksheet – Effect of Heat on Matter, 3 of 3
ball
Fig. 15.5
DepEd‐NSTIC
Fig. 15.4
ring
universal clamp

Ms. Chadee, (please replace what is in the TG with this highlighted activity. Change “remember” to “teaching chart” Denotation and Connotation Find Out and Learn: Study the picture. What do you think is happening in the picture? Is there a celebration? What kind of a celebration it is? (Remove the second picture) Read the sentences below:
1. Feast is a celebration or a festival. 2. Feast is a happy occasion. 3. We hang buntings during festival. 4. Feast is a time to eat different and delicious foods.
Which of the sentences gave the direct meaning of the word feast? Which of the sentences gave the words that can be associated with the word feast? Which of the sentences expressed your emotions about the word feast?
Sentence number 1 gave the dictionary meaning of the word feast. This is called denotation. Sentences 3 and 4 gave some words that can be associated with the word feast, such as; buntings and eat different and delicious foods. This is called connotation. Sentence 2 expressed an emotion, one felt during feast day “happy occasion”. This is another way of giving the connotation of a word. Remember: We can understand a word is several ways. Using denotation and connotation is one of the ways that we can use to understand the meaning of a word.

Denotation is the exact, “dictionary” meaning of a word. Connotation is the emotions and associations attached to a word. These may not necessary be the proper definition found in the dictionary.
Try and Learn: Fill in the chart with the appropriate word/s. The first one is done for you. Given Word Denotation (dictionary
meaning of the word) Connotation (word/s and feeling/s that can be associated to a given word
1. student A person who attends school
reader, carries a bag, happy, play, study
2. home
3. park
4. school
5. market
6. hospital
Do and Learn Read the words and its meaning. Write letter D if the meaning provided is a Denotation and C if it is a Connotation.
1. doctor ________a. a person who is licensed to treat sick and injure people. ________b. a loving and friendly person
2. teacher ________a. a person who teaches students ________b. a person who is calm and giving

3. mother _________a. loving, cooks food _________b. a female parent
4. cat
_________a. playful, soft, and hairy _________b. a small domestic animal with fur
5. horse
_________a. runs fast, used by cowboys _________b. animal use for riding Learn Some More Sometimes words have different connotations to different people because of their experiences. A Connotation can be positive and negative. Example: The word study, for some people it has positive connotation because this can mean they will pass the test or get a high grade but for others it can be negative because this means that they have to sleep late and that they can’t watch their favorite TV program.
Let’s do these:
Which of the words below have positive connotations? Which words have negative connotations? Copy these words in your notebook. Write the word positive across the given word if it has positive connotation and the word negative if it is so.
1. Monster 2. Circus 3. Sunday 4. Holiday 5. Horror film 6. TV 7. Cellphone 8. Cleaning the house 9. Gardening 10. Going to a party 11. Friends

12. Worm 13. Flu 14. Liar 15. Success
On Index - page 318 Change Try and Learn to Do and Learn this should be written after the Remember.
a. Study the data in the Index below. What is wrong with this Index, copy this in your notebook and do the necessary changes.
b. From the given book information. Make an Index following the correct format. Do this in your notebook. 1. Kinds of Sentences: command page 73, declarative pages 65 – 66,
exclamatory page 74, interrogative pages 67 – 68 2. Syllables: stress pages 10 – 11, unstressed pages 10 – 11 3. Adjectives: comparison pages 146 – 148, order of adjectives pages
149 – 150 4. Nouns: count nouns page 57, mass nouns page 56, singular and plural
pages 50 -54 5. Adverbs: manner pages 174 – 176, 178, place pages 172 – 173, 176,
time pages 170 – 171, 176
Pollution,109–120
Effect,111–114Craters,336–338Butterflies,77–79Animals,20–46
Habitats,21–23,34,40 Lifecycles,24,26,29
Clouds,310–315 Kinds,312–314
Climate,253–268Earth,387–406
Air,400–404 Land,389–394 Water,395‐399

6. Prepositions pages 183, 185 – 187 7. Telephone conversations pages 33 – 35 8. Verbs pages 120 – 135
38
Objectives:
1. To determine the work input and work output of an inclined plane. 2. To compute the efficiency. 3. To cite ways of increasing the efficiency.
Materials and Equipment:
Instructions: Note: Set the spring balance to zero before using.
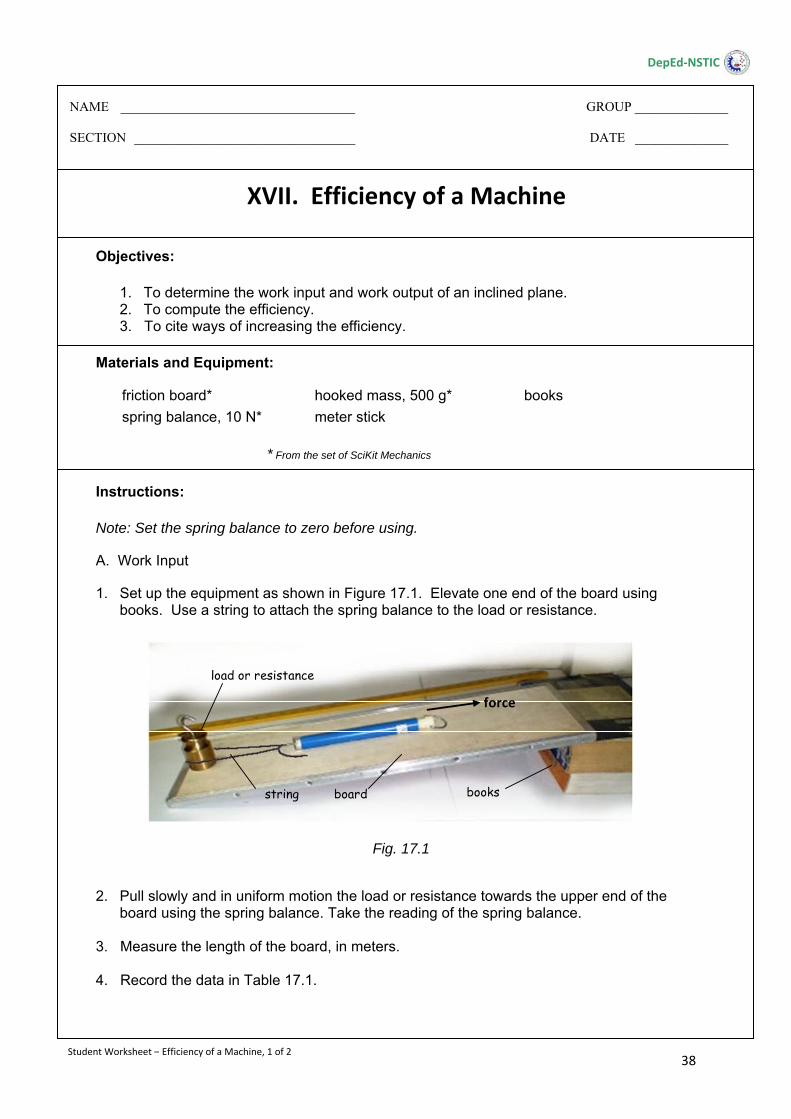
A. Work Input
1. Set up the equipment as shown in Figure 17.1. Elevate one end of the board using books. Use a string to attach the spring balance to the load or resistance.
2. Pull slowly and in uniform motion the load or resistance towards the upper end of the
board using the spring balance. Take the reading of the spring balance. 3. Measure the length of the board, in meters. 4. Record the data in Table 17.1.
friction board* hooked mass, 500 g* books
spring balance, 10 N* meter stick
board books string
force
load or resistance
XVII. Efficiency of a Machine
NAME ___________________________________ GROUP ______________
SECTION _________________________________ DATE ______________
DepEd‐NSTIC
Student Worksheet – Efficiency of a Machine, 1 of 2
Fig. 17.1
* From the set of SciKit Mechanics
39
B. Work Output
1. Measure the weight, in Newtons, of the load or resistance. 2. Measure the height or distance of the elevated end of the board from the table. 3. Record the data in Table 17.2. Data:
Table 17.1. Work input
Force (N)
Length of board (m)
Work input = effort force x length of board (N.m or Joule)
Table 17.2. Work output
Weight of load or resistance
(N)
Height
(m)
Work output = effort force x height
(N.m or Joule)
Questions: 1. How does work input compare to work output? 2. What is the quotient of work output divided by work input? ___________. When can a machine be called more efficient? 3. How can a machine like an inclined plane increase its efficiency?
Student Worksheet – Efficiency of a Machine, 2 of 2
DepEd‐NSTIC
40
Objectives:
1. To illustrate how a seismograph detects an earthquake. 2. To interpret the effects of earthquakes of different intensities. 3. To differentiate earthquake intensity from magnitude.
Materials and Equipment:
seismograph set poster, The Richter Magnitude Scale
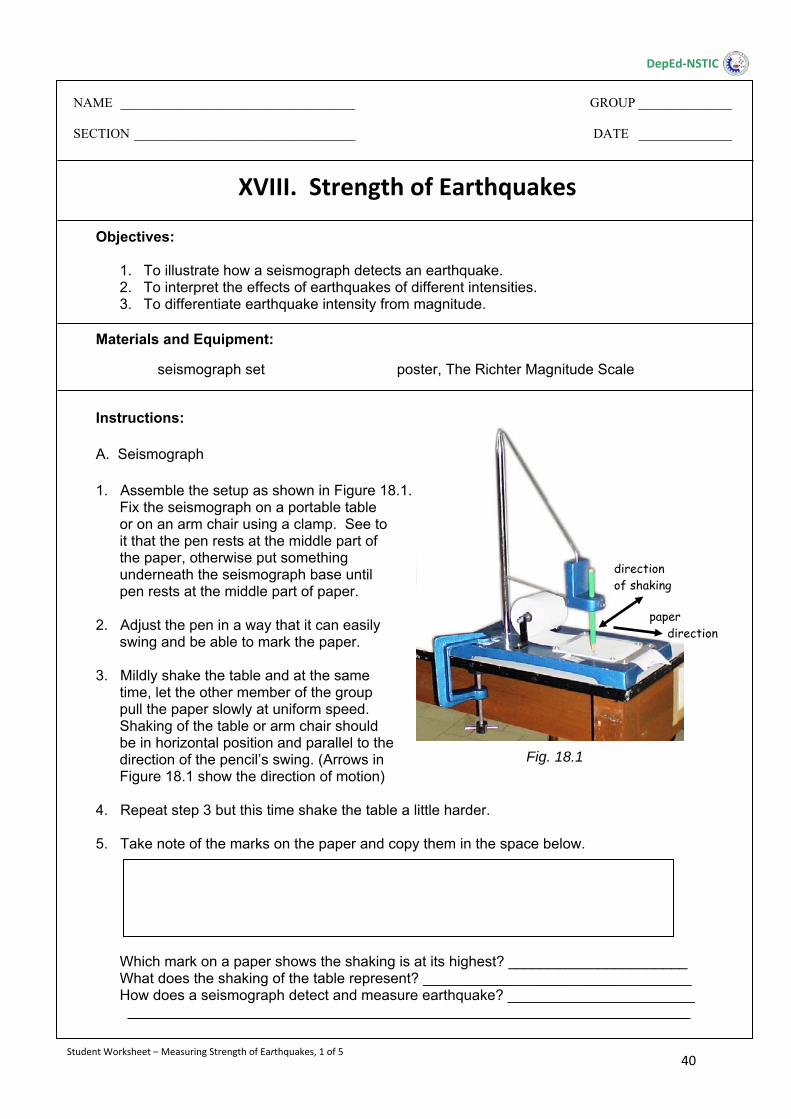
Instructions: A. Seismograph 1. Assemble the setup as shown in Figure 18.1.
Fix the seismograph on a portable table or on an arm chair using a clamp. See to it that the pen rests at the middle part of the paper, otherwise put something underneath the seismograph base until pen rests at the middle part of paper.
2. Adjust the pen in a way that it can easily
swing and be able to mark the paper.
3. Mildly shake the table and at the same time, let the other member of the group pull the paper slowly at uniform speed. Shaking of the table or arm chair should be in horizontal position and parallel to the direction of the pencil’s swing. (Arrows in Figure 18.1 show the direction of motion)
4. Repeat step 3 but this time shake the table a little harder.
5. Take note of the marks on the paper and copy them in the space below.
Which mark on a paper shows the shaking is at its highest? ______________________ What does the shaking of the table represent? _________________________________ How does a seismograph detect and measure earthquake? _______________________
XVIII. Strength of Earthquakes
NAME ___________________________________ GROUP ______________
SECTION _________________________________ DATE ______________
DepEd‐NSTIC
Fig. 18.1
direction of shaking
paper direction
Student Worksheet – Measuring Strength of Earthquakes, 1 of 5
41
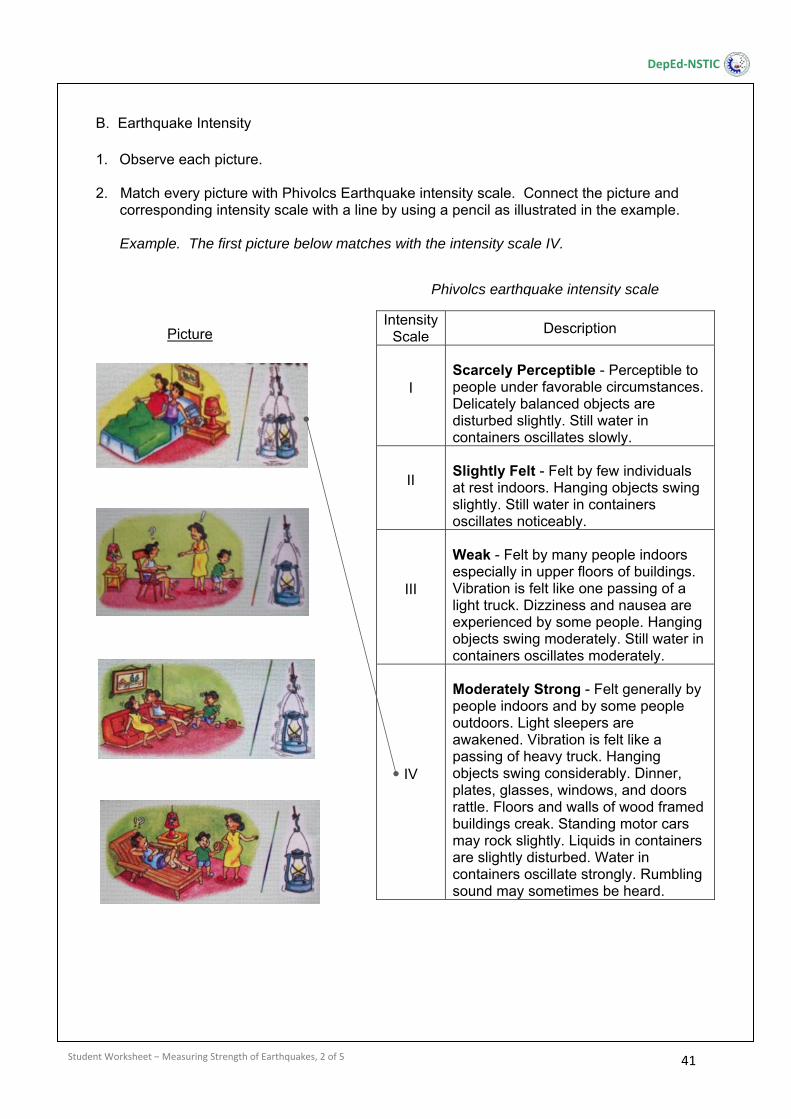
B. Earthquake Intensity 1. Observe each picture.
2. Match every picture with Phivolcs Earthquake intensity scale. Connect the picture and
corresponding intensity scale with a line by using a pencil as illustrated in the example.
Example. The first picture below matches with the intensity scale IV.
Picture
Student Worksheet – Measuring Strength of Earthquakes, 2 of 5
Intensity Scale
Description
I Scarcely Perceptible - Perceptible to people under favorable circumstances. Delicately balanced objects are disturbed slightly. Still water in containers oscillates slowly.
II Slightly Felt - Felt by few individuals at rest indoors. Hanging objects swing slightly. Still water in containers oscillates noticeably.
III
Weak - Felt by many people indoors especially in upper floors of buildings. Vibration is felt like one passing of a light truck. Dizziness and nausea are experienced by some people. Hanging objects swing moderately. Still water in containers oscillates moderately.
IV
Moderately Strong - Felt generally by people indoors and by some people outdoors. Light sleepers are awakened. Vibration is felt like a passing of heavy truck. Hanging objects swing considerably. Dinner, plates, glasses, windows, and doors rattle. Floors and walls of wood framed buildings creak. Standing motor cars may rock slightly. Liquids in containers are slightly disturbed. Water in containers oscillate strongly. Rumbling sound may sometimes be heard.
Phivolcs earthquake intensity scale
DepEd‐NSTIC
42
Student Worksheet – Measuring Strength of Earthquakes, 3 of 5
Intensity Scale
Description
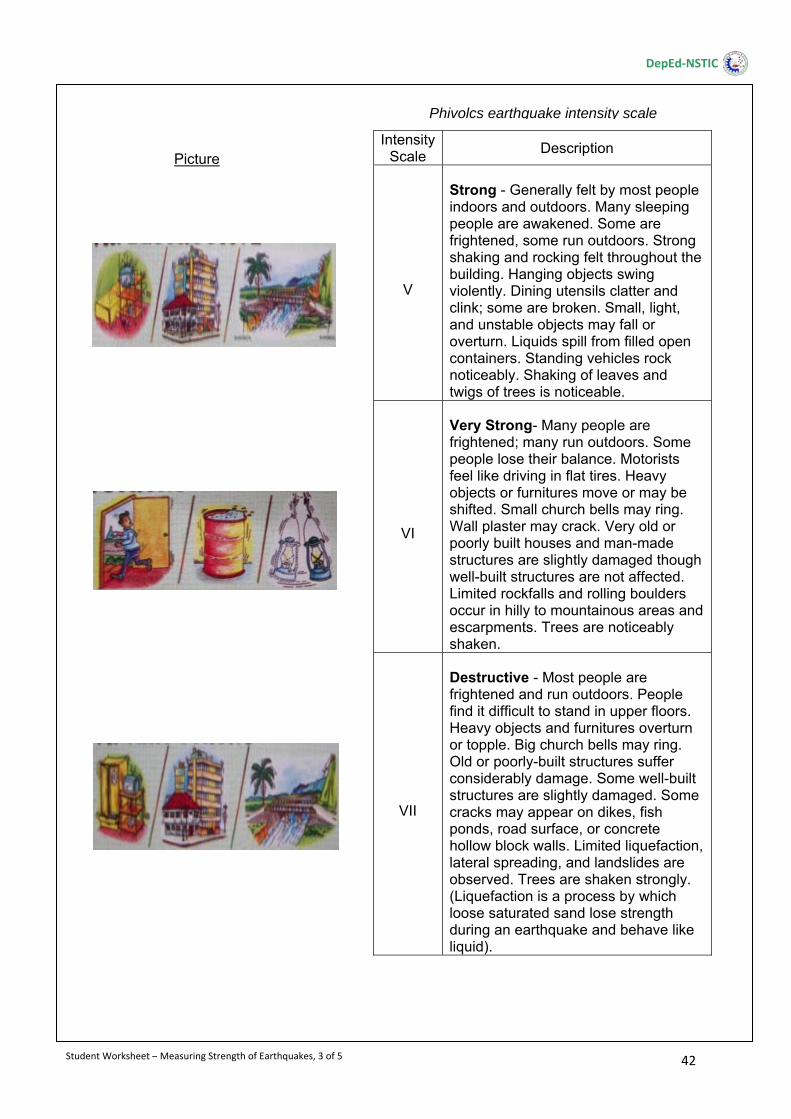
V
Strong - Generally felt by most people indoors and outdoors. Many sleeping people are awakened. Some are frightened, some run outdoors. Strong shaking and rocking felt throughout the building. Hanging objects swing violently. Dining utensils clatter and clink; some are broken. Small, light, and unstable objects may fall or overturn. Liquids spill from filled open containers. Standing vehicles rock noticeably. Shaking of leaves and twigs of trees is noticeable.
VI
Very Strong- Many people are frightened; many run outdoors. Some people lose their balance. Motorists feel like driving in flat tires. Heavy objects or furnitures move or may be shifted. Small church bells may ring. Wall plaster may crack. Very old or poorly built houses and man-made structures are slightly damaged though well-built structures are not affected. Limited rockfalls and rolling boulders occur in hilly to mountainous areas and escarpments. Trees are noticeably shaken.
VII
Destructive - Most people are frightened and run outdoors. People find it difficult to stand in upper floors. Heavy objects and furnitures overturn or topple. Big church bells may ring. Old or poorly-built structures suffer considerably damage. Some well-built structures are slightly damaged. Some cracks may appear on dikes, fish ponds, road surface, or concrete hollow block walls. Limited liquefaction, lateral spreading, and landslides are observed. Trees are shaken strongly. (Liquefaction is a process by which loose saturated sand lose strength during an earthquake and behave like liquid).
Picture
Phivolcs earthquake intensity scale
DepEd‐NSTIC

43
Intensity Scale
Description
VIII
Very Destructive - People panick and find it difficult to stand even in outdoors. Many well-built buildings are considerably damaged. Concrete dikes and foundation of bridges are destroyed by ground settling or toppling. Railway tracks are bent or broken. Tombstones may be displaced, twisted, or overturned. Utility posts, towers, and monuments mat tilt or topple. Water and sewer pipes may be bent, twisted, or broken. Liquefaction and lateral spreading cause man-made structure to sink, tilt, or topple. Numerous landslides and rockfalls occur in mountainous and hilly areas. Boulders are thrown out from their positions particularly near the epicenter. Fissures and faults rapture may be observed. Trees are violently shaken. Water splash or stop over dikes or banks of rivers.
IX
Devastating - People are forcibly thrown to ground. Many cry and shake with fear. Most buildings are totally damaged. Bridges and elevated concrete structures are toppled or destroyed. Numerous utility posts, towers, and monument are tilted, toppled, or broken. Water sewer pipes are bent, twisted, or broken. Landslides and liquefaction with lateral spreadings and sandboils are widespread. The ground is distorted into undulations. Trees are shaken very violently, some are toppled, or broken. Boulders are commonly thrown out. River water splashes violently on slops over dikes and banks.
X
Completely Devastating - Practically all man-made structures are destroyed. Massive landslides and liquefaction, large scale subsidence and uplifting of land forms, and many ground fissures are observed. Changes in river courses and destructive seiches in large lakes occur. Many trees are toppled, broken, and uprooted.
Student Worksheet – Measuring Strength of Earthquakes, 4 of 5
Picture
Phivolcs earthquake intensity scale
DepEd‐NSTIC
44
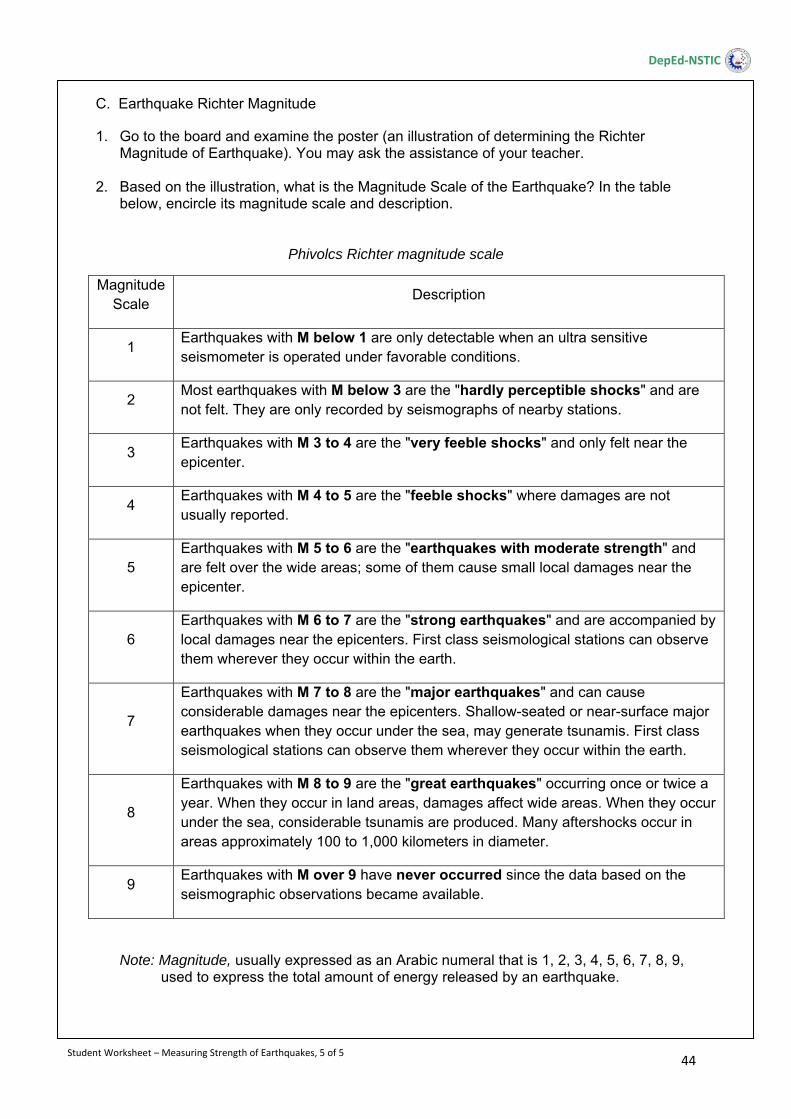
C. Earthquake Richter Magnitude
1. Go to the board and examine the poster (an illustration of determining the Richter Magnitude of Earthquake). You may ask the assistance of your teacher.
2. Based on the illustration, what is the Magnitude Scale of the Earthquake? In the table
below, encircle its magnitude scale and description.
Phivolcs Richter magnitude scale
Magnitude Scale
Description
1 Earthquakes with M below 1 are only detectable when an ultra sensitive seismometer is operated under favorable conditions.
2 Most earthquakes with M below 3 are the "hardly perceptible shocks" and are not felt. They are only recorded by seismographs of nearby stations.
3 Earthquakes with M 3 to 4 are the "very feeble shocks" and only felt near the epicenter.
4 Earthquakes with M 4 to 5 are the "feeble shocks" where damages are not usually reported.
5 Earthquakes with M 5 to 6 are the "earthquakes with moderate strength" and are felt over the wide areas; some of them cause small local damages near the epicenter.
6 Earthquakes with M 6 to 7 are the "strong earthquakes" and are accompanied by local damages near the epicenters. First class seismological stations can observe them wherever they occur within the earth.
7
Earthquakes with M 7 to 8 are the "major earthquakes" and can cause considerable damages near the epicenters. Shallow-seated or near-surface major earthquakes when they occur under the sea, may generate tsunamis. First class seismological stations can observe them wherever they occur within the earth.
8
Earthquakes with M 8 to 9 are the "great earthquakes" occurring once or twice a year. When they occur in land areas, damages affect wide areas. When they occur under the sea, considerable tsunamis are produced. Many aftershocks occur in areas approximately 100 to 1,000 kilometers in diameter.
9 Earthquakes with M over 9 have never occurred since the data based on the seismographic observations became available.
Note: Magnitude, usually expressed as an Arabic numeral that is 1, 2, 3, 4, 5, 6, 7, 8, 9, used to express the total amount of energy released by an earthquake.
Student Worksheet – Measuring Strength of Earthquakes, 5 of 5
DepEd‐NSTIC
45
Objective:
To identify the active and inactive volcanoes of the Philippines.
Material: map of Philippine volcanoes
Instructions:
1. Make use of the map of Philippine volcanoes. Identify how many active and inactive volcanoes in every major geographical division of the Philippines.
2. Record the data in Table 19.1.
Table 19.1. Number of active and inactive volcanoes of the Philippines
Questions: 1. Which of the Philippines’ geographical divisions has the highest number of active
volcanoes? _________________ 2. Which geographical division has the highest number of inactive volcanoes? __________ 3. How many active volcanoes are there in the Philippines? ___________________ 4. How many inactive volcanoes are there in the Philippines? ___________________
Geographical Divisions Active Volcanoes Inactive Volcanoes
Luzon Visayas Mindanao
XIX. Volcanoes of the Philippines
NAME ___________________________________ GROUP ______________
SECTION _________________________________ DATE ______________
DepEd‐NSTIC
Student Worksheet – Volcanoes and Fault of Philippines, 1 of 1
46
Objectives:
1. To identify the names of minerals and rock samples. 2. To familiarize with the features of the samples.
Materials and Equipment: rock samples hand lens
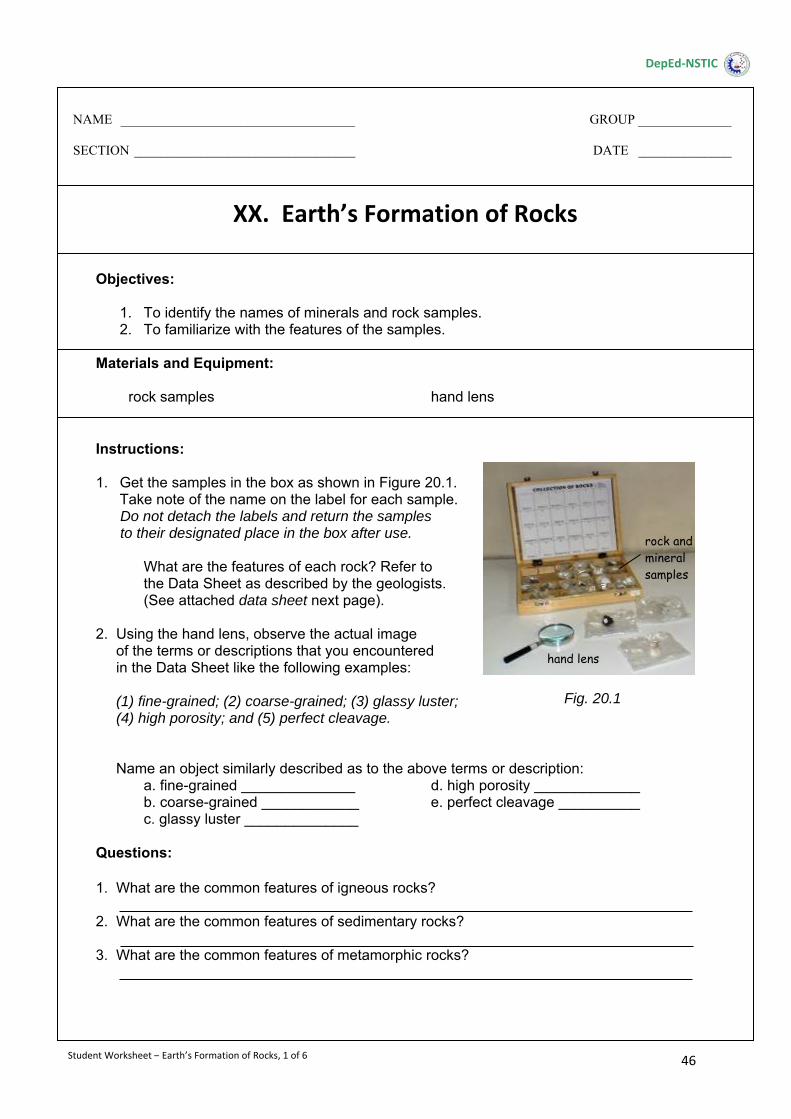
Instructions: 1. Get the samples in the box as shown in Figure 20.1.
Take note of the name on the label for each sample. Do not detach the labels and return the samples to their designated place in the box after use.
What are the features of each rock? Refer to the Data Sheet as described by the geologists. (See attached data sheet next page).
2. Using the hand lens, observe the actual image of the terms or descriptions that you encountered in the Data Sheet like the following examples: (1) fine-grained; (2) coarse-grained; (3) glassy luster; (4) high porosity; and (5) perfect cleavage. Name an object similarly described as to the above terms or description: a. fine-grained ______________ d. high porosity _____________ b. coarse-grained ____________ e. perfect cleavage __________ c. glassy luster ______________ Questions: 1. What are the common features of igneous rocks? 2. What are the common features of sedimentary rocks? 3. What are the common features of metamorphic rocks?
XX. Earth’s Formation of Rocks
NAME ___________________________________ GROUP ______________
SECTION _________________________________ DATE ______________
DepEd‐NSTIC
hand lens
rock and mineral samples
Fig. 20.1
Student Worksheet – Earth’s Formation of Rocks, 1 of 6
47
Data Sheet Minerals and Rocks
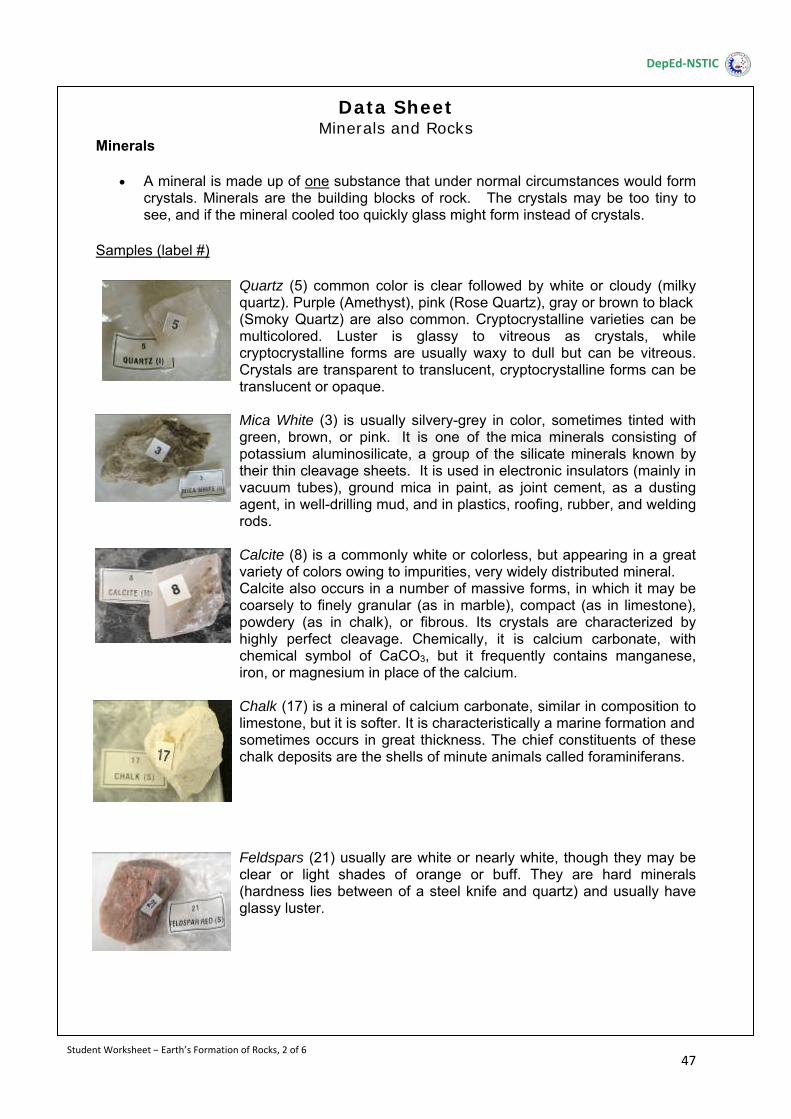
Minerals
A mineral is made up of one substance that under normal circumstances would form crystals. Minerals are the building blocks of rock. The crystals may be too tiny to see, and if the mineral cooled too quickly glass might form instead of crystals.
Samples (label #)
Quartz (5) common color is clear followed by white or cloudy (milky quartz). Purple (Amethyst), pink (Rose Quartz), gray or brown to black (Smoky Quartz) are also common. Cryptocrystalline varieties can be multicolored. Luster is glassy to vitreous as crystals, while cryptocrystalline forms are usually waxy to dull but can be vitreous. Crystals are transparent to translucent, cryptocrystalline forms can be translucent or opaque.
Mica White (3) is usually silvery-grey in color, sometimes tinted with green, brown, or pink. It is one of the mica minerals consisting of potassium aluminosilicate, a group of the silicate minerals known by their thin cleavage sheets. It is used in electronic insulators (mainly in vacuum tubes), ground mica in paint, as joint cement, as a dusting agent, in well-drilling mud, and in plastics, roofing, rubber, and welding rods.
Calcite (8) is a commonly white or colorless, but appearing in a great variety of colors owing to impurities, very widely distributed mineral. Calcite also occurs in a number of massive forms, in which it may be coarsely to finely granular (as in marble), compact (as in limestone), powdery (as in chalk), or fibrous. Its crystals are characterized by highly perfect cleavage. Chemically, it is calcium carbonate, with chemical symbol of CaCO3, but it frequently contains manganese, iron, or magnesium in place of the calcium.
Chalk (17) is a mineral of calcium carbonate, similar in composition to limestone, but it is softer. It is characteristically a marine formation and sometimes occurs in great thickness. The chief constituents of these chalk deposits are the shells of minute animals called foraminiferans.
Feldspars (21) usually are white or nearly white, though they may be clear or light shades of orange or buff. They are hard minerals (hardness lies between of a steel knife and quartz) and usually have glassy luster.
Student Worksheet – Earth’s Formation of Rocks, 2 of 6
DepEd‐NSTIC
48
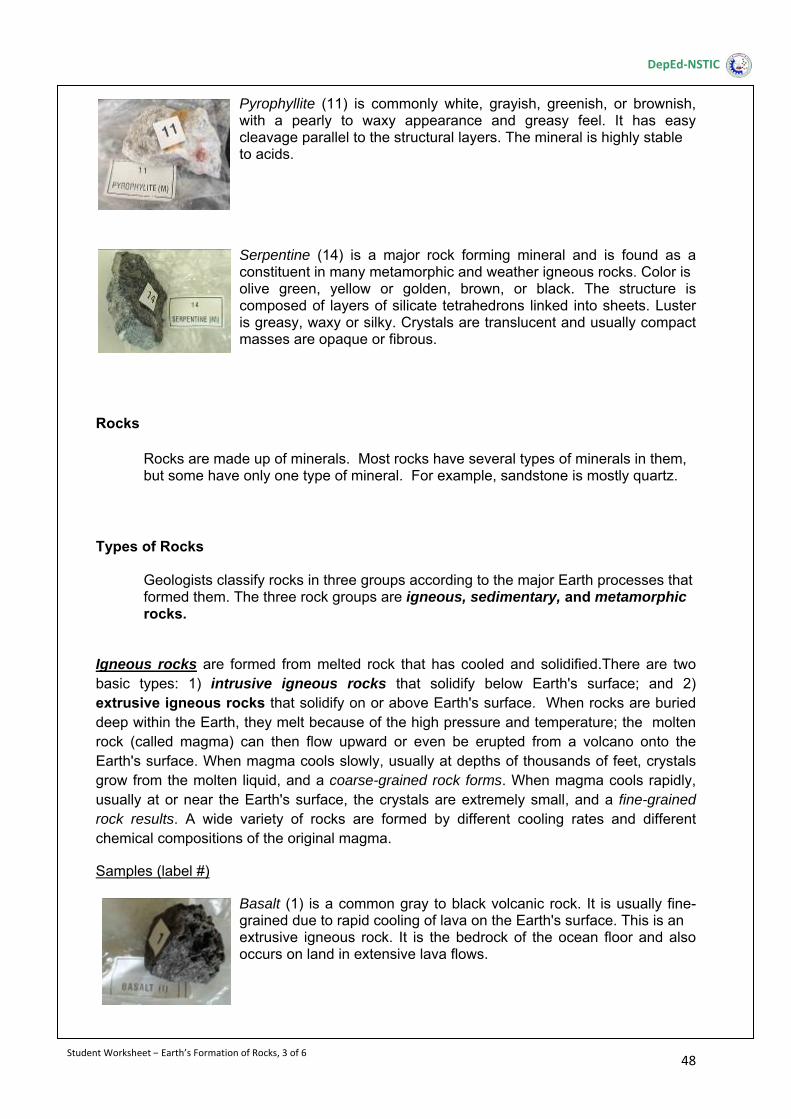
Pyrophyllite (11) is commonly white, grayish, greenish, or brownish, with a pearly to waxy appearance and greasy feel. It has easy cleavage parallel to the structural layers. The mineral is highly stable to acids.
Serpentine (14) is a major rock forming mineral and is found as a constituent in many metamorphic and weather igneous rocks. Color is olive green, yellow or golden, brown, or black. The structure is composed of layers of silicate tetrahedrons linked into sheets. Luster is greasy, waxy or silky. Crystals are translucent and usually compact masses are opaque or fibrous.
Rocks
Rocks are made up of minerals. Most rocks have several types of minerals in them, but some have only one type of mineral. For example, sandstone is mostly quartz.
Types of Rocks
Geologists classify rocks in three groups according to the major Earth processes that formed them. The three rock groups are igneous, sedimentary, and metamorphic rocks.
Igneous rocks are formed from melted rock that has cooled and solidified.There are two basic types: 1) intrusive igneous rocks that solidify below Earth's surface; and 2) extrusive igneous rocks that solidify on or above Earth's surface. When rocks are buried deep within the Earth, they melt because of the high pressure and temperature; the molten rock (called magma) can then flow upward or even be erupted from a volcano onto the Earth's surface. When magma cools slowly, usually at depths of thousands of feet, crystals grow from the molten liquid, and a coarse-grained rock forms. When magma cools rapidly, usually at or near the Earth's surface, the crystals are extremely small, and a fine-grained rock results. A wide variety of rocks are formed by different cooling rates and different chemical compositions of the original magma.
Samples (label #)
Basalt (1) is a common gray to black volcanic rock. It is usually fine-grained due to rapid cooling of lava on the Earth's surface. This is an extrusive igneous rock. It is the bedrock of the ocean floor and also occurs on land in extensive lava flows.
Student Worksheet – Earth’s Formation of Rocks, 3 of 6
DepEd‐NSTIC

49
Granite (2) is a light colored, coarse-grained, intrusive igneous rock that contains mainly quartz and feldspar minerals.
Pumice (4)is a light-colored vesicular igneous rock. It forms through very rapid solidification of a melt. The vesicular texture is a result of gas trapped in the melt at the time of solidification.
Rhyolite (6) is a light-colored, fine-grained, extrusive igneous rock that typically contains quartz and feldspar minerals.
Biotite (7) is a common rock-forming silicate mineral. It is a mica found in many types of igneous rocks and in some metamorphic rocks. It is easily recognized because of its perfect cleavage that allows it to separate into thin, black, flexible sheets.
Sedimentary rocks are formed at the surface of the Earth, either in water or on land. They are layered accumulations of sediments-fragments of rocks, minerals, or animal or plant material. Temperatures and pressures are low at the Earth's surface, and sedimentary rocks show this fact by their appearance and the minerals they contain. Most sedimentary rocks become cemented together by minerals and chemicals or are held together by electrical attraction; some, however, remain loose and unconsolidated. The layers are normally parallel or nearly parallel to the Earth's surface; if they are at high angles to the surface or are twisted or broken, some kind of Earth movement has occurred since the rock was formed. Samples (label #)
Bituminous coal or black coal (16) is usually black, sometimes dark brown, often with well- defined bands of bright and dull material. Bituminous coal seams are stratigraphically identified by the distinctive sequence of bright and dark bands and are classified accordingly as either "dull, bright-banded" or "bright, dull-banded" and so on. Relatively soft coal containing a tarlike substance called bitumen.
Student Worksheet – Earth’s Formation of Rocks, 4 of 6
DepEd‐NSTIC
50
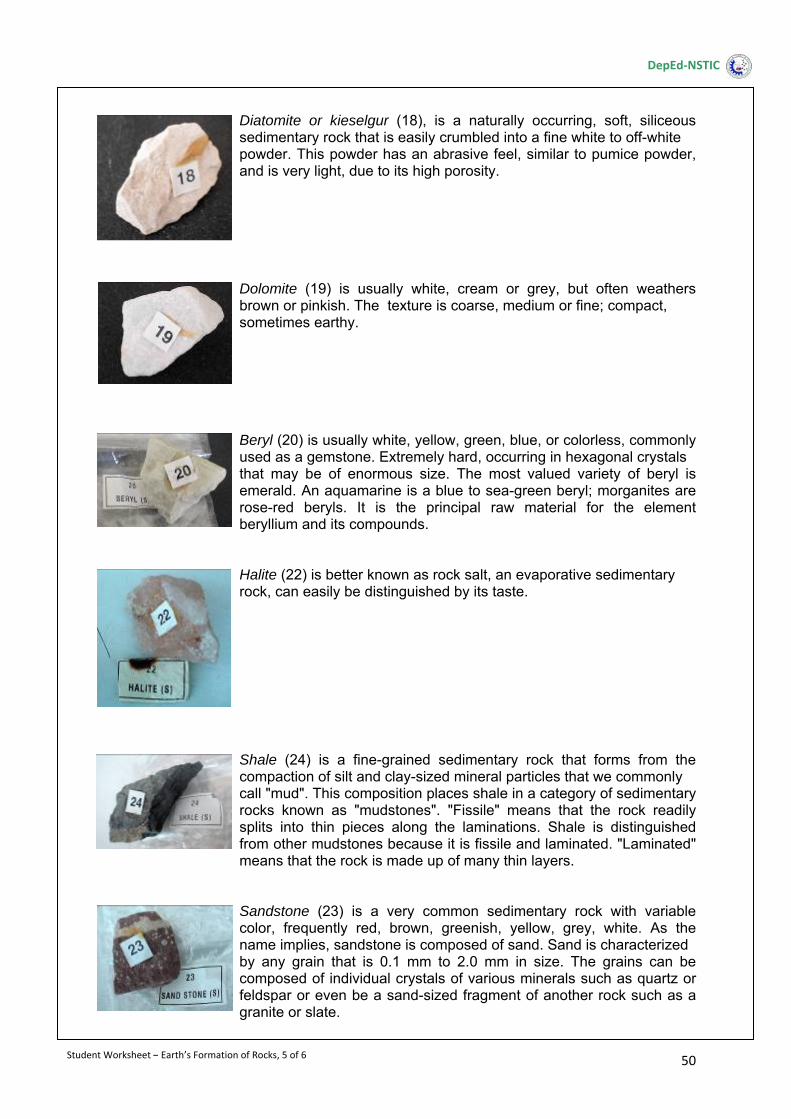
Diatomite or kieselgur (18), is a naturally occurring, soft, siliceous sedimentary rock that is easily crumbled into a fine white to off-white powder. This powder has an abrasive feel, similar to pumice powder, and is very light, due to its high porosity.
Dolomite (19) is usually white, cream or grey, but often weathers brown or pinkish. The texture is coarse, medium or fine; compact, sometimes earthy.
Beryl (20) is usually white, yellow, green, blue, or colorless, commonly used as a gemstone. Extremely hard, occurring in hexagonal crystals that may be of enormous size. The most valued variety of beryl is emerald. An aquamarine is a blue to sea-green beryl; morganites are rose-red beryls. It is the principal raw material for the element beryllium and its compounds.
Halite (22) is better known as rock salt, an evaporative sedimentary rock, can easily be distinguished by its taste.
Shale (24) is a fine-grained sedimentary rock that forms from the compaction of silt and clay-sized mineral particles that we commonly call "mud". This composition places shale in a category of sedimentary rocks known as "mudstones". "Fissile" means that the rock readily splits into thin pieces along the laminations. Shale is distinguished from other mudstones because it is fissile and laminated. "Laminated" means that the rock is made up of many thin layers.
Sandstone (23) is a very common sedimentary rock with variable color, frequently red, brown, greenish, yellow, grey, white. As the name implies, sandstone is composed of sand. Sand is characterized by any grain that is 0.1 mm to 2.0 mm in size. The grains can be composed of individual crystals of various minerals such as quartz or feldspar or even be a sand-sized fragment of another rock such as a granite or slate.
Student Worksheet – Earth’s Formation of Rocks, 5 of 6
DepEd‐NSTIC
51
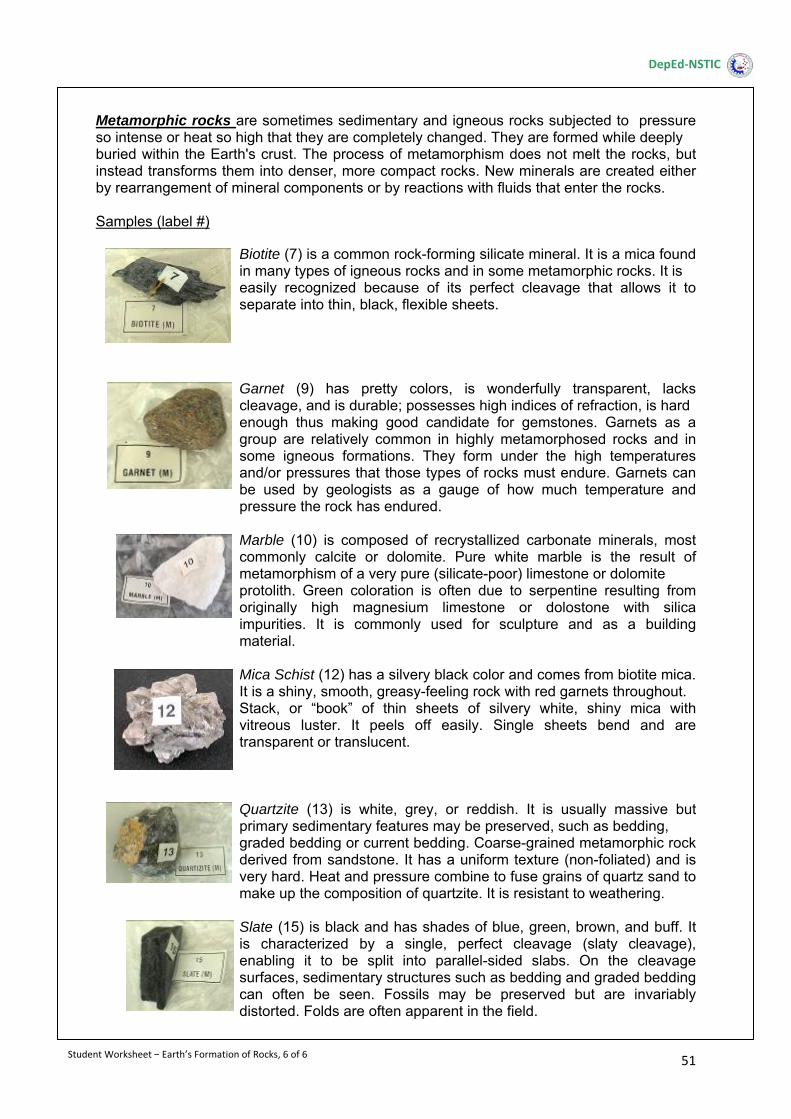
Metamorphic rocks are sometimes sedimentary and igneous rocks subjected to pressure so intense or heat so high that they are completely changed. They are formed while deeply buried within the Earth's crust. The process of metamorphism does not melt the rocks, but instead transforms them into denser, more compact rocks. New minerals are created either by rearrangement of mineral components or by reactions with fluids that enter the rocks.
Samples (label #)
Biotite (7) is a common rock-forming silicate mineral. It is a mica found in many types of igneous rocks and in some metamorphic rocks. It is easily recognized because of its perfect cleavage that allows it to separate into thin, black, flexible sheets.
Garnet (9) has pretty colors, is wonderfully transparent, lacks cleavage, and is durable; possesses high indices of refraction, is hard enough thus making good candidate for gemstones. Garnets as a group are relatively common in highly metamorphosed rocks and in some igneous formations. They form under the high temperatures and/or pressures that those types of rocks must endure. Garnets can be used by geologists as a gauge of how much temperature and pressure the rock has endured.
Marble (10) is composed of recrystallized carbonate minerals, most commonly calcite or dolomite. Pure white marble is the result of metamorphism of a very pure (silicate-poor) limestone or dolomite protolith. Green coloration is often due to serpentine resulting from originally high magnesium limestone or dolostone with silica impurities. It is commonly used for sculpture and as a building material.
Mica Schist (12) has a silvery black color and comes from biotite mica. It is a shiny, smooth, greasy-feeling rock with red garnets throughout. Stack, or “book” of thin sheets of silvery white, shiny mica with vitreous luster. It peels off easily. Single sheets bend and are transparent or translucent.
Quartzite (13) is white, grey, or reddish. It is usually massive but primary sedimentary features may be preserved, such as bedding, graded bedding or current bedding. Coarse-grained metamorphic rock derived from sandstone. It has a uniform texture (non-foliated) and is very hard. Heat and pressure combine to fuse grains of quartz sand to make up the composition of quartzite. It is resistant to weathering.
Slate (15) is black and has shades of blue, green, brown, and buff. It is characterized by a single, perfect cleavage (slaty cleavage), enabling it to be split into parallel-sided slabs. On the cleavage surfaces, sedimentary structures such as bedding and graded bedding can often be seen. Fossils may be preserved but are invariably distorted. Folds are often apparent in the field.
Student Worksheet – Earth’s Formation of Rocks, 6 of 6
DepEd‐NSTIC
52
Objectives:
1. To measure and record the atmospheric condition. 2. To present the atmospheric condition in a graph. 3. To predict the weather condition.
Materials and Equipment:
anemometer with wind vane 2 stand supports* aneroid barometer stand base* 2 thermometers stand rod, 500 mm long* rain gauge stand rod, 250 mm long* multi-clamp* cloth, 50 mm x 100 mm beaker, 250 mL colored pen/pencils 2 strings, 200 mm long water
Instructions: 1. Go to the designated stations where the instruments are located. Refer to the
instructions posted in each station.
Station 1. Air Temperature Station 4. Wind Speed and Wind Direction Station 2. Air Pressure Station 5. Cloud Cover Station 3. Relative Humidity Station 6. Rainfall 2. Get the readings of these instruments and record the observed atmospheric conditions
in Table 21.1 of the weather chart on page 54. (Refer to Table 21.2 of the sample weather chart on page 55). Note: If possible, make measurements at different times of the day for several days.
3. Prepare a graph of temperature, relative humidity, and pressure. Plot these variables on the same graph (Graph 21.1 of the weather chart on page 54) for easier comparison.
4. Use a different axis and pen color for each variable. Plot the time on the X-axis. (Refer to Graph 21.2 in the weather chart sample on page 55).
5. Discuss with your group and make a prediction for the weather for the next day. Cite the basis for your prediction.
XXI. Weather Observation
NAME ____________________________________ GROUP ______________
SECTION _________________________________ DATE ______________
DepEd‐NSTIC
Student Worksheet – Weather Observation, 1 of 11
* From the set of SciKit Basic
53
Questions:
1. Which variable shows a regular daily pattern? How would you explain this? 2. How does the temperature change from day to day?
3. Is there a relationship between temperature and pressure? What happens to the temperature when the pressure decreases or increases?
4. Which do you think is more difficult, making an accurate forecast for upcoming weather
for the next few hours, or a forecast for the entire week? Explain.
Student Worksheet – Weather Observation, 2 of 11
DepEd‐NSTIC

Ms. Chadee, (please replace what is in the TG with this highlighted activity. Change “remember” to “teaching chart” Denotation and Connotation Find Out and Learn: Study the picture. What do you think is happening in the picture? Is there a celebration? What kind of a celebration it is? (Remove the second picture) Read the sentences below:
1. Feast is a celebration or a festival. 2. Feast is a happy occasion. 3. We hang buntings during festival. 4. Feast is a time to eat different and delicious foods.
Which of the sentences gave the direct meaning of the word feast? Which of the sentences gave the words that can be associated with the word feast? Which of the sentences expressed your emotions about the word feast?
Sentence number 1 gave the dictionary meaning of the word feast. This is called denotation. Sentences 3 and 4 gave some words that can be associated with the word feast, such as; buntings and eat different and delicious foods. This is called connotation. Sentence 2 expressed an emotion, one felt during feast day “happy occasion”. This is another way of giving the connotation of a word. Remember: We can understand a word is several ways. Using denotation and connotation is one of the ways that we can use to understand the meaning of a word.
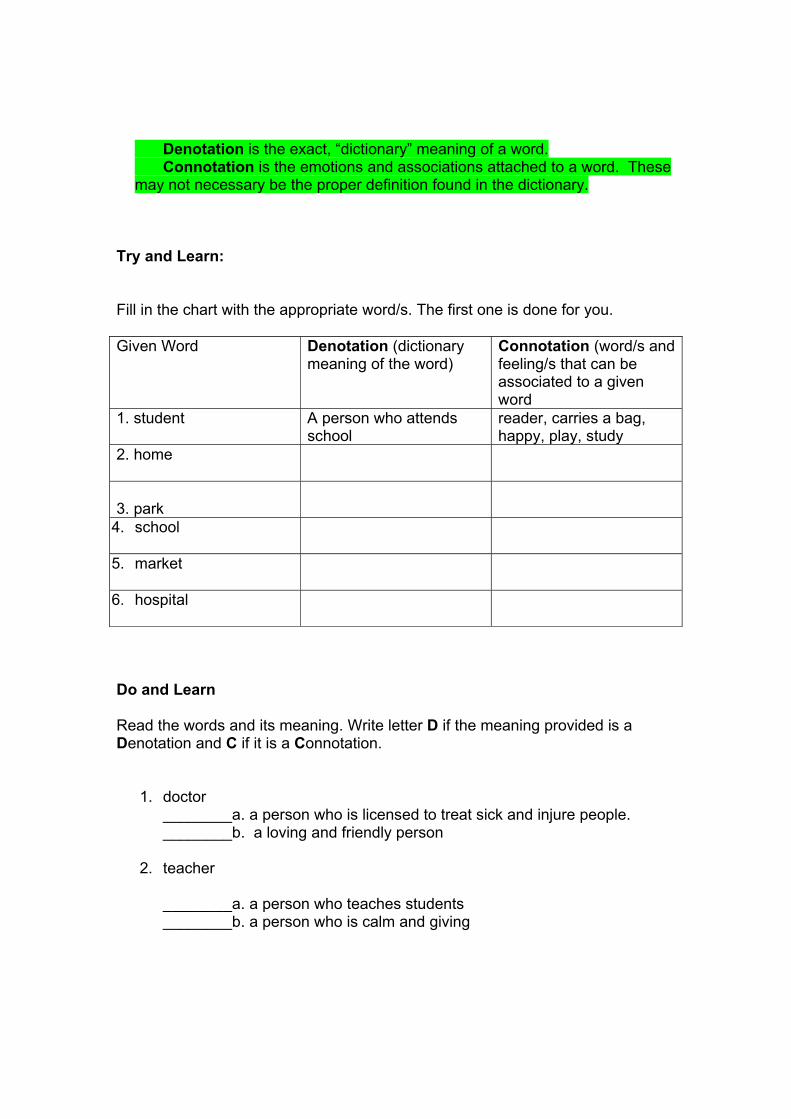
Denotation is the exact, “dictionary” meaning of a word. Connotation is the emotions and associations attached to a word. These may not necessary be the proper definition found in the dictionary.
Try and Learn: Fill in the chart with the appropriate word/s. The first one is done for you. Given Word Denotation (dictionary
meaning of the word) Connotation (word/s and feeling/s that can be associated to a given word
1. student A person who attends school
reader, carries a bag, happy, play, study
2. home
3. park
4. school
5. market
6. hospital
Do and Learn Read the words and its meaning. Write letter D if the meaning provided is a Denotation and C if it is a Connotation.
1. doctor ________a. a person who is licensed to treat sick and injure people. ________b. a loving and friendly person
2. teacher ________a. a person who teaches students ________b. a person who is calm and giving
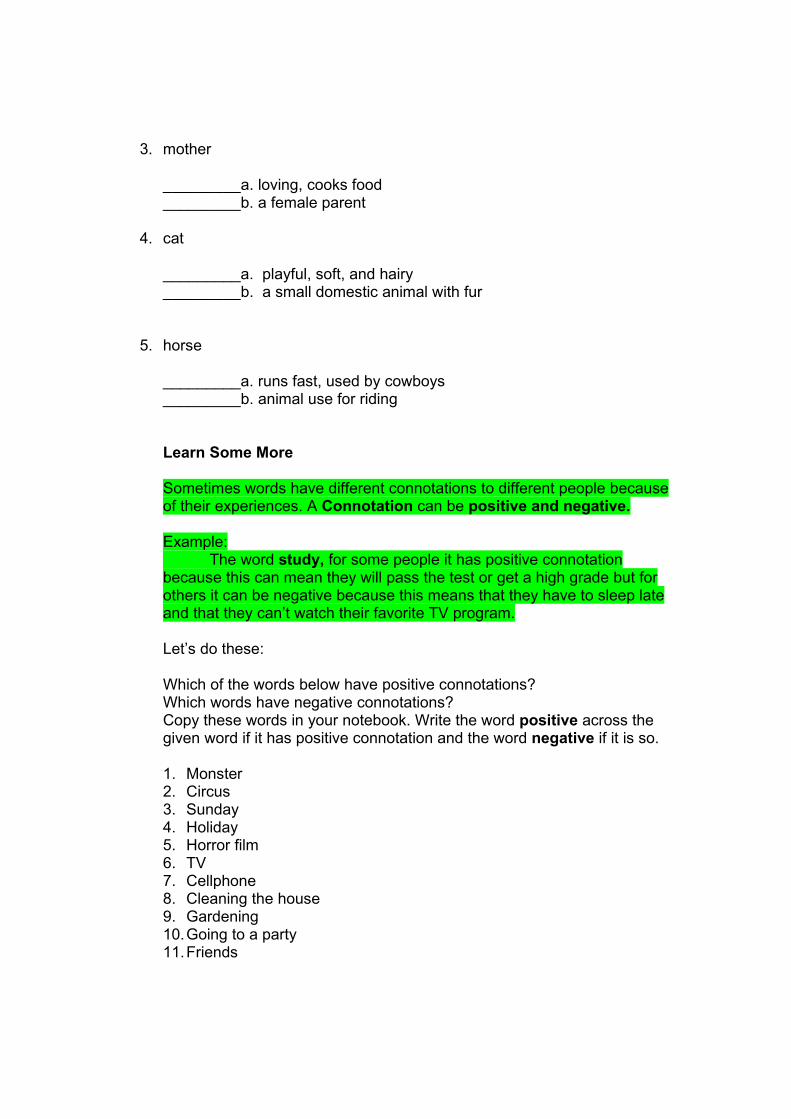
3. mother _________a. loving, cooks food _________b. a female parent
4. cat
_________a. playful, soft, and hairy _________b. a small domestic animal with fur
5. horse
_________a. runs fast, used by cowboys _________b. animal use for riding Learn Some More Sometimes words have different connotations to different people because of their experiences. A Connotation can be positive and negative. Example: The word study, for some people it has positive connotation because this can mean they will pass the test or get a high grade but for others it can be negative because this means that they have to sleep late and that they can’t watch their favorite TV program.
Let’s do these:
Which of the words below have positive connotations? Which words have negative connotations? Copy these words in your notebook. Write the word positive across the given word if it has positive connotation and the word negative if it is so.
1. Monster 2. Circus 3. Sunday 4. Holiday 5. Horror film 6. TV 7. Cellphone 8. Cleaning the house 9. Gardening 10. Going to a party 11. Friends

12. Worm 13. Flu 14. Liar 15. Success
On Index - page 318 Change Try and Learn to Do and Learn this should be written after the Remember.
a. Study the data in the Index below. What is wrong with this Index, copy this in your notebook and do the necessary changes.
b. From the given book information. Make an Index following the correct format. Do this in your notebook. 1. Kinds of Sentences: command page 73, declarative pages 65 – 66,
exclamatory page 74, interrogative pages 67 – 68 2. Syllables: stress pages 10 – 11, unstressed pages 10 – 11 3. Adjectives: comparison pages 146 – 148, order of adjectives pages
149 – 150 4. Nouns: count nouns page 57, mass nouns page 56, singular and plural
pages 50 -54 5. Adverbs: manner pages 174 – 176, 178, place pages 172 – 173, 176,
time pages 170 – 171, 176
Pollution,109–120
Effect,111–114Craters,336–338Butterflies,77–79Animals,20–46
Habitats,21–23,34,40 Lifecycles,24,26,29
Clouds,310–315 Kinds,312–314
Climate,253–268Earth,387–406
Air,400–404 Land,389–394 Water,395‐399

6. Prepositions pages 183, 185 – 187 7. Telephone conversations pages 33 – 35 8. Verbs pages 120 – 135
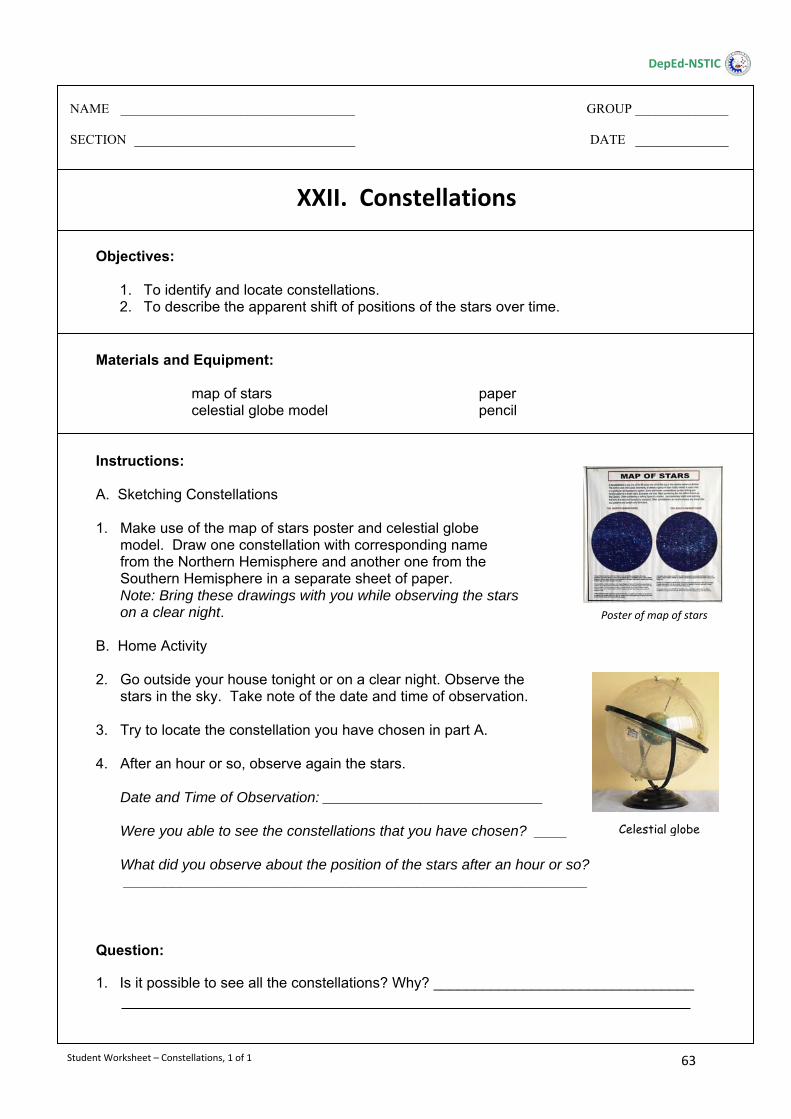
63
Objectives:
1. To identify and locate constellations. 2. To describe the apparent shift of positions of the stars over time.
Materials and Equipment: map of stars paper celestial globe model pencil Instructions: A. Sketching Constellations 1. Make use of the map of stars poster and celestial globe model. Draw one constellation with corresponding name from the Northern Hemisphere and another one from the Southern Hemisphere in a separate sheet of paper. Note: Bring these drawings with you while observing the stars on a clear night. B. Home Activity 2. Go outside your house tonight or on a clear night. Observe the stars in the sky. Take note of the date and time of observation. 3. Try to locate the constellation you have chosen in part A. 4. After an hour or so, observe again the stars. Date and Time of Observation: ___________________________ Were you able to see the constellations that you have chosen? ____ What did you observe about the position of the stars after an hour or so? _________________________________________________________ Question:
1. Is it possible to see all the constellations? Why? ________________________________
XXII. Constellations
NAME ___________________________________ GROUP ______________
SECTION _________________________________ DATE ______________
DepEd‐NSTIC
Student Worksheet – Constellations, 1 of 1
Celestial globe
Poster of map of stars
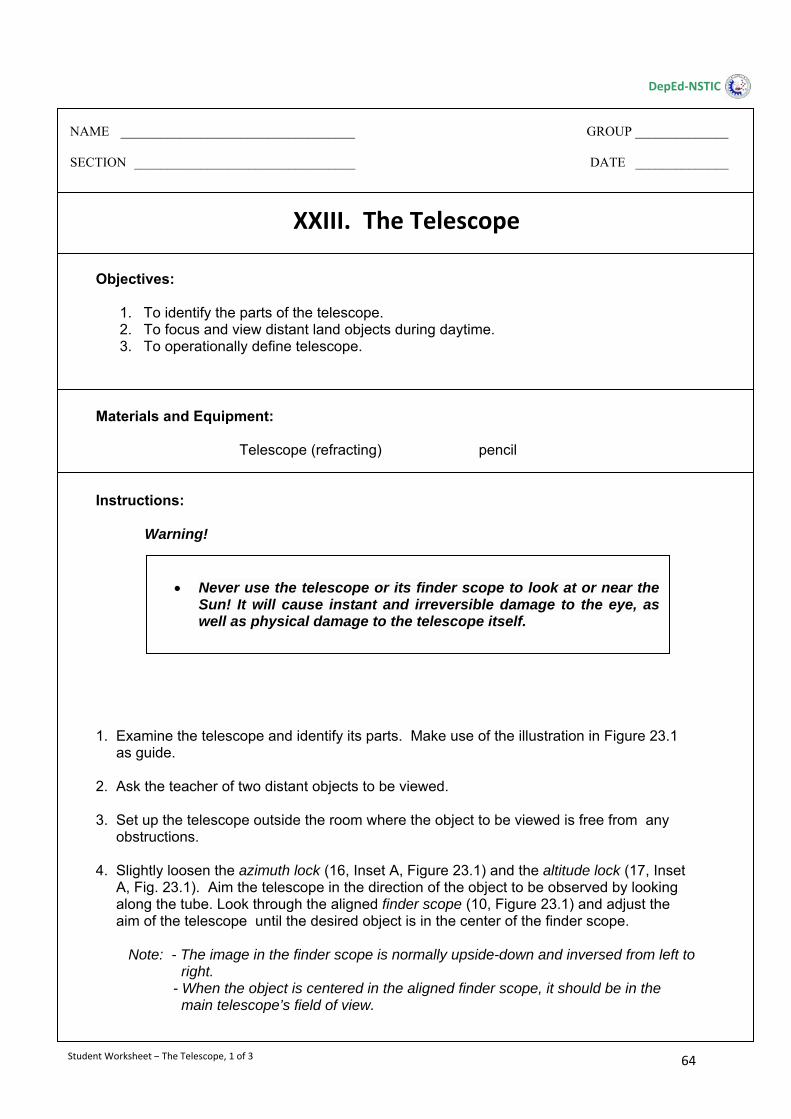
64
Objectives:
1. To identify the parts of the telescope. 2. To focus and view distant land objects during daytime. 3. To operationally define telescope.
Materials and Equipment: Telescope (refracting) pencil
Instructions: Warning! 1. Examine the telescope and identify its parts. Make use of the illustration in Figure 23.1 as guide. 2. Ask the teacher of two distant objects to be viewed. 3. Set up the telescope outside the room where the object to be viewed is free from any obstructions. 4. Slightly loosen the azimuth lock (16, Inset A, Figure 23.1) and the altitude lock (17, Inset A, Fig. 23.1). Aim the telescope in the direction of the object to be observed by looking along the tube. Look through the aligned finder scope (10, Figure 23.1) and adjust the aim of the telescope until the desired object is in the center of the finder scope. Note: - The image in the finder scope is normally upside-down and inversed from left to right. - When the object is centered in the aligned finder scope, it should be in the main telescope’s field of view.
XXIII. The Telescope
NAME ___________________________________ GROUP ______________
SECTION _________________________________ DATE ______________
DepEd‐NSTIC
Never use the telescope or its finder scope to look at or near the
Sun! It will cause instant and irreversible damage to the eye, as well as physical damage to the telescope itself.
Student Worksheet – The Telescope, 1 of 3
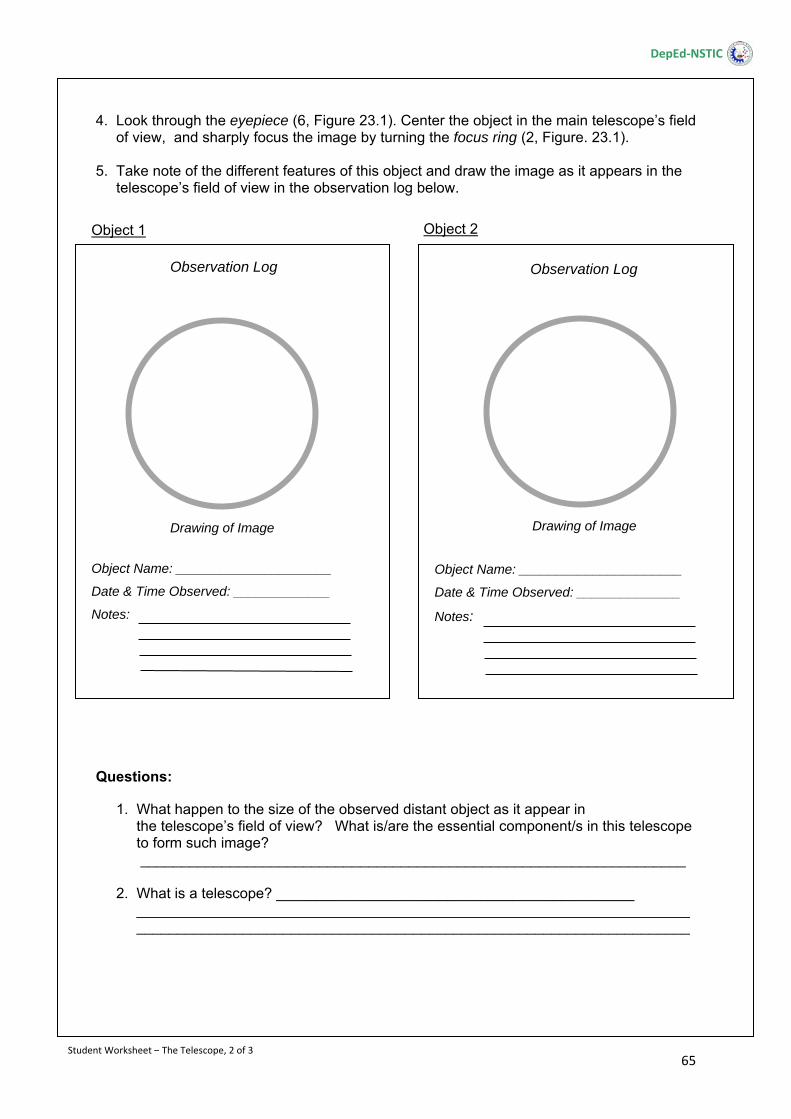
65
4. Look through the eyepiece (6, Figure 23.1). Center the object in the main telescope’s field of view, and sharply focus the image by turning the focus ring (2, Figure. 23.1). 5. Take note of the different features of this object and draw the image as it appears in the telescope’s field of view in the observation log below. 1. Questions:
1. What happen to the size of the observed distant object as it appear in the telescope’s field of view? What is/are the essential component/s in this telescope to form such image? ___________________________________________________________________ 2. What is a telescope? ____________________________________________ ____________________________________________________________________ ____________________________________________________________________
Object Name: _____________________
Date & Time Observed: _____________
Notes:
Object Name: ______________________
Date & Time Observed: ______________
Notes:
Student Worksheet – The Telescope, 2 of 3
DepEd‐NSTIC
Object 1 Object 2
Drawing of Image Drawing of Image
Observation Log Observation Log
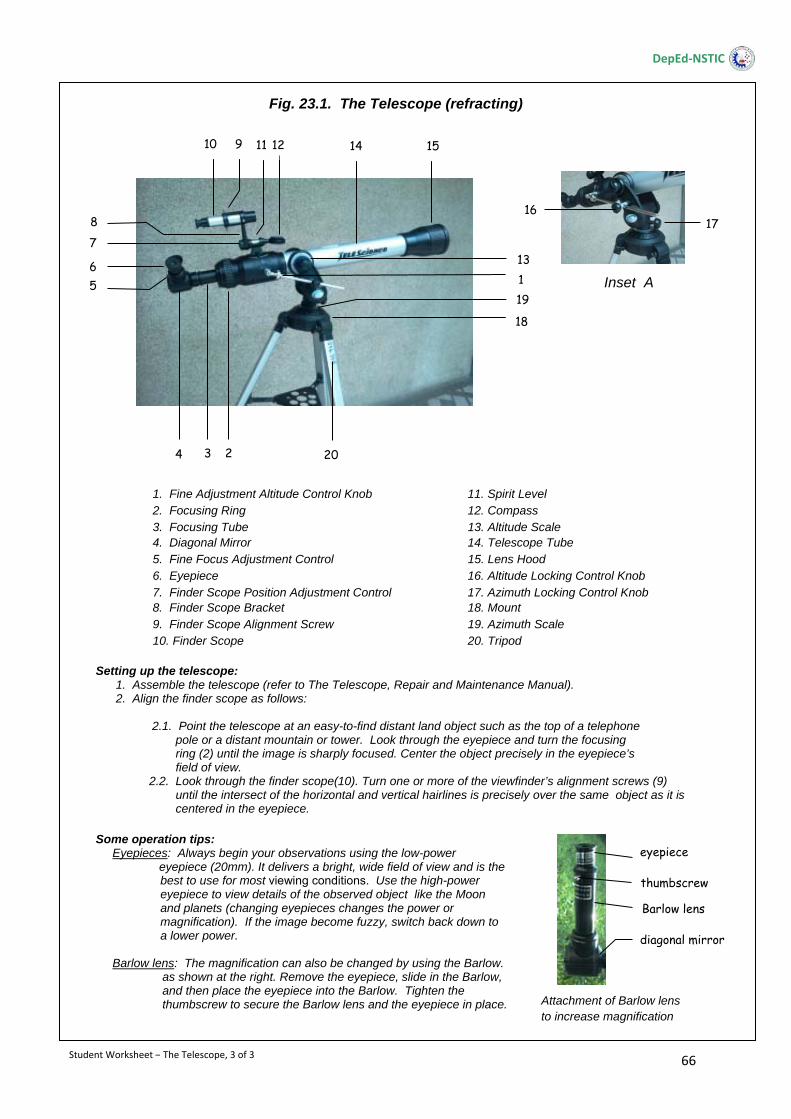
66
Fig. 23.1. The Telescope (refracting)
Setting up the telescope: 1. Assemble the telescope (refer to The Telescope, Repair and Maintenance Manual). 2. Align the finder scope as follows:
2.1. Point the telescope at an easy-to-find distant land object such as the top of a telephone pole or a distant mountain or tower. Look through the eyepiece and turn the focusing ring (2) until the image is sharply focused. Center the object precisely in the eyepiece’s field of view. 2.2. Look through the finder scope(10). Turn one or more of the viewfinder’s alignment screws (9) until the intersect of the horizontal and vertical hairlines is precisely over the same object as it is centered in the eyepiece. Some operation tips: Eyepieces: Always begin your observations using the low-power eyepiece (20mm). It delivers a bright, wide field of view and is the
best to use for most viewing conditions. Use the high-power eyepiece to view details of the observed object like the Moon and planets (changing eyepieces changes the power or magnification). If the image become fuzzy, switch back down to a lower power.
Barlow lens: The magnification can also be changed by using the Barlow. as shown at the right. Remove the eyepiece, slide in the Barlow, and then place the eyepiece into the Barlow. Tighten the thumbscrew to secure the Barlow lens and the eyepiece in place.
1. Fine Adjustment Altitude Control Knob 11. Spirit Level 2. Focusing Ring 12. Compass 3. Focusing Tube 13. Altitude Scale 4. Diagonal Mirror 14. Telescope Tube 5. Fine Focus Adjustment Control 15. Lens Hood 6. Eyepiece 16. Altitude Locking Control Knob 7. Finder Scope Position Adjustment Control 17. Azimuth Locking Control Knob 8. Finder Scope Bracket 18. Mount 9. Finder Scope Alignment Screw 19. Azimuth Scale 10. Finder Scope 20. Tripod
20
16178
5
3 4 2
6
10
7
1
11 9 12
13
14 15
18
19
DepEd‐NSTIC
Inset A
eyepiece
Barlow lens
diagonal mirror
thumbscrew
Student Worksheet – The Telescope, 3 of 3
Attachment of Barlow lens to increase magnification
67
References:
Books:
Gutierrez, Marlene M. Science and Technology for the Modern World. Makati City: Diwa Scholastic Press Inc., 1999.
Gonzales, Esperanza A. et al. Science and Technology I. Quezon City: Instructional Materials Corporation, 1988.
Manuals:
Flores, Alvin C. et al. Lesson Plans in Science I. Pasig City: Bureau of Secondary Education, Department of Education, 2003.
Experiment Manuals for the NSTIC SciKit Mechanics Equipment. Cebu City: Department of Education-National Science Teaching Instrumentation Center, 2009.
Villamil, Aurora M. Integrated Science, Teacher’s Manual. Quezon City: Abiva Publishing House Inc., 1998.
Internet:
http://www.phivolcs.dost.gov.ph, Earthquake Monitoring, January 19, 2012
http://geology.com. News and Information About Geology, September 11, 2011.
http://www.britannica.com. Science and Technology, September 11, 2011.
http://www.galleries.com. Rocks and Other Mineral Sources, September 13, 2011.
http://www.meade.com. Meade Instructional Manual, July 5, 2012.
Student Worksheet – References
DepEd‐NSTIC
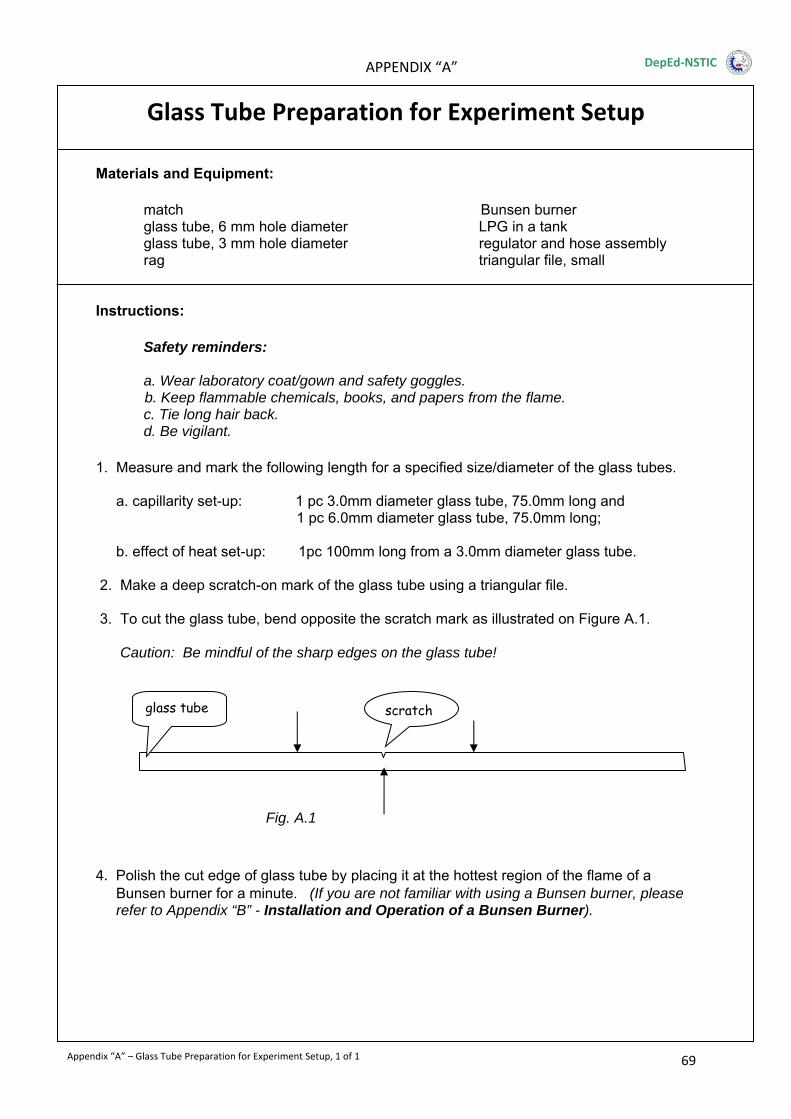
69
Glass Tube Preparation for Experiment Setup Materials and Equipment: match Bunsen burner glass tube, 6 mm hole diameter LPG in a tank glass tube, 3 mm hole diameter regulator and hose assembly rag triangular file, small
Instructions: Safety reminders: a. Wear laboratory coat/gown and safety goggles. b. Keep flammable chemicals, books, and papers from the flame. c. Tie long hair back. d. Be vigilant. 1. Measure and mark the following length for a specified size/diameter of the glass tubes. a. capillarity set-up: 1 pc 3.0mm diameter glass tube, 75.0mm long and 1 pc 6.0mm diameter glass tube, 75.0mm long; b. effect of heat set-up: 1pc 100mm long from a 3.0mm diameter glass tube. 2. Make a deep scratch-on mark of the glass tube using a triangular file. 3. To cut the glass tube, bend opposite the scratch mark as illustrated on Figure A.1. Caution: Be mindful of the sharp edges on the glass tube! 4. Polish the cut edge of glass tube by placing it at the hottest region of the flame of a Bunsen burner for a minute. (If you are not familiar with using a Bunsen burner, please refer to Appendix “B” - Installation and Operation of a Bunsen Burner).
DepEd‐NSTIC
scratch
Fig. A.1
glass tube
APPENDIX “A”
Appendix “A” – Glass Tube Preparation for Experiment Setup, 1 of 1

DepEd - NSTIC
Repair and Maintenance Manual Integrated Science