practical task manual - city and guilds · where an assignment is taken over more ... practical...
TRANSCRIPT
PR
AC
TIC
AL
TAS
K M
AN
UA
L 6706-13 Level 1 Diploma in Carpentry and Joinery September 2013 Version 1.1

Contents
Task manual amendments 1
Candidate details 2
Unit assessment overview 3 Practical task completion record 3
Instructions to candidates 5
Unit 113 Maintain and use carpentry and joinery hand tools 6 Task 1 Maintain and store carpentry and joinery hand tools 6 Task 2 Use carpentry and joinery handsaws 7 Task 3 Use carpentry and joinery hand-held planes 8 Task 4 Use carpentry and joinery chisels 9
Unit 114 Prepare and use carpentry and joinery portable power tools 11 Task 1 Use carpentry and joinery portable power drills and planers 11 Task 2 Use carpentry and joinery portable power saws 13 Task 3 Use carpentry and joinery portable power routers and sanders 14
Unit 115 Produce woodworking joints 15 Task 1 Mark out woodworking joints 15 Task 2 Produce basic woodworking joints and form a frame 17
Drawings and diagrams 19 Unit 113 Maintain and use carpentry and joinery hand tools 19 Unit 114 Prepare and use carpentry and joinery portable power tools 22 Unit 115 Produce woodworking joints 27

Practical task manual: 6706-13 Level 1 Diploma in Carpentry and Joinery 1
Task manual amendments
Amendments since version 1.0
Page 26 Unit 114, Task 3 Figure 1 Timber for router and sander amended.
Page 27 Unit 115, Task 1 and 2 Figure 1 Frame amended.

Practical task manual: 6706-13 Level 1 Diploma in Carpentry and Joinery 2
Candidate details
This Practical task manual is a record of your achievement in practical assessments. You must keep it in good condition and it must be stored in a safe place by your Assessor.
Please fill in all of your details before you carry out any assessments.
Candidate Details
Surname Forename(s)
City & Guilds enrolment number
Centre Details
Name Centre No
I understand the requirements of the qualification and that all the work towards the assessments must be my own.
Candidate signature (please print)
Assessor name (please print)
Signed
Date

Practical task manual: 6706-13 Level 1 Diploma in Carpentry and Joinery 3
Unit assessment overview Practical task completion record
To be completed by Assessor:
For each task, the points for each grade are Pass = 1, Merit = 2, and Distinction = 3 points.
Where there is a weighting given, (see Assessor guide: unit assessment overview) multiply the points by the weighting to be applied (eg to apply a weighting of 2, a distinction is: 3 x 2 = 6 points). Do not include pass/fail only tasks in the calculation, only graded.
†All tasks must be passed for the unit to be achieved.
Unit 113 Maintain and use carpentry and joinery hand tools
Task Grade for task† Points (graded tasks)
1 Maintain and store carpentry and joinery hand tools P / X
2 Use carpentry and joinery handsaws P / M / D / X
3 Use carpentry and joinery hand-held planes P / M / D / X
4 Use carpentry and joinery chisels P / X
End of unit knowledge test P / X
Total
Assessor signature and date: For graded tasks, divide total points by total number of graded tasks ÷ 2
Average =
Overall grade (see conversion chart)
Conversion chart
Average Overall Grade
1 – 1.5 Pass
1.6 – 2.5 Merit
2.6 – 3 Distinction

Practical task manual: 6706-13 Level 1 Diploma in Carpentry and Joinery 4
Unit 114 Prepare and use carpentry and joinery portable power tools
Task Grade for task
1 Use carpentry and joinery portable power drills and planers P / X
2 Use carpentry and joinery portable power saws P / X
3 Use carpentry and joinery portable power routers and sanders P / X
End of unit knowledge test P / X
Assessor signature and date: Candidates must pass all tasks, and the end of unit knowledge test, for this unit to achieve a pass grade overall.
Overall grade
Unit 115 Produce woodworking joints
Task Grade for task† Weighting for task
Weighted Points
1 Mark out woodworking joints P / M / D / X 1
2 Produce basic woodworking joints and form a frame
P / M / D / X 2
End of unit knowledge test P / X
Total
Assessor signature and date: For graded tasks, divide total points by total of weightings ÷ 3
Average =
Overall grade (see conversion chart)
Authenticity and IQA/QC sampling
The assessor’s signature on individual tasks will be taken as assurance that the judgements recorded are made on authentic candidate work produced under appropriate conditions. Please complete the declaration below to confirm this is the case.
I confirm that all tasks were conducted under conditions designed to assure the authenticity of the candidate’s work, and am satisfied that, to the best of my knowledge, the work assessed was solely that of the candidate. I have judged all assessments against the relevant assessment and grading criteria and award the candidate the unit grades as calculated above.
Assessor signature
Date
*IQA signature and date
*QC signature and date
*IQA and QC signatures attest to the evidence available on the recorded date(s).

Practical task manual: 6706-13 Level 1 Diploma in Carpentry and Joinery 5
Instructions to candidates
About this document
This Practical task manual contains all of the practical assessment for the 6706-13 Level 1 Diploma in Carpentry and Joinery.
Practical tasks
These tasks let you show your practical skills and are usually graded pass, merit or distinction – a few are pass only. These tasks will be assessed by your assessor watching how you carry out the tasks and checking your final pieces of work.
Before you carry out the task you will be told how it will be assessed and you should read the observation checklist at the end of each task so you know what you need to do to get each grade.
You can ask your assessor for help in understanding the task instructions, but all of the work must be your own.
Health and safety
You must use safe working practices at all times.
You are responsible for your own safety and the safety of others. If you behave in an unsafe way, you will be stopped and given a warning. If you do not meet all of the Health and Safety requirements, the assessment will be stopped. Your assessor will not be able to let you try the task again until they are sure you can work safely.
Time considerations
Each task shows how long it is likely to take. This is for guidance and so you can plan your work. If you have a good reason for needing more time you must explain this to your assessor as soon as possible so they can decide whether you can have more time.
Security
Where an assignment is taken over more than one session, all documentation, paperwork and work products must be labelled carefully with your name and kept securely at the centre. Your assessor will give you directions about how to leave your work.
Opportunities to repeat tasks
The tasks are ‘end tests’ so you will only be asked to take the assessment when you have had the chance to do all of the learning and practice you need. You will be able to try the whole task again if you do not pass, but you will not be able to take the assessment again just to try to get a better grade.
Feedback
As well as telling you the result for the task your assessor will give you feedback. They will give you a feedback sheet with details of what you could do to improve, and also what you did well in. This will help you to prepare for other assessments or to retake the assessment if you need to.

Practical task manual: 6706-13 Level 1 Diploma in Carpentry and Joinery 6
Unit 113 Maintain and use carpentry and joinery hand tools
Task 1 Maintain and store carpentry and joinery hand tools
Expected time 45 minutes
Task instructions Sharpen a chisel.
Sharpen a plane.
Store the tools.
Work according to the risk assessment and environmental and health and safety regulations.
Observation checklist
AC The candidate has Pass Merit Distinction
2.1 worked to a given risk assessment for using hand tools
2.2 honed and prepared hand tools ready for use
safely removed blade from plane using correct tools
honed plane blade on diamond or oilstone to correct angle and square, with burr removed
honed chisel on diamond or oilstone to correct angle and square, with burr removed
correctly re-assembled plane and set up for use
2.3 stored hand tools and materials in a secure and safe manner, in line with centre procedures
retracted blade on plane
2.4 followed current environmental and relevant health and safety regulations relating to working with carpentry and joinery hand tools, including
keeping a clean and tidy work area
Task grading rules Task grade:
To award a pass: every activity in the checklist must be successfully achieved.
Assessor Signature & Date

Practical task manual: 6706-13 Level 1 Diploma in Carpentry and Joinery 7
Unit 113 Maintain and use carpentry and joinery hand tools Task 2 Use carpentry and joinery handsaws
Expected time 1 hour
Task instructions Rip timber to 70 mm wide, as shown in Cut A.
Crosscut timber to 400 mm long as shown in Cut B.
Cut 50 mm radius corner as shown in Cut C.
Work according to environmental and health and safety regulations.
Diagrams Figure 1 Handsaw cuts page 19
Observation checklist
AC The candidate has Pass Merit Distinction
4.1 used carpentry and joinery handsaws to perform tasks in accordance with Figure 1
Cut A – ripped timber to width (not under size)
within
3 mm
within
2 mm
within
1 mm
Cut A – ripped timber square within 1 mm over 15 mm thickness
Cut B– crosscut timber to length and square across the face (not undersize)
within
3 mm
within
2 mm
within
1 mm
Cut B – crosscut timber square, within 1 mm, over 15 mm thickness
Cut C– cut curve in timber accurately
within
3 mm
within
2 mm
within
1 mm
4.2 followed current environmental and relevant health and safety regulations relating to working with carpentry and joinery handsaws, including
keeping a clean and tidy work area
Task grading rules Task grade:
To award a pass: every activity in the checklist must be successfully achieved.
To award a merit: in addition to the above, all 3 graded activities in the checklist must be achieved to at least a merit standard.
To award a distinction: in addition to both of the above, all 3 graded activities in the checklist must be achieved to a distinction standard.
Assessor Signature & Date

Practical task manual: 6706-13 Level 1 Diploma in Carpentry and Joinery 8
Unit 113 Maintain and use carpentry and joinery hand tools Task 3 Use carpentry and joinery hand-held planes
Expected time 2 hours
Task instructions Plane a piece of timber flat, straight, square and parallel to a finished size of 68 mm x 43 mm.
Rebate the timber as per Figure 1.
Chamfer the end grain.
Work according to environmental and health and safety regulations.
Diagrams Figure 1 Block to plane and rebate page 20
Observation checklist
AC The candidate has Pass Merit Distinction
6.1 used carpentry and joinery hand-held planes to perform tasks in accordance with Figure 1
timber planed straight within 0.5 mm across four faces
timber planed flat, square and parallel to finished size of 68 mm x 43 mm (not undersize)
within
3 mm
within
2 mm
within
1 mm
rebated as per Figure 1 with dimensions (not over sized)
within
2 mm
within
1 mm
within
0.5 mm
end grain chamfered within 1 mm of Figure 1 dimensions
end grain chamfered flat and without breakout
6.2 followed current environmental and relevant health and safety regulations relating to working with hand-held planes, including
keeping a clean and tidy work area
Task grading rules Task grade:
To award a pass: every activity in the checklist must be successfully achieved.
To award a merit: in addition to the above, both (2) graded activities in the checklist must be achieved to at least a merit standard.
To award a distinction: in addition to both of the above, both (2) graded activities in the checklist must be achieved to a distinction standard.
Assessor Signature & Date

Practical task manual: 6706-13 Level 1 Diploma in Carpentry and Joinery 9
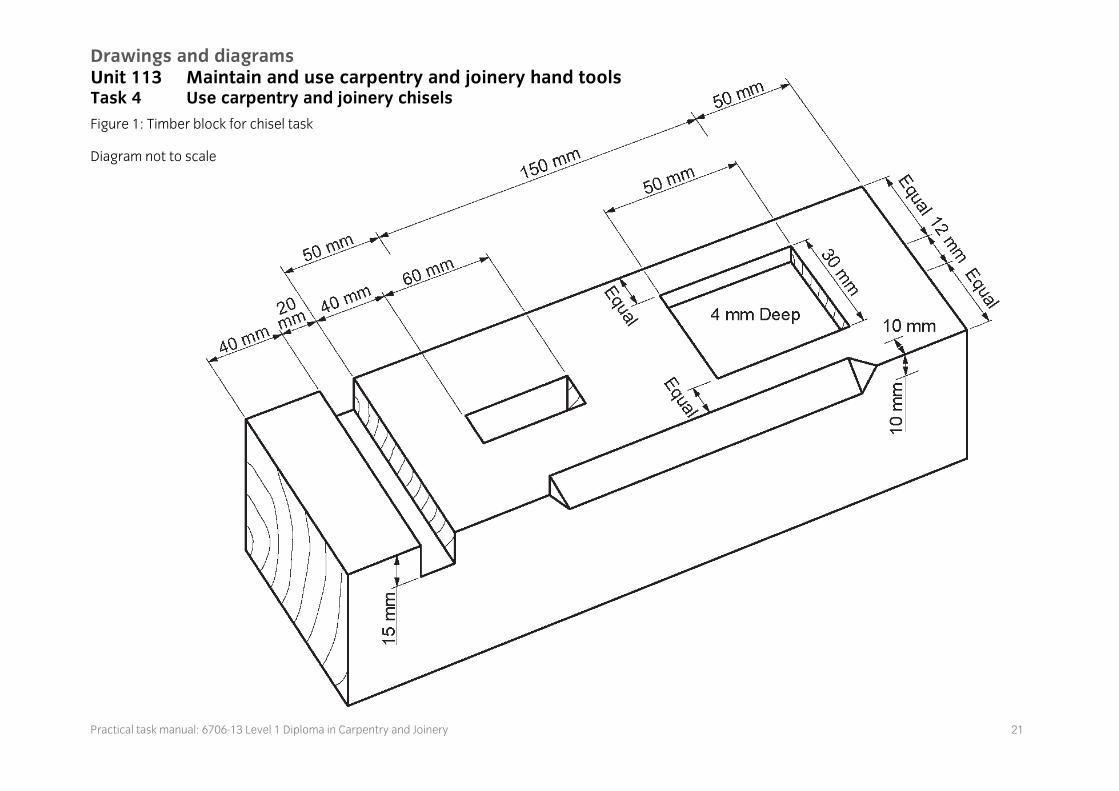
Unit 113 Maintain and use carpentry and joinery hand tools Task 4 Use carpentry and joinery chisels
Expected time 2 hours 30 minutes
Task instructions Cut a through housing.
Chop a through mortice.
Chop a recess.
Produce a stopped chamfer.
Work according to environmental and health and safety regulations.
Diagrams Figure 1 Timber block for chisel task page 21
Observation checklist
AC The candidate has Pass Merit Distinction
8.1 use carpentry and joinery chisels and mallet to perform tasks in accordance with Figure 1
cut the through housing width to the dimensions on Figure 1 to within 1 mm (not over sized).
cut the through housing depth to the dimensions on Figure 1 (± 1 mm)
chopped the through mortice to the dimensions on Figure 1 within 1 mm (not over sized)
mortice width and length consistent to accept a dummy tenon
mortice chopped without bruising
mortice chopped with no breakout
chopped a recess to the dimensions on Figure 1 to within 1 mm (not over sized)
chopped recess to the depth shown on Figure 1 (± 1 mm)
produced a stopped chamfer to length (± 2 mm)
produced a stopped chamfer parallel (± 1 mm)
produced a stopped chamfer to depth (± 1 mm)
8.2 followed current environmental and relevant health and safety regulations related to working with carpentry and joinery chisels, including
keeping a clean and tidy work area

Practical task manual: 6706-13 Level 1 Diploma in Carpentry and Joinery 10
Task grading rules Task grade:
To award a pass: every activity in the checklist must be successfully achieved.
Assessor Signature & Date

Practical task manual: 6706-13 Level 1 Diploma in Carpentry and Joinery 11
Unit 114 Prepare and use carpentry and joinery portable power tools
Task 1 Use carpentry and joinery portable power drills and planers
Expected time 4 hours
Task instructions Plane timber to a width of 68 mm.
Drill, countersink and fix batten.
Rebate.
Chamfer.
Drill holes.
Work according to environmental and health and safety regulations (including PUWER).
Diagrams Figure 1 Batten page 22 Figure 2 Timber block with batten page 23
Observation checklist
AC The candidate has Pass Merit Distinction
2.1
2.2
2.5
checked cables, power tools and guards, including checking for a valid test certificate
2.4 changed planer blades correctly
8.1 adjusted and used portable power planer to work timber in accordance with Figure 2
planed to width within 1 mm
2.3
4.1 used portable power drills to perform tasks in accordance with Figures 1 and 2
drilled, countersunk and fixed batten flush within 1 mm, as per Figures 1 and 2
8.1 planed rebate width within 1 mm, as per Figure 2
planed rebate depth within 1 mm, as per Figure 2
produced a chamfer parallel (± 1 mm)
produced a chamfer to depth (± 1 mm)
4.1 drilled two holes through with a flat bit (10-12 mm) with no break out
drilled flat bit holes through square in both directions (± 1 mm)
2.4 changed tooling correctly
drilled two blind holes to depth with an auger bit (15-18 mm) (± 1 mm)

Practical task manual: 6706-13 Level 1 Diploma in Carpentry and Joinery 12
AC The candidate has Pass Merit Distinction
all four holes centred in correct positions within 2 mm, as per Figure 2
2.6 cleaned and stored power tools safely and securely on completion
2.7
4.2
8.3
followed current environmental and relevant health and safety regulations relating to working with portable power drills and a power planer
Task grading rules Task grade:
To award a pass: every activity in the checklist must be successfully achieved.
Assessor Signature & Date

Practical task manual: 6706-13 Level 1 Diploma in Carpentry and Joinery 13
Unit 114 Prepare and use carpentry and joinery portable power tools
Task 2 Use carpentry and joinery portable power saws
Expected time 1 hour
Task instructions Use a chopsaw to cut angles across the face and down the edge of the timber.
Use a jigsaw to cut curves and shapes in manufactured board material.
Work according to environmental and health and safety regulations (including PUWER).
Diagrams Figure 1 Timber block for chopsaw page 24 Figure 2 Manufactured board for jigsaw page 25
Observation checklist
AC The candidate has Pass Merit Distinction
2.1
2.2
2.5
checked cables, power tools and guards, including checking for a valid test certificate
6.1 used portable power chop saw to cut timber in accordance with Figure 1
cut a 63° angle across the face of the timber as per Figure 1
cut a 75° angle through the thickness of the timber as per Figure 1
timber cut to length (± 1 mm)
2.4 changed jigsaw blade correctly
6.2 used portable power jigsaw to cut board materials in accordance with Figure 2
cut an external curve with a radius of 150 mm as per Figure 2 (+ 2 mm, not under sized)
cut internal aperture as per Figure 2
2.6 cleaned and stored power tools safely and securely on completion
6.3 followed current environmental and relevant health and safety regulations relating to working with portable power saws
Task grading rules Task grade:
To award a pass: every activity in the checklist must be successfully achieved.
Assessor Signature & Date

Practical task manual: 6706-13 Level 1 Diploma in Carpentry and Joinery 14
Unit 114 Prepare and use carpentry and joinery portable power tools
Task 3 Use carpentry and joinery portable power routers and sanders
Expected time 2 hours
Task instructions Router a piece of timber to form - a housing - a rebate - an ovolo mould.
Sand the face side.
Work according to environmental and health and safety regulations (including PUWER).
Diagrams Figure 1 Timber for router and sander page 26
Observation checklist
AC The candidate has Pass Merit Distinction
8.2 adjusted and used portable power router to work timber in accordance with Figure 1
housing routered to position within 1 mm
housing to depth (± 1 mm)
rebate to width (± 1 mm)
rebate to depth (± 1 mm)
ovolo mould to depth (± 1 mm)
ovolo corner square without rounding
2.4 router cutters changed correctly according to manufacturer’s instructions
10.1 used portable power orbital sander to finish work in accordance with Figure 1
sanded off marking out lines from face side, without rounding the edges
8.3
10.2 followed current environmental and relevant health and safety regulations relating to working with portable power routers and sanders
Task grading rules Task grade:
To award a pass: every activity in the checklist must be successfully achieved.
Assessor Signature & Date

Practical task manual: 6706-13 Level 1 Diploma in Carpentry and Joinery 15
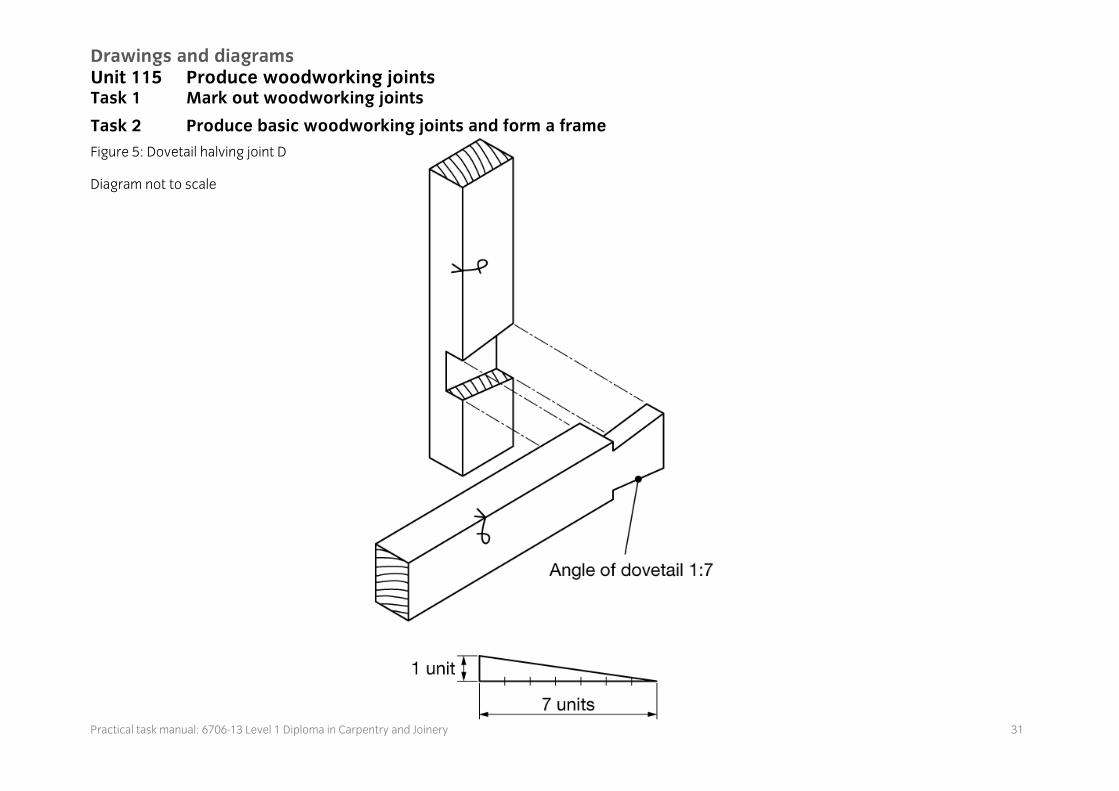
Unit 115 Produce woodworking joints Task 1 Mark out woodworking joints
Expected time 2 hours
Task instructions Produce a setting out rod showing all joint details in Figures 1-7.
Use to mark out the timber.
Work according to environmental and health and safety regulations.
Diagrams Figure 1 Frame page 27 Figure 2 Tee bridle joint A page 28 Figure 3 Tee halving joint B page 29 Figure 4 Mortice and tenon joint C page 30 Figure 5 Dovetail halving joint D page 31 Figure 6 Stub mortice and tenon joint E page 32 Figure 7 Cross halving joint F page 33
Observation checklist
AC The candidate has Pass Merit Distinction
4.1 produced a setting out rod
overall height within 1 mm
overall width within 1 mm
joint positions within 1 mm
4.2 used a setting out rod when marking out
4.3
5.1 used appropriate marking out tools to mark out
face and edge correctly selected and marked
joint positions as per rod
shoulder lines square
gauging central
± 2 mm
± 1 mm
0 mm
gauging for tenon set to mortice chisel
dovetail pitch correctly set
± 2 mm
± 1 mm
0 mm
marked out wedge allowance
4.4 followed current environmental and relevant health and safety regulations relating to marking out woodworking joints
Practical task manual: 6706-13 Level 1 Diploma in Carpentry and Joinery 16
Task grading rules Task grade:
To award a pass: every activity in the checklist must be successfully achieved.
To award a merit: in addition to the above, both (2) graded activities in the checklist must be achieved to at least a merit standard.
To award a distinction: in addition to both of the above, both (2) graded activities in the checklist must be achieved to a distinction standard.
Assessor Signature & Date

Practical task manual: 6706-13 Level 1 Diploma in Carpentry and Joinery 17
Unit 115 Produce woodworking joints Task 2 Produce basic woodworking joints and form
a frame
Expected time 8 hours
Task instructions Work to a risk assessment.
Complete a resource checklist.
Produce the joints marked out in Task 1.
Assemble the frame.
Clean up the frame.
Work according to environmental and health and safety regulations.
Diagrams Figure 1 Frame page 27 Figure 2 Tee bridle joint A page 28 Figure 3 Tee halving joint B page 29 Figure 4 Mortice and tenon joint C page 30 Figure 5 Dovetail halving joint D page 31 Figure 6 Stub mortice and tenon joint E page 32 Figure 7 Cross halving joint F page 33
Observation checklist
AC The candidate has Pass Merit Distinction
5.2 worked to a given risk assessment for using hand tools
7.1 produced and assembled woodworking joints (dry fit first) to form the frame as per Figures 1-7
joints tight fitting on both faces with no gaps exceeding 1 mm (no joints to have any more than a 2 mm gap)
Four of six joints
Five of six joints
All six joints
joints tight fitting on edges with no gaps exceeding 1 mm (no joints to have any more than a 2 mm gap)
Four of six joints
Five of six joints
All six joints
joints correctly positioned as per Figure 1
± 3 mm
± 2 mm
± 1 mm
overall height and width correct
± 3 mm
± 2 mm
± 1 mm
frame square
± 3 mm
± 2 mm
± 1 mm
screws countersunk flush with surface
wedges inserted and not split

Practical task manual: 6706-13 Level 1 Diploma in Carpentry and Joinery 18
AC The candidate has Pass Merit Distinction
twist not exceeding 2 mm
frame parallel both ways within 2 mm
planed up inside edges prior to assembling
planed up ready for varnished finish without plane marks
timber thickness and width
within
3 mm
within
2 mm
within
1 mm
5.1
5.3
5.4
selected and used correct tools and equipment
(candidates should complete the resource checklist provided)
5.5 kept tools sharp and defects reported as appropriate
5.6
7.2 followed current environmental and relevant health and safety regulations relating to using woodworking hand tools and joints, including
keeping a clean and tidy work area
Task grading rules Task grade:
To award a pass: every activity in the checklist must be successfully achieved.
To award a merit: in addition to the above, 4 out of 6 graded activities in the checklist must be achieved to at least a merit standard.
To award a distinction: 4 out of 6 graded activities in the checklist must be achieved to at least a distinction standard, and 2 of the remaining graded activities must be achieved to at least a merit standard.
Assessor Signature & Date

Practical task manual: 6706-13 Level 1 Diploma in Carpentry and Joinery 19
Drawings and diagrams Unit 113 Maintain and use carpentry and joinery hand tools Task 2 Use carpentry and joinery handsaws
Figure 1: Handsaw cuts
Diagram not to scale

Practical task manual: 6706-13 Level 1 Diploma in Carpentry and Joinery 20
Drawings and diagrams Unit 113 Maintain and use carpentry and joinery hand tools Task 3 Use carpentry and joinery hand-held planes
Figure 1: Block to plane and rebate
Diagram not to scale
Practical task manual: 6706-13 Level 1 Diploma in Carpentry and Joinery 21
Drawings and diagrams Unit 113 Maintain and use carpentry and joinery hand tools Task 4 Use carpentry and joinery chisels
Figure 1: Timber block for chisel task
Diagram not to scale

Practical task manual: 6706-13 Level 1 Diploma in Carpentry and Joinery 22
Drawings and diagrams Unit 114 Prepare and use carpentry and joinery portable power tools Task 1 Use carpentry and joinery portable power drills and planers
Figure 1: Batten
Diagram not to scale

Practical task manual: 6706-13 Level 1 Diploma in Carpentry and Joinery 23
Drawings and diagrams Unit 114 Prepare and use carpentry and joinery portable power tools Task 1 Use carpentry and joinery portable power drills and planers
Figure 2: Timber block with batten
Diagram not to scale

Practical task manual: 6706-13 Level 1 Diploma in Carpentry and Joinery 24
Drawings and diagrams Unit 114 Prepare and use carpentry and joinery portable power tools Task 2 Use carpentry and joinery portable power saws
Figure 1: Timber block for chopsaw
Diagram not to scale

Practical task manual: 6706-13 Level 1 Diploma in Carpentry and Joinery 25
Drawings and diagrams Unit 114 Prepare and use carpentry and joinery portable power tools Task 2 Use carpentry and joinery portable power saws
Figure 2: Manufactured board for jigsaw
Diagram not to scale

Practical task manual: 6706-13 Level 1 Diploma in Carpentry and Joinery 26
Drawings and diagrams Unit 114 Prepare and use carpentry and joinery portable power tools Task 3 Use carpentry and joinery portable power routers and sanders
Figure 1: Timber for router and sander
Diagram not to scale

Practical task manual: 6706-13 Level 1 Diploma in Carpentry and Joinery 27
Drawings and diagrams Unit 115 Produce woodworking joints Task 1 Mark out woodworking joints
Task 2 Produce basic woodworking joints and form a frame
Figure 1: Frame
Diagram not to scale

Practical task manual: 6706-13 Level 1 Diploma in Carpentry and Joinery 28
Drawings and diagrams Unit 115 Produce woodworking joints Task 1 Mark out woodworking joints
Task 2 Produce basic woodworking joints and form a frame
Figure 2: Tee bridle joint A
Diagram not to scale

Practical task manual: 6706-13 Level 1 Diploma in Carpentry and Joinery 29
Drawings and diagrams Unit 115 Produce woodworking joints Task 1 Mark out woodworking joints
Task 2 Produce basic woodworking joints and form a frame
Figure 3: Tee halving joint B
Diagram not to scale

Practical task manual: 6706-13 Level 1 Diploma in Carpentry and Joinery 30
Drawings and diagrams Unit 115 Produce woodworking joints Task 1 Mark out woodworking joints
Task 2 Produce basic woodworking joints and form a frame
Figure 4: Mortice and tenon joint C
Diagram not to scale
Practical task manual: 6706-13 Level 1 Diploma in Carpentry and Joinery 31
Drawings and diagrams Unit 115 Produce woodworking joints Task 1 Mark out woodworking joints
Task 2 Produce basic woodworking joints and form a frame
Figure 5: Dovetail halving joint D
Diagram not to scale

Practical task manual: 6706-13 Level 1 Diploma in Carpentry and Joinery 32
Drawings and diagrams Unit 115 Produce woodworking joints Task 1 Mark out woodworking joints
Task 2 Produce basic woodworking joints and form a frame
Figure 6: Stub mortice and tenon joint E
Diagram not to scale

Practical task manual: 6706-13 Level 1 Diploma in Carpentry and Joinery 33
Drawings and diagrams Unit 115 Produce woodworking joints Task 1 Mark out woodworking joints
Task 2 Produce basic woodworking joints and form a frame
Figure 7: Cross halving joint F
Diagram not to scale

Published by City & Guilds 1 Giltspur Street London EC1A 9DD T +44 (0)844 543 0000 F +44 (0)20 7294 2413 www.cityandguilds.com City & Guilds is a registered charity established to promote education and training
About City & Guilds As the UK’s leading vocational education organisation, City & Guilds is leading the talent revolution by inspiring people to unlock their potential and develop their skills. We offer over 500 qualifications across 28 industries through 8500 centres worldwide and award around two million certificates every year. City & Guilds is recognised and respected by employers across the world as a sign of quality and exceptional training. City & Guilds Group The City & Guilds Group operates from three major hubs: London (servicing Europe, the Caribbean and Americas), Johannesburg (servicing Africa), and Singapore (servicing Asia, Australia and New Zealand). The Group also includes the Institute of Leadership & Management (management and leadership qualifications), City & Guilds Land Based Services (land-based qualifications), the Centre for Skills Development (CSD works to improve the policy and practice of vocational education and training worldwide) and Learning Assistant (an online e-portfolio). Copyright The content of this document is, unless otherwise indicated, © The City and Guilds of London Institute and may not be copied, reproduced or distributed without prior written consent. However, approved City & Guilds centres and candidates studying for City & Guilds qualifications may photocopy this document free of charge and/or include a PDF version of it on centre intranets on the following conditions:
centre staff may copy the material only for the purpose of teaching candidates working towards a City & Guilds qualification, or for internal administration purposes
candidates may copy the material only for their own use when working towards a City & Guilds qualification The Standard Copying Conditions (see the City & Guilds website) also apply. Published by City & Guilds, a registered charity established to promote education and training Every effort has been made to ensure that the information contained in this publication is true and correct at the time of going to press. However, City & Guilds’ products and services are subject to continuous development and improvement and the right is reserved to change products and services from time to time. City & Guilds cannot accept liability for loss or damage arising from the use of information in this publication.