powerpoint 2007 - university of delawareudel.edu/~smilee/ppt/mg powerpoint.docx · web...
TRANSCRIPT

PowerPoint 20071. Electronic resources related to this training session:
http://udel.edu/~smilee/PPT/master.html
2. Public Resources A. Microsoft’s site for Win users: www.microsoft.com
• Select: Office => Office Online Training and Demos– Type search keywords: “powerpoint overview” and select
Create Your First Presentation – Type search keywords: “interactive reference guide” to
find Flash demonstrations that illustrate tool locations in the new version.
• Or, select any Office product in the “Browse by program” section in the middle of the page.
– Direct link to: PowerPoint 2007 Training.B. Microsoft’s site for Mac users, Mactopia:
http://www.microsoft.com/MAC/default.mspx
3. Campus ResourcesA. www.udel.edu/learn
• Select: Online Resources => Web-based Training• VTC.com and lynda.com (University email is required)
B. IT-Help Center: [email protected] or 831-6000
www.microsoft.com Page 1

Let’s Answer Your QuestionsQ1 Request that the instruction stay basic so that some of us at zero experience and exposure can move toward preparation of a talk. I have heard that there are a lot of advanced things that can be done with this program. Suggest this be done at a later advanced class. Some of us even have limited experience with computers [a generational and career thing].A1 This 2-session workshop is designed to address everyone’s needs, regardless of prior experience. The first session will contain an overview sample and introduce fundamental concepts, during the second session participants will be guided through the creation of their own presentation. Attendees who want to increase their skill before the second session are encouraged to pursue Microsoft’s self-paced tutorials:
Win: PowerPoint 2007 Training.Mac :PowerPoint 2008 Training
Q2 Need help in how to actually show the PowerPoint presentation. Would like instruction on how to show it to an audience. Master Gardeners have a laptop and a projector to loan to MG's.A2 I’ll share some tips during the workshop. Consider watching the “Prepare to present” videos at the Win link noted above.
Q3 Would like to know 1) how to import photos to use within PowerPoint and 2) how to set up a presentation for a workshop (please see previous response).A3 Illustrations are an important part of PowerPoint presentations and we’ll spend a considerable amount of time discussing how to incorporate them, either directly into your presentation or by linking to online galleries. We’ll be using these free resources during the workshop: http://office.microsoft.com/en-us/clipart/default.aspx, www.flickr.com/creativecommons
Q4 I'm interested in pain-free incorporation of publicly available pictures from the Internet and using my own pictures that are sitting in a drawer, and for which I have no negatives or CDs. Also, incorporating a little action into the presentation instead of just humdrum text.A4 I love this question! Regarding the images in the drawer, you may want to invest in an all-in-one printer scanner, or a photo scanner with a feeder if you really have a lot of images to digitize. There are scanning services if you want to pay a professional; search keywords “photo scanning service.” We’ll explore animations to control content delivery or add a little pizzazz to a presentation.
Q5 Is it possible to incorporate about 5 minutes from an existing VCR or DVD in a PowerPoint presentation?
A5 Copyright Fair Use considerations must be made for licensed media. For a more information see: http://www.centerforsocialmedia.org/resources/publications/fair_use_in_online_video/ There are tools that allow you to create media clips or screen capture portions of your own video.
www.microsoft.com Page 2

Create your own video using your pictures:Win: PhotoStory 3 or MovieMaker. Mac: iPhoto or iMovieScreen capture software:http://www.jingproject.com/download/:show people what's on your screen...instantly.http://www.fastvideoindexer.com/how_do_i_capture_images_from_video.htm: capture images from videos yourself today.
Main tabsHome: Copy, paste; add slides; format text and paragraphs; work with shapes;
find and replace text.Insert: Insert slides, tables, pictures, Microsoft® SmartArt™ graphics, charts,
shapes, hyperlinks, movies, sounds, files from other programs, and other things.
Design: Apply background design, colors, fonts, and special effects to the whole presentation.
Animations: Apply simple and custom animations and slide transitions.Slide Show: Do pre-show preparation. Run through slides, set up a custom show,
record narration.Review: Check spelling, use Research service or thesaurus, add review comments.View: Switch to all views including Notes Page and Master view, show grid,
arrange windows.
Temporarily hide Ribbon commandsDouble-click the currently displayed tab. To show the full Ribbon again, click any tab.
Contextual tabsThese colored tabs appear when you're doing a certain type of task. Your pointer must be within the element the tab supports, such as a picture. Examples are:Drawing Tools (Format tab): For shapes, placeholders, and text boxes, change
style, shape choice, and position. Apply WordArt and other formatting to text.
Picture Tools (Format tab): For pictures, add effects such as a shadow or glow; crop; compress; and resize.
SmartArt Tools (Design and Format tabs): Change the layout for SmartArt graphics such as org charts, and format individual shapes in the graphic.
Similar tools are available for charts, tables, movies, and sounds.
www.microsoft.com Page 3

www.microsoft.com Page 4

See more optionsClick the small diagonal arrow in the bottom right of a group. It appears when something on the slide is selected that you might want more options for, such as text or a placeholder.
See galleriesClick the scroll arrows or More button to the right of the group to see full galleries of themes, shape styles, colors, fonts, animation effects, and so on.
Customize the Quick Access Toolbar1. To add a command or button, do one of the following:
a. Click the arrow on the right end of the toolbar, and click any button on the menu to add it to the toolbar. Click More Commands on the same menu for additional button and command choices.
b. On the Ribbon, right-click the button or command that you want, and click Add to Quick Access Toolbar.
2. To remove a command or button from the toolbar:a. Right-click it on the toolbar, and click Remove from Quick Access
Toolbar.3. To put the toolbar on its own row:
a. Click the arrow on the right end of the toolbar, and click Show Below the Ribbon. Or, right-click any button or command on the toolbar, and click Show Quick Access Toolbar Below the Ribbon.
4. To put it back above the Ribbon, either click the arrow on the right end of the toolbar, or right-click any button or command on the toolbar, and click the option to move the toolbar above the Ribbon.
www.microsoft.com Page 5

Benefits of the new file formatSafer presentations Embedded code — for example, OLE objects or Microsoft Visual Basic® for Applications code — is stored in a separate section within the file, so it can be easily identified for special processing. IT administrators can block presentations that contain unwanted macros or controls, making presentations safer for users to open.Reduced file size Presentations are automatically compressed — up to 75 percent smaller in some cases.Transparency and improved information security Presentations can be shared confidentially because personally identifiable information and business-sensitive information — user names, comments, tracked changes, file paths — can be easily identified and removed.Improved damaged-file recovery The modular data storage that's possible in the new format enables files to be opened even if a component within the file is damaged — a chart or table, for example.Easier integration Specific content within the presentation, like charts, comments, and presentation metadata, is more easily shared with other types of files.
Saving in the new or old formatFor new presentations, PowerPoint 2007 uses the new format, PowerPoint Presentation (*.pptx) (how it appears in the Save As dialog box).If you open a presentation that was created in the old format but want to save it in the new format, you need to select the new format.To save a presentation in the old format for someone who doesn't have PowerPoint 2007 or required software for opening PowerPoint 2007 files:
Click the Microsoft Office Button , click Save As, and in the Save as type box (in the Save As dialog box), select PowerPoint 97-2003 Presentation (*.ppt).
You can also just point to Save As on the Microsoft Office Button menu, and click either PowerPoint Presentation, to save in the new file format, or PowerPoint 97-2003 Presentation, to save in the old format.
Note For someone who's using PowerPoint 95 or earlier and who needs to work on the presentation, save it in the PowerPoint 97-2003 Presentation (*.ppt) format.
www.microsoft.com Page 6
Add slidesTo add a slide without selecting the layout first, do one of the following:
On the Home tab, in the Slides group, click New Slide. Right-click a slide thumbnail, and click New Slide.
The first slide after the title slide gets the Title and Content layout by default. After that, a new slide gets the same layout as the slide that precedes it.
Choose and change layoutsTo insert a slide with a specific layout:
1. On the Home tab, in the Slides group, click the arrow on the New Slide button.2. Click a layout.
Tip Any layout that has "content" in its title includes icons that you can use to insert non-text items such as pictures, charts, and tables.
To change the layout of an inserted slide, do one of the following: Right-click the slide that has the layout you want to change, point to Layout on the
shortcut menu, and click a layout. Select the slide or slides whose layout you want to change (press CTRL as you click
to select multiple slides). On the Home tab, in the Slides group, click Layout , and then click a layout. If you have selected multiple slides, they all get the same layout.
Insert slides from other presentations1. Open the presentation that you want to add slides to. Make sure you're in Normal
view.2. On the Home tab, in the Slides group, click the arrow on the New Slide button.3. Click Reuse Slides.4. In the task pane, browse to either a slide library or a presentation file that has the
slides you want to use.5. If you want to keep a slide's original look, select Keep source formatting, at the
bottom of the task pane.6. Click each slide that you want to insert into your presentation.
www.microsoft.com Page 7

Insert slide elementsInsert from within a slide placeholder Apply a layout that has a content placeholder, such as this one:
Click an icon to insert a table, chart, SmartArt™ graphic, picture file, clip art, or video file.Use the Insert tab This tab has the most comprehensive collection of things to insert, including shapes, hyperlinks, headers and footers, and sounds.
Size and align pictures and text boxes With the picture selected, Picture Tools are available. On the Format tab,
use commands in the Size and Arrange groups. With the text box or shape selected, Drawing Tools are available. On the
Format tab, use commands in the Size and Arrange groups. The Arrange commands are also available on the Home tab.
Work with notes On the View tab, in the Presentation Views group, click Notes Page. In
Notes Page view, you can see and revise the notes formatting for the currently selected slide. Make sure the notes fit into the placeholder, as any text that doesn't fit will not be printed.
Get ready to print Click the Microsoft Office Button , point to Print, and click Print Preview.
o To select a type of printout, click the arrow in the Print What box (in the Page Setup group) and select from the list.
o To set color options for printing or to access the Header and Footer dialog box, click Options in the Print group.
o To print, click Print in the Print group.
www.microsoft.com Page 8

Package to CD or folderUse the Package for CD feature to bundle all your presentation files and then copy them to a folder or a CD.To package and then copy to a CD from PowerPoint, you must be running Microsoft Windows® XP or later and you must have a CD burner. If you are running Microsoft Windows 2000, you can still use this feature to package the presentation files to a folder, but you must then use a third-party program to burn the folder to a CD.Important: Options for when you're packagingThere are a couple of ways you can have your file packaged, depending on the environment in which you'll present it. You can:
Package it in the Microsoft Office PowerPoint 2007 Viewer, which enables you to show it on a computer that doesn't have PowerPoint. OR:
Package it just as it is, to be presented within PowerPoint. Note that when files are packaged for the viewer, they are converted to older file formats, such as .ppt, .pot, and .pps. This is to enable them to run automatically, if you choose, within the viewer.If you don't want to show your presentation in the viewer but plan to show it within PowerPoint, choose the Archive Package (do not update file formats) option when you're making selections in the Package for CD dialog box. To get to that option, click Options.
Final note of adviceA must before you present: Go to the room where you'll be presenting, make sure that you can access your presentation from the computer you're using, and run through the slide show. Take your printed notes with you so that you can practice referring to them while you practice clicking through the show. You might also ask someone else to go along, listen, and give feedback.
www.microsoft.com Page 9

Familiarize yourself with the PowerPoint workspaceDo one of the following:
If Office PowerPoint 2007 is already running, save and close any open presentations, and then exit and restart PowerPoint 2007.Find links to information about saving presentations in the See Also section.
If Office PowerPoint 2007 isn't already running, start it now.When you start PowerPoint, it opens in the view (view: A way of displaying the contents of a presentation and providing the user with the means to interact with it.) called Normal view, where you create and work on slides.
In the Slide pane, you can work directly on individual slides. Dotted borders identify placeholders (placeholders: Boxes with dotted or hatch-
marked borders that are part of most slide layouts. These boxes hold title and body text or objects such as charts, tables, and pictures.), where you can type text or insert pictures, charts, and other objects (object: A table, chart, graphic, equation, or other form of information. Objects created in one application, for example spreadsheets, and linked or embedded in another application are OLE objects.).
The Slides tab shows a thumbnail (thumbnail: A miniature representation of a picture.) version of each full size slide shown in the Slide pane. After you add other slides, you can click a thumbnail on the Slides tab to make the slide appear in the Slide pane. Or you can drag thumbnails to rearrange the slides in your presentation. You can also add or delete slides on the Slides tab.
www.microsoft.com Page 10

In the Notes pane (notes pane: The pane in normal view in which you type notes that you want to accompany a slide. You print these notes as notes pages or have them display when you save a presentation as a Web page.), you can type notes about the current slide. You can hand out your notes to your audience or refer to your notes in Presenter view when you give your presentation. Note By default, Office PowerPoint 2007 applies the Blank Presentation template (template: A file or files that contain the structure and tools for shaping such elements as the style and page layout of finished files. For example, Word templates can shape a single document, and FrontPage templates can shape an entire Web site.), which appears in the preceding illustration, to new presentations. Blank Presentation is the simplest and most generic of the templates in Office PowerPoint 2007. Blank Presentation is a good template to use when you first start working with PowerPoint because it is straightforward and can be adapted to many presentation types. To create a new presentation that is based on the Blank Presentation template, click the Microsoft Office Button , click New, click Blank and recent under Templates, and then double-click Blank Presentation under Blank and recent.After you open the Blank Presentation template, only a small portion of the Notes pane is visible. To see a larger portion of the Notes pane so that you have more room to type in it, do the following:
1. Point to the top border of the Notes pane.2. When the pointer becomes a , drag the border up to make a little more
room for your speaker notes, as shown in the following illustration.
Notice that the slide in the Slide pane resizes automatically to fit the available space.Near the top of the screen are three buttons that you may find useful:
Undo , which undoes your last change. (To see a ScreenTip (ScreenTip: A short description that appears when the user holds the mouse pointer over an object, such as a button or hyperlink.) about which action will be undone, rest your pointer on the button. To see a menu of other recent changes that can also be undone, click the arrow to the right of Undo .) You can also undo a change by pressing CTRL+Z.
www.microsoft.com Page 11

Redo or Repeat , which either repeats or redoes your last change, depending on what action you just performed. (To see a ScreenTip about which action will be repeated or redone, rest your pointer on the button.) You can also repeat or redo a change by pressing CTRL+Y.
Microsoft Office PowerPoint Help , which opens the PowerPoint Help pane. You can also open Help by pressing F1.
Links to more informationFind the content you need in the Help windowCustomize the Quick Access ToolbarViews in PowerPoint Top of Page
Name and save your presentationAs with any software program, it is a good idea to name and save your presentation right away and then to save your changes frequently while you work:
1. Click the Microsoft Office Button , point to Save As, and then do one of the following:
o For a presentation that can be opened only in Office PowerPoint 2007, click PowerPoint Presentation.
o For a presentation that can be opened in either Office PowerPoint 2007 or earlier versions of PowerPoint, click PowerPoint 97-2003 Presentation.If you choose this option, you cannot use any of the features that are new in Office PowerPoint 2007.
2. In the Save As dialog box, in the Save in list, select the folder or other location where you want to save your presentation.
3. In the File name box, type a name for your presentation, or do nothing to accept the default file name, and then click Save.
From now on, you can press CTRL+S or click Save near the top of the screen to save your presentation quickly at any time.Links to more informationUse PowerPoint 2007 to open or save a presentation in another file formatSave a file Top of Page
Add, rearrange, and delete slidesThe single slide that is provided automatically in your presentation has two placeholders, one formatted for a title and the other formatted for a subtitle. The
www.microsoft.com Page 12

arrangement of placeholders on a slide is called a layout (layout: The arrangement of elements, such as title and subtitle text, lists, pictures, tables, charts, AutoShapes, and movies, on a slide.). Office PowerPoint 2007 also provides other types of placeholders, such as those for pictures and SmartArt graphics.When you add a slide to your presentation, you can do the following to choose a layout for the new slide at the same time:
1. On the Slides tab, click just below the single slide that already appears there.2. On the Home tab, in the Slides group, click the arrow next to New Slide.
A gallery appears, showing thumbnails of the various slide layouts that are available.
www.microsoft.com Page 13

The name identifies the content that each layout is designed for. Placeholders that display colored icons can contain text, but you can also click
the icons to automatically insert objects, including SmartArt graphics and clip art (clip art: A single piece of ready-made art, often appearing as a bitmap or a combination of drawn shapes.).
3. Click the layout that you want for your new slide.The new slide now appears both on the Slides tab, where it is highlighted as the current slide, and in the Slide pane. Repeat this procedure for each new slide that you want to add. Tip If you want your new slide to have the same layout that the preceding slide has, you can just click New Slide instead of clicking the arrow next to it.
Apply a new layout to a slideTo change the layout of an existing slide, do the following:
www.microsoft.com Page 14

1. On the Slides tab, click the slide that you want to apply a new layout to.2. On the Home tab, in the Slides group, click Layout, and then click the new layout
that you want. Note If you apply a layout that doesn't have enough of the right kind of placeholders for the content that already exists on the slide, additional placeholders are automatically created to contain that content.
Copy a slideIf you want to create two slides that are similar in content and layout, you can save work by creating one slide that has all of the formatting and content that both slides will share and then making a copy of that slide before you add the final, individual touches to each.
1. On the Slides tab, right-click the slide that you want to copy, and then click Copy on the shortcut menu (shortcut menu: A menu that shows a list of commands relevant to a particular item. To display a shortcut menu, right-click an item or press SHIFT+F10.).
2. Still on the Slides tab, right-click where you want to add the new copy of the slide, and then click Paste on the shortcut menu.
You can also insert a copy of a slide from one presentation into another presentation.Rearrange the order of slides
On the Slides tab, click the slide that you want to move, and then drag it to the location that you want.To select multiple slides, click a slide that you want to move, and then press and hold CTRL while you click each of the other slides that you want to move.
Delete a slide On the Slides tab, right-click the slide that you want to delete, and then click
Delete Slide on the shortcut menu.Links to more information
www.microsoft.com Page 15

Add and format textThe most common content for slides in a PowerPoint presentation is text — in titles, headings, and bulleted lists.
To add text to any slide, click the placeholder where you want to add the text, and then type or paste the text that you want to add.
Format bulleted listsSome placeholders automatically format your text as a bulleted list, and other placeholders don't. On the Home tab, in the Paragraph group, do either of the following:
To switch between a bulleted list and unbulleted text, select the text, and then click Bullets .
To change the style of the bullet characters in a bulleted list, click the arrow next to Bullets , and then click the bullet style that you want.You can also make these changes by using the Mini toolbar, which is a handy, miniature, semitransparent toolbar that becomes available when you select text. To see the Mini toolbar clearly, rest your pointer on it. To use the Mini toolbar, click any of the available commands. Tip You can also display the Mini toolbar by right-clicking unselected text.
Change the appearance of textThere are many ways to change the appearance of text on a slide, ranging from basic buttons on the Home tab for formatting font, style, size, color, and paragraph characteristics to more advanced options, such as animation (animate: To add a special visual or sound effect to text or an object. For example, you can have your text bullet points fly in from the left, one word at a time, or hear the sound of applause when a picture is uncovered.) or conversion to SmartArt graphics.Add speaker's notesToo much text makes a slide cluttered and distracting to your audience. But if some of the information that you need isn't on the screen that your audience sees, how can you keep track of it?The solution to this dilemma is speaker's notes, which you can type in the Notes pane for each slide. Speaker's notes help you keep your onscreen presentation free of excess content while you still keep track of all of the information that you need during the presentation. Tip You can easily cut excessively detailed text from the Slide pane at any time and then paste that text directly into the Notes pane so that you still have it for reference.You can print your speaker's notes and then refer to them while you give your presentation. Alternatively, if you run your Office PowerPoint 2007 presentation from one monitor (at a podium, for example) while your audience views it on a
www.microsoft.com Page 16

second monitor, you can use Presenter's view to display the notes only on your monitor while you are presenting.Links to more informationDeliver a presentation on two monitors by using Presenter viewAdd formatting to your document by using the Mini toolbarUse automatic formatting as you typeCreate and print notes pagesAdd text to a slide Top of Page
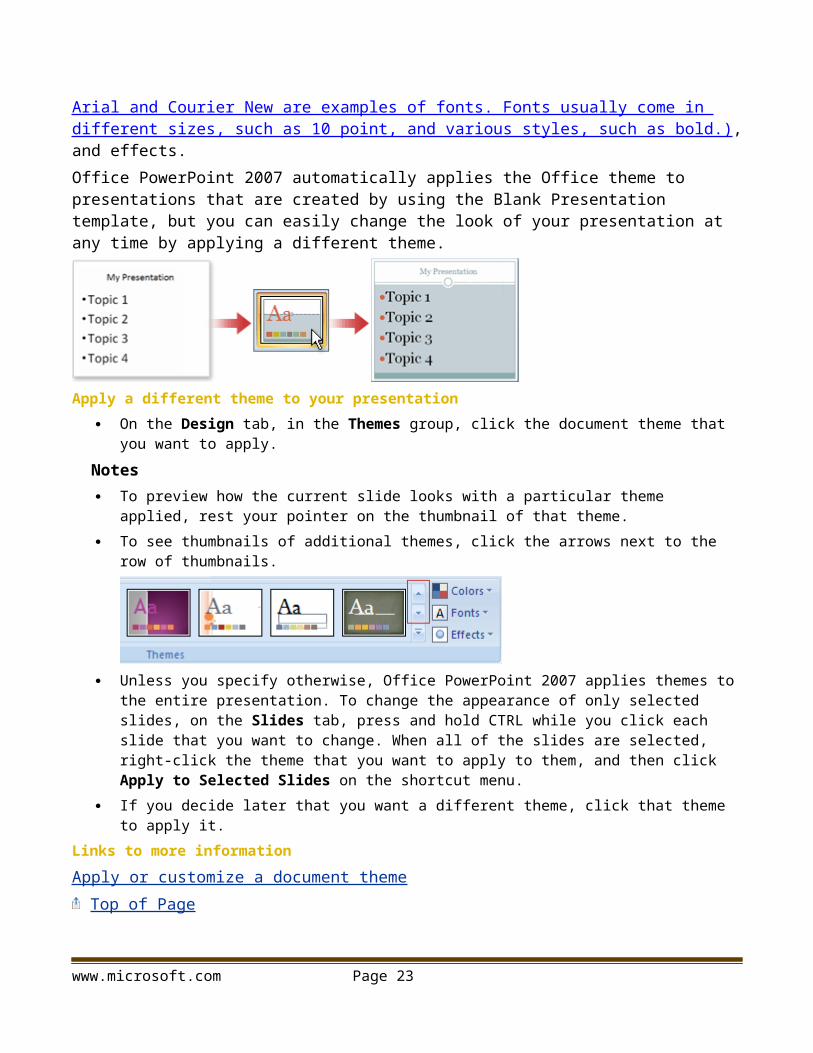
Apply a more appropriate look to your presentationSo far, you have focused on the arrangement and the basic content of your slides. Now, consider the overall appearance of your presentation. What visual tone do you want? What look and feel will make it clear and attractive to your audience?Office PowerPoint 2007 provides a wide variety of design themes (theme: A set of unified design elements that provides a look for your document by using color, fonts, and graphics.) that make it easy to change the overall look of your presentation. A theme is a set of design elements that provides a specific, unified appearance for all of your Office documents by using particular combinations of colors, fonts (font: A graphic design applied to all numerals, symbols, and alphabetic characters. Also called type or typeface. Arial and Courier New are examples of fonts. Fonts usually come in different sizes, such as 10 point, and various styles, such as bold.), and effects.Office PowerPoint 2007 automatically applies the Office theme to presentations that are created by using the Blank Presentation template, but you can easily change the look of your presentation at any time by applying a different theme.
Apply a different theme to your presentation On the Design tab, in the Themes group, click the document theme that you want
to apply. Notes
To preview how the current slide looks with a particular theme applied, rest your pointer on the thumbnail of that theme.
www.microsoft.com Page 17

To see thumbnails of additional themes, click the arrows next to the row of thumbnails.
Unless you specify otherwise, Office PowerPoint 2007 applies themes to the entire presentation. To change the appearance of only selected slides, on the Slides tab, press and hold CTRL while you click each slide that you want to change. When all of the slides are selected, right-click the theme that you want to apply to them, and then click Apply to Selected Slides on the shortcut menu.
If you decide later that you want a different theme, click that theme to apply it.Links to more informationApply or customize a document theme Top of Page
Add clip art, SmartArt graphics, and other objectsYou want to create the most effective visual presentation possible — and often, a series of slides that contains only bulleted lists is not the most dynamic choice. Lack of visual variety can cause your audience's attention to drift. And many kinds of information aren't most clearly expressed in a paragraph or a bulleted list.
Fortunately, Office PowerPoint 2007 makes it possible to add many other kinds of audio and visual content, including tables, SmartArt graphics, clip art (clip art: A single piece of ready-made art, often appearing as a bitmap or a combination of
www.microsoft.com Page 18

drawn shapes.), shapes, charts, music, movies, sounds, and animations. You can add hyperlinks (hyperlink: Colored and underlined text or a graphic that you click to go to a file, a location in a file, a Web page on the World Wide Web, or a Web page on an intranet. Hyperlinks can also go to newsgroups and to Gopher, Telnet, and FTP sites.), too — to move more flexibly both within your presentation and to locations outside of it — and you can add eye-catching transitions (transition: One of a set of transitional display effects that are available in some Microsoft Office applications. Transitions specify how the display changes (such as fading to black) as a user moves from one item (such as slide or Web page) to another.) between slides.This section introduces just a few of the most basic kinds of objects and effects that you can add to your slides.Add clip art
1. Click the placeholder that you want to add clip art to.If you don't select a placeholder, or if you select a placeholder that cannot contain an image, the clip art is inserted at the center of the slide.
2. On the Insert tab, in the Illustrations group, click Clip Art.The Clip Art task pane opens.
3. In the Clip Art task pane, locate the clip art that you want, and then click it.You can now move the clip art, resize it, rotate it, add text to it, and make other changes. Tip To search for additional clip art on the Microsoft Office Online site, click the Clip art on Office Online link at the bottom of the Clip Art task pane.Convert slide text to a SmartArt graphicA SmartArt graphic is a visual representation of your information that you can fully customize. Converting your text to a SmartArt graphic is a quick way to convert existing slides to professionally designed illustrations. For example, with one click, you can convert an Agenda slide to a SmartArt graphic.
You can choose from many built-in layouts to communicate your message or ideas effectively.
www.microsoft.com Page 19

To convert existing text to a SmartArt graphic:1. Click the placeholder that contains the text that you want to convert.2. On the Home tab, in the Paragraph group, click Convert to SmartArt Graphic
.3. In the gallery, to see how a SmartArt graphic looks with your text, rest your pointer
over the thumbnail for that SmartArt graphic. The gallery contains layouts for SmartArt graphics that work best with bulleted lists. To view the entire set of layouts, click More SmartArt Graphics. When you find a SmartArt graphic that you like, click it to apply it to your text.You can now move the SmartArt graphic, resize it, rotate it, add text to it, apply a different Quick Style (Quick Styles: Collections of formatting options that make formatting your documents and objects easier.) to it, and make other changes.
Although it is especially easy to create a SmartArt graphic for existing text, you can also work the other way around, by first inserting the SmartArt graphic that you want and then adding text to it:
1. Click the placeholder that you want to add a SmartArt graphic to.If you don't select a placeholder, or if you select a placeholder that cannot contain an image, the SmartArt graphic is inserted at the center of the slide.
2. On the Insert tab, in the Illustrations group, click SmartArt.3. In the Choose a SmartArt Graphic dialog box, in the leftmost pane, click the type
of SmartArt graphic that you want.4. In the center pane, locate and click the layout that you want, and then click OK.
Tip To see a preview of any layout, click that layout. The preview appears in the rightmost pane.
Add a slide transitionSlide transitions are animation-like effects that occur when you move from one slide to the next. Office PowerPoint 2007 provides many types of slide transitions, including standard fades, dissolves, cuts, and wipes, as well as more unusual transitions such as wheels and checkerboards.
On the Animations tab, in the Transition to This Slide group, click the transition that you want. Notes
o To preview how the current slide looks with a particular transition applied, rest your pointer on the thumbnail of that transition.
o To see thumbnails of additional transitions, click the arrows next to the row of thumbnails.
www.microsoft.com Page 20

o If you decide later that you want a different transition, click that transition to apply it.
You can choose other options in the Transition to This Slide group to control the transition speed, to add a sound, and to apply the same transition to all of the slides in the presentation.Links to more informationApply or change a Quick Style for shapesLearn more about SmartArt graphicsAdd transitions between slidesAdd, change, or delete shapesAdd a table to a slide Top of Page
Add hyperlinksYou can use hyperlinks to move from one slide to another, to a network or Internet location, or even to another file or program altogether.
1. Select the text that you want to click to activate the hyperlink.Alternatively, you can select an object (a piece of clip art, for example, or a SmartArt graphic).
2. On the Insert tab, in the Links group, click Hyperlink.3. In the Insert Hyperlink dialog box, click the appropriate button in the My Places
box for the target of your link (that is, the place where the link takes you).To go to another slide in your presentation, for example, click Place in This Document.
4. Find and click the target location, make any changes that you want in the Text to display and Address boxes, and then click OK.
Links to more informationCreate a hyperlink Top of Page
Check the spelling and preview your presentation
www.microsoft.com Page 21

When all of your slides look just like you want them to, there are two more steps to finishing your presentation.Check the spelling in your presentationEven though the spelling checker is turned on automatically in Office PowerPoint 2007, it is still a good idea to check spelling again after you finish working on your presentation:
1. Press CTRL+HOME to move to the top of your presentation.2. On the Review tab, in the Proofing group, click Spelling.
If Office PowerPoint 2007 finds spelling mistakes, it displays a dialog box, and the first misspelled word found by the spelling checker is selected. You indicate how you want to resolve each error that the program finds. After you resolve each misspelled word, the program selects the next one, and so forth.
Preview your presentation as a slide showTo view your presentation on your computer screen exactly the way that it will look to your audience when you are presenting, do the following:
1. On the Slide Show tab, in the Start Slide Show group, do one of the following:o To start with the first slide in the presentation, click From Beginning.o To start with the slide that currently appears in the Slide pane, click From
Current Slide.The presentation opens in Slide Show view.
2. Click to advance to the next slide. Tip To return to Normal view at any time, press ESC.
Of course, you can also preview your presentation at any time while you are creating it.Links to more informationCheck spelling and grammar Top of Page
Learn about preparing to deliver your presentationNow that your presentation is complete, what you do next depends upon who will give the presentation, as well as where it will be given and what equipment will be used:
Will the presentation be run on the computer on which it was created or on another computer, or will it be delivered via a CD or a network location?
If the presentation is given live, will you or someone else present it, or will it be self-running?
www.microsoft.com Page 22
Depending on the answers to these questions, you may need to complete the following processes in the given order, in a different order, or (in some cases) not at all:
Rehearse and time It is important to leave sufficient time for whoever is giving the presentation to make sure that it fits within the schedule (including time at the end for questions, if appropriate), and to rehearse it adequately. It is a good idea to rehearse the presentation in the space where it will be given, using the equipment that will be used, and preferably in front of at least one or two people. This way, the presenter can become comfortable with the facilities and with a live audience — and feedback from that audience can be useful in identifying any elements that you need to revise before the actual performance.
Print handouts and speaker's notes You can print your presentation either as speaker's notes or as handouts:
o Speaker's notes show one slide at the top of each printed page, along with the content of the Notes pane for that slide at the bottom of the page, and can be used by the speaker as a script or outline during the presentation. They can also be distributed to the audience, so that each member has more complete information from the presentation.
o Handouts show one, two, three, four, six, or nine slides per printed page and are intended for cases in which it isn't desirable to include the Notes pane contents in the distribution to the audience. (The three-slides-per-page handout includes ruled space where the audience can write notes.)
Package for CD or Web distribution When you use the Package for CD feature to copy your finished PowerPoint presentation to a CD, to a network location, or to the hard disk on your computer, Microsoft Office PowerPoint Viewer 2007 and any files that are linked to your presentation (such as movies or sounds) are copied as well. That way, all of the elements of the presentation are included, and people who do not have Office PowerPoint 2007 installed on their computers can still view the presentation.
Links to more informationCopy a presentation to a CD, network, or local disk driveRehearse and time the delivery of a presentationCreate a self-running presentationCreate and print notes pages
www.microsoft.com Page 23

Create and print handouts
www.microsoft.com Page 24