poster printing and pdf guide - university of east anglia
TRANSCRIPT

Guide to producing better quality PDFs and posters
Print Services
Opening hours: 9am - 5pm, Monday to Friday
E - [email protected] T - x2204 or 01603 592204
www.uea.ac.uk/is/printservices

Updated 14 February 2014 by CB, Print Services

This guide is intended to help you in producing better quality PDF files and Posters, using either Microsoft PowerPoint or Publisher. Other design software that we recommend for designing posters includes Adobe InDesign and QuarkXpress. Print Services will normally agree a deadline with you but as a guide you are advised to allow up to two working days to print your poster, especially if lamination is required, so please have this in mind when working to tight deadlines. Please note that multiple posters may take longer. This guide is also available digitally on our website at: www.uea.ac.uk/is/printservices/faqs If there is anything that you think we have missed from this guide or if you have any problems, please contact us at: E - [email protected] T - x2204 or 01603 592204
Guide to producing posters
1

Text There are several things to consider when preparing to make your poster, such as the overall size or whether to orientate your poster landscape or portrait. These specifications may be indicated in your brief, so check carefully before you start designing.
You may find it useful to sketch out your ideas first to make sure that you have room for all the elements that you want to include.
Using devices like columns and text boxes is a useful way to break up infor-mation and make it easier for the reader to follow. Using 2 columns is recommended for a portrait design and 3 for a landscape design.
Standard poster sizes include A3, A2, A1 and A0. Below is a list of the measurements for each of these sizes. You should ensure that you are setting up the correct measurements in your document, as failure to do so may cause elements in your design to move around.
Design & layout
A3 – 297 x 420 mm A2 – 420 x 594 mm A1 – 594 x 841 mm
A0 - 841 x 1189 mm
Landscape Portrait
The University’s preferred fonts are Helvetica Neue and Sabon Roman , and where possible these should be used when designing posters. However, where this is not available Arial and Arial Bold are adequate substitutes.
Arial & Arial Bold By making sure that you use Arial and Arial Bold, you also ensure that font compatibility is not an issue when converting your file to PDF, as these fonts are available across the University.
You should also be aware of font point sizes, and make sure to use a large enough option to ensure readability.
Avoid using shadowed, rotated or underlined text, or tools such as WordArt as this can be difficult to read and cause problems when printing. Also avoid using uppercase for whole words or passages, as this is much harder for those with specific learning difficulties, e.g. dyslexia, to recognise.
2

Using Colour
Using images & graphs
PowerPoint and Publisher, unfortunately, don't have any colour management system, so wherever possible try not to alter the transparency of colours as the onscreen and printed versions may differ dramatically. Generally we advise against using dark background colours, as not only do these take longer to print and to dry, but also can make your poster hard to read.
Images are important in order to make your poster eye-catching and to illustrate your topic.
Try to avoid downloading images from the internet, as often they will not be at a high enough resolution to print properly. We recommend using images at around 300dpi (dots per inch) and usually a TIFF or JPEG file is best for use with Microsoft packages.
There are a number of graph plotting applications, including an inbuilt function in Microsoft Powerpoint, however this is not very scientific and may not be suitable for your purpose. If you are using a different programme to produce graphs, try to save as an image file, and then insert this into your PowerPoint document, as often trying to copy and paste straight across will not work.
Please ensure that reproduction of images meets copyright regulations. Full details can be found on our website at
www.uea.ac.uk/is/printservices/copyright
Above, on the left hand side, the colour transparency has been altered to 50%and the result of this is that the colour is rendered in small square boxes. On the right hand side the colour is solid and therefore this is rendered the same as an on screen view.
3

Using the UEA logo Using the University logo properly will ensure that your poster will appear pro-fessional and meet with branding guide-lines. Logos are available to download in a range of formats from either the Print Services or the Publications office websites. Please avoid copying the logo directly from the University website as these are intended for web viewing only and are not of printable quality.
www.uea.ac.uk/is/printservices
www.uea.ac.uk/mac/publications/logosbrandguidelines
There are two forms of the logo, the standard and horizontal version, and you should follow the specifications about use carefully, and ensure you are using the correct version. Where use of the logo does not meet branding guide-lines, we will send your files back and ask you to make changes.
The standard logo must be used at a minimum size of 19mm. If your design does not incorporate the logo at 19mm or taller, then you should replace it in your design with the horizontal version.
The horizontal version of the logo must be used at a minimum height of 7mm. If your design requires the logo to be used any smaller than 7mm you should contact the Publications Office.
4

Both logos also require space around them, known as the ’exclusion zone’ which can be calculated by the distance from the centre to the top of the ‘E’ in UEA. When using multiple logos, you must ensure that you leave enough space around the UEA logo in your design to meet with these guidelines.
When using the colour version of the logo, you should ensure that it appears in Pantone 302 dark blue, which should already be set up in any files you download from the UEA website.
There is also a black version of the logo, intended primarily for black and white copying, and a reversed white version. When using the reversed white version of the logo, please ensure that it sits in an area of solid colour.
Logo do’s:
• Ensure logo meets minimum size
requirements
• Ensure logo has required exclusion
zone
• Ensure logo is in the correct
colour/on a solid colour back
ground
Logo don’ts:
• Change the colours of the logo
• Change the design of the logo
• Stretch, distort or rotate the logo
• Modify the logo with effects such as
3D rendering or drop shadows
• Create or use an outline version of
the logo
������������������������&������������'�@�����������������������&��������������$����� ������ �������������������������������������$��� ����� ���'�� ���������� �!��
� �������������
� �$ ������#����
���������� ����&��������������� ����'����������������
�
5
5
Using the UEA logo Based on using Microsoft PowerPoint, Word or Publisher with Adobe PDF creator.
As with the majority of printers and publishers, we prefer to receive you files in PDF format and therefore recommend to our customers, that after creating your work in the software of your choice, the file should then be converted to a PDF.
The advantage of this is that we can’t easily change your file, and images or fonts will appear as desired, thus lessening the chance for mistakes to occur.
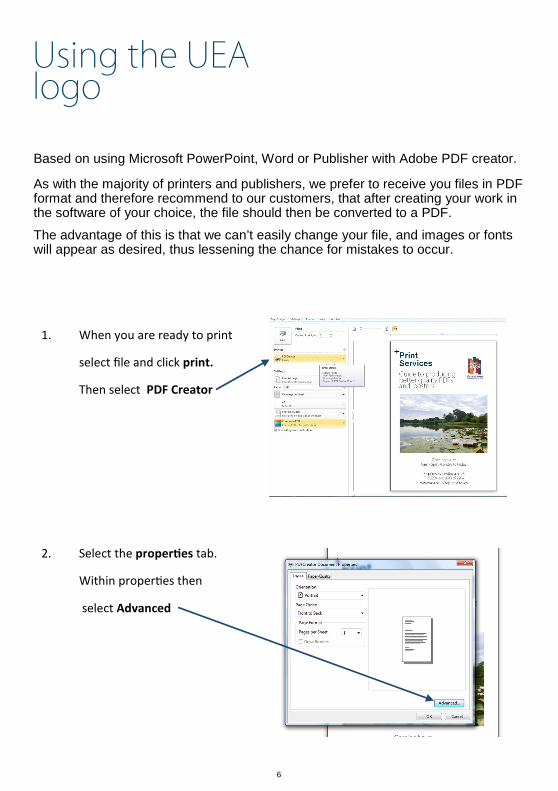
1. When you are ready to print
select file and click print.
Then select PDF Creator
2. Select the proper*es tab.
Within proper(es then
select Advanced
6

3. In Advanced select a page size to match your Word, PowerPoint or Publisher document.
Now select Print Quality , and set this to 600dpi. Click OK.
4. The screen should now revert to the regular print window.
Note: If working in PowerPoint, tick the Scale to Fit box and click OK.
You will be prompted to save your file on your system.
By following these steps you should have created a good quality embedded PDF file.
7

FAQʼs
There are lines on my PDF - why is it happening? This could be caused by a number of things, but normally it is caused by the compression that happens when converting your file to a PDF. Things that may help to reduce the likeliness of this occurring are making sure that your document is setup to the correct page size, and selecting a high enough resolution when converting to PDF. You may also get lines if you have altered the transparency of colours, so make sure you are using everything at 100% opacity.
What do you mean by bleed and crop marks? Using bleed allows for printing of colours or photographs right to the edge of your documents. In your designs, the colour or photographs will actually overlap the edges and thus when trimmed to size will leave you with a perfectly finished document.
Crop marks are fine lines which illustrate where the pages need to be trimmed. They are also used to check that your documents are printing properly, which is referred to as registration.
To ensure that your document is produced with bleed and crop marks, we recommend using MS Publisher, as it has these facilities as standard.
If you are not able to produce your document with bleed and crop marks it is important to leave space around your design (at least 10mm) for trimming to size if you have colours that need to print right to the edge.
How soon can I have my poster? We will normally agree a deadline with you which as a guide is up to two working days after submitting your artwork.
Can I pay with cash? Sorry, no. Unfortunately we are a recharge only service, so you have to have a UEA recharge code to use us.
Do I need to check proofs? Yes - If you are supplying your own artwork in Publisher or PowerPoint then we will usually ask you to check a proof copy. For large format posters, we charge £5.00 for an A3 proof. We will then ask you to sign your order off.
What do you mean by ‘standard’ size? This is an Internationally recognised way of categorising paper sizes. We regard the following poster sizes as standard.
A3 – 297 x 420 mm A2 – 420 x 594 mm A1 – 594 x 841 mm A0 - 841 x 1189 mm
How do I make sure my sections are even? The easiest way to ensure that your sections are even is to use ruler guides or to set up individual text boxes equally spaced across your document. In Publisher ruler guides can be accessed by clicking ’Arrange’ on the toolbar and selecting ‘Ruler Guides’. This is a simple way of dividing up the areas in your document to allow space around your text for folding. In Powerpoint, try looking through the pre-designed ‘Layouts’ in the ’Slides’ area of the ribbon. There may be an existing design that you can edit simply to fit your purpose.
8


Print Services