pollution solution
TRANSCRIPT

POLLUTION SOLUTION How can we design and build a floating device
that keeps plastic from entering our oceans?
A project-based learning (PBL) module
for high school classrooms
Funded through the Competitive Grant Program
from the Virginia Department of Environmental Quality
NOVEMBER 2019

2
Contents
Page 2 Introduction
Pages 3 – 4 Curricular Alignments
VA SOLs for Earth Science, ENV SCI, and ENV SCI AP
PBL Teaching Methods
Virginia’s 5C’s Success Skills
Pages 5 – 6 Project Research & Development (R&D) Overview
Part I: Researching the Problem
Part II: Developing a Solution
Pages 7 – 14 Teaching Tips (7 Milestones)
Page 15 Additional Resources
Each year, our organization connects over 15,000 students
to environmental science through hands-on lessons taking place in our
community. We have witnessed the way that interactive learning can lead to
an "aha moment" - that beautiful realization that our individual role is making
the world a less polluted place, that moment when the creative energy hums.
This project-based learning (PBL) tool is meant to trigger that moment,
and to connect science with real world challenges and solutions. Trash in our
waterways poses threats to all the aquatic life forms in the steams – not only
where it lands, but all the way downstream to the ocean. Our volunteer
teams clean up over 100 tons of trash each year, and together we want
to find better ways to “catch it” before it leaves our community. We are reaching out to the students for new and innovate ways to do just that...
Have fun researching, discovering, and designing
new solutions to this pollution!
Mary Ann
Executive Director
Clean Valley Council

3
About This Project
Content
This module teaches students about environmental issues through a research and development (R&D)
process. In the research phase, students learn about the impact of pollution (particularly plastic) on water
quality and aquatic ecosystems. Students investigate watersheds of various scales. They learn how human
impact threatens natural resources through urbanization, population growth and pollution.
Students apply this knowledge to the development phase of the project in which they design and build a
pollution solution. Students use engineering thinking and processes to refine their model. If time allows,
students build their prototype and travel to a local stream to test their prototype’s effectiveness in capturing simulated debris (e.g. rubber duckies). The project concludes with a community presentation.
Instructional Approach
This module is designed to be flexible. Teach it as a self-contained project-based learning (PBL) unit.
Alternately, select activities from the module that support your teaching needs. Use the Project Overview
and Teaching Tips section to guide your decisions.
The project uses a student-centered instructional approach adapted from PBL Works, a leading non-profit
national resource for project-based learning. In its entirety, the project also meets the expectations of a
high quality meaningful watershed educational experience (MWEE), as mandated by the Virginia
Department of Education. It supports, as well, attainment of Virginia’s 21st Century Success Skills (The 5
C’s). In other words, this unit need not be an “add-on” to what you are already teaching. Use it as a tool in your toolkit: a high-quality method of instruction.
Virginia Standards of Learning
This project aligns with a variety of science-based SOLs, as well as supporting SOLs in language arts and
mathematics.
Earth Science
ES.1 & 2 (scientific investigation)
ES.8 e, f (watersheds and human impact)
Biology
BIO.8 (human impact on ecosystems)
Environmental Science (Guidelines)
Scientific Skills & Processes, including engineering design (I), The Physical World (II), The Living
World (III), Resources (IV), Human Impact (V)
Environmental Science AP
The Living World, Earth Systems and Resources, Population, Land and Water Use, Pollution

4
Pedagogical Alignments
PBL Works “Gold Standard”
Essential Project Elements
As expressed in the Pollution Solution project . . .
Challenging Problem or Question
Students tackle a real-life design/build challenge:
Can we design and build an economical device that removes litter
from our stream or, that prevents plastic from entering our ocean?
Sustained Inquiry
Students pursue a series of supporting questions and activities as part
of the project. This teacher-facilitated pathway guides students to first
understand the pollution problem (its causes & effects). They then
address that problem via an engineered solution.
Authenticity
Students address an urgent problem that impacts wildlife and
humans. Students work authentically, using engineering processes.
Student Voice & Choice
Students design and model inventions of their own creation.
They themselves vote which prototype to build as a class.
Reflection
Students reflect on content, process, and product throughout this
project. Lesson plans include formative and summative reflection.
Critique & Revision
Students (teams) receive and share feedback about each other’s designs. They use critique to refine their prototypes.
Public Product
Students build and test their invention in a local waterway.
Students present their work to community stakeholders.
The 5 C’s As expressed in this project . . .
Creativity Students invent novel solutions to the litter catcher challenge.
Collaboration Students work together in research, design, and build teams.
They confer with outside experts about their design.
Communication Students share ideas within teams and between teams.
They communicate with outside experts during the project.
Critical Thinking Students devise—and revise—their litter catcher prototypes using
design criteria, outside feedback, and test trials.
Citizenship Students actualize environmental stewardship by participating in a
litter clean-up, and by creating their pollution-solution invention.

5
5-10, 60-min. sessions (1-2 weeks) including field investigations
Project Milestone
Key Student Question(s)
Activities
Products &
Assessment
1. Project Launch
Goal: Meet the
challenge
1 – 2 sessions,
60 – 90 min. total
Driving Question:
Can we invent and build an
economical device that keeps
plastic out of the ocean?
What do we know/need to
know to meet this
challenge?
Entry Event, see suggestions p. 7
Sticky-storm: Class creates and sorts a
collection of stickies to develop
guiding research questions, see p. 8
Organized class list
of key questions
2. Classroom
Research
Goal: Understand
the global situation
Several sessions,
60 – 240 min. total
How is plastic pollution
impacting our oceans?
What’s causing the plastic pollution?
How does this plastic
pollution affect wildlife
and people?
How bad is the problem?
1. Class reviews/discusses video clips.
2. Class participates in Enviroscape
Model or other watershed simulation
activity. (Oceans to Watersheds, CVC
program)
3. Class participates in understanding
the chemical makeup/and breakdown
of different plastics (World Drowning
in Plastic, CVC program)
Teacher-designed
worksheet(s) or quiz
What are people doing to
tackle plastic litter and
pollution?
The class interviews outside experts
and/or forms student research teams Individual or team
worksheet or
powerpoint
presentation
3. Field Research
Goal: Understand
the local situation
60 – 240 min,
including field
session
How are our local streams
contributing to the problem?
Where is one stream’s pathway to the ocean in
our community?
What kinds of litter enter
this pathway?
Optional: How healthy is our
stream? (biotic/abiotic testing)
1. Class plans and implements a data-
rich field investigation (litter pick-up,
sort, weigh-in) at proposed project
launch site.
2. Students note details of the test site
pertinent to their upcoming design
phase.
3. Students analyze data, make
conclusions via class discussion and/or
lab report.
Individual data
sheets and lab
reports
Individual or group
powerpoint slides
describing site
and/or litter
investigation results
POLLUTION SOLUTION, Part 1: Researching the Problem

6
POLLUTION SOLUTION, Part 2: Designing a Solution 5-10, 60-min. sessions, (1.5 - 2 weeks) plus all-day Build Day and Test Day
Project Milestone
Key Student Question(s)
Activities
Products &
Assessment
4. Develop
Prototypes
Goal: Design devices
3 – 5 sessions,
180 – 300 min.
What will our invention look like?
What are our design
criteria?
What materials can we
use?
How can we improve our design?
How can we present our
idea to others?
How can we give and
receive constructive
feedback?
What criteria will we use
for selecting the class
prototype?
1. Class develops common criteria.
2. Teams sketch their designs
3. Teams make small prototype
models.
4. Teams create their slides and/
or poster.
5. Peers and experts provide
feedback and teams revise plans.
6. Class develops team work plan
for build day.
Class-developed
design criteria
Team designs &
prototypes
Prototype rubric
(team)
Team and/or
individual
feedback for
another team
5. Build Device
Goal: Build prototype
½ - 1 full day
How can we work together
effectively to complete our build?
Class constructs their selected
prototype.
Class (and/or team)
work plan
Class-developed
teamwork rubric
6. Field Test Device
Goal:
Try it out!
1 field session (60 –
120 min.)
How will we measure the
effectiveness of our design?
Class tests prototype and gathers
data to measure its effectiveness.
Data sheet and/or
report
7. Public
Presentation
Goal: Sharing and
Recognition
2 – 4 sessions,
90 – 240 min.
What shall we share about our
project with the greater
community? How shall we do it?
Team create different
components of the presentation,
then present per their plan.
Individual reflection
with prompts
about the
problem, the
project, and the
solution.

7
Teaching Tips
Milestone 1: Project Launch
Overview:
Students meet the challenge in a compelling way. In a teacher-facilitated process, they then
generate questions that guide their learning about plastic pollution. This session sets the stage
for Part I of the R&D process: Research.
Materials:
stacks of post-it stickies
watershed maps (Google Earth)
optional: bag of (cleaned) litter including plastic
Notes:
1. Kick-off this Project Challenge with an Entry Event that is memorable and meaningful to your
students. Use your creativity, but a few options:
Empty a bag of cleaned plastic bottles, straws, drink cans, etc. on a student desk (or litter
the entire classroom with the debris). Do we want litter in our school habitat? Of course
not, and neither do marine animals. What’s the problem with marine debris? Encourage
student sharing of what they already know. Does everyone agree it’s a problem? What can we, as science students in this classroom, do about this problem?
Jumpstart the conversation by showing video clips of the Great Pacific Garbage path and
other ocean gyres. What is the source of this plastic? How is it harming ecosystems? How
are people tackling the problem? How can we help with this effort where we live?
Show photos of marine animals emmeshed in plastic and litter. It will be distressing but
direct the conversation to address causes and remediations. Then introduce the R&D
Pollution Solution Challenge.
2. Orient students to the Project Challenge.
a. Post the driving question in the classroom.
b. Explain the culminating product (building and testing the device for a local waterway).
c. Provide a sense of the project length.
d. Inform students that they will be working as scientists and as engineers in an R&D
(research and development) process to complete this project.
3. Create with students a road map of “what we need to know” research questions.

8
a. Inform students they will have a role (with you) in identifying questions they need
answered in order to be informed and successful inventors. These questions will serve as
a road map for the research phase of the project.
b. Ask students in pairs or small groups to generate at least 5 good questions that would
help the class understand more about plastic pollution in our waterways and oceans.
Students should write each of their questions on a separate sticky.
c. Collect and read aloud all the stickies and/or have groups read. Sort the question stickies
by similar category on the board.
d. Note major areas of interest then add yours, as linked to your curricular goals.
e. Condense all the questions into a few major supporting questions for this phase of the
project. Retain these questions on the board, as guide for future research & lessons.
Milestone 2: Classroom Research
Overview:
Students learn more about the problem of marine pollution through research. This phase is ideal
for teaching content subject matter. Maximize its utility by Identifying vocabulary and concepts
you want students to master; design research tasks and products accordingly. Consider a quiz or
test after this component of the project.
Materials:
Video Clips: Mr. Trash Wheel; https://www.youtube.com/watch?v=XLPSmKLg8hc
Optional: enviroscape or other interactive watershed model
optional: A World Drowning in Plastics (CVC program).
Notes:
1. Review with students the major supporting questions for this project phase. Then show how
what they do in class relates to answering those questions. Go light or deep, depending on your
students and course needs. A sampler of options:
Content stations: have teams rotate, answering worksheet. Or use jigsaw method: one
team becomes experts in one topic, then disperse to share their expertise with others.
Video clips, textbooks, on-line research in tandem with an individual or team graphic
organizer or worksheet
Guest expert(s): panel, Q&A, or lecture; live or online/Skype
Role play or watershed simulation. Does your school or natural resource agency have
access to the Enviroscape watershed model? Simpler build-it yourself variations can be
found online.
A World Drowning in Plastics (CVC program). Gain a better understanding of what makes
up plastics, how it is created and its pro/cons to sustainability

9
2. Let your summative assessment do double duty by having students create small, finished
products, some of which the class can later assemble as part of the class public presentation.
The same process can also be used to synthesize findings from the Field Research phase.
Examples (created by individuals or teams):
Tri-fold display with paragraphs each answering one of your class’s supporting questions
Powerpoint slides providing the same.
Milestone 3: Field Research
Overview:
Students travel to your identified outdoor test site to gather data about type and amount of
litter near and in the target stream. They also investigate features of the test site (land and
water) that will influence design and build decisions.
Extension: Students investigate health of the stream through abiotic and/or biotic testing.
Students look for opportunities to protect the streams such as riparian buffers. Students do a
clean up while they are on-site.
Materials:
Classroom:
Google satellite view of outdoor test site and surrounding landscape.
Field:
Litter Investigation: Safety gear (gloves, etc.), trash bags, first-aid kits, portable scale,
clipboards, data sheets, pencils, cameras, portable dry erase board (optional)
Site Investigation I (site assessment): 10 m. tape, stopwatches & oranges (for measuring
velocity, see next page 2b.), wading boots (optional), maps or paper for drawing maps,
clipboards, pencils, cameras
Site investigation II (stream-monitoring): abiotic and biotic testing supplies, boots, nets,
tarps, clipboards, lab sheets, pencils
Notes:
1. Prior to the Field Day:
When students arrive on the site, they should be fully prepared. They should know what they
will be doing, as well as why, how, where, and when. They should be versed in all routines
including what happens if they are off-task or acting unsafely. You should feel comfortable and
knowledgeable about the site and have all the help and materials you need for a successful day.
a. Recruit one or more resource partners to join your class on site, to add a real-world
career component as well as to help with activities and data gathering.

10
b. Select your public access test site with care. Criteria include: distance from school;
parking; access to shelter and restrooms; width, depth, and flow rate of waterway
(narrow, shallow and slow is best); presence of litter, overall safety of site. NOTE: Water
levels change daily, be sure to have 1-2 back up locations. Check test sites the night
before to select the best location.
c. Outline outdoor behavior expectations with students (stay with buddy or group in
designated area, no throwing rocks, no wading unless sanctioned, stay on task, etc.).
d. Designate individual/team roles and expectations.
e. Review with students: safety protocol, data gathering tasks, purposes, data charts, tools,
and methods.
2. During the Field Day:
a. Litter Investigation:
While maintaining safety protocols, have students work in small teams to collect debris
and litter from the investigation site (you determine the area). Then have students sort
and weigh (or count) litter by type. Record on data sheet. Consider framing the activity as
an investigative question requiring data-gathering. For example, what percent of debris is
plastic heading to the ocean? Bag and discard the collected refuse properly.
b. Site Investigation:
Remind students this location will be the test site for their device. Have student teams
map the area, measure key components, calculate velocity (if water levels and flow rates
are safe), and note other significant features (where/how will they attach their device?).
Velocity: measure and mark out 10 meters along stream. Step in stream and release
orange at start point. Time the orange’s passage to the 10 m. mark. Velocity = sec/meter.
3. After the Field Day:
Debrief in class about both elements of the investigation. Reflect on findings and impressions.
Also reflect on the investigation and teamwork processes: what went well and what would they
do differently next time based on their experience?
Use the field experience to tie together concepts explored in Part One of the Pollution Solution
project. Products from Part One can include charts, maps, paragraphs, lab reports, or
powerpoint slides, some of which the class can later use as part of the final presentation. Revisit
the “road map” questions from Day One to point out how student research in the class and in
the field has helped answer those questions.

11
Milestone 4: Develop Prototypes
Overview:
Students move into Part II of the R&D process: Development. Teams now create and refine
their inventions for removing litter from their waterway. First, the class develops common
design criteria. As teams they then design and model prototypes that meet their criteria. Later in
the process, teams create a poster about their design for peer and community critique and
subsequent revision. Note: the prototype can be the final project product if time is short.
Materials:
Graph paper, lightweight cardboard, scissors, duct tape, glue guns
Poster (chart) paper and markers
Data and maps from site investigation
Notes:
1. Develop a common design criteria for the devices: ask students to create criteria on individual
stickies, then share and sort responses. Determine and post the key design criteria. Examples:
Function: Must catch x percent of floating debric (represented in this project by released
rubber duckies, (see p. 13) during the field test. Must not harm living things or pollute
the water. Must accommodate fluctuations in stream volume and velocity.
Form: Must be easy to transport, assemble, install (including attachment strategy) and
remove. Must be built with basic materials with people of basic skills in less than x hours.
2. Form student teams of 3 – 4 “engineers” to design their device. Teams must design their
prototype aligned with the criteria, construct a paper model, and prepare a powerpoint.
3. Facilitate a feedback session for student designs. Students can share their ideas to peers and
invited guests (such as local municipal engineers/staff) through powerpoint presentations.
Alternately, students can print and post the 2-3 main design pages for a Gallery Walk. In a
Gallery Walk, each team places its poster pages on wall for others to walk by, examine, and
leave constructive comments on stickies they attach to the poster. Charge teams to revise or
even combine their designs based on the feedback.
4. Have class select one prototype for the class build using a decision-making protocol.
5. Create a class work plan together:
break down construction and other project tasks into component parts
create a plan for concurrent assemblage stations that support these tasks
outline a timeline that identifies the sequence of these tasks
identify materials needed
assign students to teams, tasks, and individual jobs
6. Create a teamwork rubric with student input that allows self- and teacher assessment of
their teamwork contributions during the upcoming “Build Day.”

12
Milestone 5: Build The Device
Overview:
Full-size student prototype should be designed to be constructed in a day or less, but plan for
several hours of work. Assign students to specific cooperative work teams and stations and/or
rotate through stations, depending on your project. Sample sequence:
9:00– 9:30 a.m.: Review project goal, work plan (team and individual roles) and safety
9:30 a.m. – noon: Work in stations to construct components, assemble, and decorate
12:30 – 1:15 p.m.: lunch
1:15 – 2:00 p.m. Final efforts, clean-up, reflect & brief for Test Day (plus what to wear).
Materials:
Student-created Teamwork Rubric (assessment tool)
Construction supplies, tools, and safety equipment (see resources)
Camera for documentation
13
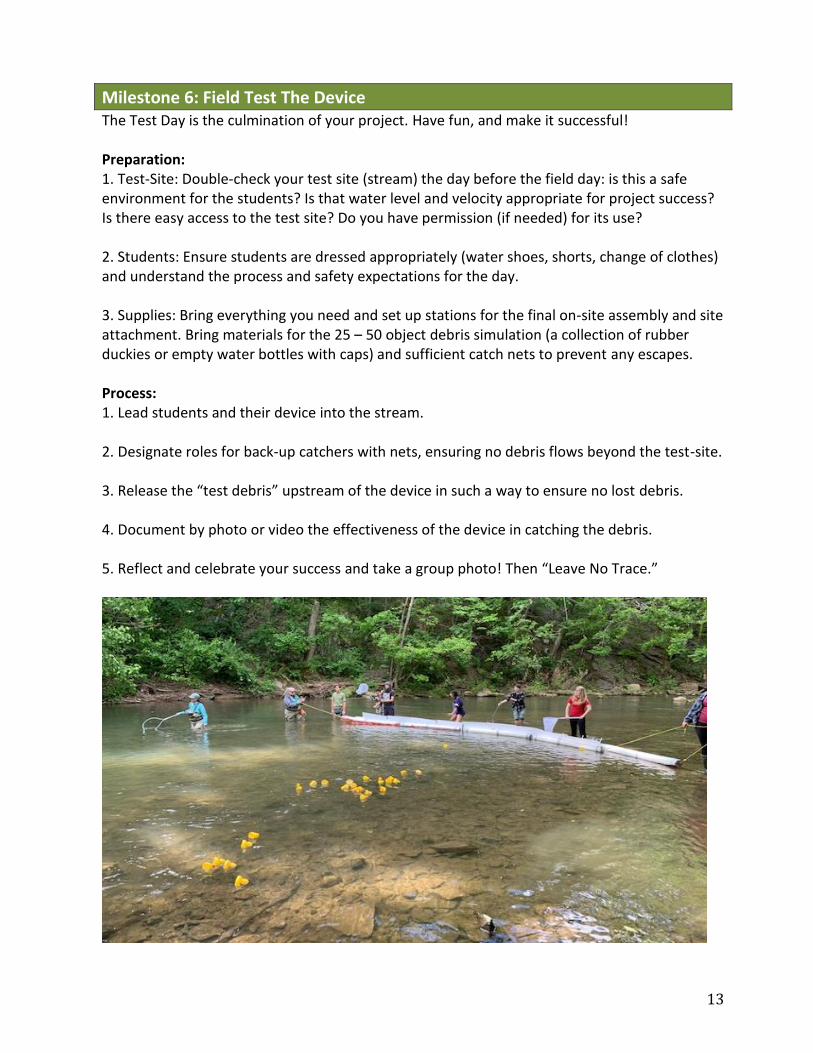
Milestone 6: Field Test The Device
The Test Day is the culmination of your project. Have fun, and make it successful!
Preparation:
1. Test-Site: Double-check your test site (stream) the day before the field day: is this a safe
environment for the students? Is that water level and velocity appropriate for project success?
Is there easy access to the test site? Do you have permission (if needed) for its use?
2. Students: Ensure students are dressed appropriately (water shoes, shorts, change of clothes)
and understand the process and safety expectations for the day.
3. Supplies: Bring everything you need and set up stations for the final on-site assembly and site
attachment. Bring materials for the 25 – 50 object debris simulation (a collection of rubber
duckies or empty water bottles with caps) and sufficient catch nets to prevent any escapes.
Process:
1. Lead students and their device into the stream.
2. Designate roles for back-up catchers with nets, ensuring no debris flows beyond the test-site.
3. Release the “test debris” upstream of the device in such a way to ensure no lost debris.
4. Document by photo or video the effectiveness of the device in catching the debris.
5. Reflect and celebrate your success and take a group photo! Then “Leave No Trace.”
14
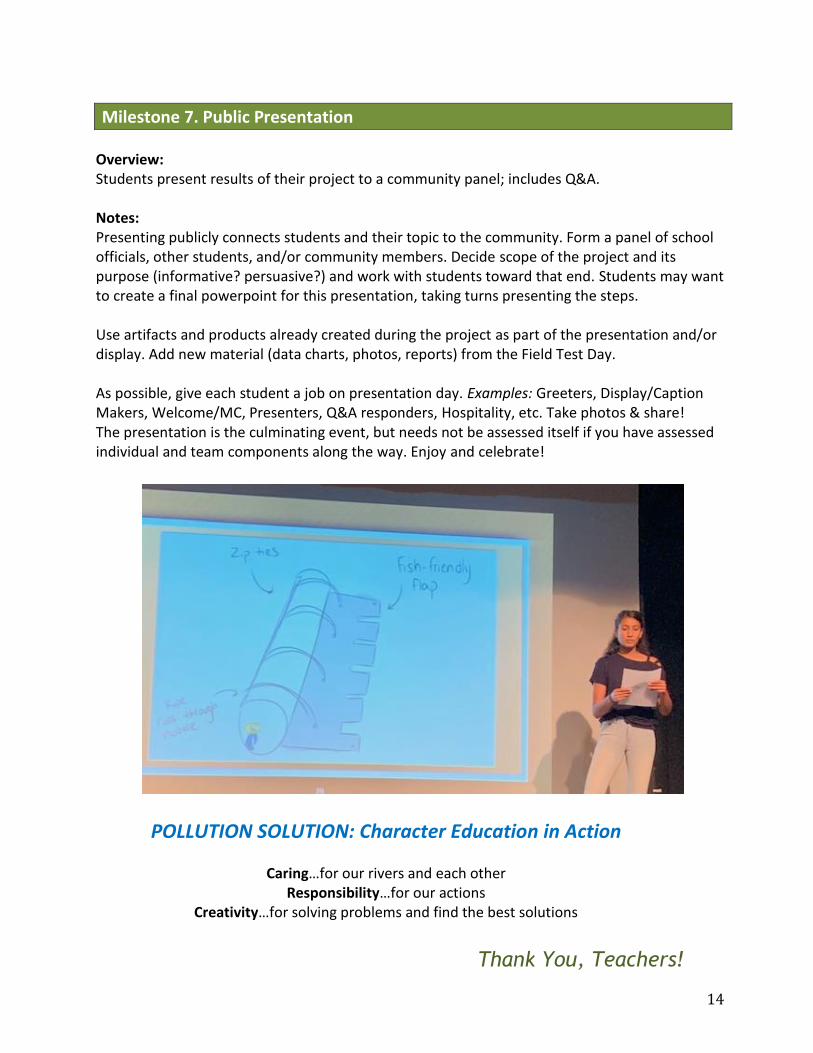
Milestone 7. Public Presentation
Overview:
Students present results of their project to a community panel; includes Q&A.
Notes:
Presenting publicly connects students and their topic to the community. Form a panel of school
officials, other students, and/or community members. Decide scope of the project and its
purpose (informative? persuasive?) and work with students toward that end. Students may want
to create a final powerpoint for this presentation, taking turns presenting the steps.
Use artifacts and products already created during the project as part of the presentation and/or
display. Add new material (data charts, photos, reports) from the Field Test Day.
As possible, give each student a job on presentation day. Examples: Greeters, Display/Caption
Makers, Welcome/MC, Presenters, Q&A responders, Hospitality, etc. Take photos & share!
The presentation is the culminating event, but needs not be assessed itself if you have assessed
individual and team components along the way. Enjoy and celebrate!
POLLUTION SOLUTION: Character Education in Action
Caring…for our rivers and each other
Responsibility…for our actions
Creativity…for solving problems and find the best solutions
Thank You, Teachers!

15
Additional Resources
1. FREE resources from Clean Valley Council
Clean Valley Council is a resource for all teachers. Classes are free where we have contracts. Contact us
to see if your community is under contract or if you’d like us to reach out to municipal leaders to create a cooperative agreement. Some free supplemental tools are on our website at www.cleanvalley.org
2. Suggested Project Toolkit for Build Day ($300 - $500 range):
Toolbox on wheels
Power Drill and Misc. Bits
Misc. Small Tools:
Rubber Mallet
Standard Hammer
Phillips/Straight Screw Drivers
Needle Nose Pliers
Snippers
Utility Knife
Utility Saw
Design-specific supplies:
Wire Ties - multiple lengths
Rope
Heavy Duty scissors
Duct Tape
Spring Clips
Small Level
Safety Glasses/Vests/Gloves
Extension Cord
3. Community Partners
a. Natural Resource Agencies
State-funded agencies in your area may have staff such as rangers, watershed educators, or
classroom specialists able to help your project at no or low cost. Many offices with educational
outreach may also have gear to lend including an Enviroscape model, posters, lesson kits, and more.
Your local Virginia Soil and Water Conservation Board and local water authorities
Local 4-H agent (Virginia Extension Office)
Nearby state parks
b. Municipal Agencies
Local offices may also have pro bono staff, resource, and insight to share. You may need to
coordinate your field test with one or more of these offices.
Municipal stormwater managers and engineers; municipal solid waste/recycling managers
Parks and Recreation departments
Water Authority engineers and outreach staff
4. Other Helpful Resources (free)
a. Project-Based Learning materials from PBL Works: A treasure trove of free materials, templates,
lessons, rubrics, and blogs. Website: http://pblworks.org
b. Chesapeake Bay & Meaningful Watershed Education Experiences (MWEE) Activities & Guide
Free education-related Bay material, including the new MWEE 101 Guide (1 credit course you can
complete on-line). The Pollution Solution can easily be framed as a MWEE, a Virginia mandate at the
elementary, middle, and high school levels. Website: http://baybackpack.com
c. Community-Action and Problem-Solving Resources from Earth Force:
Free educator guides and lessons supporting student voice and choice, empowered decision-making
processes, environmental civic action, and more. Website: http://earthforceresources.org