playstation vita teardown · to buy sony's proprietary cards. the same rule applies to the...
TRANSCRIPT

PlayStation Vita TeardownWe took apart Sony's latest portable gaming creation on February 15th, 2012.
Geschrieben von: Walter Galan
PlayStation Vita Teardown Entwurf: 2018-03-08Anleitung Nr: 7872 -
Dieses Dokument wurde am 2019-11-29 07:43:48 AM (MST) erstellt.
© iFixit — CC BY-NC-SA de.iFixit.com Seite 1 von 23

EINLEITUNG
We don't break gadgets—we rip them apart with style. We tear them down, if you will. Today we putour spudgers up against Sony's PS Vita, the newest addition to their portable platform family. Joinus as we go motherboard deep into Sony's newest device, and when we're done be sure to follow@ifixit on Twitter to stay up to date with the latest and greatest teardowns.
WERKZEUGE:iFixit Opening Picks set of 6 (1)Phillips #00 Screwdriver (1)iFixit Opening Tools (1)Spudger (1)
TEILE:PlayStation Vita (Wi-Fi) Midframe (1)
PlayStation Vita Teardown Entwurf: 2018-03-08Anleitung Nr: 7872 -
Dieses Dokument wurde am 2019-11-29 07:43:48 AM (MST) erstellt.
© iFixit — CC BY-NC-SA de.iFixit.com Seite 2 von 23

Schritt 1 — PlayStation Vita Teardown
Here it is, the Sony PS Vita. Sure itlooks similar to the good ol' PSPs,but it packs a handful of cool newfeatures:
4 Core ARM Cortex-A9 MPCoreProcessor
4 Core SGX543MP4+ GPU
512 MB RAM + 128 MB VRAM
5" OLED Touchscreen running24-bit color, 960 x 544 pixel qHDdisplay and rear capacitive multi-touch pad
Front and Rear 0.3 MP VGAcameras
Two analog joysticks
PlayStation Vita Teardown Entwurf: 2018-03-08Anleitung Nr: 7872 -
Dieses Dokument wurde am 2019-11-29 07:43:48 AM (MST) erstellt.
© iFixit — CC BY-NC-SA de.iFixit.com Seite 3 von 23

Schritt 2
The front holds the usual diamond of shape-coded buttons, a D-Pad, and two analog sticks. Ifthat's not enough for you, don't forget the two bumper buttons, the three smaller buttons parkedjust below the analog sticks and, of course, the touchscreen.
The bottom side of the PS Vita is left relatively bare and is occupied by the charging port,headphone jack, and the memory card door.
The top of the PS Vita is adorned with the volume button, power button, game card slot, and anaccessory slot.
Your accessories may have more function and may not be as gaudy.
PlayStation Vita Teardown Entwurf: 2018-03-08Anleitung Nr: 7872 -
Dieses Dokument wurde am 2019-11-29 07:43:48 AM (MST) erstellt.
© iFixit — CC BY-NC-SA de.iFixit.com Seite 4 von 23

Schritt 3
When we turn the Vita over, we areinstantly thrilled to see a secretcode!
It appears to be a cheat code. Wepostulate that pressing all of theaction buttons in order, startingwith the triangle and rotatingclockwise -- roughly 410 times --will give you unlimited lives,moneys, manas, likes, whatever!
Apparently the hidden cheat codedoes more than make your teamin NFL Blitz 12 into a pack ofrunning hotdogs. For the firsttime, this handheld deviceactually has a rear capacitivemulti-touch pad. Curious how itcould be used? Check out thisdemonstration!
Above the rear touchpad lies the firstcamera ever seen in a handheldPlayStation device.
PlayStation Vita Teardown Entwurf: 2018-03-08Anleitung Nr: 7872 -
Dieses Dokument wurde am 2019-11-29 07:43:48 AM (MST) erstellt.
© iFixit — CC BY-NC-SA de.iFixit.com Seite 5 von 23

Schritt 4
It's time to play "Which card willwork in my PS Vita?"! We'll give youa hint: it's the one labeled "Sony PSVita."
Don't be fooled by the size andshape of the PS Vita's memory card.While it looks similar to the microSDcards surrounding it, there is nocross compatibility. That's right, ifyou want more memory, you've gotto buy Sony's proprietary cards.
The same rule applies to thegame cards. They look similar toSD cards, but the pinouts andshape differ in such a way thatmakes cross-compatibilityimpossible. Sorry hackers.
PlayStation Vita Teardown Entwurf: 2018-03-08Anleitung Nr: 7872 -
Dieses Dokument wurde am 2019-11-29 07:43:48 AM (MST) erstellt.
© iFixit — CC BY-NC-SA de.iFixit.com Seite 6 von 23

Schritt 5
The 3G version of the PS Vita can connect to the internet via Wi-Fi or the AT&T 3G network with aSIM card stored right in the side of the device.
Currently, Sony only offers data plans as a month-to-month service through AT&T.
Schritt 6
Common Phillips #00 screws hold the case halves together. All are easily accessible, though twoare cleverly hidden under the accessory port cover.
10 points to Gryffindor!
PlayStation Vita Teardown Entwurf: 2018-03-08Anleitung Nr: 7872 -
Dieses Dokument wurde am 2019-11-29 07:43:48 AM (MST) erstellt.
© iFixit — CC BY-NC-SA de.iFixit.com Seite 7 von 23

Schritt 7
We remove all the screws, but the case halves hold fast. Oh well, what fun is a teardown if thedevice just opens itself up for us? We prefer a bit of a challenge.
Our plastic opening tool easily levers the case in twain to reveal a sea of tightly packed electronics.
PlayStation Vita Teardown Entwurf: 2018-03-08Anleitung Nr: 7872 -
Dieses Dokument wurde am 2019-11-29 07:43:48 AM (MST) erstellt.
© iFixit — CC BY-NC-SA de.iFixit.com Seite 8 von 23

Schritt 8
The battery is secured to the back case with a pair of Phillips #00 screws and... well that's it.There's no adhesive!
The Vita's battery runs at a standard 3.7 V and packs an impressive 2210 mAh punch.
We're confident that between the Wi-Fi, Bluetooth, 3G, 5" qHD display and two touch pads, everybit of capacity in the battery will be put to good use.
PlayStation Vita Teardown Entwurf: 2018-03-08Anleitung Nr: 7872 -
Dieses Dokument wurde am 2019-11-29 07:43:48 AM (MST) erstellt.
© iFixit — CC BY-NC-SA de.iFixit.com Seite 9 von 23

Schritt 9
The wireless card is easily identifiable by the mess of antenna cables connected to it.
A flick of our magic spudger frees the wireless card for inspection.
PlayStation Vita Teardown Entwurf: 2018-03-08Anleitung Nr: 7872 -
Dieses Dokument wurde am 2019-11-29 07:43:48 AM (MST) erstellt.
© iFixit — CC BY-NC-SA de.iFixit.com Seite 10 von 23

Schritt 10
With surgical-like precision and care,we remove the EMI shields from thewireless card to reveal:
Qualcomm PM8028 powermanagement
Avago ACPM-7868 linear quad-band power amplifier module
Epcos 7964 SAW duplexer
Avago ACPM-5001 CDMA band1 power amplifier module
Avago ACPM-5002 CDMA band2 power amplifier module
Avago ACPM-5005 CDMA band5 power amplifier module
Avago ACPM-5008 CDMA band8 power amplifier module
PlayStation Vita Teardown Entwurf: 2018-03-08Anleitung Nr: 7872 -
Dieses Dokument wurde am 2019-11-29 07:43:48 AM (MST) erstellt.
© iFixit — CC BY-NC-SA de.iFixit.com Seite 11 von 23

Schritt 11
Turning our attention to the backsideof the wireless card we find:
Qualcomm MDM6200, whichsupports HSPA+ speeds of up to14.4 Mbps
Toshiba TY890A111222KAMobile SDR SDRAM
Sony CXM3555ER antennaswitch module
PlayStation Vita Teardown Entwurf: 2018-03-08Anleitung Nr: 7872 -
Dieses Dokument wurde am 2019-11-29 07:43:48 AM (MST) erstellt.
© iFixit — CC BY-NC-SA de.iFixit.com Seite 12 von 23

Schritt 12
The PS Vita is very modular. Check out all these connectors!
Having all the components on a single ribbon cable or PCB makes repair both difficult andcostly. With all these individual components, the Vita should be easy to repair.
We detach a few connectors and remove the SIM card board from the colorful innards of thedevice.
PlayStation Vita Teardown Entwurf: 2018-03-08Anleitung Nr: 7872 -
Dieses Dokument wurde am 2019-11-29 07:43:48 AM (MST) erstellt.
© iFixit — CC BY-NC-SA de.iFixit.com Seite 13 von 23
Schritt 13
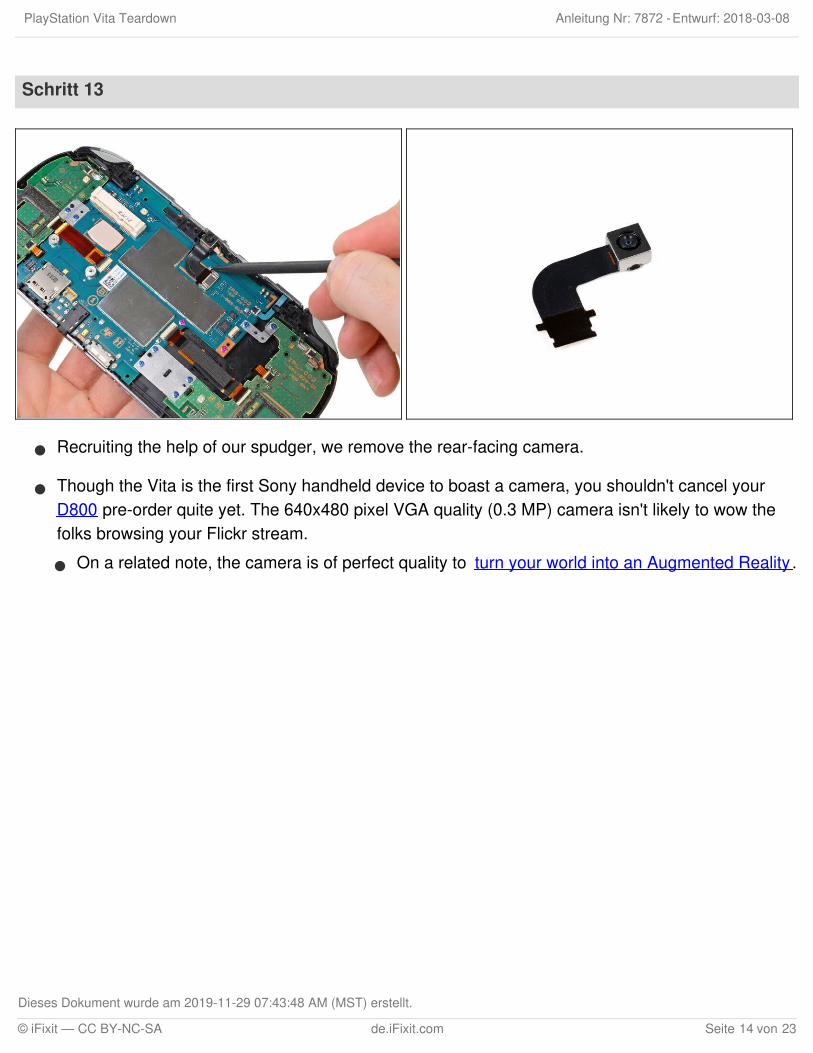
Recruiting the help of our spudger, we remove the rear-facing camera.
Though the Vita is the first Sony handheld device to boast a camera, you shouldn't cancel yourD800 pre-order quite yet. The 640x480 pixel VGA quality (0.3 MP) camera isn't likely to wow thefolks browsing your Flickr stream.
On a related note, the camera is of perfect quality to turn your world into an Augmented Reality .
PlayStation Vita Teardown Entwurf: 2018-03-08Anleitung Nr: 7872 -
Dieses Dokument wurde am 2019-11-29 07:43:48 AM (MST) erstellt.
© iFixit — CC BY-NC-SA de.iFixit.com Seite 14 von 23

Schritt 14
After a fair amount of disassembly, we find our old nemesis: adhesive!
We easily win the battle against the evil glue with our trusty plastic opening tool and separate therear multi-touch pad from its frame.
Attached to the rear touchpad, we find an Atmel mXT224 touchscreen controller.
PlayStation Vita Teardown Entwurf: 2018-03-08Anleitung Nr: 7872 -
Dieses Dokument wurde am 2019-11-29 07:43:48 AM (MST) erstellt.
© iFixit — CC BY-NC-SA de.iFixit.com Seite 15 von 23
Schritt 15
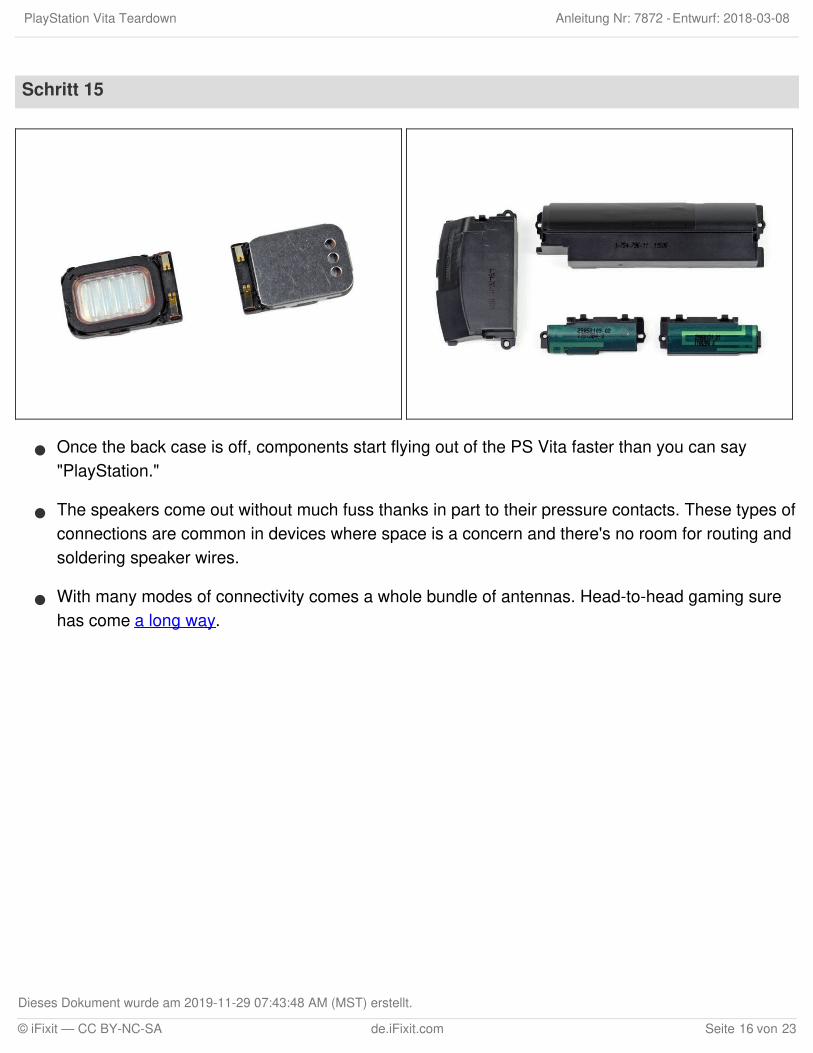
Once the back case is off, components start flying out of the PS Vita faster than you can say"PlayStation."
The speakers come out without much fuss thanks in part to their pressure contacts. These types ofconnections are common in devices where space is a concern and there's no room for routing andsoldering speaker wires.
With many modes of connectivity comes a whole bundle of antennas. Head-to-head gaming surehas come a long way.
PlayStation Vita Teardown Entwurf: 2018-03-08Anleitung Nr: 7872 -
Dieses Dokument wurde am 2019-11-29 07:43:48 AM (MST) erstellt.
© iFixit — CC BY-NC-SA de.iFixit.com Seite 16 von 23

Schritt 16
The trigger buttons are easily removed and are a simple, modular design. This means easier andcheaper repair for the masses!
If it ain't broke, don't fix it. Sony has used the same basic design for the R and L trigger buttonssince the original PSP.
PlayStation Vita Teardown Entwurf: 2018-03-08Anleitung Nr: 7872 -
Dieses Dokument wurde am 2019-11-29 07:43:48 AM (MST) erstellt.
© iFixit — CC BY-NC-SA de.iFixit.com Seite 17 von 23

Schritt 17
The button boards are held on with nothing more than a few screws.
The PS Vita control interfaces are separated into several small pieces, further enhancingrepairability of this device.
PlayStation Vita Teardown Entwurf: 2018-03-08Anleitung Nr: 7872 -
Dieses Dokument wurde am 2019-11-29 07:43:48 AM (MST) erstellt.
© iFixit — CC BY-NC-SA de.iFixit.com Seite 18 von 23

Schritt 18
As we begin removing the screws for the motherboard, it slowly dawns on us...
Colored screws! The pink-ish screws hold the motherboard in place while the blue screws holdattachments to the motherboard.
It's like a boy/girl screw party!
When we were done ogling the colored screws, we lifted the motherboard up and away, detachingthe OLED display and touchscreen connectors.
Schritt 19
A spudger and a tiny bit of force frees the front-facing camera from the motherboard.
The small camera shares the same 640 x 480 pixel VGA quality as its rear-facing brother.
PlayStation Vita Teardown Entwurf: 2018-03-08Anleitung Nr: 7872 -
Dieses Dokument wurde am 2019-11-29 07:43:48 AM (MST) erstellt.
© iFixit — CC BY-NC-SA de.iFixit.com Seite 19 von 23

Schritt 20
With the motherboard finally all by itself, we can begin chip identification:
Sony CXD5315GG quad-core processor + system memory
Samsung KLM4G1FE3A-F001 NAND flash memory
Fujitsu MB44C026A
Marvell 88W878S-BKB2 Avastar WLAN/Bluetooth/FM Single-Chip SoC
Wolfson Micro WM1803E audio codec
STMicroelectronics 3GA51H gyroscope
Kionix KXTC9 three-axis MEMS accelerometer
PlayStation Vita Teardown Entwurf: 2018-03-08Anleitung Nr: 7872 -
Dieses Dokument wurde am 2019-11-29 07:43:48 AM (MST) erstellt.
© iFixit — CC BY-NC-SA de.iFixit.com Seite 20 von 23

Schritt 21
We baked our Vita in order to separate the front plastic (and fused OLED display) from the frame.Our quick recipe for frame removal:
Pre-heat oven to 200 F.
Place PS Vita front panel assembly in the oven and set timer for 10 minutes.
Remove the PS Vita from the oven and carefully peel the plastic off the front case using severalguitar picks. Watch out -- it's hot!
Take 10 points back from Gryffindor.
Baking electronics: much easier than baking bread. All the ingredients are pre-mixed!
PlayStation Vita Teardown Entwurf: 2018-03-08Anleitung Nr: 7872 -
Dieses Dokument wurde am 2019-11-29 07:43:48 AM (MST) erstellt.
© iFixit — CC BY-NC-SA de.iFixit.com Seite 21 von 23

Schritt 22
The front plastic and OLED display slowly came off from the frame. Note that the OLED display isfused to the plastic, making this procedure very precarious.
Underneath we find another Atmel mXT224 touchscreen controller, which has graced tons ofteardown devices in the past, including this one!
We also found a grid of what appears to be a smörgåsbord of capacitors, resistors (and one lonelydiode) under the frame. Interesting...
PlayStation Vita Teardown Entwurf: 2018-03-08Anleitung Nr: 7872 -
Dieses Dokument wurde am 2019-11-29 07:43:48 AM (MST) erstellt.
© iFixit — CC BY-NC-SA de.iFixit.com Seite 22 von 23

Schritt 23
After much deliberation, the council of iFixit has deemed appropriate a reparability score of 8 outof 10.
All screws are standard Phillips #00. No security or proprietary bits here.
Modular design means lower repair costs because small parts can be replaced individually.
Only one component was held in place with adhesive: the rear touch panel.
Battery is not easily accessible, but it is definitely serviceable by the average user armed withthe appropriate screwdriver.
The front plastic is fused to the OLED (and difficult to separate from the frame), makingreplacement of the display more expensive.
PlayStation Vita Teardown Entwurf: 2018-03-08Anleitung Nr: 7872 -
Dieses Dokument wurde am 2019-11-29 07:43:48 AM (MST) erstellt.
© iFixit — CC BY-NC-SA de.iFixit.com Seite 23 von 23