plants to plastics - cabarrus county schools...permission of the museum of science, boston. for...
TRANSCRIPT

Written by the Engineering is Elementary® TeamIllustrated by Ross Sullivan-Wiley and the Engineering is Elementary® Team
Plants to Plastics: Engineering Bioplastics
Engineering Everywhere
Chemical Engineering for Out-of-School Time • Grades 6–8

© 2013, 2014 by the Museum of Science. All rights reserved. Printed in the United States of America.
This work may not be reproduced by mechanical or electronic means without the express written permission of the Museum of Science, Boston. For permission to copy portions of this material for other purposes, please write to:
Engineering is Elementary Museum of Science1 Science Park Boston, MA 02114Written by the Engineering is Elementary Team
Project Director:Christine Cunningham
Research and Evaluation:Christine GentryJonathan HertelCathy LachapelleChristopher San Antonio-TunisSang Shin Muhammad ShamsStephen SullivanRichard Sutton
Multimedia:Kristina Blanchflower Ellen Daoust
Curriculum Development:Owen BerlinerIan BurnetteMartha DavisMichelle DiIesoMelissa HigginsNatacha MeyerTania Taueriea toner
Professional Development:Chantal Balesdent Elissa JordanElise MorganShannon McManusCorey NiemannKristin SargianisMax Siegel
Operations:Valerie CostaEmily EpplerLaura HigginsKate Sokol
Interns and Consultants:Nia GipsonAnya Jacobs
Outreach:Cynthia Berger
ii © Museum of ScienceEngineering Everywhere: Plants to Plastics
Support for this project has been generously provided by i2 Camp.
Pilot Sites:This unit would not be possible without the valuable feedback from our pilot sites!
Bourne Middle School, Bourne, MA Boys’ Club of New York, New York, NYDempsey Learning Club, Delaware, OHExplorOcean, Newport Beach, CAGirls Incorporated of Lynn, Lynn, MAKnox Trail Jr High School, Spencer, MAMaine Mathematics and Science Alliance, Augusta, MEMcNair Middle School STEM Club, Atascosa, TXNeshaminy Kids Club, Levittown, PAOrchard Gardens Boys & Girls Club, Roxbury, MAScience Math and Robotic Technology Education, Indio, CATruce Fitness- Harlem Children’s Zone, New York, NYUNO Soccer Academy, Chicago, ILYWCA Greater Newburyport, Newburyport, MA
iii © Museum of ScienceEngineering Everywhere: Plants to Plastics

vivEngineering Everywhere: Plants to Plastics
© Museum of Science
Here is an overview of the activities in this unit and how they all fit together.
Activity 1: Bouncy PolymersYouths engineer a bouncy ball out of glue and borax and
model the chemical structure by forming a human polymer.
Prep Activity 2: What is Technology?Youths learn about technology through a series of interactive
games that explore the definition of technology.
Prep Activity 1: What is Engineering?Youths are introduced to engineering as they work in teams
to engineer a catapult from a plastic spoon.
Unit Map
Activity 2: Plastic ExplorationYouths explore different types of plastics in their environment
and investigate some problems created by plastics.
Activity 3: Investigating BioplasticsYouths create bioplastic samples out of agar and cornstarch.
Activity 4: Creating BioplasticsYouths engineer a bioplastic with properties similar to a
plastic they use in their daily lives.
Activity 5: Improving BioplasticsYouths will engineer a bioplastic object using an improved
recipe.
Activity 6: Engineering ShowcaseYouths communicate their work with visitors.
vEngineering Everywhere: Plants to Plastics © Museum of Science
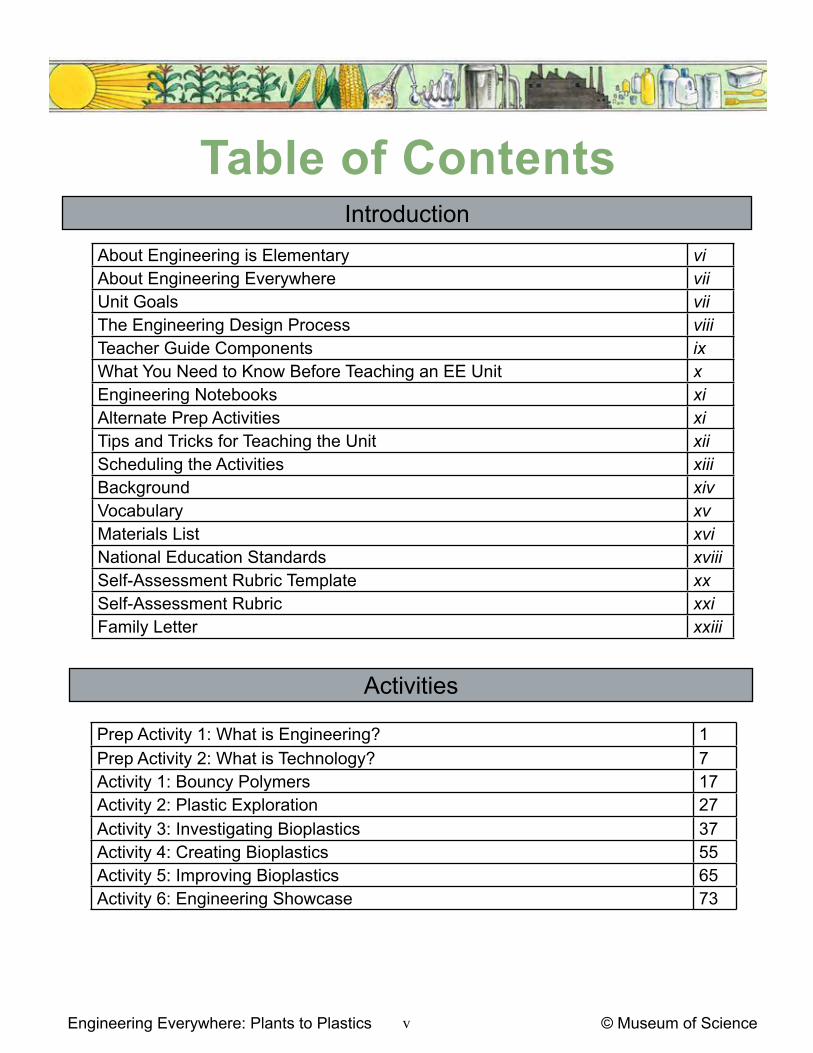
Table of Contents
Prep Activity 1: What is Engineering? 1Prep Activity 2: What is Technology? 7Activity 1: Bouncy Polymers 17Activity 2: Plastic Exploration 27Activity 3: Investigating Bioplastics 37Activity 4: Creating Bioplastics 55Activity 5: Improving Bioplastics 65Activity 6: Engineering Showcase 73
Introduction
Activities
About Engineering is Elementary viAbout Engineering Everywhere viiUnit Goals viiThe Engineering Design Process viiiTeacher Guide Components ixWhat You Need to Know Before Teaching an EE Unit xEngineering Notebooks xiAlternate Prep Activities xiTips and Tricks for Teaching the Unit xiiScheduling the Activities xiiiBackground xivVocabulary xvMaterials List xviNational Education Standards xviiiSelf-Assessment Rubric Template xxSelf-Assessment Rubric xxiFamily Letter xxiii
viiviEngineering Everywhere: Plants to Plastics
© Museum of Science
About Engineering is Elementary
Engineering is Elementary® (EiE) fosters engineering and technological literacy among children. Most humans spend over 95% of their time interacting with technology. Pencils, chairs, water filters, toothbrushes, cell phones, and buildings are all technologies—solutions designed by engineers to fulfill human needs or wants. To understand the world we live in, it is vital that we foster engineering and technological literacy among all people, even young children! Fortunately, children are born engineers. They are fascinated with building, taking things apart, and how things work. Engineering is Elementary harnesses children’s natural curiosity to promote the learning of engineering and technology concepts.
The EiE program has four primary goals: Goal 1: Increase children’s technological literacy.Goal 2: Increase educators’ abilities to teach engineering and technology. Goal 3: Increase the number of schools and out-of-school time (OST) programs in the U.S. that include engineering.Goal 4: Conduct research and assessment to further the first three goals and contribute knowledge about engineering teaching and learning.
The first product developed by the EiE program was the Engineering is Elementary curriculum series. Designed for use in elementary school classrooms, this curriculum is hands-on, research-based, standards-driven, and classroom-tested. For more information about EiE, visit: www.eie.org.
In 2011, EiE began development of Engineering Adventures (EA), a curriculum created for 3rd-5th grade children in OST environments. EA is designed to provide engaging and thought-provoking challenges appropriate for the OST setting. More information about EA can be found online at: www.engineeringadventures.org.
In 2012 the Engineering Everywhere (EE) curriculum was created. EE is designed to empower middle school-aged children in OST settings to become engineers and solve problems that are personally meaningful and globally relevant. For more information, visit: www.engineeringeverywhere.org.
Engineering is Elementary is a part of The National Center for Technological Literacy (NCTL) at the Museum of Science, Boston. The NCTL aims to enhance knowledge of technology and inspire the next generation of engineers, inventors, and innovators. Unique in recognizing that a 21st century curriculum must include today’s human-made world, the NCTL’s goal is to introduce engineering as early as elementary school and continue through high school, college, and beyond. For more information, visit: www.nctl.org.
viiEngineering Everywhere: Plants to Plastics © Museum of Science
About Engineering Everywhere
The mission of Engineering Everywhere is to create engaging out-of-school time learning experiences for 6th-8th graders that positively impact youths’ attitudes about their abilities to engineer. Our goal is to provide youth with personally meaningful and globally relevant challenges that empower them to problem solve, think creatively, and learn from one another.
The main ideas that guide the developers of EE are listed below.
We believe youths will best learn engineering when they:• engage in activities that are fun, exciting, and connect to the world in which they live. • choose their path through open-ended challenges that have multiple solutions. • have the opportunity to succeed in engineering challenges. • communicate and collaborate in innovative, active problem solving.
Through EE units, youths will learn that:• they can use the Engineering Design Process to help solve problems.• engineers design technologies to help people and solve problems.• they have talent and potential for designing and improving technologies.• they, too, are engineers.
As youths work through their engineering design challenges, they will have the opportunity to build their problem solving, teamwork, communication, and creative thinking skills. Most importantly, this curriculum is designed to provide a fun learning opportunity!
Unit Goals
In this unit, youths will be introduced to engineering and the Engineering Design Process as they work together to engineer a solution to a chemical engineering challenge. Youths will explore problems created by traditional plastic materials and engineer bioplastics—plastics made from plant-based materials—as a potential solution to current plastic problems.
By the end of the unit, youths will be ready to present what they learned about chemical engineering and the Engineering Design Process by sharing the engineering work they have done.

ixviiiEngineering Everywhere: Plants to Plastics
© Museum of Science
The Engineering Design Process
The Engineering Design Process (EDP) is the backbone of each Engineering Everywhere (EE) unit. It is an eight step process that guides youths in solving engineering challenges. Our goal for each EE unit is for youths to understand that the EDP can help them solve problems not only in engineering, but also in other areas of their lives.
While there are many versions of the EDP used in academic and professional fields of engineering, we developed an eight step process that builds on our five step process used in the elementary curriculum. There are guiding questions throughout the activities for the educator to ask to promote discussion about the EDP. There are also sections in the Engineering Notebook to encourage youths to engage in the process.
The Engineering Design Process begins with identifying a problem that needs to be solved and investigating what has already been done. Next, engineers imagine different solutions and plan their designs. Then, they create and test their design and make improvements based on the test results. Finally, engineers communicate their findings to others. While the process is shown as linear, youths may jump around to steps as they are engineering. For example, they may need to imagine and plan new designs in order to improve.
To further highlight the EDP throughout the unit, the steps are italicized in this guide. Youths are also provided with an explanation of each step, which can be seen in their Engineering Notebooks. To the right is the EDP used in the EE units.

ixEngineering Everywhere: Plants to Plastics © Museum of Science
An Educator Preview with background information, activity timing, key concepts, materials list, and preparation.
An Activity Guide with step-by-step instructions, including discussion questions, extension ideas, and tips.
Engineering Notebook pages that allow youths to record findings and reflect on their learning.
Teacher Guide Components:

xixEngineering Everywhere: Plants to Plastics
© Museum of Science
What You Need to Know Before Teaching an EE Unit
Engineering is fun.
The EE team hears this from many OST educators and youths alike. Engineering is really a way of problem solving—a way of thinking about the world—that is often very fun and creative. Any time you need to solve a problem in order to reach a goal, you are engineering.
There are no right or wrong answers.
There are often many great ways to solve the same problem. Not only is this a good engineering lesson for the youths in your program, it is a good life lesson.
You are a guide.
As the educator, it is your role to guide youths through these activities by encouraging them to pursue and communicate their own ideas, even if you think they might not work. Every problem has many possible solutions and multiple ways to reach them.
Ask questions!
Throughout the activities, you can ask questions prompting youths to share their prior knowledge, predict what they might find, or remind them of criteria that will help them as they engineer. Asking questions like these sets your youths up to succeed and feel confident in their ability to engineer.
It is okay to try it out!
It can be very helpful to try out the engineering challenge yourself—either beforehand or right alongside the youths in your program as they work through the activities. This can help you understand the challenges they might face.
Support reflection.
Each activity includes 5-10 minutes at the end for youths to communicate with their peers by sharing their work. This gives youths the chance to discuss new ideas, think about their own work and the work of others, and reflect on what was learned. Group reflection can help reduce competition by encouraging youths to support each other as they move through the Engineering Design Process.
xiEngineering Everywhere: Plants to Plastics © Museum of Science
Engineering Notebooks
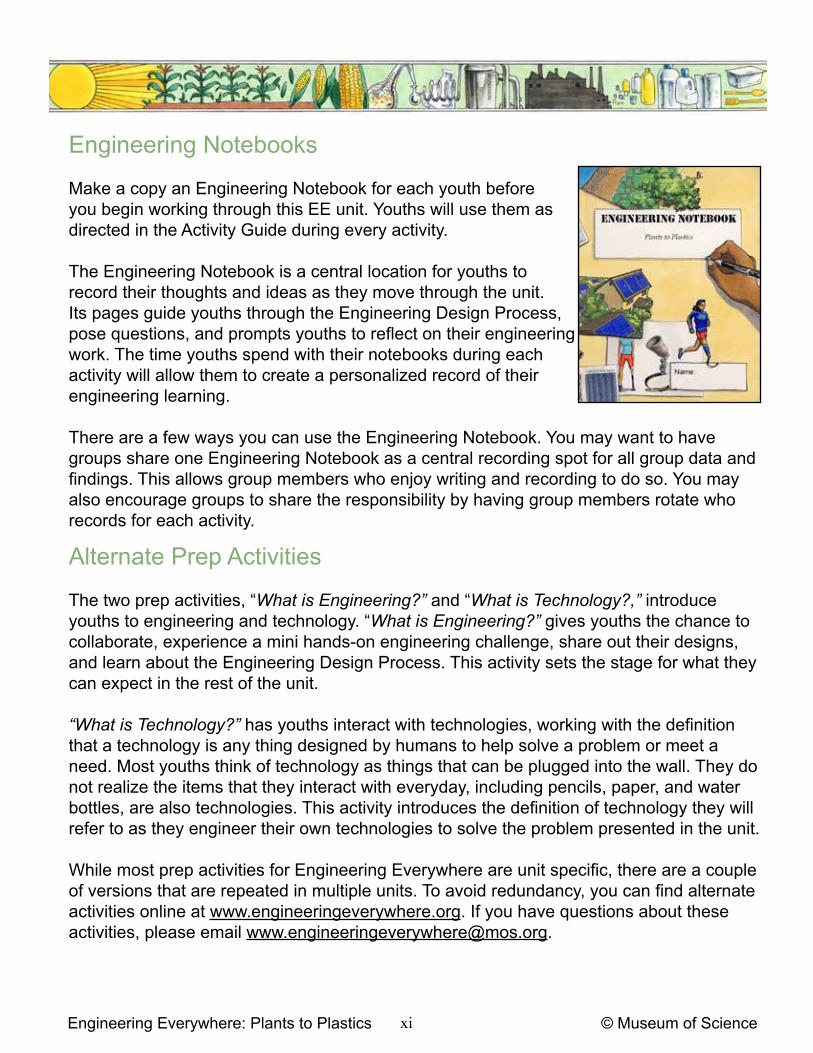
Make a copy an Engineering Notebook for each youth before you begin working through this EE unit. Youths will use them as directed in the Activity Guide during every activity.
The Engineering Notebook is a central location for youths to record their thoughts and ideas as they move through the unit. Its pages guide youths through the Engineering Design Process, pose questions, and prompts youths to reflect on their engineering work. The time youths spend with their notebooks during each activity will allow them to create a personalized record of their engineering learning.
There are a few ways you can use the Engineering Notebook. You may want to have groups share one Engineering Notebook as a central recording spot for all group data and findings. This allows group members who enjoy writing and recording to do so. You may also encourage groups to share the responsibility by having group members rotate who records for each activity.
Alternate Prep Activities
The two prep activities, “What is Engineering?” and “What is Technology?,” introduce youths to engineering and technology. “What is Engineering?” gives youths the chance to collaborate, experience a mini hands-on engineering challenge, share out their designs, and learn about the Engineering Design Process. This activity sets the stage for what they can expect in the rest of the unit.
“What is Technology?” has youths interact with technologies, working with the definition that a technology is any thing designed by humans to help solve a problem or meet a need. Most youths think of technology as things that can be plugged into the wall. They do not realize the items that they interact with everyday, including pencils, paper, and water bottles, are also technologies. This activity introduces the definition of technology they will refer to as they engineer their own technologies to solve the problem presented in the unit.
While most prep activities for Engineering Everywhere are unit specific, there are a couple of versions that are repeated in multiple units. To avoid redundancy, you can find alternate activities online at www.engineeringeverywhere.org. If you have questions about these activities, please email [email protected].
xiiixiiEngineering Everywhere: Plants to Plastics
© Museum of Science
Tips and Tricks for Teaching the Unit
Post a Daily Agenda
Giving youths a sense of the day’s activity will help them to plan ahead and manage their time.
Facilitate Teamwork
Being able to work well in teams is an important skill for any engineer. You may want to assign team roles to help youths if they struggle with teamwork. Possible roles include: the notetaker, the materials gatherer, the tester, and the presenter.
This unit requires a collaborative workspace. Tables, desks, and chairs should be movable depending on the youths needs. It is a good idea to establish a Materials Table where you can set up materials for the day. Then groups can be in charge of gathering their own materials when they are ready.
Invite Others to the Engineering Showcase
The Engineering Showcase, always the last activity in the unit, is a big deal! This is a chance for youths to highlight the engineering they have done and share their accomplishments with others. Consider inviting families, program staff, and other youth to come to the showcase.

xiiiEngineering Everywhere: Plants to Plastics © Museum of Science
Scheduling the Activities
Each activity requires at least 60 minutes of teaching time. We recommend that you budget 8-10 hours in order to complete this unit, as some activities may run longer than expected.
You can schedule this unit in several ways: once a week, several times a week, or daily. It is also possible to group certain activities together. The chart below shows which activities are easily taught together. Use this chart to help you plan your schedule.
Prep Activity 1: What is Engineering?Prep Activity 2: What is Technology? 2-3 hours
Activity 1: Bouncy Polymers 1 hourActivity 2: Plastic ExplorationActivity 3: Investigating Bioplastic (one day to dry) 2-3 hours
Activity 4: Creating a Bioplastics (one day to dry) 1 hourActivity 5: Improving Bioplastics (one day to dry) 1 hourActivity 6: Engineering Showcase 1 hour
xvxivEngineering Everywhere: Plants to Plastics
© Museum of Science
BackgroundChemical EngineeringChemical engineering is a branch of engineering that applies knowledge of math and science, particularly chemistry, to solve challenges related to chemical production, energy, biotechnology, and more. Traditionally, chemical engineering has focused on the design, construction, and operation of machines and chemical production plants that perform chemical reactions to create useful products. The field of chemical engineering has greatly evolved, though, and modern chemical engineers now work in nearly every field of engineering, applying their knowledge of chemistry to diverse problems, such as engineering tissue for medical applications, developing new ways to harness and convert energy, and designing new materials with useful properties.
Polymer materials are a common material designed by chemical engineers. In general, polymers are very large molecules composed of repeating units called monomers. These monomers, which can be thought of as beads on a necklace, are simply small molecules (i.e. compounds composed of two or more atoms). Polymer materials are composed of thousands of strands of polymers that become twisted and tangled when mixed together, similar to a plate of spaghetti. This entanglement imparts a certain amount of strength to polymer materials. Polymers can be made synthetically in a lab, like traditional plastics, or found in nature, like starch from plants that are composed of repeating sugar units. Polymers are a broad class of materials and can be found all around us in plastics, rubbers, and material coatings.
A polymer tutorial can be found in this guide, pp. 23-25.
BioplasticsPlastics are a type of polymer material that are traditionally made from the processing of petroleum oil. These materials are incredibly useful since they are inexpensive and can be designed to exhibit a range of desirable properties. Because they do not degrade, plastics build up in our landfills and can be harmful to the environment. Chemical engineers are working to design plastic materials that are derived from natural polymers, like starch in potatoes and corn or agar in algae. These plastics, referred to as bioplastics, have the ability to degrade naturally, but often do not have the same versatile properties of conventional plastics. The ongoing engineering challenge of designing degradable plastics will likely continue well into the 21st century.

xvEngineering Everywhere: Plants to Plastics © Museum of Science
Vocabulary
Bioplastics: A plastic material made out of polymers found in nature, such as in plants (e.g. cornstarch) or algae (e.g. agar).
Constraint: A factor that limits how you can solve a problem.
Criterion: A requirement of a design.
Chemical engineering: A branch of engineering that requires knowledge of math and science, particularly chemistry, to design technologies and solve problems.
Engineer: Someone who uses his or her creativity and knowledge of math and science to design technologies that solve problems.
Engineering Design Process: The steps that engineers use to design technologies to solve a problem.
Monomer: A small molecule that can combine with other molecules to form a polymer.
Polymer: A large molecule composed of repeating subunits, called monomers.
Technology: Any thing designed by people to solve a problem or meet a need.
xviixviEngineering Everywhere: Plants to Plastics
© Museum of Science
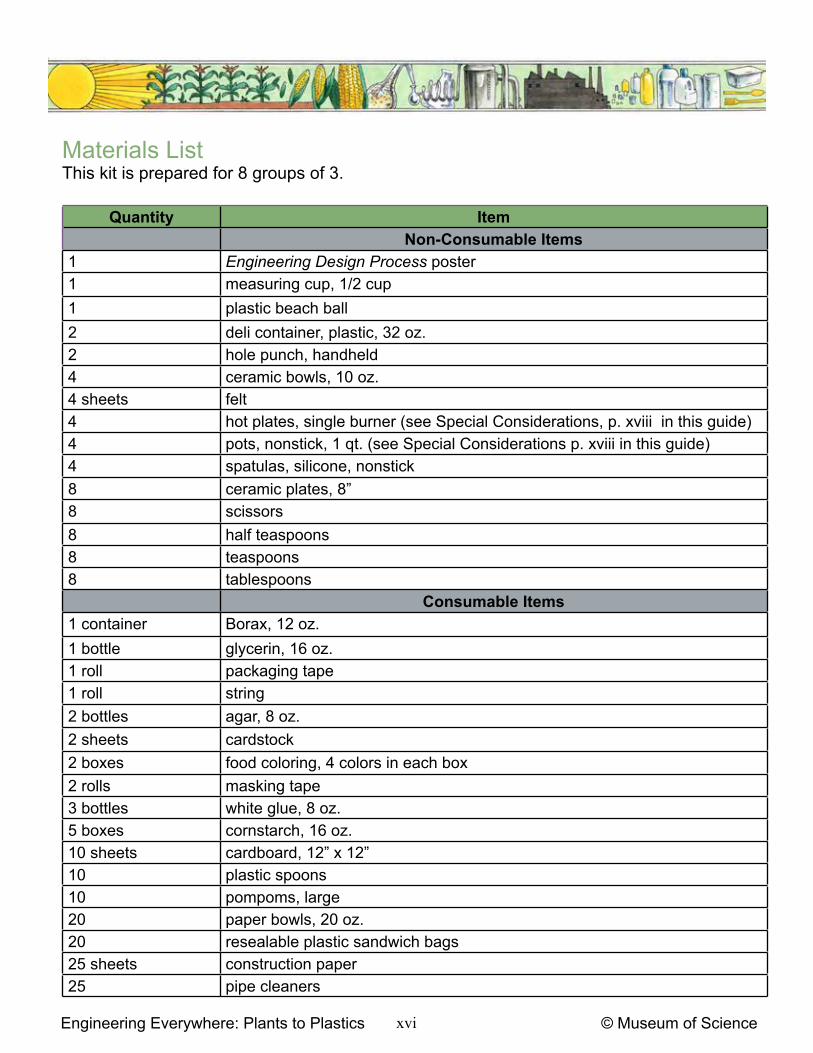
Materials ListThis kit is prepared for 8 groups of 3.
Quantity ItemNon-Consumable Items
1 Engineering Design Process poster1 measuring cup, 1/2 cup1 plastic beach ball2 deli container, plastic, 32 oz. 2 hole punch, handheld4 ceramic bowls, 10 oz.4 sheets felt4 hot plates, single burner (see Special Considerations, p. xviii in this guide)4 pots, nonstick, 1 qt. (see Special Considerations p. xviii in this guide)4 spatulas, silicone, nonstick 8 ceramic plates, 8”8 scissors8 half teaspoons8 teaspoons8 tablespoons
Consumable Items1 container Borax, 12 oz.1 bottle glycerin, 16 oz. 1 roll packaging tape1 roll string2 bottles agar, 8 oz. 2 sheets cardstock2 boxes food coloring, 4 colors in each box 2 rolls masking tape3 bottles white glue, 8 oz. 5 boxes cornstarch, 16 oz. 10 sheets cardboard, 12” x 12”10 plastic spoons10 pompoms, large20 paper bowls, 20 oz.20 resealable plastic sandwich bags25 sheets construction paper25 pipe cleaners

xviiEngineering Everywhere: Plants to Plastics © Museum of Science
Materials List (continued)
Quantity ItemConsumable Items (cont.)
32 craft sticks32 straws50 rubber bands50 twist ties100 sticky notes
NOT INCLUDED IN KIT1 2 lb. object (e.g. 2 lb. bag of flour)1 pad chart paper (or whiteboard)1 computer or device to play videos1 Engineering Everywhere Special Report DVD or use the link: https://vimeo.
com/1286026721 meter stick (optional) 1 microwave (see note on Creating Bioplastics, p. xviii in this guide)1 newspaper1 nonstick cooking spray (optional)1 roll paper towels1 plastic bag, grocery size, with handles1 plastic water bottle1 power strip (optional)1 set of markers1 stopwatch or clock24 *lab goggles, youth size (optional)
**materials for extension activities plastic samples (see Special Considerations, p. xviii in this guide)used recyclable plastic (see Special Considerations, p. xviii in this guide)
* The ingredients youths will use to engineer in this unit are not particularly hazardous. Having youths wear lab goggles while they are engaging in chemical engineering reinforces the laboratory safety skills important in this field. If you have lab goggles available, have youths wear them in the following activities: Activity 1, Activity 3, Activity 4, and Activity 5.
**There are two extension activities on pp. 47-53 that you may want to facilitate with your group. Each activity has a materials list. If you plan to do these activities, you should collect these materials as well as what is required for the rest of the unit.

xixxviiiEngineering Everywhere: Plants to Plastics
© Museum of Science
Special Considerations
Creating Bioplastics We outline two methods for creating bioplastics. Both methods require that you have access to a microwave. The first method has youths making the bioplastics on hot plates, followed by a drying procedure using a microwave. The instructions for this procedure can be found on p. 41 in this guide. We suggest this method as we have found it yields the best results.
Alternatively, bioplastics can be made by just using a microwave. This option would be best if you do not have access to hot plates or want to avoid having youths use hot plates. Instructions for microwaving bioplastics can be found on p. 42 in this guide. Using just the microwave is a quicker method for creating the samples than using the hot plate. If you choose to have youths follow this procedure, you may need to facilitate the extension lessons, p. 47-53 in this guide, to engage youths for the allotted hour.
Please note that in testing, a 1000W microwave was used. If you are using a microwave with a different wattage, the results may vary. We reccommend making some bioplastic samples before starting the unit to test the microwave and determine if you need to extend the time (try 10 second increments) in which samples are microwaved.
Collecting Used Plastics For Activity 2, you will need to collect examples of plastic items that represent the 6 types of plastics as defined by their plastic identification labels (i.e. #1-#6). You can find examples of each type of plastic on p. 33 in this guide.
Discarded plastics are used in several Extension Activities (pp. 47-53) throughout this unit. If you choose to facilitate these activities, each youth needs at least 1-2 pieces of used plastic
xixEngineering Everywhere: Plants to Plastics © Museum of Science
National Education Standards
Pre
p A
ctiv
ity 1
: Wha
t is
Eng
inee
ring?
Pre
p A
ctiv
ity 2
: Wha
t is
Tech
nolo
gy?
Act
ivity
1: B
ounc
y P
olym
ers
Act
ivity
2: P
last
ic E
xplo
ratio
n
Act
ivity
3: I
nves
tigat
ing
Bio
plas
tic
Act
ivity
4: C
reat
ing
Bio
plas
tics
Act
ivity
5: I
mpr
ovin
g B
iopl
astic
s
Act
ivity
6: E
ngin
eerin
g S
how
case
Nat
iona
l Sci
ence
Edu
catio
n S
tand
ards
Science as Inquiry Physical Science Life Science
Earth and Space ScienceScience and Technology Science in Personal and Social Perspectives
History and Nature of Science
ITE
EA
The Nature of Technology Technology and Society Design Abilities for a Technological World The Designed World
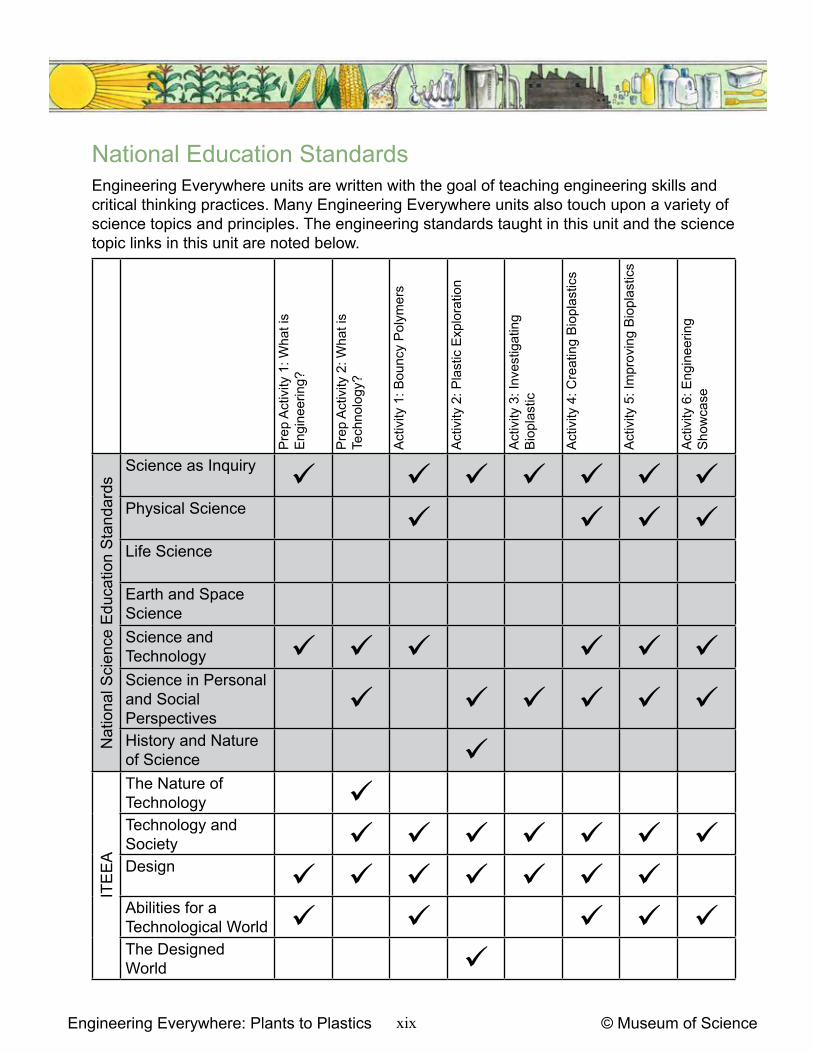
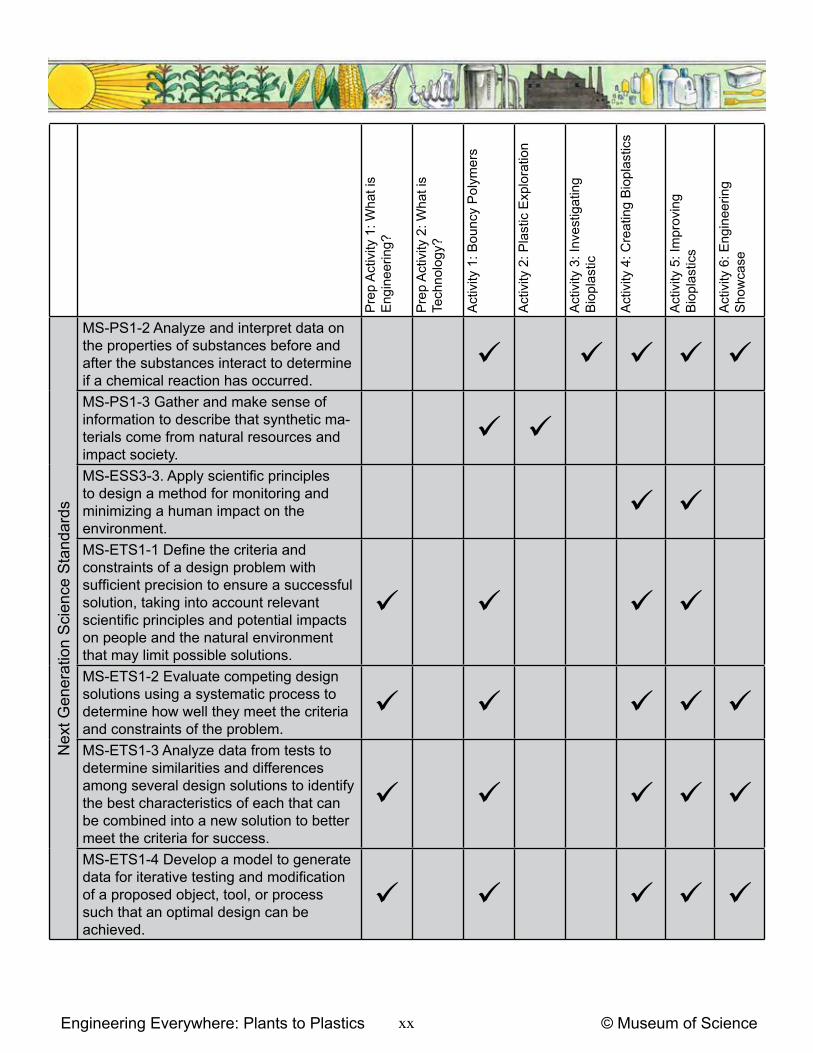
Engineering Everywhere units are written with the goal of teaching engineering skills and critical thinking practices. Many Engineering Everywhere units also touch upon a variety of science topics and principles. The engineering standards taught in this unit and the science topic links in this unit are noted below.
xxixxEngineering Everywhere: Plants to Plastics
© Museum of Science
Pre
p A
ctiv
ity 1
: Wha
t is
Eng
inee
ring?
Pre
p A
ctiv
ity 2
: Wha
t is
Tech
nolo
gy?
Act
ivity
1: B
ounc
y P
olym
ers
Act
ivity
2: P
last
ic E
xplo
ratio
n
Act
ivity
3: I
nves
tigat
ing
Bio
plas
tic
Act
ivity
4: C
reat
ing
Bio
plas
tics
Act
ivity
5: I
mpr
ovin
g B
iopl
astic
s
Act
ivity
6: E
ngin
eerin
g S
how
case
Nex
t Gen
erat
ion
Sci
ence
Sta
ndar
ds
MS-PS1-2 Analyze and interpret data on the properties of substances before and after the substances interact to determine if a chemical reaction has occurred.
MS-PS1-3 Gather and make sense of information to describe that synthetic ma-terials come from natural resources and impact society.
MS-ESS3-3. Apply scientific principles to design a method for monitoring and minimizing a human impact on the environment.
MS-ETS1-1 Define the criteria and constraints of a design problem with sufficient precision to ensure a successful solution, taking into account relevant scientific principles and potential impacts on people and the natural environment that may limit possible solutions.
MS-ETS1-2 Evaluate competing design solutions using a systematic process to determine how well they meet the criteria and constraints of the problem.
MS-ETS1-3 Analyze data from tests to determine similarities and differences among several design solutions to identify the best characteristics of each that can be combined into a new solution to better meet the criteria for success.
MS-ETS1-4 Develop a model to generate data for iterative testing and modification of a proposed object, tool, or process such that an optimal design can be achieved.
Engineering Everywhere: Plants to Plastics

xxi © Museum of ScienceEngineering Everywhere: Plants to Plastics
How
do
you
know
if y
ou a
re le
adin
g th
ese
activ
ities
suc
cess
fully
? Th
is to
ol id
entifi
es th
ree
elem
ents
of s
ucce
ss a
nd h
ighl
ight
s ho
w th
e A
ctiv
ity G
uide
sup
ports
you
in s
ettin
g th
is u
p w
ith y
our y
outh
s.
Elem
ents
of s
ucce
ssW
hat d
oes
this
look
like
?H
ow d
oes
the
guid
e he
lp m
e fa
cilit
ate
this
?
Yout
hs w
ere
enga
ged
and
chal
leng
ed b
y th
e ac
tivity
. Th
ey p
ersi
sted
thro
ugh
diffi
culti
es.
• Yo
uths
are
on-
task
.•
Yout
hs a
re tr
ying
out
thei
r ide
as.
• Yo
uths
iden
tify
wha
t is
wor
king
wel
l in
thei
r de
sign
s.•
Yout
hs tr
oubl
esho
ot th
eir o
wn
wor
k.•
Yout
hs im
prov
e th
eir d
esig
ns.
• U
se th
e bo
ld p
rom
pts
to a
sk o
pen-
ende
d qu
estio
ns to
hel
p yo
uths
trou
bles
hoot
thei
r wor
k.•
Use
the
bold
pro
mpt
s to
ask
you
ths
abou
t wha
t th
ey th
ink
is w
orki
ng w
ell i
n th
eir d
esig
ns a
nd
wha
t the
y w
ould
like
to im
prov
e. T
his
will
hel
p yo
uths
feel
mor
e co
nfide
nt a
bout
thei
r pro
blem
-so
lvin
g ab
ilitie
s.
Yout
hs d
id m
ost o
f the
ta
lkin
g, s
harin
g th
eir i
deas
w
ith e
ach
othe
r dur
ing
the
entir
e ac
tivity
.
• Yo
uths
brin
g th
eir o
wn
idea
s to
the
activ
ity a
nd
are
com
forta
ble
shar
ing
them
.•
Yout
hs b
rain
stor
m a
nd d
ebat
e w
ithin
thei
r gr
oups
.•
Yout
hs s
hare
thei
r des
igns
with
oth
ers.
• Yo
uths
talk
abo
ut h
ow th
eir i
deas
are
cha
ngin
g ov
er ti
me.
• U
se th
e bo
ld p
rom
pts
in th
e gu
ide
to e
ncou
rage
yo
uths
to s
hare
and
exp
lain
thei
r thi
nkin
g.•
Hav
e yo
uths
col
labo
rate
in g
roup
s so
they
can
br
ains
torm
and
cre
ate
a de
sign
toge
ther
.•
Use
the
bold
pro
mpt
s in
the
Refl
ect s
ectio
n to
hel
p yo
uths
sha
re th
eir n
ew id
eas
abou
t des
igns
.
Yout
hs v
alue
thei
r en
gine
erin
g w
ork
as a
pr
oces
s, n
ot ju
st a
s th
e en
d re
sult.
• Yo
uths
go
beyo
nd ta
lkin
g ab
out t
heir
desi
gn to
ta
lkin
g ab
out h
ow th
ey th
ough
t of i
t and
why
th
ey d
esig
ned
it.•
Yout
hs u
se th
e E
ngin
eerin
g D
esig
n P
roce
ss to
de
scrib
e th
eir a
ctio
ns.
• U
se th
e bo
ld p
rom
pts
in th
e gu
ide
to a
sk y
outh
s ho
w th
ey u
se th
e En
gine
erin
g D
esig
n Pr
oces
s.
Spe
ndin
g tim
e ta
lkin
g an
d th
inki
ng a
bout
thei
r pr
oces
s w
ill h
elp
yout
hs s
ee th
e va
lue
in it
.•
Use
the
bold
pro
mpt
s to
ask
all
yout
hs a
bout
im
prov
ing
thei
r des
igns
, eve
n if
thei
r des
igns
are
w
orki
ng w
ell.
• En
cour
age
yout
hs to
refle
ct in
divi
dual
ly in
thei
r E
ngin
eerin
g N
oteb
ooks
to g
ive
them
tim
e fo
r the
ir ex
perie
nces
to s
ink
in a
nd b
e re
mem
bere
d.
Self-
Ass
essm
ent R
ubric
Tem
plat
e
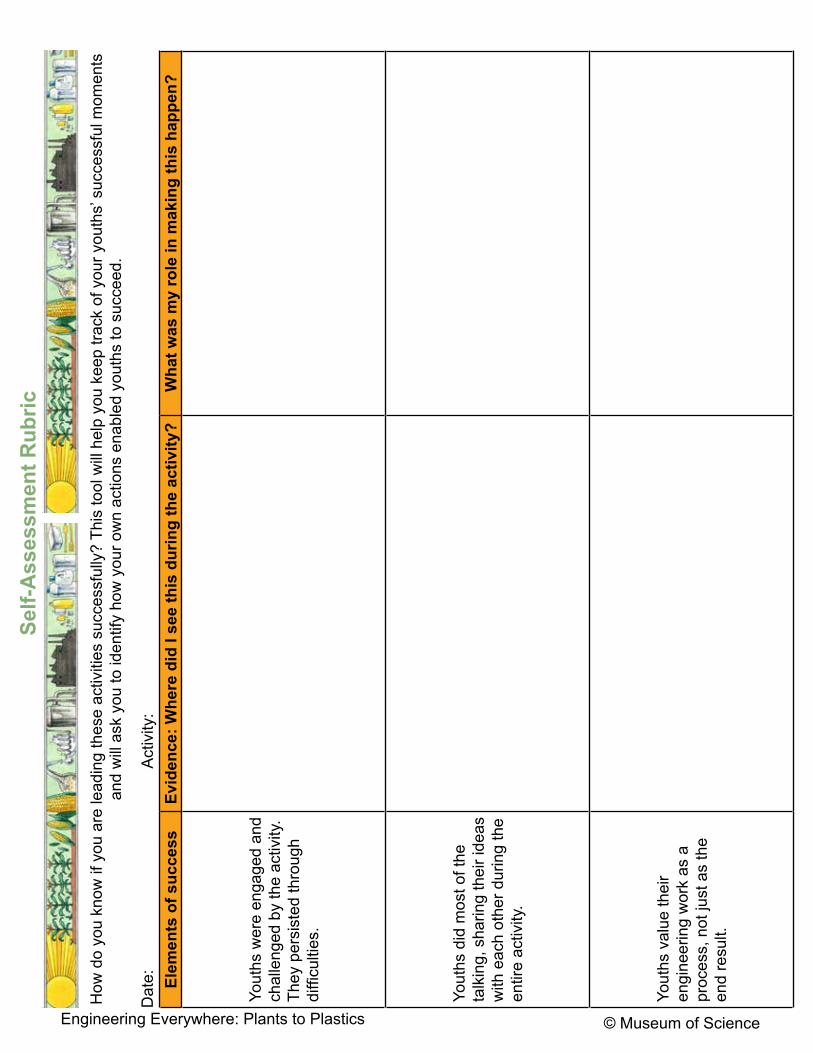
xxiiiEngineering Everywhere: Plants to Plastics
© Museum of Science
Elem
ents
of s
ucce
ssEv
iden
ce: W
here
did
I se
e th
is d
urin
g th
e ac
tivity
?W
hat w
as m
y ro
le in
mak
ing
this
hap
pen?
Yout
hs w
ere
enga
ged
and
chal
leng
ed b
y th
e ac
tivity
. Th
ey p
ersi
sted
thro
ugh
diffi
culti
es.
Yout
hs d
id m
ost o
f the
ta
lkin
g, s
harin
g th
eir i
deas
w
ith e
ach
othe
r dur
ing
the
entir
e ac
tivity
.
Yout
hs v
alue
thei
r en
gine
erin
g w
ork
as a
pr
oces
s, n
ot ju
st a
s th
e en
d re
sult.
How
do
you
know
if y
ou a
re le
adin
g th
ese
activ
ities
suc
cess
fully
? Th
is to
ol w
ill h
elp
you
keep
trac
k of
you
r you
ths’
suc
cess
ful m
omen
ts
and
will
ask
you
to id
entif
y ho
w y
our o
wn
actio
ns e
nabl
ed y
outh
s to
suc
ceed
.
Dat
e:
A
ctiv
ity:
Self-
Ass
essm
ent R
ubric

xxiiiEngineering Everywhere: Plants to Plastics © Museum of Science© Museum of Science
Dear Family, Date: _________________
We are beginning an engineering unit called Plants to Plastics: Engineering Bioplastics, which is part of the Engineering Everywhere curriculum developed by the Museum of Science, Boston. Through this unit, youths will be introduced to engineering and the Engineering Design Process as they work together to engineer a solution to a chemical engineering design challenge. This unit is set in a real-world context: throughout the unit, your child will work with teammates to learn about the benefits and challenges plastics pose and then make plant-based bioplastic materials that mimic the properties of traditional plastics.
There are many reasons to introduce youth to engineering:• Engineering projects reinforce topics youth are learning in school. Engaging youth in hands-on,
real-world engineering experiences can enliven math, science, and other content areas.• Engineering fosters problem-solving skills, including problem formulation, creativity, planning, and
testing of alternative solutions. • Youths are fascinated with building and with taking things apart to see how they work. By
encouraging these explorations, we can keep these interests alive. Describing their activities as “engineering” when youths are engaged in the natural design process can help them develop positive associations with engineering, and increase their desire to pursue such activities in the future.
• Engineering and technological literacy are necessary for the 21st century. As our society increasingly depends on engineering and technology, our citizens need to understand these fields.
Because engineering projects are hands-on, materials are often required. Several materials necessary to this unit are listed below. If you have any of these materials available, please consider donating them to us. If you have expertise in chemical engineering or the plastics field, or have any general questions or comments about the engineering unit we are about to begin, please let me know.
Sincerely,
If you have any of the following materials available and would like to donate them, I would greatly appreciate having them by the following date: ______________________ . Thank you!
____________________________ ____________________________
____________________________ ____________________________
____________________________ ____________________________


1 Plants to Plastics© Museum of ScienceEngineering Everywhere
What is Engineering?1
Prep Activity 1 Preparation1. Set up a Materials Table with all the materials available for the
challenge.
Activity Timing:Introduction: 5 minCatapult Intro: 10 minCreate: 25 minTest: 10 minReflect: 5 min
55 min
21st Century Skill Highlight:Critical ThinkingCollaborationProblem Solving
Overview: Youths will collaborate to design a spoon catapult to launch a pompom as far as possible.
Note to Educator: The Engineering Design Process is a problem-solving process youths will be asked to use throughout the rest of the unit. The catapults youths engineer are less important than youths’ interactions with each other and building their understanding that they can use the Engineering Design Process as a tool to solve many different problems.
Educator Preview
Prep Activity 1 Materials
Prep
Act
ivity
For the whole group Engineering Design Process
poster chart paper and marker 1 plastic spoon 1 roll of masking tape 1 roll of string 10 sheets of cardboard, 12” x 12” 25 pipe cleaners 25 sheets of construction paper 32 craft sticks 32 straws 50 rubber bands 50 twist ties
For each group of 3 1 pair of scissors 1 plastic spoon 1 pompom
For each youth Engineering Notebook

2 Plants to Plastics© Museum of ScienceEngineering Everywhere
Notebook Pages for Prep Activity 1
Criteria and Constraints, p. 3

3 Plants to Plastics© Museum of ScienceEngineering Everywhere
Youths will learn: • they are engineers and they can design a solution to a problem.• the Engineering Design Process is a tool used by engineers to solve problems.
Introduction (5 min)1. Tell youths they will be engineers today as they solve an engineering
challenge. Ask:• What do engineers do? Accept all answers.
2. Explain to youths that engineers design new technologies, and they also think creatively about ways to change or improve existing technologies.
3. Hold up a plastic spoon and ask:• What is the main problem that a spoon helps you solve? Hold
food, eat soup or ice cream, etc.• What else could a spoon be used for? Accept all answers.
4. If no one suggested the spoon could be used as a catapult, suggest it yourself and use the spoon to launch a pompom. Ask:• What makes a plastic spoon good at catapulting? Accept all
answers. Encourage groups to think about the spoon’s shape, size, and material.
• Do you think this spoon would make as good a catapult if it was made from a different material, like wood or metal?
Catapults Introduction (10 min)1. Tell youths they have been hired by a company called the Cutlery
Corporation to upgrade their Cutlery Catapult from a handheld catapult to a freestanding catapult. They will work in teams of engineers to design a freestanding spoon catapult.
2. Explain that freestanding means that the bottom of the spoon cannot be held during the catapult launch. Ask:• As engineers tasked with this challenge, what information
might you need to know before you start?3. Give groups a few minutes to brainstorm questions together. Then
have groups share their questions with the whole group and record them on a piece of chart paper or on the board.
4. If groups have trouble coming up with questions, you might suggest the following:• Are there time or materials limits?• How will we know if we are successful?• Do we know anything about catapults that might help us?
Tip: If time permits, add a short ice breaker, so youths are introduced to one another before they start the engineering challenge.
Tip: This activity challenges youths to design a freestanding catapult from a spoon. If you think this activity may be too difficult for your youths, adjust the challenge to have youths modify a spoon into a better handheld catapult. Encourage youths to design a catapult that can launch a pompom farther than an unmodified plastic spoon. Adjust the constraints to allow each group to use up to 8 pieces of material.
What is Engineering? Activity GuidePr
epA
ctiv
ity
1
4 Plants to Plastics© Museum of ScienceEngineering Everywhere
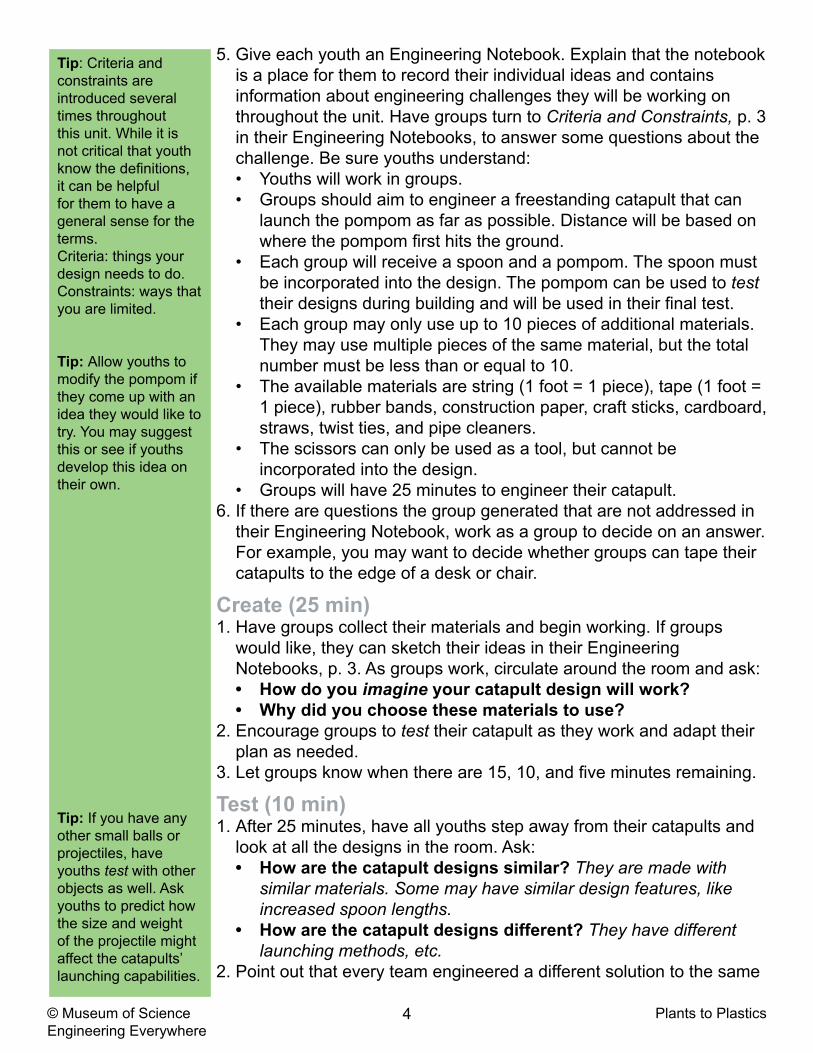
5. Give each youth an Engineering Notebook. Explain that the notebook is a place for them to record their individual ideas and contains information about engineering challenges they will be working on throughout the unit. Have groups turn to Criteria and Constraints, p. 3 in their Engineering Notebooks, to answer some questions about the challenge. Be sure youths understand:• Youths will work in groups.• Groups should aim to engineer a freestanding catapult that can
launch the pompom as far as possible. Distance will be based on where the pompom first hits the ground.
• Each group will receive a spoon and a pompom. The spoon must be incorporated into the design. The pompom can be used to test their designs during building and will be used in their final test.
• Each group may only use up to 10 pieces of additional materials. They may use multiple pieces of the same material, but the total number must be less than or equal to 10.
• The available materials are string (1 foot = 1 piece), tape (1 foot = 1 piece), rubber bands, construction paper, craft sticks, cardboard, straws, twist ties, and pipe cleaners.
• The scissors can only be used as a tool, but cannot be incorporated into the design.
• Groups will have 25 minutes to engineer their catapult.6. If there are questions the group generated that are not addressed in
their Engineering Notebook, work as a group to decide on an answer. For example, you may want to decide whether groups can tape their catapults to the edge of a desk or chair.
Create (25 min)1. Have groups collect their materials and begin working. If groups
would like, they can sketch their ideas in their Engineering Notebooks, p. 3. As groups work, circulate around the room and ask:• How do you imagine your catapult design will work?• Why did you choose these materials to use?
2. Encourage groups to test their catapult as they work and adapt their plan as needed.
3. Let groups know when there are 15, 10, and five minutes remaining.
Test (10 min)1. After 25 minutes, have all youths step away from their catapults and
look at all the designs in the room. Ask:• How are the catapult designs similar? They are made with
similar materials. Some may have similar design features, like increased spoon lengths.
• How are the catapult designs different? They have different launching methods, etc.
2. Point out that every team engineered a different solution to the same
Tip: Criteria and constraints are introduced several times throughout this unit. While it is not critical that youth know the definitions, it can be helpful for them to have a general sense for the terms. Criteria: things your design needs to do.Constraints: ways that you are limited.
Tip: Allow youths to modify the pompom if they come up with an idea they would like to try. You may suggest this or see if youths develop this idea on their own.
Tip: If you have any other small balls or projectiles, have youths test with other objects as well. Ask youths to predict how the size and weight of the projectile might affect the catapults’ launching capabilities.
5 Plants to Plastics© Museum of ScienceEngineering Everywhere
problem, and that is great! In engineering, there are always many solutions to the same problem.
3. Have each group present their design. Ask:• How did you come up with this design?• Did you change your plan or design during the building
time? Why?• Did these changes improve your catapult’s launching
capabilities?4. After each group describes their design, have them launch their
pompom with their catapult. After each test, ask the group:• How well do you think your catapult worked?• How would you improve your catapult if you had more time?
Reflect (5 min)1. Gather everyone around the Engineering Design Process poster.
Explain that engineers use a process called the Engineering Design Process to help them solve problems. Ask:• How did your team use these steps as you engineered your
catapult? • Which step did you find most useful today?• Which, if any, steps did you use more than once?
2. Remind youths they tried to modify the properties of the plastic spoon to make it a better catapult. Ask: • What other materials can a spoon be made out of besides
plastic? Metal, wood, ceramic.• Why would you engineer a spoon out of plastic instead of
these other materials? Disposable, durable, nonbreakable, light.3. Explain that youths will think more about plastics throughout this unit.
Congratulate youths on their engineering work today. Tell youths they will continue to use the Engineering Design Process to guide their engineering work throughout this unit. Tell them that next time they will explore the concept of technology.
Tip: If you have more time or are able to extend the activity another day, consider giving groups an additional session to improve their catapults.
Extension LessonsThere are two extension activities described on pp. 47-53. Both activities require the collection of used recyclable plastic items, including plastic water bottles, containers, and bags. If you are interested in facilitating these activities, ask youths to collect disposable plastics. They can determine whether or not the object is recyclable by looking for the recycling triangle on the bottom of the object. Each youth will need 1-2 pieces of plastic for each activity.


7 Plants to Plastics© Museum of ScienceEngineering Everywhere
What is Technology?2
Prep Activity 2 Preparation1. Post the Engineering Design Process poster.2. On a sheet of chart paper, write the following definition of
technology: Technology is any thing created by people that solves a problem or meets a need.
3. Copy the Guess the Technology Cards, pp. 13-15 in this guide, onto cardstock and cut out each card.
4. Blow up the plastic beach ball.5. Optional: For each group of 2-3, put the categories chart from the
Engineering Notebook, p. 4, on a piece of chart paper so groups can write their answers there. Groups can do a gallery walk at the end of the activity to see what other groups wrote.
For the whole group Engineering Design Process poster chart paper and marker 1 plastic beach ball 1 plastic sandwich bag 1 plastic spoon 1 set of Guess the Technology Cards, pp. 13-15 in this guide 2 sheets of cardstock
For each youth Engineering Notebook
Activity Timing:Introduction: 5 minBouncy Ball Toss: 10 minSolving Problems: 15 minTaboo: 10 minReflect: 10 min
50 min
21st Century Skill Highlight:Critical Thinking
Overview: Youths will learn that engineers design or improve technologies (things created by people to help solve problems or meet needs) when faced with new problems. Youths will complete multiple mini-activities to consider the definition of technology.
Note to Educator: Many people do not realize that engineers are the people who design technologies. Further, many people think of technologies only as things that require electricity. This activity introduces youths to the idea that technology can be any thing created by people to help solve a problem or meet a need.
Educator Preview
Prep Activity 2 Materials
Prep
Act
ivity

8 Plants to Plastics© Museum of ScienceEngineering Everywhere
Notebook Pages for Prep Activity 2
What is Technology?, p. 4 Engineering Profile, p. 5

9 Plants to Plastics© Museum of ScienceEngineering Everywhere
Youths will learn: • engineers design technologies.• technologies are things created by people to help solve problems or meet needs.
Introduction (5 min)1. Tell youths they will spend today thinking about technology. 2. First, have youths summarize what they worked on last time. Ask:
• What did you engineer during the last activity? We engineered a catapult to launch a pompom as far as possible.
3. Hold up a plastic spoon. Ask:• Do you think the spoon is a technology? Why or why not?
Accept all answers.4. Let youths know they will continue to think about the definition of
technology while they play a few technology-based games today.
Ball Toss (10 min)1. Gather youths in a circle and hold up the beach ball. Tell youths that
you will toss the ball to someone. If the ball is tossed to them, they should share an example of a technology. Then, they should toss the ball to someone else, who will share and toss. This will continue until everyone has had a chance to answer. Begin the game.
2. When the ball gets back to you, let the group know that you have a definition of technology you would like them to think about. Post the definition.
3. Ask:• What about this definition surprises you?
4. Tell youths they will repeat the ball toss, this time focusing on technologies they use every day that are not electronic, meaning they do not need electricity or batteries.
5. Toss the ball and start the game.6. When the ball comes back to you, ask:
• Was there anything named you think is not a technology? Go through any examples stated that youths want to debate. Encourage youths to use the definition to support their argument. If the example was not created by a human, guide youths to think about whether or not it fits into their definition of technology.
• Is this ball a technology? Why or why not? Yes, it is a toy that meets a need. It is created by humans to engage youths when they are bored.
• Who do you think designed this ball? An engineer.
Tip: There are several games in this activity designed to get youths thinking about technologies. If youths are particularly engaged in one of the games, then allow youths to spend more time exploring the ideas of technology within that game.
Tip: If you have a small group, go around the circle a couple of times for each round.
Tip: If youths have difficulty coming up with “low-tech” examples of technology, you can offer examples like sneakers, a pencil, a water bottle.
What is Technology? Activity GuidePr
epA
ctiv
ity
2
10 Plants to Plastics© Museum of ScienceEngineering Everywhere
7. Tell youths that chemical engineers use their knowledge about chemistry and their own creativity to develop materials, like the plastic used to make the beach ball, with specific properties, such as bouncy, stretchy, hard, flexible, etc.
Technologies Categories (15 min)1. Tell youths they will now play a game that focuses on the problems
technologies solve and the needs they meet. 2. Split youths into groups of 2 or 3. 3. Hold up a plastic sandwich bag and ask:
• What problem does this sandwich bag solve? It holds supplies and protects them from the outside environment.
4. Tell groups that they will have 10 minutes to come up with as many technologies they can think of that solve the problems listed in their notebooks (e.g. holds liquid, cools things down, etc). Their goal is to come up with as many technologies as they can for each category.
5. Have youths turn to What is Technology?, p. 4 in their Engineering Notebooks, to reveal the categories.
6. Start the timer and let youths know when time is almost up.7. When time is up, go through each category and have teams share
the number of technologies they came up with and 2-3 examples. If there are any examples that the group does not think are correct, facilitate a discussion using the definition of technology to determine if the object is a technology that belongs in the category (i.e. if it is made by humans and solves the problem listed).
Guess the Technology (10 min)1. Tell youths they will complete one more game to test their technology
knowledge.2. Explain that each youth will be given a card that contains a
technology and a list of “Forbidden Words” that commonly are used to describe the technology. One youth will start by trying to get the rest of the group to guess the technology on the card without saying the technology or any of the “Forbidden Words.” Once the group has correctly guessed the technology, the next person can go.
3. If youths have trouble understanding the game, take one card from the stack and practice as a group.
4. Pass out the Guess the Technology Cards, pp. 13-15 in this guide. If you have a small group you can give multiple cards to each youth.
5. Begin the game. If there is a technology that really stumps the group, set that technology card aside to talk about after the game.
6. Once the game is complete, ask:• Was there a particular strategy that helped you describe the
technology? Youths may point out that it helped to describe the problem or need the technology helped to fix.
Tip: You can extend the discussion about the sandwich bag by asking youths to think about how this technology has improved throughout time and how it could be improved upon further.
Tip: If the Guess the Technology game is too challenging for your youths, then allow youths to ignore the “Forbidden Words” as they describe the technologies on the cards.
Tip: Alternatively, you can split your group into two teams and give each group a deck of the Guess the Technology Cards. The two groups can play independently or race to see who can guess all of the technologies the fastest.

11 Plants to Plastics© Museum of ScienceEngineering Everywhere
Reflect (10 min)1. Have the group summarize what they learned. Ask:
• After doing this activity, how would you describe technology to others?
• Who designs technologies?2. If youths do not mention some of the following, underscore these
important points:• Technology is any thing made by people that solves a problem or
meets a need.• Engineers are people who create or improve technologies.
3. Save the definition of technology to post in other activities for youths to reference.
4. Have youths fill out their Engineer Profile, p. 5 in their Engineering Notebooks, and reflect on engineering skills they feel are strengths, and any engineering skills they would like to work on throughout the unit. Giving youths time to fill out an Engineer Profile will help reinforce the idea that they are engineers and guide them to reflect on themselves as engineers.

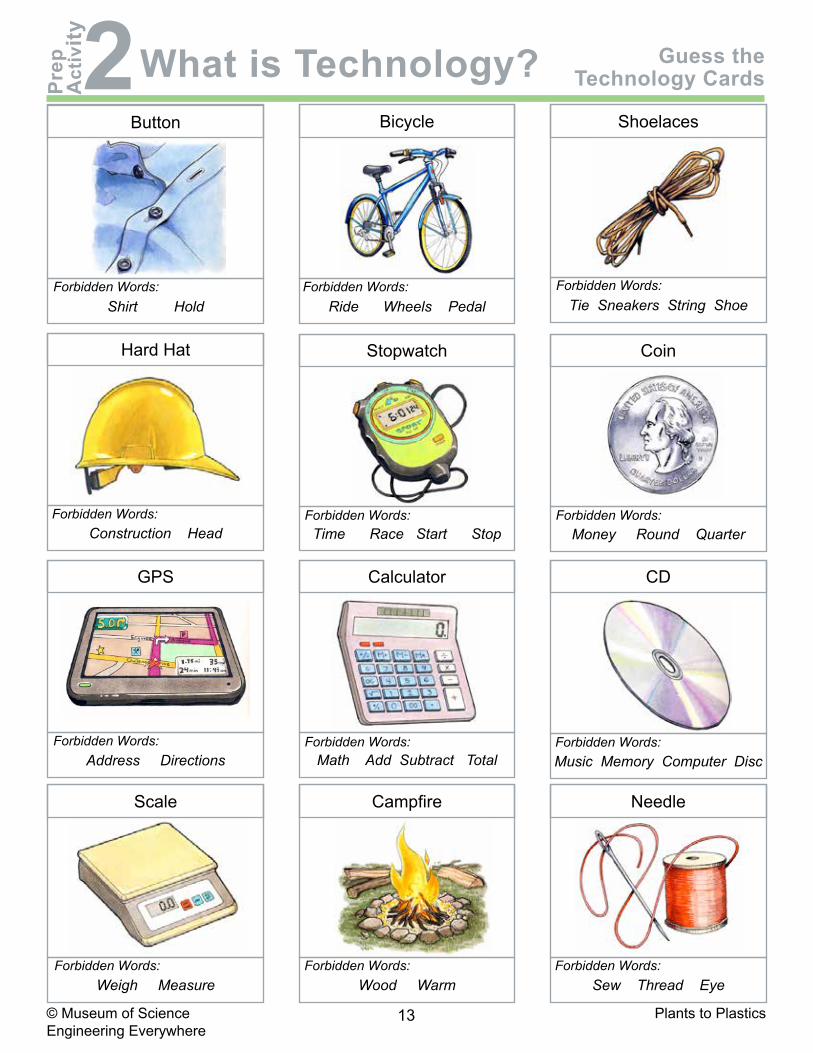
13 Plants to Plastics© Museum of ScienceEngineering Everywhere
What is Technology? Guess the Technology CardsPr
epA
ctiv
ity
2
Shirt Hold Ride Wheels Pedal Tie Sneakers String Shoe
Money Round Quarter
Math Add Subtract Total Music Memory Computer Disc
Wood Warm Sew Thread Eye
Button Bicycle Shoelaces
Time Race Start Stop
Stopwatch Coin
Calculator CD
Campfire Needle
Construction Head
Hard Hat
Address Directions
GPS
Weigh Measure
Scale
Forbidden Words: Forbidden Words: Forbidden Words:
Forbidden Words: Forbidden Words: Forbidden Words:
Forbidden Words: Forbidden Words: Forbidden Words:
Forbidden Words: Forbidden Words: Forbidden Words:


15 Plants to Plastics© Museum of ScienceEngineering Everywhere
What is Technology? Guess the Technology CardsPr
epA
ctiv
ity
2
Heat Warm Food Time Sand Flip Stick Sneakers
Music Player Vinyl Ride Wheels Vespa
Needle Thread Clothes Plastic Pay Money Game Shoot Splatter
Head Strap Protect
Microwave Hourglass Velcro
Record Scooter
Sewing Machine Credit Card Paintballs
Bike Helmet
Jacket Coat Close
Zipper
North Direction Guide
Compass
Beads Math
Abacus
Forbidden Words: Forbidden Words: Forbidden Words:
Forbidden Words: Forbidden Words: Forbidden Words:
Forbidden Words: Forbidden Words: Forbidden Words:
Forbidden Words: Forbidden Words: Forbidden Words:

17 Plants to Plastics© Museum of ScienceEngineering Everywhere
Bouncy PolymersA
ctiv
ity
1
Activity 1 Preparation1. Post the Engineering Design Process poster.2. Prepare a Materials Table with all bouncy ball ingredients. Place two
teaspoons and half teaspoons in front of the Borax, water, and glue.3. Determine an area of the room for youths to complete the human
polymer activity. The area should be small enough that youths have to interact but large enough for several youths linked together to move. This will vary for the number of youths in the program. Try an area of 15’ x 15’ for 8-15 youths and 25’ x 25’ for 16-24 youths.
4. Review the Polymer Tutorial, pp. 23-25 in this guide.5. Optional: To familiarize yourself with how the human polymer model
will work, watch Making Polymers (0:00-1:05): http://tinyurl.com/o3ejhz3. This model is similar to the one you will facilitate, but you should allow your youths to move more freely in their model.
For the whole group Engineering Design Process
poster chart paper and marker 1 box of Borax, 12 oz. 1 deli container of warm water,
32 oz. 1 newspaper to mix over 1 pack of food coloring 1 plastic beach ball 1 roll of paper towels
Activity Timing:Introduction: 5 minBouncy Ball: 30 minHuman Polymer: 15 minReflect: 5min
55 min
21st Century Skill Highlight:CollaborationCreativityProblem Solving
Note: If you only have a few youths in your program, consider recruiting other volunteers from around your center to participate in the human model, as it works best with at least 10 people.
Overview: Youths will engineer a bouncy ball to begin investigating how the chemistry of a recipe changes material properties. They will then explore how their bouncy balls were formed by making a human model of polymers, the molecules that plastics are made from.
Note to Educator: In this activity, youths will explore the structure of polymers (long molecule chains) by making bouncy balls out of polymers found in glue and then by making a human model of polymers. Youths may ask questions about polymers that you do not knowhowtoanswer.Thisisfine!Encourageyouthstoresearchanswerstotheirquestionsandreportbacktothegroup.Youcanfindapolymertutorialonpp.23-25ofthisguide.
Educator Preview
Activity 1 Materials 2 bottles of white glue, 8 oz. 6 half teaspoons 6 teaspoons 20 resealable plastic sandwich
bags optional: 1 meter stick optional: 20 paper bowls
For each youth Engineering Notebook optional: 1 paper towel

18 Plants to Plastics© Museum of ScienceEngineering Everywhere
Notebook Pages for Activity 1
Safety Considerations for Activity 1Borax is one of the ingredients provided for the bouncy ball activity. Borax is a high-powered detergent. It should not be ingested. It should not cause irritation to the touch, but have youths wash hands thoroughly after the activity. If students know they have very sensitive skin, they should be extra cautious.
Bouncy Ball Challenge, p. 6 Polymer Introduction, p. 7
Where are Polymers?, p. 8

19 Plants to Plastics© Museum of ScienceEngineering Everywhere
Youths will learn: • the ingredients that make up a material determine its chemical composition.• a material’s chemical composition (what it is made of) determine its properties.• modeling the chemical structure of a polymer can help us understand why materials
have certain material properties.
Introduction (5 min)1. Show youths the beach ball. To have them think about its properties,
ask:• How would you describe the properties of the beach ball?
Bouncy, smooth, rubbery etc.• What do you think gives this material these specific
properties? Accept all answers. 2. Tell the group that today they have been hired as a team of chemical
engineers by a toy company. Recently, there was a computer glitch andtheprocesstomaketheirprizedbouncyballwaslost!Thecompany knows what materials the bouncy balls were made from, but they do not know the recipe used to make them. Youths will work in small groups to design a new bouncy ball recipe for the company.
Making a Bouncy Ball (30 min)1. Split youths into groups of 2-3. Tell youths to turn to Bouncy Ball
Challenge, p. 6 in their Engineering Notebooks, to review their engineering challenge.
2. Point out the materials that will be available. Explain that a constraint of the challenge is that groups can only use up to four teaspoons of each material. However, they can use less if they would like and do not have to use all of the materials.
3. Tell groups that they will have 20 minutes to engineer their bouncy balls. Explain that groups should plan, create, and test one recipe without changing any ingredients. After testing, they can improve their recipe as many times as they would like. They should develop their improved recipe by changing only one ingredient at a time, so they can observe the effect. Youths should record each new recipe in their notebooks. At the end of the time limit they must have one bouncy ball to submit. The groups will then testtheirfinalbouncyballs.
4. As a group, determine a testing procedure. Youths may decide they have to drop the ball from a certain height and measure the bounce with a measuring stick or by placing a piece of tape on the wall. They may also decide they can throw the ball at the ground.
5. Give youths 20 minutes to work, letting them know when they have
Tip: The term “recipe” can also be replaced by “process.” Make sure youths know a process can be a type of technology that includes a list of ingredients and the steps to create a product.
Tip: Youths can make their bouncy balls in a sealable plastic bag or in bowls. Mixing in a sealable bag may help to contain the mess.
Tip: Suggest youths investigate how size affects their bouncy ball. They can break their balls into smaller pieces to test.
Bouncy Polymers Activity GuideA
ctiv
ity
1

20 Plants to Plastics© Museum of ScienceEngineering Everywhere
10andfiveminutes remaining.6. When time is up, have each group present their bouncy ball recipe
and demonstrate its bouncing ability. Ask:• What did you observe while you investigated the materials?
Accept all answers. Youth may find that adding borax makes the glue bouncier, but too much borax makes the ball grainy or too hard to bounce.
• How would you improve upon this design?
Human Polymers Part 1 (10 min)1. Tell youths now they are going to explore the unique chemical
structure they formed while engineering their bouncy balls. 2. Explain that glue is made up of very large molecules called polymers.
Polymers are made of smaller units called monomers. Youths can finddefinitionsfor“polymer”and“monomer”onPolymer Introduction, p. 7 of their Engineering Notebooks.
3. Ask for 4-6 volunteers. Explain that each volunteer will represent a monomer.
4. Explain that they will now explore how these monomers are able to move by themselves. Show the boundary area for the monomers to move within (see Preparation on p. 17 of this guide). Have the volunteers spend 15 seconds walking around the area. Ask:• How would you describe that experience? We had a lot of
space and freedom to move around.• When you came close to another monomer what happened?
We were able to adjust and move by each other. 5. Tell the volunteers to hold hands and form one long chain. Announce
that they just formed a polymer by bonding lots of monomers together. Now tell the group that they should move around the area as a polymer chain. Afterward, ask:• How was that different from when you were individual
molecules? We could not move as easily, we did not know who was leading or where to go.
6. Reiterate that when many monomers link up—like they just did— they form a polymer.
7. Tell the group that the glue they used to make their bouncy balls is made out of millions of these polymer chains.
8. Have the rest of the youths form polymer chains with 4-6 monomers in them, so there will be several model polymer chains. Tell the polymers to spend about 20 seconds moving within their restricted area. Ask the group:• How was that different from when there was just a single
polymer chain? We had much less room to move around. Maybe they got tangled with other polymer strands or were trapped and could not move.
Note: If time runs out, you may want to move the human polymer model to the beginning of the next activity.
Tip: You can add chairs or obstacles for more constricted movements.
Tip: If youths do not want to hold hands, tell youths to link elbows or give youths paper towel sheets to hold between each pair.
Tip: Refer to individual youths as “monomers” and chains of youths as “polymers.” The more often youths hear the vocabulary, the more comfortable they will be using it.
Tip: Youths may ask why the glue hardens. This occurs because the glue is made out of polymers and water. When the water evaporates the polymers in the glue are stuck in place and the glue hardens into place.
Tip: Watch Making Polymers (0:38-1:05): http://tinyurl.com/o3ejhz3 to familiarize yourself with how the crosslinking should work.
21 Plants to Plastics© Museum of ScienceEngineering Everywhere
Human Polymers Part 2 (5 min)1. Tell the group that in the glue they used, the polymer chains can slide
by each other, just like they were able to move around each other. Thisallowsthegluetoflowandbesqueezedoutofthebottle.
2. Now explain that the youths will simulate what happened to the glue when they added the Borax. Ask for a few volunteers to break off of the polymer strands. Explain that these volunteers will act as crosslinks and will form bonds between different polymer chains. (You will need a different number of volunteers to act as crosslinks depending on the number of polymer chains—youths —you have. You will want about two crosslinks between each of the polymer chains.)
3. Have the volunteers hold any point on the middle section of two different polymers (similar to a rung on a ladder). Ask:• How do you think this will change your ability to move?
4. Now instruct the group to move around. Afterward, ask:• How was that different from when you were individual
polymers? It was much more restricted. It kept us together if we tried to pull apart.
• What happened when you got stretched out? Did you keep stretching or did you bounce back? We bounced back because of the crosslinks.
5. Explain that crosslinks bond (or hold) polymer chains together. 6. Tell youths that the borax acted to crosslink the polymers in the glue;itpreventedthepolymerchainsfromflowing.Italsomadethematerialelastic,sothatwhentheballwasbouncedagainstthefloor,it is squished and then bounced back to its original shape.
Reflect (5 min)1. Tell youths that there are lots of types of polymers, many of which
have very different properties than the polymers in glue. One type of polymer that they are probably familiar with is plastic.
2. Ask:• What are some examples of things made from plastic? toys,
tupperware, furniture like chairs, etc.• Why do you think some plastics may be rubbery and others
may be hard? They’re made using different recipes that result in different end products, just like with the bouncy balls we explored.
3. Congratulate youths one being chemical engineers today by designing a new material and considering how the ingredients they addedinfluencedthematerials’properties.Nexttimetheywillexplorea different type of polymer material they use everyday: plastic.
Tip: See Polymer Tutorial, p. 24 in this guide, for additional information about the effect of crosslinks on polymers.
Tip: Youths may wonder what “snooker” is. Tell them that it is a cue sport like pool.
Tip: Tell youths they can explore many objects made from polymers on Where are Polymers?, p. 8 of their Engineering Notebooks.
Tip: If time permits, allow groups to improve their bouncy ball recipe.

Activity 2 Pre-PreparationIn the next activity, youths will explore types of plastics. You should try to collect an example of each type of plastic, according to their Plastic IdentificationCode(#1-#6).Not all plastic objects are labeled. Examples of each type of plastic can be found on p. 33 of this guide.

23 Plants to Plastics© Museum of ScienceEngineering Everywhere
Polymer TutorialPolymers are a broad class of materials used in a wide range of applications, like plastics, rubbers, and glue. Polymers are very large molecules made up of repeating smaller molecules, called monomers. You can think of polymers like a necklace made up of beads. Each bead represents an individual monomer, and the collection of beads on a string represents a polymer. Polymers are made up of thousands, or even millions, of monomers.
A simple example of a polymer is polyethylene. As shown below, polyethylene is made out of molecules of ethylene (C2H4). It is used to make plastic bottles, milk cartons, and saran wrap.
Origins:“Poly” = Many “Mer” = Parts“Polymer” = Of many parts
“Mono” = One “Mer” = Parts“Monomer” = One part
Ethylene monomer units Polymer (called polyethylene)
Monomers
Polymerization
Polymer

24 Plants to Plastics© Museum of ScienceEngineering Everywhere
Polymer Properties
The way polymer strands are arranged determines the properties of the material. When mixed together, polymers typically become tangled together, much like spaghetti noodles on a plate. Many plastics, like plastic bags, milk jugs and saran wrap, are made of polymers just like the image shown below. These materials are held together just by the tangling of the polymer strands. When these materials are pulled or stretched, the polymers are so twisted together that the material does not break apart until a strong enough force is applied.
Chemical Engineers Can Modify Polymers to Gain Desired Properties
Some polymer chains slip by each other and do not hold shape (untreated latex is a good example). Chemical engineers can add bonds called crosslinks that hold these chains together. Crosslinking is commonly used in rubber (like rubber bands and tires) to increase elasticity and durability. Your youths will experience crosslinking in the bouncy ball challenge. Borax adds crosslinkers between different polymers within the glue. A little borax allows the material to stretch, like silly putty, while more borax creates a tighter network that is better for bouncing.
Sometimes polymer materials are too brittle, meaning they break and shatter easily. Chemical engineerstreatthesematerialswithanadditivecalledplasticizerstoincreasetheflexibilityofthe material. Plasticizers force space between different polymer chains, allowing the chains to move by each other more easily.
Adding plasticizers is like adding oil to a plate of sticky spaghetti. The oil makes it easier for the individual noodles to move around the tangled pile. In the bioplastics your youths make later in this unit, they will add glycerin as a plasticizer.Glycerinhelpsincreasetheflexibilityofthebioplastic samples. Without glycerin the bioplastic samples are rigid and brittle.

25 Plants to Plastics© Museum of ScienceEngineering Everywhere
Wherecanyoufindpolymers?
Materials made from metal, ceramic, glass, and minerals/stone are NOT made up of polymers.
Polymers also make up...
Nylon, fishing line, parachutes, photography film, paints, bulletproof vests, waterproof clothing,
nonstick coatings, helmets, carpet
POLYMERSmake up ALL...
PlasticsBottles, containers, grocery bags,
toys, packaging, sports equipment, disposable plates/utensils
Adhesives
White glue, epoxy cement
Rubbers
Tires, rubber bands, latex gloves, shoe soles


27 Plants to Plastics© Museum of ScienceEngineering Everywhere
Plastic ExplorationA
ctiv
ity
2
Activity 2 Preparation1. Collect examples of each type of plastic labeled #1-#6, as defined
by their plastic identification number. 2. Number six pieces of chart paper #1-#6 prominently at the top of the
sheet, and mark one sheet “unlabeled.” Split each paper into three columns and label them “Object,” “Use,” and “Properties.”
3. Watch and prepare to play Engineering Everywhere Special Report Video (0:00-10:53): https://vimeo.com/128602672.
For the whole group Engineering Design Process poster Engineering Everywhere Special Report video collected plastic (see note in Preparation) computer or device to play video 1 plastic water bottle 1 roll of masking tape 7 sheets of chart paper and markers 100 sticky notes
For each youth Engineering Notebook
Activity Timing:Introduction: 10 minScavenger Hunt: 20 minBioplastics: 20 minReflect : 5 min 55 min
21st Century Skill Highlight:CollaborationCommunication
Overview: Youths will go on a scavenger hunt to identify different types of plastics that they use everyday. They will then learn about an alternative type of plastic, called bioplastic, and be introduced to their challenge for the rest of the unit.
Note to Educator: In this activity, youths will try to identify objects made of the six different types of plastic (according to their plastic identification code, #1-#6). Some plastics are difficult to find. You should collect examples of each type of plastic, so youths can explore the properties of the plastics they did not find. Since not all plastic objects are labeled, a list of examples of each type of plastic can be found on p. 33 of this guide.
Educator Preview
Activity 2 Materials

28 Plants to Plastics© Museum of ScienceEngineering Everywhere
Notebook Pages for Activity 2
Plastic Scavenger Hunt, p. 9 Plastic Scavenger Hunt, p. 10
29 Plants to Plastics© Museum of ScienceEngineering Everywhere
Youths will learn: • plastic objects are made from a variety of types of plastics, each with different and
unique properties.• plastics can cause environmental problems because they are not degradable. • bioplastics are plastic materials made from natural polymers that can degrade.
Plastics Discussion (10 min)1. Have groups reflect on what they did during the last activity. Ask:
• What type of material were the bouncy balls you made? Polymers.
2. Tell youths that today they will explore an engineered polymer material they use everyday: plastic! Remind youths that all plastic materials are made out of polymers. Ask the group:• Can someone give me an example of something plastic that
you used today?• What kind of properties did it have? Was it light and flexible
or firm and tough?3. Pick up a disposable plastic bottle and point out the triangle and
number on the bottom. Ask:• Does anyone know what these numbers means? Point out
that the triangle signifies the item is recyclable. The number represents the specific type of plastic that the item is made out of. Each plastic is made out of a different type of polymer.
4. Tell youths that they will now go on a scavenger hunt to try to find objects that are made up as many types of plastics as they can.
Scavenger Hunt (20 min)1. Split youths into groups of 3-4. Tell youths to turn to Plastic
Scavenger Hunt, p. 9 in their Engineering Notebooks, to find guidelines for their scavenger hunt.
2. Tell groups they will have 10 minutes to explore their center (within any boundaries you would like to set) and find different examples of plastic objects. For each object, they should try to identify the type of plastic it is made out of by looking for the triangle number on the bottom.
3. During the scavenger hunt, youths should fill out the chart on Plastic Scavenger Hunt, p. 10 in their Engineering Notebooks, with examples of as many types of plastics as they can, along with their uses and material properties. Not all plastics are labeled with a number. Youths can describe these objects in the “unlabeled” part of their Engineering Notebook chart.
4. Give groups 10 minutes to complete their scavenger hunt.
Tip: Ask the youths to look around the room and point out examples of plastic. Most likely their chairs or tables will be made of plastic, as well as clocks, computer monitors, bracelets, watches, or sports balls.
Tip: Each type of plastic is formed from a different polymer. Each polymer interacts differently, giving the different plastics their unique material properties.
Plastic Exploration Activity GuideA
ctiv
ity
2

30 Plants to Plastics© Museum of ScienceEngineering Everywhere
5. While youths explore, post the seven pieces of chart paper you have prepared on the wall and lay out the six plastic examples you collected.
6. When groups return, have them fill out their examples of different plastics on the chart paper.
7. Have youths pick one of the plastics and describe the properties of the items they found with that number. Ask:• Why do you think different items are made out of different
types of plastics? Different plastics have different properties that are more appropriate for specific applications.
8. Not all of the plastic types may have been found. Show youths the examples of plastics that they were not able to find. As a group, fill out the charts for these numbers. You may also want to discuss the plastics youths found that were unlabeled. See the Tip to the left.
Bioplastics Introduction and Discussion (20 min)1. Tell youths that most plastics are made from synthetic polymers,
meaning they are made in a lab. Tell youths they will now watch a quick video about some problems that traditional plastics pose, as well as how engineers are working to redesign traditional plastics using natural polymers, or polymers found in nature. Play Engineering Everywhere Special Report (0:00-10:53): https://vimeo.com/128602672.
2. After the video plays, ask:• What are some problems with traditional plastics? They
pollute our environment, degrade slowly, are not biodegradable, etc.
• How are new bioplastics different from traditional plastics? They are made using starches and sugars from plants, so they degrade more quickly than traditional plastics.
• What are some advantages of bioplastics? Because they are biodegradable, bioplastics do not pile up in landfills.
• Can you think of disadvantages of making plastic from plants-based products? Accept all answers. Youths may have difficulty identifying disadvantages. You can explain that bioplastics may rely on using a food source, which could drive up food prices. They may also have other environmental impacts (fertilizers) and their properties may not be as good as traditional plastics.
3. Explain to youths that throughout the rest of this unit, they’ll have a chance to create their own bioplastic materials, just like the engineers in the video.
4. For the rest of the time today, explain that you’d like youths to focus on ways they can repurpose or reuse existing plastics. Hold up a plastic water bottle. Explain that you will pass out sticky notes and on each sticky note they should draw or write one idea of how they could
Tip: A list of some common properties of each type of plastic can be found on p. 33 of this guide.
Tip: Many plastics are unlabeled. As a group youths can use the chart on p. 33 of this guide to hypothesize the type of plastic each unlabeled example may be. If you think your youths will be interested, you can copy the chart on p. 33 to give to them after they have completed the scavenger hunt.
31 Plants to Plastics© Museum of ScienceEngineering Everywhere
repurpose the water bottle. They should write down as many ideas as possible, each on a different sticky note.
5. Hand out sticky notes and give youths five minutes to put their ideas down. Encourage youths to think outside the box, any idea they have is worth writing or drawing! Some examples of repurposed plastics can be found on p. 35 of this guide.
6. Ask youths to share their ideas and then post their sticky notes next to the water bottle. Ask: • What are ways in which you think plastic could be reused?
Accept all answers.
Reflect (5 min) 1. Have youths gather around the Engineering Design Process poster.
Ask:• What steps of the Engineering Design Process did we use
today? Identified the plastic pollution problem, investigated plastics and potential alternatives to traditional plastic, imagined how plastic could be reused.
• What did you discover about all the types of plastics we use? There are a lot of types of plastics, each with different properties.
• Who do you think designs these different types of plastics? Chemical engineers!
2. Tell youths that during the next activity they will be chemical engineers by creating plastics from plant-based products like the ones they learned about today.
Tip: Natural polymers are found in nature and include starches, proteins, DNA, and lignin. Synthetic polymers are those made in a lab by humans. Examples of synthetic polymers are those that make up traditional plastics and adhesives. Rubber is an interesting case because the polymers that make up rubber can be found in nature (from rubber trees) or made synthetically in a lab.

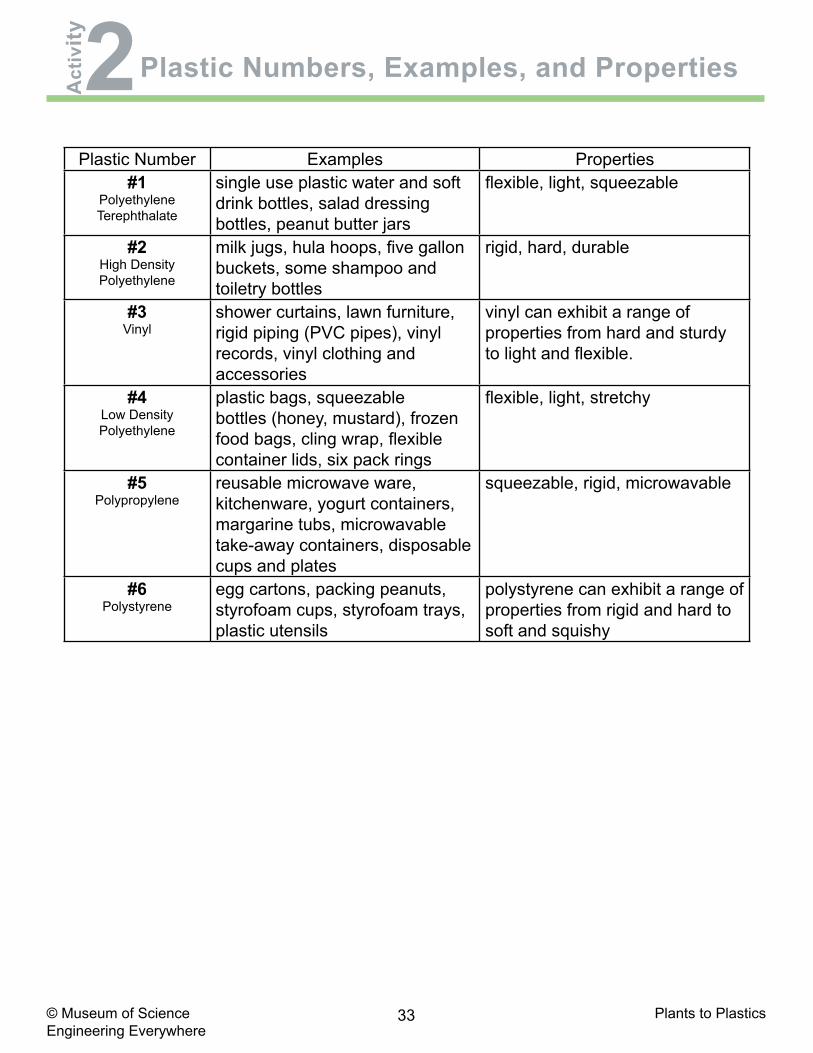
33 Plants to Plastics© Museum of ScienceEngineering Everywhere
Plastic Number Examples Properties#1
Polyethylene Terephthalate
single use plastic water and soft drink bottles, salad dressing bottles, peanut butter jars
flexible, light, squeezable
#2High Density Polyethylene
milk jugs, hula hoops, five gallon buckets, some shampoo and toiletry bottles
rigid, hard, durable
#3Vinyl
shower curtains, lawn furniture, rigid piping (PVC pipes), vinyl records, vinyl clothing and accessories
vinyl can exhibit a range of properties from hard and sturdy to light and flexible.
#4Low Density Polyethylene
plastic bags, squeezable bottles (honey, mustard), frozen food bags, cling wrap, flexible container lids, six pack rings
flexible, light, stretchy
#5Polypropylene
reusable microwave ware, kitchenware, yogurt containers, margarine tubs, microwavable take-away containers, disposable cups and plates
squeezable, rigid, microwavable
#6Polystyrene
egg cartons, packing peanuts, styrofoam cups, styrofoam trays, plastic utensils
polystyrene can exhibit a range of properties from rigid and hard to soft and squishy
Plastic Numbers, Examples, and PropertiesA
ctiv
ity
2

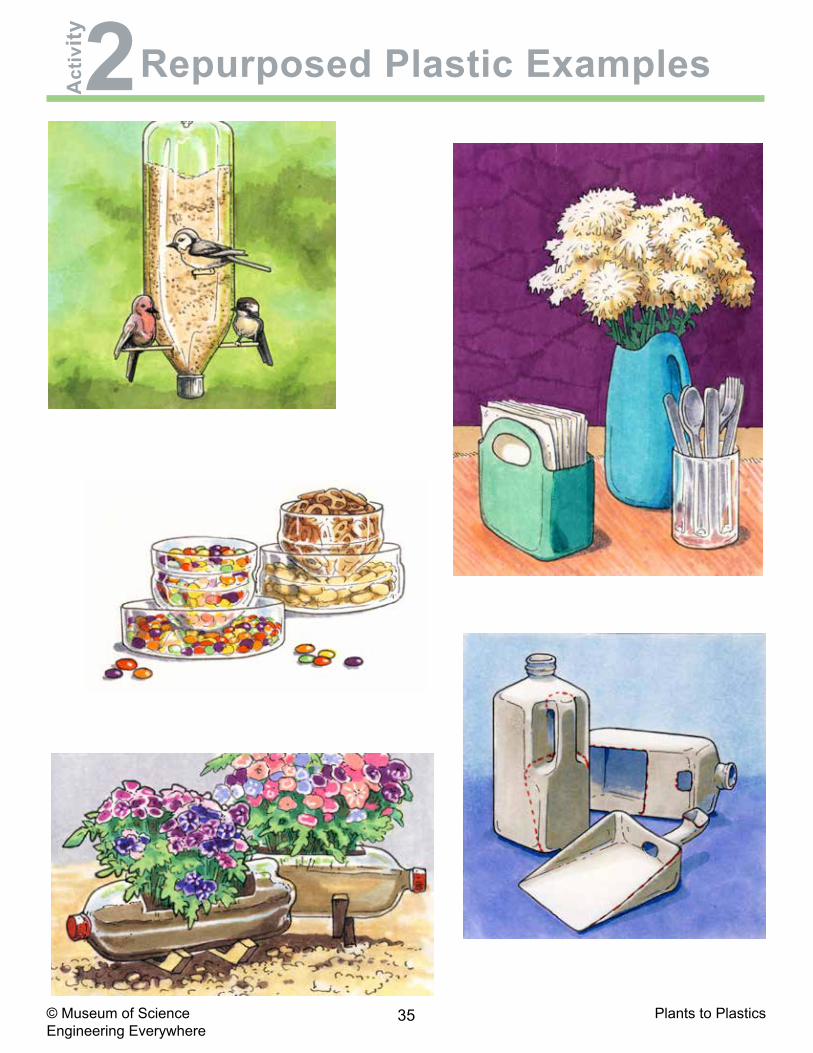
35 Plants to Plastics© Museum of ScienceEngineering Everywhere
Repurposed Plastic ExamplesA
ctiv
ity
2


37 Plants to Plastics© Museum of ScienceEngineering Everywhere
Investigating BioplasticsA
ctiv
ity
3
Activity 3 Preparation1. Set up hot plates on one table that is easy to monitor.2. Set up a Materials Table with the ingredients for the bioplastic
recipes. Place two teaspoons and two tablespoons in paper bowls in front of the agar, cornstarch, glycerin, and water.
3. Print off one copy for each group of the Observation Sheet, p. 45 in this guide.
4. Pick a procedure for groups to create their bioplastics, see p. ## in this guide.
For the whole group Engineering Design Process
poster chart paper and markers newspaper 1 container of agar 1 container of cornstarch 1 container of glycerin 1 deli container of water, 32 oz. 1 microwave 1 roll of masking tape 1 roll of paper towels 4 felt sheets
Activity Timing:Introduction: 5 min Bioplastics Investigation : 30 minReflect: 10min
45 min
21st Century Skill Highlight:Collaboration
Overview: Youths will use the investigate step to make bioplastics out of cornstarch and agar (an algae-based product).
Note to Educator: In this activity, a total of six bioplastic recipes must be made. If you have more than six groups, you can have a couple of groups make the same recipe and compare the results. The instructions here are written for making the bioplastics on hot plates and drying them in the microwave, but they can also be made just in the microwave as explained on p. 42 in this guide. There are four hot plates. If there are more than four groups, youths will have to rotate using the hot plates. Please review the safety protocol before beginning.
Educator Preview
Activity 3 Materials 4 hot plates 4 nonstick pots 4 nonstick spatulas 4 paper bowls 8 teaspoons 8 tablespoons optional: power strip
For each group of 3 1 ceramic plate 1 Observation Sheet, p. 45 in
this guideFor each youth
Engineering Notebook
Extension ActivitiesSee pp. 47-53 in this guide for two extension activities you may want to incorporate into the unit.
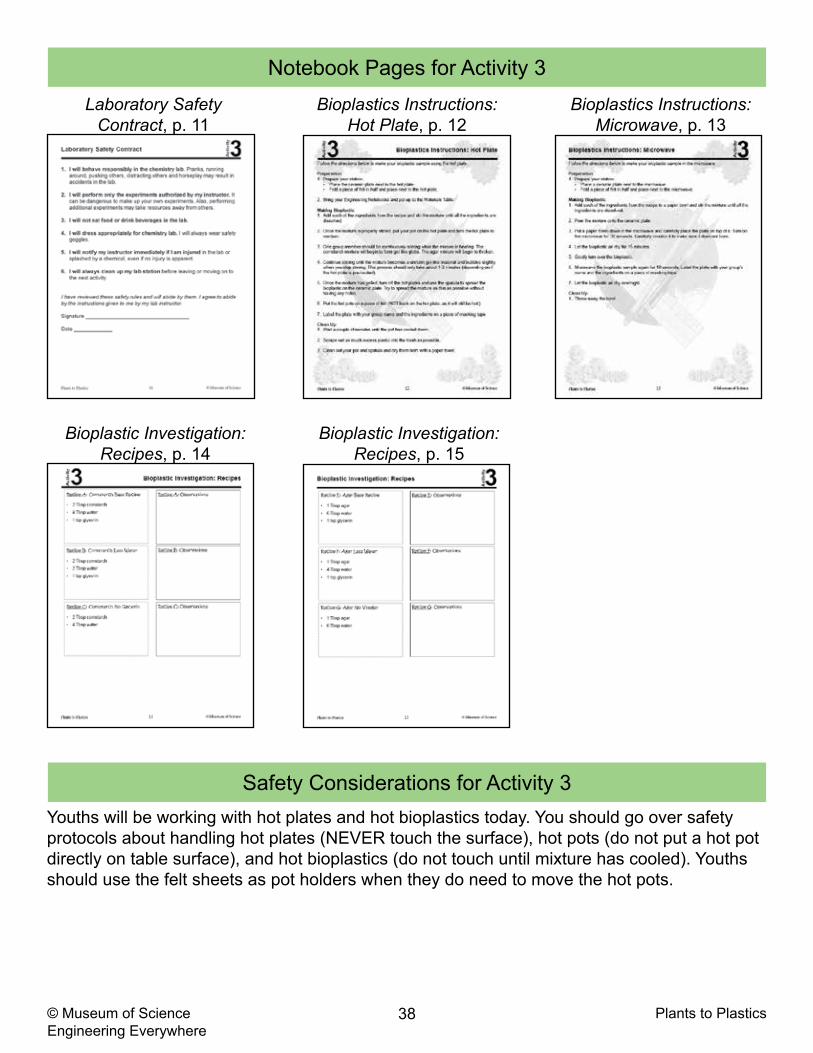
38 Plants to Plastics© Museum of ScienceEngineering Everywhere
Notebook Pages for Activity 3
Safety Considerations for Activity 3Youths will be working with hot plates and hot bioplastics today. You should go over safety protocols about handling hot plates (NEVER touch the surface), hot pots (do not put a hot pot directly on table surface), and hot bioplastics (do not touch until mixture has cooled). Youths should use the felt sheets as pot holders when they do need to move the hot pots.
Laboratory Safety Contract, p. 11
Bioplastics Instructions: Hot Plate, p. 12
Bioplastics Instructions: Microwave, p. 13
Bioplastic Investigation: Recipes, p. 14
Bioplastic Investigation: Recipes, p. 15
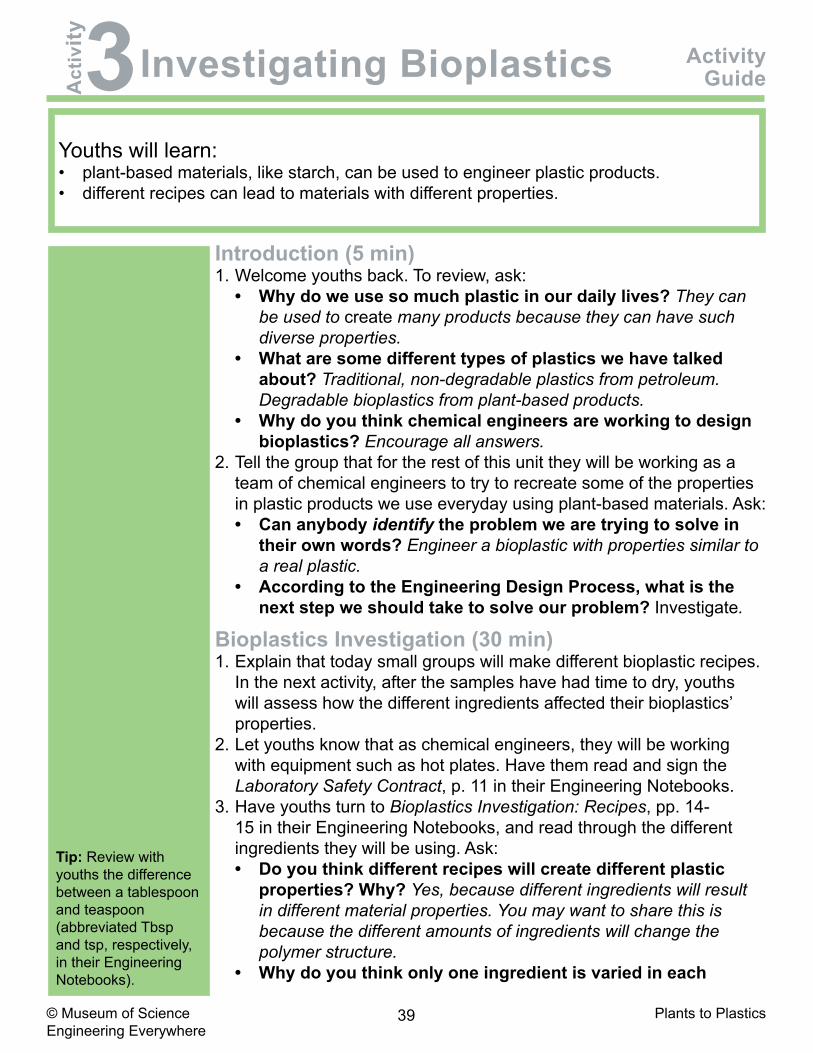
39 Plants to Plastics© Museum of ScienceEngineering Everywhere
Youths will learn: • plant-based materials, like starch, can be used to engineer plastic products.• different recipes can lead to materials with different properties.
Introduction (5 min)1. Welcome youths back. To review, ask:
• Why do we use so much plastic in our daily lives? They can be used to create many products because they can have such diverse properties.
• What are some different types of plastics we have talked about? Traditional, non-degradable plastics from petroleum. Degradable bioplastics from plant-based products.
• Why do you think chemical engineers are working to design bioplastics? Encourage all answers.
2. Tell the group that for the rest of this unit they will be working as a team of chemical engineers to try to recreate some of the properties in plastic products we use everyday using plant-based materials. Ask:• Can anybody identify the problem we are trying to solve in
their own words? Engineer a bioplastic with properties similar to a real plastic.
• According to the Engineering Design Process, what is the next step we should take to solve our problem? Investigate.
Bioplastics Investigation (30 min)1. Explain that today small groups will make different bioplastic recipes.
In the next activity, after the samples have had time to dry, youths will assess how the different ingredients affected their bioplastics’ properties.
2. Let youths know that as chemical engineers, they will be working with equipment such as hot plates. Have them read and sign the Laboratory Safety Contract, p. 11 in their Engineering Notebooks.
3. Have youths turn to Bioplastics Investigation: Recipes, pp. 14-15 in their Engineering Notebooks, and read through the different ingredients they will be using. Ask:• Do you think different recipes will create different plastic
properties? Why? Yes, because different ingredients will result in different material properties. You may want to share this is because the different amounts of ingredients will change the polymer structure.
• Why do you think only one ingredient is varied in each
Tip: Review with youths the difference between a tablespoon and teaspoon (abbreviated Tbsp and tsp, respectively, in their Engineering Notebooks).
Investigating Bioplastics Activity GuideA
ctiv
ity
3
40 Plants to Plastics© Museum of ScienceEngineering Everywhere
recipe? To identify the effect that one ingredient has on the bioplastic properties.
4. Split youths into groups of 2-3. Assign each group one recipe to make and have them circle it in their notebook. For larger groups, explain that groups will take turns making their bioplastic. While groups are working, they can make observations about other bioplastics being made.
5. Describe the bioplastic procedure described on p. 41 of this guide. Youths can follow Bioplastics Instructions: Hot Plate, p. 12 in their Engineering Notebooks. If using the microwave, go over p. 42 in this guide, and p. 13 of the Engineering Notebook.
6. Explain that chemical engineers must always keep their laboratory spaces clean for safety purposes. Tell youths they will be responsible for cleaning their entire station before they are allowed to leave. Make sure youths know to give the pot a few minutes to cool off. They can use the spatula to scrape off some of the bioplastic into a trash can before washing the pot. Try to avoid having large pieces of bioplastic go down the drain.
7. Tellthegroupthataftertheyhavefinishedmakingtheirrecipes,theyshould record their initial observations on the Observation Sheet they will be given. These will be posted, so the entire group can learn about each recipe. Youths can also record their observations on pp. 14-15 of their Engineering Notebooks next to their recipe if they would like.
8. While groups are engineering their bioplastics, ask:• What do you observe about the mixture as it is heated?• What kind of plastic do you think your recipe will make?
Reflect (10 min) 1. Gather the groups together once all equipment and materials have
been cleaned up. Store the bioplastics in a safe place, collect the Observation Sheets, and save these for the next activity. Ask:• What step of the Engineering Design Process did we use
today? Investigate.• Do you have any predictions for what kind of plastics your
recipes will make?2. Tell youths that next time they will assess the properties of the
bioplastics they made today and begin their engineering challenge.
Tip: If time permits, allow groups to make their recipes in the microwave as well so they can compare the properties.
Tip: To wash the pans without sink access, fillupalargebasinwith water and make it available in the classroom.

41 Plants to Plastics© Museum of ScienceEngineering Everywhere
Bioplastics Instructions: Hot PlateFollow the directions below to make your bioplastic sample using the hot plate.
Preparation1. Prepare your station:
• Place a plate next to the hot plate. On the edge of the plate, place a piece of masking tape with your group’s initials.
• Fold a piece of felt in half and place it next to the hot plate. 2. Bring your Engineering Notebooks and pot up to the Materials Table.
Making Bioplastic1. Add each of the ingredients from the recipe and stir the mixture until all the ingredients are
dissolved.
2. Once the mixture is properly stirred, put your pot on the hot plate and turn the hot plate to low.
3. One group member should be continuously stirring while the mixture is heating. The cornstarch mixture will begin to form gel-like globs. The agar mixture will begin to thicken.
4. Continue stirring until the mixture becomes a uniform gel-like material and bubbles slightly when you stop stirring. This process should only take about 1-4 minutes (depending on if the hot plate is pre-heated).
5. Once the mixture has gelled, turn off the hot plates and use the spatula to spread the bioplastic evenly on the plate. Spread the mixture as thin as possible without having any holes.
6. Put the hot pots on a piece of felt (NOT back on the hot plate, as it will still be hot.)
Drying Bioplastic1. Microwave the bioplastic for 30 seconds on low. Carefully monitor it to make sure it does not burn.
2. Let the bioplastic air dry for 15 minutes.
3. Gently turn over the bioplastic.
4. Repeat steps 1-3 twice so that you microwave the bioplastic a total of three times.
5. Let the bioplastic air dry overnight.
Clean Up 1. Wait a couple of minutes until the pot has cooled down.2. Scrape out as much excess plastic into the trash as possible.3. Clean out and dry your pot.

42 Plants to Plastics© Museum of ScienceEngineering Everywhere
Bioplastics Instructions: MicrowaveFollow the directions below to make your bioplastic sample in the
microwave.
Preparation1. Prepare your station:
• Place a ceramic plate next to the microwave.• Fold a piece of felt in half and place next to the microwave.
Making Bioplastic1. Add each of the ingredients from the recipe to a paper bowl and stir
the mixture until all the ingredients are dissolved.
2. Pour the mixture onto the ceramic plate.
3. Put a paper towel down in the microwave and carefully place the plate on top of it. Turn on the microwave for 30 seconds. Carefully monitor it to make sure it does not burn.
4. Let the bioplastic air dry for 15 minutes.
5. Gently turn over the bioplastic.
6. Microwave the bioplastic sample again for 10 seconds. Label the plate with your group’s name and the ingredients on a piece of masking tape.
7. Let the bioplastic air dry overnight.
Clean Up 1. Throw away the bowl.
43 Plants to Plastics© Museum of ScienceEngineering Everywhere
Bioplastic Notes• If the bioplastics cook too long on the hot plate or in the microwave,
then they have a tendency to crack. During the drying process, water evaporates out of the plastics. If the bioplastics cook too long, they lose a lot of their water and crack. To avoid cracking, err on the shorter side of cooking. • The cornstarch mixture will appear milky and then form gel-like
globs. As soon as the mixture becomes a uniform gel, it is ready to be poured onto the ceramic plate.
• The agar mixture is easier to overcook because it does not undergo a phase transition like cornstarch, but rather it slowly thickens. When you are able to scrape your spatula across the bottomofthepotandtheagardoesnotimmediatelyfillthegapthat is formed, then the mixture is ready to be poured on the ceramic plate.
• It will take approximately 5-7 days for the bioplastics to dry completely.Youwillneedtofindanundisturbedplacetoallowthebioplastics to dry for a week.
• It is tempting to peel the bioplastic off the plate while they are drying, especially for the quick-setting agar recipes, but DO NOT remove the bioplastic until the drying process is complete. Peeled off plastics will dry differently and create less uniform samples. If you think youths would like to explore samples that are not dried, have the group make additional bioplastic samples.
• As the cornstarch-based plastics dry, they will curl up and warp.
• Additional notes about making bioplastic bowls (which groups have the option of engineering in Activity 5) can be found on p. 69 of this guide.


OB
SE
RVATIO
N S
HE
ET
Recipe #:
Cornstarch:
Agar:
Water:
Glycerin:
Notes about recipe:
Initial Observations:
Final Observations:


47 Plants to Plastics© Museum of ScienceEngineering Everywhere
Repurposing Plastics (45 min)1. Tell youths they will work on a repurposing plastic project. Hand out the Extension Lesson
Notebook page, p. 49 of this guide, and have youths read about the project. Let youths know whether they will work individually or in groups.
2. Remind youths that in Activity 2 they thought about how they could repurpose a water bottle. Ask:• What ideas were brainstormed about how to reuse the water bottle?
3. Show youths the plastic pieces you have collected (or they have brought in) that they can use for this activity, and point out the art supplies they will have access to.
4. Give youths a few minutes to plan their design on the notebook page, then have youths begin creating their projects.
5. While youths are working, ask:• How are you reusing the materials that were collected?• Can you think of other projects you can do to reuse plastic?
6. Let youths know as time is winding down.
Reflect (5 min)1. Bring the whole group together, and ask a few volunteers to share their project.2. Havethegroupreflectonreurposingplasticbyaskingquestionslike:
• What did you think about repurposing plastic?• Where you surprised by any of the ideas or projects you saw?• What are the pros to repurposing plastic?
Repurposing Plastic ExtensionActivity
For the whole group recycled plastic 1 roll of string 2 hole punches 8 pairs of scissors 30 markers 50 sheets of tissue paper
Materials
Preparation1. Place the plastic pieces and the art supplies on a table so youths can access them.2. Make a copy of Repurposing Plastic, p. 49 in this guide, for each youth.3. Collect any additional art supplies you think youths may want to use.
50 twist ties 100 rubber bands optional: additional art supplies
For each participant Repurposing Plastic, p. 49 in this guide


49 Plants to Plastics© Museum of ScienceEngineering Everywhere
Challenge: Repurpose recycled plastic into something useful you can use in your daily life.
Constraint: You cannot use the plastic for its original purpose.
Project ideas:• Flower planter
• Plastic shovel
• Jewelry
• Key chain
• Coin purse/wallet
• Pencil jar
Sketch your repurposing plastic project here:
Repurpose Plastic Project
Act
ivity
3

51 Plants to Plastics© Museum of ScienceEngineering Everywhere
Plastic Art ExtensionActivity
Introduction (5 min)1. Explain to youths that art can be used to show something appealing, and can also be used
to make a statement. They will see examples of art pieces that combine smaller pieces to create one large installation.
2. Tell youths you are going to show them a short video about a group that has tried to raise awareness of plastic pollution in the ocean. Play the video Extreme Plastic Recycling Ideas (0:00-1:53): http://tinyurl.com/mn47n6v.
3. After the video, ask youths:• Do you think art can be a good way to raise public awareness about different
issues?• Can you think of any sculptures in your neighborhood that might be making a
statement about a social issue?
Plastic Art (35 min)1. Give each youth a Plastic Art page, p. 53 in this guide, to review the plastic art challenge.
Tell youths that they will each have a piece of plastic to decorate. Then, they will arrange all of the pieces together to create a unique art piece out of the recycled plastics.
2. Give youths a few minutes to brainstorm ideas for their plastic art installation. Encourage youths to think about a message they would like to convey and the ways they could use art to get their message across.
3. Ask:• How do you think you could make an art installation out of recycled plastic?• We have been talking about plastics and bioplastics. What sort of message do we
want to convey to people about the issues associated with plastics?4. Encouragethegrouptocomeupwithaplanfortheirfinaldesign.
For the whole group computer or device to play videos recycled plastic 1 bottle of glue 1 roll of string 2 hole punchers 8 pairs of scissors 30 markers
Materials
Preparation1. Place the plastic pieces and the art supplies on a table so youths can access them.2. Make a copy of Plastic Art, p. 53 in this guide, for each youth.3. Collect any additional art supplies you think youths may want to use.4. Watch and be prepared to play the video Extreme Plastic Recycling Ideas (0:00-1:53):
http://tinyurl.com/mn47n6v.
50 sheets of tissue paper 50 twist ties 100 rubber bands optional: additional art supplies
For each participant Plastic Art, p. 53 this guide

52 Plants to Plastics© Museum of ScienceEngineering Everywhere
5. Show youths the plastic pieces and art supplies they have available. Give youths about 30 minutes to decorate their individual pieces, reminding them to think about the installation as a whole and how their piece will tie in.
6. Onceyouthsbeginfinishingtheirindividualpieces,theycanstartarrangingallthepiecesinto one art installation, using hole punches and string or tape to connect the individual plastic pieces into one piece of art.
7. You may want to ask for volunteers to make a poster explaining their piece. This could be shown in the Showcase.
Reflect (5 min)1. Gathertheyouthsaroundtheirfinalartinstallationpiece.Ask:
• Do you think art is a good way to repurpose used plastic?• Do you think people will be surprised at what can be made with recycled
materials?2. As a group, decide on a place to display the plastic art installation.
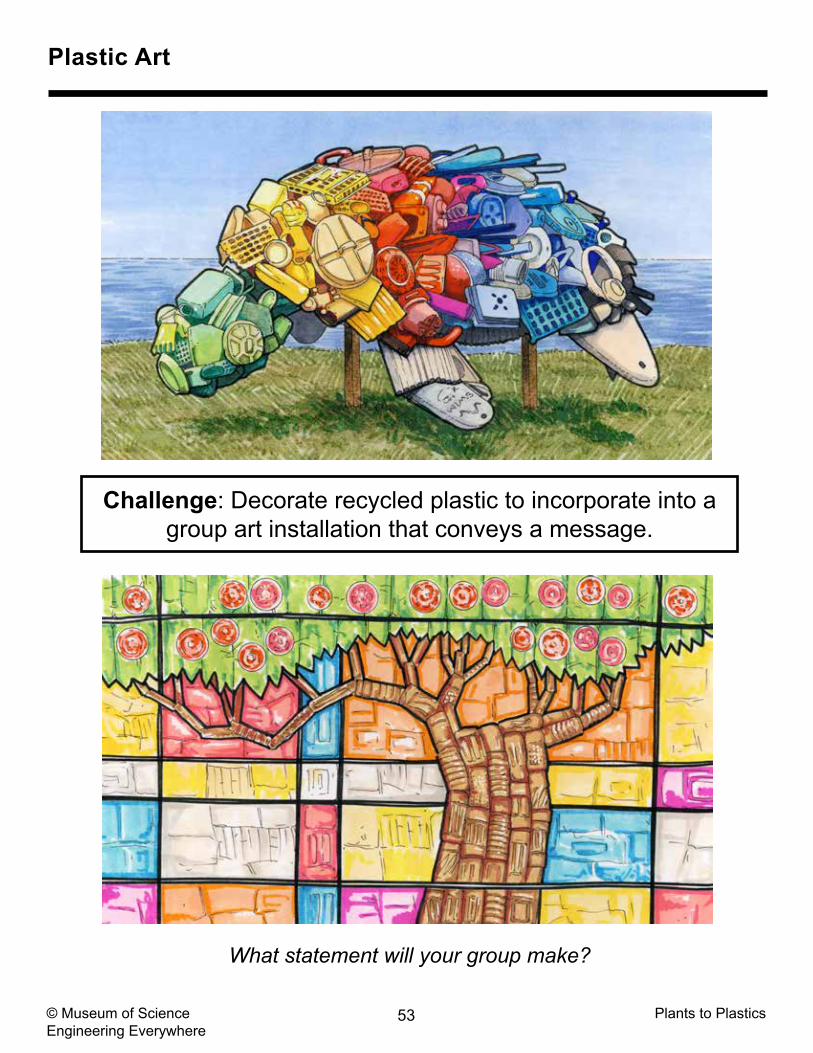
53 Plants to Plastics© Museum of ScienceEngineering Everywhere
Plastic Art
What statement will your group make?
Challenge: Decorate recycled plastic to incorporate into a group art installation that conveys a message.

55 Plants to Plastics© Museum of ScienceEngineering Everywhere
Creating BioplasticsA
ctiv
ity
4
Activity 4 Preparation1. Post the Engineering Design Process poster. 2. Set up hot plates on one table that is easy to monitor.3. Set up a Bioplastics Materials Table with all of the bioplastic
supplies.4. Make one copy of the Observation Sheet, p. 61 in this guide, for
each group. 5. Prepare to distribute bioplastic samples from Activity 3. Also, be
ready to pass out the corresponding Observation Sheets from Activity 3.
6. See pp. 47-53 in this guide for two extension activities you may want to incorporate into the unit.
For the whole group Engineering Design Process
poster chart paper and markers 1 box of food coloring 1 container of agar 1 container of cornstarch 1 container of glycerin 1 roll of masking tape 2 deli containers (with water) 4 hot plates 4 nonstick pots 4 nonstick spatulas 4 paper bowls 8 half teaspoons
Activity Timing:Review Result: 15 minChallenge: 30 minReflect:5min
50 min
21st Century Skill Highlight:Problem SolvingCollaborationCreativity
Overview: Youths will review the results of their bioplastic samples and be introduced to theirfinaldesignchallengeofrecreatingaspecifictypeofplastic.
Note to Educator: Youths will be using the hot plates to create their bioplastics. Be sure to go over safety rules before groups begin. In this activity, groups will be challenged to recreate the properties of common plastic items. In the next activity, groups will create the object using an improved recipe.
Educator Preview
Activity 4 Materials
8 teaspoons 8 tablespoons optional: nonstick cooking spray optional: power strip
For each group of 3 bioplastic sample, Activity 3 Observation Sheet, Activity 3 1 ceramic plate 1 Observation Sheet, p. 61 in this
guideFor each youth
Engineering Notebook
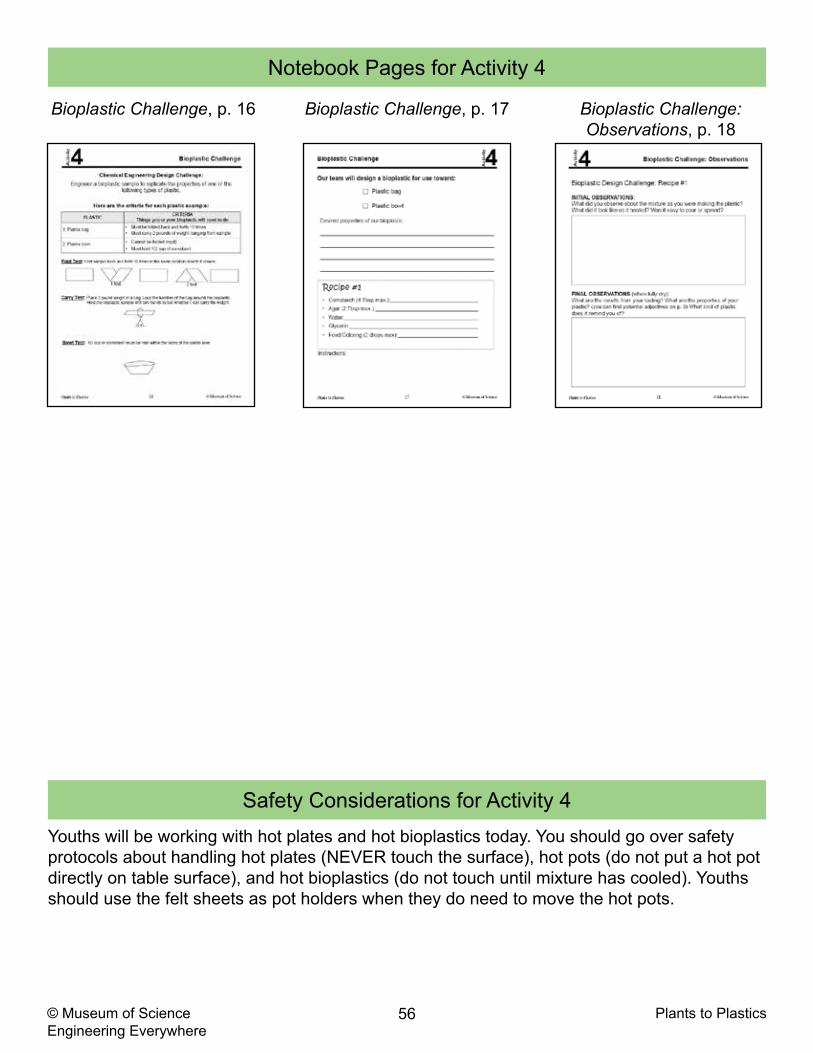
56 Plants to Plastics© Museum of ScienceEngineering Everywhere
Notebook Pages for Activity 4
Safety Considerations for Activity 4Youths will be working with hot plates and hot bioplastics today. You should go over safety protocols about handling hot plates (NEVER touch the surface), hot pots (do not put a hot pot directly on table surface), and hot bioplastics (do not touch until mixture has cooled). Youths should use the felt sheets as pot holders when they do need to move the hot pots.
Bioplastic Challenge, p. 16 Bioplastic Challenge, p. 17 Bioplastic Challenge: Observations, p. 18

57 Plants to Plastics© Museum of ScienceEngineering Everywhere
Youths will learn: • adding different ingredients affects the properties of bioplastics.• data collected through the investigate step can inform their design decisions for their
chemical engineering challenge.
Reviewing Results (15 min)1. Tell youths that today they will receive their chemical engineering designchallenge.Butfirst,theywillassesstheresultsofthebioplastics they created from the last activity.
2. Split youths into the groups they worked in during the last activity. Hand each group their bioplastic sample and corresponding Observation Sheet. Give groups a couple of minutes to explore the properties of their samples and record them in the Final Observation section of their Observation Sheets. If youths would like, they can also record their observations on Bioplastic Investigation: Recipes, pp. 14-15 in their Engineering Notebooks.
3. Have each group present their bioplastics by explaining its recipe and the properties of their sample. They may pass around their samples as they share. Ask:• How are the bioplastics different from when they were first
made?• What are the properties of your bioplastic sample?• What type of plastic is your bioplastic most similar to?
4. After each group presents, post their Observation Sheets on the wall and place their bioplastic sample nearby. Arrange Observation Sheets in groups with different recipes. Also, tell youths they can write down general observations about the different samples on pp. 14-15 in their Engineering Notebooks next to each of the bioplastic recipes.
5. Once each group has shared, have the whole group consider what they noticed between bioplastics with similar ingredients. Ask:• How are the agar and cornstarch base bioplastics different?
For information about ingredients, refer to p. 59 of this guide. • How does less glycerin change the properties of the
bioplastic samples? • How does less water change the properties of the bioplastic
samples?6. Record the groups observations on a sheet of chart paper to be
referenced for the rest of the unit.
Design Challenge Introduction and Planning (30 min)1. Tell youths that their challenge as chemical engineers for the rest of
Tip: A bioplastic ingredient observation list is given on p. 59 of this guide.
Tip: Groups may liken the properties of their plastics to the Plastic IdentificationNumbersthey explored during Activity 1. They may also designate their plastic as being similar to a plastic container, a plastic bag, plastic wrap, or a specifictypeofplasticthey have interacted with.
Tip: Youths can remain in their original groups for this challenge or form new groups. This is a good opportunity to form groups that you think will work well together for the finalengineeringchallenge.
Creating Bioplastics Activity GuideA
ctiv
ity
4
58 Plants to Plastics© Museum of ScienceEngineering Everywhere
the unit will be to create a bioplastic sample with material properties that best resemble the properties of one of two plastics they commonly use.
2. Tell youths to turn to Bioplastic Challenge, p. 16 in their Engineering Notebooks, to review their challenge. They may decide to make a bioplastic sample that has properties similar to a:• plastic bag• plastic bowl
3. Go over the testing criteria that will be used to determine if the bioplastics successfully imitate the traditional plastic’s properties. Explain that, for today, groups should focus on creating a bioplastic sample with the desired properties. During the next activity, they will have the opportunity to make the bioplastic object using an improved recipe.
4. Additionally, tell youths that they will be allowed to use up to two drops of food coloring to color their plastics and up to four tablespoons of cornstarch and two tablespoons of agar.
5. Have youths split into groups of 2-3 and tell groups to decide which type of plastic they will try to recreate and mark off their choice on Bioplastic Challenge, p. 17 of their Engineering Notebooks.
6. Next, give groups 5 minutes to brainstorm desired properties and record a recipe they think will produce these properties. Encourage groups to consult the Observation Sheets posted on the wall and examine the bioplastic samples to review how different recipes produced various plastic properties.
7. Remind youths of the safety precautions to take when working with the hot plates, pans, and heated bioplastics. Have groups take turns making their bioplastics.
8. Pass out new Observation Sheets to each group. Remind groups tofillouttheirinitialobservationsontheirnewObservation Sheets. Youths may also record their observations on Bioplastic Challenge: Observations, p. 18 in their Engineering Notebooks.
9. As groups work on their bioplastics, ask questions like:• Why do you think this recipe will create the properties of the
type of plastic you are recreating?
Reflect (5 min)1. Set aside the plastic samples and collect Observation Sheets. Gather
the group around the Engineering Design Process poster. Ask:• Which steps of the Engineering Design Process have we
used so far to engineer our bioplastics? We identified the problem, investigated properties of plastics and certain recipes of bioplastics, and we imagined, planned, and created our bioplastic.
2. Let groups know that in the next activity, they will assess the properties of their dried bioplastics, then make a bioplastic object with an improved recipe.
Tip: Youths can mix the cornstarch and agar base if they would like.

59 Plants to Plastics© Museum of ScienceEngineering Everywhere
Note: These general observation were found during the Engineering Everywhere team’s experimentation.Resultsmayvary.Ifyourgroupfindsdifferenttrends,thensupportthosefindings.Thereisnoneedtofitobservationstothoselistedhere!
Bioplastic Ingredient Observations
Ingredient General Observations
Cornstarch• Thicker samples (likely becausetheyaremoredifficultto spread)
• Opaque
Agar• Thin samples (likely because
they are easy to spread)• Slightly translucent with a
yellow tinge
Glycerin
• Moreglycerinaddsflexibilitytosample
Note: Glycerin acts as a plasticizer. Plasticizers increase theflexibilityofplasticsbycreating space between the polymer chains.
Water
• Less water generally makes the sample more brittle, however we have also seen it become thicker.
Note: Water helps to hydrate the dried polymer chain and get them tangled up. Less water means that chains do not get as tangled and the material is not as strong.

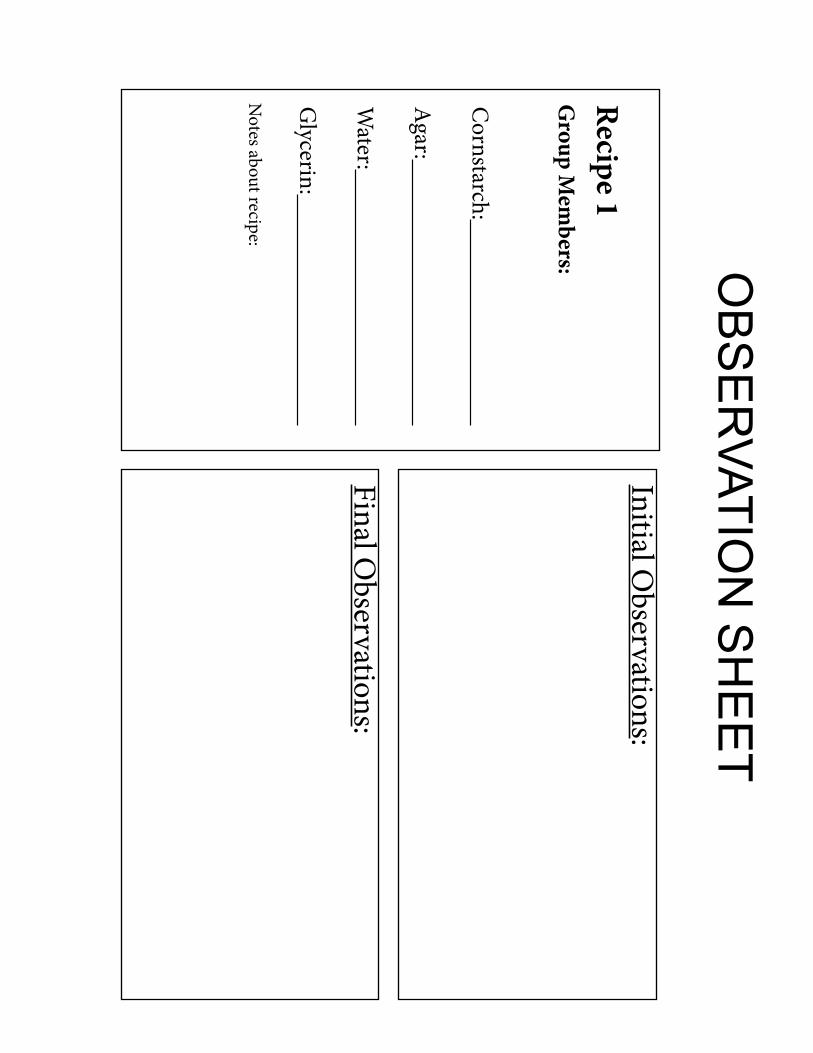
OB
SE
RVATIO
N S
HE
ET
Recipe 1
Group M
embers:
Cornstarch:
Agar:
W
ater:
Glycerin:
Notes about recipe:
Initial Observations:
Final Observations:

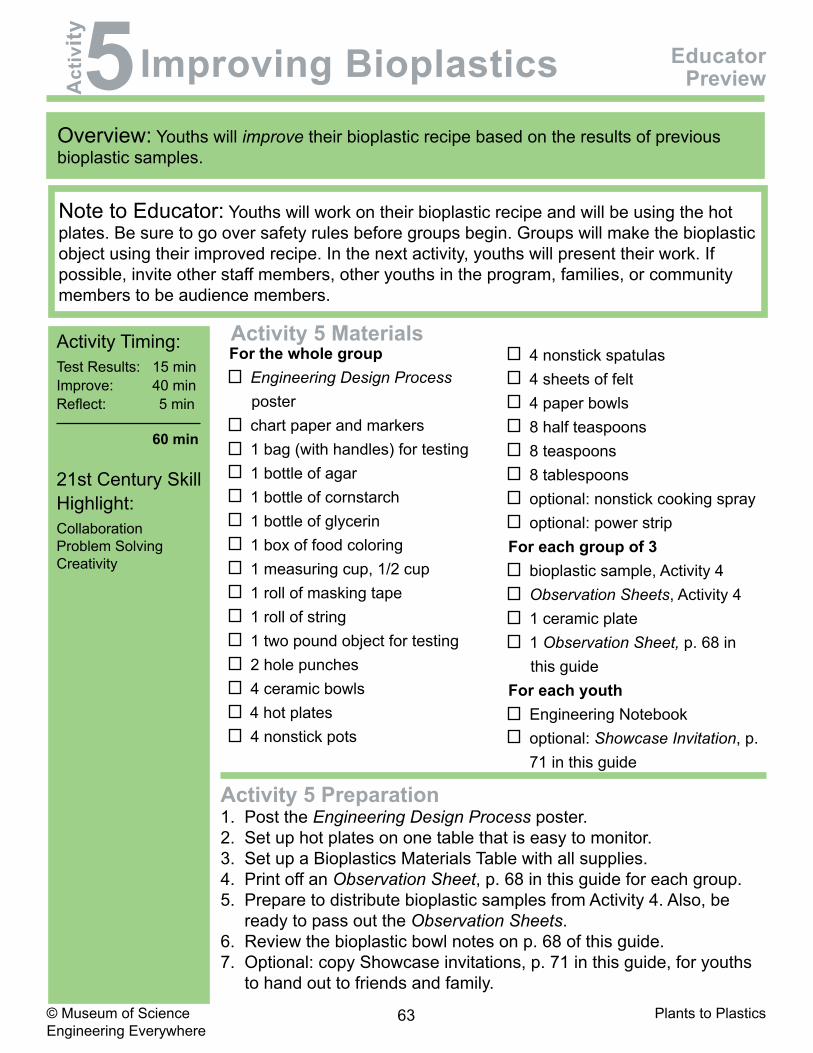
63 Plants to Plastics© Museum of ScienceEngineering Everywhere
Improving BioplasticsA
ctiv
ity
5
Activity 5 Preparation1. Post the Engineering Design Process poster. 2. Set up hot plates on one table that is easy to monitor.3. Set up a Bioplastics Materials Table with all supplies.4. Print off an Observation Sheet, p. 68 in this guide for each group. 5. Prepare to distribute bioplastic samples from Activity 4. Also, be
ready to pass out the Observation Sheets. 6. Review the bioplastic bowl notes on p. 68 of this guide.7. Optional: copy Showcase invitations, p. 71 in this guide, for youths
to hand out to friends and family.
For the whole group Engineering Design Process
poster chart paper and markers 1 bag (with handles) for testing 1 bottle of agar 1 bottle of cornstarch 1 bottle of glycerin 1 box of food coloring 1 measuring cup, 1/2 cup 1 roll of masking tape 1 roll of string 1 two pound object for testing 2 hole punches 4 ceramic bowls 4 hot plates 4 nonstick pots
Activity Timing:Test Results: 15 minImprove: 40 minReflect: 5 min 60 min
21st Century Skill Highlight:CollaborationProblem SolvingCreativity
Overview: Youths will improve their bioplastic recipe based on the results of previous bioplastic samples.
Note to Educator: Youths will work on their bioplastic recipe and will be using the hot plates. Be sure to go over safety rules before groups begin. Groups will make the bioplastic object using their improved recipe. In the next activity, youths will present their work. If possible, invite other staff members, other youths in the program, families, or community members to be audience members.
Educator Preview
Activity 5 Materials 4 nonstick spatulas 4 sheets of felt 4 paper bowls 8 half teaspoons 8 teaspoons 8 tablespoons optional: nonstick cooking spray optional: power strip
For each group of 3 bioplastic sample, Activity 4 Observation Sheets, Activity 4 1 ceramic plate 1 Observation Sheet, p. 68 in
this guide For each youth
Engineering Notebook optional: Showcase Invitation, p.
71 in this guide
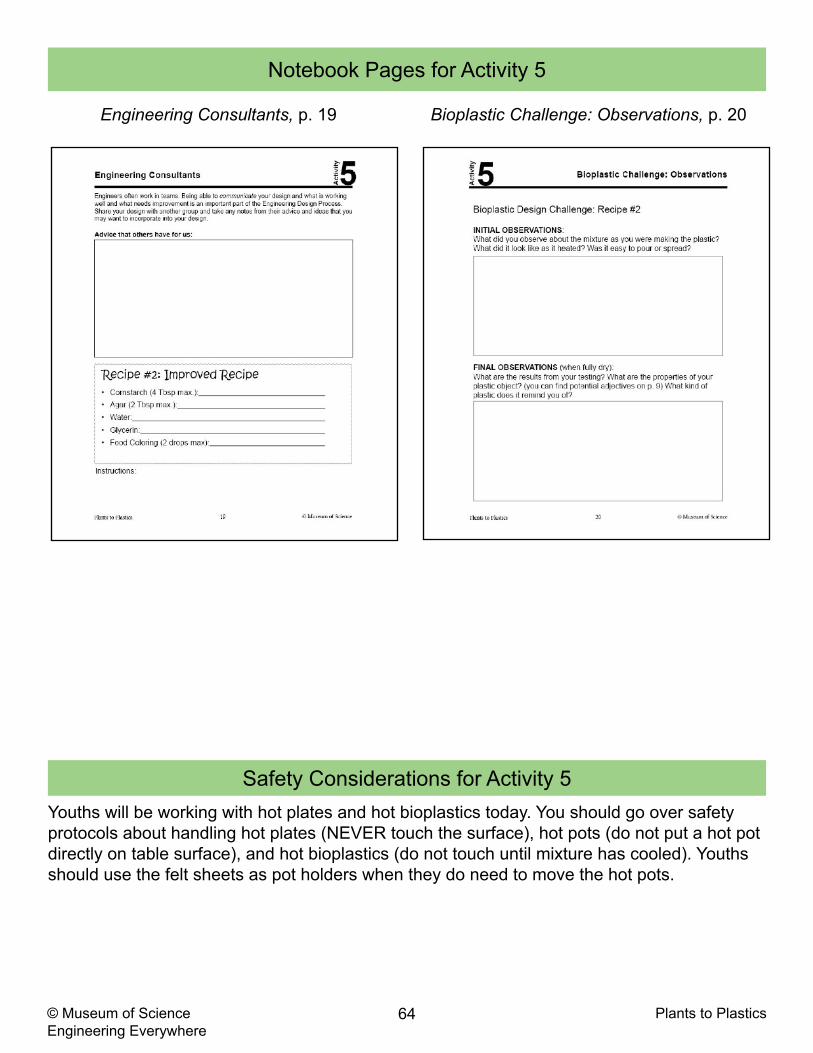
64 Plants to Plastics© Museum of ScienceEngineering Everywhere
Notebook Pages for Activity 5
Safety Considerations for Activity 5Youths will be working with hot plates and hot bioplastics today. You should go over safety protocols about handling hot plates (NEVER touch the surface), hot pots (do not put a hot pot directly on table surface), and hot bioplastics (do not touch until mixture has cooled). Youths should use the felt sheets as pot holders when they do need to move the hot pots.
Engineering Consultants, p. 19 Bioplastic Challenge: Observations, p. 20

65 Plants to Plastics© Museum of ScienceEngineering Everywhere
Youths will learn: • multiple iterations can help refine and improve a bioplastic recipe.• improving technologies is an important part of engineering.• they are engineers!
Test Results (15 min)1. Have youths reflect on the challenge they worked on last time. Ask:
• What is the chemical engineering challenge we are working to solve? Engineer a bioplastic that mimics an existing plastic.
2. Let youths know they will be making their final bioplastics today by improving upon their recipe from the last activity. First, groups will test their bioplastics from the last activity.
3. Have youths sit in their groups and hand each group their bioplastic sample and corresponding Observation Sheets.
4. Tell groups to spend 10 minutes analyzing their bioplastic and completing the tests for their chosen plastic outlined on Bioplastic Challenge, p. 16 in their Engineering Notebooks. Have groups record their finding on their Observation Sheets (and p. 18 in their Engineering Notebooks, if they would like).
5. Have each group share their sample and the properties of their dried bioplastic. Ask:• Does your bioplastic have the properties you expected?• What other uses would your bioplastic be good for?• How could you improve your bioplastic recipe?
6. After each group presents, post the group’s Observation Sheet on the wall and place their labeled bioplastic sample nearby. This gallery can be referenced by all groups as they work to improve their bioplastics.
Advice Exchange (10 min)1. Explain to groups that they will be making their bioplastic object after
they decide on and improve their recipe. Tell groups that engineers often work in groups and consult with each other as they are working to troubleshoot their designs. Just like professional engineers, groups will pair up, explain what type of bioplastic they engineered, the properties, what is working well, what needs improvement, and get suggestions from the other group.
2. Pair up groups, and have one group start. When the other group makes suggestions, youths can take notes on Engineering Consultants, p. 19 in their Engineering Notebooks, so they can refer back as they plan their improvements.
Tip: Set up stations at which each of the different tests can be performed.
Note: For youths making bowls, you may want to review the Bioplastic Bowl Tips, p. 68 in this guide.
Tip: If some groups are having difficulty designing a successful recipe, youths can just focus on recreating the properties of the desired plastic instead of creating the object.
Improving Bioplastics Activity GuideA
ctiv
ity
5

66 Plants to Plastics© Museum of ScienceEngineering Everywhere
3. Have groups switch roles.
Plan and Create (30 min)1. After groups have consulted, let them know they will now make their
final bioplastic object. Have groups turn to Bioplastic Challenge, p. 17 in their Engineering Notebooks. Ask: • How can you form a bowl? • What are some ways you can form a bag?
2. Explain that groups will need to consider how they form their bioplastic objects. Let youths know that they will have ceramic bowls available. For groups making plastic bags, let them know they should focus on making pieces of bioplastic that they can combine to make a bag in the next activity.
3. Give groups 5 minutes to plan their final recipe and record it on Engineering Consultants, p. 19 in their Engineering Notebooks. As groups are planning, circulate and make sure they are using the Observation Sheets to help inform their decisions. Ask:• What ingredients are you changing?• How do you think these new ingredients will affect the
bioplastic properties?• How will you make your desired object using the bioplastic?
4. Remind youths of the safety precautions to take when working with the hot plates, pans, and heated bioplastics. Have groups split up and create their improved bioplastic.
5. Pass out new Observation Sheets to each group as they are working. Remind groups to fill out their initial observations on their new Observation Sheets, and on p. 20 in their Engineering Notebooks if they would like.
6. As groups engineer their bioplastic objects, ask questions like:• Why do you think this recipe will create the type of plastic
you are replicating? • Are the ingredients mixing like you thought they would?• How are you creating the shape of the object? If groups are
having difficulty creating the bowl, direct them to Bioplastic Bowl Tips, p. 67 in this guide. For groups creating a bag, guide youths in thinking about the appropriate size and shape of the pieces they will assemble into a bag in the next activity.
7. Set aside the plastic samples to dry and collect Observation Sheets.
Reflect (5 min)1. Gather the entire group around the Engineering Design Process
poster. Ask:• Which steps of the Engineering Design Process did you
use today in engineering your bioplastic samples? Tested, planned, created and improved bioplastics.
2. Congratulate youths on all the excellent chemical engineering they
Optional: Hand out Showcase Invitations, p. 71 in this guide, to staff members, other youth in the program, or to families.
67 Plants to Plastics© Museum of ScienceEngineering Everywhere
have done! Explain that their bioplastic object will be finalized and evaluated at the beginning of the next session. They will then communicate their designs to an audience during the Engineering Showcase.
68 Plants to Plastics© Museum of ScienceEngineering Everywhere
• Only 4 ceramic bowls are provided in this unit. If more than 4 groups want to make the bioplastic bowl, encourage the group as a whole to talk amongst themselves to try to test as many varieties of plastics as possible.
• You may want to explain that if the bioplastics are molded to the inside of the bowl, the bioplastic bowl sides can warp and fold down during the drying process. Therefore, groups may want to try flipping the bowl upsidedown and molding their bioplastic around the outside of the bowl.
• Cornstarch bioplastics are more prone to warping and shrinking. This may cause cornstarch bioplastics to crack when molded on a hard surface. We found that an agar-based bioplastic worked well for the bowl. We strongly suggest that you encourage youths to make whatever type of bowl they would like and then discuss this point during the Improve activity.
• Youths may want to use nonstick cooking spray on the bowl to allow for easier removal.
• Youths will not be able to complete the flip step of the drying procedure after microwaving it. Youths can gently remove the bioplastic from the ceramic bowl after the second microwave step, letting the sample air dry.
Bioplastic Bowl Tips

OB
SE
RVATIO
N S
HE
ET
Recipe 2
Group M
embers:
Cornstarch:
Agar:
W
ater:
Glycerin:
Notes about recipe:
Initial Observations:
Final Observations:


71 Plants to Plastics© Museum of ScienceEngineering Everywhere
You’re Invited...
engineeringShowcase
Where:
When:
WhAT:Come support your local chemical engineers as they share
their engineered bioplastics!


73 Plants to Plastics© Museum of ScienceEngineering Everywhere
Engineering ShowcaseA
ctiv
ity
6
Activity 6 Preparation1. Make sure all samples of bioplastics and testing materials are
available.2. If youths completed the repurposed plastic project and the group
plastic art installation, make sure they are available for groups to present.
For the whole group Engineering Design Process poster 1 bag (with handles) for testing 1 measuring cup, 1/2 cup 1 two pound object for testing 1 roll of packaging tape 1 roll of string 2 cups of cornstarch 2 hole punches
For each group dried bioplastic object Observation Sheets, Activity 5
For each youth Engineering Notebook
Activity Timing:Introduction: 15 min Preparation: 15 minPresentation: 20 minReflect: 10 min
60 min
21st Century Skill Highlight:CollaborationCommunication
Overview: Youths will share their bioplastics and their use of the Engineering Design Process.
Note to Educator: The Showcase is a chance for youths to share the engineering work they have done over the course of the unit. If possible, invite parents, other youths in the program, or staff to see what the groups have engineered.
Educator Preview
Activity 6 Materials
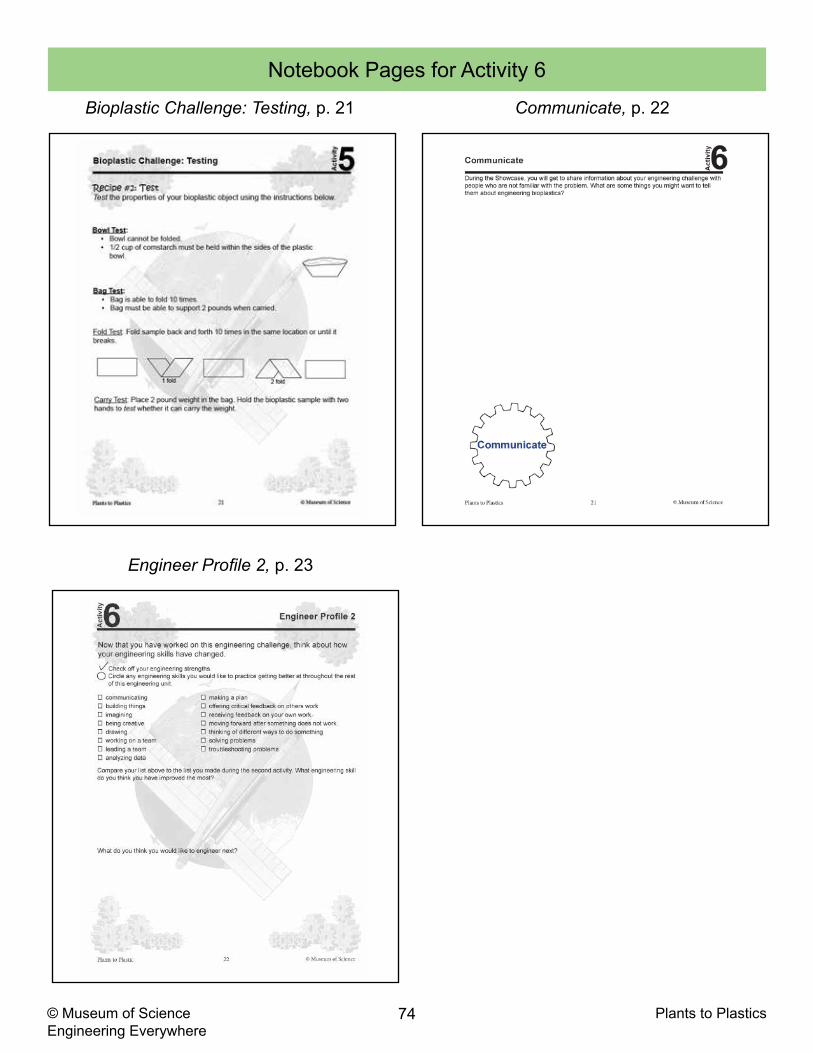
74 Plants to Plastics© Museum of ScienceEngineering Everywhere
Notebook Pages for Activity 6
Communicate, p. 22
Engineer Profile 2, p. 23
Bioplastic Challenge: Testing, p. 21

75 Plants to Plastics© Museum of ScienceEngineering Everywhere
Youths will learn: • communicating with others is an important part of the Engineering Design Process. • as engineers, they have valuable knowledge to share about the problem they have
solved.
Bioplastics Introduction (15 min)1. Remind groups that today they will present the results of their
bioplastics engineering project to visitors, but first they must test their improved bioplastics.
2. Have youths break into their groups and hand back their bioplastic objects and corresponding Observation Sheet. Give groups time to construct their bioplastic object, if needed.
3. Let groups know they should take 10 minutes to complete the tests for their chosen plastic outlined on Bioplastic Challenge: Testing, p. 21 in their Engineering Notebooks. Have groups record their findings on their Observation Sheets (and on p. 20 in their Engineering Notebooks, if they would like).
Presentation Preparation (15 min)1. When groups are done testing, gather the youths together. Ask:
• What do you think are important ideas you should present to our visitors today about the bioplastics we engineered?
• Do you have ideas about how we might structure our presentation?
• How will you share the Engineering Design Process?2. You may want to offer them the following format that includes
discussion of important steps of the Engineering Design Process and allows everyone a chance to participate. The presentation includes several parts and groups will need to volunteer to fill certain roles.
3. If youths would like to share their repurposed plastic and group plastic art projects from the extension activities, have them set them up around the room.
4. Write the following roles on the board for groups to review:• The first group explains the problems associated with plastic and
introduces bioplastics as an alternative.• The second group presents the pros and cons of bioplastics.• The third group explains the bioplastics challenge.• The fourth group explains the investigations they did.• The fifth group explains how they tested and improved their
bioplastics. • After the presentation, visitors can partake in a gallery walk to
Tip: Groups may be hesitant to test their final bioplastic object before the Showcase. If the test may destroy the object, youths may want to complete their final tests during the Showcase so they can present their completed design. If they decide to test before the Showcase, you may want to take a before and after picture to present.
Engineering Showcase Activity GuideA
ctiv
ity
6
76 Plants to Plastics© Museum of ScienceEngineering Everywhere
examine the bioplastic objects and ask youths questions about their engineering experience.
5. Have youths decide which groups would like each part and assign the roles. Give groups 10 minutes to prepare for their part of the presentation. Groups will need to decide exactly what they will say, which notebook pages they might need to show, and who among them will do the talking. The youths can record notes for their presentation on Communicate, p. 22 in their Engineering Notebooks.
6. As groups are practicing, rotate among them asking questions and providing support. The process of sharing should be fun and exciting, not stressful.
7. If groups want to use materials from the rest of the unit to show visitors the different ingredients they had or materials they could use, feel free to make those available.
Presenting Bioplastics (20 min)1. When all groups are ready, invite the visitors to come in and watch
the presentations.2. Have each group present what they have prepared.3. Have the audience do a gallery walk and ask any questions of the
groups.4. When presentations are finished, be sure to congratulate your group
on doing a great job with the communicate step of the Engineering Design Process and on being chemical engineers throughout the challenge.
Reflect (10 min)1. Gather everyone in a circle.2. Go around in a circle and have everyone share their responses to
these questions:• What are your thoughts on bioplastics and their possible use
in society?• What are you most proud of doing as part of this engineering
group?• Why do you consider yourself an engineer? • What do you want to engineer next?
3. Give youths time to complete Engineer Profile 2, p. 23 in their Engineering Notebooks, and compare them with their profiles from the start of the unit. Giving youths time to record their final thoughts will help them reflect on and wrap up their experiences.