place an order for a saved design
TRANSCRIPT

The “Place Order” Button
Begin by clicking the “Place Order” button on your Design Studio quote.
1

Page 1 - Required Item Information
Items in YELLOW must be addressed:
● Garment Size & Quantity Information● Greek/Collegiate Confirmation
After clicking “Place Order,” you will be redirected to the Product and Print Info page.
Items in GREEN do not require input.2
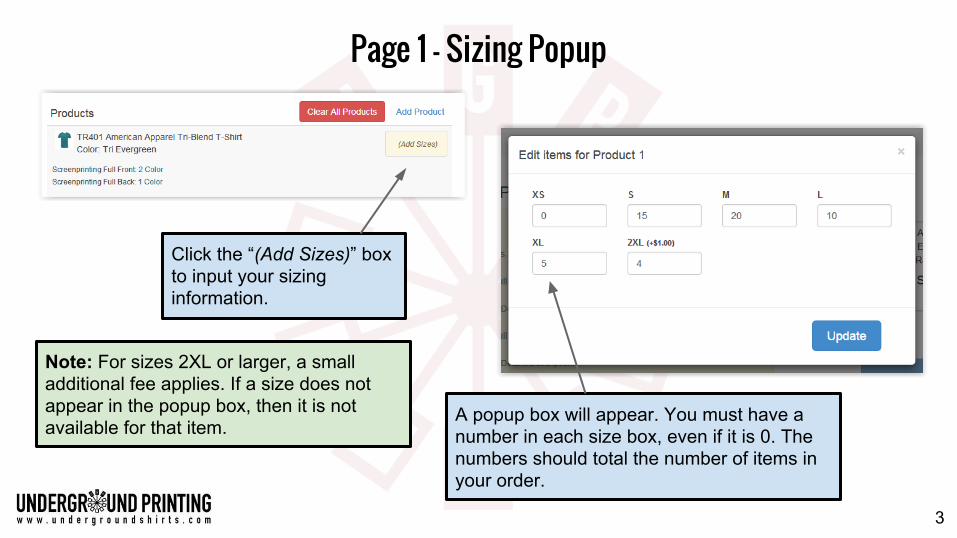
Page 1 - Sizing Popup
A popup box will appear. You must have a number in each size box, even if it is 0. The numbers should total the number of items in your order.
Click the “(Add Sizes)” box to input your sizing information.
Note: For sizes 2XL or larger, a small additional fee applies. If a size does not appear in the popup box, then it is not available for that item.
3

Page 1 - Royalty Popup
If your image contains any Collegiate or Greek logos or branding, select “Yes” accordingly. If you select “Yes” more questions will appear. Please answer to the best of your knowledge.
Click the “(Click to Answer)” box to input your royalty information.
If your image has no Collegiate or Greek images, select “No.”
4

Page 1 - Print Information Popup
Your print information should already be completed. However, if you would like to add notes, additional art, or size specifications, click here.
5

Page 1 - Print Information Popup
Upload ArtworkYour Design Studio artwork will already be applied! Feel free to upload anything else, if needed.
Art DetailsYou can add notes on your design here (e.g. a request to add text, or to remove a background).
DimensionsOnly one of these dimensions can be entered (the other will be adjusted to preserve proportions). Entering this is not required for placing the order.
Print Location Drop-DownA different print information form will apply for each print location (e.g. front, back, sleeve) on the tee. Use the a drop-down menu to select location.
6
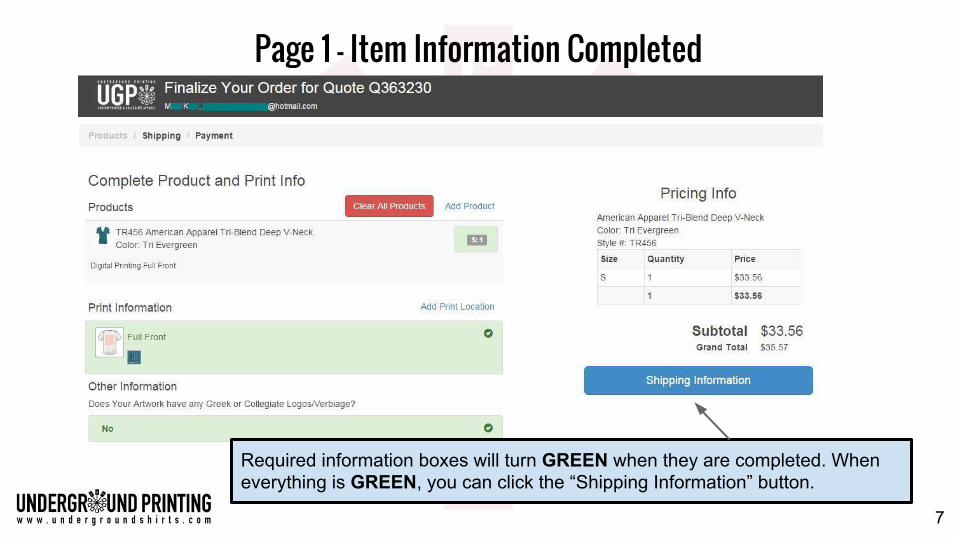
Page 1 - Item Information Completed
Required information boxes will turn GREEN when they are completed. When everything is GREEN, you can click the “Shipping Information” button.
7
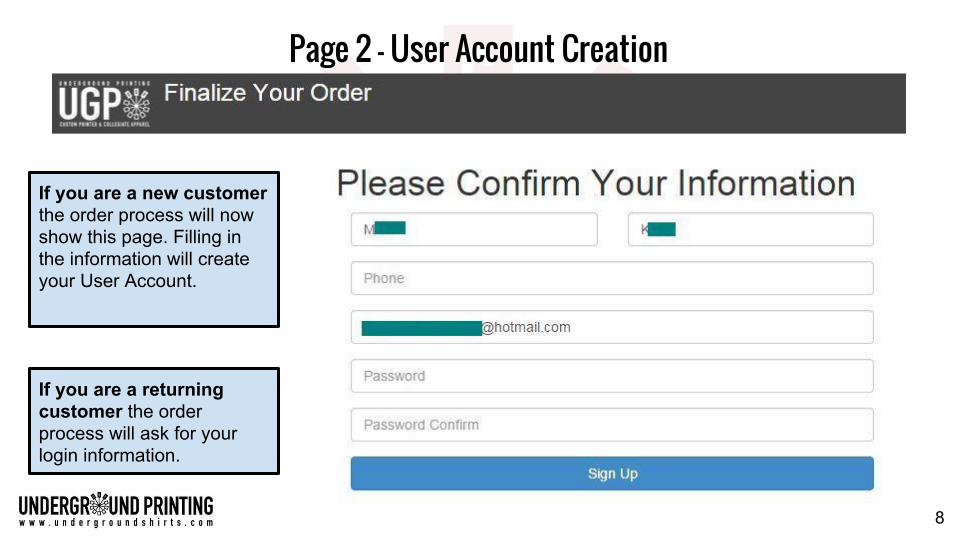
Page 2 - User Account Creation
If you are a new customer the order process will now show this page. Filling in the information will create your User Account.
If you are a returning customer the order process will ask for your login information.
8

Page 3 - Shipping Information
Input your shipping information, or press “Pickup Order in Store” and choose a store.
Change the date you need your order by, if necessary.
Add any discount codes here.
Changes made on this page may alter your shipping or item cost. You will be able to see the final price before clicking “Pay For Order.”
Chat is available if you need help!
9

Page 3 - Ship To Me
If your item is being shipped to you, select the “Ship to Me” button (it will become darker when selected), and input your shipping information.
When the shipping page is completed, select “Pay for Order.” This will create your order. You will not be required to pay immediately.
10

You will be redirected to the payment page. Your order is now created. You can pay for your order now, or access the page later to make payment.
Note: Underground Printing will not begin working on your order until it is paid for. Delaying payment can delay your In-Hands-Date.
Page 4 - Payment Page
Scroll down to pay...
11

Page 4 - Payment Page
If paying in cash or by check, pay in your local store or ask your sales manager for more options.
Your payment page will look like this once you scroll down. Input your billing address and card information here.
12

User Account Page - To Pay LaterYou can access your order later to:
● Make payments● Check order status● Review your Design Studio designs● Repeat past orders
1) Go to the Underground Printing home page ( www.undergroundshirts.com ).
2) Select the “My Orders” tab toward the top right corner of the page.
3) Enter your User Account login information.13

User Account Page - Current Orders
Once you have logged in to your User Account page, use the “Current Orders” tab to access and pay your invoices.
14

User Account Page - Order History/My Designs
Use the “My Designs” tab to view your saved designs. That page is shown here.
Use the “Order History” tab to view your past orders.
15