picnic table - installation guide - rv parts express purchased—these are used to cover the screws...
TRANSCRIPT

Picnic Table Picnic Table Picnic Table --- Installation GuideInstallation GuideInstallation Guide
coastrv.com.au coastrv.co.nz
Thank you for purchasing a Coast Picnic Table. We are confident that you will enjoy your new outdoor
area and that you will be pleased with its durability.
Please remember the following:
Safety First - ensure your RV is parked on level ground, all electrical and gas functions have been
turned off, wheels are secured and jacks are down. When drilling into the RV wall, always use
safety goggles (to cover your eyes).
Suitability - the Coast Picnic Tables are suitable for fibreglass RV’s and aluminium cladded RV’s
Let’s get started...

coastrv.com.au coastrv.co.nz
Step 1:
Before you start measuring anything, it will be
worthwhile to check that you have all the necessary
tools to complete the installation.
Essentials are:
Cordless Drill (charged and ready to go)
An appropriate sealant
Measuring tape
A Philips-head screwdriver (or flat-head, depending
on what type of screws you are going to use)
Masking tape (this is optional in terms of installing
onto a fibreglass wall, however it does help to stop
the brackets from slipping)
Step 2:
Inspect the contents of the Picnic Table packaging.
The following should be inside the box:
Picnic Table with arms already attached
X2 Keys (to lock during travel or unlock when in use)
Backing Plate (only inside packaging if M300-200 was
purchased)
X6 Cover Strips (only inside packaging if M300-200
was purchased—these are used to cover the screws
which will be used later)
Note: screws are not supplied due to varying RV wall thicknesses.
The thickness of your RV wall will determine the length of the screw
you should use.
Step 3a:
Locate a suitable place to mount your Picnic Table.
You will need: 805L x 435H (mm)
On an aluminium clad RV, it is easiest to use the
parallel aluminium folds to align your Picnic Table.
Double check that your RV is level (using a spirit
level), if it is, then you can proceed to use the folds
to ascertain a good mounting position.
Step 3b:
Locate a suitable place to mount your Picnic Table.
You will need: 805L x 435H (mm)
On a fibreglass RV, a little measuring will be required
to correctly position your Picnic Table
Use the floor of your RV as a guide and then double
check that it is level using a spirit level.
2
coastrv.com.au coastrv.co.nz 3
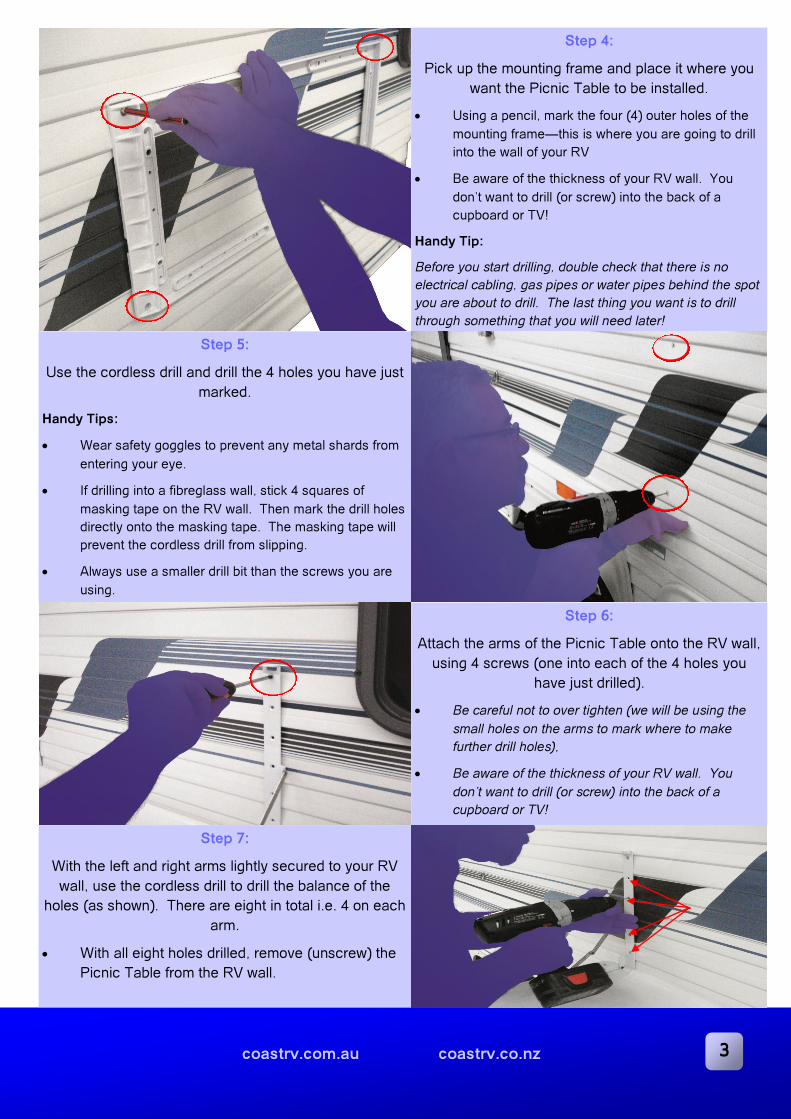
Step 4:
Pick up the mounting frame and place it where you
want the Picnic Table to be installed.
Using a pencil, mark the four (4) outer holes of the
mounting frame—this is where you are going to drill
into the wall of your RV
Be aware of the thickness of your RV wall. You
don’t want to drill (or screw) into the back of a
cupboard or TV!
Handy Tip:
Before you start drilling, double check that there is no
electrical cabling, gas pipes or water pipes behind the spot
you are about to drill. The last thing you want is to drill
through something that you will need later!
Step 5:
Use the cordless drill and drill the 4 holes you have just
marked.
Handy Tips:
Wear safety goggles to prevent any metal shards from
entering your eye.
If drilling into a fibreglass wall, stick 4 squares of
masking tape on the RV wall. Then mark the drill holes
directly onto the masking tape. The masking tape will
prevent the cordless drill from slipping.
Always use a smaller drill bit than the screws you are
using.
Step 6:
Attach the arms of the Picnic Table onto the RV wall,
using 4 screws (one into each of the 4 holes you
have just drilled).
Be careful not to over tighten (we will be using the
small holes on the arms to mark where to make
further drill holes),
Be aware of the thickness of your RV wall. You
don’t want to drill (or screw) into the back of a
cupboard or TV!
Step 7:
With the left and right arms lightly secured to your RV
wall, use the cordless drill to drill the balance of the
holes (as shown). There are eight in total i.e. 4 on each
arm.
With all eight holes drilled, remove (unscrew) the
Picnic Table from the RV wall.

Step 8:
Silicone the drilled holes.
Handy Tip:
For this installation (on an aluminium clad RV) we
have used V4 (metal and masonry sealant).
Please check with your RV manufacturer for the
recommended sealant.
For added stability, run a generous amount of the
sealant along the back of the bracket i.e. where it
will bond to the RV wall.
Step 9:
You’re now ready to permanently fix the arms of the
Picnic Table to the RV wall (remember not to over
tighten).
Use stainless steel screws (we recommend
countersunk, self tapping screws for a flush finish) to
secure the arms onto the RV wall.
Handy Tips:
Start with the 4 outer screw points i.e. the ones to suit
the first set of holes you drilled, then make your way
around all other holes.
For this installation, we have used a screw with a
20mm length. When selecting your screw length be
sure it will not damage the interior of your RV wall
or anything behind it.
Wipe off any excess sealant once all screws are in
place.
Step 10:
You’re now ready to mount the backing plate (if this is
the option you have purchased).
Using the same sealant as before, line the back of
the frame. Apply generously and be sure to use
extra on the corners (this will provide a more secure
hold).
Step 11:
Clip the frame into place.
Line the recess (on the frame) up with the rebate near
the hinge on the arm.
There are recesses on the top corners as well, make
sure these all line up and then push into place.
Once in place, hold the frame down for a few seconds
for a strong bond between the RV wall and the back of
the frame.
coastrv.com.au coastrv.co.nz 4
YES NO NO

Step 12:
Attach the frame/backing plate to the RV wall (lightly)
by screwing it in place at the four outer corners.
Follow the sequence as per the diagram (to the left),
remember not to over tighten
Step 13:
You’re now ready to permanently fix the backing plate
to your RV wall.
Work your way around the frame and drill all the
smaller holes.
Note: Do not drill into the bigger holes (12 in total) as these are
where the cover strips will fit.
With all the holes on the frame now drilled, locate all
your stainless steel screws.
Use an approved sealant on the tip of the screw and
put some into the holes that have been drilled. (Use a
fair amount as it will also stop water from entering the
holes).
Work your way around the frame, securing all screws.
Step 14:
You’re now ready to attach the cover strips.
There are six strips in total (three for each side of
the frame/backing plate)
Work your way around the frame to cover all inner
screws.
Optional Step:
If you want a super airtight and watertight seal around
your Picnic Table frame (especially in the case where
installation has been made onto an aluminium cladded
wall), Coast recommends the use of an approved
sealant bead. In the gaps between the backing plate
and your RV wall—refer to the image on the right.
Done
coastrv.com.au coastrv.co.nz 5
Do not drill these holes,
they are for the cover
strips.
Sealant
Bead

coastrv.com.au coastrv.co.nz
Things to Note:
Your Picnic Table comes with two keys, these can be used to lock the Picnic Table in its
“closed” position, either when not in use, or when you’re travelling.
Your Picnic Table is rated to hold 30Kg! However, if the structure that you’re fitting it onto
(i.e. aluminium cladding or fibreglass panelling) cannot hold that weight, you have to do two
things: 1) Check with your RV’s manufacturer, prior to installation, how much weight the
walls will hold. 2) Ensure you do not exceed the weight that your RV manufacturer has
recommended.
Your Picnic Table (without backing plate) Weighs: 4.2Kg
Your Picnic Table (with backing plate) Weighs: 4.7Kg
For more information, please visit our website.