physical education and health - volleyball québec · physical education and health elementary,...
TRANSCRIPT

LEARNING AND EVALUATION SITUATION
PHYSICAL EDUCATION AND HEALTH
ELEMENTARY, CYCLE 2, YEAR 2
COMPETENCY: TO PERFORM MOVEMENT SKILLS IN DIFFERENT
PHYSICAL ACTIVITY SETTINGS
BECOMING AN EXPERT IN HANDLING A MINIVOLLEY BALL
Produced by the Educational Services Department of
Commission scolaire des Samares
Developed by Eric Perreault
Pedagogical Consultant in Physical Education & Health
Adapted by LEARN and Volleyball Quebec for the Anglophone Community

2
TABLE OF CONTENTS
ESSENTIAL KNOWLEDGE DEVELOPED IN CONNECTION WITH THE PROGRESSION OF LEARNING ............................................................... 3 OVERVIEW ................................................................................................ 4 BECOMING AN EXPERT IN HANDLING A MINIVOLLEY BALL ............... 5 APPENDIX 1: Game “Hot Potato” .............................................................. 12 APPENDIX 2: Game “Hot Potato” Modified ................................................ 13 APPENDIX 3: Game “Ball at the Wall” ....................................................... 14 APPENDIX 4: Game “Goaltending” ........................................................... 15 APPENDIX 5: Game “Quick Pass” . . . . . . . . . . . . . . . . . . . . . . . . . . . . . . . . . . . . . . . . . . . 16 APPENDIX 6: Game “1 on 1” ..................................................................... 17 APPENDIX 7: Student Evaluation Tool – Co-Evaluation Tool ................... 18 Bibliography ............................................................................................... 20

3
ESSENTIAL KNOWLEDGE DEVELOPED IN CONNECTION WITH THE ELEMENTARY
PROGRESSION OF LEARNING
TO PERFORM MOVEMENT SKILLS IN DIFFERENT PHYSICAL SETTINGS – MOTOR SKILLS
Locomotor skills - Movements with or without obstacles
o Running, galloping, hopping, hop-foot jumping, long jumping o Side-stepping, cross-stepping, twirling
Manipulation skills
- Handling objects o Manipulating a variety of objects in different ways
- Throwing without a tool
o Underhand throwing of a variety of objects at a target o Overhand throwing of a variety of objects at a target o Throwing or hitting a variety of objects used in special activities
- Catching without a tool
o Catching a variety of objects with two hands o Catching a variety of objects with one hand o Catching an object with one foot in multipleways

4
OVERVIEW OF THE LEARNING AND EVALUATION SITUATION
BECOMING AN EXPERT IN HANDLING A MINIVOLLEY BALL
1st Pedagogical Unit Preparation
2nd Pedagogical Unit Production
3rd Pedagogical Unit Integration
Period 1 Periods 2 to 4 Periods 5 and 6
Activation of prior knowledge
Presentation to the students of the challenge and the constraints related to the activities
Presentation of the requirements and constraints of the production
Exploration of cultural references
Period 2: Presentation of the various tasks and mobilization of the learning
Presentation of different technical movements to be repeated
Periods 2 to 4 Learning of technical movements to be repeated
Evaluation of learning Presentation of all parts of the task to be evaluated and communicated to the parents
–Student evaluation as per
the suggested procedure
Leading the synthesis of the learning
Explanation and
presentation by the students of their strengths and weaknesses as well as what they have learned
Presentation by the teacher
of observations gathered from the Evaluation Grid
Polling of the students on
their participation and reinvestment of what they have learned in other tasks or physical activities

5
Learning and Evaluation Situation:
BECOMING AN EXPERT IN HANDLING A MINIVOLLEY BALL
1 st
PEDAGOGICAL UNIT - PREPARATION
PERIOD 1 – OBJECTIVE: ACTIVATION OF STUDENTS’ PRIOR KNOWLEDGE OF BASIC
MANIPULATION DURATION: 54 MINUTES
ACTIVATION OF PRIOR KNOWLEDGE (10 minutes)
The teacher will question the students on what they remember from Grade 3 about ball handling. The teacher will ask if they remember the techniques used to throw, catch and project a ball. They will also be asked about what they remember about the setting technique. The teacher will explain that this year they will learn more techniques to use when playing minivolley. The teacher will present the material used in minivolley. The students will be asked which types of balls they used in Grade 3 and which were the easiest to handle. If necessary, the teacher can introduce the students to other types of balls.
WARMUP (5 MINUTES) Movements:
Following the teacher’s directions, move throughout the entire gym space: forwards, backwards, sideways, cross-step, side-step, etc.
ACTIVITY 1: BALL HANDLING (10 MINUTES) Material: 1 ball per student (student’s choice of ball)
It is recommended that the basic minivolley throw-catch movement seen in Grade 3 be reviewed at this point.
The “Catch – Throw” movement
The movement must be fluid (nonstop). The movement must respect the sagittal plane (front or back) and stay within the span of the shoulders. Feet should not move or pivot once the ball is caught. The student should be able to see the target between his/
her arms once the pass is made.
After this, students do the following:
Throw the ball high into the air, let it bounce once and catch it with 2 hands. Throw the ball high into the air and catch it with 2 hands. Facing the wall, throw the ball at the wall, let it bounce once and catch it. Facing the wall, throw the ball at the wall, let it bounce once and catch with 2 hands. Throw the ball over the head, project it using a set and catch it with 2 hands. Facing the wall, throw the ball over the head, project it forwards to the wall using a set
and catch it with 2 hands.
ACTIVITY 2: HOT POTATO - APPENDIX 2 (25 MINUTES)

6
2 ND
PEDAGOGICAL UNIT - PRODUCTION
PERIOD 2 – OBJECTIVE: STUDENTS SHOULD ACQUIRE AND THEN PUT INTO PRACTICE THE LEARNING RELATED TO BALL HANDLING
DURATION : 54 MINUTES
WARMUP (5 MINUTES) Relay Race- 2 teams- 1 ball per team Students sit on the floor, one behind the other. The ball must be moved from front to back. When the ball reaches the last person in line, that person places the ball between his/her legs and hops to the front of the line. The team whose players are first to each take a turn hopping to the front wins the game. .
ACTIVITY 1: BALL HANDLING (20 MINUTES) Material: 1 ball per student (student’s choice of ball)
Experimentation with the setting technique (review the how-to if necessary)
Throw the ball over the head, using 2 hands, and project it using a set as many consecutive times as possible.
Standing 1 meter facing the wall, throw the ball at the wall using 2 hands, and project it using a set as many consecutive times as possible.
Standing near a basketball hoop or another wall target, aim for the target using a set (varying the distances from the target).
From this point on, students can work in pairs with the understanding that their partner is there to help learn the various techniques.
Standing 2 meters apart, Student 1, using 2 hands, gently throws the ball to Student 2
who in turn projects the ball back with a set. Student 1 should use the “Catch-Throw” movement to retrieve the ball. If students are capable they use a set to perform continuous exchanges.
PS: If there are other types of balls available, students can use them to experiment these movements.
For Activity 2, plan for 3 playing areas separated by badminton nets.
ACTIVITY 2 : HOT POTATO MODIFIED - APPENDIX 2 (25 MINUTES)
PERIOD 3 – OBJECTIVE: STUDENTS SHOULD ACQUIRE AND THEN PUT INTO PRACTICE
THE LEARNING RELATED TO BALL HANDLING AND BE INITIATED TO THE SERVICE
TECHNIQUE
DURATION : 54 MINUTES
WARMUP (5 MINUTES)
Crisscross One student is in the middle of the gym with the rest lined up with their backs against
the wall. On the teacher’s signal, all students should try to reach the opposite wall without being
tagged by the player in the middle. The teacher can suggest a variety of movements.

7
ACTIVITY 1: BALL HANDLING (15 MINUTES) Material: 1 ball per team of 2 (students’ choice of ball)
Working in teams of 2, alternating positions:
Standing 2 meters apart, Student 1, using 2 hands, gently throws the ball to Student 2
who in turn projects the ball back with a set. Student 1 should use the “Catch-Throw”
movement to retrieve the ball. Standing 2 feet apart, Student 1, using 2 hands, gently throws the ball to Student 2. Student 2 projects the ball over his/her head with a set and catches it with 2 hands. Same exercise as the previous one, but instead of catching the ball after the set,
Student 2 projects it back to Student 1. Standing 2 meters apart, Student 1 gently throws the ball to Student 2. Student 1 moves 2
steps to the right or left. Student 2 must now project the ball, using a set, back to where Student 1 is now standing.
ACTIVITY 2: BALL AT THE WALL - APPENDIX 3 (10 MINUTES)
ACTIVITY 3: INITIATION TO UNDERHAND SERVING (10 MINUTES)
The underhand serve technique: (material: 1 ball per student) “Serving” (underhand)
Feet should be slightly apart one a little in front of the other with hips
pointing towards the target. The ball should be held straight in line with the shoulder of the hitting arm.
The hitting arm should be moved to the front without moving towards the opposite shoulder.
Weight should be transferred from the back leg to the front leg.
After this, students do the following: Standing 4 meters from the wall, throw the ball at the wall using their hand and then their wrist. The ball should reach at least 2 meters high. Repeat the same exercise but this time aim for a 2m X 2m wall target.
Note: Allow the students time to experiment and find out on their own the different and most effective ways of hitting the ball (openhanded, closed wrist, etc.)
ACTIVITY 4 : GOALTENDING – APPENDIX 4 (10 -15 MINUTES)
PERIOD 4 – OBJECTIVE: STUDENTS SHOULD ACQUIRE AND THEN PUT INTO PRACTICE THE LEARNING RELATED TO BALL HANDLING, EXPERIMENT WITH UNDERHAND SERVING AND BE INTRODUCED TO THE BUMP TECHNIQUE. DURATION: 54 MINUTES
WARMUP (5 MINUTES)
Cat and mouse: The wolves are 2 by 2, holding each other by the arms and positioning themselves 3 meters apart
to form a circle. One student is the mouse and another is the cat. The cat chases the mouse who
tags a wolf so the pair of wolves becomes a trio connected by their arms. The one at the end
becomes the mouse and the process starts again. If the cat tags the mouse, the mouse becomes
the cat.

8
ACTIVITY 1: EXPERIMENTING WITH UNDERHAND SERVING (10 MINUTES) Material: 1 ball per student (student’s choice of ball)
Standing 4 meters from the wall, the student performs a serve. The ball should reach at least 2 meters high. Standing 6 meters from the wall, the student performs a serve. The ball should reach at least 3 meters high.
ACTIVITY 2: EXPERIMENTING WITH THE SETTING TECHNIQUE (10 MINUTES) Material: 1 ball per team of 2 (students’ choice of ball)
In teams of two:
Students 1 and 2 position themselves at a distance that allows them to make the most consecutive sets.
Facing the wall, Students 1 and 2 use the wall to make consecutive sets so that the ball is passed back and forth between them.
ACTIVITY 3: INITIATION TO THE BUMP TECHNIQUE (15 MINUTES)
The bump technique: (material: 1 ball per student)
The “Bump”
Feet should be slightly apart one a little in front of the other with hips
pointing towards the target.
Torso and knees should be slightly flexed. Hands together with thumbs parallel and pointing
downwards away from wrists. Wrists should be flat together and elbows locked. Arms action should be a slight push upwards.
Weight should be transferred from back foot.
After this, students do the following: Throw the ball high in the air with both hands, let it bounce once, bump it and catch it. Throw the ball high in the air with both hands, bump it and catch it. Throw the ball high in the air with both hands, bump it twice consecutively and catch it. If this is successful, try 3 consecutive bumps.
For Activity 4, plan for 3 playing areas separated by badminton nets.
ACTIVITY 4: GOALTENDER – APPENDIX 4 (10 -15 MINUTES)

9
PERIOD 5 – OBJECTIVE: STUDENTS SHOULD ACQUIRE AND THEN PUT INTO PRACTICE THE LEARNING RELATED TO BALL HANDLING AND THE OTHER TECHNIQUES PRESENTED
DURATION: 54 MINUTES
WARMUP (5 MINUTES)
Pick up your ball Separate the group into 4 teams. Material: 6 hoops and 6 balls
The first two competing teams stand at the wall facing one another. The hoops are placed in
the middle of the playing area and each hoop has a ball in it. At the teacher’s signal, players
from both teams rush to the center to get the ball in the hoop that is in front of them and
return to their start position. The team that returns with the balls most quickly wins. The
losing team is out and is replaced by another team.
ACTIVITY 1: EXPERIMENTING WITH THE UNDERHAND SERVE (10 MINUTES) Material: 1 ball per student (student’s choice of ball)
Standing 6 meters from the wall, the student performs an underhand serve. The ball
should reach a minimum distance of 3 meters. In pairs, facing each other and separated by 6 meters, students practice serving with precision. The ball should be projected into a zone that does not exceed 2 meters in circumference of his/her partner.
ACTIVITY 2 : EXPERMINTING WITH THE BUMP TECHNIQUE (10 MINUTES) Material: 1 ball per student (student’s choice of ball)
Facing the wall, throw the ball on the wall with 2 hands, let it bounce once and project
it back to the wall using a bump. Facing the wall, throw the ball on the wall with 2 hands, let it bounce once and project it
back to the wall using a bump. (2 consecutive contacts, then 3 consecutive contacts) Facing the wall, throw the ball on with 2 hands and project it back to the wall using a
bump. Facing the wall, throw the ball on with 2 hands and project it back to the wall using a
bump. (2 consecutive contacts, then 3 consecutive contacts)
For Activity 3, plan for 3 playing areas separated by badminton nets.
ACTIVITY 4 : J1 ON 1 GAME – APPENDIX 6 (25 MINUTES)
10
PERIOD 6 – OBJECTIVE: PRESENTATION ET PREPARATION FOR EVALUATION
DURATION: 54 MINUTES
The teacher will explain to the students that now that they have experimented with certain
learnings, it is time to evaluate where they are in developing their competency in performing
movement skills. The next two periods will be dedicated to this. The teacher will then explain the
various challenges and the significance of the colors related to each challenge.
Green challenge: Easy
Yellow challenge: Difficult
Red challenge: Ultimate
CHALLENGE 1: I AIM FOR A TARGET (2M X 2M)
Green: I stand 1 meter from the wall and perform an underhand serve aiming for the target.
Yellow: I stand 2 meters from the wall and perform an underhand serve aiming for the target. Red: I stand 3 meters from the wall and perform an underhand serve aiming for the target.
CHALLENGE 2: I HANDLE THE BALL USING A BUMP
Green: Solo with the ball, I throw it up in the air and project it using a bump. Repeat 3 times. Yellow: Solo with the ball, I throw it up in the air and project it using a bump 3 consecutive times.
Red: Solo with the ball, I throw it up in the air and project it using a bump 5 consecutive times.
CHALLENGE 3: I MOVE HANDLING THE BALL (LOCOMOTION-MANIPULATION)
Green: Over 9 meters, I throw the ball into the air, let it bounce once and catch it while moving forwards. Yellow: Over 9 meters, I throw the ball into the air and catch it while moving forwards. Red: Over 9 meters, I throw the ball into the air, project it using a set and catch it while moving forwards.
CHALLENGE 4: I HANDLE THE BALL AT THE WALL (MANIPULATION)
→ The student himself / herself chooses the distance from the wall.
Green: Solo with the ball, I throw it up over my head, project it towards the wall using a set, let it bounce once and catch it. Repeat 3 times.
Yellow: Solo with the ball, I throw it up over my head, project it towards the wall using a set and catch it before it hits the ground. Repeat 3 times.
Red: Solo wit the ball, I throw it up over my head, project it towards the wall using a set 3 consecutive times.

11
CHALLENGE 5: I AIM FOR A TARGET (1M X 1M) (MANIPULATION)
→ Evaluation criteria: Student hits the target 2 out of 3 times.
Green: I stand .5 meter from the wall, throw the ball up over my head and use a set to aim for a target. I have 3 attempts.
Yellow: I stand 1 meter from the wall, throw the ball up over my head and use a
set to aim for a target. I have 3 attempts.
Red: I stand 2 meters from the wall, throw the ball up over my head and use the
setting technique to aim for a target. I have 3 attempts.
After explaining the challenges, the teacher distributes the Student Evaluation Tool (APPENDIX 6) and
how it will be used. The rest of the period should be used to allow the students to practice with the
different challenges and to make their choices. At the end of this period, the teacher asks students to
hand in the evaluation sheets which they should have filled in.
PERIODS 7 AND 8 (IF NECESSARY) – OBJECTIVE: EVALUATION DURATION: 54 MINUTES TO 108 MINUTES
The teacher should give the students enough time to practice challenges. It is up to the teacher whether each student performs the 5 challenges in sequence or each challenge are performed in groups. The layout of the gym is up to the teacher (e.g.1/2 of the gym is a play area and ½ of the gym is the evaluation area.
Refer to the Evaluation Grid found on the reverse side of the Student Evaluation Sheet.
3rd
PEDAGOGICAL UNIT - INTEGRATION
The 3rd Pedagogical Unit is held immediately after the evaluation period and is reserved for student / teacher discussion of the evaluation tool. Depending on the time available, the teacher is free to ask questions about each section of the Student Evaluation Tool or on specific sections depending on the answers given by the individual student or the team.
12
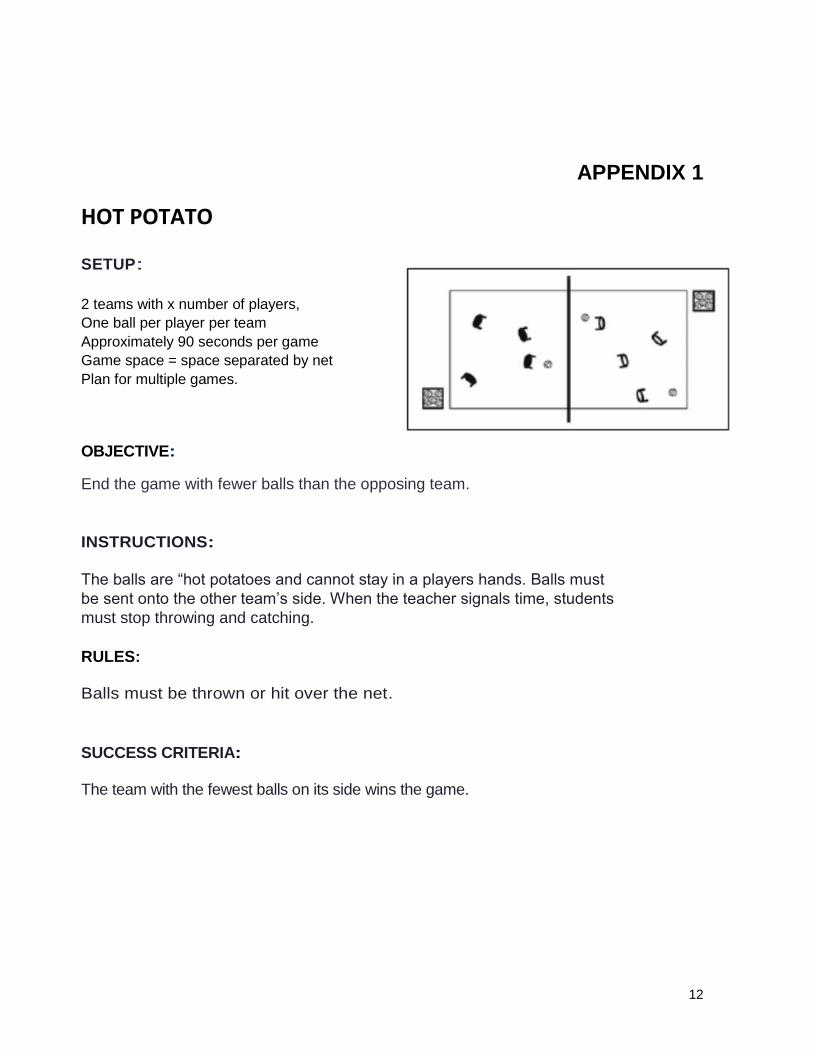
APPENDIX 1
HOT POTATO SETUP:
2 teams with x number of players,
One ball per player per team
Approximately 90 seconds per game
Game space = space separated by net
Plan for multiple games.
OBJECTIVE:
End the game with fewer balls than the opposing team.
INSTRUCTIONS:
The balls are “hot potatoes and cannot stay in a players hands. Balls must
be sent onto the other team’s side. When the teacher signals time, students
must stop throwing and catching.
RULES: Balls must be thrown or hit over the net.
SUCCESS CRITERIA: The team with the fewest balls on its side wins the game.

13
APPENDIX 2
HOT POTATO MODIFIED SETUP:
2 teams with x number of players,
playing area divided in two
one ball per player per team, approximately
90 seconds per game
Plan for multiple games
OBJECTIVE:
End the game with fewer balls than the opposing team
INSTRUCTIONS:
The balls are “hot potatoes” and cannot stay in a player’s hands. Balls must
be sent using the setting technique onto the other team’s side. When the
teacher signals time, students must stop throwing and catching.
RULES: Balls must be thrown or hit over the net.
SUCCESS CRITERIA:
The team with the fewest balls on its side wins the game

14
APPENDIX 3
BALL AT THE WALL Note: This APPENDIX activity is suggested and included here by LEARN when adapting into English.
SETUP:
1 player, 1 ball per player, wall
OBJECTIVE:
Hit a spot on the wall consistently
INSTRUCTIONS:
Pick a spot on the wall. Using the setting technique, try to hit the same spot again and again
RULES:
Balls can also be bounced off the ground then the wall so it rebounds for another repetition
SUCCESS CRITERIA:
Perform as many repetitions as possible with the time limit

15
APPENDIX 4
GOALTENDER Note: This APPENDIX activity is suggested and included here by LEARN when adapting into English.
SETUP:
2 teams with 4 players per team
OBJECTIVE:
To try to get the ball over the net onto the floor of the opposing team
RULES:
After a player throws the ball over the net, Team 1 rotates one position clockwise
Team 2 must keep the ball in play.
When the ball is thrown on the floor by an opponent, the player closest to the ball is out and must
leave the court.
When the opponent’s court is empty, the team left gets a point. The game starts again with 4
players per team.
16
APPENDIX 5
QUICK PASS Note: This APPENDIX activity is suggested and included here by LEARN when adapting into English.
SETUP:
2 teams with 4 players per team
OBJECTIVE:
To try to play the ball over the net by using a set or a bump
RULES:
The game starts with an underhand-serve from behind the service line.
Players must not catch the ball.
A team is allowed to play the ball with a maximum of 3 short contacts. After that, the ball must cross
the net to the other team’s side.
When a player has made 3 consecutive serves, the players rotate clockwise and the next player
has to serve. (New players can enter the game from the serve spot).
SCORE:
Each mistake gives a point to the opposite team. The game is over when the time limit is reached.
17
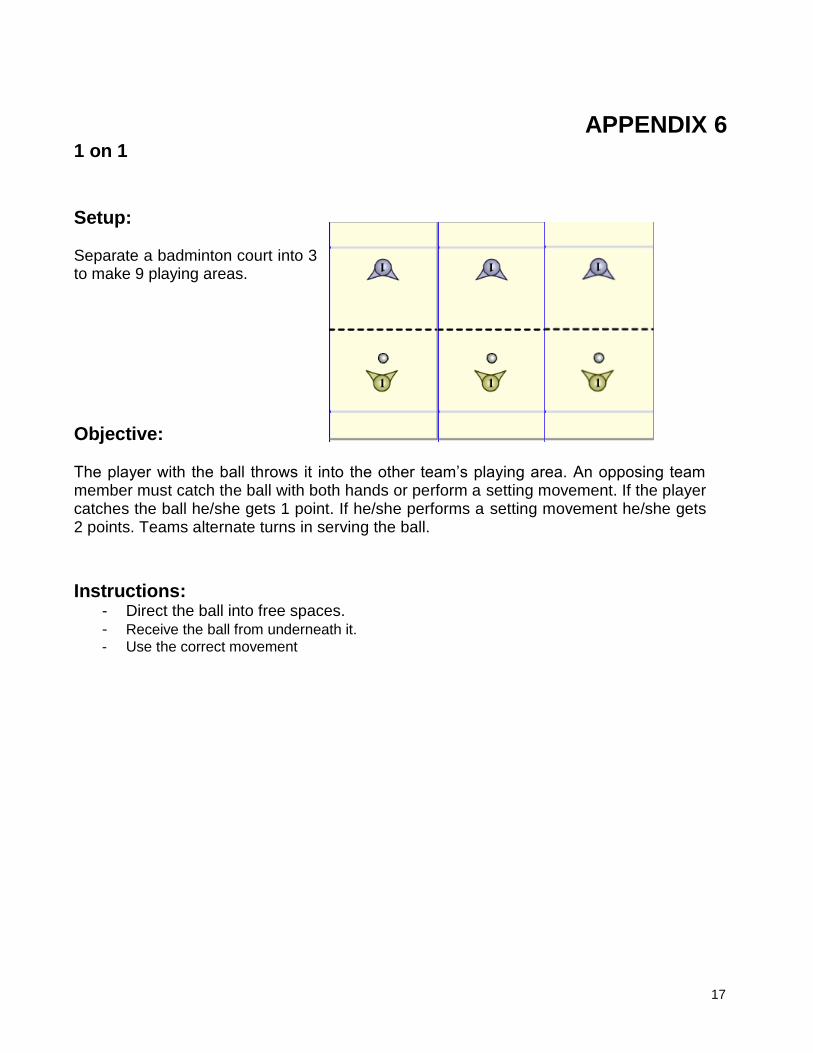
APPENDIX 6 1 on 1
Setup: Separate a badminton court into 3 to make 9 playing areas.
Objective: The player with the ball throws it into the other team’s playing area. An opposing team member must catch the ball with both hands or perform a setting movement. If the player catches the ball he/she gets 1 point. If he/she performs a setting movement he/she gets 2 points. Teams alternate turns in serving the ball.
Instructions:
- Direct the ball into free spaces. - Receive the ball from underneath it.
- Use the correct movement

Legend: ✓ Succeeds X Does not succeed
APPENDIX 7
HANDLING A MINIVOLLEY BALL
ELEMENTARY, CYCLE 2, YEAR 1
STUDENT EVALUTION TOOL-CO-EVALUATION TOOL:
I CHOOSE MY CHALLENGES
CHALLENGE 1
I move
CHALLENGE 2
I move while handling the ball
CHALLENGE 3
I handle the ball alone
I PUT AN X NEXT TO MY CHOICE
Movement:
O 1- Forwards O 4- Backwards
O 2- Side-step O 5- Cross-step
O 3- Hop foot jumping
O Green: 2 movements
O Yellow: 3 movements
O Red: 4 movements
Order of movements: (I indicate the order of my movements.) 1st movement: 2nd movement:
3rd movement:
4th movement
I PUT AN X NEXT TO MY CHOICE
My choice:
O Green: with bounce
O Yellow: with no bounce
O Red: consecutive
I PUT AN X NEXT TO MY CHOICE
My choice:
O Green: with bounce
O Yellow: with no bounce
O Red: consecutive
Teacher’s Evaluation
Choice Execution Security
Teacher’s Evaluation
Choice Execution Security
Teacher’s Evaluation
Choice Execution Security

Legend: ✓ Succeeds X Does not succeed
HANDLING A MINIVOLLEY BALL
ELEMENTARY, CYCLE 2, YEAR 1
STUDENT EVALUTION TOOL-CO-EVALUATION TOOL:
I CHOOSE MY CHALLENGES
TEACHER’S EVALUATION (To be used after the evaluation)
Coherence and Planning
Performance
Pertinence of his/her reflection
Plans his/her motor actions and links them according to his/her abilities and the
constraints of the activity.
Performs the planned
motor actions
Performs the motor actions in a continuous controlled
manner
Respects the rules of security
Evaluates his/her process
and results
5/5 5/5
3/5 5/5 1/1
SELF-EVALUATION: I performed the actions I planned.
I chose my actions according to my abilities.
I recognized my strengths and weaknesses.
I followed the rules of security.
CHALLENGE 4
I HANDLE THE BALL AT THE WALL I PUT AN X NEXT TO MY CHOICE
My choice: O Green: with bounce O Yellow: without bounce O Red: consecutive
Teacher’s Evaluation
Choice Execution Security
CHALLENGE 5
I AIM FOR THE TARGET I PUT AN X NEXT TO MY CHOICE
My choice: O Green: at .5 meters O Yellow: at 1 meter O Red: at 2 meters
Teacher’s Evaluation
Choice Execution Security
BIBLIOGRAPHY
Fédération de Volley-ball du Québec. Le volley-ball à la portée de l’enfant.
Commission du volley-ball chez les jeunes, 1984.
Julie Lachapelle. Cahier de l’entraîneur de minivolley. 1988.
Fédération Québécoise de tennis. De la manipulation d’une balle avec raquette …
au jeu de tennis, Montréal, 1986, 135 pages.
Circulation- and mini-volleyball at
http://www.fivb.org/EN/Programmes/Circulation%20volleyball%202003.pdf
(Certain appendixes in the English adaptation were adapted from the following :
Level 2 and Level 5)
20