pencil check pro user guide - toon boom animation · in this user guide, you will learn about the...
TRANSCRIPT

User Guide

Legal Notices
Published by Toon Boom Animation Inc.Corporate Headquarters 7 Laurier Avenue East Montreal, Quebec Canada H2T 1E4 Tel: (514) 278-8666 Fax: (514) 278-2666
toonboom.com
DisclaimerThe content of this manual is covered by a specific limited warranty and exclusions and limit of liability under the applicable License Agreement as supplemented by the special terms and conditions for Adobe® Flash™ File Format (SWF). Please refer to the License Agreement and to those special terms and conditions for details.
The content of this manual is the property of Toon Boom Animation Inc. and is copyrighted. Any reproduction in whole or in part is strictly prohibited. For additional copies of this manual, please contact Toon Boom Animation Inc. at the Corporate Headquarters address.
Copyright © 2008 by Toon Boom Animation Inc. All rights reserved.
TrademarksPencil Check Pro is a trademark owned by Toon Boom Animation Inc. All other trademarks are the property of their respective owners.
CreditsDocumentation Development: Peter Cawthorne.
Content Development: Marie-Eve Chartrand, Anouk Whissell
Publication DateApril 2008

Contents
Chapter 1: Introduction......................................................................................7Launching Pencil Check Pro ..............................................................................................8Interface .............................................................................................................................8Capture ..............................................................................................................................8Exposure Sheet ..................................................................................................................8Playback .............................................................................................................................8Drawing and Animation .....................................................................................................8Ink and Paint ......................................................................................................................8Camera and Sound ............................................................................................................9Rendering ..........................................................................................................................9Commands ........................................................................................................................9
Chapter 2: Launching Pencil Check Pro.....................................................................................................11
Launching Toon Boom Pencil Check Pro ........................................................................12Mac OS X ..................................................................................................................12Windows XP .............................................................................................................12Windows Vista ...........................................................................................................12
Creating and Opening a Scene .......................................................................................13Using the Welcome Screen .......................................................................................13
Creating a Scene using the Welcome Screen ....................................................14Opening a Scene using the Welcome Screen ....................................................15Opening a Recent Scene using the Welcome Screen ........................................15Accessing Tutorials using the Welcome Screen .................................................15Accessing Support and Web Help using the Welcome Screen .........................16
Using the File Menu ..................................................................................................16Creating a Scene using the File Menu ...............................................................16Opening a Scene using the File Menu ...............................................................17
Chapter 3: Interface.............................................................................................19User Interface Menus .......................................................................................................20
Top Menu ..................................................................................................................20Drawing ..............................................................................................................20Edit .....................................................................................................................20File ......................................................................................................................20Help ....................................................................................................................20Pencil Check Pro .................................................................................................20Play .....................................................................................................................21Scene ..................................................................................................................21View ....................................................................................................................21Windows .............................................................................................................21
1

Toon Boom Pencil Check Pro User Guide
Quick Menu (PopUp Menu) ...................................................................................... 21Views ............................................................................................................................... 22
Managing the Views ................................................................................................. 22Adding a View .................................................................................................... 22Closing a View .................................................................................................... 23Swapping Views ................................................................................................. 23Restore Default Workspace ............................................................................... 24
Colour View .............................................................................................................. 24Drawing View ............................................................................................................ 25Model View ............................................................................................................... 26Pen View ................................................................................................................... 26Playback View ........................................................................................................... 27Xsheet View .............................................................................................................. 28
Toolbars .......................................................................................................................... 29Managing the Toolbars ............................................................................................ 29
Showing and Hiding toolbars ............................................................................ 29Moving toolbars to a new location .................................................................... 29
Drawing Tools Toolbar ............................................................................................. 30Edit Toolbar .............................................................................................................. 30File Toolbar ............................................................................................................... 30Playback Toolbar ...................................................................................................... 30Xsheet Tools Toolbar ............................................................................................... 31
Interface Navigation ....................................................................................................... 31Preferences ..................................................................................................................... 32
Shortcuts ................................................................................................................... 32General ..................................................................................................................... 33
Colours ............................................................................................................... 34Options .............................................................................................................. 34Settings .............................................................................................................. 34
Exposure Sheet ........................................................................................................ 35Filtering .............................................................................................................. 35Options .............................................................................................................. 35Drawing Creation ............................................................................................... 35
Drawing .................................................................................................................... 36Onion Skin .......................................................................................................... 36Light Table ......................................................................................................... 36Options .............................................................................................................. 37New Colour Pots ................................................................................................ 37Settings ............................................................................................................. 37
Export ...................................................................................................................... 38Time Code ........................................................................................................ 38
Chapter 4: Capture.............................................................................................. 39Supported Devices ........................................................................................................ 40
Live Devices .............................................................................................................. 40Progressive Devices ................................................................................................. 41
2

Contents
More Information About Supported Devices ...........................................................41Setting the Scene Length ................................................................................................42Capturing From a Live Device .........................................................................................42Capturing From a Progressive Device .............................................................................46Importing Backgrounds and Other Images .....................................................................50Custom Vectorization Parameters ...................................................................................52
Vectorization Parameters dialog box ........................................................................52Options Tab ........................................................................................................53
Help Tab ....................................................................................................................55Scanner Installation ..........................................................................................................60
Configuring a Scanner for Pencil Check Pro (Windows XP) .....................................60Upgrade Your SCSI Communications Layer .......................................................60Run the findscanner utility ..................................................................................60
Configuring a Scanner for Pencil Check Pro (Windows Vista) ..................................61Run the findscanner utility ..................................................................................61
Configuring Scanners for Pencil Check Pro (Mac OS X) ...........................................62Modifying the Scan.conf File ..............................................................................62
Configuring Scan.conf to Communicate with the Scanner .......................................63The Scan.conf file is found in: .............................................................................63You can find a copy of the original default Scan.conf file in: .............................63
Chapter 5: Exposure Sheet...........................................................................67Adding Frames ................................................................................................................68
Setting the Scene Length .........................................................................................68Adding Frames Before or After a Selection ..............................................................68Adding Frames at the Beginning or at the End ........................................................69
Columns ..........................................................................................................................69Column Types ...........................................................................................................69Creating Drawing Columns ......................................................................................70Columns and Drawing Concept ................................................................................71Modifying Columns ..................................................................................................71
Ordering Xsheet Columns ..................................................................................71Show and Hide ...................................................................................................72Column Properties ..............................................................................................73
Thumbnail Display .....................................................................................................74Duplicate Columns ....................................................................................................74Column Transparency and Colour ...........................................................................75
Changing the Transparency of a Column ..........................................................75Changing the Colour of a Drawing in a Column ...............................................76
Filling Exposure ...............................................................................................................77Filling Modes .............................................................................................................77
Overwrite ............................................................................................................77Insert ...................................................................................................................78
Filling an Exposure Manually ....................................................................................78Typing Mode ......................................................................................................78Holding Exposure ...............................................................................................79
3

Toon Boom Pencil Check Pro User Guide
Extending and Dragging Exposure ................................................................... 79Increasing and Decreasing Exposure ................................................................. 83Creating Cycles .................................................................................................. 86
Automated Filling ..................................................................................................... 88Fill Cells Randomly ............................................................................................. 88Fill Selection ....................................................................................................... 89Sequence Fill ...................................................................................................... 91
Navigating Between Frames and Columns ................................................................... 93Drawing Identification .................................................................................................... 94
Identifying Drawings ................................................................................................ 94Annotation Columns ...................................................................................................... 95
Adding an Annotation Column ............................................................................... 95Drawing and Typing in the Annotation Column ..................................................... 96
Drawing in the Annotation Column ................................................................... 96Typing in the Annotation Column ..................................................................... 97Erasing Annotation Column Content ................................................................ 97
Changing the Drawing Settings .............................................................................. 98Importing an Annotation File .................................................................................. 99
Printing the Xsheet ...................................................................................................... 100
Chapter 6: Playback.......................................................................................... 101Playing Back your Line Test .......................................................................................... 102
Playback Toolbar .................................................................................................... 103Playback View Bottom Toolbar .............................................................................. 104
Chapter 7: Drawing and Animation.................................................... 105Adding a Column .......................................................................................................... 106Drawing Tools ............................................................................................................... 106
Override Tool ........................................................................................................ 107Apply Tool to All Visible Layers .............................................................................. 108Auto Create Colour Art from Brush ....................................................................... 109Brush ....................................................................................................................... 109Eraser ...................................................................................................................... 110Grabber .................................................................................................................. 110Grid ......................................................................................................................... 111Light Table .............................................................................................................. 112Onion Skin .............................................................................................................. 113Reposition All Drawings ......................................................................................... 114Rotary Table ........................................................................................................... 114Select ...................................................................................................................... 115Zoom ...................................................................................................................... 116
Drawing Layers .............................................................................................................. 117Drawing ......................................................................................................................... 118Animation ...................................................................................................................... 120
4

Contents
Chapter 8: Ink and Paint................................................................................123Painting Tools ................................................................................................................124
Auto Gap Closing ...................................................................................................124Backlight ..................................................................................................................124Close Gap ...............................................................................................................125Close Gaps ..............................................................................................................126Create Colour Art from Line Art .............................................................................127Dropper ...................................................................................................................128Paint ........................................................................................................................129Paint Unpainted .....................................................................................................130Show Strokes ...........................................................................................................131Stroke ......................................................................................................................131Unpaint ....................................................................................................................132
Dirt Clean Up .................................................................................................................133Remove Art Inside Selection ...................................................................................133Remove Art Outside Selection ...............................................................................134Remove Dirt ............................................................................................................134
Colour Art Filling Zones ................................................................................................136Colours ..........................................................................................................................137
Adding and Modifying a Colour Swatch .................................................................137Painting ..........................................................................................................................139
Painting Process ......................................................................................................139Verification .....................................................................................................................140Importing a Colour Model .............................................................................................141
Loading a Colour Model .........................................................................................141Painting With a Colour Model ................................................................................141
Chapter 9: Camera and Sound................................................................143Creating a Camera Move ..............................................................................................144Importing Sound ............................................................................................................146
Importing a Sound File ............................................................................................146Playing Back the Sound ..........................................................................................146
Detecting Your Lip-sync ................................................................................................147
Chapter 10: Rendering ...................................................................................149Rendering Images ..........................................................................................................150Rendering a Movie ........................................................................................................151
QuickTime Movie with Alpha Channel ..................................................................153Rendering an SWF .........................................................................................................154
5

Toon Boom Pencil Check Pro User Guide
Chapter 11: Commands ................................................................................ 155Drawing Menu .............................................................................................................. 156Edit Menu ...................................................................................................................... 162File Menu ...................................................................................................................... 164Help Menu .................................................................................................................... 166 Pencil Check Menu .................................................................................................... 166Play Menu .................................................................................................................... 167Scene Menu .................................................................................................................. 169View Menu .................................................................................................................... 175Windows Menu ............................................................................................................. 183
6

Chapter 1 Introduction
Toon Boom Pencil Check Pro is an easy and complete solution for verifying traditional animation sequences. With Pencil Check Pro you can capture your drawings in many ways including: camera, scanner and bitmap image import. It is even possible to paint your drawings and correct them. Toon Boom Pencil Check Pro also includes camera motion planning and annotation columns in your digital exposure sheet.
In this user guide, you will learn about the features available in Pencil Check Pro as we explain their uses in a a production environment.
This user guide is divided in the following chapters:
• Introduction, on page 7• Launching Pencil Check Pro, on page 11• Interface, on page 19• Capture, on page 39• Exposure Sheet, on page 67• Playback, on page 101• Drawing and Animation, on page 105• Ink and Paint, on page 123• Camera and Sound, on page 143• Rendering, on page 149• Commands, on page 155
An Installation and Getting Started booklet and a Keyboard Shortcuts booklet is also provided.
7

Toon Boom Pencil Check Pro User Guide
Launching Pencil Check ProIn this chapter, you will learn how to start Toon Boom Pencil Check Pro and create a new scene.
InterfaceIn this chapter, you will familiarize yourself with the Pencil Check Pro’s user interface (UI) and discover the menus, toolbars, views and different preferences available to you. This chapter explains the basic “what and why” of the interface.
CaptureIn this chapter, you will learn how to capture your animation sequences and import them into Pencil Check Pro using a camera, a scanner or bitmap image import.
Exposure SheetIn this chapter you will see how to create new columns and modify them, create annotations and set your timing.
The exposure sheet is one of the central points in Pencil Check Pro and controls almost everything you see in your project.
PlaybackIn this chapter, you will learn how to preview your line test in the Playback view after capturing your images.
Drawing and AnimationIn this chapter, you will learn how you can draw and create basic paperless animation. As you do this you will cover all the drawing tools, the onion skinning feature and the light table.
Ink and PaintIn this chapter you will discover that Pencil Check Pro also allows you to paint your vector drawings. All of the cleaning and painting tools are explained and you will also learn how to verify your ink and paint and make sure your didn’t forget to paint any zones.
8

Chapter 1: Introduction Camera and Sound
Camera and SoundIn this chapter now that your animation and timing are complete, you will learn how to create camera movements and work with sound.
RenderingThis chapter explains how to export your line tests as movies or image sequences, the last step in Toon Boom Pencil Check Pro.
CommandsThis chapter covers all of the commands listed in the menus. It describes what they are used for and their different access methods.
9

Toon Boom Pencil Check Pro User Guide
10

Chapter 2 Launching
Pencil Check ProNow that Toon Boom Pencil Check Pro is installed on your computer, it’s time to start the program and check your animation.
In this chapter, you will learn about:
• Launching Toon Boom Pencil Check Pro, on page 12• Creating and Opening a Scene, on page 13
11

Toon Boom Pencil Check Pro User Guide
Launching Toon Boom Pencil Check ProBefore you can check any of your animation you must open Pencil Check Pro.
Mac OS XTo open Toon Boom Pencil Check Pro:
Double-click the Toon Boom Pencil Check Pro icon or select Applications > Toon Boom Pencil Check Pro > Pencil Check Pro.
Toon Boom Pencil Check Pro opens, displaying the Welcome Screen.
Windows XP To open Toon Boom Pencil Check Pro:
Double-click the Toon Boom Pencil Check Pro icon or select Start > Programs > Toon Boom Animation > Toon Boom Pencil Check Pro.
Toon Boom Pencil Check Pro opens, displaying the Welcome Screen.
Windows VistaTo open Toon Boom Pencil Check Pro:
Double-click the Toon Boom Pencil Check Pro icon or select Start > Programs > Toon Boom Animation > Toon Boom Pencil Check Pro.
Toon Boom Pencil Check Pro opens, displaying the Welcome Screen.
12

Chapter 2: Launching Pencil Check Pro Creating and Opening a Scene
Creating and Opening a SceneNow that Toon Boom Pencil Check Pro is open, the first step is to create a new scene.
All Toon Boom Pencil Check Pro scenes are independent and kept locally on your computer.
There are two ways to create a new scene:
• Using the Welcome Screen, on page 13• Using the File Menu, on page 16
Using the Welcome ScreenWhen you open Toon Boom Pencil Check Pro, the Welcome Screen appears. You can create a scene from the Welcome Screen.
The Welcome Screen allows you to:
• Create scenes• Choose the scene resolution• Set the scene field size• Open scenes by browsing• Open recent scenes from a list• Access the Toon Boom Pencil Check Pro web page, eLearning, Support, and the
Forum• Access Tutorials
13
Toon Boom Pencil Check Pro User Guide
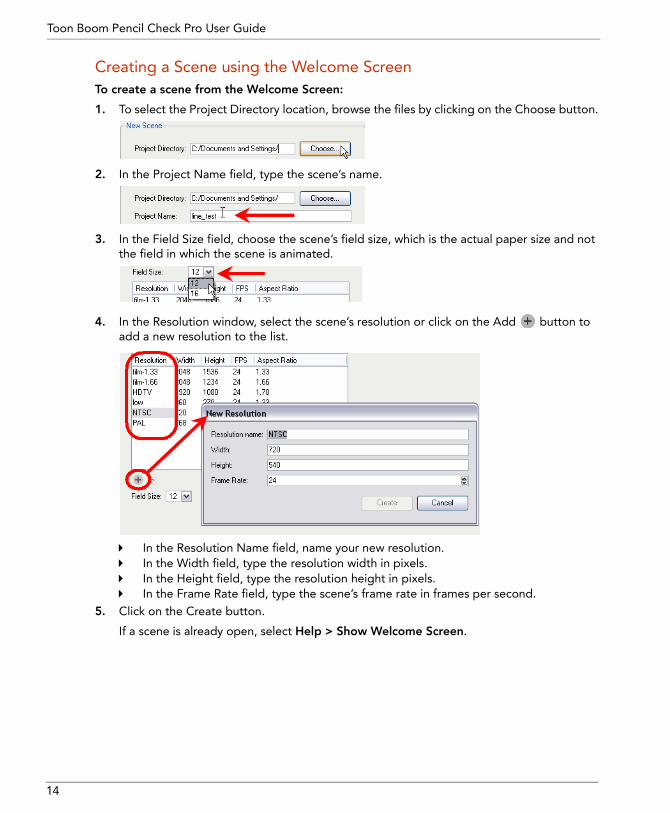
Creating a Scene using the Welcome ScreenTo create a scene from the Welcome Screen:
1. To select the Project Directory location, browse the files by clicking on the Choose button.
2. In the Project Name field, type the scene’s name.
3. In the Field Size field, choose the scene’s field size, which is the actual paper size and not the field in which the scene is animated.
4. In the Resolution window, select the scene’s resolution or click on the Add button to add a new resolution to the list.
In the Resolution Name field, name your new resolution.In the Width field, type the resolution width in pixels.In the Height field, type the resolution height in pixels.In the Frame Rate field, type the scene’s frame rate in frames per second.
5. Click on the Create button.
If a scene is already open, select Help > Show Welcome Screen.
14
Chapter 2: Launching Pencil Check Pro Creating and Opening a Scene
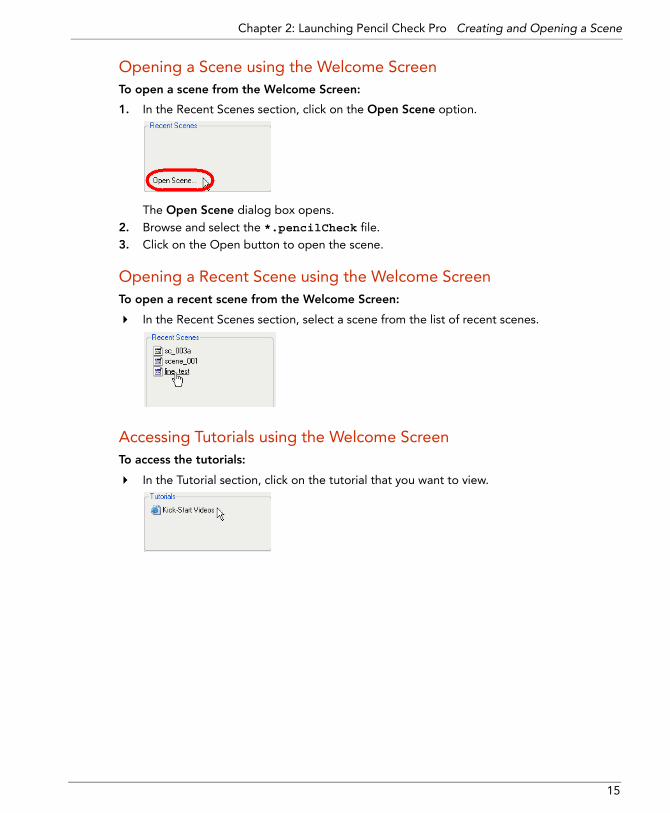
Opening a Scene using the Welcome ScreenTo open a scene from the Welcome Screen:
1. In the Recent Scenes section, click on the Open Scene option.
The Open Scene dialog box opens.2. Browse and select the *.pencilCheck file.3. Click on the Open button to open the scene.
Opening a Recent Scene using the Welcome ScreenTo open a recent scene from the Welcome Screen:
In the Recent Scenes section, select a scene from the list of recent scenes.
Accessing Tutorials using the Welcome ScreenTo access the tutorials:
In the Tutorial section, click on the tutorial that you want to view.
15

Toon Boom Pencil Check Pro User Guide
Accessing Support and Web Help using the Welcome ScreenTo access the support and web help:
Click on the icon relating to the type of support or web help you require. The icons can be found at the bottom of the Welcome Screen.
Toon Boom Pencil Check Pro Web page
Elearning
Support
Forum
Using the File MenuIf a scene is already opened and you want to create a new one, use the File menu.
Creating a Scene using the File MenuTo create a scene from the File menu:
1. Select File > New or click on the New button. The default keyboard shortcut is [Ctrl]+[N] (Windows) or [ ]+[N] (Mac OS X).
The New Scene dialog box opens.2. In the Project Name field, type the name of the new project.
3. Select a scene directory by clicking on the Choose button.4. In the Field Size field, choose the scene’s field size.
NOTE:
This is the actual paper size and not the number of the field in which the scene is animated.
16
Chapter 2: Launching Pencil Check Pro Creating and Opening a Scene
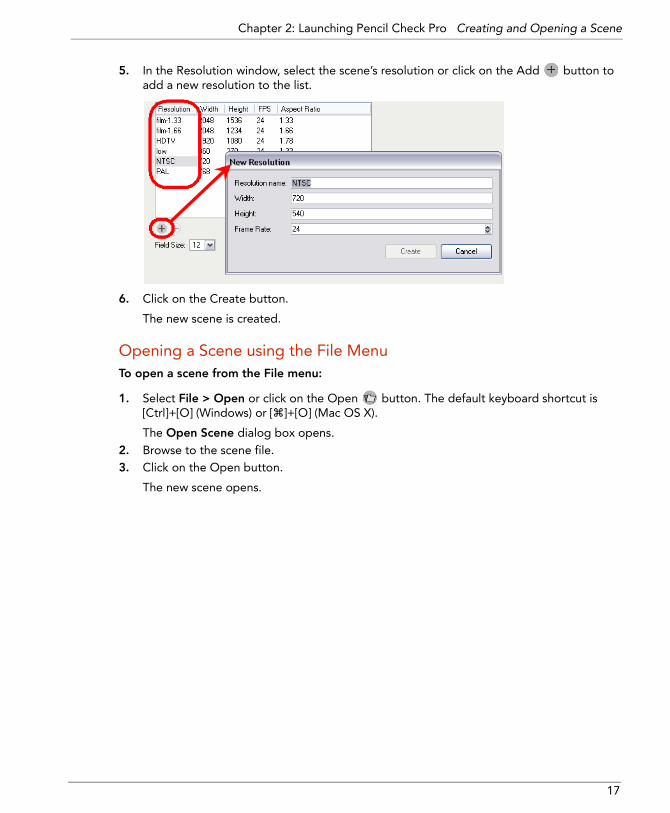
5. In the Resolution window, select the scene’s resolution or click on the Add button to add a new resolution to the list.
6. Click on the Create button.
The new scene is created.
Opening a Scene using the File MenuTo open a scene from the File menu:
1. Select File > Open or click on the Open button. The default keyboard shortcut is [Ctrl]+[O] (Windows) or [ ]+[O] (Mac OS X).
The Open Scene dialog box opens.2. Browse to the scene file.3. Click on the Open button.
The new scene opens.
17

Toon Boom Pencil Check Pro User Guide
18

Chapter 3 Interface
The Toon Boom Pencil Check Pro user interface comprises several views, menus and toolbars.
In this chapter, you will learn about:
• User Interface Menus, on page 20• Views, on page 22• Toolbars, on page 29• Interface Navigation, on page 31• Preferences, on page 32
19

Toon Boom Pencil Check Pro User Guide
User Interface MenusThe user interface (UI) has two menu types:
• Top Menu• Quick Menu (PopUp Menu)
Top Menu
The top menu remains in the same location whichever workspace is used. The menu contains all of the commands and features available in Pencil Check Pro and provides access to them.
DrawingThe Drawing menu is used to apply any action related to a drawing or the actual action of drawing.
EditThe Edit menu is used to undo actions, copying selections and many other actions that affect a selection. You can also use the Edit menu to modify your user preferences on the Windows version.
On the Mac OS X version, the Preferences command is located in the Pencil Check Pro menu.
FileThe File menu is used to create, open and save scenes, capture images and to export the scene. On the Mac OS X version, the Quit command is located in the Pencil Check Pro menu.
HelpThe Help menu is used to access the help system, the license file and to provide version information.
On the Mac OS X version, the About command is located in the Pencil Check Pro menu.
Pencil Check ProThe Pencil Check Pro menu is only available on the Mac OS X version. It contains the About, Quit and Preferences commands.
Windows
Mac OS X
20

Chapter 3: Interface User Interface Menus
PlayThe Play menu is used to playback the scene and navigate through the scene’s columns.
SceneThe Scene menu is used to modify a scene’s parameters such as the resolution, the frame rate or amount of frames. You can also use the Scene menu to add new columns to the scene, change the exposure and edit annotations.
ViewThe View menu is used to enable or disable certain features such as the Onion Skin or Light Table. You can also use this menu to reset a view.
WindowsThe Windows menu is used to add new views.
Quick Menu (PopUp Menu)Each view has a quick menu containing recurring actions. The Quick Menu is accessed by right-clicking (Windows) or [Ctrl]+Click (Mac OS X) anywhere in the view.
21

Toon Boom Pencil Check Pro User Guide
ViewsThe Toon Boom Pencil Check Pro user interface is composed of different views each designed for a specific purpose.
The views are:
• Colour View, on page 24• Drawing View, on page 25• Model View, on page 26• Pen View, on page 26• Playback View, on page 27• Xsheet View, on page 28
Managing the ViewsThis section explains how you can modify the location and accessibility of the views by adding a new view as a tab or as a window, you can also swap the view locations around.
• Adding a View, on page 22• Closing a View• Swapping Views, on page 23
Any workspace modifications you do are automatically saved when you exit the application.
Adding a View To add a view:
Select the view you want to add from Window > The desired view.
The new view appears .
22
Chapter 3: Interface Views
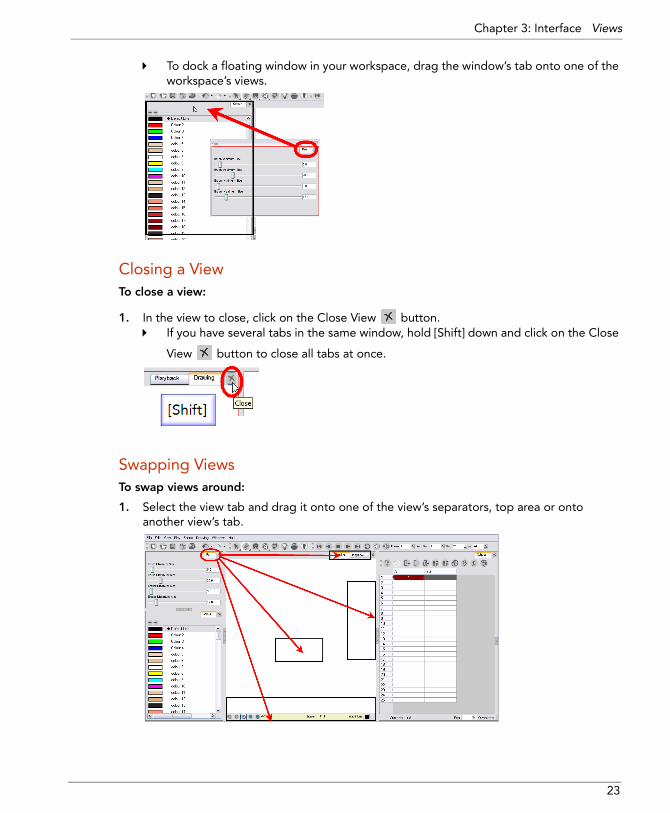
To dock a floating window in your workspace, drag the window’s tab onto one of the workspace’s views.
Closing a ViewTo close a view:
1. In the view to close, click on the Close View button.If you have several tabs in the same window, hold [Shift] down and click on the Close
View button to close all tabs at once.
Swapping Views To swap views around:
1. Select the view tab and drag it onto one of the view’s separators, top area or onto another view’s tab.
23

Toon Boom Pencil Check Pro User Guide
2. When a rectangle outline appears showing an available location for the view, release the mouse button and drop the view tab into position.
Restore Default WorkspaceTo restore the default workspace:
Select Window > Restore Default Workspace.
Colour View
The Colour view is used to create and modify colours. The Colour view is necessary when you draw and paint.
You can create and delete colours using the Colour view buttons.
• Adds a new colour to the palette.
• Deletes a colour from the palette.
24

Chapter 3: Interface Views
Drawing View
The Drawing view is used to see the images, and to draw and paint.
At the bottom of the Drawing view there is a toolbar which you can use to switch between the various display modes.
• Resets the view rotation, zoom and panning to the default values.
• Resets the view rotation.
• Displays only the Line Art (layer) from a drawing.
• Displays only the Colour Art (layer) from a drawing.
• Displays both Line and Colour Art (layers) from a drawing.
In Preview Line and Colour Art mode you can edit the selected Line or Colour Art. To apply both layers to the art, you need to enable the Apply Tool to All Visible Layers option.
25

Toon Boom Pencil Check Pro User Guide
Model View
The Model view is used to display colour models from which you can pick colours and refer to while painting. You can load any Pencil Check Pro vector drawing (*.tvg file) from a directory or directly from your scene.
At the bottom of the Model view there is a toolbar which you can use to reset the view rotation, zoom and panning.
• Resets the view rotation, zoom and panning to the default values.
• Resets the view rotation.
Pen View
The Pen view is used to adjust the brush and eraser’s maximum and minimum size by moving the sliders.
26

Chapter 3: Interface Views
Playback View
The Playback view is used to playback your line test as a final image result with anti-aliasing. You can also use the Playback view to create your lip-sync mouth chart using the sound scrubbing feature.
At the bottom of the Playback view there is a toolbar which you can use to add a preroll, display the final image or the matte, scrub through your scene and detect your sound.
• Displays the final image with anti-aliasing.
• Displays the drawings matte shape instead of the final image.
• Adds a series of black frames at the playback starts.
• Indicates if the playlist is ready or out-of-date.
27

Toon Boom Pencil Check Pro User Guide
Xsheet View
In the Xsheet view, you can create columns, add frames, create and expose drawings. The Xsheet displays the drawings exposure. You can also add sound, annotation columns and plan basic camera moves.
NOTE:
By default, the Xsheet view, has two drawing columns, A and BG, as well as 24 frames.
28

Chapter 3: Interface Toolbars
ToolbarsThe Toon Boom Pencil Check Pro user interface contains toolbars which, by default, are located at the top of the interface. These toolbars can be moved around.
Pencil Check Pro has five toolbars available:
• Drawing Tools toolbar• Edit toolbar• File toolbar• Playback toolbar• Xsheet Tools toolbar
Managing the ToolbarsYou can reposition the toolbars to a location which suits your work style or you can hide the ones which you do not use.
• Showing and Hiding toolbars, on page 29• Moving toolbars to a new location, on page 29
Showing and Hiding toolbars To show or hide a toolbar:
1. Select View > Toolbars > the desired toolbar.2. Select View > Toolbars > Line Up to align all of your toolbars.
Moving toolbars to a new location To move a toolbar:
1. Select the toolbar you want to move and drag it into a view toolbar area or into another position in the top or side interface toolbar area.
29

Toon Boom Pencil Check Pro User Guide
2. When a rectangle outline appears showing an available location for the toolbar, release the mouse button and drop the toolbar into position.
Drawing Tools Toolbar
The Drawing Tools toolbar contains all the drawing tools necessary for you to draw and paint with.
Edit Toolbar
The Edit toolbar contains the tools necessary to Undo and Redo actions. It also provides access to an action history list by clicking on the small downwards arrow to the side of the Undo or Redo buttons.
File Toolbar
The File toolbar contains the tools necessary to create, open and save scenes. You can also capture and import images.
Playback Toolbar
The Playback toolbar contains the tools necessary to playback your animation and navigate through your frames. You can also enable the sound scrubbing option.
30

Chapter 3: Interface Interface Navigation
Xsheet Tools Toolbar
The Xsheet Tools toolbar contains the tools necessary to add and remove columns, modify a drawing’s exposure, identify drawings and create a camera move. By default, it is located in the Xsheet view.
Interface NavigationToon Boom Pencil Check Pro supports zoom in, zoom out, rotate, pan and reset view position for easy navigation of the interface.
• Zoom In: Zooms into the view. Use the keyboard shortcut [2].• Zoom Out: Zooms out of the view. Use the keyboard shortcut [1].• To Zoom In and Zoom Out: Hold down [Spacebar] and your middle mouse button
while moving the mouse up or down.• To Pan the view: Hold down the keyboard shortcut [Spacebar] and drag your mouse
in the direction you want to pan the view.• To Recentre the view: Click on the keyboard shortcut [N] to recentre the view on
your mouse cursor.• Reset View: Resets the view to its default position. Use the keyboard shortcut
[Shift]+[M].• Reset Rotation: resets the view’s rotation to its default position. Use the keyboard
shortcut [Shift]+[X].• Reset Pan: Resets the view’s pan to its default position. Use the keyboard shortcut
[Shift]+[N].• Reset Zoom: Resets the view’s zoom to its default position. Use the keyboard
shortcut [Shift]+[Z].• Toggle Full Screen: Enlarges the selected view to full screen. The full screen process
is done in three stages. Use the keyboard shortcut [Ctrl] + [F] (Windows) or [ ] + [F] (Mac OS X).
First, the selected view enlarges to the maximum width or height, but keeps the tool views such as Colour or Pen. Second, the view enlarges to full screen. Third, the view returns to its original size.
31

Toon Boom Pencil Check Pro User Guide
PreferencesThe Preferences panel is where you can set a number of options for working with Pencil Check Pro.
To open the Preferences panel:
1. Select Edit > Preferences (Windows) or Pencil Check Pro > Preferences (Mac OS X).
The Preferences panel opens.
Preferences are organized by tabbed category:
• Shortcuts, on page 32• General, on page 33• Exposure Sheet, on page 35• Drawing, on page 36• Export, on page 38
Shortcuts Use the Shortcuts tab to customize existing shortcuts and to add new ones.
32
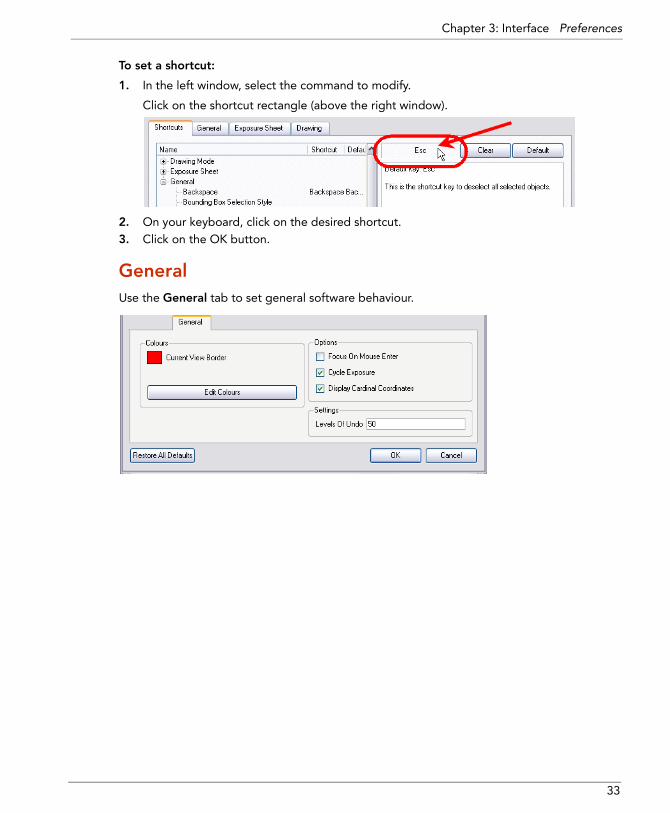
Chapter 3: Interface Preferences
To set a shortcut:
1. In the left window, select the command to modify.
Click on the shortcut rectangle (above the right window).
2. On your keyboard, click on the desired shortcut.3. Click on the OK button.
General Use the General tab to set general software behaviour.
33

Toon Boom Pencil Check Pro User Guide
Colours• Current View Border: Shows the specified colour of the frame which the system
displays around the view currently in use. • Edit Colours: Click to modify the colours of the user interface.
Options• Focus on Mouse Enter: The current view will automatically change when the mouse
cursor enters a new view.• Cycle Exposure: Makes navigation in the Xsheet view wrap-around from the last cell
or column to the first.• Display Cardinal Coordinates: Displays coordinates as either scalar (i.e. +1 / -1) or
cardinal (i.e. 1N / 1S).
Settings• Levels Of Undo: The number of actions in the undo list.
34

Chapter 3: Interface Preferences
Exposure Sheet Use the Exposure Sheet tab to change the Xsheet behaviour.
Filtering• Show Drawing Columns: When enabled, the Xsheet view will display the Drawing
columns.• Show Sound Columns: When enabled, the Xsheet view will display the Sound
columns.• Show Annotation Columns: When enabled, the Xsheet view will display the
Annotation columns.
Options• Default Add Columns: The default position where the new column will be added.• Default Column Width: The default width value for the new column being created.
Drawing Creation• Use Current Frame as Drawing Name: This option is used to automatically name the
drawing by the frame position.
35

Toon Boom Pencil Check Pro User Guide
Drawing Use the Drawing tab to affect the Drawing view behaviour.
Onion Skin• Onion Skin: Maximum Wash Value (0.0 - 1.0): The maximum washed-out value for
onion skinned drawings.• Onion Skin: Minimum Wash Value (0.0 - 1.0): The minimum washed-out value for
onion skinned drawings.• Onion Skin: Maximum Opacity (0.0 - 1.0): The maximum opacity value for onion
skinned drawings. (0 = transparent)• Onion Skin: Minimum Opacity (0.0 - 1.0): The minimum opacity value for onion
skinned drawings. (0 = transparent)
Light Table• Light Table: Wash (0.0 - 1.0): The maximum washed-out value for drawings visible in
the light table.• Light Table: Opacity (0.0 - 1.0): The minimum washed-out value for drawings visible
in the light table.
36

Chapter 3: Interface Preferences
Options• Grid On By Default: The grid is automatically displayed when the Drawing view is
opened.• Select Tool is Lasso: When this option is enabled, the Select tool will behave as a
lasso selector. When this option is disabled, the Select tool will behave as a rectangle selector.
• Brush Size Cursor: When this option is enabled, the brush tool will display the brush size as a circle around the cursor.
• Sticky Eye Dropper: When this option is enabled, the Colour Picker’s Dropper tool will stay active until the user releases it by clicking on the Dropper icon once again.
New Colour Pots• Create New Colour Pots Using Default Colour: Sets the default colour for creating a
new colour pot.
Settings • Auto Gap Closing: The value determines the size of the gap closed when using the
automatic gap closing tool while painting drawings. 0 = Disabled, 1 = Small, 2 = Medium and 3 = Large.
• Initial Drawing Tool: Determines the tool initially selected when the Drawing view is opened..
37

Toon Boom Pencil Check Pro User Guide
Export Use the Export tab to edit the time code settings.
Time Code • Front: The font used to print the time code on the final movie export.• Colour: The colour of the time code’s font.• Height: The size of the time code’s font.• Position: The position of the time code in the final movie.• Background Colour: The colour of the background against which the time code
stands out so you can see the time code’s characters in the final movie.
38

Chapter 4 Capture
To create your line test, you can capture your animation sequences and drawings in several ways. You can capture using TWAIN scanners, production scanners, cameras, web cam, bitmap image import, etc.
Once all of the animation layers are imported in Toon Boom Pencil Check Pro, you can proceed to set the timing in the digital exposure sheet.
This chapter is divided as follows:
• Supported Devices, on page 40• Setting the Scene Length, on page 42• Capturing From a Live Device, on page 42• Capturing From a Progressive Device, on page 46• Importing Backgrounds and Other Images, on page 50• Custom Vectorization Parameters, on page 52• Scanner Installation, on page 60
39

Toon Boom Pencil Check Pro User Guide
Supported Devices To capture drawings and images in Toon Boom Pencil Check Pro, you need a supported device such as a camera or a scanner. Your device needs to be installed before launching Pencil Check Pro. Follow the device manufacturers instructions on how to install the device.
The supported devices are divided in two general categories:
• Live Devices• Progressive Devices
For a list of supported devices refer to the More Information About Supported Devices below.
Live Devices
Live devices display the image in real-time, examples are: webcam or video camera.
Here is a list of the main supported technologies:
• Direct Show (Windows)• QuickTime (Mac OS X)
With these technologies, you can capture images using:Web CamDV CameraHDV CameraAnalog to Digital Capture CardAs well as any other device using the technologies above.
For more details, refer to the More Information About Supported Devices below.
40

Chapter 4: Capture Supported Devices
Progressive Devices
Progressive devices display the image after a scan process such as TWAIN scanners or SCSI scanners.
Here is a list of the main supported technologies:
• WIA (Windows)• Image Capture (Mac OS X)• Production Scanner with Proprietary Drivers• TWAIN
With these technologies, you can capture images via:Production ScannerFlatbed ScannerUSB Digital Still CameraUSB Digital Still ScannerDigital Capture CardUSB Video ConverterAs well as any other device using the technologies above.
Refer to the Professional Scanner Installation section to learn how to configure your professional scanner.
More Information About Supported DevicesAs you can see, there is a wide variety of supported technologies. To find out if your camera, card or scanner is supported or if you want to know which one to acquire, refer to the Toon Boom Pencil Check Pro web page for an updated list:
• http://www.toonboom.com/products/pencilcheckpro
NOTE:
Make sure that your device is properly installed and working before launching Pencil Check Pro.
41

Toon Boom Pencil Check Pro User Guide
Setting the Scene LengthTo capture your images, you need to first launch Pencil Check Pro and create a scene.
Refer to the Launching Pencil Check Pro chapter to learn how to launch the application and create a scene.
Once your scene is opened, you will need to set your scene length by adding the proper amount of frames.
To set the set scene length:
1. Select Scene > Set Scene Length.
The Set Scene Length dialog box opens.
2. In the Number of Frames field, type the number of frames needed.3. Click on the OK button.
Capturing From a Live Device
Pencil Check Pro allows you to capture your drawing sequences via several live devices.
Live devices display the image in real-time, examples are: web cam or video camera.
Refer to the Supported Devices section to make sure your device is supported and properly installed.
You can use the default Xsheet columns to capture your images. If ever you need to add extra columns, refer to the Exposure Sheet chapter for more information.
The Capture command will not be available unless you select a column in the Xsheet view.
42

Chapter 4: Capture Capturing From a Live Device
To capture your images with a camera:
1. In the Xsheet view, select the cell or column header in which you want to import your captured images.
2. Select File > Capture. You can also click on the Capture button. The default keyboard shortcut is [S].
The Capture dialog box opens.
3. In the Device tab, select your camera or live device in the Device field.
4. In the Peg field, indicate the peg holes location.
5. In the Device tab, enable or disable the Flip Drawing option to mirror the drawings horizontally and capture them this way.
6. Click on the Configure button to access and adjust your device’s parameters via its own configuration panel.
43

Toon Boom Pencil Check Pro User Guide
7. In the Adjustment tab, set the type of capture you want in the Type field.
Black and White: The system will capture your drawings as black and white zones.Grey: The system will capture your drawings as greyscale images.Colour: The system will capture your drawings as colour images.
8. In the Adjustment tab, set the following capture parameters:If you selected a Colour capture, adjust the Gamma and Luma. If you selected a Grey capture, adjust the Luma, Black and White.If you selected a Black and White capture, adjust the Luma and Threshold.
The Luma parameter transforms bright zones in an image into transparent areas. Decreasing the luma value causes darker zones to become transparentThe Threshold parameter increases or decreases the amount of information kept from the original drawing by keeping only the darker zones.The Black and White parameters increases or decreases the amount of information kept and the contrast of your lines by turning to white the lighter zones and to black the darker ones.The Gamma parameter controls the luminosity and contrast of your drawing colours in a nonlinear way. The black zones and white zones will mainly remain as they are as the in-between colour values will be increased or decreased.
9. In the Vectorization section, choose the desired vectorization style:
Black and White: This style vectorizes your drawings as a solid black line.Grey: This style vectorizes your drawings as a mix of vector contour and greyscale bitmap filling.Colour: This style vectorizes your image as a bitmap texture within a vector frame.
Custom: This allows you to create your own custom vectorization parameters via the Vectorization Parameters interface.
44

Chapter 4: Capture Capturing From a Live Device
The Vectorization Parameters dialog box opens automatically once you select this option.
Refer to the Custom Vectorization Parameters section to learn more about the custom parameters.
10. If desired, in the Drawing Name field, type the drawing to capture’s name.
11. If desired, in the Hold Value field, type the number of frames that the drawing will be exposed.
12. Enable the Capture and Advance option if, every time you press the Capture button you want to move to the next cell, instead of overwriting the current one.
13. Click on the Capture button to record the image.14. If you have more than one drawing, set the next drawing in place and press the Capture
button again.15. Repeat the previous steps until the capture is completed.16. Once the entire capture is completed, click on the Close button.
Your drawings are now available in the exposure sheet.
45

Toon Boom Pencil Check Pro User Guide
Capturing From a Progressive Device
Pencil Check Pro allows you to capture your drawing sequences via several scanners and progressive devices.
Progressive devices are the devices that will display the image after a scan process such as TWAIN scanners or SCSI scanners.
Refer to the Supported Devices section to make sure your scanner is supported and properly installed.
You can use the default Xsheet columns to capture your images. If ever you need to add extra columns, refer to the Exposure Sheet chapter for more information.
The Capture command will not be available unless you select a column in the Xsheet view.
To capture your images with a Scanner:
1. In the Xsheet view, select the cell or column header in which you want to import your captured images.
2. Select File > Capture. You can also click on the Capture button. The default keyboard shortcut is [S].
The Capture dialog box opens.
46

Chapter 4: Capture Capturing From a Progressive Device
3. In the Device tab, select your scanner or progressive device in the Device field.
4. In the Source tab, select if you want to scan from the scanner’s flatbed or auto-feeder.
5. In the Resolutions tab, select the scan resolution that you want to capture your drawings at.
6. In the Fields field, choose if the animation is done on 12-field or 16-field paper size.
7. In the Peg field, indicate the location of the peg holes.
8. In the Device tab, enable or disable the following options:
Flip Drawing: Enable this option to mirror the drawings horizontally and capture them this way.Optical Registration: Enable this option to get the system to automatically encounter the peg holes and align them properly as the drawings are captured.
47

Toon Boom Pencil Check Pro User Guide
9. Click on the Configure button to access and adjust your device’s parameters via its own configuration panel.
10. In the Adjustment tab, set the type of capture you want in the Type field.
Black and White: The system will capture your drawings as black and white zones.Grey: The system will capture your drawings as greyscale images.Colour: The system will capture your drawings as colour images.
11. Always in the Adjustment tab, set the following capture parameters:If you selected a Colour capture, adjust the Gamma and Luma. If you selected a Grey capture, adjust the Luma, Black and White.If you selected a Black and White capture, adjust the Luma and Threshold.
The Luma parameter transforms bright zones in an image into transparent areas. Decreasing the luma value causes darker zones to become transparentThe Threshold parameter increases or decreases the amount of information kept from the original drawing by keeping only the darker zones.The Black and White parameters increases or decreases the amount of information kept and the contrast of your lines by turning to white the lighter zones and to black the darker ones.The Gamma parameter controls the luminosity and contrast of your drawing colours in a nonlinear way. The black zones and white zones will mainly remain as they are as the in-between colour values will be increased or decreased.
12. Click on the Preview button, to make a test-scan and visualize the parameters adjusted in the previous step.
48

Chapter 4: Capture Capturing From a Progressive Device
13. In the Vectorization section, choose the desired vectorization style:
Black and White: This style vectorizes your drawings as a solid black line.Grey: This style vectorizes your drawings as a mix of vector contour and greyscale bitmap filling.Colour: This style vectorizes your image as a bitmap texture within a vector frame.
Custom : This allows you to create your own custom vectorization parameters via the Vectorization Parameters interface. The Vectorization Parameters dialog box opens automatically once you select this option.
Refer to the Custom Vectorization Parameters section to learn more about the custom parameters.
14. If desired, in the Drawing Name field, type the drawing to capture’s name.
15. If desired, in the Hold Value field, type the number of frames that the drawing will be exposed.
16. Enable the Capture and Advance option if every time you press the Capture button you want to move to the next cell instead of overwriting the current one.
17. Click on the Capture button to record the image.18. If you have more than one drawing, set the next drawing in place and press the Capture
button again.If you are scanning panoramic drawings, in the Page Panning section, move the slider to the next letter to capture your next frame.
19. Repeat the previous steps until the capture is completed.20. Once done, click on the Close button.
Your drawings are now available in the exposure sheet.
49

Toon Boom Pencil Check Pro User Guide
Importing Backgrounds and Other Images
You can also import backgrounds and other images into Pencil Check Pro. For example, if your backgrounds were painted in a third-party software, you can import them using the Import Drawings command and retain the colours. On the other hand, if you have drawings that were drawn or scanned in a third party software, you can import them and vectorize them as black and white, greyscale, colour, background or custom settings.
You can use the default Xsheet columns to import your images. To add extra columns, refer to the Exposure Sheet chapter for more information.
To import images via the Import Drawings command:
1. In the Xsheet view, select the cell where you want to import your drawing.
2. Select File > Import > Drawings. You can also click on the Import Drawings button in the File toolbar.
The Browser opens.3. Select the image or image sequences you want to import.4. Click on the Open button.
50
Chapter 4: Capture Importing Backgrounds and Other Images
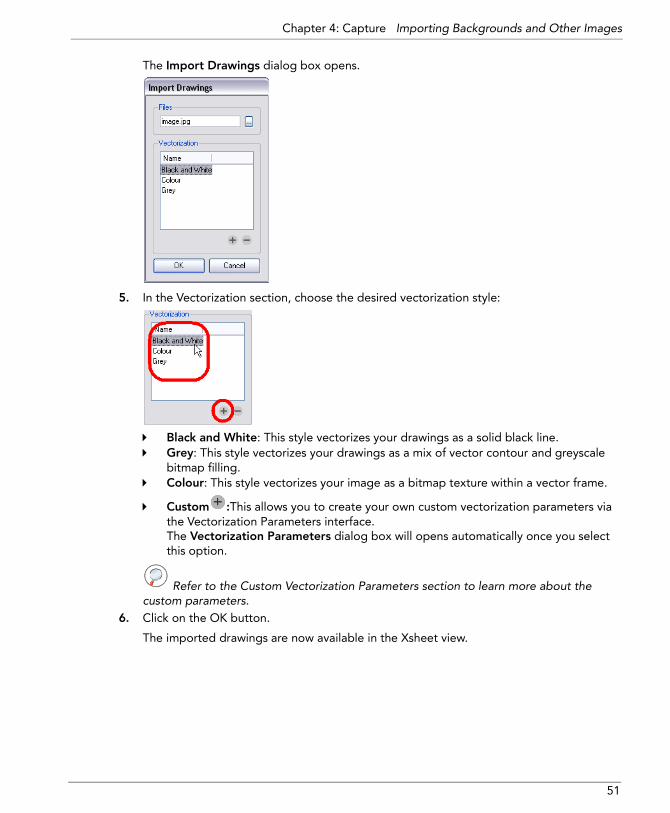
The Import Drawings dialog box opens.
5. In the Vectorization section, choose the desired vectorization style:
Black and White: This style vectorizes your drawings as a solid black line.Grey: This style vectorizes your drawings as a mix of vector contour and greyscale bitmap filling.Colour: This style vectorizes your image as a bitmap texture within a vector frame.
Custom :This allows you to create your own custom vectorization parameters via the Vectorization Parameters interface. The Vectorization Parameters dialog box will opens automatically once you select this option.
Refer to the Custom Vectorization Parameters section to learn more about the custom parameters.
6. Click on the OK button.
The imported drawings are now available in the Xsheet view.
51
Toon Boom Pencil Check Pro User Guide
Custom Vectorization ParametersPencil Check Pro offers a wide variety of vectorization parameters, using these parameters you can import your drawings the way you want to. The most common parameters are accessible through the user interface, while the most advanced ones are accessed by typing the values into an advanced field.
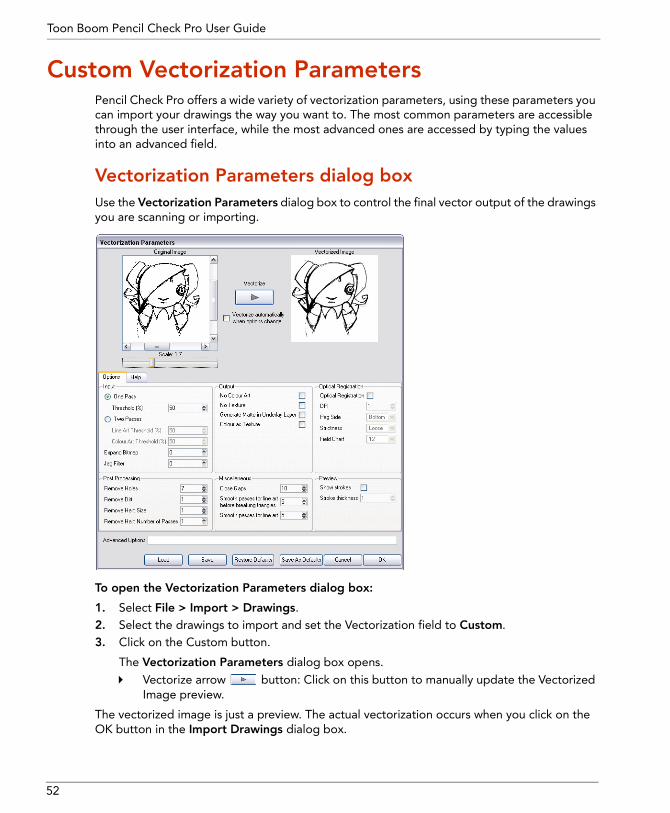
Vectorization Parameters dialog box Use the Vectorization Parameters dialog box to control the final vector output of the drawings you are scanning or importing.
To open the Vectorization Parameters dialog box:
1. Select File > Import > Drawings.2. Select the drawings to import and set the Vectorization field to Custom.3. Click on the Custom button.
The Vectorization Parameters dialog box opens.Vectorize arrow button: Click on this button to manually update the Vectorized Image preview.
The vectorized image is just a preview. The actual vectorization occurs when you click on the OK button in the Import Drawings dialog box.
52

Chapter 4: Capture Custom Vectorization Parameters
Options Tab
There are a number of options to try in the Vectorization Options dialog box. These are applied during the vectorization process.
Input
The input filters are applied to the bitmap image before it is vectorized.
• One Pass and Two Passes: If you select one pass, one threshold value will be applied to both the Line and Colour Art. • For drawings with distinct vector-style lines or mattes, you only need one
pass.If you select two passes, you can apply a different threshold value to each layer. • For greyscale drawings, you may want to pass through the vectorization
process twice to apply different threshold values to the Line and Colour Art layers..
• Threshold: Determines which values in the scanned image are considered to be a part of the Line or Colour Art layer and what will be eliminated from the vectorized drawing, 0% (zero) is white and 100% is black. The threshold is between these two values.
• Expand Bitmap: Enter a value to scale the bitmap to detect small variations in the line. Use this option if you scanned a greyscale image and you want to preserve small variations in the texture that will be applied to the line art.
• Jag Filter: Enter a value to scale back the bitmap to remove some of the line’s roughness. If you have a drawing that appears quite rough, use the jag filter to eliminate excess strokes in the final drawing.
53
Toon Boom Pencil Check Pro User Guide
Output
The output filters are applied during the vectorization process.
• No Colour Art: Does not generate filling zones Colour Art layer.• No Texture: Does not generate texture in the Line Art in the final images. Select this
option to create solid lines in the final Line Art.• Generate Matte in Underlay Layer: Enable this option if you want to create an
opaque zone behind your drawing’s lines to avoid seeing through your layers.• Colour as Texture: Converts colour values into a texture layer.
Optical Registration
The optical registration options are used to automatically align drawings based on the position of peg holes on the animation paper. The peg holes must appear in the scanned drawings for the optical registration to work.
• Optical Registration: Use peg holes to align drawings optically.• DPI: Type the dots-per-inch value of your image.• Peg Side: Select the position of the peg holes on your drawings. Identify whether
they are they on the top, bottom, left or right.• Strictness: Determine how exact the location of the peg holes must be for the
software to recognize them. You have two values to choose from:Strict: The peg holes must be in a tightly defined area to be recognized.Loose: The peg holes can be recognized somewhere in a larger area. This is the recommended setting.
• Field Chart: Select 12 or 16 to indicate the size of your animation paper.
Post Processing
The Post Processing filters are applied to the final vector images.
• Remove Holes: Removes holes of a specified value that might make painting difficult.• Remove Dirt: Removes stray marks and dirt of a specified value. Try a value around
500.• Remove Hair: Removes small strokes that have no line art. Try a value around 50.• Remove Hair: Number of Passes: The number of times the drawing will be analyzed
to identify hair marks.
Miscellaneous• Close gaps: Closes gaps in the Colour Art so that you can paint it.• Smooth passes for Line Art before breaking triangles: The number of times the
smoothing operation runs before creating the triangles that break lines in your drawing. If unnecessary triangles are appearing in your drawing, increase this value.
• Smooth passes for Line Art: The number of times the smoothing operation is performed after the triangles have been created. This further smooths the Line Art.
54

Chapter 4: Capture Custom Vectorization Parameters
Preview• Show strokes: Shows the strokes in the Vectorized Image panel.• Stroke thickness: Shows the size of the strokes.
Help Tab
Registration Options
-register <dpi side strictness>; Perform optical registration.
• Side can be one of left, right, top, bottom or l, r, t, b.• Strictness can be either loose, strict or l, s.
-registration_looseness_factor <factor>; Registration looseness factor (default 2.000000)
-rlf; short form of registration_looseness_factor
-rdebug; output registration debug messages
-pegpitch <inch (default 8.000000)>; distance between peg bars
-threshr < (default 0.500000)>; threshold for optical registration; range 0.0 to 1.0
-rmargin <inch (default 1)>; region size where to look for peg bars
-peg_distance_from_center <inch (default 5.25)>; peg distance from center of the image
-pdfc; short form of -peg_distance_from_center
-out_peg_position <side (default same)>; Wanted position of the peg on the drawing.
• Can be one of right, left, top, bottom (or r, l, t, b) or same.• A rotation will be performed if it is different from the side passed to -register.
-ssi; retrieve peg information from .si file *Unimplemented*
-output_peg_matrix; output the peg transformation matrix on standard output
55

Toon Boom Pencil Check Pro User Guide
Filtering Options
-pixel <pixel_shape (default '4x3')> -- Valid values: 4x3
-gap <worldUnits (default 10)> -- close gaps up to this big
-end <inches (default 0.1)> -- extend dangling ends by this much. *unimplemented*
-pencil -- generate line art only
-keep_dirt -- don't filter out dirt
-thresh <threshold (default 0.5)>; range 0.0 to 1.0
-rmv_hairs <worldUnits (default 1)> <passes (default 1)>
• remove hairs of size smaller than "size" in "passes" passes
-rmv_holes <area (default 7)>; remove holes smaller than "area"
-rmv_dirt <area (default 1)>; remove dirt smaller than "area"
• try values between 100 and 500 for rmv_holes and rmv_dirt. The area is in world units squared
-rmv_triangles <worldUnits (default 30.000000)>; remove triangles at "pixels"
• distance from each other. Use -no_break to remove all triangles
-no_texture -- don't generate textured strokes
-color_as_texture -- will vectorize the alpha channel and put the RGB colour in a textured colour
-noclosegap -- disable all gap closing algorithms
-no_break -- disable the breaking of line art
-jag_filter <pixels (default 0>; expand the pixels in the vectorization bitmap
-expand_bitmap <pixels (default 0>; expand the pixels in the vectorization bitmap
-fit_errorc <error (default 1.000000>; Fitting error for the colour art
-fit_errorl <error (default 1.000000>; Fitting error for the line art
-smoothl <passes (default 1>; Number of smooth passes for line art
-smoothc <passes (default 1>; Number of smooth passes for colour art
-first_smooth <passes (default 0>; Number of smooth passes for line art before breaking triangles
-first_smoothl <passes (default 0>; Number of smooth passes for line art before breaking triangles
56

Chapter 4: Capture Custom Vectorization Parameters
-first_smoothc <passes (default 0>; Number of smooth passes for line art in colour art pass (needs -2pass)
-2pass -- specify 2 sets of parameters; one for line art "l", one for colour art "c"
(-thresh, -rmv_holes and -rmv_dirt will be overriden by -threshl,-threshc, -rmv_holesl, -rmv_holesc, -rmv_dirtl and -rmv_dirtc)
-threshl <threshold for line art (default 0.5)>; range 0.0 to 1.0
-threshc <threshold for colour art (default 0.5)>; range 0.0 to 1.0
-jag_filterl <pixels (default 0>; expand the pixels in the vectorization bitmap for line art
-jag_filterc <pixels (default 0>; expand the pixels in the vectorization bitmap for colour art
-expand_bitmapl <pixels (default 0>; expand the pixels in the vectorization bitmap for line art
-expand_bitmapc <pixels (default 0>; expand the pixels in the vectorization bitmap for colour art
-rmv_holesl <area (default 7)>; remove line art holes smaller than "area"
-rmv_holesc <area (default 7)>; remove colour art holes smaller than "area"
-rmv_dirtl <area (default 1)>; remove line art dirt smaller than "area"
-rmv_dirtc <area (default 1)>; remove colour art dirt smaller than "area"
• try values between 100 and 500 for rmv_holesl, rmv_holesc, rmv_dirtl and rmv_dirtc. The values are in world units squared
-margins <inch (default 0.25)>; remove margin around bitmap
-top_margin <inch (default 0.25)>; remove margin at top of bitmap
-bottom_margin <inch (default 0.25)>; remove margin at bottom of bitmap
-left_margin <inch (default 0.25)>; remove margin at left of bitmap
-right_margin <inch (default 0.25)>; remove margin at right of bitmap
-remove_peg_bars; remove the peg bar holes
-field_size <fields (default 12 or use value in scan file)>; set the drawing to this field size
-fs; short hand for -field_size
-peg_bar_size <inch (default 1)>; the size of the peg bar region
-noframe; do not put a frame around the colour art
-frame_fields <default -1.000000>; put a frame of the speficied dimension around the colour art
Filtering Options
57

Toon Boom Pencil Check Pro User Guide
RGB Keying Options
-rgb; generate separate zones for red green and blue lines
-rgb_alpha <value (default 255)>; generate red, green and red colour with alpha of this value
-no_red; ignore red colour in vectorization
-no_green; ignore green colour in vectorization
-no_blue; ignore blue colour in vectorization
-flatten; flatten the drawing after generating colours
-rmv_rgb_dirt <threshold area default 0.0>;
remove red, green and blue regions smaller than area
-expand_bitmap_rgb <pixels (default 0>; expand the pixels in the vectorization bitmap for rgb
-threshrgb <value> <threshold for rgb vectorization default 0.200000>;
-threshsv <saturation threshold default 0.500000> <value threshold default 0.500000>;
thresholds on saturation and value to consider a pixel to be grey
Colour Vectorization Options
-color_vectorize; Perform a colour vectorization
-file2 <colour art filename>; Specify the colour art bitmap
-penstyle <center alpha (0.0-20.0)> <edge alpha (0.0-20.0)> <gamma (0-10)>
<centre pressure effect (0.0-1.0)> <edge pressure effect (0.0-1.0)>
<texture bitmap downscaling (0.2-20)> <texture bitmap file (valid filename or "" if no file)> ;
• generate brush texture for the line art
-pressure_variation <strategy (0, 1 or 2)> <min pressure (0.0-1.0)> <max pressure (0.0-1.0)> <max variation (0.0-1.0)> ;
• specify a pressure strategy for the center line.
-blur_radius <pixels (default 0)> blur the penstyle texture generated
-color_contour_smooth_passes <times (default 3)> perform number of smooth passed on contour before computing texture
-ccsp <times (default 3)> abbreviation for -color_contour_smooth_passes
58

Chapter 4: Capture Custom Vectorization Parameters
-color_rmv_holesl <world units (default 0.000000)> remove holes of this size when computing texture
-color_fill_holesl <world units (default 0.000000)> fill holes of this size for colour line art
Bubble Usage (implemented only for colour vectorization's line art)
-create_bubbles -- Add bubbles into the LineArt. Implemented for colour vectorization only
-bubble_gap <value (default 3)> -- Maximum number of colour art points between 2 bubbles
-bubble_length <value (default 10)> -- Maximum number of circles in a bubble
-min_radius <value (default 1.5000)> -- Minimum radius of a circle in a bubble relative to the line thickness (must be >= 1.0)
-max_radius <value (default 3.5000)> -- Maximum radius of a circle in a bubble relative to the line thickness (must be >= 1.0)
-uniform_gap -- The space between bubbles is constant
-uniform_height -- Same height for all bubbles. DEPRECATED Specify the same min_radius and max_radius instead
Colour Vectorization Options
59
Toon Boom Pencil Check Pro User Guide
Scanner InstallationThis section explains how to configure your scanner to be able to work with Pencil Check Pro. Make sure you install the scanner hardware according to the manufacturer’s instructions.
Before you can configure your scanner it should be, set up, switched on, and connected to your system.
This chapter contains the following topics:
• Configuring a Scanner for Pencil Check Pro (Windows XP), on page 60• Configuring a Scanner for Pencil Check Pro (Windows Vista), on page 61• Configuring Scanners for Pencil Check Pro (Mac OS X), on page 62• Configuring Scan.conf to Communicate with the Scanner, on page 63
Configuring a Scanner for Pencil Check Pro (Windows XP)After you have installed the hardware, you must perform the following tasks:
• Upgrade Your SCSI Communications Layer, on page 60• Run the findscanner utility, on page 60
Upgrade Your SCSI Communications Layer Before you can use your scanner with Pencil Check Pro you must upgrade your communications layer, that is, the functions that communicate between Pencil Check Pro and your scanner.
With the installation program, we have packaged a program that will upgrade your communications layer.
To upgrade your SCSI communications layer:
1. Locate the program aspi_471a2.exe. You can find it in the folder: \Program Files\Toon Boom Animation\Pencil Check Pro\nt\inst\tools after you install Pencil Check Pro. It is also on the Pencil Check Pro CD and is included in the download package.
2. Double-click the file in a file browser to run it. The program will extract contents to a location on your hard disk.
After you reboot the system, you are ready to proceed with the next steps of the configuration process.
Run the findscanner utilityTo configure your scanners, you need to know the following scanner information:
• SCSI controller number• SCSI ID• Logical unit number (LUN)
To get this information, run the findscanner utility we have provided with Pencil Check Pro. The utility issues a report containing all of this information.
60

Chapter 4: Capture Scanner Installation
To run the findscanner utility:
1. Locate findscanner.exe. It is stored in Program Files/Toon Boom Animation/Pencil Check Pro/nt/bin.
2. Double-click the file in a file browser to launch it. The application opens a terminal or command prompt and displays a report.
In this example, the scanner is on the last line. The information you need is contained in this segment: sc2;d5;l0.
• sc2: this is the SCSI controller number and its value is 2.• d5: this is the SCSI ID and the value is 5.• l0: this is the LUN and the value is 0.
3. Record this information so that you can enter it into the Scan.conf.
Configuring a Scanner for Pencil Check Pro (Windows Vista)After you have installed the hardware, you must perform the following tasks, outlined in this section:
• Run the findscanner utility, on page 61
Run the findscanner utilityTo configure your scanners, you need to know about the following scanner information:
• Adapter ID number • Path ID• Target ID• Logical unit number (LUN)
To get this information, run the findscanner utility we have provided with Pencil Check Pro. The utility issues a report including all of this information.
To run the findscanner utility:
1. Locate findscanner.exe. It is stored in \Program Files\Toon Boom Animation\Pencil Check Pro\nt\bin.
2. Double-click the file in a file browser to launch it.
61

Toon Boom Pencil Check Pro User Guide
The application opens a terminal or command prompt and displays a report.
In this example, the scanner is on the last line. The information you need is contained in this segment: a6;p0;t6;l0.
a6: this is the Adapter ID number and its value is 6.p0: this is the Path ID and the value is 0.t6: this is the Target ID and the value is 6.l0: this is the Logical unit number (LUN) and the value is 0.
3. Record this information so that you can enter it into the Scan.conf.
Configuring Scanners for Pencil Check Pro (Mac OS X)This section explains how to configure your scanner to work with Pencil Check Pro on Mac OS X.
Before you can configure your scanner it should be, set up, switched on, and connected to your system.
After you configure your scanner, you must modify the hardware so that Pencil Check Pro can align images scanned using autofeed.
Modifying the Scan.conf FileAfter you have installed your scanner hardware, you must configure your scanner to communicate with Pencil Check Pro. To do this, you must find the name of your scanner using the findscanner utility. Then, you must add this name to the Scan.conf file.
To run the findscanner utility:
1. Open a Terminal and type:
findscanner.
findscanner reports the following information:
Device found:
<FUJITSU/M4097Ddim>
The device found must be copied into the Scan.conf file, including the angle brackets.
62

Chapter 4: Capture Scanner Installation
Configuring Scan.conf to Communicate with the ScannerOnce your scanner is set up and you know the device driver name, brand and model, you are ready to configure the Scan.conf file so that Pencil Check Pro can communicate with it. The Scan.conf file contains a number of configuration parameters you can use to control the communication between your scanner and Pencil Check Pro.
The Scan.conf file is found in:Windows XP and Vista:
C:\Program Files\Toon Boom Animation\Pencil Check Pro\etc\
Mac OS X:
1. /Applications/Toon Boom Pencil Check Pro.localized/
2. Hold down [CTRL], click Shared Modules and then select Show Packages Contents.3. Open the etc folder.
You can find a copy of the original default Scan.conf file in:Windows XP and Windows Vista:
C:\Program Files\Toon Boom Animation\Pencil Check Pro\resources\samples
Mac OS X:
1. /Applications/Toon Boom Pencil Check Pro.localized/2. Hold down [CTRL], click Shared Modules and then select Show Packages Contents.3. Open the /resources/samples folder.
The following options must be included in the Scan.conf file for Windows Vista and Windows XP:
• host: [hostName]where [hostName] is the name of the machine that the scanner is attached to.
• name: [scannerName]where [scannerName] is the manufacturer of the scanner. This name appears in the scanner drop-down list in the Scan module.
• device:
Windows: scX;dY;lZThe SCSI identifier for the scanner.X=controller number (normally 0)Y= device number (as set on the scanner)Z= The logical unit (normally 0)ex: device: sc0;d5;l0 (if the scanner is set to scsi id 5)
63

Toon Boom Pencil Check Pro User Guide
• model:[modelName]where [modelName] is model name of your scanner (the name is case sensitive and there can be no spaces separating the name and the number). Following is a list of supported scanners.
Fujitsu_M3096G
Fujitsu_M4097D
Fujitsu_fi4750C
Fujitsu_fi5750C
Ricoh_IS330
Ricoh_IS420
Ricoh_IS430
Ricoh_IS450
Ricoh_IS760
Epson_836XL
Epson_1640XL
Epson_GT-15000
Microtek_9600XL
Umax_Mirage
Sharp_JX-610
The following options must be included in the Scan.conf file for Mac OS X:• host: [hostName]
where [hostName] is the name of the machine that the scanner is attached to.• name: [scannerName]
where [scannerName] is the manufacturer of the scanner. This name appears in the scanner drop-down list in the Scan module.
• device: <device name>where <device name> is the name findscanner reports. You must include the angle brackets.
• model:[modelName]where [modelName] is model name of your scanner (the name is case sensitive and there can be no spaces separating the name and the number). Following is a list of supported scanners.
Fujitsu_M4097D
Fujitsu_fi4750C
Epson_1640XL
64

Chapter 4: Capture Scanner Installation
Here is an example of entries in a Scan.conf file for a Fujitsu scanner on Mac OS X.
host: scan1 name: Fujitsu BW model: Fujitsu_M4097D device: <FUJITSU/M4097Ddim> descr: The scanner to use for black & white and greyscale scans. defaultGamma: .89 defaultResolution: 200
The following are optional additions to the scanner description:• descr: [scannerDescription]
Where [scannerDescription] is a description of the scanner, which appears to the user in the Scanner Information dialog box in the Scan window. This text must be all on one line.
• defaultThreshold: [value]Where [value] is the default value for threshold for black and white scanning. The
value should be an integer (0 ≤ [value] ≤ 255). The default threshold value at installation is 100 if no value is specified.
• defaultBlackPoint: [value]Where [value] is the colour value (0 < [value] < 255) that the Scan module considers to be black. The Scan module forces any colour darker than this value to black. If no value is specified, it defaults to 20.
• defaultWhitePoint: [value]Where [value] defines the colour value (0 < [value] < 255) that the Scan module considers white. The Scan module forces any colour lighter than this value to white. If no value is specified, it defaults to 235.
• defaultGamma: [value]Where [value] is the default value for colour and greyscale gamma correction (0.0 < [value] ≤ 2.55) on the scanner. The default gamma value at installation is 1.0 if no value is specified.
• defaultResolution: [value]Where [value] is the default resolution in DPI (dots per inch) for the scanner. The value should be an integer that is one of the scanner’s legal resolutions. The default resolution value at installation is 300. For Fujitsu and Ricoh scanners, 300 DPI is appropriate. For colour scanners, like the Epson, Sharp, Umax and Microtek, 150 DPI is suggested.
• defaultPegSide: [value]Where [value] defines the default value in the Peg-Side menu when you select the scanner. You can choose between Top, Right, Left or Bottom.
65

Toon Boom Pencil Check Pro User Guide
• registrationStrictness: [level]Where [level] defines how exact the location of the peg holes must be for the software to recognize them. You have two values to choose from:
Strict: the peg holes must be in a tightly defined area to be recognized. This is the default setting.Loose: the peg holes can be anywhere in a larger area to be recognized. This setting is recommended.
• pegPitch: [value]Where [value] is the number of decimal places permitted when defining the distance in inches between side pegs. The peg pitch can be defined to fix splicing problems when aligning pan cels. The default value is 8 (e.g., a distance of 0.12345678 could be defined).
• side0CleanSize: [value]side1CleanSize: [value]side2CleanSize: [value]side3CleanSize: [value]Where [value] is the distance in inches from the edge of the drawing that will not be included in the scan. Including these values can save vectorization time and remove dirtiness at the edges of a drawing. Side “0” is the side with peg holes. Remaining sides are numbered in clockwise fashion.
66

Chapter 5 Exposure Sheet
The exposure sheet is one of the central points in Pencil Check Pro and controls almost everything you see in your project. The digital exposure sheet is a reproduction of the traditional paper exposure sheet. In the Xsheet, you can control the timing, create annotations, and import sounds. It is also possible to plan camera motion. You will learn about it in Camera and Sound, on page 143.
In this chapter, you will learn about:
• Adding Frames, on page 68• Columns, on page 69• Filling Exposure, on page 77• Navigating Between Frames and Columns, on page 93• Drawing Identification, on page 94• Annotation Columns, on page 95• Printing the Xsheet, on page 100
NOTE:
By default, the Xsheet has two columns, A and BG, as well as a duration of 24 frames.
67

Toon Boom Pencil Check Pro User Guide
Adding Frames You can add frames to your scene in several different ways:
• Setting the Scene Length, on page 68• Adding Frames Before or After a Selection, on page 68• Adding Frames at the Beginning or at the End, on page 69
Setting the Scene Length To set the set scene length:
1. Select Scene > Set Scene Length.
The Set Scene Length dialog box opens.
2. In the Number of Frames field, type the amount of frames needed.3. Click on the OK button.
Adding Frames Before or After a SelectionYou can add some frames somewhere in the middle of the scene. If you select a frame row in the Xsheet view, the system will add the new frames before or after the selection depending on your choice.
To add frames before or after selection:
1. In the Xsheet view, select a frame row.
2. Select Scene > Frame > Add Frames Before Selection or Add Frames After Selection. The default keyboard shortcuts are [Ctrl]+[G] and [Ctrl]+[H] (Windows) or [ ]+[G] and [Ctrl]+[H] (Mac OS X).
68

Chapter 5: Exposure Sheet Columns
The Add Frames window opens.
3. In the Number of Frames to Add field, enter the amount of frames needed in the scene.4. Click on the OK button.
Adding Frames at the Beginning or at the EndYou can add some frames at the beginning or at the end of the scene.
To add frames at start or at end:
1. Select Scene > Frame > Add Frames at Start or Add Frames at End.
The Add Frames window opens.
2. In the Number of Frames to Add field, enter the amount of frames needed in the scene.3. Click on the OK button.
Columns Before filling any value or setting any timing or exposure, you need to add new columns.
Column TypesThere are four types of columns:
• AnnotationThe annotation column allows you to type and draw notes related to the drawing columns.
• CameraThe camera columns display the X, Y and Z coordinates of the camera motion.
• DrawingThe drawing column displays drawings and timing.
• SoundThe sound column carries sound files. The supported formats are MP3, WAV and AIFF.
NOTE:
The Annotation columns will be covered in a following section of this chapter and the Camera and Sound columns will be covered in a following chapter.
69

Toon Boom Pencil Check Pro User Guide
Creating Drawing Columns To add a drawing column:
1. Select Scene > Columns > Add Columns or you can click on the Add Columns button in the Xsheet Tools toolbar. The default keyboard shortcut is [Shift]+[C].
The Add Columns dialog box opens.
2. In the Column Name field, name your column appropriately.
3. In the Column Type field, select Drawing.
4. In the Position field, select where you want your column to be inserted.
5. In the Field field, select if the column will display drawings drawn on 12 or 16 field paper.
6. Click on the OK button.
The new column appears.
A column’s field size is not the scene field, but the paper size used to animate the sequence. The industry standard is 12-field or 16-field. We see 12-field more frequently for series, whereas feature films tend to use 16-field. This option allows the system to correctly register and align all of the columns as it is supposed to.
70

Chapter 5: Exposure Sheet Columns
Columns and Drawing ConceptEach column is linked to a directory where all of the drawings imported into or created directly in it are saved. This directory has the same name as the Xsheet column. When a value or drawing name is typed in the drawing column, the system looks in the column’s directory for the corresponding drawing to display. If there is no corresponding drawing, a new one will be created.
The column’s cells are not used for storage, but are linked to the drawings contained in the column’s directory. If you remove a drawing from the column exposure, it is not deleted, but is simply not displayed.
When you create a drawing cycle, all of the repeated drawings are linked to the same original files. This means that when you modify, repaint or correct a drawing named “1,” all drawings named “1” will be updated simultaneously.
Modifying Columns Once the columns are added to the scene, you may want to make some modifications such as the ordering, field size etc. You may also want to show or hide some of them.
Ordering Xsheet ColumnsYou can reorder columns in the Xsheet view using the mouse’s middle button.
71
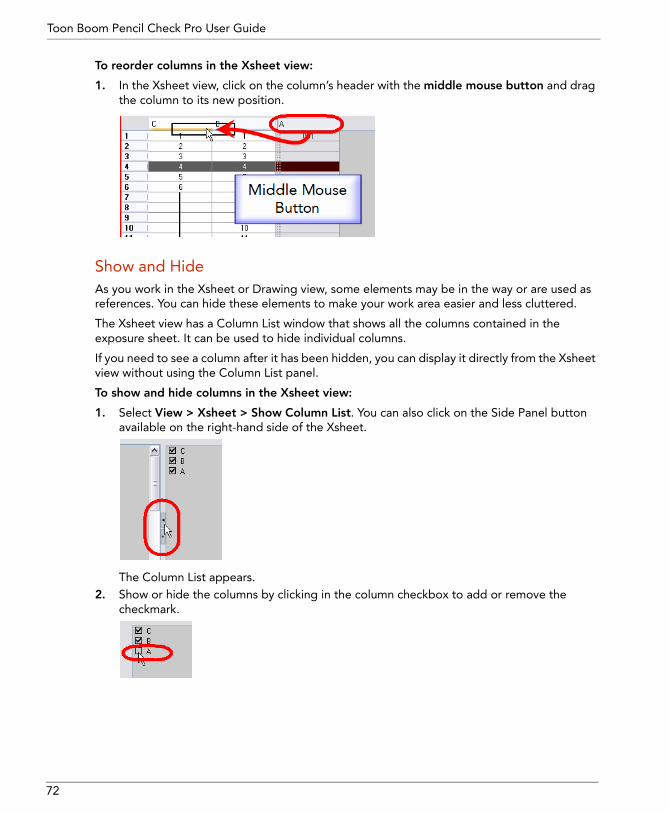
Toon Boom Pencil Check Pro User Guide
To reorder columns in the Xsheet view:
1. In the Xsheet view, click on the column’s header with the middle mouse button and drag the column to its new position.
Show and Hide As you work in the Xsheet or Drawing view, some elements may be in the way or are used as references. You can hide these elements to make your work area easier and less cluttered.
The Xsheet view has a Column List window that shows all the columns contained in the exposure sheet. It can be used to hide individual columns.
If you need to see a column after it has been hidden, you can display it directly from the Xsheet view without using the Column List panel.
To show and hide columns in the Xsheet view:
1. Select View > Xsheet > Show Column List. You can also click on the Side Panel button available on the right-hand side of the Xsheet.
The Column List appears.2. Show or hide the columns by clicking in the column checkbox to add or remove the
checkmark.
72
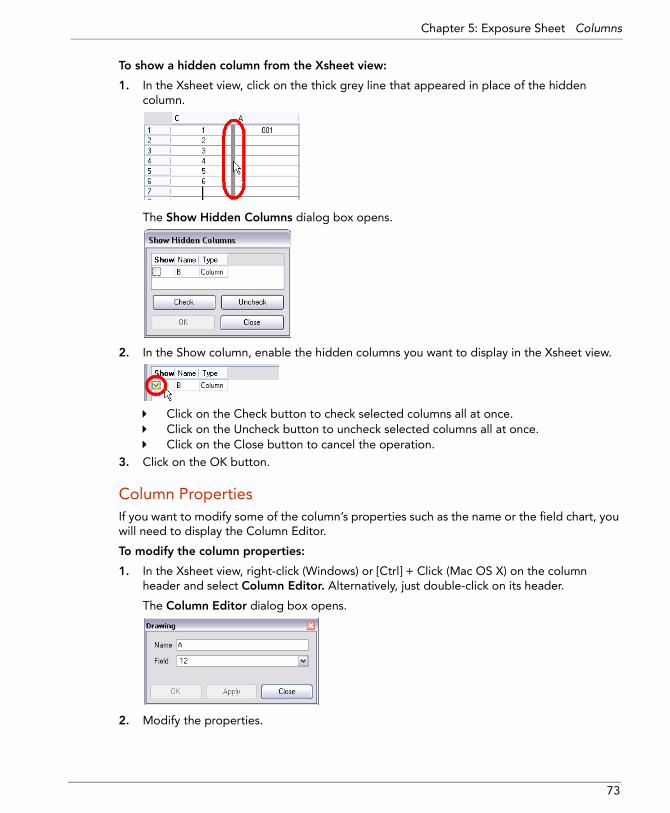
Chapter 5: Exposure Sheet Columns
To show a hidden column from the Xsheet view:
1. In the Xsheet view, click on the thick grey line that appeared in place of the hidden column.
The Show Hidden Columns dialog box opens.
2. In the Show column, enable the hidden columns you want to display in the Xsheet view.
Click on the Check button to check selected columns all at once.Click on the Uncheck button to uncheck selected columns all at once.Click on the Close button to cancel the operation.
3. Click on the OK button.
Column PropertiesIf you want to modify some of the column’s properties such as the name or the field chart, you will need to display the Column Editor.
To modify the column properties:
1. In the Xsheet view, right-click (Windows) or [Ctrl] + Click (Mac OS X) on the column header and select Column Editor. Alternatively, just double-click on its header.
The Column Editor dialog box opens.
2. Modify the properties.
73

Toon Boom Pencil Check Pro User Guide
3. Click on the OK button.Click on the Apply button to apply the changes without closing the dialog box.Click on the Close button to close the dialog box. If you previously clicked on the Apply button, the changes will remain. If you didn’t apply the changes, the operation will be canceled.
Thumbnail DisplayWhen there is a large number of columns in the exposure sheet, it is not always easy to quickly identify a particular column. Displaying the column thumbnails makes this easier. This option will display a small thumbnail picture of the current frame below the column header.
To display the thumbnails:
1. Select View > Xsheet > Show Thumbnails.
The thumbnails appear.
Duplicate ColumnsDuplicating a column provides you with an independent copy of the drawings and their exposure. You can modify anything you want in the duplicated column without affecting the original one.
To duplicate a column:
1. In the Xsheet, click on the header of the column you want to duplicate.
2. Select Scene > Columns > Duplicate Column. You can also click on the Duplicate
Column button situated in the Xsheet Tools toolbar.
The new duplicated column appears.
74

Chapter 5: Exposure Sheet Columns
Column Transparency and Colour In Pencil Check Pro it is possible to change the transparency of drawings, this improves the visibility of the line test. You can further increase the visibility by changing the line colour of each layer.
The colour override and transparency of a column are only visible in the Playback view. It will not show in the Drawing view.
Changing the Transparency of a Column If two layers overlap and you need to check the animation of the layer behind, you can change the top layer’s opacity to see through to the back layer.
To change a drawing’s transparency in a column:
1. In the Xsheet view, right-click (Windows) or [Ctrl] + Click (Mac OS X) on the column’s header and select Set Column Transparency.
The Transparency dialog box opens.
2. Move the slider until you have the amount of transparency you need, 0 being opaque and 100 being fully transparent.
3. Click on the OK button.4. Check the transparency result in the Playback view.
75

Toon Boom Pencil Check Pro User Guide
Changing the Colour of a Drawing in a Column To preview your line test in the Playback view, you can override the colour of the lines and colour fills, changing them to a specific colour. For example, layer A could be changed to red, layer B to green and layer C to blue.
To change the colour of all the drawings in a column:
1. In the Xsheet view, right-click (Windows) or [Ctrl] + Click (Mac OS X) on the column’s header and select Column Colour Manager.
The Column Colour Manager dialog box opens.
2. Click on the Line Art Colour swatch corresponding to the column you want to modify.
The Colour Picker window opens.3. Select the colour to override your drawings’ line colour.
4. Click on the Close button to close the Colour Picker window.5. Repeat the same process for the drawings’ Colour Art Colour.6. Enable the Enable Line Colour Override option to see the colour changes in the
Playback view. You can disable it if you don’t want to see them anymore.
7. Click on the Close button to close the Colour Manager window.
76

Chapter 5: Exposure Sheet Filling Exposure
Filling ExposureToon Boom Pencil Check Pro provides different tools to fill in exposures and values, create cycles, set increments, etc.
There are two filling modes:
• Overwrite, on page 77• Insert, on page 78
There are also two filling methods:
• Filling an Exposure Manually, on page 78• Automated Filling, on page 88
Filling ModesYou can fill columns using two different filling modes: Overwrite or Insert. These modes control the filling behaviour.
To toggle between Overwrite and Insert modes:
Select Scene > Exposure > Insert Mode/Overwrite Mode. The default keyboard shortcut is [I].
OverwriteBy default, the Xsheet view is set to Overwrite mode. When you add a new value or a new value sequence over existing ones, the old values will be overwritten. The existing timing sequence remains in the same place and will not be pushed further down the column.
77

Toon Boom Pencil Check Pro User Guide
InsertThe Insert mode acts the reverse of the Overwrite mode. When you add a new value or a new value sequence over existing ones, it will insert the new values between the old ones. The existing timing sequence will be pushed down the column.
Filling an Exposure ManuallyTo fill an exposure manually, there are a few things to familiarize yourself with:
• Typing Mode, on page 78• Holding Exposure, on page 79• Extending and Dragging Exposure, on page 79• Increasing and Decreasing Exposure, on page 83• Creating Cycles, on page 86
Typing ModeTo enter a value in a column’s cell, double-click in the cell and type in the numbers or letters.
NOTE:
You can only use alphanumeric values. (0-9, a-z, underscore (_) and dash (-)).
• If you press the keyboard shortcut [Return], you will move on to the next cell.• If you press the keyboard shortcut [ESC], you will exit the typing mode to return to
normal mode.
To type values in the Xsheet view:
1. In an Xsheet column, double-click on one cell.
78

Chapter 5: Exposure Sheet Filling Exposure
2. Type a value or drawing name in the cell.
Press [Return] to move on to the next cell.
Press [ESC] to quit the typing mode.
Holding ExposureAn animation is not always done in single frame. Drawings will often be exposed on double exposure, also known as double frame. This means that each drawing is exposed on two cells. It can also be exposed on three, four, five cells and so on. To prevent mistakes and also to save time, instead of typing the same thing four or five times, Toon Boom Pencil Check Pro provides you with the option of holding your cells automatically as you type.
The Xsheet’s Hold Exposure option allows you to choose how many frames you want to hold your exposure for.
To hold exposure:
1. Select Exposures > Hold Exposure > Hold 2 Cells.2. Type a value or drawing name in the cell.
Press [Return] to move on to the next cell.Press [ESC] to quit the typing mode.
3. Try the same action with Hold 3 Cells, Hold 4 Cells and Custom.The Custom option allows you to hold as many cells as needed. You can type in any amount.
Extending and Dragging ExposureOnce you type your first value and set the amount of held cells, you can use the extend exposure and dragging features.
Extending Exposure
The Extend Exposure feature allows you to select a cell containing a value and to pull it down to the desired frame.
79

Toon Boom Pencil Check Pro User Guide
To extend a cell exposure:
1. In the Xsheet view, select the red arrow in the cell’s right side.
2. Pull down the selected cell to the desired frame.
NOTE:
The red selection box must be visible when releasing the mouse button. If it is not visible, the action is considered cancelled.
Extending and Creating a Sequence
You can extend and create a sequence using almost the same procedure as you would when you extend an exposure. The only differences being that the selected cell must only contain numbers and that you need to press the [Shift] key while pulling down on the selection.
NOTE:
The creation of the sequence will not work if there are letters in the selected cell.
To create a sequence:
1. In the Xsheet view, select a cell containing a number.
2. In the selected cell, click on the red arrow on the cell’s right-hand side.
80

Chapter 5: Exposure Sheet Filling Exposure
3. Press the [Shift] key and hold it down. Make sure a [+] sign appears.
4. Pull down the selection box to the desired frame.
NOTE:
The red selection box must be visible when releasing the mouse button. If it is not visible, the action is considered as cancelled.
5. First release the [Shift] key, then release the mouse button.
81

Toon Boom Pencil Check Pro User Guide
Dragging Cells
You can also drag a cell to any other frame in the same column or into another column.
To drag a cell to another frame:
1. In the Xsheet view, select one or more cells.
2. In the Xsheet view, select the small dotted area on the left-hand side of the selected cells.
3. Drag the selection to any other cell in the same column or in another column.
If you simply drop the selection, it will overwrite the existing frames.If your press [Shift] while dropping, it will insert the selection between the existing frames.
82

Chapter 5: Exposure Sheet Filling Exposure
Increasing and Decreasing ExposureThere are five options that allow you to modify the exposure sheet’s timing quickly:
• Increase Exposure, on page 83• Decrease Exposure, on page 84• Increase/Decrease Exposure Field, on page 84• Insert Blank Cell, on page 85• Set Exposure, on page 85
Increase Exposure
Increasing the exposure will add one more exposure to a selected cell, repeating this action will add an extra cell every time. This is a very quick way of extending a drawing exposure and is always set in the Insert mode. Increasing an exposure will always push down the existing exposure.
To use Increase Exposure:
1. In the Xsheet view, select a cell.
2. Right-click (Windows) or [Ctrl] + Click (Mac OS X) on the selected cell and select
Exposure > Increase Exposure. The default keyboard shortcut is [+].
The drawing’s exposure increases.
83

Toon Boom Pencil Check Pro User Guide
Decrease Exposure
Decreasing the exposure will remove one exposure from a selected cell, repeating this action will remove an extra cell every time. This action is a rapid way to reduce a drawing exposure.
To use Decrease Exposure:
1. In the Xsheet view, select a cell.
2. Right-click (Windows) or [Ctrl] + Click (Mac OS X) on the selected cell and select
Exposure > Decrease Exposure. The default keyboard shortcut is [-].3. Right-click (Windows) or [Ctrl] + Click (Mac OS X) on the selected cell and select
Exposure > Clear Exposure and Pull. The default keyboard shortcut is [Z].
Increase/Decrease Exposure Field
Another technique you can use to quickly increase or decrease the exposure of a selected drawing is by making use of the Increase/Decrease Exposure field.
To increase and decrease exposure using the Xsheet field:
1. In the Xsheet view, select the cell to modify.
84

Chapter 5: Exposure Sheet Filling Exposure
2. In the Xsheet’s bottom right-hand corner, increase or decrease the drawing’s exposure by clicking on the up or down arrows.
Insert Blank Cell
Use the Insert Blank Cell option to place an empty cell between other cells. This is always done in Insert mode even if you are set to Overwrite mode, so it will push down existing exposure.
To use Insert Blank Cell:
1. In the Xsheet view, select a cell.
2. Right-click (Windows) or [Ctrl] + Click (Mac OS X) on the selected cell and select
Exposure > Insert Blank Cell. The default keyboard shortcut is [X].
The blank cell is inserted.
Set Exposure
You can also easily increase or decrease the exposure for a selected cell range by using the Set Exposure options.
Click on the small arrows here to increase or decrease the drawing’s exposure
85

Toon Boom Pencil Check Pro User Guide
To use Set Exposure:
1. In the Xsheet view, select the cell range that you want to modify the exposure for.
2. Select one of the following:• Scene > Exposure > Set Exposure> Set Exposure to 1 • Scene > Exposure > Set Exposure> Set Exposure to 2 • Scene > Exposure > Set Exposure> Set Exposure to 3 • Set Exposure
If you choose the Set Exposure option, the Set Exposure dialog box opens.
Type the amount of frames you want the drawings to be displayed.Click on the OK button
The new timing is displayed in the Xsheet view.
Creating CyclesOnce you have entered a series of drawings and exposures, you can create cycles out of them and repeat them.
To create cycles:
1. In the Xsheet view, select the cell range to cycle.
2. Select Scene > Exposure > Create Cycle.
86

Chapter 5: Exposure Sheet Filling Exposure
The Create Cycle dialog box opens.
3. In the Number of Cycles field, enter the amount of cycles, including the initial cycle, that you want for the selected cells. For example, if you want to extend by four more cycles, add the first cycle to this amount for a total of 5 cycles.
4. Click on the OK button.
87
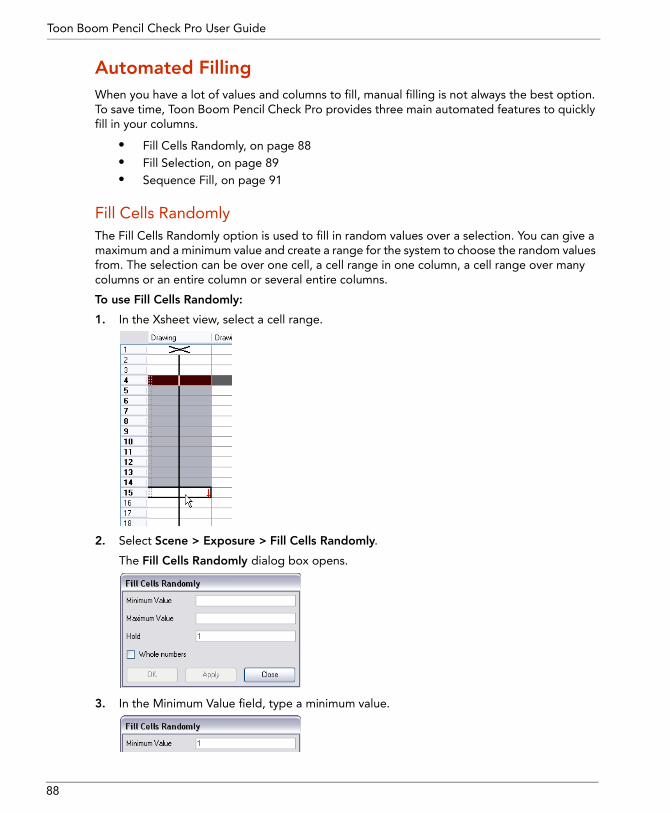
Toon Boom Pencil Check Pro User Guide
Automated FillingWhen you have a lot of values and columns to fill, manual filling is not always the best option. To save time, Toon Boom Pencil Check Pro provides three main automated features to quickly fill in your columns.
• Fill Cells Randomly, on page 88• Fill Selection, on page 89• Sequence Fill, on page 91
Fill Cells RandomlyThe Fill Cells Randomly option is used to fill in random values over a selection. You can give a maximum and a minimum value and create a range for the system to choose the random values from. The selection can be over one cell, a cell range in one column, a cell range over many columns or an entire column or several entire columns.
To use Fill Cells Randomly:
1. In the Xsheet view, select a cell range.
2. Select Scene > Exposure > Fill Cells Randomly.
The Fill Cells Randomly dialog box opens.
3. In the Minimum Value field, type a minimum value.
88

Chapter 5: Exposure Sheet Filling Exposure
4. In the Maximum Value field, type a maximum value.
5. In the Hold field, choose an exposure holding value.
6. If you are applying this option to a drawing column, enable the Whole Numbers option to avoid decimal points.
7. Click on the OK button.
Fill SelectionThe Fill Selection option is used to fill the same value all over a selection. The selection can be over one cell, a cell range in one column, a cell range over many columns, an entire column or many entire columns. You can use numbers, words, letters or any alphanumeric value.
To use Fill Selection:
1. In the Xsheet view, select a cell range.
89

Toon Boom Pencil Check Pro User Guide
2. Select Scene > Exposure > Fill Selection. The default keyboard shortcut is [Ctrl]+[T] (Windows) or [ ]+[T] (Mac OS X).
The Fill Selection dialog box opens.
3. In the Value field, type the desired value.4. Click on the OK button.
90

Chapter 5: Exposure Sheet Filling Exposure
Sequence FillThe Sequence Fill option is used to create a number sequence over a selection. The number sequence can be upward, downward, single, double or higher increment, as a cycle, etc. The selection can be over one cell, a cell range in one column, a cell range over many columns, an entire column or several entire columns.
To use Sequence Fill:
1. In the Xsheet, select a cell range.
2. Select Scene > Exposure > Sequence Fill. The default keyboard shortcut is [Ctrl]+[M]
(Windows) or [ ]+[M] (Mac OS X).
The Sequence Fill dialog box opens.
3. In the Starting Value field, type the starting number for the number sequence.
4. In the Increment field, choose an increment from the name changing range (1-2-3-4, 1-3-5-7, 10-9-8-7-6-5-4-3-2-1). The value can be positive or negative.
91

Toon Boom Pencil Check Pro User Guide
5. In the Hold field, choose an exposure holding value.
6. Enable the Cycle option if you want a cycle; type the amount of cells that this cycle will last for.
NOTE:
If you choose a two cell hold, a cycle of three drawings will last six cells
7. If you selected a larger range than the amount of frame needed, enable the End Frame and type the last frame needed.
8. If you want to have more than one digit in your numbers such as “001” instead of “1”, enable the Padding option and add as many pound signs “#” as digits needed.
9. Click on the OK button.
92

Chapter 5: Exposure Sheet Navigating Between Frames and Columns
Navigating Between Frames and Columns Once a cell is selected in the Xsheet view, you can navigate between the columns using keyboard shortcuts that are effective in both the Drawing view and the Xsheet view.
You can navigate through:
• Columns• Drawings• Frames
To navigate through the drawings, frames and columns:
1. In the Xsheet view, select a cell.
2. Once the cell is selected, you can navigate between:Previous and next columns using the keyboard shortcut [H] and [J].
Previous and next drawings using the keyboard shortcut [F] and [G].
93

Toon Boom Pencil Check Pro User Guide
Previous and next frames using the keyboard shortcut [,] and [.].
Drawing Identification The Drawing Identification tool helps the animator to identifying the drawings as:
• Key drawing• Breakdown drawing• In-between drawing
Identifying Drawings To identify drawings as Key, Breakdown or In-between:
1. In the Xsheet view, select the drawing to be identified.
2. In the Xsheet view, click on the Key , Breakdown or the In-between buttons.
Note:There is no marker displayed in the Xsheet for in-between drawings (they are regular drawings). The option is used to remove a Key or Breakdown property from a drawing
94

Chapter 5: Exposure Sheet Annotation Columns
Annotation Columns The Annotation Columns are a more than just a handy tool in Pencil Check Pro. They allow you to mark actions, corrections or any other information related to your animation that you would like to draw or write. This way, you can print your Pencil Check Pro Xsheet, take it back to your animation table and work with those treasured annotations.
This section is divided in the following topics:
• Adding an Annotation Column, on page 95• Drawing and Typing in the Annotation Column, on page 96• Changing the Drawing Settings, on page 98• Importing an Annotation File, on page 99
Adding an Annotation Column To add an annotation column:
1. Select Scene > Columns > Add Columns or you can click on the Add Columns button in the Xsheet’s toolbar. The default keyboard shortcut is [Shift]+[C].
The Add Columns dialog box opens.
2. In the Column Name field, name your column appropiately.
3. In the Column Type field, select Annotation.
4. In the Position field, select where you want your column to be inserted.
5. Click on the OK button.
The new column appears.
95

Toon Boom Pencil Check Pro User Guide
Drawing and Typing in the Annotation Column In the annotation column, you can not only type in your notes and relevant information but also draw sketches and ideas which will be useful in producing your animation.
Drawing in the Annotation ColumnBefore you can draw in the annotation column, you must first activate the Enable Drawing option. Once this is done, you can start drawing using the mouse or the pen tablet.
NOTE:
Pen tablet pressure sensitivity is not supported in the annotation column.
To enable drawing in the annotation column:
1. Select Scene > Annotation > Enable Drawing. You can also click on the column’s header icon to toggle the Drawing mode.
The Select icon indicates that the Drawing mode is disabled.
The Brush icon indicates that the Drawing mode is enabled.
To draw in the annotation column:
To draw in an annotation column, simply use your mouse or pen tablet.
96

Chapter 5: Exposure Sheet Annotation Columns
Typing in the Annotation ColumnTyping in an annotation column is independent from the Drawing mode. You can be in either mode and the typing will work.
To type in an annotation column:
1. In the annotation column, double-click on the cell where you want to write.
2. In the selected cell, type the desired text.
Refer to the Typing Mode section to get more information about typing values in the Xsheet.
Erasing Annotation Column Content You can erase part or all of the annotation column’s content.
To erase the annotation content:
1. In the Xsheet view, disable the Drawing mode.
2. In the Xsheet view, select the cell range you want to clear from text or images. Do not select any cells if you plan to clear everything.
97

Toon Boom Pencil Check Pro User Guide
3. In the Xsheet view, right-click (Windows) or [Ctrl] + Click (Mac OS X) in the annotation column and select:
Annotation > Erase All to erase completely the content of the column.Annotation > Erase Selected Images to erase the images contained in the selected cell range. Make sure to disable the Drawing mode to do so.Annotation > Erase Selected Texts to erase the text contained in the selected cell range. Make sure to disable the Drawing mode to do so.
Changing the Drawing Settings You can change the pen size and colour when you draw in the annotation column.
To change the pen width:
1. In the Xsheet view, right-click (Windows) or [Ctrl] + Click (Mac OS X) in the annotation column and select Annotation > Change Pen Width > 1, 2, 3, 4 or Custom.
If you selected the Custom option, the Pen Width dialog box opens.
2. In the Pen Width field, type the amount of pixel you want the pen size to be.3. Click on the OK button.
To change the pen colour:
1. In the Xsheet view, right-click (Windows) or [Ctrl] + Click (Mac OS X) in the annotation column and select Annotation > Change Pen Colour.
The Select Colour dialog box opens.
2. Choose the new colour.3. Click on the OK button.
98

Chapter 5: Exposure Sheet Annotation Columns
Importing an Annotation File If you scanned your paper exposure sheet’s annotations or if you need to place some pictures or drawings in your annotation columns, you can easily import them.
To import annotation files:
1. In the Xsheet view, select the first cell in the annotation column where you want the imported image to start.
2. Right-click (Windows) or [Ctrl] + Click (Mac OS X) in the annotation column and select Annotation > Import Files.
3. Browse for the bitmap image to import.4. Click on the Open button.
The image appears in the annotation column.
99

Toon Boom Pencil Check Pro User Guide
Printing the Xsheet Once your line test is completed and you have marked all the information, corrections and timing you want in your Xsheet view, you can print out your exposure sheet. Printing out the Xsheet allows you to take it with you to your animation table or to give a copy to the animator.You can also use it to create your Xsheet skeleton directly in Pencil Check Pro.
To print your exposure sheet:
1. Select File > Print Xsheet.
The Print dialog box opens.
2. To setup your print:Windows: In the Select Printer section, select your printer and adjust the rest of the printing settings. Refer to the printer’s user guide to learn more about the printer’s options.Mac OS X: In the Printer section, select your printer and adjust the rest of the settings
by clicking on the Parameters button. You can also click on the PDF button and select an option from the drop-down menu if you want to save a PDF version of your exposure sheet. Refer to the printer’s user guide to learn more about the printer’s options.
3. Click on the Print button.
100

Chapter 6 Playback
Toon Boom Pencil Check Pro allows you to playback your line test in real time.
In this chapter, you will learn about the following:
• Playing Back your Line Test, on page 102
101

Toon Boom Pencil Check Pro User Guide
Playing Back your Line Test Once you have captured your images and established your timing, you can verify your animation by performing a quick render in the Playback view, this will let you see your scene playing in real time. The Playback view is used to playback your line test as a final image result with anti-aliasing. You can also use the Playback view to create your lip-sync chart using the sound scrubbing feature.
Refer to the Camera and Sound chapter to learn more about Sound Scrubbing and Lip-Sync.
To playback your line test in Playback view:
1. Open your Playback view.
2. Click on the Play button in the Playback toolbar a first time to play your scene.
The Load dialog box opens.
In the Playback bottom toolbar, the Playlist Status icon notifies you whether the playlist is Ready or Out-dated.
Ready: When the playlist is ready, the system will not refresh the frames the next time you press the Play button.Out-dated: If changes occur in the scene, the playlist will become out-dated and the system will refresh the frames when the Play button is pressed.
102

Chapter 6: Playback Playing Back your Line Test
Playback Toolbar
• Press the Play button to play the animation forward.
• Press the Play Backward button to play the animation backward.
• Press the Stop button to stop the playback.
• Press the Loop button to repeat your playback indefinitely.
• Press the First Frame button to jump to the first frame.
• Press the Last Frame button to jump to the last frame.
• Press the Sound button to enable sound in the playback.
• Press the Sound Scrubbing button to enable sound scrubbing in the playback.• Scroll through the playback’s frames using the Jog Frames right and left arrows.
• Enter new values in the Start and Stop fields to change the range of frames to be played back.
• Enter a new value in the fps field to change the speed of the playback.
103

Toon Boom Pencil Check Pro User Guide
Playback View Bottom Toolbar
• Scroll through the playback’s frames using the Frame Slider.
• Check the Preroll check box to enable the Preroll option and enter the quantity of blank frames to be added at the start of the playback in the
Preroll field.
• Press the Matte/Image buttons to view the playback as a matte or as the final image.
• The Playlist Status Icon notifies you whether the playlist is Ready or Out-dated.
• The Scale indication in the Playback bottom toolbar, indicates the ratio of the playback size you are currently viewing in relation with the scene’s real size.
104

Chapter 7 Drawing and Animation
Toon Boom Pencil Check Pro allows you to correct the drawings you import, paint them and even draw directly in the software.
In this chapter, you will learn about the following:
• Adding a Column, on page 106• Drawing Tools, on page 106• Drawing Layers, on page 117• Drawing, on page 118• Animation, on page 120
105

Toon Boom Pencil Check Pro User Guide
Adding a ColumnTo draw in your Drawing view, you need to add a column in your Xsheet, if you do not already have one, and you also need to select a cell in your Xsheet column. This is similar to placing a pile of paper on your desk and choosing which paper you will draw on.
Refer to the Exposure Sheet chapter for more information on adding columns.
Drawing ToolsThis section provides a list and description of the drawing tools and options available in Toon Boom Pencil Check Pro.
The tools are:
• Override Tool, on page 107• Apply Tool to All Visible Layers, on page 108• Auto Create Colour Art from Brush, on page 109• Brush, on page 109• Eraser, on page 110• Grabber, on page 110• Grid, on page 111• Light Table, on page 112• Onion Skin, on page 113• Reposition All Drawings, on page 114• Rotary Table, on page 114• Select, on page 115• Zoom, on page 116
106

Chapter 7: Drawing and Animation Drawing Tools
Override Tool The Override Tool feature allows you to increase productivity by rapidly switching between tools used for short tasks and your previous tool.
Most drawing tool shortcuts are accessed using the [Alt] key followed by another key, such as the Eraser tool which is accessed by pressing [Alt]+[E].
If you are drawing with the Brush tool and need to briefly switch to the Eraser before continuing, hold down the [E] key while you are erasing. Once done, let go of [E] to return to the previous tool, in this case, the Brush.
You can do the same for most drawing tools that have a shortcut composed of [Alt] followed by another key, such as the Close Gap, Paint, Eraser, Brush, and Select tools, etc.
To override a tool:
1. In the Drawing Tools toolbar, select a Drawing tool.
2. In the Drawing view, start working.3. When another tool is needed briefly, click on the tool’s quick shortcut and hold it down.
For example, [E] (eraser), [B] (brush), [S] (select), [I] (paint), [Y] (paint unpainted) .
4. In the Drawing view, perform the action needed.5. Release the keyboard shortcut.
The system switches back to the previous tool.
107

Toon Boom Pencil Check Pro User Guide
Apply Tool to All Visible Layers
The Apply Tool to All Visible Layers option is used to apply an action such as cutting or resizing on all visible layers simultaneously (Line Art and Colour Art).
The Apply Tool to All Visible Layers option can not be applied on all commands. It can be applied with the Select, Eraser, Reposition All Drawings, Strokes and Dropper tools.
To use the Apply Tool to All Visible Layers:
1. In the Drawing view bottom toolbar, enable the Preview Line Art and Colour Art option.
2. Select Drawing > Apply Tool to All Visible Layers. The keyboard shortcut is [Shift]+[Q].
3. In the Drawing Tools toolbar, select the Eraser , Select or Reposition All Drawings
tool.4. In the Drawing view, start working.
108

Chapter 7: Drawing and Animation Drawing Tools
Auto Create Colour Art from Brush
The Auto Create Colour Art from Brush option is used to create the colour fill strokes in the Colour Art while drawing in the Line Art.
This option is useful for fixing small areas on drawings to be painted in the Colour Art.
To use the Auto Create Colour Art from Brush option:
1. Select Drawing > Auto Create Colour Art from Brush. The keyboard shortcut is [Shift]+[F2].
2. In the Drawing Tools toolbar, select the Brush tool.3. In the Drawing view, start drawing.
Brush
The Brush tool is used to draw and sketch with.
When you draw with the Brush tool and use a pen tablet you can create variable thickness lines by using the pressure sensitivity feature built into the software. The Brush lines are also known as fills.
To use the Brush tool:
1. In the Drawing Tools toolbar, click on the Brush button. The default keyboard shortcut is [Alt]+[B].
109

Toon Boom Pencil Check Pro User Guide
2. In the Drawing view, start drawing.
Eraser
If there is some dirt or unwanted art that cannot be removed automatically, it can be removed with the Eraser tool or selected with the Select tool and then deleted.
To use the Eraser tool:
1. In the Drawing Tools toolbar, click on the Eraser button. The keyboard shortcut is [Alt]+[E].
2. In the Drawing view, erase the desired zone.
Grabber
The Grabber tool lets you easily pan through the Drawing and Model views to access part of the view that is shown beyond the borders.
110

Chapter 7: Drawing and Animation Drawing Tools
To use the Grabber tool:
1. In the Drawing Tools toolbar, click on the Grabber button. Click and hold [SPACE], the default keyboard shortcut.
2. Click in your view and drag the cursor to pan.
To reset the pan:
The default keyboard shortcut is [Shift]+[N].
OR
In the Drawing view bottom toolbar, click on the Reset View button. The default keyboard shortcut is [Shift]+[M].
Grid
Toon Boom Pencil Check Pro has a Grid, also known as field chart, included in its Drawing view. It is a very handy tool to use if you want to set the characters and props heights, do layout and posing and animate in register. You can display the grid using the Show Grid option.
To use the Grid tool:
In the Drawing Tools toolbar, click on the Show Grid button. The keyboard shortcut is [Ctrl]+[‘] (Windows) or [ ]+[‘] (Mac OS X).
Select Grid > Square to display a standard square grid.Select Grid > 12 Field Grid to display a 12-field size grid.Select Grid > 16 Field Grid to display a 16-field size grid.Select Grid > Outline to display only the outline without any grid information.Select Grid > Underlay to display the grid behind the drawing columns.Select Grid > Overlay to display the grid over the drawing columns.
111

Toon Boom Pencil Check Pro User Guide
Light Table
When you are working in the Drawing view, you may need to see drawings from other columns that are on the same frame number. To do this, enable the Light Table option.
To use the Light Table:
Select View > Drawing > Light Table. The default keyboard shortcut is [Shift]+[L].
Sometimes you may find that some columns are in the way and you would like to hide certain one of them.
To hide columns that are in the way, show the Xsheet Column List.
1. Select View > Xsheet > Show Column List.
The Xsheet Column List opens.
2. Enable or Disable elements that you want to see or hide from your Drawing view by clicking in the appropriate check boxes.
112

Chapter 7: Drawing and Animation Drawing Tools
Onion Skin
The Onion Skin is used to display previous and next drawings.
To activate the Onion Skin:
1. Select View > Drawing > Onion Skin > Show Onion Skin. The default keyboard shortcut is [Alt]+[O].
2. Select View > Drawing > Onion skin and the desired amount of previous and next drawings.
The default keyboard shortcuts are:
• Windows: [~], [!], [@], [#], [Ctrl]+[1], [Ctrl]+[2] and [Ctrl]+[3]• Mac OS X: [~], [!], [@]. {#], [ ]+[1], [ ]+[2] and [ ]+[3]
NOTE:
The Onion Skin can be enabled and disabled as much as you want without having to always reset the previous and next drawings to zero.
113

Toon Boom Pencil Check Pro User Guide
Reposition All Drawings
Reposition All Drawings is used to reposition and scale all drawing strokes on every drawing included in a column.
NOTE:
There is no need to select the strokes, they will all be automatically selected as soon as the Reposition All Drawings tool is selected.
To use the Reposition All Drawings tool:
1. In the Drawing Tools toolbar, click on the Reposition All Drawings button.2. In the Drawing view, reposition or scale your drawings.
Rotary Table
The Rotary Table, also known as Rotate tool, lets you rotate your Drawing view while you draw.
114

Chapter 7: Drawing and Animation Drawing Tools
To use the Rotate tool:
1. In the Drawing Tools toolbar, click on the Rotate button. Click and hold [Ctrl]+[Alt] (Windows) or [ ]+[Alt] (Mac OS X), the default keyboard shortcut.
2. Click in your view and drag the cursor to rotate.
To reset the Rotation:
In the Drawing view bottom toolbar, click on the Reset Rotation button. The default keyboard shortcut is [Shift]+[X].
OR
In the Drawing view bottom toolbar, click on the Reset View button. The default keyboard shortcut is [Shift]+[M].
Select
The Select tool is used to select, scale, reposition, rotate, delete or skew drawing strokes.
• Press and hold [Alt] to get the rectangle select tool.
To use the Select tool:
1. In the Drawing Tools toolbar, click on the Select button. The keyboard shortcut is [Alt]+[S].In the Drawing view, select your drawing strokes.
115

Toon Boom Pencil Check Pro User Guide
Zoom
The Zoom tool is used to zoom in and zoom out of a view, to focus on smaller details or have a larger view of your work.
To use the Zoom tool:
1. In the Drawing Tools toolbar, click on the Zoom button. The default keyboard shortcuts are [1] Zoom Out and [2] Zoom In.
2. Click in your view to Zoom In or press and hold [Alt] and click in your view to Zoom Out.
To reset Zoom:
The default keyboard shortcut is [Shift]+[Z].
OR
In the Drawing view bottom toolbar, click on the Reset View button. The default keyboard shortcut is [Shift]+[M].
116

Chapter 7: Drawing and Animation Drawing Layers
Drawing LayersToon Boom Pencil Check Pro has an option which you can use to paint the lines and the colour fills separately.
A drawing is composed of two layers, a line layer and a colour layer. The colour layer is always placed under the line layer. These layers are accessible in the Drawing view. When you look at your final drawing, you will not see two layers; instead you will see the final composition of the lines and colours.
These two layers are:
• Line Art
• Colour Art
You can draw and paint in both layers, but if you prefer working in a single layer, you can do everything in Line Art.
The main advantage of using the Line Art and Colour Art option is so you can repaint the lines easily. If your colour fills are separated from the lines, it allows you to work on the lines without affecting the colour zones.
To toggle between Line Art and Colour Art and enable the Preview mode:
1. To toggle between Line Art and Colour Art:
In the Drawing view bottom toolbar, click on the Colour Art button.
In the Drawing view bottom toolbar, click on the Line Art button.The default keyboard shortcut is [L].
2. To preview the Line and Colour Art at the same time:
In the Drawing view bottom toolbar, click on the Preview Line and Colour Art button.The default keyboard shortcut is [P].
In order to paint in the Colour Art, you must first use the Create Colour Art from Line Art option to create colour zones in the Colour Art.
117

Toon Boom Pencil Check Pro User Guide
DrawingNow that you know about drawing tools, you are ready to draw.
To draw:
1. In the Xsheet view, select the cell where you want to draw.
2. In the Drawing Tools toolbar or the Drawing menu, select the drawing tool of your choice.
3. In the Colour view, select the desired colour.
4. In the Pen view, adjust the Brush and Eraser tool size with the Minimum Size and the Maximum Size sliders, or by directly typing the values in each field.
In the Drawing view, press and hold [Shift]+[O] and move your cursor to set the minimum size value.In the Drawing view, press and hold [O] and move your cursor to set the maximum size value.
118

Chapter 7: Drawing and Animation Drawing
5. In the Drawing view, start sketching your drawing.
6. Use the Rotary Table to rotate your workspace.
In the Drawing Tools toolbar, click on the Rotate button. The default keyboard shortcut is [Ctrl]+[Alt] (Windows) or [ ]+[Alt] (Mac OS X).The default keyboard shortcut to reset the workspace rotation is [Shift]+[X].
7. If you decide to draw in the next cell and need to see your previous drawing, enable the Onion Skin:
In the Drawing Tools toolbar, click on the Onion Skin button The default keyboard shortcut is [Alt]+[O].
119

Toon Boom Pencil Check Pro User Guide
AnimationToon Boom Pencil Check Pro can also be used to create simple and basic frame by frame hand-drawn animation or to fix your animation sequences.
To create your animation:
1. In the Xsheet view, add a new column and name it appropriately.
2. In the Xsheet view, select the cell where the first drawing will appear.
3. In the Drawing Tools toolbar, click on the Brush button.4. In the Drawing view, draw your first drawing.
5. In the Xsheet Tools toolbar, click on the Mark As Key Drawing button to identify the current drawing as a Key Drawing.
6. Enable and extend the Onion Skin.:
In the Drawing Tools toolbar, click on the Onion Skin button, the default keyboard shortcut is [Alt]+[O].Select View > Drawing > Onion Skin > and the number of drawings you need to show.
120

Chapter 7: Drawing and Animation Animation
7. In the Xsheet view, select the cell where the next drawing will be.
8. Draw your second Key drawing.
9. In the Xsheet view, identify the drawing as a Key drawing.10. In the Xsheet view, select a cell between your Key drawings.
11. In the Xsheet view, create a new drawing by double-clicking in a cell and typing a number.12. Extend the new drawing exposure until the next valid drawing.
121

Toon Boom Pencil Check Pro User Guide
13. In the Drawing view, draw your new drawing.
14. If necessary, identify the new drawing as a Key, Breakdown or In-between drawing in the Xsheet view.:
In the Drawing Tools toolbar, click on the Mark As Key Drawing button.
In the Drawing Tools toolbar, click on the Mark As Breakdown Drawing button.
In the Drawing Tools toolbar, click on the Mark As In-between Drawing button.
15. In the Xsheet view, select a new cell and repeat Step 10 to Step 14 for each new drawing.16. Use the Playback toolbar to play the animation.
122

Chapter 8 Ink and Paint
Toon Boom Pencil Check Pro can be used to ink and paint your animation sequences. Since all of the drawings are vector-based, the colour zones are completely filled and there are no scattered spots left blank.
In this chapter, you will learn about the following:
• Painting Tools, on page 124• Dirt Clean Up, on page 133• Colour Art Filling Zones, on page 136• Colours, on page 137• Painting, on page 139• Verification, on page 140• Importing a Colour Model, on page 141
123
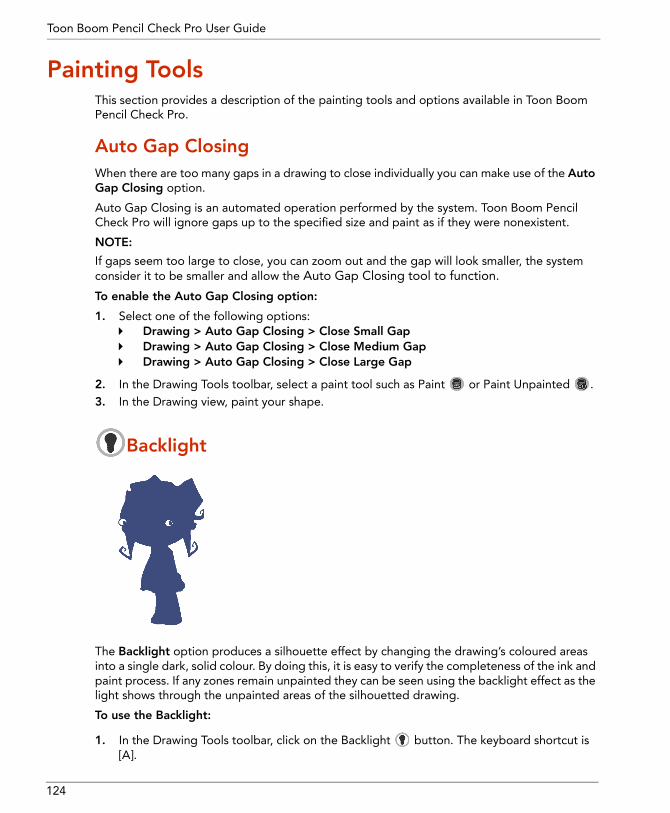
Toon Boom Pencil Check Pro User Guide
Painting ToolsThis section provides a description of the painting tools and options available in Toon Boom Pencil Check Pro.
Auto Gap Closing
When there are too many gaps in a drawing to close individually you can make use of the Auto Gap Closing option.
Auto Gap Closing is an automated operation performed by the system. Toon Boom Pencil Check Pro will ignore gaps up to the specified size and paint as if they were nonexistent.
NOTE:
If gaps seem too large to close, you can zoom out and the gap will look smaller, the system consider it to be smaller and allow the Auto Gap Closing tool to function.
To enable the Auto Gap Closing option:
1. Select one of the following options:Drawing > Auto Gap Closing > Close Small GapDrawing > Auto Gap Closing > Close Medium Gap Drawing > Auto Gap Closing > Close Large Gap
2. In the Drawing Tools toolbar, select a paint tool such as Paint or Paint Unpainted .3. In the Drawing view, paint your shape.
Backlight
The Backlight option produces a silhouette effect by changing the drawing’s coloured areas into a single dark, solid colour. By doing this, it is easy to verify the completeness of the ink and paint process. If any zones remain unpainted they can be seen using the backlight effect as the light shows through the unpainted areas of the silhouetted drawing.
To use the Backlight:
1. In the Drawing Tools toolbar, click on the Backlight button. The keyboard shortcut is [A].
124

Chapter 8: Ink and Paint Painting Tools
Close Gap
The Close Gap tool is used to close small gaps in a drawing. You need to close any small gaps in a drawing before you can use the Paint tool as it only paints closed areas. The Close Gap tool makes a small invisible stroke line between the two closest points and automatically closes the zone. This tool is designed to close a gap when you draw the invisible line a few millimeters away from it.
To use the Close Gap tool:
1. In the Drawing Tools toolbar, click on the Close Gap button. The keyboard shortcut is [Alt]+[C].
2. In the Drawing view, trace a line near the gap to close it.
You can display strokes with the Show Strokes option. Select View > Show Strokes. The default keyboard shortcut is [K].
125

Toon Boom Pencil Check Pro User Guide
Close Gaps
The Close Gaps option becomes useful when there are a lot of small gaps all over a drawing or a full animation sequence. you can choose a certain gap width and the highest the value is, bigger gaps will be closed. Once the correct level is selected, you can either apply it on a single drawing or on the whole animation sequence.
NOTE:
Make sure to enable the Show Strokes option or you will not be able to see the new strokes.
To use the Close Gaps option:
1. Select Drawing > Clean Up > Close Gaps. The keyboard shortcut is [Shift]+[F10].
The Close Gaps dialog box opens.
2. Select the correct level using the slider.
3. You can choose to apply the option on the whole column by enabling the Apply to All Drawings check box.
4. Click on the Ok button.
You can display strokes with the Show Strokes option. Select View > Show Strokes. The default keyboard shortcut is [K].
126

Chapter 8: Ink and Paint Painting Tools
Create Colour Art from Line Art
The Create Colour Art from Line Art option is used to create the colour fill strokes in the Colour Art, once the drawing in Line Art is completed.
NOTE:
You need to select the Line Art strokes with the Select tool before performing this command.
To use the Create Colour Art from Line Art option:
1. In the Drawing Tools toolbar, click on the Select button.2. Make a selection around your drawing in Line Art.3. Select Drawing > Create Colour Art from Line Art. The keyboard shortcut is [*].
127

Toon Boom Pencil Check Pro User Guide
Dropper
The Dropper tool is used to pick a colour from a Toon Boom Pencil Check Pro vector drawing. It will also highlight the selected colour in the Colour view.
To use the Dropper tool:
1. In the Drawing Tools toolbar, click on the Dropper button. The keyboard shortcut is [Alt]+[D].
2. In the Drawing view, click on the drawing’s desired colour.
128

Chapter 8: Ink and Paint Painting Tools
Paint
The Paint tool will paint any closed zone it touches, painting empty zones and repainting others.
NOTE:
Using the Paint tool, you can trace a selection around the zones to be painted, this is quicker than choosing each zone individually and painting them.
To use the Paint tool:
1. In the Drawing Tools toolbar, click on the Paint button. The keyboard shortcut is [Alt]+[I].
2. In the Colour view, select the desired colour swatch.3. In the Drawing view, paint the drawing.
129

Toon Boom Pencil Check Pro User Guide
Paint Unpainted
The Paint Unpainted tool will only paint empty closed zones. Using it you can easily paint a series of zones simultaneously once the main colour zone surrounding it is painted. For example, painting the different secondary zones on a zebra or giraffe becomes quite easy with this tool. To do this you would stretch a selection around the zones to be painted, this is quicker than selecting each zone individually and painting them.
To use the Paint Unpainted tool:
1. In the Drawing Tools toolbar, click on the Paint Unpainted button. The keyboard shortcut is [Alt]+[Y].
2. In the Colour view, select the desired colour swatch.3. In the Drawing view, paint the drawing.
130

Chapter 8: Ink and Paint Painting Tools
Show Strokes
The Show Strokes option is used to display the invisible strokes in a drawing such as contour strokes or intersection triangles. You can also use it to display the strokes while working with the Stroke tool and the Close Gap tool or when painting a drawing in the Colour Art.
To use the Show Strokes option:
Select View > Drawing > Show Strokes. The keyboard shortcut is [K].
Stroke
The Stroke tool is used to draw invisible strokes in a drawing. Unlike the Close Gap tool that creates a short straight line between two points, the stroke line will stay exactly where you draw it. This tool can be used to close a zone in a particular way or it can also be used to create some hard shadow or highlight areas. While drawing your stroke and getting quite close to an existing stroke, press [ALT] to connect the two.
NOTE:
Make sure to enable the Show Strokes option before drawing your new strokes or you will not be able to see them.
To use the Stroke tool:
1. In the Drawing Tools toolbar, click on the Stroke button. The keyboard shortcut is [Alt]+[V].
2. In the Drawing view, draw your stroke.
You can display strokes with the Show Strokes option. Select View > Show Strokes. The default keyboard shortcut is [K].
131
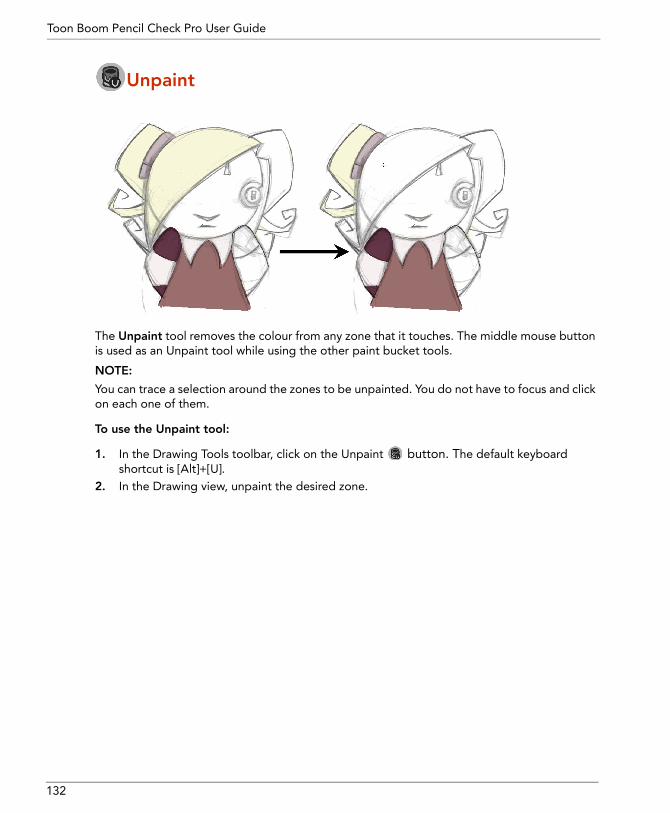
Toon Boom Pencil Check Pro User Guide
Unpaint
The Unpaint tool removes the colour from any zone that it touches. The middle mouse button is used as an Unpaint tool while using the other paint bucket tools.
NOTE:
You can trace a selection around the zones to be unpainted. You do not have to focus and click on each one of them.
To use the Unpaint tool:
1. In the Drawing Tools toolbar, click on the Unpaint button. The default keyboard shortcut is [Alt]+[U].
2. In the Drawing view, unpaint the desired zone.
132

Chapter 8: Ink and Paint Dirt Clean Up
Dirt Clean UpWhen paper drawings are passed through a scanner or camera they may pick up dirt, hair or dust. These register as part of the drawing and will appear as unwanted marks on the scanned drawing. These need to be cleaned. Pencil Check Pro provides different tools to remove them quickly.
• Remove Art Inside Selection• Remove Art Outside Selection• Remove Dirt
Remove Art Inside Selection
The Remove Art Inside Selection option is used to delete any art existing inside a selection. You can remove items such as, peg holes, black contours and large amounts of dirt on a drawing.
To use the Remove Art Inside Selection option:
1. In the Drawing Tools toolbar, click on the Select button.2. In the Drawing view, make a selection around the unwanted art.3. Select Drawing > Clean Up > Remove Art Inside Selection. The default keyboard
shortcut is [Delete].
133

Toon Boom Pencil Check Pro User Guide
Remove Art Outside Selection
The Remove Art Outside Selection option is used to delete any art existing outside a selection. You can remove items such as, peg holes, black contours and large amounts of dirt around a drawing.
To use the Remove Art Outside Selection option:
1. In the Drawing Tools toolbar, click on the Select button.2. In the Drawing view, make a selection around your drawing.3. Select Drawing > Clean Up > Remove Art Outside Selection. The default keyboard
shortcut is [Shift]+[Delete].
Remove Dirt
The Remove Dirt option will select and remove small dots and hair on a drawing and is a very quick and efficient step in the clean up process.
By raising the Remove Dirt level, it will select bigger dots. If you choose to do this be careful not to select big dots so you will avoid losing small details like pupils and nostrils. Once the level is chosen, you can apply it only on the current drawing or apply it on the whole animation sequence by enabling the Apply to All Drawings option.
134

Chapter 8: Ink and Paint Dirt Clean Up
To use the Remove Dirt option:
1. Select Drawing > Clean Up > Remove Dirt. The keyboard shortcut is [Shift]+[D].
The Remove Dirt dialog box opens.
2. Select the desired Remove Dirt level using the slider.
3. You can choose to apply the option on the whole column by enabling the Apply to All Drawings check box.
4. Click on the Ok button.
135

Toon Boom Pencil Check Pro User Guide
Colour Art Filling ZonesA Pencil Check Pro drawing is composed of a Line and a Colour filling layers. Lines and colours can be separate or together depending on the user preferences and vectorization process.
Imported and vectorized drawings will automatically have filling zones created in the Colour Art. Although if you draw directly in Pencil Check Pro, you will only have lines in your Line Art layer. If you want to paint your drawings in the Colour Art layer, you must create filling zones in your Colour Art layer previous to painting.
Refer to the Drawing and Animation chapter for more information about the Line Art and Colour Art layers.
To create filling zones in the Colour Art:
5. Select Drawing > Drawing Tools > Select. You can also click on the Select tool icon in the Drawing Tools toolbar.
6. In the Drawing view, create a selection around the whole drawing.
7. Select Drawing > Create Colour Art from Line Art.8. Repeat the previous step for each drawing in the animation sequence.
136

Chapter 8: Ink and Paint Colours
ColoursEach scene created in Toon Boom Pencil Check Pro includes a default set of colours. Each colour swatch can have its own independent name and RGBA value. So each one as its own specific identification number that associates the colour zones painted with that particular swatch to it. If the colour swatch is modified, all colour zones in the scene that are linked to it will update at once.
You can add new colour swatches and modify existing ones.
Adding and Modifying a Colour SwatchTo add or modify a colour swatch:
1. In the Colour view, click on the New Colour button.2. To modify the colour, double-click on a colour swatch.
The Colour Picker window opens.
137

Toon Boom Pencil Check Pro User Guide
3. Set your colour:In the colour wheel, select the desired colour.Type in the HSV or RGB value in the value fields.
Click on the Dropper button to select any colour on your screen. It can be from the Pencil Check Pro’s interface, your Operation System or any other visible application.
4. If need be, click on the Shade Scale’s slots to modify the shade of the selected colour.
5. If need be, adjust the desired level of transparency with the Alpha slider, or type the value directly in the Alpha field.
6. If need be, click on the add button to add the current selected colour to the Colour Storage Library, so you can quickly access it later.
7. You can rename the colour swatch in the Colour Picker window or directly in the colour list by double-clicking on its name.
138

Chapter 8: Ink and Paint Painting
PaintingYou can choose to paint your animation in the Line Art or Colour Art layer. You can paint in Line Art, but, for greyscale and textures lines, we recommend that you fill your colour zones in Colour Art.
Painting ProcessAt this point, your drawings should be cleaned and fixed, and the Colour Art filling zones should be created. You can now proceed to the actual painting.
To paint your drawings:
1. In the Drawing Tools toolbar, select the Paint or Paint Unpainted tool.2. In the Colour view, select a colour from the palette.3. Start painting the colour on your first drawing.
4. In the Drawing or Xsheet view, switch to the next or previous drawing using the [F] and [G] keyboard shortcuts.
5. Paint the zones corresponding to the selected colour.6. Repeat Step 2 to Step 5 on all the drawings in the animation sequence.
It is better and faster to paint one colour at a time on the whole animation sequence
139

Toon Boom Pencil Check Pro User Guide
VerificationWhen the ink and paint process is completed, it is always a good idea to verify that every zone was painted properly.
The Backlight feature produces a silhouette effect by changing the drawing’s coloured areas into a single dark, solid colour. Use this to verify the completeness of the ink and paint process. Any unpainted zones can be seen as the light shows through the unpainted areas of the silhouetted drawing.
To use the Backlight:
1. In the Drawing Tools toolbar, click on the Backlight Tool button. You can also use the default keyboard shortcut [A].
All the drawing’s colours turn dark blue.
2. Flip through your drawings using the default keyboard shortcuts [F] and [G] to make sure everything is painted.
3. Verify the drawings in the Colour Art to make sure that all the areas are painted.
In the Drawing view’s bottom toolbar, click on the Colour Art Layer button. The default keyboard shortcut is [L].
4. In the Drawing view’s bottom toolbar, turn on the Preview Line and Colour Art mode to see the colour zones with lines to ensure that you did not forget any spots between the colour filling and lines. The default keyboard shortcut is [P].
140

Chapter 8: Ink and Paint Importing a Colour Model
Importing a Colour ModelOnce you have a drawing fully painted, you are able to use it as a colour model and load it in the Model view. That drawing can be used and loaded in any of your Pencil Check Pro scene. You also have the possibility to load drawings that were created in Toon Boom Digital Pro and Toon Boom Harmony. As long as the drawing is a TVG format, you can load it in Pencil Check Pro.
Loading a Colour ModelYou can load a colour model from a directory on your computer or from a drawing currently in your Xsheet column.
To load a colour model from a directory:
1. Select File > Import > Model.
The browser window opens.2. Browse for your TVG file.3. Click on the Open button.
The model appears in the Model view.
To load a colour model from your Xsheet:
1. In the Xsheet view, select the desired drawing.2. In the Model view, right- click (Windows) or [Ctrl] + Click (Mac OS X) and select Use
Current Drawing.
The model appears in the Model view.
Painting With a Colour ModelTo paint with a colour model, simply follow the same steps as the painting process, but instead of selecting your colours in the Colour view, click on the colour model.
141

Toon Boom Pencil Check Pro User Guide
142

Chapter 9 Camera and Sound
To enhance the quality and accuracy of your line test, Pencil Check Pro allows you to import sound file and create camera motion! These two tools are very handy and simple to use.
In this chapter, you will learn about:
• Creating a Camera Move, on page 144• Importing Sound, on page 146• Detecting Your Lip-sync, on page 147
143

Toon Boom Pencil Check Pro User Guide
Creating a Camera MoveIn Pencil Check Pro, you can create a simple camera move based on the traditional animation principle. You can plan your camera moves based on your field chart coordinates.
To create a camera move:
1. In the Xsheet Tools toolbar, click on the Camera button.
The Create Camera Pan dialog box appears.
2. In the Start Frame field, type the first frame where the camera move will start.
3. In the End Frame field, type the frame where the camera move will stop.
4. In the Start X field, type the East-West coordinate where the camera move will start.
5. In the End X field, type the East-West coordinate where the camera move will stop.
6. In the Start Y field, type the North-South coordinate where the camera move will start.
7. In the End Y field, type the North-South coordinate where the camera move will stop.
8. In the Start Z field, type the Forward-Backward coordinate where the camera move will start.
144

Chapter 9: Camera and Sound Creating a Camera Move
9. In the End Z field, type the Forward-Backward coordinate where the camera move will stop.
10. Click on the OK button.
The camera columns appear in the Xsheet view.
You can playback the camera move in the Playback view.
Refer to the Playback chapter to learn how to playback your line test.
To modify a camera move:
1. In the Xsheet view, double-click in the cell where you want to modify the position value.2. Type the new value.
You can use the Xsheet filling features to modify your camera values. Refer to the Exposure Sheet chapter for more information about filling exposure.If the cell contains a black square , it means that it is a keyframe position.If the cell does not contain a black square , it means that it is computer generated interpolation between the keyframes.If there is a black line in the cell , it means that a previous value is held through.
You can type values in the Velocity column to affect the motion speed. The velocity always starts at “0” and ends at “1”.
145

Toon Boom Pencil Check Pro User Guide
Importing SoundIf you decide to add sound to your line test, you must first create the sound using a third-party software.
You can import WAV, AIFF or MP3 sound files.
Importing a Sound FileTo import sound into your scene:
1. Select File > Import > Sound. The Browser window opens.
2. Browse for the sound file you want to import.3. Press the OK button.
The sound file appears in the Xsheet view.
Playing Back the SoundYou can playback your animation in your Drawing and Playback view.
To playback the line test with sound:
1. In the Playback toolbar, enable the Sound button.
2. In the Playback toolbar, press the Play button to playback your scene.
Refer to the Playback chapter for more information about playing back your line test.
146

Chapter 9: Camera and Sound Detecting Your Lip-sync
Detecting Your Lip-syncOnce you have imported a dialogue sound file in Pencil Check Pro, you can scrub through your scene and listen to your sound frame-by-frame. Then you can mark your mouth shapes and phonemes in the Xsheet’s annotation columns.
To detect your lip-sync:
1. Fist, import your sound file in your scene. Refer to the Importing Sound section for more information about sound files.
2. In the Xsheet view, add an annotation column. Refer to the Exposure Sheet chapter for more information about annotation columns.
3. In the Playback toolbar, enable the Sound Scrubbing button.4. In the Playback view’s bottom toolbar, grab the slider and scrub through your scene.
5. In the Xsheet view, mark your phonemes and mouth shapes in the annotation column.
147

Toon Boom Pencil Check Pro User Guide
148

Chapter 10 Rendering
Once your line test is completed, you are ready to export it. You already saw how to Playback your scene and how to print your Exposure Sheet.
Now, you will see how to render out your clip to archive it, visualize it in an external player or show it to the animation team.
In this chapter, you will learn the following:
• Rendering Images, on page 150• Rendering a Movie, on page 151• Rendering an SWF, on page 154
149

Toon Boom Pencil Check Pro User Guide
Rendering ImagesIn Pencil Check Pro you can export your line test as a bitmap image sequence. If you have sound in your scene, the sound will not be exported with the images.
The image sequence will be exported as PNG format.
To render an Image Sequence:
1. Select File > Export > Images. The default keyboard shortcut is [Ctrl]+[Shift]+[Y] (Windows) or [ ]+[Shift]+[Y] (Mac OS X).
The Export Images dialog box opens.
2. In the Range section, select the Frame Range to render.
All: Select this option to export the entire scene.Frames: Type the first and last frame of the frame range you want to export.
3. Click on the OK button.
The image sequence is now available in the scene’s frames directory.
150

Chapter 10: Rendering Rendering a Movie
Rendering a MovieIn Pencil Check Pro movies are exported in QuickTime Movie (*.Mov) format.
To export a QuickTime movie:
1. Select File > Export > Movie.
The Export to QuickTime dialog box opens.
2. In the Export To section, browse to the desired directory by clicking on the Browse button.
The Browse dialog box opens. 3. In the File Name field, name the output file.
4. Click on the Save button.5. In the Export Range section, select the frame range to render.
All: Select this option to export the entire scene.Frames: Type the first and last frame of the frame range you want to export.
151

Toon Boom Pencil Check Pro User Guide
6. In the Time Code section, click on the radio button to indicate if you want to add a time code in your final render.
None: This option will not print a time code.Print Time Code: This option will print a time code, displaying the time in Hours, Minutes and Seconds.Print Frame Number: This option will print the frame number on each image.Note: This option allows you to add text and information to your time code such as: Sequence_027, Animator: Andy.
7. In the Options section, click on the Video Options button to set the video options.
In the Compression Type field, select the image compression you want for your movie.In the Motion section, indicate the amount of frames per second and keyframes you want for you movie.In the Compressor section, indicate the colour depth and the movie quality desired.Click on the OK button.
152

Chapter 10: Rendering Rendering a Movie
8. In the Options section, click on the Sound Options button to set the sound options.
In the Compressor section, select your compression codecs.In the Rate section, select the kHz rate.Indicate the size and if it will be Mono or Stereo sound.Click on the OK button.
9. Click on the OK button.
Your render starts.
QuickTime Movie with Alpha Channel To render out a QuickTime movie with transparency, you simply need to set your Video Options > Compressor > Depth to Millions Colors +.
153

Toon Boom Pencil Check Pro User Guide
Rendering an SWFPencil Check Pro can also export SWF movie files which is the Adobe Flash format.
To export an SWF file:
1. Select File > Export > SWF.
The Export to Flash Movie dialog box opens.
2. In the Export to section, browse to the desired directory by clicking on the Browse button.
The Choose a File Name to Save Under dialog box opens.3. In the File Name field, name the output file.
4. Click on the Save button.5. In the Export Range section, select the frame range to render.
All: Select this option to export the entire scene.Frames: Type the first and last frame of the frame range you want to export.
6. In the Options section, indicate the frame rate, the JPEG quality, if you want to protect the movie from import and also if you want to compress the movie.
7. Click on the OK button.
154

Chapter 11 Commands
This chapter describes all of the commands in the Toon Boom Pencil Check Pro menus: Use the Toon Boom Pencil Check Pro UI menu bar to access most of the software’s commands.
The menus described in this section are listed in alphabetical order:
• Drawing Menu, on page 156• Edit Menu, on page 162• File Menu, on page 164• Help Menu, on page 166• Pencil Check Menu, on page 166• Play Menu, on page 167• Scene Menu, on page 169• View Menu, on page 175• Windows Menu, on page 183
Windows
Mac OS X
155

Toon Boom Pencil Check Pro User Guide
Drawing MenuUse the Drawing menu to access drawing tools and to alter drawings.
Command Action Access Methods
Apply Tool to All Visible Layers
Use the Apply Tool to All Visible Layers command to simultaneously perform operations on the Line Art and Colour Art layers.To affect both layers at the same time, you must switch to Preview Line Art and Colour Art mode and activate the Apply Tool to All Visible Layers option.
• Select Drawing > Apply Tool to All Visible Layers.
• Press [Shift]+[Q], the default keyboard shortcut.
Auto Create Colour Art from Brush
Use the Auto Create Colour Art from Brush option to automatically create filling zones in the Colour Art layer as you draw in the Line Art layer.
• Select Drawing > Auto Create Colour Art from Brush.
• Press [Shift]+[F2], the default keyboard shortcut.
Auto Gap Closing
Use the Auto Gap Closing option to automatically close gaps as you paint.
• Use the Close Small Gap option to seal small gaps.
• Use the Close Medium Gap option to seal medium gaps.
• Use the Close Large Gap option to seal close large gaps.
• Use the Disabled option to turn off auto gap closing
The size of a gap is relative to your zoom level. Zooming out makes large gaps appear smaller.
• Select Drawing > Auto Gap Closing > Close Small Gap.
OR
• Select Drawing > Auto Gap Closing > Close Medium Gap.
OR
• Select Drawing > Auto Gap Closing > Close Large Gap.
OR
• Select Drawing > Auto Gap Closing > Disabled.
Breakdown Drawing
Use the Breakdown Drawing command to identify a drawing as a breakdown.
A icon will appear in the Xsheet view beside the drawing name.
• Select Drawing > Mark Drawing As > Breakdown Drawing.
• In the Xsheet Tools toolbar, click on the Mark As Breakdown Drawing button.
156
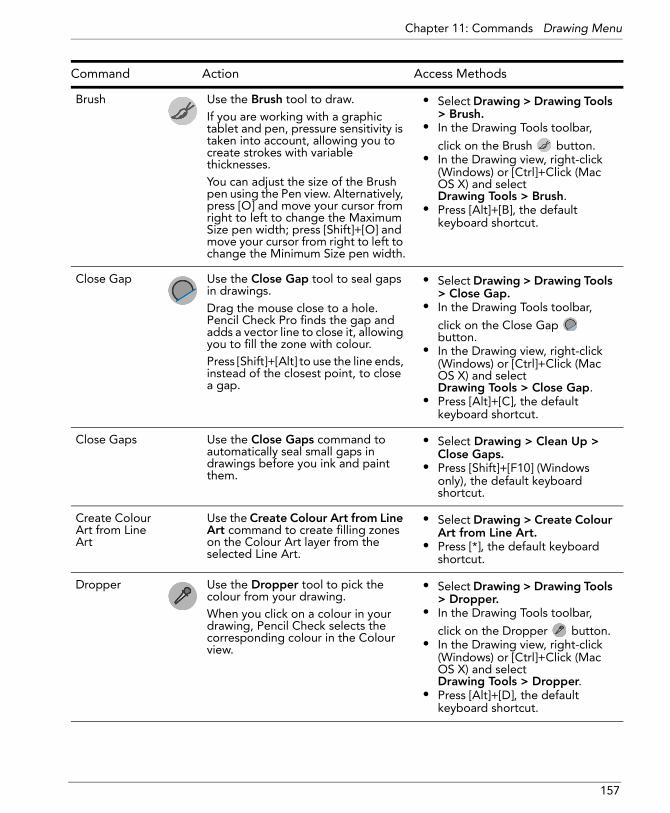
Chapter 11: Commands Drawing Menu
Brush Use the Brush tool to draw. If you are working with a graphic tablet and pen, pressure sensitivity is taken into account, allowing you to create strokes with variable thicknesses. You can adjust the size of the Brush pen using the Pen view. Alternatively, press [O] and move your cursor from right to left to change the Maximum Size pen width; press [Shift]+[O] and move your cursor from right to left to change the Minimum Size pen width.
• Select Drawing > Drawing Tools > Brush.
• In the Drawing Tools toolbar,
click on the Brush button.• In the Drawing view, right-click
(Windows) or [Ctrl]+Click (Mac OS X) and select Drawing Tools > Brush.
• Press [Alt]+[B], the default keyboard shortcut.
Close Gap Use the Close Gap tool to seal gaps in drawings.Drag the mouse close to a hole. Pencil Check Pro finds the gap and adds a vector line to close it, allowing you to fill the zone with colour. Press [Shift]+[Alt] to use the line ends, instead of the closest point, to close a gap.
• Select Drawing > Drawing Tools > Close Gap.
• In the Drawing Tools toolbar,
click on the Close Gap button.
• In the Drawing view, right-click (Windows) or [Ctrl]+Click (Mac OS X) and select Drawing Tools > Close Gap.
• Press [Alt]+[C], the default keyboard shortcut.
Close Gaps Use the Close Gaps command to automatically seal small gaps in drawings before you ink and paint them.
• Select Drawing > Clean Up > Close Gaps.
• Press [Shift]+[F10] (Windows only), the default keyboard shortcut.
Create Colour Art from Line Art
Use the Create Colour Art from Line Art command to create filling zones on the Colour Art layer from the selected Line Art.
• Select Drawing > Create Colour Art from Line Art.
• Press [*], the default keyboard shortcut.
Dropper Use the Dropper tool to pick the colour from your drawing. When you click on a colour in your drawing, Pencil Check selects the corresponding colour in the Colour view.
• Select Drawing > Drawing Tools > Dropper.
• In the Drawing Tools toolbar,
click on the Dropper button.• In the Drawing view, right-click
(Windows) or [Ctrl]+Click (Mac OS X) and select Drawing Tools > Dropper.
• Press [Alt]+[D], the default keyboard shortcut.
Command Action Access Methods
157

Toon Boom Pencil Check Pro User Guide
Eraser Use the Eraser tool to erase regions from a drawing.Use the Apply Tool to All Visible Layers option to erase from the Line Art and Colour Art layers simultaneously.You can adjust the size of the Eraser using the Pen view. Alternatively, press [O] and move your cursor from the centre outward to change the Maximum Size eraser width. Or you can press [Shift]+[O] and move your cursor from centre outward to change the Minimum Size eraser width.
• Select Drawing > Drawing Tools > Eraser.
• In the Drawing Tools toolbar,
click on the Eraser button.• In the Drawing view, right-click
(Windows) or [Ctrl]+Click (Mac OS X) and select Drawing Tools > Eraser.
• Press [Alt]+[E] (Windows) or [Ctrl]+[E] (Mac OS X), the default keyboard shortcut.
Flip Horizontal Use the Flip Horizontal command to reflect horizontally the selected drawing zones.
• Select Drawing > Transform > Flip Horizontal.
Flip Vertical Use the Flip Vertical command to reflect vertically the selected drawing zones.
• Select Drawing > Transform > Flip Vertical.
Grabber Use the Grabber tool to pan within the Drawing and the Model views.
• Select Drawing > Drawing Tools > Grabber.
• In the Drawing Tools toolbar,
click on the Grabber button.• In the Drawing view, right-click
(Windows) or [Ctrl]+Click (Mac OS X) and select Drawing Tools > Grabber.
• Hold down [Spacebar] while you click and drag the mouse in the view.
In-between Drawing
Use the In-between Drawing command to identify a drawing as an in-between. No icon will appear beside the drawing name in the Xsheet.
• Select Drawing > Mark Drawing As > In-between Drawing.
• In the Xsheet Tools toolbar, click on the Mark As In-between Drawing button.
Key Drawing Use the Key Drawing command to identify a drawing as a key.
A icon will appear in the Xsheet view beside the drawing name.
• Select Drawing > Mark Drawing As > Key Drawing.
• In the Xsheet Tools toolbar, click
on the Mark As Key Drawing button.
Command Action Access Methods
158

Chapter 11: Commands Drawing Menu
Paint Use the Paint tool to paint or repaint colour zones in your drawings.
• Select Drawing > Drawing Tools > Paint.
• In the Drawing Tools toolbar,
click on the Paint button.• In the Drawing view, right-click
(Windows) or [Ctrl]+Click (Mac OS X) and select Drawing Tools > Paint.
• Press [Alt]+[I] (Windows) or [Ctrl]+[I] (Mac OS X), the default keyboard shortcuts.
Paint Unpainted
Use the Paint Unpainted tool to paint only zones that are not already filled with colour. This tool allows you to quickly paint many zones with the same colour without changing the colour of zones that have already been painted.
• Select Drawing > Drawing Tools > Paint Unpainted.
• In the Drawing Tools toolbar,
click on the Paint Unpainted button.
• In the Drawing view, right-click (Windows) or [Ctrl]+Click (Mac OS X) on the Drawing view and select Drawing Tools > Paint Unpainted.
• Press [Alt]+[Y], the default keyboard shortcut.
Remove Art Inside Selection
Use the Remove Art Inside Selection command to remove all art inside the selected area of your drawing.
• Select Drawing > Clean-Up > Remove Art Inside Selection.
Remove Art Outside Selection
Use the Remove Art Outside Selection command to remove all art outside the selected area of your drawing.
• Select Drawing > Clean-Up > Remove Art Outside Selection.
Remove Dirt Use the Remove Dirt command to automatically remove small marks and dirt on your drawings.
• Select Drawing > Clean-Up > Remove Dirt.
• Press [Shift]+[D], the default keyboard shortcut.
Command Action Access Methods
159

Toon Boom Pencil Check Pro User Guide
Reposition All Drawings
Use the Reposition All Drawings command to move all of the drawings in a column at once.
• Select Drawing > Drawing Tools > Reposition All Drawings.
• In the Drawing Tools toolbar, click on the Reposition All Drawings button.
• In the Drawing view, right-click (Windows) or [Ctrl]+Click (Mac OS X) and select Drawing Tools > Reposition All Drawings.
Rotate 180 Use the Rotate 180 command to turn the selected drawing zones 180 degrees clockwise.
• Select Drawing > Transform > Rotate 180.
Rotate 90 CCW
Use the Rotate 90 CCW command to turn the selected drawing zones 90 degrees counter clockwise.
• Select Drawing > Transform > Rotate 90 CCW.
Rotate 90 CW Use the Rotate 90 CW command to turn the selected drawing zones 90 degrees clockwise.
• Select Drawing > Transform > Rotate 90 CW.
Select Use the Select tool to select drawing zones in the Drawing view.By default, your mouse pointer displays as a lasso. Hold [Alt] to temporarily switch between the lasso and rectangle selection tool.
• Select Drawing > Drawing Tools > Select.
• In the Drawing Tools toolbar,
click on the Select button.• In the Drawing view, right-click
(Windows) or [Ctrl]+Click (Mac OS X) and select Drawing Tools > Select.
• Press [Alt]+[S], the default keyboard shortcut.
Stroke Use the Stroke tool to draw vector lines and close gaps. This allows you to fill the zones with paint without adding line art to your drawing.To create a straight stroke, press [Shift] as you drag.
• Select Drawing > Drawing Tools > Stroke.
• In the Drawing Tools toolbar,
click on the Stroke button.• In the Drawing view, right-click
(Windows) or [Ctrl]+Click (Mac OS X) and select Drawing Tools > Stroke.
• Press [Alt]+[V], the default keyboard shortcut.
Command Action Access Methods
160

Chapter 11: Commands Drawing Menu
Unpaint Use the Unpaint tool to remove the colour from zones and lines you have already painted. To remove colour from all zones except for the one you click on, press [Shift].When a paint tool is selected, the middle mouse button turns into an Unpaint tool
• Select Drawing > Drawing Tools > Unpaint.
• In the Drawing Tools toolbar,
click on the Unpaint button.• In the Drawing view, right-click
(Windows) or [Ctrl]+Click (Mac OS X) and select Drawing Tools > Unpaint.
• Press [Alt]+[U] (Windows) or [Ctrl]+[I] (Mac OS X), the default keyboard shortcuts.
Use Current Drawing
Use the Use Current Drawing command to send the drawing that is currently displayed in the Drawing view to the Model view.
• Select Drawing > Model > Use Current Drawing.
Zoom Use the Zoom tool to select the area of the Drawing view that you want to zoom-in or zoom-out.To zoom-in, use the Zoom tool and either click an area in the window or drag the mouse pointer to draw a rectangle around the area you want to zoom-in.To zoom-out, press [Alt] and click on the window.
• Select Drawing > Drawing Tools > Zoom.
• In the Drawing Tools toolbar,
click on the Zoom button.• In the Drawing view, right-click
(Windows) or [Ctrl]+Click (Mac OS X) and select Drawing Tools > Zoom.
• Press [Alt]+[Z], the default keyboard shortcut.
• Hold [Spacebar]+Middle Mouse Button and drag your mouse up and down.
Command Action Access Methods
161

Toon Boom Pencil Check Pro User Guide
Edit MenuUse the Edit menu to undo or redo actions, cut, copy, paste, and delete objects and to access your preferences.
Command Action Access Methods
Copy Use the Copy command to copy selected objects and their properties.
• Select Edit > Copy.• Right-click (Windows) or
[Ctrl]+Click (Mac OS X) and select Copy.
• Press [Ctrl]+[C] (Windows) or [ ]+[C] (Mac OS X), the default keyboard shortcut.
Cut Use the Cut command to remove and copy the selected objects.
• Select Edit > Cut.• Right-click (Windows) or
[Ctrl]+Click (Mac OS X)and select Cut.
• Press [Ctrl]+[X] (Windows) or [ ]+[X] (Mac OS X), the default keyboard shortcut.
Delete Use the Delete command to remove selected objects.
• Select Edit > Delete.• Right-click (Windows) or
[Ctrl]+Click (Mac OS X) and select Delete.
• Press [Delete], the default keyboard shortcut.
Deselect All Use the Deselect All command to remove the selection from the selected objects.
• Select Edit > Deselect All.• Right-click (Windows) or
[Ctrl]+Click (Mac OS X) and select Deselect All.
• Press [Esc], the default keyboard shortcut.
• Click outside the selection.
Next Column Use the Next Column command to move from the current one to the next on the right.
• Select Edit > Next Column.• Press [J], the default keyboard
shortcut.
Next Drawing Use the Next Drawing command to move from the current drawing to the next valid one in the same column.
• Select Edit > Next Drawing.• Press [G], the default keyboard
shortcut.
162

Chapter 11: Commands Edit Menu
Paste Use the Paste command to paste the object you cut or copied into the location you have selected.
• Select Edit > Paste.• Right-click (Windows) or
[Ctrl]+Click (Mac OS X) and select Paste.
• Press [Ctrl]+[V] (Windows) or [ ]+[V] (Mac OS X), the default keyboard shortcut.
Preferences Use the Preferences command to change Pencil Check settings to suit your needs.
• Select Edit > Preferences (Windows) or Pencil Check > Preferences (Mac OS X).
Previous Column
Use the Previous Column command to move from the current one to the previous on the left.
• Select Edit > Previous Column.• Press [H], the default keyboard
shortcut.
Previous Drawing
Use the Previous Drawing command to move from the current drawing to the previous valid one in the same column.
• Select Edit > Previous Drawing.• Press [F], the default keyboard
shortcut.
Redo Use the Redo command when you have undone an operation that you decide to keep. The Redo command becomes active only after you use the Undo command.
• Select Edit > Redo.• In the Edit toolbar, click on the
Redo button.• Press [Ctrl]+|Shift|+[Z] (Windows)
or [ ]+[Shift]+[Z] (Mac OS X), the default keyboard shortcut.
Select All Use the Select All command to select all drawing objects in the current view.
• Select Edit > Select All.• Right-click (Windows) or
[Ctrl]+[Click] (Mac OS X) and select Select All.
• Press [Ctrl]+[A] (Windows) or [ ]+[A] (Mac OS X), the default keyboard shortcut.
Undo Use the Undo command to remove the last change made to your project. Pencil Check supports multiple undos, so you can revert changes you have made in the order you made them.
• Select Edit > Undo.• In the Edit toolbar, click on the
Undo button• Press [Ctrl]+[Z] (Windows) or
[ ]+[Z] (Mac OS X), the default keyboard shortcut.
Command Action Access Methods
163

Toon Boom Pencil Check Pro User Guide
File MenuUse the File menu to create, open, save, and import or export elements.
Command Action Access Methods
Capture Use the Capture command to capture images from live or progressive capture devices.
• Select File > Capture.• In t he File toolbar, click on the
Capture button.• Press [S], the default keyboard
shortcut.
Drawing Use the Import Drawings command to import bitmap images or image sequences in your scene and to vectorize them.
• Select File > Import > Drawings.
• In the File toolbar, click on the
Import Drawing button.• In the Xsheet view, right-click
(Windows) or [Ctrl]+Click (Mac OS X) on a column’s header and select Import > Drawings.
Model Use the Model command to import images you to use as colour models.
• Select File > Import > Model.• In the Model view, right-click
(Windows) or [Ctrl]+Click (Mac OS X) and select Import
New Use the New command to create a new scene. If your current scene has unsaved changes, you will be asked if you want to save your work before the dialog box appears.
• Select File > New.• In the File toolbar, click on the
Open button.• Press [Ctrl]+[N] (Windows) or
[ ]+[N] (Mac OS X), the default keyboard shortcut.
Open Use the Open command to open a scene. If your current scene has unsaved changes, you will be asked if you want to save your work before the dialog box appears.
• Select File > Open.• In the File toolbar, click on the
Open button.• Press [Ctrl]+[O] (Windows) or
[ ]+[O] (Mac OS X), the default keyboard shortcut.
Open Recent Use the Open Recent menu to open a recently opened scene.
• Use the Clear command to clear the most recent opened scene list.
• Select File > Open Recent.
OR
• Select File > Open Recent > Clear.
Print Xsheet The Print Xsheet command prints the Xsheet view.
• Select File > Print Xsheet.
164

Chapter 11: Commands File Menu
QuickTime Movie
Use the Quicktime Movie command to export to a QuickTime Movie.
• Select File > Export > Movie.
Quit Use the Quit command to close Pencil Check. If your current scene has unsaved changes, you will be asked if you want to save your work before the software shuts down.
• Select File > Quit (Windows) or Pencil Check > Quit (Mac OS X).
Save Use the Save command to save all changes made to the opened scene.
• Select File > Save.• In the File toolbar, click on the
Save button.• Press [Ctrl]+[S] (Windows) or
[ ]+[S] (Mac OS X), the default keyboard shortcut.
Sounds Use the Sounds command to import sound files into your scene.The supported file formats are:
• WAV• MP3• AIFF
• Select File > Import > Sounds.• In the Xsheet view, right-click
(Windows) or [Ctrl]+Click (Mac OS X) on a column’s header and select Import > Sounds.
SWF Use the SWF command to export to an Adobe Flash Movie.
• Select File > Export > SWF.
Command Action Access Methods
165

Toon Boom Pencil Check Pro User Guide
Help MenuUse the Help menu to access the Online Help and find information on the software.
Pencil Check Menu Use the Pencil Check menu to access the preferences and quit the application.
Command Action Access Methods
About Use the About command to access general information about the software version.
• Select Help > About (Windows) or Pencil Check > About (Mac OS X).
Show End User Licence Agreement
Use the Show End User Licence Agreement command to display the licence agreement.
• Select Help > Show End User Licence Agreement.
Help Use the Help command to get a quick access to the online version of Pencil Check documentation.
• Select Help > Help.• Press [F1], the default keyboard
shortcut.
Show Welcome Screen
Use the Show Welcome Screen command to display the Welcome Screen.
• Select Help > Show Welcome Screen.
Toon Boom Pencil Check Pro on the Web
Use the Toon Boom Pencil Check Pro on the Web command to direct yourself to the software’s official web page.
• Select Help > Toon Boom Pencil Check Pro on the Web.
Command Action Access Methods
About Toon Boom Pencil Check Pro
If you are using Mac OS X, use the About Toon Boom Pencil Check Pro command to display product, version, licensing and copyright information.
• Select Pencil Check > About Toon Boom Pencil Check Pro (Mac OS X) or Help > About (Windows).
Preferences If you are using Mac OS X, use the Preferences command to change Toon Boom Pencil Check Pro’s settings to suit your needs.
• Select Pencil Check > Preferences (Mac OS X) or Edit > Preferences (Windows).
Quit If you are using Mac OS X, use the Quit command to exit the application.
• Select Pencil Check > Quit (Mac OS X) or File > Quit (Windows).
• Press [ ]+[Q], the default keyboard shortcut.
166

Chapter 11: Commands Play Menu
Play Menu Use the Play menu to playback the scene and navigate through your drawings.
Command Action Access Methods
Enable Sound Use the Enable Sound command to include the soundtrack during playback.
• Select Play > Enable Sound.• In the Playback toolbar, click on
the Enable Sound button.
Enable Sound Scrubbing
Use the Enable Sound Scrubbing command to listen to your sound frame by frame.
• Select Play > Enable Sound Scrubbing.
• In the Playback toolbar, click on
the Enable Sound Scrubbing button.
First Frame Use the First Frame command to set your current frame to the first frame of the scene.
• Select Play > First Frame.• In the Playback toolbar, click on
the First Frame button.• Press [Shift]+[,], the default
keyboard shortcut.
Go to Frame The Go to Frame command sets your current frame to any frame you input in the Go to Frame dialog box.
• Select Play > Go to Frame.• Change the frame number of the
Frame field in the Playback toolbar.
Last Frame The Last Frame command to set your current frame to the last frame of the scene.
• Select Play > Last Frame.• In the Playback toolbar, click on
the Last Frame button.• Press [Shift]+[.], the default
keyboard shortcut.
Loop The Loop command repeats the scene when it reaches the last frame during playback.
• Select Play > Loop.• In the Playback toolbar, click on
the Loop button.
Next Frame The Next Frame command sets the current frame to its following frame.
• Select Play > Next Frame.• Press [.], the default keyboard
shortcut.
Play Scene Backward
The Play Scene Backward command plays the animation from the current frame to the first frame.
• Select Play > Play Scene Backward.
• In the Playback toolbar, click on
the Play Scene Backward button.
167

Toon Boom Pencil Check Pro User Guide
Play Scene Forward
The Play Scene Forward command plays the animation from the current frame to the last frame.
• Select Play > Play Scene Forward.
• In the Playback toolbar, click on
the Play Scene Forward button.
• Press [Shift]+[Enter], the default keyboard shortcut.
Playback Speed
The Playback Speed allows you to change the frame rate of the playback.
• Select Play > Playback Speed.• Change the frame in the Fps
field in the Playback toolbar.
Preview Resolution
Use the Preview Resolution command to scale down the Playback view resolution. This saves memory and allows you to work more quickly.
• Use the 1/4 of Scene Resolution command to scale down to a quarter of the scene’s resolution.
• Use the 1/3 of Scene Resolution command to scale down to a third of the scene’s resolution.
• Use the 1/2 of Scene Resolution command to scale down to half of the scene’s resolution.
• Use the 3/4 of Scene Resolution command to scale down to the three-quarters of the scene’s resolution.
• Use the Same As Scene Resolution command to display the Playback resolution to the same size as the scene resolution.
• Select Play > Preview Resolution > 1/4 of Scene Resolution.
OR
• Select Play > Preview Resolution > 1/3 of Scene Resolution.
OR
• Select Play > Preview Resolution > 1/2 of Scene Resolution.
OR
• Select Play > Preview Resolution > 3/4 of Scene Resolution.
OR
• Select Play > Preview Resolution > Same As Scene Resolution.
Previous Frame
The Previous Frame command sets the current frame to its previous frame.
• Select Play > Previous Frame.• Press [,], the default keyboard
shortcut.
Start Frame Use the Start Frame command controls the starting frame of the playback range.
• Select Play > Start Frame.• Change the frame number of the
Start field in the Playback toolbar.
Command Action Access Methods
168

Chapter 11: Commands Scene Menu
Scene MenuUse the Scene menu to modify scene length, add columns and modify the timing.
Stop Use the Stop command to stop the playback.
• Select Play > Stop.• In the Playback toolbar, click on
the Stop button.• Press [Shift]+[Enter], the default
keyboard shortcut.
Stop Frame Use the Stop Frame command to control the end frame of the playback range.
• Select Play > Stop Frame.• Change the frame number of the
Stop field in the Playback toolbar.
Command Action Access Methods
Add Columns Use the Add Columns command to create and add new columns in your Xsheet view.
• Select Scene > Columns > Add Columns.
• In the Xsheet Tools toolbar, click
on the Add Columns button.• In the Xsheet view, right-click
(Windows) or [Ctrl]+Click (Mac OS X) on a column’s header and select Add Columns.
• In the Xsheet view, right-click (Windows) or [Ctrl]+Click (Mac OS X) on a column and select Columns > Add Columns.
• Press [Shift]+[C] de default keyboard shortcut.
Add Frames After Selection
Use the Add Frames After Selection command to add new frames just after the selected frame row.
• Select Scene > Frame > Add Frames After Selection.
• In the Xsheet Tools toolbar, click on the Add Frames After Selection button.
• Press [Ctrl]+[H], the default keyboard shortcut.
Add Frames At End
Use the Add Frames At End command to add new frames at the very end of the scene.
• Select Scene > Frame > Add Frames At End.
Add Frames At Start
Use the Add Frames At Start command to add new frames at the very beginning of the scene.
• Select Scene > Frame > Add Frames At Start.
Command Action Access Methods
169

Toon Boom Pencil Check Pro User Guide
Add Frames Before Selection
Use the Add Frames Before Selection command to add new frames just before the selected frame row.
• Select Scene > Frame > Add Frames Before Selection.
• Press [Ctrl]+[G] (Windows) or [ ]+[G] (Mac OS X), the default keyboard shortcut.
Change Pen Colour
Use the Change Pen Colour command to open the Colour Picker in which you can select a new annotation pen colour.
• Select Scene > Annotation > Change Pen Colour.
• In the Xsheet view, right-click (Windows) or [Ctrl]+Click (Mac OS X) in the annotation column and select Annotation > Change Pen Colour.
Change Pen Width
Use the Change Pen Width menu to set the width of your annotation pen from 1 to 4, or enter a custom width value in the Pen Width dialog box.
• Select Scene > Annotation > Change Pen Width.
• In the Xsheet view, right-click (Windows) or [Ctrl]+Click (Mac OS X) in the annotation column and select Annotation > Change Pen Width.
Clear Use the Clear command when in Insert Mode to remove the exposure from the selected cell and pull up the values in the column, filling the cleared cell. An empty cell will appear at the end of the column. In Overwrite Mode, this command removes the value from the cell and leaves the cell empty.
• Select Scene > Exposure > Clear.
Clear Exposure And Pull
Use the Clear Exposure And Pull command to remove the exposure from the selected cell and pull up the values in the column, filling the cleared cell. An empty cell will appear at the end of the column.
• Select Scene > Exposure > Clear Exposure And Pull.
• In Xsheet view, select a cell, right-click on the selected frame and select Exposure > Clear Exposure And Pull.
• Press [Z], the default keyboard shortcut.
Create Cycle Use the Create Cycle command to create a cycle from the selected drawings. Enter the number of times that you want the cycle to repeat. The selected drawings are one full cycle.
• Select Scene > Exposure > Create Cycle.
• In Xsheet view, right-click on the selected cells and select Create Cycle.
Command Action Access Methods
170

Chapter 11: Commands Scene Menu
Decrease Exposure
Use the Decrease Exposure command to remove the exposure from the current cell and move all the timing up.
• Select Scene > Exposure > Decrease Exposure.
• In the Xsheet Tools toolbar, click
on the Decrease Exposure button.
• In the Xsheet view, right-click (Windows) or [Ctrl]+Click (Mac OS X) and select Exposure > Decrease Exposure.
• Press [-], the default keyboard shortcut.
Delete Columns
Use the Delete Columns command to delete the selected column in your Xsheet view.
• Select Scene > Columns > Delete Columns.
• In the Xsheet Tools toolbar, click
on the Delete Column button.
• In the Xsheet view, right-click (Windows) or [Ctrl]+Click (Mac OS X) on a column’s header and select Delete Columns.
• In the Xsheet view, right-click (Windows) or [Ctrl]+Click (Mac OS X) on a column and select Columns > Delete Columns.
Duplicate Columns
Use the Duplicate Columns command to copy an existing column.
• Select Scene > Columns > Duplicate Columns.
• In the Xsheet Tools toolbar, click
on the Duplicate Columns button.
• In the Xsheet view, right-click (Windows) or [Ctrl]+Click (Mac OS X) on a column’s header and select Duplicate Columns.
Enable Drawing
Use the Enable Drawing command to enable or disable drawing mode, to prevent from accidently drawing in an annotation column.
• Select Scene > Annotation > Enable Drawing.
• In the Xsheet view, right-click (Windows) or [Ctrl]+Click (Mac OS X) in the annotation column and select Annotation > Enable Drawing
Command Action Access Methods
171

Toon Boom Pencil Check Pro User Guide
Erase All Use the Erase All command to erase all notes contained in the selected annotation column.
• Select Scene > Annotation > Erase All.
• In the Xsheet view, right-click (Windows) or [Ctrl]+Click (Mac OS X) in the annotation column and select Annotation > Erase All.
Erase Selected Images
Use the Erase Selected Images command to erase all notes, except text entries, contained in the selected frame range of an annotation column.
• Select Scene > Columns > Delete Columns.
• In the Xsheet view, right-click (Windows) or [Ctrl]+Click (Mac OS X) in the annotation column and select Annotation > Erase Selected Images.
Erase Selected Text
Use the Erase Selected Text command to erase text entries notes contained in the selected frame range of an annotation column.
• Select Scene > Annotation > Erase Selected Text.
• In the Xsheet view, right-click (Windows) or [Ctrl]+Click (Mac OS X) in the annotation column and select Annotation > Erase Selected Text.
Extend Exposure
Use the Extend Exposure command to extend the current exposure of a selected cell.The Overwrite mode option will clear any following cells. The Insert mode option will simply push the following cell to make space for the new exposure cells.
• Select Scene > Exposure > Extend Exposure.
Fill Cells Randomly
Use the Fill Cells Randomly command to randomly fill a selection of cells.
• Select Scene > Exposure > Fill Cells Randomly.
• In the Xsheet view, right-click and select Exposure > Fill Cells Randomly.
Fill Selection Use the Fill Selection command to label selected cells with the same value.
• Select Scene > Exposure > Fill Selection.
• In the Xsheet view, right-click and select Exposure > Fill Selection.
• Press [Ctrl]+[T] (Windows) or [ ]+[T] (Mac OS X), the default keyboard shortcut.
Command Action Access Methods
172

Chapter 11: Commands Scene Menu
Hold Exposure Use the Hold Exposure menu to speed up data entry when working with the Xsheet view. Set your Hold Value to 1 to 4 cells. Or use the Custom command to open the Hold Value Editor dialog box and type in the desired hold cell value. This is good for cycles of drawings where each drawing is held for more than four frames.
• Select Scene > Exposure > Hold Exposure.
Import File Use the Import File command to browse a drawing file to display in the annotation column.
• Select Scene > Annotation > Import Files.
• In the Xsheet view, right-click (Windows) or [Ctrl]+Click (Mac OS X) in the annotation column and select Annotation > Import Files.
Increase Exposure
Use the Increase Exposure command to add the label to the current cell and move all exposure down.
• Select Scene > Exposure > Increase Exposure.
• In the Xsheet Tools toolbar, click
on the Increase Exposure button.
• In the Xsheet view, right-click and select Increase Exposure.
• Press [+], the default keyboard shortcut.
Insert Blank Cell
Use the Insert Blank Cell command to insert an empty cell. This pushes down all subsequent exposure in the column; the last value might be forced out of the column.
• Select Scene > Exposure > Insert Blank Cell.
• In the Xsheet view, right-click on the selected cell and select Exposure > Insert Blank Cell.
• Press [X], the default keyboard shortcut.
Insert Mode Use the Insert Mode command to switch between Insert and Overwrite Modes.
• Select Scene > Exposure > Insert Mode.
• Press [I], the default keyboard shortcut.
Overwrite Mode
Use the Overwrite Mode command to switch between Overwrite and Insert Modes.
• Select Scene > Exposure > Overwrite Mode.
• Press [I], the default keyboard shortcut.
Command Action Access Methods
173

Toon Boom Pencil Check Pro User Guide
Remove Selected Frames
Use the Remove Selected Frames command to delete selected frames from your scene. You cannot delete the last frame in a scene; a scene must contain at least one frame.
• Select Scene > Frame > Remove Selected Frames.
• In the Xsheet Tools toolbar, click on the Remove Selected Frames
button.
Rename Use the Rename command to open the Column Editor dialog box, allowing you to rename the selected column.
• Select Scene > Columns > Rename.
• In the Xsheet view, right-click (Windows) or [Ctrl]+Click (Mac OS X) on a column’s header and select Column Editor.
• In the Xsheet view, double-click on a column’s header.
Scene Settings Use the Scene Settings command to open the Resolution / Frame Rate dialog box which lets you specify the scene resolution and frame-rate of your scene.
• Select Scene > Scene Settings.
Sequence Fill Use the Sequence Fill command to create a timing sequence and cycle.
• Select Scene > Exposure > Sequence Fill.
• In the Xsheet view, right-click and select Exposure > Sequence fill.
• Press [Ctrl]+[M] (Windows) or [ ]+[M] (Mac OS X), the default keyboard shortcut.
Set Exposure to
Use the Set Exposure to menu to set the exposure value of a selected frame from 1 to 3 or to open the Set Exposure dialog box in which you can set a customized exposure to a selected frame.
• Select Scene > Exposure > Set Exposure to.
Set Scene Length
Use the Set Scene Length command to change the total number of frames in the scene. New frames are always added at the end of the scene as empty frames. If you decide to shorten your scene length, the frames at the end of your scene will be deleted.
• Select Scene > Set Scene Length.
Command Action Access Methods
174

Chapter 11: Commands View Menu
View MenuUse the View menu to modify the way that elements are displayed in the user interface.
Command Action Access Methods
12 Field Grid Use the 12 Field Grid command to display the 12-field grid in the Drawing view. The 12-field grid is based on a ratio of 4:3.To see the 12-field Grid, you must enable the Show Grid command.
• Select View > Drawing > Grid > 12 Field Grid.
• In the Drawing view, right-click (Windows) or [Ctrl]+Click (Mac OS X) and select Grid > 12 Field Grid.
16 Field Grid Use the 16 Field Grid command to display the 16-field grid in the Drawing view. The 16-field grid is based on a ratio of 4:3.To see the 16-field Grid, you must enable the Show Grid command.
• Select View > Drawing > Grid > 16 Field Grid.
• In the Drawing view, right-click (Windows) or [Ctrl]+Click (Mac OS X) and select Grid > 16 Field Grid.
Backlight Use the Backlight command to identify unpainted areas and bubbles in drawings. The Backlight command imitates a light shining from behind the drawing.
• Select View > Drawing > Backlight.
• In the Drawing Tools toolbar,
click on the Backlight button.• In the Drawing view, right-click
(Windows) or [Ctrl]+Click (Mac OS X) and select Backlight.
• Press [A], the default keyboard shortcut.
Grid Outline Only
Use the Grid Outline Only command to display only the outline of the grid border.To see the outline, you must enable the Show Grid command.
• Select View > Drawing > Grid > Grid Outline Only.
• In the Drawing view, right-click (Windows) or [Ctrl]+Click (Mac OS X) and select Grid > Grid Outline Only.
Image Use the Image command to have the Playback view mode display the current frame’s final image.
• Select View > Image.• In the Playback view bottom
toolbar, click on the Image button.
• In the Playback view, right-click (Windows) or [Ctrl]+Click (Mac OS X) and select Image.
175

Toon Boom Pencil Check Pro User Guide
Light Table Use the Light Table command to turn on and off the light table.The light table allows you to see all of the elements as they are layered in the frame you have selected, based on the order specified in the Xsheet view.
• Select View > Drawing > Light Table.
• In the Drawing Tools toolbar,
click on the Light Table button.
• In the Drawing view, right-click (Windows) or [Ctrl]+Click (Mac OS X) and select Light Table.
• Press [Shift]+[L], the default keyboard shortcut.
Line Up Use the Line Up command to line up the displayed toolbars in your interface.
• Select View > Toolbars > Line Up.
Matte The Matte command switches the Playback view mode to display the scene’s element mattes only.
• Select View > Matte.• In the Playback view bottom
toolbar, click on the Matte button.
• In the Playback view, right-click (Windows) or [Ctrl]+Click (Mac OS X) and select Matte.
Next Drawing (Onion Skin)
Use the Next Drawing command when the Onion Skin option has been enabled. The drawing immediately following the current one will display in the Drawing view.The next drawing will appear slightly lighter, helping you to identify it.
• Select View > Drawing > Onion Skin > Next Drawing.
• In the Drawing view, right-click (Windows) or [Ctrl]+Click (Mac OS X) and select Onion Skin > Next Drawing.
• Press [Ctrl]+[1] (Windows) or [ ]+[1] (Mac OS X), the default keyboard shortcut.
Next Model Use the Next Model command to display the colour model that was loaded directly after the current colour model.
• Select View > Model > Next Model.
• In the Model view, right-click (Windows) or [Ctrl]+Click (Mac OS X) and select Next Model.
• Press [G], the default keyboard shortcut.
Next Three Drawings (Onion Skin)
Use the Next Three Drawings command to display the three drawings immediately following the current one as onion skin. The next drawings will appear slightly lighter, helping you to identify them.
• Select View > Drawing > Onion Skin > Next Three Drawings.
• In the Drawing view, right-click (Windows) or [Ctrl]+Click (Mac OS X) and select Onion Skin > Next Three Drawings.
• Press [Ctrl]+[3] (Windows) or [ ]+[3] (Mac OS X), the default keyboard shortcut.
Command Action Access Methods
176

Chapter 11: Commands View Menu
Next Two Drawings (Onion Skin)
Use the Next Two Drawings command to display the two drawings immediately following the current one as onion skin. The next drawings will appear slightly lighter, helping you to identify them.
• Select View > Drawing > Onion Skin > Next Two Drawings.
• In the Drawing view, right-click (Windows) or [Ctrl]+Click (Mac OS X) and select Onion Skin > Next Two Drawings.
• Press [Ctrl]+[2] (Windows) or [ ]+[2] (Mac OS X), the default keyboard shortcut.
No Next Drawing (Onion Skin)
Use the No Next Drawings command when the Onion Skin option has been enabled. This command allows you to turn off the display of any drawings following the current one as onion skin.
• Select View > Drawing > Onion Skin > No Next Drawing.
• In the Drawing view, right-click (Windows) or [Ctrl]+Click (Mac OS X) and select Onion Skin > No Next Drawing.
• Press [Ctrl]+[ `] (Windows) or [ ]+[`] (Mac OS X), the default keyboard shortcut.
No Previous Drawing(Onion Skin)
Use the No Previous Drawings command when Onion Skinning has been enabled. This command allows you to turn off the display of any drawings preceding the current one as onion skin.
• Select View > Drawing > Onion Skin > No Previous Drawing.
• In the Drawing view, right-click (Windows) or [Ctrl]+Click (Mac OS X) and select Onion Skin > Next Previous Drawing.
• Press [~], the default keyboard shortcut.
Overlay Use the Overlay command to place the grid on top of the drawings.Use this command when you are working on images that are filled with colour and you need the grid to complete detailed work.A grid must be visible for this command to work.
• Select View > Drawing > Grid > Overlay.
• In the Drawing view, right-click (Windows) or [Ctrl]+Click (Mac OS X) and select Grid > Overlay.
Preview Line Art and Colour Art
Use the Preview Line Art and Colour Art command to display both the Colour art and Line art layers simultaneously in the Drawing view.
• Select View > Drawing > Preview Line Art and Colour Art.
• In the Drawing view bottom toolbar, click on the Preview Line Art and Colour Art button.
• In the Drawing view, right-click (Windows) or [Ctrl]+Click (Mac OS X) and select Preview Line Art and Colour Art.
• Press [P], the default keyboard shortcut.
Command Action Access Methods
177

Toon Boom Pencil Check Pro User Guide
Previous Model
Use the Previous Model command to display the colour model that was loaded directly before the current colour model.
• Select View > Model > Previous Model.
• In the Model view, right-click (Windows) or [Ctrl]+Click (Mac OS X) and select Previous Model.
• Press [F], the default keyboard shortcut.
Previous Drawing (Onion Skin)
Use the Previous Drawing command when Onion Skinning has been enabled. The drawing immediately preceding the current one will display as onion skin. It will appear lighter, helping you to identify it.
• Select View > Drawing > Onion Skin > Previous Drawing.
• In the Drawing view, right-click (Windows) or [Ctrl]+Click (Mac OS X) and select Onion Skin > Previous Drawing.
• Press [!], the default keyboard shortcut.
Previous Three Drawings(Onion Skin)
Use the Previous Three Drawings command to display the three drawings immediately preceding the current one as onion skin. These three drawings will appear slightly lighter, helping you to identify them.
• Select View > Drawing > Onion Skin > Previous Three Drawings.
• In the Drawing view, right-click (Windows) or [Ctrl]+Click (Mac OS X) and select Onion Skin > Previous Three Drawings.
• Press [#], the default keyboard shortcut.
Previous Two Drawings (Onion Skin)
Use the Previous Two Drawings command to display the two drawings immediately preceding the current one as onion skin. These two drawings will appear slightly lighter, helping you to identify the different drawings.
• Select View > Drawing > Onion Skin > Previous Two Drawings.
• In the Drawing view, right-click (Windows) or [Ctrl]+Click (Mac OS X) and select Onion Skin > Previous Two Drawings.
• Press [@], the default keyboard shortcut.
Reset Pan Use the Reset Pan command to reset the panning in the view.
• Select View > Reset Pan.• In the Xsheet view, right-click
(Windows) or [Ctrl]+Click (Mac OS X) and select View > Reset Pan.
• In the Model view, right-click (Windows) or [Ctrl]+Click (Mac OS X) and select Reset Pan.
• Press [Shift]+[N], the default keyboard shortcut.
Command Action Access Methods
178

Chapter 11: Commands View Menu
Reset Rotation Use the Reset Rotation command to reset the rotation in the view.
• Select View > Reset Rotation.• In the Drawing view bottom
toolbar, click on the Reset Rotation button.
• In the Model view, right-click (Windows) or [Ctrl]+Click (Mac OS X) and select Reset Rotation.
• Press [Shift]+[X], the default keyboard shortcut.
Reset view Use the Reset view command to reset the panning, rotation and zoom in the view.
• Select View > Reset View.• In the Xsheet view, right-click
(Windows) or [Ctrl]+Click (Mac OS X) and select View > Reset View.
• In the Model view, right-click (Windows) or [Ctrl]+Click (Mac OS X) and select Reset View.
• In the Drawing view bottom toolbar, click on the Reset view
button.• Press [Shift]+[M], the default
keyboard shortcut.
Reset Zoom Use the Reset Zoom command to reset the zoom in the view.
• Select View > Reset Zoom.• In the Xsheet view, right-click
(Windows) or [Ctrl]+Click (Mac OS X) and select View > Reset Zoom.
• In the Playback or Model view, right-click (Windows) or [Ctrl]+Click (Mac OS X) and select Reset Zoom.
• Press [Shift]+[Z], the default keyboard shortcut.
Rotate CClockwise
Use the Rotate CClockwise command to rotate the view’s workspace counter-clockwise.
• Select View > Rotate CClockwise.
Rotate Clockwise
Use the Rotate Clockwise command to rotate the view’s workspace clockwise.
• Select View > Rotate Clockwise.
Show Column List
Use the Show Columns List command to select the columns to be displayed or hidden in the Xsheet view.
• Select View > Xsheet > Show Column List.
Command Action Access Methods
179

Toon Boom Pencil Check Pro User Guide
Show Grid Use the Show Grid command to display the grid. Select this command again to deactivate it.
• Select View > Drawing > Grid > Show Grid.
• In the Drawing Tools toolbar,
click on the Show Grid button.
• In the Drawing view, right-click (Windows) or [Ctrl]+Click (Mac OS X) and select Grid > Show Grid.
• Press [Ctrl]+[‘] (Windows) or [ ]+[‘] (Mac OS X), the default keyboard shortcut.
Show Onion Skin
Use the Show Onion Skin command to activate and deactivate the onion skin.
• Select View > Drawing > Onion Skin > Show Onion Skin.
• In the Drawing Tools toolbar,
click on the Show Onion Skin button.
• In the Drawing view, right-click (Windows) or [Ctrl]+Click (Mac OS X) and select Onion Skin > Show Onion Skin.
• Press [Alt]+[O], the default keyboard shortcut.
Show Strokes Use the Show Strokes command to turn on and off the display of strokes and contours that make up the drawn shapes.This command is useful when you want to locate the gaps to close with the Close Gap or the Stroke tools.
• Select View > Drawing > Show Strokes.
• In the Drawing view, right-click (Windows) or [Ctrl]+Click (Mac OS X) and select Show Strokes.
• Press [K], the default keyboard shortcut.
Show Sound Column
Use the Show Sound Column command to display or hide your sound column in the Xsheet view.
• Select View > Xsheet > Show Sound Column.
Show Thumbnails
Use the Show Thumbnails command to show the current drawings’ thumbnail over each column in the Xsheet view.
• Select View > Xsheet > Show Thumbnails.
Square Grid Use the Square Grid command to display a standard grid in the Drawing view with a ratio 1:1. This grid is unlike the 12-field (4:3) and 16-field (4:3) grids.To see the square grid, you must enable the Show Grid command.
• Select View > Drawing > Grid > Square Grid.
• In the Drawing view, right-click (Windows) or [Ctrl]+Click (Mac OS X) and select Grid > Square Grid.
Command Action Access Methods
180

Chapter 11: Commands View Menu
Switch To Colour Art / Line Art
Use the Switch to Colour Art / Line Art command to toggle between Colour Art or Line Art layers. In Colour Art layer, Toon Boom Pencil Check Pro surrounds the regions that you can paint with thin lines, called strokes.
• Select View > Drawing > Switch To Colour Art / Line Art.
• In the Drawing view bottom toolbar, click on the Switch to Colour Art / Line Art buttons.
• In the Drawing view, right-click (Windows) or [Ctrl]+Click (Mac OS X) and select Switch to Colour Art / Line Art.
• Press [L], the default keyboard shortcut.
Toolbars Use the Toolbars menu to display a toolbar in the user interface.
• Select View > Toolbars.
Toggle Full Screen
Use the Toggle Full Screen command to maximize your current view to its fullest size.
• Select View > Toggle Full Screen.
• Press [Ctrl]+[F] (Windows) or [ ]+[F] (Mac OS X), the default keyboard shortcut.
Underlay Use the Underlay command to place the grid behind the drawings in the Drawing view.
• Select View > Drawing > Grid > Underlay.
• In the Drawing view, right-click (Windows) or [Ctrl]+Click (Mac OS X) and select Grid > Underlay.
Command Action Access Methods
181

Toon Boom Pencil Check Pro User Guide
Zoom In Use the Zoom In command to zoom in on the view’s workspace.
• Select View > Zoom In.• In the Xsheet view, right-click
(Windows) or [Ctrl]+Click (Mac OS X) and select View > Zoom In.
• In the Playback or Model view, right-click (Windows) or [Ctrl]+Click (Mac OS X) and select Zoom In.
• In the Drawing or Model view, press [Spacebar]+[middle mouse button] and move down.
• Press [2], the default keyboard shortcut.
Zoom Out Use the Zoom Out command to zoom out of the view’s workspace.
• Select View > Zoom Out.• In the Xsheet view, right-click
(Windows) or [Ctrl]+Click (Mac OS X) and select View > Zoom Out.
• In the Playback or Model view, right-click (Windows) or [Ctrl]+Click (Mac OS X) and select Zoom Out.
• In the Drawing or Model view, press [Spacebar]+[middle mouse button] and move up.
• Press [1], the default keyboard shortcut.
Command Action Access Methods
182

Chapter 11: Commands Windows Menu
Windows MenuUse the Windows menu to add a new floating window and to manage workspaces.
Command Action Access Methods
Colour Use the Colour command to open the Colour view.
• Select Windows > Colour.
Drawing Use the Drawing command to open the Drawing view.
• Select Windows > Drawing.
Model Use the Model command to open the Model view.
• Select Windows > Model.
Pen Use the Pen command to open the Pen view.
• Select Windows > Pen.
Playback Use the Playback command to open the Playback view.
• Select Windows > Playback.
Restore Default Workspace
Use the Restore Default Workspace command to restore your workspace organization to the default one.
• Select Windows > Restore Default Workspace
Xsheet Use the Xsheet command to open the Xsheet view.
• Select Windows > Xsheet.
183

Toon Boom Pencil Check Pro User Guide
184

Index: A
Index
AAbout
Colour view 24Drawing view 25Model view 26Pen view 26Playback view 27Xsheet view 28
AccessingQuick menu 21support using welcome screen 16
Addingannotation column 95columns
in exposure sheet 70Adding Colour Pots 137Adding Drawing Elements 106Alpha channel
rendering QuickTime movie with 153Annotation Columns 95
adding 95drawing in 96erasing content of 97typing in 96
Apply Tool to Line and Colour Arts 108Auto-Create Colour Art from Brush 109Auto Gap Closing
setting preferences 37automated filling 88
BBacklight 124Brush 109Brush Size Cursor
setting preferences 37
CCamera and sound
introduction 9Capture 39
custom vectorization parameters usedhow to 52
importing backgrounds 50info about supported devices 41introduction 8Live devices 40
how to 42Progressive devices 41
how to 46setting scene length 42supported devices 40
changing colourcolumn 76
Changing Drawing Settingsexposure sheet 98
changing transparencycolumn 75
Cleaning and inking the model 119, 120Clone
columns 74close a view 23Close Gaps and Auto Gap Closing 124Close Gap tool 125colour art
Apply Tool to All Layers command 156colour model templates
importing 141Colours
setting preferencesGeneral 34
Colour Viewabout 24
Columnsadding in
exposure sheet and timeline 69annotation 95
adding 95drawing in 96erasing content of 97typing in 96
185

Toon Boom Pencil Check Pro User Guide Index: C
cloning 74Colour 75creating drawing 70duplicating 74modifying in exposure sheet 71navigating between frames and 93ordering in Xsheet 71properties 73Transparency 75
Columns and drawing concept 71Commands
Drawing menu 156apply tool to all visible layers 156auto create colour art from brush 156auto gap closing 156breakdown drawing 156brush 157close gap 157close gaps 157create colour art from line art 157dropper 157eraser 158flip horizontal 158flip vertical 158grabber 158inbetween drawing 158key drawing 158paint 159paint unpainted 159remove art inside selection 159remove art outside selection 159remove dirt 159reposition all drawings 160rotate 180 degrees 160rotate 90 degrees CCW 160rotate 90 degrees CW 160select 160stroke 160unpaint 161use current drawing 161zoom 161
Edit menu 162copy 162cut 162delete 162deselect all 162
next column 162next drawing 162paste 163preferences 163previous column 163previous drawing 163redo 163select all 163undo 163
File menu 164 165Capture 164drawings 164model 164new 164open 164open recent 164print Xsheet 164QuickTime movie 165Quit 165
Help menu 166about 166help 166show end user license agreement 166show welcome screen 166Toon Boom Pencil Check Pro on the web
166Pencil check menu (Mac OS X) 166
about pencil check pro 166preferences 166quit 166
Play menu 167enable sound 167enable sound scrubbing 167first frame 167go to frame 167last frame 167loop 167next frame 167playback speed 168play scene backward 167play scene forward 168preview resolution 168previous frame 168start frame 168stop 169
186

Index: C
stop frame 169Scene menu 169
add columns 169add frames after selection 169add frames at end 169add frames at start 169add frames before selection 170change pen colour 170change pen width 170clear 170create cycle 170create exposure and pull 170decrease exposure 171delete column 171duplicate column 171enable drawing 171erase all 172erase selected image 172erase selected text 172extend exposure 172fill cells randomly 172fill selection 172hold exposure 173import file 173increase exposure 173insert blank cell 173insert mode 173overwrite mode 173remove selected frames 174rename 174scene settings 174sequence fill 174set exposure to 174set scene length 174
View menu 18012-filed grid 17516-field grid 175backlight 175grid outline only 175image 175light table 176line up 176matte 176next drawing (onion skin) 176
next model 176next three drawings (onion skin) 176next two drawings (onion skin) 177no next drawing (onion skin) 177no previous drawing (onion skin) 177overlay 177preview colour art 177preview line art 177previous drawing (onion skin) 178previous model 178previous three drawings (onion skin) 178previous two drawings (onion skin) 178reset pan 178reset rotation 179reset view 179reset zoom 179rotate counter clockwise 179show column list 179show grid 180show onion skin 180show sound column 180show strokes 180square grid 180switch to colour/lin eart 181toggle full screen 181toolbars 181underlay 181zoom in 182zoom out 182
view menu 175Windows menu 183
colour 183drawing 183model 183pen 183playback 183restore default workspace 183xsheet 183
Compression Settingsfor video 152
configurescanner 60
findscanner utility 60XP 60XP SCSI communications layer 60
187

Toon Boom Pencil Check Pro User Guide Index: D
configure scannerMac OS X 62Vista 61
Create Colour Art from Line Art 127Create New Colour Pots Using Default
Coloursetting preferences 37
Creating and opening a scene 13Creating a scene
file menu 16using welcome screen 14
creating a scenefrom the welcome screen 13
creating cycles 86Creating Strokes 136Current View Border
setting preferences 34Cycle Exposure
setting preferences 34
DDefault Add Columns
setting preferences 35defaultBlackPoint line 65Default Column Width
setting preferences 35defaultGamma line 65defaultPegSide line 65defaultResolution line 65defaultThreshold line 65defaultWhitePoint line 65Default Workspace
restoring 24Desc line 65devices for capturing images 40, 41digital exposure sheet and timeline 67dirt clean up 133Dispaly Cardinal Coordinates
setting preferences 34Dragging
an exposure 82Drawing 36
menu 156drawing
Brush command 157Drawing and animation
introduction 8Drawing Creation
setting preferencesexposure sheet 35
Drawing Identification 94Drawing Menu
uses 20drawings
Remove Dirt command 157Drawing tab
setting preferencesauto gap closing 37brush size cursor 37create new colour pots using default
colour 37grid on by default 37initial drawing tool 37light table maximum wash valuewash 36light table minimum washopacity value
36onion skin maximum opacity value 36onion skin maximum wash value 36onion skin minimum wash value 36select tool is lasso 37
setting preferences in 36light table 36new colour pots 37onion skin 36options 37settings 37
Drawing Tools 107Drawing Tools Toolbar 30Drawing view
about 25Dropper tool 128duplicate and clone columns 74
EEdit
menu 162Edit Menu
uses 20
188

Index: F
Edit Toolbar 30Eraser tool 110
using 110Export tab
setting preferences in 38time code 38
Exposuredecreasing 83dragging 79, 82extending 79holding 79increasing 83
Exposure Sheet 35Exposure sheet
changing drawing settings 98columns
modifying 71creating drawing columns 70elements
show hide 72importing
Annotation file 99introduction 8printing 100
Exposure sheet and timelineadding columns 69adding frames 68
Exposure Sheet tabsetting preferences
default add columns 35default column width 35show annotation columns 35show drawing columns 35show sound columns 35use current frame as drawing name 35
setting preferences in 35drawing creation 35filtering 35options 35
Extending and Creating a Sequence 80Extending and dragging exposure 79Extending Exposure 79
FField Chart
grid 111File
Annotationimporting 99
File Menu 164creating a scene from 16opening a scene from 17uses 20using 16
File Toolbar 30Filling an exposure manually 78
typing mode 78Filling modes 77
insert 78overwrite 77
fill randomly 88fill selection 89Filtering
setting preferencesexposure sheet 35
Focus on Mouse Entersetting preferences 34
Framesadding
in mid scene 68to scene end 69to scene start 69xsheet 68
navigating between columns and 93
Ggap closing
Close Gap command 157Close Large Gap command 156Close Medium Gap command 156Close Small Gap command 156
General 33General tab
setting preferencescurrent view border 34cycle exposure 34
189

Toon Boom Pencil Check Pro User Guide Index: H
display cardinal coordinates 34focus on mouse enter 34levels of undo 34
setting preferences in 33colours 34options 34settings 34
Gridfield chart 111
Grid on by defaultsetting preferences 37
HHelp Menu 166
uses 20Help Tab 55Hiding
toolbars 29Holding exposure 79
IIdentifying Drawings as
Breakdown 94In-between 94Key 94
Image sequencerendering 150
ImportingAnnotation File
exposure sheet 99Importing backgrounds
how to import backgrounds and other images 50
importing colour model templates 141increasing and decreasing exposure 83Initial Drawing Tool
setting preferences 37ink & paint
Paint Unpainted command 159Unpaint command 161
ink and paint 123, 143Inking and painting
introduction 8
Interfaceintroduction 8
introductioncamera and sound 9capture 8commands 9draw and create paperless animation 8exposure sheet 8inking and painting 8launching Pencil Check Pro 8Pencil Check Pro interface 8previewing line-test in playback 8rendering 9
LLaunching Pencil Check Pro
introduction 8Mac OS X 12Windows Vista 12Windows XP 12
Levels of Undosetting preferences 34
Light Tablesetting preferences
drawing 36settings 37
using 112Light Table Maximum Wash Value
setting preferences 36Light Table Minimum Wash ValueOpacity
setting preferences 36line styles
Brush command 157
MMac OS X
configure scanner 62Launching Pencil Check Pro 12Pencil Check Pro menu 20
Managingtoolbars 29views 22
Menu
190

Index: N
drawing 156edit 162help 166pencil check 166play 167scene 169view 175windows 183
Model viewabout 26
Movieadding
time code 152rendering 151
NNavigating
between frames and columns 93Navigating the user interface
31New Colour Pots
setting preferencesdrawing 37
OOnion Skin
setting preferencesdrawing 36
using 113Onion Skin Maximum Opacity Value
setting preferences 36Onion Skin Maximum Wash Value
setting preferences 36Onion Skin Minimum Wash Value
setting preferences 36Opening a scene 13
file menu 17using welcome screen 15
Optionssetting preferences
drawing 37exposure sheet 35
general 34sound options 153time code 152video compression settings 152
Ordering Xsheet Columns 71Override tool 107
Ppainting process 139Paint Unpainted tool 130Panning
user interface 31Pencil Check Pro Menu
uses 20pen styles
Brush command 157Pen View
about 26Playback
introduction 8Playback Toolbar 30Playback View
about 27Play Menu 167
uses 21Pop up menu 21Preferences 32
dialog boxdrawing tab 36export tab 38exposure sheet tab 35general tab 33shortcuts tab 32
Printing the Xsheet 100Properties
columns 73
QQuick Menu (PopUp Menu)
accessing 21QuickTime
exporting a movie 151
191

Toon Boom Pencil Check Pro User Guide Index: R
QuickTime movierendering with alpha channel 153
RRecentre view
user interface 31registrationStrictness line 66Remove art outside selection tool 133, 134Remove Dirt tool 134Rendering 151
images 150introduction 9QuickTime movie 151QuickTime movie with alpha channel 153sound options 153time code 152video compression settings 152
repositioningtoolbars 29
Reset panuser interface 31
Reset rotationuser interface 31
Reset viewuser interface 31
Reset zoomuser interface 31
SScan.conf
configuring 63defaultBlackPoint line 65defaultGamma line 65defaultPegSide line 65defaultResolution line 65defaultThreshold line 65defaultWhitePoint line 65Desc line 65registrationStrictness line 66
scannerconfigure
Mac OS X 62Vista 61
configuring 60scanners
configuring 62Scene
creating and opening 13creating using welcome screen 14length
setting 68opening using welcome screen 15
Scene Menu 169uses 21
Select Tool is Lassosetting preferences 37
sequence fill 91setting
scene length 68Settings
drawingchanging 98
setting preferencesGgeneral 34
setting scene lengthcapture 42
Shortcuts 32setting preferences 32
Show and Hide elementsexposure sheet 72
Show Annotation Columnssetting preferences 35
Show Drawing Columnssetting preferences 35
Showingtoolbars 29
Show Sound Columnssetting preferences 35
Show Strokes tool 131Sketching 118Sound options 153Support
access using welcome screen 16swapping a view 23
Tthumbnail display 74
192

Index: U
Time Codeadding 152options 152setting preferences
export 38Toggle full screen
user interface 31Toolbars 29
about 29Drawing tools 30Edit tools 30File tools 30hiding 29managing 29moving to new location 29Playback 30showing 29Xsheet 31
Tools 110auto gap closing 124close gap 125close gaps 124Create Colour Art from Line Art 127Drawing Identification 94dropper 128overide 107paint unpainted 130Remove art outside selection 133, 134remove dirt 134show strokes 131
UU.I.
using 31Use Current Frame as Drawing Name
setting preferences 35User Interface
introduction 8views 22
User interfacepan view 31recentre view 31Reset pan 31
Reset rotation 31Reset view 31Reset zoom 31Toggle full screen 31zoom in 31zoom in and out 31zoom out 31
User Interface MenusDrawing 20Edit 20File 20Help 20Pencil Check Pro 20Play 21Scene 21Top Menu 20View 21Windows Menu 21
UsingEdit menu 20File menu 20Help menu 20Light table 112Pencil Check Pro menu 20Play menu 21Scene menu 21View menu 21Windows menu 21
Using custom vectorization parameters to capture images 52
Using live devices for capturing images 42Using onion skin 113Using progressive devices for capturing
images 46
VVectorization Parameters
dialog boxhelp tab 55
verifying the zones are painted 140Video
compression settings 152View
adding as a floating window 22
193

Toon Boom Pencil Check Pro User Guide Index: W
closing 23managing the 22menu 175swapping 23
View Menuuses 21
Views 22Colour
about 24Drawing
about 25Model
about 26Pen
about 26Playback
about 27Xsheet
about 28Vista
configure scanner 61
WWelcome Screen
accessing support from from 16accessing tutorials from 15create scene from 14creating a scene from 13opening recent scene from 15open scene from 15using 13
Windows Menu 183uses 21
Windows VistaLaunching Pencil Check Pro 12
Windows XPLaunching Pencil Check Pro 12
Workspacehow to restore default 24
XXP
configure scanner 60
findscanner utility 60SCSI communications layer 60
Xsheetadding frames 68digital 67frames
adding in mid scene 68adding to scene end 69adding to scene start 69
printing 100Xsheet Toolbar 31Xsheet View
about 28
ZZoom in
user interface 31Zoom in and out
user interface 31Zoom out
user interface 31
194