gxp 1400/1405 user manual - cloco クラウドpbx … 1400/1405 user manual !!!! thank you for...
TRANSCRIPT

GXP 1400/1405 USER MANUAL
Thank you for purchasing Grandstream GXP1400/GXP1405 Small-Medium Business IP. Make sure and acknowledge that you have read this manual before using GXP1400. Package Contents:
1. Main Case 2. Handset 3. Phone Cord 4. AC Power Adaptor 5. Ethernet Cable 6. Phone Stand 7. Quick Start Guide 8. Wall Mount Spacers x2
Disclaimer * This document is subject to change without prior notice. * A possibility of noise, broken voice, or disconnection may occur because of customers’ or our network environment. We cannot guarantee the quality of voice. * The company assumes no responsibility on the difference of call or voice quality when the hearing acuity of individuals is concern. * The company assumes no responsibility when it was used outside Japan. * As for GXP1400 regular server maintenance, you may experience temporarily service stops without prior notice. * The company assumes no responsibility for the damages of customer caused by the phone malfunction or breakdown.
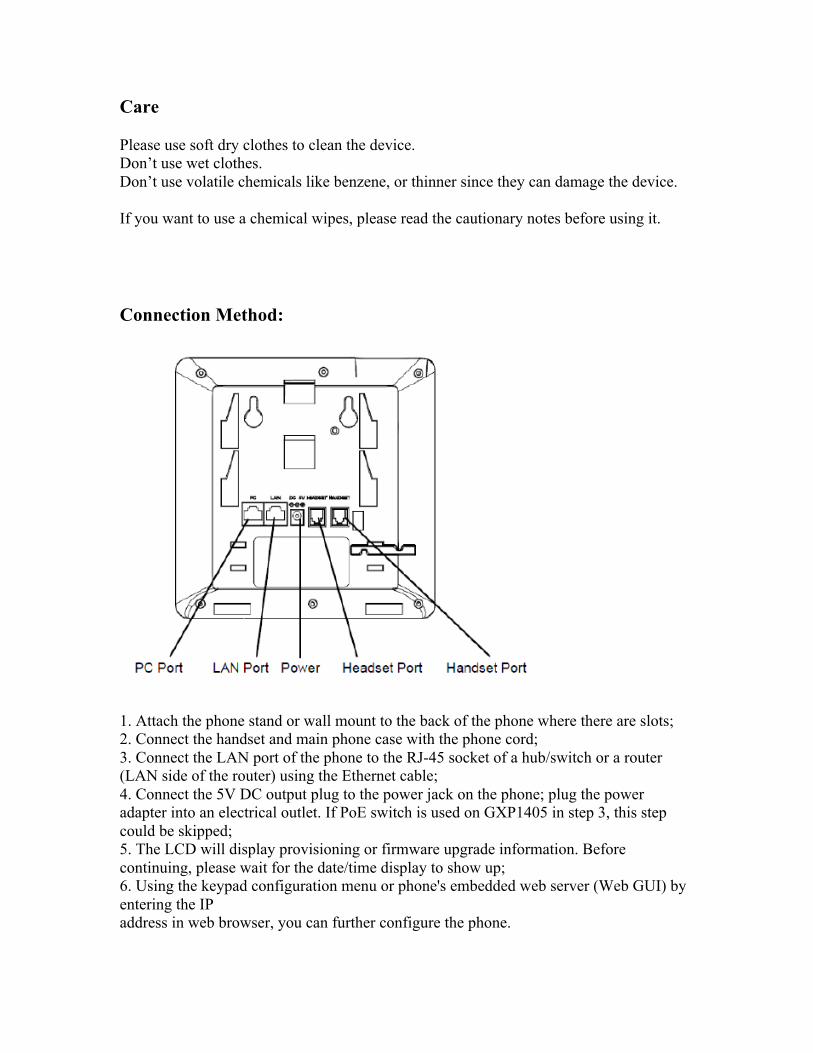
Care Please use soft dry clothes to clean the device. Don’t use wet clothes. Don’t use volatile chemicals like benzene, or thinner since they can damage the device. If you want to use a chemical wipes, please read the cautionary notes before using it. Connection Method:
1. Attach the phone stand or wall mount to the back of the phone where there are slots; 2. Connect the handset and main phone case with the phone cord; 3. Connect the LAN port of the phone to the RJ-45 socket of a hub/switch or a router (LAN side of the router) using the Ethernet cable; 4. Connect the 5V DC output plug to the power jack on the phone; plug the power adapter into an electrical outlet. If PoE switch is used on GXP1405 in step 3, this step could be skipped; 5. The LCD will display provisioning or firmware upgrade information. Before continuing, please wait for the date/time display to show up; 6. Using the keypad configuration menu or phone's embedded web server (Web GUI) by entering the IP address in web browser, you can further configure the phone.

LCD Familiarization GXP1400/GXP1405 has a dynamic and customizable screen. The screen displays differently depending on whether the phone is idle or in use (active). Date and Time - Displays the current date and time. It can be synchronized with Internet time servers. Softkeys - The softkeys are context sensitive and will change depending on the status of the phone. Typical functions assigned to softkeys are: • FORWARD ALL : Unconditionally forwards the calls to another number; • MISSED CALL : Shows unanswered calls to this phone; • NEXTSCR : Toggles among idle screen, weather and IP Address; • REDIAL : Redials the last dialed out number. Keypad Familiarization
HOLD Place active call on hold, or resume the call on hold.
TRANSFER
Transfer an active call to another number. CONF
Establish 3-way conference with other 2 parties. LINE 1/LINE 2
Switch between line 1 and line 2.
Mute. Press to mute/unmute an active call.
Headset. Used when you plugged a headset
Speaker. Hands-free function. You can call without using handset. Loudspeaker function
Send/Redial. Enter the digits and then press Send to dial out the number; Redial. Redial when there is a previously dialed call.
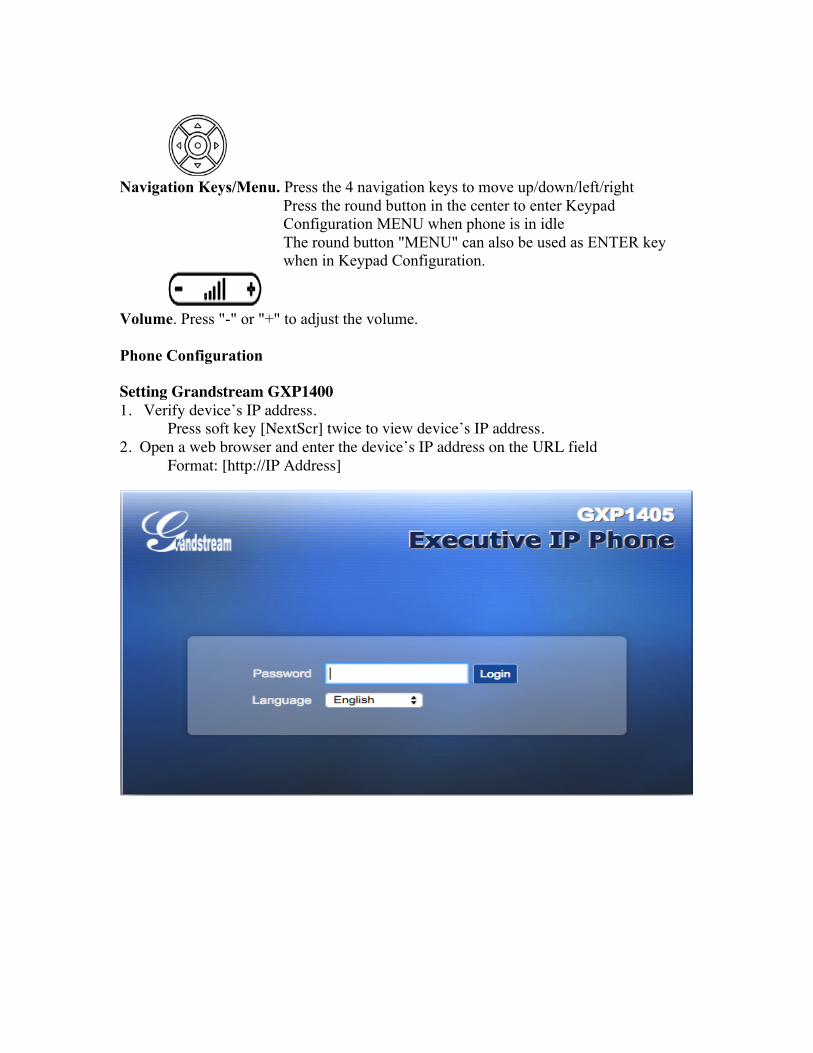
Navigation Keys/Menu. Press the 4 navigation keys to move up/down/left/right
Press the round button in the center to enter Keypad Configuration MENU when phone is in idle The round button "MENU" can also be used as ENTER key when in Keypad Configuration.
Volume. Press "-" or "+" to adjust the volume. Phone Configuration Setting Grandstream GXP1400 1. Verify device’s IP address.
Press soft key [NextScr] twice to view device’s IP address. 2. Open a web browser and enter the device’s IP address on the URL field Format: [http://IP Address]

3. Type password and click [Login]. Default password: admin *If you request to set up the device before shipping, we will change and write or paste the new password in its case.
4. Hover cursor over [Accounts]. Select [Account 1] and click [General Settings].
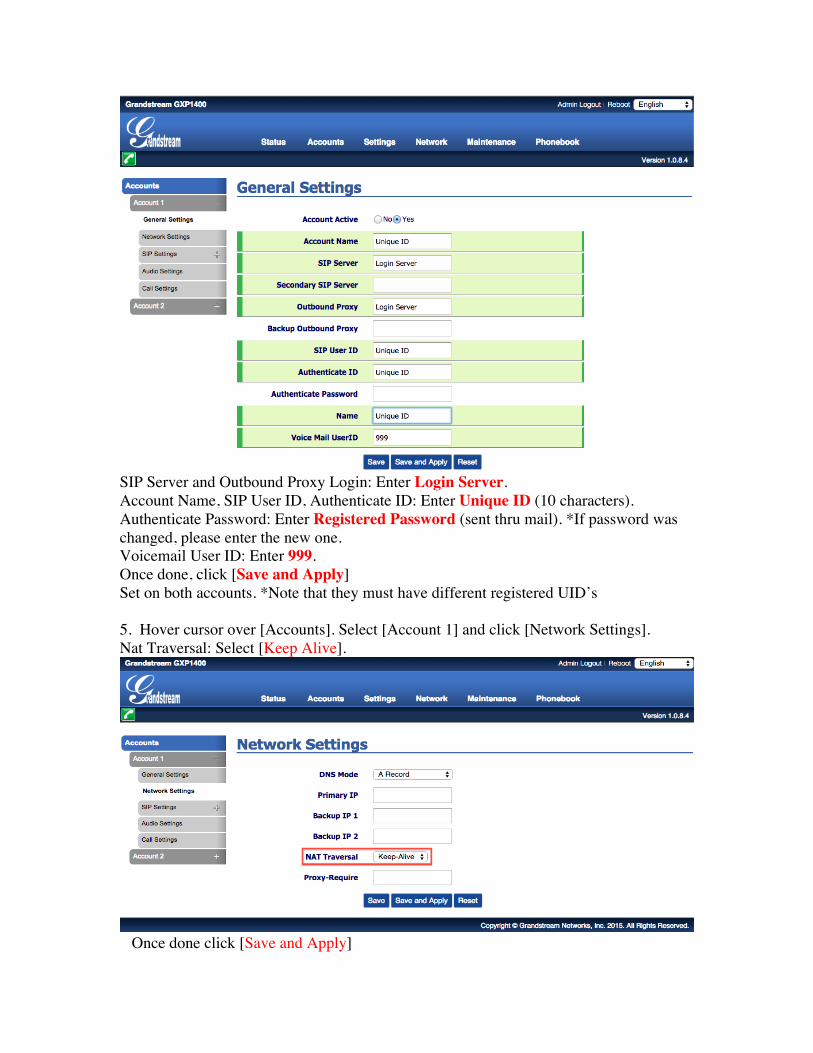
SIP Server and Outbound Proxy Login: Enter Login Server. Account Name, SIP User ID, Authenticate ID: Enter Unique ID (10 characters). Authenticate Password: Enter Registered Password (sent thru mail). *If password was changed, please enter the new one. Voicemail User ID: Enter 999. Once done, click [Save and Apply] Set on both accounts. *Note that they must have different registered UID’s 5. Hover cursor over [Accounts]. Select [Account 1] and click [Network Settings]. Nat Traversal: Select [Keep Alive].
Once done click [Save and Apply]
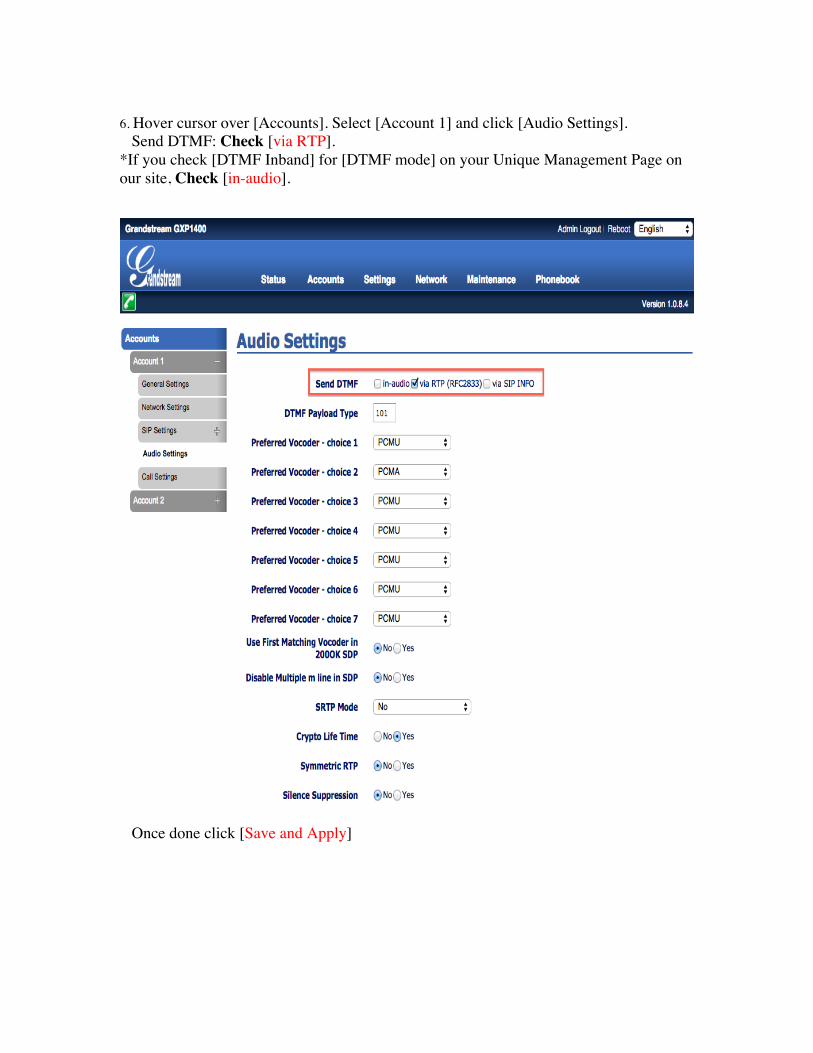
6. Hover cursor over [Accounts]. Select [Account 1] and click [Audio Settings]. Send DTMF: Check [via RTP]. *If you check [DTMF Inband] for [DTMF mode] on your Unique Management Page on our site, Check [in-audio].
Once done click [Save and Apply]

7. Hover cursor over [Settings] and click [Call Features].
Disable Call Waiting: Select [Yes]. *This will ignore Call-waiting. Select [No], if you want to enable Call-waiting. Once done, click [Save and Apply]
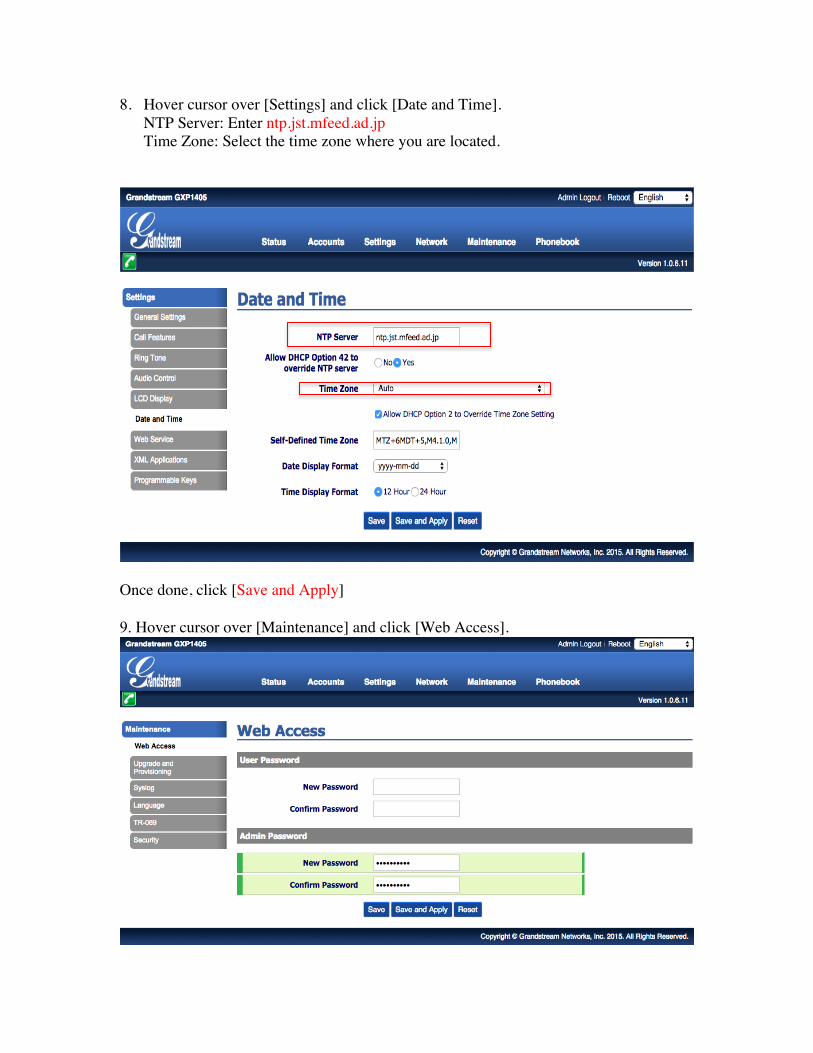
8. Hover cursor over [Settings] and click [Date and Time]. NTP Server: Enter ntp.jst.mfeed.ad.jp Time Zone: Select the time zone where you are located.
Once done, click [Save and Apply] 9. Hover cursor over [Maintenance] and click [Web Access].
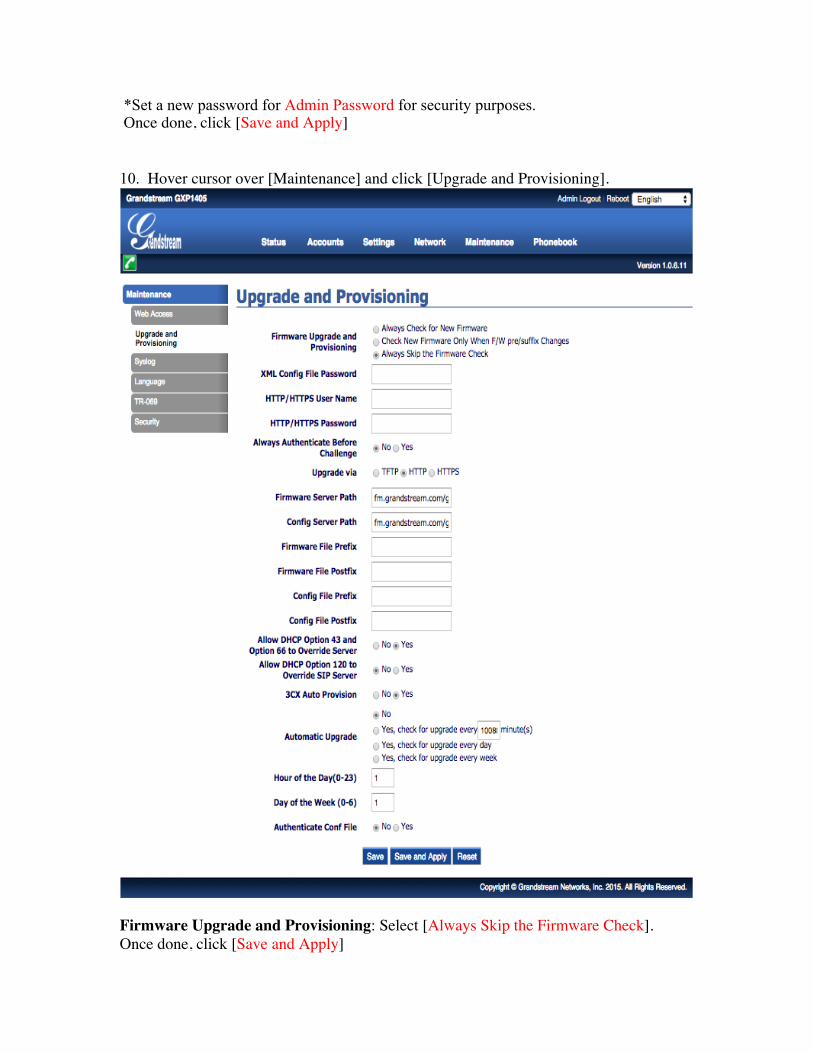
*Set a new password for Admin Password for security purposes. Once done, click [Save and Apply] 10. Hover cursor over [Maintenance] and click [Upgrade and Provisioning].
Firmware Upgrade and Provisioning: Select [Always Skip the Firmware Check]. Once done, click [Save and Apply]

11. Hover cursor over [Maintenance] and click [Language].
Display Language: Select [Auto]. Once done, click [Save and Apply]. * After all configurations are set, click [Reboot]. This will reset the device and apply all changes made.

12. Hover cursor over [Maintenance] and click [Upgrade and Provisioning]
*Note: This step should only be done if you want to upgrade firmware.
Firmware Upgrade and Provisioning: Select [Always Check for New Firmware] Upgrade via: Select [HTTP] Automatic Upgrade: Select [Yes, check for upgrade every ( ) minutes] input 10080 on field provided. Once done, click [Save and Apply]
Precautions & Safety Instructions The following instructions help use Grandstream GXP1400 properly and prevent accidents. Failure to follow these instructions would void the product’s warranty and accident may happen. 1. Immediately unplug the device from the power supply if there is a strange smell and smoke. Don’t use the device and immediately contact the dealer for repair. Do not disassemble or modify. The device may malfunction, cause electric shock and fire. 2. Do not insert metal and keep the device dry. The device may malfunction, cause electric shock and fire. 3. Do not touch the device when lightning occurs. Doing so may cause an electrical shock. Don’t place near a flammable material. This may cause fire or explosion. 4. Holding the phone on wet hands may cause electric shock. Don’t place the device in an extreme hot or cold place. Sudden temperature change may cause malfunction of the device. 5. Do not place in a damp, dusty or direct sunlight. This may trigger an explosion of the device. Place in an even and stable location. 6. Do not place the phone and earpiece near an absorbent and magnet material. This may cause malfunction.

Troubleshooting Please check the troubleshooting procedure before requesting a repair. If the problem doesn’t get resolved, please contact us. Problem Solution General Failure Plug and Unplug from the power source.
(Do this for few times). Wait for at least one minute before plugging the device. If the problem is not resolved after doing this, please contact our customer support service. Please provide your number and broadband products.
Problem Cause Solution No Ringer Sound Ethernet Cable is
disconnected. AC Adapter is disconnected. Did you change the volume settings? Did you change the settings on the display?
Check the connection of the Ethernet cable. Check the connection of the AC Adapter. Adjust the volume on the volume button. Revert the changed settings. Disconnect the Ethernet cable. (Please reboot).
Call is interrupted by noise Are there any abnormalities in the network environment?
Check your network environment.
Initialization Method Note that previous configurations will be cleared out after the initialization process. You need to set all the required information again to start your service. Press the [MENU] [●] button and select [Config]. Then, select [Factory Reset] and confirm by selecting [OK]