pdf jatco reb
DESCRIPTION
ATRA JATCO jf506e rebuild manualTRANSCRIPT

2005 ATRA. All Rights Reserved. Printed in U.S.A.
1Jatco 5 Speed

2005 ATRA. All Rights Reserved. Printed in U.S.A.
Jatco 5 Speed2

2005 ATRA. All Rights Reserved. Printed in U.S.A.
3Jatco 5 Speed
Table Of Contents
Transmission Diassembly ............................................................................ 4
Front Pump ................................................................................................. 16
Reverse/High Clutch Drum ......................................................................... 18
Direct Clutch Drum ..................................................................................... 22
Low Clutch Drum ........................................................................................ 26
Planetary Gearsets ...................................................................................... 29
Transfer Gear/Reduction Gear..................................................................... 30
Rear Cover................................................................................................... 33
Valve Body .................................................................................................. 35
Transmission Case Assembly ....................................................................... 44
Bearing Race Location ................................................................................. 64

2005 ATRA. All Rights Reserved. Printed in U.S.A.
Jatco 5 Speed4
Transmission Case: Disassembly
1. Remove the side cover.
2. Remove the bolt holding the internal harness connectors and disconnect the(2) internal harness connectors.

2005 ATRA. All Rights Reserved. Printed in U.S.A.
5Jatco 5 Speed
3. Remove only the valve body bolts shown and remove the valve body. To getto the bolt under the wiring (arrow) disconnect the solenoid.

2005 ATRA. All Rights Reserved. Printed in U.S.A.
Jatco 5 Speed6
5. Remove the valve body to case seals
4. Remove the case connector retaining clip and remove the internal wiringharness.

2005 ATRA. All Rights Reserved. Printed in U.S.A.
7Jatco 5 Speed
6. Remove the (22) bellhousing to case bolts.7. Lightly tap the converter housing with a plastic hammer to seperate the
halves.
8. Remove the differential.9. Remove the filter, pump O-ring and the input shaft O-ring.
10. Remove the front pump and the gasket.11. Remove the input shaft.

2005 ATRA. All Rights Reserved. Printed in U.S.A.
Jatco 5 Speed8
12. Remove the reduction gear assembly.13. Remove the reduction sun gear assembly.
14. Remove the direct clutch.15.. Remove the reduction brake band and the band anchor bolt.
16. Remove the (16) rear case cover bolts. Note the O-rings on the two largerbolts.
2005 ATRA. All Rights Reserved. Printed in U.S.A.
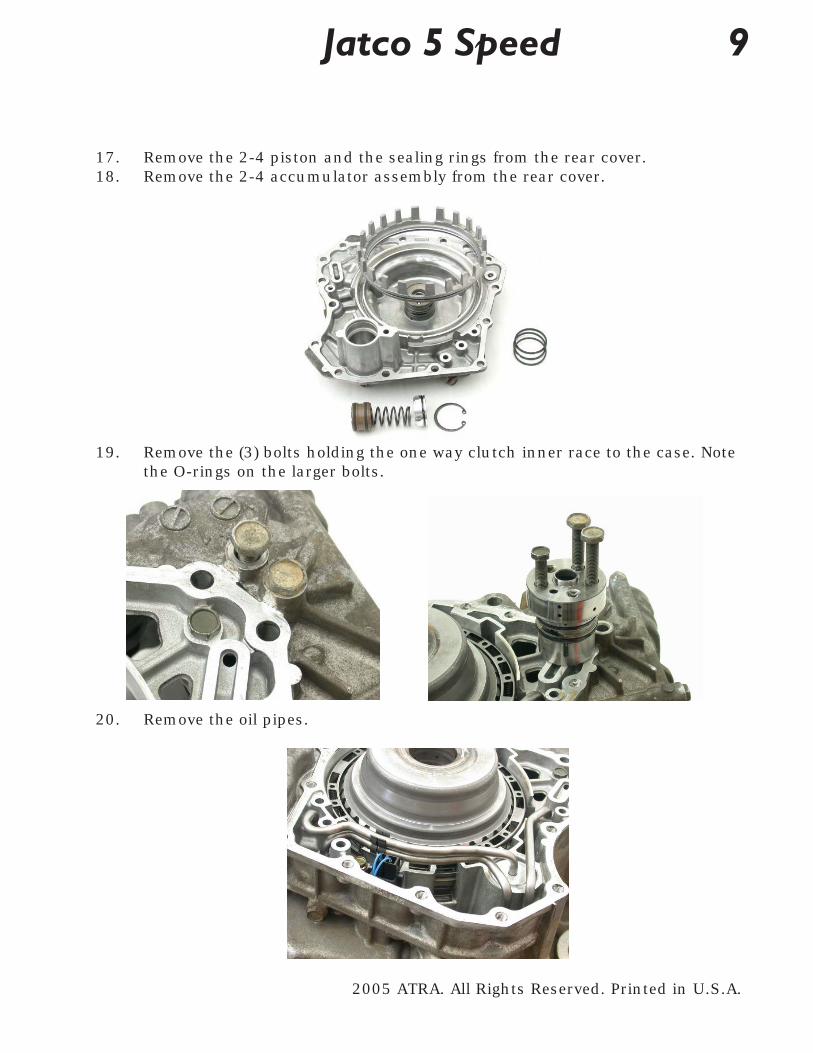
9Jatco 5 Speed
19. Remove the (3) bolts holding the one way clutch inner race to the case. Notethe O-rings on the larger bolts.
20. Remove the oil pipes.
17. Remove the 2-4 piston and the sealing rings from the rear cover.18. Remove the 2-4 accumulator assembly from the rear cover.

2005 ATRA. All Rights Reserved. Printed in U.S.A.
Jatco 5 Speed10
21. Remove the speed sensor bolts.22. Remove the speed sensor and the rear cover to main case seal.
23. Remove the direct cluch accumulator assembly.24. Remove the 2-4 clutch piston return spring.
25. Remove the Rev/High clutch drum bearing.26. Remove the Rev/High clutch drum.

2005 ATRA. All Rights Reserved. Printed in U.S.A.
11Jatco 5 Speed
27. Remove the clutch hub to Rev/High clutch drum bearing.28. Remove the clutch hub and the clutch hub to sun shell bearing.
29. Remove the sun shell and the sun shell to planet bearing.30. Remove the front planet and the planet to sun gear bearing.
31. Remove the sun gear and the sun gear to rear planet bearing.32. Remove the rear planet and the rear planet to ring gear bearing.

2005 ATRA. All Rights Reserved. Printed in U.S.A.
Jatco 5 Speed12
33. Remove the rear ring gear and the ring gear to Low drum bearing.
34. Remove the Low Drum and the Low drum to case bearing.
35. Remove the 2-4 clutches (3) and steels (4). Note: There are (2) 2-4 steelplates back to back next to the snap ring.

2005 ATRA. All Rights Reserved. Printed in U.S.A.
13Jatco 5 Speed
For this next step a special tool needs to be used. A speicial tool can befabricated out of a piece of flat steel or a piece of bar stock. A long bolt or alength of all-thread is required as well.The bar stock needs to 7-7 1/4 inches long with a hole drilled in the middlelarge enough for the bolt or the all thread to pass easily through the tool.The long bolt shown is from Kent-Moore tool # J-23327-1.
36. Using the special tool compress the low/reverse piston and remove theretaining snap ring. Note: The opening of the snap ring has curved endsand only fits into the case one way.

2005 ATRA. All Rights Reserved. Printed in U.S.A.
Jatco 5 Speed14
37. Remove the low/rev clutches (6) and steel plates (7). Note the position of thedished plate for reassembly.
Top
38. Remove the low/rev sprag retaining snap ring and the low/rev sprag. Notethe position of the snap ring opening for reassembly.
39. Remove the servo cover snap ring.40. Remove the servo cover by blowing shop air into the port shown.

2005 ATRA. All Rights Reserved. Printed in U.S.A.
15Jatco 5 Speed
WARNING!On the right is the original servo cover that was removed from thistransmission. This cover was stuck in the bore. No amount of air pressurewas going to force this cover out of the bore. Breaking the cover apart wasthe only solution.
The CauseThe problem is corrosion between the lip of the servo cover and thetransmission case.
The SolutionPrior to assembly run a bead of silicone around the servo just below the lip.This will keep out moisture and prevent corrosion.

2005 ATRA. All Rights Reserved. Printed in U.S.A.
Jatco 5 Speed16
Subassembly Rebuild Procedure
Front Pump: Disassembly And Assembly
1. Remove (8) 5mm allen bolts and split the pump halves apart.2. Remove the pump gears from the body.
3. Clean and dry all pump components.4. Inspect the pump gears and the pump pocket for wear and scoring.5. Inspect the stator support half for wear and scoring. Inspect the bushing for
wear.

2005 ATRA. All Rights Reserved. Printed in U.S.A.
17Jatco 5 Speed
7. Lightly lube the pump pocket and install the pump gears. Use a smallamount of assembly gel to keep the pump gears centered in the pocket.
8. Install the stator support onto the pump body. Install the (8) 5mm bolts andtighten them to 96 in. lbs.
6. Install a new pump bushing and seal. Note: The step in the bushing is installed towards the gear.

2005 ATRA. All Rights Reserved. Printed in U.S.A.
Jatco 5 Speed18
Reverse/High Clutch Drum: Teardown And Assembly
1. Remove the reverse clutch retaining snap ring and the reverse clutchpressure plate.
2. Remove (2) reverse clutches and (2) reverse steel plates.
3. Remove the direct clutch retaining snap ring and pressure plate.4. Remove the (5) direct clutches and (5) direct steels.

2005 ATRA. All Rights Reserved. Printed in U.S.A.
19Jatco 5 Speed
5. Using a suitable press, compress the piston return spring and remove theretaining snap ring.
6. Remove the retainer, return springs and the pistons from the drum. Removeand discard the piston seals.
7. Clean and dry all rev/hi clutch drum parts.
CautionCarefully inspect the reverse piston. The piston can crack. The crack is verydifficult to see. If the clutches in the drum are burnt, ALWAYS replace thereverse piston. The Mazda part number is FP03-19-480.

2005 ATRA. All Rights Reserved. Printed in U.S.A.
Jatco 5 Speed20
8. Install new seals on the pistons and install the pistins into the drum.9. Using a suitable press, compress the spring retainer and install the
retaining snap ring.
10. Install the (5) direct clutches and (5) steel plates.11. Install the pressure plate and the reatining snap ring. Direct clutch
clearance should be .031-.043 in. and is adjusted by changing the pressureplate.

2005 ATRA. All Rights Reserved. Printed in U.S.A.
21Jatco 5 Speed
12. Install the (2) reverse clutches and (2) steel plates.13. Install the reverse pressure plate and the retaining snap ring. Reverse
clutch clearance should be .020-.030 in. and is adjusted by changing thepressure plate.
14. Install (3) sealing rings onto the rear cover and place the drum onto the rearcover to air check the clutch drum.
2005 ATRA. All Rights Reserved. Printed in U.S.A.
Jatco 5 Speed22
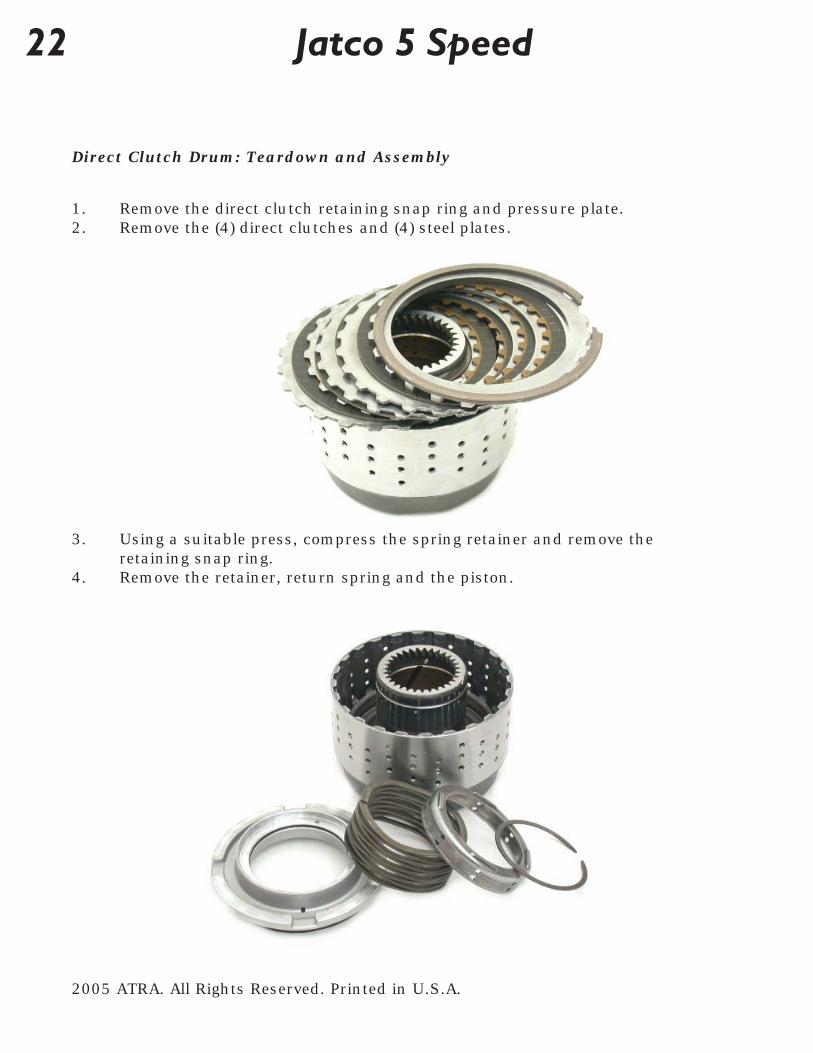
Direct Clutch Drum: Teardown and Assembly
1. Remove the direct clutch retaining snap ring and pressure plate.2. Remove the (4) direct clutches and (4) steel plates.
3. Using a suitable press, compress the spring retainer and remove theretaining snap ring.
4. Remove the retainer, return spring and the piston.

2005 ATRA. All Rights Reserved. Printed in U.S.A.
23Jatco 5 Speed
5. Remove the sprag retaining snap ring and the sprag retaining washer.6 Remove the sprag and the needle bearing.
7. Clean and dry all direct clutch drum components.8. Inspect the sprag race and the sprag elements for wear and scoring.9. Install the bearing and the sprag into the drum. Note: The lip on the sprag
faces up.10. Install the retainer and the snap ring.

2005 ATRA. All Rights Reserved. Printed in U.S.A.
Jatco 5 Speed24
11. Install new seals onto the piston. Lightly lube the seals and install thepiston into the drum.
12. Using a suitable press, compress the return spring and install the retainingsnap ring.
13. Install (4) direct clutches and (4) steel plates.14. Install the direct clutch pressure plate and the retaining snap ring. Direct
clutch clearance should be .040-.080 in. and can be adjusted by changingthe pressure plate.

2005 ATRA. All Rights Reserved. Printed in U.S.A.
25Jatco 5 Speed
15. Install the inner sprag race into the sprag to air check the drum.16. The sprag race should freewheel counter clockwise.

2005 ATRA. All Rights Reserved. Printed in U.S.A.
Jatco 5 Speed26
Low Clutch Drum: Teardown and Assembly
1. Remove the retaining snap ring and the low clutch pressure plate.2. Remove the (7) Low clutches and (7) steel plates.
3. Using a suitable press, compress the spring retainer and remove the snapring.
4. Remove the retainer, return spring and the low piston.
2005 ATRA. All Rights Reserved. Printed in U.S.A.
27Jatco 5 Speed
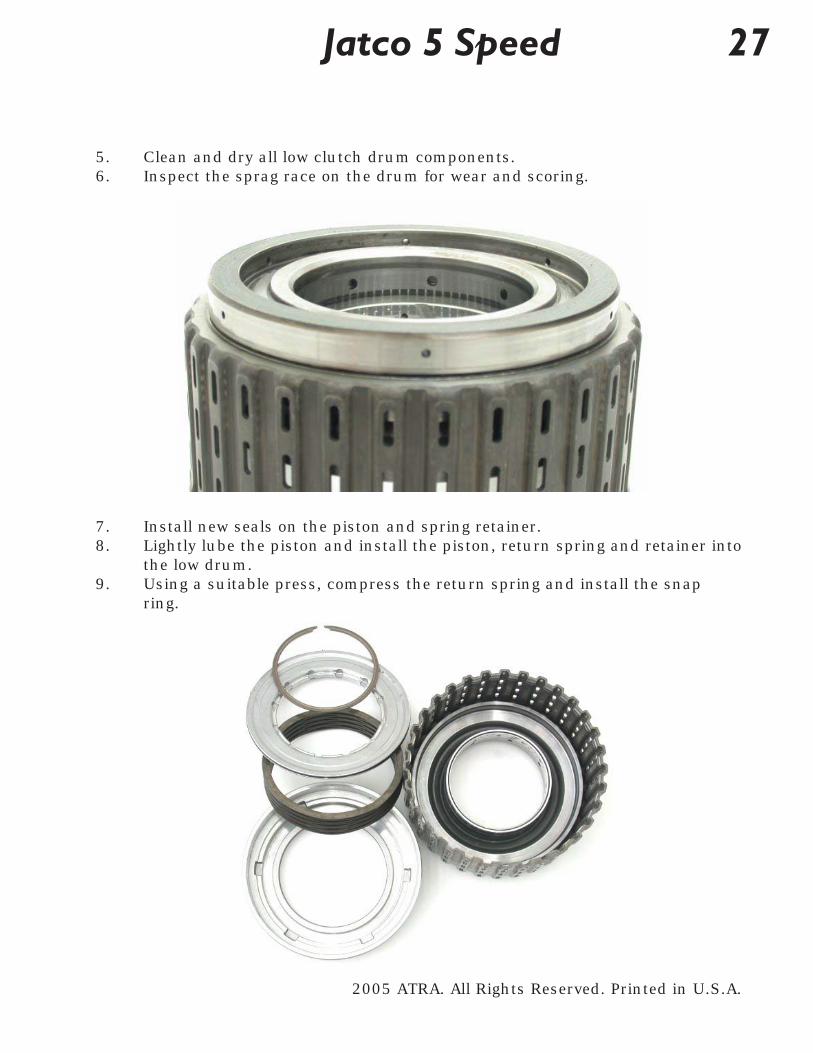
5. Clean and dry all low clutch drum components.6. Inspect the sprag race on the drum for wear and scoring.
7. Install new seals on the piston and spring retainer.8. Lightly lube the piston and install the piston, return spring and retainer into
the low drum.9. Using a suitable press, compress the return spring and install the snap
ring.
2005 ATRA. All Rights Reserved. Printed in U.S.A.
Jatco 5 Speed28
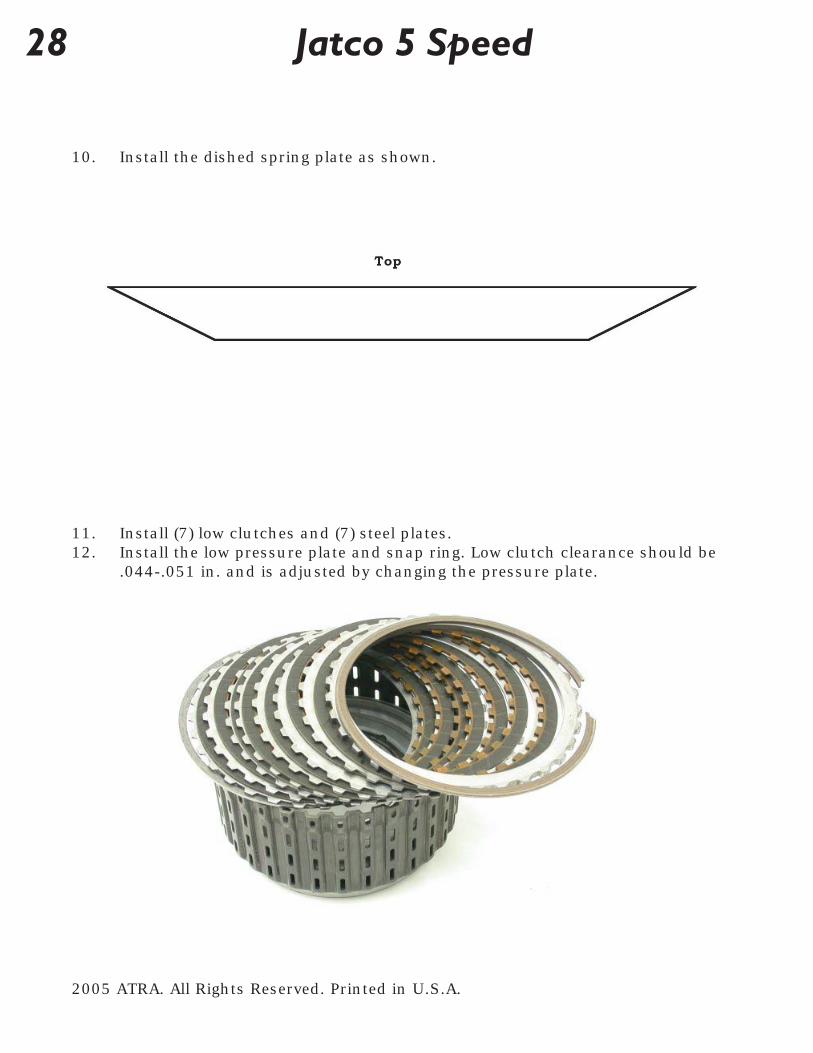
10. Install the dished spring plate as shown.
11. Install (7) low clutches and (7) steel plates.12. Install the low pressure plate and snap ring. Low clutch clearance should be
.044-.051 in. and is adjusted by changing the pressure plate.

2005 ATRA. All Rights Reserved. Printed in U.S.A.
29Jatco 5 Speed
Planetary Gear Sets
Inspect the planetary gear sets for gear wobble and broken or cracked teeth.If any are damaged or worn the planetary gear set must be replaced.

2005 ATRA. All Rights Reserved. Printed in U.S.A.
Jatco 5 Speed30
Transfer Gear / Reduction Gear: Teardown And Assembly
1. Remove the lock nut on the transfer shaft.2. Using a suitable press, support the idler gear and press the shaft through
the bearing race and the reduction gear.
3. Clean and dry all transfer gear/reduction gear components.4. Inspect the idler gear (large gear) bearings for wear and scoring.5. Inspect the reduction gear planetary gear set for gear wobble and broken or
cracked teeth.
2005 ATRA. All Rights Reserved. Printed in U.S.A.
31Jatco 5 Speed
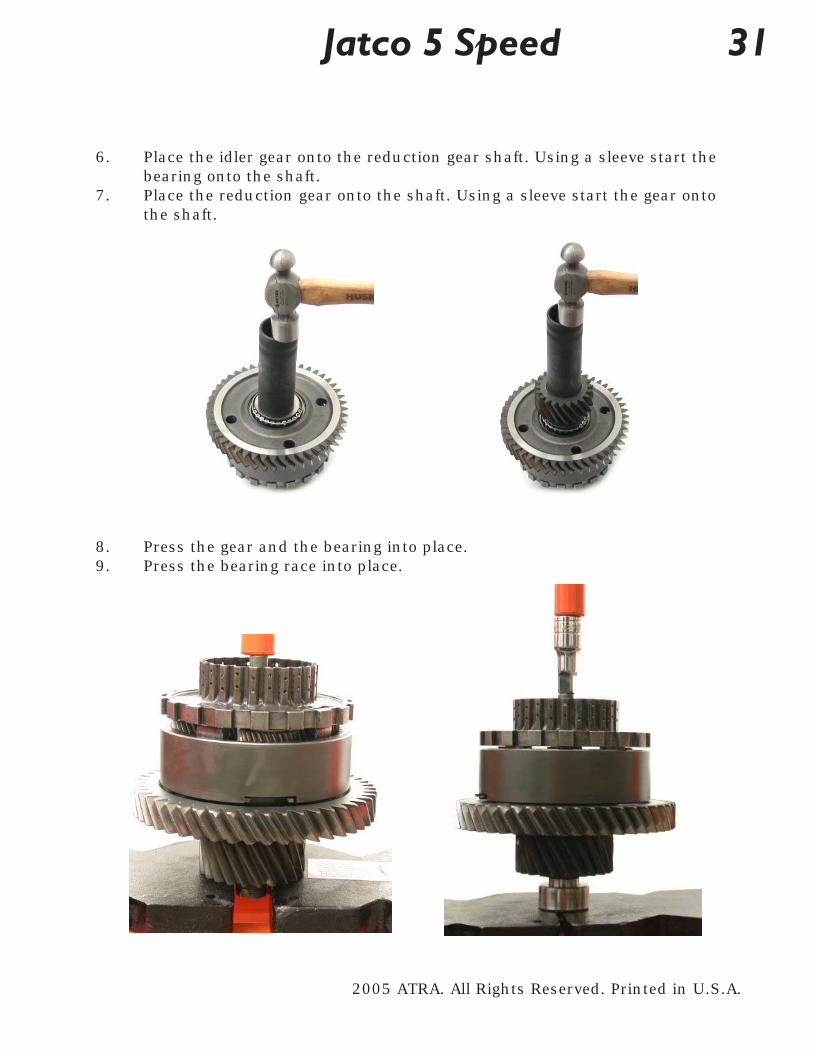
6. Place the idler gear onto the reduction gear shaft. Using a sleeve start thebearing onto the shaft.
7. Place the reduction gear onto the shaft. Using a sleeve start the gear ontothe shaft.
8. Press the gear and the bearing into place.9. Press the bearing race into place.

2005 ATRA. All Rights Reserved. Printed in U.S.A.
Jatco 5 Speed32
10. Tighten the nut onto the reduction shaft until 5-15 in. lbs. of turning torqueis obtained.
11. Stake the nut into place.

2005 ATRA. All Rights Reserved. Printed in U.S.A.
33Jatco 5 Speed
Rear Cover: Teardown And Assembly
1. Remove the piston and discard the seals.2. Remove the accumulator cover retaining snap ring.3. Remove the accumulator cover, the spring and the piston.4. Remove the three sealing rings.

2005 ATRA. All Rights Reserved. Printed in U.S.A.
Jatco 5 Speed34
5. Clean and dry all rear cover components6. Inspect the accumulator borde for wear. The bore should be smooth and
free from any scoring.7. Install new seals on the 2-4 piston. Lightly lube the seals and install the
piston into the rear cover.8. Install (2) new teflon sealing rings onto the accumulator piston and install
the piston into the rear cover.9. Install the spring and the accumulator cover with a new O-ring.10. Install the retaining snap ring.11. Install (3) new sealing rings with the V-cut as shown.

2005 ATRA. All Rights Reserved. Printed in U.S.A.
35Jatco 5 Speed
Valve Body: Teardown And Assembly
There are two vavle body configurations for this transmission. The Mazdavalve body and the Volkswagen/Jaguar. These valve bodies are NOTinterchangeable. The Jaguar valve body is the same as the Volkswagenexcept that it has one less checkball. Caution: Some of the valves in bothvalve bodies are teflon coated. DO NOT use abrasives on these valves. If thevalves are worn or become sticky in the bores the valve body may need to bereplaced.
Mazda
VW/Jaguar

2005 ATRA. All Rights Reserved. Printed in U.S.A.
Jatco 5 Speed36
Mazda Valve Body
ID Description
1 Modifier Accumulator Valve
2 Pressure Modifier Valve
3 Torque Converter Pressure Regulator Valve
4 Throttle Accumulator Valve A
5 Accumulator Valve A
6 Throttle Accumulator Valve C
7 Accumulator Control Valve C

2005 ATRA. All Rights Reserved. Printed in U.S.A.
37Jatco 5 Speed
Mazda Valve Body
ID Description
1 Failsafe Valve
2 Shift Valve A
3 Reverse Inhibit Valve
4 Neutral Control Valve
5 Accumulator Switch Valve
6 Pilot Valve
7 Manual Valve
8 Neutral Shift Valve
9 TCC Control Valve
10 Shift Valve B
11 Plug

2005 ATRA. All Rights Reserved. Printed in U.S.A.
Jatco 5 Speed38
Mazda Valve Body
ID Description
1 Shift Valve C
2 Low Clutch Accumulator
3 High Clutch Accumulator
4 Throttle Accumulator B
5 Accumultor Valve B
6 Pressure Regulator Valve
7 Line Pressure Relief Valve
8 Reduction Timing Valve
9 Reduction Reducing Valve

2005 ATRA. All Rights Reserved. Printed in U.S.A.
39Jatco 5 Speed
Mazda Checkball Locations
4 Steel Checkballs
5 Plastic Checkballs

2005 ATRA. All Rights Reserved. Printed in U.S.A.
Jatco 5 Speed40
Volkswagen/Jaguar Valve body
ID Description
1 Modifier Accumulator
2 Pressure Modifier Valve
3 Torque Converter Regulator Valve
4 Throttle Accumulator Valve A
5 Accumulator Control Valve A
6 Unknown
7 Unknown

2005 ATRA. All Rights Reserved. Printed in U.S.A.
41Jatco 5 Speed
Volkswagen/Jaguar Valve body
ID Description
1 Shift Valve C
2 Low Clutch Accumulator
3 High Clutch Accumulator
4 Throttle Accumulator
5 Unknown
6 Accumulator Control Valve B
7 Unknown
8 Pressure Regulator Valve
9 Line Pressure Relief Valve
10 Reduction Timing Valve
11 Reduction Reducing Valve

2005 ATRA. All Rights Reserved. Printed in U.S.A.
Jatco 5 Speed42
Volkswagen/Jaguar Valve body
ID Description
1 Shift Valve A
2 Reverse Inhibit Valve
3 Neutral Control Valve
4 Accumulator Switch Valve
5 Pilot Valve
6 Manual Valve
7 Neutral Shift Valve
8 TCC Control Valve
9 Shift Valve
10 Failsafe Valve

2005 ATRA. All Rights Reserved. Printed in U.S.A.
43Jatco 5 Speed
Volkswagen/Jaguar Valve body
4 Steel Checkballs
5 Plastic Checkballs
Jaguar Has No Checkball Here

2005 ATRA. All Rights Reserved. Printed in U.S.A.
Jatco 5 Speed44
Transmission Case: Assembly
1. Remove the manual lever detent spring. Drive out the (2) roll pins holdingthe rooster comb and park linkage. Remove the manual linkage retainingbolt.
2. Replace the manual lever seal and reinstall the manual linkage components.
Note: Before installing the retaining bolt be sure to aligin the park linkage.

2005 ATRA. All Rights Reserved. Printed in U.S.A.
45Jatco 5 Speed
3. Place a 1 1/4 in. 12 point socket over the splines to check the output gearturning torque. Turning torque should be 5.6- 11.5 in. .lbs.If not asspecified replace the output gear bearing assembly.
4. Install (2) low clutch drum sealing rings. Retain with assembly gel.
5. Install (2) sealing rings onto the one way clutch inner race.6. Install new O-rings onto the (2) large bolts and install the sprag race into
the case. Torque the bolts to 24-28 ft. lbs.

2005 ATRA. All Rights Reserved. Printed in U.S.A.
Jatco 5 Speed46
7. Install the low/reverse sprag into the case with the smooth side facing up.8. Install the retaining snap ring into the case. Note the location of the snap
ring opening.
9. Install the low/reverse clutches (6) and steel plates (6).10. Install the dished plate as shown.
Top

2005 ATRA. All Rights Reserved. Printed in U.S.A.
47Jatco 5 Speed
11. Install the low/reverse return spring seat and spring.12. Install the low/reverse piston and piston housing.
13. Using the special tool made during transmission teardown, compress thelow/reverse piston housing and spring assembly.
14. Install the retaining snap ring. Note the location of the snap ring opening.
15. Using assembly gel, install the low clutch to case bearing on the low drum.16. Using a twisting motion install the low drum down into the case. The drum
should feewheel counterclockwise.

2005 ATRA. All Rights Reserved. Printed in U.S.A.
Jatco 5 Speed48
17. Install the bearing down into the drum and stick the bearing to the rear ringgear with assembly gel. Install the ring gear down into the drum.
18. Install the bearing down into the ring gear and stick the race to the rearplanet with assembly gel. Install the planet down into the ring gear.
19. Install the sun gear to planet bearing down into the planet. Install the sungear into the planet with the smooth surface facing down.
20. Stick the front planet to sun gear bearing onto the planet using assemblygel and install the planet down onto the sun gear.

2005 ATRA. All Rights Reserved. Printed in U.S.A.
49Jatco 5 Speed
21. Install the bearing onto the planet and stick the race onto the sun shell withassembly gel. Install the sun shell down onto the planet.
22. Install the (3) 2-4 clutch plates and (5) steel plates.
23. Install the high clutch bearing race onto the sun shell and stick the highclutch hub bearing to hub using assembly gel.
24. Install the high clutch hub to high clutch race down into the hub. Stickthe bearing to the high drum with assembly gel and install the high drumdown onto the hub.

2005 ATRA. All Rights Reserved. Printed in U.S.A.
Jatco 5 Speed50
25. Install the high clutch to rear cover bearing down into the drum.26. Install the 2-4 piston return spring.
27. Install new seals on the accumulator piston and cover and Install theaccumulator assembly into the case.
28. Install the speed sensor wiring loom into the case and install the inputspeed sensor. Install the case to rear cover seal (arrow).

2005 ATRA. All Rights Reserved. Printed in U.S.A.
51Jatco 5 Speed
29. Install the (3) oil tubes
30. Using an H gauge check the endplay. Place the gauge on the transmissioncase and set the plunger down onto the high clutch bearing.

2005 ATRA. All Rights Reserved. Printed in U.S.A.
Jatco 5 Speed52
31. Flip the H gauge over onto the rear cover. When the washer is in place theend clearance should be .010 - .020 in. and is adjusted by changing thebearing race.

2005 ATRA. All Rights Reserved. Printed in U.S.A.
53Jatco 5 Speed
32. Place the end cover onto the transmission case. There will spring tension onthe cover. Tighten the end cover bolts down evenly and torque the bolts to14 - 16 ft. lbs.
33. Replace the O-rings on the larger bolts.
2005 ATRA. All Rights Reserved. Printed in U.S.A.
Jatco 5 Speed54
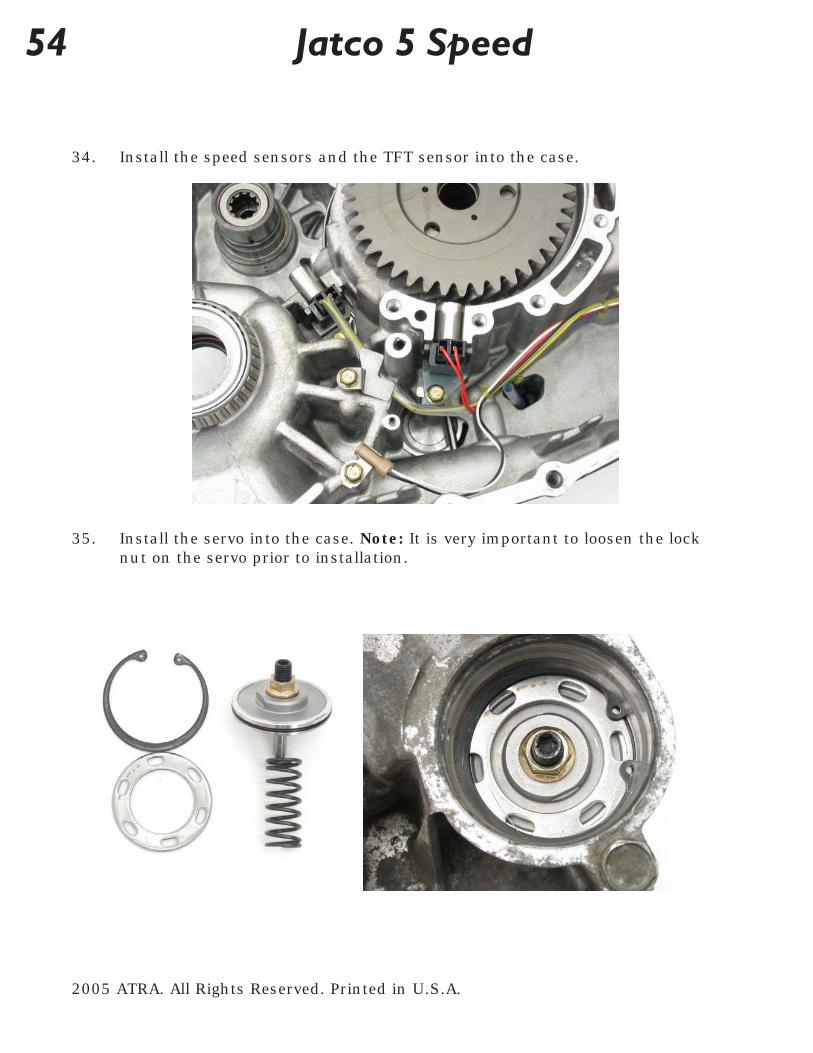
35. Install the servo into the case. Note: It is very important to loosen the locknut on the servo prior to installation.
34. Install the speed sensors and the TFT sensor into the case.

2005 ATRA. All Rights Reserved. Printed in U.S.A.
55Jatco 5 Speed
36. Install the direct drum down into the case.
37. Install the band down into the case. While holding the band in position,screw the band anchor bolt, from the outside of the case, into the slot in theband. Note: Add thread sealer to anchor bolt prior to installation to preventleaks.

2005 ATRA. All Rights Reserved. Printed in U.S.A.
Jatco 5 Speed56
38. Install the sun gear bearing down into the center of the reduction drum andsecure the race to the sun gear with assembly gel. Install the sun gear downinto the reduction drum.
39. Install the reduction gear assembly down into direct clutch. The reductiongear assembly is all the way down into the drum when the reduction gear isflush with the output gear.
40. Install (3) new sealing rings onto the input shaft and install the input shaftinto the transmission.

2005 ATRA. All Rights Reserved. Printed in U.S.A.
57Jatco 5 Speed
41. Install a new front pump gasket and install the front pump. Torque the frontpump bolts to 14-16 ft. lbs.
42. Install a new input shaft O-ring, front pump O-ring and a new filter.
43. Install the final drive.
Jaguar AWD
VW/Mazda

2005 ATRA. All Rights Reserved. Printed in U.S.A.
Jatco 5 Speed58
44. Thouroughly clean and dry the two magnets and install them into the case.
45. Flat file the bell housing to knock down any high spots prior to installation.
46. Lightly lube the pump O-ring and apply a bead of sealer to the bell housing.Install the bell housing onto the transmission case. Tighten all bolts to20-22 ft. lbs.

2005 ATRA. All Rights Reserved. Printed in U.S.A.
59Jatco 5 Speed
47. Install two case to valve body seals
48. Air Check passages.

2005 ATRA. All Rights Reserved. Printed in U.S.A.
Jatco 5 Speed60
Valve Body Installation
47. The manual valve cannot be seen during valve body installation. This makesthe installation rather trickyThe Easy WayPlace the manual linkage in the manual low position.Slide the manual valve down into the valve body and lower the valve bodyonto the transmission case. Install two bolts only hand tight.When the manual valve is engaged onto the linkage the manual valve can beseen sticking out of the valve body approx. 3/8 in. and will move in and outwhile rotating the manual lever.

2005 ATRA. All Rights Reserved. Printed in U.S.A.
61Jatco 5 Speed
48. Connect the speed sensor harness and the solenoid harness plug-ins.Install the valve body bolts. It may be necassary to unplug the solenoid toinstall the valve body bolt below the wiring harness (arrow). Tighten valvebody bolts to 60-72 in. lbs.

2005 ATRA. All Rights Reserved. Printed in U.S.A.
Jatco 5 Speed62
49. Using a new side cover gasket, install the side cover.
50. Band adjustment: Loosen the lock nut several turns. Screw the band adjuster in until it bottoms out and back off 2 1/2 turns and tighten the locknut down. Note: A 14mm crows foot may need to be modified to fit properlyover the lock nut.

2005 ATRA. All Rights Reserved. Printed in U.S.A.
63Jatco 5 Speed
51. Install new seals on the servo accumulator piston and the servo cover.Assemble the servo cover and install the snap ring.
52. Place a bead of silicone around the upper lip of the servo cover (this willprevent corrosion) and install the servo cover into the transmission.

2005 ATRA. All Rights Reserved. Printed in U.S.A.
Jatco 5 Speed64
Bearing And Race Locations

2005 ATRA. All Rights Reserved. Printed in U.S.A.
65Jatco 5 Speed
Bearing And Race Locations

2005 ATRA. All Rights Reserved. Printed in U.S.A.
Jatco 5 Speed66

2005 ATRA. All Rights Reserved. Printed in U.S.A.
67Jatco 5 Speed
2005 ATRA. All Rights Reserved. Printed in U.S.A.
Jatco 5 Speed68

2005 ATRA. All Rights Reserved. Printed in U.S.A.
69Jatco 5 Speed

2005 ATRA. All Rights Reserved. Printed in U.S.A.
Jatco 5 Speed70

2005 ATRA. All Rights Reserved. Printed in U.S.A.
71Jatco 5 Speed

2005 ATRA. All Rights Reserved. Printed in U.S.A.
Jatco 5 Speed72

2005 ATRA. All Rights Reserved. Printed in U.S.A.
73Jatco 5 Speed

2005 ATRA. All Rights Reserved. Printed in U.S.A.
Jatco 5 Speed74