password manager xp help - cp-lab.com · password manager xp help © 2002-2017 by cp lab table of...
TRANSCRIPT

© 2002-2017 by CP Lab
Password Manager XP HelpVersion 3.3

Password Manager XP Help
© 2002-2017 by CP Lab
Table of Contents
Part 1 About Password Manager XP 1
Part 2 Features 2
Part 3 License 3
Part 4 Acknowledgements 5
Part 5 Quick Start 6
Part 6 Working with Password Manager XP 7
................................................................................................................................... 81 Working with databases
.......................................................................................................................................................... 10Database settings
......................................................................................................................................................... 11General
......................................................................................................................................................... 12Users
......................................................................................................................................................... 15Encryption
......................................................................................................................................................... 16Parameters
......................................................................................................................................................... 17Backup
.......................................................................................................................................................... 18Exporting a database to file
.......................................................................................................................................................... 19Importing data from file
.......................................................................................................................................................... 20Synchronizing database
.......................................................................................................................................................... 21Repair database
.......................................................................................................................................................... 22Additional information
................................................................................................................................... 232 Working with records
.......................................................................................................................................................... 25Copying password to clipboard
.......................................................................................................................................................... 26Working with files
.......................................................................................................................................................... 27Adding custom icons
.......................................................................................................................................................... 28Setting up columns’ appearance
................................................................................................................................... 293 Form fill out and form data saving
................................................................................................................................... 324 Printing
................................................................................................................................... 335 Customizing the fields' structure
................................................................................................................................... 356 Password generator
................................................................................................................................... 377 Install to removable device Wizard
................................................................................................................................... 408 Viewing Action log
................................................................................................................................... 429 Permissions
................................................................................................................................... 4310 Configuration of Password Manager XP
.......................................................................................................................................................... 44General
.......................................................................................................................................................... 45Appearance
.......................................................................................................................................................... 46Security
.......................................................................................................................................................... 47Integration :: Hot keys
.......................................................................................................................................................... 48Integration :: Browsers
.......................................................................................................................................................... 49Integration :: Form filling
.......................................................................................................................................................... 50Locations
.......................................................................................................................................................... 51Backup

Contents
II
© 2002-2017 by CP Lab
.......................................................................................................................................................... 52Restrictions
................................................................................................................................... 5311 Configuring for network use
................................................................................................................................... 5412 Command line parameters
................................................................................................................................... 5513 Setup program’s command line parameters
................................................................................................................................... 5614 Group Policy Administrative Template
................................................................................................................................... 5715 Password Manager XP Server
.......................................................................................................................................................... 58Overview
.......................................................................................................................................................... 59Installing Password Manager XP Server
.......................................................................................................................................................... 60Enabling logging of users’ database actions
................................................................................................................................... 6116 Password Manager XP Mobile
Part 7 Support and Registration 63
................................................................................................................................... 641 Registration
................................................................................................................................... 652 Unregistered copy limitations
................................................................................................................................... 663 Technical support
Part 8 FAQ 67
Part 9 Professional Edition 69

© 2002-2017 by CP Lab
1 Password Manager XP Help
1. About Password Manager XP
Password Manager XP is a program that will help you systematize secret information stored on your PC. Youwill forget about all your headaches which were caused by loss of passwords, access codes and other sensitiveinformation. You'll be able to store all your logins, passwords, PIN codes, credit card numbers and their accesscodes, and any other confidential information in one place.
Password Manager XP allows you to create several databases for storing your information. Each database willhave its own access password and will be encrypted with various algorithms. Encryption scheme of yoursensitive data can involve usage of several algorithms at a time, what significantly increases protection againstcrackers. Besides the program provides operating mode with autoclosure of databases, what decreases probabilityof stealing your data (for example, you have been called out by your chief or you simply forgot to quit the program).Thus while working in the given operating mode database will be automatically closed if it stays idle during specifiedperiod of time.
You can create passwords databases at shared resource and access them from multiple computers across thenetwork. Install to removable device Wizard will help you to install the Password Manager XP to the removabledevices such a USB flash drives. You can run Password Manager XP and work with passwords databases directlyon removable device.
Quite frankly, Password Manager XP can considerably simplify your work with the Internet and usual Windowsapplications. It can autofill web pages, registration forms, logon windows, etc. This feature is compatible withMicrosoft Internet Explorer, Mozilla, Firefox, Chrome, Opera and majority of usual Windows applications.
Password Manager XP has built-in password generator with many adjustable functions.
Password Manager XP possesses user friendly interface, which can be easily adjusted to your likes.

Features 2
© 2002-2017 by CP Lab
2. Features
Features of Password Manager XP:
Exceptionally high security level
support of the following encryption algorithms (can be used together): Blowfish, 3DES, Rijndael, Tea, Cast128,RC4, Serpent, Twofish;
no unencrypted temporary files ever created;
memory blocks are cleared when no longer needed;
built-in password generator;
Multi-user environment support
support for multiple databases;
ability to access passwords databases from multiple computers across the network;
adjustable user privileges per given database;
permissions can be set for folders or even individual records;
concurrent write access to a database for multiple users;
NT authentication support;
logging of all data changes;
users' actions logging (Pro edition only);
Other features
database and folder fields can be fully customized. It is possible to add/modify/remove fields for individual folderor entire database;
autofill & form filler functionality. Currently it works in Internet Explorer, Firefox, Chrome, Opera and most ofordinary Windows applications;
Files can be attached to database records;
support of system wide hotkeys;
printing and ability to create custom print templates;
ability to store passwords databases and the program itself on the removable devices such a USB flash drives;
synchronization of databases.
backup and restoring of passwords databases;
export and import to/from CSV and TXT files;
ability to check for the expired passwords on Windows start;
program can be minimized to system tray;
information sorting options;
handy and easy adjustable interface;
multilingual user interface (English, German, French, Italian, Spanish, Dutch, Swedish, Norwegian, Lithuanian,Chinese, Korean, Danish, Czech, Slovak, Slovenian, Hungarian, Greek, Croatian, Polish, Portuguese (Brazil),Hebrew, Turkish, Farsi, Romanian, Russian, Ukrainian);
Windows themes support.

© 2002-2017 by CP Lab
3 Password Manager XP Help
3. License
SOFTWARE LICENSE AGREEMENT
You should carefully read the following terms and conditions before using the software.
License Agreement
This is the End User License Agreement (the "AGREEMENT") is a legal agreement between you ("LICENSEE"),the end-user, and CP Lab, the manufacturer and the copyright owner, for the use of the "Password Manager XP"software product ("SOFTWARE").
By using this Software or storing this program on a computer drive (or other media), you are agreeing to be boundby the terms of this Agreement. If you do not agree with the terms of this Agreement, please remove this Softwarefrom your system.
This Software is not Freeware. However, you may install an Evaluation Version of this Software to test and evaluatethe application during the Trial Period. If the program meets your requirements, and you wish to continue using theSoftware, after the Trial Period has ended, you have to purchase the Registered Version. If you do not want tocontinue using Software after the Trial Period, please remove this Software from your system.
You accept responsibility for any network usage costs or any other costs, incurred by using this Software.
Trial Period
There is a free 30-day Trial Period for this Software.
Evaluation Version
The Evaluation Version allows you to test and evaluate characteristics, features, and quality of this Software. Youcan also test the compatibility of the Software with your hardware and your operating system. The EvaluationVersion may have some restricted features or limitations. Using this Software after the Trial Period withoutregistration violates copyright laws and may result in severe civil and criminal penalties.
Registered Version
The Registered Version has no restricted features or limitations.
Single User License
A single user license is a license to a single user. This single user can use the Software on any computer as long asthe product is not in concurrent use on any other computer. i.e. you own two computers. You may have theSoftware installed, but not have it running on more than one computer at a time.
Multi User License
You may install the Software to any number of computers provided that this number does not exceed the quantityspecified in the Registration Key purchased by you. If you own a 2 user license, you may not install the Software on3 computers, even if you are only using it on 2 computers concurrently.
Single office site license
A single office site license authorizes you to install and use the product to any number of computers within a singlesite. You are entitled to upgrade to any future version of the software free of charge.
Worldwide site license
A worldwide site license authorizes you to install and use the product to any number of computers belonging to yourorganization - no matter where they are located. You are entitled to upgrade to any future version of the software

License 4
© 2002-2017 by CP Lab
free of charge.
Registration Key
The Registration Key may come as an unlock code, password, algorithm, or a service file. The Evaluation Versionbecomes Registered after the Registration Key has been applied. The Registration Key can be obtained directlyfrom CP Lab or from its authorized dealer or representative only. You can only use the Registration Key that youown or have permissions to use, as an employee or member of a licensed group. You must not publicize ordistribute the Registration Key (or a part of it) without the permission of CP Lab.
Upgrades
Unless otherwise indicated, a valid license to use the registered version includes the right to free updates until thenext major release of the software.
Distribution
The Evaluation Version of this Software may be distributed freely through on-line services, bulletin boards, or otherforms of electronic media, as long as the files are distributed in their entirety. Computer Magazines/Archives areauthorized to distribute the Evaluation Version on any Cover Disk or CD-ROM without an individual permission.Please inform us via e-mail ([email protected]) each time you distribute the evaluation copy.
RESTRICTIONS
YOU MAY NOT ALTER THIS SOFTWARE IN ANY WAY, INCLUDING CHANGING OR REMOVING ANYMESSAGES OR WINDOWS. YOU MAY NOT DECOMPILE, REVERSE ENGINEER, DISASSEMBLE OROTHERWISE REDUCE THIS SOFTWARE TO A HUMAN PERCEIVABLE FORM. YOU MAY NOT MODIFY, RENTOR RESELL THIS SOFTWARE FOR PROFIT, OR CREATE ANY DERIVATIVE WORKS, BASED UPON THISSOFTWARE. PUBLICATION OR DISTRIBUTING OF THE REGISTRATION KEY OR SOME OF ITS PART ISSTRICTLY PROHIBITED!
DISCLAIMER
THIS SOFTWARE IS PROVIDED ON AN "AS IS" BASIS WITHOUT WARRANTY OF ANY KIND, EXPRESSEDOR IMPLIED, INCLUDING BUT NOT LIMITED TO THE IMPLIED WARRANTIES OF MERCHANTABILITY ANDSUITABILITY FOR A PARTICULAR PURPOSE. THE PERSON USING THE SOFTWARE BEARS ALL RISK ASTO THE QUALITY AND PERFORMANCE OF THE SOFTWARE. CP Lab WILL NOT BE LIABLE FOR ANYSPECIAL, INCIDENTAL, CONSEQUENTIAL, INDIRECT OR SIMILAR DAMAGES DUE TO LOSS OF DATA ORANY OTHER REASON, EVEN IF CP Lab OR AN AGENT OF CP Lab HAS BEEN ADVISED OF THE POSSIBILITYOF SUCH DAMAGES. IN NO EVENT WILL CP Lab BE LIABLE FOR COSTS OF ANY DAMAGES, EXCEEDINGTHE PRICE PAID FOR THE SOFTWARE LICENSE, REGARDLESS OF THE FORM OF THE CLAIM. YOUACKNOWLEDGE THAT YOU HAVE READ THIS LICENSE, UNDERSTOOD IT, AND AGREED TO BE BOUNDBY ITS TERMS.

© 2002-2017 by CP Lab
5 Password Manager XP Help
4. Acknowledgements
We wish to thank the following people for their help in developing Password Manager XP:
Vladimir Kladov for KOL library (http://bonanzas.rinet.ru).David Barton for DCPCrypt library (http://www.cityinthesky.co.uk/cryptography.html). Jung-Ho Ahn for Korean translation,Dan Svarreby for Swedish translation,Guy Luthringer and Gerald Pasquier for French translation,Jakob Kruse and Henrik Pagel for Danish translation,Igor Slizik for Slovak translation,Linus, Claudio Venti and Michele Beriola (http://michele.beriola.it/indexPM.html) for Italian translation,Zhuoyi Wang and Tracky for Chinese translation,Brett de Jong for Dutch translation,Alvaro Fernandez Diez for Spanish translation,John Tombros (http://www.blueinteger.eu) for Greek translation,Tobias Zschoche and Martin Thelen for German translation,Ivica Bozanic for Croatian translation,Jiri Kropac for Czech translation,Daniel Sundsdal Vassdal for Norwegian translation,Vygantas Imbrasas aka Hoppa for Lithuanian translation,Noam Krendel for Hebrew translation,SimoZone for Polish translation,Rubio R. C. Terra for Portuguese (Brazil) translation,Yasin Guven for Turkish translation,Adrian Cisnadean for Romanian translation,Farbod Farman for Farsi translation,Peter Kovacs (http://www.kpg.hu) for Hungarian translation,Miro Ciganovic for Slovenian translation,Krasimir Tchonov for Bulgarian translation,Shi Jun for Japanese translation.

Quick Start 6
© 2002-2017 by CP Lab
5. Quick Start
This topic briefly overviews the main commands. It is made to help you get started with Password Manager XPquickly. This topic is recommended for reading to both newbies and advanced users.
Creating databases and folders with required fields structureDo not use the sample database for storing your data. Once the program is installed, please create a new databaseand set a strong hacker-proof password for it.
NOTE: The password must be of at least 8 characters long and contain numbers, caps and lower case letters,and punctuation characters.
Create a folders structure for storing your data. Create a required field structure and list columns to be displayed foreach folder. The field structure can be copied from the sample database. To have that done, simply copy the folderto your database and delete the demo records from it.
Importing data to the programOnce your database and folders structure are created, you can import your data, if you have them stored in a textfile with delimiters or in the .csv format (Excel can save data to .csv files). First, select the folder to import the datato, and then select the Database > Import from file... item on the menu.
Configuring backupBy default, Password Manager XP always backs up databases automatically before saving them. Make sure youhave properly configured the backup settings and noted where backup copies are stored to avoid the loss of data.The best place for keeping your backup folder is in a secure place on your computer’s hard drive. You can configurethe backup’s general settings to have them applied to all databases. You can as well define backup settings foreach database individually.
Configuring and using form auto-fillThe program allows entering data to forms automatically and filling forms on demand. Hotkeys, browser or systemtray menu items can be used to call the auto-fill manually.
All forms that are “known” to the program will be filled out automatically. To have the "unknown" form filledautomatically in the future, you will need to enter the required data manually for the first time and save the data tothe program by selecting the Save form data to Password Manager XP item on the browser’s popup menu (or byselecting the same item in the program’s tray menu) or press the hotkey Ctrl+Alt+S.
By default, Password Manager XP will ask whether you want to save the form data you have entered to thedatabase once you click on the Submit button. For more information on configuring the automatic form filling, pleaseread the Integration :: Form filling topic.
If the database already has a record with the data that you want to enter in the current form, you can call the auto-fillby selecting the Fill form using Password Manager XP item on the browser’s popup menu (or by selecting thesame item in the program’s tray menu) or press the hotkey Ctrl+Alt+L. From now on, the form will be filled outautomatically, since the program will remember which record in the database it has to use for the current form.
For more information on filling out forms, please read the Form fill out and form data saving topic.
Installing the program on a USB flash disk and synchronizing databasesIf you use several computers, you can choose to install the program on a USB flash disk (removable device) formore convenience. This way, you will always have access to your data and will be able to run the program on anycomputer, without having to install it first. There are several ways the program can be used:
1. Always run the program on the USB flash disk. The database is stored on the same disk.2. Run the program installed on your computers (home computer, office computer, laptop) and then set the
program to use the database stored on the USB flash disk.3. Run the program installed on your computers and use the local database. To maintain the freshness of the data,
synchronize data in the local databases with the one stored on the USB flash disk.

© 2002-2017 by CP Lab
7 Password Manager XP Help
6. Working with Password Manager XP
Quick StartWorking with databasesWorking with recordsForm fill-out and form data savingPrintingCustomizing the fields' structurePassword generatorInstall to removable device WizardViewing Action logPermissionsConfiguration of Password Manager XPConfiguring for network useCommand line parametersSetup program’s command line parametersGroup Policy Administrative TemplatePassword Manager XP ServerPassword Manager XP Mobile

Working with Password Manager XP 8
© 2002-2017 by CP Lab
6.1. Working with databases
List of all your databases is displayed in the left part of the program's window. The icon which shows current state ofthe database is shown to the left of the database name. In case the icon is gray the database is closed, when it'syellow - opened.
Opening a databaseTo open database doubleclick on the needed database and enter the password in the displayed window. Alsodatabase can be opened through Database > Open menu or popup menu which can be invoked by clicking rightmouse button.
NOTE: If you open a database that already opened at other computer in write mode then this database will beopened in the read only mode. To allow concurrent write access you need to enable Concurrent write accessoption in database properties.
Creating new databaseTo create new database select menu Database > Create new.... Then choose database name, password andencryption algorithm(s) in the popup window. You can specify folder where this database will be stored. Also youcan specify database users. See Database settings topic for more information.
Changing settings of your databaseTo change settings of a database select menu Database > Properties.... Then change required settings in thepopup window. You can change database's name, password, encryption algorithms. Also you can change folderwhere this database will be stored. See Database settings topic for more information.

© 2002-2017 by CP Lab
9 Password Manager XP Help
Saving changes in a databaseAfter making some changes in your database save them, otherwise the changes will be lost. To save changespress Save button on the toolbar or select menu Database > Save. While closing database or the program itselfyou'll be automatically prompted to save all recently made changes into your database(s).
NOTE: By default automatic backup copy is made before each save of a database. To setup autobackupparameters see Configuration of Password Manager XP - Backup and Database settings - Backup topics.
Deleting a databaseIf you want to delete some database you need to open database and select Edit > Delete menu item and confirmthe operation in the popup window.
NOTE: To delete an inaccessible database you need to delete its file. To do that select the database and chooseTools > Go to databases folder menu item. Explorer window will be opened and database file will be selected.The file will be in following format: PMBaseX.dat (where X is some number). Just delete the selected file and thedatabase will be removed from Password Manager XP.
Backup of a databaseIf you want to backup some database menu Database > Backup... and choose name and location of the backupfile in the popup window.
Restoring database from backupTo restore database from backup select menu Database > Restore.... Then choose backup file to be restored inthe popup window and press Open button. If database to be restored is already exists then you will be prompted tooverwrite it or to restore as new database.
Working with Password Manager XP 10
© 2002-2017 by CP Lab
6.1.1. Database settings
To access database settings first open the database. Then choose Database > Properties... menu item.Database settings are divided into the following pages:
GeneralUsersEncryptionParametersBackup

© 2002-2017 by CP Lab
11 Password Manager XP Help
6.1.1.1. General
Database name - database name.
Password - password for accessing the database.
NOTE: The password must be of at least 8 characters long and contain numbers, caps and lower caseletters, and punctuation characters.
Retype password - repeat the password to make sure it is entered correctly.
Description - database description (optional).
Database location - path / folder where the database file is stored (use the Manage locations... button toadjust the setting. See also: Locations).
Database filename - full database file name, including path and file extension. Provided for the informationpurposes.
Working with Password Manager XP 12
© 2002-2017 by CP Lab
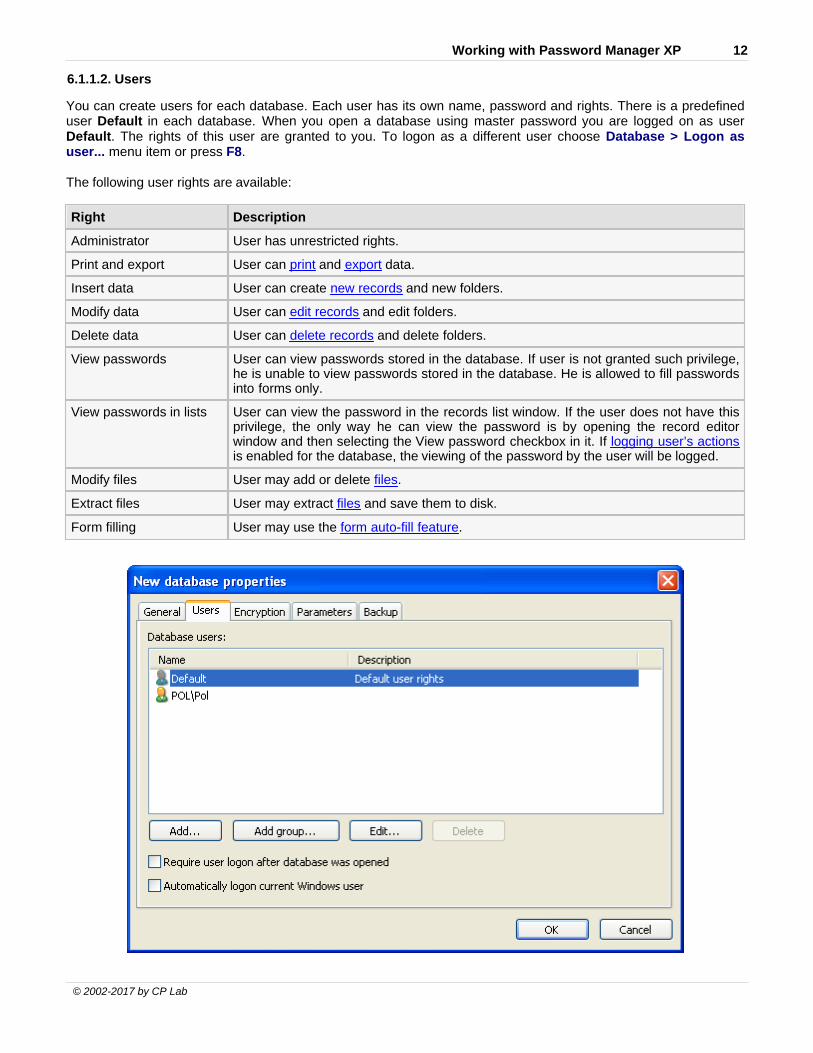
6.1.1.2. Users
You can create users for each database. Each user has its own name, password and rights. There is a predefineduser Default in each database. When you open a database using master password you are logged on as userDefault. The rights of this user are granted to you. To logon as a different user choose Database > Logon asuser... menu item or press F8.
The following user rights are available:
Right Description
Administrator User has unrestricted rights.
Print and export User can print and export data.
Insert data User can create new records and new folders.
Modify data User can edit records and edit folders.
Delete data User can delete records and delete folders.
View passwords User can view passwords stored in the database. If user is not granted such privilege,he is unable to view passwords stored in the database. He is allowed to fill passwordsinto forms only.
View passwords in lists User can view the password in the records list window. If the user does not have thisprivilege, the only way he can view the password is by opening the record editorwindow and then selecting the View password checkbox in it. If logging user’s actionsis enabled for the database, the viewing of the password by the user will be logged.
Modify files User may add or delete files.
Extract files User may extract files and save them to disk.
Form filling User may use the form auto-fill feature.

© 2002-2017 by CP Lab
13 Password Manager XP Help
To manage database users go to database properties using Database > Properties... menu item and choose theUsers tab.
Require user logon after database was opened - If you select this option the user logon dialog will appearimmediately after database password request. The database will not be opened unless you logon as user.
Automatically logon current Windows user - If you select this option, then, right after the database is opened,the program will logon the current Windows user, if possible.
To add new database user press Add... button.To add new group press Add group... button.To edit a user/group properties choose required record in the list and press Edit... button.To delete a user/group choose required record in the list and press Delete button.
User properties User name - name of database user.
Use NT authentication - Windows domain authentication will be used to check user password. Enter username or security group of Windows NT/2000/2003 domain in the Domain\UserName form. If you selectsecurity group, all users that belong to it will have access to that database. If NT authentication is used, userpassword will be checked by the Windows NT/2000/2003 domain. To select user or group from list, pressBrowse... button. You can select multiple users or groups at once.
NOTES: 1. If domain is unavailable, NT authenticated user will not be able to logon.2. It is possible to allow offline access for NT authenticated user in Install to removable device Wizard.
Password - user password.
Retype password - verification of user password.
Description - optional description of the user.
User is disabled - The user is disabled and user logon will fail.
User rights - Rights granted to this user.
Member of - open this page to include user to groups.

Working with Password Manager XP 14
© 2002-2017 by CP Lab
Group properties Group name - name of group.
Description - optional description of the group.
Members - open this page to add users to the group.

© 2002-2017 by CP Lab
15 Password Manager XP Help
6.1.1.3. Encryption
Select which encryption algorithms will be used to protect the database at this property page. See Additionalinformation topic to learn how the database is encrypted.
Blowfish - one of the most powerful block encryption algorithms, developed by cryptography guru BruceSchneier. Block size is 64 bits, key size - up to 448 bits;
3DES - uses DES algorithm, by is applied three times with different keys, which increases dependability whencompared to DES but does not change the situation radically (still vulnerable);
Rijndael - algorithm, developed by Joan Daemen and Vincent Rijmen. Meets AES standards (AdvancedEncryption Standard). Uses blocks of different sizes (128, 192 and 256 bits) and equal-size keys;
Tea - strong algorithm (Tiny Encryption Algorithm). Its most prominent feature is a very small size. Tea is verysimple, does not use table values and is optimized for 32-bit processor architecture, which makes it possible to useit with ASSEMBLER, even when the code size is extremely small. The drawbacks include slow work and the needfor "data scrambling" since no tables are used;
CAST128 - a rather dependable algorithm with key length up to 128 bits. Developed by C.M. Adams and S.E.Tavares, who offered it at AES competition;
RC4 - a stream encryption algorithm used in many network security systems (for example SSL protocol used inNetscape and Windows NT password encryption). The major advantages of this code is very fast speed andadjustable key size. This algorithm was developed in RSA by Ronald Rivest. RC stands for "Ron's Code" or "RivestCipher". Used to be the intellectual property of RSA up to 1995;
Serpent - developed by Lars Ramkilde Knudsen, a famous cryptographer and cryptoanalyst, known forsuccessful cryptoattacks of several popular codes, who worked and lectured in Norwegian, Swedish, and Belgianuniversities. Currently, Lars is a professor of math at Denmark's Technical University;
Twofish - algorithm that replaced Blowfish, authored by Bruce Schneier as its predecessor. Considered to behack-proof (no known incidents of code-cracking).

Working with Password Manager XP 16
© 2002-2017 by CP Lab
6.1.1.4. Parameters
Concurrent write access - when this option is selected, several users from different computers can openthe same database and work with it simultaneously.
Remember sort order - sorting order in folders is remembered when database is saved.
Log data changes - log data changes to maintain the history of changes. This option is to be selected if youwant to use the database synchronization function.
Log user actions - log user’s actions with Password Manager XP Server to control users while they areworking with database. See the Enabling logging of users’ database actions topic for more information.
Log server - network name or IP address of the computer running Password Manager XP Server.
Skip actions logging on mobile devices - this option allows to use this database on mobile device, even ifuser actions logging is turned on. If this option is not selected and user action logging is enabled, the databasewill be inaccessible on mobile device, since user action logging is not supported by Password Manager XPMobile.
Override global auto closure timeout - overriding global timeout setting for the automatic database closureon idleness (see the Security topic).
Close when inactive - this option forces the automatic closure of databases after the database has been idlea certain period of time. A database will be closed if it has been inactive for this period of time.

© 2002-2017 by CP Lab
17 Password Manager XP Help
6.1.1.5. Backup
Use global backup settings - when this option is selected, the program will use the global backup settings (see Backup topic).
Specify individual backup settings - when this option is selected, the program will use custom backupsettings provided for this particular database.
Make backup copies before saving - when this option is selected, the program will backup database everytime before it saves changes.
Number of backup copies - sets the number of backup copies to maintain.
Auto backup folder - specifies folder where backup copies will be stored.

Working with Password Manager XP 18
© 2002-2017 by CP Lab
6.1.2. Exporting a database to file
To export database records to a file select Database > Export to file... menu. Export options window will appear.PressBrowse... button and choose the target file and its type - CSV file or TXT file.
The following export options are available:
Option Description
Column delimiter One or more character(s) are used to separate columns data.
Selected records only If checked, currently selected records will be exported only.
Child folders with the samestructure only
Child folders which have the same fields structure as root folder will beexported only.
Folder names If checked, the folder names will be exported.
Column titles If checked, the column titles will be exported.
Scope Scope of export (Entire database, Current folder only, Current folder and allchild folders).
Export all columns All data fields will be exported.
Export chosen columns List of columns to be exported.

© 2002-2017 by CP Lab
19 Password Manager XP Help
6.1.3. Importing data from file
Password Manager XP can import data from text files with delimiters and from .csv files (these ones can be createdwith Excel).To import data from file, select the folder where the program is to place records to be imported. Then selectDatabase > Import from file... on the menu. In the window that appears, select the file to import data from. Thatwill be followed by the import settings window. In that window, specify the Columns delimiter being used in the file,the line, from where data is to be imported, and the fields to read data from. Use the data preview to adjust theimport parameters. When you are finished with the settings, click OK.

Working with Password Manager XP 20
© 2002-2017 by CP Lab
6.1.4. Synchronizing database
Password Manager XP can synchronize databases. To use this function, make sure that both databasesparticipating in synchronization have the Log data changes parameter in database properties enabled.
To synchronize current (local) database with another (remote) database, select Database > Synchronize... on themenu. In the window that appears, select the folder where the remote database is stored, then select the databaseand click OK.
Synchronize local changes to remote database - when this option is enabled, the program will perform thetwo-way synchronization of changes in both local and remote databases; i.e. when the synchronization is over, bothdatabases will be fully identical.
To synchronize database on a local computer with one on a USB flash disk, use the Install to removable deviceWizard or Quick install to removable device functions.
1. Make sure that data changes logging is enabled for a database. To do that open database properties and makesure that Log data changes option is turned on at Parameters page.
2. Install Password Manager XP to removable device using Install to removable device Wizard and make sure thatthe database will be installed at the device as well.
3. Now you can take you removable device with you and make changes into the database stored at the device. Alsothe local database can be changed.
4. It is time to synchronize both local and remote databases. Plug the device into PC. Use Install to removabledevice Wizard at PC again, choose to install the same database and make sure that Synchronize databasebefore overwriting option is set in the Wizard.
5. Wizard will apply remote changes to the local database and then copy synchronized database to the removabledevice.
6. Now you have 2 identical databases at both locations (PC and removable device).

© 2002-2017 by CP Lab
21 Password Manager XP Help
6.1.5. Repair database
A database file can be corrupted for some reason. If you receive error message when trying to attach or extract file,you need to check database integrity.To check the database integrity and remove corrupted file attachments choose Database > Repair menu item.

Working with Password Manager XP 22
© 2002-2017 by CP Lab
6.1.6. Additional information
All data inside the database is firstly compressed with zip compression method and then is sequentially encryptedby selected algorithms. At the same time information about record expiration date is not involved in the encryptionprocess, so that the database can be easily checked for expired passwords without knowing the database'spassword.

© 2002-2017 by CP Lab
23 Password Manager XP Help
6.2. Working with records
Creating new recordTo create new record press Create new record button on the toolbar or select menu Edit > New record. The newrecord window will appear. Enter the data in the corresponding fields at your discretion. See the Customizing thefields' structure topic to find out how to setup fields for entering data of different types.
Each record has the expiration date field. When a record expires, Password Manager XP will notify you of that, andyou will be able to perform the required actions (e.g., change password).
Password generator can be used for generating strong passwords. In order to do so press the button to the right ofthe password edit box.
Fields of type URL can be used to store links to the following objects: Web page address ( http://www.cp-lab.com ). E-Mail address ( mailto:[email protected] ). Local folder or file ( C:\Program Files or C:\My Documents\Price.txt ). Remote folder or file ( \\Sever\Share or \\Sever\Share\readme.txt ). Executable file with command line parameters ( notepad.exe c:\readme.txt ). It is needed to specify
.exe extension for executable file.
You can set an image to appear on the records list for each record. At your discretion, you can assign images forrecords from the collection provided by the program or add your own images. See Adding custom icons topic formore information.
You can also attach files to records by clicking on the Files page. See Working with files topic for more information.Finally press OK to save the record.
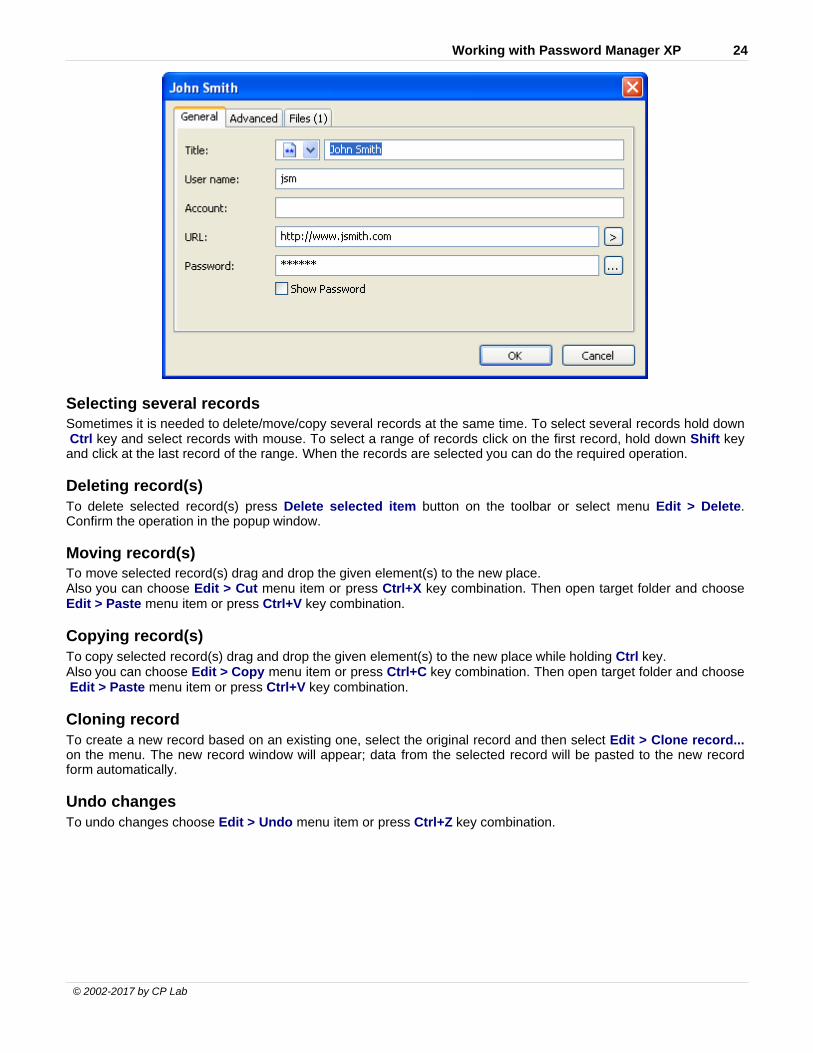
Editing recordTo edit record double click on it or press Edit selected record button on the toolbar or select Edit > Edit recordmenu item. When the window popups change the required data in input fields. See Creating new record chapter formore information. Press OK to save changes.
Working with Password Manager XP 24
© 2002-2017 by CP Lab
Selecting several recordsSometimes it is needed to delete/move/copy several records at the same time. To select several records hold down Ctrl key and select records with mouse. To select a range of records click on the first record, hold down Shift keyand click at the last record of the range. When the records are selected you can do the required operation.
Deleting record(s)To delete selected record(s) press Delete selected item button on the toolbar or select menu Edit > Delete.Confirm the operation in the popup window.
Moving record(s)To move selected record(s) drag and drop the given element(s) to the new place.Also you can choose Edit > Cut menu item or press Ctrl+X key combination. Then open target folder and chooseEdit > Paste menu item or press Ctrl+V key combination.
Copying record(s)To copy selected record(s) drag and drop the given element(s) to the new place while holding Ctrl key.Also you can choose Edit > Copy menu item or press Ctrl+C key combination. Then open target folder and choose Edit > Paste menu item or press Ctrl+V key combination.
Cloning recordTo create a new record based on an existing one, select the original record and then select Edit > Clone record...on the menu. The new record window will appear; data from the selected record will be pasted to the new recordform automatically.
Undo changesTo undo changes choose Edit > Undo menu item or press Ctrl+Z key combination.

© 2002-2017 by CP Lab
25 Password Manager XP Help
6.2.1. Copying password to clipboard
If you want to copy password of the selected record to clipboard simply press Copy password to clipboard buttonon the toolbar or select the corresponding element from the popup menu. The password then can be pasted fromthe clipboard to any application, but only once. Contents of user name field of same record are copied in theclipboard also. Thus, the password is pasted at the first paste, and the user name - at subsequent paste. After thatthese data become unavailable to paste. Also the password will be unavailable to paste if not pasted within 1minute. Once you need to paste it again you'll have to repeat the procedure (copy the password to clipboard). Whenprogram quits you won't be able to paste the password or user name any more.

Working with Password Manager XP 26
© 2002-2017 by CP Lab
6.2.2. Working with files
You can perform the following actions with files:
Attach - add new file to current record;
Extract - extract / save selected file from current record;
Properties - view / edit selected file’s properties;
Remove - delete selected file from current record.
Adding new fileTo add a new file, select the record to add the file to and then open it for editing. In the window that appears, openthe Files tab and then click on the Attach... button. Next, select the file to be attached and then click on the Openbutton.
Extracting fileTo extract file, select the record to extract the file from and then open it for editing. In the window that appears, openthe Files tab, then select the file to be extracted (or select several files by holding the Ctrl key down) and then clickon the Extract... button. Next, select the folder where the file is to be saved and then click OK. Another way toextract files is right-clicking on the selected record and using the popup menu’s Extract file item.
Viewing / editing file’s propertiesTo view/edit file’s properties, select the required record and open it for editing. In the window that appears, open the Files tab, select the file you need and then click on the Properties... button. You can also edit the Descriptionfield. To save changes, click on the OK button.
Removing fileTo remove file, select the required record and open it for editing. In the window that appears, open the Files tab,select the file you need (or select several files by holding the Ctrl key down) and then click on the Remove button.Then confirm the deletion by clicking on the Yes button in the confirmation window.

© 2002-2017 by CP Lab
27 Password Manager XP Help
6.2.3. Adding custom icons
Password Manager XP allows adding custom images to records. Open the record for editing. In the window thatappears, click on the image selection combo box and then click on the Customize... button. That will open theCustom images window.
In this window, you can add, remove custom images from files, and copy custom images from other PasswordManager XP databases. The program supports two image formats: *.ico and *.bmp. All images will be resized to16x16 pixels; therefore, it is better to have the original images prepared in the 16x16 pixels format.Use the Copy from button to copy images from other open Password Manager XP’s database.

Working with Password Manager XP 28
© 2002-2017 by CP Lab
6.2.4. Setting up columns’ appearance
Each folder in the program can have its own list of columns and the order how they are to appear on the list. Tocustomize that, select Tools > Setup columns... on the menu. In the window that appears, set the columns to bedisplayed and the order they are to follow by using the Up and Down buttons. Click on the Properties... button tochange the selected column’s title and width.
© 2002-2017 by CP Lab
29 Password Manager XP Help
6.3. Form fill out and form data saving
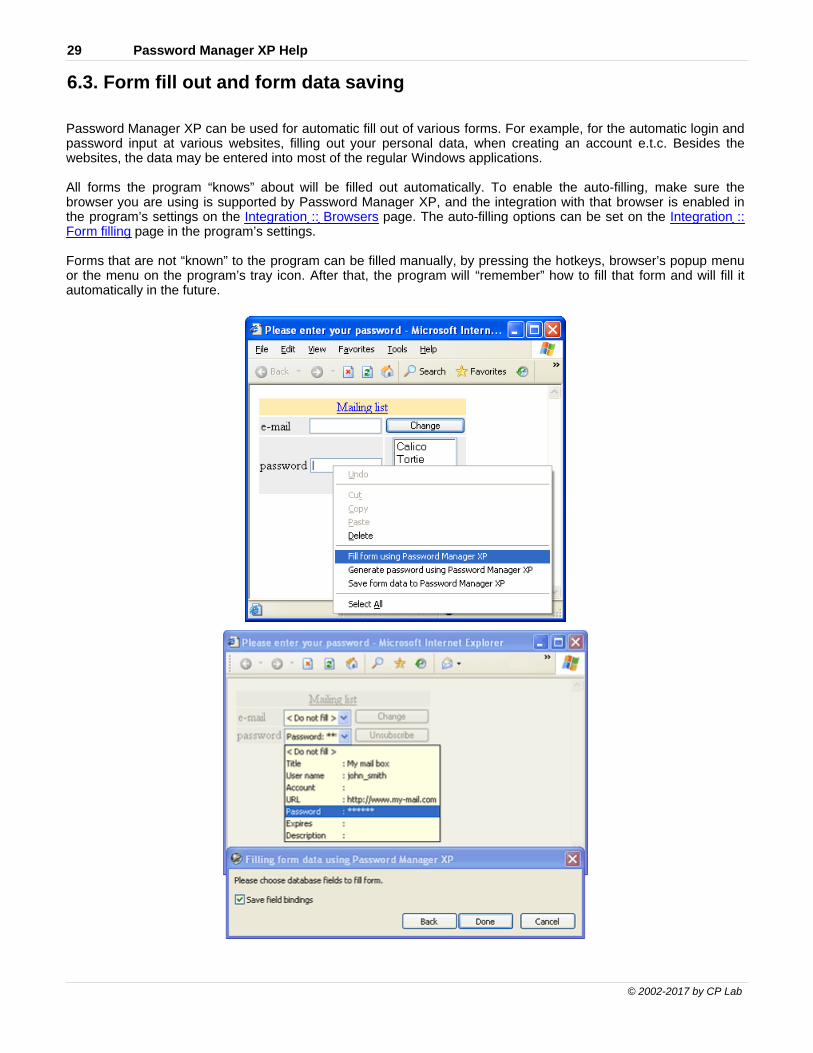
Password Manager XP can be used for automatic fill out of various forms. For example, for the automatic login andpassword input at various websites, filling out your personal data, when creating an account e.t.c. Besides thewebsites, the data may be entered into most of the regular Windows applications.
All forms the program “knows” about will be filled out automatically. To enable the auto-filling, make sure thebrowser you are using is supported by Password Manager XP, and the integration with that browser is enabled inthe program’s settings on the Integration :: Browsers page. The auto-filling options can be set on the Integration ::Form filling page in the program’s settings.
Forms that are not “known” to the program can be filled manually, by pressing the hotkeys, browser’s popup menuor the menu on the program’s tray icon. After that, the program will “remember” how to fill that form and will fill itautomatically in the future.

Working with Password Manager XP 30
© 2002-2017 by CP Lab
Working with formsPassword Manager XP offers two operations for working with the forms: Fill form and Save form data. Theseoperations can be called in the following ways:
1. Using the menu, which appears at right-clicking on the Password Manager XP icon in system tray area of thetask bar.
2. Using browser’s popup menu, which opens up by right-clicking on web pages’ data entry fields. Items areadded to Password Manager XP’s pop-up menu if the integration with the browser is enabled in the program’ssettings on the Integration :: Browsers page.
3. By default, Password Manager XP will ask whether you want to save data entered in the form to databasewhen the submit button is clicked on. See Integration :: Form filling topic for more information.
4. Using the hotkeys. By default, for Fill form, press Ctrl+Alt+L key combination and for Save form data, pressCtrl+Alt+S. The hotkeys may be reassigned at Integration :: Hot keys page of the program settings. Moreover,there exists a parameter, which permits the hotkeys even if Password Manager XP is not currently running.
Saving form data into a databaseFirst of all, create the folders with the fields' structure, sufficient for storing data for various forms in the database.Right after that you can create the data records and enter data manually into the database.
Database records can also be created and populated with the data of the current form, using Save form datafunction (it is called by using the Ctrl+Alt+S hotkeys or via program's tray icon menu or via browser popup menu).
If Password Manager XP "knows" about this form, the corresponding record in the database will be updated silently(database password can be prompted if the database is currently closed).
NOTE: To save form data to another record or to edit field bindings of a record linked to this form, press andhold down the Shift and select the Save form data item on your browser’s popup menu or in the program's trayicon menu.
If the current form is "unknown" to the program or Shift key was holded down, the form will be shaded and aPassword Manager XP window will appear, where you will need to do the following:
1. Open the database, which the form data will be saved to.

© 2002-2017 by CP Lab
31 Password Manager XP Help
2. If Password Manager XP "knows" about this form, you will be offered the applicable records for saving formdata.a) Select a record and press Done to save the form data into this record.b) Select the Review field bindings parameter and press Next to review whether the form fields
correspond to the record fields.3. If the program did not find any records, suitable for this form, you have to select a folder, which the new records
will be created in, or select an existing record to overwrite its data with form's data.4. Indicate the accordance of the form fields with the record fields in the database, using yellow comboboxes,
located above the form fields. 5. Press the Done button. 6. A record adding/editing window will appear, where the entry fields will be populated with the form data. Press
OK to save the data.
After that, the program will remember, which record in the database is to be used for this form. And if the formauto-filling is enabled in the program’s settings on the Integration :: Form filling page, the form will be filled outautomatically the next time it is opened.
Calling form fill out manuallyTo fill out a current form, perform the Fill form operation (called by using the Ctrl+Alt+L hotkeys or via the tray iconmenu or via browser popup menu).
If Password Manager XP "knows" about this form, it will be filled out immediately (database password can beprompted if the database is currently closed).
NOTE: To fill a form with data from another record or edit field bindings of a record linked to this form, press andhold down the Shift and select the Fill form on your browser’s popup menu or in the program's tray icon menu.
If the current form is "unknown" to the program or Shift key was holded down, the form will be shaded andPassword Manager XP window will appear, where you will need to do the following:
1. Open the database, which the form data will be taken from.2. If Password Manager XP "knows" about this form, you will be offered the applicable records for filling out the
form.a) Select a record and press Done to fill out the form.b) Select the Review field bindings parameter and press Next to review whether the form fields
correspond to the record fields.3. If the program did not find any records, suitable for this form, you have to select a proper record.4. Indicate the accordance of the form fields with the record fields in the database, using yellow comboboxes,
located above the form fields.5. Press the Done button to fill out the form.

Working with Password Manager XP 32
© 2002-2017 by CP Lab
6.4. Printing
Password Manager XP allows you to print your data. You can either print data stored in your current folder or printall data stored in the database. There are options to print data as a table or as a card (form). In addition, you cancreate your own report templates with report name, columns to be printed, their titles, width, length, sequence,format and other parameters. Page orientation (portrait or landscape) can be specified as well.
Printing data from current folderIn order to print data from a folder, select it and press the Print button. To see how the data will look like whenprinted out, press the Print preview button.
Printing the entire databaseTo print the entire database, select the Database > Print... menu item, and choose the report template and printingparameters. Then, press Print or Preview to see how your report will look like.
Creating report templatesTo create a new report template, select the Database > Print... menu item and press the Manage reports...button. The window that appears will let you create, edit or delete report templates. To create a new template, press New... button and then enter template parameters, like the template name, columns to be printed and theirparameters, etc. The Layout tab lets you set page orientation (portrait or landscape) and report format (table orcards).

© 2002-2017 by CP Lab
33 Password Manager XP Help
6.5. Customizing the fields' structure
You can customize the data fields' structure in the database for each folder or a group of folders, at your owndiscretion. Which means that you can create the folders for storing various data types, such as: credit cards, notes,passwords, contacts, software support e t.c. The fields' list is unlimited. The fields may be of various types and maybe arranged in the editing window in the required way and on the specified tabs. At any time, you can modify thefields' naming and the arrangement order with no data loss.
To adjust the fields' structure, highlight the required folder and select the Edit > Customize fields... menu item. Ifthe folder inherits its structure from a parent folder, a confirmation window appears. Press Yes to create anindependent fields' structure for this folder and all of its subfolders; press No to edit the structure of the parentfolder.
When you're done, a fields' structure editing window appears. This window has two tabs: Fields and Sections.
The Sections tab is designed for setting a list of sections, which are intended for fields grouping. Each sectionconstitutes a tab in the records editing and creating window. The tabs are arranged in the same order, as thesections in the list.
At the Fields tab, you can set a full list of the data fields. Each field is assigned a section, determining the tab,which the field will be located at in the records editing and creating window.
If there is only one section or no sections, the records editing window will contain no tabs.
There also are a few mandatory fields, which cannot be removed, such as: Created, Modified, Modified by andExpires.
The following fields' structure editing actions are available: Add... - add a field; Edit... - edit the field's properties; Delete - delete a field; Move Up - move a field one position up; Move Down - move a field one position down.

Working with Password Manager XP 34
© 2002-2017 by CP Lab
Each field has the following parameters: Field name - the field's title, which is going to be displayed in the records editing window and in the table's title; Field type - the field's type: String, Date, Integer, Float or Checkbox; Field option - an option for the String-type field: Regular string, Password field, Multiline text, Clickable
URL or Predefined values; Default value - the fields's default value; Section - the section, which this field is going to be located at; Description - the description of this field, if required.

© 2002-2017 by CP Lab
35 Password Manager XP Help
6.6. Password generator
Random password generator has the following options:
Option Description
Lower case letters (a-z) Latin lower case letters a-z will be used for password generation.
Upper case letters (A-Z) Latin upper case letters A-Z will be used for password generation.
Digits (0-9) Digits 0-9 will be used for password generation.
Special symbols ($,%,!,@, ...) Special symbols ~ ! @ $ % ^ & * ( ) - + | = / : ; [ ] < > , . will be used forpassword generation.
Custom characters User defined characters will be used for password generation. Enter neededcharacters in this input field.
Exclude characters The specified characters will be excluded from password generation. Enterneeded characters in this input field.
Password template It is possible to define the template for password generation. If the template isspecified, the password will be generated according to this template.
The following characters can be used in the template:
a the random lower case letter will be placed in this position;
A the random upper case letter will be placed in this position;
9 the random digit will be placed in this position;
$ the random special character will be placed in this position;
C one of user defined characters, specified in Custom charactersinput field, will be placed in this position;
" quoted text will be placed in the resulting password as is.
Length The desired length of password.

Working with Password Manager XP 36
© 2002-2017 by CP Lab

© 2002-2017 by CP Lab
37 Password Manager XP Help
6.7. Install to removable device Wizard
This wizard installs Password Manager XP and chosen databases to removable devices such a USB flash drives.You will be able to run Password Manager XP directly from the device and use databases stored on this device.You can plug the device to any Windows computer and use your data instantly.
To run the wizard choose Tools > Install to removable device Wizard... menu item. The wizard's welcome pagewill appear. Click Next to continue.
On the next page choose the device, in which to install Password Manager XP. You can also set the followingparameters:
Show all devices - when this option is selected, the program will display all devices available for theinstallation of the program, not only removable ones;
Install in this folder - when this option is selected, the program will be installed in the specific folder on thedevice. Otherwise, the program will be installed in the root folder;
Install print templates - when this option is selected, report templates will be installed on the device.
Install support for browsers integration - when this option is selected, browsers integration will be installedon the device.
Click Next to continue.

Working with Password Manager XP 38
© 2002-2017 by CP Lab
On the next page you can choose the databases to be installed to the device. You can also set the followingparameters:
Synchronize database before overwriting - when this option is selected, changes in the database locatedon the device will be copied to the local database. Only when the copying is complete, changes will be saved tothe database on the device. This option allows eliminating the risk of losing data when changes are made in bothlocal and remote database located on the device. For more information on synchronization, please read theSynchronizing database topic.
Set the read only attribute for databases at removable media - when this option is selected, databasesinstalled on the device will have the ‘read-only’ attribute.
Allow offline access for current user - this parameter can be selected if you are using the multi-user accessto databases along with NT authentication. When this parameter is selected, the program will create a new user(with a tag) with permissions and password of a domain user logged on to database. This option allows using thedatabase when the domain is unavailable. Simply use the user with the Offline tag.
Click Next to begin install.

© 2002-2017 by CP Lab
39 Password Manager XP Help
After install process will finish, the device will contain Password Manager XP executable files and chosendatabases. To launch the Password Manager XP from device, locate Password Manager XP executable file (Password Manager XP.exe) and run it.
Quick install to removable device:To perform quick install you need to run Install to removable device Wizard first and configure needed options.When all necessary parameters are set, the quick (silent) installation of the software with the parameters providedduring the first run will be performed the next time the Quick install to removable device... function is called.

Working with Password Manager XP 40
© 2002-2017 by CP Lab
6.8. Viewing Action log
Password Manager XP can log the following data changes: Insert Update Delete
and user actions: Open DB Logon View password Print Export Fill form
See Parameters page in database properties for information how to enable data changes and user action logging.
To view the actions log, use the menu items View > Action log... and View > Full action log... The Action log...item is designed for viewing actions log for a currently selected record or folder. The Full action log... item isdesigned for viewing the complete actions log for the entire database.
To view actions log, select View > Full action log... on the menu. In the window that appears, you can specify filterparameters for the action viewer:
Date from - display actions beginning with this date; Date to - display actions ending by this date; User - display actions for this user; Action - display actions of this type; Computer - display actions for this computer.
Once the necessary filter parameters are set, click OK. The window that appears will display the actions log. Thefollowing commands are applicable to actions log:
Print - print selected actions; Print preview - preview selected actions; Filter - edit filter parameters for the actions viewer; Delete changes - delete actions currently being displayed.

© 2002-2017 by CP Lab
41 Password Manager XP Help

Working with Password Manager XP 42
© 2002-2017 by CP Lab
6.9. Permissions
For the purpose of distinction of the access privileges to an entire database or the specific objects of the database,it is necessary to create the database users. For user/group management, use the Database > Properties… menuitem and the Users page. A user with the Administrator right can assign the access permissions to the databaseobjects (such as the folders and records). To do this, check the object(s) and select the Edit > Permissions...menu item.
If in the permissions window of the object, the checkboxes are shaded, that means that the access permission tothis object is inherited from a parent object. If you deselect the Permissions are inherited from parent objectcheckbox, you can set the access permissions specifically for this object and all child objects. You can modify theaccess privileges or delete the users/groups from the permissions list.
NOTE: If you delete a user from the list, the object will become completely unavailable to him - the folders will beinvisible and all of the records data will be displayed as the asterisks ("*" symbols).
The following permissions are available: Insert data, Modify data, Delete data, View passwords, Viewpasswords in lists, Modify files, Extract files and Form Filling. See Users topic for more information aboutpermissions.To allow or deny a privilege for a user, select the according checkbox ( Allow or Deny). In the list, leave onlythe users that have the access rights for the object of interest. If you would like to reset the permissions for all of thesub-objects and enable the inherited permissions transfer, enable Reset permissions of child objectsparameter.

© 2002-2017 by CP Lab
43 Password Manager XP Help
6.10. Configuration of Password Manager XP
To access Password Manager XP options select Tools > Options... from the main menu. Password Manager XPoptions include the following pages:
General Appearance Security Integration :: Hot keys Integration :: Browsers Integration :: Form filling Locations Backup Restrictions

Working with Password Manager XP 44
© 2002-2017 by CP Lab
6.10.1. General
Notify about expired records on Windows start - when this option is selected user will be notified aboutall expired records on Windows start.
Start application minimized - when this option is selected, the application will be started in minimizedstate.
Expand folders tree when database was opened - when this option is selected all folders will beexpanded after database was opened.
Enable drag'n'drop for objects moving and copying - when this option is selected a records and folderscan be moved and copied using drag'n'drop.
Action on double click - set which action should be performed on a record's double click (Edit record orCopy password to clipboard).
Interface language - language of Password Manager XP user interface.
Interface font - font of Password Manager XP user interface.
Interface scaling - scaling factor of Password Manager XP user interface (100-800%).

© 2002-2017 by CP Lab
45 Password Manager XP Help
6.10.2. Appearance
Tray icon always visible - if selected, Password Manager XP icon will be shown in system tray always.
Minimize application to the system tray - this option allows to minimize application to System Tray.Password Manager XP button will not be shown in the system taskbar when the program will be minimized.
Close application to the system tray - when this option is selected, the application will be minimized toSystem Tray when you press a close button. To quit application you need to choose Database > Exit menuitem.
Startup screen graphics - when this option is not selected a simple startup screen will be shown. It isuseful to simplify startup screen when working in terminal session.
Alternate colors of rows - when this option is selected, even and odd rows in records list will be drawnusing slightly different background colors.
Remember last database user name - when this option is selected, the name of the last user accessed thedatabase will be selected by default next time the database is opened. This option is available only when thedatabase has users.

Working with Password Manager XP 46
© 2002-2017 by CP Lab
6.10.3. Security
Warn if clipboard monitor was detected - if some application is monitoring clipboard contents, PasswordManager XP will warn you.
Password is visible by default in the edit window - when this option is selected the password fields willbe visible when you open edit record dialog.
Close databases when application is minimized - when this option is selected all databases will beclosed when Password Manager XP will be minimized.
Close database when inactive - this option forces automatic database closing on expiry of the given timeinterval. When the database stays inactive for this period of time it will be closed;
Default expiration time for new records - specifies default expiration time for new records;
Minimal length of the database password - specifies minimal allowed length of the database password.
WARNING: Do not use passwords less then 8 characters in length!

© 2002-2017 by CP Lab
47 Password Manager XP Help
6.10.4. Integration :: Hot keys
This page lists currently assigned hot keys. To modify hot key double click on its entry.

Working with Password Manager XP 48
© 2002-2017 by CP Lab
6.10.5. Integration :: Browsers
This page lists all internet browsers that was found in your system. Password Manager XP can add menu items tobrowser's popup menu to easily use form data filling and saving functions. Also browser integration allow automaticform filling function in a browser.
© 2002-2017 by CP Lab
49 Password Manager XP Help
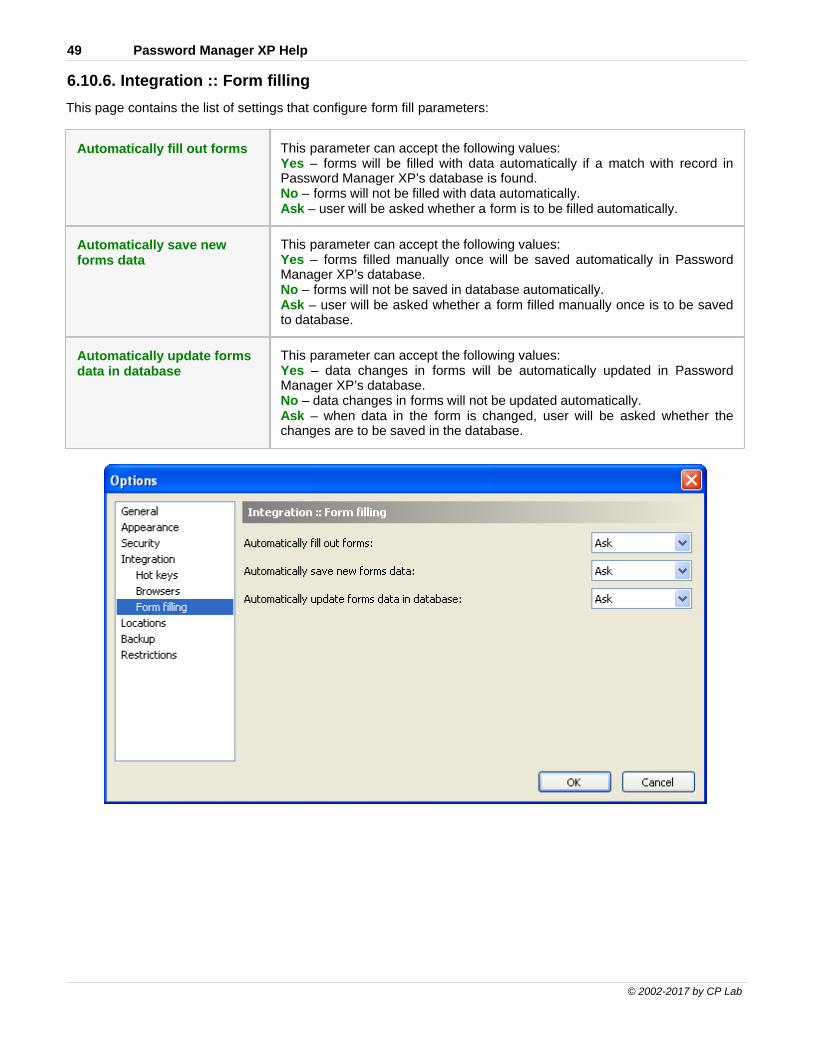
6.10.6. Integration :: Form filling
This page contains the list of settings that configure form fill parameters:
Automatically fill out forms This parameter can accept the following values:Yes – forms will be filled with data automatically if a match with record inPassword Manager XP’s database is found.No – forms will not be filled with data automatically.Ask – user will be asked whether a form is to be filled automatically.
Automatically save newforms data
This parameter can accept the following values:Yes – forms filled manually once will be saved automatically in PasswordManager XP’s database.No – forms will not be saved in database automatically.Ask – user will be asked whether a form filled manually once is to be savedto database.
Automatically update formsdata in database
This parameter can accept the following values:Yes – data changes in forms will be automatically updated in PasswordManager XP’s database.No – data changes in forms will not be updated automatically.Ask – when data in the form is changed, user will be asked whether thechanges are to be saved in the database.

Working with Password Manager XP 50
© 2002-2017 by CP Lab
6.10.7. Locations
Folders to be searched for databases - list of folders that will be searched for databases. UNC paths (\\Server\Share) are supported here.
To add folder to the list press Add... button. To edit selected folder press Edit... button. To remove selected folderfrom the list press Remove button.
To access the same database(s) from computers across the network follow this steps:
1. Create a network share on some computer.
2. Add path to this shared resource to the list of folders in Password Manager XP.
3. Now you can use existing or create new database(s) at this shared resource.
Database file name template - template which is used to create or search database file names. You can changedefault template to make database file names different from standard.

© 2002-2017 by CP Lab
51 Password Manager XP Help
6.10.8. Backup
Make backup copies of databases before saving - when this option is selected the backup copies of thedatabases will be created each time before saving changes.
Number of backup copies - specifies number of backup copies per each database to maintain;
Auto backup folder - specifies folder where backup copies will be stored.

Working with Password Manager XP 52
© 2002-2017 by CP Lab
6.10.9. Restrictions
You can restrict some user interface elements of Password Manager XP. Restrictions will be applied to allcomputers except some administrator's computer(s), which are specified. If no administrator's computers specified,the restrictions are not used.
The following restrictions can be set:
Disable Locations and Backup options pages;
Disable restoring of databases from backup;
Disable Install to removable device wizard.
NOTE: You can use Password Manager XP Group Policy Administrative Template to set restrictions and optionsof Password Manager XP for all users/computers of your Windows domain.

© 2002-2017 by CP Lab
53 Password Manager XP Help
6.11. Configuring for network use
Password Manager XP can be used to access the same databases from multiple computers across the network.Follow this steps to configure application for network use:
1. Create the network share on some computer. This shared resource will be used to store databases.
2. Install the Password Manager XP to the needed computer.
3. Run it and go to application options (Tools > Options... menu item).
4. Open Locations tab.
5. Press Add... button and type shared resource path (e. g. \\Server\Share). Press OK to save settings.
Now Password Manager XP will display all databases located at shared resource in the list of databases. Also youcan create new databases at shared resource (when creating new database you can choose needed location fromcombobox).To configure other computers repeat steps 2-5 for every computer.
Network use without need of installationPassword Manager XP can be run directly from network share without need of installation.
1. Copy all installed files from application folder to network share.2. Copy PwdManager.key file from \Documents and Settings\<user_account>\ApplicationData\Password Manager XP folder to network share.
Now you can run Password Manager XP executable directly from network share at any computer in the network.Before using Password Manager XP at a computer you need to perform steps 3-4 in above table to configurelocations of databases.
NOTE: To make the program settings on all computers the same, create a "blank" file called PwdManager.iniand copy it to the network share.

Working with Password Manager XP 54
© 2002-2017 by CP Lab
6.12. Command line parameters
The following command line parameters can be used with Password Manager XP:
Parameter Description
/Add:"<fields data>" Adds new record to passwords database.<fields data> describes data to be added in the following format:field_name1=field_value1,field_name2=field_value2,...field_name is a name of database's field. The following field names can beused:Title, User, Account, URL, Password, Description, Expires.
/DbName=<name> Name of a database or name of database file.
/DbPassword=<password> Password for the database, specified by DbName parameter. If password isnot specified it will be prompted.
/DbUser=<user_name> A name of the database user to be used for log on.
/DbUserPassword=<password>
A password of the database user to be used for log on.
/DbFolder=<folder_name> Name of folder inside the database, specified by DbName parameter. If folderis not specified, the root folder will be used.
/Confirm Allows to review or edit data before adding new record.
/Silent Do not display any information messages.
/Sync Synchronize the database, specified by DbName parameter.
/RemotePath=<path> Path to a folder with remote database for synchronization.
/RemoteDbName=<name> Name of remote database for synchronization, located in RemotePath folder. Ifthis parameter is omitted, remote database name will be the same as specifiedby DbName parameter.
/RemoteDbFileName=<file_name>
File name of remote database. RemotePath is ignored.
/TwoWaySync 2-way synchronization of databases. Remote changes are applied to localdatabase and local changes are applied to remote database. Without thisoption remote database is not modified.
Examples:
PwdManager.exe /add:"Title=My FTP password, User=jonh, Password=12345678,Expires=12/01/2010" /DbName="My Passwords"
This command will add new record to database My Passwords and will prompt you for its password if needed. Aninformation message will be displayed at end.
PwdManager.exe /add:"Title=My FTP password, User=jonh, Password=12345678" /DbName="MyPasswords" /DbPassword=mypassword /DBFolder=Web /silent
This command will add new record to database My Passwords to folder Web. The mypassword password will beused to open the database. No information messages will be displayed.
PwdManager.exe /sync /dbname="My Passwords" /remotepath="\\server\dbs" /twowaysync
This command will synchronize local database My Passwords with server copy, located in folder \\server\dbs.

© 2002-2017 by CP Lab
55 Password Manager XP Help
6.13. Setup program’s command line parameters
Setup program’s command line parameters can be used for the unattended installation.
NOTE: The command line parameters are case-sensitive.
/S - setup will not prompt user for anything. The installation will be performed to the folder "ProgramFiles\Password Manager XP".
/A - Password Manager XP will be installed for all users on this computer.
/NoSampleDB - do not install sample database.
/NoMultiLang - do not install multilingual support.
/NoDocs - do not install documentation.

Working with Password Manager XP 56
© 2002-2017 by CP Lab
6.14. Group Policy Administrative Template
Using Group Policy Administrative Template, you can set different Password Manager XP settings for all userswithin a Windows domain.
Download Password Manager XP Administrative Template here:http://www.cp-lab.com/Files/pwdmgr.adm
Then open Group Policy Editor for your domain and add the Password Manager XP Administrative Template filepwdmgr.adm to the User configuration section.
The description of each option can be found in Group Policy Editor on the Explain page.

© 2002-2017 by CP Lab
57 Password Manager XP Help
6.15. Password Manager XP Server
OverviewInstalling Password Manager XP ServerEnabling logging of users’ database actions

Working with Password Manager XP 58
© 2002-2017 by CP Lab
6.15.1. Overview
Password Manager XP Server is needed for registering users’ actions, such as:
Open DB
Logon
View password
Export
Fill form
The server is to be installed on a computer within your network. Users’ actions database is stored on the server.When user attempts to perform an action, which is to be logged, Password Manager XP connects to the server andnotifies it of the user’s action. If the server is unavailable, user will not be able to complete the selected action. Databetween the client and the server is exchanged through a secure protocol SSL.

© 2002-2017 by CP Lab
59 Password Manager XP Help
6.15.2. Installing Password Manager XP Server
Run the Password Manager XP Professional installation program and select the Password Manager XP Servercomponent on the component selection page.
Next, enter your company name and, optionally, your 2-character country code (US, UK, FR, etc.) and your e-mailaddress. This data will be stored in the SSL certificate, which will be issued during the installation.
Next, enter the Password Manager XP Server access password. This password will be needed to enable users'actions logging for a databases.
The cert folder, located in the installation folder, will contain SSL certificates and keys. The file ca.cer stored inthat folder is Password Manager XP Server’s public certificate. This file is public (can be shared) and will benecessary for enabling users’ database actions. Move or copy the file ca.cer to a place where you can find itquickly.
WARNING: All files in the installation folder, except for ca.cer, are closed for users. Configure your network andfile system permissions to allow accessing Password Manager XP Server files to administrators only.
Password Manager XP connects to server over the TCP port 12461, using the secure SSL protocol. Configure afirewall on the computer running the server to allow incoming connections to TCP port 12461. On client computers,allow outgoing connections through TCP port 12461.

Working with Password Manager XP 60
© 2002-2017 by CP Lab
6.15.3. Enabling logging of users’ database actions
To enable logging users’ database actions, open the database’s properties on the Parameters page. Activate theLog user actions parameter and enter network name or IP address of the computer running Password ManagerXP Server. Click OK. The program will ask for the CA certificate file. Select the file ca.cer described in theInstalling Password Manager XP Server topic.
If logging users’ database actions for the database is enabled, and Password Manager XP Server is unavailable –an error message will be displayed. If you have the database administrator privileges, you can disable the actionslogging by clicking on the Setup button in the error message window.
Do not install database with enabled actions logging on a removable disk – you will be unable to open the databaseoutside of your network. This is the reason why Install to removable device Wizard does not install OpenSSL libraryfiles on a removable disk. Opening such database from a removable disk will cause an error message telling thatOpenSSL libraries could not be found. When it is necessary, you can copy the files libeay32.dll and ssleay32.dllfrom the installation folder to the removable disk manually.

© 2002-2017 by CP Lab
61 Password Manager XP Help
6.16. Password Manager XP Mobile
Password Manager XP Mobile brings full strength of desktop based Password Manager XP on your mobile device.Password Manager XP Mobile supports the same database format and same key features as desktop version.Get Password Manager XP Mobile here: http://www.cp-lab.com/windows-mobile.html
You can synchronize databases with Password Manager XP Mobile via ActiveSync. To do that turn on Password Manager XP synchronization in ActiveSync options and press OK button.Then select which databases should be synchronized by pressing Settings... button for Password Manager XPsynchronization module.

Working with Password Manager XP 62
© 2002-2017 by CP Lab

© 2002-2017 by CP Lab
63 Password Manager XP Help
7. Support and Registration
RegistrationUnregistered copy limitationTechnical support

Support and Registration 64
© 2002-2017 by CP Lab
7.1. Registration
If you would like to order our products, you can do the registration online on the Internet by secure web siteShareIt! or Plimus directly from registration page. If you do not have access to the Internet, you can register viaphone, fax or postal mail.
On purchase you receive:
fully functional, unrestricted copy of Password Manager XP;
free and priority technical support by e-mail;
free updates until the next major release of the software;
e-mail notifications about version updates.
For questions regarding Password Manager XP purchase write to [email protected].

© 2002-2017 by CP Lab
65 Password Manager XP Help
7.2. Unregistered copy limitations
Password Manager XP is distributed on a Try Before You Buy (shareware) basis. The evaluation (trial) version willonly work for 30 days after the first install. You'll be able to create only 2 databases with maximum 30 passwordrecords in each, and trial reminder will be shown at the program startup. If you like this program and decide tokeep it, you will need to purchase a registration key. All functions will be available and limitations will be removed assoon as you register your copy of Password Manager XP.

Support and Registration 66
© 2002-2017 by CP Lab
7.3. Technical support
You can send a message to our technical support team with your bug reports or ideas. All errors found will becorrected as soon as possible.
Technical support for Password Manager XP is provided via electronic mail solely.
Please provide us with the following information when contacting tech support:
problem description along with the actions being taken before the problem occurred;
Password Manager XP version;
your operating system version (9x, ME, NT, 2000, XP, 2003, Vista).
You can also send a message to our development team with your ideas regarding Password Manager XPimprovements (new features, functionality etc.)
© 2002-2017 by CP Lab
67 Password Manager XP Help
8. FAQ
NOTE: The most recent version of the FAQ can be found here: www.cp-lab.com/faq.html
Q1: I use computer at home and office and have a notebook as well. How many licenses do I need to purchase?
A1: If you are the only person who uses the program, one license is sufficient.
Q2: When I open a web page in a browser, Password Manager XP fills it automatically, but only the Password fieldis filled. How do I "teach" Password Manager XP to fill out User Name field also?
A2: You will need to edit field bindings for the record linked to this form. To do that, press and hold down the Shiftkey and then select the "Fill Form" item on your browser’s popup menu or on the program's tray icon menu. Thenselect the "Review field bindings" option for the record and choose which form fields correspond with the recordfields. Press "Done" to save new field bindings.
Q3: I have 2 accounts for a web site. But Password Manager XP always fills login information automatically with thefirst account’s credentials. Can Password Manager XP ask me, data from which account should it use for filling theform?
A3: To fill a form with data from another record, press and hold down the Shift key and then select the "Fill Form"item on your browser’s popup menu or on the program's tray icon menu. You will be able to choose the other recordfor your web site. From now on, you will be asked, which record is to be used for fill out the web site.
Q4: I created several users inside a database and assigned appropriate privileges to each. Why do I have to enter apassword for accessing a database first and then log on as a user?
A4: Database master password, requested when the database is opened, is used to encrypt/decrypt data inside thedatabase. That is, knowing the password allows anybody to easily decipher the data. That's why this passwordshould not be too simple or easy to pick. This password is the only real protection for your data. The user passwordis used to delegate access privileges and is not a reliable protection on its own. If an experienced hacker knows themaster password, he will be able to bypass any access privilege limits. VERY IMPORTANT! Only your most trustedemployees should know the master password, regardless of what access privileges they've got.
Q5: How do I set up database access from several network computers?
A5: You need to go through the following steps:1. Create a network resource that will be used for storing databases.2. Install Password Manager XP on the network computers that need to have access to the database.3. Launch the program and select the "Tools" -> "Options" menu item on each computer.4. Go to the "Locations" tab and press "Add…" to add the network resource that is used to store shared databases.
Q6: Our department has a common password database, stored on the server. So if one employee accesses thedatabase, all others can access it in the read-only mode. How can I fix this problem?
A6: For that you need to set the database to allow multiple individuals to be able to use the databasesimultaneously. To do that, access database properties and open "Parameters" tab. There, activate option called"Concurrent write access".
Q7: I don't want to install the program on each network computer. Is there a way to launch the program from anetwork resource so that all the users have the same program settings?
A7: Yes. You have to copy all files from the program folder to the network resource. Then copy PwdManager.keyfile from \Documents and Settings\<user_account>\Application Data\Password Manager XP folder to networkshare. Allow access to it for all necessary users. Now you can launch the program directly from there. To make theprogram settings on all computers the same, create a "blank" file called PwdManager.ini and copy it to the networkresource.

FAQ 68
© 2002-2017 by CP Lab
Q8: What is being encrypted inside the database - passwords only or all data?
A8: All data inside the database is encrypted with the exception of the password expiration date. This lets theprogram notify users about expired passwords without having to enter a password to access the database first.
Q9: How is data being encrypted inside a database?
A9: First, the data is being compressed with the zip algorithm. Then the data is sequentially encrypted with everyalgorithm selected. A hash key is generated for each algorithm used, based on the database password.
Q10: How do I print out all passwords located inside a database?
A10: Simply select the "Database" -> "Print..." menu item and then select the "List of passwords" report in thewindow that appears.
Q11: The password/name/title field is being cut off during printing. How do I fix this problem?
A11: You need to create a new report template. Select all columns you'd like to be included in the report and set thewidth for each. To do this, select the "Database" -> "Print..." menu item and press the "Manage Reports..." button inthe window that appears. Then create a new report template, enter page orientation settings and the list of allcolumns to be included. To change the title or the width of a column, press the " Properties..." button in the"Columns setup" window.
Q12: What browsers are supported by Password Manager XP?
A12: Internet Explorer 5+, Firefox 3+, Google Chrome 6+, Opera 10+.

© 2002-2017 by CP Lab
69 Password Manager XP Help
9. Professional Edition
Comparison chart of Standard and Professional editions:
Feature Standard Professional
Concurrent read/write access to a database for multiple usersacross the network + +
Adjustable user privileges per given database + +
Permissions can be set for folders or even individual records + +
NT authentication support + +
Windows security groups support + +
User actions logging: Open DB, Logon, View password, Print,Export, Fill form using Password Manager XP Server – +
Built-in user groups – +