outlook xp email only - florida atlantic university - fau · outlook xp email only . 2 ... e-mail...
TRANSCRIPT
Outlook XP Email Only
2
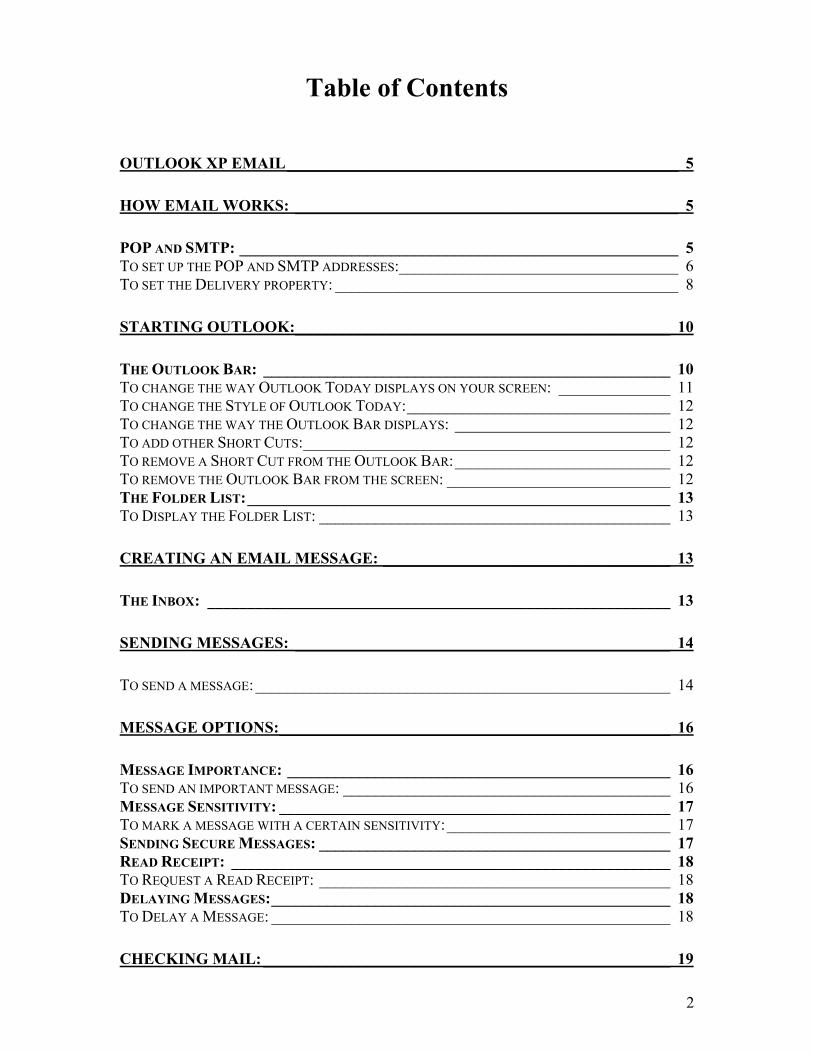
Table of Contents
OUTLOOK XP EMAIL_________________________________________________ 5
HOW EMAIL WORKS: ________________________________________________ 5
POP AND SMTP: _______________________________________________________ 5 TO SET UP THE POP AND SMTP ADDRESSES:___________________________________ 6 TO SET THE DELIVERY PROPERTY: ___________________________________________ 8
STARTING OUTLOOK:_______________________________________________ 10
THE OUTLOOK BAR: ___________________________________________________ 10 TO CHANGE THE WAY OUTLOOK TODAY DISPLAYS ON YOUR SCREEN: ______________ 11 TO CHANGE THE STYLE OF OUTLOOK TODAY:_________________________________ 12 TO CHANGE THE WAY THE OUTLOOK BAR DISPLAYS: ___________________________ 12 TO ADD OTHER SHORT CUTS:______________________________________________ 12 TO REMOVE A SHORT CUT FROM THE OUTLOOK BAR:___________________________ 12 TO REMOVE THE OUTLOOK BAR FROM THE SCREEN: ____________________________ 12 THE FOLDER LIST:_____________________________________________________ 13 TO DISPLAY THE FOLDER LIST: ____________________________________________ 13
CREATING AN EMAIL MESSAGE: ____________________________________ 13
THE INBOX: __________________________________________________________ 13
SENDING MESSAGES: _______________________________________________ 14
TO SEND A MESSAGE:____________________________________________________ 14
MESSAGE OPTIONS:_________________________________________________ 16
MESSAGE IMPORTANCE: ________________________________________________ 16 TO SEND AN IMPORTANT MESSAGE: _________________________________________ 16 MESSAGE SENSITIVITY: _________________________________________________ 17 TO MARK A MESSAGE WITH A CERTAIN SENSITIVITY:____________________________ 17 SENDING SECURE MESSAGES: ____________________________________________ 17 READ RECEIPT: _______________________________________________________ 18 TO REQUEST A READ RECEIPT: ____________________________________________ 18 DELAYING MESSAGES:__________________________________________________ 18 TO DELAY A MESSAGE: __________________________________________________ 18
CHECKING MAIL: ___________________________________________________ 19
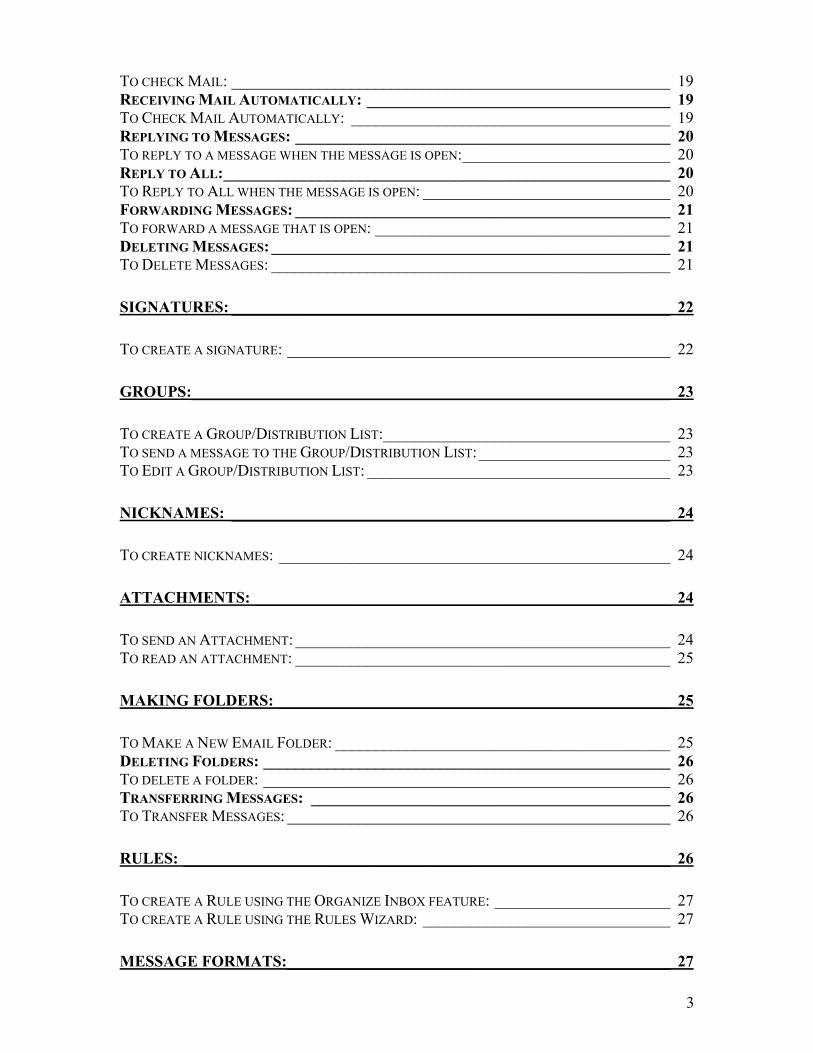
3
TO CHECK MAIL: _______________________________________________________ 19 RECEIVING MAIL AUTOMATICALLY: ______________________________________ 19 TO CHECK MAIL AUTOMATICALLY: ________________________________________ 19 REPLYING TO MESSAGES: _______________________________________________ 20 TO REPLY TO A MESSAGE WHEN THE MESSAGE IS OPEN:__________________________ 20 REPLY TO ALL:________________________________________________________ 20 TO REPLY TO ALL WHEN THE MESSAGE IS OPEN: _______________________________ 20 FORWARDING MESSAGES: _______________________________________________ 21 TO FORWARD A MESSAGE THAT IS OPEN: _____________________________________ 21 DELETING MESSAGES: __________________________________________________ 21 TO DELETE MESSAGES: __________________________________________________ 21
SIGNATURES: _______________________________________________________ 22
TO CREATE A SIGNATURE: ________________________________________________ 22
GROUPS:____________________________________________________________ 23
TO CREATE A GROUP/DISTRIBUTION LIST:____________________________________ 23 TO SEND A MESSAGE TO THE GROUP/DISTRIBUTION LIST:________________________ 23 TO EDIT A GROUP/DISTRIBUTION LIST: ______________________________________ 23
NICKNAMES: _______________________________________________________ 24
TO CREATE NICKNAMES: _________________________________________________ 24
ATTACHMENTS: ____________________________________________________ 24
TO SEND AN ATTACHMENT: _______________________________________________ 24 TO READ AN ATTACHMENT: _______________________________________________ 25
MAKING FOLDERS: _________________________________________________ 25
TO MAKE A NEW EMAIL FOLDER: __________________________________________ 25 DELETING FOLDERS: ___________________________________________________ 26 TO DELETE A FOLDER: ___________________________________________________ 26 TRANSFERRING MESSAGES: _____________________________________________ 26 TO TRANSFER MESSAGES: ________________________________________________ 26
RULES: _____________________________________________________________ 26
TO CREATE A RULE USING THE ORGANIZE INBOX FEATURE: ______________________ 27 TO CREATE A RULE USING THE RULES WIZARD: _______________________________ 27
MESSAGE FORMATS:________________________________________________ 27
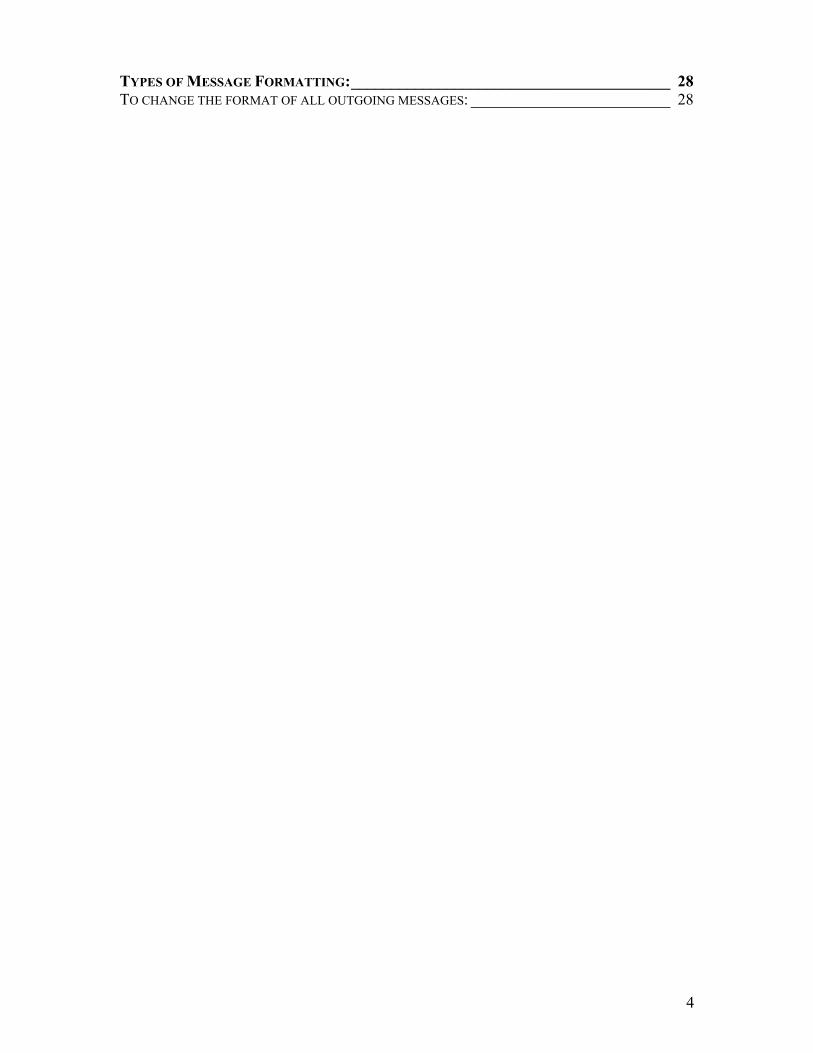
4
TYPES OF MESSAGE FORMATTING:________________________________________ 28 TO CHANGE THE FORMAT OF ALL OUTGOING MESSAGES: _________________________ 28
5
Outlook XP Email
Email, also known as electronic mail, is a system that uses plain text to send and receive messages and has quickly become a world wide electronic communications standard. Microsoft Outlook 2000 is an information management system that, in addition to being able to communicate via email, also allows you to keep track of your calendar, contact list, and tasks. It also allows you to journal, jot down notes, share data and organize your desktop. Although there are many great features of Outlook that will be covered in other classes, for this particular study we will concentrate on the emailing capabilities of Outlook.
ow email works: In order for an email message to successfully be delivered, it must navigate a
complex conglomeration of server computers, client systems, telephone lines, satellite links, and routing pathways. Although we are not going to cover the highly technical elements of a message’s journey, there are some things every email user should know. There is a “process” that email messages follow when sent out and a “process” by which they are received. These “processes” are referred to as “protocols”. POP and SMTP: POP = Post Office Protocol and is the process by which messages are received. So when you check your mail with Outlook, the message is traveling via POP from a POP Server to your own computer (also referred to as the client computer or POP client). SMTP = Simple Mail Transfer Protocol and is the process by which messages are sent out. When you send a message it travels via SMTP to a SMTP Server. From the SMTP Server computer it then travels to other nodes on the Internet until finally arriving at the recipient’s POP Server. To establish the POP and SMTP Server addresses in Outlook, you have to move into the properties area and type in the correct addresses for these servers.
H
6
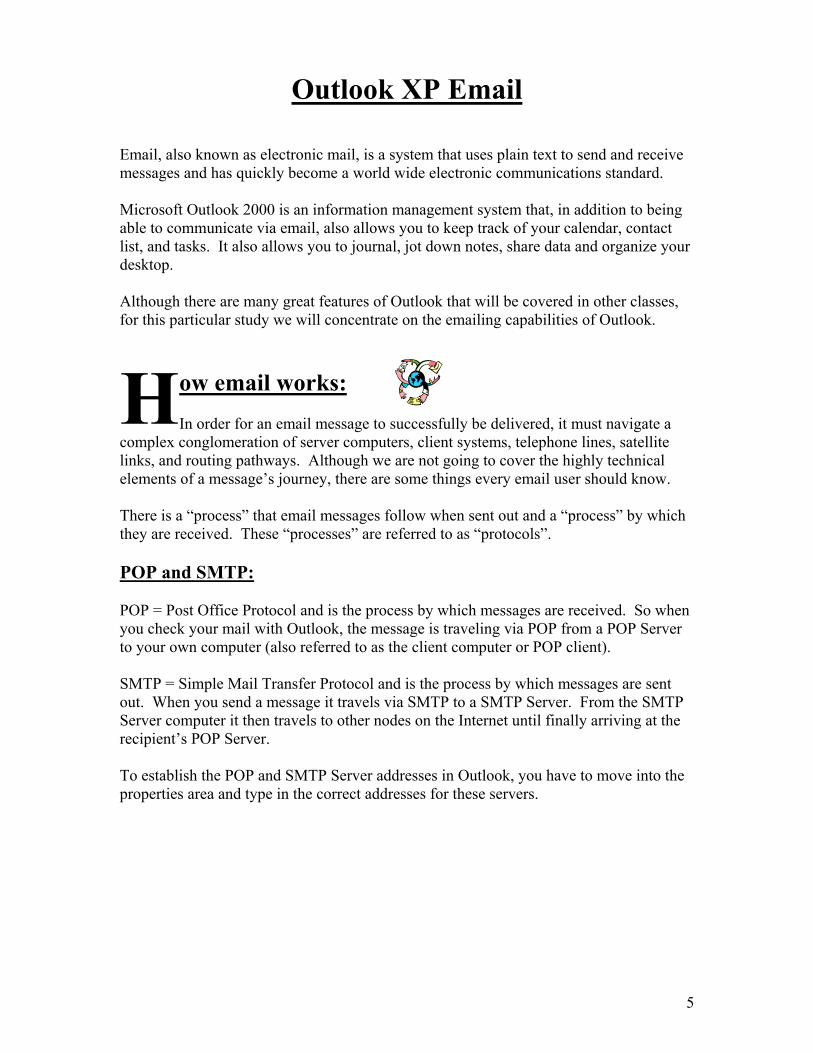
To set up the POP and SMTP addresses:
1. Choose Tools, Email Accounts from the Menu bar.
2. If Outlook is already installed on your system, your account has most likely already been created. However, you can view or change properties regarding your current email account or add a brand new email account.
We will assume in this exercise that you are creating a brand new email account. 3. Choose Add a new e-mail account checkbox, then click Next.
7
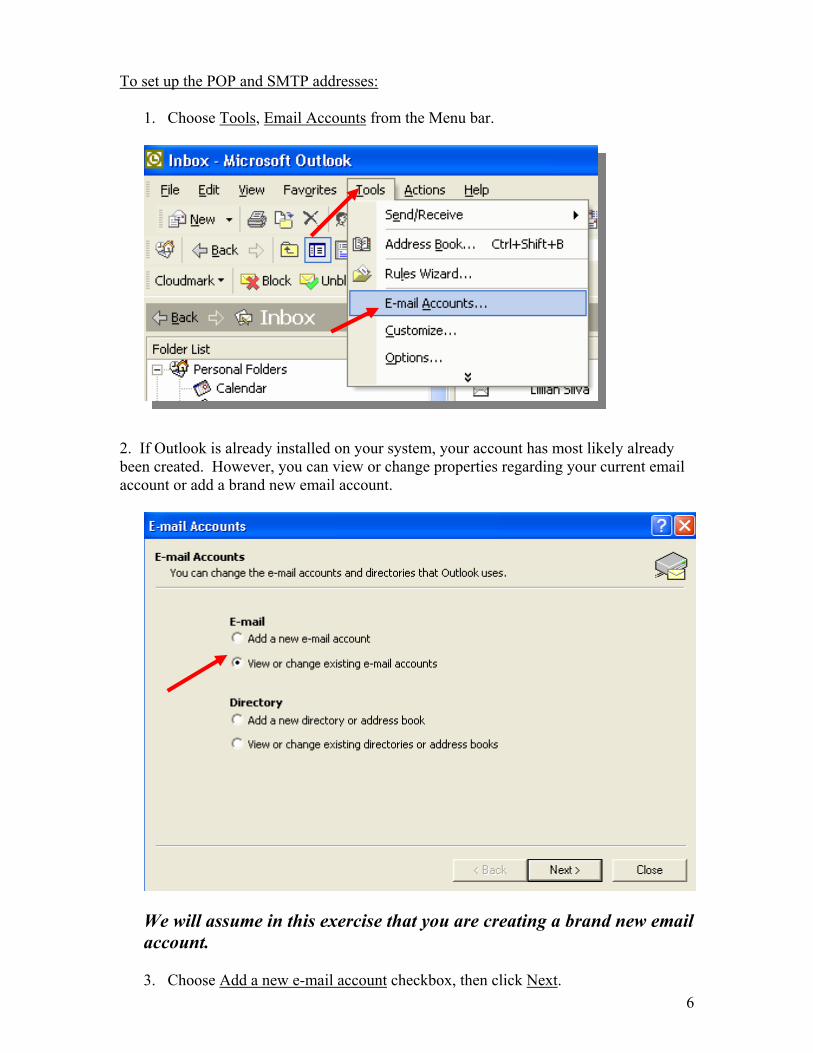
4. Choose the correct server type for your email account. (Here at FAU, we use a POP3 E-Mail Server), then click Next.
5. Type in the necessary information, such as Your Name, E-mail Address, POP3 Server, SMTP Server, and Your Username and Password; then click Next.
8
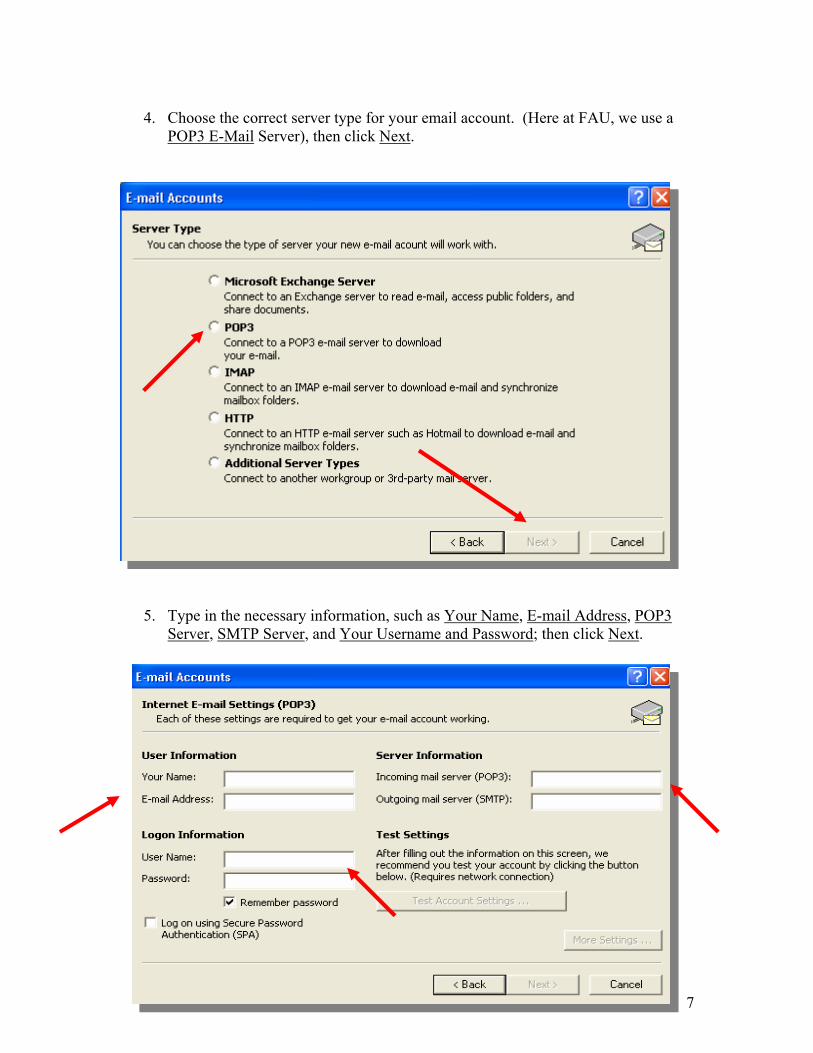
Here at FAU, the POP account currently should be type in as follows: pop.fau.edu and the SMTP account information should be as follows: fau.edu (or smtp.fau.edu) It’s always a good idea to know where this information is located in Outlook because at any time the names of the POP and SMTP accounts can change. As long as you know where to make the changes, your email functions will go on uninterrupted.
6. Click the Finish button when the Account Wizard is complete. Your account has now been set up and is ready to use. However, if you are checking your mail from a different computer than your main computer (i.e. a laptop, home computer), then you need to set a property that will ensure that you are only getting copies of your mail messages delivered. This way when you check your mail again with your main computer, the original messages will be downloaded to your computer and removed from the Server. This feature ensures that messages don’t stay on the Server for an extended period of time. To set the Delivery property:
1. Choose Tools, Email Accounts from Menu bar. 2. Choose View or change existing e-mail accounts option, then click Next. 3. Highlight the account you wish to change the delivery properties of, then click
Change… button. 4. Click More Settings… button, then click Next.
9
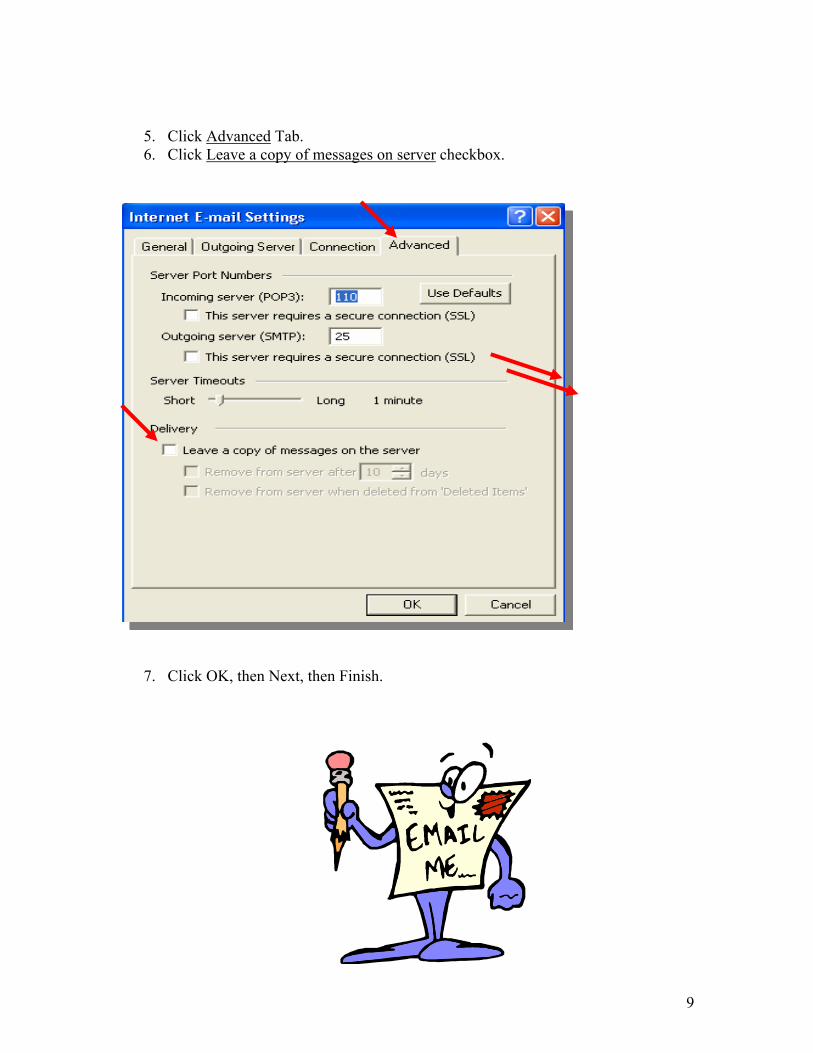
5. Click Advanced Tab. 6. Click Leave a copy of messages on server checkbox.
7. Click OK, then Next, then Finish.
10
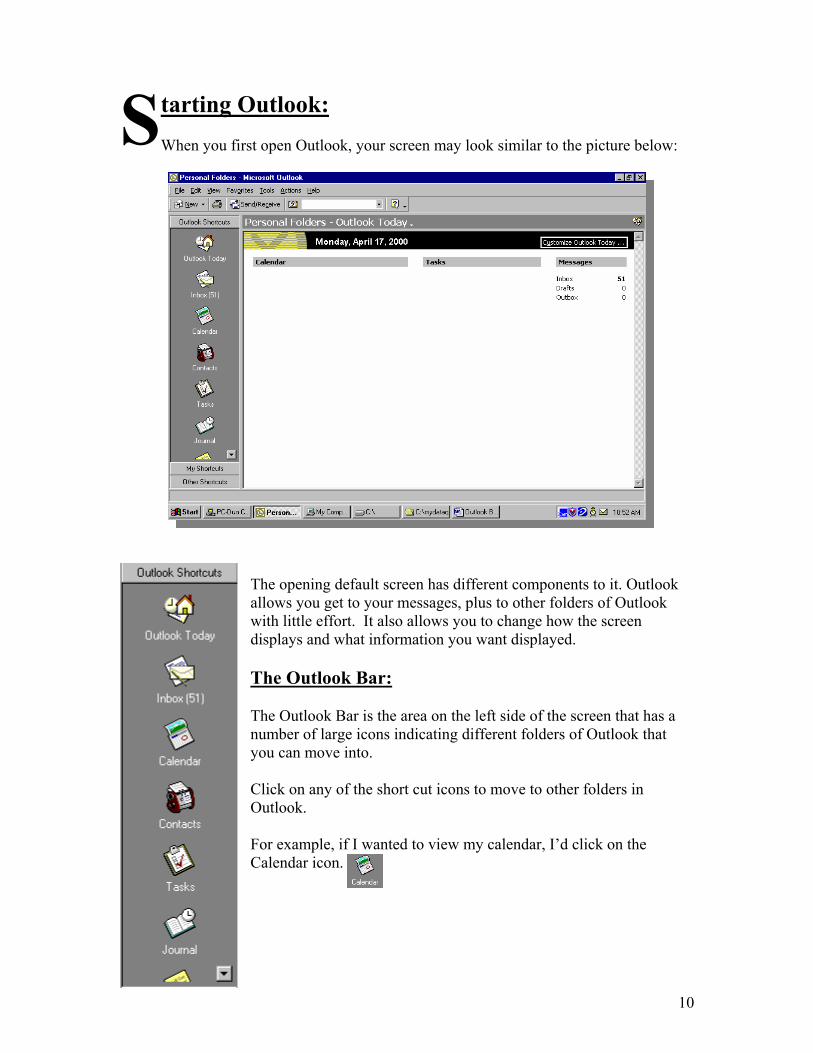
tarting Outlook: When you first open Outlook, your screen may look similar to the picture below:
The opening default screen has different components to it. Outlook allows you get to your messages, plus to other folders of Outlook with little effort. It also allows you to change how the screen displays and what information you want displayed. The Outlook Bar: The Outlook Bar is the area on the left side of the screen that has a number of large icons indicating different folders of Outlook that you can move into. Click on any of the short cut icons to move to other folders in Outlook. For example, if I wanted to view my calendar, I’d click on the Calendar icon.
S

11
By default, you start off in the Outlook Today area, which gives you a synopsis of your Calendar, Tasks and Messages. Plus, will tell you the current date and allow you customize the way Outlook Today appears on your screen. To change the way Outlook Today displays on your screen:
1. Click on the Customize Outlook Today button on the Date Bar at the top of the screen.
2. Decide which options you’d like to have in the Outlook Today screen.
Have Outlook Today start up every time. Choose which folders you want to be apart of Outlook Today. Decide how many days you want to see in your calendar. Customize your Task list. Pick a different Style.
Customize Outlook Today button

12
You can also hide the Outlook Bar by choosing View from Menu bar and unchecking the Outlook Bar button.
Right click
To change the Style of Outlook Today:
1. Click on the arrow next to the word Standard in the Styles section. 2. Choose from the list of styles available. 3. Choose Save Changes from the Customize Outlook Today bar at the top of the
window. You can also decide how you want the Outlook Bar to display or even whether or not you want it to display. To change the way the Outlook Bar displays:
1. Right click on the header at the top of the bar that says Outlook Shortcuts. 2. Choose Small Icons.
Changing to small icons will make it easier to see all of your Short Cuts without having to scroll up and down the bar. It also makes more room if you want to add other Short Cuts to the Outlook Shortcuts bar. To add other Short Cuts:
1. Right click on the header at the top of the bar that says Outlook Shortcuts.
2. Choose Outlook Bar Shortcut. 3. Choose the new short cut that you’d
like to have on the Outlook Bar. 4. Click OK.
To remove a Short Cut from the Outlook Bar:
1. Right click on the short cut that you want to remove. 2. Choose Remove From Outlook Bar. 3. Click Yes.
You may decide that you don’t even want to have the Outlook Bar on the screen. You can choose to create different folders that belong in different areas by using the Menu bar, or by choosing to display the Folder List instead. To remove the Outlook Bar from the screen:
1. Right click on the header of the Outlook Shortcuts Bar.
2. Choose Hide Outlook Bar.
13
The Folder List: You may decide that you’d like to display the Folder List instead of the Outlook Bar. The Folder List allows you to see all of your folders in one place and any additions to the Folder List easily. To Display the Folder List:
1. Choose View, Folder List from Menu Bar.
reating an Email Message: All aspects of sending or receiving email are found within the Inbox area in
Outlook. Click on the Inbox Short Cut from the Outlook bar, click on the Inbox Folder in the Folder List or click on the word Inbox from the Outlook Today screen.
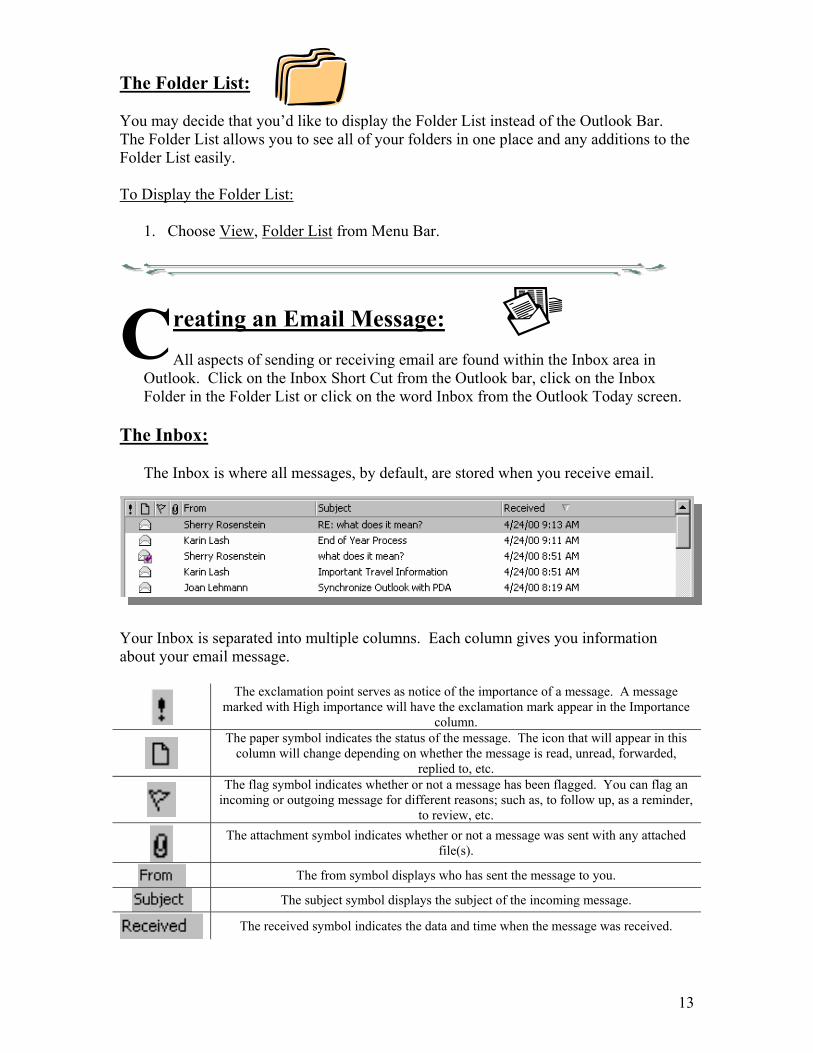
The Inbox: The Inbox is where all messages, by default, are stored when you receive email.
Your Inbox is separated into multiple columns. Each column gives you information about your email message.
The exclamation point serves as notice of the importance of a message. A message marked with High importance will have the exclamation mark appear in the Importance
column.
The paper symbol indicates the status of the message. The icon that will appear in this column will change depending on whether the message is read, unread, forwarded,
replied to, etc.
The flag symbol indicates whether or not a message has been flagged. You can flag an incoming or outgoing message for different reasons; such as, to follow up, as a reminder,
to review, etc.
The attachment symbol indicates whether or not a message was sent with any attached file(s).
The from symbol displays who has sent the message to you.
The subject symbol displays the subject of the incoming message.
The received symbol indicates the data and time when the message was received.
C
14
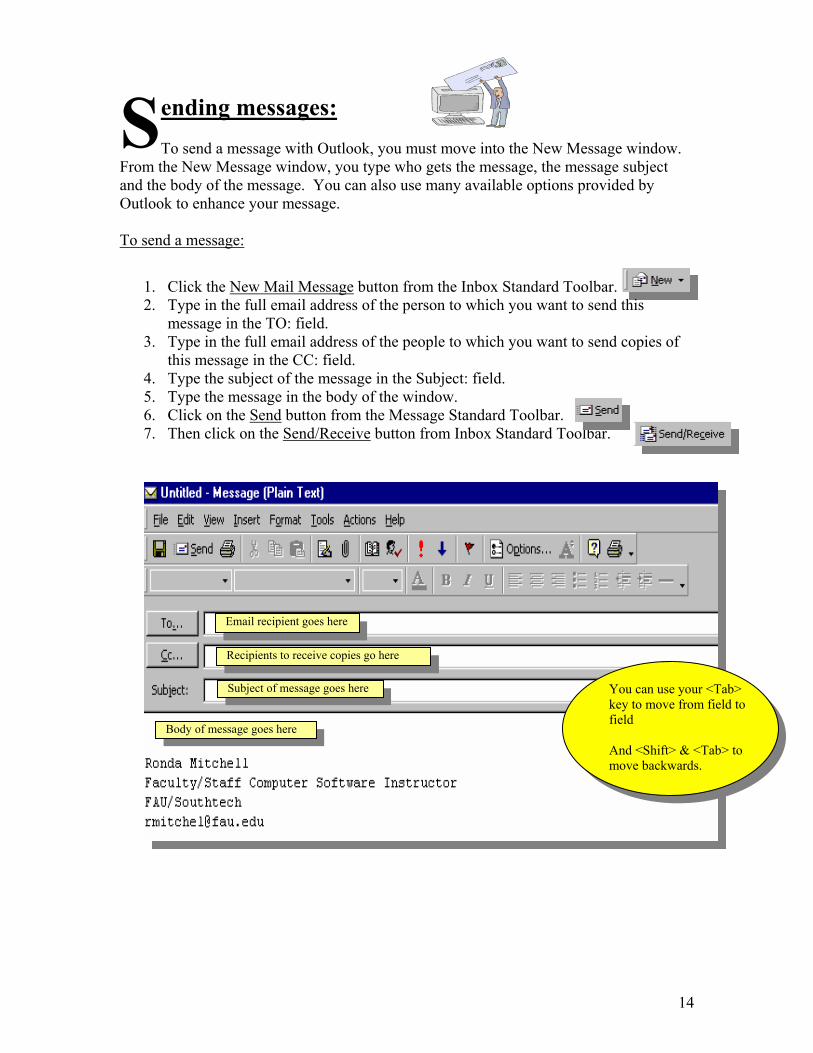
ending messages: To send a message with Outlook, you must move into the New Message window.
From the New Message window, you type who gets the message, the message subject and the body of the message. You can also use many available options provided by Outlook to enhance your message. To send a message:
1. Click the New Mail Message button from the Inbox Standard Toolbar. 2. Type in the full email address of the person to which you want to send this
message in the TO: field. 3. Type in the full email address of the people to which you want to send copies of
this message in the CC: field. 4. Type the subject of the message in the Subject: field. 5. Type the message in the body of the window. 6. Click on the Send button from the Message Standard Toolbar. 7. Then click on the Send/Receive button from Inbox Standard Toolbar.
S
You can use your <Tab> key to move from field to field And <Shift> & <Tab> to move backwards.
Email recipient goes here
Recipients to receive copies go here
Subject of message goes here
Body of message goes here
15
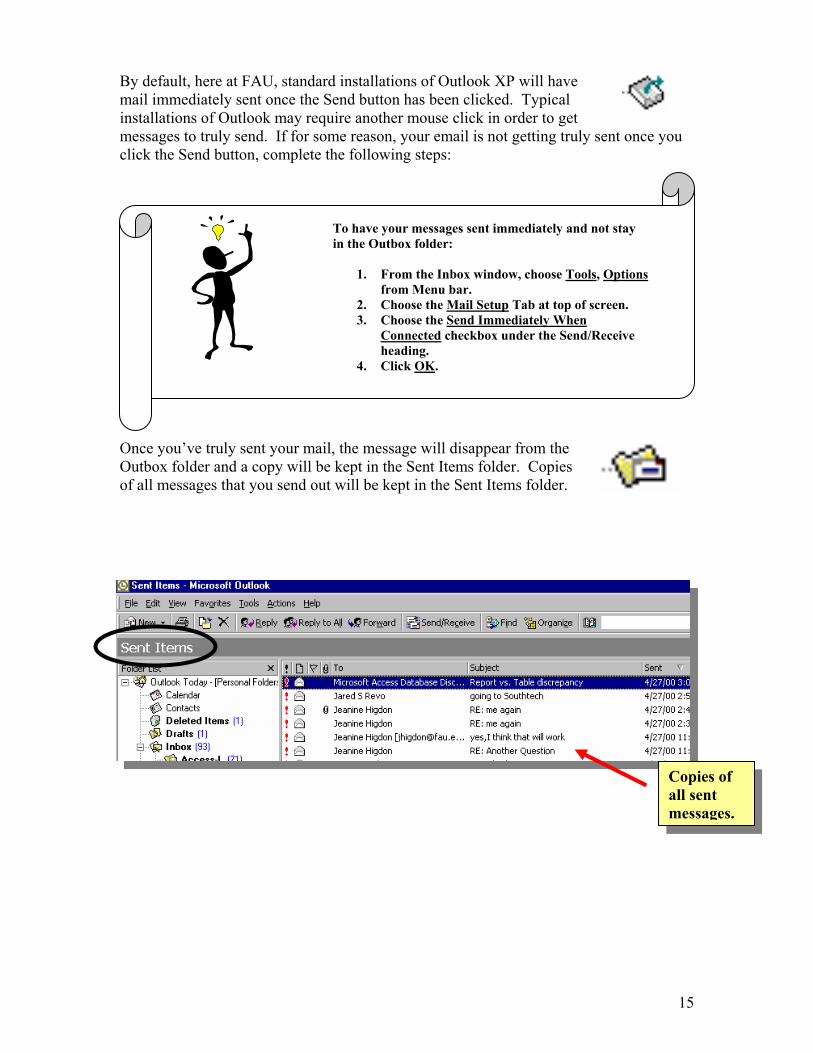
By default, here at FAU, standard installations of Outlook XP will have mail immediately sent once the Send button has been clicked. Typical installations of Outlook may require another mouse click in order to get messages to truly send. If for some reason, your email is not getting truly sent once you click the Send button, complete the following steps: Once you’ve truly sent your mail, the message will disappear from the Outbox folder and a copy will be kept in the Sent Items folder. Copies of all messages that you send out will be kept in the Sent Items folder.
To have your messages sent immediately and not stay in the Outbox folder:
1. From the Inbox window, choose Tools, Options from Menu bar.
2. Choose the Mail Setup Tab at top of screen. 3. Choose the Send Immediately When
Connected checkbox under the Send/Receive heading.
4. Click OK.
Copies of all sent messages.
16
You can also choose the High or Low importance buttons from the message window.
essage Options: There are many options that you can set on a per message basis:
1. Message Importance 2. Message Sensitivity 3. Security Features (if available) 4. Read Receipt 5. Message waiting
Message Importance: By default, when you send a messages it goes out under an importance level of Normal. However, if a message is very important, you can send it with a High Importance. To send an important message:
1. Click on the New button from the Inbox window. 2. Type your message. 3. Click the Options button from the Standard Toolbar of
the Message window. 4. Choose the drop down arrow next to the Importance text
box. 5. Choose the level of importance you desire. 6. Choose Close. 7. Send the message.
You can tell the message went out with a certain importance because a banner will display across the top of your sent message stating at what level of importance the message was sent. You can also tell the message was sent with a certain importance by simply looking in the Sent folder.
If there is a red exclamation mark next to the message – it was sent with High importance. If there is a blue arrow next to the message – it was sent with Low importance.
If there is no icon next to the message – the message was sent Normal.
M
17
Message Sensitivity: You can mark a message with a certain sensitivity. For example, you can mark a message private or confidential. This doesn’t provide any security level, it simply marks the message as being private or confidential and assumes the reader will respect that. To mark a message with a certain sensitivity:
1. Click on the New button from the Inbox window. 2. Type your message. 3. Click the Options button from the Standard Toolbar of the Message window. 4. Choose the drop down arrow next to the Sensitivity text box. 5. Choose the level of sensitivity you desire. 6. Choose Close. 7. Send the message.
Sending Secure Messages:
Outlook provides two ways of sending secure messages. One is to encrypt your message so that only the recipient can read it. The other way is to add a Digital Signature that proves you are the person who wrote the message and that it has not been tampered with. In either case, you cannot send secure messages unless you have a Digital ID. A digital ID (also called a certificate) provides a means for proving your identity on the Internet. With a digital ID you can add a digital signature to your messages so the intended recipients can make sure that the message actually came from you and has not been tampered with. You can also encrypt messages, using a special mathematical formula, so that only the intended recipient can read your messages and attachments.
You obtain your digital ID from a certifying authority, such as Verisign, Inc. With some types of e-mail servers, your network administrator can also issue a digital ID. Part of the digital ID is an irreplaceable private key that is usually stored on your computer. You can export and import this private key to other computers if you need to move your secure e-mail security settings from one computer to another. You can also make a backup copy of your digital ID. The other component of your digital ID is a public key that you send to people who want to send you encrypted messages or verify your signed messages.
Digital ID’s are an advanced feature and beyond the scope of the course. For more information on Digital ID’s, have your Office Assistant search for security.
18
Read Receipt: Read Receipt is an option that you can use when you want to know when a person has read your email. However, this does not mean that you will receive a notification. Receiving a Read Receipt notification means that the person who read your message agreed to let you know that they read your message. They have the option of not notifying you when they read your messages. To Request a Read Receipt:
1. Click on the New button from the Inbox window. 2. Type your message. 3. Click the Options button from the Standard Toolbar of the Message window. 4. Click on the checkbox under Tracking Options that says “request a read receipt
for this message”. 5. Choose Close. 6. Send the message.
Delaying Messages: You can also create an email message but then not send it until a later time. Reasons for doing this could be that you know the email server is down, but you want to go ahead and write the message. You can delay the message so that it is sent at a later time, hopefully, when the server is back up. If you choose to delay a message, the message will remain in the Outbox folder until the next time you click the Send/Receive button after the time you specify for the message to be sent. For example, if I delay a message for 1 hour from the time that I type it, it will remain in the Outbox folder until after that 1 hour has passed and only go when I click the Send/Receive button on the Inbox Standard Toolbar, even though I may have clicked that button many times within the hour. No matter what time you chose, the message will not go out until you click the Send/Receive button (or have Outlook set up to send/receive your mail automatically). Using this option simply means the message will not go before the appointed time. To Delay a Message:
1. Click on the New button from the Inbox window. 2. Type your message. 3. Click the Options button from the Standard Toolbar of the Message window. 4. Click the Do Not Deliver Before checkbox. 5. Choose a date from the drop down calendar and type the time in yourself. 6. Choose Close. 7. Send the message.
19
FAU requests that automatic mail checks be set to at least 60 minutes.
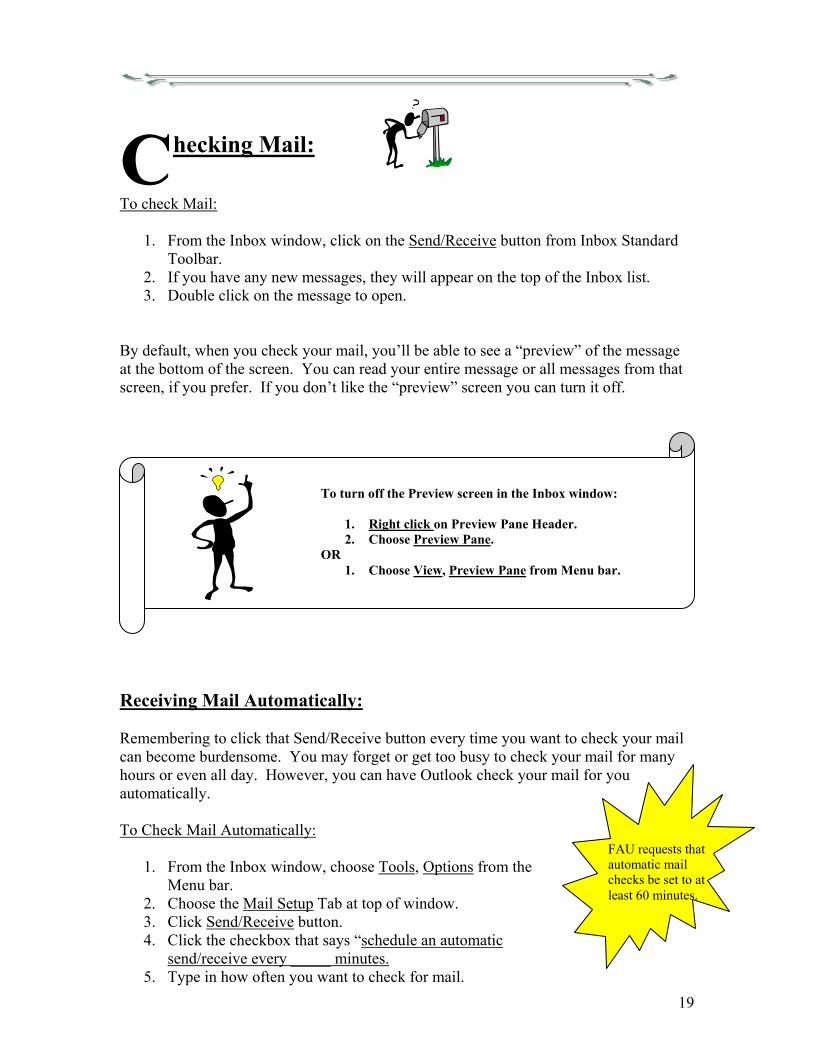
hecking Mail:
To check Mail:
1. From the Inbox window, click on the Send/Receive button from Inbox Standard Toolbar.
2. If you have any new messages, they will appear on the top of the Inbox list. 3. Double click on the message to open.
By default, when you check your mail, you’ll be able to see a “preview” of the message at the bottom of the screen. You can read your entire message or all messages from that screen, if you prefer. If you don’t like the “preview” screen you can turn it off.
Receiving Mail Automatically: Remembering to click that Send/Receive button every time you want to check your mail can become burdensome. You may forget or get too busy to check your mail for many hours or even all day. However, you can have Outlook check your mail for you automatically. To Check Mail Automatically:
1. From the Inbox window, choose Tools, Options from the Menu bar.
2. Choose the Mail Setup Tab at top of window. 3. Click Send/Receive button. 4. Click the checkbox that says “schedule an automatic
send/receive every _____ minutes. 5. Type in how often you want to check for mail.
C
To turn off the Preview screen in the Inbox window:
1. Right click on Preview Pane Header. 2. Choose Preview Pane.
OR 1. Choose View, Preview Pane from Menu bar.
20
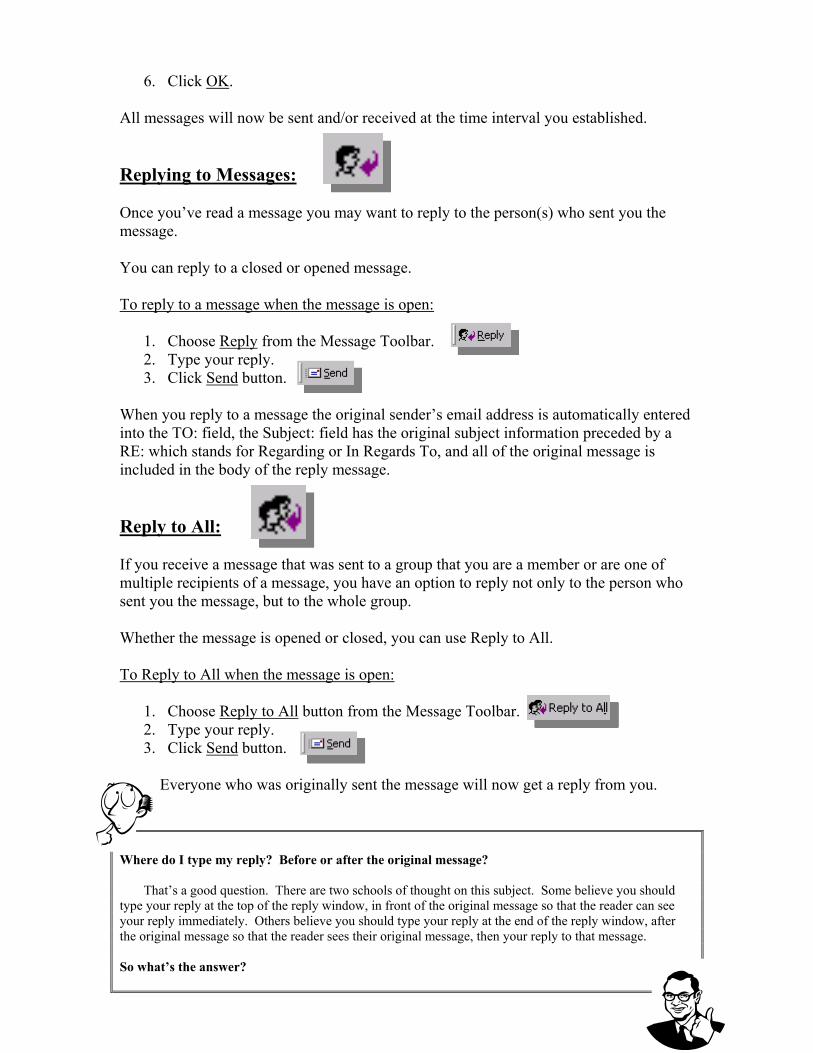
6. Click OK. All messages will now be sent and/or received at the time interval you established. Replying to Messages: Once you’ve read a message you may want to reply to the person(s) who sent you the message. You can reply to a closed or opened message. To reply to a message when the message is open:
1. Choose Reply from the Message Toolbar. 2. Type your reply. 3. Click Send button.
When you reply to a message the original sender’s email address is automatically entered into the TO: field, the Subject: field has the original subject information preceded by a RE: which stands for Regarding or In Regards To, and all of the original message is included in the body of the reply message. Reply to All: If you receive a message that was sent to a group that you are a member or are one of multiple recipients of a message, you have an option to reply not only to the person who sent you the message, but to the whole group. Whether the message is opened or closed, you can use Reply to All. To Reply to All when the message is open:
1. Choose Reply to All button from the Message Toolbar. 2. Type your reply. 3. Click Send button.
Everyone who was originally sent the message will now get a reply from you.
Where do I type my reply? Before or after the original message? That’s a good question. There are two schools of thought on this subject. Some believe you should type your reply at the top of the reply window, in front of the original message so that the reader can see your reply immediately. Others believe you should type your reply at the end of the reply window, after the original message so that the reader sees their original message, then your reply to that message. So what’s the answer?
21
You can also delete messages by right-clicking on the message and choosing Delete from Short Cut menu or by clicking on the Delete button on Inbox Standard Toolbar.
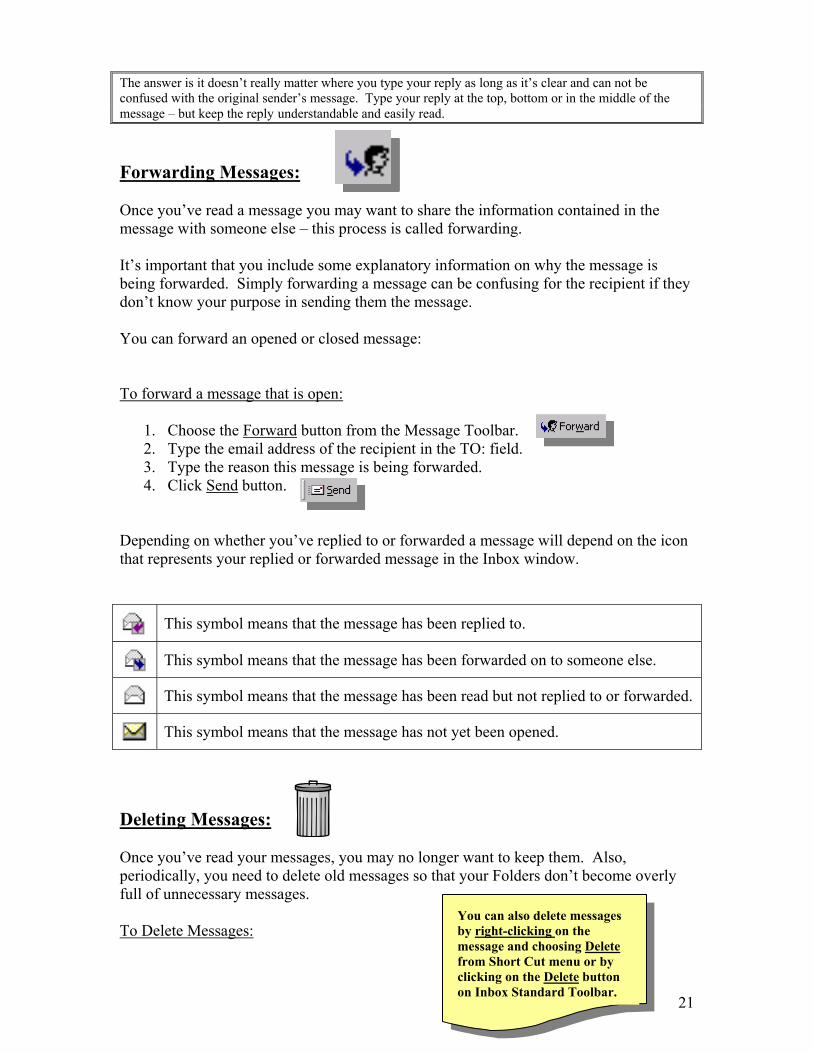
The answer is it doesn’t really matter where you type your reply as long as it’s clear and can not be confused with the original sender’s message. Type your reply at the top, bottom or in the middle of the message – but keep the reply understandable and easily read. Forwarding Messages: Once you’ve read a message you may want to share the information contained in the message with someone else – this process is called forwarding. It’s important that you include some explanatory information on why the message is being forwarded. Simply forwarding a message can be confusing for the recipient if they don’t know your purpose in sending them the message. You can forward an opened or closed message: To forward a message that is open:
1. Choose the Forward button from the Message Toolbar. 2. Type the email address of the recipient in the TO: field. 3. Type the reason this message is being forwarded. 4. Click Send button.
Depending on whether you’ve replied to or forwarded a message will depend on the icon that represents your replied or forwarded message in the Inbox window.
This symbol means that the message has been replied to.
This symbol means that the message has been forwarded on to someone else.
This symbol means that the message has been read but not replied to or forwarded.
This symbol means that the message has not yet been opened.
Deleting Messages: Once you’ve read your messages, you may no longer want to keep them. Also, periodically, you need to delete old messages so that your Folders don’t become overly full of unnecessary messages. To Delete Messages:
22
1. Select the message(s) that you want to delete. 2. Press Delete key on keyboard.
When you delete your messages from your Inbox or any other Folder, the messages move into the Deleted Items Folder. They will remain in the Deleted Items Folder until you decide to delete them from there.
Once you’ve deleted messages from the Deleted Items Folder, the messages are purged from your system and cannot be retrieved.
ignatures: You can add text at the bottom of every email message that contains information
that you’d like to include on all correspondence, but don’t want to have to type it every time you send mail. Signatures should contain your full name, your title, your department, your full email address and anything else you feel should be included on each email message. Outlook also allows you to create multiple signatures that you can use interchangeably depending on the recipient of your message. You can create one signature that is your business signature, another that’s designed for more casual correspondence, one that is used strictly for correspondence with members of your committee, etc. To create a signature:
1. Choose Tools, Options from Menu bar. 2. Click the Mail Format tab. 3. Click on the Signatures…button at bottom of window. 4. Click New. 5. Name your new signature. 6. Choose Next. 7. Type the contents of your signature. 8. Click Finish. 9. Click OK. 10. Set the signature you wish to use for new messages and forwards/replies. 11. Click OK.
Now when you open a New Message window, your signature information will be included automatically.
S
23
roups: There are times where you need to send more than one person the same
message. If you find yourself sending the same message to more than one person on a regular basis, you may want to create a Distribution List or Group. You send your message to the Group and everyone in the group gets the same message. Using Groups cuts down on the amount of typing that you have to do and assures that everyone gets the message. To create a Group/Distribution List:
1. Move to Contacts folder. 2. Choose the dropdown button next to the New button. 3. Choose Distribution List. 4. Click either Add Member… to add an already created member of your Contacts
folder to this distribution list or click Add New… to add a new email address to this distribution list.
5. Continue adding all necessary members of this list. 6. Click Save and Close when done.
To send a message to the Group/Distribution List:
1. Choose New from the Inbox window. 2. Either type in the name of the Group/Distribution List in the TO: field or click on
the TO: button and choose the group from the list by double clicking on Group/Distribution List name.
3. Click OK. 4. Type the message. 5. Choose Send.
After you have created a Group/Distribution List, you need to make sure that you keep up with the members in that Group. There will be times when you will need to add or delete members from a Group. To Edit a Group/Distribution List:
1. Move to Contacts folder. 2. Double click on Group/Distribution List name. 3. Add and/or delete members as needed. 4. Click Save and Close button.
G
24
icknames: Outlook allows you to keep a contact list of people. You can use this contact list
to email messages. However, remembering the full email address of all of your contacts can be overwhelming. You can create an easy to remember nickname for each person in your contact list that you can use in place of the full email address in your email messages To make a nickname you are basically creating your contacts list and the process is very similar to making a Group. To create nicknames:
1. Open the contact of the person from the Contacts folder that you wish to include a Nickname.
2. Click on the Details Tab in the Contact for. 3. Type in the nickname in the Nickname textbox. 4. Confirm the full email address in the Email Addresses textbox from the General
Tab 5. Click Save and Close.
ttachments: Attachments are files that you can attach to an outgoing message. For example,
if you would like your co-worker to review a document you’ve created for accuracy, you can email them and “attach” a copy of the document.
Attachments received via email can contain viruses. You should scan all attachments with a current virus detection program (Norton AntiVirus or McAfee VirusScan) before opening. To send an Attachment:
1. Click the New Message button from Inbox window. 2. Click Paperclip button on Message Standard Toolbar. 3. Select file that you wish to attach. 4. Click Insert. 5. Make a point in your message to inform the reader that you are sending them an
attachment. 6. Send the message.
N
A
25
When the reader receives your message, they will know that the message has an attachment because in the Inbox window, there is a paperclip that appears in the Status column next to the message. Also, when they open the message, the attachment typically appears as an icon at the bottom of the message window or as a text entry in the header area at top of message. To read an attachment:
1. Open the message that has the attachment. 2. Double click on the attachment icon at bottom of the screen (or click the
attachment header). 3. The attached file will open in its own window. 4. You can save the attached file or close the window without saving. 5. Close the message window.
Attachments are kept with the incoming message. If you want to send the attachment on to some else, simply forward the message on. The attached file will go with the message automatically.
There are many different types of files that can be attached to email messages. In order to read an attachment, the recipient must have a program that will understand the format of the attached file. If they don’t, they will not be able to read the attachment. Also Outlook XP has built in security features that will block certain types of attachments. For example, files with .exe, or .mdb file extensions will automatically be blocked.
aking Folders: You have the option to create more Folders than just those that come with
Outlook. You can create other Folders to hold specific messages. For example, if you are involved in a work related project, you may want all the email messages regarding that project to be held in a Folder called “Work Project”. You can then transfer all the messages coming into your Inbox into the “Work Project” Folder. To Make a New Email Folder:
1. Highlight the folder in the Folders List that you’d like to create a new folder beneath.
2. Right click on that folder. 3. Choose New Folder… 4. Name the new Folder.
M
26
5. Click OK. 6. If you receive a message that asks you if you want a shortcut added to the Outlook
Bar, click either Yes or No. If your Folder List is displayed, you can now see your new Folder in the list of Inbox folders. Deleting Folders: At any time, you can delete a folder that you’ve created. Be aware that if you delete a folder that holds items, the items get deleted along with the folder. To delete a folder:
1. Right click on the folder you wish to delete. 2. Choose Delete from short cut menu. 3. Click Yes.
Transferring Messages: Now that you have new Folders, you can transfer messages into those new folders to keep your email organized. To Transfer Messages:
1. Right click on any message. 2. Choose Move to Folder from Short Cut menu. 3. Select the Folder that will contain the message. 4. Click OK.
ules: Rules are types of filters that can be used to sort and organize your email. You
can create a rule that will automatically transfer messages into other Folders without you having to do it manually. Rules come in handy when you are receiving multiple messages from the same source. For example, you are starting to get over 20 messages a day regarding the “Work Project” you are involved in, you can now set up a Rule that will automatically move messages regarding the Work Project into the “Work Project” Folder. Depending on the type of Rule you want to make will depend on how you make it. If you want to make a rule that will transfer email coming from someone in particular, you can use the Organize Inbox feature. If you want to make a rule that will do other things than transfer or is based on something other than “who” sent the message, you have to use Tools, Rules Wizard from Menu bar.
R
You can also transfer messages by choosing Edit, Move to Folder from Menu bar or as long as you have the Folder List displayed, you can literally drag the message onto the new Folder.

27
To create a Rule using the Organize Inbox feature:
1. Make sure you are in the Inbox window. 2. Choose the Organize button from Inbox Standard Toolbar. 3. Type in the email address of the person for which you are making the Rule in the
textbox after the word “from.” 4. Choose the Folder that you want to transfer the incoming messages into from the
Folder drop-down list. 5. Click on Create 6. Choose Yes to the question that asks if you want to apply the new Rule to the
current contents of the Inbox. 7. Click Organize button again to close Organize window.
To create a Rule using the Rules Wizard:
1. Make sure you are in the Inbox window. 2. Choose Tools, Rules Wizard from Menu bar. 3. Click New button. 4. Choose the type of Rule that you want to create. 5. Click on any necessary setup text from the Rule description field. 6. Click Next to move through the Rules Wizard. 7. Click Finish when finished creating the Rule.
Once you have a Rule established, all incoming mail will be sorted and organized by the information contained in each Rule.
essage Formats: By default, Outlook sends messages in Plain Text Format. This format
insures that all readers with any email program can read your email. You can change the format in which your message will be sent out in Outlook. Keeping the format in plain text will make it easier for Eudora or any other plain text email program users to read your email messages, but no formatting (bold, underline) will be allowed. If it’s important that you send your messages with a certain amount of formatting, you need to change the format to Rich Text or HTML. However, plain text email programs will still not be able to see the formatting you’ve applied and, in fact, may display a false attachment to the message usually called “winmail#.dat”. This may be confusing to plain text program users.
M
28
Types of Message Formatting: Plain Text: formats your messages in plain ASCII text. All computers, even those with the most basic email applications, can read this type of message. HTML: formats your message as an HTML document. If the recipient’s email program does not support HTML messages, they will see the HTML code along with the text of the message. Most users will find this confusing and some will find it impossible to read or simply become frustrated and delete or ignore the message. If the recipient’s email program does support HTML, all applied formatting will show up, and look just like the sender intended. Rich Text: formats your message in Rich Text Format. If the recipient’s email program does not support RTF messages, the plain text of the message will come through, but the formatting may be displayed as an attachment. To change the format of all outgoing messages:
1. Choose Tools, Options from Inbox window. 2. Choose Mail Format tab. 3. Choose the type of message format you desire from the compose in this message
format text box. 4. Click OK.
All future outgoing messages will now be sent in that format.