part3 - sop express features and functions...
TRANSCRIPT

SOP EXPRESS
PART3 - SOP EXPRESS FEATURES AND
FUNCTIONS MANUAL
SOPX-3
Guide

DC1FE4E9C81D48229A1CD588B0EC6708
Part3 - SOP Express Features and Functions Manual SOPX-3 v.3 11/14/2017 Page ii
c.2017 Princeton Center
All information in this document is the confidential property of Princeton Center for Education Services, Inc.. and is intended for viewing, distribution, and use only within Princeton Center for Education Services, Inc.. No part of this document may be copied or distributed without the express written consent of Princeton Center for Education Services, Inc.
Direct all inquiries to Princeton Center for Education Services, Inc. Support and Training Department.

DC1FE4E9C81D48229A1CD588B0EC6708
Part3 - SOP Express Features and Functions Manual SOPX-3 v.3 11/14/2017 Page iii
Table of Contents
1. Introduction ............................................................. 1
1.1 Purpose ................................................................................................ 1 1.2 Scope ................................................................................................... 1 1.3 General Requirements ........................................................................... 1
2. Importing Content .................................................... 1
2.1 Place your cursor in white space exactly where you want to copy the new information. ................................................................................... 1
2.2 Click the TS Edit menu > Import Content or right-click and select Import Content. ............................................................................................... 1
2.3 If you wish to import an object from within the Master Document, select the object(s) and click done. .................................................................. 2
2.4 If you want to select content from another module, click the Select mode checkbox to display a list of the modules inside your project folder. .................................................................................................. 2
2.5 Select the source master document from the list box. .............................. 3 2.6 Select the content you wish to import ..................................................... 3 2.7 Click the Done button. ........................................................................... 4
3. Update Database ...................................................... 5
4. Update Table of Contents (TOC) ................................ 6
4.1 Right-click on the table of contents. ........................................................ 6 4.2 Select Update Field. ............................................................................... 6 4.3 Select Update entire table. ..................................................................... 7 4.4 Click the OK button. .............................................................................. 7
5. Closing the Master Document .................................... 7
6. Questions ................................................................. 8
7. Insert Question ........................................................ 9
7.1 Place the cursor in "white space" on a page where a new question is to be inserted. .......................................................................................... 9
7.2 Choose Content Types > Question .......................................................... 9 7.3 Choose the Auto Insert Question option from the submenu. ..................... 9 7.4 Enter your question and directions. ....................................................... 10 7.5 Insert a check mark in the box in front of Responses. ............................ 10 7.6 Click OK. ............................................................................................ 11 7.7 Enter the number of responses in the block (default is 2). ...................... 11 7.8 Click OK. ............................................................................................ 12

DC1FE4E9C81D48229A1CD588B0EC6708
Part3 - SOP Express Features and Functions Manual SOPX-3 v.3 11/14/2017 Page iv
8. Insert Questions – entering responses ..................... 12
8.1 Type in your responses ........................................................................ 12 8.2 Mark correct answer with "X" ............................................................... 13 8.3 Select Update (ALT + U) ...................................................................... 13
9. Insert Questions – providing feedback ..................... 14
9.1 Scroll to the feedback area for the current question. .............................. 14 9.2 Edit the Label...................................................................................... 15 9.3 Edit the Text area ............................................................................... 15 9.4 Select Update (ALT + U) ...................................................................... 16
10. Add-Delete Question Responses .............................. 16
10.1 Select Content Types > Responses. ...................................................... 16 10.2 Choose Insert Response (Above or Below) or Delete Response. .............. 16
11. Add a detail block for feedback to a new question response 17
11.1 Place cursor in the new response and right click. ................................... 17 11.2 Select Add Detail. ................................................................................ 17 11.3 Select Yes or No. ................................................................................. 18 11.4 If you chose No in the previous step, enter the desired number in the
field. If you chose Yes, select the item you want to insert from the list of the predefined content. ....................................................................... 18
11.5 Click the OK button. ............................................................................ 19 11.6 In the Priority (1-9) field, enter the desired sequence number for this
Detail or accept the default number to append it to the end.................... 19 11.7 Click the OK button. ............................................................................ 20
12. Pack and Send ....................................................... 21
12.1 Open ExpressTrain Desktop. ................................................................ 21 12.2 Place cursor on file and right click. ........................................................ 21 12.3 Select Pack and Send .......................................................................... 22 12.4 Click Yes at the prompt to send file via email. ........................................ 22 12.5 Highlight file address that will be pasted in attachment dialog. ................ 22 12.6 Select 'attach file'. ............................................................................... 23 12.7 Paste file address into attachment dialog field........................................ 23 12.8 Zipped file is now in the email and ready to send. .................................. 24
13. Pack files only ........................................................ 24
13.1 Open ExpressTrain Desktop. ................................................................ 24 13.2 Place cursor on file and right click. ........................................................ 24 13.3 Select Pack. ........................................................................................ 25

DC1FE4E9C81D48229A1CD588B0EC6708
Part3 - SOP Express Features and Functions Manual SOPX-3 v.3 11/14/2017 Page v
14. Receive and Load .ETM file ..................................... 25
14.1 Save the .etm file(s) to the project folder.. ............................................ 25 14.2 Open the ExpressTrain Desktop. ........................................................... 25 14.3 Click the Load Module button. .............................................................. 25 14.4 Select the .etm file to load and click Ok. ................................................ 26 14.5 If there is no module in the project folder with this name, it will proceed
to load it with no further prompts until it is finished loading. ................... 27 14.6 If there is already a module with this name, click Yes or No to overwrite
the existing module of the same name. ................................................. 27 14.7 If you choose not to overwrite an existing module, click Yes or No to
duplicate the module. .......................................................................... 28 14.8 If you choose Yes to duplicate the module, enter a unique name and
click OK. ............................................................................................. 28 14.9 If you choose not to duplicate an existing module, click Yes or No to
rename the module. ............................................................................ 28 14.10 If the module loaded successfully, it will ask at the end if you would
like to open it. ..................................................................................... 29
15. References ............................................................. 29
16. Revision History ...................................................... 30

SOP Express Introduction
DC1FE4E9C81D48229A1CD588B0EC6708
Part3 - SOP Express Features and Functions Manual SOPX-3 v.3 11/14/2017 Page 1
Introduction
1. Introduction
1.1 Purpose
This is the continuation of SOP Express level functions and the steps for executing them.
1.2 Scope
This is Part 3 of the set of three documents that cover the entirety of SOP Express. Specifically, Part 3 describes importing content, working with questions, and packing, loading, and renaming modules.
1.3 General Requirements
The user must have a minimum of the SOP Express level license, hardware and other software required as specified in ExpressTrain HW_SW_config_2017.pdf, and fully installed and checked instance of SOP Express version 9.0 or newer.
Importing Content
2. Importing Content
SOP Express allows you to access and insert into a new module a single object or complete sections from other documents saved in the database. This feature enables you to create and approve information one time and reuse it when needed.
To import content from another Master Document:
2.1 Place your cursor in white space exactly where you want to copy the new information.
In your ExpressTrain document, place the cursor in "white space" at the point on the page where the content from the source master document is to be copied.
Be sure to have several carriage returns before and after the area where you will be inserting this new content.
2.2 Click the TS Edit menu > Import Content or right-click and select Import Content.

SOP Express Importing Content
DC1FE4E9C81D48229A1CD588B0EC6708
Part3 - SOP Express Features and Functions Manual SOPX-3 v.3 11/14/2017 Page 2
2.3 If you wish to import an object from within the Master Document, select the object(s) and click done.
NOTE: Some older modules or modules built on early models may not show anything in this window. If you want to copy something from the module you are in, use Copy Knowledge Object on the right-click menu.
2.4 If you want to select content from another module, click the Select mode checkbox to display a list of the modules inside your project folder.

SOP Express Importing Content
DC1FE4E9C81D48229A1CD588B0EC6708
Part3 - SOP Express Features and Functions Manual SOPX-3 v.3 11/14/2017 Page 3
2.5 Select the source master document from the list box.
Figure 1: Get Link Content Dialog Box
The document you are working in can be a source document too. You may wish to copy items like in-line questions into your Quiz section. By using this procedure you would not have to re-write the questions for the quiz.
2.6 Select the content you wish to import
After you select which ExpressTrain document you wish to import from, a list of all of the content in that document will appear. Select those you wish to import.

SOP Express Importing Content
DC1FE4E9C81D48229A1CD588B0EC6708
Part3 - SOP Express Features and Functions Manual SOPX-3 v.3 11/14/2017 Page 4
If you uncheck Select Mode, the window returns to the document selection list and the content selection list is cleared.
2.7 Click the Done button.
Once you have selected all of the desired content, click the Done button.
The selected items are copied and inserted into your active master document where your cursor was placed. The Get Link Content window will close.
If you choose the option Maintain Link, then any operation in the master document that would modify the content will trigger a warning that it is linked and ask if you want to proceed with the change thereby breaking the link. Any other content brought into your document using Import Content may be edited in the normal way.
If you choose Modify, then the content that was selected will be presented in the auto-insert dialog box for further sub selection of the knowledge class item.
See any of the Auto-Insert functions, for example, procedure or fact.
The selected content will be written into the active document.

SOP Express Update Database
DC1FE4E9C81D48229A1CD588B0EC6708
Part3 - SOP Express Features and Functions Manual SOPX-3 v.3 11/14/2017 Page 5
3. Update Database
As you create the Master Document, you should routinely update the database. This process ensures that your content is written to the database and saved for future use. As a best practice, you should right-click and select Update (ALT + U) after completing each Content Type (Detail, Procedure, Facts, Question, etc.).
If you don't update the database, you may lose any unsaved content. This feature tells ExpressTrain to update the database with the content for all of the changes you have made to the ExpressTrain Document.

SOP Express Update Table of Contents (TOC)
DC1FE4E9C81D48229A1CD588B0EC6708
Part3 - SOP Express Features and Functions Manual SOPX-3 v.3 11/14/2017 Page 6
4. Update Table of Contents (TOC)
When you are finished creating the Master Document or you have made changes to the document, you should update the database to ensure all changes have been saved to the database and then update the Table of Contents.
To update the Table of Contents:
4.1 Right-click on the table of contents.
4.2 Select Update Field.
If the Update Table of Contents window displays, continue with the next step below. Otherwise, you are done and the table of contents has been updated.

SOP Express Closing the Master Document
DC1FE4E9C81D48229A1CD588B0EC6708
Part3 - SOP Express Features and Functions Manual SOPX-3 v.3 11/14/2017 Page 7
4.3 Select Update entire table.
4.4 Click the OK button.
The table of contents is updated to display the new sections and page numbers.
5. Closing the Master Document
When you are done working with the Master Document,
• Click TS Edit and select Module Options.
Make sure the Module tab is displaying and take a look at the Saving and Backup options. It is highly recommended that you keep these settings checked. When you close the Master Document, ExpressTrain will automatically save your document as a Word document. When you open the Master Document the next time, a snapshot will be made of the document and the database as it exists at that time so you will have a backup of how this information looked before you started to make any changes for that day.
• Click Ok if you make changes; if not, click Cancel. You are ready to close the document.
• Click the X in the upper right-hand corner on the Word Title Bar.

SOP Express Questions
DC1FE4E9C81D48229A1CD588B0EC6708
Part3 - SOP Express Features and Functions Manual SOPX-3 v.3 11/14/2017 Page 8
Inserting Questions
6. Questions
Three types of questions can be entered in the Master Document:
• Multiple choice – True/False • Fill-in-the-blank
• Matching

SOP Express Insert Question
DC1FE4E9C81D48229A1CD588B0EC6708
Part3 - SOP Express Features and Functions Manual SOPX-3 v.3 11/14/2017 Page 9
7. Insert Question
The procedures here describe in detail how to create a question "from scratch" using the Insert Question function. A much faster way to do this is to put your cursor in an existing Question and choose Copy Knowledge Object. Then go to the location where you would like it copied, right click and choose Paste Knowledge Object. You can then edit it like any other content.
This begins the Question insertion process using Insert Question.
7.1 Place the cursor in "white space" on a page where a new question is to be inserted.
The cursor should be placed at least one paragraph before and after any existing tables.
7.2 Choose Content Types > Question
7.3 Choose the Auto Insert Question option from the submenu.

SOP Express Insert Question
DC1FE4E9C81D48229A1CD588B0EC6708
Part3 - SOP Express Features and Functions Manual SOPX-3 v.3 11/14/2017 Page 10
7.4 Enter your question and directions.
Type in the question stem -- what is actually being asked. Then type in the directions if required, such as, "Choose the phrase that best completes this sentence."
Figure 2: Insert Question dialog box
7.5 Insert a check mark in the box in front of Responses.
After entering your stem and directions check the box in front of Responses.

SOP Express Insert Question
DC1FE4E9C81D48229A1CD588B0EC6708
Part3 - SOP Express Features and Functions Manual SOPX-3 v.3 11/14/2017 Page 11
Figure 3: Insert Question dialog box
7.6 Click OK.
Confirm your entries by clicking OK.
Figure 4: Insert Question dialog box
7.7 Enter the number of responses in the block (default is 2).
Take a minute to think about the question you are creating and enter the appropriate number of responses now.

SOP Express Insert Questions – entering responses
DC1FE4E9C81D48229A1CD588B0EC6708
Part3 - SOP Express Features and Functions Manual SOPX-3 v.3 11/14/2017 Page 12
Figure 5: Insert Response Table dialog box
If you need to add or delete responses you can do that later, but it is a good idea to enter you best estimate at this time.
7.8 Click OK.
Figure 6: Insert Response Table dialog box
The minimum number of responses for a question is two (2).
8. Insert Questions – entering responses
8.1 Type in your responses
Put your cursor inside the blank row given for each response and enter your new text.

SOP Express Insert Questions – entering responses
DC1FE4E9C81D48229A1CD588B0EC6708
Part3 - SOP Express Features and Functions Manual SOPX-3 v.3 11/14/2017 Page 13
Figure 7: New Question Shell
8.2 Mark correct answer with "X"
Put an ''x" in the box (cell) to the right of the correct response.
Figure 8: X marks the correct response
8.3 Select Update (ALT + U)

SOP Express Insert Questions – providing feedback
DC1FE4E9C81D48229A1CD588B0EC6708
Part3 - SOP Express Features and Functions Manual SOPX-3 v.3 11/14/2017 Page 14
9. Insert Questions – providing feedback
You would start this procedure after you have completed Question Menu - Insert Question parts 1 and 2.
In-line questions and test questions behave differently with regard to the feedback provided in the web-based training available when using ExpressTrain Developer or Publisher. In WBT, in-line questions will provide informational or corrective feedback when incorrect responses are chosen. Questions in the Quiz section show the feedback for the correct response only, regardless of the response chosen, to reinforce the correct response over all others.
9.1 Scroll to the feedback area for the current question.
Here you will enter the Feedback for the question responses.

SOP Express Insert Questions – providing feedback
DC1FE4E9C81D48229A1CD588B0EC6708
Part3 - SOP Express Features and Functions Manual SOPX-3 v.3 11/14/2017 Page 15
9.2 Edit the Label
For example in the label field enter, "Correct" or "Incorrect" if you are creating an in-line question. Do not enter Incorrect or Correct if you are creating a quiz question, because whether the person chose the correct or incorrect response, only the feedback for the correct response is displayed.
9.3 Edit the Text area
Next edit the Text area. Here you will enter the corresponding feedback for the response. If the response is the correct answer you should offer positive feedback. If the response is incorrect enter corrective feedback.
Remember that you can always edit the feedback at any time and use Update (ALT + U) to save the changes.

SOP Express Add-Delete Question Responses
DC1FE4E9C81D48229A1CD588B0EC6708
Part3 - SOP Express Features and Functions Manual SOPX-3 v.3 11/14/2017 Page 16
9.4 Select Update (ALT + U)
10. Add-Delete Question Responses
The procedure works the same for all question types.
10.1 Select Content Types > Responses.
To add or delete a response, select the response where you need to make the change and then use Content Types > Questions > then either Insert Response (Above or Below) or Delete Response.
10.2 Choose Insert Response (Above or Below) or Delete Response.
You can load responses by using the right click menu and choosing Update (ALT+U)

SOP Express Add a detail block for feedback to a new question response
DC1FE4E9C81D48229A1CD588B0EC6708
Part3 - SOP Express Features and Functions Manual SOPX-3 v.3 11/14/2017 Page 17
You can quickly Delete a response by right clicking on the response and choosing Delete or put the cursor in the response and press ALT+X .
11. Add a detail block for feedback to a new question response
When you add responses to a question you may require a Detail block to go with it to provide the feedback.
You may not need to do this! If you are adding multiple responses, after you save the responses using Update (ALT + U) you may need to use Rebuild (ALT + R) to display Details that were automatically added for each response. To add Detail to the feedback:
11.1 Place cursor in the new response and right click.
11.2 Select Add Detail.
The Predefined Detail or Generic window displays. You can also Press ALT + A to Add Details.

SOP Express Add a detail block for feedback to a new question response
DC1FE4E9C81D48229A1CD588B0EC6708
Part3 - SOP Express Features and Functions Manual SOPX-3 v.3 11/14/2017 Page 18
11.3 Select Yes or No.
After you make your selection, the Add Detail to Description Block window displays asking you how many Details you want to add.
Remember: Predefined Custom Displays provides a dialog box presenting custom predefined displays, creates new detail record using predefined content and output. Content defined in such a way can be chosen from a list for simple insertion into the document.
11.4 If you chose No in the previous step, enter the desired number in the field. If you chose Yes, select the item you want to insert from the list of the predefined content.

SOP Express Add a detail block for feedback to a new question response
DC1FE4E9C81D48229A1CD588B0EC6708
Part3 - SOP Express Features and Functions Manual SOPX-3 v.3 11/14/2017 Page 19
11.5 Click the OK button.
The Properties window displays. The options in this window are advanced features covered in the Advanced Training.
11.6 In the Priority (1-9) field, enter the desired sequence number for this Detail or accept the default number to append it to the end.

SOP Express Add a detail block for feedback to a new question response
DC1FE4E9C81D48229A1CD588B0EC6708
Part3 - SOP Express Features and Functions Manual SOPX-3 v.3 11/14/2017 Page 20
The number in this field tells ExpressTrain where to insert the new Detail block. If you want the new Detail block to be the first Detail listed in the selected section, enter the number 1. If you want it to be the second Detail listed, enter 2, etc.
11.7 Click the OK button.
The feedback Detail block is added to the document. You can now edit the feedback as required.
SOP Express Pack and Send
DC1FE4E9C81D48229A1CD588B0EC6708
Part3 - SOP Express Features and Functions Manual SOPX-3 v.3 11/14/2017 Page 21
Packing a Module
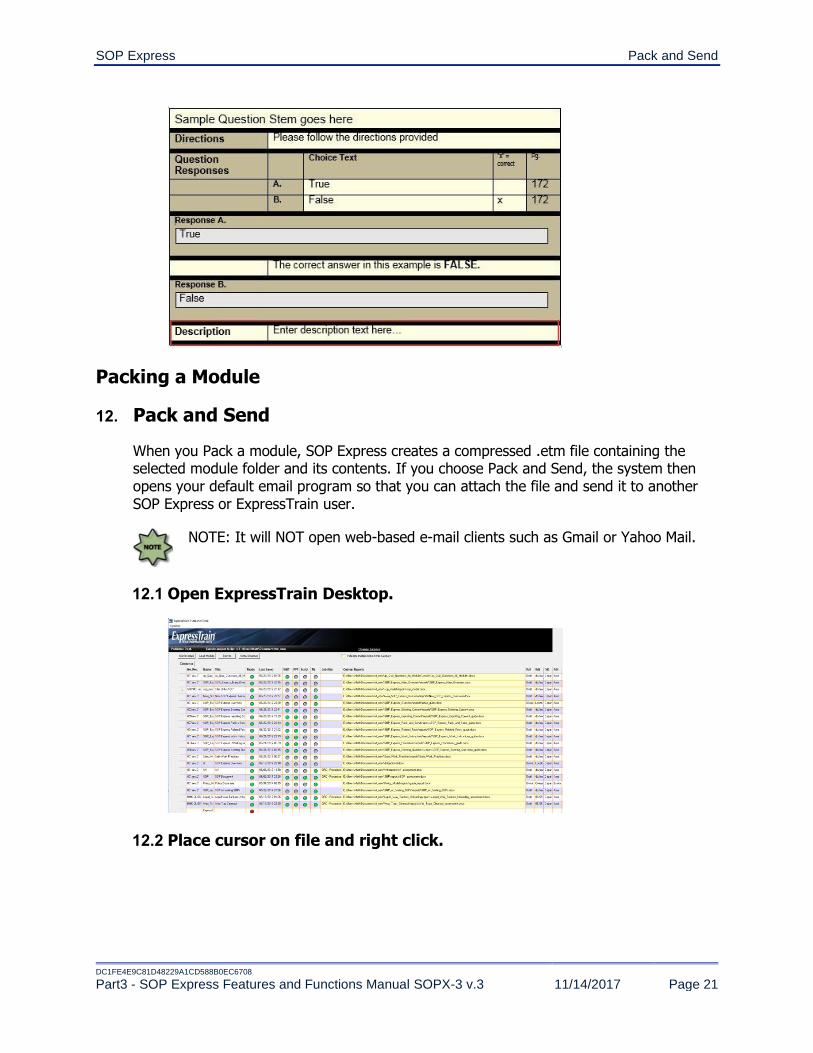
12. Pack and Send
When you Pack a module, SOP Express creates a compressed .etm file containing the selected module folder and its contents. If you choose Pack and Send, the system then opens your default email program so that you can attach the file and send it to another SOP Express or ExpressTrain user.
NOTE: It will NOT open web-based e-mail clients such as Gmail or Yahoo Mail.
12.1 Open ExpressTrain Desktop.
12.2 Place cursor on file and right click.

SOP Express Pack and Send
DC1FE4E9C81D48229A1CD588B0EC6708
Part3 - SOP Express Features and Functions Manual SOPX-3 v.3 11/14/2017 Page 22
12.3 Select Pack and Send
12.4 Click Yes at the prompt to send file via email.
12.5 Highlight file address that will be pasted in attachment dialog.
Email form appears.

SOP Express Pack and Send
DC1FE4E9C81D48229A1CD588B0EC6708
Part3 - SOP Express Features and Functions Manual SOPX-3 v.3 11/14/2017 Page 23
Make sure your mail client default is set to Outlook. If it is not, it will open an internet browser.
12.6 Select 'attach file'.
12.7 Paste file address into attachment dialog field.

SOP Express Pack files only
DC1FE4E9C81D48229A1CD588B0EC6708
Part3 - SOP Express Features and Functions Manual SOPX-3 v.3 11/14/2017 Page 24
12.8 Zipped file is now in the email and ready to send.
13. Pack files only
The Pack feature creates a compressed .etm file containing the selected module folder and its contents. This file can then be passed between writers when the file is too large to email or moved to another xtProject directory.
13.1 Open ExpressTrain Desktop.
13.2 Place cursor on file and right click.

SOP Express Receive and Load .ETM file
DC1FE4E9C81D48229A1CD588B0EC6708
Part3 - SOP Express Features and Functions Manual SOPX-3 v.3 11/14/2017 Page 25
13.3 Select Pack.
ExpressTrain creates a compressed .etm file for the selected master and places this file in the xtProject/temp folder.
14. Receive and Load .ETM file
14.1 Save the .etm file(s) to the project folder..
You should create a "temp" folder in your project folder if you do not already have one. This is often where people save received .etm files and other packed modules.
This procedure could overwrite any previous version of a module with the same name that you may have.
14.2 Open the ExpressTrain Desktop.
14.3 Click the Load Module button.

SOP Express Receive and Load .ETM file
DC1FE4E9C81D48229A1CD588B0EC6708
Part3 - SOP Express Features and Functions Manual SOPX-3 v.3 11/14/2017 Page 26
14.4 Select the .etm file to load and click Ok.
If you select a valid ExpressTrain module folder instead of .etm file this procedure works the same way and all the dialog boxes and prompts that follow apply.
If you chose a valid module .etm file it will first copy the files to the xtProject/temp folder.

SOP Express Receive and Load .ETM file
DC1FE4E9C81D48229A1CD588B0EC6708
Part3 - SOP Express Features and Functions Manual SOPX-3 v.3 11/14/2017 Page 27
14.5 If there is no module in the project folder with this name, it will proceed to load it with no further prompts until it is finished loading.
14.6 If there is already a module with this name, click Yes or No to overwrite the existing module of the same name.
Be certain that you understand that the existing module in your project will be overwritten with the one you are loading.
• You can create a new module from an existing model and modify it – adding or deleting content or changing its organization -- and save it.
• You could then use Load Modules and choose to duplicate it with a different name each time you want to make a new module from your modified base.

SOP Express Receive and Load .ETM file
DC1FE4E9C81D48229A1CD588B0EC6708
Part3 - SOP Express Features and Functions Manual SOPX-3 v.3 11/14/2017 Page 28
• You can also create a second module from an existing fully populated one and add/modify/delete content for a different population of user.
• If you wanted to have an existing module translated from one language to another you may choose to use this feature to duplicate the original and have the translator work on the copy.
14.7 If you choose not to overwrite an existing module, click Yes or No to duplicate the module.
You would select Yes if wish to duplicate a module with a different name to make a new module.
14.8 If you choose Yes to duplicate the module, enter a unique name and click OK.
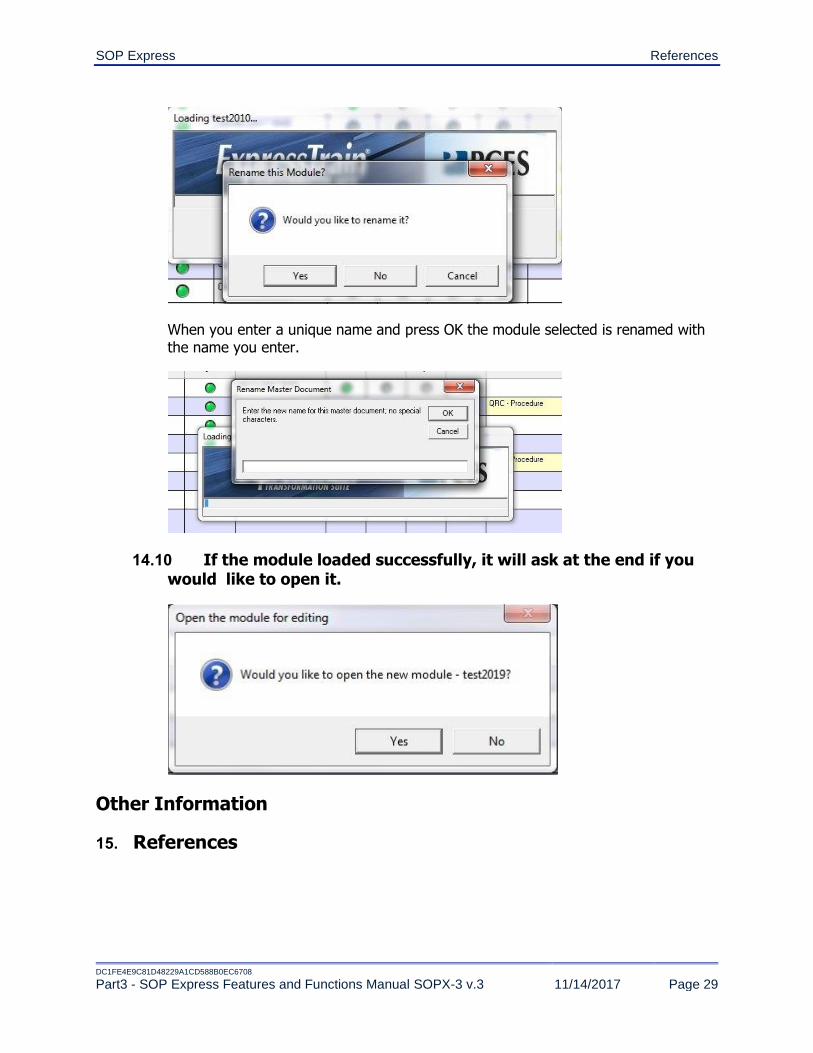
14.9 If you choose not to duplicate an existing module, click Yes or No to rename the module.
SOP Express References
DC1FE4E9C81D48229A1CD588B0EC6708
Part3 - SOP Express Features and Functions Manual SOPX-3 v.3 11/14/2017 Page 29
When you enter a unique name and press OK the module selected is renamed with the name you enter.
14.10 If the module loaded successfully, it will ask at the end if you would like to open it.
Other Information
15. References

SOP Express Revision History
DC1FE4E9C81D48229A1CD588B0EC6708
Part3 - SOP Express Features and Functions Manual SOPX-3 v.3 11/14/2017 Page 30
Title Description
http://support.princetoncenter.com/documents/online_resources_2017.pdf
PDF document containing a list of various online resources and their links.
16. Revision History
Rev. Revision Date Modified by Description
3 9/1/2017 K.Kelly Added section on Import Content and integrated the new Update function.
9/22/2017 K.Kelly Resized graphics for consistency.