orthopedic exam pearls - amazon...
TRANSCRIPT

Orthopedic Exam PearlsAnnual CAPA Conference
San Diego, CAAugust 12, 2017
Raymond V. Contino, MPA, PA‐C
Eric V. Glassman, MHS, PA‐C
Kaiser Permanente, Irvine
Disclosures
• We have no financial disclosures
Learning Objectives
1. Review anatomy and anatomical landmarks to help identify potential pathology
2. Understand basic tips to best approach a patient when performing an orthopedic exam
3. Describe and review provocative maneuvers to help establish an accurate diagnosis

Musculoskeletal workup
• Clinical Evaluation• History
• Physical Examination
• Laboratory Evaluation• Biochemistry
• Imaging (X‐rays, CT, MRI, US)
• Electrophysiology (EMG)
• Others: DXA
PHYSICAL EXAM
• Confirms your hypothesis
• History is still 90% of the diagnosis
• Reliability
• Diagnosis specific
Musculoskeletal History• Where is the pain?
• When did it start?
• How bad is it?
• Does it keep you awake at night?
• What makes it better/worse?
• What treatments have you had and did they work?
• Is it affecting your daily activities or work activities?
• Problems with this joint in the past?

Basic Physical Exam Tips
• Make the patient comfortable• CC: Pain (Fear)
• Distraction
• Examine the painful part LAST!!
• Always examine unaffected side first
• Show compassion
AFFECT
• Pay attention!
Knee History
• Mechanism of Injury
• What exactly happened?
• Which way did your knee go?
• Did you hear or feel a pop?• Did your knee swell?
• Right away or over the next 24 hours?• Mechanism can often times make the diagnosis• Pop and immediate swelling almost always ACL
• Hip pain can refer to the knee
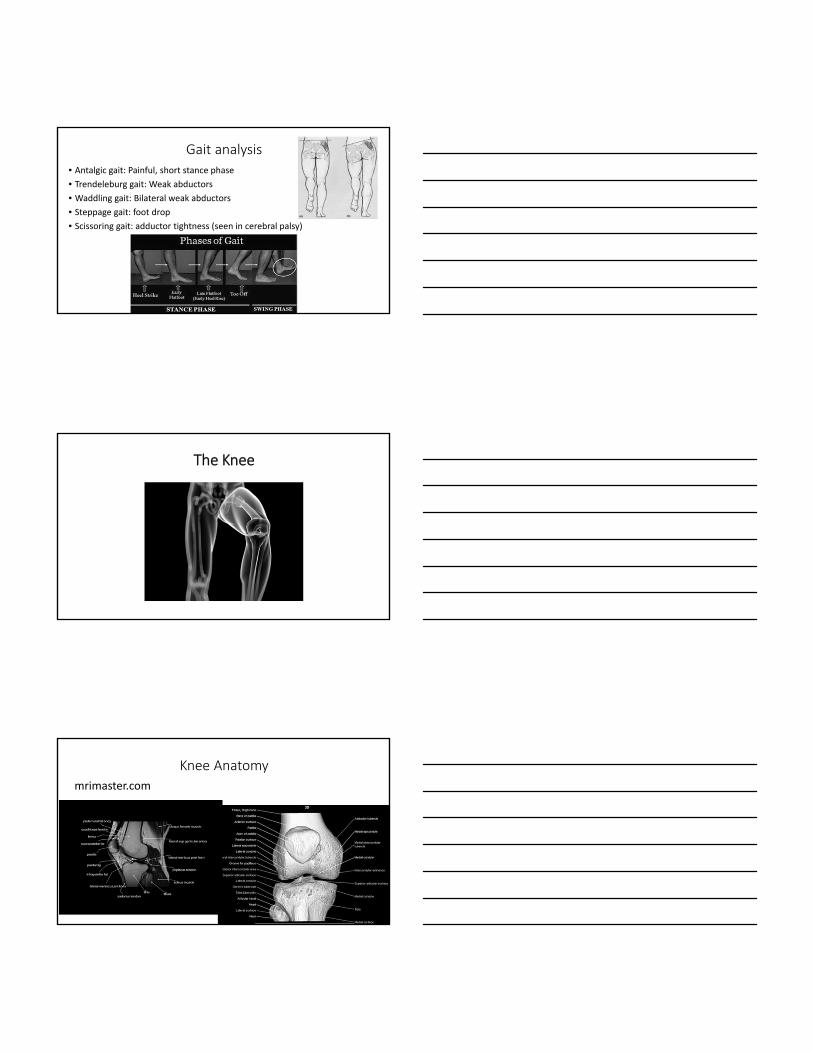
Gait analysis
• Antalgic gait: Painful, short stance phase
• Trendeleburg gait: Weak abductors
• Waddling gait: Bilateral weak abductors
• Steppage gait: foot drop
• Scissoring gait: adductor tightness (seen in cerebral palsy)
The Knee
Knee Anatomy
mrimaster.com

Knee Exam‐Inspection
• Gait
• Deformity: Varus, valgus, recurvatum
• Atrophy
• Swelling
• Skin changes, erythema, scars
• Masses, lumps/bumps
Inspection
Q –Angle (Quadriceps Angle)
• Bony landmarks: ASIS, center of patella, tibial tubercle
• Men‐ 14° (+/‐3)
• Women‐ 17° (+/‐3)
• Increase risk for ACL injury, patellofemoral syndrome, patella dislocation, iliotibial band friction syndrome

Knee Range of Motion
• Both active and passive
• Can assess ROM, crepitus, alignment, and pain all at once
• Crepitus, excessive movement (laxity), limited movement (contracture, painful limitation), catching, locking
• Extension: Quadriceps (innerv. by femoral nerve)
• Flexion: Hamstrings (innerv. by sciatic nerve)
Range of Motion (Supine)
• Extension‐ 0°‐ (‐10°)
• Flexion‐ 130°‐140°
• Rotation: Minimal in extension, increases with flexion
Knee‐Palpation• Principles
• Reference points/painful areas
• Warmth, swelling, effusion, tenderness
• Popliteal area (posterior)
• Sites• Patella: margins and surfaces
• Quadriceps and patellar tendon
• Bursae
• Ligaments, tendons, ITB attachment (Gerdy’s tubercle)
• Joint line: medial and lateral
• Effusion: milking test, ballotment

Knee‐Stability
• Varus (LCL)/Valgus (MCL)‐Assess MCL/LCL‐ 0° and 30° of flexion• 30° of flexion isolates MCL/LCL
• Grade 1:1‐5mm, Grade 2: 6‐10mm, Grade 3: 11+
Knee Stability

MCL/LCL stability
• Hold the lower leg against your body
• Hand on proximal tibial area
• Move lower leg into varus/valgus with body
Knee‐ACL Tear
• Lachman (Pt. supine)‐Most sensitive for ACL tear• Stand on side of limb, medial hand on proximal tibia distal to popliteal crease, second hand on distal femur. Knee bent 20‐30° of flexion
• Modify for big leg or small hand‐let leg hang off table and stabilize distal femur with forearm or pillow under knee
• Feel for end point
Knee‐ACL Tear
• Anterior Drawer‐ seated or supine• Knee bent to 90˚
• Relax hamstrings
• Stabilize foot
• Feel for endpoint

Knee‐ACL Tear‐KT 1000 Arthrometer
• Useful to quantify anterior laxity
• Exam with knee in slight flexion
• May be used pre and post operatively
Knee‐PCL Tear
• Posterior drawer‐ knee at 90˚ flexion, posterior force on tibia
• Posterior sag sign‐ Supine, knees and hips flexed to 90˚, support ankles, observe for posterior shift of tibia compared to uninvolved knee
Meniscal Tests‐McMurray’s
• Med‐ flex to ext. with varus
and internal rotation
• Lat‐ flex to ext. with valgus
and external rotation
• Click/pop is a “positive test”
• Goal is to get torn piece to pop
in and out of place

Meniscal Tests‐ Apley’s and Thessaly
Knee‐ Patella Tests
• Patellar Apprehension‐Medial pressure to displace laterally
• Patellofemoral Grind test‐ push patella into trochlear groove to feel for pain or crepitation
Knee‐ Patella Tests “J‐sign”
• Lateral patellar tracking/ J sign‐As the knee is extended from 90 degrees flexion to full extension, the patella demonstrates an abnormal path, deviating laterally at full extension

Noble’s Test‐IT Band Tendonitis
• Patient seated or supine with knee and hip at 90˚
• Pressure is applied to lateral femoral condyle while knee is placed into extension
• Positive test is pain at ~30˚
The Hip
Hip Specific History• How far can you walk?• Do you use any assistive devices (cane, walker, wheelchair)?• Do you limp?
• Can you tie your shoes, put on your socks, paint your toenails, clip your toenails?
• Do you climb stairs normally or one at a time?
• How long can you sit?• Do you have pain with the first steps after sitting?• Where is your hip pain? Lateral? Groin? Posterior”

Leg Length Discrepancy
• True‐ ASIS to medial malleoli
• Apparent‐ Umbilicus to medial malleoli
Hip Exam‐ Inspection
• Leg length discrepancy
• Deformity and asymmetry
• Muscle wasting (atrophy)
• Swelling
• Skin changes (erythema) etc.
Hip Exam‐ Palpation
• Principles• Reference points‐ painful areas
• Increased temperature, swelling, tenderness
• Palpation can be less reliable than other joints
• Sites• Front: Pubic tubercle, ASIS
• Side: Greater trochanter, iliotibial band, iliac crest
• Back: SI joint, ischial tuberosity, PSIS

Hip Exam‐ Range of Motion
• Principles• Active vs. Passive ROM
• Feel for crepitus, excessive movement (laxity), limited movement (contracture), painful limitation
• Check in several different positions (seated, prone, supine)
• Movements• Flexion and extension
• Internal and external rotation (in flexion and extension)
• Abduction and adduction
Hip‐ Range of Motion
• Flexion‐ 120˚‐140˚ (Supine) • Extension‐ 30˚ (Prone)
Hip‐ Range of Motion
• Internal Rotation‐ 35˚ • External Rotation‐ 45˚

Hip‐ Range of Motion
• Internal Rotation • External Rotation
Hip‐ Osteoarthritis
• Internal rotation produces pain
Hip Range of Motion (Palpate ASIS for pelvic rotation)• ABduction‐ 45˚ • ADDuction‐ 20˚‐30˚

Hip Exam‐ Special Tests
• Log roll‐ helps establish intra‐ or extra‐articular hip pathology and can asses range of motion
Ober’s Test (ITB contracture)
FABER/Patrick’s Test (SIJ, ITB pain)
• FABER‐Flexion, Abduction, External Rotation (Figure of 4)
• Stabilize pelvis

Trendeleberg Test (Abductor strength)
Thomas Test (Flexion Contracture)
Negative Thomas Test Positive Thomas Test
Snapping Hip‐ Iliopsoas (extra‐articular)
• Start: Flexion, ABduction, External rotation
• Finish: Extension, Internal rotation
• Clunk/pop as iliopsoas tendon snaps over femoral head/iliopectinealeminence
• May hear loud snap/pop from across the room

Snapping Hip‐ Iliotibial band
• “Eric my hip feels like it’s dislocating”
• Tensor fascia lata flips back and forth over greater trochanter
• Pt. lays on side and flex/extend the hip to reproduce symptoms
• May also perform Ober’s Test
Snapping Hip‐ Loose body/Torn labrum (intra‐articular)• Pt. supine, max flex hip, knee to 90 degrees, internal/externally rotate, feel for catching/popping
Shoulder Specific History
• Was there an injury?
• Where is the pain?
• Does it radiate?
• Loss of motion?
• How long has the pain been present?
• Does it affect sleep?
• Has this happened before?
• What type of activities or work do they do?

Shoulder ROM (normal)
• Forward Flexion180 degrees
• External Rotation70 degrees
• Abduction External Rotation90/90 degrees
• Internal RotationT10
• Abduction Internal Rotation70 degrees
• Abduction180 degrees
General Appearance
• Does the patient have any discomfort taking shirt off and moving to exam bed?
• How are they sitting?
• Are the shoulders equal?
• Is the back straight?
• Are the scapulae equal? Is there winging?
Shoulder Land Marks

Shoulder Land Marks
Assess the Back
• Winging scapulae• Always inspect as it is surprisingly common and often the problem especially with young overhead athletes
• To quickly assess for winging of the scapula
• Fatigue peri‐scapular muscles by having patient raise arms above head 5‐6 times. Have patient forward flex arm to 120 degrees, flex elbow to 90 degrees and apply downward pressure to arm while patient resists.
Assess the Back
• Importance of assessing scapular winging
• If true winging then it is a Long Thoracic Nerve Injury and SerratusAnterior muscle issue.
• If mild winging then likely Scapular Dyskinesia with no likely long term nerve injury
• Either way both will misguide the rest of your shoulder exam if missed.

Frozen Shoulder:Got Pain at End Range of Motion?• A frozen shoulder will supersede almost all other shoulder pathology and is an easy diagnosis. Don’t miss it.
• Stabilize the scapula for best results during test
• Always check for pain at End Range of Motion!
• With external rotation arm at side• With abduction external rotation• With abduction internal rotation
Shoulder Anatomy
Shoulder Examination Focus
• Impingement • Near and Hawkin’s
• Rotator cuff tear/ weakness• Rotator cuff strength, Whipple’s, Bear Hug
• Bicep Inflammation• Palpation, Yergason’s
• Labral tear• O’Brien’s, Speeds, Crank Tests

Neer Sign(Impingement)
• Passively take upper extremity in full shoulder flexion with the humerus in internal rotation.
• Positive if painful
Neer Sign(Impingement)
Hawkins Sign(impingement)
• Raise patient’s arm to 90 degrees of shoulder flexion and bend patients elbow 90 degrees. Apply a forceful internal rotation while stabilizing scapula.
• Positive if painful

Hawkins Sign(impingement)
Rotator Cuff Strength Testing(Supraspinatus, Infraspinatus, Subscapularis)
• Supraspinatus• Patient seated facing you. Have patient abduct both arms to 90 degrees with thumbs down (empty can position). Apply downward force and have patient resist.
• Weakness and pain is positive
Rotator Cuff Strength Testing(Supraspinatus, Infraspinatus, Subscapularis)
• Infraspinatus• Patient seated facing you. With arms at their side have patient bend both elbows to 90 degrees (pistol shooting style). Patient externally rotates arms against your resisted pressure while keeping their elbows at hips.
• Weakness is positive
Rotator Cuff Strength Testing(Supraspinatus, Infraspinatus, Subscapularis)
• Subscapularis “Lift off”• Patient sits with hand in the curve of their lumbar spine. Have patient lift their hand off their back against your resistance.
• Inability or weakness lifting off is positive
Rotator Cuff Strength Testing(Supraspinatus, Infraspinatus, Subscapularis)
• Subscapularis “Belly press”• Patient’s hand is placed flat on the their abdomen with their hand, wrist, and elbow in a straight line. Patient is instructed to press down on the abdomen
• Inability to press down without flexing the wrist is positive
Whipple’s Test(Supraspinatus)
• Patient seated arm flexed 90 degrees and adducted until hand is opposite contralateral shoulder.
• Place downward pressure on the forearm and assess pain.

Bear‐Hug Test(Subscapularis)
• Patient places the palm on the side of the opposite shoulder, elbow flexed and pointing straight ahead.
• Attempt to pull the patient’s arm away from the shoulder.
• If patient can not hold hand on shoulder this is a positive test.
O’Brien’s Test(Labral Tear, SLAP tear, AC Joint Pain)
• Elbow straight with shoulder flexed to 90 degrees. 20 degrees of arm adduction, and maximal internal rotation of hand/arm.
• Apply downward force and have patient resist the force
• Positive with pain
Speed’s Test(SLAP tear, Labral Tear)
• Patient seated/standing, extends elbow and fully supinates the forearm.
• Patient brings arm up from 0 to 60 degrees with resisted flexion by examiner.
• If pain located in bicipital groove the test is positive.

Crank Test(Labral Tear, SLAP Tear)
• Patient sitting or supine. Bring patient’s shoulder to 160 degrees of abduction and elbow in 90 degrees of flexion.
• Apply a compressive force to humerus and rotate humerus internal/external to pinch labrum.
• Pain with or without click is usually positive.
Long Head Biceps Palpation(Biceps Tendon Inflammation)
• Palpate the long head of the biceps tendon in the bicipital groove.
• Positive if painful to palpation.
Yergason’s Test(Biceps Inflammation, SLAP Tear)
• Patient’s elbow flexed to 90 degrees with forearm pronated while maintaining upper arm at side.
• Instruct patient to supinate their forearm while you resist their supination at the wrist.
• Pain in the bicipital groove is positive.

ELBOW Specialized Testing
• Varus/valgus stress test
• Tinel’s Sign
• Cozen’s Test
• Golfer’s Elbow Test
Varus Stress Test(Lateral Collateral Ligament Test)
• Patient’s elbow in full extension. Apply a varus force while palpating the lateral collateral ligament of the elbow
• Positive if pain
Valgus Stress Test(Medial Collateral Ligament Test)
• Patient’s elbow in full extension. Apply a valgus force while palpating the medial collateral ligament of the elbow
• Positive if pain

Tinel’s Sign(Cubital Tunnel Syndrome, Ulnar Nerve )
• Apply 4‐6 taps to the patient’s ulnar nerve just proximal to the cubital tunnel.
• Positive if reproduction of symptoms along ulnar nerve
Elbow Flexion Test
• Test for cubital tunnel syndrome
• Fully flex both arms while supinating hands
• Positive if reproduction of numbness/tingling/ pain in ulnar distribution
Wartenberg Test
• Tests for ulnar nerve entrapment
• Have patient abduct fingers then attempt to adduct fingers in a relaxed position
• Unable to adduct fifth digit due to ulnar nerve palsy

Cozen’s Test(Lateral Epicondylitis)
• Palpate lateral epicondyle. Patient makes a fist with forearm in pronation and radial deviation
• Patient extends wrist against resistance
• Positive if pain at lateral epicondyle
Long Finger Resistance Test
• Test for lateral epicondylitis
• Resist extension of the long finger while palpating the lateral epicondyle
• Positive if pain at the lateral epicondyle
Golfer’s Elbow Test(Medial Epicondylitis)
• Palpate the medial epicondyle.
• Passively supinate the forearm and extend the elbow and wrist
• Positive if pain at medial epicondyle

Questions?