oracle financial services liquidity risk management financial... · oracle financial services...
TRANSCRIPT

Oracle Financial Services Liquidity Risk Management
User Guide
Release 2.0
September 2013

User Guide: Oracle Financial Services Liquidity Risk Management Release 2.0
Oracle Financial Software Services Confidential-Restricted ii
Table of Contents
ABOUT THE GUIDE ........................................................................................................................................ V
SCOPE OF THE GUIDE ....................................................................................................................................................... V AUDIENCE V WHERE TO FIND INFORMATION ......................................................................................................................................... V HOW TO USE THIS USER GUIDE ........................................................................................................................................ VI DOCUMENT CONVENTIONS.............................................................................................................................................. VI
1. INTRODUCTION ....................................................................................................................................... 7
1.1. SCOPE OF THE APPLICATION .............................................................................................................................. 7
2. UNDERSTANDING THE LRM APPLICATION ..................................................................................... 9
2.1. PROCESS FLOW .............................................................................................................................................. 9 2.2. CASH FLOW DATA DOWNLOAD ......................................................................................................................... 9 2.3. TIME BUCKETING .......................................................................................................................................... 10
2.3.1. Input ..................................................................................................................................................... 10 2.3.2. Time Bucketing Process Flow ............................................................................................................... 10
2.4. CASH FLOW AGGREGATION ............................................................................................................................ 11 2.5. CURRENCY CONVERSION ................................................................................................................................ 11
2.5.1. Input ..................................................................................................................................................... 12 2.5.2. Currency Conversion Process Flow ....................................................................................................... 12 2.5.3. Calculation ........................................................................................................................................... 13
2.6. CONTRACTUAL RUN DEFINITION AND EXECUTION ............................................................................................... 13 2.7. BUSINESS ASSUMPTION DEFINITION ................................................................................................................. 13
2.7.1. Deposits Balance Growth ..................................................................................................................... 15 2.7.2. Haircut ................................................................................................................................................. 15 2.7.3. Additional Collateral - Rating Downgrade -Increase in Cash Flow....................................................... 15 2.7.4. Additional Collateral - Valuation Changes-Increase in Cash flow ........................................................ 16 2.7.5. Additional Collateral - Rating Downgrade -Asset Value Decrease ....................................................... 16 2.7.6. Additional Collateral – Valuation Changes – Asset Value Decrease .................................................... 17 2.7.7. Rollover of Assets ................................................................................................................................. 17 2.7.8. Rollover of Liabilities ............................................................................................................................ 18 2.7.9. Run-off ................................................................................................................................................. 18 2.7.10. Prepayment .......................................................................................................................................... 19 2.7.11. Emerging Delinquency -Large Customers ............................................................................................ 19 2.7.12. Emerging Delinquency –Non Large Customers .................................................................................... 20 2.7.13. Recovery from Delinquent Accounts .................................................................................................... 20 2.7.14. EOP Balance Run-off ............................................................................................................................ 21
2.7.14.1. Cash Flow Assignment in Decreasing Order to all Time Buckets up to and including the Selected Bucket . 22 2.7.14.2. Equal Assignment of Cash Flows to all Buckets ........................................................................................... 23 2.7.14.3. Cash Flow Assignment in Proportion to the Bucket Size ............................................................................. 24 2.7.14.4. Cash Flow Assignment to Selected Time Bucket Only ................................................................................. 25
2.7.15. Asset Book Growth ............................................................................................................................... 25 2.7.16. Liability Book Growth ........................................................................................................................... 26 2.7.17. Drawdown of Unutilized Credit ............................................................................................................ 27 2.7.18. EOP Asset Balance Growth .................................................................................................................. 28 2.7.19. EOP Liability Balance Growth............................................................................................................... 29 2.7.20. Drawdown of Funding Line of Credit ................................................................................................... 30 2.7.21. Change in Value of Asset ..................................................................................................................... 31 2.7.22. Liquidity Haircut ................................................................................................................................... 32 2.7.23. Available Stable Funding Factors ......................................................................................................... 32

2.7.24. Required Stable Funding Factors ......................................................................................................... 32 2.8. BAU RUN DEFINITION AND EXECUTION ............................................................................................................ 32 2.9. STRESS ASSUMPTION DEFINITION .................................................................................................................... 32 2.10. STRESS SCENARIO DEFINITION ......................................................................................................................... 33 2.11. STRESS RUN DEFINITION AND EXECUTION .......................................................................................................... 33 2.12. LIQUIDITY RATIOS AND FUNDING CONCENTRATION CALCULATIONS ........................................................................ 33
2.12.1. Input ..................................................................................................................................................... 33 2.12.2. Liquidity Ratio and Funding Concentration Calculation Process Flow ................................................. 33
2.12.2.1. Liquidity Coverage Ratio .............................................................................................................................. 33 2.12.2.2. Net Stable Funding Ratio ............................................................................................................................. 37 2.12.2.3. Funding Concentration by Counterparty, Currency and Product ................................................................ 38
2.13. COUNTERBALANCING STRATEGIES .................................................................................................................... 38
3. PREPARING FOR EXECUTION ............................................................................................................ 40
3.1. DATA REQUIREMENTS ................................................................................................................................... 40 3.1.1. Setup Role Management ..................................................................................................................... 40 3.1.2. Setup Data Management..................................................................................................................... 40 3.1.3. Run Data Management ....................................................................................................................... 42
3.2. DATA QUALITY CHECKS .................................................................................................................................. 42 3.3. DEFINING PARAMETERS OF BUSINESS ASSUMPTIONS – SCREEN INPUTS ................................................................... 43
4. EXECUTION ............................................................................................................................................. 48
4.1. EXECUTING A RUN ........................................................................................................................................ 48 4.2. APPLYING COUNTERBALANCING STRATEGIES ...................................................................................................... 51
ANNEXURE A: SCREEN FORMATS ............................................................................................................. 56
ANNEXURE B: UNDERSTANDING THE LRM DATA FLOW .................................................................. 115
ANNEXURE C: BUSINESS ASSUMPTIONS DATA MAINTENANCE ...................................................... 118
ANNEXURE D: CONFIGURING PRE AND POST PROCESS STEPS IN A BAU RUN. ........................... 121
ANNEXURE E: BEST PRACTICES IN CONFIGURING BEHAVIOUR ASSUMPTIONS ........................ 122
ANNEXURE F: MULTIPLE SEGMENTS ..................................................................................................... 123
ANNEXURE G: TIME BUCKET .................................................................................................................... 124
ANNEXURE H: CONFIGURING LIMIT MANAGEMENT ........................................................................ 125
GLOSSARY ........................................................................................................................................................ 126
INDEX .............................................................................................................................................................. 128

User Guide: Oracle Financial Services Liquidity Risk Management Release 2.0
Oracle Financial Software Services Confidential-Restricted iv
Document Control
Version Number Revision Date Changes Done
Version 2.0 April 2012 Details the process flow and methodologies used in the computation and management of Liquidity Risk.
Version 2.0.1.0.0 June 2013 Setup Role Management was newly introduced as a type of data to be configured in the application.
Version 2.0.1.1.0 September 2013 The following sections have been added: Annexure F: Multiple Segments Annexure G: Time Bucket Annexure H: Configuring limit
Management

About the Guide This section provides a brief description of the scope, the audience, the references, the organization of the
User Guide and conventions incorporated into the User Guide. The topics in this section are organized as
follows:
Scope of the Guide
Audience
Where to Find Information
How to Use this User Guide
Document Conventions
Scope of the Guide The objective of this User Guide is to provide a comprehensive working knowledge on Oracle Financial
Services Liquidity Risk Management, Release 2.0. This User Guide is intended to help you understand the
key features and functionalities of Oracle Financial Services Liquidity Risk Management (LRM) Release
2.0 and details the process flow and methodologies used in the computation and management of Liquidity
Risk.
However, this User Guide is not meant to give details on the installation and handling of Oracle Financial
Services Analytical Application Infrastructure (OFSAAI). This User Guide is also not meant to provide
details on the installation of Oracle Financial Services Liquidity Risk Management, Release 2.0.
Audience This manual is intended for the following audience:
Business User: This user reviews the functional requirements and information sources, like
reports.
Strategists: This user identifies strategies to maintain an ideal Liquidity ratio and Liquidity gap
based on the estimated inflow and outflow of cash.
Data Analyst: This user would be involved with cleaning, validation and importing of data into
the OFSAA Download Specification Format.
Where to Find Information For additional information on Oracle Financial Services Liquidity Risk Management, Release 2.0, refer to
the following documents:
Business Metadata Documents: These documents are grouped into two sets as follows:
Oracle Financial Services Liquidity Risk Management V2.0 Business
Metadata.xls: This document contains the definitions of the Business Metadata
like Measures, Business Processors, Hierarchies, Hierarchy Attributes, Aliases,
Derived Entities and Datasets in the LRM Application.
Oracle Financial Services Liquidity Risk Management V2.0 Rule Metadata.xls:
This document contains the definitions of Rules, Pooling, Optimizer and
Processes.
Download Specifications: The format and structure of the RDBMS tables is specified in the
Download Specifications (DL Specs) Document. Download Specifications document contains
details of the attributes required for processing the LRM Application.
OFSAAI Infrastructure documents: The set of OFSAAI documents packaged in the installer, to
help you understand the functions of the various components of the Oracle Financial Services
Analytical Application Infrastructure (OFSAAI).

Oracle Financial Services Liquidity Risk Management, Release 2.0, Installation Manual.
How to use this User Guide The information in this User Guide is divided into the following chapters
Chapter 1 “Introduction”: The main objective of this chapter is to introduce you to Oracle
Financial Services Liquidity Risk Management, Release 2.0 and explain the scope of the LRM
Application.
Chapter 2 “Understanding the LRM Application”: The main objective of this chapter is to
provide a detailed explanation of the various functionalities of Oracle Financial Services
Liquidity Risk Management, Release 2.0.
Chapter 3 “Preparing for Execution”: The main objective of this chapter is to provide a detailed
explanation on the activities to be performed before execution of Runs such as data
configuration and defining business assumptions.
Chapter 4 “Execution”: The main objective of this chapter is to provide a step by step
understanding on the procedure to execute a run and thereafter apply counterbalancing
strategies.
Document Conventions Certain practices have been incorporated into this document, to help you easily navigate through the
document. The table given below lists some of the document conventions incorporated into this User
Guide:
Conventions Description
Bold User Interface Terms
Italics Cross References
Emphasis
Glossary Terms
Table 1: Document Conventions
The other document conventions incorporated into this User Guide are as follows:
Oracle Financial Services Liquidity Risk Management, Release 2.0 has been referred to as LRM
Application in this User Guide.
In this document, a Note is represented as follows:
Important or useful information has been represented as a Note.

User Guide: Oracle Financial Services Liquidity Risk Management Release 2.0
Oracle Financial Software Services Confidential-Restricted 7
1. Introduction Liquidity Risk Management (LRM) has emerged as a critical risk management function for banking
institutions, as regulators increasingly require banks to have a robust liquidity management framework in
place. As per the Basel Committee on Banking Supervision (BCBS), “liquidity is the ability of a bank to
fund increases in assets and meet obligations as they come due, without occurring unacceptable losses”.1
Oracle Financial Services Liquidity Risk Management, Release 2.0, is designed to address liquidity risk of
banking institutions across the world. It allows institutions to comply with the Individual Liquidity
Adequacy Standards (ILAS) or similar standards issued by other regulators. The objective of the LRM
Application is to provide a control system to financial institutions to help them identify, measure, monitor,
and manage liquidity risk.
1.1. Scope of the Application Oracle Financial Services Liquidity Risk Management, Release 2.0 supports the following functionalities:
Supports storage and reporting of cash flows (BAU, Stress) across natural, local and reporting
currencies.
Liquidity Gap Calculation
Calculate liquidity gaps under the following scenarios:
Contractual: where cash inflows and outflows are considered to take place on
contractual terms. For more information on Contractual Execution, see
“Contractual Run Definition and Execution” on page 13.
Business as Usual (BAU): In a BAU scenario, various business assumptions are
applied to the contractual cash flows and gaps are re-calculated. For more
information on BAU Execution, see “BAU Run Definition and Execution” on page
32.
Stress Scenario: In a Stress Scenario, certain stressed business assumptions are
applied to the BAU cash flows and gaps are re-calculated. For more information
on Stress Scenario, see “Stress Scenario Definition” on page 33.
There are 24 pre-configured business assumptions packaged as part of the LRM
Application which are used for BAU as well as Stress Scenarios. For more
information on the business assumptions, see “Business Assumption Definition” on
page 13.
Define stress scenarios and create a library of rule shocks: Multiple stress scenarios can be
configured using the above mentioned Business Assumption types and parameters.
Ability to execute Business As Usual (BAU) and Stress Runs across multiple legal entities and
support Solo and Consolidated Runs.
Liquidity Coverage and Funding Concentration Calculation
Calculate the following as per Basel III Guidelines:
Liquidity coverage ratio
Net stable funding ratio
Funding concentration is calculated on the basis of following dimensions:
o Currency
o Product
1 As defined by BCBS in Principles of Sound Liquidity Risk Management and Supervision published in September
2008

o Customer
Defining Counterbalancing Strategies
Ability to define counterbalancing strategies to minimize the gaps identified as part of a
BAU or a Stress Run. The following types of counterbalancing positions are supported in
order to define counterbalancing strategies:
Sale of Marketable Assets
Sale of Other Assets
Roll Over of existing Repos
Create a New Repo Deal
New Funding like Deposits, Primary Issuances, Borrowing and so on.

2. Understanding the LRM Application The main objective of this chapter is to familiarize you with the various functionalities of Oracle Financial
Services Liquidity Risk Management, Release 2.0, through the process flow. The logical order, in which
the LRM Application functionalities are executed, will help you understand, execute, and maintain data in
the LRM Application.
2.1. Process Flow Oracle Financial Services Liquidity Risk Management, Release 2.0, allows you to identify and monitor
liquidity risk, through the Liquidity Risk Gap Report. Liquidity Risk is managed by the LRM Application
through the following functionalities as represented in the given diagram:
LRM Process Flow
2.2. Cash Flow Data Download The cash flow data is to be provided as a download by the bank. This data is transformed and loaded to
FCT_PROCESS_CASHFLOW from STG_ACCOUNT_CASH_FLOWS.
FCT_PROCESS_CASHFLOW contains the cash flow amount and cash flow date of all the accounts. The

cash flows are further bucketed and moved to FCT_ACCOUNT_CASH_FLOWS table based on the
defined Liquidity Risk time buckets.
For more information on the Data Flow, see “Annexure B: Understanding the LRM Data Flow” on page
115.
2.3. Time Bucketing Time Bucketing is the process of allocating cash flows to defined time intervals to identify, measure, and
manage liquidity risk. The purpose of time bucketing is to increase operational efficiency as it helps save
time in measuring liquidity risk on cash flows on a daily basis.
2.3.1. Input Inputs required for Time Bucketing are as follows:
Defining time buckets.
Cash flows and cash flow dates.
Legal entity details of the account to which the cash flow relates to.
Country specific holiday list.
2.3.2. Time Bucketing Process Flow Time bucket definitions are uploaded in the DIM_RESULT_BUCKET table.
For more information on the setup processing tables, see “
Data Requirements” on page 40.
Once time buckets are uploaded it can be viewed in the Time Buckets screen. To view the Time Buckets
Screen and the relevant descriptions of each field, see “Annexure A: Screen Format” on page 56. The
process flow for Time Bucketing is as follows:
1. Calculate the number of holidays between the execution date and cash flow date
2. Calculate number of business days for a cash flow on the basis of cash flow date and
holidays
3. Assign the cash flow to the time buckets on the basis of the business days
Calculate the number of holidays between the execution date and cash flow date: Oracle Financial
Services Liquidity Risk Management, Release 2.0, supports multiple holiday calendars to enable multi-
jurisdictional estimation of liquidity gaps in each time bucket based on business days. Each legal entity is
mapped to a country and each country has a corresponding holiday calendar. The number of holidays
between the execution date and cash flow date is determined by looking up the calendar corresponding to
the legal entity of the cash flow. The LRM Application stores the list of holidays in two tables
FSI_HOLIDAY_MASTER and FSI_HOLIDAY_DETAIL corresponding to the relevant country.
FSI_HOLIDAY_MASTER stores the calendar ID of each country and FSI_HOLIDAY_DETAIL stores
the list of holidays against the given IDs.
The time bucketing module supports multiple calendars. The holiday calendar for each cash flow
is selected based on the calendar corresponding to the country to which the cash flow belongs to.
The country of origin is determined based on the legal entity mapped to it which is an attribute of
each cash flow.
Calculate number of business days for a cash flow on the basis of cash flow date and holidays: Once
the number of holidays between the execution date and cash flow date is known using the holiday list, the
days of the cash flow is computed and subsequently assigned to the corresponding time bucket. The
business day convention used for cash flows falling on holidays will be as per the selection made by you
while executing the Run. For more information on selection of business day convention while executing a
Run, see “Executing a Run” on page 48.
The business day conventions supported by the LRM Application are as follows:

No Adjustment: No holiday adjustments are made to the cash flows and the cash flow is
assigned to the time bucket accordingly.
Prior: All the cash flows which occur on a holiday are shifted to the previous business day and
allocated to a time bucket accordingly.
Following: All the cash flows which occur on a holiday are shifted to the next business day and
allocated to a time bucket accordingly.
Conditional Prior: All the cash flows which occur on a holiday are shifted to the previous
business day only if the cash flow date and previous business day falls within the same time
bucket or else the cash flow is shifted to the next business day and allocated to a time bucket
accordingly.
Conditional Following: All the cash flows which occur on a holiday is shifted to the next
business day only if the cash flow date and next business day falls within the same time bucket
or else the cash flow is shifted to the previous business day and assigned to a time bucket
accordingly.
○You also have the flexibility of selecting three levels of time buckets (Level 0, Level 1 and Level
2). These levels can be used for defining business assumptions. Although data in FACT tables are
stored in Level 0, business assumptions can be applied to Level 0, Level 1 as well as Level 2.
Level 0 time buckets refer to time buckets that are defined at the highest level of granularity.
These are subsequently grouped together to form lower levels of granularity of time buckets.
○The LRM Application applies the business assumptions at a time bucket level and not on an
individual cash flow.
Assign cash flow to the time buckets on the basis of the business days: As mentioned earlier, in the
LRM Application time buckets are defined on the basis of business days (ignoring holidays which is
available in the holiday calendar). Each cash flow is assigned to its respective time bucket based on the
cash flow date, the holiday calendar and the business day convention. For example: if the first time bucket
is over night, second time bucket is business days 1 to 7 and third time bucket is business days 8 to 14, then
the process of assigning cash flows is as follows:
If the business day of the cash flow is 0 then it is assigned to the first time bucket.
If the business day of the cash flow is 4 then it is assigned to the second time bucket.
If the business day of the cash flow is 9 then it is assigned to the third time bucket.
The method used to calculate the business days of the cash flow are as follows:
Business days for cash flow = Execution Date – Cash Flow Date – (Number of Holidays between Execution
Date and Cash Flow Date)
2.4. Cash Flow Aggregation Once the cash flow is assigned to a time bucket, then all the cash flows are aggregated on the basis of 48
dimensions that are the attributes of the cash flow and are loaded into FCT_AGG_CASH_FLOWS. The
LRM Application applies specific business assumptions at the aggregated cash flow level and not at the
individual cash flow level.
For more information on the Data Flow, see “Annexure B: Understanding the LRM Data Flow” on page
115.
2.5. Currency Conversion Currency conversion is the next step in the process flow. All the input data is captured in its natural
currency, that is, all cash flows are generated in the natural currency. Currency conversion, converts the
cash flow from its natural currency to the local or reporting currency based on the prevailing spot rates or
forward rates, as specified by you.

The features of currency conversion in the LRM Application are as follows:
Option to select forward exchange rate or spot rate for currency conversion.
Forward exchange rate is interpolated to the cash flow date using linear or log linear
interpolation method, as specified by you.
If a direct quote between currencies is not available then an indirect quote is used. For currency
pairs that do not have a quotation against each other, either direct or indirect, the cross exchange
rate is calculated using the direct quotes available against US Dollar (USD) for each currency, as
USD is considered as the base currency in each quote. The base currency can be configured in
the SETUP MASTER table.
2.5.1. Input Inputs required for currency conversion are as follows:
Interpolation method to be used.
Cash flows in natural currency
Specification of local and reporting currency
Spot rates between all the natural, local, and reporting currencies
Forward exchange rates between the natural, local, and reporting currencies
Selection of rate to be applied on each currency, that is, spot rate or forward exchange rate
2.5.2. Currency Conversion Process Flow
The process flow for currency conversion is as follows:
1. For currency conversion the direct quote or the indirect quote (as per availability) is
derived
2. For each currency, the rate to be used, that is, spot rate or forward exchange rate is
to be specified
For currency conversion the direct quote or the indirect quote is derived: For
Example: To derive the conversion rate between GBP to JPY, the LRM Application first
checks for a direct quote. If a direct quote is unavailable then the LRM Application checks
for an indirect quote, that is, a JPY to GBP Rate. If an indirect quote is also not available,
a cross currency rate with USD as the base currency is considered (base currency can be
configured in the SETUP_MASTER table) that is, the rate between GBP and USD and
the rate between JPY and USD is derived to arrive at the conversion rate between GBP
and JPY.
For each currency, the rate to be used, that is, spot rate or forward exchange rate is
to be specified: On the basis of the input, the exchange rate between currencies is
obtained for conversion. For forward exchange rate the mid points of all the defined time
buckets are calculated. Forward exchange rates are interpolated for all the currency
combinations provided by the bank at the midpoint of all the time buckets. For example:
Forward rate for GBP and JPY is available at Spot, 30 days, 60 days and 90 days. If the
time bucket is defined as 8 - 14 days then the midpoint of the time bucket will be 11 days.
Therefore, for the 11th
day time bucket, the forward exchange rate will be calculated by
interpolating the spot rate and the 30 days forward exchange rate using the Linear and Log
Linear Interpolation method based on your selection. If interpolation is to be done on the
95th
day (which does not have any upper forward exchange rate available) then the 95th
day forward exchange rate will be calculated by extrapolating 60 and 90 forward exchange
rates.
○Assigning a cash flow to a particular time bucket is important for computing forward exchange

rate. If a cash flow is not assigned to a particular time bucket then forward exchange rate for that
cash flow will not be computed.
○For each currency, you can select the spot rate or forward exchange rate to be used for currency
conversion, however the interpolation method is selected while defining the parameters of a Run.
○For interpolation of a day, the two forward exchange rates obtained are the ones which is closest
to the lower tenor forward exchange rate available or higher tenor forward exchange rate
available. If higher tenor forward exchange rate is not available, then using the two nearest lower
tenor forward exchange rates available an extrapolation is done.
2.5.3. Calculation The steps to obtain the exchange rate of currencies are as follows:
For rate between INR to JPY:
Check 1: If (INR to JPY) is available then
Rate required = Rate between INR to JPY
Check 2: If (JPY to INR) is available then
Rate required = 1/ Rate between JPY to INR
Check 3: If (INR to USD) and (USD to JPY) is available then
Rate required = Rate between INR to USD * Rate between USD to JPY
Check 4: If (USD to INR) and (USD to JPY) is available then
Rate required = (1/ Rate between USD to INR) * Rate between USD to JPY
Check 5: If (INR to USD) and (JPY to USD) is available then
Rate required = Rate between INR to USD * (1/ Rate between JPY to USD)
Check 6: If (USD to INR) and (JPY to USD) is available then
Rate required = (1/ Rate between USD to INR) * (1/ Rate between JPY to USD)
Else fail (no data available)
For spot, the rate is obtained on a combination of currencies and for forward the rate is obtained on a
combination of currencies and time bucket.
2.6. Contractual Run Definition and Execution A contractual run allows you to estimate liquidity gaps based on the contractual cash flows received as a
download from the bank. All inflows and outflows of cash are assumed to be generated based on the terms
of the contract. The liquidity gaps are estimated on a standalone (Solo) basis for each selected legal entity
or on a consolidated basis at the level of the selected legal entity. The gap report enables the analysis of the
current liquidity gaps in each time bucket purely based on contractual terms. Contractual Execution caters
to the as of date liquidity status of the organization without the application of any business assumption.
A Contractual Run is defined using the Run Framework of the Oracle Financial Services Analytical
Applications Infrastructure (OFSAAI) and executed using the Run Management User Interface (UI) of the
LRM Application.
For more information on defining Contractual Run , see “OFSAAI Rule, Process and Run Framework User
Guide”.
For more information on Execution of a Contractual Run, see “Executing a Run” on page 48.
2.7. Business Assumption Definition After defining and executing a contractual run, business assumptions are to be defined and applied to the
contractual cash flows, through BAU execution (under normal conditions) or stress execution (under
stressed conditions). The Liquidity Gap report provides the liquidity status of the organization based on the
impact of these business assumptions on the cash flows. A Rule forms the basis of any business
assumption. Each rule pre-configured in the LRM Application is associated with one business assumption.

For more information on defining Rules, see “OFSAAI Run Rule Framework User Guide”
For more information on defining the parameters of a business assumption, see “Defining Parameters of
Business Assumptions – Screen Inputs” on page 43.
The types of business assumptions that are supported by the LRM Application are as follows:
Deposit Balance Growth
Haircut
Additional Collateral - Rating Downgrade Increase In Cash flow
Additional Collateral - Valuation Changes-Increase In Cash flow
Additional Collateral - Rating Downgrade Asset Value Decrease
Additional Collateral - Valuation Changes – Decrease in value of Asset
Rollover of Assets
Rollover of Liabilities
Run-off
Prepayment
Emerging Delinquency -Large Customers
Emerging Delinquency –Non Large Customers
Recovery from Delinquent Accounts
EOP Balance Run-off
Asset Book Growth
Liability Book Growth
Drawdown of Unutilized Credit
EOP Asset Balance Growth
EOP Liability Balance Growth
Drawdown of Funding Line of Credit
Change in Value Of Asset
Liquidity Haircut
Available Stable Funding Factors
Required Stable Funding Factors
○All business assumptions can be defined based on any of the hierarchies supported by the LRM
application. Time bucket hierarchy is a mandatory selection to define business assumptions for all
cases except Emerging Delinquency -Large Customers.
○All business assumptions except Emerging Delinquency -Large Customers, Available Stable
Funding Factors, Liquidity Haircut, and Required Stable Funding allow you to specify the
amount in percentage as well as value. If percentage has been selected then the specified
percentage amount is that of the corresponding cash flow amount on the specified combination. If
value has been selected as input, then the currency of the amount specified in the assumption has
to be selected.
○You have the option to select two types of currencies namely; natural currency or equivalent
currency. If you have opted for natural currency then the currency hierarchy becomes a mandatory
hierarchy for the assumption and the amount specified is in the corresponding natural currency
displayed in the hierarchy. Similarly, for equivalent currency, a particular currency is selected and
all amounts specified by you in such scenarios are considered in the selected currency.

For more information on maintaining business assumptions metadata, see “Annexure C: Business
Assumptions Data Maintenance” on page 118.
The detailed descriptions of all the business assumptions supported in the LRM Application are as follows:
2.7.1. Deposits Balance Growth Deposits balance refers to the cash in hand and the deposits maintained by the bank with other institutions
including the central bank. Increase in deposit balance results in an increased cash inflow in the maturing
time bucket. Old cash inflow is replaced with the new cash inflow in the specified time bucket.
Deposits Balance Growth can either be positive or negative.
Cash flow assignment is done in the following manner:
An example of the assumption applied to product type (Deposits), legal entity (LE 1) and currency (USD)
is as follows:
Assumption Cash Flow Assignment
Product Type Legal
Entity
Currency Time
Bucket
Deposit
Growth
Contractual
Flow
Revised Cash Flow
Deposits LE1 USD 1-15Days 10% 10000 11000
(= 10000 + (0.1 *
10000))
Table 2: Deposit Balance Growth
2.7.2. Haircut Haircut is applied only to unencumbered marketable assets to determine the value of the repo. The haircut
percentage is a measure, which is a part of the contractual cash flow. Haircut would lead to a reduced cash
outflow in the selected time bucket. This assumption is applied to the marked to market value of
unencumbered marketable assets.
Cash flow assignment is done in the following manner:
An example of the assumption applied to product type (Repo), legal entity (LE 1) and currency (USD) is as
follows:
Assumption Cash Flow Assignment
Product
Type
Legal
Entity
Currency Time
Bucket
Haircut Mark to
Market Value
Revised Cash Flow
Repo LE1 USD 1-15Days 10% 10000 11000
(= 10000 + (0.1 * 10000))
Table 3: Haircut
2.7.3. Additional Collateral - Rating Downgrade -Increase in Cash Flow For some financing transactions or derivatives with embedded triggers for downgrade, a downgrade in the
bank’s rating by a recognized credit rating institution requires the bank to post additional collateral which
will result in an increase of cash outflow of unencumbered liquid assets as specified by the bank. The
downgrade trigger and collateral value is available as part of the account information.
Cash flow assignment is done in the following manner:

The following example illustrates the effect of this business assumption on the cash outflows when the
downgrade trigger is selected as 3-Notches.
Assumption Cash Flow Assignment
Product
Type
Asset
Status
Time
Bucket
Additional
Collateral
Contractual
Cash
Outflow
Downgrade
Trigger
Collateral
Value
Revised Cash
Outflow
Derivative
1
Level
2
Asset
1-7 Day 80% 70000 1 Notch 11000 78800
[= 70000 +
(11000*80%)]
Derivative
2
Other
Asset
1-7 Day 100% 50000 2 Notches 9000 59000
[= 50000 +
(9000*100%)]
Financing
Transaction
1
Level
2
Asset
1-7 Day 80% 200000 3 Notches 80000 2064000
[= 200000 +
(80000*80%)]
Table 4: Additional Collateral - Rating Downgrade - Increase in Cash flow
2.7.4. Additional Collateral - Valuation Changes-Increase in Cash flow Some derivatives are secured by collateral to cover losses arising from changes in marked to market
valuations. For changes in the value of the derivative, additional collateral is posted resulting in a cash
outflow. This additional collateral posted is encumbered and is not available for the purpose of
counterbalancing or for estimating the cash inflows for Liquidity Coverage Ratio (LCR). This assumption is
defined and cash flows are assigned in a manner similar to that under the assumption Additional Collateral
– Rating Downgrade as per the increase in cash outflow option. Under this assumption only net cash
outflows are affected. In this case, the additional collateral to be posted is deemed to be purchased which
involves a cash outflow. This collateral is marked as encumbered.
2.7.5. Additional Collateral - Rating Downgrade -Asset Value Decrease For some financing transactions or derivatives with embedded downgrade triggers, downgrade in a bank’s
rating by a recognized credit rating institution will require the bank to post additional collateral which will
result in deducting the relevant amount from the stock of high quality liquid assets.
This assumption also allows you to select the downgrade.
New Stock of HQLA assignment is done in the following manner:
Assuming a downgrade trigger of 3-Notches, this assumption is specified as follows:
Assumption Assignment

Asset Level Additional
Collateral Collateral Value
Downgrade
Trigger Decrease in HQLA
Level 2 Asset 80% 11000 1 Notch 8800
[= (11000*80%)]
Level 1 Asset 100% 9000 2 Notches 9000
[= (9000*100%)]
Level 1 Asset 80% 80000 3 Notches 64000
[= (80000*80%)]
Table 5: Additional Collateral - Rating Downgrade - Asset Value Decrease
2.7.6. Additional Collateral – Valuation Changes – Asset Value Decrease In this assumption, the additional collateral posted will result in the selected assets being marked as
encumbered. The relevant amount is deducted from the stock of high quality liquid assets where applicable.
These assets will not be available for the purpose of counterbalancing or for estimating the cash inflows for
LCR. This assumption is specified and cash flows are assigned in the same manner as that for the
assumption Additional Collateral – Rating Downgrade under the decrease in value of level 1 assets option.
2.7.7. Rollover of Assets Rollover of Assets refers to the rescheduling of a certain percentage of cash flows to a future time bucket.
This occurs when an asset is renewed for an additional term. The amount of cash flow rolled over is thus
reduced from the original time bucket and assigned to the new time bucket. The effect of this assumption
would be an altered final cash flow in the affected time buckets. Rollover of assets impacts the inflow
amount.
Cash flow assignment is done in the following manner:
An example of the assumption applied to product type (Loan), legal entity (LE 1) and currency (USD) is as
follows:
Assumption Cash flow Assignment
Product
Type
Legal
Entity
Currency Original
Maturity
Bucket
Revised
Time
Bucket
Percentage
to be
moved
Contractual
Cash flow
Time
Bucket
Revised Cash
flow amount
10000 15-30
Days
3000 (= 10000
– (0.1 *
10000) – (0.6
* 10000))

Assumption Cash flow Assignment
Product
Type
Legal
Entity
Currency Original
Maturity
Bucket
Revised
Time
Bucket
Percentage
to be
moved
Contractual
Cash flow
Time
Bucket
Revised Cash
flow amount
Loan LE 1 USD 15-30
Days
60-90
Days
10% 5000 60-90
Days
6000 (= 5000
+ (0.1 *
10000))
180-360
Days
60% 7000 180-360
Days
13000 (= 7000
+ (0.6 *
10000))
Table 6: Rollover of Assets
2.7.8. Rollover of Liabilities Rollover of liabilities refers to the rescheduling of a certain percentage of cash flows to a future time
bucket. It occurs when the liabilities are renewed for an additional term. The amount of cash flow rolled
over is thus increased in the original maturity time bucket and assigned to the new maturity time bucket.
The effect of the business assumption would be an altered final cash flow in the various time buckets.
Rollover of liabilities impacts the cash outflow amount.
Cash flow assignment is done in the following manner:
Cash flow assignment for Rollover of Liabilities is similar to the business assumption - Rollover of Assets.
2.7.9. Run-off In a Run-off assumption the bank assumes that a certain percentage of deposits will be withdrawn by their
customers before the scheduled maturity of the deposit. This business assumption would result in an
additional outflow in an earlier time bucket and a reduction in the contractual cash outflow in the original
time bucket.
Cash flow assignment is done in the following manner:
Cash flow assignment for this business assumption is similar to the business assumption – Rollover of
Assets.

2.7.10. Prepayment Prepayment is a situation where the customer repays the loan in part or full, at any time before the maturity
of the loan. Prepayment would lead the bank lose out on the interest component that it would have received
if the loan was not pre-paid. Prepayment results in a cash inflow in a time bucket prior to the original time
bucket and reduced cash inflow in the original time bucket. The percentage of prepayment is to be specified
by you and the balance is payable only when it is due.
Cash flow assignment is done in the following manner:
Cash flow assignment for this business assumption is similar to the business assumption – Rollover of
Assets.
2.7.11. Emerging Delinquency -Large Customers Emerging Delinquency -Large Customers is a business assumption where the bank anticipates an emerging
loss due to the delinquency of certain large customers and applies the business assumption on the future
cash flows due from that customer. To define this, based on the data selected in the dimensions, the
customers who are expected to be delinquent are to be specified by you. Hence, all the cash flows of the
customer marked as delinquent would be summed up across time buckets and would be placed in the
overnight time bucket as contractually the entire dues are to be paid by the customer immediately.
Since, contractually the entire dues are to be paid by the customer immediately providing an amount or
percentage is irrelevant, hence all the options will be disabled under this assumption.
Cash flow assignment is done in the following manner:
An example of the assumption applied to product type (product 01), legal entity (LE 1) and currency (USD)
is as follows:
Assumption Cash flow Assignment
Product
Type
Legal Entity Currency Loan
Status
Time Bucket Contractual
Cash Flow
Adjusted Cash
Flow
Product 01 LE 1 USD Doubtful Overnight 100 500
1 – 30 days 100 0
30 – 60 days 100 0
60 – 180 days 100 0

Assumption Cash flow Assignment
Product
Type
Legal Entity Currency Loan
Status
Time Bucket Contractual
Cash Flow
Adjusted Cash
Flow
Last Bucket : 180
-
100 0
Table 7: Emerging Delinquency -Large Customers
2.7.12. Emerging Delinquency –Non Large Customers Emerging Delinquency –Non Large Customers is a business assumption where the bank anticipates an
emerging loss due to delinquency of its customers and applies the business assumption on the future cash
flows. In order to define this, based on the data selected in the dimensions, the customers that are expected
to be delinquent are to be specified by you. Percentage of the cash flows of the customer marked as
delinquent would be placed in the time bucket selected by you.
Cash flow assignment is done in the following manner:
An example of the assumption applied to product type (loan), legal entity (LE 1) and currency (USD) is as
follows:
Assumption Cash flow Assignment
Product
Type
Legal
Entity
Currency Loan
Status
Time
Bucket
Business
Assumption
Time
Bucket
Contractual
Cash Flow
Adjusted
Cash Flow
Loan LE 1 USD Doubtfu
l
1 – 30
days
0.1 Overnight 100 110
1 – 30 days 100 90
30 – 60 days 100 100
60 – 180
days
100 100
Last Bucket :
180 -
100 100
Table 8: Emerging Delinquency –Non Large Customers
2.7.13. Recovery from Delinquent Accounts In this assumption, the contractual cash flows assigned to the overnight time bucket is considered. Even
though contractually it is due immediately, the actual recovery takes place only over a period of time.
Hence, based on past experiences you are allowed to specify the percentage of recovery in each time
bucket. The balance percentage which is not specified by you is placed in the last time bucket. Hence, the
contractual cash flow is first deducted from the overnight time bucket and assigned to various other time
buckets based on the defined percentages.
Cash flow assignment is done in the following manner:

An example of the assumption applied to product type (loan), legal entity (LE 1) and currency (USD) is as
follows:
Assumption Cash flow Assignment
Product
Type
Legal
Entity
Currency Loan
Status
Time
Bucket
Business
Assumption
Time
Bucket
Contractual
Cash Flow
Business
Assumption
Adjusted
Cash
flow
Overnight 10000 -10000
Product
01
LE 1 USD Doubtful 1 – 30
days
10% 1 – 30
days
10% 1000
30 – 60
days
15% 30 – 60
days
15% 1500
60 –
180
days
25% 60 – 180
days
25% 2500
Last
Bucket
i.e. 180 -
5000
(=10000-
1000-
1500-
2500)
Table 9: Recovery from Delinquent Accounts
2.7.14. EOP Balance Run-off EOP Balance Run-off is applied to the End of Period (EOP) liability balances indicating the amount of
liabilities that are withdrawn prior to their scheduled maturity. Run-offs are also applicable to debt
instruments issued by the bank. Run-off is applied to the EOP balances and assigned to the time buckets in
multiple ways.
This assumption also allows you to select the method for cash flow assignment. The various options
supported for cash flow assignment are as follows:
Decreasing – In decreasing order to all time buckets up to and including the selected time
bucket.
Equal – Equal to all time buckets up to and including the selected time bucket.
Proportional – In proportion to the time bucket size.
Selected – Selected time bucket only
Run-off calculations for demand deposits and time deposits differ to some extent. For demand deposits,
there is no contractual cash flow assigned to time buckets, hence the run-off is applied to the EOP balance
and the value is assigned to the respective time bucket. For time deposits, the contractual cash flow is
assigned to time buckets based on the maturity of the deposit. The run-off is applied to the EOP balance

and the value is added to the cash outflows available in the respective time buckets.
The following section detail the assignment of cash flows to time buckets under each methodology when
the EOP balances for demand and time deposits is 200000 and 500000 respectively. The standard time
buckets are Overnight, 1-7 Days, 8-15 Days, 16-30 Days, 1-3 Months, 3-6 Months, 6-12 Months, 1-5 years
and > 5 Years.
2.7.14.1. Cash Flow Assignment in Decreasing Order to all Time Buckets up to
and including the Selected Bucket
Cash flow assignment for this methodology is done using the following formula:
If a run-off is specified for more than one time bucket, then the cash flow value is calculated based on
the first run-off percentage ,assigned in decreasing order to all time buckets up to the first selected time
bucket. For all subsequent time buckets, cash flow values are calculated based on the respective run-
off percentages and assigned in decreasing order to the time buckets immediately succeeding the time
bucket selected previously, up to the selected time bucket as follows:
Business Assumption Cash Flow Assignment
Product Time
Bucket Run-off
Contractua
l Cash Flow
Time
Bucket Revised Cash Outflows
Demand Deposits 16-30
Days 10%
Nil Overnight –20000
[= (–200000*10%)*(1-10%)(1-1)
]
Nil 1-7 Days –18000
[= (–200000*10%)*(1-10%)(2-1)
]
Nil 8-15 Days –16200
[= (–200000*10%)*(1-10%)(3-1)
]
Nil 16-30
Days
–14580
[= (–200000*10%)*(1-10%)(4-1)
]
Time Deposits 16-30
Days 5%
-3000 Overnight –28000
[= –3000 – {(500000*5%)*(1-
5%)(1-1)
}]
-8000 1-7 Days –31750
[= –8000 – {(500000*5%)*(1-
5%)(2-1)
}]
-5000 8-15 Days –27562.5
[= –5000 – {(500000*5%)*(1-
5%)(3-1)
}]
-10000 16-30
Days
–31434.375
[= –10000 – {(500000*5%)*(1-

Business Assumption Cash Flow Assignment
Product Time
Bucket Run-off
Contractua
l Cash Flow
Time
Bucket Revised Cash Outflows
5%)(4-1)
}]
Time Deposits 3-6
Months 10%
-15000 1-3
Months
–65000
[= –15000 – {(500000*10%)*(1-
10%)(1-1)
}]
-25000 3-6
Months
–70000
[= –25000 – {(500000*10%)*(1-
10%)(2-1)
}]
Table 10: Decreasing assignment of cash flows
2.7.14.2. Equal Assignment of Cash Flows to all Buckets
Equal cash flow assignment is done in the following manner:
If a run-off is specified for more than one time bucket, then the cash flow value is calculated based on
the first run-off percentage assigned equally to all time buckets up to the first selected time bucket. For
all subsequent time buckets, cash flow values are calculated based on the respective run-off
percentages and assigned equally to the time buckets immediately succeeding the time bucket selected
previously up to the selected time bucket as follows:
Business Assumption Cash Flow Assignment
Product Time
Bucket
Run-off Contractual
Cash Flow
Time
Bucket
Revised Cash Outflows
Demand
Deposits
16-30
Days
10% Nil Overnight –5000
[= (–200000*10%)/4]
Nil 1-7 Days –5000
[= (–200000*10%)/4]
Nil 8-15 Days –5000
[= (–200000*10%)/4]
Nil 16-30
Days
–5000
[= (–200000*10%)/4]
Time Deposits 16-30
Days
5% -3000 Overnight –9250
[= –3000 – {(500000*5%)/4}]
-8000 1-7 Days –14250
[= –8000 – {(500000*5%)/4}]
-5000 8-15 Days –11250
[= –5000 – {(500000*5%)/4}]

Business Assumption Cash Flow Assignment
Product Time
Bucket
Run-off Contractual
Cash Flow
Time
Bucket
Revised Cash Outflows
-10000 16-30
Days
–16250
[= –10000 – {(500000*5%)/4}]
Time Deposits 3-6
Months
10% -15000 1-3
Months
–40000
[= –15000 – {(500000*10%)/2}]
-25000 3-6
Months
–50000
[= –25000 – {(500000*10%)/2}]
Table 11: Equal Assignment of Cash flows
2.7.14.3. Cash Flow Assignment in Proportion to the Bucket Size
Cash flow assignment is done in the following manner:
For proportionate assignment, the cash outflow is assigned to all time buckets up to the first selected
time bucket, in proportion to the number of days in each time bucket divided by the total number of
days up to the selected time bucket. For all subsequent time buckets, the number of days in each
subsequent set of time buckets is divided by the difference between the total number of days up to the
selected time bucket and the total number of days up to the time bucket immediately preceding the
selected time bucket as follows:
Business Assumption Cash Flow Assignment
Product Time
Bucket
Run-off Contractual Cash
Flow
Time
Bucket
Revised Cash Flow
Time
Deposits
16-30 Days 5% -3000 Overnight –3000
[= –3000 – {(500000*5%)*0/30}]
-8000 1-7 Days –13833
[= –8000 – {(500000*5%)*7/30}]
-5000 8-15 Days –11667
[= –5000 – {(500000*5%)*8/30}]
-10000 16-30 Days –22500
[= –10000 –
{(500000*5%)*15/30}]
Time
Deposits
3-6 Months 10% -15000 1-3 Months –35000
[= –15000 –
{(500000*10%)*60/150}]
-25000 3-6 Months –55000
[= –25000 –

Business Assumption Cash Flow Assignment
Product Time
Bucket
Run-off Contractual Cash
Flow
Time
Bucket
Revised Cash Flow
{(500000*10%)*90/150}]
Table 12: Proportional assignment of cash flows
2.7.14.4. Cash Flow Assignment to Selected Time Bucket Only
Cash flow assignment is done in the following manner:
For selected assignment, the cash outflow is assigned to all selected time buckets as follows:
Business Assumption Cash Flow Assignment
Product Time
Bucket Run-off Product
Contractual
Cash Flow
Time
Bucket Revised Cash Flow
Demand
Deposits 16-30 Days 10%
Demand
Deposits Nil 16-30 Day
–20000
[= –200000*10%]
Demand
Deposits 1-3 Months 12%
Demand
Deposits Nil 1-3 Months
–24000
[= (–200000*12%)]
Time
Deposits 16-30 Days 5%
Time
Deposits -10000 16-30 Day
–35000
[= –10000 –
(500000*5%)]
Time
Deposits 3-6 Months 10% Time
Deposits -25000 3-6 Months
–75000
[= –25000 –
(500000*10%)]
Table 13: Selected cash flow assignment
2.7.15. Asset Book Growth Asset book refers to the balances of loans and advances given by the bank. Increase in the asset balance
results in an increased cash outflow in the selected time bucket and corresponding inflows in future time
buckets. Old inflows will be replaced by new inflows in the selected time bucket. This assumption also
accounts for both the initial outflows as well as corresponding inflows occurring due to growth in the
business represented by Leg 1 and Leg 2.
Cash flow assignment is done in the following manner:
An example of the assumption applied to product type (auto loan), legal entity (LE 1) and currency (USD)
is as follows:
Assumption Cash Flow Assignment
Product
Type
Legal
Entity
Growth
%
Outflow
Bucket
Inflow
Bucket
Inflow
%
Time
Bucket
Original
Cash
Flow
Revised
Cash
Flow

Assumption Cash Flow Assignment
Product
Type
Legal
Entity
Growth
%
Outflow
Bucket
Inflow
Bucket
Inflow
%
Time
Bucket
Original
Cash
Flow
Revised
Cash
Flow
Auto Loan LE 1 5% 1-7 Days 1-3
Months
27% 1-7 Days 125000 118750
[=125000
–
(125000*5
%)]
8-15
Days
175000 141320
[=175000
–
(421000*8
%)]
3-6
Months
32% 1-3
Months
223000 224687.5
[=223000
+
{(125000*
5%)*27%}
]
3-6
Months
198000 200000
[=198000
+
{(1250000
*5%)*32%
}]
6-12
Months
47% 6-12
Months
346000 348937.5
[=346000
+
{(1250000
*5%)*47%
}]
8% 8-15 Days 1-3
Years
112% 1-3 Years 421000 458721.6
[=421000
+
{(421000*
8%)*112%
}]
Table 14: Asset Book Growth
2.7.16. Liability Book Growth Liability Book Growth refers to the growth in the value of deposits which are maintained by the bank’s
customers or borrowings that have been taken by the bank. The growth in the value of deposits results in an
additional cash outflow in the maturing time bucket. Old outflow will be replaced by new outflows. This
assumption also accounts for both the outflows and corresponding inflows occurring due to the growth in
business represented by Leg 1 and Leg 2.
Cash flow assignment is done in the following manner:
An example of the assumption applied to product type (fixed deposit), legal entity (LE 1) and currency
(USD) is as follows:

Assumption Cash Flow Assignment
Product
Type
Legal
Entity Growth
%
Outflow
Bucket
Inflow
Bucket Inflow
%
Time
Bucket
Original
Cash Flow Revised Cash Flow
Fixed
Deposit
LE 1 5%
1-7
Days
1-3
Months 27%
1-7 Days 125000
118750
[=125000 –
(125000*5%)]
8-15 Days 175000
141320
[=175000 –
(421000*8%)]
3-6
Months 32%
1-3
Months 223000
224687.5
[=223000 +
{(125000*5%)*27%}]
3-6
Months 198000
200000
[=198000 +
{(1250000*5%)*32%}]
6-12
Months 47%
6-12
Months 346000
348937.5
[=346000 +
{(1250000*5%)*47%}]
8%
8-15
Days
1-3
Years 112% 1-3 Years 421000
458721.6
[=421000 +
{(421000*8%)*112%}]
Table 15: Liability Book Growth
2.7.17. Drawdown of Unutilized Credit Banks generally allow its customers to withdraw a certain amount which is a percentage of the value
specified as the limit. This business assumption is applied to the undrawn portion, the assumption being
that certain portion of the undrawn amount is drawn by the customer at the specified time bucket thus
leading to additional cash out flows. This assumption also allows you to specify the corresponding cash in
flow for the specified cash out flow.
This business assumption also allows you to select the method for cash flow assignment. Various options
for cash flow assignment available are as follows:
Decreasing – In decreasing order to all time buckets up to and including the selected time
bucket.
Equal – Equally to all time buckets up to and including the selected time bucket.
Proportional – In proportion to the time bucket size.
Selected – Selected time bucket only.
Decreasing Cash flow assignment is done using the following formula:
Decreasing cash flow assignment methodology is similar to the decreasing cash flow assignment
methodology supported by the business assumption - EOP Balance Run-off.
Equal Cash flow assignment is done using the following formula:

Equal cash flow assignment methodology is similar to the equal cash flow assignment methodology
supported by the business assumption - EOP Balance Run-off.
Proportional Cash flow assignment is done using the following formula:
Proportional cash flow assignment methodology is similar to the proportional cash flow assignment
methodology supported by the business assumption - EOP Balance Run-off.
Selected Cash flow assignment is done using the following formula:
Selected cash flow assignment methodology is similar to the selected cash flow assignment methodology
supported by the business assumption - EOP Balance Run-off.
2.7.18. EOP Asset Balance Growth EOP Asset Balance of Growth assumption estimates new businesses based on the EOP balance of assets
and liabilities. It accounts for both legs of the transactions, that is, inflows as well as outflows. Growth is
applied to the EOP balance and assigned to time buckets in multiple ways.
This business assumption also allows you to select the method for cash flow assignment. Various options
for cash flow assignment available are as follows:
Decreasing – In decreasing order to all time buckets up to and including the selected time
bucket.
Equal – Equally to all time buckets up to and including the selected time bucket
Proportional – In proportion to the time bucket size
Selected – Selected time bucket only.
Decreasing Cash flow assignment is done using the following formula:
Decreasing cash flow assignment methodology is similar to the decreasing cash flow assignment
methodology supported by the business assumption - EOP Balance Run-off.
Equal cash flow assignment is done using the following formula:

Equal cash flow assignment methodology is similar to the equal cash flow assignment methodology
supported by the business assumption - EOP Balance Run-off.
Proportional Cash flow assignment is done using the following formula:
Proportional cash flow assignment methodology is similar to the proportional cash flow assignment
methodology supported by the business assumption - EOP Balance Run-off.
Selected Cash flow assignment is done using the following formula:
Selected cash flow assignment methodology is similar to the selected cash flow assignment methodology
supported by the business assumption - EOP Balance Run-off.
2.7.19. EOP Liability Balance Growth EOP Liability Balance Growth assumption estimates new businesses based on the EOP balance of assets
and liabilities. It accounts for both legs of the transactions, that is, inflows as well as outflows. Growth is
applied to the EOP balance and assigned to time buckets in multiple ways.
Various options for cash flows assignment available are as follows:
Decreasing – In decreasing order to all time buckets up to and including the selected time
bucket.
Equal – Equally to all time buckets up to and including the selected time bucket.
Proportional – In proportion to the time bucket size
Selected – Selected time bucket only.
Decreasing Cash flow assignment is done using the following formula:
Decreasing cash flow assignment methodology is similar to the decreasing cash flow assignment
methodology supported by the business assumption - EOP Balance Run-off.
Equal Cash flow assignment is done using the following formula:

Equal cash flow assignment methodology is similar to the equal cash flow assignment methodology
supported by the business assumption - EOP Balance Run-off.
Proportional Cash flow assignment is done using the following formula:
Proportional cash flow assignment methodology is similar to the proportional cash flow assignment
methodology supported by the business assumption - EOP Balance Run-off.
Selected Cash flow assignment is done using the following formula:
Selected cash flow assignment methodology is similar to the selected cash flow assignment methodology
supported by the business assumption - EOP Balance Run-off.
2.7.20. Drawdown of Funding Line of Credit Banks receive lines of credit from other banks and financial institutions. The bank can drawdown these
lines as per its requirement at anytime during the tenure of the facility. A percentage of the total undrawn
amount is assumed to be drawn down over each time bucket. Drawdown of funding line of credit results in
cash inflow first and outflow at a later date. This assumption also allows you to specify the corresponding
cash outflow for the specified cash inflow.
Various options for cash flows assignment available for this assumption are as follows:
Decreasing – In decreasing order to all time buckets up to and including the selected time
bucket.
Equal – Equally to all time buckets up to and including the selected time bucket
Proportional – In proportion to the time bucket size
Selected – Selected time bucket only.
Decreasing Cash flow assignment is done using the following formula:
Decreasing cash flow assignment methodology is similar to the decreasing cash flow assignment
methodology supported by the business assumption - EOP Balance Run-off.

Equal Cash flow assignment is done using following formula:
Equal cash flow assignment methodology is similar to the equal cash flow assignment methodology
supported by the business assumption - EOP Balance Run-off.
Proportional Cash flow assignment is done using the following formula:
Proportional cash flow assignment methodology is similar to the proportional cash flow assignment
methodology supported by the business assumption - EOP Balance Run-off.
Selected Cash flow assignment is done using the following formula:
Selected cash flow assignment methodology is similar to the selected cash flow assignment methodology
supported by the business assumption - EOP Balance Run-off.
2.7.21. Change in Value of Asset This assumption is applied to the current Market value and the changed value is used as the revised Market
Value for the purpose of counterbalancing.
For example: the Market Value of Bond A is $100 and the bank has 100 units of Bond A (-10% change in
bond value is specified). In this case, the asset value change assumption estimates the revised Market Value
value as $90 [100 – (100*10%)] and stores it. 50 units of Bond A are sold for the purpose of
counterbalancing at a 12% discount. The cash flow from the sale of Bond A is $3960 [50*{90 –
(90*12%)}]. In this case, the revised Market value of $90 (based on the change in asset value assumption)
is taken into consideration while counterbalancing and not the actual Market which is $100.
Change in Value of Asset assignment is done in the following manner:
Assumption Asset Assignment
Product Type Legal
Entity Currency Assumption Market Value Revised Market Value
Bond LE1 USD -10% 100 90

Assumption Asset Assignment
Product Type Legal
Entity Currency Assumption Market Value Revised Market Value
(= 100 + ( -0.1 * 100))
Table 16: Change in Value of Asset
2.7.22. Liquidity Haircut Liquidity haircuts are applied to high quality liquid assets in order to determine the stock of high quality
liquid assets. This assumption does not affect the cash flows. This business assumption allows you to
specify the amount in percentage only. Percentage specified will be applied to the selected combination in
order to calculate the Stock of High Quality Liquid Assets.
This business assumption is an assignment assumption and there are no calculations involved. The assigned
percentage is used in calculating Liquidity Coverage Ratio (LCR). For more information on Liquidity
Coverage Ratio, see “Liquidity Ratio and Funding Concentration Calculation Process Flow” on page 33.
2.7.23. Available Stable Funding Factors Available stable funding factors are the multiplication factors specified for liabilities and equities for the
purpose of calculating the Net Stable Funding Ratio (NSFR). This assumption does not affect the cash
flows for the purpose of computing liquidity gaps, but is used only for calculating the total available stable
funding. This business assumption allows you to specify the amount in percentage only. The percentage
specified is applied to the selected combination in order to calculate the NSFR.
This business assumption is an assignment assumption and there are no calculations involved. This
assigned percentage is used in calculating Net Stable Funding Ratio. For more information on Liquidity
Coverage Ratio, see “Liquidity Ratio and Funding Concentration Calculation Process Flow” on page 33.
2.7.24. Required Stable Funding Factors Required stable funding factors are the multiplication factors specified for assets for the purpose of
calculating the NSFR. This business assumption does not affect the cash flows for the purpose of
computing liquidity gaps, but is used for calculating the total required stable funding only. This assumption
allows you to specify the amount in percentage only. The percentage specified is applied to the selected
combination in order to calculate the Net Stable Funding Ratio (NSFR).
This business assumption is an assignment assumption and there are calculations involved. This assigned
percentage is used in calculating Net Stable Funding Ratio. For more information on Liquidity Coverage
Ratio, see “Liquidity Ratio and Funding Concentration Calculation Process Flow” on page 33.
2.8. BAU Run Definition and Execution In Business As Usual (BAU) Execution one or multiple business assumptions under normal conditions are
applied to the contractual cash flows and the cash inflows and outflows are modified accordingly. A BAU
Execution allows you to estimate and analyze the liquidity gaps under normal business conditions. The
liquidity gap report (after BAU Execution) provides the liquidity status of the organization based on the
impact of these business assumptions on the contractual cash flows. Additionally, liquidity ratios are
estimated based on cash flows adjusted for normal conditions in accordance with the Basel III guidelines
specified by BIS.
A BAU Run is defined using the Run Framework of the Oracle Financial Services Analytical Applications
Infrastructure (OFSAAI) and executed using the Run Management User Interface (UI) of the LRM
Application.
For more information on defining BAU Run, see the “OFSAAI Rule, Process and Run Framework User
Guide”.
For more information on Execution of a Contractual Run, see “Executing a Run” on page 48.
2.9. Stress Assumption Definition Business assumptions (as explained in the earlier section) are also applied to the contractual or BAU cash
flows through stress execution. The definition and application of these assumptions in a stress execution is

different from that of BAU execution as it is stressed based on historical data or user judgment. A Rule is
the basis of any business assumption. Each rule pre-configured in the LRM Application is associated with a
single business assumption. A rule can be defined or modified in the Rule framework of the OFSAAI.
2.10. Stress Scenario Definition Rule shocks can be easily defined by replacing an existing rule with a stressed rule. Each stressed rule
captures an assumption related to Asset Sale, Run-off, Repo- Rollover, Collateral Haircut change and so
on, under a stressed or BAU scenario. These rules can be easily modified and saved as new stress rules.
Multiple Rules can be consolidated to form a single scenario. For more information on definition of Stress
Scenarios, see the “Stress Testing Framework”.
2.11. Stress Run Definition and Execution A stressed scenario is mapped to a Baseline Run to create a Stress Run. A Stress Run or execution is used
to study the adverse effects of the application of stressed business assumptions on the liquidity gaps. For
more information on executing a Stress Run, see “Executing a Run” on page 48.
2.12. Liquidity Ratios and Funding Concentration Calculations Various parameters in Liquidity Risk Management help in analyzing the liquidity status of the bank.
Liquidity ratios are one such parameter prescribed in the Basel III Guidelines. There are two types of ratios
calculated by the LRM Application which are as follows:
Liquidity Coverage Ratio: Liquidity coverage ratio addresses the short-term liquidity needs of
an institution during a stress situation. It estimates whether the stock of high quality liquid assets
is sufficient to cover the net cash outflows under stress situations over a specified future period.
Liquidity coverage ratio is calculated at the legal entity level. Liquidity coverage ratio is also
calculated at the currency level, which is known as Foreign Currency Liquidity Coverage Ratio.
Net stable funding ratio: addresses the medium and long-term liquidity needs of a bank during
a stress situation. It specifies the minimum amount of stable funding required to be maintained
in order to promote stable long term funding.
Funding Concentration Calculation
Wholesale funding from significant sources is calculated in order to monitor the liquidity risk arising
from the withdrawal of such funds. Funding concentration is calculated on the basis of following
dimensions:
Concentration by Significant Counterparties
Concentration by Significant Products
Concentration by Significant Currencies
2.12.1. Input Inputs required for Liquidity Ratios to be calculated by the LRM Application are as follows:
Definition of assumptions Liquidity Haircut, Available Stable Funding Factors and
Required Stable Funding Factors.
Liquidity Horizon specified as the run time parameter
2.12.2. Liquidity Ratio and Funding Concentration Calculation Process
Flow This section aims to explain the procedure of calculating the Liquidity Coverage Ratio (LCR) and Net
Stable Funding Ratio (NSFR) as well as provides a brief explanation on Funding Concentration calculation.
2.12.2.1. Liquidity Coverage Ratio
The procedure for calculating Liquidity Coverage Ratio is as follows:
1. Asset level identification

2. Level 1 asset amount calculation
3. Level 2 asset amount used computation
4. Level 2 asset amount unused computation
5. Stock of High Quality Liquid Asset (SHQLA) computation
6. Cash inflow computation
7. Cash outflow computation
8. Net Cash Outflow (NCOF) computation
9. Liquidity Coverage Ratio computation
Asset level identification: A set of Asset Reclassification Rules which assigns an Asset Level to each
account is supported by the LRM Application. The asset levels, Level 1 and Level 2, are as specified by
BIS as part of the Basel III guidelines. If any asset is not assigned to Level 1 or Level 2 asset category, they
are marked as Other Assets.
Level 1 asset amount calculation: Total Level 1 Asset amount is calculated and stored at legal entity and
currency granularity. This process is performed by a Table to Table (T2T) transformation in the Liquidity
Coverage Ratio Run, namely LRM_LCR_DATA_POPULATION. The formula for calculating Total
Level 1 Asset Amount is as follows:
Level 2 asset amount used computation: Total Level 2 Asset amount used is calculated and
stored at legal entity and currency granularity. This process is done by a T2T Transformation in
the Liquidity Coverage Ratio Run, namely LRM_LCR_DATA_POPULATION. The formula
used for calculating Total Level 2 Asset Amount Used is as follows:
Level 2 asset amount unused computation: Total Level 2 Asset amount unused is calculated and stored
at legal entity and currency granularity. This process is done by a T2T transformation in the Liquidity
Coverage Ratio Run, namely LRM_LCR_DATA_POPULATION. The formula for calculating Total
Level 2 Asset Amount Unused is as follows:

Stock of High Quality Liquid Asset (SHQLA) computation: SHQLA is calculated at legal
entity and currency granularity. This is performed by the rule LRM - SHQLA Computation.
The formula for calculating SHQLA is as follows:
Cash inflow computation: Cash inflow is the sum of all the cash inflows that occur within the specified
liquidity horizon and for all the accounts which are marked as other assets. This process is performed by
the rule LRM - Cash Inflow Computation. The formula for calculating cash inflow is as follows:
Cash outflow computation: Cash outflow is the sum of the all cash outflows that occur within the
specified liquidity horizon and for all the accounts which are marked as Other Assets. This process is
performed by the Rule LRM - Cash Outflow Computation. The formula for calculating Cash Outflow is
as follows:

Net cash outflow computation (NCOF): Net Cash Outflow is derived from cash inflow and cash outflow.
This is performed at the granularity of legal entity and currency. This process is performed by the Rule
LRM - NCOF Computation. The formula for calculating net cash outflow is as follows:
Liquidity Coverage Ratio computation: Liquidity coverage ratio is calculated at legal entity and
Currency Granularity and stored in the database. This is performed by the Rule LRM - Liquidity
Coverage Ratio Computation. The formula for calculating liquidity coverage ratio is as follows:
The formula to calculate LCR at legal entity level only is as follows:
Some jurisdictions may not have sufficient amount of Level 1 or Level 2 liquid assets. In such cases, the
following options may be exercised in order to cover the net cash outflows:
Option 1: Contractually Committed Liquidity Facilities from the Relevant Central Bank
Option 2: Foreign Currency Liquid Assets
Option 3: Additional Use of Level 2 Assets
Option 1
Option 1 increases the Stock of HQLA. For currencies in which sufficient HQLA is not available, the bank
can add the amount to Stock of HQLA from Product Type Contractual Committed Liquidity Facilities
from the Central Bank. This computation happens in LRM LCR Option1 Computation Process.
Data is first inserted in the table with Option Type as Option 1 and then a set of Rules are executed which
updates the Option 1 Amount, the Stock of HQLA, and then recalculates the Liquidity Coverage Ratio post
Options 1.
Option 2
Option 2 increases the Stock of HQLA. For currencies in which sufficient HQLA is not available, the bank
can add the amount to Stock of HQLA from foreign currency. Stock of HQLA from foreign currencies can
only be added if there is extra Stock of HQLA available in foreign currency. This computation happens in
LRM LCR Option2 Computation Process.
Data is first inserted in the table with Option Type as Option 2 and then a set of Rules are executed which
brings in the extra Stock of HQLA from foreign Currency and adds it to the Stock of HQLA of the
currency where the funds are insufficient. Once the Option amount and New Stock of HQLA is updated
then Liquidity Coverage Ratio is recalculated.

Option 3
Option 3 increases the Stock of HQLA for currencies in which sufficient HQLA is not available, banks can
take the additional amount from Asset 2 if available. This computation happens in LRM LCR Option3
Computation process.
Data is first inserted in the table with Option Type as Option 3 and then a set of Rules are executed which
updates the Option 3 Amount, Stock of HQLA and then recalculates the Liquidity Coverage Ratio post
Options 3.
Different processes have been created in the Run for all three Options. You are allowed to specify
the sequence in which these options are to be executed. The sequence of execution is available as
part of the Run.
2.12.2.2. Net Stable Funding Ratio
The procedure to calculate Net Stable Funding Ratio is as follows:
1. Available amount of stable funding computation
2. Required amount of stable funding computation
3. Net Stable funding ratio computation
Available amount of stable funding computation: is calculated and stored at legal entity and currency
granularity. This process is performed by a Table to Table (T2T) transformation in the Liquidity Coverage
Ratio Run, LRM_LCR_DATA_POPULATION. The formula for calculating Available Amount of Stable
Funding is as follows:
Required amount of stable funding computation: is calculated and stored at legal entity and currency
granularity. This process is done by T2T transformation in LCR Run, namely
LRM_LCR_DATA_POPULATION. The following formula is used for calculating the Required Amount
of Stable Funding:

Net Stable Funding Ratio (NSFR) computation: is calculated at legal entity and currency granularity.
This is done by the Rule LRM - Net Stable Funding Ratio Computation. The following formula is used
for calculating Net Stable Funding Ratio:
2.12.2.3. Funding Concentration by Counterparty, Currency and Product
Ratio of each of the cash flow in the aggregate table is first calculated with respect to the concentration at
legal entity level. Any counterparty or product is termed as significant if the sum of its concentration is
greater than 1%. A currency is termed as a significant currency if the sum of its concentration is greater
than 5% of the currency.
2.13. Counterbalancing Strategies Counterbalancing Strategy caters to the requirement of applying preventive measures to manage a bank’s
liquidity gaps. A counterbalancing strategy or a contingency funding plan refers to certain measures
undertaken by banks to minimize or nullify the gaps identified under the BAU and Stress conditions. The
purpose is to identify negative and positive liquidity gaps across defined time buckets and apply a funding
plan that will reduce the negative gaps. A counterbalancing strategy consists of a set of one or more
positions. Counterbalancing Strategies are implemented after business assumptions have been applied and
liquidity gaps have been estimated. The LRM Application gives you the option of applying five different
types of Counterbalancing Strategies, where you can sell existing instruments or purchase new instruments
to manage liquidity gaps. The counterbalancing strategies that can be applied by the bank are as follows:
Sale of Marketable Assets: Additional cash inflow can be generated by the sale of marketable
assets. Unencumbered marketable assets (identified through encumbrance status and marketable
asset indicator) are available as a part of this counterbalancing strategy.
Sale of Other Assets: Cash inflow can be created by sale of marketable assets. Unencumbered
marketable assets (identified through encumbrance status and marketable asset indicator) are
available as a part of this counterbalancing strategy.
Rollover of Existing Repos: Rollover refers to rescheduling of cash outflows to a future date.
This is applied at an individual repo position level.
New Repo Deal: Creation of a new repo, results in a cash inflow and a corresponding outflow
based on the date of contract and maturity date specified for the position. New repos can be
created for the following types of debt instruments:
Unencumbered securities (identified through encumbrance status)
Securities for which the bank has re-hypothecation rights (indicator for re-
hypothecation rights)
The calculation of a new repo deal is similar to the calculation of rollover of existing
repos. You can select the set of securities to create a new repo deal.
New Funding like Deposits, Primary Issuances, Borrowing and so on: A new funding
(deposits or borrowing) creates a cash inflow on the specified date. The LRM Application allows
you to specify the select product, borrowing date (inflow date), borrowed amount, maturity date
and amount.

The LRM Application has incorporated a Graphic User Interface (GUI) to allow a bank apply
counterbalancing strategies of their choice on the liquidity gaps that have been identified in the various
time buckets. For more information on Application of Counterbalancing Strategies, see “Applying
Counterbalancing Strategies” on page 51.

3. Preparing for Execution This chapter aims to detail the important activities that you need to perform before executing Contractual,
BAU or Stress Runs. It aims to provide details on the data required to be populated in the LRM Application
and the steps to be followed to define business assumptions which will help identify liquidity gaps.
3.1. Data Requirements Configuring data into the LRM Application is the basic and most important activity to commence working
on the LRM Application. Data to be configured in the LRM Application can be divided into three types:
Setup Role Management
Setup Data Management
Run Data Management
The subsequent sections list the set of Setup tables and Run Data tables to be populated. However, for
details on the columns to be populated within each table, refer to the Download Specifications (DL Specs)
document.
3.1.1. Setup Role Management The following table provides details about the functions and their use. You are requested to create specific
roles to access the respective functionality of the screens and map these roles to user groups.
V_FUNCTION_CODE V_FUNCTION_NAME V_FUNCTION_DESC
LRMBAACT Activate Behaviour
Assumption
Users mapped to this group can activate the assumption
LRMBAADD Add Behaviour
Assumption
The user group mapped to this function can add new
behaviour assumptions.
LRMBADEL Delete Behaviour
Assumption
The user group mapped to this function can Delete
behaviour assumptions.
LRMBAMOD Modify Behaviour
Assumption
The user group mapped to this function can edit behaviour
assumptions.
LRMBAVIW View Behaviour
Assumption
The user group mapped to this function can view
behaviour assumptions.
LRMCBADD Add Counter Banlancing
method
The user group mapped to this function can add new
Couter balencing method.
LRMCBDEL Delete Counter
Banlancing method
The user group mapped to this function can Delete existing
Couter balencing method/s.
LRMCBMOD Modify Counter
Banlancing method
The user group mapped to this function can edit Couter
balencing method.
LRMCBVIW View Counter
Banlancing method
The user group mapped to this function can view Couter
balencing method.
LRMRUNADD Add LRM Run The user group mapped to this function can add new runs.
LRMRUNDEL Delete LRM Run The user group mapped to this function can Delete runs.
LRMRUNEXEC Execute LRM Run The user group mapped to this function can Execute runs.
LRMRUNMOD Modify LRM Run The user group mapped to this function can edit runs.
LRMRUNVIW View LRM Run The user group mapped to this function can view runs.
Table 17: Setup Role Management
3.1.2. Setup Data Management This section refers to the setup data required to be populated in Oracle Financial Services Liquidity Risk
Management, Release 2.0. Setup data is a set of dimension tables which does not change frequently and can
be categorized as a onetime setup activity.
The setup tables required to be populated in the LRM application are as follows:

DIM_ACCT_STATUS
DIM_ASSET_LEVEL
DIM_BASEL_CREDIT_RATING
DIM_BASEL_CUSTOMER_TYPE
DIM_BASEL_GUARANTOR_TYPE
DIM_BASEL_ISSUER_TYPE
DIM_BASEL_PRODUCT_TYPE
DIM_BOOLEAN_FLAGS
DIM_CASH_FLOW_TYPE
DIM_COUNTRY
DIM_CREDIT_RATING
DIM_CURRENCY
DIM_GL_ACCOUNT
DIM_HOLDING_TYPE
DIM_INSTRUMENT_CATEGORY
DIM_INTEREST_TYPE
DIM_LCR_OPTION
DIM_LR_COUNTER_BALANCE_METHOD
DIM_MATURITY_BAND
DIM_ORG_UNIT
DIM_RISK_WEIGHT
DIM_RUN
DIM_RUN_TYPE
FSI_BEHAVIOR_ASSUMPTION_TYPE
MAP_LE_TB
FSI_M_LOOKUP_MASTER
FSI_M_LOOKUP_B
FSI_M_LOOKUP_TL
FSI_M_OBJECT_DEFINITION_B
FSI_M_OBJECT_DEFINITION_TL
FSI_TEMPLATE_DEFINITION
FSI_TEMPLATE_DEFINITION_MLS
FSI_TEMPLATE_DETAILS
FSI_LIMIT_DEFINITION
FSI_LIMIT_DEFINITION_DETAILS
FSI_LIMIT_DEFINITION_VALUES
SETUP_ADVANCE_FILTERS

SETUP_BA_ALIAS_FLAG_MAP
SETUP_MASTER
SYS_STG_JOIN_MASTER
SYS_TBL_MASTER
DQ_CHECK_MASTER
DQ_GROUP_MAPPING
SETUP_ASSUMPTION_RULE_MAP
For more information on the specific columns to be populated within each table, see the “Download
Specifications (DL Specs)” document.
3.1.3. Run Data Management Run or Execution data management details the staging data to be populated that change with each
execution. This section refers to the set of data which can be categorized as input data in the LRM
Application. It provides information about the various staging tables required to be populated in the LRM
Application. The list of staging tables to be populated in the LRM Application is as follows:
STG_ACCOUNT_CASH_FLOWS
STG_FORWARD_EXCHG_RATES
STG_CUSTOMER_MASTER
STG_INSTRUMENT_CONTRACT_MASTER
STG_LOB_MASTER
STG_PRODUCT_MASTER
STG_PRODUCT_TYPE_MASTER
STG_SALES_CHANNEL_MASTER
TMP_INT_ORG_STRUCTURE_MASTER
STG_FOREIGN_CCY_UTIL_DETAILS
FSI_TIME_BUCKET
STG_CUSTOMER_TYPE_MASTER
STG_GUARANTOR_TYPE
STG_ISSUER_TYPE
FSI_HOLIDAY_MASTER
FSI_HOLIDAY_LIST
FCT_REG_CAP_ACCOUNT_SUMMARY
For more information on the specific columns to be populated within each table, see the “Download
Specifications (DL Specs)” document.
3.2. Data Quality Checks In order to maintain the integrity and accuracy of the data populated into the LRM Application certain data
quality checks have been pre-configured under the Data Quality Framework link in OFSAAI. A few of
the data quality checks pre-configured in the LRM Application are as follows:
Data Quality Checks on STG_ACCOUNT_CASH_FLOWS
Cash flow date (D_CASH_FLOW_DATE) must not be less than Execution date
(FIC_MIS_DATE)

Null Value checks for Cash Flow date (D_CASH_FLOW_DATE)
Null Value checks for Cash Flow amount (N_CASH_FLOW_AMT)
List of Value Checks on Cash flow type (V_CASH_FLOW_TYPE). Value
should be either I or O (Inflow/Outflow).
List of Value Checks on Financial Element type
(V_FINANCIAL_ELEMENT_CODE) of Cash flow. Value should be P, I or O
(Principal or Interest or Others). If no value is given, it would be taken as P
(Principal).
Reference Checks on Cash flow date (D_CASH_FLOW_DATE) from
DIM_DATES.
Reference Checks on Currency (V_CCY_CODE) from DIM_CURRENCY.
Reference Checks on Product (V_PROD_CODE) from DIM_PRODUCT.
Reference Checks on Organization Unit (V_ORG_UNIT_CODE) from
DIM_ORG_UNIT.
Reference Checks on Account Number (V_ACCOUNT_NUMBER) from
DIM_ACCOUNT.
Reference Checks on Instrument Type (N_INSTRUMENT_TYPE_CD) from
DIM_INSTRUMENT_TYPE.
Reference Checks on GL Account Code (V_GL_ACCOUNT_CODE) from
DIM_GL_ACCOUNT.
3.3. Defining Parameters of Business Assumptions – Screen Inputs After configuring setup data and run or staging data (as mentioned in the earlier section) in the LRM
Application, the next step is to define the parameters of the business assumption before executing a Run.
Business Assumptions can be defined by you in the Business Assumptions Definition screen of the LRM
Application. This section provides a step-by-step explanation of the process of defining the parameters of
business assumptions.
Certain fields appearing in the Business Definition Screen are unique to specific business
assumptions. To view the respective business assumption screenshots with the relevant description
of each field to be updated, see “Annexure A: Screen Format” on page 56.
Follow the steps given below to define a Business Assumption:
1. Click Business Assumption Definition Link under Liquidity Risk Management to open
the Business Assumptions Summary screen.
2. Click to open the Business Assumption Definitions screen to add and define new
business assumptions.
3. Enter the description of the Assumption in the Assumption Description field, under
Assumption Details shown in the following figure:
Figure 1: Assumption Details Section
4. Select the Business Assumption from the Assumption Type dropdown shown in figure 2.
5. Click to select the relevant Rule Name as shown in the preceding figure..

○All the rules for selected assumption type will be displayed. This mapping of assumption type
and rule is maintained in SETUP_ASSUMPTION_RULE_MAP setup table. If new rule is created
then SETUP_ASSUMPTION_RULE_MAP should be updated with the mapping of rule code and
assumption type.
There are two ways to select a Rule:
○Enter the name of the assumption or rule in the search field and click .
○Select the relevant Rule from the list of Rules and click .
6. Click against each dimension to select one or multiple members (nodes) of the
dimension required to define the business assumptions under the Dimension Member
Selection field, shown in the following figure. Dimensions displayed in this section are
the ones which are selected as the source hierarchy in the associated rule.
Figure 2: Dimension Member Selection
○The Business Assumption Definition screen provides you with the flexibility to apply filters in
the columns. Once all the nodes in the dimensions are selected then a Cross Grid of the
dimensions is created in the Assumption Specification section. You can select the required
combination of the nodes and slice the grid to define the business assumption using the filter
option based on the dimension columns as shown in the following figure.
Figure 3: Filters
7. Click to select the Assumption unit as Value or Percentage, shown in the following
figure.
Figure 4: Assumption Unit and Currency selection

8. Click to select the Assumption Currency if the Assumption Unit selected is Value
shown in the preceding figure.
9. Click to select the relevant currency if the Assumption Currency selected is
Equivalent Currency shown in figure 3.
10. Click the Downgrade dropdown to select the notch over which the Business Assumption
is to be applied shown in the following figure. This is applicable for the following
Business Assumptions:
i. Additional Collateral - Rating Downgrade Increase in Cash Flow
ii. Additional Collateral - Rating Downgrade Asset Value Decrease
Figure 5: Notch Selection
○For each of the rows in the business assumption a Delete icon has also been provided. A Delete
button deletes the row from the Assumption.
Figure 6: Delete Rows icon
11. Select the relevant Cash Flow Assignment Method for Leg 1 and Leg 2 as Decreasing,
Equally, Proportional or Selected. This is applicable for the following business
assumptions.
i. Drawdown of Unutilized Credit
ii. EOP Asset Balance Growth
iii. EOP Liability Balance Growth
iv. Drawdown of Funding Line of Credit
○When Leg 1 and Leg 2 Cash Flow assignment selections are made, the Assumption Value for
Leg1 and Leg2 are to be entered in the Outflow or Inflow Amount field and Offset Leg field
respectively, as shown in the following figure.

Figure 7: Outflow or Inflow Amount selection
○For assumption EOP Balance Run Off a single field for Cash Flow Assignment Method
selection is available.
○If decreasing has been selected then assumption unit should be in percentage and not value.
12. Enter the Assumption Value or Amount under field Inflow Amount or Outflow Amount
depending on the type of assumption.
Figure 8: Assumption Value Selection
For business assumption Emerging Delinquency- Large Customers you have a choice to select
the combination over which the assumption is to be applied under the Inflow Amount field shown
in the following figure:
13. Select the Revised Time Bucket shown in the following figure. This is applicable for the
following Business Assumptions:
i. Rollover of Assets

ii. Rollover of Liabilities
iii. Run-off
iv. Prepayment
v. Asset Book Growth
vi. Liability Book Growth
vii. Drawdown of Unutilized Credit
viii. EOP Asset Balance Growth
ix. EOP Liability Balance Growth
x. Drawdown of Funding Line of Credit
Figure 9: Revised Time Bucket
To view the respective business assumption screenshots with the relevant description of each field to be
updated, see “Annexure A: Screen Format” on page 56.
For more information on business assumptions data maintenance, see “Annexure C: Business Assumptions
Data Maintenance” on page 123.

4. Execution Once data stores are created and defined, the timing and frequency of execution of data can be established.
The LRM application contains a Graphic User Interface (GUI) which contains the functionality of
executing runs, by selecting different run level parameters for each execution. Runs can be defined in the
Run framework of Oracle Financial Services Analytical Application Infrastructure (OFSAAI). For more
information on definition of a Run, see “OFSAAI Run Rule Framework User Guide”.
After execution of a Run, counterbalancing strategies are applied on the liquidity gaps identified. This
chapter aims to explain the step by step procedure of executing a Run and thereafter the procedure to apply
counterbalancing strategies to the liquidity gap report.
4.1. Executing a Run To define a Run, follow the steps given below:
1. Click Run Management on the LHS menu of the LRM Application to open the Run
Management Summary Screen.
2. Click to select a Run under section List of Runs, shown in the following figure.
Figure 10: List of Runs Selection
○To search for a particular Run, enter the Run Name or select Run Type and click under the
search field.
○All the Runs mapped to the corresponding infodom and segment are displayed in the Run
Management screen.
○All the Rules mapped to the corresponding infodom and segment are displayed in the Rule
Browser under Behaviour Assumption Definition screen
3. Click to define the parameters of the Run, shown in figure 11. The Run Parameter
Selection Screen appears, shown in the following figure:

Figure 11: Run Parameter Selection
4. Enter the Run Name.
5. Enter the Consolidation Type as Solo or Consolidated, shown in figure 12.
6. Click to select the Reporting Currency, shown in figure 12.
7. Select the relevant Business Day Convention for the purpose of Time Bucketing, shown
in figure 13.
For more information on time buckets, see “Time Bucketing” on page 10.
8. Select the Forward Rate Interpolation Method as Linear or Log Linear for the purpose
of currency conversion, shown in figure 12.
For more information on currency conversion, see “Currency Conversion” on page 11.
9. Enter the LCR Horizon (in Days) for the purpose of calculating Liquidity Coverage Ratio
as prescribed in the Basel III guidelines, shown in figure 12.
10. Select the Legal Entity under the Legal Entity Selection field.
Legal entity selection is dependent on the consolidation type selected:
○If Solo Run is selected, you will have to manually select all the Legal Entities for which the run
is to be executed.
○If Consolidated Run is selected, you are allowed to select the parent node only and all the legal
entities under this parent node is automatically selected for execution.
You have successfully defined a Run.

The procedure for executing a run is as follows:
1. Click to select a Run under section List of Runs in the Run Management Summary
Screen.
2. Click in the List of Runs section to open the Run Execution Parameter Selection
screen to define the execution parameters, shown in the following figure:
Figure 12: Run Execution Parameter Selection
All fields except FIC MIS Date and Run Execution Description are non-editable fields.
3. Enter the FIC MIS Date which is the execution date in which the data is to be available in
the stage table, shown in figure 13.
4. Enter the Run Description under the field Run Execution Description, shown in figure
13.
5. Click Execute to execute the Run immediately or else click Create Batch to schedule a
batch to a later date.
To view the Run Execution Summary screens with the relevant description of each field to be updated, see

“Annexure A: Screen Format” on page 56.
○If you are not executing the run for the first time, then the parameters in the Run Parameters
Link will be the same as the one selected for the previous run.
○You have the option of defining and executing any number of Runs. For each Run defined, you
can select all or few assumptions to be applied to the run. You also have the option of re-executing
the same run for different Execution dates.
4.2. Applying Counterbalancing Strategies After executing BAU and Stress Runs, Counterbalancing Strategies are applied to the liquidity gaps
identified after execution of the Run. For more information on the types of Counterbalancing Strategies,
see “Counterbalancing Strategies” on page 38.
The step-by-step procedure to apply Counterbalancing Strategies on indentified liquidity gaps is as follows:
1. Click Counterbalancing Strategy Definition link on the Left Hand Side (LHS) menu of
the LRM Application. The Counterbalancing Strategy Summary screen appears. To view
the Counterbalancing Strategy Summary screen with the relevant description of each field
to be updated, see “Annexure A: Screen Format” on page 56.
2. Click in the counterbalancing strategy summary screen. The Counterbalancing
Strategy Definition screen appears to define the counterbalancing strategy.
3. Enter the name of the counterbalancing strategy in the field Counterbalancing Strategy
Name, shown in the following figure:
Figure 13: Description and Counterbalancing Strategy Name Selection
4. Enter the Description of the Counterbalancing Strategy, shown in the preceding figure.
5. Click to select the Execution Date in the FIC MIS Date field, shown in the following
figure:
Figure 14: FIC MIS Date Selection
6. Select the type of Run (Baseline, Stress or Contractual) under field Condition, shown in
the preceding figure.
7. Click to select the Run Name in the Run Selection field shown in the following
figure:
Figure 15: Run and Execution ID selection
8. Select the Run Execution ID from the dropdown shown in the preceding figure.
9. Select the Currency for which the Counterbalancing Strategy is to be executed shown in
the following figure:
Figure 16: Currency and Legal Entity

10. Select the Legal Entity for which the Counterbalancing Strategy is to be executed shown
in the preceding figure.
11. Select the level at which the Time Buckets are to be displayed shown in the following
figure:
For more information on multi level time buckets, see “Time Bucketing” on page 10.
Figure 17: Time Bucket Level Selection
12. Select the Values to be shown in multiples of Thousands, Million or Billion, shown in
the preceding figure:
13. Click to display the Liquidity Gap Report, shown in the following figure:
Figure 18: Liquidity Gap Report
14. Click button in the Counterbalancing Positions section to view the Add
Counterbalancing Position screen. In this screen you can define five different types of
counterbalancing strategies. To view the “Add counterbalancing position” screen with the
relevant description of each field, see “Annexure A: Screen Format” on page 56.
15. Each counterbalancing strategy has its own edit option ( ) which will allow you to select
the instrument from the Instrument Selection Browser screen and subsequently apply the
counterbalancing strategy to the identified Liquidity Gap. A detailed explanation in
relation to the inputs required for each counterbalancing strategy is provided in the
following section:
Sale of Marketable Assets
The list of instruments displayed in the Instrument Selection Browser screen is
taken from the table FCT_COMMON_ACCOUNT_SUMMARY where
Marketability Indicator is set to Y. You can alternatively search for the instrument by
selecting the various filter options in the Advanced Filter field.
The following information is auto populated from the
FCT_COMMON_ACCOUNT_SUMMARY table when you select the instrument
in the Instrument Selection Browser Screen.
o Asset
o Natural Currency
o Asset Maturity Date
o Units Available
o Market Value per Unit(NCY)
o Market Value per Unit (Converted)
o Number of Days for Liquidation
The following information is to be updated by you:
o Units to be sold: State the number units of the instrument to be sold.
o Discount (in %): Discount provided on the price of the instrument is to

be entered in percentage.
o Revised Inflow Bucket: Select the inflow bucket where the above stated
cash inflow will occur.
If an additional instrument is to be added then click and repeat the above stated
procedure.
Sale of Other Assets
The list of assets displayed in the Instrument Selection Browser screen is taken
from the table FCT_COMMON_ACCOUNT_SUMMARY where encumbrance
status is set to N. You can alternatively search for the instrument by selecting the
various filter options in the Advanced Filter field.
The following information is auto populated from the
FCT_COMMON_ACCOUNT_SUMMARY table when you select the Asset in
the Instrument Selection Browser Screen.
o Asset
o Natural Currency
o Asset Value(NCY)
o Asset Value (Converted)
o Number of Days for Liquidation
The following information is to be updated by you:
o Percentage of Assets to be sold: Specify the percentage of units of
instruments to be sold.
o Discount (in Percentage): The discount provided on the price of the
instrument is to be entered in percentage.
o Inflow Bucket: Select the inflow bucket where cash inflows will occur.
If an additional asset is to be added then click button and repeat the above
stated procedure.
Rollover of existing Repos
The list of Repos to be rescheduled, displayed in the Instrument Selection
Browser screen is taken from the table
FCT_COMMON_ACCOUNT_SUMMARY and
STG_ACCOUNT_CASH_FLOWS where encumbrance status is set to ‘N’ and
it’s a Repo Transaction. You can alternatively search for the instrument by
selecting the various filter options in the Advanced Filter field.
The following information is auto populated from the
FCT_COMMON_ACCOUNT_SUMMARY table when you select the Repos in
the Instrument Selection Browser Screen.
o Repo Name
o Natural Currency
o Repo Maturity Date
o Repo Maturity Amount (NCY)
o Repo Maturity Amount (Converted)
o Underlying Instrument
o Instrument Maturity Date

o Number of Units
o Market Value per unit (NCY)
The following information is to be updated by you:
o Revised Maturity Bucket: Specify the Revised Time Bucket in which
the repo values are to be readjusted. Revised Maturity Bucket should fall
within the range of number of days to maturity of the underlying
instrument.
o Haircut (%): Provide the haircut in percentage.
If an additional repo is to be added then click button and repeat the above
stated procedure.
New Repo Deal
The list of instruments displayed in the Instrument Selection Browser screen is
taken from the table FCT_COMMON_ACCOUNT_SUMMARY where the
underlying is a Repo. You can alternatively search for the instrument by selecting
the various filter options in the Advanced Filter field.
The following information is auto populated from the
FCT_COMMON_ACCOUNT_SUMMARY table when you select the
Instrument to be purchased:
o Natural Currency
o Availability Start Date
o Availability End Date
o Units Available
o Market Value per Unit(NCY)
o Market Value per Unit (Converted)
o Revised Maturity Amount
The following information is to be updated by you:
o Number of units to be Repo’d: Specify the number of units to be repo’d.
o Haircut (%): Provide the haircut in percentage.
o Revised Inflow Bucket: Specify the Revised Inflow Bucket that is in
which bucket you will purchase the Instrument.
o Revised Maturity Bucket: Specify the Revised Maturity Bucket
If an additional instrument is to be added then click button and repeat the
above stated procedure.
New Funding like Deposits, Primary Issuances, Borrowing and so on
The list of products to be purchased displayed in the Instrument Selection
Browser screen is taken from the table GL Master, where GL items with GL Type
as Liability is considered. You can alternatively search for the instrument by
selecting the various filter options in the Advanced Filter field.
The following information is to be updated by you for the product selected:
o Inflow Bucket: Specify the inflow bucket, that is, in which bucket the
Instrument is to be purchased.
o Inflow Amount: Specify the amount you are going to purchase in the
given bucket.

o Maturity Bucket: Specify the bucket in which the instrument is
Maturing
o Maturity Amount: Specify the maturity amount of the instrument.
If an additional instrument is to be added then click button and repeat the
above stated procedure.
The following errors may pop up while defining Counterbalancing Strategies:
○The Counterbalancing strategy name already exists. Please specify a different name: This
error appears if you enter the name of the counterbalancing strategy which is already defined
then system.
○The upper bound of the Inflow Bucket cannot be less than MIS Date + No. of Days for
Liquidation: This error appears when the time bucket selected is less than execution date.
○Units to be sold cannot be greater than the Units Available: This error message appears if
the given units to be sold are more than the units available for the selected instrument.
○Discount % needs to be between 0 and 100%: This error message appears if the values
provided in the discount field is not between Zero and Hundred.
○Revised Maturity Bucket should fall within the range of the number of days to maturity of
the underlying instrument:If the revised maturity date bucket entered is greater than the
maturity date of the underlying, this error pop up message would appear.
16. Click Validate to validate the entries updated by you or else click OK after defining the
counterbalancing strategy.
17. Click Apply Counterbalancing in the Counterbalancing Strategy Definition screen to
execute the Counterbalancing Strategy and view the updated report with the revised
liquidity gaps.
You can now view the time bucket wise gap report and see the impact of each counterbalancing strategy
selected in the Liquidity Gap Report Post Counterbalancing section. You can save these strategies for
future use by clicking the Save button.

Annexure A: Screen Formats LRM Application Login and Log off Procedures
Figure 19: OFSAAI Log in Screen
Screen Description OFSAAI Login screen is used for login to OFSAAI. Once logged in
OFSAAI the LRM Application can be accessed.
Reference number Tag Description
1
Language Select the language in this field.
User ID Enter the User ID to Login.
Password Enter the password to Login.
2 Login
Click the Login Button after providing User ID and
Password for Login.
Table 18: OFSAAI Log In
1
2

Figure 20: OFSAAI Logout Screen
Screen Description This is the first screen which appears when you log into OFSAAI.
Reference number Tag Description
1 Logout Click this button to logout of OFSAAI.
Table 19: OFSAAI Log Out Screen
1

Figure 21: Liquidity Risk Management Link
Screen Description This is the first screen which appears when you log into OFSAAI.
Reference number Tag Description
1 Infodom Select the infodom where the LRM Application is
installed.
2 Liquidity risk
Management Link
Click this link to access LRM Application Screens.
Table 20: Liquidity Risk Management Link
1
2

Defining Time Buckets
Figure 22: Time Bucket
Screen Description Time Bucket Definition Screen allows you to edit or define the Time
Buckets used in the LRM Application.
Reference number Tag Description
1 Time bucket
Definition
Click this link to view the defined Time Buckets.
2 Bucket Name
To view the time bucket definition click this link.
Time bucket definition is shown as a tree structure
as shown in the preceding figure.
Table 21: Time Bucket
1
2

Defining Business Assumptions
Figure 23: Business Assumption Summary
Screen Description Business Assumption Summary displays a list of all the Assumptions which
are defined by you.
Reference number Tag Description
1 Business Assumption
Definition
Click this link to define, view or edit business
assumptions in the LRM Application,
2 Assumption Type
This section allows you to search the pre-defined
assumption on the basis of the Assumption type.
You need to specify the Assumption Type here for
searching the pre-defined assumption.
3 Rule Name Selection
This section allows you to search the pre-defined
assumption on the basis of the Rule Name. You
need to specify the Rule Name here for searching
the pre-defined assumption.
4
Search
This link allows you to search the Assumption on
the basis of the Assumption Type or Rule Name
defined by you.
Reset This link allows you to reset the screen to its default
state where all the assumptions are displayed.
5
Add This link allows you to define a new assumption.
View This link allows you to view the selected
assumption.
Edit This link allows you to edit the selected assumption.
1
2
3
4
5

Screen Description Business Assumption Summary displays a list of all the Assumptions which
are defined by you.
Reference number Tag Description
Delete This link allows you to delete the selected
assumption.
Table 22: Business Assumption Summary
Figure 24: Business Assumption Add - Deposit Balance Growth
Screen Description Business Assumption Definition Screen allows you to define a new
Assumption in the LRM Application.
Reference number Tag Description
1 Assumption
Description
This text box allows you to specify the Assumption
Description.
2 Rule Name
This button allows you to select the pre-defined
Rule which is associated with the assumption which
you are defining.
3 Assumption Type This dropdown allows you to select the type of
assumption you want to define.
4 Dimension Member
Selection
When the Rule and Assumption Type has been
selected by you, all the dimensions which are
available in the Rule are displayed in this section.
Each dimension will appear with its selection button
which allows you to select the nodes of the
dimension member which will participate in
defining the assumption. By clicking the button the
respective Dimension Member Selection Browser
pops up.
5 Assumption Unit This button gives you the option of specifying the
assumption in percentage or value.
6 Assumption
Currency
This button is enabled if you select the Value as the
option in Assumption Unit. Equivalent Currency is
1
2
3
4
5
6 7
8 9
10
11
12

Screen Description Business Assumption Definition Screen allows you to define a new
Assumption in the LRM Application.
Reference number Tag Description
to be selected if you want to give value of the
assumption as the common currency. Natural
Currency is to be selected if you want to give the
values of the assumption in the natural currency of
the record.
7 Currency
This button is activated if Equivalent Currency is
selected in the Assumption Currency. This button
allows you to define the Currency of the amount
entered.
8 Filter For each dimension of the rule, Filter is provided for
ease of defining the assumption.
9 Assumption Value This section allows you to enter the Assumption
Amount.
10 Select Check Box If you click this button then the corresponding
Assumption Row is selected.
11 Delete row This button deletes all the records from the Grid
where Select Check Box button is selected.
12
Save This button allows you to save the defined
assumption.
Cancel This button allows you to discard all the changes
made to the screen.
Table 23: Business Assumption Add - Deposit Balance Growth
Figure 25: Business Assumption Add - Haircut
1
2
3
4
5
6 7
8 9
10
11
12

Screen Description Business Assumption Definition Screen allows you to define a new
Assumption in the LRM Application.
Reference number Tag Description
1 Assumption
Description
This Text Box allows you to specify the
Assumption Description.
2 Rule Name This button allows you to select the pre-defined
Rule which is associated with the assumption.
3 Assumption Type This Dropdown allows you to select the type of
assumption you want to define.
4 Dimension Member
Selection
When the Rule and Assumption Type is selected, all
the dimensions which are available in the Rule will
be displayed in this section. Each dimension appears
with its selection button; which allows you to select
the nodes of the dimension member which
participates in defining the assumption. By clicking
the button the respective Dimension Member
Selection Browser pops up.
5 Assumption Unit
This button gives you the option of specifying the
assumption in percentage or value. For this
assumption, Assumption unit selected can be in
percentage only.
6 Assumption
Currency
This button is disabled for this assumption.
7 Currency This button is disabled for this assumption.
8 Filter For each dimension of the rule, Filter is provided for
ease of defining the Assumption.
9 Assumption Value This section allows you to enter the Assumption
Amount.
10 Select Check Box If you click this button then the corresponding
Assumption Row is selected.
11 Delete row This button deletes all the records from the Grid
where Select Check Box button is selected.
12 Save
This button allows you to save the defined
assumption.
Cancel This button allows you to discard all changes made.
Table 24: Business Assumption Add - Haircut

Figure 26: Business Assumption Add - Additional Collateral - Rating Downgrade Increase in Cash flow
Screen Description Business Assumption Definition Screen allows you to define a new
Assumption in the LRM Application.
Reference number Tag Description
1. Assumption
Description
This text box allows you to specify the Assumption
Description.
2. Rule Name
This button allows you to select the pre-defined
Rule which is associated with the assumption.
3. Assumption Type
This dropdown allows you to select the type of
assumption you want to define.
4. Dimension Member
Selection
When the rule and assumption type is selected, all
the dimensions which are available in the Rule are
displayed in this section. Each dimension will
appear with its selection button; which allows you
to select the nodes of the dimension member which
will participate in defining the assumption. By
clicking the button the respective Dimension
Member Selection browser pops up.
5. Assumption Unit
This button gives you the option of specifying the
assumption in percentage or value.
6. Assumption
Currency
This button is enabled if you have selected value as
the option in the Assumption Unit. Equivalent
Currency is to be selected if you want to give value
of the Assumption as the common currency. Natural
Currency is to be selected if you want to give the
values of the assumption in the natural currency of
the record.
1
2
3
4
5
6 7
8
9 10 11
12
13

Screen Description Business Assumption Definition Screen allows you to define a new
Assumption in the LRM Application.
Reference number Tag Description
7. Currency
This button is activated if Equivalent Currency is
selected in the Assumption Currency. This button
allows you to define the Currency of the amount.
8. Downgrade
This dropdown allows you to select the Notch Level
over which the assumption is to be applied. There
are 10 Different Notch Levels supported.
9. Filter
For each dimension of the rule, Filter is provided for
ease of defining the assumption.
10. Assumption Value
This section allows you to enter the assumption
amount.
11. Select Check Box
If you click this button then the corresponding
Assumption Row is selected.
12. Delete row
This button deletes all the records from the Grid
where Select Check Box button is selected.
13. Save This button allows you to save the defined
assumption.
Cancel This button allows you to discard all changes made.
Table 25: Business Assumption Add - Additional Collateral - Rating Downgrade Increase in Cash flow
Figure 27: Business Assumption Add - Additional Collateral - Valuation Changes Increase in Cash Flow
Screen Description Business Assumption Definition Screen allows you to define a new
assumption in the LRM Application.
Reference number Tag Description
1. Assumption
Description
This text box allows you to specify the assumption
description.
2. Rule Name
This button allows you to select the pre-defined
Rule which is associated with the assumption which
you are defining.
1
2
3
4
5
6 7
8
9 10
11
12

Screen Description Business Assumption Definition Screen allows you to define a new
assumption in the LRM Application.
Reference number Tag Description
3. Assumption Type
This dropdown allows you to select the type of
Assumption you want to define.
4. Dimension Member
Selection
When you have selected the Rule and Assumption
Type, all the dimensions which are available in the
Rule is displayed in this section. Each dimension
appears with its selection button, which allows you
to select the nodes of the dimension member which
will participate in defining the assumption. By
clicking this button the respective Dimension
Member Selection browser pops up.
5. Assumption Unit
This button gives you the option of specifying the
assumption in percentage or value.
6. Assumption
Currency
This button is enabled if you select value as the
option in Assumption Unit. Equivalent Currency is
to be selected if you want to give value of the
assumption as the common currency. Natural
Currency is to be selected if you want to give the
values of the Assumption in the natural currency of
the record.
7. Currency
This button is activated if Equivalent Currency is
selected in the Assumption Currency. This button
allows you to provide the currency of the amount
entered for a particular assumption.
8. Filter
For the dimension of the rule, filter is provided for
ease of defining the assumption.
9. Assumption Value
This section allows you to enter the assumption
amount.
10. Select Check Box
If you click this button then the corresponding
Assumption Row is selected.
11. Delete row
This button deletes all the records from the Grid
where Select Check Box button is selected.
12. Save This button allows you to save the defined
Assumption.
Cancel This button allows you to discard all changes made.
Table 26: Business Assumption Add - Additional Collateral - Valuation Changes-Increase in Cash flow

Figure 28: Business Assumption Add - Additional Collateral - Rating Downgrade- Asset Value Decrease
Screen Description Business Assumption Definition Screen allows you to define new
Assumption in Liquidity Risk Management Application.
Reference number Tag Description
1. Assumption
Description
This Text Box allows you to specify the
Assumption Description.
2. Rule Name
This button allows you to select the pre-defined
Rule which is associated with the assumption you
are defining.
3. Assumption Type
This dropdown allows you to select the type of
assumption.
4. Dimension Member
Selection
When you have selected the Rule and Assumption
Type, all the Dimensions which are available in the
Rule is displayed in this section. Each Dimension
appears with its selection button which allows you
to select the nodes of dimension member which
participates in defining the Assumption. By clicking
the button the respective Dimension Member
Selection Browser pops up.
5. Assumption Unit
This Radio Button gives you the option of
specifying the assumption in Percentage or Value.
6. Assumption
Currency
This Radio button is enabled if you have selected
the Value as the option in Assumption Unit.
Equivalent Currency is to be selected if you want to
give value of the Assumption as the common
currency. Natural Currency is to be selected if you
want to give the values of the Assumption in the
natural currency of the record.
7. Currency
This button is activated if Equivalent Currency is
selected in the Assumption Currency. This Button
allows you to define the Currency of the amount

Screen Description Business Assumption Definition Screen allows you to define new
Assumption in Liquidity Risk Management Application.
Reference number Tag Description
entered for Assumptions.
8. Notch
This Dropdown allows you to select the Notch
Level over which the Assumption is to be Applied.
There are 10 Different Notch Level supported.
9. Filter
For each dimension of the rule, Filter is provided for
ease of defining the Assumption.
10. Assumption Value
This section allows you to enter the Assumption
Amount.
11. Select Check Box
If you click this button then the corresponding
Assumption Row is selected.
12. Delete row
This Button deletes all the records from the Grid
where Select Check Box button is selected.
13. Save This button allows you to save the defined
Assumption.
Cancel This button allows you to discard all changes made.
Table 27: Business Assumption Add - Additional Collateral - Rating Downgrade- Asset Value Decrease
Figure 29: Business Assumption Add - Additional Collateral - Valuation Changes- Asset Value Decrease
Screen Description Business Assumption Definition Screen allows you to define new
Assumption in Liquidity Risk Management Application.
Reference number Tag Description
1. Assumption
Description
This Text Box allows you to specify the
Assumption Description.
2. Rule Name
This button allows you to select the pre-defined
Rule which is associated with the assumption you
are defining.
1
2
3
4
5 6
7
9
12
8
10
11

Screen Description Business Assumption Definition Screen allows you to define new
Assumption in Liquidity Risk Management Application.
Reference number Tag Description
3. Assumption Type
This dropdown allows you to select the type of
assumption.
4. Dimension Member
Selection
When you have selected the Rule and Assumption
Type, all the Dimensions which are available in the
Rule is displayed in this section. Each Dimension
appears with its selection button which allows you
to select the nodes of dimension member which
participates in defining the Assumption. By clicking
the button the respective Dimension Member
Selection Browser pops up.
5. Assumption Unit
This Radio Button gives you the option of
specifying the assumption in Percentage or Value.
6. Assumption
Currency
This Radio button is enabled if you have selected
the Value as the option in Assumption Unit.
Equivalent Currency is to be selected if you want to
give value of the Assumption as the common
currency. Natural Currency is to be selected if you
want to give the values of the Assumption in the
natural currency of the record.
7. Currency
This button is activated if Equivalent Currency is
selected in the Assumption Currency. This Button
allows you to define the Currency of the amount
entered for Assumptions.
8. Filter
For each dimension of the rule, Filter is provided for
ease of defining the Assumption.
9. Assumption Value
This section allows you to enter the Assumption
Amount.
10. Select Check Box
If you click this button then the corresponding
Assumption Row is selected.
11. Delete row
This Button deletes all the records from the Grid
where Select Check Box button is selected.
12. Save This button allows you to save the defined
Assumption.
Cancel This button allows you to discard all changes made.
Table 28: Business Assumption Add - Additional Collateral - Valuation Changes- Asset Value Decrease

Figure 30: Business Assumption Add - Rollover of Assets
Screen Description Business Assumption Definition Screen allows you to define a new
assumption in Liquidity Risk Management Application.
Reference number Tag Description
1. Assumption
Description
This text box allows you to specify the Assumption
Description.
2. Rule Name
This button allows you to select the pre-defined
Rule which is associated with the Assumption.
3. Assumption Type
This dropdown allows you to select the type of
Assumption.
4. Dimension Member
Selection
When you have selected the Rule and Assumption
Type, all the dimensions which are available in the
Rule is displayed in this section. Each dimension
appears with its selection button, which allows you
to select the nodes of the dimension member which
will participate in defining the assumption. By
clicking the button the respective Dimension
Member Selection Browser pops up.
5. Assumption Unit
This button gives you the option of specifying the
assumption in percentage or value.
6. Assumption
Currency
This button is enabled if you have selected the
Value as the option in the Assumption Unit.
Equivalent Currency is to be selected if you want to
give value of the Assumption in the common
currency. Natural Currency is to be selected if you
want to give the values of the Assumption in the
natural currency of the record.
7. Currency
This button is activated if Equivalent Currency is
selected in the field Assumption Currency. This
button allows you to provide the currency of the

Screen Description Business Assumption Definition Screen allows you to define a new
assumption in Liquidity Risk Management Application.
Reference number Tag Description
amount entered.
8. Filter
For each dimension of the rule, filter is provided for
ease of defining the Assumption.
9. Assumption Value
This section allows you to enter the Assumption
Amount.
10. Revised Time Bucket
You can select the Revised Time bucket from the
dropdown. Revised Time buckets in the dropdown
will be at the same level at which the Time Bucket
Hierarchy has been created.
11. Select Check Box
If you click this button then the corresponding
Assumption Row is selected.
12. Delete row
This button deletes all the records from the Grid
where Select Check Box button is selected.
13. Add
If an additional amount for one more bucket for the
same combination is to be added then you can click
the Add button to insert one more rows at the same
combination.
Delete
If you want to delete the row added for the same
combination then you can click the Delete button to
Delete row at the same combination.
14. Save This button allows you to save the defined
Assumption.
Cancel This button allows you to discard all changes made.
Table 29: Business Assumption Add - Rollover of Assets

Figure 31: Business Assumption Add - Rollover of Liabilities
Screen Description Business Assumption Definition Screen allows you to define a new
Assumption in the LRM Application.
Reference number Tag Description
1. Assumption
Description
This text box allows you to specify the assumption
description.
2. Rule Name
This button allows you to select the pre-defined
Rule which is associated with the assumption.
3. Assumption Type
This dropdown allows you to select the type of
assumption.
4. Dimension Member
Selection
When you have selected the Rule and Assumption
Type, all the Dimensions which are available in the
Rule is displayed in this section. Each Dimension
appears with its selection button, which allows you
to select the nodes of the dimension member which
participate in defining the assumption. By clicking
the button the respective Dimension Member
Selection Browser pops up.
5. Assumption Unit
This button gives you the option of specifying the
assumption in percentage or value.
6. Assumption
Currency
This button is enabled if you select value as the
option in the Assumption Unit. Equivalent Currency
is to be selected if you want to give value of the
Assumption as the common currency. Natural
Currency is to be selected if you want to give the
values of the assumption in the natural currency of
the record.
1
2
3
4
5
6 7
8
9 11
12
14
13
10

Screen Description Business Assumption Definition Screen allows you to define a new
Assumption in the LRM Application.
Reference number Tag Description
7. Currency
This button is activated if Equivalent Currency is
selected in the Assumption Currency. This button
allows you to define the Currency of the amount
entered for Assumptions.
8. Filter
For each dimension of the rule, Filter is provided for
the ease of defining the Assumption.
9. Assumption Value
This section allows you to enter the assumption
amount.
10. Revised Time Bucket
You can select the Revised Time bucket from the
Dropdown. Revised Time buckets in the Dropdown
will be at the same level at which the Time Bucket
Hierarchy has been created.
11. Select Check Box
If you click this button then the corresponding
Assumption Row is selected.
12. Delete row
This button deletes all the records from the Grid
where Select Check Box button is selected.
13. Add
If an additional amount for one more bucket of the
same combination is to be added then click the Add
button to insert one more rows at the same
combination.
Delete
If you want to delete the row added for the same
combination then you can click the Delete button to
Delete the row at the same combination.
14. Save This button allows you to save the defined
Assumption.
Cancel This button allows you to discard all changes made.
Table 30: Business Assumption Add - Rollover of Liabilities

Figure 32: Business Assumption Add - Run-off
Screen Description Business Assumption definition screen allows you to define a new
assumption in the LRM Application.
Reference number Tag Description
1. Assumption
Description
This text box allows you to specify the assumption
description.
2. Rule Name
This button allows you to select the pre-defined rule
associated with the assumption.
3. Assumption Type
This dropdown allows you to select the type of
assumption.
4. Dimension Member
Selection
When you have selected the Rule and Assumption
Type, all the dimensions which are available in the
Rule is displayed in this section. Each dimension
appears with its selection button, which allows you
to select the nodes of the dimension member which
participates in defining the assumption. By clicking
the button the respective Dimension Member
Selection Browser pops up.
5. Assumption Unit
This button gives you the option of specifying the
assumption in percentage or value.
6. Assumption
Currency
This Radio button is enabled if you have selected
Value as the option in the field Assumption Unit.
Equivalent Currency is to be selected if you want to
give value of the Assumption as the common
currency. Natural Currency is to be selected if you
want to give the values of the Assumption in the
natural currency of the record.
1
2
3
4
5
6 7
8
9 11
12
14
13
10

Screen Description Business Assumption definition screen allows you to define a new
assumption in the LRM Application.
Reference number Tag Description
7. Currency
This button is activated if Equivalent Currency is
selected in the field Assumption Currency. This
Button allows you to define the Currency of the
amount entered for Assumptions.
8. Filter
For each dimension of the rule, Filter is provided for
ease of defining the Assumption.
9. Assumption Value
This section allows you to enter the assumption
amount.
10. Revised Time Bucket
You can select the Revised Time bucket from the
dropdown. Revised Time buckets in the dropdown
will be at the same level at which the Time Bucket
Hierarchy has been created.
11. Select Check Box
If you click this button then the corresponding
assumption row is selected.
12. Delete row
This button deletes all the records from the Grid
where Select Check Box button is selected.
13. Add
If an additional amount for one more bucket for the
same combination is to be added then you can click
the Add button to insert one more rows at the same
combination.
Delete
If you want to delete the row added for the same
combination then you can click the Delete button to
Delete row at the same combination.
14. Save This button allows you to save the defined
Assumption.
Cancel This button allows you to discard all changes made.
Table 31: Business Assumption Add - Run-off
Figure 33: Business Assumption Add - Prepayment
1
2
3
4
5
6 7
8
9
11
12
14
13
10

Screen Description Business Assumption Definition Screen allows you to define a new
assumption in the LRM Application.
Reference number Tag Description
1. Assumption
Description
This text box allows you to specify the Assumption
Description.
2. Rule Name
This button allows you to select the pre-defined
Rule which is associated with the assumption which
you are defining.
3. Assumption Type
This dropdown allows you to select the type of
assumption you want to define.
4. Dimension Member
Selection
When you have selected the Rule and Assumption
Type, all the dimensions which are available in the
Rule is displayed in this section. Each dimension
appears with its selection button which allows you
to select the nodes of the dimension member which
will participate in defining the assumption. By
clicking the button the respective Dimension
Member Selection Browser pops up.
5. Assumption Unit
This button gives you the option of specifying the
assumption in percentage or value.
6. Assumption
Currency
This button is enabled if you have selected the
Value as the option in Assumption Unit. Equivalent
Currency is to be selected if you want to give value
of the Assumption as the common currency. Natural
Currency is to be selected if you want to give the
values of the Assumption in the natural currency of
the record.
7. Currency
This button is activated if Equivalent Currency is
selected in the field Assumption Currency. This
button allows you to provide the Currency of the
amount entered for assumptions.
8. Filter
For each dimension of the rule, Filter is provided for
ease of defining the Assumption.
9. Assumption Value
This section allows you to enter the Assumption
Amount.
10. Revised Time Bucket
You can select the Revised Time bucket from this
Dropdown. Revised Time buckets in the Dropdown
will be at the same level at which the Time Bucket
Hierarchy has been created.
11. Select Check Box
If you click this button then the corresponding
Assumption Row is selected.
12. Delete row
This button deletes all the records from the Grid
where Select Check Box button is selected.
13. Add
If an additional amount for one more buckets for the
same combination is to be added then you can click
on the Add button to insert one more rows at the
same combination.
Delete
If you want to delete the row added for the same
combination then you can click the Delete button to
delete the row at the same combination.
14. Save This button allows you to save the defined
assumption.
Cancel This button allows you to discard all changes made.
Table 32: Business Assumption Add - Prepayment

Figure 34: Business Assumption Add - Emerging Delinquency -Large Customers
Screen Description Business Assumption Definition Screen allows you to define a new
Assumption in the LRM Application.
Reference number Tag Description
1. Assumption
Description
This text box allows you to specify the Assumption
Description.
2. Rule Name
This button allows you to select the pre-defined
Rule which is associated with the Assumption.
3. Assumption Type
This dropdown allows you to select the type of
Assumption.
4. Dimension Member
Selection
When you have selected the Rule and Assumption
Type, all the dimensions which are available in the
Rule is displayed in this section. Each dimension
appears with its selection button, which allows you
to select the nodes of dimension member which will
participate in defining the Assumption. By clicking
the button the respective Dimension Member
Selection Browser pops up.
5. Assumption Unit
This button is disabled for this assumption.
6. Assumption
Currency
This button is disabled for this assumption.
7. Currency
This button is disabled for this assumption.
8. Filter
For each dimension of the rule, Filter is provided for
ease of defining the assumption.
9. Assumption
Selection
This section allows you to select the combination
over which the assumption is to be applied.
1
2
3
4
5
6 7
8
9
11
12
10

Screen Description Business Assumption Definition Screen allows you to define a new
Assumption in the LRM Application.
Reference number Tag Description
10. Select Check Box
If you click this button then the corresponding
Assumption Row is selected.
11. Delete row
This button deletes all the records from the Grid
where Select Check Box button is selected.
12. Save
This button allows you to save the defined
assumption.
Cancel This button allows you to discard all changes made.
Table 33: Business Assumption Add - Emerging Delinquency -Large Customers
Figure 35: Business Assumption Add- Emerging Delinquency –Non Large Customers
Screen Description Business Assumption Definition Screen allows you to define a new
Assumption in the LRM Application.
Reference number Tag Description
1. Assumption
Description
This text box allows you to specify the Assumption
Description.
2. Rule Name
This button allows you to select the predefined Rule
which is associated with the Assumption which you
are defining.
3. Assumption Type
This dropdown allows you to select the type
Assumption you have to define.
4. Dimension Member
Selection
When you select the Rule and Assumption Type, all
the Dimensions which are available in the Rule is
displayed in this section. Each Dimension will
appear with its selection button, which allows you
to select the nodes of dimension member which will
participate in defining the assumption. By clicking
the button the respective Dimension Member
Selection Browser pops up.
1
2
3
4
5
6 7
8
9
10
11
12

Screen Description Business Assumption Definition Screen allows you to define a new
Assumption in the LRM Application.
Reference number Tag Description
5. Assumption Unit
This button gives you the option of specifying the
assumption in percentage or value.
6. Assumption
Currency
This button is enabled if you have selected the
Value as the option in Assumption Unit. Equivalent
Currency is to be selected if you want to give value
of the Assumption in the common currency. Natural
Currency is to be selected if you want to give the
values of the Assumption in the natural currency of
the record.
7. Currency
This button is activated if Equivalent Currency is
selected in the Assumption Currency. This button
allows you to provide the Currency of the amount
entered for assumptions.
8. Filter
For each dimension of the rule, Filter is provided for
ease of defining the Assumption.
9. Assumption Value
This section allows you to enter the Assumption
Amount.
10. Select Check Box
If you click this button then the corresponding
Assumption Row is selected.
11. Delete row
This button deletes all the records from the Grid
where Select Check Box button is selected.
12. Save This button allows you to save the defined
Assumption.
Cancel This button allows you to discard all changes made.
Table 34: Business Assumption Add - Emerging Delinquency –Non Large Customers
Figure 36: Business Assumption Add- Recovery from Delinquent Accounts
1
2
3
4
5
6 7
8
9
10
11
12

Screen Description Business Assumption Definition Screen allows you to define a new
Assumption in Liquidity Risk Management Application.
Reference number Tag Description
1. Assumption
Description
This text box allows you to specify the Assumption
Description.
2. Rule Name
This button allows you to select the pre-defined
Rule which is associated with the assumption which
you are defining.
3. Assumption Type
This dropdown allows you to select the type of
assumption.
4. Dimension Member
Selection
When you have selected the Rule and Assumption
Type, all the dimensions which are available in the
Rule is displayed in this section. Each dimension
appears with its selection button which allows you
to select the nodes of dimension member which will
participate in defining the assumption. By clicking
the button the respective Dimension Member
Selection Browser pops up.
5. Assumption Unit
This button gives you the option of specifying the
assumption in percentage or value.
6. Assumption
Currency
This button is enabled if you have selected the
Value as the option in Assumption Unit. Equivalent
Currency is to be selected if you want to give value
of the Assumption as the common currency. Natural
Currency is to be selected if you want to give the
values of the assumption in the natural currency of
the record.
7. Currency
This button is activated if Equivalent Currency is
selected in the Assumption Currency. This button
allows you to define the Currency of the amount
entered for Assumption.
8. Filter
For each dimension of the rule, Filter is provided for
ease of defining the Assumption.
9. Assumption Value
This section allows you to enter the Assumption
Amount.
10. Select Check Box
If you click this button then the corresponding
Assumption Row is selected.
11. Delete row
This button deletes all the records from the Grid
where Select Check Box button is selected.
12. Save This button allows you to save the defined
assumption.
Cancel This button allows you to discard all changes made.
Table 35: Business Assumption Add – Recovery from Delinquent Accounts

Figure 37: Business Assumption Add - EOP Balance Run-off
Screen Description Business Assumption Definition Screen allows you to define a new
Assumption in Liquidity Risk Management Application.
Reference number Tag Description
1. Assumption
Description
This text box allows you to specify the Assumption
Description.
2. Rule Name
This button allows you to select the pre-defined
Rule which is associated with the assumption you
are defining.
3. Assumption Type
This dropdown allows you to select the type of
assumption.
4. Dimension Member
Selection
When you have selected the Rule and Assumption
Type, all the dimensions which are available in the
Rule is displayed in this section. Each dimension
appears with its selection button which allows you
to select the nodes of the dimension member which
will participate in defining the assumption. By
clicking the button the respective Dimension
Member Selection Browser pops up.
5. Assumption Unit
This button gives you the option of specifying the
assumption in percentage or value.
6. Assumption
Currency
This button is enabled if you have selected the
Value as the option in Assumption Unit. Equivalent
Currency is to be selected if you want to give value
of the Assumption as the common currency. Natural
Currency is to be selected if you want to give the
values of the Assumption in the natural currency of
1
2
3
4
5
6 7
8
9
10
11
12
13

Screen Description Business Assumption Definition Screen allows you to define a new
Assumption in Liquidity Risk Management Application.
Reference number Tag Description
the record.
7. Currency
This button is activated if Equivalent Currency is
selected in the Assumption Currency field. This
Button allows you to define the Currency of the
amount entered for the assumption.
8. Cash flow
Assignment Method
Use this link to select the Cash flow Assignment
Method as Decreasing, Equally, Proportional or
Selected.
9. Filter
For each dimension of the rule, Filter is provided for
ease of defining the Assumption.
10. Assumption Value
This section allows you to enter the Assumption
Amount.
11. Select Check Box
If you click this button then the corresponding
assumption row is selected.
12. Delete row
This button deletes all the records from the Grid
where Select Check Box button is selected.
13.
Copy This button allows you to copy the assumption and
save as new mapping.
Save This button allows you to save the defined
Assumption.
Cancel This button allows you to discard all changes made.
Table 36: Business Assumption Add - EOP Balance Run-off
Figure 38: Business Assumption Add - Asset Book Growth
Screen Description Business Assumption Definition Screen allows you to define a new
Assumption in Liquidity Risk Management Application.
Reference number Tag Description
1
2
3
4
5
6 7
8
9
11
12
14
13
10

Screen Description Business Assumption Definition Screen allows you to define a new
Assumption in Liquidity Risk Management Application.
Reference number Tag Description
1. Assumption
Description
This text box allows you to specify the Assumption
Description.
2. Rule Name
This button allows you to select the pre-defined
Rule which is associated with the assumption you
are defining.
3. Assumption Type
This dropdown allows you to select the type of
assumption.
4. Dimension Member
Selection
When you have the Rule and Assumption Type, all
the Dimensions which are available in the Rule will
be displayed in this section. Each dimension will
appear with its selection button which allows you to
select the nodes of dimension member which will
participate in defining the Assumption. By clicking
the button the respective Dimension Member
Selection Browser pops up.
5. Assumption Unit
This button gives you the option of specifying the
assumption in percentage or value.
6. Assumption
Currency
This button is enabled if you have selected the
Value as the option in the assumption unit.
Equivalent Currency is to be selected if you want to
give value of the assumption as the common
currency. Natural Currency is to be selected if you
want to give the values of the assumption in the
natural currency of the record.
7. Currency
This button is activated if Equivalent Currency is
selected as the Assumption Currency. This button
allows you to define the Currency of the amount
entered for assumptions.
8. Filter
For each dimension of the rule, Filter is provided for
ease of defining the assumption.
9. Assumption Value
This section allows you to enter the Assumption
Amount.
10. Revised Time Bucket
You can select the Revised Time bucket from this
dropdown. Revised Time buckets in the dropdown
will be at the same level at which the Time Bucket
Hierarchy has been created.
11. Select Check Box
If you click this button then the corresponding
Assumption Row is selected.
12. Delete row
This button deletes all the records from the Grid
where Select Check Box button is selected.
13. Add
If an additional amount for one more bucket for the
same combination is to be added then you can click
the Add button to insert one or more rows for the
same combination.
Delete
If you want to delete the row added for the same
combination then you can click the Delete button to
Delete row of the same combination.
14. Save This button allows you to save the defined
assumption.
Cancel This button allows you to discard all changes made.
Table 37: Business Assumption Add - Asset Book Growth

Figure 39: Business Assumption Add - Liability Book Growth
Screen Description Business Assumption Definition Screen allows you to define a new
Assumption in Liquidity Risk Management Application.
Reference number Tag Description
1. Assumption
Description
This text box allows you to specify the assumption
description.
2. Rule Name
This button allows you to select the pre-defined
Rule which is associated with the assumption which
you are defining.
3. Assumption Type
This dropdown allows you to select the type of
assumption.
4. Dimension Member
Selection
When you have selected the Rule and Assumption
Type, all the dimensions which are available in the
Rule is displayed in this section. Each dimension
appears with its selection button which allows you
to select the nodes of the dimension member which
will participate in defining the Assumption. By
clicking the button the respective Dimension
Member Selection browser pops up.
5. Assumption Unit
This button gives you the option of specifying the
assumption in percentage or value.
6. Assumption
Currency
This button is enabled if you have selected the
Value as the option in Assumption Unit. Equivalent
Currency is to be selected if you want to give value
of the assumption as the common currency. Natural
1
2
3
4
5
6 7
8
9
11
12
14
13
10

Screen Description Business Assumption Definition Screen allows you to define a new
Assumption in Liquidity Risk Management Application.
Reference number Tag Description
Currency is to be selected if you want to give the
values of the assumption in the natural currency of
the record.
7. Currency
This button will be activated if Equivalent Currency
is selected in the Assumption Currency. This button
allows you to provide the Currency of the amount
entered for Assumptions.
8. Filter
For each dimensions of the rule, Filter is provided
for ease of defining the Assumption.
9. Assumption Value
This section allows you to enter the Assumption
Amount.
10. Revised Time Bucket
You can select the Revised Time bucket from this
dropdown. Revised Time bucket in the dropdown
will be at the same level at which the Time Bucket
Hierarchy has been created.
11. Select Check Box
If you click this button then the corresponding
Assumption Row is selected.
12. Delete row
This button deletes all the records from the Grid
where Select Check Box button is selected.
13. Add
If an additional amount for one more bucket for the
same combination is to be added then you can click
the Add button to insert one more rows at the same
combination.
Delete If you want to delete the row added for the same
combination then you can click the Delete button.
14.
Copy This button allows you to copy the assumption and
save as new mapping.
Save This button allows you to save the defined
assumption.
Cancel This button allows you to discard all changes made.
Table 38: Business Assumption Add - Liability Book Growth

Figure 40: Business Assumption Add - Drawdown of Unutilized Credit
Screen Description Business Assumption Definition Screen allows you to define a new
Assumption in the LRM Application.
Reference number Tag Description
1. Assumption
Description
This text box allows you to specify the Assumption
Description.
2. Rule Name
This button allows you to select the pre-defined
Rule which is associated with the assumption you
are defining.
3. Assumption Type
This dropdown allows you to select the type of
assumption.
4. Dimension Member
Selection
Once you have selected the Rule and Assumption
Type, all the dimensions which are available in the
Rule is displayed in this section. Each dimension
appears with its selection button which allows you
to select the nodes of the dimension member which
will participate in defining the assumption. By
clicking the button the respective Dimension
Member Selection Browser pops up.
5. Assumption Unit
This button gives you the option of specifying the
assumption in percentage or value.
6. Assumption
Currency
This button is enabled if you have selected the value
as the option in Assumption Unit. Equivalent
Currency is to be selected if you want to give value
of the Assumption in the common currency. Natural
Currency is to be selected if you want to give the
values of the Assumption in the natural currency of
the record.
7. Currency
This button is activated if Equivalent Currency is
selected in the Assumption Currency. This button
1
2
3
4
5
6 7
10
11
14
15
17
16
12
8
9
13

Screen Description Business Assumption Definition Screen allows you to define a new
Assumption in the LRM Application.
Reference number Tag Description
allows you to provide the Currency of the amount
entered for Assumptions.
8. Cash flow
Assignment Method
– Leg 1
Use this link to select the Cash flow Assignment
Method as Decreasing, Equally, Proportional or
Selected.
9. Cash flow
Assignment Method
– Leg 2
Use this link to select the Cash flow Assignment
Method as Decreasing, Equally, Proportional or
Selected.
10. Filter
For each dimension of the rule, Filter is provided for
ease of defining the Assumption.
11. Assumption Value
for Leg 1
This section allows you to enter the Assumption
Amount for Leg 1.
12. Revised Time Bucket
You can select the Revised Time bucket from this
Dropdown. Revised Time buckets in the Dropdown
will be at the same level at which the Time Bucket
Hierarchy has been created.
13. Assumption Value
for Leg 2
This section allows you to enter the Assumption
Amount for Leg 2.
14. Select Check Box
If you click this button then the corresponding
Assumption Row is selected.
15. Delete row
This button deletes all the records from the Grid
where Select Check Box button is selected.
16. Add
If an additional amount for one more bucket for the
same combination is to be added then you can click
the Add button to insert one more rows for the same
combination.
Delete
If you want to delete the row added for the same
combination then you can click the Delete button to
Delete row at the same combination.
17.
Copy This button allows you to copy the Assumption and
save as new mapping.
Save This button allows you to save the defined
Assumption.
Cancel This button allows you to discard all changes made.
Table 39: Business Assumption Add - Drawdown of Unutilized Credit

Figure 41: Business Assumption Add - EOP Asset Balance Growth
Screen Description Business Assumption Definition Screen allows you to define a new
Assumption in the LRM Application.
Reference number Tag Description
1. Assumption
Description
This text box allows you to specify the Assumption
Description.
2. Rule Name
This button allows you to select the pre-defined
Rule which is associated with the assumption.
3. Assumption Type
This dropdown allows you to select the type of
assumption.
4. Dimension Member
Selection
When you have selected the Rule and Assumption
Type, all the dimensions which are available in the
Rule is displayed in this section. Each dimension
appears with its own selection button which allows
you to select the nodes of the dimension member
which will participate in defining the assumption.
By clicking the button the respective Dimension
Member Selection Browser pops up.
5. Assumption Unit
This button gives you the option of specifying the
assumption in percentage or value.
6. Assumption
Currency
This button is enabled if you have selected the
Value as the option in Assumption Unit. Equivalent
Currency is to be selected if you want to give value
of the Assumption in the common currency. Natural
Currency is to be selected if you want to give the
values of the Assumption in the natural currency of
the record.
1
2
3
4
5
6 7
10
11
14
15
17
16
12
8
9
13

Screen Description Business Assumption Definition Screen allows you to define a new
Assumption in the LRM Application.
Reference number Tag Description
7. Currency
This button is activated if Equivalent Currency is
selected in the Assumption Currency field. This
button allows you to provide the Currency of the
amount entered for Assumptions.
8. Cash flow
Assignment Method
– Leg 1
Use this link to select the Cash flow Assignment
Method as Decreasing, Equally, Proportional or
Selected.
9. Cash flow
Assignment Method
– Leg 2
Use this link to select the Cash flow Assignment
Method as Decreasing, Equally, Proportional or
Selected.
10. Filter
For each dimension of the rule, Filter is provided for
ease of defining the Assumption.
11. Assumption Value
for Leg 1
This section allows you to enter the Assumption
Amount for Leg 1.
12. Revised Time Bucket
You can select the Revised Time bucket from this
dropdown. Revised Time buckets in the dropdown
will be at the same level at which the Time Bucket
Hierarchy is created.
13. Assumption Value
for Leg 2
This section allows you to enter the Assumption
Amount for Leg 2.
14. Select Check Box
If you click this button then the corresponding
Assumption Row is selected.
15. Delete row
This button deletes all the records from the Grid
where Select Check Box button is selected.
16. Add
If an additional amount for one more bucket for the
same combination is to be added then you can click
the Add button to insert one more row at the same
combination.
Delete
If you want to delete the row added for the same
combination then you can click the Delete button to
Delete the row at the same combination.
17. Save This button allows you to save the defined
assumption.
Cancel This button allows you to discard all changes made.
Table 40: Business Assumption Add - EOP Asset Balance Growth

Figure 42: Business Assumption Add - EOP Liability Balance Growth Screen
Screen Description Business Assumption Definition Screen allows you to define a new
Assumption in the LRM Application.
Reference number Tag Description
1. Assumption
Description
This text box allows you to specify the Assumption
Description.
2. Rule Name
This button allows you to select the pre-defined
Rule which is associated with the assumption which
you are defining.
3. Assumption Type
This dropdown allows you to select the type of
Assumption.
4. Dimension Member
Selection
When you have selected the Rule and Assumption
Type, all the dimensions which are available in the
Rule is displayed in this section. Each dimension
appears with its selection button which allows you
to select the nodes of dimension member which will
participate in defining the Assumption. By clicking
this button the respective Dimension Member
Selection Browser will popup.
5. Assumption Unit
This button gives you the option of specifying the
assumption in percentage or value.
6. Assumption
Currency
This button is enabled if you have selected the
Value as the option in Assumption Unit. Equivalent
Currency is to be selected if you want to give value
of the Assumption in the common currency. Natural
Currency is to be selected if you want to give the
values of the Assumption in the natural currency of
the record.
1
2
3
4
5
6 7
10
11
14
15
17
16
12
8
9
13

Screen Description Business Assumption Definition Screen allows you to define a new
Assumption in the LRM Application.
Reference number Tag Description
7. Currency
This button is activated if Equivalent Currency is
selected in the Assumption Currency. This button
allows you to provide the Currency of the amount
entered for Assumptions.
8. Cash flow
Assignment Method
– Leg 1
Use this link to select the Cash flow Assignment
Method as Decreasing, Equally, Proportional or
Selected
9. Cash flow
Assignment Method
– Leg 2
Use this link to select the Cash flow Assignment
Method as Decreasing, Equally, Proportional or
Selected.
10. Filter
For each dimension of the rule, Filter is provided for
ease of defining the Assumption.
11. Assumption Value
for Leg 1
This section allows you to enter the Assumption
Amount for Leg 1.
12. Revised Time Bucket
You can select the Revised Time bucket from this
dropdown. Revised Time buckets in the dropdown
will be at the same level at which the Time Bucket
Hierarchy has been created.
13. Assumption Value
for Leg 2
This section allows you to enter the Assumption
Amount for Leg 2.
14. Select Check Box
If you click this button then the corresponding
Assumption Row is selected.
15. Delete row
This button deletes all the records from the Grid
where Select Check Box button is selected.
16. Add
If an additional amount for one more bucket for the
same combination is to be added then you can click
the Add button to insert an additional row at the
same combination.
Delete
If you want to delete the row added for the same
combination then you can click the Delete button to
Delete row at the same combination.
17. Save This button allows you to save the defined
Assumption.
Cancel This button allows you to discard all changes made.
Table 41: Business Assumption Add - EOP Liability Balance Growth
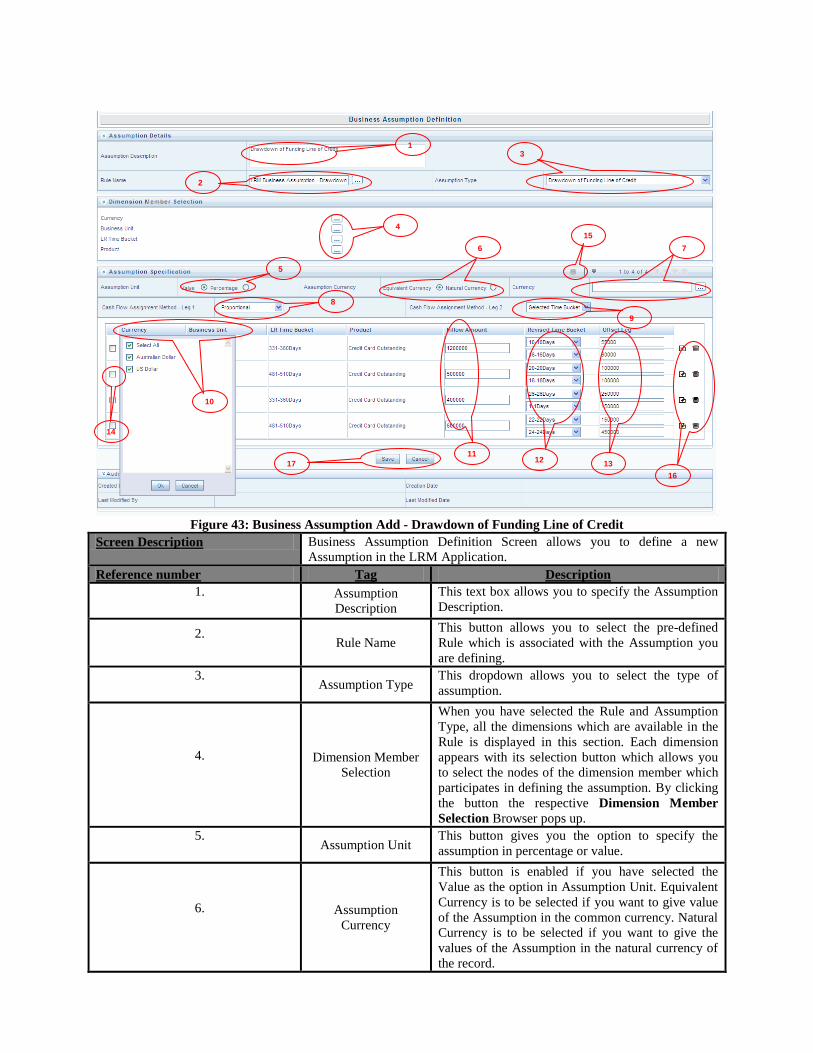
Figure 43: Business Assumption Add - Drawdown of Funding Line of Credit
Screen Description Business Assumption Definition Screen allows you to define a new
Assumption in the LRM Application.
Reference number Tag Description
1. Assumption
Description
This text box allows you to specify the Assumption
Description.
2. Rule Name
This button allows you to select the pre-defined
Rule which is associated with the Assumption you
are defining.
3. Assumption Type
This dropdown allows you to select the type of
assumption.
4. Dimension Member
Selection
When you have selected the Rule and Assumption
Type, all the dimensions which are available in the
Rule is displayed in this section. Each dimension
appears with its selection button which allows you
to select the nodes of the dimension member which
participates in defining the assumption. By clicking
the button the respective Dimension Member
Selection Browser pops up.
5. Assumption Unit
This button gives you the option to specify the
assumption in percentage or value.
6. Assumption
Currency
This button is enabled if you have selected the
Value as the option in Assumption Unit. Equivalent
Currency is to be selected if you want to give value
of the Assumption in the common currency. Natural
Currency is to be selected if you want to give the
values of the Assumption in the natural currency of
the record.
1
2
3
4
5
6 7
10
11
14
15
17
16
12
8
9
13

Screen Description Business Assumption Definition Screen allows you to define a new
Assumption in the LRM Application.
Reference number Tag Description
7. Currency
This button is activated if Equivalent Currency is
selected in the Assumption Currency. This button
allows you to provide the Currency of the amount
entered of the Assumption.
8. Cash flow
Assignment Method
– Leg 1
Use this link to select the Cash flow Assignment
Method as Decreasing, Equally, Proportional or
Selected.
9. Cash flow
Assignment Method
– Leg 2
Use this link to select the Cash flow Assignment
Method as Decreasing, Equally, Proportional or
Selected.
10. Filter
For each dimension of the rule, Filter is provided for
ease of defining the Assumption.
11. Assumption Value
for Leg 1
This section allows you to enter the Assumption
Amount for Leg 1.
12. Revised Time Bucket
You can select the Revised Time bucket from this
dropdown. Revised Time buckets in the dropdown
will be at the same level at which the Time Bucket
Hierarchy has been created.
13. Assumption Value
for Leg 2
This section allows you to enter the Assumption
Amount for Leg 2.
14. Select Check Box
If you click this button then the corresponding
Assumption Row is selected.
15. Delete row
This button deletes all the records from the Grid
where Select Check Box button is selected.
16. Add
If an additional amount for one more bucket for the
same combination is to be added then you can click
the Add button to insert an additional row at the
same combination.
Delete
If you want to delete the row added for the same
combination then you can click the Delete button to
Delete row at the same combination.
17. Save This button allows you to save the defined
assumption.
Cancel This button allows you to discard all changes made.
Table 42: Business Assumption Add - Drawdown of Funding Line of Credit

Figure 44: Business Assumption Add - Change in Value of Asset
Screen Description Business Assumption Definition Screen allows you to define new
Assumption in Liquidity Risk Management Application.
Reference number Tag Description
1. Assumption
Description
This text box allows you to specify the Assumption
Description.
2. Rule Name
This button allows you to select the pre-defined
Rule which is associated with the assumption you
are defining.
3. Assumption Type
This dropdown allows you to select the type of
Assumption.
4. Dimension Member
Selection
If you have selected the Rule and Assumption Type,
all the dimensions which are available in the Rule is
displayed in this section. Each dimension will
appear with its selection button which allows you to
select the nodes of dimension member which will
participate in defining the Assumption. By clicking
the button the respective Dimension Member
Selection Browser pops up.
5. Assumption Unit
This button gives you the option of specifying the
assumption in percentage or value.
6. Assumption
Currency
This button is enabled if you have selected the
Value as the option in Assumption Unit. Equivalent
Currency is to be selected if you want to give value
of the Assumption in the common currency. Natural
Currency is to be selected if you want to give the
values of the Assumption in the natural currency of
1
2
3
4
5
6 7
8
9 10
11
12

Screen Description Business Assumption Definition Screen allows you to define new
Assumption in Liquidity Risk Management Application.
Reference number Tag Description
the record.
7. Currency
This button will be activated if Equivalent Currency
is selected in the Assumption Currency. This button
allows you to define the Currency of the amount
entered for Assumptions.
8. Filter
For each dimensions of the rule, Filter is provided
for ease of defining the Assumption.
9. Assumption Value
This section allows you to enter the Assumption
Amount.
10. Select Check Box
If you click this button then the corresponding
Assumption Row is selected.
11. Delete row
This button deletes all the records from the Grid
where Select Check Box button is selected.
12. Save This button allows you to save the defined
assumption.
Cancel This button allows you to discard all changes made.
Table 43: Business Assumption Add - Change in Value of Asset
Figure 45: Business Assumption Add - Liquidity Haircut
Screen Description Business Assumption Definition Screen allows you to define new
Assumption in Liquidity Risk Management Application.
Reference number Tag Description
1
2
3
4
5
6 7
9
10
11
12
8

Screen Description Business Assumption Definition Screen allows you to define new
Assumption in Liquidity Risk Management Application.
Reference number Tag Description
1. Assumption
Description
This text box allows you to specify the Assumption
Description.
2. Rule Name
This button allows you to select the pre-defined
Rule which is associated with the assumption you
are defining.
3. Assumption Type
This dropdown allows you to select the type of
assumption.
4. Dimension Member
Selection
When you have selected the Rule and Assumption
Type, all the dimensions which are available in the
Rule is displayed in this section. Each dimension
appears with its selection button which allows you
to select the nodes of the dimension member which
will participate in defining the Assumption. By
clicking the button the respective Dimension
Member Selection Browser pops up.
5. Assumption Unit
This button gives you the option to specify the
assumption in percentage or value.
6. Assumption
Currency
This button is enabled if you have selected the value
as the option in Assumption Unit. Equivalent
Currency is to be selected if you want to give value
of the Assumption as the common currency. Natural
Currency is to be selected if want to give the values
of the Assumption in the natural currency of the
record.
7. Currency
This button is activated if Equivalent Currency is
selected in the Assumption Currency. This button
allows you to provide the Currency of the amount
entered.
8. Filter
For each dimensions of the rule, Filter is provided
for ease of defining the Assumption.
9. Assumption Value
This section allows you to enter the Assumption
Amount.
10. Select Check Box
If you click this button then the corresponding
Assumption Row is selected.
11. Delete row
This button deletes all the records from the Grid
where Select Check Box button is selected.
12.
Copy This button allows you to copy the assumption and
save as new mapping.
Save This button allows you to save the defined
Assumption.
Cancel This button allows you to discard all changes made.
Table 44: Business Assumption Add - Liquidity Haircut

Figure 46: Business Assumption Add - Available Stable Funding Factors
Screen Description Business Assumption Definition Screen allows you to define a new
assumption in the LRM Application.
Reference number Tag Description
1. Assumption
Description
This text box allows you to specify the Assumption
Description.
2. Rule Name
This button allows you to select the pre-defined
Rule which is associated with the Assumption
which you are defining.
3. Assumption Type
This dropdown allows you to select the type of
Assumption you want to define.
4. Dimension Member
Selection
When you have selected the Rule and Assumption
Type, all the dimensions which are available in the
Rule is displayed in this section. Each dimension
appears with its selection button which allows you
to select the nodes of dimension member which will
participate in defining the assumption. By clicking
the button the respective Dimension Member
Selection Browser pops up.
5. Assumption Unit
This button gives you the option of specifying the
assumption in Percentage or Value.
6. Assumption
Currency
This button is enabled if you have selected the value
as the option in Assumption Unit. Equivalent
Currency is to be selected if you want to give value
of the assumption as the common currency. Natural
Currency is to be selected if you want to give the
values of the assumption in the natural currency of
1
2
3
4
5
6 7
9
10
11
12
8

Screen Description Business Assumption Definition Screen allows you to define a new
assumption in the LRM Application.
Reference number Tag Description
the record.
7. Currency
This button is activated if Equivalent Currency is
selected in the Assumption Currency. This button
allows you to define the Currency of the amount
entered for assumptions.
8. Filter
For each dimension of the rule, Filter is provided for
ease of defining the Assumption.
9. Assumption Value
This section allows you to enter the Assumption
Amount.
10. Select Check Box
If you click this button then the corresponding
Assumption Row is selected.
11. Delete row
This button will delete all the records from the Grid
where Select Check Box button is selected.
12.
Copy This button allows you to copy the assumption and
save as new mapping.
Save This button allows you to save the defined
Assumption.
Cancel This button allows you to discard all changes made.
Table 45: Business Assumption Add - Available Stable Funding Factors
Figure 47: Business Assumption Add-Required Stable Funding Factor
Screen Description Business Assumption Definition Screen allows you to define a new
Assumption in the LRM Application.
Reference number Tag Description
1. Assumption
Description
This text box allows you to specify the Assumption
Description.
2. Rule Name
This button allows you to select the pre-defined
Rule which is associated with the Assumption
which you are defining.
1
2 3
4
5
6 7
8 9
11
10

Screen Description Business Assumption Definition Screen allows you to define a new
Assumption in the LRM Application.
Reference number Tag Description
3. Assumption Type
This dropdown allows you to select the type of
Assumption you want to define.
4. Dimension Member
Selection
When you have selected the Rule and Assumption
Type, all the dimensions which are available in the
Rule is displayed in this section. Each dimension
appears with its selection button which allows you
to select the nodes of dimension member which will
participate in defining the assumption. By clicking
the button the respective Dimension Member
Selection Browser pops up.
5. Assumption Unit
This button gives you the option of specifying the
assumption in Percentage or Value.
6. Assumption
Currency
This button is enabled if you have selected the value
as the option in Assumption Unit. Equivalent
Currency is to be selected if you want to give value
of the assumption as the common currency. Natural
Currency is to be selected if you want to give the
values of the assumption in the natural currency of
the record.
7. Currency
This button is activated if Equivalent Currency is
selected in the Assumption Currency. This button
allows you to define the Currency of the amount
entered for assumptions.
8. Filter
For each dimension of the rule, Filter is provided for
ease of defining the Assumption.
9. RSF Factor
This section allows you to enter the RSF factor
amount.
10. Select Check Box
If you click this button then the corresponding
Assumption Row is selected.
11. Save
This button allows you to save the defined
Assumption.
Cancel This button allows you to discard all changes made.
Table 46: Business Assumption Add- Required Stable Funding Factor

Executing Runs
Figure 48: Run Management Summary
Screen Description Run Management Screen allows you to define or execute the Run in the
LRM Application.
Reference number Tag Description
1. Run Management
Click this link to define/edit/ execute the run in the
LRM Application.
2. Run Name
This section allows you to search the pre-defined
Run on the basis of the Run name. You need to
specify the Run Name here for searching the pre
defined Run.
3. Run Type
This section allows you to search the pre-defined
Run on the basis of Run Type. You need to specify
the Run Type here for searching pre-defined Run.
4. Search
This link allows you to search the Run on the basis
of the given data of Run Name, Consolidation Type
or Run Type.
Reset This link allows you to reset the screen to its default
state where all the Runs are displayed.
5. Select Check Box
If you click this button then the corresponding Run
is selected.
6. View
After selecting the Run using Select Check Box
you can click the view button to view the
Assumption rules used in the Run
Run Parameter
Selection
After selecting the Run using Select Check Box
you can click the Run Parameter Selection button
1
2
3
4
6
5

Screen Description Run Management Screen allows you to define or execute the Run in the
LRM Application.
Reference number Tag Description
to give default parameter to the Run
Run Execution
Parameter Selection
After selecting the Run using Select Check Box
you can click the Run Execution Parameter
Selection button to give default parameter to the
Run
Run Execution
Summary
After selecting the Run using Select Check Box
you can click the Run Execution Summary button to
view the Run Execution Details.
Table 47: Run Management Summary
Figure 49: Business as Usual Run Parameters Selection
Screen Description Run Management Screen allows you to define/execute the Run in the LRM
Application.
Reference number Tag Description
1
2
3
4
5
6
7
8
9
10

Screen Description Run Management Screen allows you to define/execute the Run in the LRM
Application.
Reference number Tag Description
1. Run Name
This is an un-editable field where Run name will be
displayed
2. Consolidation Type
Select Consolidation Type as Solo or Consolidated
3. Contractual Run
Select Contractual Run over which Business as
Usual (BAU) Run is executed.
4. Run Execution ID
There can be multiple runs for the Contractual Run
selected. You need to select one of the Run
Execution IDs of the Contractual Run selected.
5. Reporting Currency
Provide the reporting Currency by clicking the
Reporting Currency Select button which will
display the Reporting Currency Browser where all
the currencies are displayed and you can select any
one of them as Reporting Currency.
6. Business Day
Convention
Select one of the Business Day Conventions.
Business day Convention is used for Time
Bucketing. The Business Day Conventions
supported are as follows: No Adjustment, Prior,
Following, Conditional Prior or Conditional
Following
7. Forward Rate
Interpolation Method
Select the interpolation method to be applied while
using Forward Exchange Rate.
8. LCR Horizon (In
Days)
Provide the LCR Horizon in days. LCR Horizon
also known as Liquidity Horizon is used for
calculating the Liquidity Coverage Ratios as
prescribed in the Basel III guidelines.
9. Legal Entity
Selection
Select the set of Legal Entities over which the Run
is to be executed. Legal Entity Selection depends on
Consolidation type selected. If you have selected
Solo Run then you will have to manually select all
the Legal Entities over which you execute the run. If
you select Consolidated then you are allowed to
select only Parent Node and all the legal entities
which are coming under parent node will
automatically be selected for execution.
10. OK Click OK button to save the Parameters given.
Close Click Close button to close the parameter screen.
Table 48: Business as Usual Run Parameters Selection

Figure 50: Contractual Run Parameters Selection
Screen Description Run Management Screen allows you to define/execute the Run in the LRM
Application.
Reference number Tag Description
1. Run Name
This is an un-editable field where the Run name will
be displayed
2. Consolidation Type
Select the Consolidation Type as Solo or
Consolidated
3. Reporting Currency
You will have to provide the Reporting Currency by
clicking the Reporting Currency button.
Reporting Currency Browser where all the
currencies will be displayed and you can select any
one of the currencies displayed as the Reporting
Currency.
1
2
3
4
5
6
7
8

Screen Description Run Management Screen allows you to define/execute the Run in the LRM
Application.
Reference number Tag Description
4. Business Day
Convention
Select one of the Business Day Conventions.
Business Day Convention is used for Time
Bucketing. Following are the Business Day
Conventions supported: No Adjustment, Prior,
Following, Conditional Prior or Conditional
Following
5. Forward Rate
Interpolation Method
Select the interpolation method to be applied while
using Forward Exchange Rate.
6. LCR Horizon (In
Days)
Provide the LCR Horizon in days. LCR Horizon
also known as Liquidity Horizon is used for
calculating the Liquidity Coverage Ratios as
mentioned by the regulators.
7. Legal Entity
Selection
Select the set of Legal Entities for executing the run.
Legal Entity Selection depends on the Consolidation
type selected by you. If you select Solo Run then
you will have to manually select all the Legal
Entities over which you want to execute the run. If
you select Consolidated then you are allowed to
select only Parent Node and all the legal entities
which are coming under parent node will
automatically be selected for execution.
8. OK Click OK button to save the Parameters given.
Close Click Close button to close the parameter screen.
Table 49: Contractual Run Parameters Selection

Figure 51: Run Execution Parameters Selection
Screen Description Run Management Screen allows you to define or execute the Run in the
LRM Application.
Reference number Tag Description
1. FIC MIS Date
Select the Execution date in the given field.
2. Run Execution
Description
Provide the Run Execution Description, as an
optional entry.
3. Create Batch
Create a batch for the run and schedule the
execution of the batch to some later date in the
future.
Execute Execute button will immediately execute the run
Close Click Close button to close the parameter screen.
Table 50: Run Execution Parameters Selection
1
2
3
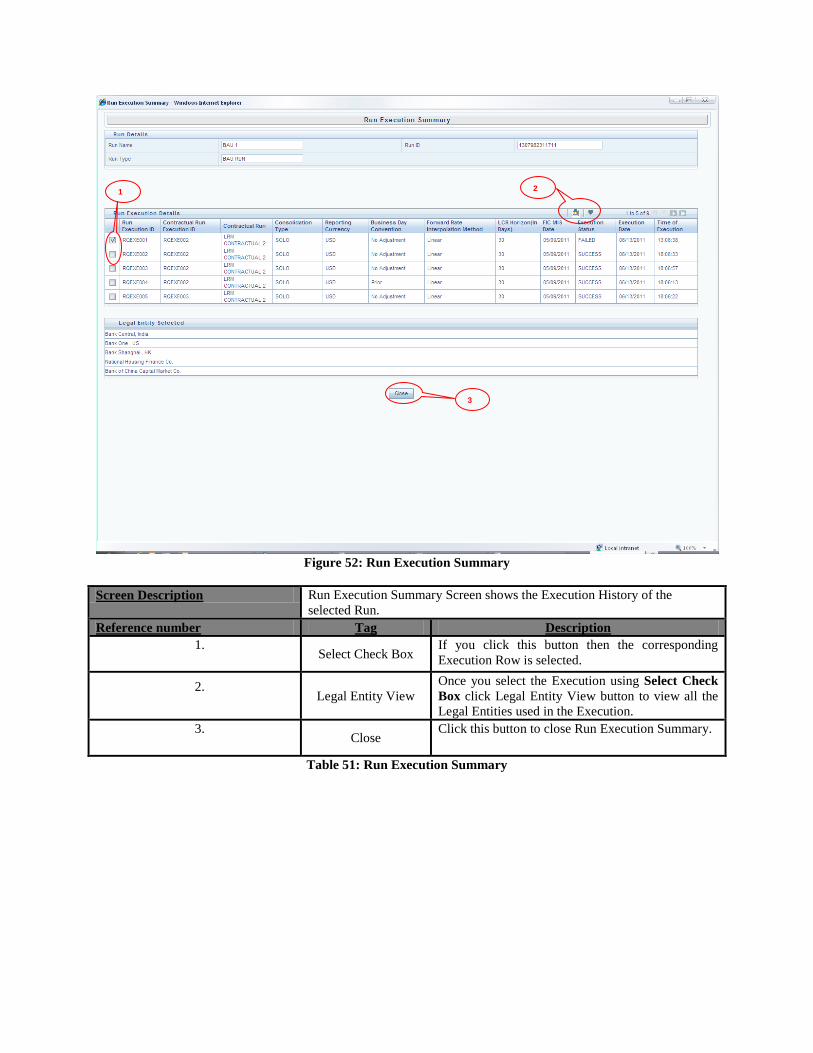
Figure 52: Run Execution Summary
Screen Description Run Execution Summary Screen shows the Execution History of the
selected Run.
Reference number Tag Description
1. Select Check Box
If you click this button then the corresponding
Execution Row is selected.
2. Legal Entity View
Once you select the Execution using Select Check
Box click Legal Entity View button to view all the
Legal Entities used in the Execution.
3. Close
Click this button to close Run Execution Summary.
Table 51: Run Execution Summary
2
1
3

Defining and Applying Counterbalancing Strategy
Figure 53: Counterbalancing Strategy Summary
Screen Description Counterbalancing Summary Screen allows you to define/execute a
Counterbalancing Strategy in the LRM Application.
Reference number Tag Description
1 Counterbalancing
Strategy Definition
By clicking this link you can define/edit/ execute
the Counterbalancing Strategy in the LRM
Application.
2 Counterbalancing
Strategy Name
This section allows you to search the pre-defined
Counterbalancing Strategy on the basis of the
Counterbalancing Strategy. Specify the
Counterbalancing Strategy Name to search for the
pre-defined Counterbalancing Strategy.
3 Run
This section allows you to search the pre-defined
Counterbalancing Strategy on the basis of the Run
Name. Specify the Run Name here to search for the
pre defined Counterbalancing Strategy.
4 FIC MIS Date/Run
Execution Date
This section allows you to search the pre-defined
Counterbalancing Strategy on the basis of Execution
Date. Specify the Execution Date here to search for
the pre-defined Counterbalancing Strategy.
5 Legal Entity
This section allows you to search the pre-defined
Counterbalancing Strategy on the basis of Legal
Entity. Specify the Legal entity to search for the
pre-defined Counterbalancing Strategy.
6
Search
This link allows you to search the Counterbalancing
Strategy on the basis of Counterbalancing Strategy
Name, Run Name, Execution Date or Legal Entity.
Reset
This link allows you to reset the screen to its default
state where all the Counterbalancing Strategies are
displayed.
7 Add
This link allows you to define a new
Counterbalancing Strategy.
Edit This link allows you to edit the selected
3
1
2
4 5
6
7

Counterbalancing Strategy.
View This link allows you to view the selected
Counterbalancing Strategy.
Delete This link allows you to delete the selected
Counterbalancing Strategy.
Table 52: Counterbalancing Strategy Summary
Figure 54: Counterbalancing Strategy Definition Screen 1
Screen Description Counterbalancing Strategy Definition Screen allows you to define/Execute a
new Counterbalancing Strategy.
Reference number Tag Description
1
Counterbalancing
Strategy Name
This section allows you to specify Counterbalancing
Strategy Name.
FIC MIS Date/
Execution Date
This button allows you to select the execution date
of the Run over which the Counterbalancing
Strategy needs to be executed,
Run Selection This button allows you to select the Run over which
the Counterbalancing Strategy needs to be executed.
Baseline Run
This button allows you to select the baseline Run
over which the Counterbalancing Strategy needs to
be executed. By clicking the selection button Run
Selection Browser pops up which will allow you to
select the Run.
Currency
This dropdown allows you to select the Reporting
Currency or Local Currency as an option. This
will be executed on the selected Currency Type over
the selected Run.
1
2
3
4
5

Screen Description Counterbalancing Strategy Definition Screen allows you to define/Execute a
new Counterbalancing Strategy.
Reference number Tag Description
2
Description This section allows you to specify the description of
the Counterbalancing Strategy.
Run Execution ID
This dropdown allows you to select the Run
Execution ID of the selected Run over which
Counterbalancing Strategy needs to be executed.
Condition
This dropdown allows you to select the type of Run
on which you want to apply the Counterbalancing
Strategy. Options available in the dropdown are
Baseline or Stress.
Stress Scenario
If you have selected Stress run for executing the
Counterbalancing Strategy then this dropdown
allows you to select the Stress scenario over which
Counterbalancing Strategy needs to be executed.
Values to be shown
in Multiples of
Click this dropdown to select to display the values
in multiples of thousands, millions and billions
Legal Entity
This dropdown allows you to select the Legal Entity
over which the Counterbalancing Strategy needs to
be executed.
3 Go
This button allows you to generate the Gap report of
the selected Run before the Counterbalancing
Strategy is applied.
4 Liquidity Gap Report
This section displays the Counterbalancing Gap
Report of the selected Run. This grid is populated
once you click Go Button.
5
Add
Counterbalancing
Position
This link will allow you to add a Counterbalancing
Strategy. By clicking this link the Counterbalancing
Position Add Screen is displayed where you can
define the Counterbalancing Strategy to be applied.
Table 53: Counterbalancing Strategy Definition Screen 1
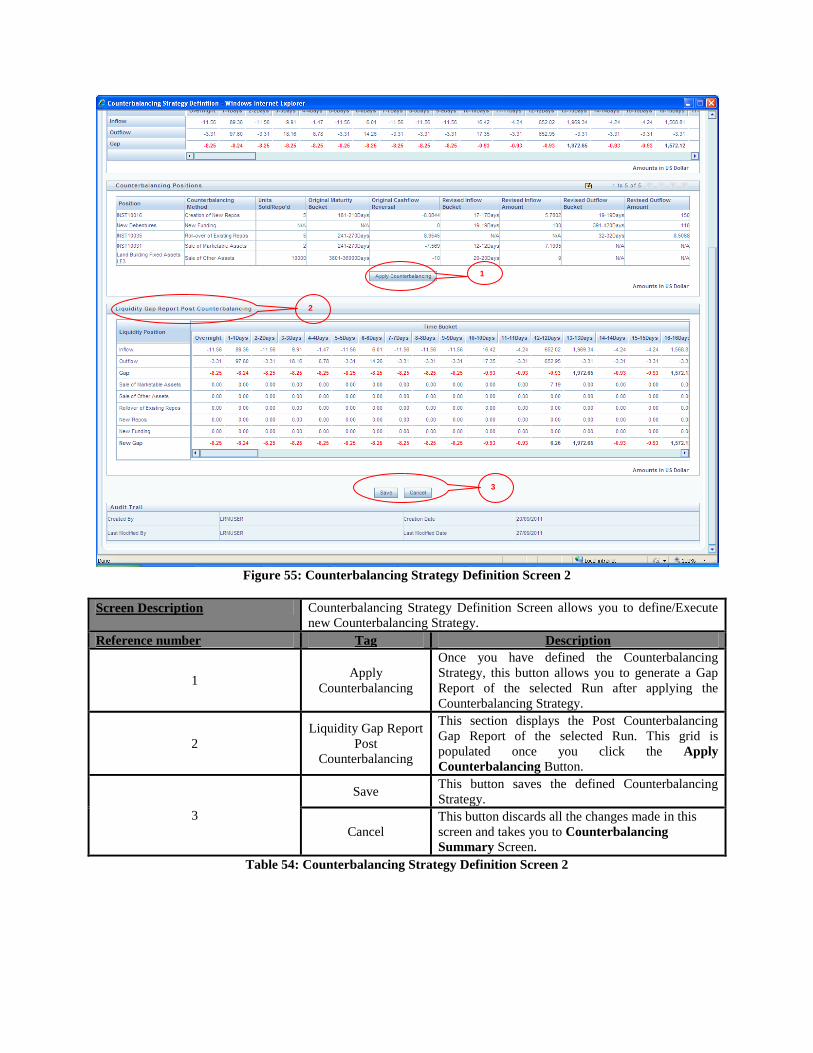
Figure 55: Counterbalancing Strategy Definition Screen 2
Screen Description Counterbalancing Strategy Definition Screen allows you to define/Execute
new Counterbalancing Strategy.
Reference number Tag Description
1 Apply
Counterbalancing
Once you have defined the Counterbalancing
Strategy, this button allows you to generate a Gap
Report of the selected Run after applying the
Counterbalancing Strategy.
2
Liquidity Gap Report
Post
Counterbalancing
This section displays the Post Counterbalancing
Gap Report of the selected Run. This grid is
populated once you click the Apply
Counterbalancing Button.
3
Save This button saves the defined Counterbalancing
Strategy.
Cancel
This button discards all the changes made in this
screen and takes you to Counterbalancing
Summary Screen.
Table 54: Counterbalancing Strategy Definition Screen 2
1
2
3

Figure 56: Counterbalancing Positions Add 1
Screen Description Counterbalancing Position Add Screen allows you to add Counterbalancing
Strategy in the LRM Application.
Reference number Tag Description
1
Add
This link allows you to add Sale of Marketable
Assets Counterbalancing Strategy. By clicking this
link the Instrument Selection Browser screen is
displayed where you can select the Instrument over
which Sale of Marketable Asset Counterbalancing
Strategy is to be applied.
Delete This button allows you to delete the selected
Strategy.
2
Units to be Sold State the number units of the instrument to be sold.
Discount (in %)
Provide information on the discount on the price of
the instrument. Discount should be entered in
Percentage.
Revised Inflow
Bucket
Select the inflow bucket where the stated cash
inflow will occur.
3
Add
This link allows you to add Sale of Other Assets
Counterbalancing Strategy. By clicking this link
the Non-Marketable Asset Selection Browser screen
appears where you can select the Non-Marketable
Asset over which Sale of Other Assets
Counterbalancing Strategy is to be applied.
Delete This button allows you to Delete the selected
Strategy.
4
Percentage of Assets
to be Sold
You need to state the percentage of the units of
instruments to be sold.
Discount (in %) You need to provide information on discount
1
3
5
2
4
6

Screen Description Counterbalancing Position Add Screen allows you to add Counterbalancing
Strategy in the LRM Application.
Reference number Tag Description
provided on the price of the instrument. Discount
should be entered in percentage.
Inflow Bucket You need to select the inflow bucket where above
stated cash inflow occurs.
5
Add
This link allows you to add Rollover of Existing
Repos Counterbalancing Strategy. By clicking this
link the Repo Selection Browser is displayed
where you can select the Repo over which Rollover
of Existing Repos Counterbalancing Strategy is to
be applied.
Delete This button allows you to Delete the selected
Strategy.
6
Units to be Rolled
Over
You need to provide information on the number of
units to be rolled over
Revised Maturity
Bucket
You need to specify the Revised Time Bucket into
which the repo values are to be readjusted. Revised
Maturity Bucket should fall within the range of the
number of days to maturity of the underlying
instrument.
Haircut (in %) You need to provide the Haircut
Table 55: Counterbalancing Positions Add 1
Figure 57: Counterbalancing Positions Add 2
Reference number Tag Description
7 Add
This link allows you to add New Repos
Counterbalancing Strategy. By clicking this link
the Instrument Browser screen is displayed where
7
8
9
10
11

Reference number Tag Description
you can select the instrument over which New
Repos Counterbalancing Strategy is to be applied.
Delete This button allows you to Delete the selected
Strategy.
8
No and Units to be
Repo’d
Specify the number of units to be repo’d.
Haircut (in %) Provide the Haircut in %.
Revised Inflow
Bucket
Specify the Revised Inflow Bucket, that is, in
which bucket you are going to purchase the
Instrument.
Revised Maturity
Bucket
Specify the Revised Maturity Bucket
9
Add
This link allows you to add New Funding
Counterbalancing Strategy. By clicking this link
the Product Browser screen is displayed where you
can select the Product over which the New Funding
Counterbalancing Strategy is to be applied.
Delete This button allows you to Delete the selected
Strategy.
10
Inflow Bucket
You need to specify the Inflow Bucket that is in
which bucket you are going to purchase the
Instrument.
Inflow Amount You need to specify the amount you are going to
purchase in a given bucket.
Maturity Bucket You need to specify the Maturity Bucket in which
instrument is maturing
Maturity Amount You need to specify the Maturity Amount of the
instrument.
11
Ok
This button allows you to save Counterbalancing
Strategy and return to Counterbalancing Strategy
Screen.
Close
This button allows you to discard all the changes
made in the current screen and return to
Counterbalancing Strategy Screen.
Table 56: Counterbalancing Positions Add 2

Figure 58: Validate Counterbalancing Positions
Screen Description Validate Counterbalancing Position screen helps verify the
counterbalancing positions updated in the Add Counterbalancing Positions
screen
Reference number Tag Description
1 Limit
The Limits are for the following :
Exceed Available Units
Sale Limit Breach
Repo Limit Breach and Counterparty Limit
Breach. In case if they are any Errors as in
case of creation of new repos then the
breach would be displayed in RED. If they
are just warnings then they are displayed in
Orange. The definition would be allowed
to save only if there are any warnings, In
case there are any Errors the definition
would not be allowed to be saved until the
user changes the positions Units
sold/Repo’d.
2
Revalidate Once the positions are changed then you can click
on Revalidate to verify if there is any breach.
Ok
This will close the window and Add
Counterbalancing Positions screen will be
displayed.
Table 57: Validate Counterbalancing Positions
1
2

Annexure B: Understanding the LRM Data Flow This section provides details on the movement of data from staging area or tables to the processing area or
tables. There are various table to table (T2T) definitions and a few data transformations (DT) which are
used for moving data from the staging tables to the processing tables. It specifies all the table names where
cash flow data is moved from, processed and finally stored in the reporting tables.
Data on cash flows is provided as an input in the staging table STG_ACCOUNT_CASH_FLOWS which
also contains cash flow dates for all the accounts. On execution of the T2T, data moves from
STG_ACCOUNT_CASH_FLOWS to FCT_PROCESS_CASHFLOW. In
FCT_PROCESS_CASHFLOW all the codes like Account Codes, Currency Codes as specified in the
Stage table are converted into their corresponding skey (Surrogate Key from Dim tables). Hence,
FCT_PROCESS_CASHFLOW is similar to STG_ACCOUNT_CASH_FLOWS, the only difference
being of codes in the Stage table and skey in FCT table.
From FCT_PROCESS_CASHFLOW data moves to FCT_ACCOUNT_CASH_FLOW where all cash
flow dates are converted into time buckets, that is, time bucket assignment takes place in this stage of the
LRM application data flow.
For more information on Time Bucket, see “Time Bucketing” on page 10.
FCT_ACCOUNT_CASH_FLOWS table contains cash flows at Account and time bucket granularity.
FCT_PROCESS_CASHFLOW table contains cash flow at Account and cash flow date granularity.
Cash flows from FCT_ACCOUNT_CASH_FLOWS moves into FCT_AGG_CASH_FLOWS. These
cash flows are aggregated based on 48 dimensions which are as follows:
Accounting Classification
Asset Level
Basel Customer Type
Basel II Risk Weight
Basel Issuer Type
Basel Rating
Callable Period
Collateral Used to Cover Short Positions

Commitment Status
Component of a Major Index
Country
Currency
Customer
Customer Chanel
Customer Financial Entity Flag
Customer Type
Delinquency Period
Domestic Currency Indicator
Effective Maturity
Effective Residual Maturity
Encumbrance Status
Guarantor Type
Illiquidity Status
Instrument Type
Interest Rate Type
Issuer
Issuer Financial Entity Flag
Legal Entity
Line of Business
Listing Status
Loan Renewable Status
Loan Status
Marketability Indicator
Maturity
Operational Relationship
Product
Product Type
Rating
Residual Maturity
Revocability Status
Secured Status
Sold Exclusively in Retail Market
Stability
Time Bucket
Underlying Asset Level

Withdrawal Notice Period
Withdrawal Penalty
Cash flow Type
These dimensions are either attributes of a Cash flow or are attributes of an Account. Dimensions which are
attributes of account are fetched from FCT_COMMON_ACCOUNT_SUMMARY and dimensions
which are attributes of cash flows are fetched from FCT_ACCOUNT_CASH_FLOWS. Once data is
loaded in the FCT_AGG_CASH_FLOWS then currency conversion module is executed which converts
the cash flows from its Natural currency to the Local and Reporting Currency.
For more information on currency conversion, see “Currency Conversion” on page 11.
For Contractual Execution, data flows from FCT_AGG_CASH_FLOWS to the reporting tables and Gap
reports of Unadjusted Cash flows is generated from reporting tables.
For BAU or Stress Execution, the data which was loaded into FCT_AGG_CASH_FLOWS is re-inserted
in the same table against a new execution skey and currency conversion module is re-executed as Reporting
Currency of the Contractual run and BAU or Stress run may be different.
For more information on currency conversion, see “Currency Conversion” on page 11.
Business Assumptions as defined by you are executed in FCT_AGG_CASH_FLOWS where the
aggregated cash flows are stored. Once the assumptions are applied, rules for assumptions will adjust the
cash flow in the reporting currency; hence currency conversion is re-executed which will convert adjusted
cash flows from reporting currency to local and natural currency.
Once cash flows are adjusted in the FCT_AGG_CASH_FLOWS data is moved into the reporting tables
and Gap reports of Adjusted Cash flow can be generated from these reporting tables.

Annexure C: Business Assumptions Data Maintenance Adding Existing Dimension to the Assumption
The steps for configuring an existing dimension in the assumption are as follows:
1. Add existing dimension in the source hierarchy of the assumption rule.
2. Change ANSI Join in the associated dataset to include the newly added dimension table.
Adding New Dimension to the Assumption
The steps for configuring new dimension in the assumption are as follows:
1. New dimensions can be added by including the new dimensions table or creating an alias
over the existing dimension table.
2. Create a hierarchy on the Dimension table or alias.
If it’s a cash flow Attribute then a column needs to be added to the following tables:
STG_ACCOUNT_CASH_FLOWS
FCT_PROCESS_CASHFLOW
FCT_ACCOUNT_CASH_FLOWS
FCT_AGG_CASH_FLOWS
TEMP_AGG_CASH_FLOWS
FSI_BEHAVIOR_ASSUMPTIONS
TEMP_FSI_BEHAVIOR_ASSUMPTIONS
FSI_BEHAVIOR_ASSUMPTIONS_FD (data type should be
VARCHAR2(500))
TEMP_FSI_BEHAVIOR_ASSMPT_FD
o Column_NAME (data type should be VARCHAR2(500) as it holds a
hierarchy unique code)
o Column_NAME_DSC (data type should be VARCHAR2(500))
Column Name should be the same across the following tables:
○FCT_PROCESS_CASHFLOW
○FCT_ACCOUNT_CASH_FLOWS
○FCT_AGG_CASH_FLOWS
○TEMP_AGG_CASH_FLOWS
○FSI_BEHAVIOR_ASSUMPTIONS
○TEMP_FSI_BEHAVIOR_ASSUMPTIONS
If it’s an account attribute then a column needs to be added to the following tables:
FCT_COMMON_ACCOUNT_SUMMARY
FCT_AGG_CASH_FLOWS
TEMP_AGG_CASH_FLOWS
FSI_BEHAVIOR_ASSUMPTIONS
TEMP_FSI_BEHAVIOR_ASSUMPTIONS

FSI_BEHAVIOR_ASSUMPTIONS_FD (data type should be
VARCHAR2(500))
TEMP_FSI_BEHAVIOR_ASSMPT_FD
Column_NAME (data type should be VARCHAR2(500) as it holds hierarchy
unique code)
Column_NAME_DSC (data type should be VARCHAR2(500))
Column_NAME is just a dummy name for the column. You need to specify an appropriate name.
Column Name should be the same across following tables:
FCT_COMMON_ACCOUNT_SUMMARY
FCT_AGG_CASH_FLOWS
TEMP_AGG_CASH_FLOWS
FSI_BEHAVIOR_ASSUMPTIONS
TEMP_FSI_BEHAVIOR_ASSUMPTIONS
Changes the appropriate T2Ts which is populating data from one table to another table.
Changes in level flatting DT (FN_DT_LEVEL_FLATTEN_BAU_FD) which populates data
from FSI_BEHAVIOR_ASSUMPTIONS_FD to
TEMP_FSI_BEHAVIOR_ASSUMPTIONS table
The list of changes required in the DT is as follows:
Add a new column in the cursor which fetches the data from
FSI_BEHAVIOR_ASSUMPTIONS_FD.
There are a set of IF Clauses for each of the Dimensions which are part of the
aggregate table. One or more IF clauses are required to be added so that the new
column can be added as the Dimension.
If the hierarchy of the Dimension is based on alias then the following entry is to be made in
SETUP_BA_ALIAS_FLAG_MAP.
Column Name Description of the Entry to be made
V_ALIAS_NAME Alias name of the Table
V_FLAG_COL_NAME Physical column name in the
FSI_BEHAVIOR_ASSUMPTIONS
Table 58: Entry for Hierarchy of Dimension based on Hierarchy
Add entry in SETUP_MASTER. The entry should be as follows:
Column Name Description of the First Entry to be
made
Description of the Second Entry to be
made
V_COMPONENT_CODE Following Format entry required
LRM#DIM<running_number>#
Name of Dimension Table/Alias over
which the corresponding Hierarchy has

Column Name Description of the First Entry to be
made
Description of the Second Entry to be
made
been created
V_COMPONENT_DESC Following is the Entry required
Dimensions used in LRM
Following is the Entry required Dimension
Code - Column Mapping
V_COMPONENT_VALU
E
Physical column name in the
FSI_BEHAVIOR_ASSUMPTIONS
Physical column name in the
FSI_BEHAVIOR_ASSUMPTIONS_FD
Table 59: Add entry in SETUP_MASTER
Add dimension in the source hierarchy of the assumption’s Rule.
Change ANSI Join in the associated dataset to include the newly added dimension table.

Annexure D: Configuring Pre and Post Process steps in a BAU run. The entries which explain the configuration of pre and post processing steps in a Business as Usual (BAU)
Execution are as follows:
Update entry in SETUP_MASTER. Entries should be as follows:
For post processing, update process code of new post process where
V_COMPONENT_CODE equals to RM_POSTPROCESS_CODE.
For pre processing update process code of new pre process where
V_COMPONENT_CODE equals to RM_PREPROCESS_CODE.

Annexure E: Best Practices in Configuring Behaviour Assumptions The best practices in configuring Behaviour Assumptions are listed as follows:
The Rules Framework of OFSAAI is the framework in which the Behaviour Assumption's are
executed.
The ‘Behaviour Assumption’ screen displays only those hierarchies which are selected in the
underlying Rule. In other words, a filter at the UI level helps to display only those hierarchies
that are already selected in the underlying Rule.
In Rules, include only those hierarchies on which you want to configure the Behaviour
Assumptions. Adding hierarchies in the Rule and not using them in the Behaviour Assumptions
is as good as excluding them in the Rule, as the default behaviour is to select all the leaf values
of Hierarchies participating in the underlying Dataset.
The nodes selected in the Behaviour Assumption acts as filters on the Hierarchy chosen in the
underlying Rules.
Assumptions should be defined for selective nodes therefore it is best not to map the Assumption
at the root node of the hierarchies. If Assumptions are defined at the root level of the hierarchy
then it is as good as not selecting the hierarchy in the underlying Rule.
While defining the underlying Rule of the ‘Behaviour Assumptions’, map the corresponding
Business Processor at the root level of the source hierarchies. Though the Behaviour Assumption
may specify behaviour at a higher level of the hierarchy, these Assumptions are applied only on
the nodes chosen in the Rule, since the Rule is defined on specific nodes of the Hierarchy.
Therefore, the function of the Behavior Assumption UI is to filter the data over and above the
filters already applied by the underlying Rule and Dataset.

Annexure F: Multiple Segments The configurations to be done to support multiple segments:
Comma separated list of all the segments created for LRM needs to be updated in
V_COMPONENT_VALUE of SETUP_MASTER table where V_COMPONENT_CODE
equals to LRMSEGM. The entry should be as follows:
○ Time Bucket is common across all the segments.
○ Segment is not applicable to “Counterbalancing Strategy Definition”, user can define
counterbalancing strategy on the runs defined across LRM segments.

Annexure G: Time Bucket User can define multiple time bucket definitions, but only one definition is applicable for LRM processing.
The specific time bucket definition is configured by following SETUP_MASTER entries.
‘Time Bucket as of date identifier’ should be updated to the ‘as of date of the time bucket’ to be
used for processing. ‘As of date’ should be updated in column V_COMPONENT_VALUE of
SETUP_MASTER table where V_COMPONENT_CODE equals to
LRM_BCKT_AS_OF_DATE in “YYYYMMDD” format (Default value is 19000123).
‘Time Bucket Sys id’ should be updated to the ‘Sys id of the time bucket’ to be used for
processing. Sys id should be updated in column V_COMPONENT_VALUE of
SETUP_MASTER table where V_COMPONENT_CODE equals to LRM_BCKT_SYS_ID
(Default value is -999999).
‘Time Bucket type identifier’ should be updated to the ‘bucket type identifier of the time bucket’
to be used for processing. Bucket type identifier should be updated in column
V_COMPONENT_VALUE of SETUP_MASTER table where V_COMPONENT_CODE
equals to LRM_BCKT_TYPE_ID (Default value is LRM).

Annexure H: Configuring Limit Management Limit Management in LRM Application is used to setup Liquidity Gap Limit. Following are the steps for
configuring the limit defined in limit management application in LRM.
Define limit using Limit Management Application. Please refer to Limit Management user guide
for defining the limit management application.
Once limit is defined, “SETUP_LIMIT_APP_VALUES” has to be updated. Following are the
values to be updated in the table:
Column Name Value to be update Comment
n_limit_seq Sequence to be populated Sequence is the running number in the table, if there
are no records then sequence will start from 1
v_dataset_code DSLRM051 This is a pre-defined data set for Limit in LRM,
with description as “Liquidity Gap Limit”.
DIM_ORG_STRUCTURE and
DIM_RESULT_BUCKET are included in the
dataset definition (by default), If user prefers to
define limit on any other hierarchies, the
dimensions on which those hierarchies are defined
have to be included in the dataset.
If user prefers to use any other data set for Limit
updation, then, the corresponding data set value has
to be updated in this column.
v_target_measure_code Measure code created on
n_gap_limit
Measure has to be created on the target column.
Target column can be any column of the fact table
included in dataset mentioned in v_dataset_code
column.
By default, LRM stores the limit in the following
column of Fact Aggregate Cash Flow table
FCT_AGG_CASH_FLOWS.N_GAP_LIMIT.
If user prefers to use the same column a measure
has to be created on the column and updated in this
field.
If user prefers to use some other column of the fact
table selected in the above dataset then measure has
to be created on the corresponding column and
updated in the this field.
n_limit_def_sys_id Limit definition System ID of
the LRM limit created.
Limit Definition System ID is generated while
defining Limit through Limit Management
Application.
Details of the Limit Definition System ID are
available FSI_LIMIT_DEFINITION_DETAILS
and FSI_LIMIT_DEFINITION_VALUES.
n_limit_template_sys_id Limit template ID of the
LRM limit created.
Limit Definition Template ID is generated while
defining Limit template through Limit Management
Application.
Details of the Limit Definition Template ID are
available FSI_LIMIT_DEFINITION_DETAILS
and FSI_LIMIT_DEFINITION_VALUES.
v_appl_name LRM This field stores the Application name, for LRM
Application, value of this field will be LRM.

Glossary
AASF Available Amount of Stable Funding
BAU Business as Usual
BCBS Basel Committee for Banking Supervision
BCBS 188
Basel III: International framework for liquidity risk measurement,
standards and monitoring
HQLA High Quality Liquid Asset
ILAS Individual Liquidity Adequacy Standards
LCR Liquidity Coverage Ratio
Level 1 Assets
Level 1 Assets as per Basel III Guidelines are as follows:
Cash
Central bank reserves to the extent that can be drawn down
during times of stress.
Marketable securities which satisfy the following conditions:
Issuer type or Guarantor Type is one of the
following:
o Sovereign
o Central Bank
o Non-Central Government Public
Sector Entity
o Multi-lateral Development Bank
o The Bank For International
Settlements
o The International Monetary Fund
o The European Commission
They are assigned a 0% risk-weight under the
standardized Approach of Basel II
Issuer type is not a bank or other financial
services entity
Debt securities issued in the local currency of the legal entity
in which the liquidity risk is being undertaken or the bank’s
country of domicile where the issuer type is sovereign or
central bank and the risk weight assigned to the sovereign is
greater than 0%
Debt securities issued in foreign currencies, to the extent that
matches currency needs of bank’s operations in that
jurisdiction, where the issuer type is domestic sovereign or
central bank and the risk weight assigned to the sovereign is
greater than 0%
Level 2 Assets
Level 2 Assets as per Basel III Guidelines are as follows:
Marketable securities which satisfy the following conditions:
Issuer type or Guarantor Type is one of the
following:

o Sovereign
o Central Bank
o Non-Central Government Public
Sector Entity
o Multi-lateral Development Banks
They are assigned a 20% risk-weight under the
standardized Approach of Basel II
Price has not decreased or haircut has not
increased by more than 10% over a 30-day
period during a relevant period of significant
liquidity stress which is specified by the bank
Corporate Bonds and Covered Bonds which satisfy the
following conditions
Issuer type is a non-financial institution
Issuer type is not the bank itself for which the
computations are being carried out or any of its
affiliated entities (in case of covered bonds)
Credit rating by a recognized external credit
assessment institution is equal to or greater than
AA- or if it does not have an external rating, the
probability of default as per the internal rating
corresponds to a rating which is equal to or
greater than AA-
Price has not decreased or haircut has not
increased by more than 10% over a 30-day
period during a relevant period of significant
liquidity stress which is specified by the bank
NSFR Net Stable Funding Ratio
OFSAAI Oracle Financial Services Analytical Applications Infrastructure
RASF Required Amount of Stable Funding
Revised Time
Buckets
Revised time bucket is the bucket into which the cash flows are to be
moved from the original time bucket.
Unencumbered
Assets
Unencumbered Assets are assets which can easily sold or mortgaged as
these assets are free from debt with no legal defects in its title.

Index
A
Activate Behaviour Assumption ..................................................................................................................................................... 44 Add Behaviour Assumption ............................................................................................................................................................ 44 Add Counter Banlancing method .................................................................................................................................................... 44 Add LRM Run ................................................................................................................................................................................ 45 Adding Existing Dimension to the Assumption ............................................................................................................................. 126 Additional Collateral - Rating Downgrade Asset Value Decrease ................................................................................................... 20 Additional Collateral - Rating Downgrade Asset Value Decrease Calculation ................................................................................. 20 Additional Collateral - Rating Downgrade Increase in Cash flow .................................................................................................... 19 Additional Collateral - Rating Downgrade Increase in Cash flow Calculation ................................................................................. 19 Additional Collateral - Valuation Changes – Increase in Cash flow ................................................................................................. 19 Applying Counterbalancing Strategies ............................................................................................................................................ 56 Asset Book Growth ......................................................................................................................................................................... 29 Asset Book Growth Calculation....................................................................................................................................................... 29 Asset Level Identification ................................................................................................................................................................ 37 Assumption Currency ...................................................................................................................................................................... 49 Assumption Description .................................................................................................................................................................. 48 Assumption Details ......................................................................................................................................................................... 48 Assumption Specification................................................................................................................................................................ 49 Assumption Type ............................................................................................................................................................................ 48 Assumption unit .............................................................................................................................................................................. 49 Available Stable Funding Factors .................................................................................................................................................... 35
B
Base currency.................................................................................................................................................................................. 15 Basel Committee on Banking Supervision
BCBS ........................................................................................................................................................................................... 10 Business As Usual Execution
BAU Execution ............................................................................................................................................................................ 36 Business as Usual Run Parameters Selection screen .................................................................................................................... 109 Business Assumption Add - Additional Collateral - Rating Downgrade Increase in Cash Flow screen ............................................ 69 Business Assumption Add - Additional Collateral - Valuation Changes Increase in Cash Flow screen ............................................ 71 Business Assumption Add - Change in Value Of Asset screen ...................................................................................................... 101 Business Assumption Add - Deposit Balance Growth screen .......................................................................................................... 66 Business Assumption Add – Haircut screen .................................................................................................................................... 68 Business Assumption Add – Prepayment screen ............................................................................................................................ 81 Business Assumption Add - Rollover of Assets screen .................................................................................................................... 75 Business Assumption Add - Rollover of Liabilities screen ............................................................................................................... 77 Business Assumption Add - Run-off screen .................................................................................................................................... 79 Business Assumption Edit - Additional Collateral - Rating Downgrade Decrease in Asset screen .................................................. 72 Business Assumption Edit - Asset Book Growth screen ............................................................................................................ 89, 90 Business Assumption Edit - Available Stable Funding Factors screen ........................................................................................... 104 Business Assumption Edit - Drawdown of Funding Line of Credit screen ....................................................................................... 99 Business Assumption Edit - Drawdown of Unutilized Credit screen ......................................................................................... 93, 94 Business Assumption Edit - Emerging Delinquency -Large Customers screen ................................................................................ 83 Business Assumption Edit - Emerging Delinquency –Non Large Customers screen ....................................................................... 84 Business Assumption Edit - EOP Asset Balance Growth screen ...................................................................................................... 95 Business Assumption Edit - EOP Balance Run-off screen ................................................................................................................ 87 Business Assumption Edit - EOP Liability Growth screen ................................................................................................................ 97 Business Assumption Edit - Liability Book Growth screen ........................................................................................................ 91, 92 Business Assumption Edit - Liquidity Haircut screen .................................................................................................................... 102 Business Assumption Edit – Recovery from Delinquent Accounts screen ...................................................................................... 86 Business Assumption Summary screen ........................................................................................................................................... 65 Business Assumptions Data Maintenance .................................................................................................................................... 126 Business assumptions types ........................................................................................................................................................... 17 Business day conventions ............................................................................................................................................................... 14

Business Days computation ............................................................................................................................................................ 13 Business Metadata Documents ...................................................................................................................................................... viii
C
Cash Flow Aggregation ................................................................................................................................................................... 14 Cash Flow Assignment Method for Leg 1 and Leg 2 ....................................................................................................................... 50 Cash flow data ................................................................................................................................................................................ 12 Cash flow date ................................................................................................................................................................................ 13 Cash inflow ..................................................................................................................................................................................... 39 Cash outflow ............................................................................................................................................................................. 37, 39 Change in Value Of Asset ................................................................................................................................................................ 35 Concentration by Significant Counterparties .................................................................................................................................. 37 Concentration by Significant Currencies ......................................................................................................................................... 37 Concentration by Significant Products ............................................................................................................................................ 37 Conditional Following ..................................................................................................................................................................... 14 Conditional Prior Day Convention .................................................................................................................................................. 14 Configuring Behaviour Assumptions ............................................................................................................................................. 130 Configuring Existing Dimension .................................................................................................................................................... 126 Consolidation Type ......................................................................................................................................................................... 54 Contractual run ............................................................................................................................................................................... 16 Contractual Run Parameters Selection screen .............................................................................................................................. 111 Counterbalancing Positions Add 1 screen..................................................................................................................................... 119 Counterbalancing Positions Add 2 screen..................................................................................................................................... 120 Counterbalancing Strategies ........................................................................................................................................................... 42 Counterbalancing Strategies definition errors ................................................................................................................................ 60 Counterbalancing Strategy Definition ............................................................................................................................................. 56 Counterbalancing Strategy Definition Screen 1 screen ................................................................................................................ 116 Counterbalancing Strategy Definition Screen 2 screen ................................................................................................................ 118 Counterbalancing Strategy Name ................................................................................................................................................... 56 Counterbalancing Strategy Summary screen ................................................................................................................................ 115 Create Batch ................................................................................................................................................................................... 56 Currency Conversion Features ........................................................................................................................................................ 15 Currency conversion inputs ............................................................................................................................................................ 15 Currency conversion process flow .................................................................................................................................................. 15
D
Data Analyst .................................................................................................................................................................................... viii Data flow....................................................................................................................................................................................... 123 Data Quality Checks ........................................................................................................................................................................ 47 Data Quality Checks on STG_ACCOUNT_CASH_FLOWS .................................................................................................................. 47 Data Quality Framework ................................................................................................................................................................. 47 Data Requirements ......................................................................................................................................................................... 44 Defining Business Assumptions – Screen Inputs ............................................................................................................................. 47 Delete Behaviour Assumption ........................................................................................................................................................ 44 Delete Counter Banlancing method ................................................................................................................................................ 44 Delete LRM Run............................................................................................................................................................................. 45 Deposit Balance Growth Calculation .............................................................................................................................................. 18 Deposits Balance Growth ................................................................................................................................................................ 18 DIM_RESULT_BUCKET..................................................................................................................................................................... 13 Dimension Member Selection ........................................................................................................................................................ 48 Dimensions for cash flow aggregation .......................................................................................................................................... 123 direct quote .................................................................................................................................................................................... 15 Documents ...................................................................................................................................................................................... viii Download Specifications document ............................................................................................................................................... viii Drawdown of Funding Line of Credit .............................................................................................................................................. 34 Drawdown of Unutilized Credit ...................................................................................................................................................... 30
E
Emerging Delinquency -Large Customers ....................................................................................................................................... 22

Emerging Delinquency -Large Customers Calculation .................................................................................................................... 23 Emerging Delinquency –Non Large Customers ............................................................................................................................... 23 Emerging Delinquency –Non Large Customers Calculation ............................................................................................................ 24 EOP Asset Balance Growth ............................................................................................................................................................. 31 EOP Balance Run-off ....................................................................................................................................................................... 25 EOP Liability Balance Growth .......................................................................................................................................................... 32 Exchange rate computation ............................................................................................................................................................ 16 Execute ........................................................................................................................................................................................... 56 Execute LRM Run .......................................................................................................................................................................... 45 Executing a Run .............................................................................................................................................................................. 53 Execution ........................................................................................................................................................................................ 53 Execution date ................................................................................................................................................................................ 13
F
FCT_ACCOUNT_CASH_FLOW ........................................................................................................................................................ 123 FCT_ACCOUNT_CASH_FLOWS ........................................................................................................................................................ 13 FCT_AGG_CASH_FLOWS ......................................................................................................................................................... 14, 123 FCT_COMMON_ACCOUNT_SUMMARY ........................................................................................................................................ 125 FCT_PROCESS_CASHFLOW ..................................................................................................................................................... 13, 123 FIC MIS Date ............................................................................................................................................................................. 55, 56 Following Day Convention .............................................................................................................................................................. 14 Foreign Currency Liquidity Coverage Ratio ..................................................................................................................................... 37 Forward Exchange Rate .................................................................................................................................................................. 15 FSI_HOLIDAY_DETAIL ...................................................................................................................................................................... 13 FSI_HOLIDAY_MASTER .................................................................................................................................................................... 13 Funding Concentration by Counterparty, Currency and Product ................................................................................................... 42 Funding Concentration Calculation................................................................................................................................................. 37
H
Haircut ............................................................................................................................................................................................ 18 Haircut Calculation.......................................................................................................................................................................... 19
I
indirect quote ................................................................................................................................................................................. 15 Inflow Amount ................................................................................................................................................................................ 51 Infrastructure documents .................................................................................................................................................................ix Input in liquidity ratios .................................................................................................................................................................... 37 Inputs for Time Bucketing ............................................................................................................................................................... 13 Interpolation method ..................................................................................................................................................................... 16
L
Level 2 Asset Amount Used ............................................................................................................................................................ 38 Liability Book Growth...................................................................................................................................................................... 30 Liability Book Growth Calculation ................................................................................................................................................... 30 Liquidity Coverage Ratio ..................................................................................................................................................... 36, 37, 40 Liquidity Gap Report Post Counterbalancing .................................................................................................................................. 60 Liquidity Haircut .............................................................................................................................................................................. 35 Liquidity Risk Management Link ..................................................................................................................................................... 63 LRM - Cash Inflow Computation ..................................................................................................................................................... 39 LRM - Cash Outflow Computation .................................................................................................................................................. 39 LRM - Liquidity Coverage Ratio Computation ................................................................................................................................. 40 LRM - NCOF Computation
Net Cash Outflow ....................................................................................................................................................................... 39 LRM - Net Stable Funding Ratio Computation ................................................................................................................................ 42 LRM - SHQLA Computation ............................................................................................................................................................. 39 LRM Application Functionalities ..................................................................................................................................................... 10 LRM LCR Option1 Computation ...................................................................................................................................................... 40

LRM LCR Option2 Computation ...................................................................................................................................................... 40 LRM LCR Option3 Computation ...................................................................................................................................................... 41 LRM_LCR_DATA_POPULATION ................................................................................................................................................. 38, 41 LRMBAACT .................................................................................................................................................................................. 44 LRMBAADD ................................................................................................................................................................................. 44 LRMBADEL .................................................................................................................................................................................. 44 LRMBAMOD ................................................................................................................................................................................. 44 LRMBAVIW .................................................................................................................................................................................. 44 LRMCBADD .................................................................................................................................................................................. 44 LRMCBDEL .................................................................................................................................................................................. 44 LRMCBMOD ................................................................................................................................................................................. 44 LRMCBVIW .................................................................................................................................................................................. 44 LRMRUNADD............................................................................................................................................................................... 45 LRMRUNDEL ............................................................................................................................................................................... 45 LRMRUNEXEC ............................................................................................................................................................................. 45 LRMRUNMOD .............................................................................................................................................................................. 45 LRMRUNVIW ............................................................................................................................................................................... 45
M
Modify Counter Banlancing method ............................................................................................................................................... 44 Modify LRM Run ........................................................................................................................................................................... 45 Module 1: Setup Data Management .............................................................................................................................................. 45 Multi Level Time Bucketing
Level 0, Level 1, Level 2 Time Buckets ........................................................................................................................................ 14
N
Net Cash outflow (NCOF) ................................................................................................................................................................ 39 Net stable funding ratio .................................................................................................................................................................. 37 Net Stable Funding Ratio ................................................................................................................................................................ 41 New Funding ............................................................................................................................................................................. 43, 60 New Repo Deal ......................................................................................................................................................................... 42, 59 No adjustment Day Convention ...................................................................................................................................................... 14 Notch .............................................................................................................................................................................................. 49 Number of Holidays computation .................................................................................................................................................. 13
O
OFSAAI Log in Screen ...................................................................................................................................................................... 61 OFSAAI Logout Screen .................................................................................................................................................................... 62 Option 1 .......................................................................................................................................................................................... 40 Option 2 .......................................................................................................................................................................................... 40 Option 3 .......................................................................................................................................................................................... 40 Outflow Amount ............................................................................................................................................................................. 51
P
Preparing for Execution .................................................................................................................................................................. 44 Prepayment .................................................................................................................................................................................... 22 Prior Day Convention ...................................................................................................................................................................... 14 Process Flow ................................................................................................................................................................................... 12 Process Flow of liquidity ratios ....................................................................................................................................................... 37
R
Recovery from Delinquent Accounts ........................................................................................................................................ 24, 25 Required Amount of Stable Funding ............................................................................................................................................... 41 Required Stable Funding Factors .................................................................................................................................................... 36 Revised Time Bucket ....................................................................................................................................................................... 51 Roll Over of existing Repos ............................................................................................................................................................. 58

Rollover of Assets ........................................................................................................................................................................... 20 Rollover of Assets Calculation ......................................................................................................................................................... 21 Rollover of existing Repos ............................................................................................................................................................... 42 Rollover of Liabilities ....................................................................................................................................................................... 21 Rule Name ...................................................................................................................................................................................... 48 Rule shocks ..................................................................................................................................................................................... 36 Run Data Management ................................................................................................................................................................... 46 Run Execution Description .............................................................................................................................................................. 56 Run Execution ID ............................................................................................................................................................................. 57 Run Execution Parameters Selection screen................................................................................................................................. 113 Run Execution Summary screen ................................................................................................................................................... 114 Run Management Summary ........................................................................................................................................................... 55 Run Management Summary screen .............................................................................................................................................. 107 Run Name ....................................................................................................................................................................................... 54 Run Selection .................................................................................................................................................................................. 56 Run-off ............................................................................................................................................................................................ 22
S
Sale of Marketable Assets ......................................................................................................................................................... 42, 57 Sale of Other Assets .................................................................................................................................................................. 42, 58 Scope of the Application ................................................................................................................................................................. 10 setup tables .................................................................................................................................................................................... 45 Spot rate ......................................................................................................................................................................................... 15 Staging tables .................................................................................................................................................................................. 46 STG_ACCOUNT_CASH_FLOWS ...................................................................................................................................................... 123 Stock of High Quality Liquid Asset (SHQLA) .................................................................................................................................... 39 Stress Assumption Definition .......................................................................................................................................................... 36 Stress Execution .............................................................................................................................................................................. 36 Stress Scenario Definition ............................................................................................................................................................... 36
T
Time bucket definitions .................................................................................................................................................................. 13 Time bucket hierarchy .................................................................................................................................................................... 18 Time Bucket Summary screen......................................................................................................................................................... 64 Time Bucketing ............................................................................................................................................................................... 13 Time Bucketing Process Flow .......................................................................................................................................................... 13
V
View Behaviour Assumption .......................................................................................................................................................... 44 View Counter Banlancing method .................................................................................................................................................. 44 View LRM Run .............................................................................................................................................................................. 45
W
Wholesale funding .......................................................................................................................................................................... 37

Oracle Financial Services Liquidity Risk Management Release 2.0, User Guide
September 2013
Version number 1.0
Oracle Corporation
World Headquarters
500 Oracle Parkway
Redwood Shores, CA 94065
U.S.A.
Worldwide Inquiries:
Phone: +1.650.506.7000
Fax: +1.650.506.7200
http://www.oracle.com/us/industries/financial-services/index.html
Copyright © 2013, Oracle and/or its affiliates. All rights reserved.
No part of this work may be reproduced, stored in a retrieval system, adopted or transmitted in any form or by any means, electronic, mechanical, photographic, graphic, optic recording or otherwise, translated in any language or computer language, without the prior written permission of Oracle Financial Services Software Limited.
Due care has been taken to make this Oracle Financial Services Liquidity Risk Management User Guide and accompanying software package as accurate as possible. However, Oracle Financial Services Software Limited makes no representation or warranties with respect to the contents hereof and shall not be responsible for any loss or damage caused to the user by the direct or indirect use of this User Manual and the accompanying Software System. Furthermore, Oracle Financial Services Software Limited reserves the right to alter, modify or otherwise change in any manner the content hereof, without obligation of Oracle Financial Services Software Limited to notify any person of such revision or changes. All company and product names are trademarks of the respective companies with which they are associated.