oracle eloqua profiler user guide · ©2020oraclecorporation.allrightsreserved 2of87 contents...
TRANSCRIPT

Oracle Eloqua Profiler
User Guide
©2020Oracle Corporation. All rights reserved 15-Jul-2020

©2020Oracle Corporation. All rights reserved 2 of 95
Contents
Profiler 4
Installing Profiler 8
Reconfiguring Profiler 12
Accessing Profiler 15
Apps for Profiler 17
Installing apps for Profiler 17
Managing Profiler app extensions 18
Restricting access to a Profiler app using Oracle Eloqua Security Groups 19
Accessing contact records in Profiler 21
Viewing data in Profiler 27
Summary 29
Activities 31
Details 31
Extensions 34
Adjusting the lead score model 35
Setting up activity notifications 36
Viewing email alerts 38
Accessing LinkedIn Sales Navigator 42
Profiler integration 44
Embedding Profiler as a subtab in Oracle CX Sales 44
Step 1: Creating a sandbox 45
Step 2: Creating mashup content 46
Step 3: Adding the mashup content to a standard object 48
Step 4: Publishing your sandbox 51
Adding a Profiler link to Oracle CX Sales 52

©2020Oracle Corporation. All rights reserved 3 of 95
Embedding Profiler in CRM onDemand 55
Embedding Profiler in Microsoft Dynamics 2013 58
Embedding Profiler in Microsoft Dynamics 2016 62
Embedding Profiler in Microsoft Dynamics 365 66
Embedding Profiler in Salesforce Classic 76
Embedding Profiler in Salesforce Lightning 86
Embedding Profiler in OKTA with SSO 92
Configuration 92

©2020Oracle Corporation. All rights reserved 4 of 95
Profiler
Profiler is one of Oracle Eloqua's Sales Tools. It presents valuable information about
contacts in an easily accessible and data-rich format that can be viewed on desktop
computers, tablets, and mobile devices.
With Profiler you are able to view the contact details for a potential client, their activities,
their lead score value, and so on. It is designed specifically for use with iOS and Android
devices, giving marketers the option to access Oracle Eloqua's Profiler functionality from
their mobile devices when they are on-the-go.
See examples of Profiler's responsive design on multiple devices (desktop, tablet, and
mobile phone):

©2020Oracle Corporation. All rights reserved 5 of 95

©2020Oracle Corporation. All rights reserved 6 of 95

©2020Oracle Corporation. All rights reserved 7 of 95
Learn more by watching this video: https://www.youtube.com/playlist?list=PLw7GyH-
Hj8cPP6TQfGeDGUYv4Py9k_EwQ
Note: Before you can access the responsive version of Profiler it must be
installed in your Oracle Eloqua instance. Once installed, the customer
administrator can customize the options that Profiler provides. Learn more about
installing and configuring Profiler.

©2020Oracle Corporation. All rights reserved 8 of 95
Installing Profiler
Before you can use Profiler a user with client administrator rights must install the app
and configure the settings for your Eloqua instance.
Important: Ensure that your users have asset creation permissions for creating
emails and profile views.
To install the Profiler app:
1. Follow the Profiler installation URL provided:
https://login.eloqua.com/?ReturnUrl=Apps/Cloud/Admin/Catalog/Add/512cc250-bf75-4b64-
98c2-9ce3858a18e1/D3-01-E2-AB-6C-23-36-17-7C-B1-44-49-89-11-D0-C3
2. Log in with your Eloqua credentials, if required.
3. Click Accept and Install to add the app to your Apps list.'
4. Confirm your credentials and click Sign In.

©2020Oracle Corporation. All rights reserved 9 of 95
5. Configure Profiler:
Settings

©2020Oracle Corporation. All rights reserved 10 of 95
a. Select the check boxes next to the options that you want to enable for your instance.
Note: Clearing the Show Subscription Status check box will hide the subscription
status from the Details tab in Profiler.
Note: Email preview is available for 120 days after the send date.
b. Apps: Enable the display of apps, such as LinkedIn Sales Navigator.
c. Social Field Mappings: To map the social fields that will appear in Profiler, select the field that
corresponds with each social networking platform. Contacts may have more than one account in a
single social networking site. The Social Field Mappings section allows you to specify from which
account fields, personal or professional, Profiler should draw information.
d. ClickSave.
App Access

©2020Oracle Corporation. All rights reserved 11 of 95
a. Select the apps for which you want to allow your Oracle Eloqua security groups to access.
Note: Users must log out of Eloqua for Eloqua security group changes to take effect.
6. Click Accept or switch users.
The app is now installed and can be viewed in your Apps list (Settings > Apps, under
the Platform Extensions section). Select an app to view a description, modify the
configuration settings, reinstall, or uninstall it. You can also check its status and
dependencies.
You can change these configuration settings at any time. Learn more about
reconfiguring Profiler.

©2020Oracle Corporation. All rights reserved 12 of 95
Reconfiguring Profiler
The options that appear in Profiler depend on the settings that were selected when the
app was installed. If you would like to reconfigure these settings, you must do so through
the AppCloud catalog.
Important: The configuration process must be done by a user with client
administrator rights.
To reconfigure Profiler:
1. Log in to Oracle Eloqua.
2. Click Settings .
3. Click Apps in the PlatformExtensions section.
4. Select the Profiler app.
5. ClickConfigure .
6. Reconfigure Profiler using the Settings and App Access tabs as needed.
Settings

©2020Oracle Corporation. All rights reserved 13 of 95
a. Select the check boxes next to the options that you want to enable for your instance.
Note: Clearing the Show Subscription Status check box will hide the subscription
status from the Details tab in Profiler.
Note: Email preview is available for 120 days after the send date.
b. Apps: Enable the display of apps, such as LinkedIn Sales Navigator.
c. Social Field Mappings: To map the social fields that will appear in Profiler, select the field that
corresponds with each social networking platform. Contacts may have more than one account in a
single social networking site. The Social Field Mappings section allows you to specify from which
account fields, personal or professional, Profiler should draw information.
d. ClickSave.
App Access

©2020Oracle Corporation. All rights reserved 14 of 95
a. Select the apps for which you want to allow your Oracle Eloqua security groups to access.
Note: Users must log out of Eloqua for Eloqua security group changes to take effect.
7. Click Save to save your settings.
Your configuration settings have been updated. You can modify them at any time.

©2020Oracle Corporation. All rights reserved 15 of 95
Accessing Profiler
Note: Before you can access the responsive version of Profiler it must be
installed in your Oracle Eloqua instance. Once installed, the customer
administrator can customize the options that Profiler provides. Learn more about
installing and configuring Profiler.
Profiler can be accessed in the following ways:
l Direct: https://login.eloqua.com/apps/salesTools/profiler
l Autologin: https://login.eloqua.com/autoLogin?LoginPrefix={Login_
Prefix}&Url=/apps/salesTools/profiler
l SAML: https://login.eloqua.com/auth/saml2/autologin?LoginPrefix=
{Login_Prefix}&ReturnUrl=/apps/salesTools/profiler
l SFDC IDP: https://{podURL}/sso/sfdc/v1/svp.aspx?LP={Login_
Prefix}&RU=/apps/salesTools/profiler
Replace {podURL} with the URL in your browser after you have logged in successfully to
Eloqua (for example, secure.p01.eloqua.com). Click here for additional information
about how to determine your pod.
Login Prefix is a four-character code for the company name that you enter in the Company
box on the login page. To add this parameter to your URL, enter LoginPrefix={Login_Prefix} ,
where {Login_Prefix} is replaced with the four characters company name. You can obtain
your company's login prefix in Eloqua by navigating to Settings > Display Preferences >
Company Defaults.

©2020Oracle Corporation. All rights reserved 16 of 95
Example: In the example image below, the login prefix is EXCO.
You can also directly access a contact's record in Profiler using their email address.
Simply add the following to the URLs above, and insert the contact's email address
where needed: /contacts?emailAddress=[enter contact's email address]
Tip: If you are using Microsoft Internet Explorer or Microsoft Edge to access the
Oracle Eloqua sign in page in an iframe, an addition should be made to trusted
sites. Add https://*.eloqua.com and the URL of the site where login page
(Oracle Eloqua and/or Sales Tools) is being iframed. The browser must be closed
fully and restarted before the change is recognized. For additional information, see
this Topliners post about Oracle Eloqua login enhancements.

©2020Oracle Corporation. All rights reserved 17 of 95
Apps for Profiler
Apps that are available for Oracle Eloqua Profiler are built on Oracle CX Apps, which is
the extension framework that partners and customers can use to build apps that are
available for multiple applications within Oracle CX Marketing. For more information on
Oracle CX Apps, visit the Oracle CX Marketing App Manager Help Center.
In this topic, you'll learn about:
l Installing apps for Profiler
l Managing Profiler app extensions
l Restricting access to a Profiler app using Oracle Eloqua Security Groups
Installing apps for Profiler
Apps available for Profiler can be found in the Oracle Cloud Marketplace
(https://cloudmarketplace.oracle.com/marketplace/en_US/homePage.jspx). Once the
app is installed in Profiler, you'll be able to manage and configure it from within Oracle
Eloqua.
Important: The configuration process must be done by a user with client
administrator rights.
Installation is a straight forward guided experience that will generally follow these
steps:

©2020Oracle Corporation. All rights reserved 18 of 95
1. Start in theOracle CloudMarketplace (https://cloudmarketplace.oracle.com/marketplace/en_
US/homePage.jspx) and search for the app you want to install.
2. Click on the app listing, then click theGet App button.
3. You will be prompted where you want to install the app, if it was built to be used with multiple
Oracle CX Marketing products i.e. Eloqua Sales Tools, Responsys or Maxymizer. In this case
you will be installing into one of the Sales Tools products. Pick the product where you want to
install the app.
4. Log in with your Eloqua credentials, if required.
5. ClickConfirm to confirm the installation of the app into Oracle Eloqua Profiler.
Although there may be slight variances in the flow, these are generally the steps you will
experience when installing an app. After you’ve installed the app, you can review its
configuration and control its usage based on your individual needs.
Managing Profiler app extensions
Apps installed for Profiler are accessible from within Profiler’s app configuration. This is
a bit different from other apps in Oracle Eloqua because apps installed for Profiler do not
display in the main AppCloud Catalog. You must go into the settings for Profiler itself to
locate the apps that you’ve installed just for Profiler.
To manage Profiler app extensions from within Oracle Eloqua:
1. Click Settings in the global header.

©2020Oracle Corporation. All rights reserved 19 of 95
2. Click Apps in the PlatformExtensions section.
3. Find and open the Profiler app.
4. ClickConfigure .
Warning: Selecting the Reinstall option for an app will force you to go through
the entire installation process again. The app will be unavailable for all users during the
reinstall.
5. Clickthe Apps tab.
6. Click on the app to open the configuration options for that app.
7. You can perform the following actions:
lGet Dependencies : View any assets that are using the app's services and would be affected
if the app was uninstalled.
lConfigure : AllowsMarketing Administrators to set up the extension directly from Oracle
Eloqua.
lUninstall : Uninstall and remove the app from your Profiler instance.
l Services: View the kinds of services you currently have under the app.
Restricting access to a Profiler app using Oracle EloquaSecurity Groups
There are certain circumstances where you may want to restrict who can access an app
installed in Profiler. A couple of use cases to consider:

©2020Oracle Corporation. All rights reserved 20 of 95
l You are running an app pilot with a select set of trusted power users within the sales team.
l The app is provided by a third party and requires a paid license that is not available to all sales
users i.e. an account based application where licenses are only available for strategic account
managers and not inside sales.
l The App Access section within Profiler’s global settings will allow you to control who has
access to an app you’ve installed.
1. ClickConfigure in the Profiler page of the AppCloud Catalog.
2. Open the App Access tab.
3. Check the box beside Allow access only to these to security group(s).
Note:When an app is installed, it is available to all users by default. If the box beside
Allow access to security groups is checked but no security groups are selected, then all
security groups are granted access.
4. From the Select a security group drop-down, select the Oracle Eloqua security groups
containing users that should be granted access to the Profiler app.
Important: The listed security groups have been configured in Eloqua. Additionally,
modifying access settingswill immediately change access for users, including deletion
of user settings.
5. Click Save.

©2020Oracle Corporation. All rights reserved 21 of 95
Accessing contact records in Profiler
Profiler allows you to view contact information on your mobile devices using a
convenient and device friendly interface. When you log in to Profiler for the first time you
will see a welcome message on the home page, this message informs you that you can
search for contacts using a name or email address, as described below.
To search for a contact in Profiler:
1. Select the icon in the upper right-hand corner of the Profiler screen.
Note: You can also use the Search Contacts field that appears on the search page
when you open the app.
2. Type a string of letters or numbers corresponding with a contact's First Name, Last Name, or
Email Address field values into the Search bar. This search is not case-sensitive. The results

©2020Oracle Corporation. All rights reserved 22 of 95
display a list of all contacts who have a matching contact field that starts with your search
criteria.
Example: A search for Alex displays users such as Alex, Alexandra, and
Alexander.
3. (Optional) Filter your contacts:
lClick Filter or the filter icon to open the filter. The filter displays on the right.
l Enter a title, account, city, or domain to narrow your contact search, and clickApply.
l Click the X next to a filter to remove it. To remove all filters, clickClear.
Note: Filtering shows users that match all of your filtering criteria (using an AND
operator).
Example of filtering by example.com domain:

©2020Oracle Corporation. All rights reserved 23 of 95
The example below shows filtering by domain of example.com and title of CEO. The results
display all users whomatch both of these criteria. Users who have CEO as the title, but a
different domain will not appear.
4. Select the name of the correct contact from the list. Their contact record opens displaying their
details and activities. Learn more about the information provided in Profiler.
After your first visit to Profiler, a recently-viewed contacts list is displayed on the
homepage. This convenient list makes it easier to locate the contacts that you may be

©2020Oracle Corporation. All rights reserved 24 of 95
dealing with on a regular basis, or with whom you are attempting to establish a
connection. From this recently viewed list you can select the contact's name and you are
taken directly to their contact record.

©2020Oracle Corporation. All rights reserved 25 of 95

©2020Oracle Corporation. All rights reserved 26 of 95

©2020Oracle Corporation. All rights reserved 27 of 95
Viewing data in Profiler
When you open a contact record in Profiler, that contact's email address is displayed
along with any other fields your administrator has given you access to.

©2020Oracle Corporation. All rights reserved 28 of 95
You are also provided with a number of icons that make it easier for you to reach out to a
contact:

©2020Oracle Corporation. All rights reserved 29 of 95
lCall the contact.
lReach out to the contact via email. Clicking this icon or a contact's email address
opens one of the following depending on where you are using Engage:
lWeb Engage: Clicking the icon or a contact's email address in Profiler will open a
Composewindow in Engage.
l Oracle Eloqua Sales Tools for Microsoft Outlook: If you access Profiler inOracle Eloqua
Sales Tools for Microsoft Outlook, clicking the icon or a contact's email address opens a
new compose window in Microsoft Outlook. All emails within Outlook are tracked and will adhere
to contact validation rules.
lBounced back or unsubscribed. This icon indicates that you cannot send a message
to this contact, because email bounced back or the contact is globally unsubscribed.
lLocate the contact using Google Maps.
Contact data is provided under three tabs in Profiler, each of these tabs provide different
useful information that is easy to understand and navigate. With the contact record open
in Profiler, select the corresponding tab to access the information described below.
Summary
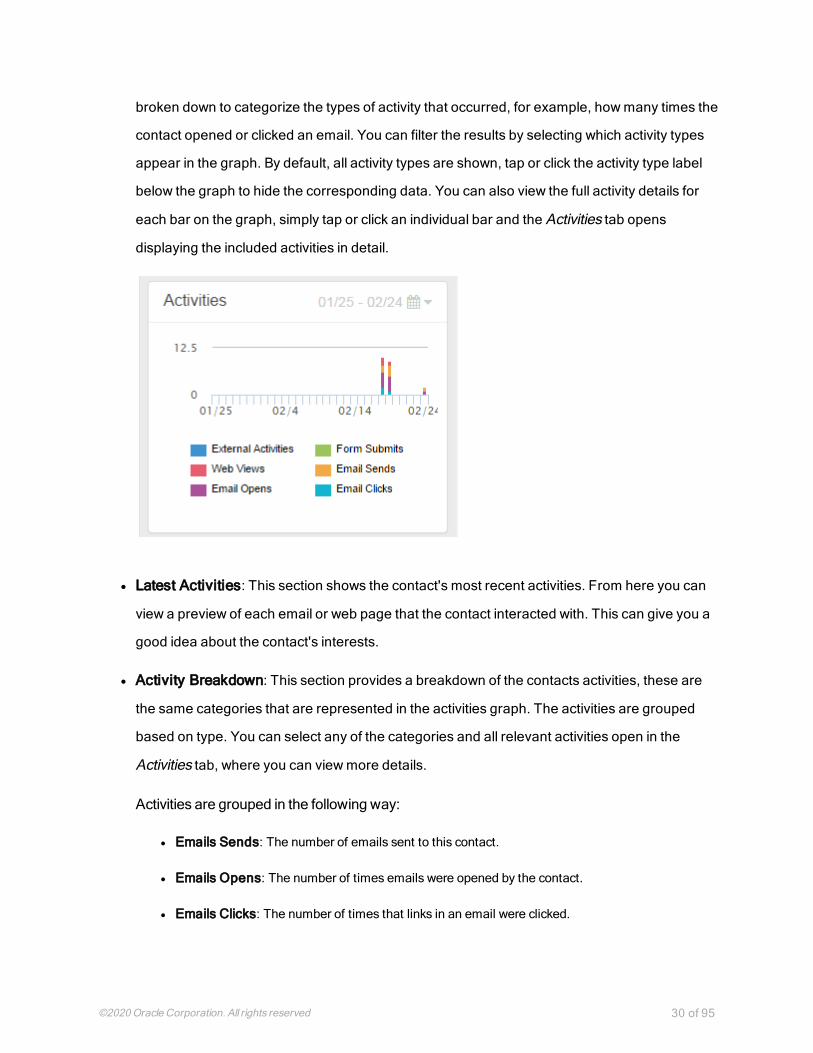
This tab presents the contact's activities in the following ways:
l Activities: This is a graphical representation of all the contact's activities within a specific date
range. You can use the calendar icon in the upper right-hand corner of the graph to change
the date range, select 30 days, 6 months, or 1 year as needed. The bars in the graph are
©2020Oracle Corporation. All rights reserved 30 of 95
broken down to categorize the types of activity that occurred, for example, howmany times the
contact opened or clicked an email. You can filter the results by selecting which activity types
appear in the graph. By default, all activity types are shown, tap or click the activity type label
below the graph to hide the corresponding data. You can also view the full activity details for
each bar on the graph, simply tap or click an individual bar and the Activities tab opens
displaying the included activities in detail.
l Latest Activities: This section shows the contact's most recent activities. From here you can
view a preview of each email or web page that the contact interacted with. This can give you a
good idea about the contact's interests.
l Activity Breakdown: This section provides a breakdown of the contacts activities, these are
the same categories that are represented in the activities graph. The activities are grouped
based on type. You can select any of the categories and all relevant activities open in the
Activities tab, where you can viewmore details.
Activities are grouped in the following way:
l Emails Sends: The number of emails sent to this contact.
l Emails Opens: The number of times emails were opened by the contact.
l Emails Clicks: The number of times that links in an email were clicked.

©2020Oracle Corporation. All rights reserved 31 of 95
l Web Page Visits: Visits to tracked web pages.
l Form Submissions: Number of forms that were submitted by the contact.
l External Activities: Data captured for the contact's non-Eloqua (external) activities, such as
attending a webinar, trade show, and so on.
Activities
This tab shows you all of the contact's activities, all events (email sent, email open and
so on) are listed with the time and date on which they occurred. Here you can select any
event and a thumbnail image will open (if the thumbnails option is enabled), or select
Preview to see the email, form, and so on in more detail. If you want to search for
specific events in the contact's record, you can do so using the search field located
under the Activities tab. To view the activities from a specific date, select Filter
and enter a date in the Go To Date field, then select Apply Filter to filter the
results.
Note: Email preview is available for 120 days after the send date.
Details
This tab provides you with the contact's details. Contact fields vary depending on your
security group settings in Oracle Eloqua and the views your administrator has given you
access to. Select the desired view from the View list. Learn more about contact views in
Profiler.

©2020Oracle Corporation. All rights reserved 32 of 95
If messages to this contact have bounced back or the contact is globally unsubscribed,
the following icon is displayed next to the email address:

©2020Oracle Corporation. All rights reserved 33 of 95

©2020Oracle Corporation. All rights reserved 34 of 95
Extensions
This tab provides you with access to the contact's LinkedIn Sales Navigator information
and will host additional social networks in the future.
©2020Oracle Corporation. All rights reserved 35 of 95
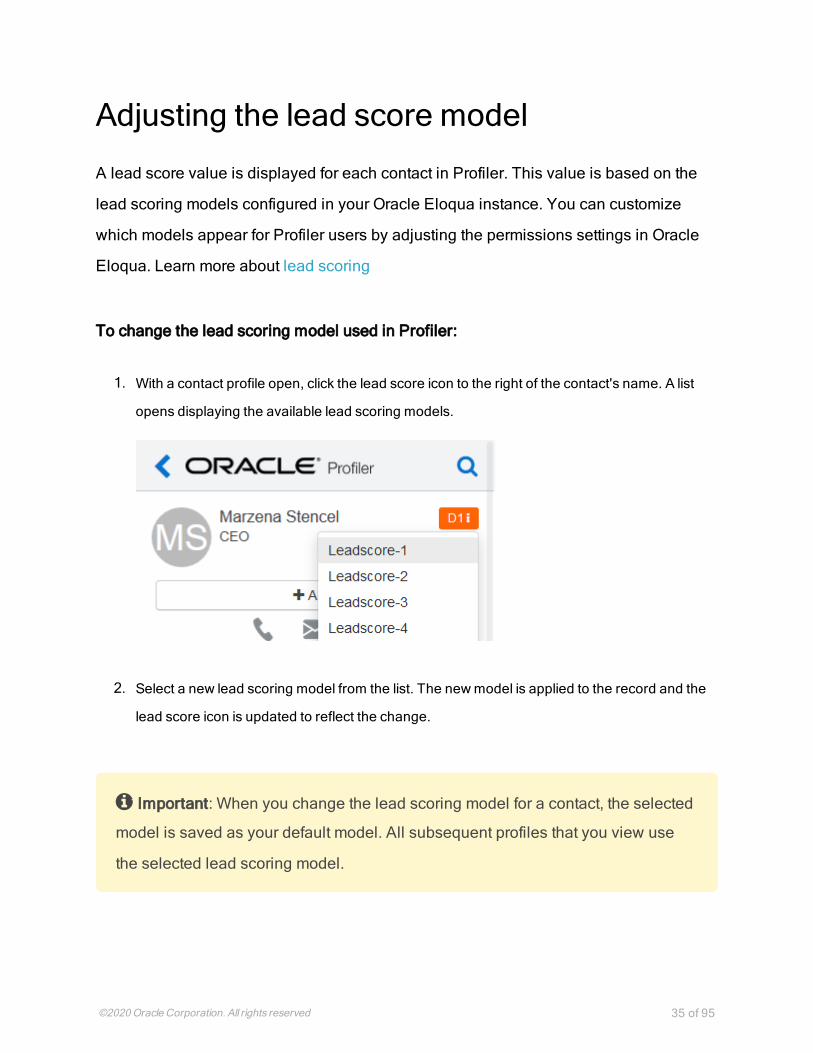
Adjusting the lead score model
A lead score value is displayed for each contact in Profiler. This value is based on the
lead scoring models configured in your Oracle Eloqua instance. You can customize
which models appear for Profiler users by adjusting the permissions settings in Oracle
Eloqua. Learn more about lead scoring
To change the lead scoring model used in Profiler:
1. With a contact profile open, click the lead score icon to the right of the contact's name. A list
opens displaying the available lead scoring models.
2. Select a new lead scoring model from the list. The newmodel is applied to the record and the
lead score icon is updated to reflect the change.
Important: When you change the lead scoring model for a contact, the selected
model is saved as your default model. All subsequent profiles that you view use
the selected lead scoring model.

©2020Oracle Corporation. All rights reserved 36 of 95
Setting up activity notifications
The Profiler Email Alert function allows you to set up alerts that will inform you each time
a contact, or anyone from the same domain, visits your website. As a Profiler user, you
are able to configure this setting on a per-contact basis. The email alerts function
provides you with the opportunity to follow-up with contacts after they have expressed
interest in your product or materials by visiting your website.
Note: The web alert function must be enabled for Profiler when the app is
installed. If it was not enabled, you can reconfigure the app in the Apps area.
To set up email alerts in Profiler:
1. Open the profile for the contact for whom you wish to set up notifications.
2. Click the +Alert button below the contact's name. The Setup Alerts dialog opens.

©2020Oracle Corporation. All rights reserved 37 of 95
3. Select or clear the check boxes to specify in which cases you want to be notified.
4. Click Save. The dialog closes and your web alert preferences are saved for this contact. You
will be sent a notification email informing you of the contact's activities, according to the
settings you configured. When you click This Contact's Activity (in the notification email),
Profiler opens to the contact's Activities tab where the referenced activity is displayed.
To find and remove email alerts:
Go to Settings > Profiler > Email Alerts.

©2020Oracle Corporation. All rights reserved 38 of 95
Viewing email alerts
Using Engageand Profiler, you can view a list of the email alerts you are subscribed to.
Note: Email alerts are displayed if you have a Profiler license.
To view email alerts:

©2020Oracle Corporation. All rights reserved 39 of 95
1. Click Settings .

©2020Oracle Corporation. All rights reserved 40 of 95
2. Select the Email Alerts tab.

©2020Oracle Corporation. All rights reserved 41 of 95
Your existing email alerts are displayed. You can remove any email alerts you no longer
want to receive by clicking X.

©2020Oracle Corporation. All rights reserved 42 of 95
Accessing LinkedIn Sales Navigator
Important: All customers currently using the native integration for LinkedIn
Sales Navigator within Eloqua Profiler must transition to the new LinkedIn Sales
Navigator app, available with the Eloqua 19C Release. All customers will need to
make this transition by Sept. 27, 2019. For more details, see our product notice.
LinkedIn Sales Navigator is a business solution offered by LinkedIn to help sales users
target buyers, understand key insights, and engage with prospects. It can be accessed
when viewing a contact record in Profiler, within the Extensions list. Profiler searches for
a match in LinkedIn based on the Oracle Eloqua contact's first name, last name, and
company name.
Visit LinkedIn's Sales Solutions site to learn more about LinkedIn Sales Navigator.

©2020Oracle Corporation. All rights reserved 43 of 95
Prerequisites
l ATeam or Enterprise LinkedIn Sales Navigator user license is required. Users authenticate
individually using their own license to access Sales Navigator. Learn more about LinkedIn's
SalesNavigator plans.
l The LinkedIn Sales Navigator app extension must be enabled in Profiler Global Settings.
l Your own LinkedIn account for logging in via Profiler.
You can search for and install new apps in the Oracle Cloud Marketplace
(https://cloudmarketplace.oracle.com/marketplace/en_US/homePage.jspx).
To access LinkedIn Sales Navigator in Profiler:
1. Go to https://cloudmarketplace.oracle.com/marketplace/app/LinkedInSalesNavigator.
2. ClickGet App.
3. Review the Oracle Cloud Marketplace terms, and if you still want to install the app, accept the
license agreement and clickNext.
4. On theOMC AppManager - Install App page, select Eloqua Profiler - Eloqua.
5. Log in with your Eloqua credentials.
6. Follow the on-screen installation instructions.
7. Open Profiler.
8. Open a contact record.
9. Click the Extensions list and then select LinkedIn Sales Navigator . A sign in screen is
displayed if you are not already logged in to LinkedIn via your LinkedIn account. If you are
already logged in, the LinkedIn profile information loads automatically.
You can now access LinkedIn Sales Navigator in Profiler.

©2020Oracle Corporation. All rights reserved 44 of 95
Profiler integration
Profiler can be embedded in several customer relationship management (CRM)
systems, including Oracle CX Sales (formerly Oracle Sales Cloud), CRM onDemand,
and Salesforce. This integration makes it easier and more convenient for you to access
the sales tool from within your chosen system.
Note: If you already have an older version of Profiler embedded in a CRM, you
must replace the login URL.
Embedding Profiler as a subtab in Oracle CX Sales
Important: Oracle Sales Cloud is now known as Oracle CX Sales. This change
in name may not immediately reflect everywhere in the Oracle Eloqua user
interface.
To enrich the user experience when working in Oracle CX Sales, you can embed a
Profiler subtab into standard objects, such as Contacts and Sales Leads. This way, you
can view the contact details for a potential client, their activities, their lead score value,
and so on without needing to leave that Contact or Sales Lead object.

©2020Oracle Corporation. All rights reserved 45 of 95
There are four steps to creating a Profiler subtab in CX Sales:
1. Creating a sandbox
2. Creatingmashup content
3. Adding themashup content to a standard object in CX Sales
4. Publishing your sandbox
Step 1: Creating a sandbox
To create a sandbox:
1. Log in to Oracle CX Sales with your Administrator credentials.
2. ClickNavigator at the top of the page, and under Configuration click Sandboxes.
3. ClickCreate Sandbox.
4. Ensure Application Composer is checked as Active, give your sandbox a name, and ensure
that Publishable is set to Yes.

©2020Oracle Corporation. All rights reserved 46 of 95
5. ClickCreate and Enter.
You'll be redirected to the Available Sandboxes page.
Step 2: Creatingmashup content
To create mashup content:
1. At the top of the page, click Tools > Application Composer.

©2020Oracle Corporation. All rights reserved 47 of 95
2. In theOverview section, clickMashup Content > Register Web Application. Alternatively,
you can clickMashup Content in the left-side panel under Common Setup.
3. Configure the following options:
l Give your web application a name. For example, Eloqua Profiler.
l For Type, select Parameter-based.
l ForURL definition, enter one of the following URLs:
Tip: Replace {prefix} in the Auto-login URL and SAMLURLwith the Login Prefix in
Eloqua. To find out your Login Prefix, navigate to Settings > Display Preferences >
Company Defaults.
Direct: https://login.eloqua.com/apps/salesTools/profiler
Auto-login: https://login.eloqua.com/autoLogin?LoginPrefix=
{prefix}&Url=/apps/salesTools/profiler
SAML: https://login.eloqua.com/auth/saml2/autologin?LoginPrefix=
{prefix}&ReturnUrl=/apps/salesTools/profiler
l In theURLParameters section, clickAdd, then add the emailAddress parameter.
4. Click Save and Close.
©2020Oracle Corporation. All rights reserved 48 of 95
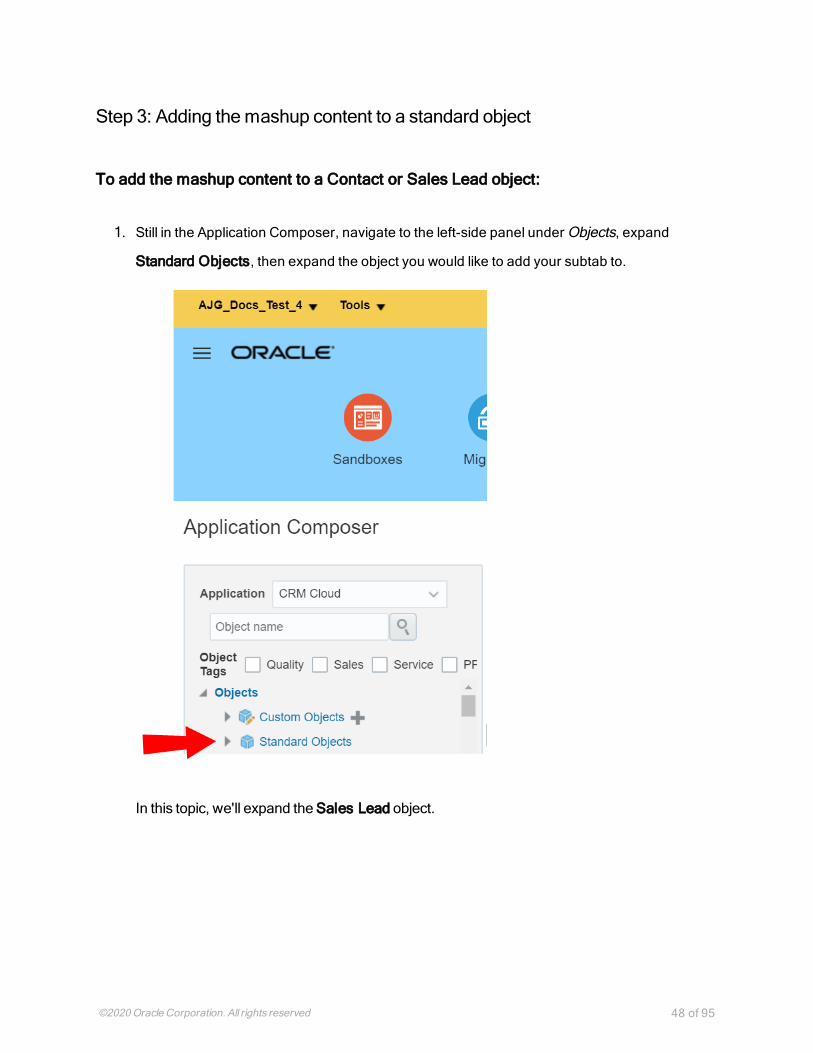
Step 3: Adding themashup content to a standard object
To add the mashup content to a Contact or Sales Lead object:
1. Still in the Application Composer, navigate to the left-side panel underObjects, expand
Standard Objects, then expand the object you would like to add your subtab to.
In this topic, we'll expand the Sales Lead object.

©2020Oracle Corporation. All rights reserved 49 of 95
2. Click Pages.
3. In the Application Pages tab, scroll down to the Details Page Layouts section, and click
Default Custom Layout.
Note: The Default Custom Layout layout may not be present. If this is the case, select
and duplicate an existing layout, for example you can duplicate the Standard layout.
You can then edit the duplicate layout.

©2020Oracle Corporation. All rights reserved 50 of 95
4. Scroll down and click Add .
5. SelectMashup Content, then clickNext.
6. Select your Mashup Content from theWebApplications list, then click Insert.
7. Configure the following options:
l Give your subtab a name. In this case, you would give it a name related to Profiler. For example,
you could name the subtab Eloqua Profiler.
l (Optional) ClickChange Icon to change your subtab'sDisplay Icon.
l Select values for your URL parameters. For Sales Leads, the Parameter is emailAddress, and the
Value isContact Email. For Contacts, the Parameter is also emailAddress, and the Value is
Contact E-mail.
8. (Optional) ClickNext. The Next option only appears if there are other details page layouts
available to add the subtab to.
9. Click Save and Close >Done.

©2020Oracle Corporation. All rights reserved 51 of 95
Step 4: Publishing your sandbox
1. Click Sandboxes, then click on your sandbox's name.
2. Click Publish.
After following these steps for Profiler, you can now view the subtab when you navigate to the
standard object's page. For example, since in this topic we created a subtab for the Sales
Lead object, we'll navigate to Navigator > Leads under Sales. Once you open a lead, you
see the Profiler subtab.

©2020Oracle Corporation. All rights reserved 52 of 95
Adding a Profiler link to Oracle CX Sales
Important: Oracle Sales Cloud is now known as Oracle CX Sales. This change
in name may not immediately reflect everywhere in the Oracle Eloqua user
interface.
There are two main steps that you must follow to add a Profiler link to your Oracle CX
Sales (formerly Oracle Sales Cloud) account:
1. Create a Profiler link
2. Add the link to a layout
Step 1: Creating a Profiler link.
To create a Profiler link:
1. Log in with your Administrator credentials.
2. Click the Navigator icon, then under Configuration click Application Composer.
3. In the left-side pane, selectMarketing from the Application drop-down list.
4. In the left-side pane underObjects, expand Standard Objects >Sales Lead >Sales Lead
Contacts, then select Actions and Links .
5. ClickCreate to create a link, then enter the following information:
l Display Label: Profiler
l Name: Eloqua_Profiler
l Type: Select Link

©2020Oracle Corporation. All rights reserved 53 of 95
l URL Definition: Enter one of the following URLs:
Direct:
def URL="https://login.eloqua.com/apps/salesTools/profiler?emailAddress=" + nvl
(PrimaryEmailAddress,"")
Auto-login:
def URL="https://login.eloqua.com/autoLogin?LoginPrefix=<Login
Prefix>&Url=/apps/salesTools/profiler?emailAddress=" + nvl(PrimaryEmailAddress,"")
SAML:
def URL="https://login.eloqua.com/auth/saml2/autologin?LoginPrefix=<Login
Prefix>&ReturnUrl=/apps/salesTools/profiler?emailAddress=" + nvl(PrimaryEmailAddress,"")
Replace {Login_Prefix} with your four-character Eloqua login prefix code, such as ELQA. You
can alternatively use SiteId={site_ID}with your Eloqua site ID, which is a numeric code. To
find your login prefix or your site ID, navigate to Settings > Display Preferences > Company
Defaults. You can also choose to ignore this parameter and it will attempt to log you in using the
first Eloqua saved credential it finds.
6. Click Validate to validate the script.
7. Click Save.

©2020Oracle Corporation. All rights reserved 54 of 95
Step 2: Adding the Profiler link to layouts
To add the Profiler link to a layout:
1. In Application Composer left-side menu, navigate to Standard Objects >Sales Lead, then
click Pages.
2. Under Simplified Pages, locate the Details Page Layouts section, then click on the name of
the layout to which you want to add the link.
3. In the SubtabsRegion section, open the Contacts tab.
4. Click Edit next to Contacts.
5. Under the Available Fields column, select the Profiler link that you created then click to
move the link to the Selected Fields column.
6. Adjust the link's location in the Selected Fields list using the up and down arrows next to the
list, then click Save and Close.
When you open to a customer you will see the Profiler link.
Adding an Engage link to Oracle CX Sales

©2020Oracle Corporation. All rights reserved 55 of 95
Embedding Profiler in CRM onDemand
When embedding Profiler in CRM onDemand, there are two main steps that you must
follow:
1. Create a web applet
2. Add the web applet to a page layout
Note: You will need to create two applets– one for leads and one for contacts.
The instructions below are for Contacts but you can follow the same procedure for
Leads.
Step 1: Creating a web applet for contact and leads
To create a web applet:
1. Login to CRM onDemand with your Administrator credentials.
2. Navigate to User > Configure > Admin.

©2020Oracle Corporation. All rights reserved 56 of 95
3. Click Application Customization.
4. Under Record Type Setup, clickContact.
5. Under Pay Layout Management, click Contact Web Applet, then enter the information below:
l Name: Enter a name. ( Example: Contact Profiler)
l Location: Select Detail Page
l Type: Select URL
l URL: Enter one off the following URLs
l Direct: https://login.eloqua.com/apps/salesTools/profiler?emailAddress%3D%%%Email_
Address%%%
l Auto-login: https://login.eloqua.com/autoLogin?LoginPrefix=<Login
Prefix>&Url=/apps/salesTools/profiler?emailAddress%3D%%%Email_Address%%%
l SAML: https://login.eloqua.com/auth/saml2/autologin?LoginPrefix=<Login
Prefix>&ReturnUrl=/apps/salesTools/profiler?emailAddress%3D%%%Email_Address%%%
l Height: Enter 800
6. Click Save.

©2020Oracle Corporation. All rights reserved 57 of 95
Step 2: Adding webs applet to page layouts
To add an applet to a page layout
1. Navigate to User >Configure >Admin.
2. Click Application Customization.
3. Under Page Layout Management, clickContact Page Layout.
4. Choose the page layout that you want to modify
Note: It is not necessary to configure Steps 2 or 3. Click Step 4 (Related Information)
to continue.
5. In the Not Available Information column, locate the web applet that you created, then highlight
it (single left-click) and click the > arrow to move it to the Available Information column.
6. Select the applet in the Available Information column, then click the > arrow to move it to the
Displayed Information column.
7. Click Finish.
Important: Repeat the above steps for Leads
Embedding Profiler in Microsoft Dynamics 2016

©2020Oracle Corporation. All rights reserved 58 of 95
Embedding Profiler in Microsoft Dynamics 2013
Profiler can be embedded in Microsoft Dynamics.
To install Profiler in Microsoft Dynamics 2013:
1. Navigate to Settings >Customization >Customizations >Customize the System
2. Select Entities >Contact > Forms
3. Double-click the form to which you want to add Profiler.
4. Click Insert in the top menu.
5. Add aOneColumn Tab.
6. Add an IFRAME to this tab.
l Name: IFRAME_Profiler
l URL: http://about:blank
l Label: Eloqua Profiler
l Ensure that Restrict cross-frame scripting is not selected.
7. On the Formatting tab, modify the height by setting the number of rows, such as 20.
8. On the Dependencies tab, add email as a dependent field.
9. ClickOK to close the IFRAME window.

©2020Oracle Corporation. All rights reserved 59 of 95
10. On the Home tab, click Form Properties.
11. On the Events tab under Form Libraries, click Add and then clickNew.
a. Name: new_EPPOnLoad
b. Type: Script (JScript)
c. ClickSave andClose
12. Double-click the new_EPPOnLoad form library.
13. In the text editor, copy and paste one of the following code snippets (depending on your login
choice).
l Direct login
var newUrl =
"https://login.eloqua.com/apps/salesTools/profiler?emailAddress="
+ document.getElementById
("emailaddress1").title;Xrm.Page.ui.controls.get("IFRAME_
Profiler").setSrc(newUrl);
l Autologin
var newUrl = "https://login.eloqua.com/autoLogin?LoginPrefix=
{Login_Prefix}&Url=/apps/salesTools/profiler?emailAddress="+
document.getElementById
("emailaddress1").title;Xrm.Page.ui.controls.get("IFRAME_
Profiler").setSrc(newUrl);
l SAML SSO
var newUrl =
"https://login.eloqua.com/auth/saml2/autologin?LoginPrefix=
{Login_
Prefix}&ReturnUrl=/apps/salesTools/profiler?emailAddress="+

©2020Oracle Corporation. All rights reserved 60 of 95
document.getElementById
("emailaddress1").title;Xrm.Page.ui.controls.get("IFRAME_
Profiler").setSrc(newUrl);
Replace {Login_Prefix} with your four-character Eloqua login prefix code, such as
ELQA. You can alternatively use SiteId={site_ID}with your Eloqua site ID, which is
a numeric code. To find your login prefix or your site ID, navigate to Settings > Display
Preferences > Company Defaults. You can also choose to ignore this parameter and it
will attempt to log you in using the first Eloqua saved credential it finds.
14. Click Save and click on the newly created library.
15. ClickOK

©2020Oracle Corporation. All rights reserved 61 of 95
16. Click Save
17. Publish the model.
18. Repeat for the Leads entity if needed.
Important: If the IFRAME window appears blank, navigate to Settings >
Administration > System Settings > General, and change the setting for Use
legacy form rendering to Yes. Microsoft Dynamics will then correctly render the
Profiler iframe.

©2020Oracle Corporation. All rights reserved 62 of 95
Embedding Profiler in Microsoft Dynamics 2016
Profiler can be embedded in Microsoft Dynamics.
To install Profiler in Dynamics:
1. Navigate toMenu >Settings >Customization >Customizations >Customize the System.
2. Under Components, select Entities >Contact > Forms.
3. ClickNew, then select the form to which you want to add Profiler.
4. Click the Insert tab in the top menu.
5. Add a one-column tab.
6. Add an iframe to this tab.
l Name: IFRAME_Profiler
l URL: http://about:blank
l Label: Eloqua Profiler
l Ensure that Restrict cross-frame scripting is unchecked
7. On the Formatting tab, modify the height by setting the number of rows, such as 20.
8. On the Dependencies tab, add email as a dependent field.
9. ClickOK to close the IFRAME window.
10. On the Home tab, click Form Properties in the Form section.

©2020Oracle Corporation. All rights reserved 63 of 95
11. Under Form Libraries, click Add, then clickNew.
l Name: new_EPPOnLoad
l Type: Script (JScript)
12. Click the text editor button that appears.
13. In the text editor, copy and paste the following string: function loadProfiler() {
14. Copy and paste one of the following code snippets (depending on your login choice).
l Direct login
var newUrl =
"https://login.eloqua.com/apps/salesTools/profiler?emailAddress="
+ document.getElementById
("emailaddress1").title;Xrm.Page.ui.controls.get("IFRAME_
Profiler").setSrc(newUrl);
l Autologin
var newUrl = "https://login.eloqua.com/autoLogin?LoginPrefix=
{Login_Prefix}&Url=/apps/salesTools/profiler?emailAddress="+
document.getElementById
("emailaddress1").title;Xrm.Page.ui.controls.get("IFRAME_
Profiler").setSrc(newUrl);
l SAML SSO
var newUrl =
"https://login.eloqua.com/auth/saml2/autologin?LoginPrefix=
{Login_
Prefix}&ReturnUrl=/apps/salesTools/profiler?emailAddress="+
document.getElementById
("emailaddress1").title;Xrm.Page.ui.controls.get("IFRAME_
Profiler").setSrc(newUrl);

©2020Oracle Corporation. All rights reserved 64 of 95
15. Be sure to close everything with a final }. If you chose auto-login, your code should look
something like this:
function loadProfiler() {var newUrl =
"https://login.eloqua.com/autoLogin?LoginPrefix=ELQA&Url=/apps
/salesTools/profiler?emailAddress="+ document.getElementById
("emailaddress1").title;Xrm.Page.ui.controls.get("IFRAME_
Profiler").setSrc(newUrl);}
Replace {Login_Prefix} with your four-character Eloqua login prefix code, such as ELQA. You
can alternatively use SiteId={site_ID}with your Eloqua site ID, which is a numeric code.
To find your login prefix or your site ID, navigate to Settings > Display Preferences >
Company Defaults. You can also choose to ignore this parameter and it will attempt to log
you in using the first Eloqua saved credential it finds.
16. ClickOK to close the text editor.
17. Click Save, then click Publish and close the window.
18. Close the LookUpRecordwindow.
19. Under Event Handlers, click Add.
20. Select the new function you created from the list and then name it.

©2020Oracle Corporation. All rights reserved 65 of 95
21. ClickOK.
22. ClickOK in the FormPropertieswindow.
23. Click Save, then click Publish on your form.
24. Repeat for the Leads entity if needed.
Important: If the IFRAME window appears blank, navigate to Settings >
Administration > System Settings > General, and change the setting for Use
legacy form rendering to Yes. Microsoft Dynamics will then correctly render the
Profiler iframe.

©2020Oracle Corporation. All rights reserved 66 of 95
Embedding Profiler in Microsoft Dynamics 365
You can add Profiler to your Microsoft Dynamics 365 instance.
Prerequisites
l An installed Profiler instance, its associated credentials, including company name and its login
prefix
l AMicrosoft Dynamics 365 instance and the permissions needed to customize it
To install Profiler in Microsoft Dynamics 365:
1. Log in to Microsoft Dynamics 365 and navigate to Settings.
2. In the Customization section, clickCustomizations.

©2020Oracle Corporation. All rights reserved 67 of 95
3. On the Customization page, clickCustomize the System.
4. On the PowerApps page, under Components, select Entities >Contact > Forms.
5. ClickNew, then select the form you want to add Profiler to, such asMain Form.
6. Click the Insert tab in the top menu.

©2020Oracle Corporation. All rights reserved 68 of 95
7. Add aOneColumn Tab select the new tab and click IFRAME to add an iframe to it.
The Add an IFRAME window is displayed.

©2020Oracle Corporation. All rights reserved 69 of 95
8. Enter the following iframe values.
a. Name: IFRAME_Profiler
b. URL: http://about:blank

©2020Oracle Corporation. All rights reserved 70 of 95
c. Label: Eloqua Profiler
d. In the Security section, clear theRestrict cross-frame scripting option.
9. (Recommended) In the Row Layout section of the Formatting tab, increase the height by
setting the number of rows to 20 so that Profiler will have enough room to display its
information.
10. On the Dependencies tab, add email as a dependent field.
11. ClickOK to close the Add an IFRAME window.
12. On the Home tab, click Form Properties.
The FormPropertieswindow is displayed.

©2020Oracle Corporation. All rights reserved 71 of 95
13. Click Add. The Handler Propertieswindow is displayed.
14. From the Library list, select new_EPPOnLoad.
15. In the Function box, enter loadProfiler and clickOK.
16. Double-click your new iframe. The IFRAME Propertieswindow is displayed.
17. On the Events tab, expand Form Libraries and double-click new_EPPOnLoad. The Edit
Contentwindow is displayed.
18. Depending on your login type, copy and paste one of the following code snippets into the code
editor:
l Direct login
function loadProfiler() {
var newUrl =
"https://login.eloqua.com/apps/salesTools/profiler?emailAddress="
+ document.getElementById("
{emailaddress1}").title;Xrm.Page.ui.controls.get("IFRAME_

©2020Oracle Corporation. All rights reserved 72 of 95
Profiler").setSrc(newUrl);
}
l Autologin
function loadProfiler() {
var newUrl = "https://login.eloqua.com/autoLogin?LoginPrefix=
{Login_Prefix}&Url=/apps/salesTools/profiler?emailAddress="+
document.getElementById("
{emailaddress1}").title;Xrm.Page.ui.controls.get("IFRAME_
Profiler").setSrc(newUrl);
}
l SAML SSO
function loadProfiler() {
var newUrl =
"https://login.eloqua.com/auth/saml2/autologin?LoginPrefix=
{Login_
Prefix}&ReturnUrl=/apps/salesTools/profiler?emailAddress="+
document.getElementById("
{emailaddress1}").title;Xrm.Page.ui.controls.get("IFRAME_
Profiler").setSrc(newUrl);
}
Direct login example:

©2020Oracle Corporation. All rights reserved 73 of 95
Replace {Login_Prefix} with your four-character Eloqua login prefix code, such as ELQA. You
can alternatively use SiteId={site_ID}with your Eloqua site ID, which is a numeric code.
To find your login prefix or your site ID, navigate to Settings > Display Preferences >
Company Defaults. You can also choose to ignore this parameter and it will attempt to log
you in using the first Eloqua saved credential it finds.
Replace the {emailaddress1}with the value in your Microsoft Dynamics 365 instance. For
example, it can be emailaddress1, emailaddress1_d, or emailaddress1_i. To determine
what is used in your Microsoft Dynamics 365 data, inspect an existing contact's email address
with your browser's developer tools. For example, to find your value using Google Chrome:
a. Go to Sales >Contacts and click an existing contact.
b. Pressing Ctrl+Shift+I to open developer tools.
c. On the Elements tab, press Ctrl+F and search for emailaddress1.
d. The value associated with the contact's email address field that is followed by title="
{emailAddress}" indicates the value you need to include. In the following example, the needed

©2020Oracle Corporation. All rights reserved 74 of 95
value is emailaddress1_d.
Example: If you chose autologin, your {LoginPrefix} is ELQA, and your
{emailaddress1} value is emailaddress1_d, your code should look something like this:
function loadProfiler(){
var newUrl =
"https://login.eloqua.com/autoLogin?LoginPrefix=ELQA&Url=/
apps/salesTools/profiler?emailAddress="+
document.getElementById("emailaddress1_
d").title;Xrm.Page.ui.controls.get("IFRAME_
Profiler").setSrc(newUrl);
}
19. ClickOK to close the text editor.

©2020Oracle Corporation. All rights reserved 75 of 95
20. On the Home tab, click Save, click Publish, and then close the PowerAppswindow.
21. Go to Contacts and open a contact that is known to exist in both Oracle Eloqua Profiler and
Microsoft Dynamics 365 to test that your new Eloqua Profiler iframe is working. If you are
prompted to authenticate, enter your Eloqua credentials. If there is a match based on the
email address, the Profiler iframe should display information for the contact.

©2020Oracle Corporation. All rights reserved 76 of 95
Important: If the IFRAME window appears blank, navigate to Settings >
Administration > System Settings > General, and change the setting for Use
legacy form rendering to Yes. Microsoft Dynamics will then correctly render the
Profiler iframe.
Embedding Profiler in Salesforce Classic
Note: If you are using Salesforce Lighting, see Embedding Profiler in Salesforce
Lightning.
The users that can see Eloqua Profiler in your CRM system are dependent on the
views/layouts you have set up in your CRM system and on which of those views/layouts
you insert the Eloqua Profiler component.

©2020Oracle Corporation. All rights reserved 77 of 95
Note: If you want to test Eloqua Profiler without making it available to your entire
sales or marketing team, you should assign yourself a contact/lead view to which
nobody else has access and then add Eloqua Profiler to that view.
There are three main steps you must follow when installing Profiler using Visualforce:
1. Create a Visualforce page for contacts and leads
2. Adjust security for Visualforce pages
3. Add Visualforce pages to contact and lead layouts
Step 1: Creating a Visualforce page for contacts and leads
You will need to create two (2) Visualforce pages – one for leads and one for contacts.
Then you will be editing your existing Contact and Lead views by inserting the
appropriate Visualforce pages into their corresponding views. Below, we will cover the

©2020Oracle Corporation. All rights reserved 78 of 95
installation for a Lead view, however the steps required for a Contact view are mostly the
same but for a few minor text items noted below.
To create a Visualforce page:
1. Log into your Salesforce.com account using your administrator credentials, then navigate to
Setup in the upper right-hand corner of the screen.
2. Navigate to Develop (under Build section) > Visualforce Pages > New.

©2020Oracle Corporation. All rights reserved 79 of 95
3. Provide a Label and a Name for the Visualforce page.
Note: These two fields will only be used whenmanaging layouts and sections and
will not be visible by users simply reviewing a lead record. The name can be whatever

©2020Oracle Corporation. All rights reserved 80 of 95
you want but it must contain only alpha-numeric characters andmust not have any
spaces.
4. In the VisualforceMarkup tab, copy and paste the code that corresponds with your choice of
login options:
l Direct: <apex:page standardController="Lead"><apex:iframe
scrolling="true"
src="https://login.eloqua.com/apps/salesTools/profiler?emailAddress=
{!lead.email}"/> </apex:page>
l Auto-login: <apex:page standardController="Lead"><apex:iframe
scrolling="true"
src="https://login.eloqua.com/autoLogin?LoginPrefix=
{prefix}&Url=/apps/salesTools/profiler?emailAddress={!lead.email}"/>
</apex:page>
l SAML: <apex:page standardController="Lead"><apex:iframe
scrolling="true"
src="https://login.eloqua.com/auth/saml2/autologin?LoginPrefix=
{prefix}&ReturnUrl=/apps/salesTools/profiler?emailAddress=
{!lead.email}"/> </apex:page>
l Salesforce IDP: <apex:page standardController="Lead"><apex:iframe
scrolling="true" src="https://<podURL>/sso/sfdc/v1/svp.aspx?LP=
{prefix}&RU=/apps/salesTools/profiler?emailAddress={!lead.email}"/>
</apex:page>
Note: Replace {podURL} with the URL in your browser after you have logged in
successfully to Eloqua (for example, secure.p01.eloqua.com). Click here for

©2020Oracle Corporation. All rights reserved 81 of 95
additional information about how to determine your pod.LoginPrefix values are a
four-character code for the company name that you enter in the Company field on the
login page. To add this parameter to your URL, enter LoginPrefix={prefix}
where {prefix} is replaced with the four characters company name. You can obtain
your company's login prefix in Eloqua by navigating to Settings > Display Preferences >
CompanyDefaults. For your contacts Visualforce page, replace {!lead.email}
with {!contact.email}.
Tip: If SSOwith Salesforce is configured, the use of either the SAML or Salesforce
IDP method of integrating Sales Tools instead of the Direct method is recommended.
The SAML link should be used if SSOwith SFDC is setup using Eloqua’s SAML
capability. If using the Salesforce IDP option for SSO, the Salesforce IDP link should be
used for integrating Sales Tools.
5. If you wish to enable this on the salesforce1 mobile app, select the check box next to Available
for Salesforcemobile apps.
6. Click Save.

©2020Oracle Corporation. All rights reserved 82 of 95
Step 2: Adjusting security for Visualforce pages
Salesforce.com has default security that prevents certain users from viewing Visualforce
pages unless the security on those individual pages is customized.
To adjust the security for a Visualforce page:
1. Navigate to Develop (under Build section) >Visualforce Pages.
2. Click Security next to the pages you created.
3. Add the user types that should be able to view Eloqua Profiler to the Enabled Profiles list.
4. Click Save.

©2020Oracle Corporation. All rights reserved 83 of 95
Step 3: Adding Visualforce pages to contact and lead layouts
The steps below describe the procedure for adding the Leads Visualforce page to a
layout. The same steps can be followed for the Visualforce Contacts page you created.
To add a Visualforce page to layouts:
1. Navigate to Setup in the upper right-hand corner of the screen.
2. Navigate to Customize (under Build section) > Leads >Page Layouts.
3. Select Edit next to the layout in which you would like to insert Eloqua Profiler (either the one
you are testing or the one that your sales team uses to review Lead records).
4. Drag the button located near the top of your screen to create a new section in your
layout to contain Eloqua Profiler.

©2020Oracle Corporation. All rights reserved 84 of 95
5. Place the new section into the area of the layout in which you would like Eloqua Profiler
displayed.
6. Name the section. Ensure that the two check boxes are selected, and select a 1-Column

©2020Oracle Corporation. All rights reserved 85 of 95
Layout.
Note: The section name is what will be displayed above the section within the Lead
view. Ensure that the name is something that will be relevant and intuitive to your sales
users.
7. Go back to the top area (the area from which you dragged and dropped the new section) and
scroll down if necessary to select Visualforce Pages (in the area just to the left of the buttons
area).
8. Drag the button for the new Visualforce page yo made into the new section you just created.
You have now included Eloqua Profiler in your layout. Now let's adjust the settings for this
new section.
9. Hover over the top right corner of the Visualforce page (inside the Section) until a wrench icon
appears. Make sure it is the one for the Visualforce page and not the entire section.
10. Click on the wrench icon. In the VisualForce Page Properties, ensure that the width is set to
100% and the height is set to 610.
11. Click Save to save this layout.
Important: Repeat the above steps for the layout of your Contact object.
12. When you return to the Leads tab in Salesforce and click on a lead, the new Visualforce page
containing Profiler is displayed in the new section you added.

©2020Oracle Corporation. All rights reserved 86 of 95
Embedding Profiler in Salesforce Lightning
Note: If you are using Salesforce Classic, see Embedding Profiler in Salesforce
Classic.
The users that can see Eloqua Profiler in your CRM system are dependent on the
views/layouts you have set up in your CRM system and on which of those views/layouts
you insert the Eloqua Profiler component.

©2020Oracle Corporation. All rights reserved 87 of 95
Note: If you want to test Eloqua Profiler without making it available to your entire
sales or marketing team, you should assign yourself a contact/lead view to which
nobody else has access and then add Eloqua Profiler to that view.
There are three main steps you must follow when installing Profiler using Visualforce:
1. Create a Visualforce page for contacts and leads
2. Adjust security for Visualforce pages
3. Add Visualforce pages to contact and lead layouts
Step 1: Creating a Visualforce page for contacts and leads
You will need to create two (2) Visualforce pages – one for leads and one for contacts.
Then you will be editing your existing Contact and Lead views by inserting the
appropriate Visualforce pages into their corresponding views. Below, we will cover the
installation for a Lead view, however the steps required for a Contact view are mostly the
same but for a few minor text items noted below.
To create a Visualforce page:
1. Log into your Salesforce.com account using your administrator credentials, then navigate to
Setup in the upper right-hand corner of the screen.
2. Locate theQuick Find search box, and search for Visualforce Pages
Alternatively, you can click Custom Code > Visualforce Pages.
3. ClickNew.

©2020Oracle Corporation. All rights reserved 88 of 95
4. Provide a Label and a Name for the Visualforce page.
Note: These two fields will only be used whenmanaging layouts and sections and
will not be visible by users simply reviewing a lead record. The name can be whatever
you want but it must contain only alpha-numeric characters andmust not have any
spaces.
5. In the VisualforceMarkup tab, copy and paste the code that corresponds with your choice of
login options:
l Direct: <apex:page standardController="Lead"><apex:iframe
scrolling="true"
src="https://login.eloqua.com/apps/salesTools/profiler?emailAddress=
{!lead.email}"/> </apex:page>
l Auto-login: <apex:page standardController="Lead"><apex:iframe
scrolling="true"
src="https://login.eloqua.com/autoLogin?LoginPrefix=
{prefix}&Url=/apps/salesTools/profiler?emailAddress={!lead.email}"/>
</apex:page>
l SAML: <apex:page standardController="Lead"><apex:iframe
scrolling="true"
src="https://login.eloqua.com/auth/saml2/autologin?LoginPrefix=
{prefix}&ReturnUrl=/apps/salesTools/profiler?emailAddress=
{!lead.email}"/> </apex:page>
l Salesforce IDP: <apex:page standardController="Lead"><apex:iframe
scrolling="true" src="https://<podURL>/sso/sfdc/v1/svp.aspx?LP=
{prefix}&RU=/apps/salesTools/profiler?emailAddress={!lead.email}"/>
</apex:page>

©2020Oracle Corporation. All rights reserved 89 of 95
Note: Replace {podURL} with the URL in your browser after you have logged in
successfully to Eloqua (for example, secure.p01.eloqua.com). Click here for
additional information about how to determine your pod.LoginPrefix values are a
four-character code for the company name that you enter in the Company field on the
login page. To add this parameter to your URL, enter LoginPrefix={prefix}
where {prefix} is replaced with the four characters company name. You can obtain
your company's login prefix in Eloqua by navigating to Settings > Display Preferences >
CompanyDefaults. For your contacts Visualforce page, replace {!lead.email}
with {!contact.email}.
Tip: If SSOwith Salesforce is configured, the use of either the SAML or Salesforce
IDP method of integrating Sales Tools instead of the Direct method is recommended.
The SAML link should be used if SSOwith SFDC is setup using Eloqua’s SAML
capability. If using the Salesforce IDP option for SSO, the Salesforce IDP link should be
used for integrating Sales Tools.
6. If you wish to enable this on the salesforce1 mobile app, select the check box next to Available
for Salesforcemobile apps.
7. Click Save.

©2020Oracle Corporation. All rights reserved 90 of 95
Step 2: Adjusting security for Visualforce pages
Salesforce.com has default security that prevents certain users from viewing Visualforce
pages unless the security on those individual pages is customized.
To adjust the security for a Visualforce page:
1. Locate theQuick Find search box, and search for Visualforce Pages
Alternatively, you can click Custom Code > Visualforce Pages.
2. Click Security next to the pages you created.
3. Add the user types that should be able to view Eloqua Profiler to the Enabled Profiles list.

©2020Oracle Corporation. All rights reserved 91 of 95
4. Click Save.
Step 3: Adding Visualforce pages to contact and lead layouts
The steps below describe the procedure for adding the Leads Visualforce page to a
layout. The same steps can be followed for the Visualforce Contacts page you created.
To add a Visualforce page to layouts:
1. Locate theQuick Find search box, and search for Object Manager.
Alternatively, you can clickObjects and Fields > Object Manager.
2. Click Lead >Page Layouts.
3. Click on the layout in which you would like to insert Eloqua Profiler (either the one you are
testing or the one that your sales team uses to review Lead records).
4. Drag the button near the top of your screen to create a new section in your layout to
contain Eloqua Profiler.
5. Place the new section into the area of the layout in which you would like Eloqua Profiler
displayed.
6. Name the section. Ensure that the two check boxes are selected, and select a 1-Column
Layout.
Note: The section name is what will be displayed above the section within the Lead
view. Ensure that the name is something that will be relevant and intuitive to your sales
users.
7. Go back to the Contact Layout section at the top of the page, and click on Visualforce Pages
in the list of options.

©2020Oracle Corporation. All rights reserved 92 of 95
8. Drag the button for the new Visualforce page you made into the new section you just created.
You have now included Eloqua Profiler in your layout. Now let's adjust the settings for this
new section.
9. Hover over the top right corner of the Visualforce page (inside the Section) until a wrench icon
appears. Make sure it is the one for the Visualforce page and not the entire section.
10. Click on the wrench icon. In the Visualforce Page Properties dialog, ensure that the width is
set to 100% and the height is set to 610.
11. ClickOK.
12. Click Save to save this layout.
Important: Repeat the above steps for the layout of your Contact object.
13. When you return to the Leads tab in Salesforce and click on a lead, the new Visualforce page
containing Profiler is displayed in the new section you added.
Embedding Profiler in OKTA with SSO
This guide explains how to seamlessly configure and access Profiler through OKTA.
Configuration
The high level configuration steps are as follows:
1. Configure Profiler in OKTA with SSO
2. Accessing Eloqua Sales asOKTA apps

©2020Oracle Corporation. All rights reserved 93 of 95
Step 1: Configuring Profiler in OKTA with SSO
Profiler is an app you can access via a URL from any location. It could be launched
standalone in a browser but is most commonly are embedded inside a CRM system.
Once configured, you need to update Profiler to work with OKTA so that access is
seamless.
To configure SSO with OKTA into Profiler:
1. Enter the following URL:
https://login.eloqua.com/auth/saml2/autologin?LoginPrefix=<Login
Prefix>&ReturnUrl=/apps/salesTools/profiler
Note: Replace LoginPrefix=<LoginPrefix> where prefix is a 4 character
identifying code like 'ELQA'. You can alternatively use <siteID> with your site ID - a
numeric code, like '33' (it may be much longer). If you do not know what your prefix
is, log a Service Request ("SR") via My Oracle Support (support.oracle.com). You
can also choose to ignore this parameter and it will attempt to log you in using the
first Eloqua saved credential it finds. Replace <IDPid> with the IDP unique ID from
your SSO setup.
Note: To find your IDP unique ID in Eloqua, navigate back to the Identity
Management Provider interface. Right-click on the name of the Identity Provider
you set up for OKTA and click Open Link in New Tab.

©2020Oracle Corporation. All rights reserved 94 of 95
On the new browser tab, look at the URL and copy the ID that appears after
"....Display/".
Once you have this properly formatted URL, as long as a user has an OKTA session
active in their browser, the URL can be accessed from any location on the internet and it
will allow seamless access to Profiler.
Step 2: Accessing Profiler as an OKTA app
To allow users direct access to Profiler from apps in OKTA:
1. Repeat the SSO Configuration section above to create a new SAML2 template for Eloqua
Profiler.

©2020Oracle Corporation. All rights reserved 95 of 95
2. While creating the SAML2 template, add the following to the Default Relay State field:
ReturnURL=%2FsalesTools%2Fprofiler