operation warrior forge supplement training guide
TRANSCRIPT
Operation WARRIOR FORGE Supplement Training Guide This booklet is designed to ‘supplement’ training in those tasks needing additional emphasis based on input and experience gathered from previous Warrior Forge Cadre and Staff. Furthermore, not only does the supplemental training addresses some of the requirements essential to complete Warrior Forge successfully, but it also addresses some skills important for survival on the battlefield (current war on terrorism). The information in this booklet is not all-inclusive; for further clarity and more information, consult the applicable field manuals and approved publications for complete reference. Remember the mission: “To commission the future officer leadership of the US Army and motivate young people to be better citizens.” The specific days the classes are to be taught are listed below and are reflected on the regimental training schedule. The classes are to be taught on that specific day. PART I: SPECIFIED TRAINING ON SPECIFIC DAYS D2 RTO Mandatory In-Brief: Page 4 Intro of Regimental Cadre Chain-of-Command Page 6 WF Policy Letters Inspector General Phones Red Cross Shoppette Additional Cadet PT (Policy) Road March Routes WF Timeline, Completion Requirements Page 7 Barracks Standards and Integration Policy
NOTE: Ref: WF SOP 2006, CC Cir 145-05 for subcategories without page numbers.
D2 – D4 Subjects covered by PTO/PTNCO during arrival period Page 8 Safety/Security Page 8 Cadet Creed Barracks Maintenance/Hygiene Fitting/Wear of Uniform & LBE Inspection and Appearance of Cadet Class Uniform Regimental Affiliation/Traditions/History/Lineage Leader Stakes Criteria LDP Review US Army Customs and Courtesies Lyrics for Cadet Command Song/D & C Page 8/9 Initial Inspections (Packing List) NOTE: Ref: WF SOP 2006, CC Cir 145-05 for subcategories without page numbers. D3 Land Navigation Review Page 18 GM Angle Page 18 Intersection Page 22 Resection Page 24 Terrain Features Page 27 Navigational Methods Page 34 Pace Count Page 38 Land Nav Smart Section Page 39

2
D4 IPB/Scenario Update Page 44 Day 3/4: Brief OPORD 06-04 and Annex B (Intelligence/Road to War) Cadets receive Smart Cards Day 14: Brief FRAGO 1 - Deployment into Palomas/TAA Training (Security Operations Committee) Day 15: Brief FRAGO 2 - Tactical Training within Palomas (Squad STX Committee) Day 19: Brief FRAGO 3 – Refit/Rearm (Platoon Security Operations) Day 20: Brief FRAGO 4 – Combat Operations in ZOS (Patrolling Committee) Day 22: Patrolling S2 Briefs INTSUM #1 to Cadets while they’re at Plt Sec Ops
NOTE: Refer to OPORD 06-04, Annex B, and FRAGOs 1 - 4 for more detailed information
D4 Field Craft Intro Shelter Site Selection Page 45 Poncho Shelters Page 46 Field Hygiene Page 49 D6 BRM Prep Page 51 Zeroing & Target Acquisition Page 51 Shadow Box Page 54 Dime/Washer Drill Page 57 Immediate Action Steps Page 58 Modified Prone Supported Firing Position Page 58 Basic Prone Unsupported Firing Position Page 58 Kneeling Unsupported Firing Position Page 59 D9 Foot Marches (Basic Foot Care) Page 59 D10 Interaction with the Media Page 64 D 14 to D 16 Field Prep Page 65 Extended Hygiene Page 65 Tactical Task Review Troop Leading Procedures Page 68 Squad Warning/Operation Orders Page 72/73 Squad Attack Page 80 Breaking Contact Page 83 Reacting to a Ambush (Near/Far) Page 84 Knock out a Bunker Page 85 Clearing a Room Page 87 Crossing a Linear Danger Area Page 90 Conduct a Recon Patrol Page 92 Conduct an Ambush Page 96 Reacting to Indirect Fire Page 98 Radio Procedures Page 100 Processing EPW Page 99 Occupying an Assembly Area Page 110 Review of Call-for-Fire & 9-Line Medivac Page 112/115 Squad STX/Patrolling ROE Page 119 Scenario Update Page 119

3
Squad Organization & Movement Page 120 Squad Additional Duties Page 122 Squad SOP Developed Page 123 Casualty Feeder Reports Page 124 AAR Techniques Page 126 D 21/22 Patrolling Prep/Review Page 131 Patrol Order Page 131 Organization of a Patrol Page 131 Patrolling ROE Page 132 Current Scenario Update Page 132 Patrol Base Activities Page 132 Movement Techniques Page 135 PART II: MISCELLANEOUS SUBJECTS TO BE REVIEWED (AS TIME PERMITS) First Aid Page 136 UXO Review Page 147 US Weapons Data Page 160

4
PART I: SPECIFIED TRAINING ON SPECIFIC DAYS
WF Day 2 RTO Mandatory In-Brief References: WF SOP (2006) and CC Cir 145-05
Standardized In-Brief to Regimental Cadre, Contractors, and Cadets
1. Introduction of the Regimental Cadre a. RTO, SGM, XO, Operations Officer, CTOs, etc.
2. Overview of the WF Chain-of-Command a. WF Cdr, Dep Cdr, CC, etc.
3. WF Policy Letters #1 - Policy Guidance for Height/Weight Failures at WF #2 - Policy Guidance for APFT Failures at WF #3 - Policy Guidance for Land Navigation Training at WF #4 - Policy Guidance for Securing Sensitive Items in GSA, Leased, and Personally Owned Vehicles at WF. #5 - Policy Guidance While Operating GSA/Leased Vehicles at WF. #6 - Policy Guidance on Uniform for COMTek Administrative and Logistics Employees at WF. #7 - Policy Guidance on Dining Facility Privileges for COMTek Employees at WF. #8 - Policy Guidance on wear of BDU/ACU and Camelback WaterPacks at WF. #9 - Policy Guidance on Cadet Refusal to Train at WF. #10 - Policy Guidance on Equal Opportunity (EO) and Complaint Procedures at WF. #11 - Policy Guidance on Prevention of Sexual Harassment at WF. #12 - Policy Guidance for Tobacco Product Use at WF. #13 - Policy Guidance for the Swim Requirement at WF. #14 - Policy on Cadet Running During Personal Time. #15 - Policy Guidance on Cadet Visitations at WF.
4. Brief explanation of the IG and ways they can contact the IG (IG boxes, open-door, sensing sessions, etc.)
5. Phones a. Cell phone policy
i. Cadets can keep cell phones for the first two days but must give up their cell phones to the Regimental Chain-of-Command by Lights out on D2. This allows the Cadets to call home to family members and let them know they have arrived safely, and also ensures that the cell phones do not detract from training.
ii. Regimental Cadre will return the Cadet’s cell phones after Dinner on D29. iii. Regimental Cadre will dictate hours of use, but the Cadets will not be
allowed to use the cell phones during periods of Regimental training. iv. Recommend that Regimental Cadre keep phones secured in the Platoon
Bays in order to have quick access for cadet use in case of emergencies. Cadet will notify cadre in cases of emergencies to allow for re-issue of phones.
v. Cadets that violate these policies may receive a negative spot report and or be dismissed from WF based upon an “Honor’s Violation”.
b. Pay phone policy and hours, etc. i. Cadets must be allowed to utilize the payphones during their first 48 hours
at WF. Regiments must balance this against training requirements, but all Cadets within the Regt must be allowed the same amount of time and consistency across Regts as well.

5
6. Explanation of the Red Cross and how parents can get in touch with the Cadets in case of an emergency.
a. Parents can call the WF TOC 24 hours a day to informally notify the TOC of family emergencies. However, the family must also call the Red Cross so that emergency can be verified and go through the official channels. The Red Cross, in turn will get in contact with Fort Lewis, and the WF TOC. The WF TOC will notify the Cdr, CC, and the Regimental RTO. Regimental Chain-of-Command will brief the Cadet. They type of emergency will determine what Cadet actions will be taken. (Make certain that our host schools know this information as well).
7. Shoppette and pogey bait policy a. Training is the priority, but Regimental Cadre will not restrict Cadet use of the
shoppette. b. Alcohol and Tobacco products are prohibited, but Regimental Cadre will not
otherwise dictate what foods the Cadets may/may not buy from the Shoppette. c. Under no circumstance, will Cadets be allowed to eat inside the barracks. d. Cadets that violate this policy may receive negative spot reports or have their
Shoppette privileges suspended for a period of days or the duration of WF. 8. Policy on additional Cadet PT during WF
a. Times allowed – Anytime that it doesn’t interfere with other training, but generally during Tac Officer Time (TOT) in the evening.
b. Running Route – i. WF Training Section will provide a large map of the approved running
route. ii. Cadets must wear the Army Physical Fitness Uniform (APFU) with
reflective belt. Headphones or musical devices are not allowed. c. Coordination Required
i. Cadets must request permission of their PTOs/PTNCOs. ii. Cadets must sign out from the barracks with the time they’re leaving, their
expected time of return, and their proposed running route. iii. Cadets must run in teams of at least two personnel.
9. Overview of authorized road march routes. a. WF Training Section will provide a large map showing the authorized Road March
routes so the Cadets and Regimental Cadre can plan their training and route selection to the various training events; Platoon Photos, FLRC, Confidence D1 & D2, etc.
10. Brief Overview of WF timeline, completion requirements, etc. a. WF Training Section will provide a large Master Training Schedule (MTS) for the
Regiment to use during this brief. b. Cadre must spell out requirement to graduate (85% of training) and the potential
impact if a cadet does not meet this (recycle or send home). Issue is sick call/riding sick call.
c. Clearly define the rope drop and slide for life as graduation requirements (if that is what our policy will be).
d. Explain Recondo requirements in detail (failure of select obstacles will result in DQ from Recondo).
e. Explain the APFT retests. If you fail an event, bust ass on the others – may help in deciding rather you stay or are recycled. Had significant number of cadets bounce back from an initial APFT failure and successfully complete the course last year (05).

6
f. Talk about Weapons Immersion i. When it will start and end
ii. Policies and Procedures iii. Clearing Barrels, etc.
11. Explain the Cadet Chain of Command – specifically the addition of non-evaluated (formally) team leader positions and their responsibility to plan/conduct some opportunity training in the evenings.
12. Explain Consideration for Others/EEO. This is the Dave Chapelle/South Park generation. Comments and attitudes expressed on those shows, the humor, music, and magazines that our cadets are exposed to run counter to our values, norms, and expected behavior. We ‘lost’ several cadets last year because of racially insensitive or gender insensitive remarks and actions. Much more went on then what we identified and addressed. Explain what are proper/improper relationships between cadet and cadet and cadet and cadre. Explain the ‘victim’ has a responsibility to put a stop to the abhorrent behavior—first line of defense –and to IMMEDIATELY report it to the chain of command if it does not stop—second line of defense.
13. Cover saluting in the field and in garrison. 14. Brief Q&A period
Release Cadets and then Brief Cadre and Contractors on the Following:
1. Policy Guidance for Securing Sensitive Items in GSA, Leased, and POVs at WF 2. Policy Guidance on Operating GSA/Leased Vehicles at WF 3. Policy Guidance on Uniform for COMTek Admin and Log Employees at WF 4. Policy Guidance on Dining Facility Privileges for COMTek Employees at WF 5. Policy Guidance for GSA and Rental Non-Tactical Vehicle Use at WF 6. Reminder about the fraternization policy.
Warrior Forge 2006 Chain-of-Command NCO Support Channel WF Commander: Colonel Corbett WF CSM: CSM Mercado Regt Tng Officer: Regt CSM: CO TAC Officer: CO TAC NCO: PLT TAC Officer: PLT TAC NCO: SQD LDR: REGIMENT: REGIMENT NAME & MOTTO: COMPANY: PLATOON:

7
WF COMPLETION CRITERIA to successfully complete WF, cadets must: (1) Meet Height/Weight and Body Fat standards outlined in AR 600-9. See Appendix E, Height/Weight Policy Memo. (2) Pass the APFT with a minimum total score of 180 points and 60 points in each event. If the initial test is failed, the cadet will be considered for retention in training. If approved a final APFT is taken at the end of the regimental training cycles. See Appendix E, WF APFT Policy Memo. (3) Pass Land Navigation by attaining a cumulative score of 70 percent, with a minimum of 70 percent on all tests (written and practical). See Appendix E, Land Navigation Policy Memo.
(4) If an end-of-WF commissionee, pass the CWST. See Appendix E, CWST Policy Memo. (5) Earn a minimum rating of "Satisfactory" on each of the 16 leadership dimensions (part V) and the area of Values at the end of WF on the final evaluation report (Cadet Command Form 67-9).
(6) Complete at least 90% percent of training.
Cadets who fail to meet the standards above will be considered to determine whether they merit WF Graduation credit.
9. RECONDO REQUIREMENTS. To receive the RECONDO badge, cadets must:
a. Execute all Confidence and CWST events presented on the day of execution to prescribed standard. Failure to meet the standard for any event denotes a “NO GO” for badge qualification. b. Achieve an APFT score of 270 or above without retest, 90 points in each event. c. Achieve a score of 80% percent or higher on each of the written and practical (cumulative day and night) land navigation proficiency tests, without retest. d. Achieve a “GO” on BRM (23 of 40 target hits). e. Complete Hand Grenade Assault Course, the Individual Tactical Training assault course, and the 1st Aid Assault Course..
f. Achieve satisfactory (S) performance ratings or higher at Squad STX on both evaluations.
g. Successfully complete WF without a performance waiver. Medical waivers are acceptable.
h. Receive satisfactory or above summary ratings for all 16 scored Leadership
Dimensions and the area of Values, as reported on the CDT CMD Form 67-9. i. Meet Ht/Wt or Body Fat Standards IAW AR 600-9.

8
WF Day 2 PTO/PTNCO Subjects (Limited) Ref.: WF SOP (2006) and CC Cir 145-05
CADET CREED
I am an Army Cadet. Soon I will take an oath and become an Army Officer committed to defending the values which make this nation great. Honor is my touchstone. I understand mission first and people always. I am the past – the spirit of those warriors who have made the final sacrifice. I am the present – the scholar and apprentice soldier enhancing my skills in the science of warfare and the art of leadership. But above all, I am the future – the future warrior leader of the United States Army. May God give me the compassion and judgment to lead and the gallantry in battle to win.
I will do my duty.
Lyrics: The Army Goes Rolling Along
Verse: First to fight for the right, And to build the Nation’s might, And The Army Goes Rolling Along Proud of all we have done, Fighting till the battle’s won, And the Army Goes Rolling Along. Refrain: Then it’s Hi! Hi! Hey! The Army’s on its way. Count off the cadence loud and strong For where e’er we go, You will always know That The Army Goes Rolling Along. Verse: Valley Forge, Custer’s ranks, San Juan Hill and Patton’s tanks, And the Army went rolling along Minute men, from the start, Always fighting from the heart, And the Army keeps rolling along. (refrain) Verse: Men in rags, men who froze,
Lyrics: Bar of Gold on Army Green
Listen up, you brave young man The battle's loomin' near You have to take the hill by morning light Do you read me loud and clear?
Yes sir, they nod, every man Though their eyes are flecked with fear For they've come to know the man in chargeAnd the cause he holds so dear
CHORUS:
A bar of gold on Army Green A bar of gold on Army Green When you're looking for a leader One who's heard as well as seen Look to the man who's earned respect And a bar of gold on Army green
9
Still that Army met its foes, And the Army went rolling along. Faith in God, then we’re right, And we’ll fight with all our might, As the Army keeps rolling along. (refrain)
General D & C Excerpt: FM 3-21.5
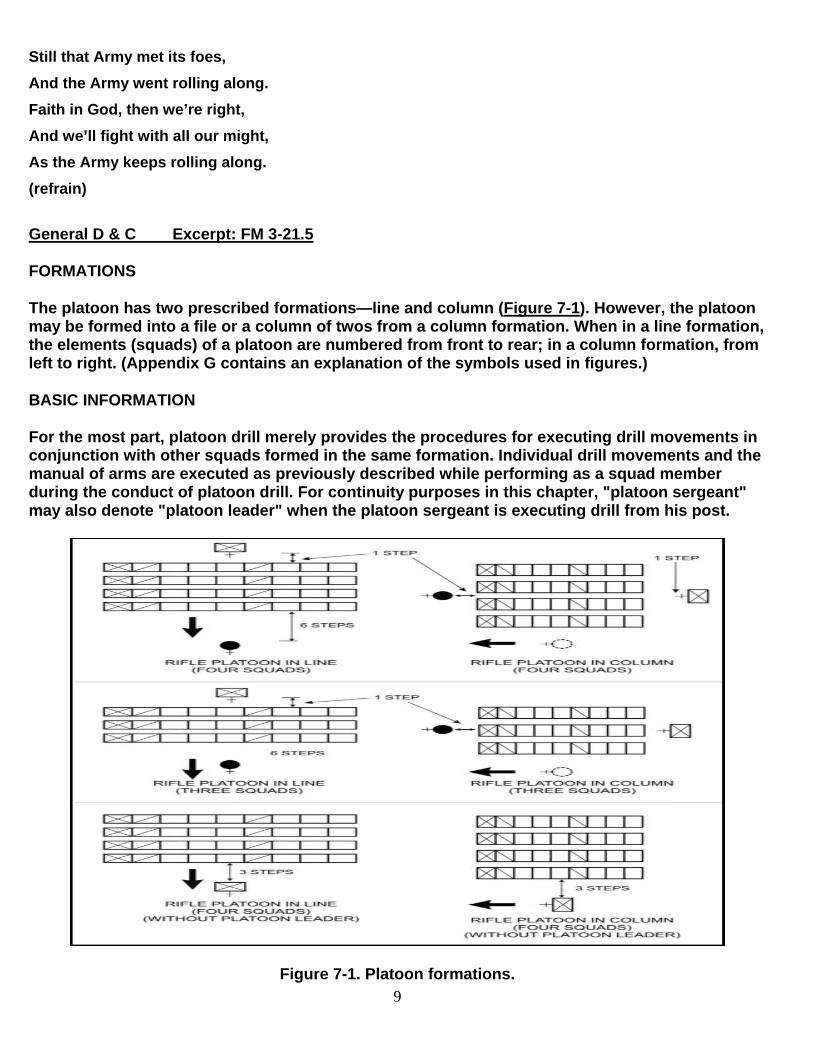
FORMATIONS
The platoon has two prescribed formations—line and column (Figure 7-1). However, the platoon may be formed into a file or a column of twos from a column formation. When in a line formation, the elements (squads) of a platoon are numbered from front to rear; in a column formation, from left to right. (Appendix G contains an explanation of the symbols used in figures.)
BASIC INFORMATION
For the most part, platoon drill merely provides the procedures for executing drill movements in conjunction with other squads formed in the same formation. Individual drill movements and the manual of arms are executed as previously described while performing as a squad member during the conduct of platoon drill. For continuity purposes in this chapter, "platoon sergeant" may also denote "platoon leader" when the platoon sergeant is executing drill from his post.
Figure 7-1. Platoon formations.

10
a. During all drill and ceremonies, the platoon leader and platoon sergeant carry their rifles at Sling Arms. When the platoon drills as part of a larger unit, the platoon leader and platoon sergeant remain at Sling Arms during all manual of arms movements except when executing the Hand Salute while at Sling Arms.
b. When the platoon drills as a separate unit or as part of a larger unit in a line formation, without officers present, the post for the platoon sergeant is three steps in front of and centered on the platoon. When in column formation, the post for the platoon sergeant is three steps to left flank of and centered on the platoon.
c. The post for the platoon sergeant with the platoon leader present is one step to the rear and centered on the platoon in line or column formation.
d. When assuming his post in column from a line formation with the platoon leader present, the platoon sergeant faces to the left in marching (on the command of execution FACE) and marches in the most direct route to his post. He then halts and faces to the right. When assuming his post in line from a column formation, he faces to the right in marching (on the command of execution FACE) and marches in the most direct route to his post, halts centered on the platoon, and faces to the left.
NOTE: When the files (columns) are uneven, the platoon sergeant normally directs the men in longer files to move to another file to balance the formation; or he may fill the vacancy himself as the last man in the right file.
e. When control of the formation is being exchanged between the platoon sergeant and the platoon leader, the platoon sergeant will always travel around the right flank (squad leader) of the formation when marching from post to post. The platoon leader will always travel around the left flank of the formation when marching post to post.
f. On the command Open Ranks, MARCH; Backward, MARCH; Right (Left) Step, MARCH; Forward, MARCH and on commands that cause the platoon to change interval in line, he moves at the same time (with the appropriate step) so as to maintain proper position.
g. The leader of the first squad serves as the base when the platoon is a line formation. The leader of the fourth squad serves as the base when the platoon is in a column formation.
h. If for some reason the platoon is authorized a guidon or phase banner (in training units for example), the bearer’s post is one step in front of and two 15-inch steps to the right of and facing the person forming the platoon. When the formation is faced to the right for a marching movement, he executes in the same manner as explained in Appendix H, except that his post is three steps in front of and centered on the squad leaders. If the platoon leader is present and at his post, the bearer’s post is one step to the rear and two 15-inch steps to the left of the platoon leader.
i. When the platoon drills as a separate unit, in a line formation, the post for the platoon leader is six steps in front of and centered on the platoon; when in a column formation, the platoon leader is six steps to the left flank and centered on the platoon. When marching as part of a larger formation, his post is one step in front of and centered on the squad leaders.

11
j. When the platoon leader commands Open Ranks, MARCH; Backward, MARCH; Right (Left) Step, MARCH; Forward, MARCH or causes the platoon to change interval, he moves at the same time (with the appropriate step) so as to maintain proper position.
(1) When assuming his post in column from a line formation, the platoon leader faces to the right in marching (on the command of execution FACE) and marches in the most direct route to his post, halts, and faces to the left.
(2) When assuming his post in line from a column formation, the platoon leader faces to the left in marching (on the command of execution FACE) and marches in the most direct route to his post, halts perpendicular to the formation, and faces to the right.
FORMING THE PLATOON
The platoon normally forms in a line formation; however, it may re-form in a column when each man can identify his exact position (equipment grounded) in the formation.
a. The platoon forms basically the same as a squad. The platoon sergeant assumes the Position of Attention and commands FALL IN (At Close Interval, FALL IN or In Column, FALL IN). On the command FALL IN (At Close Interval, FALL IN), the squad leader and the first squad (when formed) is three steps in front of and centered on the platoon sergeant. Other squad leaders cover on the first squad leader at the correct distance, which is obtained by estimation. The members of the first squad fall in on their squad leader as prescribed for squad drill. Members of the other squads fall in on their squad leader, assume the Position of Attention, and turn their heads and eyes to the right. They obtain correct distance by taking short steps forward or backward and align themselves on the man to their right. They then sharply turn their heads and eyes to the front as in the Position of Attention and obtain proper interval by taking short steps left and right to cover on the man to their front. Members of all squads, other than the first squad, will not raise their left arms unless the man to their immediate left has no one to his front in the formation on which to cover.
b. When armed, members fall in at Order Arms or Sling Arms. For safety, the commands Inspection, ARMS; Ready, Port, ARMS; Order (Sling), ARMS are given at the initial formation of the day and just before the last command, DISMISSED.
c. When a report is appropriate, the platoon sergeant commands REPORT. The squad leaders, in succession from front to rear, turn their heads and eyes toward the platoon sergeant and salute (holding the Salute until returned) and report. The squad leaders do not state the unit. For example:
(1) Situation 1. When all squad members are in formation, the report is "All present."
(2) Situation 2. When squad members are absent, the soldiers and reasons for absence are reported:
Pvt. Smith - CQ runner.
Pvt. Jones - sick call.
Pvt. Williams –AWOL.

12
d. The platoon sergeant turns his head and eyes toward the reporting squad leader, receives the report, and returns the salute. After receiving the report from the squad leaders, the platoon sergeant faces about and awaits the arrival of the platoon leader or a directive from the first sergeant to REPORT. When the platoon leader has halted at his post, the platoon sergeant salutes and reports, "Sir, All present"; or "Sir, All accounted for"; or "Sir, (so many) men absent." The platoon leader returns the Salute. After the Salute has been returned, the platoon sergeant faces to the right in marching, inclines around the squad leaders, halts at his post, and faces to the right. If reporting to the first sergeant, the platoon sergeant turns his head and eyes toward the first sergeant, salutes, and reports.
e. If the platoon leader is not present for the formation, and the commander is in charge of the formation, the platoon sergeant steps forward three steps (after receiving the squad leader’s report) and, on the command POST, assumes the duties of the platoon leader.
f. When appropriate, the platoon may be formed by the platoon leader rather than by the platoon sergeant. The procedures are the same as previously described except that the first squad forms six steps in front of and centered on the platoon leader, and the platoon sergeant forms at his post to the rear of the platoon. For continuity purposes in this chapter, "platoon sergeant" may also denote "platoon leader" when the platoon leader is executing drill from his post.
BREAKING RANKS
When the situation requires one or more individuals to leave the formation or to receive specific instructions from the platoon sergeant, the platoon sergeant directs: "Private Doe (pause), front and center"; or, "The following personnel front and center—Private Doe (pause), Private Smith." When the individual’s name is called, he assumes the position of attention and replies, "Here, Sergeant (Sir)." He then takes one (15-inch) step backward, halts, faces to the right (left) in marching, and exits the formation by marching to the nearest flank. The soldier does not look left or right. Once the individual has cleared the formation, he begins to double-time and halts two steps in front of and centered on the platoon sergeant.
NOTE: When a group of individuals are called from the formation, the group forms centered on the platoon sergeant. The platoon sergeant should direct (point) the first man into position so that the rank will be centered when the last man has joined the group.
When space is limited and the platoon sergeant wants to march his unit in the opposite direction (reverse), with the squad leaders at the head of their squads, he commands Counter Column, MARCH. On the command of execution MARCH (at the Halt), the first squad marches forward three steps, executes a Column Right, marches across the front of the platoon, and executes another Column Right just beyond the fourth squad. The second squad steps forward one step, executes a Column Right, marches forward, and executes another Column Right between the third and fourth squads. The third squad executes two short Column Lefts from the Halt and marches between the remainder of the third squad and the second squad. The fourth squad marches forward two steps, executes a Column Left, marches across the front of the platoon, and executes another Column Left between the first and second squads (Figure 7-2).

13
Figure 7-2. Counter-Column March at the Halt.
g. As the third squad leader marches past the last man in the third squad, he and his squad begin to march at the Half Step. After marching past the last man in each file, all other squads incline to the right and left as necessary, obtain Normal Interval on the third squad, and begin to march with the Half Step. When all squads are abreast of each other, they begin marching with a 30-inch step without command.
h. During the movement, without the platoon leader present, the platoon sergeant marches alongside the first squad. With the platoon leader present, the platoon sergeant marches one step to the rear and centered between the second and third squads (Figure 7-1) and the platoon leader marches alongside the first squad.
i. When marching, the preparatory command Counter-Column is given as the left foot strikes the marching surface and the command of execution MARCH is given the next time the left foot strikes the marching surface. On the command of execution MARCH, the platoon executes the movement basically the same as from the Halt, except that the squad takes one additional step to ensure that the pivot foot is in the correct position to execute the movement.
NOTE: 1. When there are only three squads in the column, the first squad takes two steps before executing.
2. When the platoon leader and platoon sergeant are marching at their posts as part of a larger formation, the platoon leader takes three steps forward and executes a column right, marches across the front of the platoon, executes another column right (just beyond fourth squad), marches to his post in the most direct manner, takes up the Half Step, and then steps off with a 30-inch step when the squad leaders come on line. The platoon sergeant inclines to the right, follows the third squad until the movement is completed, and then resumes his post.

14
REST POSITIONS AT THE HALT
Any of the positions of rest may be commanded and executed from the Position of Attention.
a. Parade Rest. Parade Rest is commanded only from the Position of Attention. The command for this movement is Parade, REST.
(1) On the command of execution REST, move the left foot about 10 inches to the left of the right foot. Keep the legs straight without locking the knees, resting the weight of the body equally on the heels and balls of the feet.
(2) Simultaneously, place the hands at the small of the back and centered on the belt. Keep the fingers of both hands extended and joined, interlocking the thumbs so that the palm of the right hand is outward (Figure 4-2).
(3) Keep the head and eyes as in the Position of Attention. Remain silent and do not move unless otherwise directed. Stand at Ease, At Ease, and Rest may be executed from this position.
NOTE: Enlisted soldiers assume this position when addressing all noncommissioned officers or when noncommissioned officers address noncommissioned officers of superior rank.
Figure 4-2. Parade Rest.
b. Stand At Ease. The command for this movement is Stand at, EASE. On the command of execution EASE, execute Parade Rest, but turn the head and eyes directly toward the person in charge of the formation. At Ease or Rest may be executed from this position.

15
c. At Ease. The command for this movement is AT EASE. On the command AT EASE, the soldier may move; however, he must remain standing and silent with his right foot in place. The soldier may relax his arms with the thumbs interlaced. Rest may be executed from this position.
d. Rest. The command for this movement is REST. On the command REST, the soldier may move, talk, smoke, or drink unless otherwise directed. He must remain standing with his right foot in place. AT EASE must be executed from this position to allow soldiers to secure canteens, other equipment, and so forth.
NOTE: On the preparatory command for Attention, immediately assume Parade Rest when at the position of Stand at Ease, At Ease, or Rest. If, for some reason, a subordinate element is already at attention, the members of the element remain so and do not execute parade rest on the preparatory command, nor does the subordinate leader give a supplementary command.
IN-RANKS INSPECTION
To conduct in-ranks inspections, use the following procedures:
a. With the platoon in line formation, the platoon sergeant commands Count, OFF. On the command of execution OFF, all personnel with the exception of the right flank personnel turn their head and eyes to the right and the right flank personnel count off with "ONE." After the right flank soldiers have counted their number, the soldiers to their left count off with the next higher number and simultaneously turn their head and eyes to the front. All other members of the formation count off in the same manner until the entire formation has counted off.
b. After the platoon has counted off, the platoon sergeant commands Open Ranks, MARCH. On the command of execution MARCH, the front rank takes two steps forward, the second rank takes one step forward, the third rank stands fast, and the fourth rank takes two steps backward. If additional ranks are present, the fifth rank takes four steps backward, and the sixth rank takes six steps backward.
NOTE: After taking the prescribed number of steps, the men do not raise their arms. If the platoon leader wants exact interval or alignment, he commands At Close Interval (At Double Interval), Dress Right, and DRESS. (See paragraph 7-6 for more information on aligning the platoon.)
c. At this point, the platoon is ready to be inspected. Typically, the squads are inspected by the squad leaders; however they may be inspected by the platoon sergeant or platoon leader. (See paragraphs 7-17 and 7-18.)

16
SQUAD LEADERS’ INSPECTION
If the platoon sergeant wants the squad leaders to inspect their squads, he will direct INSPECT YOUR SQUADS. Salutes are not exchanged.
a. The squad leader marches forward and to the left, inclines as necessary until he is at a point 15 inches in front of and centered on the first man.
NOTE: If the members of the platoon are armed, the squad leaders will sling their weapons diagonally across the back with the muzzle down and to the right. This movement will be executed without command and prior to the squad leader stepping off. (For more information on how to inspect personnel with weapons and how to manipulate the weapon, see paragraph 8-19, c-f.)
b. The squad leader remains at a modified Position of Attention moving his head and eyes only. After inspecting at the center position, he takes a short step forward and to the left and inspects, returns to the center and steps forward and to the right and inspects, and returns to the center position.
c. Having inspected the first man, the squad leader faces to the right as in marching and takes one (two if at normal interval) step, halts, and faces the next man at the appropriate distance. The squad leader conducts the inspection for the rest of the soldiers in the squad.
d. After inspecting the last soldier in the squad, the squad leader faces to the right as in marching and marches around behind the squad, inclining as necessary. While the squad leader marches back to his post, he inspects the squad from the rear.
e. After resuming his post, the squad leader turns his head and eyes over his left shoulder and commands his squad to assume At Ease.
f. The platoon sergeant remains at his post (inspects the guidon bearer if appropriate). After the last squad has been inspected and is at At Ease, the platoon sergeant commands the platoon to Attention.
g. After commanding the platoon to Attention, the platoon sergeant commands Close Ranks, MARCH. On the command of execution MARCH, the first rank takes four steps backward, the second rank takes two steps backward, the third rank stands fast, and the fourth rank takes one step forward. On the command of execution MARCH, the platoon leader and platoon sergeant take the appropriate number of steps to maintain their posts.
h. If the platoon is being inspected as part of a larger formation and control of the platoon has not been turned over to the platoon sergeant, he faces about, executes At Ease, and awaits further instructions from the first sergeant.

17
PLATOON SERGEANT’S/PLATOON LEADER’S INSPECTION
If the platoon sergeant is not going to inspect the entire platoon, he directs the squad leaders of the appropriate squads to inspect their squads. All others will be inspected by the platoon sergeant. When armed, the platoon sergeant slings his weapon in the same manner as the squad leaders.
a. The platoon sergeant faces to the Half Left as in marching and marches by the most direct route to a point 15 inches in front of and centered on the first squad leader (or the squad leader of the squad to be inspected). As soon as the platoon sergeant halts in front of the squad leader, he commands the other squads to At Ease and inspects the squad leader.
b. The platoon sergeant remains at a modified Position of Attention moving his head and eyes only. After inspecting at the center position, he takes a short step forward and to the left and inspects, returns to the center and steps forward and to the right and inspects, and returns to the center position.
c. Having inspected the squad leader, the platoon sergeant faces to the right as in marching and takes one (two if at normal interval) steps, halts, and faces the next man at the appropriate distance. After the platoon sergeant steps off, the squad leader takes a half step forward and faces about. When moving from man to man, the squad leader and platoon sergeant move simultaneously.
d. Having inspected the last soldier in the squad, the platoon sergeant faces to the right as in marching and marches around behind the squad, inclining as necessary, and inspects the squad from the rear.
e. As the platoon sergeant begins to inspect the first squad from the rear, he commands the next squad to Attention. The squad leader returns to his post. After the platoon sergeant arrives in front of the next squad leader, he commands the first squad to At Ease over the right shoulder.
f. The platoon sergeant and squad leader execute in the same manner as in inspecting the first squad until the entire platoon has been inspected. After inspecting the rear of the last squad, the platoon sergeant marches by the most direct route to his post, halts, faces to the left and commands the platoon to Attention.
g. After commanding the platoon to Attention, the platoon sergeant commands Close Ranks, MARCH. On the command of execution MARCH, the first rank takes four steps backward, the second rank takes two steps backward, the third rank stands fast, and the fourth rank takes one step forward. On the command of execution MARCH, the platoon leader and platoon sergeant take the appropriate number of steps to maintain their posts.
h. If the platoon is being inspected as part of a larger formation and control of the platoon has been not been turned over to the platoon sergeant, he faces about, executes At Ease, and awaits further instructions from the first sergeant.

18
WF Day 3 Excerpt: FM 3-25.26, Map Reading and Land Navigation
6-6. DECLINATION DIAGRAM
Declination is the angular difference between any two norths. If you have a map and a compass, the one of most interest to you will be between magnetic and grid north. The declination diagram (Figure 6-8) shows the angular relationship, represented by prongs, among grid, magnetic, and true norths. While the relative positions of the prongs are correct, they are seldom plotted to scale. Do not use the diagram to measure a numerical value. This value will be written in the map margin (in both degrees and mils) beside the diagram.
Figure 6-8. Declination diagrams.
a. Location. A declination diagram is a part of the information in the lower margin on most larger maps. On medium-scale maps, the declination information is shown by a note in the map margin.
b. Grid-Magnetic Angle. The G-M angle value is the angular size that exists between grid north and magnetic north. It is an arc, indicated by a dashed line that connects the grid-north and magnetic-north prongs. This value is expressed to the nearest 1/2 degree, with mil equivalents shown to the nearest 10 mils. The G-M angle is important to the map reader/land navigator because azimuths translated between map and ground will be in error by the size of the declination angle if not adjusted for it.
c. Grid Convergence. An arc indicated by a dashed line connects the prongs for true north and grid north. The value of the angle for the center of the sheet is given to the nearest full minute with its equivalent to the nearest mil. These data are shown in the form of a grid-convergence note.
d. Conversion. There is an angular difference between the grid north and the magnetic north. Since the location of magnetic north does not correspond exactly with the grid-north lines on the maps, a conversion from magnetic to grid or vice versa is needed.

19
(1) With Notes. Simply refer to the conversion notes that appear in conjunction with the diagram explaining the use of the G-M angle (Figure 6-8). One note provides instructions for converting magnetic azimuth to grid azimuth; the other, for converting grid azimuth to magnetic azimuth. The conversion (add or subtract) is governed by the direction of the magnetic-north prong relative to that of the north-grid prong.
(2) Without Notes. In some cases, there are no declination conversion notes on the margin of the map; it is necessary to convert from one type of declination to another. A magnetic compass gives a magnetic azimuth; but in order to plot this line on a gridded map, the magnetic azimuth value must be changed to grid azimuth. The declination diagram is used for these conversions. A rule to remember when solving such problems is this: No matter where the azimuth line points, the angle to it is always measured clockwise from the reference direction (base line). With this in mind, the problem is solved by the following steps:
(a) Draw a vertical or grid-north line (prong). Always align this line with the vertical lines on a map (Figure 6-9).
Figure 6-9. Declination diagram with arbitrary line.
(b) From the base of the grid-north line (prong), draw an arbitrary line (or any azimuth line) at a roughly right angle to north, regardless of the actual value of the azimuth in degrees (Figure 6-9).
(c) Examine the declination diagram on the map and determine the direction of the magnetic north (right-left or east-west) relative to that of the grid-north prong. Draw a magnetic prong from the apex of the grid-north line in the desired direction (Figure 6-9).
(d) Determine the value of the G-M angle. Draw an arc from the grid prong to the magnetic prong and place the value of the G-M angle (Figure 6-9).
(e) Complete the diagram by drawing an arc from each reference line to the arbitrary line. A glance at the completed diagram shows whether the given azimuth or the desired azimuth is greater, and thus whether the known difference between the two must be added or subtracted.

20
(f) The inclusion of the true-north prong in relationship to the conversion is of little importance.
e. Applications. Remember, there are no negative azimuths on the azimuth circle. Since 0 degree is the same as 360 degrees, then 2 degrees is the same as 362 degrees. This is because 2 degrees and 362 degrees are located at the same point on the azimuth circle. The grid azimuth can now be converted into a magnetic azimuth because the grid azimuth is now larger than the G-M angle.
(1) When working with a map having an east G-M angle:
(a) To plot a magnetic azimuth on a map, first change it to a grid azimuth (Figure 6-10).
Figure 6-10. Converting to grid azimuth.
(b) To use a magnetic azimuth in the field with a compass, first change the grid azimuth plotted on a map to a magnetic azimuth (Figure 6-11).
Figure 6-11. Converting to magnetic azimuth.
(c) Convert a grid azimuth to a magnetic azimuth when the G-M angle is greater than a grid azimuth (Figure 6-12).

21
Figure 6-12. Converting to a magnetic azimuth when the G-M angle is greater.
(2) When working with a map having a west G-M angle:
(a) To plot a magnetic azimuth on a map, first convert it to a grid azimuth (Figure 6-13).
Figure 6-13. Converting to a grid azimuth on a map.
(b) To use a magnetic azimuth in the field with a compass, change the grid azimuth plotted on a map to a magnetic azimuth (Figure 6-14).
Figure 6-14. Converting to a magnetic azimuth on a map.

22
(c) Convert a magnetic azimuth when the G-M angle is greater than the magnetic azimuth (Figure 6-15).
Figure 6-15. Converting to a grid azimuth when the G-M angle is greater.
(3) The G-M angle diagram should be constructed and used each time the conversion of azimuth is required. Such procedure is important when working with a map for the first time. It also may be convenient to construct a G-M angle conversion table on the margin of the map.
NOTE: When converting azimuths, exercise extreme care when adding and subtracting the G-M angle. A simple mistake of 1° could be significant in the field.
6-7. INTERSECTION
Intersection is the location of an unknown point by successively occupying at least two (preferably three) known positions on the ground and then map sighting on the unknown location. It is used to locate distant or inaccessible points or objects such as enemy targets and danger areas. There are two methods of intersection: the map and compass method and the straightedge method (Figures 6-16 and 6-17).
Figure 6-16. Intersection, using map and compass.

23
Figure 6-17. Intersection, using a straightedge.
a. When using the map and compass method—
(1) Orient the map using the compass.
(2) Locate and mark your position on the map,
(3) Determine the magnetic azimuth to the unknown position using the compass.
(4) Convert the magnetic azimuth to grid azimuth.
(5) Draw a line on the map from your position on this grid azimuth.
(6) Move to a second known point and repeat steps 1, 2, 3, 4, and 5.
(7) The location of the unknown position is where the lines cross on the map. Determine the grid coordinates to the desired accuracy.
b. The straight edge method is used when a compass is not available. When using it—
(1) Orient the map on a flat surface by the terrain association method.
(2) Locate and mark your position on the map.
(3) Lay a straight edge on the map with one end at the user’s position (A) as a pivot point; then, rotate the straightedge until the unknown point is sighted along the edge.
(4) Draw a line along the straight edge
(5) Repeat the above steps at position (B) and check for accuracy.

24
(6) The intersection of the lines on the map is the location of the unknown point (C). Determine the grid coordinates to the desired accuracy (Figure 6-17).
6-8. RESECTION
Resection is the method of locating one's position on a map by determining the grid azimuth to at least two well-defined locations that can be pinpointed on the map. For greater accuracy, the desired method of resection would be to use three or more well-defined locations.
a. When using the map and compass method (Figure 6-18)—
(1) Orient the map using the compass.
(2) Identify two or three known distant locations on the ground and mark them on the map.
(3) Measure the magnetic azimuth to one of the known positions from your location using a compass.
(4) Convert the magnetic azimuth to a grid azimuth.
(5) Convert the grid azimuth to a back azimuth. Using a protractor, draw a line for the back azimuth on the map from the known position back toward your unknown position.
(6) Repeat 3, 4, and 5 for a second position and a third position, if desired.
(7) The intersection of the lines is your location. Determine the grid coordinates to the desired accuracy.
Figure 6-18. Resection with map and compass.

25
a. When using the straightedge method (Figure 6-19)—
(1) Orient the map on a flat surface by the terrain association method.
(2) Locate at least two known distant locations or prominent features on the ground and mark them on the map.
(3) Lay a straightedge on the map using a known position as a pivot point. Rotate the straightedge until the known position on the map is aligned with the known position on the ground.
(4) Draw a line along the straightedge away from the known position on the ground toward your position.
(5) Repeat 3 and 4 using a second known position.
(6) The intersection of the lines on the map is your location. Determine the grid coordinates to the desired accuracy.
Figure 6-19. Resection with straightedge.
6-9. MODIFIED RESECTION
Modified resection is the method of locating one's position on the map when the person is located on a linear feature on the ground, such as a road, canal, or stream (Figure 6-20). Proceed as follows:
a. Orient the map using a compass or by terrain association.
b. Find a distant point that can be identified on the ground and on the map.
c. Determine the magnetic azimuth from your location to the distant known point.
d. Convert the magnetic azimuth to a grid azimuth.

26
e. Convert the grid azimuth to a back azimuth. Using a protractor, draw a line for the back azimuth on the map from the known position back toward your unknown position.
f. The location of the user is where the line crosses the linear feature. Determine the grid coordinates to the desired accuracy.
Figure 6-20. Modified resection.
6-10. POLAR COORDINATES
A method of locating or plotting an unknown position from a known point by giving a direction and a distance along that direction line is called polar coordinates. The following elements must be present when using polar coordinates (Figure 6-21).
Present known location on the map.
Azimuth (grid or magnetic).
Distance (in meters).
Figure 6-21. Polar plot.

27
Using the laser range finder to determine the range enhances your accuracy in determining the unknown position's location.
10-6. TERRAIN FEATURES
All terrain features are derived from a complex landmass known as a mountain or ridgeline (Figure 10-16). The term ridgeline is not interchangeable with the term ridge. A ridgeline is a line of high ground, usually with changes in elevation along its top and low ground on all sides from which a total of 10 natural or man-made terrain features are classified.
Figure 10-16. Ridgeline.
a. Major Terrain Features.
(1) Hill. A hill is an area of high ground. From a hilltop, the ground slopes down in all directions. A hill is shown on a map by contour lines forming concentric circles. The inside of the smallest closed circle is the hilltop (Figure 10-17).
Figure 10-17. Hill.
(2) Saddle. A saddle is a dip or low point between two areas of higher ground. A saddle is not necessarily the lower ground between two hilltops; it may be simply a dip or break along a level ridge crest. If you are in a saddle, there is high ground in two opposite directions and lower ground in the other two directions. A saddle is normally represented as an hourglass (Figure 10-18).

28
Figure 10-18. Saddle.
(3) Valley. A valley is a stretched-out groove in the land, usually formed by streams or rivers. A valley begins with high ground on three sides, and usually has a course of running water through it. If standing in a valley, three directions offer high ground, while the fourth direction offers low ground. Depending on its size and where a person is standing, it may not be obvious that there is high ground in the third direction, but water flows from higher to lower ground. Contour lines forming a valley are either U-shaped or V-shaped. To determine the direction water is flowing, look at the contour lines. The closed end of the contour line (U or V) always points upstream or toward high ground (Figure 10-19).
Figure 10-19. Valley.
(4) Ridge. A ridge is a sloping line of high ground. If you are standing on the centerline of a ridge, you will normally have low ground in three directions and high ground in one direction with varying degrees of slope. If you cross a ridge at right angles, you will climb steeply to the crest and then descend steeply to the base. When you move along the path of the ridge, depending on the geographic location, there may be either an almost unnoticeable slope or a very obvious incline. Contour lines forming a ridge tend to be U-shaped or V-shaped. The closed end of the contour line points away from high ground (Figure 10-20).
Figure 10-20. Ridge.

29
(5) Depression. A depression is a low point in the ground or a sinkhole. It could be described as an area of low ground surrounded by higher ground in all directions, or simply a hole in the ground. Usually only depressions that are equal to or greater than the contour interval will be shown. On maps, depressions are represented by closed contour lines that have tick marks pointing toward low ground (Figure 10-21).
Figure 10-21. Depression.
b. Minor Terrain Features.
(1) Draw. A draw is a less developed stream course than a valley. In a draw, there is essentially no level ground and, therefore, little or no maneuver room within its confines. If you are standing in a draw, the ground slopes upward in three directions and downward in the other direction. A draw could be considered as the initial formation of a valley. The contour lines depicting a draw are U-shaped or V-shaped, pointing toward high ground (Figure 10-22).
Figure 10-22. Draw.
(2) Spur. A spur is a short, continuous sloping line of higher ground, normally jutting out from the side of a ridge. A spur is often formed by two rough parallel streams, which cut draws down the side of a ridge. The ground sloped down in three directions and up in one direction. Contour lines on a map depict a spur with the U or V pointing away from high ground (Figure 10-23).

30
Figure 10-23. Spur.
(3) Cliff. A cliff is a vertical or near vertical feature; it is an abrupt change of the land. When a slope is so steep that the contour lines converge into one "carrying" contour of contours, this last contour line has tick marks pointing toward low ground (Figure 10-24A). Cliffs are also shown by contour lines very close together and, in some instances, touching each other (Figure 10-24B).
Figure 10-24A. Cliff.
Figure 10-24B. Cliff.
c. Supplementary Terrain Features.
(1) Cut. A cut is a man-made feature resulting from cutting through raised ground, usually to form a level bed for a road or railroad track. Cuts are shown on a map when they are at least 10 feet high, and they are drawn with a contour line along the cut line. This contour line extends the length of the cut and has tick marks that extend from the cut line to the roadbed, if the map scale permits this level of detail (Figure 10-25).

31
Figure 10-25. Cut and fill.
(2) Fill. A fill is a man-made feature resulting from filling a low area, usually to form a level bed for a road or railroad track. Fills are shown on a map when they are at least 10 feet high, and they are drawn with a contour line along the fill line. This contour line extends the length of the filled area and has tick marks that point toward lower ground. If the map scale permits, the length of the fill tick marks are drawn to scale and extend from the base line of the fill symbol (Figure 10-25).
10-7. INTERPRETATION OF TERRAIN FEATURES
Terrain features do not normally stand a lone. To better understand these when they are depicted on a map, you need to interpret them. Terrain features (Figure 10-26) are interpreted by using contour lines, the SOSES approach, ridge lining, or streamlining.
Figure 10-26. Terrain features.
a. Contour Lines. Emphasizing the main contour lines is a technique used to interpret the terrain of an area. By studying these contour lines, you able to obtain a better understanding of the layout of the terrain and to decide on the best route.
(1) The following description pertains to Figure 10-27. Running east to west across the complex landmass is a ridgeline. A ridgeline is a line of high ground, usually with changes in elevation along its top and low ground on all sides. The changes in elevation are the three hilltops and two saddles along the ridgeline. From the top of each hill, there is lower ground in all directions. The saddles have lower ground in two directions and high ground in the opposite two directions. The contour lines of

32
each saddle form half an hourglass shape. Because of the difference in size of the higher ground on the two opposite sides of a saddle, a full hourglass shape of a saddle may not be apparent.
(2) There are four prominent ridges. A ridge is on each end of the ridgeline and two ridges extend south from the ridgeline. All of the ridges have lower ground in three directions and higher ground in one direction. The closed ends of the U's formed by the contour lines point away from higher ground.
(3) To the south lies a valley; the valley slopes downward from east to west. Note that the U of the contour line points to the east, indicating higher ground in that direction and lower ground to the west. Another look at the valley shows high ground to the north and south of the valley.
(4) Just east of the valley is a depression. There is higher ground in all directions when looking from the bottom of the depression.
(5) There are several spurs extending generally south from the ridgeline. They, like ridges, have lower ground in three directions and higher ground in one direction. Their contour line U's point away from higher ground.
(6) Between the ridges and spurs are draws. They, like valleys, have higher ground in three directions and lower ground in one direction. Their contour line U's and V's point toward higher ground.
(7) Two contour lines on the north side of the center hill are touching or almost touching. They have ticks indicating a vertical or nearly vertical slope or a cliff.
(8) The road cutting through the eastern ridge depicts cuts and fills. The breaks in the contour lines indicate cuts, and the ticks pointing away from the roadbed on each side of the road indicate fills.
b. SOSES. A recommended technique for identifying specific terrain features and then locating them on the map is to make use of five of their characteristics known by the mnemonic SOSES. Terrain features can be examined, described, and compared with each other and with corresponding map contour patterns in terms of their shapes, orientations, sizes, elevations, and slopes.
(1) Shape. The general form or outline of the feature at its base.
(2) Orientation. The general trend or direction of a feature from your viewpoint. A feature can be in line, across, or at an angle to your viewpoint.
(3) Size. The length or width of a feature horizontally across its base. For example, one terrain feature might be larger or smaller than another terrain feature.
(4) Elevation. The height of a terrain feature. This can be described either in absolute or relative terms as compared to the other features in the area. One landform may be higher, lower, deeper, or shallower than another.

33
(5) Slope. The type (uniform, convex, or concave) and the steepness or angle (steep or gentle) of the sides of a terrain feature.
Through practice, you can learn to identify several individual terrain features in the field and see how they vary in appearance.
c. Ridge lining. This technique helps you to visualize the overall lay of the ground within the area of interest on the map. Follow these steps:
(1) Identify on the map the crests of the ridgelines in your area of operation by identifying the close-out contours that lie along the hilltop.
(2) Trace over the crests so each ridgeline stands out clearly as one identifiable line.
(3) Go back over each of the major ridgelines and trace over the prominent ridges and spurs that come out of the ridgelines.
The usual colors used for this tracing are red or brown; however, you may use any color at hand. When you have completed the ridge lining process, you will find that the high ground on the map will stand out and that you will be able to see the relationship between the various ridgelines (Figure 10-27).
d. Streamlining. This procedure (Figure 10-27) is similar to that of ridge lining.
(1) Identify all the mapped streams in the area of operations.
(2) Trace over them to make them stand out more prominently.
(3) Then identify other low ground, such as smaller valleys or draws that feed into the major streams, and trace over them.
This brings out the drainage pattern and low ground in the area of operation on the map. The color used for this is usually blue; but again, if blue is not available, use any color at hand so long as the distinction between the ridgelines and the streamlines is clear.
11-6. NAVIGATION METHODS
Staying on the route is accomplished through the use of one or two navigation techniques—dead reckoning and terrain association. These methods are discussed in detail below.
a. Moving by Dead Reckoning. Dead reckoning consists of two fundamental steps. The first is the use of a protractor and graphic scales to determine the direction and distance from one point to another on a map. The second step is the use of a compass and some means of measuring distance to apply this information on the ground. In other words, it begins with the determination of a polar coordinate on a map and ends with the act of finding it on the ground.

34
(1) Dead reckoning along a given route is the application of the same process used by a mapmaker as he establishes a measured line of reference upon which to construct the framework of his map. Therefore, triangulation exercises (either resection or intersection) can be easily undertaken by the navigator at any time to either determine or confirm precise locations along or near his route. Between these position-fixes, establish your location by measuring or estimating the distance traveled along the azimuth being followed from the previous known point. You might use pacing, a vehicle odometer, or the application of elapsed time for this purpose, depending upon the situation.
(2) Most dead reckoned movements do not consist of single straight-line distances because you cannot ignore the tactical and navigational aspects of the terrain, enemy situation, natural and man-made obstacles, time, and safety factors. Another reason most dead reckoning movements are not single straight-line distances is because compasses and pace-counts are imprecise measures. Error from them compounds over distance; therefore, you could soon be far afield from your intended route even if you performed the procedures correctly. The only way to counteract this phenomenon is to reconfirm your location by terrain association or resection. Routes planned for dead reckoning generally consist of a series of straight-line distances between several checkpoints with perhaps some travel running on or parallel to roads or trails.
(3) There are two advantages to dead reckoning. First, dead reckoning is easy to teach and to learn. Second, it can be a highly accurate way of moving from one point to another if done carefully over short distances, even where few external cues are present to guide the movements.
(4) During daylight, across open country, along a specified magnetic azimuth, never walk with the compass in the open position and in front of you. Because the compass will not stay steady or level, it does not give an accurate reading when held or used this way. Begin at the start point and face with the compass in the proper direction, then sight in on a landmark that is located on the correct azimuth to be followed. Close the compass and proceed to that landmark. Repeat the process as many times as necessary to complete the straight-line segment of the route.
(5) The landmarks selected for these purposes are called steering marks, and their selection is crucial to success in dead reckoning. Steering marks should never be determined from a map study. They are selected as the march progresses and are commonly on or near the highest points that you can see along the azimuth line that you are following when they are selected. They may be uniquely shaped trees, rocks, hilltops, posts, towers, and buildings—anything that can be easily identified. If you do not see a good steering mark to the front, you might use a back azimuth to some feature behind you until a good steering mark appears out in front. Characteristics of a good steering mark are:
(a) It must have some characteristics about it, such as color, shade of color, size, or shape (preferably all four), that will assure you that it will continue to be recognized as you approach it.

35
(b) If several easily distinguished objects appear along your line of march, the best steering mark is the most distant object. This procedure enables you to travel farther with fewer references to the compass. If you have many options, select the highest object. A higher mark is not as easily lost to sight as is a lower mark that blends into the background as you approach it. A steering mark should be continuously visible as you move toward it.
(c) Steering marks selected at night must have even more unique shapes than those selected during daylight. As darkness approaches, colors disappear and objects appear as black or gray silhouettes. Instead of seeing shapes, you begin to see only the general outlines that may appear to change as you move and see the objects from slightly different angles.
(6) Dead reckoning without natural steering marks is used when the area through which you are traveling is devoid of features, or when visibility is poor. At night, it may be necessary to send a member of the unit out in front of your position to create your own steering mark in order to proceed. His position should be as far out as possible to reduce the number of chances for error as you move. Arm-and-hand signals or a radio may be used in placing him on the correct azimuth. After he has been properly located, move forward to his position and repeat the process until some steering marks can be identified or until you reach your objective.
(7) When handling obstacles/detours on the route, follow these guidelines:
(a) When an obstacle forces you to leave your original line of march and take up a parallel one, always return to the original line as soon as the terrain or situation permits.
(b) To turn clockwise (right) 90 degrees, you must add 90 degrees to your original azimuth. To turn counterclockwise (left) 90 degrees from your current direction, you must subtract 90 degrees from your present azimuth.
(c) When making a detour, be certain that only paces taken toward the final destination are counted as part of your forward progress. They should not be confused with the local pacing that takes place perpendicular to the route in order to avoid the problem area and in returning to the original line of march after the obstacle has been passed.
(8) Sometimes a steering mark on your azimuth of travel can be seen across a swamp or some other obstacle to which you can simply walk out around. Dead reckoning can then begin at that point. If there is no obvious steering mark to be seen across the obstacle, perhaps one can be located to the rear. Compute a back azimuth to this point and later sight back to it once the obstacle has been passed in order to get back on track.
(9) You can use the deliberate offset technique. Highly accurate distance estimates and precision compass work may not be required if the destination or an intermediate checkpoint is located on or near a large linear feature that runs nearly perpendicular to your direction of travel. Examples include roads or highways, railroads, power transmission lines, ridges, or streams. In these cases, you should apply a deliberate error (offset) of about 10 degrees to the azimuth you planned to

36
follow and then move, using the lensatic compass as a guide, in that direction until you encounter the linear feature. You will know exactly which way to turn (left or right) to find your destination or checkpoint, depending upon which way you planned your deliberate offset.
(10) Because no one can move along a given azimuth with absolute precision, it is better to plan a few extra steps than to begin an aimless search for the objective once you reach the linear feature. If you introduce your own mistake, you will certainly know how to correct it. This method will also cope with minor compass errors and the slight variations that always occur in the earth's magnetic field.
(11) There are disadvantages to dead reckoning. The farther you travel by dead reckoning without confirming your position in relation to the terrain and other features, the more errors you will accumulate in your movements. Therefore, you should confirm and correct your estimated position whenever you encounter a known feature on the ground that is also on the map. Periodically, you should accomplish a resection triangulation using two or more known points to pinpoint and correct your position on the map. Pace counts or any type of distance measurement should begin anew each time your position is confirmed on the map.
(a) It is dangerous to select a single steering mark, such as a distant mountaintop, and then move blindly toward it. What will you do if you must suddenly call for fire support or a medical evacuation? You must periodically use resection and terrain association techniques to pinpoint your location along the way.
(b) Steering marks can be farther apart in open country, thereby making navigation more accurate. In areas of dense vegetation, however, where there is little relief, during darkness, or in fog, your steering marks must be close together. This, of course, introduces more chance for error.
(c) Finally, dead reckoning is time-consuming and demands constant attention to the compass. Errors accumulate easily and quickly. Every fold in the ground and detours as small as a single tree or boulder also complicate the measurement of distance.
b. Moving by Terrain Association. The technique of moving by terrain association is more forgiving of mistakes and far less time-consuming than dead reckoning. It best suits those situations that call for movement from one area to another. Once an error has been made in dead reckoning, you are off the track. Errors made using terrain association are easily corrected, however, because you are comparing what you expected to see from the map to what you do see on the ground. Errors are anticipated and will not go unchecked. You can easily make adjustments based upon what you encounter. After all, you do not find the neighborhood grocery store by dead reckoning—you adjust your movements according to the familiar landmarks you encounter along the way (Figure 11-8). Periodic position-fixing through either plotted or estimated resection will also make it possible to correct your movements, call for fire, or call in the locations of enemy targets or any other information of tactical or logistical importance.

37
Figure 11-8. Terrain association navigation.
(1) Identifying and Locating Selected Features. Being able to identify and locate the selected features, both on the map and on the ground, are essential to the success in moving by terrain association. The following rules may prove helpful.
(a) Be certain the map is properly oriented when moving along the route and use the terrain and other features as guides. The orientation of the map must match the terrain or it can cause confusion.
(b) To locate and identify features being used to guide the movement, look for the steepness and shape of the slopes, the relative elevations of the various features, and the directional orientations in relation to your position and to the position of the other features you can see.
(c) Make use of the additional cues provided by hydrography, culture, and vegetation. All the information you can gather will assist you in making the move. The ultimate test and the best practice for this movement technique is to go out in the field and use it. The use of terrain, other natural features, and any man-made objects that appear both on the map and on the ground must be practiced at every opportunity. There is no other way to learn or retain this skill.
(2) Using Handrails, Catching Features, and Navigational Attack Points. First, because it is difficult to dead reckon without error over long distances with your compass, the alert navigator can often gain assistance from the terrain.
(a) Handrails are linear features like roads or highways, railroads, power transmission lines, ridgelines, or streams that run roughly parallel to your direction of travel. Instead of using precision compass work, you can rough compass without the use of steering marks for as long as the feature travels with you on your right or left. It acts as a handrail to guide the way.

38
(b) Second, when you reach the point where either your route or the handrail changes direction, you must be aware that it is time to go your separate ways. Some prominent feature located near this point is selected to provide this warning. This is called a catching feature; it can also be used to tell you when you have gone too far.
(c) Third, the catching feature may also be your navigational attack point; this point is the place where area navigation ends and point navigation begins. From this last easily identified checkpoint, the navigator moves cautiously and precisely along a given azimuth for a specified distance to locate the final objective. The selection of this navigational attack point is important. A distance of 500 meters or less is most desirable.
(3) Recognizing the Disadvantages of Terrain Association. The major disadvantage to navigation by terrain association is that you must be able to interpret the map and analyze the world around you. Recognition of terrain and other features, the ability to determine and estimate direction and distance, and knowing how to do quick-in-the-head position fixing are skills that are more difficult to teach, learn, and retain than those required for dead reckoning.
c. Combination of Techniques. Actually, the most successful navigation is obtained by combining the techniques described above. Constant orientation of the map and continuous observation of the terrain in conjunction with compass-read azimuths, and distance traveled on the ground compared with map distance, used together make reaching a destination more certain. One should not depend entirely on compass navigation or map navigation; either or both could be lost or destroyed.
Pace Count. Another way to measure ground distance is the pace count. A pace is equal to one natural step, about 30 inches long. To accurately use the pace count method, you must know how many paces it takes you to walk 100 meters. To determine this, you must walk an accurately measured course and count the number of paces you take. A pace course can be as short as 100 meters or as long as 600 meters. The pace course, regardless of length, must be on similar terrain to that you will be walking over. It does no good to walk a course on flat terrain and then try to use that pace count on hilly terrain. To determine your pace count on a 600-meter course, count the paces it takes you to walk the 600 meters, then divide the total paces by 6. The answer will give you the average paces it takes you to walk 100 meters. It is important that each person who navigates while dismounted knows his pace count.
(1) There are many methods to keep track of the distance traveled when using the pace count. Some of these methods are: put a pebble in your pocket every time you have walked 100 meters according to your pace count; tie knots in a string; or put marks in a notebook. Do not try to remember the count; always use one of these methods or design your own method.
(2) Certain conditions affect your pace count in the field, and you must allow for them by making adjustments.
(a) Slopes. Your pace lengthens on a down slope and shortens on an upgrade. Keeping this in mind, if it normally takes you 120 paces to walk 100 meters, your pace count may increase to 130 or more when walking up a slope.

39
(b) Winds. A head wind shortens the pace and a tail wind increases it.
(c) Surfaces. Sand, gravel, mud, snow, and similar surface materials tend to shorten the pace.
(d) Elements. Falling snow, rain, or ice cause the pace to be reduced in length.
(e) Clothing. Excess clothing and boots with poor traction affect the pace length.
(f) Visibility. Poor visibility, such as in fog, rain, or darkness, will shorten your pace.
LAND NAVIGATION SMART SECTION
What colors are used on military maps?
-Blue: water
-Green: vegetation
-Red-Brown: cultural features, all relief features, and elevation
-Red: main roads and populated areas
-Black: man-made objects
-Brown: relief features & elevation
What are the five major and five minor terrain features found on a military map?
-Major: hill; saddle; valley; ridge; depression
-Minor: Draw; spur; cliff; cut; fill
What are the two methods used for finding an azimuth using a compass?
-Centerhold method
-Compass to cheek
Presetting a Compass and Following an Azimuth. Although different models of the lensatic compass vary somewhat in the details of their use, the principles are the same.
(1) During daylight hours or with a light source:
(a) Hold the compass level in the palm of the hand.

40
(b) Rotate it until the desired azimuth falls under the fixed black index line (for example, 320°), maintaining the azimuth as prescribed (Figure 9-4).
Figure 9-4. Compass preset at 320 degrees.
(c) Turn the bezel ring until the luminous line is aligned with the north-seeking arrow. Once the alignment is obtained, the compass is preset.
(d) To follow an azimuth, assume the centerhold technique and turn your body until the north-seeking arrow is aligned with the luminous line. Then proceed forward in the direction of the front cover's sighting wire, which is aligned with the fixed black index line that contains the desired azimuth.
(2) During limited visibility, an azimuth may be set on the compass by the click method. Remember that the bezel ring contains 3° intervals (clicks).
(a) Rotate the bezel ring until the luminous line is over the fixed black index line.
(b) Find the desired azimuth and divide it by three. The result is the number of clicks that you have to rotate the bezel ring.
(c) Count the desired number of clicks. If the desired azimuth is smaller than 180°, the number of clicks on the bezel ring should be counted in a counterclockwise direction. For example, the desired azimuth is 51°. Desired azimuth is 51°¸ 3 = 17 clicks counterclockwise. If the desired azimuth is larger than 180°, subtract the number of degrees from 360° and divide by 3 to obtain the number of clicks. Count them in a clockwise direction. For example, the desired azimuth is 330°; 360°-330° = 30 ¸ 3 = 10 clicks clockwise.
(d) With the compass preset as described above, assume a centerhold technique and rotate your body until the north-seeking arrow is aligned with the luminous line on the bezel. Then proceed forward in the direction of the front cover's luminous dots, which are aligned with the fixed black index line containing the azimuth.

41
(e) When the compass is to be used in darkness, an initial azimuth should be set while light is still available, if possible. With the initial azimuth as a base, any other azimuth that is a multiple of three can be established through the use of the clicking feature of the bezel ring.
NOTE: Sometimes the desired azimuth is not exactly divisible by three, causing an option of rounding up or rounding down. If the azimuth is rounded up, this causes an increase in the value of the azimuth, and the object is to be found on the left. If the azimuth is rounded down, this causes a decrease in the value of the azimuth, and the object is to be found on the right.
d. Bypassing an Obstacle. To bypass enemy positions or obstacles and still stay oriented, detour around the obstacle by moving at right angles for specified distances.
(1) For example, while moving on an azimuth of 90° change your azimuth to 180° and travel for 100 meters. Change your azimuth to 90°and travel for 150 meters. Change your azimuth to 360°and travel for 100 meters. Then, change your azimuth to 90°and you are back on your original azimuth line (Figure 9-5).
Figure 9-5. Bypassing an obstacle.
(2) Bypassing an unexpected obstacle at night is a fairly simple matter. To make a 90° turn to the right, hold the compass in the centerhold technique; turn until the center of the luminous letter E is under the luminous line (do not move the bezel ring). To make a 90° turn to the left, turn until the center of the luminous letter W is under the luminous line. This does not require changing the compass setting (bezel ring), and it ensures accurate 90° turns.
e. Offset. A deliberate offset is a planned magnetic deviation to the right or left of an azimuth to an objective. Use it when the objective is located along or in the vicinity of a linear feature such as a road or stream. Because of errors in the compass or in map reading, the linear feature may be reached without knowing whether the objective lies to the right or left. A deliberate offset by a known number of degrees in a known direction compensates for possible errors and ensures that upon reaching the linear feature, the user knows whether to go right or left to reach the objective. Ten degrees is an adequate offset for most tactical uses. Each degree offset moves the course about 18 meters to the

42
right or left for each 1,000 meters traveled. For example, in Figure 9-6, the number of degrees offset is 10. If the distance traveled to "x" in 1,000 meters, then "x" is located about 180 meters to the right of the objective.
Figure 9-6. Deliberate offset to the objective.
Contour Lines. Contour lines are the most common method of showing relief and elevation on a standard topographic map. A contour line represents an imaginary line on the ground, above or below sea level. All points on the contour line are at the same elevation. The elevation represented by contour lines is the vertical distance above or below sea level. The three types of contour lines (Figure 10-1) used on a standard topographic map are as follows:
Figure 10-1. Contour lines.
(1) Index. Starting at zero elevation or mean sea level, every fifth contour line is a heavier line. These are known as index contour lines. Normally, each index contour line is numbered at some point. This number is the elevation of that line.
(2) Intermediate. The contour lines falling between the index contour lines are called intermediate contour lines. These lines are finer and do not have their elevations given. There are normally four intermediate contour lines between index contour lines.
(3) Supplementary. These contour lines resemble dashes. They show changes in elevation of at least one-half the contour interval. These lines are normally found where there is very little change in elevation, such as on fairly level terrain.

43
10-3. CONTOUR INTERVALS
Before the elevation of any point on the map can be determined, the user must know the contour interval for the map he is using. The contour interval measurement given in the marginal information is the vertical distance between adjacent contour lines. To determine the elevation of a point on the map—
a. Determine the contour interval and the unit of measure used, for example, feet, meters, or yards (Figure 10-2).
Figure 10-2. Contour interval note.
a. Find the numbered index contour line nearest the point of which you are trying to
determine the elevation (Figure 10-3).
Figure 10-3. Points on contour lines.
c. Determine if you are going from lower elevation to higher, or vice versa. In Figure 10-3, point (a) is between the index contour lines. The lower index contour line is numbered 500, which means any point on that line is at an elevation of 500 meters above mean sea level. The upper index contour line is numbered 600, or 600 meters. Going from the lower to the upper index contour line shows an increase in elevation. d. Determine the exact elevation of point (a), start at the index contour line numbered 500 and count the number of intermediate contour lines to point (a). Locate point (a) on the second intermediate contour line above the 500-meter index contour line. The contour interval is 20 meters (Figure 10-2), thus each one of the intermediate contour lines crossed to get to point (a) adds 20 meters to the 500-meter index contour line. The elevation of point (a) is 540 meters; the elevation has increased. e. Determine the elevation of point (b). Go to the nearest index contour line. In this case, it is the upper index contour line numbered 600. Locate point (b) on the intermediate contour line immediately below the 600-meter index contour line. Below means downhill or a lower elevation. Therefore, point (b) is located at an elevation of 580 meters. Remember, if you are increasing elevation, add the contour interval to the nearest index contour line. If you are decreasing elevation, subtract the contour interval from the nearest index contour line. f. Determine the elevation to a hilltop point (c). Add one-half the contour interval to the elevation of the last contour line. In this example, the last contour line before the hilltop is

44
an index contour line numbered 600. Add one-half the contour interval, 10 meters, to the index contour line. The elevation of the hilltop would be 610 meters.
D4 IPB/Scenario Update Refer to OPORD 06-04, Annex B, and FRAGOs 1 & 2 for more detailed information. The Cadets have been alerted/mobilized for a pending deployment to the fictitious country of Palomas in Southern Europe. Fort Lewis represents their CONUS Replacement Center (CRC) where the Cadets will receive their deployment physicals, conduct marksmanship qualification, and receive additional tactical training before going ‘in country’. The APFT, LN, BRM, HG, ITT, US Weap., Conf, FS, and First Aid Committees represent that additional refresher and certification training that the Cadets will receive prior to their deployment. The Cadets will then deploy to Palomas where they will receive Tactical Assembly Area training at Security Operations which is now part of the Squad STX committee. The Cadets then continue with 4 days of Tactical Training within Palomas at Squad STX before moving to Platoon Security Operations (PSO). PSO is led by Regimental Cadre and represents a Tactical Staging area near the ZOS where the cadets will refit and rearm prior to moving into the ZOS. The Cadets will then move into the ZOS, replicated by the Patrolling Committee, where they will conduct combat operations as part of a UN brokered multinational force. The scenario is similar to the Balkans in that there are international boundaries, ethnic conflicts, and unconventional enemy forces, but the scenario also includes some of the current dangers faced by our troops in OIF and OEF. The scenario and lanes at SQD STX and Patrolling are designed to assess Cadet Leadership. As such, the Cadets are evaluated on how they react to a complex battlefield. There are multiple ‘right’ answers for every lane and Cadets that can think quickly and adapt to a rapidly changing environment will be rewarded. The following products will be given to the Regimental Cadre when they arrive at WF. Regimental Cadre will brief the Cadets on the following days: Day 3/4: Brief OPORD 06-04 and Annex B (Intelligence/Road to War) Cadets receive Smart Cards Day 14: Brief FRAGO 1 - Deployment into Palomas (Squad STX Committee) Day 19: Brief FRAGO 2 – Movement into ZOS (Platoon Security Operations & Patrolling Committee) Day 22: Patrolling S2 Briefs INTSUM #1 to Cadets while they’re at Plt Sec Ops
WF Day 4 Field Craft Introduction Excerpt: FM 3-05.70, Survival, Chapter 5
Shelters
A shelter can protect you from the sun, insects, wind, rain, snow, hot or cold temperatures, and enemy observation. It can give you a feeling of well-being and help you maintain your will to survive.
In some areas, your need for shelter may take precedence over your need for food and possibly even your need for water. For example, prolonged exposure to cold can cause excessive fatigue

45
and weakness (exhaustion). An exhausted person may develop a "passive" outlook, thereby losing the will to survive.
Seek natural shelters or alter them to meet your needs, therefore, saving energy. A common error in making a shelter is to make it too large. A shelter must be large enough to protect you and small enough to contain your body heat, especially in cold climates.
PRIMARY SHELTER—UNIFORM
5-1. Your primary shelter in a survival situation will be your uniform. This point is true regardless of whether you are in a hot, cold, tropical, desert, or arctic situation. For your uniform to protect you, it must be in as good of a condition as possible and be worn properly. We use the term COLDER which is addressed in Chapter 15 to remind us of what to do.
SHELTER SITE SELECTION
5-2. When you are in a survival situation and realize that shelter is a high priority, start looking for shelter as soon as possible. As you do so, remember what you will need at the site. Two requisites for shelter are that it must—
• Contain material to make the type of shelter you need. • Be large enough and level enough for you to lie down comfortably.
5-3. You should focus on your tactical situation and your safety when considering these requisites. You must also consider whether the site—
• Provides concealment from enemy observation. • Has camouflaged escape routes. • Is suitable for signaling, if necessary. • Provides protection against wild animals and rocks and dead trees that might fall. • Is free from insects, reptiles, and poisonous plants.
5-4. You must remember the problems that could arise in your environment. For instance, avoid—
• Flash flood areas in foothills. • Avalanche or rockslide areas in mountainous terrain. • Sites near bodies of water that are below the high-water mark.
5-5. In some areas, the season of the year has a strong bearing on the site you select. Ideal sites for a shelter differ in winter and summer. During cold winter months you will want a site that will protect you from the cold and wind, but will have a source of fuel and water. During summer months in the same area you will want a source of water, but you will also want the site to be almost insect free.
5-6. When you are considering shelter site selection, remember the word BLISS and the following guidelines:
• B-Blend in with the surroundings. • L-Low silhouette.

46
• I-Irregular shape. • S-Small. • S-Secluded location.
TYPES OF SHELTERS
5-7. When looking for a shelter site, keep in mind the type of shelter you need. However, you must also consider the questions below:
• How much time and effort will you need to build the shelter? • Will the shelter adequately protect you from the elements (sun, wind, rain, snow)? • Do you have the tools to build it? If not, can you make improvised tools? • Do you have the type and amount of materials needed to build it?
5-8. To answer these questions, you need to know how to make various types of shelters and what materials you need to make them.
PONCHO LEAN-TO
5-9. It takes only a short time and minimal equipment to build this lean-to (Figure 5-1). You need a poncho, 2 to 3 meters (7 to 10 feet) of rope or parachute suspension line, three stakes about 30 centimeters (1 foot) long, and two trees or two poles 2 to 3 meters (7 to 10 feet) apart. Before selecting the trees you will use or the location of your poles, check the wind direction. Ensure that the back of your lean-to will be into the wind.
Figure 5-1. Poncho Lean-to
5-10. To make the lean-to, you should—
• Tie off the hood of the poncho. Pull the drawstring tight, roll the hood longways, fold it into thirds, and tie it off with the drawstring.
• Cut the rope in half. On one long side of the poncho, tie half of the rope to the corner grommet. Tie the other half to the other corner grommet.
• Attach a drip stick (about a 10-centimeter [4-inch] stick) to each rope about 2.5 centimeters (about 1 inch) from the grommet. These drip sticks will keep rainwater from running down the ropes into the lean-to. Tying strings (about 10 centimeters [4 inches] long) to each grommet along the poncho's top edge will allow the water to run to and down the line without dripping into the shelter.
• Tie the ropes about waist high on the trees. Use a round turn and two half hitches with a quick-release knot.

47
• Spread the poncho and anchor it to the ground, putting sharpened sticks through the grommets and into the ground.
5-11. If you plan to use the lean-to for more than one night, or you expect rain, make a center support for the lean-to. Make this support with a line. Attach one end of the line to the poncho hood and the other end to an overhanging branch. Make sure there is no slack in the line.
5-12. Another method is to place a stick upright under the center of the lean-to. However, this method will restrict your space and movements in the shelter.
5-13. For additional protection from wind and rain, place some brush, your rucksack, or other equipment at the sides of the lean-to.
5-14. To reduce heat loss to the ground, place some type of insulating material, such as leaves or pine needles, inside your lean-to.
NOTE: When at rest, you lose as much as 80 percent of your body heat to the ground.
5-15. To increase your security from enemy observation, lower the lean-to's silhouette by making two changes. First, secure the support lines to the trees at knee height (not at waist height) using two knee-high sticks in the two center grommets (sides of lean-to). Second, angle the poncho to the ground, securing it with sharpened sticks, as above.
PONCHO TENT
5-16. This tent (Figure 5-2) provides a low silhouette. It also protects you from the elements on two sides. It has, however, less usable space and observation area than a lean-to, decreasing your reaction time to enemy detection. To make this tent, you need a poncho, two 1.5- to 2.5-meter (5- to 8-foot) ropes, six sharpened sticks about 30 centimeters (1 foot) long, and two trees 2 to 3 meters (7 to 10 feet) apart.
Figure 5-2. Poncho Tent Using Overhanging Branch
5-17. To make the tent, you should—
• Tie off the poncho hood in the same way as the poncho lean-to. • Tie a 1.5- to 2.5-meter (5- to 8-foot) rope to the center grommet on each side of the poncho. • Tie the other ends of these ropes at about knee height to two trees 2 to 3 meters (7 to 10
feet) apart and stretch the poncho tight.

48
• Draw one side of the poncho tight and secure it to the ground pushing sharpened sticks through the grommets.
• Follow the same procedure on the other side.
5-18. If you need a center support, use the same methods as for the poncho lean-to. Another center support is an A-frame set outside but over the center of the tent (Figure 5-3). Use two 90- to 120-centimeter-long (12- to 16-foot-long) sticks, one with a forked end, to form the A-frame. Tie the hood's drawstring to the A-frame to support the center of the tent.
Figure 5-3. Poncho Tent with A-Frame
ONE-MAN SHELTER
5-27. A one-man shelter (Figure 5-7) you can easily make using a parachute requires a tree and three poles. One pole should be about 4.5 meters (15 feet) long and the other two about 3 meters (10 feet) long.
Figure 5-7. One-Man Shelter
5-28. To make this shelter, you should—
• Secure the 4.5-meter (15-foot) pole to the tree at about waist height. • Lay the two 3-meter (10-foot) poles on the ground on either side of and in the same
direction as the 4.5-meter (15-foot) pole. • Lay the folded canopy over the 4.5-meter (15-foot) pole so that about the same amount of
material hangs on both sides.

49
• Tuck the excess material under the 3-meter (10-foot) poles and spread it on the ground inside to serve as a floor.
• Stake down or put a spreader between the two 3-meter (10-foot) poles at the shelter's entrance so they will not slide inward.
• Use any excess material to cover the entrance.
PERSONAL HYGIENE, Field Hygiene Introduction
4-20. In any situation, cleanliness is an important factor in preventing infection and disease. It becomes even more important in a survival situation. Poor hygiene can reduce your chances of survival.
4-21. A daily shower with hot water and soap is ideal, but you can stay clean without this luxury. Use a cloth and soapy water to wash yourself. Pay special attention to the feet, armpits, crotch, hands, and hair as these are prime areas for infestation and infection. If water is scarce, take an "air" bath. Remove as much of your clothing as practical and expose your body to the sun and air for at least 1 hour. Be careful not to sunburn.
4-22. If you don't have soap, use ashes or sand, or make soap from animal fat and wood ashes if your situation allows. To make soap—
• Extract grease from animal fat by cutting the fat into small pieces and cooking it in a pot. • Add enough water to the pot to keep the fat from sticking as it cooks. • Cook the fat slowly, stirring frequently. • After the fat is rendered, pour the grease into a container to harden. • Place ashes in a container with a spout near the bottom. • Pour water over the ashes and collect the liquid that drips out of the spout in a separate
container. This liquid is the potash or lye.
4-23. Another way to get the lye is to pour the slurry (the mixture of ashes and water) through a straining cloth.
• In a cooking pot, mix two parts grease to one part lye. • Place this mixture over a fire and boil it until it thickens.
After the mixture (the soap) cools, you can use it in the semi liquid state directly from the pot. You can also pour it into a pan, allow it to harden, and cut it into bars for later use.
Keep Your Hands Clean
4-24. Germs on your hands can infect food and wounds. Wash your hands after handling any material that is likely to carry germs, after urinating or defecating, after caring for the sick, and before handling any food, food utensils, or drinking water. Keep your fingernails closely trimmed and clean, and keep your fingers out of your mouth.
Keep Your Hair Clean
4-25. Your hair can become a haven for bacteria or fleas, lice, and other parasites. Keeping your hair clean, combed, and trimmed helps you avoid this danger.

50
Keep Your Clothing Clean
4-26. Keep your clothing and bedding as clean as possible to reduce the chances of skin infection or parasitic infestation. Clean your outer clothing whenever it becomes soiled. Wear clean underclothing and socks each day. If water is scarce, "air" clean your clothing by shaking, airing, and sunning it for 2 hours. If you are using a sleeping bag, turn it inside out after each use, fluff it, and air it.
Keep Your Teeth Clean
4-27. Thoroughly clean your mouth and teeth with a toothbrush at least once each day. If you don't have a toothbrush, make a chewing stick. Find a twig about 20 centimeters (cm) (8 inches) long and 1 centimeter (1/3 inch) wide. Chew one end of the stick to separate the fibers. Then brush your teeth thoroughly. Another way is to wrap a clean strip of cloth around your fingers and rub your teeth with it to wipe away food particles. You can also brush your teeth with small amounts of sand, baking soda, salt, or soap. Rinse your mouth with water, salt water, or willow bark tea. Also, flossing your teeth with string or fiber helps oral hygiene.
4-28. If you have cavities, you can make temporary fillings by placing candle wax, tobacco, hot pepper, toothpaste or powder, or portions of a gingerroot into the cavity. Make sure you clean the cavity by rinsing or picking the particles out of the cavity before placing a filling in the cavity.
Take Care of Your Feet
4-29. To prevent serious foot problems, break in your shoes before wearing them on any mission. Wash and massage your feet daily. Trim your toenails straight across. Wear an insole and the proper size of dry socks. Powder and check your feet daily for blisters.
4-30. If you get a small blister, do not open it. An intact blister is safe from infection. Apply a padding material around the blister to relieve pressure and reduce friction. If the blister bursts, treat it as an open wound. Clean and dress it daily and pad around it. Leave large blisters intact. To avoid having the blister burst or tear under pressure and cause a painful and open sore, do the following:
• Obtain a sewing-type needle and a clean or sterilized thread. • Run the needle and thread through the blister after cleaning the blister. • Detach the needle and leave both ends of the thread hanging out of the blister. The thread
will absorb the liquid inside. This reduces the size of the hole and ensures that the hole does not close up.
• Pad around the blister.
Get Sufficient Rest
4-31. You need a certain amount of rest to keep going. Plan for regular rest periods of at least 10 minutes per hour during your daily activities. Learn to make yourself comfortable under less-than-ideal conditions. A change from mental to physical activity or vice versa can be refreshing when time or situation does not permit total relaxation.

51
Keep Campsite Clean
4-32. Do not soil the ground in the campsite area with urine or feces. Use latrines, if available. When latrines are not available, dig "cat holes" and cover the waste. Collect drinking water upstream from the campsite. Purify all water.
WF Day 6 Excerpt: FM 3-22.9
ZEROING AND TARGET ACQUISITION FOR AN M16A2
1. The M16A2 rifle has two adjustable sights -- front and rear. Elevation adjustments are made using the front sight, and elevation changes and windage adjustments are made using the rear sight.
2. The sight systems.
a. The rear sight has an elevation knob with range indicators from 300 to 800 meters and two apertures for range. One aperture is marked 0-2 for short range from 0-200 meters and an unmarked aperture for normal range from 300 to 800 meters.
(1) The 0-2 (large) aperture is used for short range. This aperture is used only when the rear sight is all the way down. The 8/3 (300-meter) mark on the elevation knob is aligned with the index mark on the left side of the receiver. (2) The unmarked (small) aperture (Figure 108) is used for normal range. This aperture is used for most firing situations. It is used in conjunction with the elevation knob for 300- to 800-meter targets.
b. The rear sight also consists of a windage knob on the rear side of the sight.
(1) Each click of the windage knob will move the strike on the round from 1/8 inch (.3 centimeters) at 25 meters to 4 inches (10 centimeters) at 800 meters. (2) A windage scale is on the rear of the sight and the windage knob pointer is on the windage knob.
c. The front sight consists of a rotating sight post with a spring-loaded detent.
. Rear sight

52
(Left) Unmarked aperture (Right) Windage knob.
Front sight
1. The front sight is moved up or down when zeroing the rear sight 2. Once the rear sight is zeroed, the front sight post should not be moved 3. Each notch on the front sight will move the strike of the bullet from 3/8 inch
(0.9 centimeters) to 2 3/4 inches (7 centimeters) at 200 meters.
3. Sight adjustments. a. Rear sight.
(1) To adjust windage or move the strike of the round, turn the windage knob counterclockwise to move the strike to the left and clockwise to move the strike to the right. (2) To adjust elevation, turn the elevation knob until the desire range is indexed at the index mark on the left side on the sight.
b. Front sight. To adjust elevation, depress the detent and rotate the sight post. To raise the strike of the round, rotate the sight post in the direction of the arrow marked UP. Reverse the direction of rotation to lower the strike.
4. Zero the rifle. The following steps will establish a zero at 25 meters, your M16A2 rifle sights will be set with a 300-meter battlesight zero.
a. Establish mechanical zero on the rifle.
(1) Align the windage indicator mark on the 0-2 aperture with the center line of the windage scale (the unmarked aperture is up).

53
. Depress detent..
(2) Rotate the elevation knob down until the range scale 8/3 (300-meter) mark is aligned with the mark on the left side of the receiver. (3) Rotate the front sight post up or down as require until the base of the front sight post is flush with the top of the sight post well.
b. Zero at 25 meters. (1) After setting the front and rear sights to mechanical zero, the elevation knob is rotated up (clockwise) one click past the 8/3 (300-meter) mark. The elevation knob will remain in this position until the battlesight zeroing has been completed. NOTE: Any changes in elevation required during the zeroing procedures will be made using the front sight post only. (2) Carefully aim and fire each shot of a three-shot group at the circle on the silhouette. (3) If your shot group is not within the circle on the silhouette, use the squares on the target to determine the required clicks to move your next shot group into the circle. NOTE: The squares are numbered around the edges of the target to equal the number of clicks required to move the shot group to the circle. (4) To raise your next shot group, rotate the front sight post UP (clockwise). To lower your next shot group, rotate the front sight post DOWN (counterclockwise). One click will move the strike of the round one square on the target. (5) To move the shot group to the left, turn the windage knob counterclockwise. To move the shot group to the right, turn the windage knob clockwise. Three clicks of the windage knob will move the strike of the round one square on the target. (6) Continue to fire three-round shot groups and make corrections until you have a tight shot group in the circle on the silhouette. (7) If your shot group is within the circle, your rifle is now "calibrated." (8) To place your 300-meter zero on the rifle, you must rotate the elevation knob one click counterclockwise. The 8/3 (300-meter) mark on the elevation knob should now be aligned with the index mark on the left side of the sight. NOTES: 1. There are clicks between the range numbers as you turn the elevation knob. Use these clicks if you need more elevation past a certain range number to hit a target. 2. The unmarked aperture is automatically zeroed to 200 meters. Use the 0-2 aperture when shooting at night or at close ranges; for example, in an urban environment or in dense jungle.
. 5. Sight setting. your rifle sights should be kept set to a combat zero of 300 meters. If you are
told to engage a target at a longer range; for example, 500 meters:
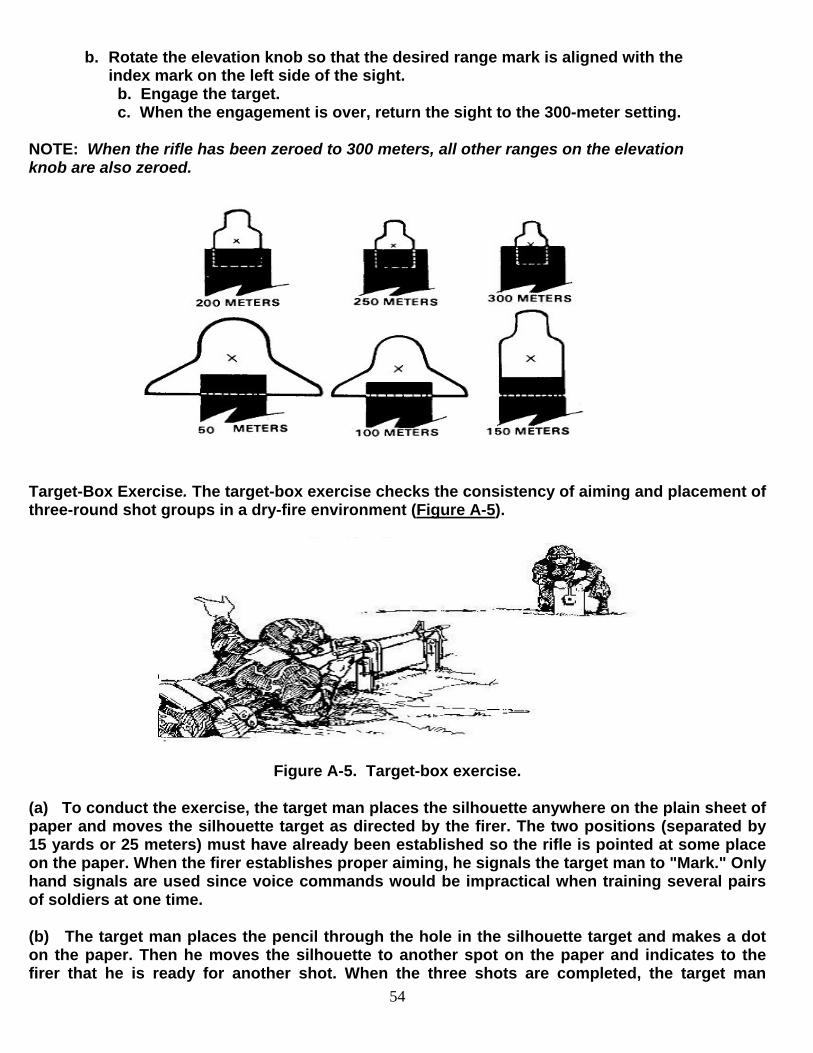
54
b. Rotate the elevation knob so that the desired range mark is aligned with the index mark on the left side of the sight. b. Engage the target. c. When the engagement is over, return the sight to the 300-meter setting.
NOTE: When the rifle has been zeroed to 300 meters, all other ranges on the elevation knob are also zeroed.
Target-Box Exercise. The target-box exercise checks the consistency of aiming and placement of three-round shot groups in a dry-fire environment (Figure A-5).
Figure A-5. Target-box exercise.
(a) To conduct the exercise, the target man places the silhouette anywhere on the plain sheet of paper and moves the silhouette target as directed by the firer. The two positions (separated by 15 yards or 25 meters) must have already been established so the rifle is pointed at some place on the paper. When the firer establishes proper aiming, he signals the target man to "Mark." Only hand signals are used since voice commands would be impractical when training several pairs of soldiers at one time.
(b) The target man places the pencil through the hole in the silhouette target and makes a dot on the paper. Then he moves the silhouette to another spot on the paper and indicates to the firer that he is ready for another shot. When the three shots are completed, the target man

55
triangulates the three shots and labels it shot group number one. The firer and instructor view the shot group. Each soldier will dry fire the exercise until they have demonstrated six out of six of the aim points within the plastic target-box paddle's 4-centimeter template. The exercise should be repeated as many times as necessary to achieve two consecutive shot-groups that will fit into the same 2-centimeter circle.
(c) A simulated shot group covered with a 1-centimeter (diameter) circle indicates consistent aiming. Since no rifle or ammunition variability is involved and since there is no requirement to place the shot group in a certain location, a 1-centimeter standard may be compared to obtaining a 4-centimeter shot group on the 25-meter live-fire zero range. The soldier fires several shot groups. After two or three shot groups are completed in one location, the rifle, paper holder, or paper is moved so shots fall on a clean section of the paper.
(d) Any movement of the rifle or paper between the first and third shots of a group voids the exercise. Two devices are available to hold the rifle (Figures A-6 and A-7). The rifle holding device and rifle holding box are positioned on level ground, or are secured by sandbags or stakes to ensure the rifle does not move during the firing of the three shots. Movement of the paper is eased by using a solid backing (Figure A-8). Any movement of either is reflected in the size of the shot group. Several varieties of wooden target boxes have been locally fabricated. A new rifle holder has been developed and should be used (Figure A-7).
Figure A-7. Rifle holder (locally fabricated).
Figure A-8. Paper being placed on a stationary object.
(e) The silhouettes on the plastic paddle (Figure A-9) are scaled to represent an E-type silhouette target at 250 meters. The visual perception during the target-box exercise is similar to what a soldier sees while zeroing on a standard zeroing target. The small E-type silhouette is the same scale at 15 yards as the larger silhouette is at the 25-meter range (some training areas are set up at 15 yards; others are set up at 25 meters). While there are some benefits to representing a 250-meter target, the main benefit of this exercise can be obtained at any distance. A standard zero target can be used at 25 meters in place of the paddle by placing a small hole in the center (dot), moving the target sheet over the paper, and marking as previously outlined.

56
Figure A-9. Target-box paddle (DVC-T-7-86).
The shot-group exercise provides a chance for the trainer to critique the soldier on his aiming procedures, aiming consistency, and placement of shot groups. Assuming the rifle and paper remain stationary and the target man properly marks the three shots, the only factor to cause separation of the dots on the paper is error in the soldier's aiming procedure. When the soldier can consistently direct the target into alignment with the sights on this exercise, he should be able to aim at the same center-of-mass point on the zero range or on targets at actual range.
(8) Dime (Washer) Exercise. This dry-fire technique is used to teach or evaluate the skill of trigger squeeze and is effective when conducted from an unsupported position. When using the M16A1 rifle for this exercise, the soldier must cock the weapon, assume an unsupported firing position, and aim at the target. An assistant places a dime (washer) on the rifle's barrel between the flash suppressor and front sight post assembly. The soldier then tries to squeeze the trigger naturally without causing the dime (washer) to fall off. Several repetitions of this exercise must be conducted to determine if the soldier has problems with trigger squeeze. The purpose of the exercise is for the firer to dry-fire six of six consecutive shots without causing the dime or washer to fall. (Repeat this exercise from the prone unsupported firing position.)
(a) If the dime (washer) is allowed to touch the sight assembly or flash suppressor, it may fall off due to the jolt of the hammer. Also, the strength of the hammer spring on some rifles can make this a difficult exercise to perform.
(b) When using the M16A2 rifle, the dime (washer) exercise is conducted the same except that a locally fabricated device must be attached to the weapon. A piece of 3/4-inch bonding material is folded into a clothes-pin shape and inserted in the flash suppressor of the weapon so the dime (washer) can be placed on top of it.
STOPPAGES
A stoppage is a failure of an automatic or semiautomatic firearm to complete the cycle of operation. The firer can apply immediate or remedial action to clear the stoppage. Some stoppages cannot be cleared by immediate or remedial action and may require weapon repair to

57
correct the problem. A complete understanding of how the weapon functions is an integral part of applying immediate action procedures.
a. Immediate Action. Immediate action involves quickly applying a possible correction to reduce a stoppage without performing troubleshooting procedures to determine the actual cause. The key word SPORTS will help the firer remember the steps in order during a live-fire exercise. To apply immediate action, the soldier:
Slaps gently upward on the magazine to ensure it is fully seated, and the magazine follower is not jammed (see note).
Pulls the charging handle fully to the rear. Observes for the ejection of a live round or expended cartridge. (If the weapon fails to
eject a cartridge, perform remedial action.) Releases the charging handle (do not ride it forward). Taps the forward assist assembly to ensure bolt closure. Squeezes the trigger and tries to fire the rifle.
Only apply immediate action once for a stoppage. If the rifle fails to fire a second time for the same malfunction inspect the weapon to determine the cause of the stoppage or malfunction and take the appropriate remedial action outlined below.
NOTE: When slapping up on the magazine, be careful not to knock a round out of the magazine into the line of the bolt carrier, causing more problems. Slap only hard enough to ensure the magazine is fully seated. Ensure that the magazine is locked into place by quickly pulling down on the magazine.
b. Remedial Action. Remedial action is the continuing effort to determine the cause for a stoppage or malfunction and to try to clear the stoppage once it has been identified. To apply the corrective steps for remedial action, first try to place the weapon on SAFE, then remove the magazine, lock the bolt to the rear, and place the weapon on safe (if not already done).
NOTE: A bolt override may not allow the weapon to be placed on SAFE.

58
Modified Prone Supported Firing Position
Once the basic firing skills have been mastered during initial training, the soldier should be encouraged to modify positions, to take advantage of available cover, to use anything that helps to steady the rifle, or to make any change that allows him to hit more combat targets. The modified prone firing position uses sandbags to support the handguard and frees the nonfiring hand to be used on any part of the rifle to hold it steady.
Basic Prone Unsupported Firing Position
This firing position offers another stable firing platform for engaging targets. To assume this position, the soldier faces his target, spreads his feet a comfortable distance apart, and drops to his knees. Using the butt of the rifle as a pivot, the firer rolls onto his nonfiring side, placing the nonfiring elbow close to the side of the magazine. He places the rifle butt in the pocket formed by the firing shoulder, grasps the pistol grip with his firing hand, and lowers the firing elbow to the ground. The rifle rests in the V formed by the thumb and fingers of the non-firing hand. The soldier adjusts the position of his firing elbow until his shoulders are about level, and pulls back firmly on the rifle with both hands. To complete the position, he obtains a stock weld and relaxes, keeping his heels close to the ground.

59
Kneeling Unsupported Firing Position
This position is assumed quickly, places the soldier high enough to see over small brush, and provides a stable firing position. The non-firing elbow should be pushed forward of the knee so the upper arm is resting on a flat portion of the knee to provide stability. The trailing foot should be placed in a comfortable position.
WF Day 9 Excerpt: FM 3-25.18, Foot Marches, (APPENDIX C)
FOOT CARE
Foot hygiene and sanitation are extremely important since feet are enclosed in heavy rigid footwear during most working hours and are constantly in action. Foot care involves good hygiene measures such as bathing frequently, using foot powder, wearing properly fitted footwear to allow for ventilation, and correctly trimming toenails.
FOOT HYGIENE
The care of minor foot ailments should be given the utmost attention. Many major conditions requiring hospitalization and disability have resulted from neglected or maltreated minor conditions.
C-1. CONDITIONING
Conditioning is accomplished by progressively increasing the distance to be marched from day to day. Marching is a good way to strengthen the feet and legs; running alone will not suffice. The arch, ankle, and calf can be conditioned by performing simple exercises--for example, rising high on the toes or placing the feet on towels and using the toes to roll the towel back under the arch.
C-2. PREVENTIVE MEASURES
Certain preventive measures can be implemented to avoid painful foot problems.

60
a. Before Marches. Trim toenails at least every two or three weeks, depending upon individual needs. Cut toenails short and square, and straight across (Figure C-1). Keep feet clean and dry, and use foot powder. Wear clean, dry, unmended, good-fitting socks (preferably cushion-soled) with seams and knots outside. A nylon or polypropylene sock liner can reduce friction and add protection. Carry an extra pair of socks. Carefully fit new boots. When getting used to a new pair of boots, alternate with another pair; tape known hot spots before wearing.
b. During Halts. Lie down with the feet elevated during each halt. If time permits, massage the feet, apply foot powder, change socks, and medicate blisters. Cover open blisters, cuts, or abrasions with absorbent adhesive bandages. Obtain relief from swelling feet by slightly loosening bootlaces where they cross the arch of the foot.
c. After Marches. Repeat procedures for the care of feet, wash and dry socks, and dry boots. Medicate blisters, abrasions, corns, and calluses. Inspect painful feet for sprains and improper fitting of socks and boots. Feet can develop red, swollen, tender skin along the sides of the feet from prolonged marching, which could become blisters. Therefore, feet require aeration, elevation, rest, and wider footwear. Prevent major foot problems by keeping the feet clean. The formation of blisters and abrasions with dirt and perspiration can cause infection and serious injury. If possible, give the feet a daily foot bath. In the field, cool water seems to reduce the sensation of heat and irritation. After washing, dry the feet well.
FOOT INJURIES
Many foot injuries can occur from foot marches, but only the most common are discussed herein.
C-3. BLISTERS AND ABRASIONS
Common causes of blisters and abrasions are improperly conditioned feet, ill-fitting footwear and socks, improperly maintained footwear, heat, and moisture. They are normally caused by friction or pressure, as opposed to impact.
a. To clean a blister, wash gently around it with soap and water, being careful not to break the skin (Figure C-2). If unbroken, use a sterilized needle or knifepoint to prick the lower edge of the blister to remove fluid. (To sterilize needle or knifepoint, hold in a flame.) Do not remove the skin; cover the blister with an absorbent adhesive bandage or similar dressing, extending beyond the edge of the blister. After applying the dressing, dust the outside of the dressing and entire foot with foot powder.

61
Figure C-2. Treatment of a foot blister.
b. Use just enough foot power since it can harden and become irritating. Foot powder lessens friction on the skin and prevents the raw edges of the adhesive plaster from adhering to socks. The adhesive plaster should be smooth so it can serve as a "second skin." Check the blister periodically for proper drying. After the blister has dried, remove the adhesive plaster. Carefully inspect the foot for other problem areas that are red and tender that may need the protection of an adhesive plaster. Cover abrasions and cuts on the foot with absorbent adhesive bandages for rapid healing. In an emergency, medical personnel can inject tincture of benzoin into a blister to prevent further abrasion and loss of skin.
C-4. PERSPIRATION PROBLEMS
When feet perspire, the secretion decomposes and causes a foul odor. The skin between the toes usually becomes white and soft, rubs off easily, and is prone to abrasions. Treatment consists of washing and thoroughly drying the feet, and carefully painting the affected area with a cotton swab and the following solution:
Formalin--one part Rubbing alcohol--nine parts.
This solution should be allowed to dry. If the skin begins to burn, the excess solution should be washed off It should be kept out of abrasions and cuts since it can cause severe pain. The entire area of the foot to include the ankle is painted. The areas around the heel and instep, and between toes should be treated since they are main trouble spots. The solution should be applied once daily until the perspiration is halted and the skin becomes hardened.

62
C-5. ATHLETE'S FOOT
Athlete's foot usually occurs between the toes, on the sole of the foot, and at points of contact between skin and footwear. This and other mild chronic cases of fungus infection may respond to daily foot powder applications. If fungicidal ointment is available, it can be used in addition to foot powder. Ointment should be used as directed and while the feet are at rest. If applications of foot powder and ointment do not heal the infection, an aidman or surgeon should be consulted.
C-6. FROSTBITE: N/A during summer months of Warrior Forge on Fort Lewis. See FM 21-16, Foot Marches, for complete section.
C-8. IMMERSION FOOT
Immersion foot is a form of injury that follows prolonged immersion of the feet in water that is not cold enough to cause freezing or frostbite. It can occur after exposure in subtropical waters. Clinically and pathologically, immersion foot is like trench foot since its cause is the same--lowering the temperature of the body part involved. It is associated with dependency (legs and feet down as in sitting or standing) and immobility of the lower extremities, and with constriction of the limbs by clothing or shoes. Other important factors are: body cooling due to wind, total immersion, inadequate protective clothing, illness, and starvation. The treatment for immersion foot is the same as for trench foot.
C-9. STRESS FRACTURES AND MUSCLE INJURIES
Once stress fractures have occurred, they must be allowed time to heal. The affected area must rest for two or three weeks until the pain is gone, followed by a slow return to activity to avoid recurring injury. Personnel who have had an injury are more likely to be injured again. The best form of treatment for this type injury is prevention. This can be accomplished through a conditioning program and by ensuring major muscle groups are properly stretched and warmed up before marching.
CARE OF FOOTWEAR
Boots must be dried after use to avoid loosing shape and hardening of the leather. This can be done by placing a warm cloth in the boot or by any method that avoids rapid drying. To prevent moist leather from freezing during winter, boots should be placed inside a sleeping bag or used as a headrest.
C-10. BOOTS
Two important factors in fitting boots are: the space between the end of the great toe and the toe of the boot should be the width of the thumb; and, in the unlaced boot, there should be enough space under the lower edge of the tongue to insert an index finger.

63
a. Poorly fitted boots can cause blisters, abrasions, calluses, and corns. Pressure is caused by boots being too small; friction is caused by boots being too large. If the tops of the toes are involved, the cap is too low or too stiff. If the ends of the toes are affected, the boot is too short or too loosely laced. If the sides of the big and little toes become irritated, the boot is too narrow. Irritation at the heel is caused by boots being too long, too loosely laced, or too wide a heel space.
b. Proper lacing of boots not only prevents blisters but also prevents improper blood flow in the foot. Laces can assume a seesaw action, which can produce a long blister across the instep. To prevent blistering, lacing over the instep can be avoided. If possible, broad laces should be used and an extra pair should be carried.
C-11. SOCKS
To check the fit of socks, a soldier should stand with his weight evenly distributed on both feet. If the socks fit correctly, no tightness or fullness should exist (Table C-1). The wool cushion-sole sock is best because it offers good foot protection.
a. Soldiers should allow 3/8 of an inch for shrinkage of new socks. Those that are too large wrinkle inside the shoe, rub the feet, and cause blisters and abrasions. Socks that are too small wear quickly and reduce blood flow in the foot. When wearing two pairs of socks, soldiers

64
should wear an outer pair at least a half-size larger than usual. Socks must be changed daily-- dirty socks are conductors of heat and allow warmth to escape. They should be washed in lukewarm water to preserve the fiber of the sock since hot water can cause them to shrink.
b. When socks become damp, they can be dried by placing them inside a shirt next to the body. Socks should be completely dry before wearing. If it is not possible to wash the socks, they should be changed; the dirty socks should be dried and kneaded with the hands to remove dirt and hardness.
WF Day 10 Interaction with the Media, Task # 224-176-1425 (Ch. 3, STP-21-1-SMCT Oct 05)
Standards: Identified the principles of interacting with the media.
Conditions: In a field, military operations in urban terrain (MOUT) or garrison environment interact with news media when no public affairs practitioners are present.
Standards: Identified the principles of interacting with the media.
Performance Steps:
1. Role of the individual when interacting with the media.
a. Check identification or press credentials. If identification or press credentials are produced, continue with interview. If no identification or press credentials are produced, refer the individual to your chain of command or public affairs representative.
b. Recognize your rights.
(1) You don't have to speak to the media.
(2) You don't have to answer all the questions.
(3) You control the length of the interview.
c. Maintain operational security (OPSEC). Do not discuss classified information.

65
2. Guidelines for speaking with the media.
a. Think before you answer.
b. Tell the truth. You should not lie or intentionally mislead members of the media.
c. Discuss only things that you have direct responsibility for or have personal knowledge about. Speak at your level. You should discuss only matters for which you have direct knowledge.
d. Don't answer speculative (what if) or hypothetical questions.
e. Avoid jargon, acronyms, slang and technical terms.
f. Answer the question with which you are most comfortable when asked multiple questions.
g. Keep remarks brief and concise.
h. Assume everything you say may be printed or broadcast.
i. Use "I" not "we" when stating your opinion.
j. If you don't know the answer to a question or cannot discuss it for any reason, say so. Avoid using "no comment".
3. Inform the chain of command of interaction with the media.
WF Day 14 to 16 Field Prep
Personal Hygiene (Extended FTX) (FM 21-75, CH 8)
Personal hygiene consists of practices which safeguard your health and that of others. It is often thought of as being the same as personal cleanliness. While cleanliness is important, it is only one part of healthy living. Personal hygiene is important to you because:
• It protects against disease-causing germs that are present in all environments. • It keeps disease-causing germs from spreading. • It promotes health among soldiers. • It improves morale.
PERSONAL CLEANLINESS
Skin. Wash your body frequently from head to foot with soap and water. If no tub or shower is available, wash with a cloth and soapy water, paying particular attention to armpits, groin area, face, ears, hands, and feet.

66
Hair. Keep your hair clean, neatly combed, and trimmed. At least once a week, wash your hair and entire scalp with soap and water. Also, shave as often as the water supply and tactical situation permit. Do not share combs or shaving equipment with other soldiers.
Hands. Wash your hands with soap and water after any dirty work, after each visit to the latrine, and before eating. Keep your fingernails closely trimmed and clean. Do not bite your fingernails, pick your nose, or scratch your body.
Clothing and Sleeping Gear. Wash or exchange clothing when it becomes dirty (situation permitting). Wash or exchange sleeping gear when it becomes dirty. If clothing and sleeping gear cannot be washed or exchanged, shake them and air them regularly in the sun. That greatly reduces the number of germs on them.
CARE OF THE MOUTH AND TEETH
Regular and proper cleaning of the mouth and the teeth helps prevent tooth decay and gum disease. The most healthful oral hygiene is to clean your mouth and teeth thoroughly and correctly after each meal with a toothbrush and toothpaste. If a toothbrush is not available, cut a twig from a tree and fray it on one end to serve as a toothbrush. If mouthwash is available, use it to help kill germs in your mouth. To help remove food from between your teeth, use dental floss or toothpicks. Twigs can also be used for toothpicks.
CARE OF THE FEET
Wash and dry your feet daily. Use foot powder on your feet to help kill germs, reduce friction on the skin, and absorb perspiration. Socks should be changed daily. After crossing a wet area, dry your feet, put on foot powder, and change socks, as soon as the situation permits.
FOOD AND DRINK
For proper development, strength, and survival, your body requires:
• Proteins. • Fats and carbohydrates. • Minerals. • Vitamins. • Water.
Issued rations have those essential food substances in the right amounts and proper balance. So, eat primarily those rations. When feasible, heat your meals. That will make them taste better and will reduce the energy required to digest them. Do not overindulge in sweets, soft drinks, alcoholic beverages, and other non-issued rations. Those rarely have nutritional value and are often harmful.
Drink water only from approved water sources or after it has been treated with water-purification tablets. To purify water from rivers or streams:
• Fill your canteen with water (be careful not to get trash or other objects in your canteen). • Add one purification tablet per quart of clear water or two tablets per quart of cloudy or
very cold water. (If you are out of tablets, use boiling water that has been boiled for 5 minutes.)

67
• Replace the cap loosely. • Wait 5 minutes. • Shake the canteen well and allow some of the water to leak out. • Tighten the cap. • Wait an additional 20 minutes before drinking the water.
EXERCISE
Exercise of the muscles and joints helps to maintain physical fitness and good health. Without that, you may lack the physical stamina and ability to fight. Physical fitness includes a healthy body, the capacity for skillful and sustained performance, the ability to recover from exertion rapidly, the desire to complete a designated task, and the confidence to face any eventuality. Your own safety, health, and life may depend on your physical fitness.
There are lulls in combat when you will not be active. During such lulls, exercise. That helps to keep the muscles and body functions ready for the next period of combat. It also helps pass the time in the lulls.
REST
Your body needs regular periods of rest to restore physical and mental vigor. When you are tired, your body functions are sluggish, and your ability to react is slower than normal. That also makes you more susceptible to sickness. For good health, 6 to 8 hours of uninterrupted sleep each day is desirable. As that is seldom possible in combat, use rest periods and off-duty time to rest or sleep. Do not be ashamed to say that you are tired or sleepy. Do not, however, sleep when on duty.
MENTAL HYGIENE
The way you think affects the way you act. If you know your job, you will probably act quickly and effectively. If you are uncertain or doubtful of your ability to do your job, you may hesitate and make wrong decisions. Positive thinking is a necessity. You must enter combat with absolute confidence in your ability to do your job.
Fear is a basic human emotion. It is both a mental and physical state. Fear is not shameful if it is controlled. It can even help you by making you more alert and more able to do your job. Fear makes the pupils of your eyes enlarge, which increases your field of vision so you can detect movement more easily. Fear also increases your rate of breathing and heartbeat. That increases your strength. Therefore, control your fear and use it to your advantage.
Do not let your imagination and fear run wild. Remember, you are not alone. You are part of a team. There are other soldiers nearby, even though they cannot always be seen. Everyone must help each other and depend on each other.
Worry undermines the body, dulls the mind, and slows down thinking and learning. It adds to confusion, magnifies troubles, and causes you to imagine things which really do not exist. If you are worried about something, talk to your leader about it. He may be able to help solve the problem.

68
You may have to fight in any part of the world and in all types of terrain. Therefore, adjust your mind to accept conditions as they are. If mentally prepared for it, you should be able to fight under almost any conditions.
RULES FOR AVOIDING ILLNESS IN THE FIELD
• Don't consume foods and beverages from unauthorized sources. • Don't soil the ground with urine or feces. (Use a latrine or "cat-hole.") • Keep your fingers and contaminated objects out of your mouth. • Wash your hands following any contamination, before eating or preparing food, and
before cleaning your mouth and teeth. • Wash all mess gear after each meal. • Clean your mouth and teeth at least once each day. • Avoid insect bites by wearing proper clothing and using insect repellents. • Avoid getting wet or chilled unnecessarily. • Don't share personal items (canteens, pipes, toothbrushes, washcloths, towels, and
shaving gear) with other soldiers. • Don't leave food scraps lying around. • Sleep when possible. • Exercise regularly.
Tactical Review
TROOP-LEADING PROCEDURES
Troop leading is the process a leader goes through to prepare his unit to accomplish a tactical mission. It begins when he is alerted for a mission. It starts again when he receives a change or a new mission. The troop-leading procedure comprises the steps listed below. Steps 3 through 8 may not follow a rigid sequence. Many of them may be accomplished concurrently. In combat, rarely will leaders have enough time to go through each step in detail. Leaders must use the procedure as outlined, if only in abbreviated form, to ensure that nothing is left out of planning and preparation, and that their soldiers understand the platoon's and squad's mission and prepare adequately. They continuously update their estimates throughout the preparation phase and adjust their plans as appropriate.
STEP 1. Receive the mission. STEP 5. Reconnoiter. STEP 2. Issue a warning order. STEP 6. Complete the plan. STEP 3. Make a tentative plan. STEP 7. Issue the complete order. STEP 4. Start necessary movement. STEP 8. Supervise.
a. STEP 1. Receive the Mission. The leader may receive the mission in a warning order, an operation order (OPORD), or a fragmentary order (FRAGO). He immediately begins to analyze it using the factors of METT-T:
What is the MISSION? What is known about the ENEMY? How will TERRAIN and weather affect the operation? What TROOPS are available?

69
How much TIME is available?
(1) The leader should use no more than one third of the available time for his own planning and for issuing his operation order. The remaining two thirds is for subordinates to plan and prepare for the operation. Leaders should also consider other factors such as available daylight and travel time to and from orders and rehearsals. In the offense, the leader has one third of the time from his receipt of the mission to the unit's LD time. In the defense, he has one third of the time from mission receipt to the time the squad or platoon must be prepared to defend.
(2) In scheduling preparation activities, the leader should work backwards from the LD or defend time. This is reverse planning. He must allow enough time for the completion of each task.
b. STEP 2. Issue a Warning Order. The leader provides initial instructions in a warning order. The warning order contains enough information to begin preparation as soon as possible. Platoon SOPs should prescribe who will attend all warning orders and the actions they must take upon receipt: for example, drawing ammunition, rations and water, and checking communications equipment. The warning order has no specific format. One technique is to use the five-paragraph OPORD format. The leader issues the warning order with all the information he has available at the time. He provides updates as often as necessary. The leader never waits for information to fill a format. A sample warning order is in Figure 2-1. If available, the following information may be included in a warning order.
The mission or nature of the operation. Who is participating in the operation. Time of the operation. Time and place for issuance of the operation order.
c. STEP 3. Make a Tentative Plan. The leader develops an estimate of the situation to use as the basis for his tentative plan. The estimate is the military decision making process. It consists of five steps: detailed mission analysis, situation analysis and course of action development, analysis of each course of action, comparison of each course of action, and decision. The decision represents the tentative plan. The leader updates the estimate continuously and refines his plan accordingly. He uses this plan as the start point for coordination, reconnaissance, task organization (if required), and movement instructions. He works through this problem solving sequence in as much detail as time available allows. As the basis of his estimate, the leader considers the factors of METT-T:
(1) Mission. The leader considers his mission as given to him by his commander. He analyzes it in light of the commander's intent two command levels higher, and derives the essential tasks his unit must perform in order to accomplish the mission.
(2) Enemy. The leader considers the type, size, organization, tactics, and equipment of the enemy he expects to encounter. He identifies their greatest threat to his mission find their greatest vulnerability.
(3) Terrain. The leader considers the effect of terrain and weather on enemy and friendly forces using the guidelines below (OCOKA):

70
(a) Observation and fields of fire. The leader considers ground that allows him observation of the enemy throughout his area of operation. He considers fields of fire in terms of the characteristics of the weapons available to him; for example, maximum effective range, the requirement for grazing fire, and the arming range and time of flight for antiarmor weapons.
(b) Cover and concealment. The leader looks for terrain that will protect him from direct and indirect fires (cover) and from aerial and ground observation (concealment).
(c) Obstacles. In the attack, the leader considers the effect of restrictive terrain on his ability to maneuver. In the defense, he considers how he will tie in his obstacles to the terrain to disrupt, turn, fix, or block an enemy force and protect his own forces from enemy assault.
(d) Key terrain. Key terrain is any locality or area whose seizure or retention affords a marked advantage to either combatant. The leader considers key terrain in his selection of objectives, support positions, and routes in the offense, and on the positioning of his unit in the defense.
(e) Avenues of approach. An avenue of approach is an air or ground route of an attacking force of a given size leading to its objective or key terrain in its path. In the offense, the leader identifies the avenue of approach that affords him the greatest protection and places him at the enemy's most vulnerable spot. In the defense, the leader positions his key weapons along the avenue of approach most likely to be used by the enemy.
(f) Weather. In considering the effects of weather, the leader is most interested in visibility and trafficability.
(4) Troops available. The leader considers the strength of subordinate units, the characteristics of his weapon systems, and the capabilities of attached elements as he assigns tasks to subordinate units.
(5) Time available. The leader refines his allocation of time based on the tentative plan and any changes to the situation.
d. STEP 4. Start Necessary Movement. The platoon may need to begin movement while the leader is still planning or forward reconnoitering. The platoon sergeant or a squad leader may bring the platoon forward, usually under the control of the company executive officer or first sergeant. This step could occur at any time during the troop-leading procedure.
e. STEP 5. Reconnoiter. If time allows, the leader makes a personal reconnaissance to verify his terrain analysis, adjust his plan, confirm the usability of routes, and time any critical movements. When time does not allow, the leader must make a map reconnaissance. The leader must consider the risk inherent in conducting reconnaissance forward of friendly lines. Sometimes the leader must rely on others (for example, scouts) to conduct the reconnaissance if the risk of contact with the enemy is high.
f. STEP 6. Complete the Plan. The leader completes his plan based on the reconnaissance and any changes in the situation. He should review his mission, as he received it from his

71
commander, to ensure that his plan meets the requirements of the mission and stays within the framework of the commander's intent.
g. STEP 7. Issue the Complete Order. Platoon and squad leaders normally issue oral operations orders.
(1) To aid subordinates in understanding the concept for the mission, leaders should issue the order within sight of the objective or on the defensive terrain. When this is not possible, they should use a terrain model or sketch.
(2) Leaders must ensure that subordinates understand the mission, the commander's intent, the concept of the operation, and their assigned tasks. Leaders may require subordinates to repeat all of part of the order or demonstrate on the model or sketch, their understanding of the operation. They should also quiz their soldiers to ensure that all soldiers understand the mission. Chapter 5 provides a list of questions that leaders can ask to determine if the soldiers understand the mission.
h. STEP 8. Supervise. The leader supervises the unit's preparation for combat by conducting rehearsals and inspections.
(1) Rehearsals. The leader uses rehearsals to--
Practice essential tasks (improve performance). Reveal weaknesses or problems in the plan. Coordinate the actions of subordinate elements. Improve soldier understanding of the concept of the operation (foster
confidence in soldiers).
(a) Rehearsals include the practice of having squad leaders brief their planned actions in execution sequence to the platoon leader.
(b) The leader should conduct rehearsals on terrain that resembles the actual ground, and in similar light conditions.
(c) The platoon may begin rehearsals of battle drills and other SOP items before the receipt of the operation order. Once the order has been issued, it can rehearse mission specific tasks.
(d) Some important tasks to rehearse include--
Actions on the objective. Assaulting a trench, bunker, or building. Actions at the assault position. Breaching obstacles (mine and wire). Using special weapons or demolitions. Actions on unexpected enemy contact.
(2) Inspections. Squad leaders should conduct initial inspections shortly after receipt of the warning order. The platoon sergeant spot checks throughout the unit's preparation for combat. The platoon leader and platoon sergeant make a final inspection. They should inspect--

72
Weapons and ammunition. Uniforms and equipment. Mission-essential equipment. Soldier's understanding of the mission and their specific responsibilities. Communications. Rations and water. Camouflage. Deficiencies noted during earlier inspections.
WARNING ORDER FORMAT
Conditions: Given preliminary notice of an order or action that is to follow and a requirement to develop and issue a warning order (WARNO) to subordinates.
Standards: Developed a warning order and issued it to subordinate leaders within the time allotted. The order was issued so all subordinate leaders understood their missions and any coordinating instructions. Issued the warning order in the standard OPORD format.
Performance Steps
1. Precede the order with the words “WARNING ORDER.”
2. Use standard terminology.
3. Issue the WARNO in the five-paragraph field order format.
a. Situation Paragraph.
(1) Enemy forces: Provide available information on disposition, composition, strength, capabilities, and most probable course of action.
(2) Friendly forces: Give available information concerning the missions of next higher and adjacent units.
(3) Attachments and detachments: Give information concerning any units that have been attached or detached.
b. Mission Paragraph. The mission paragraph contains a clear, concise statement of the task to be accomplished and the purpose for doing it.
c. Execution Paragraph. Provide information about the operation, if available.
d. Service Support Paragraph. Provide all known instructions and arrangements supporting the operation.
e. Command and Signal Paragraph. Designate the succession of command if it differs from unit SOP.
Note. Warning orders involving movement should state the time of movement.

73
OPERATION ORDER FORMAT
An operation order (OPORD) is a directive issued by the leader to his subordinate leaders in order to effect the coordinated execution of a specific operation.
a. The leader briefs his OPORD orally from notes that follow the five-paragraph format below (Figure 2-2).

74

75

76

77

78

79
b. The leader uses a fragmentary order (FRAGO) to change an existing order. He normally uses the OPORD format, but addresses only those elements that have changed. The leader should make his instructions brief, simple, clear, and specific.
c. Annexes provide the instructions for conducting specific operations (such as air assault, boat and truck movement, stream crossings, establishing patrol bases, and airborne insertions), if they are so detailed that a platoon SOP is insufficient for a particular situation. The format is the same as the five-paragraph OPORD.
d. An operation overlay is a tracing of graphic control measures on a map. It shows boundaries, unit positions, routes, objectives, and other control measures. It helps to clarify the operation order. Platoons normally trace their overlays from the company operations map. Squad leaders transfer control measures on to their maps as needed. The subordinate's need for higher unit graphics must be balanced against the risk of the enemy obtaining this information.
e. When possible, the leader uses the actual terrain or a terrain model to brief his OPORD. He may also use concept sketches--large, rough drawings of the objective areas--to show the flow of events and actions clearly.
(1) Concept sketch. The sketch shows the locations and positions of objectives, control measures, and key terrain in relation to each other. It is not necessarily drawn to scale.
(2) Terrain model. A terrain model is a three-dimensional scale model of the terrain (Figure 2-3). It is effective for briefing and discussing the actions on the objective. It may depict the entire mission area. However, for offense missions, priority should be given to building a model of the objective area.

80
(a) It should be built oriented to the ground (north on the model is north on the ground) and should show the main terrain features in the area.
(b) The next step after orienting the model to the ground is the construction of grid squares. The leader should identify the grid squares that the model will show. These ensure a more accurate model.
(c) The terrain model should depict key terrain, friendly control measures, and enemy dispositions.
(d) Materiel for constructing the model includes string, yarn (various colors), chalk (colored), 3x5 cards, target markers, or unit markers.
BATTLE DRILL 1A. SQUAD ATTACK
SITUATION: The squad is moving as part of the platoon conducting a movement to contact or a hasty or deliberate attack.
REQUIRED ACTIONS: (Figure 4-3):
STEP 1. Action on Enemy Contact.
a. Soldiers receiving fire take up nearest positions that afford protection from enemy fire (cover) and observation (concealment).
b. The fire team in contact immediately returns heavy volume of suppressive fire in the direction of the enemy.
(1) Soldiers in the fire team in contact move to positions (bound or crawl) from which they can fire their weapons, position themselves to ensure that they have observation, fields of fire, cover, and concealment. They continue to fire and report known or suspected enemy positions to the fire team leader.
(2) The team leader directs fires using tracers or standard fire commands.
(3) The fire team not in contact takes covered and concealed positions in place and observes to the flanks and rear of the squad.
(4) The squad leader reports contact to the platoon leader and moves toward the fire team in contact.
STEP 2. Locate the Enemy.
a. Using sight and sound, the fire team in contact acquires known or suspected enemy positions.
b. The fire team in contact begins to place well-aimed fire on suspected enemy positions.
c. The squad leader moves to a position where he can observe the enemy and assess the situation.

81
d. The squad leader requests, through the platoon leader, for immediate suppression indirect fires (normally 60-mm mortars).
e. The squad leader reports the enemy size and location, and any other information to the platoon leader. (As the platoon leader comes forward, he completes the squad leader's assessment of the situation.)
STEP 3. Suppress the Enemy.
The squad leader determines if the fire team in contact can gain suppressive fire based on the volume and accuracy of the enemy fire.
a. If the answer is YES, the fire team leader continues to suppress the enemy:
(1) The fire team destroys or suppresses enemy crew-served weapons first.
(2) The fire team places smoke (M203) on the enemy position to obscure it.
(3) The fire team leader continues to control fires using tracers or standard fire commands. Fires must be well-aimed and continue at a sustained rate with no lulls.
(4) Buddy teams fire their weapons so that both are not reloading their weapons at the same time.
b. If the answer is NO, the squad leader then deploys the fire team not in contact to establish a support-by-fire position. He reports the situation to the platoon leader. Normally, the squad will become the base-of-fire element for the platoon. The squad continues to suppress the enemy and responds to orders from the platoon leader. (The platoon leader, his RATELO, the platoon FO, one machine gun team, and the squad leader of the next squad, as well as the platoon sergeant and the other machine gun team, are already moving forward IAW Battle Drill 1, Platoon Attack.)
STEP 4. Attack.
If the fire team in contact can suppress the enemy, the squad leader determines if the fire team not in contact can maneuver. He makes the following assessment:
Location of enemy position(s) and obstacles. Size of enemy force engaging the squad. (The number of enemy automatic weapons, the
presence of any vehicles, and the employment of indirect fires are indicators of enemy strength.)
Vulnerable flank. Covered and concealed flanking route to the enemy position.
a. If the answer is YES, the squad leader maneuvers the fire team in the assault:
(1) The squad leader directs the fire team in contact to support the movement of the other fire team. He then leads or directs the assaulting fire team leader to maneuver his fire team along a route that places the fire team in a position to assault the enemy. (The assaulting fire team must pick up and maintain fire superiority throughout the assault. Handover of

82
responsibility for direct fires from the supporting fire team to the assaulting fire team is critical.)
(2) Once in position, the squad leader gives the prearranged signal for the supporting fire team to lift fires or shift fires to the opposite flank of the enemy position.
(3) The assaulting fire team fights through enemy positions using fire and movement. (The supporting fire team must be able to identify the near flank of the assaulting fire team.)
(a) The team leader selects the route that allows him to reach his objective, while providing the best available cover and concealment for his team. The team leader then leads his team, from up front, in a shallow wedge throughout the attack.
(b) Fire team members conduct individual movement techniques as individuals or buddy teams, while maintaining their relative position in the assault formation. At the end of each move, soldiers take up covered and concealed positions and resume firing.
b. If the answer is NO or the assaulting fire team cannot continue to move, the squad leader deploys the assaulting fire team to add its fires against the enemy, reports to the platoon leader and requests instructions. The squad continues suppressing enemy positions and responds to the orders of the platoon leader.
STEP 5. Consolidate and Reorganize.
a. Once the assaulting fire team has seized the enemy position, the squad leader establishes local security. (The squad leader must quickly prepare to defeat any enemy counterattack. At the conclusion of the assault, the squad is most vulnerable.)
(1) The squad leader signals for the supporting fire team to move up into a designated position.
(2) The squad leader assigns sectors of fire for both fire teams.
(3) The squad leader positions key weapons.
(4) All soldiers take up hasty defensive positions.
(5) The squad leader develops an initial fire support plan against an enemy counterattack. (As the platoon moves up, he hands the plan to the platoon leader for further development.)
(6) The squad leader posts an OP to warn of enemy activity.
b. The squad performs the following tasks:
(1) Reestablish the chain of command.
(2) Redistribute and resupply ammunition.

83
(3) Man crew-served weapons first.
(4) Redistribute critical equipment (for example, radios, NBC, NVDs).
(5) Treat casualties and evacuate wounded.
(6) Fill vacancies in key positions.
(7) Search, silence, segregate, safeguard, and speed EPWs to collection points.
(8) Collect and report enemy information and materiel.
c. Team leaders provide ammunition, casualty, and equipment (ACE) reports to the squad leader.
d. The squad leader consolidates the ACE report and passes it to the platoon leader (or platoon sergeant).
e. The squad continues the mission after receiving instructions from the platoon leader. (The platoon follows the success of the squad's flanking attack with the remaining squads as part of the platoon attack.)
f. The squad leader reports the situation to the platoon leader.
BATTLE DRILL 3. BREAK CONTACT
SITUATION: The squad/platoon is under enemy fire and must break contact.
REQUIRED ACTIONS: (Figure 4-5.)
1. The squad/platoon leader directs one fire team/squad in contact to support the disengagement of the remainder of the unit.
2. The squad/platoon leader orders a distance and direction, or a terrain feature, or last objective rally point for the movement of the first fire team/squad.
3. The base of fire (fire team/squad) continues to suppress the enemy.
4. The moving element uses fragmentation, concussion, and smoke grenades to mask its movement.
5. The moving element takes up the designated position and engages the enemy position.
6. The platoon leader directs the base-of-fire element to move to its next location. (Based on the terrain and the volume and accuracy of the enemy's fire, the moving fire team/squad may need to use fire and movement techniques.
7. The squad/platoon continues to bound away from the enemy until (the squad/platoon must continue to suppress the enemy as it breaks contact)--
It breaks contact.

84
It passes through a higher level support-by-fire position. Its fire teams/squads are in the assigned position to conduct the next mission.
8. The leader should consider changing the direction of movement once contact is broken. This will reduce the ability of the enemy to place effective indirect fires on the unit.
9. If the squad or platoon becomes disrupted, soldiers stay together and move to the last designated rally point.
10. Squad/platoon leaders account for soldiers, report, reorganize as necessary and continue the mission.
BATTLE DRILL 4. REACT TO AMBUSH
SITUATION: If the squad/platoon enters a kill zone and the enemy initiates an ambush with a casualty-producing device and a high volume of fire, the unit takes the following actions.
REQUIRED ACTIONS: (Figure 4-6.)
1. In a near ambush (within hand-grenade range), soldiers receiving fire immediately return fire, take up covered positions, and throw fragmentation concussion, and smoke grenades.
a. Immediately after the grenades detonate, soldiers in the kill zone assault through the ambush using fire and movement.
b. Soldiers not in the kill zone immediately--
Identify enemy positions. Initiate immediate suppressive fires against the enemy. Take up covered positions. Shift fires as the soldiers in the kill zone assault through the ambush.
2. In a far ambush (beyond hand-grenade range). soldiers receiving fire immediately return fire, take up covered positions, and suppress the enemy by--
Destroying or suppressing enemy crew-served weapons first. Obscuring the enemy position with smoke (M203). Sustaining suppressive fires.
a. Soldiers (teams/squads) not receiving fires move by a covered and concealed route to a vulnerable flank of the enemy position and assault using fire and movement techniques.
b. Soldiers in the kill zone continue suppressive fires and shift fires as the assaulting team/squad fights through the enemy position.
3. The platoon FO calls for and adjusts indirect fires as directed by the platoon leader. On order, he lifts fires or shifts them to isolate the enemy position, or to attack them with indirect fires as they retreat.
4. The squad/platoon leader reports, reorganizes as necessary, and continues the mission.

85
BATTLE DRILL 5. KNOCK OUT BUNKERS
SITUATION: The platoon identifies enemy in bunkers while moving as a part of a larger force.
REQUIRED ACTIONS: (Figures 4-7 and 4-8.)
1. The platoon initiates contact:
a. The squad in contact establishes a base of fire.
b. The platoon leader, his RATELO, platoon FO, and one machine gun team move forward to link up with the squad leader of the squad in contact.
c. The platoon sergeant moves forward with the second machine gun team and assumes control of the base-of-fire element.
d. The base-of-fire element--
(1) Destroys or suppresses enemy crew-served weapons first.
(2) Obscures the enemy position with smoke (M203).
(3) Sustains suppressive fires at the lowest possible level.
e. The platoon FO calls for and adjusts indirect fires as directed by the platoon sergeant.
2. The platoon leader determines that he can maneuver by identifying--
a. The enemy bunkers, other supporting positions, and any obstacles.
b. The size of the enemy force engaging the platoon. (The number of enemy automatic weapons, the presence of any vehicles, and the employment of indirect fires are indicators of enemy strength.)
c. A vulnerable flank of at least one bunker.
d. A covered and concealed flanking route to the flank of the bunker.
3. The platoon leader determines which bunker is to be assaulted first and directs one squad (not in contact) to knock it out.
4. If necessary, the platoon sergeant repositions a squad, fire team, or machine gun team to isolate the bunker as well as to continue suppressive fires.
5. The assaulting squad, with the platoon leader and his RATELO, move along the covered and concealed route and take action to knock out the bunker.
a. The squad leader moves with the assaulting fire team along the covered and concealed route to the flank of the bunker.
86
(1) The assaulting fire team approaches the bunker from its blind side and does not mask the fires of the base-of-fire element.
(2) Soldiers constantly watch for other bunkers or enemy positions in support of it.
b. Upon reaching the last covered and concealed position--
(1) The fire team leader and the automatic rifleman remain in place and add their fires to suppressing the bunker (includes the use of LAW/AT4s).
(2) The squad leader positions himself where he can best control his teams. On the squad leader's signal, the base-of-fire element lifts fires or shifts fires to the opposite side of the bunker from the assaulting fire team's approach.
(3) The grenadier and rifleman continue forward to the blind side of the bunker. One soldier takes up a covered position near the exit, while one soldier cooks off (two seconds maximum) a grenade, shouts FRAG OUT, and throws it through an aperture.
(4) After the grenade detonates, the soldier covering the exit enters the bunker, firing short bursts, to destroy the enemy. The soldier who throws the grenade should not be the first one to clear the bunker.
c. The squad leader inspects the bunker to ensure that it has been destroyed. He reports, reorganizes as needed, and continues the mission. The platoon follows the success of the attack against the bunker and continues the attack of other bunkers.
6. The platoon leader repositions base-of-fire squads as necessary to continue to isolate and suppress the remaining bunkers, and maintain suppressive fires.
7. The platoon leader either re-designates one of the base-of-fire squads to move up and knock out the next bunker; or, directs the assaulting squad to continue and knock out the next bunker.
NOTE: The platoon leader must consider the condition of his assaulting squad(s) (ammunition and exhaustion) and rotate squads as necessary.
a. On the platoon leader's signal, the base-of-fire element lifts fires or shifts fires to the opposite side of the bunker from which the squad is assaulting.
b. At the same time, the platoon FO shifts indirect fires to isolate enemy positions.
8. The assaulting squad takes action to knock out the next bunker (see paragraph 5, above).
9. The platoon leader reports, reorganizes as necessary, and continues the mission. The company follows up the success of the platoon attack and continues to assault enemy positions.

87
BATTLE DRILL 6. ENTER BUILDING/CLEAR ROOM
SITUATION: Operating as part of a larger force, the squad is moving and identifies an enemy force in a building.
REQUIRED ACTIONS: (Figures 4-9 and 4-10.)

88
NOTE: The discussion that follows assumes that the infantry squad is supported only by the platoon's organic weapons. The preferred method of entering a building is to use a tank main gun round; direct-fire artillery round; or TOW, Dragon, or Hellfire missile to clear the first room. Additionally, some MOUT situations may require precise application firepower. This is true of a MOUT environment where the enemy is mixed with noncombatants. The presence of civilians can restrict the use of fires and reduce the combat power available to a platoon leader. His platoon may have to operate with "no fire" areas. Rules of engagement (ROE) can prohibit the use of certain weapons until a specific hostile action takes place. The use of hand grenades and suppressive fire to enter rooms may be prohibited to preclude noncombatant casualties and collateral damage. All leaders must be aware of the ROE. They must include the precise use of weapons in their planning for MOUT missions. This includes how the platoon will employ its organic weapons including snipers and other weapon systems it may have in support; for example, AC 130 or AH 64 aircraft. They must coordinate the use of marking systems to prevent casualties due to friendly fire. FM 90-10 and FM 90-10-1 provide additional techniques for platoons and squads in MOUT.
1. The fire team initiating contact establishes a base of fire and suppresses the enemy in and around the building.
2. The squad leader determines that he can maneuver by identifying--
a. The building and any obstacles.
b. The size of the enemy force engaging the squad.
c. An entry point. (Assaulting fire teams should enter the building at the highest level possible.)
d. A covered and concealed route to the entry point.
3. The fire team in contact--
a. Destroys or suppresses enemy crew-served weapons first.
b. Obscures the enemy position with smoke (M203).
c. Sustains suppressive fires.
4. The squad leader directs the fire team in contact to support the entry of the other fire team into the building.
5. If necessary, the supporting fire team repositions to isolate the building as well as continue suppressive fires. (Normally, the platoon has added its supporting fires against the enemy.)
6. The squad leader designates the entry point of the building. The platoon and squad shift direct fires and continue to suppress the enemy in adjacent positions and to isolate the building. The platoon FO lifts indirect fires or shifts them beyond the building.

89
7. The squad leader and the assaulting fire team approach the building and position themselves at either side of the entrance. (Soldiers should avoid entering buildings through doors and windows, because they will normally be covered by enemy weapons inside the building.)
8. Allowing cook-off time (two seconds maximum), and shouting FRAG OUT, the lead soldier of the assaulting fire team prepares and throws a grenade into the building.
DANGER______________________________________________________ If walls and floors are thin, they do not provide protection from hand grenade fragments.
9. After the explosion, the next soldier enters the building and positions himself to the right (left) of the entrance, up against the wall, engages all identified or likely enemy positions with rapid, short bursts of automatic fire, and scans the room. The rest of the team provides immediate security outside the building.
a. The size and shape of the room may cause the soldier entering the room to move to the left or right. The first soldier in the room decides where the next man should position himself and gives the command NEXT MAN IN, LEFT (or RIGHT). The next man shouts COMING IN, LEFT (RIGHT), enters the building, positions himself to the left of the entrance, up against the wall, and scans the room. Once in position, he shouts NEXT MAN IN (RIGHT or LEFT).
b. Depending on the enemy's situation, the size of the entry and the training of the squad, two soldiers can enter the room simultaneously after the grenade detonates. The soldier from the right side of the entry enters, fires from left to right, and moves to right with his back to the wall. At the same time, the soldier on the left enters from the left, fires from right to left, and moves to the left with his back to the wall. One soldier goes high, the other low, to prevent firing at one another. This method puts more firepower in the room more quickly, but is more difficult and requires more practice. When both soldiers are in position, the senior soldier gives the command NEXT MAN IN (RIGHT or LEFT).
10. The assaulting fire team leader shouts COMING IN (RIGHT or LEFT), enters the building initially moving left or right and against the wall, and positions himself where he can control the actions of his team. He does not block the entrance way. He makes a quick assessment of the size and shape of the room, and begins to clear the room. He determines if the remaining man in his team is required to assist in clearing the room.
a. If the team leader decides to bring the last man in, he shouts NEXT MAN IN LEFT (or RIGHT). The last man in the fire team shouts COMING IN LEFT (or RIGHT), enters the building, and begins to clear through the room.
b. If the team leader decides not to bring the last man in, he shouts NEXT MAN, STAND FAST. The last man remains outside the building and provides security from there. The team leader then directs the soldier on the right of the entrance to begin clearing. The team leader reports to the squad leader and then assumes the duties of the soldier on the right of the entrance to provide support.
DANGER _____________________________________________________________ While clearing rooms, soldiers must be alert for trip wires and booby traps. They

90
should not expose themselves through open windows or doors.
11. Once the room is cleared, the team leader signals to the squad leader that the room is cleared.
12. The squad leader enters the building and marks the entry point in accordance with the SOP. The squad leader determines whether or not his squad can continue to clear rooms and still maintain suppressive fires outside the building. Normally, it takes a platoon to clear a building.
13. The squad leader and assault fire team move to the entrance of the next room to be cleared and position themselves on either side of the entrance. The squad enters and clears all subsequent rooms by repeating the actions discussed in paragraphs 8 through 12, above.
14. The squad leader directs the team to continue and clear the next room. The squad leader rotates fire teams as necessary to keep the soldiers fresh, to equitably distribute the dangerous duties, and to continue the momentum of the attack.
15. The squad leader follows the fire team that is clearing to ensure that cleared rooms are properly marked in accordance with the SOP.
16. The squad leader assesses the situation to determine if he can continue clearing the building. He reports the situation to the platoon leader. The platoon follows the success of the entry into the building.
17. The squad consolidates its position in the building and then reorganizes as necessary. Leaders redistribute ammunition.
NOTE: Normally the squad/platoons will suppress enemy in buildings with large caliber weapons (particularly if HMMWVs with caliber .50, BFVs, or tanks are available).
Crossing of Linear Danger Areas (Platoon). The platoon crosses the danger area in the formation and location specified by the platoon leader. On the far side of the danger area, platoon personnel and eqnt are accounted for. The platoon continues the mission. (Figure 2-27.)

91
(1) When the lead team signals "danger area" (relayed throughout the platoon), the platoon halts.
(2) The platoon leader moves forward, confirms the danger area, and determines what technique the platoon will use to cross. The platoon sergeant also moves forward to the platoon leader.
(3) The platoon leader informs all squad leaders of the situation and the near-side and far-side rally points.
(4) The platoon sergeant directs positioning of the near-side security (usually conducted by the trail squad). These two security teams may follow him forward when the platoon halts and a danger area signal is passed back.
(5) The platoon leader reconnoiters the danger area and selects the crossing point that provides the best cover and concealment.
(6) Near-side security observes to the flanks and overmatches the crossing.
(7) When the near-side security is in place, the platoon leader directs the far-side security team to cross the danger area.
(8) The far-side security team clears the far side.
(9) The far-side security team leader establishes an OP forward of the cleared area.
(10) The far-side security team signals to the squad leader that the area is clear. The squad leader relays the message to the platoon leader.
(11) The platoon leader selects the method the platoon will use to cross the danger area.
(12) The platoon quickly and quietly crosses the danger area.
(13) Once across the danger area, the main body begins moving slowly on the required azimuth.
(14) The near-side security element, controlled by the platoon sergeant, crosses the danger area where the platoon crossed. They may attempt to cover any tracks left by the platoon.
(15) The platoon sergeant ensures everyone crosses and sends up the report.
(16) The platoon leader ensures accountability and resumes movement at normal speed.
NOTE: The same principles stated above are used when crossing a smaller unit across a danger area

92
RECONNAISSANCE PATROL
The three types of reconnaissance patrols are area, zone, and route. Reconnaissance patrols provide timely and accurate information on the enemy and terrain. They confirm the leader's plan before it is executed. The commander must inform the leader of the specific information requirements for each mission.
3-9. ORGANIZATION
Besides the common elements, reconnaissance patrols have a reconnaissance team and a reconnaissance and security team.
a. Reconnaissance Team. Reconnaissance teams reconnoiter the objective area once the security teams are in position. Normally these are two-man teams (buddy teams) to reduce the possibility of detection.
b. Reconnaissance and Security Team. R&S teams are normally used in a zone reconnaissance, but may be useful in any situation when it is impractical to separate the responsibilities for reconnaissance and security.
3-10. TASKS TO SUBORDINATE UNITS
Normally the platoon headquarters element controls the platoon on a reconnaissance patrol mission.
a. The platoon leader must consider the requirements for reconnaissance and security in assigning tasks to his squads or fire teams. He may separate the tasks so that one or more squads conduct the reconnaissance while other squads or fire teams provide security at various locations. Or, he may assign reconnaissance and security (R&S) tasks to each squad or team. When a fire team conducts a reconnaissance patrol it operates as a single R&S team.
b. In assigning tasks, the leader must also consider the size and number of reconnaissance objectives, the requirement to secure the ORP and other points, and the time allowed for conducting the mission.
AREA RECONNAISSANCE
An area reconnaissance is conducted to obtain information about a specified location and the area around it. The location may be given as a grid coordinate or an objective on an overlay. In an area reconnaissance, the platoon or squad uses surveillance or vantage-points around the objective from which to observe it and the surrounding area. In planning for an area reconnaissance mission, the platoon leader considers the following sequence of actions.
a. The leader may include a surveillance team in his reconnaissance of the objective from the ORP. He positions it while on the reconnaissance. The subordinate leader responsible for security establishes security at the ORP and positions other security teams as required on likely enemy avenues of approach into the objective area.

93
b. If required the leader positions other surveillance elements about the objective. He may move them on one route, posting them as they move, or he may direct them to move on separate routes to their assigned locations.
c. After observing the objective for a specified time, all elements return to the ORP and report their observations to the leader or the recorder. Once all information is collected, it is disseminated to every soldier.
ZONE RECONNAISSANCE
A zone reconnaissance is conducted to obtain information on enemy, terrain, and routes within a specified zone. Zone reconnaissance techniques include the use of moving elements, stationary teams, or a series of area reconnaissance actions.
a. Moving Elements. The leader plans the use of squads or fire teams moving along multiple routes to cover the entire zone. Methods for planning the movement of multiple elements through a zone include the fan, the box, converging routes, and successive sectors.
(1) Fan method. The leader first selects a series of ORPs throughout the zone. The platoon establishes security at the first ORP. Each R&S team moves from the ORP along a different fan-shaped route that overlaps with others to ensure reconnaissance of the entire area. The leader maintains a reserve at the ORP. When all R&S teams have returned to the ORP, the platoon collects and disseminates all information to every soldier before moving on to the next ORP. (Figure 3-3.)
(2) Box method. The leader sends his R&S teams from the ORP along routes that form a boxed-in area. He sends other teams along routes through the area within the box. All teams meet at a link-up point at the far side of the box from the ORP. (Figure 3-4.)

94
(3) Converging routes method. The leader selects routes from the ORP through the zone to a link-up point at the far side of the zone from the ORP. Each R&S team moves along a specified route and uses the fan method to reconnoiter the area between routes. The leader designates a time for all teams to link-up. (Figure 3-5.)
(4) Successive sector method. The leader may divide the zone into a series of sectors. Within each sector, the platoon uses the converging routes method to reconnoiter to an intermediate link-up point where it collects and disseminates the information gathered to that point before reconnoitering the next sector. (Figure 3-6.)

95
b. Stationary Teams. Using this technique, the leader positions surveillance teams in locations where they can collectively observe the entire zone for long-term, continuous information gathering (Figure 3-7). He must consider sustaining requirements when developing his soldier's load plan.
c. Multiple Area Reconnaissance. The leader tasks each of his squads to conduct a series of area reconnaissance actions along a specified route. (Figure 3-8.)

96
AMBUSH
An ambush is a surprise attack from a concealed position on a moving or temporarily halted target. Antiarmor ambushes are established when the mission is to destroy enemy armored or mechanized forces. Ambushes are classified by category--hasty or deliberate; type--point or area; and formation--linear or L-shaped. The leader uses a combination of category, type, and formation in developing his ambush plan.
a. Planning. The key planning considerations include--
Covering the entire kill zone by fire. Using existing or reinforcing obstacles (Claymores and other mines) to keep the enemy in the
kill zone.
Protecting the assault and support elements with mines, Claymores, or explosives. Using security elements or teams to isolate the kill zone. Assaulting into the kill zone to search dead and wounded, assemble prisoners, and collect
equipment. (The assault element must be able to move quickly through its own protective obstacles.)
Timing the actions of all elements of the platoon to preclude loss of surprise. Using only one squad to conduct the entire ambush and rotating squads over time from the
ORP. This technique is useful when the ambush must be manned for a long time.

97
b. Formations. The leader considers the linear or L-shaped formations in planning an ambush.
(1) Linear. In an ambush using a linear formation, the assault and support elements deploy parallel to the enemy's route (Figure 3-11). This positions both elements on the long axis of the kill zone and subjects the enemy to flanking fire. This formation can be used in close terrain that restricts the enemy's ability to maneuver against the platoon, or in open terrain provided a means of keeping the enemy in the kill zone can be effected.
(2) L-shaped. In an L-shaped ambush, the assault element forms the long leg parallel to the enemy's direction of movement along the kill zone. The support element forms the short leg at one end of and at right angles to the assault element. This provides both flanking (long leg) and enfilading fires (short leg) against the enemy. The L-shaped ambush can be used at a sharp bend in a trail, road, or stream. It should not be used where the short leg would have to cross a straight road or trail. (Figure 3-12.)

98
TASK: React to Indirect Fire CONDITIONS: The platoon/squad is moving, halted, or occupying a firing position with or without a dug-in mortar emplacement. Any soldier gives the alert, "INCOMING," or a round impacts nearby. STANDARDS: The squad/platoon begins drill immediately. If moving, halted, or in an unimproved firing position, the squad moves with all of its mission-essential equipment and ammunition to a rally point or alternate firing position beyond the impact area. If in a dug-in mortar emplacement, the squad moves into the personnel shelters with all of its mission-essential equipment except the mortar ammunition. The squad/platoon completes the drill before the enemy initiates a fire for effect. ILLUSTRATIONS: N/A TASK STEPS AND PERFORMANCE MEASURES:
1. Any soldier announces, "INCOMING."
2. If the squad is in a firing position, but not dug in: a. Gunner removes and secures sight. b. Gunner collapses and attaches the mount under the barrel. c. Ammunition bearer pushes down on the barrel to dislodge the baseplate from the
ground. d. Gunner configures the mortar for a one-man carry and picks up the sight. (60mm only) e. Squad leader and ammunition bearer secure the remainder of the mission-essential
equipment and ammunition. f. Squad performs additional steps 3 or 4 below as appropriate.
3. If the squad is moving, is halted, or has prepared to move in accordance with step 1: a. Squad leader gives the direction and distance for the squad to move to a rally point by
ordering direction and distance--for example, THREE O'CLOCK, ONE HUNDRED METERS.
b. Squad members move rapidly along the direction and distance to the rally point. c. At the rally point, the leader immediately accounts for personnel and equipment, and
forms the squad/platoon for a move to an alternate firing position. d. At the alternate firing position, the leader immediately accounts for personnel and
computes a new mounting azimuth. Squad leader lays the mortar on the new azimuth and prepares to respond to calls for fire.
e. Senior leader present submits a SHELREP, a report that gives details of the enemy attack.
4. If the squad is in an improved (dug in) firing position-- a. Squad members seek cover in personnel shelters. b. Squad members protect as much mission-essential equipment as possible by placing it
in the personnel shelter. c. Senior leader present submits a SHELREP.

99
Enemy Prisoners of War. Soldiers must handle EPWs IAW international law and treat them humanely; they must not abuse them physically or mentally. EPWs must be allowed to keep their personal protective equipment. The senior officer or NCO present is responsible for their care. If a platoon cannot evacuate EPWs in a reasonable time, they must give EPWs food, water, and first aid. Soldiers should not give EPWs comfort items such as cigarettes or candy.
(1) EPWs who receive favors and those who are mistreated make poor interrogation subjects. Use the five S's in handling EPW.
(a) Search the EPW. One soldier should guard the EPW while another searches. The soldier searching should not get between the EPW and the guard. Position the EPW spread-eagled against a tree or wall or have him get on the ground in a push-up position with his knees touching the ground. Search him and search all his gear and clothing. Take his weapons and papers, except identification papers. Give the EPW a written receipt for any personal property and documents taken.
(b) Segregate all EPWs into groups of males and females and subgroups of officers, NCOs, enlisted soldiers, civilians, and politicians. This keeps the leaders from promoting escape efforts. Keep groups segregated as they move to the rear.
(c) Silence EPWs. Do not let EPWs talk to each other. This keeps them from planning an escape and from cautioning each other on security. Report anything an EPW says or tries to say to another EPW.
(d) Speed EPWs to the rear. Platoons turn EPWs over to the company where they are assembled and moved to the rear for questioning by qualified intelligence soldiers.
(e) Safeguard EPWs when taking them to the rear. Make sure they arrive safely. Watch out for escape attempts. Do not let them bunch up, spread too far out, or start diversions, such as fist fights, that create a chance for escape. At the same time, do not allow anyone to abuse them.
(2) If an EPW is wounded and cannot be evacuated through normal channels, he is treated by an aidman and evacuated through medical channels. The EPW must be guarded by other than medical soldiers.
(3) Before evacuating an EPW, tag him with a minimal EPW tag and equipment/document tag (Figures 2-68 and 2-69) or a complete tag (Figures 2-70). The tag should be perforated into three parts and made of durable material. It should measure about 10 centimeters by 10 centimeters for each part. It should be pierced at the top and bottom, and reinforced for security for ease of attachment. (See STANAG 2044.)

100
Radiotelephone Operating Procedures
Phonetic Alphabet
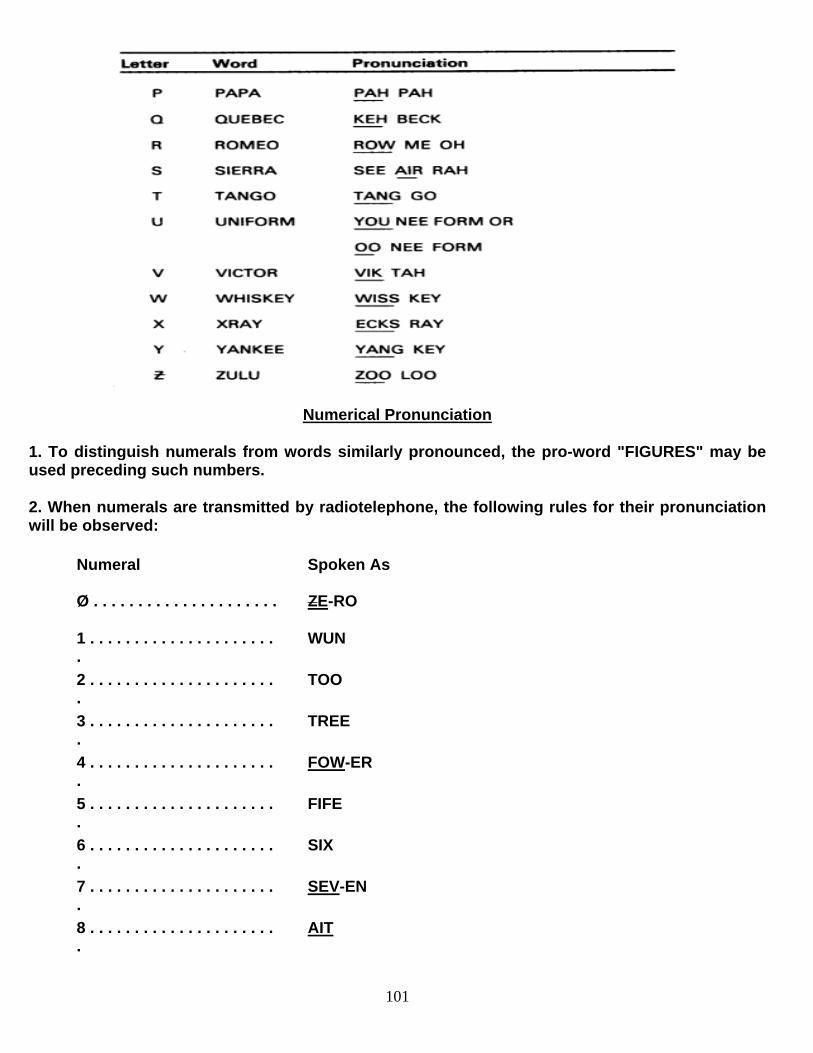
101
Numerical Pronunciation
1. To distinguish numerals from words similarly pronounced, the pro-word "FIGURES" may be used preceding such numbers.
2. When numerals are transmitted by radiotelephone, the following rules for their pronunciation will be observed:
Numeral Spoken As
Ø . . . . . . . . . . . . . . . . . . . . . ZE-RO
1 . . . . . . . . . . . . . . . . . . . . . .
WUN
2 . . . . . . . . . . . . . . . . . . . . . .
TOO
3 . . . . . . . . . . . . . . . . . . . . . .
TREE
4 . . . . . . . . . . . . . . . . . . . . . .
FOW-ER
5 . . . . . . . . . . . . . . . . . . . . . .
FIFE
6 . . . . . . . . . . . . . . . . . . . . . .
SIX
7 . . . . . . . . . . . . . . . . . . . . . .
SEV-EN
8 . . . . . . . . . . . . . . . . . . . . . .
AIT

102
9 . . . . . . . . . . . . . . . . . . . . . .
NIN-ER
3. Numbers will be transmitted digit by digit except that exact multiples of thousands may be spoken as such. However, there are special cases, such as anti-air warfare reporting procedures, when the normal pronunciation of numerals is prescribed for example, 17 would then be "seventeen."
Numeral Spoken As 44 . . . . . . . . . . . . . . . . . . . FOW-ER FOW-ER 9Ø . . . . . . . . . . . . . . . . . . . NIN-ER ZE-RO 136 . . . . . . . . . . . . . . . . . . . WUN TREE SIX
TIME 12ØØ . . . . . . . . . . . . WUN TOO ZE-RO ZE-RO 1478 . . . . . . . . . . . . . . . . . . WUN FOW-ER SEV-EN AIT 7ØØØ . . . . . . . . . . . . . . . . SEV-EN TOU-SAND 16ØØØ . . . . . . . . . . . . . . . WUN SIX TOU-SAND 812681 . . . . . . . . . . . . . . . . AIT WUN TOO SIX AIT WUN
4. The figure "ZERO" is to be written "Ø," the figure "ONE" is to be written "1" and the letter "ZULU" is to be written "Z."
5. Difficult words may be spelled phonetically using the four-step method. Abbreviations and isolated letters should be phonetisized without the pro-word "I SPELL."
Radiotelephone Procedures

103
Pro-words Listed Alphabetically

104

105
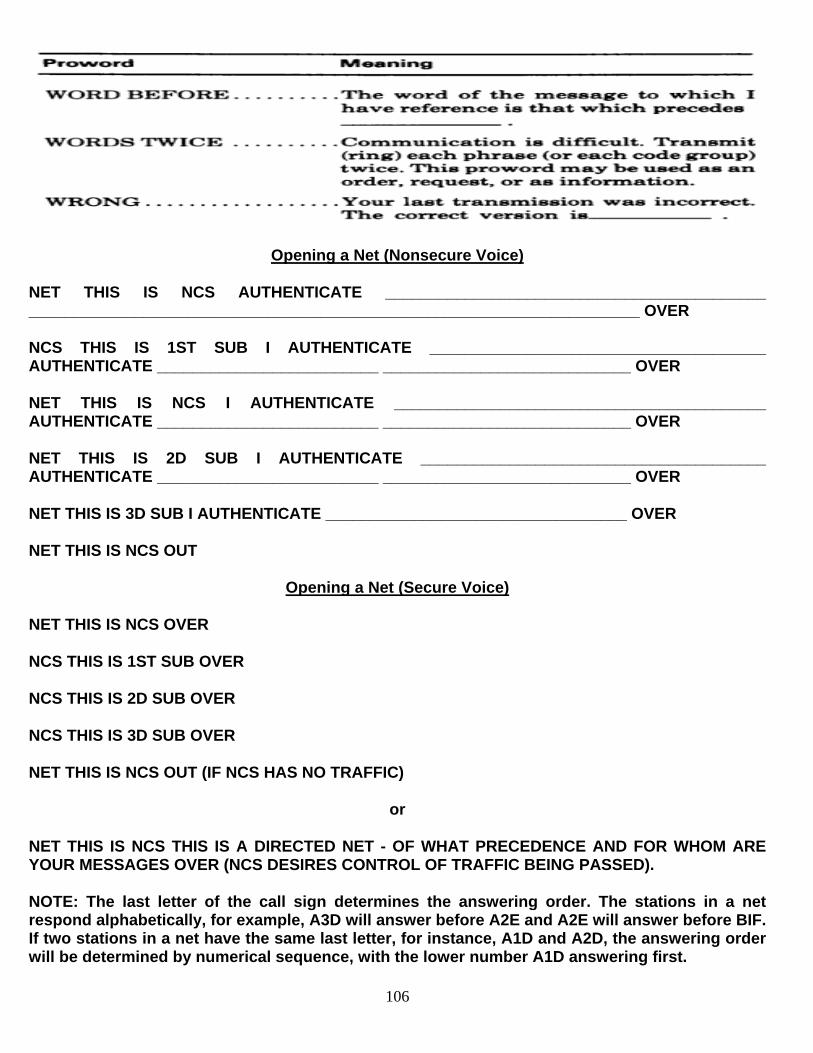
106
Opening a Net (Nonsecure Voice)
NET THIS IS NCS AUTHENTICATE ___________________________________________ _____________________________________________________________________ OVER
NCS THIS IS 1ST SUB I AUTHENTICATE ______________________________________ AUTHENTICATE _________________________ ____________________________ OVER
NET THIS IS NCS I AUTHENTICATE __________________________________________ AUTHENTICATE _________________________ ____________________________ OVER
NET THIS IS 2D SUB I AUTHENTICATE _______________________________________ AUTHENTICATE _________________________ ____________________________ OVER
NET THIS IS 3D SUB I AUTHENTICATE __________________________________ OVER
NET THIS IS NCS OUT
Opening a Net (Secure Voice)
NET THIS IS NCS OVER
NCS THIS IS 1ST SUB OVER
NCS THIS IS 2D SUB OVER
NCS THIS IS 3D SUB OVER
NET THIS IS NCS OUT (IF NCS HAS NO TRAFFIC)
or
NET THIS IS NCS THIS IS A DIRECTED NET - OF WHAT PRECEDENCE AND FOR WHOM ARE YOUR MESSAGES OVER (NCS DESIRES CONTROL OF TRAFFIC BEING PASSED).
NOTE: The last letter of the call sign determines the answering order. The stations in a net respond alphabetically, for example, A3D will answer before A2E and A2E will answer before BIF. If two stations in a net have the same last letter, for instance, A1D and A2D, the answering order will be determined by numerical sequence, with the lower number A1D answering first.

107
Radio Checks
To minimize transmission time, use radio checks sparingly. Transmit only when you have message traffic.
NET THIS IS NCS RADIO CHECK OVER
NCS THIS IS 1ST SUB ROGER OUT
NCS THIS IS 2D SUB WEAK READABLE OVER (2D SUB receives NCS weak)
NCS THIS IS 3D SUB ROGER OUT
NET THIS IS NCS ROGER OUT
Passing Message Traffic 1. A preliminary call will be transmitted when the sending station wishes to know if the
receiving station is ready to receive a message.
1ST SUB THIS IS 2D SUB - (precedence) - OVER 2D SUB THIS IS 1ST SUB - OVER 1ST SUB THIS IS 2D SUB - MESSAGE - NUMBER ONE PRIORITY TIME 14Ø5ØØZ MAR 87 FROM COMMANDER'S FULL CALL SIGN 2D SUB TO COMMANDER'S FULL CALL SIGN 1ST SUB BREAK TEXT OF MESSAGE BREAK OVER 2D SUB THIS IS 1ST SUB ROGER OUT
or
3D SUB THIS IS 1ST SUB - MESSAGE - OVER 1ST SUB THIS 3D SUB - OVER 3D SUB THIS IS 1ST SUB (Sends Message) - OVER 1ST SUB THIS IS 3RD SUB - ROGER - OUT
2. When communications reception is good and contact has been continuous, a preliminary call is optional.
Station Entering Net 1. The 3d substation was unable to answer when the net was opened and now wishes to
report into the net. NCS THIS IS 3D SUB - REPORTING INTO NET - OVER 3D SUB THIS IS NCS AUTHENTICATE _____ _____ OVER NCS THIS IS 3D SUB I AUTHENTICATE _____ AUTHENTICATE _____ _____ OVER 3D SUB THIS IS NCS I AUTHENTICATE _____ OVER NCS THIS IS 3D SUB ROGER OUT
2. The 3d substation finds it necessary to enter a net in which it does not normally operate. NCS THIS IS 3D SUB REQUEST PERMISSION TO ENTER
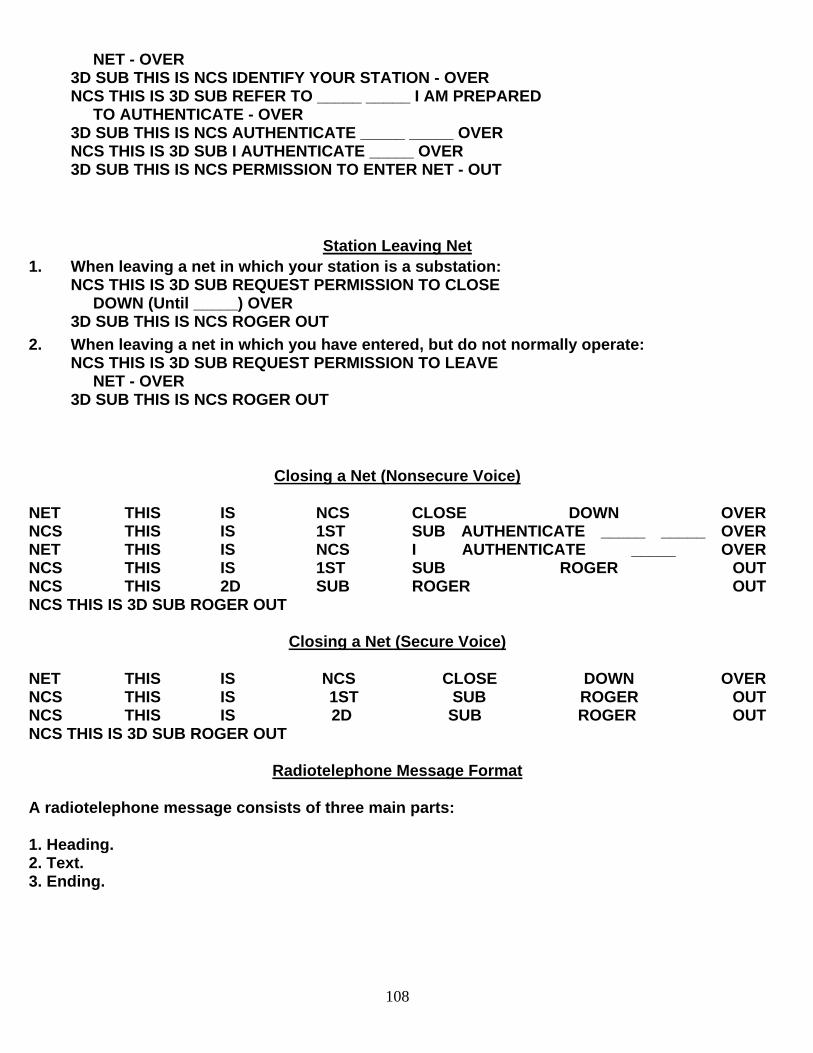
108
NET - OVER 3D SUB THIS IS NCS IDENTIFY YOUR STATION - OVER NCS THIS IS 3D SUB REFER TO _____ _____ I AM PREPARED TO AUTHENTICATE - OVER 3D SUB THIS IS NCS AUTHENTICATE _____ _____ OVER NCS THIS IS 3D SUB I AUTHENTICATE _____ OVER 3D SUB THIS IS NCS PERMISSION TO ENTER NET - OUT
Station Leaving Net 1. When leaving a net in which your station is a substation:
NCS THIS IS 3D SUB REQUEST PERMISSION TO CLOSE DOWN (Until _____) OVER 3D SUB THIS IS NCS ROGER OUT
2. When leaving a net in which you have entered, but do not normally operate: NCS THIS IS 3D SUB REQUEST PERMISSION TO LEAVE NET - OVER 3D SUB THIS IS NCS ROGER OUT
Closing a Net (Nonsecure Voice)
NET THIS IS NCS CLOSE DOWN OVER NCS THIS IS 1ST SUB AUTHENTICATE _____ _____ OVER NET THIS IS NCS I AUTHENTICATE _____ OVER NCS THIS IS 1ST SUB ROGER OUT NCS THIS 2D SUB ROGER OUT NCS THIS IS 3D SUB ROGER OUT
Closing a Net (Secure Voice)
NET THIS IS NCS CLOSE DOWN OVER NCS THIS IS 1ST SUB ROGER OUT NCS THIS IS 2D SUB ROGER OUT NCS THIS IS 3D SUB ROGER OUT
Radiotelephone Message Format
A radiotelephone message consists of three main parts:
1. Heading. 2. Text. 3. Ending.

109

110

111
Conduct Occupation of an Assembly Area
Conditions: You are a platoon-size unit leader, given a company commander's order to occupy a specific sector of a company assembly area and a map of the operational area.
Standards: Moved unit to the location specified in the company order. Ensured preparation of the assigned sector was completed in the time specified in the order. Positioned elements, weapons, and observation posts in a manner that supported the company plan for occupation of the assembly area.
Performance Steps
1. Conduct preparation for occupation of the assembly area (AA).
a. Perform the required troop-leading procedures (a series of eight interrelated, overlapping processes that are often accomplished concurrently and do not follow a rigid sequence). Use the procedures as outlined, if only in abbreviated form, to ensure that nothing is left out of planning and preparation and that soldiers understand the mission and prepare adequately.
(1) Receive the mission and the company OPORD.
(2) Issue the warning order to subordinate leaders. Include location, special equipment required, and the earliest time for movement.
(3) Make a tentative plan for moving to the position and preparing the position based on the estimate of the situation and an analysis of METT-TC. Your plan must support the company plan for occupation of the AA.
(4) Start necessary movement. Movement may need to begin while you are still planning. This step could occur at any time during the troop-leading procedures.
(5) Reconnoiter the position and the route(s) to it. This may not be possible due to the situation. As a minimum, conduct a map reconnaissance to confirm or deny assumptions made during the estimate of the situation.
(6) Complete the plan.
(7) Issue the order to subordinate leaders. Use the standard OPORD format. As a minimum, the order should include—
(a) Situation.
(b) Mission and purpose for occupation of the AA.
(c) Each squad position (left, right, and center) in the platoon sector.
(d) Security plan (passwords, observation posts, and percent of personnel on alert).
(e) Times for movement or occupation of the AA.

112
(f) Other pertinent information such as location of the command post, waste disposal, and environmental hazards.
(8) Supervise continuously.
b. Make necessary coordination with elements that will be attached or adjacent to your position in the AA.
c. Provide platoon representatives for company quartering party as required. Instruct them to perform the following tasks or other tasks, as required.
(1) Reconnoiter the AA to ensure it is clear of enemy.
(2) Establish initial security.
(3) Select initial positions for all platoon elements.
(4) Identify, clear, or mark obstacles in the platoon sector of the AA.
2. Direct platoon movement to designated platoon release point. Use appropriate movement techniques based on the terrain and the situation.
3. Prepare your sector of the AA in accordance with the company plan.
a. Link up with guides and move the platoon to its initial position.
b. Establish and maintain local security.
c. Assign squad sectors. Ensure sectors are mutually supporting and that all gaps are covered by fire and observation.
d. Designate observation post(s) locations and the elements responsible for establishing and maintaining them.
e. Ensure communication is established within the platoon and company.
f. Submit timely progress reports to company headquarters.
g. Establish and enforce priority of work. The following is an example of work priority and may vary based on unit SOP, mission, or METT-TC.
(1) Position vehicles, crew-served weapons, and chemical-agent alarms, and designate PDF, FPL, and FPF.
(2) Construct fighting position.
(3) Set up wire communications.
(4) Prepare range cards.

113
(5) Distribute ammunition, rations, water, supplies, and special equipment.
(6) Conduct preventive maintenance checks and services on equipment.
(7) Inspect personnel and equipment.
(8) Rehearse critical aspects of the upcoming mission.
(9) Test small arms (if situation permits).
(10) Conduct personal hygiene and field sanitation.
(11) Institute a rest plan.
h. Coordinate with adjacent units and others, as required.
(1) Coordinate for security patrols (if applicable).
(2) Establish responsibility for overlapping enemy avenues of approach between adjacent units.
(3) Ensure there are no gaps between elements.
(4) Exchange information on OP locations and unit signals.
(5) Coordinate for local counterattacks.
(6) Complete and forward a copy of the platoon sector sketch to company headquarters.
TECHNIQUES OF INDIRECT FIRE CONTROL
The positioning of the FO and the proper procedures used to call for fire is critical in order to receive immediate indirect fire.
a. Forward Observer Positioning. The platoon leader and FO should always be together during execution This ensures close synchronization of the scheme of maneuver and plan of fire support. The platoon leader is responsible for both, but concentrates on maneuver and direct fires. The FO is the platoon leader's principle assistant in managing indirect fires. They eat, sleep, and fight together. Each has separate requirements to communicate with higher headquarters, but will do so almost always from the same location. The platoon leaders and FO identify primary and alternate positions to ensure continuous observation during limited visibility conditions. The FO verifies and rehearses FM radio communications as the tactical situation permits. Squad leaders may be designated to observe targets and call for fire, or they can be designated as an alternate FO to the platoon FO.
(1) The platoon leader must ensure that the FO knows the overall concept of the operation to include the following:

114
(a) The location and description of the targets to engage.
(b) The terminal effects required (destroy, delay, disrupt, suppress) and the purpose.
(c) The communication means, radio net, call signs, and fire direction center to use.
(d) When or under what circumstances to engage targets.
(e) The relative priority of targets.
(f) The method of engagement and method of control to be used in the call for fire.
(2) If the platoon leader and the FO cannot see the targets and trigger lines or TRPs under the visibility conditions expected at the time the target is to be fired, they immediately notify the company. The company commander and fire support team (FIST) evaluate the situation and notify higher headquarters. The planning headquarters ten plans a new target at a location that meets the commander's purpose for fire support.
b. Call for Fire. A call for fire is a message prepared by an observer. It has all the information needed to deliver indirect fires on the target. Any soldier in the platoon can request indirect fire support by use of the call for fire.
(1) Calls for fire must include--
(a) Observer identification and warning order.
• Adjust fire. • Fire for effect. • Suppress. • Immediate suppression (target identification).
(b) Target location methods.
• Grid. • Polar. • Shift from a known point.
(c) Target description. Give a brief description of the target using the acronym "SNAP."
• Size/shape. • Nature/nomenclature. • Activity. • Protection/posture.
(2) A call for fire may also include the following information (optional elements):
(a) Method of engagement. The method of engagement consists of the type of adjustments, danger close, trajectory, ammunition, and distribution.

115
(b) Method of fire and control.
• At my command. • Cannot observe. • Time on target. • Continuous illumination. • Coordinated illumination. • Cease loading. • Check firing. • Continuous fire. • Repeat.
(c) Refinement and end of mission.
• Correct any adjustments. • Record as target. • Report battle damage assessment.
(3) Examples of call for fire follow:
(a) Grid.
• "_____ this is _____ adjust fire/fire for effect, over." • "Grid _____, over. " • "(Target description) _____, over."
NOTE 1. Determine a six-digit grid for the target.
NOTE 2. Determine a grid direction to the target and send after the call for fire but before any subsequent corrections.
(b) Polar.
• "_____ this is _____ adjust fire/fire for effect, polar, over." • "Direction _____, Distance _____, Up/Down _____ over." • "(Target description) _____, over."
NOTE 1. Determine the grid direction to the target.
NOTE 2. Determine a distance from the observer to the target.
NOTE 3. Determine if any significant vertical interval exists.
NOTE 4. Fire direction center must have OP location.
(c) Shift from a known point.
• "_____ this is _____ adjust fire/fire for effect, shift (target number/registration point number), over."
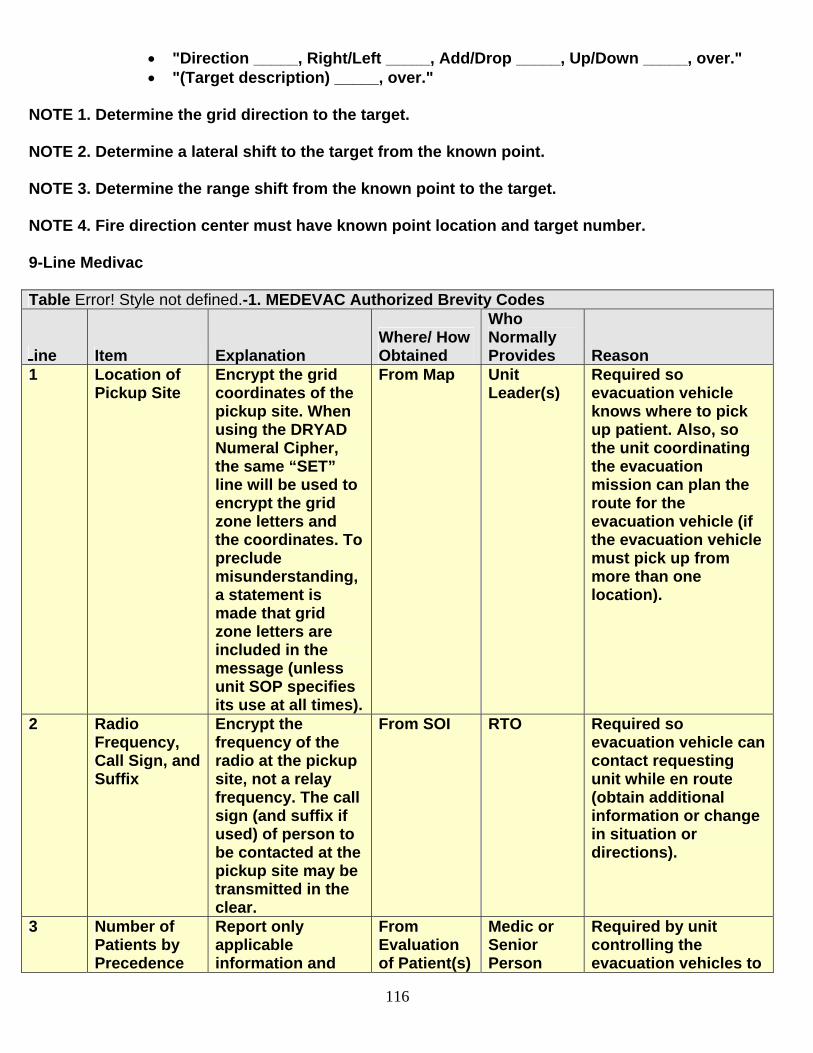
116
• "Direction _____, Right/Left _____, Add/Drop _____, Up/Down _____, over." • "(Target description) _____, over."
NOTE 1. Determine the grid direction to the target.
NOTE 2. Determine a lateral shift to the target from the known point.
NOTE 3. Determine the range shift from the known point to the target.
NOTE 4. Fire direction center must have known point location and target number.
9-Line Medivac Table Error! Style not defined.-1. MEDEVAC Authorized Brevity Codes
Line Item Explanation Where/ How Obtained
Who Normally Provides Reason
1 Location of Pickup Site
Encrypt the grid coordinates of the pickup site. When using the DRYAD Numeral Cipher, the same “SET” line will be used to encrypt the grid zone letters and the coordinates. To preclude misunderstanding, a statement is made that grid zone letters are included in the message (unless unit SOP specifies its use at all times).
From Map Unit Leader(s)
Required so evacuation vehicle knows where to pick up patient. Also, so the unit coordinating the evacuation mission can plan the route for the evacuation vehicle (if the evacuation vehicle must pick up from more than one location).
2 Radio Frequency, Call Sign, and Suffix
Encrypt the frequency of the radio at the pickup site, not a relay frequency. The call sign (and suffix if used) of person to be contacted at the pickup site may be transmitted in the clear.
From SOI RTO Required so evacuation vehicle can contact requesting unit while en route (obtain additional information or change in situation or directions).
3 Number of Patients by Precedence
Report only applicable information and
From Evaluation of Patient(s)
Medic or Senior Person
Required by unit controlling the evacuation vehicles to
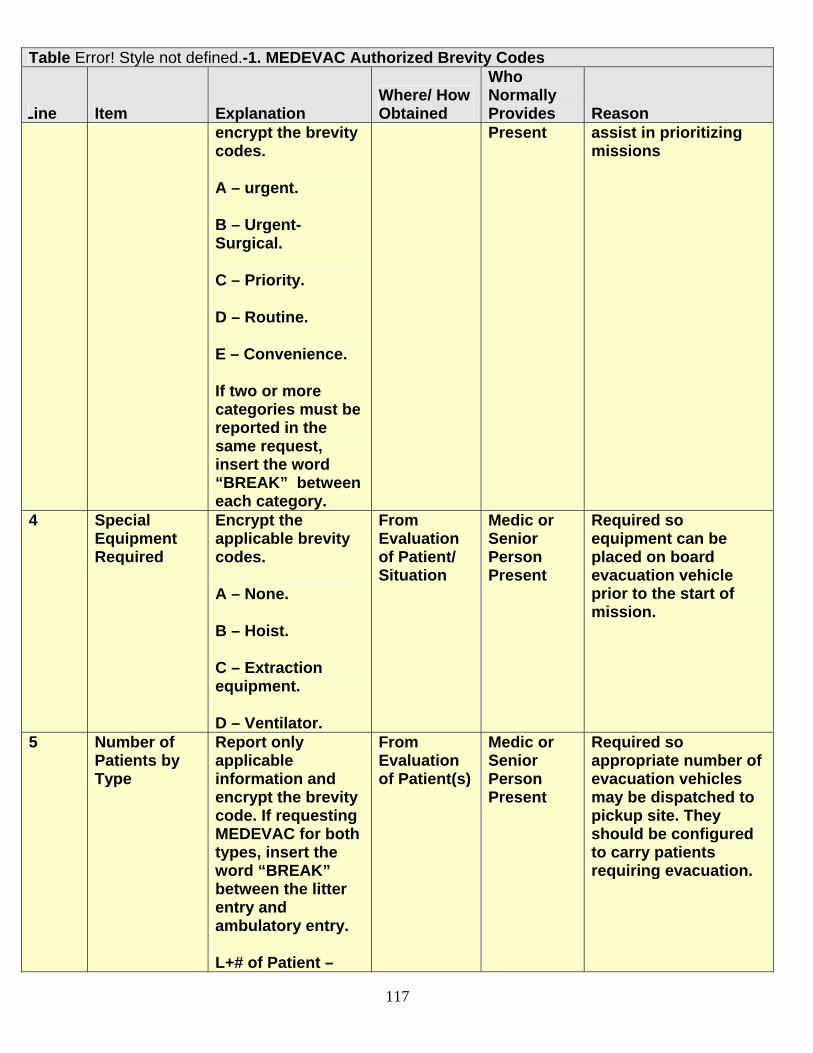
117
Table Error! Style not defined.-1. MEDEVAC Authorized Brevity Codes
Line Item Explanation Where/ How Obtained
Who Normally Provides Reason
encrypt the brevity codes.
A – urgent.
B – Urgent-Surgical.
C – Priority.
D – Routine.
E – Convenience.
If two or more categories must be reported in the same request, insert the word “BREAK” between each category.
Present assist in prioritizing missions
4 Special Equipment Required
Encrypt the applicable brevity codes.
A – None.
B – Hoist.
C – Extraction equipment.
D – Ventilator.
From Evaluation of Patient/ Situation
Medic or Senior Person Present
Required so equipment can be placed on board evacuation vehicle prior to the start of mission.
5 Number of Patients by Type
Report only applicable information and encrypt the brevity code. If requesting MEDEVAC for both types, insert the word “BREAK” between the litter entry and ambulatory entry.
L+# of Patient –
From Evaluation of Patient(s)
Medic or Senior Person Present
Required so appropriate number of evacuation vehicles may be dispatched to pickup site. They should be configured to carry patients requiring evacuation.

118
Table Error! Style not defined.-1. MEDEVAC Authorized Brevity Codes
Line Item Explanation Where/ How Obtained
Who Normally Provides Reason
Litter
A+# of Patient – Ambulatory (sitting)
6 Security of Pickup Site (Wartime)
N – No enemy troops in area.
P – Possible enemy troops in area (approach with caution).
E – Enemy troops in area (approach with caution).
X – Enemy troops in area (armed escort required).
From Evaluation of Situation
Unit Leader Required to assist the evacuation crew in assessing the situation and determining if assistance is required. More definitive guidance can be furnished the evacuation vehicle while it is en route (specific location or enemy to assist an aircraft in planning its approach).
6 Number and Type of Wound, Injury, or Illness (Peacetime)
Specific information regarding patient wounds by type (gunshot or shrapnel). Report serious bleeding, along with patient blood type, if known.
From Evaluation of Patient
Medic or Senior Person Present
Required to assist evacuation personnel in determining treatment and special equipment needed.
7 Method of Marking Pickup Site
Encrypt the brevity codes.
A – Panels.
B – Pyrotechnic signal.
C – Smoke signal.
D – None.
E – Other.
Based on Situation and Availability of Materials
Medic or Senior Person Present
Required to assist the evacuation crew in identifying the specific location of the pickup. Note that the color of the panels or smoke should not be transmitted until the evacuation vehicle contacts the unit (just prior to its arrival). For security, the crew should identify the color and the unit should verify it.
8 Patient The number of From Medic or Required to assist in

119
Table Error! Style not defined.-1. MEDEVAC Authorized Brevity Codes
Line Item Explanation Where/ How Obtained
Who Normally Provides Reason
Nationality and Status
patients in each category need not be transmitted. Encrypt only the applicable brevity codes.
A = U.S. military.
B – U.S. civilian.
C – Non-U.S. military.
D – Non-U.S. civilian.
E – EPW
Evaluation of Patient
Senior Person Present
planning for destination facilities and need for guards. Unit requesting support should ensure there is an English-speaking representative at the pickup site.
9 NBC Con-tamination (Wartime)
Include this line only when applicable. Encrypt the applicable brevity codes.
N – Nuclear.
B = Biological.
C – Chemical.
From Situation
Medic or Senior Person Present
Required to assist in planning for the mis-sion. (Determine which evacuation vehicle will accomplish the mission and when it will be accomplished.)
9 Terrain Description (Peacetime)
Include details of terrain features in and around pro-posed landing site. If possible, describe relationship of site to prominent terrain feature (lake, mountain, and tower).
From Area Survey
Personnel at site
Required to allow evacuation personnel to assess route/avenue of ap-proach into area. Of particular importance if hoist operation is required.

120
EXERCISE RULES OF ENGAGEMENT SQUAD STX / PATROLLING STX
1. Movement or fires across the international boundary is not allowed, even in pursuit of enemy troops. 2. Personnel not in uniform, carrying automatic weapons, are enemy and may be engaged without warning. 3. Personnel not in uniform, carrying hunting-style rifles, are considered civilian, but treated with great caution. If personnel with hunting rifles are commingled with enemy, they may be engaged without warning. 4. Personnel not in uniform, with hunting rifles may be engaged without warning if threatening noncombatants or US forces. 5. Civilian vehicles with weapons mounted are enemy and may be engaged without warning. 6. US forces will not endanger noncombatants to engage enemy forces unless absolutely necessary. 7. Civilians threatening US forces or noncombatants with weapons such as clubs, rocks, or instruments other than firearms, gasoline, or explosives, will be prevented from harming US troops and noncombatants. In these circumstances, deadly force will not be used unless absolutely necessary to prevent imminent loss of life or limb to US forces or noncombatants. Safety/ Reminders: 8. Do not have physical contact with OPFOR. 9. Do not restrain or tie/ handcuff OPFOR. 10. Do not tackle or wrestle OPFOR. 11. Do not fire weapons within 10 meters of OPFOR soldiers. 12. These are American soldiers assisting in your training. SQD STX Scenario Update Refer to OPORD 06-04, Annex B, and FRAGOs 1 & 2 for more detailed information. The Cadets have been alerted/mobilized for a pending deployment to the fictitious country of Palomas in Southern Europe. Fort Lewis represents their CONUS Replacement Center (CRC) where the Cadets will receive their deployment physicals, conduct marksmanship qualification, and receive additional tactical training before going ‘in country’. The APFT, LN, BRM, HG, ITT, US Weap., Conf, FS, and First Aid Committees represent that additional refresher and certification training that the Cadets will receive prior to their deployment. The Cadets will then deploy to Palomas where they will receive Tactical Assembly Area training at Security Operations which is now part of the Squad STX committee. The Cadets then continue with 4

121
days of Tactical Training within Palomas at Squad STX before moving to Platoon Security Operations (PSO). PSO is led by Regimental Cadre and represents a Tactical Staging area near the ZOS where the cadets will refit and rearm prior to moving into the ZOS. The Cadets will then move into the ZOS, replicated by the Patrolling Committee, where they will conduct combat operations as part of a UN brokered multinational force. The scenario is similar to the Balkans in that there are international boundaries, ethnic conflicts, and unconventional enemy forces, but the scenario also includes some of the current dangers faced by our troops in OIF and OEF. The scenario and lanes at SQD STX and Patrolling are designed to assess Cadet Leadership. As such, the Cadets are evaluated on how they react to a complex battlefield. There are multiple ‘right’ answers for every lane and Cadets that can think quickly and adapt to a rapidly changing environment will be rewarded. The following products will be given to the Regimental Cadre when they arrive at WF. Regimental Cadre will brief the Cadets on the following days: Day 3/4: Brief OPORD 06-04 and Annex B (Intelligence/Road to War) Cadets receive Smart Cards Day 14: Brief FRAGO 1 - Deployment into Palomas (Squad STX Committee) Day 19: Brief FRAGO 2 – Movement into ZOS (Platoon Security Operations & Patrolling Committee) Day 22: Patrolling S2 Briefs INTSUM #1 to Cadets while they’re at Plt Sec Ops
SQUAD ORGANIZATION AND MOVEMENT
SQUAD FORMATIONS
Squad formations describe the relationships between fire teams in the squad. They include the squad column and squad line. A comparison of the formations is in Figure 2-10.
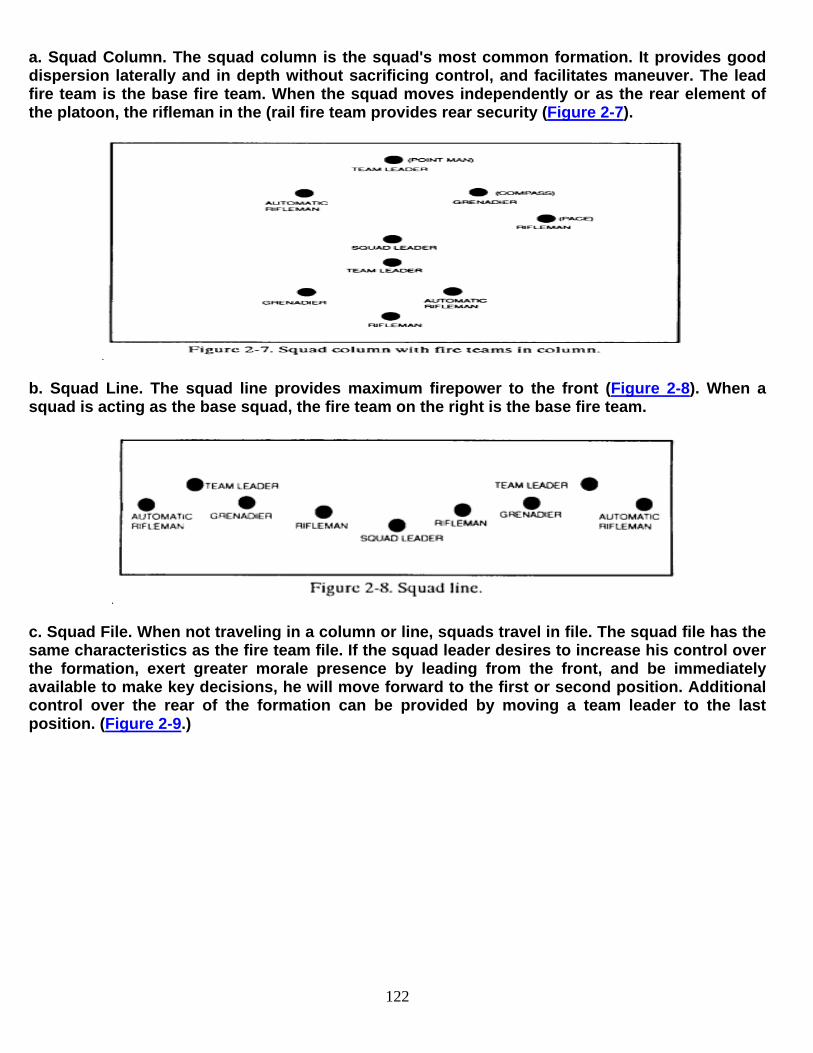
122
a. Squad Column. The squad column is the squad's most common formation. It provides good dispersion laterally and in depth without sacrificing control, and facilitates maneuver. The lead fire team is the base fire team. When the squad moves independently or as the rear element of the platoon, the rifleman in the (rail fire team provides rear security (Figure 2-7).
b. Squad Line. The squad line provides maximum firepower to the front (Figure 2-8). When a squad is acting as the base squad, the fire team on the right is the base fire team.
c. Squad File. When not traveling in a column or line, squads travel in file. The squad file has the same characteristics as the fire team file. If the squad leader desires to increase his control over the formation, exert greater morale presence by leading from the front, and be immediately available to make key decisions, he will move forward to the first or second position. Additional control over the rear of the formation can be provided by moving a team leader to the last position. (Figure 2-9.)

123
Squad Duties/Additional Duties
Rifle Squad Leader. This soldier is responsible for all that the rifle squad does or fails to do. He is a tactical leader and, as such, leads by example. The rifle squad leader--
(1) Controls the maneuver of his squad and its rate and distribution of fire.
(2) Trains his squad on the individual and collective tasks required to sustain combat effectiveness.
(3) Manages the logistical and administrative needs of his squad. He requests and issues ammunition, water, rations, and special equipment.
(4) Maintains accountability of his soldiers and equipment.
(5) Completes casualty feeder reports and reviews the casualty reports completed by squad members.
(6) Submits requests for awards and decorations.
(7) Directs the maintenance of the squad's weapons and equipment.
(8) Inspects the condition of soldiers' weapons, clothing, and equipment.
(9) Ensures that material and supplies are distributed to the soldiers in the squad.
(10) Keeps the platoon sergeant/leader informed on squad supply status and squad requirements.
(11) Ensures supplies and equipment are internally cross-leveled within the squad.
d. Weapons Squad Leader (Infantry, Airborne, and Air Assault Divisions Only). This soldier is responsible for all that the weapons squad does or fails to do. His duties are the same as the rifle squad leader. He also controls the machine guns and MAWs in support of the platoon's mission. He advises the platoon leader on employing his squad.

124
e. Machine Gun Squad Leader (Ranger Rifle Company Only). This soldier is responsible for all that the machine gun squad does or fails to do. His duties are the same as the rifle squad leader, and he also controls the machine guns in support of the platoon's mission. He advises the platoon leader on employing the squad.
f. Team Leader. This soldier is a fighting leader who leads by personal example and helps the squad leader as required. He controls the movement of his fire team and the rate and placement of fire by leading from the front and using the proper commands and signals. He maintains accountability of his soldiers and equipment. He ensures his soldiers maintain the unit standards in all areas.
g. Platoon Aidman. This soldier helps the platoon sergeant direct aid and litter teams; he monitors the health and hygiene of the platoon. The platoon aidman--
(1) Treats casualties and assists in their evacuation under the control of the platoon sergeant.
(2) Aids the platoon leader/sergeant in field hygiene matters, personally checks the health and physical condition of platoon members.
(3) Requests Class VIII (medical) supplies through the platoon sergeant.
(4) Provides technical expertise and supervision of the combat lifesavers.
(5) Carries out other tasks assigned by the platoon leader and platoon sergeant.
h. Platoon Radiotelephone Operator. The platoon RATELO must know the use and care of the radio to include waterproofing and presetting frequencies, the use of the SOI, and how to construct and erect field-expedient antennas
Squad SOP Development
This outline is to be used as a reference in consideration in developing SOPs for the squad and platoon. Reference is FM 7-8 for detailed explanations of each category and subcategory.
TASK ORGANIZATION
COMMAND AND CONTROL
Duties and Responsibilities
Communication
Estimate of the Situation
Orders and Reports
Movement
OPERATIONS
Assembly Area Procedures

125
NBC
AIR DEFENSE ARTILLERY
FIRE SUPPORT
FIRE CONTROL AND DISTRIBUTION
OPERATIONAL SECURITY
COMBAT SERVICE SUPPORT
Casualty Reporting. During lulls in the battle, platoons give by-name or roster number (SOP dependent) casualty information to the company headquarters. Soldiers with direct knowledge of an incident must complete a DA Form 1155 (Figure 2-66). This form is used to report KIAs who were not recovered and missing or captured soldiers. DA Form 1156 is used to report those soldiers who have been killed and recovered and soldiers who have been wounded (Figure 2-67). The platoon leader or platoon sergeant reviews these forms for accuracy, then forwards them to the company headquarters.

126

127
Excerpt: TC 25-20, Chapter 4
Conducting the After-Action Review
INTRODUCTION AND RULES
The training exercise is over, AAR preparation is complete, and key players are at the designated AAR site. It is now time to conduct the AAR. The leader should begin with some type of "attention getter" -- a joke, an appropriate anecdote, or a historical example that relates to the training, exercise, event, or conduct of the AAR. Then, if necessary, he reviews the purpose and sequence of the AAR to ensure everyone understands what an AAR is and how it works. His introduction should include the following thoughts:
• An AAR is a dynamic, candid, professional discussion of training which focuses on unit performance against the Army standard for the tasks being trained. Everyone can, and should, participate if they have an insight, observation, or question which will help the unit identify and correct deficiencies or maintain strengths.
• An AAR is not a critique. No one, regardless of rank, position, or strength of personality, has all of the information or answers. After-action reviews maximize training benefits by allowing soldiers, regardless of rank, to learn from each other.
• An AAR does not grade success or failure. There are always weaknesses to improve and strengths to sustain.
NOTE: Figure 4-1 contains a recommended sequence for conducting an AAR.
Introduction and rules
Review of objectives and intent
Training objectives Commander's mission/intent (what was supposed to happen) OPFOR commander's mission/intent Relevant doctrine, tactics, techniques, and procedures (TTPs)
Summary of recent events (what happened)
Discussion of key issues
Chronological order of events Battlefield operating system (BOS) Key events/themes/issues
Discussion of optional issues
Soldier/leader skills Tasks to sustain/improve Statistics Others

128
Discussion of force protection (safety)
Closing comments (summary) Figure 4-1. Sequence for Conducting AARs
Soldier participation is directly related to the atmosphere created during the introduction. The AAR leader should make a concerted effort to draw in and include soldiers who seem reluctant to participate. The following techniques can help the leader create an atmosphere conducive to maximum participation. He should--
• Enter the discussion only when necessary. • Reinforce the fact that it is permissible to disagree. • Focus on learning and encourage people to give honest opinions. • Use open-ended and leading questions to guide the discussion of soldier, leader, and unit
performance.
REVIEW OF OBJECTIVES AND INTENT
Training Objectives
The AAR leader should review unit training objectives for the training mission(s) the AAR will cover. He should also restate the tasks being reviewed as well as the conditions and standards for the tasks.
Commander's Mission and Intent (What Was Supposed to Happen)
Using maps, operational graphics, terrain boards, and so on, the commander should restate the mission and his intent. Then, if necessary, the discussion leader should guide the discussion to ensure everyone understands the plan and the commander's intent. Another technique is to have subordinate leaders restate the mission and discuss their commander's intent.
OPFOR Commander's Mission and Intent
In a formal AAR, the OPFOR commander explains his plan to defeat friendly forces. He uses the same training aids as the friendly force commander so participants can understand the relationship of both plans.
SUMMARY OF RECENT EVENTS (WHAT HAPPENED)
The AAR leader now guides the review using a logical sequence of events to describe and discuss what happened. He should not ask yes or no questions, but encourage participation and guide discussion by using open-ended and leading questions. An open-ended question has no specific answer and allows the person answering to reply based on what was significant to him. Open-ended questions are also much less likely to put him on the defensive. This is more effective in finding out what happened. For example, it is better to ask,
"SGT Johnson, what happened when your Bradley crested the hill?"

129
rather than--
"SGT Johnson, why didn't you engage the enemy tanks to your front?"
As the discussion expands and more soldiers add their perspectives, what really happened will become clear. Remember, this is not a critique or lecture; the OC does not tell the soldiers or leaders what was good or bad. However, the AAR leader must ensure specific issues are revealed, both positive and negative in nature. Skillful guidance of the discussion will ensure the AAR does not gloss over mistakes or unit weaknesses.
DISCUSSION OF KEY ISSUES
The AAR is a problem-solving process. The purpose of discussion is for participants to discover strengths and weaknesses, propose solutions, and adopt a course of action to correct problems. Leaders can organize the discussion using one of the three techniques in the following paragraphs.
Discussion Techniques
Chronological Order of Events
This technique is logical, structured, and easy to understand. It follows the flow of training from start to finish and allows soldiers to see the effects of their actions on other units and events. By covering actions in the order they took place, soldiers and leaders are better able to recall what happened.
Battlefield Operating Systems (BOS)
To focus and structure the AAR, the leader can also use the seven BOS (Figure 4-2). By focusing on each BOS and discussing it across all phases of the training exercise, participants can identify systemic strengths and weaknesses. This technique is particularly useful in training staff sections whose duties and responsibilities directly relate to one or more BOS. However, leaders using this technique must be careful not to lose sight of the big picture. They must not get into long discussions about BOS which do not relate to mission accomplishment.
1. Intelligence (INTEL) 2. Maneuver (MVR) 3. Fire Support (FS) 4. Mobility, countermobility, survivability (M, C, S) 5. Air Defense (AD) 6. Combat Service Support (CSS) 7. Command and Control (C2)
Figure 4-2. The Seven BOS

130
Key Events/Themes/Issues
A key events discussion focuses on critical training events which directly support training objectives the chain of command identified before the exercise began. Keeping a tight focus on these events prevents the discussion from becoming sidetracked by issues which do not relate to training objectives. This technique is particularly effective when time is limited.
Fratricide
All incidents or near incidents of fratricide, whether inflicted by direct fire, indirect fire, or close air support (CAS), will be discussed in detail. The leader must focus on identifying the cause of the fratricide and develop SOPs and TTPs to prevent it in the future. Regardless of the environment (training or combat), the leader must swiftly deal with all fratricide incidents. As soon as possible after the event, an AAR should be held to discuss the circumstances surrounding the event, using the following discussion points:
• How and why did the incident occur? • How were friendly personnel and equipment identified? • What fire control measures were in place where the fratricide occurred and how
effective were they? • How did the commander's risk assessment and overall intent for the mission
address the issue of fratricide?
Flexibility
One of the strengths of the AAR format is its flexibility. The leader could use the chronological format to structure the discussion, then, if a particular BOS seems to have systemic issues that the group needs to address, follow that BOS across the entire exercise. Once that topic is exhausted, the AAR could proceed using the chronological format. Each technique will generate discussion, identify unit strengths, weaknesses, and training the unit needs to improve proficiency. However, the leader must remember to--
• Be specific, avoiding generalizations. • Be thorough. • Not dwell on issues unrelated to mission accomplishment. • Focus on actions. • Relate performance to the accomplishment of training objectives. • Identify corrective action for areas of weakness. • Continually summarize.
DISCUSSION OF OPTIONAL ISSUES
In addition to discussing key issues, the leader might also address several optional topics, included in the following paragraphs.
Soldier/Leader Skills
Through discussion, the unit can identify critical soldier and leader skills which affected unit or individual performance. The leader should note these skills for retraining or for future unit training. (Often it is best to discuss leader skills in a separate meeting or AAR

131
specifically for that purpose. This allows for a candid discussion of leadership issues without wasting unit AAR time best spent on reviewing the entire training exercise.) The AAR leader for follow-on meetings should be a member of the unit so participants can candidly address key training issues without fear of airing dirty laundry in front of outsiders.
Tasks to Sustain/Improve
This technique focuses on identifying tasks on which the unit is proficient and tasks on which they need further training. The intent is to focus training on mission-essential tasks and supporting soldier, leader, and collective tasks which need improvement rather than training to known strengths. Although it is important to sustain proficiency on tasks whose standards the unit has met, it is more important to train to standard on new or deficient mission-essential tasks. Train to weakness, not to strength.
Statistics
Statistics is a double-edged sword. Effective feedback requires participants to measure, collect, and quantify performance during the training exercise. Statistics supply objective facts which reinforce observations of both strengths and weaknesses. The danger lies in statistics for statistics' sake. Chart after chart of ratios, bar graphs, and tables quickly obscures any meaning and lends itself to a "grading" of unit performance. This stifles discussion and degrades the AAR's value. Statistics and statistics-based charts should identify critical trends or issues and reinforce teaching points. (An example for an armored unit would be to link the number of rounds fired to the number of enemy vehicles destroyed. This would provide a good indication of unit gunnery skills.) Judicious use of statistic feedback supports observations and provides a focus to AAR discussions.
Other
Other topics which participants may need to discuss include troop-leading procedures, troop deployment and use of terrain, synchronization, enemy disposition and tactics, information dissemination and use, obstacle emplacement and breaching, vision of the battlefield, knowing the enemy, and so forth.
DISCUSSION OF FORCE PROTECTION (SAFETY) ISSUES
Safety is every soldier's business and applies to everything a unit does in the field and in garrison. Safety should be specifically addressed in every AAR and discussed in detail when it impacts unit effectiveness or soldier health. The important thing is to treat safety precautions as integral parts of every operation.
CLOSING COMMENTS (SUMMARY)
During the summary, the AAR leader reviews and summarizes key points identified during the discussion. He should end the AAR on a positive note, linking conclusions to future training. He should then leave the immediate area to allow unit leaders and soldiers time to discuss the training in private.

132
Day 21 – 22: Patrolling Prep/Review Patrol Order: See Page 70
Patrol Fragmentary Order:
Fragmentary order. The format for a FRAGO is that portion of the current OPORD that has changed. If significant changes have occurred since the last OPORD, a new OPORD should be prepared. See FRAGOs.
Organization of a Patrol
To accomplish the patrolling mission, a platoon or squad must perform specific tasks; for example, secure itself, danger area crossings, or rally points; reconnoiter the patrol objective; breach, support, or assault. As with other missions, the leader tasks elements of his platoon in accordance with his estimate of the situation. He identifies those tasks the platoon must perform and decides which elements will perform them. Where possible, in assigning tasks, the leader should maintain squad and fire team integrity. The chain of command continues to lead its elements during a patrol. The terms "element" and "team" refer to the squads, fire teams, or buddy teams that perform the tasks as described. Squads and fire teams may perform more than one task in an assigned Sequence others may perform only one task. The leader must plan carefully to ensure that he has identified and assigned all required tasks in the most efficient way. Elements and teams for platoons conducing patrols include the common and specific elements for each type of patrol. The following elements are common to all patrols.
a. Headquarters Element. The headquarters consists of the platoon leader, RATELO, platoon sergeant, FO, and FO RATELO. It may consist of any attachments that the platoon leader decides that he or the platoon sergeant must control directly.
b. Aid and Litter Team. Aid and litter teams are responsible for treating and evacuating casualties.
c. Enemy Prisoner of War Team. EPW teams are responsible for controlling enemy prisoners IAW the five S's and the leader's guidance.
d. Surveillance Team. The surveillance team keeps watch on the objective from the time that the leader's reconnaissance ends until the unit deploys for actions on the objective. They then join their element.
e. En Route Recorder. The en route recorder records all information collected during the mission.
f. Compass Man. The compass man assists in navigation by ensuring the lead fire team leader remains on course at all times. Instructions to the compass man must include an initial azimuth with subsequent azimuths provided as necessary. The compass man should preset his compass on the initial azimuth before moving out, especially if the move will be during limited visibility conditions. The platoon or squad leader should also designate an alternate compass man.
g. Pace Man. The pace man maintains an accurate pace at all times. The platoon or squad leader should designate how often the pace man is to report the pace to him. The pace man should also report the puce at the end of each leg. The leader should also designate an alternate pace man.

133
Patrolling ROE: See Page 117
Current Scenario Update: See IPB/Scenario Update; Page 44 or Page 117.
Patrol Base Activities
Patrol Base Occupation
A patrol base is established using the following steps. a. The patrol base is reconnoitered and established the same as an ORP or RRP, except that the platoon will enter at a 90-degree turn (Figure 3-22.)
NOTE: This action is METT-T dependent; if there is nothing to be gained by doing this step, then the unit does not do it (for example, flat desert terrain.
b. The platoon leader leaves a two-man OP at the turn. The platoon sergeant and the last fire team will get rid of any tracks from the turn into the patrol base.
c. The platoon moves into the patrol base as depicted in Figure 3-22. (Squads will occupy a cigar-shaped perimeter.)
d. All squad leaders move to the left flank of their squad sector.
e. The platoon leader and support element or weapons squad leader start at 6 o'clock and move in a clockwise manner adjusting the perimeter (meeting each squad leader at his squad's left flank). If the platoon leader and support element leader find a better location for one of the machine guns, they reposition it.
f. After the platoon leader has checked each squad's sector, the squad leader and another squad member report to the CP as an R&S team.
g. The platoon leader issues the three R&S teams a contingency plan and remind them that they are looking for the enemy, water, built-up areas or human habitat, roads and trails, and any possible rally points. (Squads occupying patrol base on their own do not send out R&S teams at night.)

134
h. The R&S team departs from the left flank of their squad's sector and moves out a given distance, as stated by the platoon leader in his instructions. The team moves in a clockwise direction and reenters the patrol base at the right flank of their squad's sector. The R&S team, if at all possible, should prepare a sketch of the squad's front and report to the CP.
NOTE 1: The distance the R&S team moves away from the squad's sector will vary depending on the terrain and vegetation (anywhere from 200 to 400 meters). All members of the platoon are on 100 percent alert during this time. The R&S team is of little value at night without the use of night vision devices. The RATELO must be able to establish communications with higher headquarters using a directional antenna.
NOTE 2: If the platoon leader feels that the platoon may have been tracked, he may elect to maintain 100 percent security and wait awhile in total silence before sending out the R&S teams.
i. Once all squad leaders (R&S teams) have completed their reconnaissance, they report back to the platoon leader at the CP.
j. The platoon leader gathers the information from his three R&S teams and determines if the platoon is going to be able to use the location as a patrol base.
PB Activities Defined:
If the platoon leader determines that he will be able to use the location as a patrol base, he gives the following information to his platoon sergeant and squad leaders. Platoon leader also disseminates other information such as daily challenge and password, frequencies, call signs. Squad leaders return to their squads, give out information, and begin the priorities of work as stated by the platoon leader. The patrol base must be sterilized upon departure.
a. Security. Only one point of entry and exit is used. Noise and light discipline are maintained at all times. Everyone is challenged. Squad leaders supervise the placement of aiming stakes and ensure Claymores are put out. Each squad establishes an OP and may quietly dig hasty fighting positions. Squad leaders prepare and turn in sector sketches to include range cards.
b. Alert Plan. The platoon leader states the alert posture (for example, 50 percent or 33 percent) and the stand-to time for day and night. He sets up the plan to ensure positions are checked periodically, OPs are relieved periodically, and ensure that at least one leader is up at all times.
c. Withdrawal Plan. Platoon leader designates which signal to use if contact is made (for example, colored star cluster), the order of withdrawal if forced out (for example, squads not in contact will move first), and the rendezvous point for the platoon (if the platoon is not to link up at an alternate patrol base).
d. Maintenance Plan. Platoon leader ensures that machine guns, other weapon systems, communication equipment, NVDs are not broken down at the same time for maintenance. Redistribute ammunition.
NOTE: Weapons are not disassembled at night.

135
e. Sanitation and Personal Hygiene Plan. The platoon sergeant ensures the platoon slit trench is dug and marked at night with a chemical light inside the trench. Squad leaders designate squad urine areas. All soldiers accomplish the following daily: shave; brush teeth; wash face, hands, armpits, groin, and feet; and darken (polish) boots. Soldiers ensure that no trash is left behind.
f. Mess Plan. No more than half of the platoon eats at one time.
g. Water Resupply. Platoon sergeant organizes a watering party. They carry canteens in an empty rucksack.
NOTE: Squads have the same requirements with their squad patrol base as platoons.
*The platoon should remain in single file. The platoon sergeant follows directly behind the guide so that he can count each soldier that passes through the passage point. He gives the count to the guide, tells him how long to wait at the passage point (or when to return), and confirms the running password. If the platoon makes contact after it is past the departure point, it fights through. Soldiers return to the departure point only if they become disorganized. They then reoccupy the initial rally point and the leader reports to higher headquarters.
Movement Techniques:
a. Formation. Leaders choose the formation based on their analysis of METT-T and likelihood of enemy contact.
(1) Fire team formations. All soldiers in the team must be able to see their leader.
(a) Wedge. This is the basic fire team formation; it will be used unless modified because of terrain, dense vegetation, terrain or mission.
(b) File. Used in close terrain, dense vegetation, limited visibility.
(2) Squad formations. Squad formations describe the relationships between fire teams in the squad.
(a) Column. Primary squad formation and will be used unless METT-T dictates otherwise.
(b) Line. Used when maximum fire power is needed (to the front.
(c) File. Used in close terrain, dense vegetation, or limited visibility.
(3) Platoon formations. METT-T will determine where crew-served weapons move in the formation. They normally move with the platoon leader so he can quickly establish a base of fire.
(a) Column. Primary platoon formation--used unless METT-T dictates otherwise.
(b) Platoon line, squads on line. Used when the platoon leader wants all soldiers on line for maximum firepower forward. Used when the enemy situation is known.
(c) Platoon line, squads in column. Used when the platoon leader dots not want everyone forward, but wants to be prepared for contact such as near the objective.

136
(d) Platoon Vee. Used when enemy situation is vague, but contact is expected to the front.
(e) Platoon wedge. Used when enemy situation is vague and contact is not expected.
(f) Platoon file. Used when visibility is poor due to terrain or light.
b. Movement Techniques. Leaders choose a movement technique based on their mission analysis of METT-T and likelihood of enemy contact.
(1) Traveling. Used when contact is not likely and speed is important.
(2) Traveling overwatch. Used when contact is possible but speed is important.
(3) Bounding overwatch. Used when contact is likely or imminent and speed is not important.
PART II: MISCELLANEOUS SUBJECTS TO BE REVIEWED (AS TIME PERMITS)
Basic First Aid (FM 21-75 & FM 21-11
First aid is the care and treatment you give a casualty before medical personnel arrive. Personal hygiene is the steps you take to protect your own health and that of others. Your personal-hygiene and first-aid skills could save your life or the life of a buddy.
By knowing what to do, and by getting medical help quickly, you may be able to save lives, prevent permanent disabilities, and prevent long periods of hospitalization.
The field first-aid packet issued to you should be carried at all times for personal use. It contains one or two field first-aid dressings. Use the first-aid dressings on wounds. When giving first aid to a casualty, you should use the casualty's first-aid items. You may need your own items later if you become injured.
LIFESAVING MEASURES
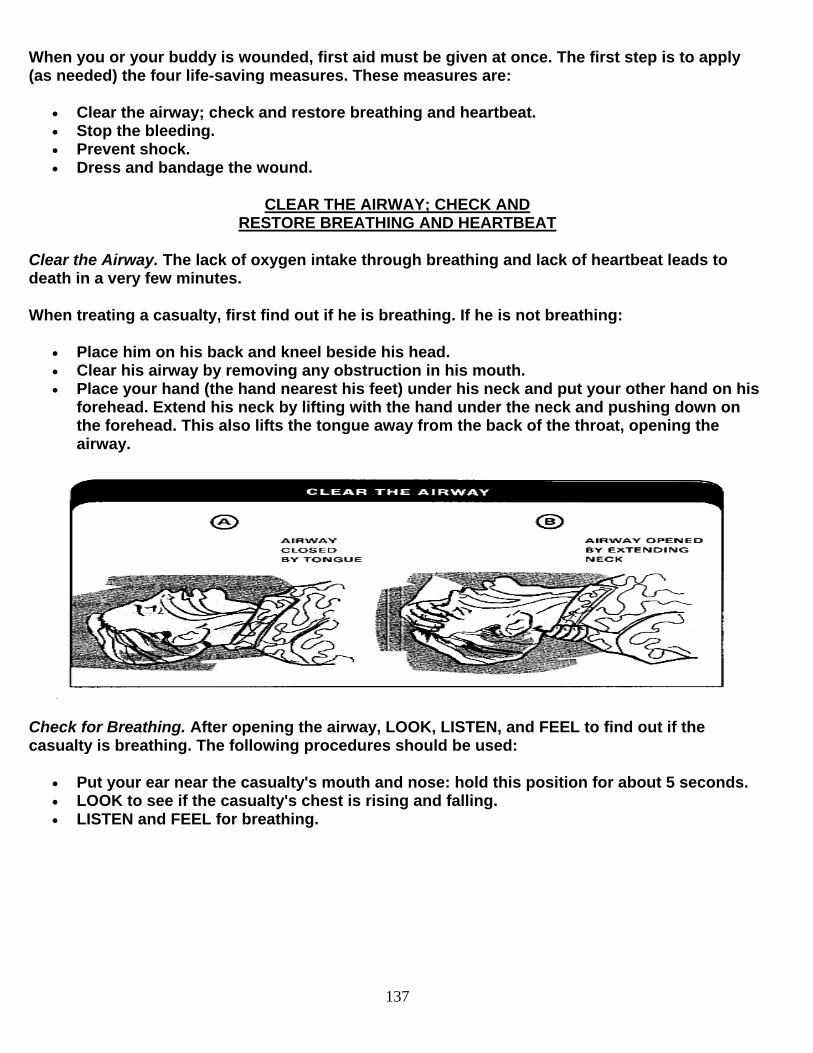
137
When you or your buddy is wounded, first aid must be given at once. The first step is to apply (as needed) the four life-saving measures. These measures are:
• Clear the airway; check and restore breathing and heartbeat. • Stop the bleeding. • Prevent shock. • Dress and bandage the wound.
CLEAR THE AIRWAY; CHECK AND RESTORE BREATHING AND HEARTBEAT
Clear the Airway. The lack of oxygen intake through breathing and lack of heartbeat leads to death in a very few minutes.
When treating a casualty, first find out if he is breathing. If he is not breathing:
• Place him on his back and kneel beside his head. • Clear his airway by removing any obstruction in his mouth. • Place your hand (the hand nearest his feet) under his neck and put your other hand on his
forehead. Extend his neck by lifting with the hand under the neck and pushing down on the forehead. This also lifts the tongue away from the back of the throat, opening the airway.
Check for Breathing. After opening the airway, LOOK, LISTEN, and FEEL to find out if the casualty is breathing. The following procedures should be used:
• Put your ear near the casualty's mouth and nose: hold this position for about 5 seconds. • LOOK to see if the casualty's chest is rising and falling. • LISTEN and FEEL for breathing.

138
Restore Breathing. IF THERE ARE NO SIGNS OF BREATHING, START MOUTH-TO-MOUTH RESUSCITATION AT ONCE. The following procedures should be used:
• Put a hand under the casualty's neck to keep the head tilted far back. • Press down on his forehead with the other hand. • Move this hand and pinch his nostrils between your thumb and index finger. • Open his mouth wide. • Take a deep breath and place your mouth over his, making an airtight seal with your lips. • Blow into his mouth. • Give four or five quick but full breaths to make sure his lungs are full. • Remove your mouth, turn your head, and LOOK, LISTEN, and FEEL for exhaled air. • Repeat this procedure once every 5 seconds until the casualty exhales.
If you feel strong resistance when you first blow air into the casualty's mouth, quickly reposition his head and try again. If the airway is still not clear, roll him onto his side. Hit him sharply between his shoulder blades with the heel of your hand to dislodge any foreign objects. If the casualty's abdomen bulges (air going into stomach), apply gentle pressure on his abdomen with one hand to force the air out. If this makes the casualty vomit, quickly turn him onto his side, clean out his mouth, and continue giving mouth-to-mouth resuscitation.

139
Check for Heartbeat. When you find an unconscious casualty, check to see if he has a heartbeat and if he is breathing. To check for heartbeat, use the following procedures:
• Tilt the casualty's head back. • Place your fingers on his throat. • Feel for the Adam's apple. • Slide the fingers down from the Adam's apple to the side of the throat. This will place the
fingertips over an artery, where the pulse can be felt.
Restore Heartbeat. You must start external heart massage quickly, as permanent damage to the brain may occur if it is deprived of oxygenated blood.
External heart massage provides artificial circulation by squeezing the heart between the breastbone and the backbone, forcing blood through the lungs, brain, and body.
To perform mouth-to-mouth resuscitation and external heart massage at the same time:
• Kneel at the casualty's side. • Blow four quick but full breaths into the casualty (as described earlier) to fill the lungs with
air (his head must be tilted back and his airway open). Locate the tip of the breastbone and measure two finger-widths up from that tip.
• Place the heel of the other hand along side the fingers. Then, put both hands together and interlace the fingers. Push downward on the chest 15 times at a rate of 80 counts per minute.
• Lean forward with the elbows locked. • That will compress the casualty's chest about 11/2 to 2 inches. Then release the pressure
on the chest. • After each 15 compressions, shift positions slightly and give him 2 quick, but full, breaths. • Continue this 15 to 2 ratio:
Until the casualty can breathe by himself and his pulse returns. Until relieved by someone. Until the casualty is dead.
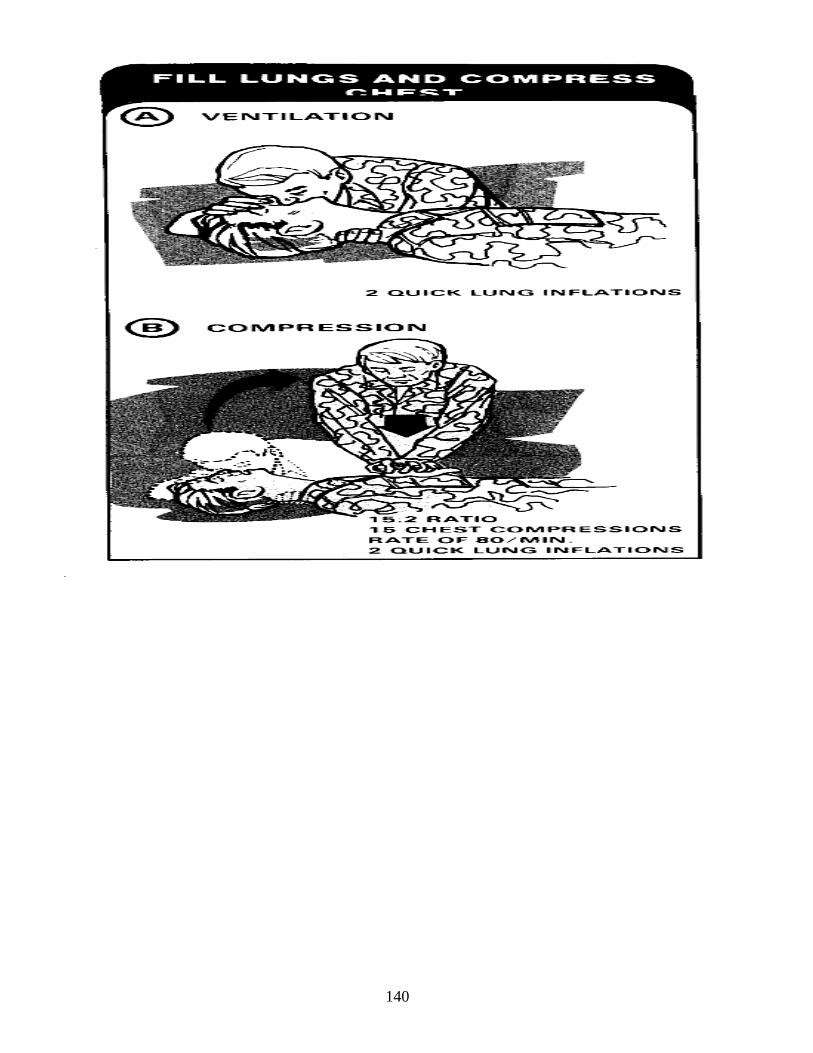
140

141
If two of you are present, one should give mouth-to-mouth resuscitation and the other should give heart massage. In that case, the procedure is slightly different. The soldier giving the heart massage should change the number of compressions from 15 at a time to 5, keeping the 80-per-minute rate. The soldier giving mouth-to-mouth resuscitation, should give 2 breaths after each 5 compressions.

142
STOP THE BLEEDING
If the casualty is breathing and his heart is beating, the next thing to do is to stop the bleeding of the wound. Before you stop the bleeding, you must find all wounds. Look for both entry and exit points by checking the front and back for wounds. This is to see that nothing is overlooked, as a bullet usually makes a smaller wound where it enters than where it exits.
After finding all wounds, stop the bleeding by using the following procedure:
• Without touching or trying to clean the wound/cut and lift the clothing away from the wound to expose it. Do not touch the wound or try to remove objects from it.
• Put a field first-aid dressing on the wound, trying not to contaminate the dressing or the wound. To put on the dressing:
Remove the dressing from its plastic envelope and twist it to break the paper wrapper.
Grasp the folded dressing with both hands (do not touch the side of the dressing that goes on the wound).
Place the dressing on the wound without letting it touch anything else. Wrap the dressing around the wound and tie the ends securely with a square knot. If
possible, tie the knot directly over the wound.
• If the bleeding continues after the dressing is secured on the wound, press the bandage for 5 to 10 minutes.
• If more pressure is needed to stop the bleeding, put a thick pad or stone on top of the dressing and tie the ends of the dressing over the pad or stone. This is called a pressure dressing.
• If the wound is in an arm or leg and the bleeding has not stopped, raise the injured limb above the level of the heart. This helps to slow down or stop the bleeding. Do not, however, raise a limb with a broken bone unless it is properly splinted.

143
• If blood is spurting from the wound, there is bleeding from an artery. To stop it, press on the point of the body where the main artery supplying the wounded area with blood is located This pressure should shut off or slow down the flow of blood from the heart to the wound until a pressure dressing can be put on it. In some cases, you may have to keep pressure on the pressure point even after the dressing is put on. The best pressure points of the body to use in stopping arterial bleeding are shown in the following illustration:
• If the wound continues to bleed after you apply pressure to a pressure point and apply a pressure dressing, use a tourniquet. This should be a LAST RESORT ONLY. Put the tourniquet between the wound and where the injured limb joins the trunk. Put it 2 to 4 inches above the wound, not over it. Never loosen or remove a tourniquet once it has been put on. If possible, mark a "T" on the casualty's fore head at the time the tourniquet is put on. Then get the casualty to an aid station quickly.

144
PREVENT SHOCK
Unless shock is prevented or treated, death may result, even though the injury would not otherwise be fatal.
Shock may result from any injury, but is more likely to result from a severe injury. Warning signs of shock are restlessness, thirst, pale skin, and rapid heartbeat. A casualty in shock may be excited or appear calm and tired. He may be sweating when his skin feels cool and clammy. As his condition worsens, he may take small, fast breaths or gasps; stare blindly into space or become blotchy or bluish around his mouth.
After giving the casualty the first two lifesaving measures, look for signs of shock. If the casualty is in shock or is about to go into shock, treat him at once for shock. To treat for shock, proceed as follows:
• Loosen the casualty's clothing at the neck, waist, and wherever it restricts circulation.

145
• Reassure the casualty by being calm and self-confident. Assure him that he will be taken care of.
• Place the casualty in a comfortable position. His position depends on his condition. If he is conscious, place him on his back with his feet raised 15 to 20 cm (6 to 8 in). If he is unconscious, place him on his side or abdomen with his head turned to the side. If he has a head wound, raise his head higher than his body. If he has a wound of the face and/or neck, set him up and lean him forward with his head down or in the position for an unconscious casualty. If he has a sucking chest wound, set him up or lay him down on the injured side. If he has an abdominal wound, lay him on his back with his head turned to the side.
• Keep the casualty warm. It may be necessary to place ponchos or blankets under and over him.
CHECK FOR FRACTURES
WARNING: Leg fractures must be splinted before elevating the legs as a first aid measure for shock.
(a) Check for the following signs and symptoms of a back or neck injury and perform first aid procedures as necessary.
• Pain or tenderness of the back or neck area. • Cuts or bruises on the back or neck area. • Inability of a casualty to move or decreased sensation to extremities
(paralysis or numbness). • Ask about ability to move (paralysis). • Touch the casualty’s arms and legs and ask whether he can feel your
hand (numbness).

146
• Unusual body or limb position.
(b) Immobilize any casualty suspected of having a back or neck injury by doing the following:
• Tell casualty no to move. • If a back injury is suspected, place padding (rolled or folded to conform
to the shape of the arch) under the natural arch of the casualty’s back. (For example, a blanket/poncho may used as padding.)
WARNING: Do no move casualty to place padding.
• If a neck injury is suspected, immediately immobilize (manually) the head and neck. Place a roll of cloth under the casualty’s neck, and put weighted boots (filled with dirt or sand) or rocks on both sides of his head.
(c) Check the casualty’s arms and legs for open or closed fractures.
• Check for open fractures by looking for – - Bleeding. - Bones sticking through the skin. - Check for pulse.
• Check for closed fractures by looking for – - Swelling. - Discoloration. - Deformity. - Unusual body position. - Check for pulse.
(d) Stop the evaluation and begin first aid measures if a fracture to an arm or leg is suspected. Refer to FM 21-11, Chapter 4 for information on splinting a suspected fracture.
(e) Check for signs/symptoms of fractures of other body areas (for example, shoulder or hip) and provide first aid as necessary.
CHECK FOR BURNS
Look carefully for reddened, blistered, or charred skin; also check for singed clothing. If burns are found, stop the evaluation and begin first aid procedures. Refer FM 21-11 on steps in treating burn injuries.
CHECK FOR POSSIBLE HEAD INJURY
(a) Look for the following signs and symptoms: • Unequal pupils. • Fluid from the ear(s), nose mouth, or injury site. • Slurred speech. • Confusion. • Sleepiness.
147
• Loss of memory or consciousness. • Staggering in walking. • Headache. • Dizziness. • Nausea or vomiting. • Paralysis. • Convulsions or twitches. • Bruising around the eyes and behind the ears.
(b) If a head injury is suspected, continue to watch for signs which would require performance of rescue breathing, first aid measures for shock, or control of bleeding; seek medical aid. Refer to FM 21-11 for information on first aid measures for head injuries.
DOs AND DON'Ts OF FIRST AID
When giving first aid to a casualty, remember the following:
• DO act promptly but calmly. • DO reassure the casualty and gently examine him to determine the needed first aid. • DO give lifesaving measures as required. • DON'T position a soldier on his back if he is unconscious or has a wound on his face or
neck. • DON'T remove clothing from an injured soldier by pulling or tearing it off. • DON'T touch or try to clean dirty wounds, including burns. • DON'T remove dressings and bandages once they have been put on a wound. • DON'T loosen a tourniquet once it has been applied. • DON'T move a casualty who has a fracture until it has been properly splinted, unless it is
absolutely necessary. • DON'T give fluids by mouth to a casualty who is unconscious, nauseated, or vomiting, or
who has an abdominal or neck wound. • DON'T permit the head of a casualty with a head injury to be lower than his body. • DON'T try to push protruding intestines or brain tissue back into a wound. • DON'T put any medication on a burn. • DON'T administer first-aid measures which are unnecessary or beyond your ability. • DON'T fail to replace items used from the first-aid case.
UXO Familiarization and Reporting FM 21-16, CH 2
RECOGNIZE UXO Being able to recognize a UXO is the first and most important step in reacting to a UXO hazard. There is a multitude of ordnance used throughout the world, and it comes in all shapes and sizes. This chapter explains and shows the general identifying features of the different types of ordnance, both foreign and US. In this chapter, ordnance is divided into four main types: dropped, projected, thrown, and placed.
DROPPED ORDNANCE
148
Regardless of its type or purpose, dropped ordnance is dispensed or dropped from an aircraft. Dropped ordnance is divided into three subgroups: bombs; dispensers, which contain munitions; and sub munitions. Photographs of dropped ordnances and their net explosive weights (NEWs) are in Appendix B, FM 21-16.
BOMBS
General-purpose bombs come in many shapes and sizes depending on the country that made them and how they are to be used. Generally, all of these bombs are built the same and consist of a metal container, a fuse, and a stabilizing device. The metal container (called the bomb body) holds explosive or chemical filler. The body may be in one piece or in multiple pieces.
Chemical-agent filled bombs are built the same as general-purpose bombs. They have chemical filler in place of explosive filler. The color codes and markings shown in Appendix A, FM 21-16 may be used to identify chemical bombs. For example, the US and North Atlantic Treaty Organization (NATO) color code for chemical munitions is a gray background with a dark green band. The former Soviet Union used the same bombs and added a combination of green, red, and blue markings to the nose and tail sections to indicate chemical agents. Soviet bombs all have a gray background. See Appendix A, FM 21-16.
DISPENSERS
Dispensers may be classified as another type of dropped ordnance. Like bombs, they are carried by aircraft. Their payload, however, is smaller ordnance called sub munitions. Dispensers come in a variety of shapes and sizes depending on the payload inside. Some dispensers are reusable, and some are one-time-use items. Never approach a dispenser or any part of a dispenser you find on the battlefield. The payload of sub munitions always scatters in the area where the dispenser hit the ground.
Dropped Dispensers
These dispensers fall away from the aircraft and are stabilized in flight by fin assemblies. Dropped dispensers may be in one piece or in multiple pieces. All dropped dispensers use either mechanical time or proximity fusing. These fuses allow the payload to be dispersed at a predetermined height above the target. Multiple-piece dispensers open up and disperse their payload when the fuse functions. Single-piece dispensers eject their payload out of ports or holes in the body when the fuse functions.
Attached Dispensers
These dispensers stay attached to the aircraft and can be reloaded and used again. Their payload is dispersed out the rear or from the bottom of the dispenser.
SUBMUNITIONS
Sub munitions are classified as bomblets, grenades, or mines. They are small explosive-filled or chemical-filled items designed for saturation coverage of a large area. They may be antipersonnel (APERS), antimateriel (AMAT), antitank (AT), dual-purpose (DP), incendiary, or chemical. Sub munitions may be spread by dispensers, missiles, rockets, or projectiles. Each of these delivery systems disperses its payload of sub munitions while still in flight, and the sub

149
munitions drop over the target. On the battlefield, sub munitions are widely used in both offensive and defensive missions.
Sub munitions are used to destroy an enemy in place (impact) or to slow or prevent enemy movement away from or through an area (area denial). Impact sub munitions go off when they hit the ground. Area-denial sub munitions, including FASCAM, have a limited active life and self-destruct after their active life has expired.
The major difference between scatterable mines and placed mines is that the scatterable mines land on the surface and can be seen. Placed mines may be hidden or buried under the ground and usually cannot be seen.
The ball-type sub munitions APERS. They are very small and are delivered on known concentrations of enemy personnel, which are designed to be scattered across an area. Like a land mine, it will not blow up until pressure is put on it.
APERS submunition can be delivered by aircraft or by artillery. When it hits the ground, a small fragmentation ball shoots up and detonates about 6 feet above the ground. These sub munitions are known as area-denial APERS sub munitions (FASCAM). These sub munitions are delivered into areas for use as mines. When they hit the ground, trip wires kick out up to 20 feet from the mine. All area-denial sub munitions use antidisturbance fusing with self-destruct fusing as a backup. The self-destruct time can vary from a couple of hours to as long as several days.
The DP submunition has a shaped charge for penetrating hard targets but is also used against personnel. These sub munitions are delivered by artillery or rockets. The arming ribbon serves two purposes: it not only arms the fuse as the submunition comes down, but it also stabilizes the submunition so that it hits the target straight on.
The AMAT and/or AT sub munitions are designed to destroy hard targets such as vehicles and equipment. They are dispersed from an aircraft-dropped dispenser and function when they hit a target or the ground. Drogue parachutes stabilize these sub munitions in flight so they hit their targets straight on. The sub munitions are also used to destroy hard targets such as vehicles and equipment. The only difference is that the fin assembly stabilizes the submunition instead of the drogue parachute.
AT area-denial sub munitions can be delivered by aircraft, artillery, and even some engineer vehicles. These FASCAMs all have magnetic fusing. They will function when they receive a signal from metallic objects. These sub munitions, similar to the APERS area-denial sub munitions have antidisturbance and self-destruct fusing. AT and APERS area-denial mines are usually found deployed together.
PROJECTED ORDNANCE
All projected ordnance is fired from some type of launcher or gun tube. Projected ordnance falls into the following five subgroups:
• Projectiles. • Mortars. • Rockets. • Guided missiles. • Rifle grenades.

150
PROJECTILES
Projectiles range from 20 millimeters to 16 inches in diameter and from 2 inches to 4 feet in length. They can be filled with explosives, chemicals (to include riot-control agents such as CS), white phosphorus (WP), illumination flares, or sub munitions. Projectile bodies can be one piece of metal or multiple sections fastened together.
Projectiles, like bombs, can have impact or proximity fusing. They can also be fuzzed with time-delay fusing that functions at a preset time after firing. For safety reasons, all projectiles should be considered as having proximity fusing. Getting too close to proximity fusing will cause the fuse to function, and the projectile will blow up. Depending on the type of filler and the design of the projectile, the fuse can be in the nose, or in the base.
There are two ways projectiles are stabilized, by spin or fin. Spin-stabilized projectiles use rotating bands near the rear section to stabilize the projectile. Riding along the internal lands and grooves of the gun tube, these bands create a stabilizing spin as the projectile is fired. Fin-stabilized projectiles may have either fixed fins or folding fins. Folding fins unfold after the projectile leaves the gun tube to stabilize the projectile.
MORTARS
Mortars range from 45 millimeters to 280 millimeters in diameter. Like projectiles, mortar shells can be filled with explosives, toxic chemicals, WP, or illumination flares. Mortars generally have thinner metal bodies than projectiles but use the same kind of fusing. Like projectiles, mortars are stabilized in flight by fin or spin. Most mortars are fin stabilized. Other mortars are spin stabilized.
ROCKETS
A rocket may be defined as a self-propelled projectile. Unlike guided missiles, rockets cannot be controlled in flight. Rockets range in diameter from 37 millimeters to over 380 millimeters. They can range in length from 1 foot to over 9 feet. There is no standard shape or size to rockets. All rockets consist of a warhead section, a motor section, and a fuse. They are stabilized in flight by fins, or canted nozzles, that are attached to the motor.
The warhead is the portion of the rocket that produces the desired effect. It can be filled with explosives, toxic chemicals, WP, sub munitions, CS, or illumination flares. The motor propels the rocket to the target. The fuse is the component that initiates the desired effect at the desired time. Rockets use the same type of fusing as projectiles and mortars. The fuse may be located in the nose or internally between the warhead and the motor.
Rockets can be launched or fired from individual weapons (such as the light antitank weapon system), aircraft, mobile-launch vehicles, or stationary launch pads.
Some rockets are spin stabilized. Unlike projectiles and mortars, these rockets do not have rotating bands. Instead their motor nozzles are slanted to produce the spin. The presence of motor nozzles, or venturies, in the rear of the rocket motor can be used for positive identification purposes for this type of ordnance. Generally, the rocket motor will not create an additional hazard, because the motor is usually burned out shortly after the rocket leaves the launcher.

151
GUIDED MISSILES
Guided missiles are like rockets in that they consist of the same parts. The difference is that the missiles are guided to their target by various guidance systems. Some of the smaller missiles, such as the tube-launched, optically tracked, wire-guided (TOW) and Dragon missiles are wire-guided by the gunner to their targets.
Larger missiles, such as the phased-array tracking radar intercept on target (PATRIOT) and the Sparrow are guided by radar to their target. The radar may be internal to the missile, like the PATRIOT, or external, like the Sparrow, which uses the airplane’s radar system. Guided missiles are usually stabilized in flight by fins that are controlled by internal electronics. Guided missiles use internal, proximity fusing. Therefore, do not approach any guided missile you find lying on the battlefield.
RIFLE GRENADES
Rifle grenades look like mortars and are fired from a rifle that is equipped with a grenade launcher or an adapter. Many countries use rifle grenades as an infantry direct-fire weapon. Some rifle grenades are propelled by specially designed blank cartridges, while others are propelled by standard ball cartridges. Rifle grenades may be filled with high explosives (HEs), WP, CS, illumination flares, or colored screening smoke. They range in size from the small APERS rifle grenade to the larger AT rifle grenade. APERS rifle grenades use impact fusing. Some rifle grenades, such as the AT, have internal fusing behind the warhead. This type of fusing still functions on impact with the target.
THROWN ORDNANCE
Thrown ordnance, commonly known as hand grenades, can be classified by use as follows:
• Fragmentation (also called defensive). • Offensive. • Antitank. • Smoke. • Illumination.
Hand grenades are small items that may be held in one hand and thrown. All grenades have three main parts: a body, a fuse with a pull ring and safety clip assembly, and a filler. Never pick up a grenade you find on the battlefield, even if the spoon and safety pin are still attached. All grenades found lying on a battlefield should be considered booby-trapped.
FRAGMENTATION GRENADES
Fragmentation grenades are the most common type of grenade and may be used as offensive or defensive weapons. They have metal or plastic bodies that hold explosive filler. These grenades produce casualties by high-velocity projection of fragments when they blow up. The fragmentation comes from the metal body or a metal fragmentation sleeve that can be internal or attached to the outside of the grenade. These grenades use a burning delay fuse that functions 3 to 5 seconds after the safety lever is released.

152
OFFENSIVE GRENADES
Offensive grenades have a plastic or a cardboard body. They are not designed to have a lot of fragmentation. Their damage is caused from the over pressure of the explosive blast. These grenades use a burning-delay fuse that functions 3 to 5 seconds after the safety lever is released.
ANTITANK GRENADES
AT grenades are designed to be thrown at tanks and other armored vehicles. They have a shaped-charge explosive warhead and are stabilized in flight by a spring-deployed parachute or a cloth streamer. These grenades use impact fusing.
SMOKE GRENADES
There are two types of smoke grenades: bursting and burning. They may be made of rubber, metal, or plastic. Bursting-type smoke grenades are filled with WP and blow up when the fuse functions. These grenades use a burning delay fuse that functions 3 to 5 seconds after the safety lever is released. Burning-type smoke grenades produce colored smoke. This type of grenade uses an instant-action fuse. There is no delay once the spoon is released. This is the same type of grenade that is used to dispense riot-control agents (such as CS).
ILLUMINATION GRENADES
Illumination grenades are used for illuminating, signaling, and as an incendiary agent. The metal body breaks apart after the fuse functions and dispenses an illumination flare. This type of grenade uses a burning-delay fuse that functions 3 to 5 seconds after the safety lever is released.
PLACED ORDNANCE
Placed ordnance is commonly referred to as land mines. Land mines may be hidden or buried under the ground and may be classified as APERS or AT. Visual detection of land mines may be difficult at best. If you come to a suspected minefield, report it as a minefield to your commander. All combat arms personnel report a minefield on an obstacle report. For further information and procedures for reporting land mines refer to FM 20-32.
ANTIPERSONNEL MINES
APERS mines are generally small and come in different shapes and sizes. Some APERS mines are even made of wood, for example. Some APERS mines are designed to function when stepped on. Other APERS mines are designed for use as booby traps. These mines are set up to function by using a trip wire laid out across a path or road. When the trip wire is pulled or cut, the fuse functions. Some APERS mines, such as the US claymore mine, may be set up to function by command detonation.
ANTITANK MINES
AT mines are much larger than APERS mines and usually have pressure or tilt-rod fusing. However, some AT mines also use magnetic-sensitive fusing. Some of the more modern AT

153
mines have plastic bodies, which make them hard to detect with a metallic mine detector. The variety of AT mines all function by direct pressure from a tank or vehicle. These mines use a tilt-rod fuse that sticks out of the ground. When the rod is moved or pushed over, the mine blows up.
FM 21-16, CH 3
TAKE IMMEDIATE ACTION All UXOs found on the battlefield affect maneuver and mission capabilities. When you find a UXO, you must make some immediate decisions. These decisions will depend on your current mission, the size and location of the UXO, and your unit’s capabilities. This information is also in GTA 9-12-1, which is available at your local TASC.
If at all possible, avoiding/bypassing the UXO hazard is the safest option to take for personnel and equipment. If the UXO hazard is left from a recent enemy attack, you must consider protecting your personnel and equipment by extracting them from the area before another attack is targeted on you. See Chapter 5, FM 21-16 for extraction procedures.
If the mission cannot be accomplished due to the presence of the UXO and the hazard cannot be avoided/bypassed, protective measures must be taken to reduce the hazard to personnel and equipment.
Regardless of the option you choose, the location of the UXO must be clearly marked with UXO markers and the hazard reported to your next higher headquarters. See Chapter 4, FM 21-16 for procedures on reporting a UXO hazard.
PROTECTIVE MEASURES
There are three methods you can use to protect personnel and equipment. You can evacuate, isolate, or barricade them.
EVACUATE
Evacuation of all nonessential personnel and equipment is the best protective measure. The evacuation distances given in Figure 3-2 provide a reasonable degree of safety for unprotected personnel and equipment. These distances are based on your estimate of the amount of

154
explosive filler in the UXO. If protective barricades are used around the UXO, these distances can be reduced.
The general rule for estimating the amount of explosive in an ordnance item is as follows: Assume that 50 percent of the total ordnance weight equals the NEW. For example, a 500-pound bomb would be calculated to have 250 pounds of explosive. According to Figure 3-2, the safe distance for unprotected personnel is 625 meters. After all personnel and equipment are evacuated, movement within the area should be kept to essential operations only. If equipment cannot be evacuated, only mission-essential personnel should be allowed in the area. The equipment should be protected by barricades and personnel should wear all protective equipment.
ISOLATE
Sometimes, for mission-related, operational, or other reasons, you cannot evacuate personnel and/or equipment or you cannot leave a particular area. When this happens, you must isolate either your assets (personnel, equipment, and operations) from the UXO or isolate the UXO from your assets.
BARRICADE
If your unit is stationary, evacuate all nonessential personnel and equipment out of the hazard area. Equipment that cannot be moved must be protected with barricades. Personnel who cannot be evacuated from the area must also be protected from the hazard. You can do this by reinforcing the fighting positions on the side facing the hazard and by adding overhead cover.
A barricade is an artificial barrier that provides limited protection by channeling the blast and fragmentation from the threatened area. Barricades may also be used to lessen the effect of the blast and to reduce the size of the evacuation area. When determining if barricades are needed, you must estimate the probable damage that would result if the UXO were to explode. Building artificial barricades is very time consuming and requires a large number of sandbags. Depending
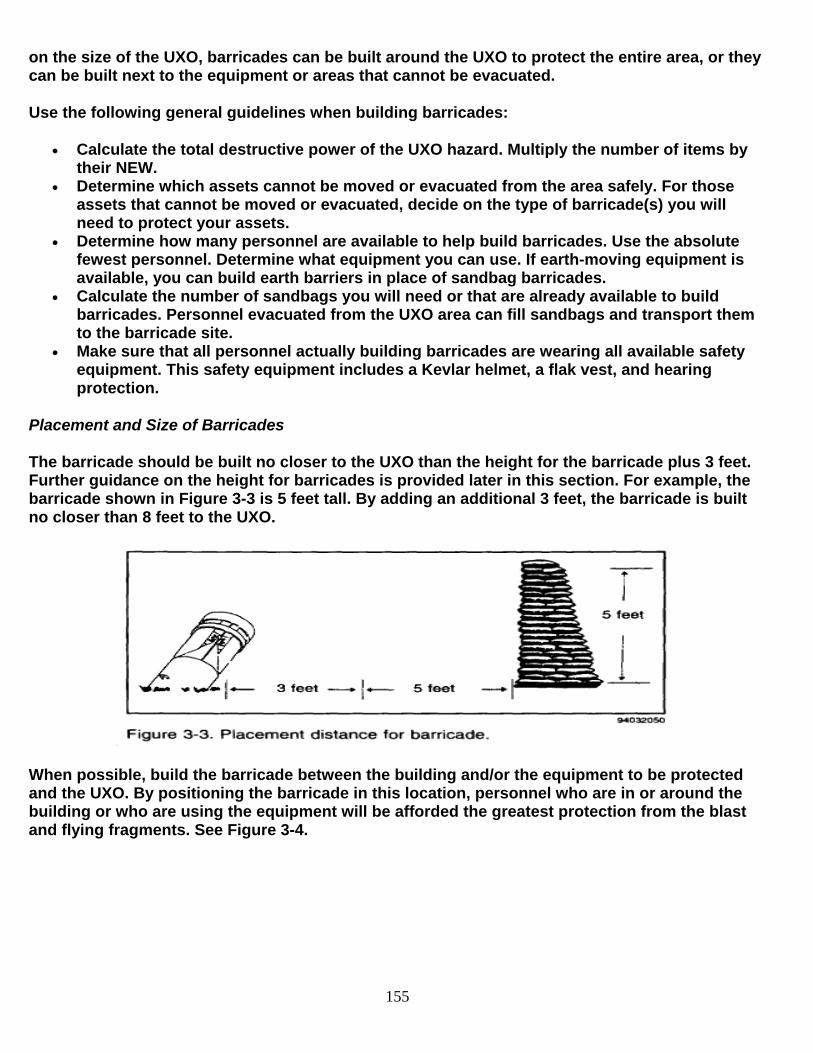
155
on the size of the UXO, barricades can be built around the UXO to protect the entire area, or they can be built next to the equipment or areas that cannot be evacuated.
Use the following general guidelines when building barricades:
• Calculate the total destructive power of the UXO hazard. Multiply the number of items by their NEW.
• Determine which assets cannot be moved or evacuated from the area safely. For those assets that cannot be moved or evacuated, decide on the type of barricade(s) you will need to protect your assets.
• Determine how many personnel are available to help build barricades. Use the absolute fewest personnel. Determine what equipment you can use. If earth-moving equipment is available, you can build earth barriers in place of sandbag barricades.
• Calculate the number of sandbags you will need or that are already available to build barricades. Personnel evacuated from the UXO area can fill sandbags and transport them to the barricade site.
• Make sure that all personnel actually building barricades are wearing all available safety equipment. This safety equipment includes a Kevlar helmet, a flak vest, and hearing protection.
Placement and Size of Barricades
The barricade should be built no closer to the UXO than the height for the barricade plus 3 feet. Further guidance on the height for barricades is provided later in this section. For example, the barricade shown in Figure 3-3 is 5 feet tall. By adding an additional 3 feet, the barricade is built no closer than 8 feet to the UXO.
When possible, build the barricade between the building and/or the equipment to be protected and the UXO. By positioning the barricade in this location, personnel who are in or around the building or who are using the equipment will be afforded the greatest protection from the blast and flying fragments. See Figure 3-4.

156
When building a barricade, the sandbags must be interlocked for stability. See Figure 3-5. Sandbags that are not interlocked will reduce protection and make the barricade unstable.
Small UXO. For small UXOs such as missiles and rockets less than 70 millimeters in diameter, for projectiles less than 75 millimeters in diameter, and for sub munitions and grenades, a double wall thickness of sandbags should surround the area of the UXO. The sandbags must be stacked to a height of at least 3 feet and should be thick enough to protect personnel and equipment from the blast and fragmentation. This type of barricade may be semicircular or circular. Types of barricades are discussed later in this section.
Medium UXO. For medium-sized UXOs such as missiles, rockets, and projectiles up to 200 millimeters in diameter, and for large-sized placed munitions on the surface, a four-or five-wall thickness of sandbags should surround the area. The sandbags must be stacked to a height of at least 5 feet in order to protect assets. This type of barricade is usually semicircular.
Large UXO. Large UXOs such as projectiles, missiles, and general-purpose bombs are too large for effective barricades to be built around them. In these cases, equipment and personnel activity areas would need to be barricaded. A wall barricade between the affected area and the UXO hazard provides the best and easiest protection.

157
Barricade Types
The three types of barricades are circular, semicircular, and wall. The type barricade that you use will depend on the UXO hazard and the area that requires protection.
Circular. A circular barricade is the best choice for small UXO hazards, because it provides complete protection for personnel and equipment. A circular barricade that is 8 feet in diameter, 3 feet tall and 3 sandbags thick would require approximately 400 sandbags.
Semicircular. A semicircular barricade is used for small- and medium-sized UXO hazards. It will channel the blast and fragmentation through the open side and away from the protected area.
Wall. The wall barricade protects specific equipment or personnel areas. It is used when the UXO hazard is too large to contain by using a circular or semicircular barricade. The number of wall barricades you need will depend on how much equipment or how many personnel you must protect. A wall barricade that is 12 feet long, 6 feet high and 3 sandbags thick would require 700 sandbags. The barricade should extend beyond and be at least as tall as the equipment or personnel areas to be protected. Equipment that is barricaded must still be usable. The radar must be exposed in order to function.
MARK UXO
Marking a UXO hazard is just as important as marking other hazard areas such as NBC areas, minefields, and booby-trapped areas. All of these hazards are marked by using triangular signs, if readily available, that by their background color indicate the danger involved. The standard UXO marker is shown in Figure 3-9. The background is red with a white bomb inset. It has the same dimensions as the other markers.
The UXO marker is placed above ground at waist level (about 3 feet) with the bomb pointing down as shown in Figure 3-10. The marker should be placed no closer to the hazard than the point where you first recognized the UXO hazard. The marker should be attached to a stake (Figure 3-10), a tree, or other suitable holder. Just be sure that the marker is clearly visible.

158
You should also mark all logical approach routes to the area. If the hazard is near a road, as a minimum, put a marker on each side of the road approaching the UXO. If there is a large concentration of UXO hazards such as sub munitions, mark the area as you would a scatterable minefield, with markers placed about every 15 meters around the area. Refer to FM 20-32 for additional information on marking minefields.
As a general rule, the UXO hazard itself must be easily seen from any of the markers. This helps to keep others away from the hazard. It also helps the EOD team to find the hazard.
If standard UXO markers are not available, you may use other suitable materials (such as engineer tape or colored ribbons). Ensure that the same color is used to avoid confusion. When using other materials, the same principles used for the standard markers apply for placement of the makeshift markers. That is, they should be placed about 3 feet off the ground and easily seen from all approach routes. See Figure 3-11.

159
FM 21-16, CH 4
REPORT THE UXO HAZARD UXO hazards on the battlefield have an enormous affect on command and control decisions for battle planning. The location of these hazards is vital to the command and control elements when projecting movement and support of combat units. UXO hazards also have a direct impact on the combat capabilities of any element that encounters them. To assist commanders, an effective UXO reporting system must be in place and maintained to allow commanders to concentrate EOD and engineer assets according to priorities and battle plans.
UXO SPOT REPORT
The UXO spot report is a detailed, swift, two-way reporting system that makes clear where the UXO hazard areas are, what their priorities are, and which units are affected by them. The report is used to request help in handling a UXO hazard that is beyond a unit’s ability to handle and that affects the unit’s mission. This report helps the commander set priorities based on the battlefield situation.
The UXO spot report is the first-echelon report that is sent when a UXO is encountered. Information about this report is also found in GTA 9-12-1 and in the supplemental information section of the signal operating instructions (SOI), where it is just behind the request for medical evacuation (MEDEVAC). The report consists of nine lines. The information must be sent by the fastest means available and the required information provided in the following order:
Line 1. Date-Time Group: DTG item was discovered.
Line 2. Reporting Activity (unit identification code [UIC]) and location (grid of UXO).
Line 3. Contact Method: Radio frequency, call sign, point of contact (POC), and telephone number.
Line 4. Type of Ordnance: Dropped, projected, placed, or thrown. If available, supply the subgroup. Give the number of items, if more than one.
Line 5. NBC Contamination: Be as specific as possible.
Line 6. Resources Threatened: Report any equipment, facilities, or other assets that are threatened.
Line 7. Impact on Mission: Provide a short description of your current tactical situation and how the presence of the UXO affects your status.
Line 8. Protective Measures: Describe any measures you have taken to protect personnel and equipment.
Line 9. Recommended Priority: Recommend a priority for response by EOD technicians or engineers.

160
Priority Basis
Immediate Stops the unit’s maneuver and mission capability or threatens critical assets vital to the mission.
Indirect Slows the unit’s maneuver and mission capability or threatens critical assets important to the mission.
Minor Reduces the unit’s maneuver and mission capability or threatens non-critical assets of value.
No Threat Has little or no affect on the unit’s capabilities or assets.
US Weapons Data
M16A2 Equipment Information
Primary function: Infantry weapon Manufacturer: Colt Manufacturing and Fabrique Nationale Manufacturing Inc. Length: 39.63 inches (100.66 centimeters) Weight, with 30 round magazine: 8.79 pounds (3.99 kilograms) Bore diameter: 5.56mm (.233 inches) Maximum effective range: Area target: 2,624.8 feet (800 meters) Point target: 1,804.5 feet (550 meters) Muzzle velocity: 2,800 feet (853 meters) per second Rate of fire: Cyclic: 800 rounds per minute Sustained: 12-15 rounds per minute Semiautomatic: 45 rounds per minute Burst: 90 rounds per minute

161
Magazine capacity: 30 rounds
Features: The M16A2 5.56mm rifle is a lightweight, air-cooled, gas-operated, magazine-fed, shoulder- or hip-fired weapon designed for either automatic fire (3-round bursts) or semiautomatic fire (single shot) through the use of a selector lever. The weapon has a fully adjustable rear sight. The bottom of the trigger guard opens to provide access to the trigger while wearing winter mittens. The upper receiver/barrel assembly has a fully adjustable rear sight and a compensator which helps keep the muzzle down during firing. The steel bolt group and barrel extension are designed with locking lugs which lock the bolt group to the barrel extension allowing the rifle to have a lightweight aluminum receiver.
M4 Carbine Equipment Information
Used to deter, and if necessary, compel adversaries by enabling individuals and small units to engage targets with accurate, lethal, direct fire.
A compact version of the M16A2 rifle, with a collapsible stock, a flat-top upper receiver accessory rail and a detachable handle/rear aperture site assembly. The M4 enables a soldier operating in close quarters to engage targets at extended range with accurate, lethal fire. It achieves more than 85 percent commonality with the M16A2 rifle and will replace all .45 caliber M3 submachine guns, selected M9 pistols, and M16 series rifles.
Caliber: 5.56 mm
Weight: 7.5 lbs (loaded weight with sling & one magazine)
Max Effective Range: 600 m (area target) 500 m (point target)

162
M249 Equipment Information
Primary function: Hand-held combat machine gun Manufacturer: Fabrique Nationale Manufacturing, Inc. Length: 40.87 inches (103.81 centimeters) Weight: With bipod and tools: 15.16 pounds (6.88 kilograms) 200-round box magazine: 6.92 pounds (3.14 kilograms) 30-round magazine: 1.07 pounds (.49 kilograms) Bore diameter: 5.56mm (.233 inches) Maximum effective range: 3281 feet (1000 meters) for an area target Maximum range: 2.23 miles (3.6 kilometers) Rates of fire: Cyclic: 725 rounds per minute Sustained: 85 rounds per minute
Features: The Squad Automatic Weapon (SAW), or 5.56mm M249 is an individually portable, gas operated, magazine or disintegrating metallic link-belt fed, light machine gun with fixed headspace and quick change barrel feature. The M249 engages point targets out to 800 meters, firing the improved NATO standard 5.56mm cartridge. The SAW forms the basis of firepower for the fire team. The gunner has the option of using 30-round M16 magazines or linked ammunition from pre-loaded 200-round plastic magazines. The gunner's basic load is 600 rounds of linked ammunition.

163
M203 Equipment Information
Weight: Launcher: 3 pounds (1.36 kilograms) Rifle (M16A2): 8.79 pounds (3.99 kg) Total (including 30 rounds): 11.79 pounds (5.35 kg) Bore diameter: 40mm Maximum effective range: Area target: 1148.35 feet (350 meters) Point target: 492.15 feet (150 meters) Maximum range: 1312.4 feet (400 meters) Minimum safe range: Training: 426.53 feet (130 meters) Combat: 101.71 feet (31 meters) Unit Replacement Cost: $601
Features: The M203 40mm Grenade Launcher is used while attached to an M16A2 5.56mm rifle. It is a lightweight, compact, breech loading, pump action, single shot launcher. The launcher consists of a hand guard and sight assembly with an adjustable metallic folding, short-range blade sight assembly, and an aluminum receiver assembly which houses the barrel latch, barrel stop and firing mechanism. The launcher is capable of firing a variety of low velocity 40mm ammunition. The launcher also has a quadrant sight which may be attached to the M16A2 carrying handle and is used when precision is required out to the maximum effective range of the weapon.

164
M9 Equipment Information
Primary function: Semiautomatic pistol Builder: Beretta and Beretta USA Length: 8.54 inches (21.69 centimeters) Width: 1.50 inches (3.81 centimeters) Height: 5.51 inches (14 centimeters) Barrel length: 4.92 inches (12.5 centimeters) Weight fully loaded: 2.55 pounds (1.16 kilograms) Bore diameter: 9mm (approximately .355 inches) Maximum effective range: 152.5 feet (50 meters) Magazine capacity: 15 rounds Muzzle velocity: 1200 feet (365 meters) per second Unit Replacement Cost: $263
Features: The M9 is a light weight, semiautomatic pistol manufactured by Beretta and designed to replace the M1911A1 .45 caliber pistol and .38 caliber revolvers. The M9 has redundant automatic safety features to help prevent unintentional discharges. It can be fired in either double or single action mode and can be unloaded without activating the trigger while the safety is in the "on" position. The M9 pistol has a 15-round magazine, and may be fired without a magazine inserted. This weapon can have the hammer lowered from the cocked, "ready to fire," position to the uncocked position without activating the trigger by placing the thumb safety on the "on" position.

165
M240B Equipment Information
Manufacturer: Fabrique Nationale Manufacturing, Inc. Length: 47.5 inches (120.65 centimeters) Weight: 24.2 pounds (10.99 kilograms) Bore diameter: 7.62mm (.308 inches) Maximum effective range: 1.1 miles (1.8 kilometers) on tripod mount Maximum range: 2.31 miles (3.725 kilometers) Rates of fire: Cyclic: 650-950 rounds per minute Rapid: 200 rounds per minute Sustained: 100 rounds per minute
The M240D 7.62mm machine gun is a left hand feed, gas operated, air cooled, fixed head space weapon. The M240D has two possible configurations: aircraft and egress (ground). In the aircraft configuration the M240D has a front and rear sight and a trigger group which accommodates the spade grip device. The ground configuration involves the installation of an Egress Package which is designed to provide downed aircrew personnel with increased fire power. The Egress Package contains a buttstock assembly, a buffer assembly, a bipod assembly, and a conventional trigger assembly. The M240D is issued for aircraft configuration. The barrel assembly contains a three position gas plug. The first gas plug position allows the weapon to cycle at 750 shots-per-minute (SPM). The two remaining ports increase the SPM by 100 each (I.E., gas port position 2 = 850 SPM; gas port position 3 = 950 SPM). The aircraft configured M240D weighs 25.6 lb. and is 42.3 inches long. The egress configuration weighs 26.2 lb. and is 49.0 inches long.

166
AT4 Equipment Information
Primary function: Light anti-armor weapon Manufacturer: FFV Ordnance, Sweden and Alliant Techsystems Length: 40 inches (101.6 centimeters) Weight: 14.75 pounds (6.7 kilograms) Bore diameter: 84mm Maximum effective range: 984.3 feet (300 meters) Penetration: 400 mm of rolled homogenous armor Time of Flight (to 250 meters): less than 1 second Muzzle velocity: 950 feet (285 meters) per second Operating temperature: -104 to +140° F (-40 to +60° C) Ammunition: Rocket with shaped charge warhead Unit Replacement Cost: $1,480.64
Features: The AT-4 is a Swedish-manufactured, shoulder-launched anti-armor weapon designed to defeat modern threat main battle tanks.

167
M18A1 Claymore Mine Equipment Information
• Present Status: Fielded • Arming: Manual • Safe Arm Time: N/A • Fuzing: Command • Warhead: Directional Fragmentation • Sensing Width: N/A • Anti-Handling Device: No • Self-Destruct: No • Explosive Weight: 1.5 lb • Mine Weight: 3.5 lb • Mines Per 5T Dump: 1,782
The M18 Claymore, a directional fragmentation mine, is 8-1/2 inches long, 1-3/8 inches wide, 3-1/4 inches high, and weighs 3-1/2 pounds. The mine contains 700 steel spheres (10.5 grains) and 1-1/2 pound layer of composition C-4 explosive and is initiated by a No. 2 electric blasting cap. The M18 command-detonated mine may be employed with obstacles or on the approaches,

168
forward edges, flanks and rear edges of protective minefields as close-in protection against a dismounted Infantry attack.
M2 Equipment Information
Builder: Saco Defense Length: 61.42 inches (156 centimeters) Weight: Gun: 84 pounds (38 kilograms) M3 Tripod (Complete): 44 pounds (19.98 kilograms) Total: 128 pounds (58 kilograms) Bore diameter: .50 inches (12.7mm) Maximum effective range: 2000 meters with tripod mount Maximum range: 4.22 miles (6.8 kilometers) Cyclic rate of fire: 550 rounds per minute Unit Replacement Cost: $14,002
Features: The Browning M2 .50 Caliber Machine Gun, Heavy barrel is an automatic, recoil operated, air-cooled machine gun with adjustable headspace and is crew transportable with limited amounts of ammunition over short distances. By repositioning some of the component parts, ammunition may be fed from either the left or right side. A disintegrating metallic link-belt is used to feed the ammunition into the weapon. This gun is has a back plate with spade grips, trigger, and bolt latch release. This gun may be mounted on ground mounts and most vehicles as an anti-personnel and anti-aircraft weapon. The gun is equipped with leaf-type rear sight, flash suppressor and a spare barrel assembly. Associated components are the M63 antiaircraft mount and the M3 tripod mount.
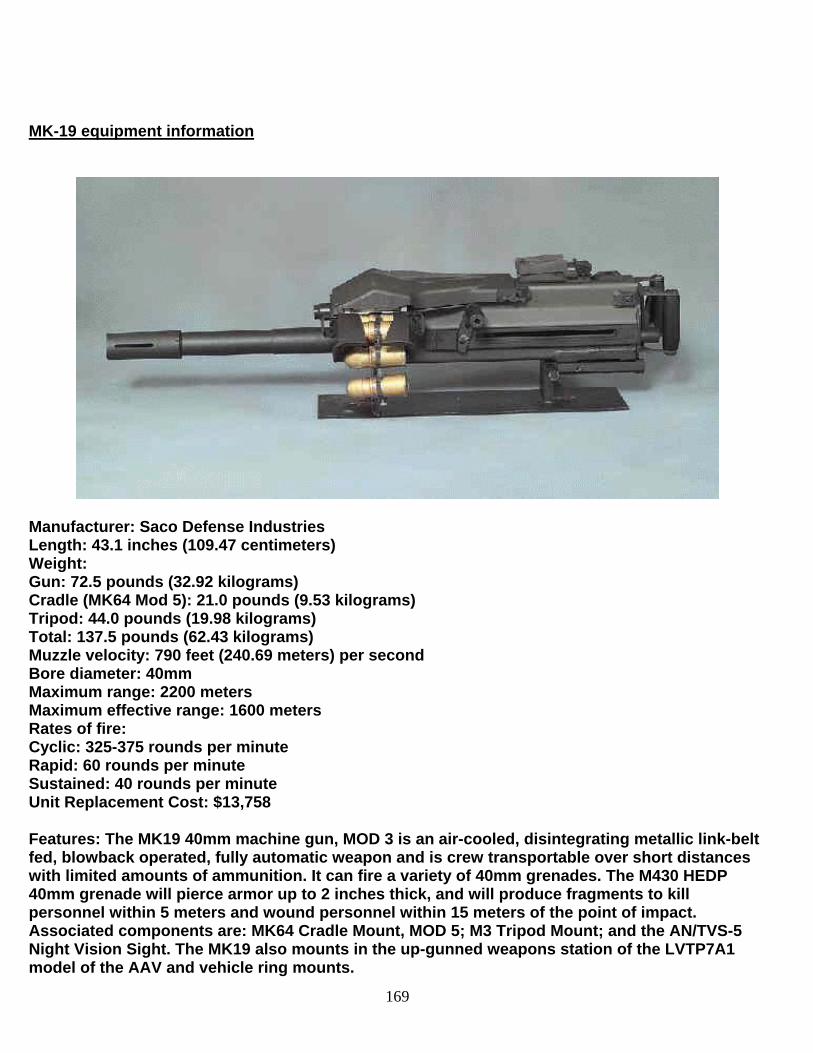
169
MK-19 equipment information
Manufacturer: Saco Defense Industries Length: 43.1 inches (109.47 centimeters) Weight: Gun: 72.5 pounds (32.92 kilograms) Cradle (MK64 Mod 5): 21.0 pounds (9.53 kilograms) Tripod: 44.0 pounds (19.98 kilograms) Total: 137.5 pounds (62.43 kilograms) Muzzle velocity: 790 feet (240.69 meters) per second Bore diameter: 40mm Maximum range: 2200 meters Maximum effective range: 1600 meters Rates of fire: Cyclic: 325-375 rounds per minute Rapid: 60 rounds per minute Sustained: 40 rounds per minute Unit Replacement Cost: $13,758
Features: The MK19 40mm machine gun, MOD 3 is an air-cooled, disintegrating metallic link-belt fed, blowback operated, fully automatic weapon and is crew transportable over short distances with limited amounts of ammunition. It can fire a variety of 40mm grenades. The M430 HEDP 40mm grenade will pierce armor up to 2 inches thick, and will produce fragments to kill personnel within 5 meters and wound personnel within 15 meters of the point of impact. Associated components are: MK64 Cradle Mount, MOD 5; M3 Tripod Mount; and the AN/TVS-5 Night Vision Sight. The MK19 also mounts in the up-gunned weapons station of the LVTP7A1 model of the AAV and vehicle ring mounts.

170