operation warrior forge supplemental training · pdf fileoperation warrior forge supplemental...
TRANSCRIPT

i
Operation WARRIOR FORGE Supplemental Training Guide
This guide is designed to augment Warrior Forge training and is based on input and experience gathered from previous years. Supplemental training addresses skills Cadets will require to successfully execute Warrior Forge. The intent is for Cadre to review this material during designated Training Day while Cadets are not involved with set committee training. Sections A and B are initial overview and Warrior Forge reception requirements. Sections C through I are for review purposes to reinforce necessary skills. Training Day SUBJECT Page D1 – D2 RTO In-Brief (SECTION A) Intro of Regimental Cadre ............................................................ A-1 WF Chain-of-Command ................................................................ A-1 WF Policy Letters ......................................................................... A-1 IG Policies and Procedures ......................................................... A-2 Cadet Use of Telephones ............................................................. A-2 Emergency Notifications ............................................................. A-2 Shoppette Policy .......................................................................... A-3 Cadet Personal PT (Policy) .......................................................... A-3 Foot March Routes ....................................................................... A-3 WF Timeline, Completion Requirements, RECONDO ................ A-3 Cadet Chain of Command ............................................................ A-5 Consideration for Others/EEO ..................................................... A-5 Saluting ......................................................................................... A-5 Barracks Standards and Integration Policy ............................... A-5 D2 – D3 Subjects covered by PTO/PTNCO (SECTION B) Risk Assessment ......................................................................... B-1 Safety/Security .............................................................................. B-1 Barracks Maintenance/Hygiene ................................................... B-1 Fitting/Wear of Uniform & MOLLE ............................................... B-2 Initial Inspections (Packing List) ................................................. B-2 Regimental Affiliation/Traditions/History/Lineage ..................... B-2 Leader Stakes Criteria .................................................................. B-2 LDP Review ................................................................................... B-2 Customs and Courtesies ............................................................. B-2 Cadet Creed/Soldier’s Creed ....................................................... B-3 Lyrics for the Army Song ............................................................. B-4 Lyrics for the Cadet Command Song ......................................... B-5 Drill & Ceremony .......................................................................... B-5

ii
Training Day SUBJECT Page D3 – D4 Common Teaching Scenario, Cultural Awareness, and Ethics
(SECTION C) Common Teaching Scenario (CTS) ............................................ C-1 Cultural Awareness ...................................................................... C-3 Ethics and Values ......................................................................... C-4 D4 – D5 Land Navigation Review (SECTION D) Land navigation Training ............................................................. D-1 WF Requirements ........................................................................ D-1 Land Navigation Markings ........................................................... D-2 Land Navigation Planning ........................................................... D-3 Declination .................................................................................... D-4 Locating Points Intersection ................................................................................ D-10 Resection .................................................................................... D-12 Polar Coordinates ...................................................................... D-14 Terrain Features ........................................................................... D-16 Navigational Methods Dead Reckoning ......................................................................... D-24 Terrain Association ................................................................... D-26 Pace Count ................................................................................. D-28 Compass Techniques Following an Azimuth ................................................................ D-29 Bypassing Obstacle ................................................................... D-31 Contour Intervals and Elevation .................................................. D-32 D5 – D6 Hygiene (SECTION E) Extended Field Hygiene ............................................................... E-1 Basic Foot Care ............................................................................ E-4 Fitting of Boots ............................................................................. E-7 Blister Prevention ......................................................................... E-9 D10 – D13 First Aid (SECTION F) Medical Overview ......................................................................... F-1 Medical Do’s and Don’ts ............................................................. F-1 9-Line MEDEVAC .......................................................................... F-2

iii
Training Day SUBJECT Page D10 – D13 Weapons Handling (SECTION G) Accountability .............................................................................. G-1 Clearing Procedures M16 series ................................................................................. G-2 M249 .......................................................................................... G-4 M60 ............................................................................................ G-3 ROE and Escalation of Force ..................................................... G-5 D10 – D14 Tactical Review (SECTION H) Troop Leading Procedures ............................................................ H-1 Squad Warning/Operations Orders ............................................... H-3 Squad Tactical Missions Squad Attack ................................................................................... H-14 Break Contact .................................................................................. H-17 Reacting to an Ambush (Near/Far) ................................................ H-18 Knock out a Bunker ........................................................................ H-19 Enter a Building ............................................................................... H-19 Clear a Room ................................................................................... H-20 Crossing a Linear Danger Area ...................................................... H-23 Conduct a Recon Patrol .................................................................. H-24 Conduct an Ambush ....................................................................... H-28 Reacting to Indirect Fire ................................................................. H-29 Processing EPW .............................................................................. H-31 Radio Procedures ........................................................................... H-33 Call for Fire ...................................................................................... H-39 Squad Organization & Movement .................................................. H-41 Interaction with the Media .............................................................. H-43 AAR Format ..................................................................................... H-44 IED Planning .................................................................................... H-45 As Time Weapons Data (SECTION I) Permits M16A2 ............................................................................................ I-1 M4 ............................................................................................... I-2 M249 .............................................................................................. I-3 M203 .............................................................................................. I-4 M9 ............................................................................................... I-5 M240B ............................................................................................ I-6 AT4 ............................................................................................... I-7 M18A1 Claymore ........................................................................... I-8 M2 MG ............................................................................................ I-9 MK19 .............................................................................................. I-10 81 mm ............................................................................................ I-11 M60 MG .......................................................................................... I-12

iv
PAGE INTENTIONALLY LEFT BLANK

A-1
SECTION A: RTO In-Brief (WF SOP and CC Cir 145-05) 1. Introduction of the Regimental Cadre 2. Overview of the WF Chain-of-Command
WF Chain of Command Officer NCO
WF Cdr COL Paul Wood WF CSM CSM Lamar Walker Cmdt of Cdts COL Sharon Wisniewski Cmdt of Cdts SGM SGM Gerardo Garcia RTO Regt CSM CTO PTO Plt TAC NCO Plt TAC LT CEO CENCO Regt Motto 3. WF Policy Letters (Sec A, Chap 7, WF SOP) MEMO # SUBJECT # 1 Waiver Process for Ht/Wt, APFT, and Land Navigation Training # 2 Securing Sensitive Items in GSA, Leased, and POVs # 3 Operating GSA / Leased Vehicles # 4 Uniform for COMTek Administrative and Logistics Employees # 5 Dining Facility Privileges for COMTek Employees # 6 Wear of ACUs and Camelbacks # 7 Cadet Refusal to Train # 8 Equal Opportunity and Complaint Procedures # 9 Prevention of Sexual Harassment # 10 Sexual Assault Prevention and Response Reporting # 11 Tobacco Product Use # 12 Alcohol Consumption # 13 Cadet Running during Personal Time # 14 Cadet Visitation # 15 Cadre Personnel Accountability # 16 LDAC Performance and Potential Rating Criteria # 17 Performance Appeals # 18 Security of Information Technology and Sensitive Data # 19 Rights of Civilian Employees to Present Complaints to IG # 20 Rights of Soldiers and Cadets to Present Complaints to IG # 21 Policy Guidance for Gator Utility Vehicle Safety

A-2
4. IG policies and Procedures (Sec I, WF SOP and WF Policy Memo #20)) a. IG boxes b. Open-door policy c. Sensing sessions 5. Cadet Use of Telephones a. Cell phone policy (1) To ensure that Cadet cell phones do not detract from training, Cadets will turn in personal cell phones to the Regimental Chain-of-Command NLT Lights Out on D2. Until that time, Cadets will be allowed to call family members and let them know they have arrived safely. (2) Regimental Cadre will return cell phones to Cadets after Dinner on D27. (3) Regimental Cadre will establish hours of use, but Cadets will not be allowed to use cell phones during periods of training. (4) Recommend that Regimental Cadre keep phones secured in the Platoon Bays in order to have quick access for Cadet use in case of emergencies. Cadre may authorize a Cadet’s personal phone to be temporarily reissued in the event of an official emergency (Para. 6 below). (5) Cadets who violate these policies may receive a negative spot report and/or be dismissed from WF based upon an Honor Violation. b. Pay Phone Usage: Cadets will be allowed to utilize public pay phones during their first 48 hours at WF. Regiments will ensure that phone usage does not conflict with training requirements. Commandant of Cadets will ensure phone use policy remains consistent across all regiments. 6. Emergency Notifications: Family members may call the WF TOC 24 hours a day (tel. no. (253) 967-6449/1767) to informally notify the TOC of family emergencies. Families must also call the Red Cross to verify emergencies through official channels. The Red Cross will officially contact Fort Lewis and the WF TOC. The WF TOC will notify the Cdr, CoC, and the RTO. Regimental Chain of Command will brief the Cadet. The type of emergency will determine what actions will be taken. Regimental cadre will notify the MIR (military institutional representative) from the Cadet’s host program with this information as well. A list of MIRs is available from the WF LNO office located on the second floor building 11D39.

A-3
7. Shoppette Policy (Sec R, Chap 6, WF SOP) a. Training is the priority, but Regimental Cadre will not restrict Cadet use of the AAFES Shoppette. b. Alcohol and Tobacco products are prohibited, but Regimental Cadre will not otherwise dictate what foods the Cadets may/may not buy from the Shoppette. c. Under no circumstance will Cadets be allowed to eat inside the barracks. d. Cadets who violate this policy may receive negative spot reports or have their Shoppette privileges suspended for a period of days or the duration of WF. 8. Cadet Personal PT (WF Policy Memo #13) a. Times Authorized – Anytime that it doesn’t interfere with other training, but generally during TAC Officer Time (TOT) in the evening. When in a field environment, at no time will Cadets be permitted off the AA or TTB to conduct PT, even if training is completed. b. Running Routes (1) WF Training Section will provide a large map of approved running routes. (2) Cadets must wear the Army Physical Fitness Uniform (APFU) with reflective belt. (3) Headphones or musical devices are not allowed. c. Coordination Required (1) Cadets must request permission of PTO/PTNCO. (2) Cadets must sign out from the barracks with the time of departure, expected time of return, and proposed running route. (3) Cadets must run in teams of at least two personnel. 9. Authorized Foot March Routes: For safety purposes, WF Training Section will provide maps showing authorized Foot March routes to be used to move formations to those training events requiring Foot March movement; Platoon Photos, FLRC, Confidence 1 and 2, etc. 10. WF Timelines, Completion Requirements, RECONDO (CC Cir 145-05, WF Molicy Memo #16, TSS Assessor Guide Tab C, D) a. WF Training Section will provide Master Training Schedules (MTS) for the Regiment to use during this brief.

A-4
b. Provide overview of the WF Refusal to Train policy and its implications. Clearly identify the Rope Drop and Slide for Life as events which historically (and intentionally) challenge Cadets’ ability to overcome fear. c. WF COMPLETION CRITERIA: Cadets who fail to meet the standards below will be considered to determine whether they merit WF Graduation credit. (1) Meet Height/Weight and Body Fat standards outlined in AR 600-9. (Section A, WF SOP (Height / Weight Policy Memo #1). (2) Pass the APFT with a minimum total score of 180 points/60 points in each event. If the initial test is failed, the Cadet will be considered for retention in training. If approved, a final APFT is taken at the end of the regimental training cycles. (See WF Policy Memo #1). (3) Pass Land Navigation by attaining a cumulative score of 70 percent on all tests (14/20 Written, 5/8 Day, 3/5 Night). (Sec A, WF SOP, WF Policy Memo #1). (4) Earn a minimum rating of "Satisfactory" on each of the 17 leadership dimensions (part V) and the area of Values on the final evaluation report (Cadet Command Form 67-9). (5) Complete at least 90% percent of training. Point out potential impact if Cadet does not meet this standard (possible recycle or send home). Issue is sick call/riding sick call. d. RECONDO REQUIREMENTS: To receive the RECONDO badge, Cadets must: (1) Execute all Confidence events presented on the day of execution to prescribed standard. Failure to meet the standard for any event denotes a “NO GO” for RECONDO qualification. (2) Achieve an APFT score of 270 or above without retest, 90 points in each event. (3) Achieve a score of 80% percent or higher on each of the written and practical (16/20 Written, 40/50 Day, 24/30 Night) Land Navigation proficiency tests, without retest. (4) Complete First Aid training and receive a “GO” on evaluated tasks: Evaluate a Casualty, Manage the Airway, Control Bleeding, Treat a Chest Wound, and Evacuate a Casualty. (5) Achieve Satisfactory (S) or higher performance ratings at Squad STX on both evaluations and on Patrolling STX Evaluation. (6) Successfully complete WF without a performance waiver. Medical waivers are acceptable. (7) Achieve Satisfactory or higher summary ratings for all 17 scored Leadership Dimensions and the area of Values, as reported on the CDT CMD Form 67-9. (8) Meet Ht/Wt or Body Fat Standards IAW AR 600-9.

A-5
11. Cadet Chain of Command: Specifically discuss the addition of team leader positions and their responsibility to plan/conduct opportunity training in the evenings. 12. Consideration of Others/EEO: Disparaging comments and derogatory behaviors run counter to Army Values and conduct expected of the Soldier. There is no need to lose Cadets due to racially or gender insensitive remarks and actions. Explain proper/improper relationships between Cadet and Cadet, Cadet and cadre. Explain the ‘victim’ has a responsibility to put a stop to the inappropriate behavior—first line of defense–and to IMMEDIATELY report it to the chain of command if it does not stop—second line of defense. 13. Saluting in the field and in garrison : Cadre and Cadets will salute superior officers, and sound off with the appropriate motto while in the Cantonment Area, the Assembly Areas, and the Tactical Training Base (TTB). They will provide an appropriate greeting and motto when they see noncommissioned officers. Cadets will not salute once the company or regiment reports to a training site (with exception of AA and TTB as noted above). 14. Barracks Standards and Integration Policy (Sec. R, Chap 12, WF SOP) 15. Q&A period
________________________________________________________________
16. Release Cadets and Brief Cadre and Contractors on the Following: (WF Policy Memos) a. Securing Sensitive Items in GSA, Leased, and POVs b. Operating GSA/Leased Vehicles c. Uniform for COMTek Admin and Log Employees d. Dining Facility Privileges for COMTek Employees e. GSA and Rental Non-Tactical Vehicle Use f. Fraternization Policy
________________________________________________________________

B-1
SECTION B: PTO/PTNCO Briefings (Ref. WF SOP, CC Cir 145-05, Cadre Assessor Guide)
Risk Assessment:
Although not limited to, special attention to risk should be paid to the following: Sexual misconduct, high injury risk activities and any event involving the use of vehicles. Prior to execution of any LDAC event, Cadre leaders should address junior cadre and Cadets on the importance of Risk Assessment. Cadre leaders identifing hazards as they relate to specific tasks, historical lessons, cadre experiences, judgment, equipment characteristics and warnings and how these compound that hazard is important. Once determined, the Initial Risk Level should be used to develop one or more controls for each hazard. These controls will either eliminate the hazard or reduce the risk probability or severity. Determine how each of these Controls is to be administered. Once applied, determine the Residual Risk Level, assuming the controls are properly implemented. Make a clear and precise plan on the implementation of these controls and communicate this process so that it is clear to every member of the team. The use of SOPs, written or spoken instructions, and rehearsals are all good techniques. Determine then…if Risks have been thoroughly addressed and mitigated to the point of acceptable execution. Above all, SUPERVISE this process from start to finish.
1. Safety/Security - (Sec K; R, Chap 17, WF SOP) – At the end of this instruction, Cadets should be familiar with fire safety procedures, physical security requirements of personal effects and barracks areas, and the specific requirements to secure sensitive items. Cadets should also be familiar with basic safety responsibilities and the use of buddy teams to reduce risk. a. Fire safety b. Physical security (barracks) c. Sensitive items security d. Training safety/buddy teams e. Red medical tags/zip ties f. Charge of Quarters duties (CQ) 2. Barracks Maintenance/Personal Hygiene - (Sec. R, Chap 12, WF SOP) – At the end of this instruction, Cadets should be familiar with standards of barracks maintenance and individual duties. Cadets should also be familiar with personal hygiene requirements, shower schedules, preventative health care and sick call procedures. a. Maintenance standards/duties b. Personal hygiene

B-2
c. Latrine schedules/locations d. Sick call procedures 3. Wear of the Uniform/MOLLE - (Sec. R, Chap 13, WF SOP and TACSOP) – At the end of this period of instruction, Cadets should be familiar with uniforms allowed at WF. Cadets should be familiar with MOLLE SOP. a. Duty uniforms b. MOLLE layout 4. Initial Inspection (Packing List Items) - (CC Cir 145-05 Para 24/25 and APP C) – At the end of this inspection, all Cadet shortages should be identified and contraband items removed. Cadre will assist Cadets in resolving shortcomings. NOTE: Must be conducted prior to CIF. a. Initial (shakedown) inspection – Use checklist in App C to identify equipment shortages. Take corrective actions as required (Cadet purchase/issue at CIF). b. Confiscate contraband items (para 25) and secure as necessary. c. (Following CIF) – Field Packing List (p. R-104, WF SOP) 5. Regimental Affiliation/Traditions/History/Lineage - (Issue 1, Warrior Leader) – Cadets should be familiar with the history and traditions of the affiliated regiment. 6. Leader Stakes - (p3, CC Cir 145-05) – Cadets should be aware of the Leader Stakes program as a competition intended to encourage maximum effort and participation and as a teambuilding event. Briefly describe Leader Stakes program and platoon competition. 7. LDP Review - (Tabs B, E & F, TSS Cadre Assessor Guide) – Cadets should be aware of formal requirements to complete WF, timelines associated with LDP, and appeals processes at both regiment and committee. a. Leadership opportunities/scheduling b. Leadership timelines -Orders process -Self-assessment -Counseling c. Appeals process d. Performance and Potential Guidelines d. Cadet Evaluation Report (CER) 8. Customs and Courtesies - (Rules and Policies, Sec. R, Chap 6, WF SOP) – Cadets should be familiar with standards of military behavior and bearing. 9. Cadet Creed/Soldier’s Creed/Army Song/Cadet Command Song – Ensure Cadets/cadre memorize the Cadet Creed, Army Song, and Cadet Command Song prior to Regimental Activation Ceremony. Identify potential Cadets to recite Cadet Creed as part of the Activation Ceremony.

B-3
CADET CREED
I am an Army Cadet. Soon I will take an oath and become an Army Officer, committed to defending the values which make this nation great. Honor is my touchstone. I understand mission first and people always.
I am the past – the spirit of those warriors who have made the final sacrifice.
I am the present – the scholar and apprentice soldier enhancing my skills in the science of warfare and the art of leadership.
But above all, I am the future – the future warrior leader of the United States Army. May God give me the compassion and judgment to lead and the gallantry in battle to win.
I will do my duty.
THE SOLDIER’S CREED
I am an American Soldier.
I am a Warrior and a member of a team.
I serve the people of the United States and live the Army Values.
I will always place the mission first
I will never accept defeat.
I will never quit.
I will never leave a fallen comrade.
I am disciplined, physically and mentally tough, trained and proficient in my warrior tasks and drills. I always maintain my arms, my equipment and myself.
I am an expert and I am a professional.
I stand ready to deploy, engage, and destroy the enemies of the United States of America in close combat.
I am a guardian of freedom and the American way of life.
I am an American Soldier.
B-4
Lyrics: The Army Song Verse: First to fight for the right, And to build the Nation’s might, And The Army Goes Rolling Along Proud of all we have done, Fighting till the battle’s won, And the Army Goes Rolling Along. Refrain: Then it’s Hi! Hi! Hey! The Army’s on its way. Count off the cadence loud and strong For where e’er we go, You will always know That The Army Goes Rolling Along. Verse: Valley Forge, Custer’s ranks, San Juan Hill and Patton’s tanks, And the Army went rolling along Minute men, from the start, Always fighting from the heart, And the Army keeps rolling along. (refrain) Verse: Men in rags, men who froze, Still that Army met its foes, And the Army went rolling along. Faith in God, then we’re right, And we’ll fight with all our might, As the Army keeps rolling along. (refrain)
Lyrics: Bar of Gold on Army Green

B-5
(Cadet Command Song) Listen up, you brave young man The battle's loomin' near You have to take the hill by morning light Do you read me loud and clear? Yes sir, they nod, every man Though their eyes are flecked with fear For they've come to know the man in charge And the cause he holds so dear CHORUS: A bar of gold on Army Green A bar of gold on Army Green When you're looking for a leader One who's heard as well as seen Look to the man who's earned respect And a bar of gold on Army green
………………………………………………………………………………………………………………..… 10. General Drill & Ceremony - (Excerpt: Chap. 7, FM 3-21.5) a. Cover basic information concerning Platoon/Squad formations and leadership responsibilities. b. Run Cadets through basic drill prior to RAC to refresh skills and identify potential problem areas. c. Identify locations for platoon formations and standards for forming the unit.
PART I – FORMATIONS The platoon has two prescribed formations—line and column (Figure B1). However, the platoon may be formed into a file or a column of twos from a column formation. When in a line formation, the elements (squads) of a platoon are numbered from front to rear; in a column formation, from left to right. 1. BASIC INFORMATION: For the most part, platoon drill merely provides the procedures for executing drill movements in conjunction with other squads formed in the same formation. Individual drill movements and the manual of arms are executed as previously described while

B-6
performing as a squad member during the conduct of platoon drill. For continuity purposes; in this chapter, "platoon sergeant" may also denote "platoon leader", when the platoon sergeant is executing drill from designated post.
Figure B1 - Platoon formations.
a. During all drill and ceremonies, the platoon leader and platoon sergeant carry their rifles at Sling Arms. When the platoon drills as part of a larger unit, the platoon leader and platoon sergeant remain at Sling Arms during all manual of arms movements except when executing the Hand Salute while at Sling Arms. b. When the platoon drills as a separate unit or as part of a larger unit in a line formation, without officers present, the post for the platoon sergeant is three steps in front of and centered on the platoon. When in column formation, the post for the platoon sergeant is three steps to left flank of and centered on the platoon.

B-7
c. The post for the platoon sergeant with the platoon leader present is one step to the rear and centered on the platoon in line or column formation. d. When assuming designated post in column from a line formation with the platoon leader present, the platoon sergeant faces to the left in marching (on the command of execution FACE) and marches in the most direct route to designated post then halts and faces to the right. When assuming designated post in line from a column formation, platoon sergeant faces to the right in marching (on the command of execution FACE) and marches in the most direct route to designated post, halts centered on the platoon, and faces to the left.
NOTE: When the files (columns) are uneven, the platoon sergeant normally directs the soldiers in longer files to move to another file to balance the formation; or platoon sergeant may fill the vacancy himself as the last soldier in the right file.
e. When control of the formation is being exchanged between the platoon sergeant and the platoon leader, the platoon sergeant will always travel around the right flank (squad leader) of the formation when marching from post to post. The platoon leader will always travel around the left flank of the formation when marching post to post. f. On the command Open Ranks, MARCH; Backward, MARCH; Right (Left) Step, MARCH; Forward, MARCH and on commands that cause the platoon to change interval in line, platoon sergeant move at the same time (with the appropriate step) so as to maintain proper position. g. The leader of the first squad serves as the base when the platoon is a line formation. The leader of the fourth squad serves as the base when the platoon is in a column formation. h. If for some reason the platoon is authorized a guidon or phase banner (in training units for example), the bearer’s post is one step in front of and two 15-inch steps to the right of and facing the person forming the platoon. When the formation is faced to the right for a marching movement, execution is in the same manner as explained in Appendix H, except that the post is three steps in front of and centered on the squad leaders. If the platoon leader is present and at designated post, the bearer’s post is one step to the rear and two 15-inch steps to the left of the platoon leader. i. When the platoon drills as a separate unit, in a line formation, the post for the platoon leader is six steps in front of and centered on the platoon; when in a column formation, the platoon leader is six steps to the left flank and centered on the platoon. When marching as part of a larger formation, designated post is one step in front of and centered on the squad leaders. j. When the platoon leader commands Open Ranks, MARCH; Backward, MARCH; Right (Left) Step, MARCH; Forward, MARCH or causes the platoon to change interval, platoon leader moves at the same time (with the appropriate step) so as to maintain proper position.

B-8
(1) When assuming designated post in column from a line formation, the platoon leader faces to the right in marching (on the command of execution FACE) and marches in the most direct route to designated post, halts, and faces to the left. (2) When assuming designated post in line from a column formation, the platoon leader faces to the left in marching (on the command of execution FACE) and marches in the most direct route to designated post, halts perpendicular to the formation, and faces to the right. 2. FORMING THE PLATOON: The platoon normally forms in a line formation. However, it may re-form in a column when each soldier can identify his or her exact position (equipment grounded) in the formation. a. The platoon forms basically the same as a squad. The platoon sergeant assumes the Position of Attention and commands FALL IN (At Close Interval, FALL IN or In Column, FALL IN). On the command FALL IN (At Close Interval, FALL IN), the squad leader and the first squad (when formed) is three steps in front of and centered on the platoon sergeant. Other squad leaders cover on the first squad leader at the correct distance, which is obtained by estimation. The members of the first squad fall in on their squad leader as prescribed for squad drill. Members of the other squads fall in on their squad leader, assume the Position of Attention, and turn their heads and eyes to the right. They obtain correct distance by taking short steps forward or backward and align themselves on the man to their right. They then sharply turn their heads and eyes to the front as in the Position of Attention and obtain proper interval by taking short steps left and right to cover on the man to their front. Members of all squads, other than the first squad, will not raise their left arms unless the soldier to their immediate left has no one to his or her front in the formation on which to cover. b. When armed, members fall in at Order Arms or Sling Arms. For safety, the commands Inspection, ARMS; Ready, Port, ARMS; Order (Sling), ARMS are given at the initial formation of the day and just before the last command, DISMISSED. c. When a report is appropriate, the platoon sergeant commands REPORT. The squad leaders, in succession from front to rear, turn their heads and eyes toward the platoon sergeant and salute (holding the Salute until returned) and report. The squad leaders do not state the unit. For example: (1) Situation 1. When all squad members are in formation, the report is "All present." (2) Situation 2. When squad members are absent, the soldiers and reasons for absence are reported: “Cdt. Smith - CQ runner” “Cdt. Jones - sick call” “Cdt. Williams –Out of Ranks” d. The platoon sergeant turns his or her head and eyes toward the reporting squad leader, receives the report, and returns the salute. After receiving the report from the squad leaders, the platoon sergeant faces about and awaits the arrival of the platoon leader or a directive from the first sergeant to REPORT. When the platoon leader has halted at designated post, the platoon sergeant salutes and reports, "Sir or Ma’am, All present"; or "Sir or Ma’am,

B-9
All accounted for"; or "Sir or Ma’am, (so many) soldiers absent." The platoon leader returns the Salute. After the Salute has been returned, the platoon sergeant faces to the right in marching, inclines around the squad leaders, halts at designated post, and faces to the right. If reporting to the first sergeant, the platoon sergeant turns his or her head and eyes toward the first sergeant, salutes, and reports. e. If the platoon leader is not present for the formation, and the commander is in charge of the formation, the platoon sergeant steps forward three steps (after receiving the squad leader’s report) and, on the command POST, assumes the duties of the platoon leader. f. When appropriate, the platoon may be formed by the platoon leader rather than by the platoon sergeant. The procedures are the same as previously described except that the first squad forms six steps in front of and centered on the platoon leader, and the platoon sergeant forms at designated post to the rear of the platoon. For continuity purposes in this chapter, "platoon sergeant" may also denote "platoon leader" when the platoon leader is executing drill from designated post. 3. BREAKING RANKS: When the situation requires one or more individuals to leave the formation or to receive specific instructions from the platoon sergeant, the platoon sergeant directs: "Private Doe (pause), front and center"; or, "The following personnel front and center—Private Doe (pause), Private Smith." When the individual’s name is called, he or she assumes the position of attention and replies, "Here, Sergeant (Sir or Ma’am)." The soldier then takes one (15-inch) step backward, halts, faces to the right (left) in marching, and exits the formation by marching to the nearest flank. The soldier does not look left or right. Once the individual has cleared the formation, he or she begins to double-time and halts two steps in front of and centered on the platoon sergeant.
NOTE: When a group of individuals are called from the formation, the group forms centered on the platoon sergeant. The platoon sergeant should direct (point) the first man into position so that the rank will be centered when the last man has joined the group.
4. COUNTER-COLUMN MOVEMENT: When space is limited and the platoon sergeant wants to march the unit in the opposite direction (reverse), with the squad leaders at the head of their squads, the command Counter Column, MARCH is given. On the command of execution MARCH (at the Halt), the first squad marches forward three steps, executes a Column Right, marches across the front of the platoon, and executes another Column Right just beyond the fourth squad. The second squad steps forward one step, executes a Column Right, marches forward, and executes another Column Right between the third and fourth squads. The third squad executes two short Column Lefts from the Halt and marches between the remainder of the third squad and the second squad. The fourth squad marches forward two steps, executes a Column Left, marches across the front of the platoon, and executes another Column Left between the first and second squads (Figure B2).

B-10
Figure B2 - Counter-Column March at the Halt.
a. As the third squad leader marches past the last man in the third squad, the entire squad begins to march at the Half Step. After marching past the last soldier in each file, all other squads incline to the right and left as necessary, obtain Normal Interval on the third squad, and begin to march with the Half Step. When all squads are abreast of each other, they begin marching with a 30-inch step without command. b. During the movement, without the platoon leader present, the platoon sergeant marches alongside the first squad. With the platoon leader present, the platoon sergeant marches one step to the rear and centered between the second and third squads (Figure B1) and the platoon leader marches alongside the first squad. c. When marching, the preparatory command Counter-Column is given as the left foot strikes the marching surface and the command of execution MARCH is given the next time the left foot strikes the marching surface. On the command of execution MARCH, the platoon executes the movement basically the same as from the Halt, except that the squad takes one additional step to ensure that the pivot foot is in the correct position to execute the movement.
NOTE: 1. When there are only three squads in the column, the first squad takes two steps before executing. 2. When the platoon leader and platoon sergeant are marching at their posts as part of a larger formation, the platoon leader takes three steps forward and executes a column right, marches across the front of the platoon, executes another column right (just beyond fourth squad), marches to designated post in the most direct

B-11
manner, takes up the Half Step, and then steps off with a 30-inch step when the squad leaders come on line. The platoon sergeant inclines to the right, follows the third squad until the movement is completed, and then resumes designated post.
PART II - REST POSITIONS AT THE HALT
Any of the positions of rest may be commanded and executed from the Position of Attention. 1. Parade Rest. Parade Rest is commanded only from the Position of Attention. The command for this movement is Parade, REST. a. On the command of execution REST, move the left foot about 10 inches to the left of the right foot. Keep the legs straight without locking the knees, resting the weight of the body equally on the heels and balls of the feet. b. Simultaneously, place the hands at the small of the back and centered on the belt. Keep the fingers of both hands extended and joined, interlocking the thumbs so that the palm of the right hand is outward (Figure B3). c. Keep the head and eyes as in the Position of Attention. Remain silent and do not move unless otherwise directed. Stand at Ease, At Ease, and Rest may be executed from this position.
NOTE: Enlisted soldiers assume this position when addressing all noncommissioned officers or when noncommissioned officers address noncommissioned officers of superior rank.

B-12
Figure B3 - Parade Rest.
2. Stand At Ease. The command for this movement is Stand at, EASE. On the command of execution EASE, execute Parade Rest, but turn the head and eyes directly toward the person in charge of the formation. At Ease or Rest may be executed from this position. 3. At Ease. The command for this movement is AT EASE. On the command AT EASE, the soldier may move; however must remain standing and silent with right foot in place. The soldiers may relax their arms with the thumbs interlaced. 4. Rest. The command for this movement is REST. On the command REST, the soldier may move, talk, smoke, or drink unless otherwise directed. The soldiers must remain standing with their right foot in place. AT EASE must be executed from this position to allow soldiers to secure canteens, other equipment, and so forth.
NOTE: On the preparatory command for Attention, immediately assume Parade Rest when at the position of Stand at Ease, At Ease, or Rest. If, for some reason, a subordinate element is already at attention, the members of the element remain so and do not execute parade rest on the preparatory command, nor does the subordinate leader give a supplementary command.

B-13
PART III – INSPECTIONS
1. IN-RANKS INSPECTION: To conduct in-ranks inspections, use the following procedures: a. With the platoon in line formation, the platoon sergeant commands Count, OFF. On the command of execution OFF, all personnel with the exception of the right flank personnel turn their head and eyes to the right and the right flank personnel count off with "ONE." After the right flank soldiers have counted their number, the soldiers to their left count off with the next higher number and simultaneously turn their head and eyes to the front. All other members of the formation count off in the same manner until the entire formation has counted off. b. After the platoon has counted off, the platoon sergeant commands Open Ranks, MARCH. On the command of execution MARCH, the front rank takes two steps forward, the second rank takes one step forward, the third rank stands fast, and the fourth rank takes two steps backward. If additional ranks are present, the fifth rank takes four steps backward, and the sixth rank takes six steps backward.
NOTE: After taking the prescribed number of steps, the soldiers do not raise their arms. If the platoon leader wants exact interval or alignment, he or she commands, At Close Interval (At Double Interval), Dress Right, and DRESS. (See paragraph 7-6, FM 3-21.5, for more information on aligning the platoon.)
c. At this point, the platoon is ready to be inspected. Typically, the squads are inspected by the squad leaders; however they may be inspected by the platoon sergeant or platoon leader. (See paragraphs 7-17 and 7-18, FM 3-21.5) 2. SQUAD LEADERS’ INSPECTION: If the platoon sergeant wants the squad leaders to inspect their squads, he or she will direct INSPECT YOUR SQUADS. Salutes are not exchanged. a. The squad leader marches forward and to the left, inclines as necessary until he or she is at a point 15 inches in front of and centered on the first man.
NOTE: If the members of the platoon are armed, the squad leaders will sling their weapons diagonally across the back with the muzzle down and to the right. This movement will be executed without command and prior to the squad leader stepping off. (For more information on how to inspect personnel with weapons and how to manipulate the weapon, see paragraph 8-19, c-f, FM 3-21.5)
b. The squad leader remains at a modified Position of Attention moving his or her head and eyes only. After inspecting at the center position, takes a short step forward and to the left and inspects, returns to the center and steps forward and to the right and inspects, and returns to the center position.

B-14
c. Having inspected the first man, the squad leader faces to the right as in marching and takes one (two if at normal interval) step, halts, and faces the next man at the appropriate distance. The squad leader conducts the inspection for the rest of the soldiers in the squad. d. After inspecting the last soldier in the squad, the squad leader faces to the right as in marching and marches around behind the squad, inclining as necessary inspecting the squad from the rear while marching back to original post. e. After returning to original post, the squad leader turns his or her head and eyes over the left shoulder and commands the squad to assume At Ease. f. The platoon sergeant remains at his or her post (inspects the guidon bearer if appropriate). After the last squad has been inspected and is at At Ease, the platoon sergeant commands the platoon to Attention. g. After commanding the platoon to Attention, the platoon sergeant commands Close Ranks, MARCH. On the command of execution MARCH, the first rank takes four steps backward, the second rank takes two steps backward, the third rank stands fast, and the fourth rank takes one step forward. On the command of execution MARCH, the platoon leader and platoon sergeant take the appropriate number of steps to maintain their posts. h. If the platoon is being inspected as part of a larger formation and control of the platoon has not been turned over to the platoon sergeant, he or she faces about, executes At Ease, and awaits further instructions from the first sergeant. 3. PLATOON SERGEANT’S/PLATOON LEADER’S INSPECTION: If the platoon sergeant is not going to inspect the entire platoon, he or she directs the squad leaders of the appropriate squads to inspect their squads. All others will be inspected by the platoon sergeant. When armed, the platoon sergeant slings weapon in the same manner as the squad leaders. a. The platoon sergeant faces to the Half Left as in marching and marches by the most direct route to a point 15 inches in front of and centered on the first squad leader (or the squad leader of the squad to be inspected). As soon as the platoon sergeant halts in front of the squad leader, he or she commands the other squads to At Ease and inspects the squad leader. b. The platoon sergeant remains at a modified Position of Attention moving the head and eyes only. After inspecting at the center position, takes a short step forward and to the left and inspects, returns to the center and steps forward and to the right and inspects, and returns to the center position. c. Having inspected the squad leader, the platoon sergeant faces to the right as in marching and takes one (two if at normal interval) steps, halts, and faces the next man at the appropriate distance. After the platoon sergeant steps off, the squad leader takes a half step forward and faces about. When moving from man to man, the squad leader and platoon sergeant move simultaneously.

B-15
d. Having inspected the last soldier in the squad, the platoon sergeant faces to the right as in marching and marches around behind the squad, inclining as necessary, and inspects the squad from the rear. e. As the platoon sergeant begins to inspect the first squad from the rear, the next squad is called to Attention. The squad leader returns to original post. After the platoon sergeant arrives in front of the next squad leader, the first squad is called to At Ease over the right shoulder. f. The platoon sergeant and squad leader execute in the same manner as in inspecting the first squad until the entire platoon has been inspected. After inspecting the rear of the last squad, the platoon sergeant marches by the most direct route to original post, halts, faces to the left and commands the platoon to Attention. g. After commanding the platoon to Attention, the platoon sergeant commands Close Ranks, MARCH. On the command of execution MARCH, the first rank takes four steps backward, the second rank takes two steps backward, the third rank stands fast, and the fourth rank takes one step forward. On the command of execution MARCH, the platoon leader and platoon sergeant take the appropriate number of steps to maintain their posts. h. If the platoon is being inspected as part of a larger formation and control of the platoon has not been turned over to the platoon sergeant, he or she faces about, executes At Ease, and awaits further instructions from the first sergeant.
C-1
SECTION C: Common Teaching Scenario, Cultural Awareness, and Ethics
COMMON TEACHING SCENARIO (CTS) 1. GENERAL
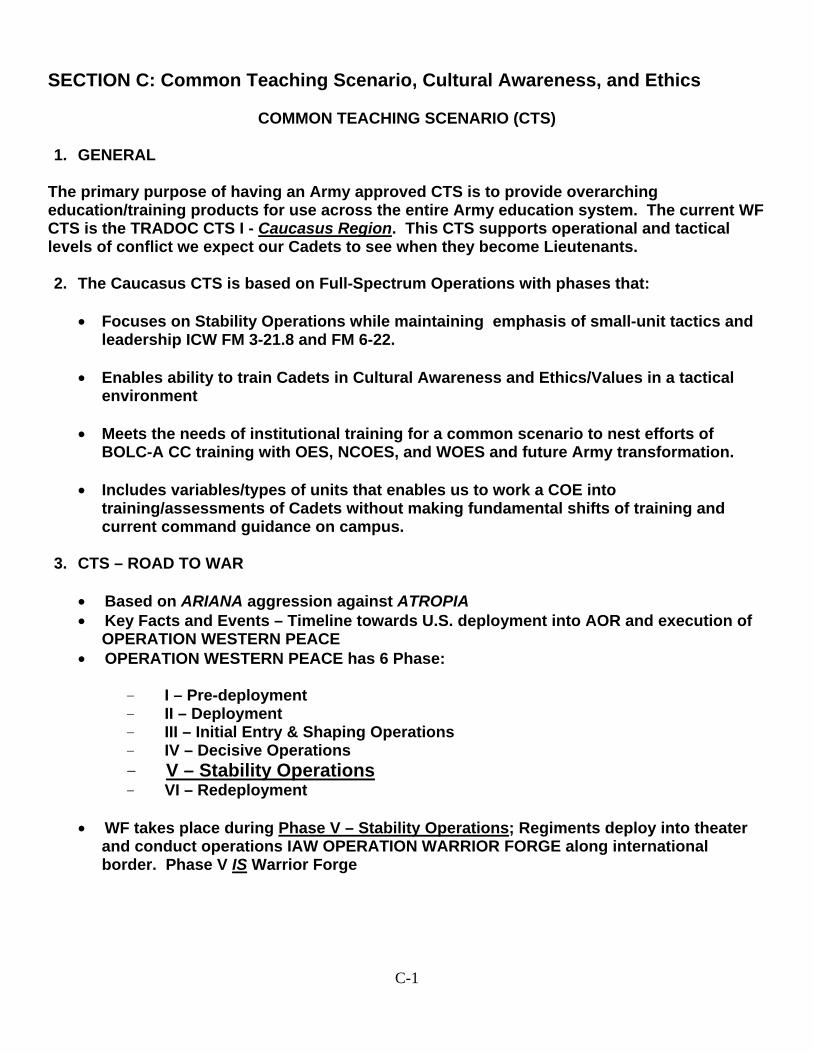
The primary purpose of having an Army approved CTS is to provide overarching education/training products for use across the entire Army education system. The current WF CTS is the TRADOC CTS I - Caucasus Region. This CTS supports operational and tactical levels of conflict we expect our Cadets to see when they become Lieutenants. 2. The Caucasus CTS is based on Full-Spectrum Operations with phases that:
• Focuses on Stability Operations while maintaining emphasis of small-unit tactics and
leadership ICW FM 3-21.8 and FM 6-22. • Enables ability to train Cadets in Cultural Awareness and Ethics/Values in a tactical
environment • Meets the needs of institutional training for a common scenario to nest efforts of
BOLC-A CC training with OES, NCOES, and WOES and future Army transformation. • Includes variables/types of units that enables us to work a COE into
training/assessments of Cadets without making fundamental shifts of training and current command guidance on campus.
3. CTS – ROAD TO WAR
• Based on ARIANA aggression against ATROPIA • Key Facts and Events – Timeline towards U.S. deployment into AOR and execution of
OPERATION WESTERN PEACE • OPERATION WESTERN PEACE has 6 Phase:
- I – Pre-deployment - II – Deployment - III – Initial Entry & Shaping Operations - IV – Decisive Operations - V – Stability Operations - VI – Redeployment
• WF takes place during Phase V – Stability Operations; Regiments deploy into theater
and conduct operations IAW OPERATION WARRIOR FORGE along international border. Phase V IS Warrior Forge

C-2
4. WF Tactical Mission: Regiments deploy to ISB Lewis beginning 14Jun10 in order to support 2-76th IBCT combat operations against Insurgent (Arianan) Forces in Southern Atropia. On Order conduct Stability Operations along the Atropia-Ariana international border IOT maintain Atropia’s territorial integrity and prevent enemy forces from influencing the local population. 5. WF Tactical Phases:
• Phase 1 begins RSOI process with Regiments deploying to Atropian Theater of Operations; occupying the Intermediate Staging Base (ISB) Lewis. Regiments complete combat preparations by verifying Soldier physicals, receiving additional equipment, and completing individual training. Ends with AO Navigation certification. (FRAGO 1 – AA/Training Execution)
• Phase 2 begins with movement to secure Assembly Areas 1 & 2 in order to conduct
and individual and collective training required for small-unit level combat operations. Ends with completion of RSOI and movement to Tactical Training Bases (TTB) vicinity of the International Border. (FRAGO 2 – TTB and Combat Operations)
• Phase 3 begins with occupation of either TTB East or West and conduct of squad and
section patrols ISO stability operations. Units will BPT conduct reconnaissance, raids, ambushes, and other combat operations IOT prevent enemy forces from influencing the local population. Ends when relieved by follow-on forces. (FRAGO 3 – Recovery and Redeployment)
• Phase 4 begins with return to ISB Lewis; Regiments will complete operations and
conduct recovery in preparation for redeployment. Ends with Soldiers departing AOR and arriving back at Home Station.
Cadre brief the Orders as follows:
• OPORD 10-03; OPERATION WARRIOR FORGE: Days 3-4
• FRAGO 1 – AA/Training Execution: Days 5-6
• FRAGO 2 – TTB and Combat Operations: Days 11-12
• FRAGO 3 – Recovery and Redeployment: Days 19-20
CULTURAL AWARENESS

C-3
1. Overview:
Providing formal Cultural Awareness training during Warrior Forge 2010 at JBLM exposes Cadets to cultural factors, religion, and economic factors that may impact operations and mission accomplishment within a Contemporary Operating Environment (COE). Cadets will go through training by Company on Days 8, 9, 10, or 11. Cadre reviews the Caucasus Region WF GTA with Cadets.
Cultural Awareness is the foundation of communication and involves the ability of standing back from ourselves and becoming aware of cultural values, beliefs and perceptions. Why do we do things in that way? How do we see the world? Why do we react in that particular way?
Cultural awareness becomes central when we have to interact with people from other cultures. People see, interpret and evaluate things in a different ways. What is considered an appropriate behavior in one culture is frequently inappropriate in another one. Misunderstandings arise when someone uses their own meanings to make sense of other’s reality.
Becoming aware of our cultural dynamics is a difficult task because culture is not conscious to us. We have learned to see and do things at an unconscious level. Our experiences, our values and our cultural background lead us to see and do things in a certain way. Sometimes we have to step outside of our cultural boundaries in order to realize the impact that our culture has on our behavior.
Soldiers come into our Army with knowledge, behaviors, and beliefs systems that are unique to the particular group of which they are part. To be an effective leader, our Cadets must understand and respect the cultural backgrounds of their Soldiers. If they respect Soldiers, Soldiers will respect them. As an Army Lieutenant, our Cadets will travel to many places in the world and interact with people of many cultures, both in war and in peace. For this reason, it is also essential that our Cadets, understand the culture of the country their unit is operating in and that they train their Soldiers to achieve a similar understanding.
2. Degrees of Cultural Awareness
There are several levels of cultural awareness that reflect how people grow to perceive cultural differences. Some examples to discuss with Cadets:
a. My way is the only way - people are aware of their way of doing things, and their way is the only way. At this stage, they ignore the impact of cultural differences on the operation and their Soldiers.
b. I know their way, but my way is better - people are aware of other ways of doing things, but still consider their way as the best one. In this stage, cultural differences are perceived as source of problems and people tend to ignore them or reduce their significance.
c. My Way and Their Way - people are aware of their own way of doing things and others’ ways of doing things, and they chose the best way according to the situation. At this stage

C-4
people realize that cultural differences can lead both to problems and benefits and are willing to use cultural diversity to create new solutions and alternatives. d. Our Way - brings people from different cultural background together for the creation of a culture of shared meanings. People dialogue repeatedly with others, create new meanings, new rules to meet the needs of a particular situation.
ETHICS and VALUES
1. Basic Definitions: Ethics – are the systemic reflection of morals Morals – may be described as the set of standards and values, of manners and customs in a certain group of people at a particular time. Most people act on the basis of a certain moral, in other words using particular standards and values. Standard – is a rule, a guideline for behaviour. An example of a standard is politeness; they may be regarded as guides towards a certain objective, a certain value. Value – is the objective of a standard. In the example given, ‘politeness’ is the standard and ‘respect for another as a person’ the objective. This example may be used to illustrate that a standard is empty without an underlying value, and thus has little purpose, because if there is no respect behind the expressed politeness for the person in question, the politeness is nothing more than a sham, and thus has no meaning whatsoever. A value may be regarded as an ideal, as something to be pursued, something one tries to achieve. Values are things that people say are important; hence the assertion that something is valuable or has value. This is said, for example, of peace and security; these are two values which form a significant justification for the deployment of of our Soldiers. 2. The Ethical Decision Making Process. In certain situations, Army Values may conflict with each other or some other valid factor such as rules, orders, or the situation itself. An ethical dilemma ia a situation where you find that two or more factors conflict as you try to decide the “right” course of action.

C-5
The Ethical Decision making Process ia a way to use ethical reasoning to apply Army Values to your day-to-day activities. The process helps resolve dilemmas and assists in making sound, ethical decisions. Ethical dilimmas contain a moral dimension – a decision related to what is right or wrong, good or evil, rather than a problem that simply requires a decision based on facts and assumptions.
The 7 steps include:
• Identify the Ethical Problem
• Identify the Key Issues
• Generate Alternatives
• Analyze Alternatives
• Compare Alternatives
• Take and Execute a Decision
• Assess the Results

D-1
SECTION D: LAND NAVIGATION TRAINING 1. PURPOSE. This training overview is intended to assist Cadre with ensuring Cadets understand requirements for Land Navigation at Warrior Forge. It is not a modification or change for lessons taught in the MSL 300 curriculumon campus. The techniques and recommendations are to provide situational awareness and ensure expectations are understood prior to your Cadets arriving to Joint Base Lewis-McChord. 2. OVERVIEW. Land Navigation is an assessed event at Warrior Forge. The committee (and regimental cadre when feasible) will conduct review of proper techniques prior to the execution of the written, day, and night portions; however, if is essential that Cadets arrive with a full understanding of land navigation. Odd regiments will take the written exam on D+3/4 and even regiments on D+5. The actual day/night courses are conducted on D+6 for odd regiments and D+7 for even regiments. If required, Cadets will retest land navigation on either D+7 or D+8. If Cadets fail this second attempt, AND are afforded an opportunity to remain at WF and continue to train, they will receive additional land navigation training after tactics (on D+22 or D+23) and retest on D+23 or D+24. 3. REQUIREMENTS. a. Written Examination. Examination is administered in garrison prior to conducting the practical. Cadets must correctly answer 14 out of 20 questions to pass (20 questions in 75 minutes). b. Day Land Navigation. Cadets must correctly navigate to 5 out of 8 points. Total point to point distance will cover approximately 5-8 kms with an average distance between each point of 650-1000 m. Total time allotted for the course is 5 hours. c. Night Land Navigation. Cadets must correctly navigate to 3 out of 5 points. Total point to point distance will cover approximately 3-4 kms with an average distance between each point of 600-800 m. Total time allotted for the course is 3.5 hours. d. RECONDO. Cadets must EXCEED normal passing scores as outlined above to qualify for RECONDO. Without retest, achieve a score of 80% or higher on each event – Written: 16/20 correct answers; Day: 40/50 (6 of 8 points); Night: 24/30 (4 of 5 points). 4. SUCCESS AT WARRIOR FORGE. a. Understand that the land navigation practical is conducted on Fort Lewis terrain. The terrain at Fort Lewis is naturally flat, with a rise in elevation of up to about 20 meters. This makes terrain association difficult, as there are few to no prominent land marks. Given the nature of the terrain, recognize that dead reckoning skills are applicable, but will not guarantee complete success because the density of the underbrush prevents this technique in some areas, particularly at night. Therefore, the ability to navigate by roads and trails, using an attack point is necessary to ensure success.

D-2
b. Hard ball, dirt roads, and trails are accurately depicted on the Fort Lewis map; however, trail depicturing is not completely reliable as some trails are reflected on the map, while others are not. Cadets should primarily rely upon their pace counts and reference trails to ensure they maintain situational awareness of their current location. The land navigation committee will cover reference trails during the overview on site. c. Checkpoints are established on the course to aid Cadets in determining their exact location. Cadets should not use these as a “Crutch” but should instead refer to them as a means to verify their information. d. Confidence in pace count is critical. At a minimum, Cadets must know:
1) Day Road and Wooded Terrain Pace Counts (DRPC & WTPC) 2) Night Road and Wooded Terrain Pace Counts (NRPC & WTPC)
e. During your campus training and within your resource/training constraints, attempt to mimic the WF land navigation assessment to the best of your ability.
1) Employ a terrain model of your course. 2) Use similar point markings. 3) Ensure distances between points are comparable to distances used at WF for both day and
night course. If time permits, use the same number of points. 4) Due to the size of the training area, recognize that the night course may not take place over
the exact same terrain as the day course. This is an important as Cadets may not have had the benefit of the day course familiarity, when they conduct the night course.
5) Use comparable times for planning and course conduct for both day and night. 6) Use land navigation lane strips so Cadets are forced to practice plotting their course and
thinking through “best strategy” for completing the course based upon their knowledge of the terrain, roads and trails.
f. The G-M Angle Conversion for Fort Lewis is 17.5 degrees. You can use 17 degrees and maintain accuracy on your land navigation exam and the practical exams in the field. You must SUBTRACT 17 DEGREES from the Grid Azimuth (GA) for Magnetic Azimuth (MA) which is an easterly GM angle. g. WF Land Navigation Markings. 1) Land Navigation Point. LN points are 12” orange and white placards with alpha numeric labeling. The 12” placard is attached to a tree or stake and is visible from all directions (360 degrees) when practical. Each LN point has a “clacker” tied off to the 12” orange and white placard with 550 Cord. The “clacker” is a pin pattern punch assigned to a specific LN point. It is accessible at every point which allows the committee to validate the Cadet found the correct point. 2) Check Point (CP). CPs are yellow placards with black lettering showing the 8-digit grid location of that point. Each CP is manned. At night, there is a chemical light attached to the CP. 3) Training Point. Training points are red placards with white alpha numeric labeling. They are set up in close proximity to the committee TOC and are used only for Cadets that require additional training after LN1 or LN2. Cadets should ignore these points while conducting the actual test as these points do not aid or provide any reference.

D-3
4) Reference Point (RP). RPs are white placards with black lettering showing the 8-digit grid location of that point. These points are located at some (but not all) road and trail intersections. Similar to CPs, these points may assist Cadets in verifying their current location. Unlike CPs though, RPs are not manned. Additionally, at night, RPs WILL NOT have a chemical light.
5) Siber Stakes. Siber stakes are red and yellow striped sections of PVC pipe mounted on stakes. They designate ecologically sensitive land in training areas on Fort Lewis. THEY DO NOT AFFECT the land navigation course. Understand what they represent and ignore – will not affect foot traffic in, around, or through areas. 5. Land Navigation Planning. It is important that your Cadets understand how to plan their route for actual execution. Without a systematic plan that plots their points from their lane strip and incorporates all control measures, time allocated for determining each point, routes, and a method for finding each point, your Cadets may waste valuable time and not successfully accomplish the course. We recommend that you teach a deliberate planning method for land navigation. The following planning technique is only a recommendation. This may work well for some Cadets, but not others. The intent is for Cadets to have some type of planning knowledge prior to execution. At WF 2010 Cadets at a minimum (to pass), must locate and identify total of 5 out of 8 PTs within 5 hours (Day) and 3 out of 5 PTs within 3.5 hours (Night). Acronyms used: GA Grid Azimuth MA Magnetic Azimuth SP Start Point PT Point GM Grid to Magnetic (which equals 17 degrees on this course) BA Black Azimuth DRPC Day Road Pace Count DWPC Day wooded Pace Count NRPC Night Road Pace Count NWPC Night Wooded Pace Count

D-4
Land Navigation Planning Steps:
• Step 1. Cadet plots all points; double checks each point to ensure accuracy.
• Step 2. Cadet reviews points and decides the best way to attack the course.
• Step 3. Cadet develops an attack plan for finding plotted points in a loop format. The next few pages provide a technique for planning.
• Step 4. Cadets should estimate available time to find each point plotted. Planning
should equal no more than 60 minutes for each PT. Cadets will have to carefully manage time available while on the course. If a Cadet uses more than 60 minutes to find one PT, he/she should then spend less than 60 minutes for another PT. After locating each point, Cadets should review their plan and adjust time available, if necessary.
Excerpt: FM 3-25.26, Map Reading and Land Navigation)
PART I - DECLINATION Declination is the angular difference between any two norths. If you have a map and a compass, the one of most interest to you will be between magnetic and grid north. The declination diagram (Figure D1) shows the angular relationship, represented by prongs, among grid, magnetic, and true norths. While the relative positions of the prongs are correct, they are seldom plotted to scale. Do not use the diagram to measure a numerical value. This value will be written in the map margin (in both degrees and mils) beside the diagram.
Figure D1 - Declination diagrams.

D-5
1. Location. A declination diagram is a part of the information in the lower margin on larger maps. On medium-scale maps, the declination information is shown by a note in the map margin. 2. Grid-Magnetic Angle. The G-M angle value is the angular size that exists between grid north and magnetic north. It is an arc, indicated by a dashed line that connects the grid-north and magnetic-north prongs. This value is expressed to the nearest 1/2 degree, with mil equivalents shown to the nearest 10 mils. The G-M angle is important to the map reader/land navigator because azimuths translated between map and ground will be in error by the size of the declination angle if not adjusted for it. 3. Grid Convergence. An arc indicated by a dashed line connects the prongs for true north and grid north. The value of the angle for the center of the sheet is given to the nearest full minute with its equivalent to the nearest mil. These data are shown in the form of a grid-convergence note. 4. Conversion. There is an angular difference between the grid north and the magnetic north. Since the location of magnetic north does not correspond exactly with the grid-north lines on the maps, a conversion from magnetic to grid or vice versa is needed. a. With Notes. Simply refer to the conversion notes that appear in conjunction with the diagram explaining the use of the G-M angle (Figure D1). One note provides instructions for converting magnetic azimuth to grid azimuth; the other, for converting grid azimuth to magnetic azimuth. The conversion (add or subtract) is governed by the direction of the magnetic-north prong relative to that of the north-grid prong. b. Without Notes. In some cases, there are no declination conversion notes on the margin of the map; it is necessary to convert from one type of declination to another. A magnetic compass gives a magnetic azimuth; but in order to plot this line on a gridded map, the magnetic azimuth value must be changed to grid azimuth. The declination diagram is used for these conversions. A rule to remember when solving such problems is this: No matter where the azimuth line points, the angle to it is always measured clockwise from the reference direction (base line). With this in mind, the problem is solved by the following steps: (1) Draw a vertical or grid-north line (prong). Always align this line with the vertical lines on a map (Figure D2).

D-6
Figure D2 - Declination diagram with arbitrary line.
(2) From the base of the grid-north line (prong), draw an arbitrary line (or any azimuth line) at a roughly right angle to north, regardless of the actual value of the azimuth in degrees (Figure D2). (3) Examine the declination diagram on the map and determine the direction of the magnetic north (right-left or east-west) relative to that of the grid-north prong. Draw a magnetic prong from the apex of the grid-north line in the desired direction (Figure D2). (4) Determine the value of the G-M angle. Draw an arc from the grid prong to the magnetic prong and place the value of the G-M angle (Figure D2). (5) Complete the diagram by drawing an arc from each reference line to the arbitrary line. A glance at the completed diagram shows whether the given azimuth or the desired azimuth is greater, and thus whether the known difference between the two must be added or subtracted. (6)The inclusion of the true-north prong in relationship to the conversion is of little importance. 5. Applications. Remember, there are no negative azimuths on the azimuth circle. Since 0 degree is the same as 360 degrees, then 2 degrees is the same as 362 degrees. This is because 2 degrees and 362 degrees are located at the same point on the azimuth circle. The grid azimuth can now be converted into a magnetic azimuth because the grid azimuth is now larger than the G-M angle. a. When working with a map having an east G-M angle:

D-7
(1) To plot a magnetic azimuth on a map, first change it to a grid azimuth (Figure D3).
Figure D3 - Converting to grid azimuth.
(2) To use a magnetic azimuth in the field with a compass, first change the grid azimuth plotted on a map to a magnetic azimuth (Figure D4).
Figure D4 - Converting to magnetic azimuth.

D-8
(3) Convert a grid azimuth to a magnetic azimuth when the G-M angle is greater than a grid azimuth (Figure D5).
Figure D5 - Converting to a magnetic azimuth when the G-M angle is greater.
b. When working with a map having a west G-M angle: (1) To plot a magnetic azimuth on a map, first convert it to a grid azimuth (Figure D6).
Figure D6 - Converting to a grid azimuth on a map.
D-9
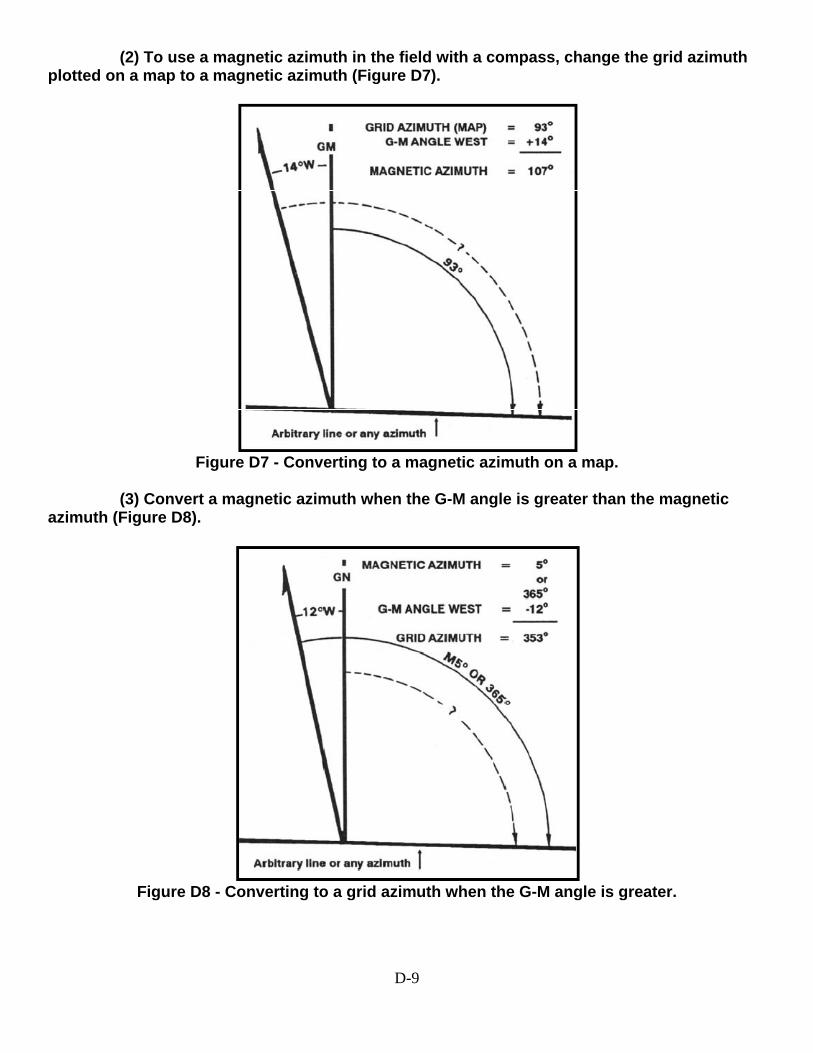
(2) To use a magnetic azimuth in the field with a compass, change the grid azimuth plotted on a map to a magnetic azimuth (Figure D7).
Figure D7 - Converting to a magnetic azimuth on a map.
(3) Convert a magnetic azimuth when the G-M angle is greater than the magnetic azimuth (Figure D8).
Figure D8 - Converting to a grid azimuth when the G-M angle is greater.

D-10
c. The G-M angle diagram should be constructed and used each time the conversion of azimuth is required. Such procedure is important when working with a map for the first time. It also may be convenient to construct a G-M angle conversion table on the margin of the map.
NOTE: When converting azimuths, exercise extreme care when adding and subtracting the G-M angle. A simple mistake of 1° could be significant in the field.
PART II – LOCATING POINTS
1. INTERSECTION: Intersection is the location of an unknown point by successively occupying at least two (preferably three) known positions on the ground and then map sighting on the unknown location. It is used to locate distant or inaccessible points or objects such as enemy targets and danger areas. There are two methods of intersection: the map and compass method and the straightedge method (Figures D9 and D10).
Figure D9 - Intersection, using map and compass.

D-11
Figure D10 - Intersection, using a straightedge.
a. When using the map and compass method— (1) Orient the map using the compass. (2) Locate and mark your position on the map, (3) Determine the magnetic azimuth to the unknown position using the compass. (4) Convert the magnetic azimuth to grid azimuth. (5) Draw a line on the map from your position on this grid azimuth. (6) Move to a second known point and repeat steps 1, 2, 3, 4, and 5. (7) The location of the unknown position is where the lines cross on the map. Determine the grid coordinates to the desired accuracy. b. The straight edge method is used when a compass is not available. When using it— (1) Orient the map on a flat surface by the terrain association method. (2) Locate and mark your position on the map. (3) Lay a straight edge on the map with one end at the user’s position (A) as a pivot point; then, rotate the straightedge until the unknown point is sighted along the edge. (4) Draw a line along the straight edge (5) Repeat the above steps at position (B) and check for accuracy. (6) The intersection of the lines on the map is the location of the unknown point. Determine the grid coordinates to the desired accuracy.
D-12
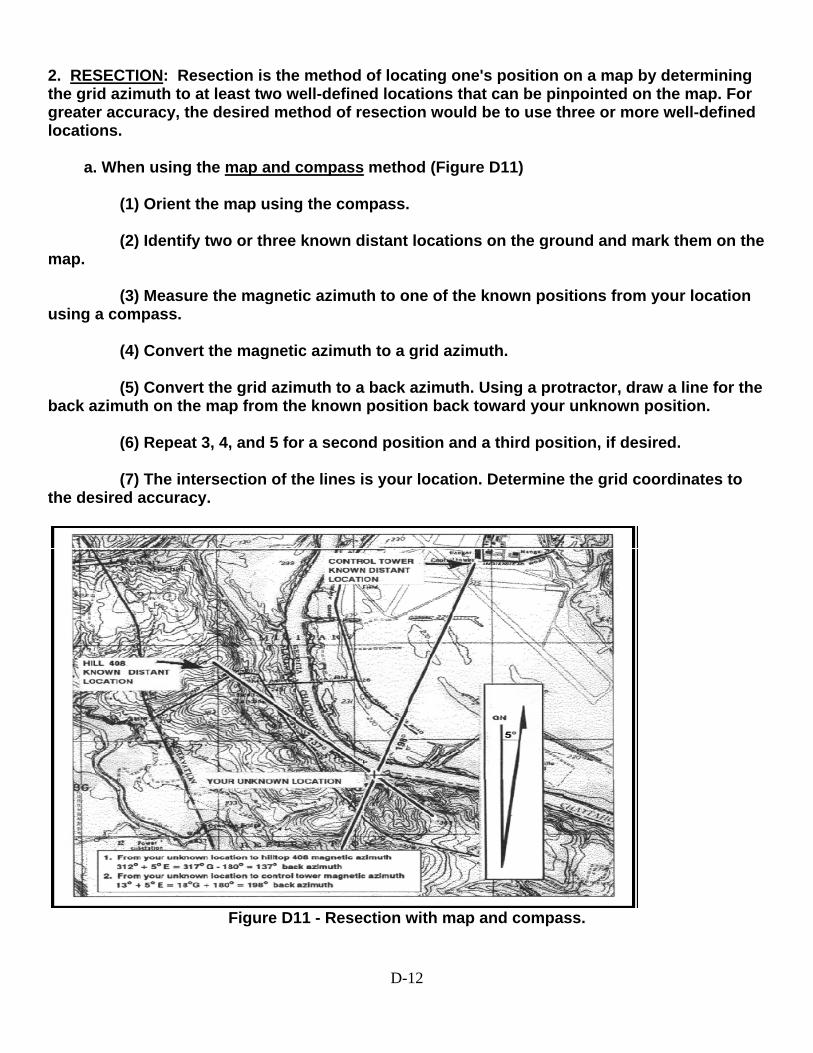
2. RESECTION: Resection is the method of locating one's position on a map by determining the grid azimuth to at least two well-defined locations that can be pinpointed on the map. For greater accuracy, the desired method of resection would be to use three or more well-defined locations. a. When using the map and compass method (Figure D11) (1) Orient the map using the compass. (2) Identify two or three known distant locations on the ground and mark them on the map. (3) Measure the magnetic azimuth to one of the known positions from your location using a compass. (4) Convert the magnetic azimuth to a grid azimuth. (5) Convert the grid azimuth to a back azimuth. Using a protractor, draw a line for the back azimuth on the map from the known position back toward your unknown position. (6) Repeat 3, 4, and 5 for a second position and a third position, if desired. (7) The intersection of the lines is your location. Determine the grid coordinates to the desired accuracy.
Figure D11 - Resection with map and compass.

D-13
b. When using the straightedge method (Figure D12) (1) Orient the map on a flat surface by the terrain association method. (2) Locate at least two known distant locations or prominent features on the ground and mark them on the map. (3) Lay a straightedge on the map using a known position as a pivot point. Rotate the straightedge until the known position on the map is aligned with the known position on the ground. (4) Draw a line along the straightedge away from the known position on the ground toward your position. (5) Repeat 3 and 4 using a second known position. (6) The intersection of the lines on the map is your location. Determine the grid coordinates to the desired accuracy.
Figure D12 - Resection with straightedge.
3. MODIFIED RESECTION: Modified resection is the method of locating one’s position on the map when the person is located on a linear feature on the ground, such as a road, canal, or stream (Figure D13). a. Orient the map using a compass or by terrain association. b. Find a distant point that can be identified on the ground and on the map. c. Determine the magnetic azimuth from your location to the distant known point. d. Convert the magnetic azimuth to a grid azimuth.

D-14
e. Convert the grid azimuth to a back azimuth. Using a protractor, draw a line for the back azimuth on the map from the known position back toward your unknown position. f. The location of the user is where the line crosses the linear feature. Determine the grid coordinates to the desired accuracy.
Figure D13 – Modified resection.
4. POLAR COORDINATES: A method of locating or plotting an unknown position from a known point by giving a direction and a distance along that direction line is called polar coordinates. The following elements must be present when using polar coordinates (Figure D14). a. Proceed as follows: (1) Present known location on the map. (2) Azimuth (grid or magnetic). (3) Distance (in meters).

D-15
Figure D14 - Polar plot.
Using the laser range finder to determine the range enhances your accuracy in determining the unknown position's location.

D-16
PART III - TERRAIN FEATURES
All terrain features are derived from a complex landmass known as a mountain or ridgeline (Figure D15). The term ridgeline is not interchangeable with the term ridge. A ridgeline is a line of high ground, usually with changes in elevation along its top and low ground on all sides from which a total of 10 natural or man-made terrain features are classified.
Figure D15 - Ridgeline.
1. Major Terrain Features. a. Hill. A hill is an area of high ground. From a hilltop, the ground slopes down in all directions. A hill is shown on a map by contour lines forming concentric circles. The inside of the smallest closed circle is the hilltop (Figure D16).
Figure D16 - Hill.

D-17
b. Saddle. A saddle is a dip or low point between two areas of higher ground. A saddle is not necessarily the lower ground between two hilltops; it may be simply a dip or break along a level ridge crest. If you are in a saddle, there is high ground in two opposite directions and lower ground in the other two directions. A saddle is normally represented as an hourglass (Figure D17).
Figure D17 - Saddle.
c. Valley. A valley is a stretched-out groove in the land, usually formed by streams or rivers. A valley begins with high ground on three sides, and usually has a course of running water through it. If standing in a valley, three directions offer high ground, while the fourth direction offers low ground. Depending on its size and where a person is standing, it may not be obvious that there is high ground in the third direction, but water flows from higher to lower ground. Contour lines forming a valley are either U-shaped or V-shaped. To determine the direction water is flowing, look at the contour lines. The closed end of the contour line (U or V) always points upstream or toward high ground (Figure D18).
Figure D18 - Valley.

D-18
d. Ridge. A ridge is a sloping line of high ground. If you are standing on the centerline of a ridge, you will normally have low ground in three directions and high ground in one direction with varying degrees of slope. If you cross a ridge at right angles, you will climb steeply to the crest and then descend steeply to the base. When you move along the path of the ridge, depending on the geographic location, there may be either an almost unnoticeable slope or a very obvious incline. Contour lines forming a ridge tend to be U-shaped or V-shaped. The closed end of the contour line points away from high ground (Figure D19).
Figure C19 - Ridge.
e. Depression. A depression is a low point in the ground or a sinkhole. It could be described as an area of low ground surrounded by higher ground in all directions, or simply a hole in the ground. Usually only depressions that are equal to or greater than the contour interval will be shown. On maps, depressions are represented by closed contour lines that have tick marks pointing toward low ground (Figure D20).
Figure D20 - Depression.

D-19
2. Minor Terrain Features. a. Draw. A draw is a less developed stream course than a valley. In a draw, there is essentially no level ground and, therefore, little or no maneuver room within its confines. If you are standing in a draw, the ground slopes upward in three directions and downward in the other direction. A draw could be considered as the initial formation of a valley. The contour lines depicting a draw are U-shaped or V-shaped, pointing toward high ground (Figure D21).
Figure D21 - Draw.
b. Spur. A spur is a short, continuous sloping line of higher ground, normally jutting out from the side of a ridge. A spur is often formed by two rough parallel streams, which cut draws down the side of a ridge. The ground sloped down in three directions and up in one direction. Contour lines on a map depict a spur with the U or V pointing away from high ground (Figure D22).
Figure D22 - Spur.

D-20
c. Cliff. A cliff is a vertical or near vertical feature; it is an abrupt change of the land. When a slope is so steep that the contour lines converge into one "carrying" contour of contours, this last contour line has tick marks pointing toward low ground. Cliffs are also shown by contour lines very close together and, in some instances, touching each other (Figure D23).
Figure D23 - Cliff.
3. Supplementary Terrain Features. a. Cut. A cut is a man-made feature resulting from cutting through raised ground, usually to form a level bed for a road or railroad track. Cuts are shown on a map when they are at least 10 feet high, and they are drawn with a contour line along the cut line. This contour line extends the length of the cut and has tick marks that extend from the cut line to the roadbed, if the map scale permits this level of detail (Figure D24).
Figure D24 - Cut and fill.
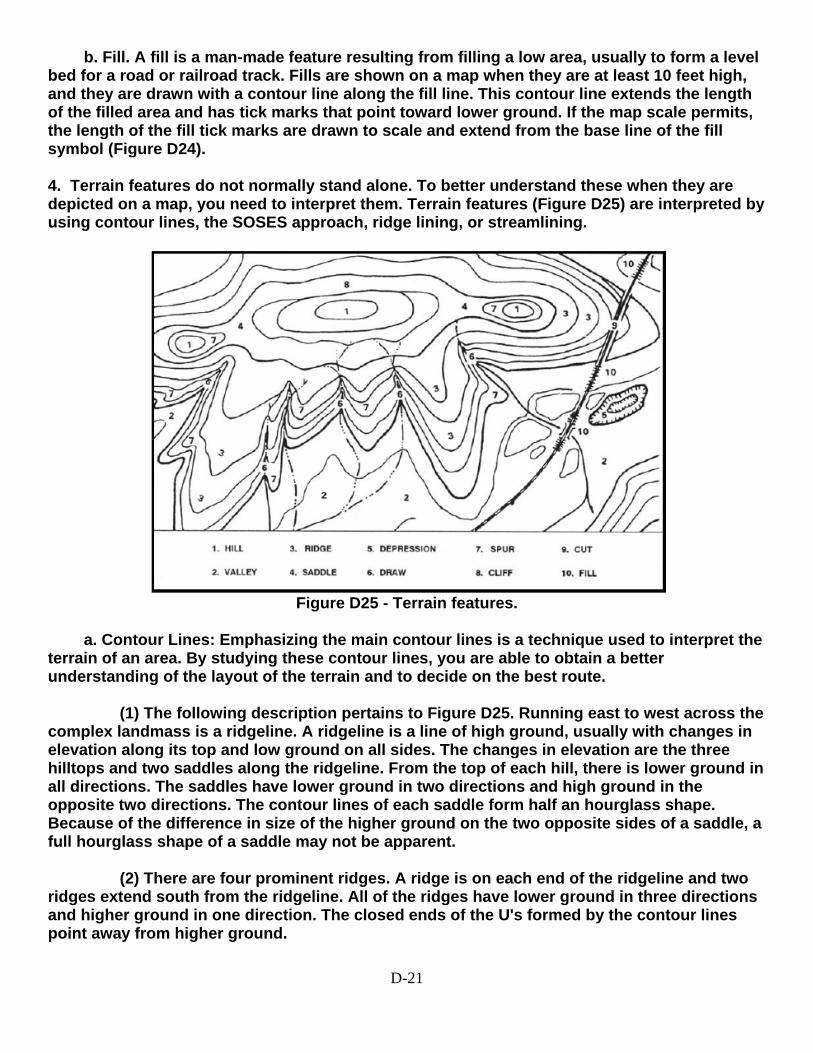
D-21
b. Fill. A fill is a man-made feature resulting from filling a low area, usually to form a level bed for a road or railroad track. Fills are shown on a map when they are at least 10 feet high, and they are drawn with a contour line along the fill line. This contour line extends the length of the filled area and has tick marks that point toward lower ground. If the map scale permits, the length of the fill tick marks are drawn to scale and extend from the base line of the fill symbol (Figure D24). 4. Terrain features do not normally stand alone. To better understand these when they are depicted on a map, you need to interpret them. Terrain features (Figure D25) are interpreted by using contour lines, the SOSES approach, ridge lining, or streamlining.
Figure D25 - Terrain features.
a. Contour Lines: Emphasizing the main contour lines is a technique used to interpret the terrain of an area. By studying these contour lines, you are able to obtain a better understanding of the layout of the terrain and to decide on the best route. (1) The following description pertains to Figure D25. Running east to west across the complex landmass is a ridgeline. A ridgeline is a line of high ground, usually with changes in elevation along its top and low ground on all sides. The changes in elevation are the three hilltops and two saddles along the ridgeline. From the top of each hill, there is lower ground in all directions. The saddles have lower ground in two directions and high ground in the opposite two directions. The contour lines of each saddle form half an hourglass shape. Because of the difference in size of the higher ground on the two opposite sides of a saddle, a full hourglass shape of a saddle may not be apparent. (2) There are four prominent ridges. A ridge is on each end of the ridgeline and two ridges extend south from the ridgeline. All of the ridges have lower ground in three directions and higher ground in one direction. The closed ends of the U's formed by the contour lines point away from higher ground.

D-22
(3) To the south lies a valley; the valley slopes downward from east to west. Note that the U of the contour line points to the east, indicating higher ground in that direction and lower ground to the west. Another look at the valley shows high ground to the north and south of the valley. (4) Just east of the valley is a depression. There is higher ground in all directions when looking from the bottom of the depression. (5) There are several spurs extending generally south from the ridgeline. They, like ridges, have lower ground in three directions and higher ground in one direction. Their contour line U's point away from higher ground. (6) Between the ridges and spurs are draws. They, like valleys, have higher ground in three directions and lower ground in one direction. Their contour line U's and V's point toward higher ground. (7) Two contour lines on the north side of the center hill are touching or almost touching. They have ticks indicating a vertical or nearly vertical slope or a cliff. (8) The road cutting through the eastern ridge depicts cuts and fills. The breaks in the contour lines indicate cuts, and the ticks pointing away from the roadbed on each side of the road indicate fills.
Figure D26 – Ridgelining and streamlining
b. SOSES: A recommended technique for identifying specific terrain features and then locating them on the map is to make use of five of their characteristics known by the mnemonic SOSES. Terrain features can be examined, described, and compared with each other and with corresponding map contour patterns in terms of their shapes, orientations, sizes, elevations, and slopes.

D-23
(1) Shape. The general form or outline of the feature at its base. (2) Orientation. The general trend or direction of a feature from your viewpoint. A feature can be in line, across, or at an angle to your viewpoint. (3) Size. The length or width of a feature horizontally across its base. For example, one terrain feature might be larger or smaller than another terrain feature. (4) Elevation. The height of a terrain feature. This can be described either in absolute or relative terms as compared to the other features in the area. One landform may be higher, lower, deeper, or shallower than another. (5) Slope. The type (uniform, convex, or concave) and the steepness or angle (steep or gentle) of the sides of a terrain feature. Through practice, you can learn to identify several individual terrain features in the field and see how they vary in appearance. c. Ridgelining. This technique helps you to visualize the overall lay of the ground within the area of interest on the map. Follow these steps: (1) Identify on the map the crests of the ridgelines in your area of operation by identifying the close-out contours that lie along the hilltop. (2) Trace over the crests so each ridgeline stands out clearly as one identifiable line. (3) Go back over each of the major ridgelines and trace over the prominent ridges and spurs that come out of the ridgelines. The usual colors used for this tracing are red or brown; however, you may use any color at hand. When you have completed the ridge lining process, you will find that the high ground on the map will stand out and that you will be able to see the relationship between the various ridgelines (Figure D26). d. Streamlining. This procedure (Figure D26) is similar to that of ridgelining. (1) Identify all the mapped streams in the area of operations. (2) Trace over them to make them stand out more prominently. (3) Then identify other low ground, such as smaller valleys or draws that feed into the major streams, and trace over them. This brings out the drainage pattern and low ground in the area of operation on the map. The color used for this is usually blue; but again, if blue is not available, use any color at hand so long as the distinction between the ridgelines and the streamlines is clear.

D-24
PART IV - NAVIGATIONAL METHODS Staying on the route is accomplished through the use of one or two navigation techniques—dead reckoning and terrain association. These methods are discussed in detail below. 1. Moving by Dead Reckoning. Dead reckoning consists of two fundamental steps. The first is the use of a protractor and graphic scales to determine the direction and distance from one point to another on a map. The second step is the use of a compass and some means of measuring distance to apply this information on the ground. In other words, it begins with the determination of a polar coordinate on a map and ends with the act of finding it on the ground. a. Dead reckoning along a given route is the application of the same process used by a mapmaker that establishes a measured line of reference upon which to construct the framework of the map. Therefore, triangulation exercises (either resection or intersection) can be easily undertaken by the navigator at any time to either determine or confirm precise locations along or near their route. Between these position-fixes, establish your location by measuring or estimating the distance traveled along the azimuth being followed from the previous known point. You might use pacing, a vehicle odometer, or the application of elapsed time for this purpose, depending upon the situation. b. Most dead reckoned movements do not consist of single straight-line distances because you cannot ignore the tactical and navigational aspects of the terrain, enemy situation, natural and man-made obstacles, time, and safety factors. Another reason most dead reckoning movements are not single straight-line distances is because compasses and pace-counts are imprecise measures. Errors compound over distance; therefore, you could soon be far from your intended route even if you performed the procedures correctly. The only way to counteract this phenomenon is to reconfirm your location by terrain association or resection. Routes planned for dead reckoning generally consist of a series of straight-line distances between several checkpoints with perhaps some travel running on or parallel to roads or trails. c. There are two advantages to dead reckoning. First, dead reckoning is easy to teach and to learn. Second, it can be a highly accurate way of moving from one point to another if done carefully over short distances, even where few external cues are present to guide the movements. d. During daylight, across open country, along a specified magnetic azimuth, never walk with the compass in the open position and in front of you. Because the compass will not stay steady or level, it does not give an accurate reading when held or used this way. Begin at the start point and face with the compass in the proper direction, then sight in on a landmark that is located on the correct azimuth to be followed. Close the compass and proceed to that landmark. Repeat the process as many times as necessary to complete the straight-line segment of the route. e. The landmarks selected for these purposes are called steering marks, and their selection is crucial to success in dead reckoning. Steering marks should never be determined from a map study. They are selected as the march progresses and are commonly on or near the highest points that you can see along the azimuth line that you are following when they are selected. They may be uniquely shaped trees, rocks, hilltops, posts, towers, and buildings—anything that can be easily identified. If you do not see a good steering mark to the

D-25
front, you might use a back azimuth to some feature behind you until a good steering mark appears out in front. Characteristics of a good steering mark are: (1) It must have some characteristics about it, such as color, shade of color, size, or shape (preferably all four), that will assure you that it will continue to be recognized as you approach it. (2) If several easily distinguished objects appear along your line of march, the best steering mark is the most distant object. This procedure enables you to travel farther with fewer references to the compass. If you have many options, select the highest object. A higher mark is not as easily lost to sight as is a lower mark that blends into the background as you approach it. A steering mark should be continuously visible as you move toward it. (3) Steering marks selected at night must have even more unique shapes than those selected during daylight. As darkness approaches, colors disappear and objects appear as black or gray silhouettes. Instead of seeing shapes, you begin to see only the general outlines that may appear to change as you move and see the objects from slightly different angles. f. Dead reckoning without natural steering marks is used when the area through which you are traveling is devoid of features, or when visibility is poor. At night, it may be necessary to send a soldier of the unit out in front of your position to create your own steering mark in order to proceed. The position should be as far out as possible to reduce the number of chances for error as you move. Arm-and-hand signals or a radio may be used in placing soldier on the correct azimuth. After soldier has been properly located, move forward to that position and repeat the process until some steering marks can be identified or until you reach your objective. g. When handling obstacles/detours on the route, follow these guidelines: (1) When an obstacle forces you to leave your original line of march and take up a parallel one, always return to the original line as soon as the terrain or situation permits. (2) To turn clockwise (right) 90 degrees, you must add 90 degrees to your original azimuth. To turn counterclockwise (left) 90 degrees from your current direction, you must subtract 90 degrees from your present azimuth. (3) When making a detour, be certain that only paces taken toward the final destination are counted as part of your forward progress. They should not be confused with the local pacing that takes place perpendicular to the route in order to avoid the problem area and in returning to the original line of march after the obstacle has been passed. h. Sometimes a steering mark on your azimuth of travel can be seen across a swamp or some other obstacle to which you can simply walk out around. Dead reckoning can then begin at that point. If there is no obvious steering mark to be seen across the obstacle, perhaps one can be located to the rear. Compute a back azimuth to this point and later sight back to it once the obstacle has been passed in order to get back on track. i. You can use the deliberate offset technique. Highly accurate distance estimates and precision compass work may not be required if the destination or an intermediate checkpoint

D-26
is located on or near a large linear feature that runs nearly perpendicular to your direction of travel. Examples include roads or highways, railroads, power transmission lines, ridges, or streams. In these cases, you should apply a deliberate error (offset) of about 10 degrees to the azimuth you planned to follow and then move, using the lensatic compass as a guide in that direction until you encounter the linear feature. You will know exactly which way to turn (left or right) to find your destination or checkpoint, depending upon which way you planned your deliberate offset. j. Because no one can move along a given azimuth with absolute precision, it is better to plan a few extra steps than to begin an aimless search for the objective once you reach the linear feature. If you introduce your own mistake, you will certainly know how to correct it. This method will also cope with minor compass errors and the slight variations that always occur in the earth's magnetic field. k. There are disadvantages to dead reckoning. The farther you travel by dead reckoning without confirming your position in relation to the terrain and other features, the more errors you will accumulate in your movements. Therefore, you should confirm and correct your estimated position whenever you encounter a known feature on the ground that is also on the map. Periodically, you should accomplish a resection triangulation using two or more known points to pinpoint and correct your position on the map. Pace counts or any type of distance measurement should begin anew each time your position is confirmed on the map. (1) It is dangerous to select a single steering mark, such as a distant mountaintop, and then move blindly toward it. What will you do if you must suddenly call for fire support or a medical evacuation? You must periodically use resection and terrain association techniques to pinpoint your location along the way. (2) Steering marks can be farther apart in open country, thereby making navigation more accurate. In areas of dense vegetation, however, where there is little relief, during darkness, or in fog, your steering marks must be close together. This, of course, introduces more chance for error. (3) Finally, dead reckoning is time-consuming and demands constant attention to the compass. Errors accumulate easily and quickly. Every fold in the ground and detours as small as a single tree or boulder also complicate the measurement of distance. 2. Moving by Terrain Association. The technique of moving by terrain association is more forgiving of mistakes and far less time-consuming than dead reckoning. It best suits those situations that call for movement from one area to another. Once an error has been made in dead reckoning, you are off the track. Errors made using terrain association are easily corrected, however, because you are comparing what you expected to see from the map to what you do see on the ground. Errors are anticipated and will not go unchecked. You can easily make adjustments based upon what you encounter. After all, you do not find the neighborhood grocery store by dead reckoning—you adjust your movements according to the familiar landmarks you encounter along the way (Figure D27). Periodic position-fixing through either plotted or estimated resection will also make it possible to correct your movements, call for fire, or call in the locations of enemy targets or any other information of tactical or logistical importance.

D-27
Figure D27 - Terrain association navigation.
a. Identifying and Locating Selected Features. Being able to identify and locate the selected features, both on the map and on the ground, are essential to the success in moving by terrain association. The following rules may prove helpful. (1) Be certain the map is properly oriented when moving along the route and use the terrain and other features as guides. The orientation of the map must match the terrain or it can cause confusion. (2) To locate and identify features being used to guide the movement, look for the steepness and shape of the slopes, the relative elevations of the various features, and the directional orientations in relation to your position and to the position of the other features you can see. (3) Make use of the additional cues provided by hydrography, culture, and vegetation. All the information you can gather will assist you in making the move. The ultimate test and the best practice for this movement technique is to go out in the field and use it. The use of terrain, other natural features, and any man-made objects that appear both on the map and on the ground must be practiced at every opportunity. There is no other way to learn or retain this skill. b. Using Handrails, Catching Features, and Navigational Attack Points. Because it is difficult to dead reckon without error over long distances with your compass, the alert navigator can often gain assistance from the terrain. (1) Handrails are linear features like roads or highways, railroads, power transmission lines, ridgelines, or streams that run roughly parallel to your direction of travel. Instead of using precision compass work, you can rough compass without the use of steering marks for as long as the feature travels with you on your right or left. It acts as a handrail to guide the way.

D-28
(2) When you reach the point where either your route or the handrail changes direction, you must be aware that it is time to go your separate ways. Some prominent feature located near this point is selected to provide this warning. This is called a catching feature; it can also be used to tell you when you have gone too far. (3) The catching feature may also be your navigational attack point; this point is the place where area navigation ends and point navigation begins. From this last easily identified checkpoint, the navigator moves cautiously and precisely along a given azimuth for a specified distance to locate the final objective. The selection of this navigational attack point is important. A distance of 500 meters or less is most desirable. c. Recognizing the Disadvantages of Terrain Association. The major disadvantage to navigation by terrain association is that you must be able to interpret the map and analyze the world around you. Recognition of terrain and other features, the ability to determine and estimate direction and distance, and knowing how to do quicJ-in-the-head position fixing are skills that are more difficult to teach, learn, and retain than those required for dead reckoning. 3. Combination of Techniques. Actually, the most successful navigation is obtained by combining the techniques described above. Constant orientation of the map and continuous observation of the terrain in conjunction with compass-read azimuths, and distance traveled on the ground compared with map distance, used together make reaching a destination more certain. One should not depend entirely on compass navigation or map navigation; either or both could be lost or destroyed. 4. Pace Count. Another way to measure ground distance is the pace count. A pace is equal to one natural step, about 30 inches long. To accurately use the pace count method, you must know how many paces it takes you to walk 100 meters. To determine this, you must walk an accurately measured course and count the number of paces you take. A pace course can be as short as 100 meters or as long as 600 meters. The pace course, regardless of length, must be on similar terrain to that you will be walking over. It does no good to walk a course on flat terrain and then try to use that pace count on hilly terrain. To determine your pace count on a 600-meter course, count the paces it takes you to walk the 600 meters, then divide the total paces by 6. The answer will give you the average paces it takes you to walk 100 meters. It is important that each person who navigates while dismounted knows his or her pace count. a. There are many methods to keep track of the distance traveled when using the pace count. Some of these methods are: put a pebble in your pocket every time you have walked 100 meters according to your pace count; tie knots in a string; or put marks in a notebook. Do not try to remember the count; always use one of these methods or design your own method. b. Certain conditions affect your pace count in the field, and you must allow for them by making adjustments. (1) Slopes. Your pace lengthens on a down slope and shortens on an upgrade. Keeping this in mind, if it normally takes you 120 paces to walk 100 meters, your pace count may increase to 130 or more when walking up a slope. (2) Winds. A head wind shortens the pace and a tail wind increases it.

D-29
(3) Surfaces. Sand, gravel, mud, snow, and similar surface materials tend to shorten the pace. (4) Elements. Falling snow, rain, or ice cause the pace to be reduced in length. (5) Clothing. Excess clothing and boots with poor traction affect the pace length. (6) Visibility. Poor visibility, such as in fog, rain, or darkness, will shorten your pace.
PART V - COMPASS TECHNIQUES 1. Presetting a Compass and Following an Azimuth. Although different models of the lensatic compass vary somewhat in the details of their use, the principles are the same. a. During daylight hours or with a light source: (1) Hold the compass level in the palm of the hand. (2) Rotate it until the desired azimuth falls under the fixed black index line (for example, 320°), maintaining the azimuth as prescribed (Figure D28).
Figure D28 - Compass preset at 320 degrees.
D-30
(3) Turn the bezel ring until the luminous line is aligned with the north-seeking arrow. Once the alignment is obtained, the compass is preset. (4) To follow an azimuth, assume the centerhold technique and turn your body until the north-seeking arrow is aligned with the luminous line. Then proceed forward in the direction of the front cover's sighting wire, which is aligned with the fixed black index line that contains the desired azimuth. b. During limited visibility, an azimuth may be set on the compass by the click method. Remember that the bezel ring contains 3° intervals (clicks). (1) Rotate the bezel ring until the luminous line is over the fixed black index line. (2) Find the desired azimuth and divide it by three. The result is the number of clicks that you have to rotate the bezel ring. (3) Count the desired number of clicks. If the desired azimuth is smaller than 180°, the number of clicks on the bezel ring should be counted in a counterclockwise direction. For example, the desired azimuth is 51°. Desired azimuth is 51°¸ 3 = 17 clicks counterclockwise. If the desired azimuth is larger than 180°, subtract the number of degrees from 360° and divide by 3 to obtain the number of clicks. Count them in a clockwise direction. For example, the desired azimuth is 330°; 360°-330° = 30º/3 = 10 clicks clockwise. (4) With the compass preset as described above, assume a centerhold technique and rotate your body until the north-seeking arrow is aligned with the luminous line on the bezel. Then proceed forward in the direction of the front cover's luminous dots, which are aligned with the fixed black index line containing the azimuth. (5) When the compass is to be used in darkness, an initial azimuth should be set while light is still available, if possible. With the initial azimuth as a base, any other azimuth that is a multiple of three can be established through the use of the clicking feature of the bezel ring.
NOTE: Sometimes the desired azimuth is not exactly divisible by three, causing an option of rounding up or rounding down. If the azimuth is rounded up, this causes an increase in the value of the azimuth, and the object is to be found on the left. If the azimuth is rounded down, this causes a decrease in the value of the azimuth, and the object is to be found on the right.
2. Bypassing an Obstacle. To bypass enemy positions or obstacles and still stay oriented, detour around the obstacle by moving at right angles for specified distances. a. For example, while moving on an azimuth of 90° change your azimuth to 180° and travel for 100 meters. Change your azimuth to 90°and travel for 150 meters. Change your azimuth to 360°and travel for 100 meters. Then, change your azimuth to 90°and you are back on your original azimuth line (Figure D29).

D-31
Figure D29 - Bypassing an obstacle.
b. Bypassing an unexpected obstacle at night is a fairly simple matter. To make a 90° turn to the right, hold the compass in the centerhold technique; turn until the center of the luminous letter E is under the luminous line (do not move the bezel ring). To make a 90° turn to the left, turn until the center of the luminous letter W is under the luminous line. This does not require changing the compass setting (bezel ring), and it ensures accurate 90° turns. 3. Offset. A deliberate offset is a planned magnetic deviation to the right or left of an azimuth to an objective. Use it when the objective is located along or in the vicinity of a linear feature such as a road or stream. Because of errors in the compass or in map reading, the linear feature may be reached without knowing whether the objective lies to the right or left. A deliberate offset by a known number of degrees in a known direction compensates for possible errors and ensures that upon reaching the linear feature, the user knows whether to go right or left to reach the objective. Ten degrees is an adequate offset for most tactical uses. Each degree offset moves the course about 18 meters to the right or left for each 1,000 meters traveled. For example, in Figure D30, the number of degrees offset is 10. If the distance traveled to "x" in 1,000 meters, then "x" is located about 180 meters to the right of the objective.
Figure D30 - Deliberate offset to the objective.

D-32
PART VI - CONTOUR LINES AND ELEVATION Contour lines are the most common method of showing relief and elevation on a standard topographic map. A contour line represents an imaginary line on the ground, above or below sea level. All points on the contour line are at the same elevation. The elevation represented by contour lines is the vertical distance above or below sea level.
Figure D31 - Contour lines.
1. Contour Lines: The three types of contour lines (Figure D31) used on a standard topographic map are as follows: a. Index. Starting at zero elevation or mean sea level, every fifth contour line is a heavier line. These are known as index contour lines. Normally, each index contour line is numbered at some point. This number is the elevation of that line. b. Intermediate. The contour lines falling between the index contour lines are called intermediate contour lines. These lines are finer and do not have their elevations given. There are normally four intermediate contour lines between index contour lines. c. Supplementary. These contour lines resemble dashes. They show changes in elevation of at least one-half the contour interval. These lines are normally found where there is very little change in elevation, such as on fairly level terrain. 2. Determining Elevation: Before the elevation of any point on the map can be determined, the user must know the contour interval for the map being used. The contour interval measurement given in the marginal information is the vertical distance between adjacent contour lines. To determine the elevation of a point on the map— a. Determine the contour interval and the unit of measure used, for example, feet, meters, or yards (Figure D32).
Figure D32 - Contour interval note.

D-33
b. Find the numbered index contour line nearest the point of which you are trying to determine the elevation (Figure D33).
Figure D33 - Points on contour lines.
c. Determine if you are going from lower elevation to higher, or vice versa. In Figure D33, point (a) is between the index contour lines. The lower index contour line is numbered 500, which means any point on that line is at an elevation of 500 meters above mean sea level. The upper index contour line is numbered 600, or 600 meters. Going from the lower to the upper index contour line shows an increase in elevation. d. Determine the exact elevation of point (a), start at the index contour line numbered 500 and count the number of intermediate contour lines to point (a). Locate point (a) on the second intermediate contour line above the 500-meter index contour line. The contour interval is 20 meters (Figure D33), thus each one of the intermediate contour lines crossed to get to point (a) adds 20 meters to the 500-meter index contour line. The elevation of point (a) is 540 meters; the elevation has increased. e. Determine the elevation of point (b). Go to the nearest index contour line. In this case, it is the upper index contour line numbered 600. Locate point (b) on the intermediate contour line immediately below the 600-meter index contour line. Below means downhill or a lower elevation. Therefore, point (b) is located at an elevation of 580 meters. Remember, if you are increasing elevation, add the contour interval to the nearest index contour line. If you are decreasing elevation, subtract the contour interval from the nearest index contour line. f. Determine the elevation to a hilltop point (c). Add one-half the contour interval to the elevation of the last contour line. In this example, the last contour line before the hilltop is an index contour line numbered 600. Add one-half the contour interval, 10 meters, to the index contour line. The elevation of the hilltop would be 610 meters.

E-1
SECTION E - PERSONAL HYGIENE
PART I - Personal Hygiene (Extended FTX)
FM 21-75
Personal hygiene consists of practices which safeguard your health and that of others. It is often thought of as being the same as personal cleanliness. While cleanliness is important, it is only one part of healthy living. Personal hygiene is important to you because:
• It protects against disease-causing germs that are present in all environments. • It keeps disease-causing germs from spreading. • It promotes health among soldiers. • It improves morale.
1. PERSONAL CLEANLINESS: a. Skin. Wash your body frequently from head to foot with soap and water. If no tub or shower is available, wash with a cloth and soapy water, paying particular attention to armpits, groin area, face, ears, hands, and feet. b. Hair. Keep your hair clean, neatly combed, and trimmed. At least once a week, wash your hair and entire scalp with soap and water. Also, shave as often as the water supply and tactical situation permit. Do not share combs or shaving equipment with other soldiers. c. Hands. Wash your hands with soap and water after any dirty work, after each visit to the latrine, and before eating. Keep your fingernails closely trimmed and clean. Do not bite your fingernails, pick your nose, or scratch your body. d. Clothing and Sleeping Gear. Wash or exchange clothing when it becomes dirty (situation permitting). Wash or exchange sleeping gear when it becomes dirty. If clothing and sleeping gear cannot be washed or exchanged, shake them and air them regularly in the sun. That greatly reduces the number of germs on them. 2. CARE OF THE MOUTH AND TEETH: Regular and proper cleaning of the mouth and the teeth helps prevent tooth decay and gum disease. The most healthful oral hygiene is to clean your mouth and teeth thoroughly and correctly after each meal with a toothbrush and toothpaste. If a toothbrush is not available, cut a twig from a tree and fray it on one end to serve as a toothbrush. If mouthwash is available, use it to help kill germs in your mouth. To help remove food from between your teeth, use dental floss or toothpicks. Twigs can also be used for toothpicks. 3. CARE OF THE FEET: Wash and dry your feet daily. Use foot powder on your feet to help kill germs, reduce friction on the skin, and absorb perspiration. Socks should be changed daily. After crossing a wet area, dry your feet, put on foot powder, and change socks, as soon as the situation permits.

E-2
4. FOOD AND DRINK: For proper development, strength, and survival, your body requires:
• Proteins. • Fats and carbohydrates. • Minerals. • Vitamins. • Water.
a. Issued rations have those essential food substances in the right amounts and proper balance. So, eat primarily those rations. When feasible, heat your meals. That will make them taste better and will reduce the energy required to digest them. Do not overindulge in sweets, soft drinks, alcoholic beverages, and other non-issued rations. Those rarely have nutritional value and are often harmful. b. Drink water only from approved water sources or after it has been treated with water-purification tablets. To purify water from rivers or streams:
• Fill your canteen with water (be careful not to get trash or other objects in your canteen). • Add one purification tablet per quart of clear water or two tablets per quart of cloudy or very cold water. (If you are out of tablets, use boiling water that has been boiled for 5 minutes.) • Replace the cap loosely. • Wait 5 minutes. • Shake the canteen well and allow some of the water to leak out. • Tighten the cap. • Wait an additional 20 minutes before drinking the water.
4. EXERCISE: a. Exercise of the muscles and joints helps to maintain physical fitness and good health. Without that, you may lack the physical stamina and ability to fight. Physical fitness includes a healthy body, the capacity for skillful and sustained performance, the ability to recover from exertion rapidly, the desire to complete a designated task, and the confidence to face any eventuality. Your own safety, health, and life may depend on your physical fitness. b. There are lulls in combat when you will not be active. During such lulls, exercise. That helps to keep the muscles and body functions ready for the next period of combat. It also helps pass the time in the lulls. 5. REST: Your body needs regular periods of rest to restore physical and mental vigor. When you are tired, your body functions are sluggish, and your ability to react is slower than normal. That also makes you more susceptible to sickness. For good health, 6 to 8 hours of uninterrupted sleep each day is desirable. As that is seldom possible in combat, use rest periods and off-duty time to rest or sleep. Do not be ashamed to say that you are tired or sleepy. Do not, however, sleep when on duty.

E-3
6. MENTAL HYGIENE: a. The way you think affects the way you act. If you know your job, you will probably act quickly and effectively. If you are uncertain or doubtful of your ability to do your job, you may hesitate and make wrong decisions. Positive thinking is a necessity. You must enter combat with absolute confidence in your ability to do your job. b. Fear is a basic human emotion. It is both a mental and physical state. Fear is not shameful if it is controlled. It can even help you by making you more alert and more able to do your job. Fear makes the pupils of your eyes enlarge, which increases your field of vision so you can detect movement more easily. Fear also increases your rate of breathing and heartbeat. That increases your strength. Therefore, control your fear and use it to your advantage. c. Do not let your imagination and fear run wild. Remember, you are not alone. You are part of a team. There are other soldiers nearby, even though they cannot always be seen. Everyone must help each other and depend on each other. d. Worry undermines the body, dulls the mind, and slows down thinking and learning. It adds to confusion, magnifies troubles, and causes you to imagine things which really do not exist. If worried about something, talk to your leader about it. He or she may be able to help solve the problem. e. You may have to fight in any part of the world and in all types of terrain. Therefore, adjust your mind to accept conditions as they are. If mentally prepared for it, you should be able to fight under almost any conditions. 7. RULES FOR AVOIDING ILLNESS IN THE FIELD:
• Don't consume foods and beverages from unauthorized sources. • Don't soil the ground with urine or feces. (Use a latrine or hole dug for that purpose.) • Keep your fingers and contaminated objects out of your mouth. • Wash your hands following any contamination, before eating or preparing food, and before cleaning your mouth and teeth. • Wash all mess gear after each meal. • Clean your mouth and teeth at least once each day. • Avoid insect bites by wearing proper clothing and using insect repellents. • Avoid getting wet or chilled unnecessarily. • Don't share personal items (canteens, pipes, toothbrushes, washcloths, towels, and shaving gear) with other soldiers. • Don't leave food scraps lying around. • Sleep when possible. • Exercise regularly.

E-4
PART II - FOOT CARE
(Excerpt: FM 21-18, Foot Marches, APPENDIX C) Foot hygiene and sanitation are extremely important since feet are enclosed in heavy rigid footwear during most working hours and are constantly in action. Foot care involves good hygiene measures such as bathing frequently, using foot powder, wearing properly fitted footwear to allow for ventilation, and correctly trimming toenails. 1. FOOT HYGIENE - The care of minor foot ailments should be given the utmost attention. Many major conditions requiring hospitalization and disability have resulted from neglected or maltreated minor conditions. a. CONDITIONING - Conditioning is accomplished by progressively increasing the distance to be marched from day to day. Marching is a good way to strengthen the feet and legs; running alone will not suffice. The arch, ankle, and calf can be conditioned by performing simple exercises--for example, rising high on the toes or placing the feet on towels and using the toes to roll the towel back under the arch. b. PREVENTIVE MEASURES - Certain preventive measures can be implemented to avoid painful foot problems. (1) Before Marches. Trim toenails at least every two or three weeks, depending upon individual needs. Cut toenails short and square, and straight across (Figure C-1). Keep feet clean and dry, and use foot powder. Wear clean, dry, unmended, good-fitting socks (preferably cushion-soled) with seams and knots outside. A nylon or polypropylene sock liner can reduce friction and add protection. Carry an extra pair of socks. Carefully fit new boots. When getting used to a new pair of boots, alternate with another pair; tape known hot spots before wearing. (2) During Halts. Lie down with the feet elevated during each halt. If time permits, massage the feet, apply foot powder, change socks, and medicate blisters. Cover open blisters, cuts, or abrasions with absorbent adhesive bandages. Obtain relief from swelling feet by slightly loosening bootlaces where they cross the arch of the foot. (3) After Marches. Repeat procedures for the care of feet, wash and dry socks, and dry boots. Medicate blisters, abrasions, corns, and calluses. Inspect painful feet for sprains and improper fitting of socks and boots. Feet can develop red, swollen, tender skin along the sides of the feet from prolonged marching, which could become blisters. Therefore, feet require aeration, elevation, rest, and wider footwear. Prevent major foot problems by keeping the feet clean. The formation of blisters and abrasions with dirt and perspiration can cause infection and serious injury. If possible, give the feet a daily foot bath. In the field, cool water seems to reduce the sensation of heat and irritation. After washing, dry the feet well.

E-5
2. FOOT INJURIES - Many foot injuries can occur from foot marches, but only the most common are discussed herein. a. BLISTERS AND ABRASIONS - Common causes of blisters and abrasions are improperly conditioned feet, ill-fitting footwear and socks, improperly maintained footwear, heat, and moisture. They are normally caused by friction or pressure, as opposed to impact. (1) To clean a blister, wash gently around it with soap and water, being careful not to break the skin (Figure G1). If unbroken, use a sterilized needle or knifepoint to prick the lower edge of the blister to remove fluid. (To sterilize needle or knifepoint, hold in a flame.) Do not remove the skin; cover the blister with an absorbent adhesive bandage or similar dressing, extending beyond the edge of the blister. After applying the dressing, dust the outside of the dressing and entire foot with foot powder.
Figure E1 - Treatment of a foot blister.

E-6
(2) Use just enough foot powder since it can harden and become irritating. Foot powder lessens friction on the skin and prevents the raw edges of the adhesive plaster from adhering to socks. The adhesive plaster should be smooth so it can serve as a "second skin." Check the blister periodically for proper drying. After the blister has dried, remove the adhesive plaster. Carefully inspect the foot for other problem areas that are red and tender that may need the protection of an adhesive plaster. Cover abrasions and cuts on the foot with absorbent adhesive bandages for rapid healing. In an emergency, medical personnel can inject tincture of benzoin into a blister to prevent further abrasion and loss of skin. b. PERSPIRATION PROBLEMS - When feet perspire, the secretion decomposes and causes a foul odor. The skin between the toes usually becomes white and soft, rubs off easily, and is prone to abrasions. Treatment consists of washing and thoroughly drying the feet, and carefully painting the affected area with a cotton swab and a solution of one part Formalin and nine parts rubbing alcohol. This solution should be allowed to dry. If the skin begins to burn, the excess solution should be washed off It should be kept out of abrasions and cuts since it can cause severe pain. The entire area of the foot to include the ankle is painted. The areas around the heel and instep and between toes should be treated since they are main trouble spots. The solution should be applied once daily until the perspiration is halted and the skin becomes hardened. c. ATHLETE’S FOOT - Athlete's foot usually occurs between the toes, on the sole of the foot, and at points of contact between skin and footwear. This and other mild chronic cases of fungus infection may respond to daily foot powder applications. If fungicidal ointment is available, it can be used in addition to foot powder. Ointment should be used as directed and while the feet are at rest. If applications of foot powder and ointment do not heal the infection, an aidman or surgeon should be consulted. d. FROSTBITE: N/A during summer months of Warrior Forge on Fort Lewis. See FM 21-18, Foot Marches, for complete section. e. IMMERSION FOOT - Immersion foot is a form of injury that follows prolonged immersion of the feet in water that is not cold enough to cause freezing or frostbite. It can occur after exposure in subtropical waters. Clinically and pathologically, immersion foot is like trench foot since its cause is the same--lowering the temperature of the body part involved. It is associated with dependency (legs and feet down as in sitting or standing) and immobility of the lower extremities, and with constriction of the limbs by clothing or shoes. Other important factors are: body cooling due to wind, total immersion, inadequate protective clothing, illness, and starvation. The treatment for immersion foot is the same as for trench foot. f. STRESS FRACTURES AND MUSCLE INJURIES - Once stress fractures have occurred, they must be allowed time to heal. The affected area must rest for two or three weeks until the pain is gone, followed by a slow return to activity to avoid recurring injury. Personnel who have had an injury are more likely to be injured again. The best form of treatment for this type injury is prevention. This can be accomplished through a conditioning program and by ensuring major muscle groups are properly stretched and warmed up before marching.

E-7
g. CARE OF FOOTWEAR - Boots must be dried after use to avoid loosing shape and hardening of the leather. This can be done by placing a warm cloth in the boot or by any method that avoids rapid drying. To prevent moist leather from freezing during winter, boots should be placed inside a sleeping bag or used as a headrest. h. BOOTS - Two important factors in fitting boots are: the space between the end of the great toe and the toe of the boot should be the width of the thumb; and, in the unlaced boot, there should be enough space under the lower edge of the tongue to insert an index finger.
Figure E2 – Fitting Boots
(1) Poorly fitted boots can cause blisters, abrasions, calluses, and corns. Pressure is caused by boots being too small; friction is caused by boots being too large. If the tops of the toes are involved, the cap is too low or too stiff. If the ends of the toes are affected, the boot is too short or too loosely laced. If the sides of the big and little toes become irritated, the boot is too narrow. Irritation at the heel is caused by boots being too long, too loosely laced, or too wide a heel space. (2) Proper lacing of boots not only prevents blisters but also prevents improper blood flow in the foot. Laces can assume a seesaw action, which can produce a long blister

E-8
across the instep. To prevent blistering, lacing over the instep can be avoided. If possible, broad laces should be used and an extra pair should be carried. i. SOCKS — To check the fit of socks, a soldier should stand with weight evenly distributed on both feet. If the socks fit correctly, no tightness or fullness should exist (Table G-3). The wool cushion-sole sock is best because it offers good foot protection. (1) Soldiers should allow 3/8 of an inch for shrinkage of new socks. Those that are too large wrinkle inside the shoe, rub the feet, and cause blisters and abrasions. Socks that are too small wear quickly and reduce blood flow in the foot. When wearing two pairs of socks, soldiers should wear an outer pair at least a half-size larger than usual. Socks must be changed daily—dirty socks are conductors of heat and allow warmth to escape. They should be washed in lukewarm water to preserve the fiber of the sock since hot water can cause them to shrink. (2) When socks become damp, they can be dried by placing them inside a shirt next to the body. Socks should be completely dry before wearing. If it is not possible to wash the socks, they should be changed; the dirty socks should be dried and kneaded with the hands to remove dirt and hardness.
Figure E3 – Proper sizes for wool socks

E-9
BLISTER PREVENTION
FIRST LINE OF DEFENSE
• Good proper fitting boots are a must!!!!! • Proper socks (Thorlo® is an excellent brand.) - Never use cotton. - Use moisture-wicking socks such as polypropelene. - Try two pairs of socks. - Double layer socks are available at sports stores. • Lubricants can be used to reduce friction (Apply a thin layer to the bottom of your foot). - Vaseline®, Bag Balm®, Bodyglide® - New lubricants contain silicone and pain relievers. • Powders absorb moisture and therefore reduce friction. - Beware of powders that cake up. - Zeasorb® is great. A cheap version is cornstarch.
SECOND LINE OF DEFENSE
• Break in boots • Frequent sock changes • Orthotics (inserts and heel supports) • Spray antiperspirants containing aluminum chlorhydrate or aluminum chloride on feet.
FIVE KEY TIPS
• Break in boots. • Get the right socks. • Keep skin dry. • Change socks 3 times per day. • Treat hot spots before they turn into blisters.
BLISTER CARE
• Cover blister area with moleskin that has a hole formed to blister shape. This relieves pressure on that area.
• Avoid touching blister area (This decreases bacterial contamination). FOLLOW-UP CARE
• If area of redness and warmth develops or fluid from blister is whitish/greenish refer to Medical Clinic for evaluation.
• Continue with moleskin and hygiene as described above. Blistered areas may take several days to weeks to heal.
REMEMBER!!!!! BE PROACTIVE, NOT REACTIVE

F-1
SECTION F: FIRST AID
BASIC FIRST AID
The intent of the Supplemental Training Guidance for First Aid is to provide a general overview to Cadets. It is not meant to provide time to review or practice the basic First Aid tasks that the committee will teach and evaluate on training days 10-13. First Aid is the care and treatment you give a casualty before medical personnel arrive. Personal hygiene is the step you take to protect your own health and that of others. Your personal hygiene and first aid skills could save your life or the life of a buddy.
Do’s AND Don’ts of First Aid
When giving first aid to a casualty, remember the following:
• DO act promptly but calmly.
• DO reassure the casualty and gently examine him to determine the needed first aid.
• DO give lifesaving measures as required.
• DON'T position a soldier on his back if he is unconscious or has a wound on his face or neck.
• DON'T remove clothing from an injured soldier by pulling or tearing it off.
• DON'T touch or try to clean dirty wounds, including burns.
• DON'T remove dressings and bandages once they have been put on a wound.
• DON'T loosen a tourniquet once it has been applied.
• DON'T move a casualty who has a fracture until it has been properly splinted, unless it is absolutely necessary.
• DON'T give fluids by mouth to a casualty who is unconscious, nauseated, or vomiting, or who has an abdominal or neck wound.
• DON'T permit the head of a casualty with a head injury to be lower than his body.
• DON'T try to push protruding intestines or brain tissue back into a wound.
• DON'T put any medication on a burn.
• DON'T administer first-aid measures which are unnecessary or beyond your ability.
• DON'T fail to replace items used from the first-aid case.

F-2
9 Line MEDEVAC Request Format
Line 1: Location of PZ Line 2: Frequency and Call Sign: Line 3: Number of Patients and Precedence:
A-Urgent B-Urgent Surgery C-Priority D-Routine E-Convenience
Line 4: Special Equipment Required. A-None B-Hoist C-Forest/Jungle Penetrator D-Ventilator
Line 5: Number of Patients by type #-Litter #-Ambulatory
Line 6: Number and Type of Wound, Illness Line 7: PZ Marking
A-None B-Panels C-Pyrotechnic Signal D-Smoke (state color) E-Other (Explain)
Line 8: Patient Status (Number and type) A-US Military B-US Civilian C-NON-US Military D-NON-US Civilian E-EPW
Line 9: Terrain Description

G-1
SECTION G: WEAPONS HANDLING
ACCOUNTABILITY
Physical Security (Defined) “That part of security concerned with physical measures designed to safeguard personnel, to prevent unauthorized access to equipment, installations, material and documents, and to safeguard them against espionage, sabotage, damage, and theft.” AR 190-16 Responsibility
• You are responsible for all US Army equipment you sign for. – You can be charged for missing or damaged equipment.
• If you lose it, report it! – A field loss can be investigated if reported immediately. You buy it on the showdown
Weapons • Individuals issued arms are responsible for their security at all times. • Each issued weapon will be carried on the person at all times. • Weapons will not be entrusted to the custody of another person.
Sensitive Items
• Cannot be lost • Report immediately to the chain of command if missing
– Comsec equipment – Weapons – Certain Technology
• SINCGARS • NBC Alarms, NVG’s
Conclusion
• Secure equipment! • Remember – You signed for it, you own it. • Treat your weapon as if your life depends on it! • Limit access! “Should that person be here?”

G-2
Weapons Clearing Procedures
M16-series
*Point the Weapon into the clearing barrel during all steps*
• Clear the M16-Series Rifle. • Attempt to place the selector lever on SAFE. If the weapon is not cocked,
the lever cannot be placed on SAFE. • Remove the magazine from the rifle, if there is one present. • Lock the bolt open. • Pull the charging handle rearward. • Press the bottom of the bolt catch. • Allow the bolt to move forward until it engages the bolt catch. • Return the charging handle to the forward position. • If the selector lever is not on SAFE, place it on SAFE. • Inspect receiver and chamber to ensure they do not contain ammunition. • Allow the bolt to go forward by pressing the upper portion of the bolt catch. • Place the selector lever on FIRE and squeeze the trigger. • Pull charging handle fully rearward and release, allowing bolt to go
forward. • Place the selector lever on SAFE.

G-3
M249 Machine Gun
*Point the Weapon into the clearing barrel during all steps*
• Clear the M249 machine gun. • Move the safety to the fire position. • With your right hand, palm up, pull the cocking handle to the rear and lock
the bolt to the rear. • Hold the cocking handle to the rear and move the safety to the safe
position. Push the cocking handle forward to the locked position. Place weapon on safe.
• Push cocking handle forward to its lock position (you should hear a click). • Raise the cover and feed mechanism assembly. To check for brass, links,
or ammunition: - Check the feed pawl assembly under the feed cover. - Check the feed tray assembly. - Lift the feed tray assembly and inspect the chamber. - Check the space between the bolt assembly and chamber. - Insert two fingers in the magazine well and feel for brass or
ammunition. • Close the cover and feed mechanism assembly. • Move the safety to the fire position. • Pull the cocking handle to the rear, press the trigger, • and ease the bolt forward.

G-4
M60 Machine Gun
*Point the Weapon into the clearing barrel during all steps*
• Place the weapon in the “fire” position. • Pull the cocking handle to the rear.. • Place the weapon in the “safe” position. • Return and lock the cocking handle to the forward position. • Raise the cover/feed mechanism assembly and conduct a 4-point check for
ammo: - Check the feed pawl assembly under the cover. - Check the feed tray. - Lift the feed tray and inspect the chamber. - Check space between face of bolt and chamber.
• Close the cover. • Place the weapon in the “fire” position. • Pull the cocking handle to the rear position. • Pull the trigger and ease the bolt forward. • Place the weapon in the safe position.

G-5
RULES OF ENGAGEMENT
For Warrior Forger 2010 – Caucasus Region NOTHING IN ROE LIMITS YOUR INHERENT AUTHORITY AND OBLIGATION TO TAKE ALL NECESSARY AND APPROPRIATE ACTIONS TO DEFEND YOURSELF, YOUR UNIT, AND OTHER US FORCES.
1. HOSTILE FORCES: SAPA/Arianan Forces have been declared hostile.
2. HOSTILE ACTORS: You may engage persons who commit hostile acts or show hostile intent with the minimum force necessary to counter the hostile act or demonstrated hostile intent and to protect US Forces.
• Hostile act: Attack or other use of force against US Forces or use of force that directly precludes or impedes the mission/duties of US Forces.
• Hostile intent: Threat of imminent use of force against US Forces or threat of force to preclude or impede the mission/duties of US Forces.
3. You may use force, up to and including deadly force, against hostile actions:
a) In self-defense;
b) In defense of your unit, or other US Forces;
c) To prevent the theft, damage, or destruction of firearms, ammunition, explosives, or property designated by your Commander as vital to national security. Protect other property with less than deadly force.
4. ESCALATION OF FORCE: When possible, use the following degrees of force against hostile actors:
a. SHOUT; verbal warnings to HALT (ALTO).
b. SHOVE; physically restrain, block access, or detain. c. SHOW; your weapon and demonstrate intent to use it.
d. SHOOT; to remove the threat of death/serious bodily injury or to protect designated property. IF YOU MUST FIRE:
(1) Fire only aimed shots. NO WARNING SHOTS!
(2) Fire no more rounds than necessary.
(3) Fire with due regard for the safety of innocent bystanders.
(4) Take reasonable efforts not to destroy property.
(5) Stop firing as soon as the situation permits.
5. CROWDS: Control civilian crowds, mobs, or rioters interfering with US Forces with minimum necessary force. When circumstances permit, attempt following steps:
a. Repeated warnings to HALT (ALTO).
b. Show of force, including riot control formation.
c. Blocking of access, or other reasonable use of force necessary under the circumstances and proportional to the threat.
6. DETAINEES: You may stop, detain, search, and disarm persons as required to protect US Forces. Detainees will be turned over to the Military Police or Atropian Police ASAP.
7. Treat all persons with dignity and respect.

H-1
SECTION H: Tactical Review
(FM 7-8 Infantry Rifle Platoon & Squad)
TROOP-LEADING PROCEDURES (TLP) TLPs are not a hard and fast set of rules. Some actions may be performed simultaneously or in an order. They are a guide that must be applied consistent with the situation and the experience of the platoon leader and his subordinate leaders. The tasks involved in some actions (such as initiate movement, issue the WARNO, and conduct reconnaissance) may recur several times during the process. The last action (activities associated with supervising and refining the plan) occurs continuously throughout TLP and execution of the operation. The following information concerning the TLP assumes that the platoon leader will plan in a time-constrained environment. All steps should be done, even if done in abbreviated fashion. As such, the suggested techniques are oriented to help a platoon leader quickly develop and issue a combat order. 1. Receive the Mission. This step begins with the receipt of an initial WARNO. It also may begin when the platoon leader receives the commander’s OPORD, or it may result from a change in the overall situation. Receipt of mission initiates the planning and preparation process so the platoon leader can prepare an initial WARNO as quickly as possible. 2. Issue a Warning Order. After the leader determines the mission and gauges the time available for planning, preparation, and execution, he immediately issues an oral WARNO to his subordinates. In addition to telling his subordinates of the platoon’s new mission, the WARNO also gives them the leader’s planning timeline. The leader relays all other instructions or information that he thinks will assist the platoon in preparing for the new mission. Such information includes information about the enemy, the nature of the overall plan, and specific instructions for preparation. Most importantly, by issuing the initial WARNO as quickly as possible, the leader enables his subordinates to begin their own planning and preparation. 3. Make a Tentative Plan. After receiving the company OPORD (or FRAGO), the leader develops a tentative plan. The process of developing this plan in a time-constrained environment usually has six steps: receipt of the mission, mission analysis, COA development, COA analysis, COA selection, and issue the order. The leader relies heavily on the commander’s METT-TC analysis. This allows the leader to save time by focusing his analysis effort on areas that affect his plan. 4. Initiate Movement. The leader initiates any movement that is necessary to continue preparations or to posture the unit for the operation. This may include movement to an assembly area (AA), battle position, perimeter defense, or attack position; movement of reconnaissance elements; or movement to compute time-distance factors for the unit’s mission. 5. Conduct Reconnissance. Even if you have made a leader’s reconnaissance with the commander at some point during TLP, you should still conduct a reconnaissance after developing the plan. The focus of the reconnaissance is to confirm the priority intelligence requirements (PIRs) that support the tentative plan.

H-2
6. Complete the Plan. Completion of the plan includes several actions that transform the commander’s intent and concept and the platoon concept into a fully developed OPORD. These actions include preparing overlays, refining the indirect fire list, completing sustainment and C2 requirements, and updating the tentative plan as a result of the reconnaissance. It also allows the platoon leader to prepare the briefing site, briefing medium and briefing material he will need to present the OPORD to his subordinates. Completing the plan allows the platoon leader to make final coordination with other units or the commander before issuing the OPORD to his subordinates. 7. Issue the Operations Order. The OPORD precisely and concisely explains the mission, the commander’s intent and concept of how he wants his squads to accomplish the mission. The OPORD must not contain unnecessary information that could obscure what is essential and important. The platoon leader must ensure his squads know exactly what must be done, when it must be done, and how the platoon must work together to accomplish the mission and stay consistent with the intentions of the commander. 8. Supervise and Refine. The leader supervises the unit’s preparation for combat by conducting confirmation briefs, rehearsals, and inspections. OPERATION ORDER FORMAT An operation order (OPORD) is a directive issued by the leader to his subordinate leaders in order to effect the coordinated execution of a specific operation. The leader briefs his OPORD orally from notes that follow the five-paragraph format below. (Figure H1).

H-3
Figure H1- Example Operation Order

H-4
Figure H1- Example Operation Order (continued)

H-5
Figure H1- Example Operation Order (continued)

H-6
Figure H1- Example Operation Order (continued)

H-7
Figure H1- Example Operation Order (continued)
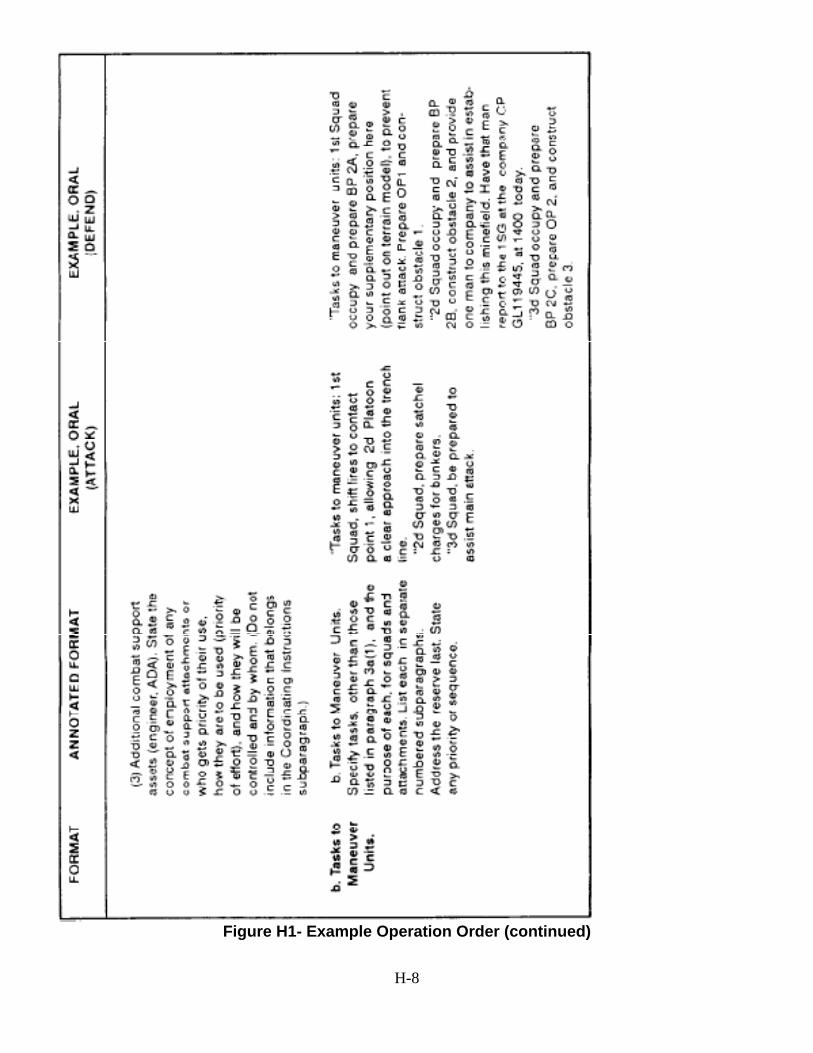
H-8
Figure H1- Example Operation Order (continued)

H-9
Figure H1- Example Operation Order (continued)

H-10
Figure H1- Example Operation Order (continued)

H-11
Figure H1- Example Operation Order (continued)

H-12
Figure H1- Example Operation Order (continued)

H-13
Figure H1- Example Operation Order (continued)

H-14
SQUAD ATTACK SITUATION: The squad is moving as part of the platoon conducting a movement to contact or a hasty or deliberate attack. REQUIRED ACTIONS: 1. Action on Enemy Contact. a. Soldiers receiving fire take up nearest positions that afford protection from enemy fire (cover) and observation (concealment). b. The fire team in contact immediately returns heavy volume of suppressive fire in the direction of the enemy. (1) Soldiers in the fire team in contact move to positions (bound or crawl) from which they can fire their weapons, position themselves to ensure that they have observation, fields of fire, cover, and concealment. They continue to fire and report known or suspected enemy positions to the fire team leader. (2) The team leader directs fires using tracers or standard fire commands. (3) The fire team not in contact takes covered and concealed positions in place and observes to the flanks and rear of the squad. (4) The squad leader reports contact to the platoon leader and moves toward the fire team in contact. 2. Locate the Enemy. a. Using sight and sound, the fire team in contact acquires known or suspected enemy positions. b. The fire team in contact begins to place well-aimed fire on suspected enemy positions. c. The squad leader moves to a position to better observe the enemy and assess the situation. d. The squad leader requests, through the platoon leader, for immediate suppression indirect fires (normally 60-mm mortars). e. The squad leader reports the enemy size and location, and any other information to the platoon leader. (As the platoon leader comes forward, he or she completes the squad leader's assessment of the situation.) 3. Suppress the Enemy. - The squad leader determines if the fire team in contact can gain suppressive fire based on the volume and accuracy of the enemy fire. a. If the answer is YES, the fire team leader continues to suppress the enemy: (1) The fire team destroys or suppresses enemy crew-served weapons first.

H-15
(2) The fire team places smoke (M203) on the enemy position to obscure it. (3) The fire team leader continues to control fires using tracers or standard fire commands. Fires must be well-aimed and continue at a sustained rate with no lulls. (4) Buddy teams fire their weapons so that both are not reloading their weapons at the same time. b. If the answer is NO, the squad leader then deploys the fire team not in contact to establish a support-by-fire position, and then reports the situation to the platoon leader. Normally, the squad will become the base-of-fire element for the platoon. The squad continues to suppress the enemy and responds to orders from the platoon leader. (The platoon leader, RATELO, the platoon FO, one machine gun team, and the squad leader of the next squad, as well as the platoon sergeant and the other machine gun team, are already moving forward for the Platoon Attack.) 4. Attack. - If the fire team in contact can suppress the enemy, the squad leader determines if the fire team not in contact can maneuver and makes the following assessment:
Location of enemy position(s) and obstacles. Size of enemy force engaging the squad. (The number of enemy automatic weapons, the presence of any vehicles, and the employment of indirect fires are indicators of enemy strength.) Vulnerable flank. Covered and concealed flanking route to the enemy position.
a. If the answer is YES, the squad leader maneuvers the fire team in the assault: (1) The squad leader directs the fire team in contact to support the movement of the other fire team. Then leads or directs the assaulting fire team leader to maneuver the fire team along a route that places the fire team in a position to assault the enemy. (The assaulting fire team must pick up and maintain fire superiority throughout the assault. Handover of responsibility for direct fires from the supporting fire team to the assaulting fire team is critical.) (2) Once in position, the squad leader gives the prearranged signal for the supporting fire team to lift fires or shift fires to the opposite flank of the enemy position. (3) The assaulting fire team fights through enemy positions using fire and movement. (The supporting fire team must be able to identify the near flank of the assaulting fire team.) (a) The team leader selects the route that allows access to reach the objective, while providing the best available cover and concealment for the team. The team leader then leads the team, from up front, in a shallow wedge throughout the attack. (b) Fire team members conduct individual movement techniques as individuals or buddy teams, while maintaining their relative position in the assault formation. At the end of each move, soldiers take up covered and concealed positions and resume firing. b. If the answer is NO or the assaulting fire team cannot continue to move, the squad leader deploys the assaulting fire team to add its fires against the enemy, reports to the platoon leader and requests instructions. The squad continues suppressing enemy positions and responds to the orders of the platoon leader.

H-16
5. Consolidate and Reorganize. a. Once the assaulting fire team has seized the enemy position, the squad leader establishes local security. (The squad leader must quickly prepare to defeat any enemy counterattack. At the conclusion of the assault, the squad is most vulnerable.) (1) The squad leader signals for the supporting fire team to move up into a designated position. (2) The squad leader assigns sectors of fire for both fire teams. (3) The squad leader positions key weapons. (4) All soldiers take up hasty defensive positions. (5) Squad leader develops initial fire support plan against an enemy counterattack. (As platoon moves up, then hands plan to platoon leader for further development.) (6) The squad leader posts an OP to warn of enemy activity. b. The squad performs the following tasks: (1) Reestablish the chain of command. (2) Redistribute and resupply ammunition. (3) Man crew-served weapons first. (4) Redistribute critical equipment (for example, radios, NBC, NVDs). (5) Treat casualties and evacuate wounded. (6) Fill vacancies in key positions. (7) Search, silence, segregate, safeguard, and speed EPWs to collection points. (8) Collect and report enemy information and materiel. c. Team leaders provide ammo, casualty, and equipment (ACE) reports to squad leader. d. The squad leader consolidates the ACE report and passes it to the platoon leader (or platoon sergeant). e. The squad continues the mission after receiving instructions from the platoon leader. (The platoon follows the success of the squad's flanking attack with the remaining squads as part of the platoon attack.) f. The squad leader reports the situation to the platoon leader.

H-17
BREAK CONTACT SITUATION: The squad/platoon is under enemy fire and must break contact. REQUIRED ACTIONS: 1. The squad/platoon leader directs one fire team/squad in contact to support the disengagement of the remainder of the unit. 2. The squad/platoon leader orders a distance and direction, or a terrain feature, or last objective rally point for the movement of the first fire team/squad. 3. The base of fire (fire team/squad) continues to suppress the enemy. 4. The moving element uses fragmentation, concussion, and smoke grenades to mask its movement. 5. The moving element takes up the designated position and engages the enemy position. 6. The platoon leader directs the base-of-fire element to move to its next location. (Based on the terrain and the volume and accuracy of the enemy's fire, the moving fire team/squad may need to use fire and movement techniques. 7. The squad/platoon continues to bound away from the enemy until --
It breaks contact. It passes through a higher level support-by-fire position. Its fire teams/squads are in the assigned position to conduct the next mission.
NOTE: The squad/platoon must continue to suppress the enemy as it breaks contact. 8. The leader should consider changing the direction of movement once contact is broken. This will reduce the ability of the enemy to place effective indirect fires on the unit. 9. If the squad or platoon becomes disrupted, soldiers stay together and move to the last designated rally point. 10. Squad/platoon leaders account for soldiers, report, reorganize as necessary and continue the mission.

H-18
REACT TO AMBUSH SITUATION: If the squad/platoon enters a kill zone and the enemy initiates an ambush with a casualty-producing device and a high volume of fire, the unit takes the following actions. REQUIRED ACTIONS: 1. In a near ambush (within hand-grenade range), soldiers receiving fire immediately return fire, take up covered positions, and throw fragmentation concussion, and smoke grenades. a. Immediately after the grenades detonate, soldiers in the kill zone assault through the ambush using fire and movement. b. Soldiers not in the kill zone immediately--
Identify enemy positions. Initiate immediate suppressive fires against the enemy. Take up covered positions. Shift fires as the soldiers in the kill zone assault through the ambush.
2. In a far ambush (beyond hand-grenade range). soldiers receiving fire immediately return fire, take up covered positions, and suppress the enemy by--
Destroying or suppressing enemy crew-served weapons first. Obscuring the enemy position with smoke (M203). Sustaining suppressive fires.
a. Soldiers (teams/squads) not receiving fires move by a covered and concealed route to a vulnerable flank of the enemy position and assault using fire and movement techniques. b. Soldiers in the kill zone continue suppressive fires and shift fires as the assaulting team/squad fights through the enemy position. 3. The platoon FO calls for and adjusts indirect fires as directed by the platoon leader. On order, lifts fires or shifts them to isolate the enemy position, or to attack them with indirect fires as they retreat. 4. The squad/platoon leader reports, reorganizes as necessary, and continues the mission.

H-19
KNOCK OUT A BUNKER The term bunker in this FM covers all emplacements having overhead cover and containing apertures (embrasures) through which weapons are fired. The two primary types are reinforced concrete pillboxes, and log bunkers. There are two notable exploitable weaknesses of bunkers. First, bunkers are permanent, their location and orientation fixed. Bunkers cannot be relocated or adjusted to meet a changing situation. They are optimized for a particular direction and function. The worst thing an Infantry platoon or squad can do is to approach the position in the manner it was designed to fight. Instead, the unit should approach the position from the direction it is least able to defend against—the flank or rear. Second, bunkers must have openings (doors, windows, apertures, or air vents). There are two disadvantages to be exploited here. First, structurally, the opening is the weakest part of the position and will be the first part of the structure to collapse if engaged. Second, a single opening can only cover a finite sector, creating blind spots. To cover these blind spots, the defender has to either rely on mutually supporting positions or build an additional opening. Mutual support may be disrupted, thereby enabling the attacker to exploit the blind spot. Adding additional openings correspondingly weakens the position’s structural soundness, in which case the attacker targets the opening to collapse the position. Ideally the team is able to destroy the bunker with standoff weapons and HE munitions. However, when required, the fire team can assault the bunker with small arms and grenades. A fire team (two to four men) with HE and smoke grenades move forward under cover of the suppression and obscuration fires from the squad and other elements of the base of fire. When they reach a vulnerable point of the bunker, they destroy it or personnel inside with grenades or other hand-held demolitions. All unsecured bunkers must be treated as if they contain live enemy, even if no activity has been detected from them. The clearing of bunkers must be systematic or the enemy will come up behind assault groups. ENTER BUILDING Squads and platoons, particularly when augmented with engineers, are the best organized and equipped units in the Army for breaching protective obstacles; gaining access to buildings; and assaulting rooms, hallways, and stairways. Although there are specific drills associated with fighting in buildings, the overall assault is an operation, not a drill. When using a doorway as the point of entry, the path of least resistance is initially determined on the way the door opens. If the door opens inward, the Soldier plans to move away from the hinged side. If the door opens outward, he plans to move toward the hinged side. Upon entering, the size of the room, enemy situation, and obstacles in the room (furniture and other items) that hinder or channel movement become factors that influence the number one man’s direction of movement.

H-20
CLEAR A ROOM The term room in this FM means any enclosed space or partition within a building. Although rooms come in all shapes and sizes, there are some general principles that apply to most room clearing tasks. For clearing large open buildings such as hangars or warehouses, it may be necessary to use subordinate units using a line formation while employing traveling or bounding overwatch. These methods can effectively clear the entire structure while ensuring security. Room clearing techniques differ based on METT-TC, ROE, and probability of noncombatants inside the building. If there are known or suspected enemy forces, but no noncombatants inside the building, the platoon may conduct high intensity room clearings. If there are known or suspected noncombatants within the building, the platoon may conduct precision room clearings. High intensity room clearing may consist of fragmentation grenade employment and an immediate and high volume of small arms fire placed into the room, precision room clearing will not. Room clearing techniques are described using the standard four-man fire team. This does not mean that all four members must enter a room, nor does it mean that more than four men cannot enter. The fire team organization is the baseline from where units adapt to the specific situation. This is because the compartmentalized nature typical of buildings and rooms makes units larger than squads awkward and unmanageable. For this battle drill to be effectively employed, each member of the team must know his sector of fire and how his sector overlaps and links with the sectors of the other team members. No movement should mask the fire of any of the other team members. On the signal, the team enters through the entry point (or breach). As the team members move to their points of domination, they engage all threats or hostile targets in sequence in their sector. The direction each man moves should not be preplanned unless the exact room layout is known. Each man should, however, go in a direction opposite the man in front of him (Figure H2). For example:
• #1 Man. The #1 man enters the room and eliminates any immediate threat. He can move left or right, moving along the path of least resistance to a point of domination—one of the two corners and continues down the room to gain depth.
• #2 Man. The #2 man enters almost simultaneously with the first and moves in the opposite direction, following the wall. The #2 man must clear the entry point, clear the immediate threat area, and move to his point of domination.
• #3 Man. The #3 man simply moves in the opposite direction of the #2 man inside the room, moves at least 1 meter from the entry point, and takes a position that dominates his sector.
• #4 Man. The #4 man moves in the opposite direction of the #3 man, clears the doorway by at least 1 meter, and moves to a position that dominates his sector.

H-21
Once the room is cleared, the team leader may order some team members to move deeper into the room overwatched by the other team members. The team leader must control this action. In addition to dominating the room, all team members are responsible for identifying possible loopholes and mouseholes in the ceiling, walls, and floor. Cleared rooms should be marked IAW unit SOP.
Figure H2 - Clearing a room.
1. The fire team initiating contact establishes a base of fire and suppresses the enemy in and around the building. 2. The squad leader determines the ability to maneuver by identifying-- a. The building and any obstacles. b. The size of the enemy force engaging the squad. c. An entry point. (Assaulting fire teams should enter the building at the highest level possible.) d. A covered and concealed route to the entry point.

H-22
3. The fire team in contact-- a. Destroys or suppresses enemy crew-served weapons first. b. Obscures the enemy position with smoke (M203). c. Sutains suppressive fires. 4. The squad leader directs the fire team in contact to support the entry of the other fire team into the building. 5. If necessary, the supporting fire team repositions to isolate the building as well as continue suppressive fires. (Normally, the platoon has added its supporting fires against the enemy.) 6. The squad leader designates the entry point of the building. The platoon and squad shift direct fires and continue to suppress the enemy in adjacent positions and to isolate the building. The platoon FO lifts indirect fires or shifts them beyond the building. 7. The squad leader and the assaulting fire team approach the building and position themselves at either side of the entrance. (Soldiers should avoid entering buildings through doors and windows, because they will normally be covered by enemy weapons inside the building.) 8. Allowing cool-off time (two seconds maximum), and shouting FRAG OUT, the lead soldier of the assaulting fire team prepares and throws a grenade into the building. 9. After the explosion, the next soldier enters the room and positions self to the right (left) of the entrance, engages all identified or likely enemy positions, and scans the room. 10. The assaulting fire team leader shouts COMING IN (RIGHT or LEFT), enters the building initially moving left or right , and positions self in location to control the actions of the team. Team leader does not block the entrance way. Team leader makes a quick assessment of the size and shape of the room, and begins to clear the room.. 11. Once the room is cleared, the team leader signals to the squad leader that the room is cleared. 12. The squad leader enters the building and marks the entry point in accordance with the SOP. The squad leader determines whether or not the squad can continue to clear rooms and still maintain suppressive fires outside the building. Normally, it takes a platoon to clear a building.

H-23
CROSSING A LINEAR DANGER AREA 1. Crossing of Linear Danger Areas (Platoon). The platoon crosses the danger area in the formation and location specified by the platoon leader. On the far side of the danger area, platoon personnel and equipment are accounted for. The platoon continues the mission. (Figure H3.)
Figure H3 – Crossing a danger area.
a. When the lead team signals "danger area" (relayed throughout the platoon), the platoon halts. b. The platoon leader moves forward, confirms the danger area, and determines what technique the platoon will use to cross. The platoon sergeant also moves forward to the platoon leader. c. The platoon leader informs all squad leaders of the situation and the near-side and far-side rally points. d. The platoon sergeant directs positioning of the near-side security (usually conducted by the trail squad). These two security teams may follow him forward when the platoon halts and a danger area signal is passed back. e. The platoon leader reconnoiters the danger area and selects the crossing point that provides the best cover and concealment. f. Near-side security observes to the flanks and overmatches the crossing. g. When the near-side security is in place, the platoon leader directs the far-side security team to cross the danger area.

H-24
h. The far-side security team clears the far side. i. The far-side security team leader establishes an OP forward of the cleared area. j. The far-side security team signals to the squad leader that the area is clear. The squad leader relays the message to the platoon leader. k. The platoon leader selects the method the platoon will use to cross the danger area. l. The platoon quickly and quietly crosses the danger area. m. Once across the danger area, the main body begins moving slowly on the required azimuth. n. The near-side security element, controlled by the platoon sergeant, crosses the danger area where the platoon crossed. They may attempt to cover any tracks left by the platoon. o. The platoon sergeant ensures everyone crosses and sends up the report. p. The platoon leader ensures accountability and resumes movement at normal speed. NOTE: The same principles stated above are used when crossing a smaller unit across a danger area CONDUCT A RECON PATROL The three types of reconnaissance patrols are area, zone, and route. Reconnaissance patrols provide timely and accurate information on the enemy and terrain. They confirm the leader's plan before it is executed. The commander must inform the leader of the specific information requirements for each mission. 1. ORGANIZATION - Besides the common elements, reconnaissance patrols have a reconnaissance team and a reconnaissance and security team. a. Reconnaissance Team. Reconnaissance teams reconnoiter the objective area once the security teams are in position. Normally these are two-man teams (buddy teams) to reduce the possibility of detection. b. Reconnaissance and Security Team. R&S teams are normally used in a zone reconnaissance, but may be useful in any situation when it is impractical to separate the responsibilities for reconnaissance and security. 2. TASKS TO SUBORDINATE UNITS - Normally the platoon headquarters element controls the platoon on a reconnaissance patrol mission.

H-25
a. The platoon leader must consider the requirements for reconnaissance and security in assigning tasks to the squads or fire teams. The tasks may separate so that one or more squads conduct the reconnaissance while other squads or fire teams provide security at various locations. Platoon leader may also assign reconnaissance and security (R&S) tasks to each squad or team. When a fire team conducts a reconnaissance patrol it operates as a single R&S team. b. In assigning tasks, the leader must also consider the size and number of reconnaissance objectives, the requirement to secure the ORP and other points, and the time allowed for conducting the mission. 3. AREA RECONNAISSANCE - An area reconnaissance is conducted to obtain information about a specified location and the area around it. The location may be given as a grid coordinate or an objective on an overlay. In an area reconnaissance, the platoon or squad uses surveillance or vantage-points around the objective from which to observe it and the surrounding area. In planning for an area reconnaissance mission, the platoon leader considers the following sequence of actions. a. The leader may include a surveillance team in reconnaissance of the objective from the ORP and may positions it while on the reconnaissance. The subordinate leader responsible for security establishes security at the ORP and positions other security teams as required on likely enemy avenues of approach into the objective area. b. If required the leader positions other surveillance elements about the objective or may move them on one route, posting them as they move, or may direct them to move on separate routes to their assigned locations. c. After observing the objective for a specified time, all elements return to the ORP and report their observations to the leader or the recorder. Once all information is collected, it is disseminated to every soldier. 4. ZONE RECONNAISSANCE - A zone reconnaissance is conducted to obtain information on enemy, terrain, and routes within a specified zone. Zone reconnaissance techniques include the use of moving elements, stationary teams, or a series of area reconnaissance actions. a. Moving Elements. The leader plans the use of squads or fire teams moving along multiple routes to cover the entire zone. Methods for planning the movement of multiple elements through a zone include the fan, the box, converging routes, and successive sectors. (1) Fan method. The leader first selects a series of ORPs throughout the zone. The platoon establishes security at the first ORP. Each R&S team moves from the ORP along a different fan-shaped route that overlaps with others to ensure reconnaissance of the entire area. The leader maintains a reserve at the ORP. When all R&S teams have returned to the ORP, the platoon collects and disseminates all information to every soldier before moving on to the next ORP. (Figure H4.)
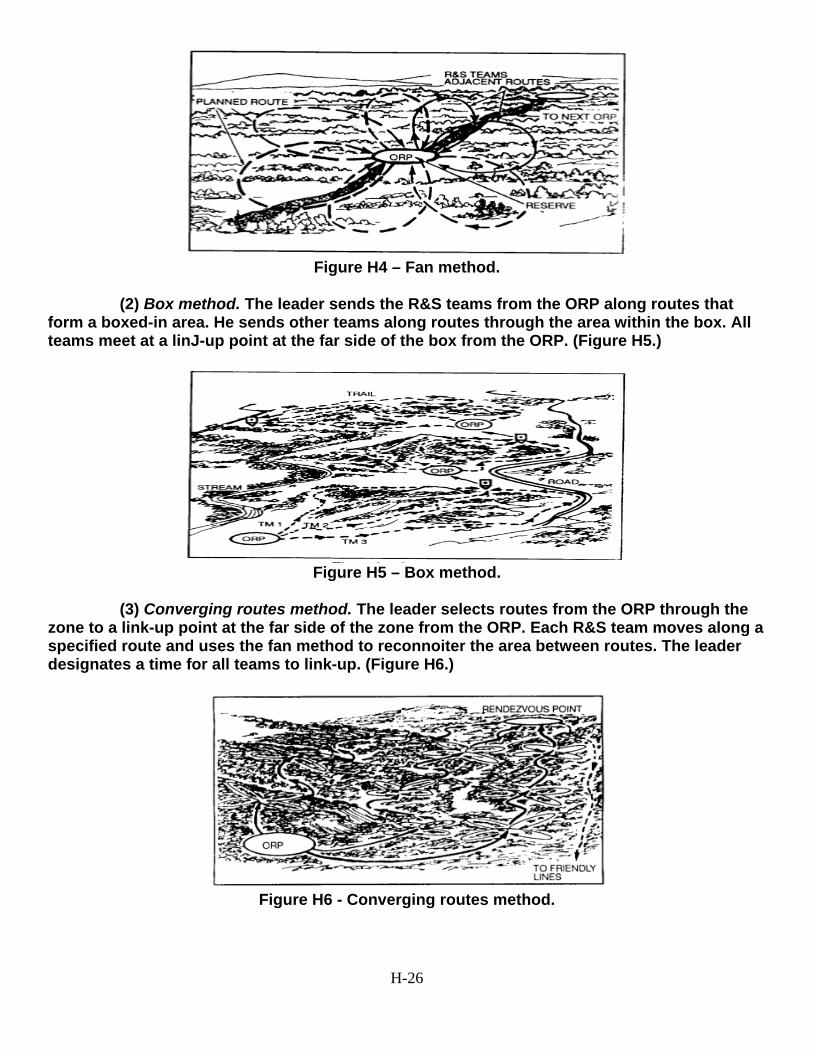
H-26
Figure H4 – Fan method.
(2) Box method. The leader sends the R&S teams from the ORP along routes that form a boxed-in area. He sends other teams along routes through the area within the box. All teams meet at a linJ-up point at the far side of the box from the ORP. (Figure H5.)
Figure H5 – Box method.
(3) Converging routes method. The leader selects routes from the ORP through the zone to a link-up point at the far side of the zone from the ORP. Each R&S team moves along a specified route and uses the fan method to reconnoiter the area between routes. The leader designates a time for all teams to link-up. (Figure H6.)
Figure H6 - Converging routes method.

H-27
(4) Successive sector method. The leader may divide the zone into a series of sectors. Within each sector, the platoon uses the converging routes method to reconnoiter to an intermediate linJ-up point where it collects and disseminates the information gathered to that point before reconnoitering the next sector. (Figure H7.)
Figure H7 - Successive sector method.
b. Stationary Teams. Using this technique, the leader positions surveillance teams in locations where they can collectively observe the entire zone for long-term, continuous information gathering (Figure H8). Leader must consider sustaining requirements when developing soldier's load plan.
Figure H8 – Zone reconnaissance using stationary surveillance.

H-28
CONDUCT AN AMBUSH An ambush is a surprise attack from a concealed position on a moving or temporarily halted target. Antiarmor ambushes are established when the mission is to destroy enemy armored or mechanized forces. Ambushes are classified by category--hasty or deliberate; type--point or area; and formation--linear or L-shaped. The leader uses a combination of category, type, and formation in developing the ambush plan. 1. Planning. The key planning considerations include--
Covering the entire kill zone by fire. Using existing or reinforcing obstacles (Claymores and other mines) to keep the enemy in the kill zone. Protecting the assault and support elements with mines, Claymores, or explosives. Using security elements or teams to isolate the kill zone. Assaulting into the kill zone to search dead and wounded, assemble prisoners, and collect equipment. (The assault element must be able to move quickly through its own protective obstacles.) Timing the actions of all elements of the platoon to preclude loss of surprise. Using only one squad to conduct the entire ambush and rotating squads over time from the ORP. This technique is useful when the ambush must be manned for a long time.
2. Formations. The leader considers the linear or L-shaped formations in planning an ambush. a. Linear. In an ambush using a linear formation, the assault and support elements deploy parallel to the enemy's route (Figure H9). This positions both elements on the long axis of the kill zone and subjects the enemy to flanking fire. This formation can be used in close terrain that restricts the enemy's ability to maneuver against the platoon, or in open terrain provided a means of keeping the enemy in the kill zone can be effected.
Figure H9 - Linear ambush formation.

H-29
b. L-shaped. In an L-shaped ambush, the assault element forms the long leg parallel to the enemy's direction of movement along the kill zone. The support element forms the short leg at one end of and at right angles to the assault element. This provides both flanking (long leg) and enfilading fires (short leg) against the enemy. The L-shaped ambush can be used at a sharp bend in a trail, road, or stream. It should not be used where the short leg would have to cross a straight road or trail. (Figure H10.)
Figure H10 – L-shaped ambush formation.
REACT TO INDIRECT FIRE 1. CONDITIONS: The platoon/squad is moving, halted, or occupying a firing position with or without a dug-in mortar emplacement. Any soldier gives the alert, "INCOMING," or a round impacts nearby. 2. STANDARDS: The squad/platoon begins drill immediately. If moving, halted, or in an unimproved firing position, the squad moves with all of its mission-essential equipment and ammunition to a rally point or alternate firing position beyond the impact area. If in a dug-in mortar emplacement, the squad moves into the personnel shelters with all of its mission-essential equipment except the mortar ammunition. The squad/platoon completes the drill before the enemy initiates a fire for effect. 3. TASK STEPS AND PERFORMANCE MEASURES: a. Any soldier announces, "INCOMING." b. If the squad is in a firing position, but not dug in: (1) Gunner removes and secures sight. (2) Gunner collapses and attaches the mount under the barrel. (3) Ammunition bearer pushes down on the barrel to dislodge the baseplate from the ground.

H-30
(4) Gunner configures the mortar for a one-man carry and picks up the sight. (60mm only) (5) Squad leader and ammunition bearer secure the remainder of the mission-essential equipment and ammunition. (6) Squad performs additional steps 3 or 4 below as appropriate. c. If the squad is moving, is halted, or has prepared to move in accordance with step 1: (1) Squad leader gives the direction and distance for the squad to move to a rally point by ordering direction and distance--for example, THREE O'CLOCK, ONE HUNDRED METERS. (2) Squad members move rapidly along the direction and distance to the rally point. (3) At the rally point, the leader immediately accounts for personnel and equipment, and forms the squad/platoon for a move to an alternate firing position. (4) At the alternate firing position, the leader immediately accounts for personnel and computes a new mounting azimuth. Squad leader lays the mortar on the new azimuth and prepares to respond to calls for fire. (5) Senior leader present submits a SHELREP, a report that gives details of the enemy attack. d. If the squad is in an improved (dug in) firing position-- (1) Squad members seek cover in personnel shelters. (2) Squad members protect as much mission-essential equipment as possible by placing it in the personnel shelter. (3) Senior leader present submits a SHELREP.

H-31
ENEMY PRISONERS OF WAR. All detained persons shall be immediately given humanitarian care and treatment. U.S. Armed Forces will never torture, maltreat, or purposely place detained persons in positions of danger. There is never a military necessity exception to violate these principles. Field processing of detainees is always handled IAW the 5 Ss and T method: Search: Confiscate weapons and items of intelligence value or items that might assist the detainee to escape. Let the detainee keep protective clothing, equipment, identification and personal items. All confiscated items must be tagged. Silence: Direct the detainees not to talk, or make facial or hand gestures. They may be gagged. Segregate: Leaders are separated from the rest of the population. Separate hostile elements such as religious, political, or ethnic groups. Separate women and minors from adult male detainees. Safeguard: Ensure detainees are provided adequate food, potable water, clothing, shelter, medical attention, and that they not exposed to unnecessary danger. Do not use coercion to obtain information. Immediately report allegations of abuse through command channels. Speed to a safe area/rear: Evacuate detainees from the battlefield to a holding area or facility as soon as possible. Transfer captured documents and other property to the forces assuming responsibility for the detainees. Tag: Before evacuating an EPW detainee, he and his equipment must be tagged. Information should include date and time of capture, location of capture, capturing unit, and circumstances of capture. (Figures H11 and H12). Tagging is critical. If it does not happen the ability of higher headquarters to quickly obtain pertinent tactical information is greatly reduced.
Figure H11 – Minimal EPW tag.

H-32
Figure H12 – Minimal EPW document/equipment tag.

H-33
RADIO OPERATING PROCEDURES 1. Phonetic Alphabet

H-34
2. Numerical Pronunciation
Numeral Spoken As
Ø . . . . . . . . . . . . . . . . . . . . . ZE-RO
1 . . . . . . . . . . . . . . . . . . . . . . WUN
2 . . . . . . . . . . . . . . . . . . . . . . TOO
3 . . . . . . . . . . . . . . . . . . . . . . TREE
4 . . . . . . . . . . . . . . . . . . . . . . FOW-ER
5 . . . . . . . . . . . . . . . . . . . . . . FIFE
6 . . . . . . . . . . . . . . . . . . . . . . SIX
7 . . . . . . . . . . . . . . . . . . . . . . SEV-EN
8 . . . . . . . . . . . . . . . . . . . . . . AIT
9 . . . . . . . . . . . . . . . . . . . . . . NIN-ER c. Numbers are transmitted digit by digit except that exact multiples of thousands are spoken as such. However, there are special cases, such as antH-air warfare reporting procedures, when the normal pronunciation of numerals is prescribed for example, 17 would then be "seventeen."
Numeral Spoken As 44 . . . . . . . . . . . . . . . . . . . FOW-ER FOW-ER 9Ø . . . . . . . . . . . . . . . . . . . NIN-ER ZE-RO 136 . . . . . . . . . . . . . . . . . . . WUN TREE SIX
TIME 12ØØ . . . . . . . . . . . . WUN TOO ZE-RO ZE-RO 1478 . . . . . . . . . . . . . . . . . . WUN FOW-ER SEV-EN AIT 7ØØØ . . . . . . . . . . . . . . . . SEV-EN TOU-SAND 16ØØØ . . . . . . . . . . . . . . . WUN SIX TOU-SAND 812681 . . . . . . . . . . . . . . . . AIT WUN TOO SIX AIT WUN
d. The figure "ZERO" is to be written "Ø," the figure "ONE" is to be written "1" and the letter "ZULU" is to be written "Z." e. Difficult words may be spelled phonetically using the four-step method. Abbreviations and isolated letters should be spoken without using the pro-words "I SPELL."

H-35
3. Pro-words Listed Alphabetically

H-36

H-37

H-38
4. Radio Checks - To minimize transmission time, use radio checks sparingly. Transmit only when you have message traffic. NET THIS IS NCS RADIO CHECK OVER NCS THIS IS 1ST SUB ROGER OUT NCS THIS IS 2D SUB WEAK READABLE OVER (2D SUB receives NCS weak) NCS THIS IS 3D SUB ROGER OUT NET THIS IS NCS ROGER OUT

H-39
CALL FOR FIRE A call for fire is a message prepared by an observer. It has all the information needed to deliver indirect fires on the target. Any soldier in the platoon can request indirect fire support by use of the call for fire. Calls for fire must include-- (1) Observer identification and warning order.
• Adjust fire. • Fire for effect. • Suppress. • Immediate suppression (target identification). •
(2) Target location methods. • Grid. • Polar. • Shift from a known point. •
(3) Target description. Give brief description of the target using the acronym "SNAP." • Size/shape. • Nature/nomenclature. • Activity. • Protection/posture.
Examples of Call for Fire: (1) Grid.
• "_____ this is _____ adjust fire/fire for effect, over." • "Grid _____, over.” • "(Target description) _____, over."
NOTE 1. Determine a six-digit grid for the target. NOTE 2. Determine a grid direction to the target and send after the call for fire but before any subsequent corrections. (2) Polar.
• "_____ this is _____ adjust fire/fire for effect, polar, over." • "Direction _____, Distance _____, Up/Down _____ over." • "(Target description) _____, over."
NOTE 1. Determine the grid direction to the target. NOTE 2. Determine a distance from the observer to the target. NOTE 3. Determine if any significant vertical interval exists. NOTE 4. Fire direction center must have OP location.

H-40
(3) Shift from a known point. • "_____ this is _____ adjust fire/fire for effect, shift (target number/registration point number), over." • "Direction _____, Right/Left _____, Add/Drop _____, Up/Down _____, over." • "(Target description) _____, over."
NOTE 1. Determine the grid direction to the target. NOTE 2. Determine a lateral shift to the target from the known point. NOTE 3. Determine the range shift from the known point to the target. NOTE 4. Fire direction center must have known point location and target number.

H-41
SQUAD ORGANIZATION AND MOVEMENT 1. SQUAD FORMATIONS - Squad formations describe the relationships between fire teams in the squad. They include the squad column and squad line. A comparison of the formations is in Figure H13.
Figure H13 – Comparison of squad formations
a. Squad Column. The squad column is the squad's most common formation. It provides good dispersion laterally and in depth without sacrificing control, and facilitates maneuver. The lead fire team is the base fire team. When the squad moves independently or as the rear element of the platoon, the rifleman in the (trail fire team provides rear security (Figure H14).
Figure H14 – Sqaud column, fire teams in wedge.
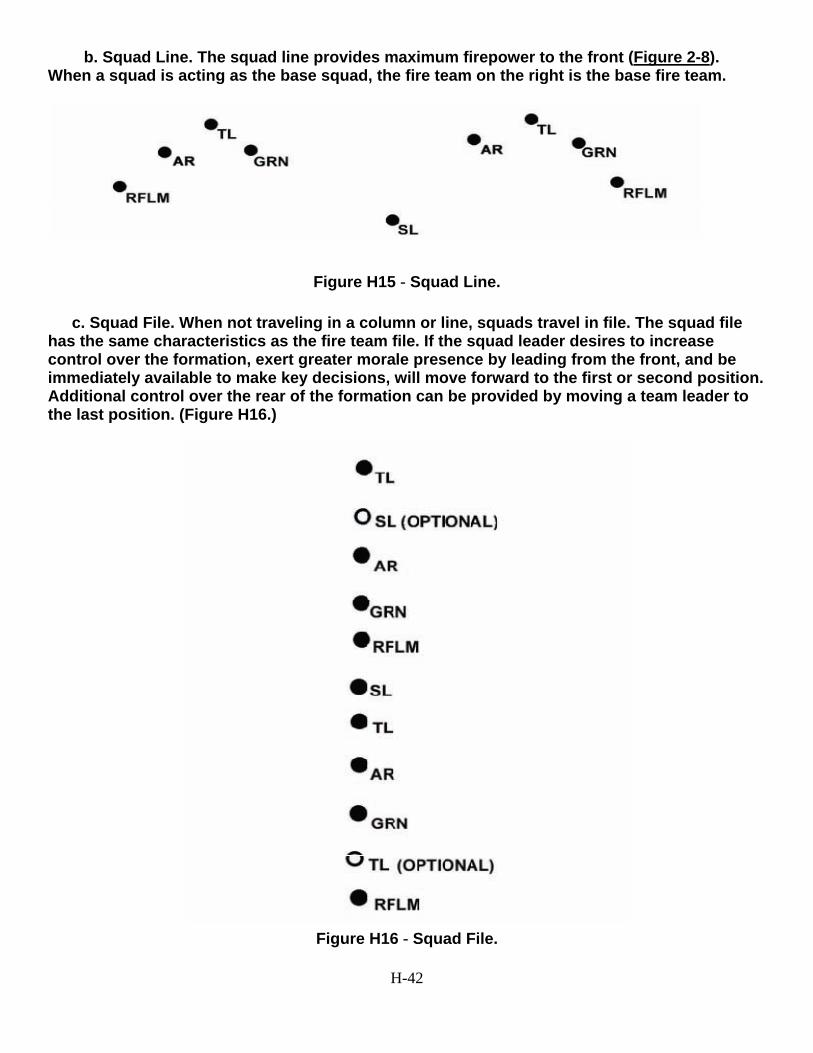
H-42
b. Squad Line. The squad line provides maximum firepower to the front (Figure 2-8). When a squad is acting as the base squad, the fire team on the right is the base fire team.
Figure H15 - Squad Line.
c. Squad File. When not traveling in a column or line, squads travel in file. The squad file has the same characteristics as the fire team file. If the squad leader desires to increase control over the formation, exert greater morale presence by leading from the front, and be immediately available to make key decisions, will move forward to the first or second position. Additional control over the rear of the formation can be provided by moving a team leader to the last position. (Figure H16.)
Figure H16 - Squad File.

H-43
Interaction with the Media, Task # 224-176-1425 (Ch. 3, STP-21-1-SMCT Oct 06) 1. Role of the individual when interacting with the media.
a. Check identification or press credentials. If identification or press credentials are produced, continue with interview. If no identification or press credentials are produced, refer the individual to your chain of command or public affairs representative.
b. Recognize your rights.
(1) You don't have to speak to the media.
(2) You don't have to answer all the questions.
(3) You control the length of the interview.
c. Maintain operational security (OPSEC). Do not discuss classified information.
2. Guidelines for speaking with the media.
a. Think before you answer.
b. Tell the truth. You should not lie or intentionally mislead members of the media.
c. Discuss only things that you have direct responsibility for or have personal knowledge about. Speak at your level. You should discuss only matters for which you have direct knowledge.
d. Don't answer speculative (what if) or hypothetical questions.
e. Avoid jargon, acronyms, slang and technical terms.
f. Answer the question with which you are most comfortable when asked multiple questions.
g. Keep remarks brief and concise.
h. Assume everything you say may be printed or broadcast.
i. Use "I" not "we" when stating your opinion.
j. If you don't know the answer to a question or cannot discuss it for any reason, say so. Avoid using "no comment".
3. Inform the chain of command of interaction with the media.

H-44
CONDUCTING THE AFTER-ACTION REVIEW WF CADRE WILL ONLY USE THE ARMY STANDARD AAR FORMAT BASED ON TRAINING CIRCULAR 25-20 “A LEADER’S GUIDE TO AFTER-ACTION REVIEWS.” NO OTHER FORMATS OR MODIFICATIONS ARE AUTHORIZED.
• Introduction and rules
• Review of training objectives
• Commander's mission and intent (what was supposed to happen)
• Opposing force (OPFOR) commander's mission and intent
• Relevant doctrine; tactics, techniques, & procedures (TTPs)
• Summary of recent events (what happened)
• Discussion of key events (why it happened and how to improve)
• Tasks to Sustain and Improve
• Discussion of optional issues (based on time available)
• Discussion of force protection issues (safety)
• Closing comments (summary)

H-45
IED Planning
(Cadre will use only for review prior to Tactics as Cadets will receive IED training at U.S. Weapons either Day 8, 9, 10, or 11)
--------------------------------------------------------------------------------------------------------------------------------------
FIVES C's TECHNIQUE. “While the 5-Cs are conducted in no specific order, the response must be instinctive, effective and based on METT-TC.” FM 3.90.119, COMBINED ARMS IMPROVISED EXPLOSIVE DEVICE DEFEAT OPERATIONS
CONFIRM:
• Always CONFIRM presence of suspected item; If an item has function, then it is confirmed
• CONFIRM from safe location w/max distance, frontal and overhead protection • DO NOT compromise your safety for positive identification of an IED. • DO NOT move closer to device unless absolutely necessary; achieve observation with
binoculars or scopes if necessary. • DO NOT get tunnel vision; ensure you are constantly aware of possibility of secondary
devices • Inform your command; request EOD using IED/UXO report.
CLEAR:
• CLEAR personnel away from suspected item • Mark YOUR location and note direction and distance to device • Move to a minimum distance of 300 meters from suspected item. • Leader at scene makes decision on how large an area to clear based on METT-TC • Detonation may be imminent if the device was armed before being located • Make maximum use of hard cover, stay out of direct line of site
CORDON:
• CORDON off danger area • Establish an Incident Control Point (ICP) for follow on units • Purpose of CORDON is to prevent unauthorized personnel from entering site (for their
safety and safety of first responders), to preserve scene for further exploitation, and to provide outward protection and security against command-initiated IEDs
• Conduct individual checks when moving personnel from area, as potential exists in identifying a triggerman, cameraman, and/or insurgent personnel
• Unit personnel man the perimeter until additional assets arrive • DO NOT become distracted

H-46
CHECK: • CHECK immediate area for secondary devices by conducting 5 and 25 meter sweeps • Look for IED materials and equipment (detonating cord, receivers, transmitters, cell
phones, antennas etc.) that may lead to other IEDs • Report any suspicious items immediately • Mark the area around the device as per unit-designated marking system • Cordon re-established to a safe area and the 5/25 procedure conducted again
CONTROL: • CONTROL area inside CORDON to ensure only authorized access • Allow only first responders to breach CORDON through ICP • Divert civilian traffic away from CORDON • Maintain visual/line of sight (binoculars or scopes) of subject IED to ensure no
tampering occurs • Report immediately any personnel observed approaching IED • Secure CORDON, ensuring no one enters danger area until EOD Team has cleared. • Remain alert and look for a potential triggerman from your position.

H-47
IED Reporting

H-48
5 and 25 Meter Checks 5 and 25-meter checks ensure your patrol stops in a safe place. Checks require entire vehicle crew (or patrol) to read terrain and avoid areas likely to conceal IEDs, mines and/or UXOs. 5-meter Checks:
• Initial check conducted within protection of armored vehicle or from cover/concealment • Identify best position to stop then carry out stand-off check using binoculars or other
optics • Check for disturbed earth and suspicious objects • Work from ground level and continue up above head height • Once vehicle is stopped, conduct an immediate physical check of the ground before
dismounting and then check around and under vehicle • Clear area out to 5 meters around your vehicle • Be systematic and take your time • Use ISR if available, if not and situation allows, use a white flashlight at night
25-meter Checks:
• Continue scanning out to 25 meters in your sector or area of responsibility • Check for potential IED indicators and anything else out of ordinary • If searching off hardball scan area first with optics for possible victim operated devices • Be on lookout for any potential triggerman observing your actions • Remain calm on identifying any IEDs as hasty actions may alert triggerman to function
device.

H-49
PAGE INTENTIONALLY LEFT BLANK

I-1
US WEAPONS DATA
M16A2 5.56mm Rifle Equipment Information
• Primary function: Infantry weapon • Manufacturer: Colt Manufacturing and Fabrique Nationale Manufacturing Inc. • Length: 39.63 inches (100.66 centimeters) • Weight, with 30 round magazine: 8.79 pounds (3.99 kilograms) • Bore diameter: 5.56mm (.233 inches) • Maximum effective range:
Area target: 2,624.8 feet (800 meters) Point target: 1,804.5 feet (550 meters)
• Muzzle velocity: 2,800 feet (853 meters) per second • Rate of fire: • Cyclic: 800 rounds per minute
Sustained: 12-15 rounds per minute Semiautomatic: 45 rounds per minute Burst: 90 rounds per minute
• Magazine capacity: 30 rounds Features: The M16A2 5.56mm rifle is a lightweight, air-cooled, gas-operated, magazine-fed, shoulder- or hip-fired weapon designed for either automatic fire (3-round bursts) or semiautomatic fire (single shot) through the use of a selector lever. The weapon has a fully adjustable rear sight. The bottom of the trigger guard opens to provide access to the trigger while wearing winter mittens. The upper receiver/barrel assembly has a fully adjustable rear sight and a compensator which helps keep the muzzle down during firing. The steel bolt group and barrel extension are designed with locking lugs which lock the bolt group to the barrel extension allowing the rifle to have a lightweight aluminum receiver.

I-2
M4 Carbine Equipment Information
Used to deter, and if necessary, compel adversaries by enabling individuals and small units to engage targets with accurate, lethal, direct fire. A compact version of the M16A2 rifle, with a collapsible stock, a flat-top upper receiver accessory rail and a detachable handle/rear aperture site assembly. The M4 enables a soldier operating in close quarters to engage targets at extended range with accurate, lethal fire. It achieves more than 85 percent commonality with the M16A2 rifle and will replace all .45 caliber M3 submachine guns, selected M9 pistols, and M16 series rifles.
• Caliber: 5.56 mm • Weight: 7.5 lbs (loaded weight with sling & one magazine) • Max Effective Range: 600 m (area target) 500 m (point target)
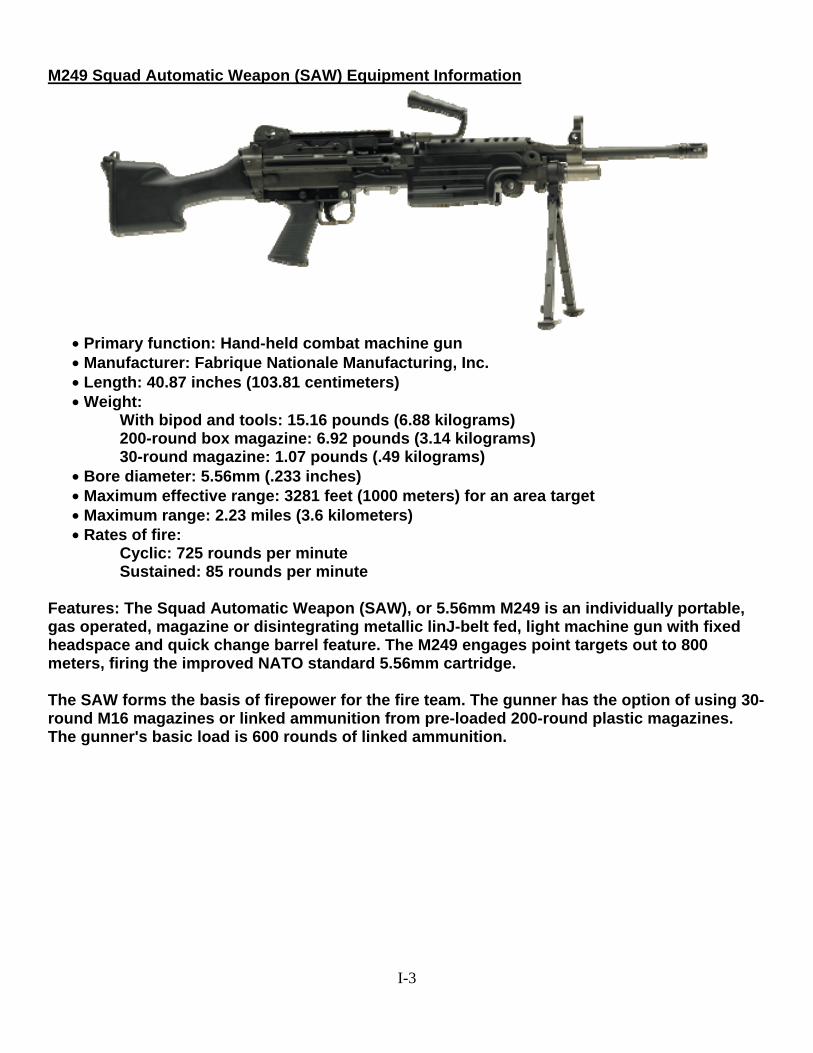
I-3
M249 Squad Automatic Weapon (SAW) Equipment Information
• Primary function: Hand-held combat machine gun • Manufacturer: Fabrique Nationale Manufacturing, Inc. • Length: 40.87 inches (103.81 centimeters) • Weight:
With bipod and tools: 15.16 pounds (6.88 kilograms) 200-round box magazine: 6.92 pounds (3.14 kilograms) 30-round magazine: 1.07 pounds (.49 kilograms)
• Bore diameter: 5.56mm (.233 inches) • Maximum effective range: 3281 feet (1000 meters) for an area target • Maximum range: 2.23 miles (3.6 kilometers) • Rates of fire:
Cyclic: 725 rounds per minute Sustained: 85 rounds per minute Features: The Squad Automatic Weapon (SAW), or 5.56mm M249 is an individually portable, gas operated, magazine or disintegrating metallic linJ-belt fed, light machine gun with fixed headspace and quick change barrel feature. The M249 engages point targets out to 800 meters, firing the improved NATO standard 5.56mm cartridge. The SAW forms the basis of firepower for the fire team. The gunner has the option of using 30-round M16 magazines or linked ammunition from pre-loaded 200-round plastic magazines. The gunner's basic load is 600 rounds of linked ammunition.

I-4
M203 40mm Grenade Launcher Equipment Information
• Weight:
Launcher: 3 pounds (1.36 kilograms) Rifle (M16A2): 8.79 pounds (3.99 kg) Total (including 30 rounds): 11.79 pounds (5.35 kg)
• Bore diameter: 40mm • Maximum effective range:
Area target: 1148.35 feet (350 meters) Point target: 492.15 feet (150 meters)
• Maximum range: 1312.4 feet (400 meters) • Minimum safe range:
Training: 426.53 feet (130 meters) Combat: 101.71 feet (31 meters) Features: The M203 40mm Grenade Launcher is used while attached to an M16A2 5.56mm rifle. It is a lightweight, compact, breech loading, pump action, single shot launcher. The launcher consists of a hand guard and sight assembly with an adjustable metallic folding, short-range blade sight assembly, and an aluminum receiver assembly which houses the barrel latch, barrel stop and firing mechanism. The launcher is capable of firing a variety of low velocity 40mm ammunition. The launcher also has a quadrant sight which may be attached to the M16A2 carrying handle and is used when precision is required out to the maximum effective range of the weapon.

I-5
M9 Pistol Equipment Information
• Primary function: Semiautomatic pistol • Builder: Beretta and Beretta USA • Length: 8.54 inches (21.69 centimeters) • Width: 1.50 inches (3.81 centimeters) • Height: 5.51 inches (14 centimeters) • Barrel length: 4.92 inches (12.5 centimeters) • Weight fully loaded: 2.55 pounds (1.16 kilograms) • Bore diameter: 9mm (approximately .355 inches) • Maximum effective range: 152.5 feet (50 meters) • Magazine capacity: 15 rounds • Muzzle velocity: 1200 feet (365 meters) per second
Features: The M9 is a lightweight, semiautomatic pistol manufactured by Beretta and designed to replace the M1911A1 .45 caliber pistol and .38 caliber revolvers. The M9 has redundant automatic safety features to help prevent unintentional discharges. It can be fired in either double or single action mode and can be unloaded without activating the trigger while the safety is in the "on" position. The M9 pistol has a 15-round magazine, and may be fired without a magazine inserted. This weapon can have the hammer lowered from the cocked, "ready to fire," position to the uncocked position without activating the trigger by placing the thumb safety on the "on" position.

I-6
M240B 7.62mm MG Equipment Information
• Manufacturer: Fabrique Nationale Manufacturing, Inc. • Length: 47.5 inches (120.65 centimeters) • Weight: 24.2 pounds (10.99 kilograms) • Bore diameter: 7.62mm (.308 inches) • Maximum effective range: 1.1 miles (1.8 kilometers) on tripod mount • Maximum range: 2.31 miles (3.725 kilometers) • Rates of fire:
Cyclic: 650-950 rounds per minute Rapid: 200 rounds per minute Sustained: 100 rounds per minute The M240B 7.62mm machine gun is a left hand feed, gas operated, air cooled, fixed head space weapon. The M240B has two possible configurations: aircraft and egress (ground). In the aircraft configuration the M240B has a front and rear sight and a trigger group which accommodates the spade grip device. The ground configuration involves the installation of an Egress Package which is designed to provide downed aircrew personnel with increased fire power. The Egress Package contains a buttstock assembly, a buffer assembly, a bipod assembly, and a conventional trigger assembly. The M240B is issued for aircraft configuration. The barrel assembly contains a three position gas plug. The first gas plug position allows the weapon to cycle at 750 shots-per-minute (SPM). The two remaining ports increase the SPM by 100 each (I.E., gas port position 2 = 850 SPM; gas port position 3 = 950 SPM). The aircraft configured M240B weighs 25.6 lb. and is 42.3 inches long. The egress configuration weighs 26.2 lb. and is 49.0 inches long.

I-7
AT4 Equipment Information
• Primary function: Light antH-armor weapon • Manufacturer: FFV Ordnance, Sweden and Alliant Techsystems • Length: 40 inches (101.6 centimeters) • Weight: 14.75 pounds (6.7 kilograms) • Bore diameter: 84mm • Maximum effective range: 984.3 feet (300 meters) • Penetration: 400 mm of rolled homogenous armor • Time of Flight (to 250 meters): less than 1 second • Muzzle velocity: 950 feet (285 meters) per second • Operating temperature: -104 to +140° F (-40 to +60° C) • Ammunition: Rocket with shaped charge warhead
Features: The AT-4 is a Swedish-manufactured, shoulder-launched antH-armor weapon designed to defeat modern threat main battle tanks.

I-8
M18A1 Claymore Mine Equipment Information
• Present Status: Fielded • Arming: Manual • Safe Arm Time: N/A • Fuzing: Command • Warhead: Directional Fragmentation • Sensing Width: N/A • AntH-Handling Device: No • Self-Destruct: No • Explosive Weight: 1.5 lb • Mine Weight: 3.5 lb • Mines Per 5T Dump: 1,782
The M18 Claymore, a directional fragmentation mine, is 8-1/2 inches long, 1-3/8 inches wide, 3-1/4 inches high, and weighs 3-1/2 pounds. The mine contains 700 steel spheres (10.5 grains) and 1-1/2 pound layer of composition C-4 explosive and is initiated by a No. 2 electric blasting cap. The M18 command-detonated mine may be employed with obstacles or on the approaches, forward edges, flanks and rear edges of protective minefields as close-in protection against a dismounted Infantry attack.

I-9
M2 MG Equipment Information
• Builder: Saco Defense • Length: 61.42 inches (156 centimeters) • Weight:
Gun: 84 pounds (38 kilograms) M3 Tripod (Complete): 44 pounds (19.98 kilograms) Total: 128 pounds (58 kilograms)
• Bore diameter: .50 inches (12.7mm) • Maximum effective range: 2000 meters with tripod mount • Maximum range: 4.22 miles (6.8 kilometers) • Cyclic rate of fire: 550 rounds per minute
Features: The Browning M2 .50 Caliber Machine Gun, Heavy barrel is an automatic, recoil operated, air-cooled machine gun with adjustable headspace and is crew transportable with limited amounts of ammunition over short distances. By repositioning some of the component parts, ammunition may be fed from either the left or right side. A disintegrating metallic linJ-belt is used to feed the ammunition into the weapon. This gun is has a back plate with spade grips, trigger, and bolt latch release. This gun may be mounted on ground mounts and most vehicles as an antH-personnel and antH-aircraft weapon. The gun is equipped with leaf-type rear sight, flash suppressor and a spare barrel assembly. Associated components are the M63 antiaircraft mount and the M3 tripod mount.

I-10
MK-19 Equipment Information
• Manufacturer: Saco Defense Industries • Length: 43.1 inches (109.47 centimeters) • Weight:
Gun: 72.5 pounds (32.92 kilograms) Cradle (MK64 Mod 5): 21.0 pounds (9.53 kilograms) Tripod: 44.0 pounds (19.98 kilograms) Total: 137.5 pounds (62.43 kilograms)
• Muzzle velocity: 790 feet (240.69 meters) per second • Bore diameter: 40mm • Maximum range: 2200 meters • Maximum effective range: 1600 meters • Rates of fire:
Cyclic: 325-375 rounds per minute Rapid: 60 rounds per minute Sustained: 40 rounds per minute Features: The MK19 40mm machine gun, MOD 3 is an air-cooled, disintegrating metallic linJ-belt fed, blowback operated, fully automatic weapon and is crew transportable over short distances with limited amounts of ammunition. It can fire a variety of 40mm grenades. The M430 HEDP 40mm grenade will pierce armor up to 2 inches thick, and will produce fragments to kill personnel within 5 meters and wound personnel within 15 meters of the point of impact. Associated components are: MK64 Cradle Mount, MOD 5; M3 Tripod Mount; and the AN/TVS-5 Night Vision Sight. The MK19 also mounts in the up-gunned weapons station of the LVTP7A1 model of the AAV and vehicle ring mounts.

I-11
M252 81 mm Equipment Information
Bore diameter: 81 mm Length: 50 in (1.27 m) Weight: 93.5 lb (41.27 kg) Maximum effective range: 5675 m Minimum range: 83 m Overall length: 33.5 inches (838 mm) Max ROF: 20 round/min Sustained ROF: 12 round/min Crew: 3 Ammunition: HE, Smoke, Illum, Practice

I-12
M60 MACHINE GUN
• Ammunition 7.62-mm Ball • Tracer burnout 900 meters • Length of the M60 43.5 inches • Weight of the M60 23 pounds • Weight of tripod mount M122 with traversing and elevating mechanism and pintle 16
pounds • Rates of fire:
Sustained 100 rounds per minute. 6- to 9-round bursts. 4 to 5 seconds between bursts. Barrel changed every 10 minutes. Rapid 200 rounds per minute. 10- to 13-round bursts. 2 to 3 seconds between bursts. Barrel changed every 2 minutes. Cyclic 550 rounds per minute. Fire continuous burst. Barrel changed every minute.
• Basic load of ammunition for a three-man crew 600 to 900 rounds. • Maximum range 3,725 meters • Max effective range 1,100 meters with tripod / T&E
Area: Tripod.........................................1,100 meters Bipod..........................................800 meters Point: Tripod.........................................800 meters Bipod..........................................600 meters
• Maximum extent of grazing fire obtainable over level or uniformly sloping terrain: 600 meters
• Height of the M60 on tripod mount M122 16.5 inches
I-13
WARNING Manually return the cocking handle to its forward position each time the bolt is pulled to the rear to prevent damage to the cocking and injury to the gunner.
DANGER NEVER LOAD ANY AMMUNITION OTHER THAN BLANKS WHEN THE BFA IS IN PLACE. NEVER FIRE THE BFA-FITTED MACHINE GUN AT PERSONNEL WHO ARE WITHIN 20 FEET OF THE WEAPON. IT COULD CAUSE DEATH OR INJURY. MAINTENANCE: Proper maintenance contributes to weapon effectiveness as well as unit readiness. Maintenance aspects of the M60 include inspection; cleaning and lubrication; and maintenance before, during, and after firing, and during NBC conditions. Associated tasks essential to maintenance (clearing, general assembly and disassembly, and function checks) are discussed in detail. CLEARING PROCEDURES The first step in maintenance is to clear the weapon. This applies in all situations, not just after firing. The gunner must always assume the M60 is loaded. To clear the M60, the gunner performs the following procedures. a. Moves the safety lever to the “F” position. b. With his right hand, palm up, pulls the cocking handle in the rear. Moves the safety lever to the “S” position. Returns and locks the cocking handle in the forward position. c. Raises the cover and conducts the four-point safety check for brass, links, or ammunition. (1) Checks the feed pawl assembly under the cover. (2) Checks the feed tray. (3) Lifts the feed tray and hanger assembly and inspects the chamber. (4) Checks the space between the face of the bolt and the chamber. d. Closes the cover and moves the safety lever to the “F” position. Pulls the cocking handle to the rear position. Pulls the trigger and at the same time eases the bolt forward by manually riding the cocking handle forward. e. Places the safety lever on “S” and raises the cover. (If not disassembling the gun, keep the cover down.)

I-14
Figure 2-7. Clearing procedures.
GENERAL DISASSEMBLY: The gunner performs general disassembly, which is removing and replacing the eight major groups (Figure 2-8). (The unit armorer performs the detailed disassembly. Disassembly beyond this point is prohibited except by ordnance personnel.) During general disassembly, the gunner clears the weapon and places each part on a clean flat surface such as a table or mat. This aids in assembly in reverse order and avoids the loss of parts.
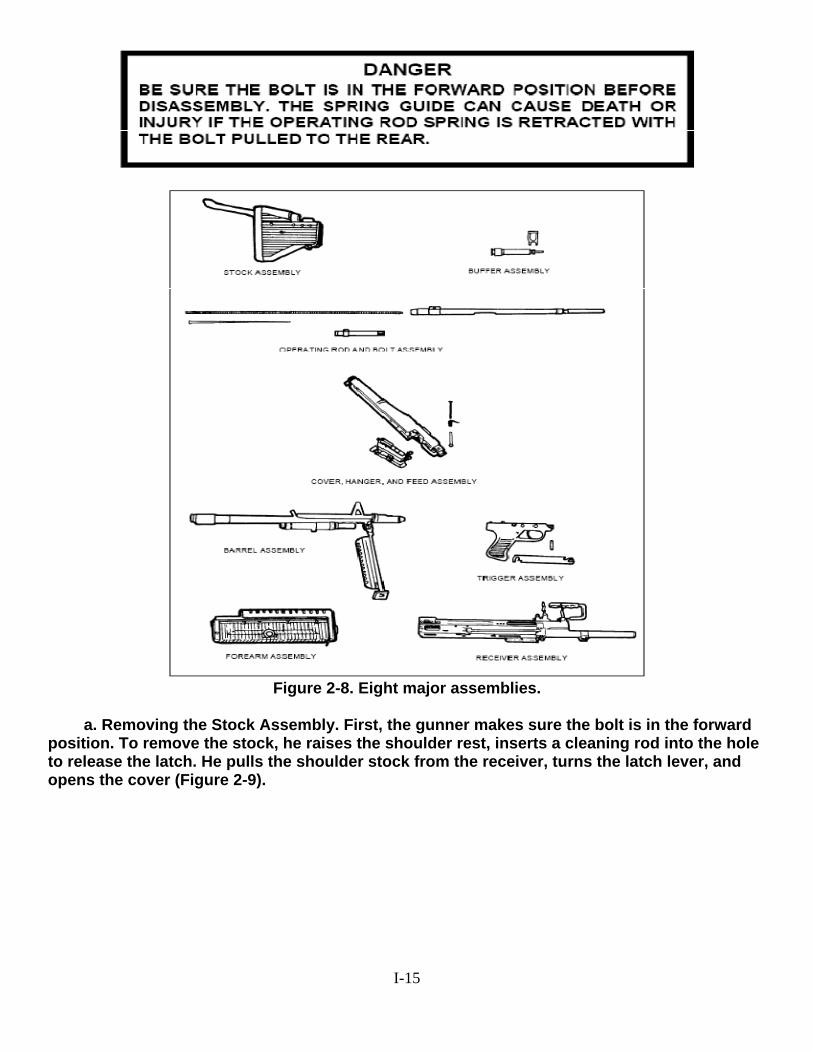
I-15
Figure 2-8. Eight major assemblies.
a. Removing the Stock Assembly. First, the gunner makes sure the bolt is in the forward position. To remove the stock, he raises the shoulder rest, inserts a cleaning rod into the hole to release the latch. He pulls the shoulder stock from the receiver, turns the latch lever, and opens the cover (Figure 2-9).

I-16
Figure 2-9. Removal of the stock.
b. Removing the Buffer, Operating Rod, and Bolt Assemblies. (1) To remove the buffer assembly, the gunner applies slight palm pressure to the rear of the hydraulic buffer assembly. He reaches inside the receiver and pulls up and out on the yoke to remove it from the receiver. He reaches in the back of the receiver and pulls the guide rod and drive spring out the rear of the receiver. (Figure 2-10).
(2) The gunner removes the operating rod assembly and bolt assembly as a unit. He reaches in the top of the receiver, places a finger on the face of the bolt, and pushes rearward until the bolt and operating rod assemblies extend past the rear of the receiver. Then, he pulls them out as a unit. To separate the bolt from the operating rod, he places the operating rod in his left hand and, with his right hand, pulls the bolt down and away.

I-17
Figure 2-10. Removal of the buffer, operating rod, and bolt assemblies.
c. Removing the Cover, Hanger and Cartridge Feed Tray Assemblies. The gunner uses a cleaning rod to unlatch the hook of the hinge pin latch. He removes the hinge pin latch and cover hinge pin. He removes the cover assembly, torsion spring, and hanger and cartridge feed tray assembly (Figure 2-11).

I-18
Figure 2-11. Removal of the cover, hanger and cartridge feed tray assemblies. d. Removing the Barrel Assembly. The gunner pushes in the spring detent, raises the barrel lock, and removes the barrel assembly (Figure 2-12).
Figure 2-12. Removal of the barrel assembly.
e. Removing the Trigger Mechanism Grip Assembly. The gunner pushes in and removes the flat leaf spring. He pushes out the front pin and slides the trigger mechanism grip assembly slightly forward, then pulls it out to remove it (Figure 2-13).
Figure 2-13. Removal of the trigger mechanism grip assembly.
f. Removing the Forearm Assembly. The gunner inserts a cleaning rod or the reamer portion of a combination wrench through the round opening in the forearm assembly, and then he pushes down on the spring. He lifts and gently slides the forearm assembly from the receiver (Figure 2-14, page 2-16).
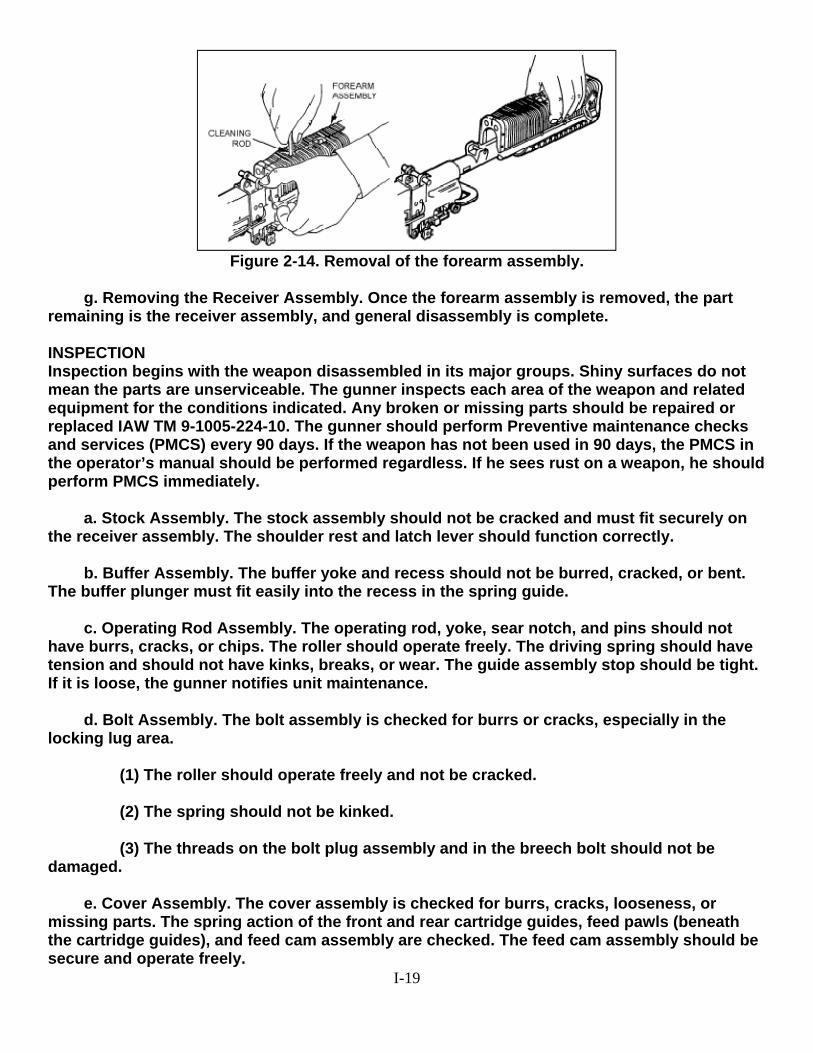
I-19
Figure 2-14. Removal of the forearm assembly.
g. Removing the Receiver Assembly. Once the forearm assembly is removed, the part remaining is the receiver assembly, and general disassembly is complete. INSPECTION Inspection begins with the weapon disassembled in its major groups. Shiny surfaces do not mean the parts are unserviceable. The gunner inspects each area of the weapon and related equipment for the conditions indicated. Any broken or missing parts should be repaired or replaced IAW TM 9-1005-224-10. The gunner should perform Preventive maintenance checks and services (PMCS) every 90 days. If the weapon has not been used in 90 days, the PMCS in the operator’s manual should be performed regardless. If he sees rust on a weapon, he should perform PMCS immediately. a. Stock Assembly. The stock assembly should not be cracked and must fit securely on the receiver assembly. The shoulder rest and latch lever should function correctly. b. Buffer Assembly. The buffer yoke and recess should not be burred, cracked, or bent. The buffer plunger must fit easily into the recess in the spring guide. c. Operating Rod Assembly. The operating rod, yoke, sear notch, and pins should not have burrs, cracks, or chips. The roller should operate freely. The driving spring should have tension and should not have kinks, breaks, or wear. The guide assembly stop should be tight. If it is loose, the gunner notifies unit maintenance. d. Bolt Assembly. The bolt assembly is checked for burrs or cracks, especially in the locking lug area. (1) The roller should operate freely and not be cracked. (2) The spring should not be kinked. (3) The threads on the bolt plug assembly and in the breech bolt should not be damaged. e. Cover Assembly. The cover assembly is checked for burrs, cracks, looseness, or missing parts. The spring action of the front and rear cartridge guides, feed pawls (beneath the cartridge guides), and feed cam assembly are checked. The feed cam assembly should be secure and operate freely.

I-20
f. Hanger and Cartridge Feed Tray Assembly. The hanger and cartridge feed tray assembly is checked for burrs, cracks, and missing or loose parts. The feed tray is checked to make sure it fits on the receiver and that the cartridge-retaining pawl works properly. The hanger is checked for obstructions. g. Barrel Assembly. The barrel assembly is checked for burrs, cracks, and wear, especially in the barrel socket area. The sight and flash suppressor are checked to make sure they are tight. The bipod should work properly, the legs should be straight, and connections should be tight. The bipod plungers should operate smoothly. h. Trigger Mechanism Grip Assembly. The sear is checked for chips, cracks, or signs of wear. The sear plunger and spring are checked for wear. i. Forearm Assembly. The forearm assembly is checked for damage. j. Receiver Assembly. The receiver rails are checked for burrs and wear. The cocking handle should move freely. k. M122 Mount. The T&E mechanism should not bind. The numbers on the scales and dials must be legible. (1) Distinct clicks must be heard when the handwheels are turned. Index lines should be calibrated with the indicator pointer. (2) The pintle should fit snugly in the pintle bushing, and the pintle lock should hold the pintle securely. (3) The sleeve latch should function properly, and the traversing bar should be tight when the tripod legs are extended and latched. l. Carrying Case. Maintenance tools and equipment should be complete and serviceable. The case should be serviceable. Frequent washing of the case should be avoided. Such washing may destroy the waterproofing and shrink the case. 2-8. CLEANING, LUBRICATION, AND PREVENTIVE MAINTENANCE The M60 machine gun should be cleaned immediately after firing. The gunner disassembles the M60 into its major groups for cleaning. All metal components and surfaces that have been exposed to powder fouling should be cleaned using CLP on a bore-cleaning patch. The CLP is used on the bristles of the receiver brush to clean the receiver. After the M60 is cleaned and wiped dry, a thin coat of CLP is rubbed on with a cloth. This lubricates and preserves the exposed metal parts during all normal temperature ranges.

I-21
a. The gas cylinder components are removed and cleaned only when inspection shows that the piston will not move within the cylinder when the barrel is tilted end-for-end. Unit maintenance personnel must supervise disassembly of the gas system. The receiver brush and swab-holding section of the cleaning rod may be used to clean the interior of the gas cylinder. When CLP is used, the gas cylinder and gas piston must be wiped dry before assembly. After assembly, the piston is checked for free movement. The unit armorer replaces safety wire. The gunner cleans the rest of the weapon as follows: (1) Cleans the bore using CLP and a bore brush attached to a cleaning rod. Does not reverse the direction of the bore brush while in the bore. (a) Runs the brush through the bore several times until most of the powder fouling and other foreign matter have been removed. (b) Swabs the bore several times using a cleaning rod and a swab wet with CLP. (c) Swabs the bore several times using a cleaning rod and dry swab. (2) Cleans the chamber using CLP and a chamber brush attached to a cleaning rod. (a) Runs the brush through the chamber several times until most of the powder fouling and other foreign matter have been removed. (b) Swabs the chamber several times using a cleaning rod and a swab wet with CLP. (c) Swabs the chamber several times using a cleaning rod and dry swab. (3) Cleans the receiver using a receiver brush and CLP. (a) Brushes the receiver until most of the powder fouling and other foreign matter have been removed. (b) Swabs the receiver several times using a cleaning rod section and a swab wet with CLP. (c) Swabs the receiver several times using a cleaning rod section and dry swab. (4) Wipes all the parts of the weapon except those that are rubber coated, using a rag wet with CLP. (5) Dries completely all parts cleaned with CLP. (6) Lubricates the following moving parts with CLP as instructed: (a) Barrel Assembly. Lubricates on the camming surfaces of the bolt locking lugs. (b) Operating Rod Assembly. Lubricates on the rollers and those surfaces immediately below the yoke that ride within the receiver rails. (c) Cover assembly. Lubricates inside the feed cam assembly. (d) Bolt assembly. Lubricates on the bolt locking lugs and cam actuator roller, and in the camming recess (for the operating rod). b. After lubricating, the components are cycled by hand to spread the CLP. Weapons fired infrequently or stored for prolonged periods should have a light film of CLP applied to the interior of the gas cylinder and the gas piston immediately after cleaning or inspection. Preventive maintenance is performed every 90 days, unless inspection reveals more frequent servicing is necessary. The use of the lubricant does not eliminate the requirement for

I-22
cleaning and inspecting to ensure that corrosion has not formed. Before the weapon is used, the gas system and components must be clean and free of oil and lubricants. c. All exposed surfaces of the M122 tripod, pintle assembly, and T&E mechanism are wiped down with a clean rag. For stubborn areas with hard-to remove dirt, a steel brush or bore brush is used to loosen the particles. Then a clean rag is used to wipe them down and CLP is used to lubricate them. d. The following procedures apply to cleaning and lubricating the M60 during unusual conditions: (1) Below 0 degrees Fahrenheit-use lubricating oil, arctic weather (LAW). Oil lightly to avoid freeze-up. (2) Extreme heat-use a light coat of CLP. (3) Damp or salty air-use CLP. Clean and apply frequently. (4) Sandy or dusty areas-use CLP. Clean and apply frequently. Wipe with a rag after each application to remove excess.

I-23
FUNCTION CHECK The gunner must perform a function check to ensure that the M60 is correctly assembled. The procedures, in order, are: Open the cover and pull the cocking handle to the rear. Place the safety on “S” position. Return the cocking handle to the forward position. Close the feed tray cover. Place the safety on “F” position. Grasp the cocking handle with the right hand, pull the trigger with the left hand, and ease the bolt forward.