operating systems resource allocation simulator edward … written with c++ and the glow library,...
TRANSCRIPT

The candidate confirms that the work submitted is their own and the appropriate credit has been given where reference has been made to the work of others.
I understand that failure to attribute material which is obtained from another source may be considered as plagiarism.
(Signature of student)________________________
Operating Systems Resource Allocation Simulator
Edward W Widdows BSc. Computing
2001/2002
i
Project Summary
Students and researchers attempting to learn more about the low level functionalities of operating
systems often find that there are many complicated features which can be a challenge to visualise, and
are thus difficult to learn about. The purpose of this project was to create a piece of software that
could simulate the resource allocation and scheduling functions of operating systems and present
them in a friendly and graphical manner.
The program that was produced is called OSRAS, the Operating System Resource Allocation
Simulator, written with C++ and the GLOW library, allowing it to use the graphical functions of GL
in order to provide a clear and flexible display, combined with GLOW's own widget system to
provide a rich and easy to use GUI. The intended audience is university students on modules with at
least a basic introduction to the material that OSRAS deals with. It therefore contains quite a large
amount of specialist terminology and concepts, and is not designed to be a standalone way to learn.

ii
Acknowledgements
Thank you to Dr Nick Efford for his continued support and advice throughout this project, and to
Professor Graham Birtwistle for some useful hints.
Also thank you to all the random people who leaned over my shoulder while I was working on
OSRAS and made comments good, bad, and ugly.

iii
Contents Project Summary .....................................................................................................................................i Acknowledgements ................................................................................................................................ii Contents.................................................................................................................................................iii Chapter 1 – Project Overview ................................................................................................................ 1
1.1 Introduction ..................................................................................................................................1 1.2 Evaluating the Software ............................................................................................................... 1 1.3 Minimum Requirements............................................................................................................... 1 1.4 Work Schedule ............................................................................................................................. 2
Chapter 2 – Planning and Research ........................................................................................................4 2.1 Introduction ..................................................................................................................................4 2.2 Existing Simulators ...................................................................................................................... 4
2.2.1 JOSS: Java Operating System Simulator [1] .........................................................................4 2.2.2 Medusa: an Operating Systems Simulator [5] .......................................................................5 2.2.3 MOSS: Modern Operating Systems Simulators [2] .............................................................. 5
2.2.3.1 MOSS CPU Scheduling Section..................................................................................... 5 2.2.3.2 MOSS Deadlocking Section........................................................................................... 6 2.2.3.3 MOSS Memory Management......................................................................................... 6 2.2.3.4 MOSS File System Simulator......................................................................................... 7 2.2.3.5 MOSS Summary.............................................................................................................7
2.2.4 SPIM A MIPS R2000/R3000 Simulator [4].......................................................................... 7 2.2.5 Conclusions Drawn From Existing Simulators .....................................................................7
2.3 Development Language................................................................................................................ 7 2.3.1 Java ........................................................................................................................................8 2.3.2 C++........................................................................................................................................8
2.3.2.1 GLUT, GLUI and GLOW .............................................................................................. 8 2.3.2.2 QT...................................................................................................................................9
2.3.3 Python....................................................................................................................................9 2.3.4 Summary of Languages .......................................................................................................10
2.4 Resource Allocation Functions...................................................................................................10 2.4.1 CPU Scheduling .................................................................................................................. 10 2.4.2 Memory Allocation ............................................................................................................. 11 2.4.3 Disk Scheduling................................................................................................................... 13
2.5 Conclusions Based This Research.............................................................................................. 14 2.5.1 Which language? ................................................................................................................. 14 2.5.2 Which scheduling function should be implemented first? .................................................. 15
Chapter 3 – Interface Design................................................................................................................ 16 3.1 Introduction ................................................................................................................................ 16 3.2 Memory Paging Simulator .........................................................................................................16 3.3 CPU and Process Simulator........................................................................................................ 18
3.3.1 Simple CPU Mode............................................................................................................... 18 3.3.2 Advanced CPU Mode.......................................................................................................... 19
3.4 Disk Scheduling Simulator.........................................................................................................20 Chapter 4 – Code Design...................................................................................................................... 22
4.1 Introduction ................................................................................................................................ 22 4.2 Class Structure............................................................................................................................ 22
4.2.1 Class: OsrasWindow ...........................................................................................................22 4.2.2 Class OsrasModule.............................................................................................................. 23 4.2.3 Class OsrasMemory............................................................................................................. 23
4.2.3.1 Class OsrasMemoryPager............................................................................................. 23 4.2.3.2 Memory Pages .............................................................................................................. 24 4.2.3.3 Implementation of FIFO Memory Paging ....................................................................25 4.2.3.4 Implementation of LRU Memory Paging.....................................................................25

iv
4.2.3.5 Implementation of Optimal Memory Paging................................................................ 25 4.2.3.6 Implementation of Second Chance Paging...................................................................26
4.2.4 Class OsrasCpu.................................................................................................................... 26 4.2.4.1 Class OsrasCpuLogic ...................................................................................................27 4.2.4.2 Processes....................................................................................................................... 27 4.2.4.3 Implementation of FCFS CPU Scheduling...................................................................28 4.2.4.4 Implementation of Round Robin CPU Scheduling ...................................................... 28 4.2.4.5 Implementation of SJF CPU Scheduling......................................................................28 4.2.4.6 Implementation of SRTF CPU Scheduling ..................................................................28 4.2.4.7 Class OsrasLine ............................................................................................................ 29
4.2.5 Class OsrasDisk................................................................................................................... 29 4.2.5.1 Class OsrasDiskLogic...................................................................................................29 4.2.5.2 Implementation of FCFS Disk Scheduling...................................................................30 4.2.5.3 Implementation of SSTF Disk Scheduling ...................................................................30 4.2.5.4 Implementation of Scan Disk Scheduling ....................................................................30 4.2.5.5 Implementation of Circular Scan Disk Scheduling ...................................................... 31 4.2.5.6 Implementation of Look Disk Scheduling....................................................................31 4.2.5.7 Implementation of Circular Look Disk Scheduling...................................................... 32
4.2.6 OSRAS' Graphics functions ................................................................................................ 32 4.2.6.1 OsrasColours ................................................................................................................ 32
Chapter 5 – Implementation Issues ......................................................................................................33 5.1 7th February – Making a GLOW Library................................................................................ 33 5.2 16th February – Rebuilding GLOW controls on the fly .......................................................... 33 5.3 14th April – GLOW Menu Glitch?.......................................................................................... 34 5.4 16th April – Important Numbers ............................................................................................. 34
Chapter 6 – OSRAS Manual ................................................................................................................ 36 6.1 OSRAS CPU Simulation............................................................................................................ 36
6.1.1 CPU Control Panel .............................................................................................................. 38 6.1.2 Explanation of Algorithms ..................................................................................................38 6.1.3 Explanation of Process Details ............................................................................................ 39
6.2 OSRAS Memory Swapping .......................................................................................................39 6.2.1 Memory Control Panel ........................................................................................................ 40 6.2.2 Explanation of Algorithms ..................................................................................................41
6.3 OSRAS Disk Simulation ............................................................................................................ 41 6.3.1 Disk Control Panel .............................................................................................................. 42 6.3.2 Explanation of Algorithms ..................................................................................................43
Chapter 7 – Evaluation ......................................................................................................................... 44 Chapter 8 – Overall Conclusions and Future Work ............................................................................. 47
8.1 OSRAS as it is ............................................................................................................................ 47 8.2 OSRAS as it could be................................................................................................................. 47
Bibliography.........................................................................................................................................49 Appendix A – Personal Reflections......................................................................................................51

1
Chapter 1 – Project Overview
1.1 Introduction
When one is attempting to learn about how operating systems work, there is one conclusion that
frequently springs to mind: it is a very complicated subject area. There are many low level functions
that operating systems perform that are difficult to visualise, and therefore, difficult for
students/researchers to learn about.
This project aimed to create a piece of software that would assist learning about such functions in as
friendly and flexible a manner as possible.
1.2 Evaluating the Software
There will of course come a time when the software will need to be evaluated. A basic layout for such
can be summarised with the following questions:
• Does it work without errors and on any University of Leeds computer?
• Does it simulate at least one of the scheduling functions listed above?
• Is the choice of language appropriate?
• Does it use an appropriate user interface? Although it would be possible to complete a
simulation with text interface, a GUI is very highly desirable.
• Is the software easy to use, and is there documentation easily available?
• Do the simulated results match with what would be expected from general knowledge? If not,
it suggests something is wrong.
• Do people find that it helps them understand what is going on?
• Is the software written in such a way that it can be easily built upon in the future?
1.3 Minimum Requirements
The minimum requirements that were agreed for this project were:
1 The software should be created in such a way that it becomes a cross-platform solution for
use on any of the university's machines.
2 Research should be done into the various available languages for cross platform solutions in
order to decide the most appropriate.
2
3 The software should simulate at least one of: CPU, Memory or Disk allocation.
4 The software should be easy to use, and full instructions for its use should be available.
1.4 Work Schedule
In order to avoid a massive overload of work towards the end of the project, I attempted to create a
realistic schedule to work to. In general, I was pleased to find that I was able to hold to it, so that
while the time approaching the deadline was busy, it was not unrealistically difficult to complete the
work. In most cases, each section of scheduled work needed to be completed before the next section
could begin.
13.12.2001 Begin background research into cross platform programming languages and
scheduling functions that should be simulated.
Complete the mid term report for this project. This will require a decision about
which language to use, and which scheduling system to implement first.
28.1.2002 Collection of mid-term report. It should be noted that after this, I adjusted the plan
for this project to include research about existing simulators. This needed to be
started immediately, since it could have a significant impact on other decisions.
7.2.2002 Begin a plan of the GUI layout for the initial simulation, based on the capabilities of
the chosen language. This is something similar to a user requirements specification,
and should detail what the software will do, without detailing how.
14.2.2002 Begin a plan of the major classes and functions that will be necessary to provide the
desired functionality.
21.2.2002 Begin coding the first simulation.
28.2.2002 Begin writing the draft chapter that will be due in two weeks. This is going to have to
happen at the same time as the coding for the first simulation.
14.3.2002 Hopefully the first simulation, memory, CPU, or disk, will be at least partially
complete by this point.
21.3.2002 This should be the completion of the first simulation module. If it has been done
well, then it should be sufficient to reach the minimum requirements.
7.4.2002 Given that a large portion of the work in the first simulation will have been creating
the GUI, if appropriate reuse can be made of the code, and with the knowledge
gained, it should be possible to have a second simulation module completed by this
point. The project report needs to be started.

3
21.4.2002 If the project report went swiftly, and is near completion, then try to have the third
simulation module completed.

4
Chapter 2 – Planning and Research
2.1 Introduction
The aim of this project is to create a piece of software to simulate and demonstrate the resource
allocation functions of operating systems. In order to do this, it is necessary to first have an
appropriate plan of action, based upon three major branches of research: existing similar software,
appropriate programming languages, and perhaps most importantly, detailed information about what
to actually simulate.
The information gathered here is not to be considered the be all and end all of what needs to be
known, rather, it is a starting point. Much of the research will no doubt need to be done during the
coding process.
2.2 Existing Simulators
Perhaps the most fundamental question that must be asked when developing a piece of software is
"Has anyone done anything similar before, and if so, can I learn anything from it?" A large part of the
research for this project has focussed on other operating system simulation software. There are many
more pieces of software that could have been reviewed, but a lot of what is available on the Internet
appears to have some serious problems actually compiling/running and is thus unusable. Some of the
most notable pieces that were available are listed here.
2.2.1 JOSS: Java Operating System Simulator [1]
JOSS is "a simulation of a basic multi-tasking non-pre-emptive operating system written in Java". In
other words, it simulates FCFS CPU scheduling.
It appears to be a rather
simple applet, but it has the
rather nice feature of a
graphical display of the CPU
utilisation at the current point
in time, and in the recent
history. The simulated
processes in JOSS are rather
advanced, having several different states, including running, messaging other processes, and using
semaphores.

5
The major downside I can see to JOSS is that it is not particularly obvious exactly what it is doing,
and processes appear to run indefinitely, never actually reaching a point where they can be
terminated.
2.2.2 Medusa: an Operating Systems Simula tor [5]
It is rather a shame that there is no software available to download from this website, because the
design of this simulator looks to be fantastic (it is also regrettable that even if it was available, all the
text is in Greek). It also looks to be much along the lines of the software I am attempting to develop:
an educational tool for the
demonstration of the scheduling and
allocation functions of operating
systems.
The screenshot of the system shows
an extremely advanced GUI compared
to the other simulators I have
reviewed, while the documentation
says that it simulates a single CPU
machine with two input/output units.
It does not seem to go into great depth
about how the I/O is achieved, or about how the memory is managed, which is rather a shame.
2.2.3 MOSS: Modern Operating Systems Simulators [2]
Moss is less a single simulator than a collection of programs, each one designed to simulate a
different aspect of operating system functionality. The programs are designed to work with Modern
Operating Systems [3] so users without this text may be (and in my view will be) at something of a
disadvantage.
2.2.3.1 MOSS CPU Scheduling Section
The CPU scheduling section of moss is rather limited. There is no GUI, and all parameters are
specified by means of a configuration file. Output is to a text file, and the only CPU algorithm is
available is FCFS, with a suggestion that the user (presumed to be a student) try to implement others.

6
The MOSS default CPU configuration file.
Perhaps not immediately hostile, but not exactly
friendly either. The numbers do not have any
obvious purpose on first inspection.
A portion of the output from the MOSS CPU
scheduler. I don't think many people would class
this as user-friendly output.
2.2.3.2 MOSS Deadlocking Section
The section of MOSS that deals with
deadlocking has a GUI, although a rather
primitive one. The intent of this program is
to demonstrate how, when there are two or
more resources, it is possible for processes
to each hold one of them, and wait for the
other to become available before releasing, hence, deadlock. Again, the program requires
configuration files, requiring a large amount of user time for experimentation beyond the two
standard scenarios.
2.2.3.3 MOSS Memory Management
The third of the programs in MOSS deals with
memory management. As with deadlocking, this
has a GUI. As with the other sections however,
this program is not particularly user friendly,
requiring the user to set up a configuration file in
order to tell the program which memory pages to
request (or rather, to specify an address, which the
program will translate into a page request). The
// # of Process
numprocess 3
// mean deivation
meandev 1100
// standard deviation
standdev 510
// process # I/O blocking
process 100
process 500
process 30
// duration of the simulation in milliseconds
runtime 5000 Process: 0 registered... (998 100 0 0)
Process: 0 I/O blocked... (998 100 100 100)
Process: 1 registered... (966 500 0 0)
Process: 1 I/O blocked... (966 500 500 500)
Process: 0 registered... (998 100 100 100)
Process: 0 I/O blocked... (998 100 200 200)
Process: 1 registered... (966 500 500 500)

7
default file provides for 7 steps, and then stops, leaving the user to work out what happened. MOSS
apparently does not know how to actually deal with page faults…
2.2.3.4 MOSS File System Simulator
This section of MOSS is exactly what its title suggests: it is a simulator, and is rather reminiscent of a
small dos/unix style operating system built entirely with Java. While creating this program was no
doubt interesting and instructional, it is not obvious how such a thing is useful to a student, since most
students will find the hex dumps of the file system to be rather difficult to interpret.
2.2.3.5 MOSS Summary
Moss has a few interesting features, but it is designed more to be expanded upon by a student than it
is to be used as a learning aid about how the operating system works, as it encourages the student to
find out the information (presumably in Modern Operating Systems [3]) rather than actually
providing it.
2.2.4 SPIM A MIPS R2000/R3000 Simulator [4]
SPIM turns out to be a processor simulator, allowing execution of assembly code for MIPS R2000
and R3000 CPUs. Although it looks potentially relevant on first glance, there seems to be very little
to do with the way the system actually schedules tasks, and is probably not worth looking at for too
long.
2.2.5 Conclusions Drawn From Existing Simulators
There seems to be something of a shortage of programs similar to what this project was trying to
develop. Most "operating system simulators" that seem to be available (or at least, those that are
available free) seem to be either designed as true simulators, which literally duplicate operating
systems (like the MOSS file system simulator) or they lack an easily comprehensible interface (like
JOSS).
The primary lesson to learn be learned here was: program the software for what it is meant to do, i.e.
demonstrate the resource allocation functions of operating systems, it is not necessary to duplicate
them. The secondary lesson was to keep to simple functions, at least at the start, for the system is
designed to be a learning aid, not an exercise in realistic programming.
2.3 Development Language
One of the early questions that must always be asked when developing a piece of software is "what
language should it be written in?" In this case, it was necessary that the software be a cross-platform
solution. Although this does limit the choices slightly, it opens up some exciting chances to
investigate some of the more recent development tools.

8
2.3.1 Java
Let us start by looking at the most famously cross platform language of all: Java. Java is often cited as
a true cross-platform language, because it runs on a virtual machine rather than being compiled for a
specific architecture.
It is pointed out in Java Gently [6] that Java is especially designed for system-independent software,
and this independence is something worth stressing in Java's favour. Assuming that the machine the
software is to be run on is set up for Java, it will work as it did on the machine the program was
created on. There is however, the point that the machine must be set up for Java. Most operating
systems have by default some capability to run Java programs, but this is frequently restricted to
applets. In order to expand the functionality of the software beyond this rather basic level, it would be
necessary to make use of the libraries in the Java JDK, requiring some users to make a very large (30-
100 megabyte) download. This is not a particularly satisfactory way to distribute software.
Perhaps the greatest flaw of Java is its speed, as noted by Deitel and Deitel in [7]: because it is
necessary to run the program on a virtual machine, there is an extra layer of processing that must be
done. It seems unlikely that this would be a major problem, as I do not foresee any great need for
large amounts of processing, but it should be thought about when the issue of how to display the
simulation is questioned. It seems appropriate for a simulator to make it easier to understand the
processes that are actually occurring, and thus the display should be clear, informative, and if
possible, interesting. Although the graphical abilities of Java have been improving recently, for
anything other than relatively basic image display, Java may show its lower speed.
2.3.2 C++
C++ is not normally considered when one talks about cross-platform languages, as it needs to be
compiled for different platforms. But, compiling aside, there is really no reason that C++ cannot be
used for a cross platform program, especially when taking account of some of the new libraries that
allow the use of the OpenGL API for "write once, compile anywhere" programs.
2.3.2.1 GLUT, GLUI and GLOW
The GLUT library ([8]) was originally developed to be a cross platform library for use with OpenGL
and its (more or less) equivalent, MESA. It is generally good for graphics applications that require
little user interaction, so alone it is not very useful for software, which would require the greater
degree of control needed to act as a scheduling simulator.
One possible add-on to GLUT is GLUI, which could provide a GUI for the simulator:
"GLUI is a GLUT-based C++ user interface library which provides controls such as buttons,
checkboxes, radio buttons, and spinners to OpenGL applications. It is window-system independent,

9
relying on GLUT to handle all system-dependent issues, such as window and mouse management."
[9]
General opinion however, seems to be that GLOW, a slightly more recent library, is a more stable and
more complete windowing system for GLUT. GLOW includes a convenient "widget library"
specifically designed for GUIs. [10]
Using GLOW would provide the advantage of a range of built in GUI tools and widgets, whilst also
permitting the use of the underlying GL functions for all the graphical display, and maintaining the
cross-platform nature of the software. Worst case scenario would be the necessity to include a
makefile or visual C++ workspace to allow the user to compile it themselves.
2.3.2.2 QT
QT is a cross-platform development API built for C++. Like the GLUT library, it is built for "write
once, compile anywhere" development. It is, in fact, the code behind the KDE Linux desktop.
The developers of QT state "The Qt library encapsulates the different APIs of different operating
systems, providing the application programmer with a single, common API for all operating
systems." [13] Because QT incorporates the various windowing system APIs within itself, it does not
need any interpreter, and runs as fast as any other C++ based software.
QT is fully capable of generating graphical output and is very well developed in terms of its GUI
capabilities.
Unlike GLUT or Python, QT will take on the appearance of the desktop environment it is running in.
Although this might act to make the user of the program feel more comfortable with it, it may also
have the effect of making development harder because it will be necessary to continuously check it
across all platforms it is intended to run the software on in order to verify the layout of the various
GUI components.
Perhaps the major downside of QT is that unlike all the other options I have discussed, it is not free. It
is, of course, a part of most Linux distributions, and thus QT is free for that platform, but it is
necessary to purchase QT for Microsoft Windows-based platforms, with different licenses placing
restrictions of the use of the software. Although it is unlikely to cause any problems for the end user,
it would make the software particularly difficult to create.
2.3.3 Python
Python is a relatively recent, general purpose scripting language, which is gaining increasing
popularity. Python is often compared to Java, in that it runs on an interpreter, rather than being
compiled for specific architectures, and thus generated very cross-platform code. Like Java, Python
shares the performance hit that comes with interpreted languages, being slower than Java at some
points. It is however, possible to compile some modules in C, allowing performance increases.

10
Like Java however, Python is designed to be window-system independent, and includes interfaces to
libraries from many of them, covering X11, Motif, Tk, Mac and MFC. [11] Python also allows the
easy use of standard GUI features and widgets.
Python is, in fact, GLUT compatible, although apparently not GLUI or GLOW. It is fairly obvious
however, that Python itself would be able to provide all the functionality of these libraries. The
Python OpenGL binding is such that it allows the developer to "concentrate on your OpenGL code
instead of the underlying GUI environment." [12] Which would be beneficial to any who know any
OpenGL to start with.
2.3.4 Summary of Languages
2.4 Resource Allocation Functions
So far, the simulation functions have simply been referred to by three categories. This section shall go
into a little more detail about each. Since it does not seem relevant to discuss the advantages and
disadvantages of each algorithm mentioned, it shall explain only how they operate, and avoid making
judgement. The point, after all, is to simulate and demonstrate all of these, and allow experimentation,
not to create the most efficient system possible. Most of this information is taken from [14] since the
students on that module are a large part of the target users of the software, and it is important that it
works in a way they are familiar with. Other information is from [15].
2.4.1 CPU Scheduling
To the user, all multi-tasking operating systems present the appearance of running programs
simultaneously. This is not, of course, the case. The programs, or rather, processes are being run in
sequence, with only one process occupying the CPU at any one time. There are variety of ways in
which this is implemented, some of which force processes on and off the CPU, some which just allow
each process to run to completion before changing to the next.
Algorithms
First Come First Served: This is the most basic of all CPU scheduling. The first process to arrive at
the CPU is allowed to execute until it has completed.
Attribute Java C++/GLOW C++/QT Python
Cross-platform execution Yes No No Yes
Cross-platform with separate compilation - Yes Yes -
Speed Low High High Low
Graphical capabilities Medium High Medium Medium
License Free Free Commercial Free
11
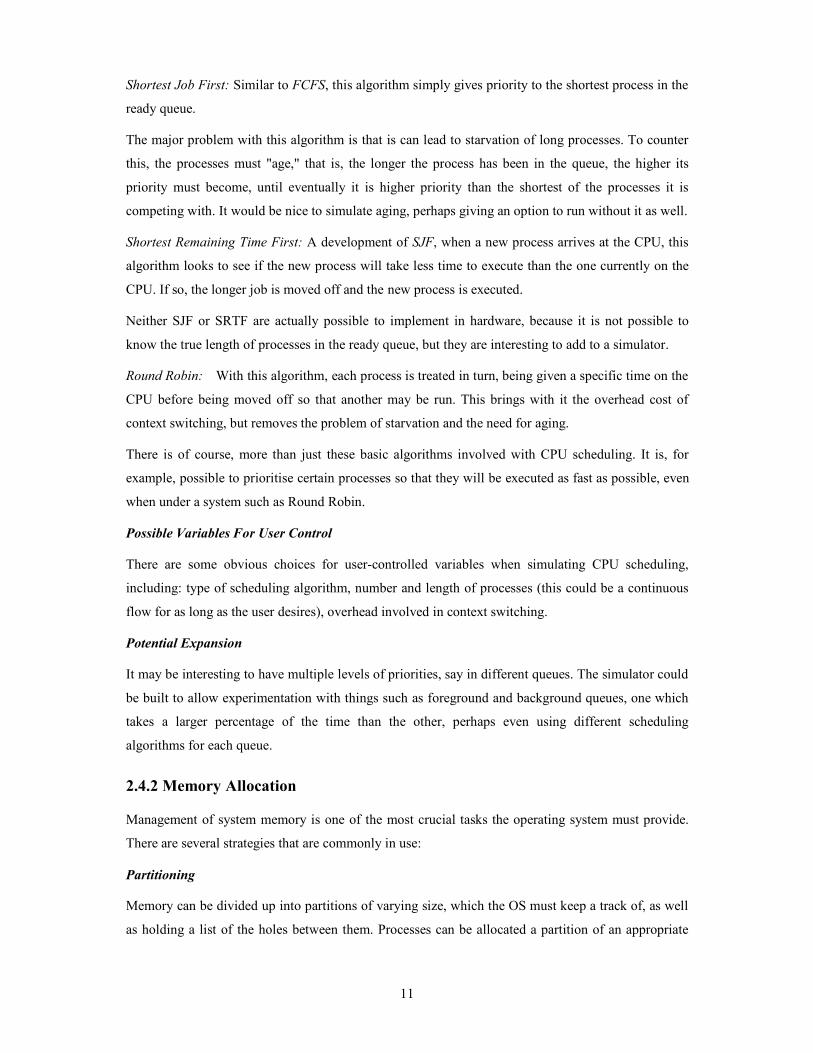
Shortest Job First: Similar to FCFS, this algorithm simply gives priority to the shortest process in the
ready queue.
The major problem with this algorithm is that is can lead to starvation of long processes. To counter
this, the processes must "age," that is, the longer the process has been in the queue, the higher its
priority must become, until eventually it is higher priority than the shortest of the processes it is
competing with. It would be nice to simulate aging, perhaps giving an option to run without it as well.
Shortest Remaining Time First: A development of SJF, when a new process arrives at the CPU, this
algorithm looks to see if the new process will take less time to execute than the one currently on the
CPU. If so, the longer job is moved off and the new process is executed.
Neither SJF or SRTF are actually possible to implement in hardware, because it is not possible to
know the true length of processes in the ready queue, but they are interesting to add to a simulator.
Round Robin: With this algorithm, each process is treated in turn, being given a specific time on the
CPU before being moved off so that another may be run. This brings with it the overhead cost of
context switching, but removes the problem of starvation and the need for aging.
There is of course, more than just these basic algorithms involved with CPU scheduling. It is, for
example, possible to prioritise certain processes so that they will be executed as fast as possible, even
when under a system such as Round Robin.
Possible Variables For User Control
There are some obvious choices for user-controlled variables when simulating CPU scheduling,
including: type of scheduling algorithm, number and length of processes (this could be a continuous
flow for as long as the user desires), overhead involved in context switching.
Potential Expansion
It may be interesting to have multiple levels of priorities, say in different queues. The simulator could
be built to allow experimentation with things such as foreground and background queues, one which
takes a larger percentage of the time than the other, perhaps even using different scheduling
algorithms for each queue.
2.4.2 Memory Allocation
Management of system memory is one of the most crucial tasks the operating system must provide.
There are several strategies that are commonly in use:
Partitioning
Memory can be divided up into partitions of varying size, which the OS must keep a track of, as well
as holding a list of the holes between them. Processes can be allocated a partition of an appropriate

12
size in which to run. Processes are prevented from being able to access memory outside their
partition. There are three main strategies for allocating memory space:
First Fit: Processes are allocated the first memory hole large enough for them. Searching for space is
a matter of running through the list of free spaces until a large enough one is found.
Best fit: Processes are allocated the smallest hole large enough for them. This requires searching the
entire list of free spaces.
Worst Fit: Processes are allocated to the largest hole in the hope that other processes can be allocated
to the large space remaining.
Paging
Paging is an alternative memory management strategy that avoids the need to partition the memory
space. Memory is divided into frames, something like small partitions. The memory requirements of a
process, its "logical address space," are broken up into pages of equal size to the frames. Each page is
allocated a memory frame. There is usually a little bit of space wasted, but because frames are usually
512-2048 bytes in size, this is not a lot.
The major challenge is in keeping track of where the pages of a process actually are, and where
within that page is the data that the process requires. This is normally done with a page table, which
stores the base address of every page in memory. The logical address received by the CPU is broken
down into an index number for the page table, and an offset to give the precise location of the data
within the page.
It is, on first glance, not immediately clear exactly how closely the paging system in the simulator
will need to be to the real system. Whether it is or no, there is a considerable amount of research that
will need to be done into the behaviours of paging before a simulation of paging memory
management can begin.
Swapping
Swapping to disk is another part of memory management, although it is becoming increasingly
redundant as the price of computer memory falls. While usually necessary on a machine with only 16
MB of RAM, the 128, 256, and even 512 MB machines of today are rarely in need of disk swapping.
Nevertheless, it needs to be considered when simulating memory management. Swapping occurs
when a process requests memory space that is not available. A page of memory that is not currently in
use will be written to disk, allowing that page to be used for the requesting process. There is a large
delay when this occurs, and, thankfully, this delay is all that the simulator should need to take account
of.
There are a number of algorithms in use for page replacement strategies [15, p313-320]:

13
First In First Out: this is a simple strategy: the page that is swapped to disk is the one that has been in
memory the longest.
Least Recently Used: this algorithm swaps the page of memory that has not been used for the longest
time.
Second Chance: this algorithm cycles through the pages, giving a page a second chance not to be
swapped out. Essentially, it tests if this page could be swapped, and whether it is on its second chance
already before making a decision.
Possible Variables For User Control
Amount of memory, memory used by each process, number of processes, sizes of memory
partitions/pages, speed of disk swapping.
Potential Expansion
There are other swapping algorithms available, and it might be interesting to research the so-called
optimal algorithm to see how accurately page access can be predicted.
2.4.3 Disk Scheduling
I suppose I should clarify what I mean by disk scheduling. When a disk drive is in use, it is receiving
a number of requests to move to various parts of the disk surface, and read the data that is there.
Compared with much of a computer's activity, this is relatively time consuming, and but it is possible
to use intelligent scheduling to improve the speed at which the disk retrieves data.
It is the movement between cylinders that takes up most of the time, physical movement being far
slower than electronic data transfer, and thus the intelligent scheduling of a disk rests upon the
appropriate direction of the read/write head.
The following algorithms can be found in [15, p437-440]
First Come First Served: Exactly the same as the CPU algorithm of the same name, requests are dealt
with in order of arrival.
Shortest Seek Time First: This algorithm moves the head to the request that is closest to the current
position.
Scan and C-Scan: In the Scan algorithm disk head moves from one end of the disk to the other, and
snaps back when it reaches the end. C-Scan is the same, but the head scans both ways, one after the
other.
Look and C-Look: As Scan and C-Scan but the head reverses direction when there are no more
requests that way, rather than at the end of the disk.

14
Possible Variables For User Control: Number of requests per second, spread of requests, type of
algorithm in use.
Potential expansion: There is a potential to expand this area of the simulator to allow the use of
specific file systems, with features such as forcing the disk head to read the index area of the disk,
and tracking a chain of non-contiguous disk blocks, rather than just single block reading.
2.5 Conclusions Based This Research
Having done background research into both the appropriate software development tools, and the
various scheduling algorithms to implement, there are two questions to be answered:
2.5.1 Which language?
After consideration of this question, I have decided that the use of C++ and the GLOW library is the
most promising line of approach. I have some amount of familiarity with the underlying GLUT
library already, and definitely with C++, which will assist me with the development. GLOW's other
main benefits are that it is free, and easily obtainable.
GLOW itself is a static library, meaning that the user does not need any special libraries on their
machine to run software which is built using GLOW, although the GL and GLUT libraries are needed
(but these are small and easy to obtain and install).
Arguments against the other options considered:
Java was a close second contender. In the end, it lost the battle for first choice partly on the grounds
of my familiarity with it, as in, I do not know it as well as I know C++. It is also undeniable that
Java's graphics capability is less that that of GLOW, although this was countered by the argument of
its cross-platform nature. Perhaps the final decider was the fact that in order for a user's computer to
run a Java program that goes beyond an applet level, it is necessary to have them install the entire
JDE.
QT would have to be purchased, and is a complete unknown as far as development goes. Although its
capabilities are undoubtedly powerful, the development of the software would be restricted in that I
would have to complete it entirely within the University computer labs. I am also unsure as to
whether the Windows machines actually have QT installed.
Python would require me to learn a whole new language. Although it is recommended as being easy
to learn, the thought occurs that spending even, say, fifty hours becoming familiar with it, would
waste a large portion of my project time. I believe I could take the software further if working in a
relatively familiar software environment.

15
2.5.2 Which scheduling function should be implemented first?
I originally planned to implement the Disk Scheduling simulation first, as this seemed to be the most
basic of the three components, but having learned that a second year module was moving into the
territory of memory management at about the same time the coding began, I decided that this would
be the best place to start. This will allow the prototype software to be made available to the students
on the module, and hopefully gain some feedback.

16
Chapter 3 – Interface Design
3.1 Introduction
This chapter details the initial plans for the software interface and display. Although different sections
of the software were developed at different times, and design of each section was not done
consecutively, this chapter will detail the design for all parts of the software.
Perhaps one overriding concept that occurs through all the parts of OSRAS is the idea of a cycle. The
simulations within OSRAS all take into account the passage of time. A cycle can be treated in many
ways depending on exactly which part of OSRAS is running, but it is worth considering that many
things will work best when there is a view of the recent history of the simulator as well as the present
time.
All sections of OSRAS have the ability to control the length of one cycle (between reasonable
bounds) so that the user can slow down/speed up the simulation. This was implemented using the
GlowSliderWidget class. The only small downside of this being that it was rather difficult to set
specific values such as 1000 ms, but since most people cannot tell the difference between 1000 ms
and 1023 ms, this didn't seem to be a great problem.
All of the GLOW classes listed in this section may be found in the GLOW reference manual [10]
3.2 Memory Paging Simulator
This was the first part of the software (henceforth referred to as OSRAS, since it is no longer an
abstract idea but a reality) to be created. Much of the code design (see 4.2.3) was done immediately
after this design was completed.
In order to demonstrate memory paging algorithms, it seemed wise to present them in a familiar
format. The format used in some of the course notes about memory paging use a grid something like
this:
Since this seems to be a rather nice way to demonstrate the way memory pages are chosen for
swapping, I decided to use this format in the program. The numbers can be animated as time steps
Page requests 2 3 1 5 4 2 6 5 3 2 2 2 2 4 4 4 4 4
Memory pages 3 3 3 3 2 2 2 2
1 1 1 1 6 6 6
5 5 5 5 5 3
Faults f f f f f f f f

17
move onwards, by moving them in from the left side of the grid and off the right. In this way, an
unlimited number of page requests may be made, because OSRAS will display only a limited number
of time steps.
Something else that occurred was to allow two separate algorithms to be run using the same page
request string, so that algorithms could in effect be "raced" against each other.
There are some rather generic readouts that I decided to include in the memory paging display, such
as percentage bars, where comparisons between the number of faults and non-faults in an algorithm
and between the two algorithms can be compared graphically.
User Controls
Desirable controls for this part of OSRAS were:
- The ability to switch between memory algorithms on each side of the display. This was
implemented as a drop down list using the GlowLabeledPopupMenuWidget class.
- The number of memory pages, so that the user can expand/reduce the simulated memory space.
Again, this is best as a GlowSliderWidget. This also holds true for the total number of memory pages
Total Pages x
Memory pages x
Grid 1
Grid 2
Algorithm 1 Algorithm 2
1 2 5 3 9 10 4 7 5 3 8 0 9 4 11 0
Display of useful numbers
Type of algorithm
Display grid Faults vs non-faults
Future page requests (for the optimal algorithm) Faults of each algorithm compared

18
that can be requested, allowing the physical memory of the simulation to be a greater or lesser portion
of the total memory (including virtual) in the simulator.
- The variance in the probabilities of pages. This is better explained in 4.2.3.1.
- Some basic function such as Quit, Pause, Step, and Reset, which are easily implemented with the
GlowPushButtonWidget class.
3.3 CPU and Process Simulator
3.3.1 Simple CPU Mode
The initial design for the CPU simulation part of OSRAS is rather simple:
It is possible to click on and select any of the processes in the ready queue to gain more information
about it, such as process age, the length remaining and the length when the process was created. The
processes themselves are of different colours and labelled with the ID number that will be assigned to
them. They are divided along their length, split into squares, each one representing one CPU cycle
worth of work.
User Controls
Desirable controls for the CPU section of OSRAS were:
Ready queue
Completed jobs
Processes Completed x
Average Waiting Time x
Space for process
details
Some interesting numbers
A queue of processes waiting
to be run on the CPU
A brief history of completed
processes
Show some details about the
selected process Status information
Auto generate Aging

19
- A way to change the CPU scheduling algorithm. This would be best as a drop down list.
- A way to turn process aging on and off (this is important in SJF and SRTF scheduling algorithms
only). A simple button was sufficient for this.
- A way to decide whether the simulator should automatically generate processes or not. This was
combined with another control to allow the user to force a process to be added to the ready queue. In
both cases, a standard button was sufficient.
- Some basic function such as Quit, Pause, Step, and Reset, which were easily implemented as
common or garden buttons.
3.3.2 Advanced CPU Mode
Having implemented both the Memory Paging simulation, and the above Simple CPU simulation,
there still seemed to be a considerable amount that could be done with the CPU simulator, so I started
to look at what things other than pure calculation the processes on the CPU could do. More
information about exactly what I decided to research and add to OSRAS and why I did so is in
chapter 5. Suffice to say that this part of OSRAS shows processes requesting memory access.
The centre of the blocks in each process is colour coded in advanced mode, green for standard
calculation (the only option in simple mode) and blue for memory access.
These lines highlight according to
where the requested memory page is
found
Ready queue
Processes Completed x
Average Waiting Time x
Space for process
details
Auto generate Aging
I/O queue
TLB
Page table
Disk
Memory grid
A grid like that in the memory paging
simulator Processes are put on the I/O queue
when they request memory access.
Like the ready queue, they can be
selected by clicking.

20
3.4 Disk Scheduling Simulator
The disk simulator is possibly the simplest part of OSRAS (which came as something of a relief since
time was running short as it was being coded).
The graphical display of the disk simulator is very simple in design, in that its major feature is, well, a
disk. As with the memory simulation however, there will be a string of requests sent to the disk.
According to the scheduling algorithm selected, the disk head (and a highlighted ring) with move
back and forth over the disk surface, reading the appropriate cylinders. OSRAS does not at this time
have enough functionality to request anything more than a cylinder access, though this might make an
interesting future addition.
In addition to simply showing the drive head, and the cylinder it is currently reading, OSRAS shows
the future of the head movement, as far as the requests in its queue allow. It highlights the next track
that will be accessed in one colour, and uses a gentle gradient of colour over the other tracks in the
queue, so that consecutive tracks have little difference, but first and last on the list are totally different
colours.
The disk simulator also keeps a track of the total time it has taken to perform the various accesses it
has been asked to do, using the seek time between each access, the access time, and the rotational
delay of the disk. Assuming only one cluster of data is read/written per request, and a cluster size of
4KB, the simulator can provide an estimate of the data transfer rate. Although this does not tally with
real world drives, it does give a very nice way to benchmark the various algorithms available against
each other.
Useful info:

21
In all likelihood, the reason that the figure does not match real life performance is because OSRAS is
in effect simulating a very fragmented drive. In most systems, access requests would not be received
from all over the disk surface with equal occurrence, since certain files tend to get accessed far more
often than others. Assuming such files were not fragmented across the disk surface, then most
requests would appear in a narrow band, greatly reducing the seek time.
User Controls
- A drop down list is used to allow the user to change the scheduling algorithm
- Sliders are used to control the average seek time, the rpm, and the access time of the disk. Although
not strictly necessary, this is an interesting and simple addition.
22
Chapter 4 – Code Design
4.1 Introduction
This chapter gives an overview of the main structure of the OSRAS code, including its major classes
and functions.
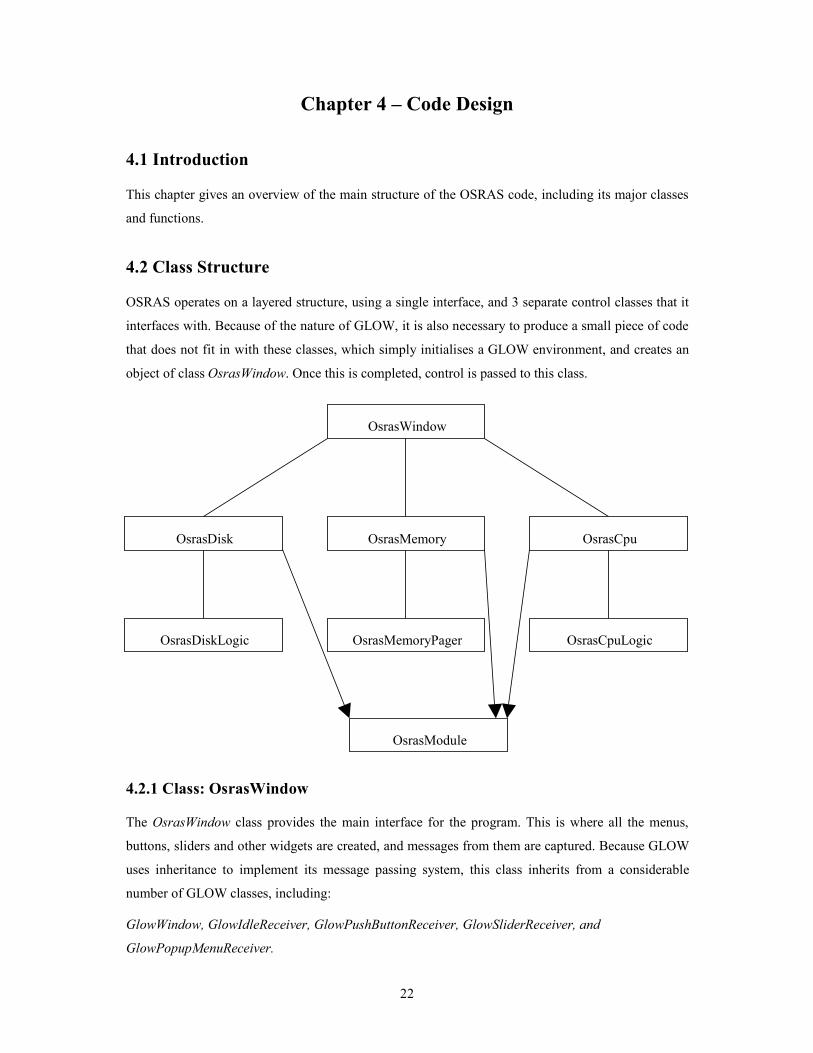
4.2 Class Structure
OSRAS operates on a layered structure, using a single interface, and 3 separate control classes that it
interfaces with. Because of the nature of GLOW, it is also necessary to produce a small piece of code
that does not fit in with these classes, which simply initialises a GLOW environment, and creates an
object of class OsrasWindow. Once this is completed, control is passed to this class.
4.2.1 Class: OsrasWindow
The OsrasWindow class provides the main interface for the program. This is where all the menus,
buttons, sliders and other widgets are created, and messages from them are captured. Because GLOW
uses inheritance to implement its message passing system, this class inherits from a considerable
number of GLOW classes, including:
GlowWindow, GlowIdleReceiver, GlowPushButtonReceiver, GlowSliderReceiver, and
GlowPopupMenuReceiver.
OsrasWindow
OsrasMemory OsrasCpu OsrasDisk
OsrasMemoryPager OsrasCpuLogic OsrasDiskLogic
OsrasModule

23
The class itself contains no functionality to do with the simulation functionality of OSRAS, instead it
takes input from the various widgets and passes them to whichever simulation is currently running. It
contains pointers to a class for each simulation type, and a class of type OsrasModule, which can be
used to ensure that messages are passed to the simulation that is running.
4.2.2 Class OsrasModule
The OsrasModule class forms a base class for OsrasMemory, OsrasCpu and OsrasDisk. It provides a
small number of common functions, allowing the OsrasWindow class to maintain a pointer to a class
of this type, rather than constantly keep track of which simulation is running at any given time. These
functions are:
void TakeMessage(int type, void* message)
By maintaining a header file with integer definitions for the various message types, it was possible to
have a single function take any arguments desired (in the form of the void pointer) and deal with them
according to their type.
void Draw(int w, int h)
This provides the graphical display for a module, taking as arguments the width and height of the
current window.
void Tick()
All modules in OSRAS share the concept of a tick. A tick can be considered to be a single unit of
calculation, such as a singe page being swapped into memory, or a single unit of process execution
time being executed.
void Reset()
Resets the active simulation to its default settings.
4.2.3 Class OsrasMemory
The OsrasMemory class was the first of the simulations to be implemented, and as such was the
longest and most difficult to code. In order to provide a simulation where two memory paging
algorithms may be "raced" against each other, much of the processing was put into the
OsrasMemoryPager class. In doing so, the OsrasMemory class can simply hold two instances of the
memory pager, deal with them separately, and draw them next to each other.
4.2.3.1 Class OsrasMemoryPager
This class generates memory page requests, and deals with them according to an internal algorithm
and its simulated memory contents. It is also capable of drawing a grid to show the memory contents,
allowing multiple classes of this type to be used in a single part of OSRAS.

24
Perhaps the most interesting function that this class performs is the generation of page requests.
Rather than just generate a random page number from the range of potentials, the
InitRandomGenerator function allows weighting of the request probabilities in order to provide a
more realistic simulation of how processes access memory. Essentially it assigns each page number a
random percentage, then raises that percentage to the power of a user-controllable variance, finally
normalising the final results so that the probabilities assigned to each page sum to one. The
GenerateNewRequest function uses this list of probabilities to choose which page to next add to the
list of page requests. The upshot is that with a higher variance, there will be some pages that get
requested far more often than others.
4.2.3.2 Memory Pages
In order to implement the various memory paging algorithms, it was necessary to have an array of
requests that would appear in the future (for use with the optimal algorithm) and an array of frames
that are currently in the memory. Each frame needed some associated information, such as the
number of the page in it, the time that page has been in memory, a flag to indicate whether this page
is on its first or last chance in memory, and a status flag (this is used purely to colour code the
display, not for functionality). This is better shown with the following pseudo code:
By using structs of this nature, an entire memory system can be simulated by simply having an array
(or in this case, and STL vector) of these. In order to give a view of the recent past of the memory
states, an array of arrays was used.
There now follows a pseudo code listing of each memory algorithm implemented.
The page number currently at this point in memory
The age of the page
Used by the optimal algorithm when looking for the page
that will not be used for the longest time.
Status can be not paged, just paged, or requested and
found in the memory.
The chance flag shows if the page is on its first or second
chance (second chance algorithm)
struct MemoryPage {
int value
int age
int time_until_next_use
status
chance
}

25
4.2.3.3 Implementation of FIFO Memory Paging
4.2.3.4 Implementation of LRU Memory Paging
4.2.3.5 Implementation of Optimal Memory Paging
Increment the age of all pages in memory
If the new request is not found in memory (page fault)
Look for a page not used yet
If one is found, load the page in at this point, with age zero
Else if there are no free pages
Find the oldest page in memory
Replace it, and set its age to zero
Set the page's status to just paged
Increment the age of all the pages in memory
If the new request is not found in memory (page fault)
Look for a page not used yet
If one is found, load the page in at this point, with age zero
Else find the page with the highest age
Replace it, setting the age to zero
Else if the new page is found at a memory location (no page fault)
Set the age of that page of memory to zero
If the new request is not found in memory (page fault)
Replace the page that will not be used for the longest time

26
4.2.3.6 Implementation of Second Chance Paging
Note that the second chance algorithm requires the used of a counter, an integer that cycles around the
memory locations in a circular pattern.
4.2.4 Class OsrasCpu
While it was possible to provide two simulations for memory paging, it was not possible to do so with
CPU scheduling, for the differing algorithms could cause the process queue's of each to become badly
mismatched, which would mean that giving them the same input would become difficult, and making
racing the algorithms and unfair test, since one could potentially have to hold back for the other to
catch up. Instead, the OsrasCpu class focuses on giving two levels of simulation with the clearest
possible visualisation
As with OsrasMemory, this class places most of the processing into another class (OsrasCpuLogic),
and is used mostly for display. The OsrasCpu class does however, add a layer of sophistication to the
simulation by using the results from OsrasCpuLogic and from OsrasMemoryPager to combine CPU
and memory paging simulation.
In its advanced mode, OsrasCpu simulates a single CPU system with a small amount (just four pages)
of main memory, and an equal amount of virtual memory. Processes may request access to a page
from memory. There are three options as to where the address of the memory page may be found:
• In the translation lookaside buffer (TLB). For reasons of simplicity, OsrasCpu does not
actually simulate a TLB at all. Instead, it assumes that there is a certain chance that a page
address will be found here. If it is decided that the process' memory request is found in the
TLB, OsrasCpu will choose a page that it already knows to be in memory to request. This
will incur the shortest time delay.
If the new request is not found in memory (page fault)
While the page the counter points at is not on its second chance
Set that page to its second chance
Increment the counter
Replace the page at the counter location with the new request
Set it to its first chance
Increment the counter
Else if the new page is found at a memory location (no page fault)
Set that page of memory to be on its first chance

27
• In main memory, the OsrasMemoryPager class. If OsrasCpu decides that the page is not to
be found in the TLB, it will request a random page from the page table. Whether the page
table says that the page is found in main memory or not depends entirely on the algorithm
being used for memory swapping. If it is in main memory, a medium time delay is incurred.
• On disk. Should the page that is requested not be found to be in main memory, then
OsrasCpu will simulate loading it from disk. This will incur the longest time delay.
OsrasCpu understands the concept of interrupts. For every tick, it will check if the process at the top
of the IO queue has waited for the appropriate length of time. If it has, then it triggers the
IOInterrupt() function of the OsrasCpuLogic class. When this happens, the process at the top of the
IO queue is immediately put at the top of the ready queue, displacing any process that is already on it.
4.2.4.1 Class OsrasCpuLogic
The OsrasCpuLogic class deals with the generation and processing of processes. It is capable of
drawing queue of processes that are waiting for CPU time and for memory access, as well as a brief
view of the processes that have recently been dealt with.
4.2.4.2 Processes
Similar to OsrasMemoryPager, this class uses a vector of processes (a process queue, indeed) to do
its work. The pseudo code below describes the information that is stored for each process:
The ready queue of the simulated processor is composed of a vector of such structs, which in many
ways are the equivalent of Process Control Blocks [15, p89]. Each tick of the simulator causes the
CPU to look at the current task on the topmost process in the ready queue. If the task is calculation,
then the process length is shortened by one unit, and a single unit of that process is placed upon the
out queue. If the task is memory access, then the process is moved immediately to the IO queue,
The initial length of the process, and the length at this
point in time
The amount of time that this process has spent on the
CPU, and not on the CPU
The time (in CPU cycles) that this process was created
The total age of this process
As in a real system, OSRAS assigns each process a
unique ID to identify it
For each unit of its length, a process may have different
tasks, such as calculation, or I/O
struct CpuProcess {
int initial length
int length
int cputime
int waittime
int arrivaltime
int age
int id
vector < CpuTask > tasks
}

28
where it will wait until it receives an instruction to say that the memory page has been located, and is
in main memory.
The OsrasCpuLogic class does not know how to remove processes from its IO queue, it must be
instructed to by another class, in this case, OsrasCpu. Because OsrasCpu holds an
OsrasMemoryPager, it can use this to tell OsrasCpuLogic when the memory page has been found.
Below follows a listing of pseudo code for each scheduling algorithm
4.2.4.3 Implementation of FCFS CPU Scheduling
4.2.4.4 Implementation of Round Robin CPU Scheduling
Round Robin scheduling requires the simulator to keep a counter to indicate how long the process has
been executing on the CPU. When this counter reaches the limit (the quantum) the process is moved
to the back of the queue.
4.2.4.5 Implementation of SJF CPU Scheduling
4.2.4.6 Implementation of SRTF CPU Scheduling
Process one unit from the process at the top of the ready queue
While Counter < Quantum
Process one unit from the process at the top of the ready queue
Increment Counter
Move the process at the top of the ready queue to the bottom
Bubble sort the ready queue except the top process
to place the shortest process in second place
Process one unit from the process at the top of the ready queue
Bubble sort the ready queue including the top process
to place the shortest process in second place
Process one unit from the process at the top of the ready queue

29
4.2.4.7 Class OsrasLine
OsrasLine is a small but very useful class which is repeatedly used in drawing for OsrasCpu. It
contains a vector of points, with c and y coordinates, and allows a line of any level of complexity to
be drawn with a single function call.
4.2.5 Class OsrasDisk
Unlike OsrasMemory, there did not seem to be any great advantage in displaying two separate disk
scheduling algorithms side by side. The only comparison that can easily be made between the
behaviour of different algorithms would be the effective access rate of the disk, which, it must be
confessed, is not particularly accurate. Rather that deceive the user with figures that are rather hard to
verify, it seemed wisest to concentrate instead on helping the user to understand the way in which the
algorithm worked.
As with the other simulations in OSRAS, this class puts most of its calculation into a second class, in
order that a simulation of a disk may easily be transferred into another part of the program.
4.2.5.1 Class OsrasDiskLogic
The OsrasDiskLogic class performs various disk scheduling algorithms upon a queue of access
requests. It is not sophisticated enough to deal with requests for specific blocks on parts of the disk,
instead using a request queue of cylinder numbers to work with. When seeking between cylinders it
takes account of the user-adjustable seek time of the disk by scaling this to fit the number of tracks
that the disk head has moved across in order to perform access on the requested cylinder. The further
the disk head is required to move, the greater the time this class will calculate. OsrasDiskLogic
assumes motion of constant velocity between tracks, rather than the acceleration that is seen in real
disk drives.
Unlike the CPU or memory simulations, the access request queue is simply a vector of integers, with
no special data structures needed.
This class translates the values for rotational delay and average seek time into something more
meaningful. Rotational delay is simply halved, assuming that on average the disk with have to rotate
half way around to find the appropriate sector. The average seek time is divided by half the number of
clusters (this simulation uses sixty four, since anything greater crowds the display too much to be
usable) to get a seek time per track. This can then be used to give a reasonably accurate seek time to
any track, giving a shorter value of time for closer tracks.
Since there is a great similarity in the Scan, CScan, Look and CLook algorithms, they were all
implemented within the same function, using a pair of Boolean arguments to turn circular and looking
on and off.

30
The following pseudo code describes the implementation of the various disk scheduling algorithms.
Note that in most cases, the greatest part of the code lies in sorting the request queue into the order of
future access. This is done to aid the visualisation, but would otherwise be almost completely
unnecessary. To demonstrate this face, the code for moving the disk head and the code for sorting the
queue will be shown separately.
4.2.5.2 Implementation of FCFS Disk Scheduling
Pseudo code for disk head movement:
No queue sorting is necessary.
4.2.5.3 Implementation of SSTF Disk Scheduling
Pseudo code for disk head movement:
Pseudo code for queue sorting:
4.2.5.4 Implementation of Scan Disk Scheduling
In simple scan scheduling, the disk head is only ever moving outwards.
When sorting the queue for the scan algorithm, it must be ordered so that the request in front of the
head is first in the list, and the request that is closest behind the head position is the last. Pseudo code
for queue sorting:
Move the head to the next requested cylinder in the queue
Service the closest request
Move the disk head outwards to the next request above it and service it
If the disk head is at the edge of the disk
Reset the disk head to the track zero
Bubble sort the request queue according to the distance of the requested
cylinder from the disk head
Service request at the beginning of the queue
Split the access queue into two parts, one above the disk head, one below
Sort the lists according to distance from the disk head
In descending order above the disk head
In ascending order below it
Place the list from above the disk head back into the request queue
Place the list from below the disk head back into the request queue

31
4.2.5.5 Implementation of Circular Scan Disk Scheduling
For circular scan it is necessary to keep track of the direction in which the disk head is moving, i.e.
inwards, or outwards. It must not move in the wrong direction.
When sorting the list for circular scan, the requests in front of the disk head must come first, in order
of nearness, and the requests behind the head come after them, also in order of nearness to the disk
head. Whether above or below the disk head can be classed as in front of or behind depends entirely
upon its direction of movement.
4.2.5.6 Implementation of Look Disk Scheduling
There is not a lot of difference between the Look and the Scan algorithms as far as disk head
movement is concerned:
There is no difference at all in the queue sorting code.
If the disk head is moving outwards
Move the disk head outwards to the next request and service it
If the disk head is at the edge of the disk
Start the disk head moving inwards
Else if the disk head is moving inwards
Move the disk head inwards to the next request and service it
If the disk head is at the centre of the disk
Start the disk head moving outwards
Split the access queue into two parts, one in front of the disk head, one
behind
Sort the lists according to distance from the disk head
In descending order
Place the list from in front of the disk head back into the request queue
Place the list from behind the disk head back into the request queue
Move the disk head outwards to the next request above it and service it
If the disk head is beyond the highest number request
Reset the disk head to the track zero

32
4.2.5.7 Implementation of Circular Look Disk Scheduling
As with the Look algorithm, the Circular Look is very little different to the Circular Scan algorithm.
And once again there is no difference in the code to sort the queue.
4.2.6 OSRAS' Graphics functions
OsrasGraphics is not a class, more a group of functions. While they are undeniably small and simple,
they have been indispensable in creating the displays of OSRAS. Almost all the classes make use of
these functions at some point. Functions included are to:
• Print an integer value to the screen
• Print a string to the screen
• Draw a "slider chart," using specified colours for each side, taking two integer arguments and
drawing each side as the appropriate proportion for that value. This is used to provide the
charts on the memory page replacement display.
• Drawing a background when given a pointer to a TGAFile class. This class is contained in
the file tga.h and features functions for loading a GL texture from a Targa image file. I
adapted this into a C++ class from the C code in OpenGL Game Programming [16, p222-
225].
• Drawing a rectangle by specifying only two corners of it
• Drawing a rectangle with a shaded border, two sides in shadow, two sides in highlight
4.2.6.1 OsrasColours
To go alongside the OsrasGraphics functions are the colours defined in the OsrasColours collection.
This is a collection of floating point arrays, ready for use with the glColor3f function.
If the disk head is moving outwards
Move the disk head outwards to the next request and service it
If the disk head is beyond the highest value request
Start the disk head moving inwards
Else if the disk head is moving inwards
Move the disk head inwards to the next request and service it
If the disk head is within the lowest value request
Start the disk head moving outwards

33
Chapter 5 – Implementation Issues
As with all software development, this program has been prone to pauses where programming issues,
and lack of knowledge arose during the development. This chapter details some of the major issues
that needed to be dealt with, in chronological order.
5.1 7th February – Making a GLOW Library
This is something I did not originally foresee being necessary. However, on the realisation that
compiling the GLOW source code was taking somewhere around four minutes to compile, even with
the very simplest programs using it, it became evident that something had to be done. Creating a
static library seemed the best option, as it would ensure that the appropriate code was compiled into
the executable. Although this did increase the file size, it also minimised the number of files needed
to distribute the program.
Building the library for Linux turned out to be particularly easy. All that was necessary was a pair of
commands to the GCC compiler:
g++ -g –c *.cpp
ar rcv libGlow.a *.o
Surprisingly, this worked immediately that the resulting library was placed in an appropriate
directory. The windows compiler that I have been using however, MinGW [17] seems to have a
problem with this. It will build the library, but is unable to link to it. Sadly, this is an issue I was
unable to resolve, and OSRAS has historically been compiled by linking to every .o file that is
created in a GLOW compilation. Although not ideal, this did seem to work, although it is an issue
that needs to be resolved if OSRAS is ever desired to be compiled without a static library.
5.2 16th February – Rebuilding GLOW controls on the fly
It took some time to figure out how to rebuild the GLOW control panel without causing the program
to segmentation fault. When creating a control panel for GLOW, it is essentially a matter of creating
"panels" to place the widgets onto, and then adding the widgets in the order desired, before issuing a
final Pack() command which will actually create the control panel (a control panel is of type
GlowQuickPaletteWindow). There is a second type, which allows fine control of the layout of the
widgets, but for the purposes of OSRAS, the simpler (and faster) option was used.
When programming multiple control panels, it is important that there never be two, otherwise one of
them will hang around in the background, but not accept any input (apart from the close window
command, which will terminate the program). At the same time, GLOW has a serious problem if the
control panel that is currently in use is deleted before another set of controls is made. This made for a

34
rather tricky set of functions that would build a requested control panel, and immediately delete the
previous, whichever it happened to have been.
5.3 14th April – GLOW Menu Glitch?
There is a glitch in the program which as far as I can tell is associated with the
GlowLabelledPopupMenu class. The error first manifested itself as a seemingly random tendency to
segmentation fault when using the menus to switch between simulation modes. It did not at the time
matter which simulation was currently active, nor which was being switched to.
I finally tracked this problem down by means of printf, triggering a console message every time a
control panel was built. What I found was that occasionally a control panel would be rebuilt twice.
For whatever reason, and I do not know whether it is something to do with my code, or a small bug in
GLOW itself, it would seem that a message from a popup menu can sometimes appear twice.
Now, for most things this just isn't a problem, but the functions I had created to switch between
control panels were never designed to cope with being asked to build a panel of their own type, while
one already existed. It is important that each control panel type have only a single instance in the
program. They could delete control panels for other simulations, but there seemed to be no way to
allow it to delete a control panel of its own type. In the end, it was simply a matter of checking
whether that particular control panel existed already before calling the function in the first place.
5.4 16th April – Important Numbers
During the coding of the modules in OSRAS, I frequently used variables for the time taken to
perform actions such as disk head seeks, or TLB hits/misses. Having completed the coding, it seems
wise to now get hold of some real values to set as the ranges/defaults for such things.
Disk Simulator:
Several things spring to mind that need to be checked for the disk simulator. Thankfully, hard drives
being a piece of technology that people actually buy, a number of online computer shops give details
about seek times, rotational speeds, and transfer rates. One such place is Dabs [18]. From a trip
around their hard drives section, it is possible to find that:
Transfer rates range from 66MB/s to 133 MB/s. This would translate into an access time of:
1 / (66 * 1024) = 0.0147 ms to read one kilobyte
1 / (133 * 1024) = 0.0073 ms to read one kilobyte
Common knowledge is that before the ATA66 drives, there were ATA33, so the simulator will
provide a range of access times from:
30 microseconds (an ATA33 drive) to 7 microseconds (an ATA133 drive)

35
The hard drives listed typically have rotational speeds of 5400 or 7200 rpm for IDE, and up to 15000
rpm for SCSI. Laptop hard drives generally have a lower speed, typically 4200 rpm. 4200 and 15000
would thus make sensible limits for the rotational speed of the simulated drive.
Seek times appear to typically range from 8 to 9 ms, leaving me to wonder whether it is worth
allowing the user to control this at all. Still, on the assumption that older drives had slower seek
times, I have provided a range from 8 to 12.
Advanced CPU Simulator
The advanced CPU simulation uses a waiting time in CPU cycles for each TLB hit/TLB miss/disk
access that is needed for the processes in the I/O queue.
On the assumption that a TLB hit costs 120 ns, and a TLB miss cost 220 ns [15, p275], if we assume
a 100MHz processor (i.e. one cycle every ten nanoseconds), then we would get a 12 cycle pause for a
TLB hit, and a 22 cycle pause for a TLB miss.
There is no hard and fast rule for a disk access, but given that seek times average 8ms, and rotational
delays average 5ms, we can assume at least 13ms for a disk access, or 1300 CPU cycles! This frankly
would cause the simulator to jam up should this value actually be used, since the I/O queue will fill
beyond its ability to show, while the ready queue will seem to be empty and unchanging (OSRAS
will not generate a new process if the I/O queue is too full).
In order to avoid choking the simulation (or rather, causing it to start thrashing) I have kept the times
down to 2 cycles for a TLB hit, 4 cycles for a TLB miss, and 8 cycles for a disk access. I believe that
this is enough to allow the user to visualise the delays without causing the simulator major struggles.

36
Chapter 6 – OSRAS Manual
This chapter contains an approximation of the website created to be the OSRAS manual, edited
slightly for paper. The actual website can be found at http://www.ewiddows.freeserve.co.uk/osras/
6.1 OSRAS CPU Simulation
OSRAS features two levels of CPU simulation. The first, and most basic shows a CPU with a queue
of processes in a queue. The user can select which algorithm the CPU will use to process this queue,
and watch as processes are dealt with. Each process will be assigned a unique identity number and a
colour. More information about each process can be seen by clicking on it.
Each block in each process signifies one CPU cycle worth of work. The green indicates that this work
is calculation. For simple mode, this is the only colour you will see.
The display for the advanced mode is considerably more complex. Let me explain...
What the advanced mode shows is a single CPU system with a small amount of physical memory and
virtual memory on disk. Processes may request access to a page in memory (this is signified by a blue
centre on a block). When the CPU comes to processing this block, it will move the process onto the
I/O queue. At this time there are three things that might happen:
• The process requests a page that is found in the Translation Lookaside Buffer. (OSRAS does not
actually contain a TLB, it simply says there is a certain chance that a memory page's address will
be found in it. In this case, completion of memory access takes only a couple of CPU cycles.

37
• The process requests a page that is not found in the TLB, but which the Page Table shows to be in
memory. When this happens, memory access takes a little longer, and the I/O queue is held up for
a greater time.
• The process requests a page that is not found in the TLB, and which the page table says is on
disk. In this case memory access takes a considerable length of time.
In each case, the route through the system is shown by highlighting the blue connection lines in red.
When a memory access request is completed, it triggers an interrupt on the CPU. At this point, the
process that just finished on the I/O queue is placed at the front of the ready queue, regardless of what
the CPU is doing at this time.

38
6.1.1 CPU Control Panel
Cycle time: sets the delay between page requests.
Simulation Mode: selects simple or advanced mode.
CPU Algorithm: selects which scheduling algorithm
the CPU is using.
Process Aging: Turns process aging on and off.
When this option is on (the readout at the bottom is
green) then SJF and SRTF will subtract a portion of
the age of the process from the length of a process
before ordering them in the ready queue. In this way,
the CPU avoids starvation of the longer processes.
Process Auto Generation: with this option on
(words in green at the bottom of the screen) OSRAS
will automatically keep the ready queue full (more or
less) by adding random processes.
Add Process: forces OSRAS to add a new process if the ready queue is not already over a certain
size (this limit is for the convenience of the simulator, and should not be taken as present for real
systems).
Memory Paging: the memory system of the simulator is as functional as the memory simulation
mode. This option allows the user to choose which algorithm they would like to use for memory
paging.
Reset: Restart the simulation from a blank memory.
Quit: Erm, quit?
Run/Pause: Pauses if running, runs from where it was paused if paused.
Step: When paused, move forward one step in time. Allows you to proceed at your own pace.
6.1.2 Explanation of Algorithms
FCFS: First Come First Served, this algorithm causes the CPU to deal with each process in turn. In
OSRAS this algorithm may be interrupted by an I/O interrupt.

39
SJF: Shortest Job First, whenever a new job arrives, all processes not executing are ordered by length
so that the shortest job is dealt with first. When the aging function is not used, this can cause long
processes to starve at the back of the ready queue.
SRTF: Shortest Remaining Time First, whenever a new job arrives, all processes, including that on
the CPU, are ordered by length so that the shortest job is dealt with first. When the aging function is
not used, this can cause long processes to starve at the back of the ready queue.
RR: Round Robin, this algorithm deals with processes in turns, giving each process a maximum of a
quantum on the CPU (in OSRAS, the quantum is 3 CPU cycles) before moving it to the back of the
ready queue.
6.1.3 Explanation of Process Details
Process ID: each process is given a unique ID number so that the system can identify it.
CPU Time: the number of cycles this process has spent on the CPU.
Wait Time: the number of cycles this process has spent not on the CPU since it was created.
Arrival Time: the time (in CPU cycles) that this process arrived.
Age: the number of CPU cycles that have passed since this process arrived.
Length: The number of CPU "blocks" left in the process.
Initial Length: The number of CPU "blocks" in the process when it was first created.
6.2 OSRAS Memory Swapping

40
OSRAS displays two grids of memory pages. The column on the left side of each grid shows the
memory page numbers currently held in memory. As time progresses, this column will shift right,
allowing a view of the recent history of pages stored.
The page numbers are coloured according to this key:
Light blue: nothing happened in this time slot. No memory pages swapped. (When using second
chance algorithm, this also indicates that this page still has its second chance)
Dark blue: this page is on its second chance and may be swapped out (Second Chance algorithm
only)
Green: this page was requested and found in the memory. No pages were swapped.
Red: this page was swapped in from disk and the previous contents removed: a page fault occured.
Orange: there was a page fault at this time, but not this page.
6.2.1 Memory Control Panel
Simulation mode: switches between memory simulation
(this) and CPU simulation.
Left and right algorithm: choose the memory swapping
algorithms that are used for the left and right grid. Note
that both left and right grids receive the same set of page
requests (as shown in the new request queue).
Cycle time: sets the delay between page requests.
Memory pages: sets the number of physical memory
pages to simulate.
Total pages: sets the total number of pages that may be
requested from memory.
Page probability variance: sets a measure of the
difference in the likelihoods of each page being
requested. A value of 1 means that each page is equally
likely to be requested. Higher values mean that some
pages are randomly chosen to be more important than
others, providing a more realistic simulation of memory
access.
Reset: Restart the simulation from a blank memory.

41
Quit: Erm, quit?
Run/Pause: Pauses if running, runs from where it was paused if paused.
Step: When paused, move forward one step in time. Allows you to proceed at your own pace.
6.2.2 Explanation of Algorithms
FIFO: First In First Out, replaces memory pages in linear order. The most basic kind of swapping
algorithm, and not very good.
Optimal: Relies on the future knowledge of what will be requested. Swaps out the page that will not
be used for the longest period of time. Cannot actually be implemented in a system, but is useful in
simulation for comparing the other algorithms to.
LRU: Least Recently Used: replaces the page that has not been used for the longest period of time.
Second chance: Uses a circular counter, and a page replacement bit. When a page is requested that
causes a fault, it replaces the page the counter is on only if that page is on its second chance. If the
page is on its first chance, it is set to its second chance and the counter moves on. This continues until
a page is found that can be replaced, even if it means going right through all the pages.
6.3 OSRAS Disk Simulation
OSRAS' Disk Simulator comprises a graphical display of some of the scheduling algorithms for disk
access.

42
OSRAS is not (yet) capable of simulating access to different blocks of a disk. Instead, it will simulate
requests as if they arrive per cylinder of the disk, adding an average rotational delay to each access
time. OSRAS keeps track of the simulated time that the disk takes to access each request. Simulated
time does not in any way match with real time, and is based entirely upon the figures that are
provided by the control panel.
The highlighted cylinders show where the requests have appeared on the disk surface. The shading
from yellow to red denotes how long it will be before the disk head reaches it; the more yellow, the
longer it will be, the redder it is, the sooner the disk head will access that cylinder.
OSRAS provides easy benchmarking of the various algorithms in the KBytes/s readout. This is an
approximation of how many kilobytes per second the virtual disk is transferring. Note that this figure
does not reflect the performance that you may expect from a hard disk of today's standards. This
appears to be because OSRAS does not understand the concept of disk fragmentation, or that requests
tend to come in clusters of many kilobytes spread over a few neighbouring cylinders, rather than
across the entire disk. If you leave your Windows drive for about a year without defragmenting, you
may get something like the OSRAS simulation ;o)
6.3.1 Disk Control Panel
Cycle time: sets the delay between movements of the
disk head.
Rotation: sets the rotation speed (rpm) of the virtual
disk.
Seek time: the simulated time taken to move the disk
head half way across the disk. OSRAS will perform a bit
of magic to use this figure to generate longer times for
further travel.
Access time: sets the time take for the disk head to
actually read what it has been sent to. The maximum
value on this scale is approximately equal to an ATA133
disk drive.
Access size: the number of kilobytes per access.
Cylinders: the number of cylinders on the disk. A real
disk would have much more than the maximum OSRAS
can provide, but this makes it impossible to see the
cylinders on the display.

43
Reset: Restart the simulation and randomise the requests again.
Quit: Erm, quit?
Run/Pause: Pauses if running, runs from where it was paused if paused.
Step: When paused, move forward one step in time. Allows you to proceed at your own pace.
6.3.2 Explanation of Algorithms
FCFS: First Come First Served, the disk head deals with the requests in the order they arrive.
SSTF: Shortest Seek Time First, the disk head deals with the closest request to the one it just
serviced.
Scan: the disk head scans from the centre of the disk to the outside, servicing requests on the way,
then snaps back to the centre.
CScan: Circular Scan, as above but the disk head reverses direction when it reaches the edge of the
disk.
Look: as Scan, but the disk head returns to the centre when there are no more requests outside it.
CLook: As CScan, but the disk head reverses direction when there are no more requests to service in
the direction it is moving.

44
Chapter 7 – Evaluation
Following the evaluation framework in section 1.2, I have evaluated my final software thusly:
Does it work without errors and on any University of Leeds computer?
As far as I can tell, yes. The Windows version works on Windows, the Linux version works on…
well, Linux. OSRAS tends to be a little bit slow on some of the lower spec machines, but from
experience, anything with Pentium 3 400MHz and above, especially with an OpenGL graphics card,
will run very nicely.
Does it simulate at least one of the scheduling functions listed above?
This is also a yes. In fact, it simulates all three of the scheduling functions, covering CPU, memory,
and disk allocation. It could, I confess, be pointed out that none of the simulations that OSRAS covers
is complete according to the research/possible expansions listed. The question should then be asked,
why not? The simple answer is because the subject area is so huge. As deep as I may have gone into
any or all of the three simulations, it would almost always be possible to find more depth that the
simulator could go into. In the end, I decided to draw the line and call the software complete when it
covered the major features of each simulation. I must confess, there was also a time factor involved,
since despite the best work I can produce, and putting in all my hours, this was all that I had time for.
Is the choice of language appropriate?
As far as I can tell, yes it is. There is actually more processor work involved in OSRAS than I at first
anticipated, so my choice of C++ as a development language seems justified, since I am unsure that
slower languages such as Python or Java would be able to handle the workload at full speed.
This said, it can be pointed out that one reason for OSRAS' high processor requirements are the
OpenGL graphics. On a machine with an OpenGL accelerated graphics card (almost everything under
two years old), this is not a problem. It does however cause something of a slowdown effect on some
of the older machines in the University of Leeds. However, to counter this, I would point out that if
the machine does not have hardware graphics acceleration, then it is very likely to have a low end
processor as well, which might actually have caused more problems if using a slower language.
Does it use an appropriate user interface?
From what people have said as they leaned over my shoulder from time to time, and from those I
persuaded to fill in the form I included on the OSRAS website, yes, I believe so. User interface is via
a GUI of sliders, menus, and push buttons, with the CPU simulation also being able to catch and
interpret mouse clicks on the simulation display. General opinion is that these controls are
comfortable and familiar.

45
Is the software easy to use, and is there documentation easily available?
Full documentation (and program/source code downloads) for OSRAS are available at the website
http://www.ewiddows.freeserve.co.uk/osras This is my own site that I have put together to form the
user manual for OSRAS. An approximation of this web page is included in chapter 6.
Opinions of the ease of use of OSRAS have been rather hard to generate. The software is specifically
aimed at second year computing/computer science students, but despite requests for feedback, I have
only had one contact, with the comment of "Cool project". This being the case, I have had to fall back
on asking people I can trap in a confined space with no escape routes. General opinion here seems to
be that yes, the interface is friendly, although the advanced CPU simulation is a little confusing until
people have read the manual. Some people are of the opinion that I have offered too many options,
leaving them wondering what it is they are supposed to be changing. I can only guess that a student
who was actually learning the subject, rather than one who was just testing the software, would make
it their business to understand…
Do the simulated results match with what would be expected from general knowledge?
In general, yes.
The memory simulator has least page faults when using the optimal algorithm, LRU and second
chance both outperform FIFO, etc.
The CPU simulator… does what it is supposed to. There is no real way to benchmark the CPU
simulator, because there is no real right or wrong way to deal with processes. All that can be said is
that the algorithms behave as would be expected, both with and without process aging.
The disk simulation is a little confusing, especially when looking at the access rate (which is,
admittedly, a contrived value). However, it is noticeable that this value is lowest on FCFS scheduling,
which is as expected, because the disk head will be travelling considerably further between requests
than it ideally would.
Do people find that it helps them understand what is going on?
I am rather sad to say that I am not sure. The lack of feedback from the intended audience has caused
me something of a problem. From the comments I have gathered from those willing to give feedback,
yes, but it should be taken into account that these are people who have already sat, and mostly passed,
the exams for the subject area that OSRAS is designed to assist with.

46
Is the software written in such a way that it can be easily built upon in the future?
Throughout the project, I have designed OSRAS to be as expandable as I know how. As long as a
module is descended from class OsrasModule it requires only two files to be edited (those containing
the OsrasWindow class) in order to include it with the existing modules.
The common functions in OsrasGraphics provide a quick and easy starting point to add graphical
displays to any new modules with the minimum of fuss.

47
Chapter 8 – Overall Conclusions and Future Work
8.1 OSRAS as it is
As it stands, I believe that OSRAS is not a bad simulator as far as it goes. It fully covers CPU, and
disk scheduling algorithms, and memory swapping algorithms, presenting each on an easy to follow
graphical display, which, in my opinion, provides a superior visualisation to any of the other
simulators I have encountered.
General opinion of OSRAS has been pleasing, with the greatest issue being that there are if anything,
too many options for the simulations. I personally don't consider this to be too much of a problem,
since all the simulations are fully documented on the OSRAS website, and anyone with sense can
simply ignore any controls they still do not understand. All options default to a standard value, so
little can go wrong if they are ignored.
8.2 OSRAS as it could be
There is quite a wide scope for future work on OSRAS, ranging from small additions to existing
modules that I simply didn't find time to include, right up to whole new modules. Things which I
would have liked to do but couldn't are:
• Allowing the user to set a reference string for memory page replacement, either by direct
input, or by specifying a file.
• Include the enhancements to the second chance memory page replacement algorithm [15,
p320] which uses a modify bit as well as a reference bit to determine if the most recent access
of the page was a read or a write operation. For this to make any difference to the simulation,
it would be necessary to actually have read and write requests, and also include a counter to
keep track of the time taken by the algorithm, since if the page has been modified, it will need
to be written to disk before being replaced.
• Expand each algorithm in the page swapping to include a buffer of free frames. When
combined with a timer, this would show how pages can now be swapped immediately, rather
than having to wait for them to be swapped out to disk [15, p321].
• Allowing the user to vary the times it takes for a TLB hit/miss/disk access in the advanced
CPU simulation.
• Actually have a TLB in advanced CPU mode rather than simply faking the effect of one.
• Allow processes to request direct disk access, rather than just memory access in the advanced
CPU simulation.

48
• Include a foreground and background queue system in the CPU simulator, each of which may
have a difference proportion of time on the CPU, and a different scheduling algorithm.
• Include acceleration of the disk head in the disk simulator to give a more realistic movement
pattern.
• A new simulation to show the translation of logical addresses to physical addresses in the
page table. Perhaps this could be combined with the advanced CPU simulation.
• Try to fix that small but annoying problem in the Windows version of OSRAS where the
control panel tends to relocate itself when rebuilt (changing between simulations).
• Inspired by MOSS [2], new modules for deadlocking and file systems could be added.
This list is by no means definitive. There are no doubt many more additions that could be made to
OSRAS, probably several final year projects worth of work could be put into its development before
it could be considered "complete".

49
Bibliography
[1] Operating System Simulator In Java
URL:http://www.geocities.com/Tokyo/Flats/3313/Joss.html [9th April 2002]
[2] Ontko, Ray, & Reeder, Alexander, (2001), Modern Operating Systems Simulators
URL: http://www.ontko.com/moss/ [9th March 2002]
[3] Tanenbaum, Andrew S, (2001), Modern Operating System, Second Edition, Prentice-Hall
[4] Larus, James, (2002), SPIM A MIPS R2000/R3000 Simulator
URL: http://www.cs.wisc.edu/~larus/spim.html
Free with Hennessy & Patterson, Computer Organization and Design: The
Hardware/Software Interface
[5] Kerenidis, I & Markakis, E & Potika, K & Siaterlis, C, Medusa: an Operating Systems
Simulator
URL: http://www.vstu.vinnica.ua/ies2000/doclad/b/152.htm [10th March 2002]
[6] Bishop, Judy, (1998) Java Gently, Addison-Wesley 2nd Ed.
[7] Deitel & Deitel, (1999), Java How To Program, Prentice Hall, 3rd Ed.
[8] SGI, URL: http://www-europe.sgi.com/software/opengl/glut.html [10th April 2002]
[9] Rademacher, Paul, GLUI User Interface Library,
URL: http://www.cs.unc.edu/~rademach/glui [10th March 2002]
[10] Azuma, Daniel, (2000), The GLOW Toolkit,
URL: http://www.ugcs.caltech.edu/~dazuma/glow/ [10th March 2002]
[11] Python, URL: http://www.python.org/ [10th March 2002]
[12] PyOpenGL the Python OpenGL Binding,
URL: http://pyopengl.sourceforge.net/ [10th March 2002]
[13] QT, URL: http://www.trolltech.com/products/qt/index.html [10th March 2002]
[14] Efford, Nick, (2000-2001) Si21 Lecture Notes
[15] Silberschatz, Abraham, Galvin, Peter and Gagne, Greg, (2000), Applied Operating Systems
Concepts, First edition, Wiley

50
[16] Hawkins, Kevin, and Astle, Dave, (2001), OpenGL Game Programming, Fist edition, Prima
Publishing
[17] MinGW, URL: http://www.mingw.org [16th April 2002]
[18] Dabs, URL: http://www.dabs.com [16th April 2002]

51
Appendix A – Personal Reflections
With regards to my personal experiences during this project, I would have to say they were unique.
This is undeniably the largest software engineering task I have ever undertaken, as well as one of the
largest research tasks I have ever attempted.
Looking back on managing the project, I feel I did so reasonably well. I seem to have been able to
judge the workloads of each section of the project to a fairly high accuracy, and have managed to stay
within one week of my schedule at all times. I found it to be a nice change to be allowed to guide
myself through the tasks, rather than answering directly to someone else's decision as to how the
project should be managed.
With regards to actual programming, I feel I have learned a lot. I feel much more confident in my
ability to code software from the word go, and I have learned some important lessons about being
certain I know what I want to code before I actually sit down and do it. I have also learned that I do
have something of a tendency to rush into the coding phase of my work, in this case the best example
was the original design of the OsrasMemory class. In the beginning, this class contained all the code
necessary to produce the memory simulation, and did not put any of the calculation into another class.
When the idea of using two memory simulations side by side occurred, I was then forced to adapt this
class so that it used numerous arrays of size two. When it came to the design of the advanced CPU
simulation, and I found I wanted to move a part of the memory simulation into it, I had to rewrite the
OsrasMemory class once again, placing most of its calculation into a secondary class. Although the
work involved in this was not great (most of it was cutting and pasting code) it has made me very
aware of my tendency to rush towards the programming, and I hope I can now be on guard for this in
the future.
With regards to the final result of the project, I am fairly pleased. There was a brief point of doubt
about half way through when I seriously wondered if it was going to be possible to include modules
for all three of the scheduling areas that I wanted to, because it looked as though the code was going
to take considerably longer to generate than I had anticipated. Thankfully, through some hard work
and a couple of late nights, I was able to get a firm enough grasp on how I needed to do things, and
was able to focus more on what I wanted to do.
I am a little disappointed that OSRAS does not go into greater detail than it does. I would have liked
to include a module for memory address translation, but sadly there is just not time to do so.
My overall conclusion would be that the project has turned out as well as it could, given the
knowledge I had when I began. If I had to do it again from scratch, I feel certain I could have pushed
it further, which I actually class as a good thing, since it tells me that I have actually learned
something.