operating instructions commercial dishwasher g 7859€¦ · operating instructions commercial...
TRANSCRIPT
Operating instructions
Commercial DishwasherG 7859
It is essential to read theseoperating instructions before @ä]installing, commissioning or using the machine, to avoid the risk of accident or damage M.-Nr. 05 339 030

ContentsDescription of the machine . . . . . . . . . . . . . . . . . . . . . . . . . . . . . . . . . . . . . . . . . . 3Guide to the machine. . . . . . . . . . . . . . . . . . . . . . . . . . . . . . . . . . . . . . . . . . . . . . . 4Warning and safety instructions. . . . . . . . . . . . . . . . . . . . . . . . . . . . . . . . . . . . . . 6Warning and Safety instructions (detachable). . . . . . . . . . . . . . . . . Centre pagesCaring for the environment . . . . . . . . . . . . . . . . . . . . . . . . . . . . . . . . . . . . . . . . . 10Before using for the first time . . . . . . . . . . . . . . . . . . . . . . . . . . . . . . . . . . . . . . . 11Opening and closing the door . . . . . . . . . . . . . . . . . . . . . . . . . . . . . . . . . . . . . . 12Water softener . . . . . . . . . . . . . . . . . . . . . . . . . . . . . . . . . . . . . . . . . . . . . . . . . . . 13Setting the water softener . . . . . . . . . . . . . . . . . . . . . . . . . . . . . . . . . . . . . . . . . . . 15Filling the salt reservoir . . . . . . . . . . . . . . . . . . . . . . . . . . . . . . . . . . . . . . . . . . . . . 16Salt indicator . . . . . . . . . . . . . . . . . . . . . . . . . . . . . . . . . . . . . . . . . . . . . . . . . . . . . 17Loading the machine . . . . . . . . . . . . . . . . . . . . . . . . . . . . . . . . . . . . . . . . . . . . . . 18Adjusting the upper basket . . . . . . . . . . . . . . . . . . . . . . . . . . . . . . . . . . . . . . . . . . 21Items not suitable for dishwashers. . . . . . . . . . . . . . . . . . . . . . . . . . . . . . . . . . . . . 21Adding rinse aid . . . . . . . . . . . . . . . . . . . . . . . . . . . . . . . . . . . . . . . . . . . . . . . . . . 22Setting the dosage . . . . . . . . . . . . . . . . . . . . . . . . . . . . . . . . . . . . . . . . . . . . . . . . . 24Adding cleaning agent. . . . . . . . . . . . . . . . . . . . . . . . . . . . . . . . . . . . . . . . . . . . . 25Programme selection. . . . . . . . . . . . . . . . . . . . . . . . . . . . . . . . . . . . . . . . . . . . . . 27Programme chart . . . . . . . . . . . . . . . . . . . . . . . . . . . . . . . . . . . . . . . . . . . . . . . . . 28Switching the machine on and off . . . . . . . . . . . . . . . . . . . . . . . . . . . . . . . . . . . 30Switching on. . . . . . . . . . . . . . . . . . . . . . . . . . . . . . . . . . . . . . . . . . . . . . . . . . . . . . 30Switching off. . . . . . . . . . . . . . . . . . . . . . . . . . . . . . . . . . . . . . . . . . . . . . . . . . . . . . 31Cancelling a programme . . . . . . . . . . . . . . . . . . . . . . . . . . . . . . . . . . . . . . . . . . . . 32Programming special functions . . . . . . . . . . . . . . . . . . . . . . . . . . . . . . . . . . . . . 33Cleaning and care . . . . . . . . . . . . . . . . . . . . . . . . . . . . . . . . . . . . . . . . . . . . . . . . 38Correcting minor faults . . . . . . . . . . . . . . . . . . . . . . . . . . . . . . . . . . . . . . . . . . . . 42After Sales Service . . . . . . . . . . . . . . . . . . . . . . . . . . . . . . . . . . . . . . . . . . . . . . . . . 43Installation . . . . . . . . . . . . . . . . . . . . . . . . . . . . . . . . . . . . . . . . . . . . . . . . . . . . . . 44Electrical connection . . . . . . . . . . . . . . . . . . . . . . . . . . . . . . . . . . . . . . . . . . . . . . 46Plumbing . . . . . . . . . . . . . . . . . . . . . . . . . . . . . . . . . . . . . . . . . . . . . . . . . . . . . . . . 47Technical data . . . . . . . . . . . . . . . . . . . . . . . . . . . . . . . . . . . . . . . . . . . . . . . . . . . 49
Contents
2

Description of the machineThis Miele machine is a frontloadingcommercial dishwasher, with very shortbatch times especially suitable for usein restaurants, cafés, fast food outlets,boarding houses, etc.
It operates on the freshwater systemand is equipped with a water softenerand electro-thermal door lock as stand-ard.
Optional extra
Steam condenser (DK)
Description of the machine
3
Guide to the machine
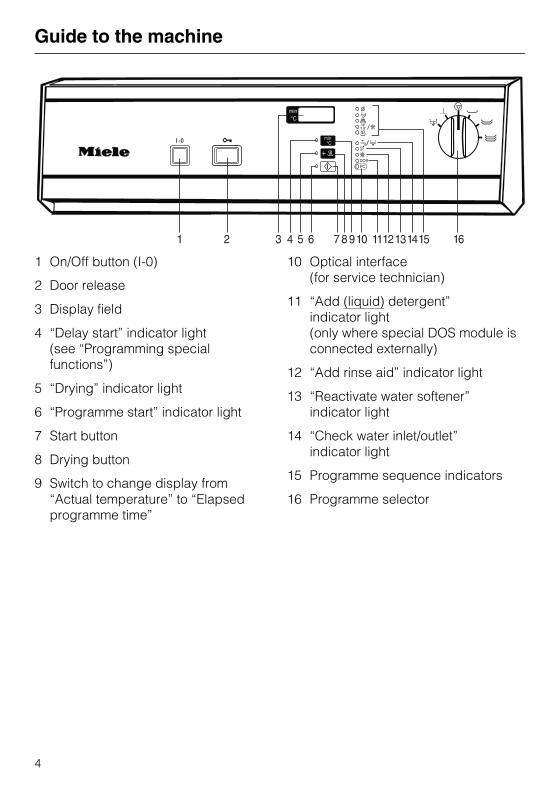
1 On/Off button (I-0)
2 Door release
3 Display field
4 “Delay start” indicator light(see “Programming specialfunctions”)
5 “Drying” indicator light
6 “Programme start” indicator light
7 Start button
8 Drying button
9 Switch to change display from“Actual temperature” to “Elapsed programme time”
10 Optical interface(for service technician)
11 “Add (liquid) detergent”indicator light(only where special DOS module isconnected externally)
12 “Add rinse aid” indicator light
13 “Reactivate water softener” indicator light
14 “Check water inlet/outlet”indicator light
15 Programme sequence indicators
16 Programme selector
Guide to the machine
4
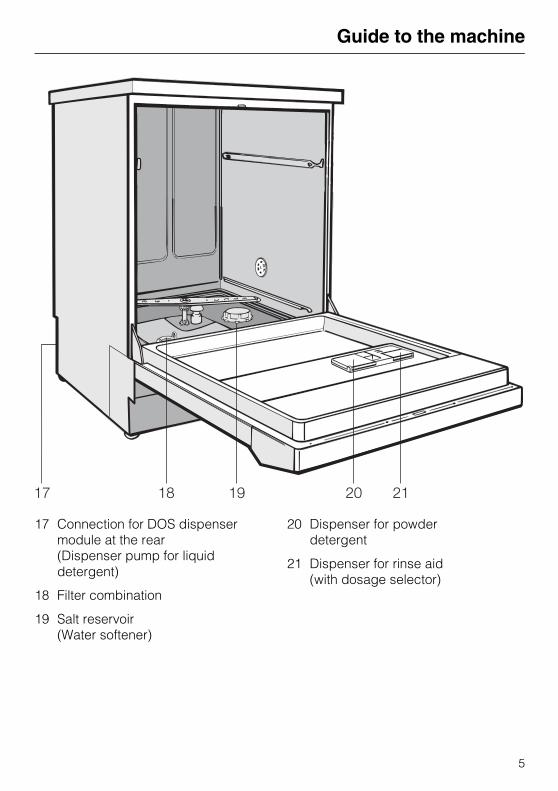
17 Connection for DOS dispenser module at the rear(Dispenser pump for liquiddetergent)
18 Filter combination
19 Salt reservoir(Water softener)
20 Dispenser for powder detergent
21 Dispenser for rinse aid (with dosage selector)
Guide to the machine
5
Warning and safety instructionsThis machine conforms to currentsafety requirements. Inappropriateuse can however lead to personalinjury and damage to property. Read the operating instructionscarefully before starting to use thismachine. This way you will avoidthe risk of accidents and damage tothe machine.Keep these instructions in a safeplace, and make them available tofuture users.
Appropriate usage
This machine is designed for com-mercial use and for specialised
applications only, as described inthese Operating Instructions. Using itfor purposes other than those for whichit was designed would be unauthorisedand could cause harm.The manufacturer cannot be held re-sponsible for damage caused by im-proper use.
This equipment is not designed formaritime use or for use in mobile in-
stallations such as caravans, aircraftetc. However it may be suitable forsuch usage subject to a risk assess-ment of the installation being carriedout be a suitably qualified engineer.
The following notes are to help avoidpersonal injury
The machine should be commis-sioned and then maintained only by
a Miele authorised and trained servicetechnician or other suitably qualified andcompetent persons.
Do not install the machine in an area
where there is a danger of explo-sion or of freezing conditions.
The electrical safety of this ma-chine can only be guaranteed
when continuity is complete betweenthe machine and an effective earthingsystem on site. It is imperative that thisbasic safety requirement is tested and,where there is any doubt, the electricalsystem checked out by a qualified elec-trician. The manufacturer cannot be held re-sponsible for damage or injury causedby missing or defective earthing, suchas electric shock.
A damaged machine is dan-gerous. Switch off at the mains im-
mediately and call the Miele Service De-partment or an authorised and trainedMiele Service Dealer or other suitablyqualified and competent person.
Repair work may only be carriedout by an authorised Miele service
technician or other suitably qualifiedand competent person. Repairs by un-qualified persons could be dangerous.
Personnel operating the machineshould be trained regularly. Child-
ren and untrained personnel should notbe allowed access to the machine orits controls.
Do not allow children to play in oraround the dishwasher, or to oper-
ate it. There is a danger they could getinto the machine and lock themselvesin.
Warning and safety instructions
6
Take care when handling liquidagents/additives. These may con-
tain irritant or corrosive ingredients. Onno account use any organic solvent, asthere may be the danger of an explo-sion occuring.Follow the instructions and relevantsafety procedures carefully. Wear pro-tective gloves and goggles. With allchemical agents the manufacturer’ssafety instructions must be observed.
Avoid inhalation of powder deter-gents.
They can cause burning in the mouthand throat if swallowed, or inhibit brea-thing.
The water in the machine must notbe used as drinking water.
Do not sit or lean on the opendoor. This could cause the ma-
chine to tip and be damaged.
Be careful when sorting sharp-pointed items. You may prefer to
place cutlery with sharp points with thehandles upwards to avoid possible in-jury.
When using this machine in thehigher temperature ranges be
especially careful not to scald or burnyourself. Baskets and inserts must firstcool down. Any water which may re-main in containers will be very hot andmust be emptied into the wash cabinet.
Do not touch the heating elementsduring or directly after the end of a
programme, you could burn yourself.They remain hot for a while after the end ofa programme.
Never clean the machine or closevicinity with a water hose or a high
pressure hose.
Before any maintenance or repairwork is undertaken, the machine
must be disconnected from the mainssupply by switching off at the mains iso-lator or switching off the mains fuse.
The following notes should help toavoid material damage.
Only use detergents formulated forspecial processes and
approved by Miele for use with this machine. Use of unsuitable detergentscould adversely affect the componentsof the machine as well as items beingcleaned.
For pre-treatment and / or cleaningonly use low-foaming detergents
and disinfecting agents which havebeen approved by Miele. Foam canhave an adverse effect on the disinfec-tion and cleaning process.
Warning and safety instructions
7
Where a chemical additive is re-commended on technical grounds
(e.g. with a cleaning agent), this doesnot imply that the manufacturer of themachine takes responsibility for thecompatibility with the items beingcleaned.Please be aware that changes in formu-lation, storage conditions etc., whichmay not be publicised by the chemicalproducer, can have a negative effecton the cleaning result.
When using cleaning agents andspecialised products, it is essential
that the manufacturer’s instructions arefollowed. Only use the product for theapplication described by the manufac-turer, to avoid any material damage orthe occurrence of strong chemical reac-tions.
The machine is designed only foroperation with water and cleaning
agents. Organic solvents must not beused in the machine, as there is thedanger under certain circumstances ofexplosion. (Although this is not thecase with all organic solvents, otherproblems could arise with their use, forexample damage to rubber and syn-thetic materials).
In critical applications where verystringent requirements have to be
met, it is strongly recommended that allthe relevant factors for the process,such as cleaning agent, quality ofwater, etc. are discussed with the Miele Application Technology specialists.
If the cleaning result is subject toparticularly stringent requirements
(e.g. chemical analysis, specialisedprocesses, etc.), a regular quality con-trol test must be carried out by the userto ensure that required standards ofcleanliness are being achieved.
The special inserts should only beused for their specific application.
Empty any containers or utensils be-fore arranging them in the machine.
Do not allow any remains of acidsor solvents, and in particular hydro-
chloric acid or chloride solutions to ac-cess the wash cabinet. Similarly avoidany materials with a corrosive effect.The presence in compounds of any sol-vents should be minimal, (especiallythose in hazard class A1).
Ensure that solutions or steam con-taining acid salts do not come into
contact with the steel outer casing ofthe machine, to avoid any corrosiondamage.
Please follow the advice on installa-tion in these instructions and in the
separate Installation Instructions.
In countries where there are areaswhich may be subject to infesta-
tion by cockroaches or other vermin,pay particular attention to keeping theappliance and its surroundings in aclean condition at all times. Any dam-age which may be caused by cock-roaches or other vermin will not becovered by the appliance guarantee.
Warning and safety instructions
8

Use of accessories
Only specific additional equip-ment, made by Miele should be
connected to this machine. ConsultMiele on the type and application ofsuch equipment.
Disposal of the old machine
When disposing of your old ma-chine first make it unusable. Dis-
connect from the mains power supply,cut off the cable and any plug from thecable. For environmental and safety reasons,ensure the machine is completelydrained of any residue water and clean-ing agent. (Observe safety regulationsand wear safety goggles and gloves). Make the door lock inoperative, so thatchildren cannot accidentally shut them-selves in. Make appropriate arrange-ments for the safe disposal of the ma-chine.For tank system machines ensure thatany water is emptied out of the tank.
The manufacturer cannot be held responsible for any damage causedthrough non-observance of theseWarning and Safety instructions.
Warning and safety instructions
9
Caring for the environmentDisposal of the packing materialThe transport and protective packinghas been selected from materialswhich are environmentally friendly fordisposal and can normally be recycled.
Rather than just throwing these materialsaway, please ensure they are offered forrecycling.
Disposal of your old ma-chine/applianceOld machines/appliances contain materials which can be reclaimed or recycled. Please contact your dealer,your waste collection centre or scrap merchant about potential recyclingschemes.Ensure that the machine/appliancepresents no danger to children whilebeing stored for disposal.See the appropriate section in theWarning and Safety instructions.
Caring for the environment
10
Before using for the first timeBefore using for the first time pleasepay special attention to the follow-ing points:
Detailed information on these pointscan be found in the relevant section ofthe Operating Instructions.
Setting the water softener.
The water softener unit must be set todeal with the water hardness level inyour area.
The salt reservoir must also first befilled with water and then with dish-washer reactivation salt.
ImportantFilling the salt reservoir with detergentby mistake will cause serious damageto the water softener.Please check every time before refillingthat the package contains dishwasherreactivation salt.
Adding rinse aid.
Inadvertently filling the reservoir forrinse aid with powder or liquid deter-gent, or washing up liquid, will causeserious damage to the reservoir.
Only use designated cleaning agentsfor special applications.
Do not use detergents formulated foruse in domestic dishwashers.
Loading the crockery correctly.
Arrange the load so that water willcome into contact with all the surfaces.This ensures that they will be properlycleaned.The spray arms must not be blockedby any items.
Adding the correct amount of clean-ing agent.
Follow the detergent manufacturer’srecommendations. Using less than ad-vised can adversely affect cleaning re-sults.
The amount dispensed will depend onthe type of detergent used and the pro-gramme selected.Read the notes on dosage given in theprogramme chart.
Cleaning results may vary from brandto brand. If you are not satisfied withthe results from one brand, try anotherquality brand before contacting theCustomer Service Department for advice.
The filter combination in the base ofthe wash cabinet and the spray armsmust be kept clean.
Regular checking and cleaning are essential.
Before using for the first time
11
Opening and closing the door Electric door lockThe machine is equipped with an elec-tric door lock.
The door can only be opened when:
the machine is connected electrically
the main switch I-0 is on.
To open the door aPress the door button in fully and atthe same time pull open the door.
Do not touch the heating elements ifyou open the door during or directlyafter the end of a programme. Theheating elements remain hot forsome time after the end of a pro-gramme.
To close the doorLift the door upwards until it clicksinto position. Do not push in the doorrelease button as you do so.
The door is locked approx. 1.5 mins.after programme start, except in theprogrammes D (COLD), 6 (DRAIN)and during the drying phase (additionalprogramme). The door remains locked until the endof the programme, when it can be op-ened again.
Cancelling a programmeIf a programme has to be cancelled inextreme cases, e.g. when articles inthe machine jostle against each otheror the programme is interrupted with afault indication, the door must be op-ened (deliberate intervention):
Turn the programme selector switchto f (the programme is cancelledafter approx. 2 secs.).
Important: Further procedures are de-scribed in the section “Switching on andoff” under “Cancelling a programme”.
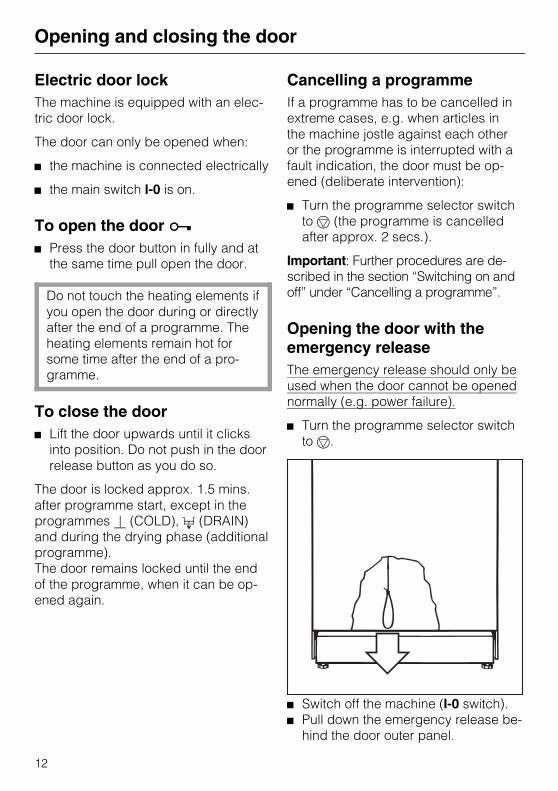
Opening the door with theemergency releaseThe emergency release should only beused when the door cannot be openednormally (e.g. power failure).
Turn the programme selector switchto f.
Switch off the machine (I-0 switch).Pull down the emergency release be-hind the door outer panel.
Opening and closing the door
12
Water softenerTo avoid the build-up of calcium de-posits on items being cleaned and inthe machine the water needs to be soft-ened.
To ensure a steady supply of soft waterthe water softener unit must always be:
1. correctly set (programmed) and
2. the salt reservoir must be filled. (If the water hardness level is below70 mg/l (4°d) the water does notneed to be softened.)
The machine is set at the factory for awater hardness level of 340 mg/l (19 °d).
If the water supply is harder or softerthan this (including below 70 mg/l or4°d) the factory setting will need tobe changed following the instruc-tions in the section “Setting thewater softener”. For settings, seechart on the next page.
Your local water authority will adviseyou on the water hardness in your area.
For fluctuating levels (e.g. 140 - 310 mg/lor 8 - 17°d) set the water softener to the highest setting (in this example to 310 mg/l or 17°d).
ImportantThe built-in water softener has settingsfrom 20 mg/l to 1080 mg/l or 1°d - 60°d.
For future servicing it is useful to makea note of your water hardness level.
Enter details of your water hardnesslevel here: °d / mg/l
Water softener
13

Table of settings
°d mg/l °f Setting
123456789101112131415161718
19 *)2021222324252627282930313233343536373839404142434445
2040507090
110130140160180200220230250270290310320340360380400410430450470490500520540560580590610630650670680700720740760770790810
24579
11131416182022232527293132343638404143454749505254565859616365676870727476777981
123456789
101112131415161718192021222324252627282930313233343536373839404142434445
°d mg/l °f Setting
464748495051525354555657585960
830850860880900920940950970990
10101030104010601080
83858688909294959799
101103104106108
464748495051525354555657585960
*) factory setting
Machines without a water softenerare set to “0” at the factory. This set-ting of “0” must not be changed onthese machines.
Water softener
14
Setting the water softenerSwitch the machine off.
Turn the programme selector to f“STOP”.
Press 4 and 6 at the same time,hold them in and whilst doing soswitch on the machine with the I-0main switch. The actual programme status “P...”appears in the display.The p / 6 indicator light illuminates.
Press 3 once. “E01” (programmelevel 1) appears in the display.
Turn the programme selector sixswitch positions to the right (6 o’clockposition).The number “19” appears in the dis-play (the factory water hardness set-ting in °d, equivalent to 340 mg/l).
Press 4 as many times as isnecessary, or hold it in until the re-quired water hardness level appearsin the display.The counter returns to “0” afterreaching “60”.
Press 6. “SP” is displayed.
Press 6 once more. The setting willnow be saved. The display clears.
The machine is now ready for operation.
Water softener
15
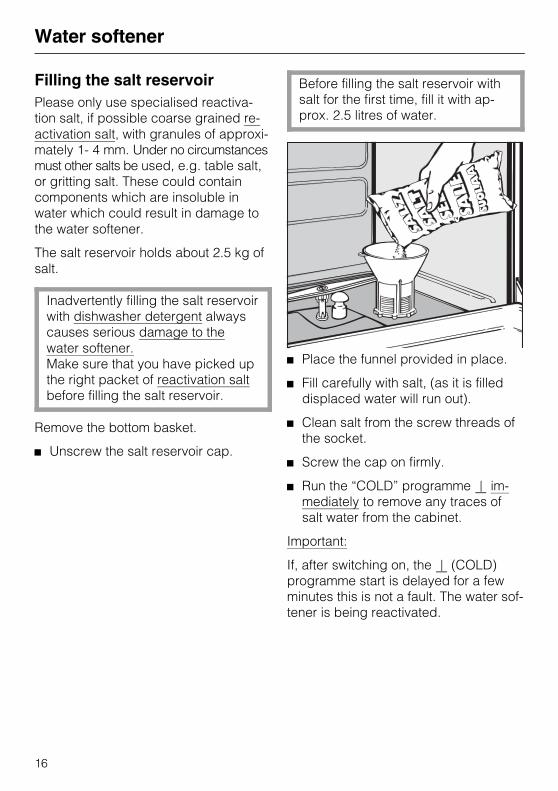
Filling the salt reservoirPlease only use specialised reactiva-tion salt, if possible coarse grained re-activation salt, with granules of approxi-mately 1- 4 mm. Under no circumstancesmust other salts be used, e.g. table salt,or gritting salt. These could containcomponents which are insoluble inwater which could result in damage tothe water softener.
The salt reservoir holds about 2.5 kg ofsalt.
Inadvertently filling the salt reservoirwith dishwasher detergent alwayscauses serious damage to thewater softener.Make sure that you have picked upthe right packet of reactivation saltbefore filling the salt reservoir.
Remove the bottom basket.
Unscrew the salt reservoir cap.
Before filling the salt reservoir withsalt for the first time, fill it with ap-prox. 2.5 litres of water.
Place the funnel provided in place.
Fill carefully with salt, (as it is filleddisplaced water will run out).
Clean salt from the screw threads ofthe socket.
Screw the cap on firmly.
Run the “COLD” programme D im-mediately to remove any traces ofsalt water from the cabinet.
Important:
If, after switching on, the D (COLD)programme start is delayed for a fewminutes this is not a fault. The water sof-tener is being reactivated.
Water softener
16
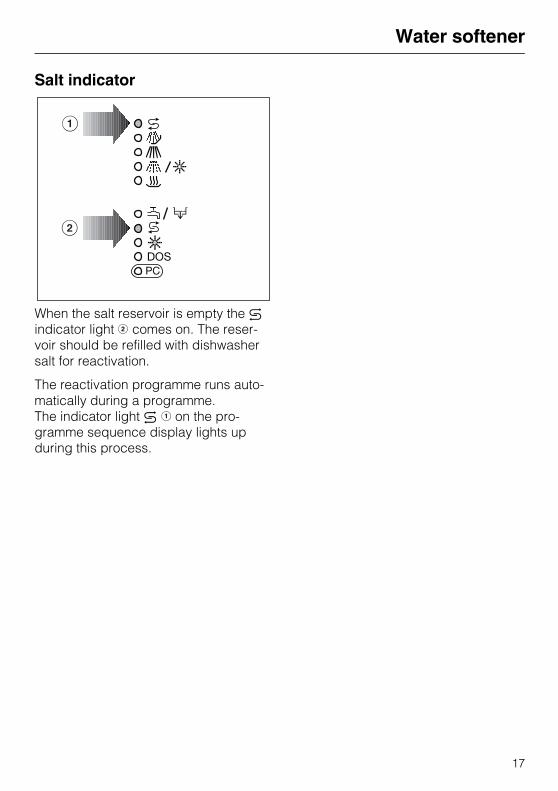
Salt indicator
When the salt reservoir is empty the kindicator light c comes on. The reser-voir should be refilled with dishwashersalt for reactivation.
The reactivation programme runs auto-matically during a programme.The indicator light k b on the pro-gramme sequence display lights upduring this process.
Water softener
17

Loading the machineLoading the machine
Preparation
Empty all containers before loadinginto the machine.
Ensure that no acid or solventresidues, especially hydrochloricacid or chlorides access the washcabinet.
Notes
Load items so that water will comeinto contact with all surfaces. This ensures that they will be properlycleaned.
Do not place items to be cleaned in-side other pieces where they may beconcealed.
Hollow vessels such as cups,glasses, pots etc. should be invertedand placed in the correct inserts.
Deep based items should be placedat an angle to ensure that water runsfreely off them.
Tall, narrow, hollow pieces should beplaced in the centre of the basket toensure good coverage of water.
Small pieces should be placed onthe cup racks in the upper basket.Do not obscure them by larger itemsbelow. Cups should be on the lowerrack and bowls on the top rack sothat water reaches all pieces.
The water duct for the spray arm inthe middle of the upper basket mustnot be covered.
The spray arms must not be blockedby items which are too tall or whichhang down in their path. If necess-ary, manually rotate the arms to test.
Use the upper basket for:
small, lightweight, delicate itemssuch as cups, saucers, glasses, des-sert bowls etc. as well as for light-weight thermally stable plastic items.
Use the bottom basket for:
larger and heavier items such asplates, serving platters, saucepans,bowls etc. Glasses may only becleaned in the bottom basket if it isfitted with a special glassware insertor if there is a special bottom basket.
Cutlery
Unsorted cutlery should be placed inthe cutlery holders with the handlesfacing downwards.
Select baskets and inserts which areappropriate for the application.
See examples on the following pages
Loading the machine
18
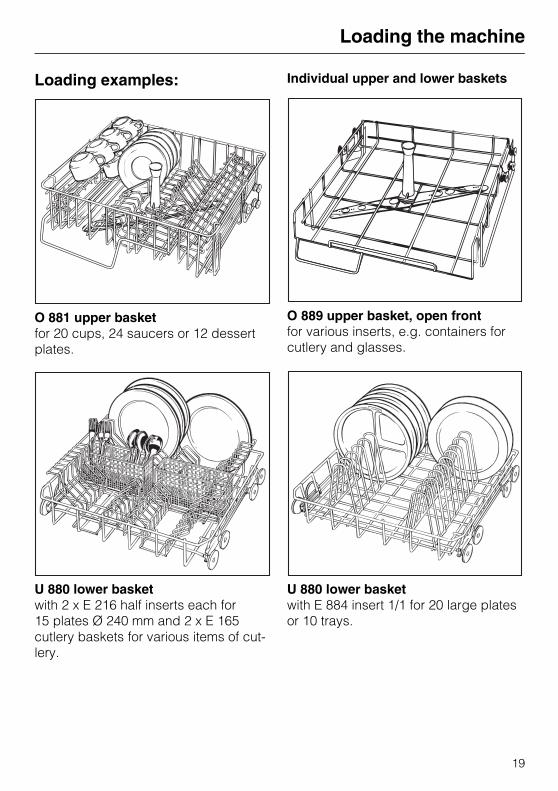
Loading examples:
O 881 upper basketfor 20 cups, 24 saucers or 12 dessertplates.
U 880 lower basketwith 2 x E 216 half inserts each for 15 plates Ø 240 mm and 2 x E 165 cutlery baskets for various items of cut-lery.
Individual upper and lower baskets
O 889 upper basket, open front for various inserts, e.g. containers forcutlery and glasses.
U 880 lower basketwith E 884 insert 1/1 for 20 large platesor 10 trays.
Loading the machine
19

Glassware set GG/F-GL
O 882 upper basketfor 27 glasses Ø 65 mm.
U 880 lower basketwith 2 x E 205 half inserts each for 14 glasses Ø 65 mm.
Loading the machine
20

Adjusting the upper basketThe upper basket can be adjustedabove and below the middle positionby 2.5 cm. It is set in the middle posi-tion on delivery.
Depending on the position of the upperbasket plates of the following diametercan be accommodated in the baskets:
Example: Upper basket O 881
Upper basket position
Upperbasket
plate Ø cm
Bottombasket
plate Ø cmtop max. 16.5 24 *)middle max. 19 24 *)bottom max. 21.5 24 *)
*) in insert E 216. For plates up toØ 30 cm use insert E 888.
To adjust the upper basket:
Pull the upper basket out until a re-sistance is felt, lift from the runnersand remove.
Unscrew the knurled nuts (rollerbearings) on both sides of the bas-ket with a spanner and reposition asrequired.
Items not suitable for dish-washers
Cutlery with wooden or horn handles.
Wooden or laminated cutting boards.
Glued items, e.g. old knives withhandles which have been glued on.
Hand-made craft items.
Copper or tin items.
Plastic items which are not heat resistant.
Please note
Silver and aluminium items can suffer some discolouration.
Colours painted over a glaze mayfade after a number of washes.
Clouding may occur on glasses afterfrequent washing.
Our recommendations
Wash delicate glassware by hand.
When purchasing new glasses,dishes and cutlery make sure theyare dishwasher-proof.
Loading the machine
21

Adding rinse aidRinse aid is necessary to ensure thatwater does not cling and leave markson utensils during the drying phase.Rinse aid is poured into the storagereservoir and the amount set is dis-pensed automatically in the final rinse. The rinse aid reservoir holds approx.125 ml.
Inadvertently filling the rinse aidreservoir with powder detergent (orliquid detergent) always causes serious damage to the reservoir.Only use rinse aid formulated forthis machine.
Adding rinse aid
If the indicator light H “Add rinse aid”on the control panel comes on, therinse aid reservoir must be refilled.
Open the door fully.
Press the button in the direction ofthe arrow until the flap springs open.
Adding rinse aid
22
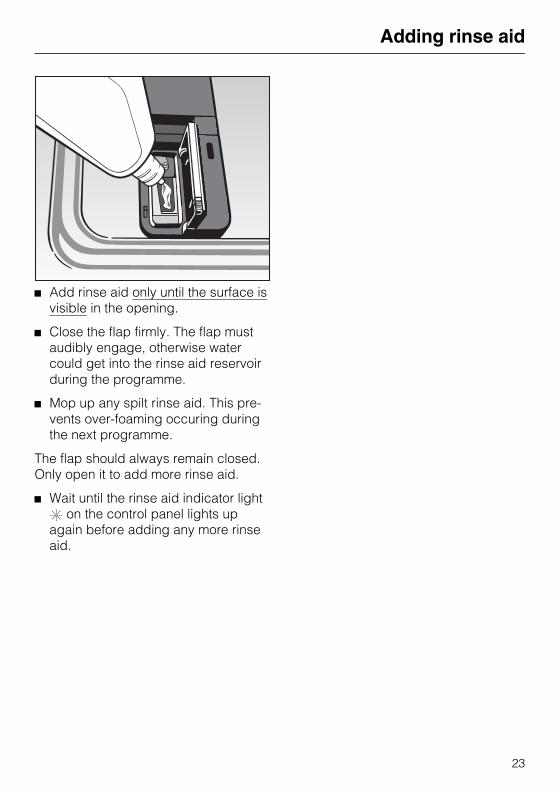
Add rinse aid only until the surface isvisible in the opening.
Close the flap firmly. The flap mustaudibly engage, otherwise watercould get into the rinse aid reservoirduring the programme.
Mop up any spilt rinse aid. This pre-vents over-foaming occuring duringthe next programme.
The flap should always remain closed.Only open it to add more rinse aid.
Wait until the rinse aid indicator lightH on the control panel lights upagain before adding any more rinseaid.
Adding rinse aid
23
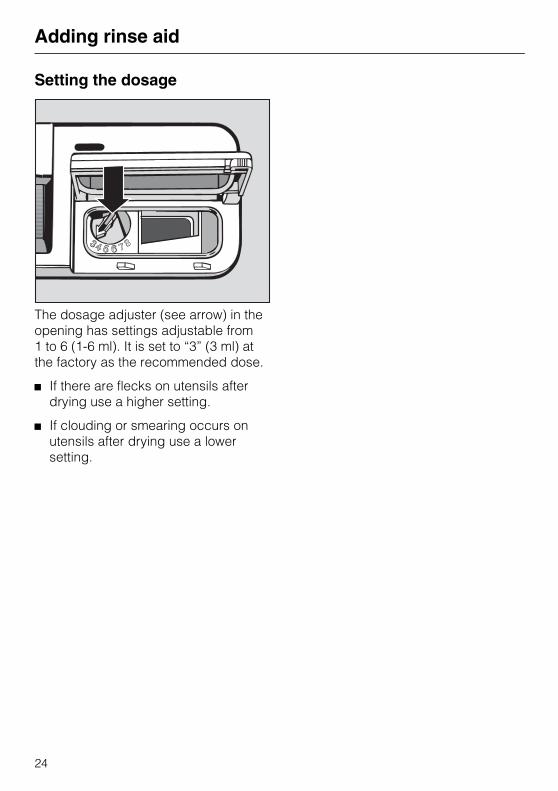
Setting the dosage
The dosage adjuster (see arrow) in theopening has settings adjustable from1 to 6 (1-6 ml). It is set to “3” (3 ml) atthe factory as the recommended dose.
If there are flecks on utensils afterdrying use a higher setting.
If clouding or smearing occurs onutensils after drying use a lower setting.
Adding rinse aid
24

Adding cleaning agentOnly use cleaning agents formu-lated for specialist machines. Donot use detergents formulated fordomestic dishwashers.
Powder cleaning agent is dispensedvia the dispenser for powder cleaningagents in the door or liquid cleaningagent via the DOS module (availableas an optional extra - see “Note” on thenext page).
If liquid cleaning agent is not beingused then, powder cleaning agentmust be placed in the detergent con-tainer prior to every programme (ex-cept D “PRE-RINSE”) (see also thenote in the “Programme chart”).
Press the opening catch on the con-tainer flap (see arrow) forwards. Theflap will spring open. (The flap is al-ways open at the end of a pro-gramme).
Add powder cleaning agent to com-partment II.
Dosage: approx. 3 g/l, correspondingto approx. 20 g per cleaning stage.During the “Cleaning (main wash)”stage approx. 7 litres of water are used.
Follow manufacturer’s instructions ifthey differ.
Close the dispenser lid.
Under certain circumstances, i.e. spe-cial soiling, different combinations ofcleaning agents and other additivesmay be necessary. The Miele Profes-sional Department (Applications Tech-nology) will be pleased to advise you.
Adding cleaning agent
25

Note
As a chargeable optional extra this ma-chine can also be fitted with a “dispen-ser pump for liquid cleaning agent”(DOS module G 60). This is connectedexternally. See “Programming special functions”for information on venting the dispens-ing system and setting the dosage.
See separate instructions for “Installa-tion and connection of the optionalDOS module”
Dispensing system maintenanceTo ensure safe functioning, mainten-ance work should be carried out at spe-cified intervals.The work should only be carried out bya Miele authorised and trained servicetechnician or other suitably qualifiedand competent person.
Every 1 - 1 1/2 years
Exchange the hoses in the dispensingsystems / DOS modules.
Take great care when handling liq-uid agents. They may contain acidsor caustic substances. Please fol-low the safety instructions.Wear protective goggles andgloves if necessary.
Adding cleaning agent
26

G 7859 Warning and Safety instructionsTo the person responsible for this machine:
Make this pull-out with the Warning and Safety instructions available to anyoperators of the machine. Place it near the machine, where it can be seen andnot removed.
Ensure that operators know and understand these Warning and Safety instruc-tions, and observe them in use.
This machine conforms to currentsafety requirements. Inappropriateuse can however lead to personalinjury and damage to property. Read the operating instructionscarefully before starting to use thismachine. This way you will avoidthe risk of accidents and damage tothe machine.Keep these instructions in a safeplace, and make them available tofuture users.
Appropriate usage
This machine is designed for com-mercial use and for specialised
applications only, as described inthese Operating Instructions. Using itfor purposes other than those for whichit was designed would be unauthorisedand could cause harm.The manufacturer cannot be held re-sponsible for damage caused by im-proper use.
This equipment is not designed formaritime use or for use in mobile in-
stallations such as caravans, aircraftetc. However it may be suitable forsuch usage subject to a risk assess-ment of the installation being carriedout be a suitably qualified engineer.
The following notes are to help avoidpersonal injury
The machine should be commis-sioned and then maintained only
by a Miele authorised and trained ser-vice technician or other suitably quali-fied and competent person.
Do not install the machine in anarea where there is a danger of ex-
plosion or of freezing conditions.
The electrical safety of this ma-chine can only be guaranteed
when continuity is complete betweenthe machine and an effective earthingsystem on site. It is imperative that thisbasic safety requirement is tested andwhere there is any doubt, the electricalsystem is checked out by a qualifiedelectrician. The manufacturer cannot be held re-sponsible for damage or injury causedby missing or defective earthing, suchas electric shock.
A damaged machine is dan-gerous. Switch off at the mains im-
mediately and call the Miele Service De-partment or an authorised and trainedMiele Service Dealer or other suitablyqualified and competent person.
G 7859 Warning and Safety instructions
1
Warning and Safety instructionsRepair work may only be carriedout by an authorised Miele service
technician or other suitably qualifiedand competent person. Repairs by un-qualified persons could be dangerous.
Personnel operating the machineshould be trained regularly. Child-
ren and untrained personnel should notbe allowed access to the machine orits controls.
Do not allow children to play in oraround the dishwasher, or to oper-
ate it. There is a danger they could getinto the machine and lock themselvesin.
Take care when handling liquidagents/additives. These may con-
tain irritant or corrosive ingredients. Onno account use any organic solvent, asthere may be the danger of an explo-sion occuring.Follow the instructions and relevantsafety procedures carefully. Wear pro-tective gloves and goggles. With allchemical agents the manufacturer’ssafety instructions must be observed.
Avoid inhalation of powder deter-gents.
They can cause burning in the mouthand throat if swallowed, or inhibit brea-thing.
The water in the machine must notbe used as drinking water.
Do not sit or lean on the opendoor. This could cause the ma-
chine to tip and be damaged.
Be careful when sorting sharp-pointed items. You may prefer to
place cutlery with sharp points with thehandles upwards to avoid possible in-jury.
When using this machine in thehigher temperature ranges be
especially careful not to scald or burnyourself. Baskets and inserts must firstcool down. Any water which may re-main in containers will be very hot andmust be emptied into the wash cabinet.
Do not touch the heating elementsduring or directly after the end of a
programme, you could burn yourself.They remain hot for a while after theend of a programme.
Never clean the machine or close vicinity with a water hose or a high
pressure hose.
Before any maintenance or repairwork is undertaken, the machine
must be disconnected from the mainssupply by switching off at the mains iso-lator or switching off the mains fuse.
Warning and Safety instructions
2
The following notes should help toavoid material damage.
Only use detergents formulated forspecial processes and
approved by Miele for use with this machine. Use of unsuitable detergentscould adversely affect the componentsof the machine as well as items beingcleaned.
For pre-treatment and / or cleaningonly use low-foaming detergents
and disinfecting agents which havebeen approved by Miele. Foam canhave an adverse effect on the disinfec-tion and cleaning process.
Where a chemical additive is re-commended on technical grounds
(e.g. with a cleaning agent), this doesnot imply that the manufacturer of themachine takes responsibility for thecompatibility with the items beingcleaned.Please be aware that changes in formu-lation, storage conditions etc., whichmay not be publicised by the chemicalproducer, can have a negative effecton the cleaning result.
When using cleaning agents andspecialised products, it is essential
that the manufacturer’s instructions arefollowed. Only use the product for theapplication described by the manufac-turer, to avoid any material damage orthe occurrence of strong chemical reac-tions.
The machine is designed only foroperation with water and cleaning
agents. Organic solvents must not beused in the machine, as there is thedanger under certain circumstances ofexplosion. (Although this is not thecase with all organic solvents, otherproblems could arise with their use, forexample damage to rubber and syn-thetic materials).
In critical applications where very strin-gent requirements have to be met, it isstrongly recommended that all the rele-vant factors for the process, such ascleaning agent, quality of water, etc.are discussed with the Miele Applica-tion Technology specialists.
If the cleaning result is subject toparticularly stringent requirements
(e.g. chemical analysis, specialisedprocesses, etc.), a regular quality con-trol test must be carried out by the userto ensure that required standards ofcleanliness are being achieved.
The special inserts should only beused for their specific application.
Empty any containers or utensils be-fore arranging them in the machine.
Do not allow any remains of acidsor solvents, and in particular hydro-
chloric acid or chloride solutions to ac-cess the wash cabinet. Similarly avoidany materials with a corrosive effect.The presence in compounds of any sol-vents should be minimal, (especiallythose in hazard class A1).
Warning and Safety instructions
3
Ensure that solutions or steam con-taining acid salts do not come into
contact with the steel outer casing ofthe machine, to avoid any corrosiondamage.
Please follow the advice on installa-tion in these instructions and in the
separate Installation Instructions.
In countries where there are areaswhich may be subject to infesta-
tion by cockroaches or other vermin,pay particular attention to keeping theappliance and its surroundings in aclean condition at all times. Any dam-age which may be caused by cock-roaches or other vermin will not becovered by the appliance guarantee.
Use of accessories
Only specific additional equip-ment, made by Miele should be
connected to this machine. ConsultMiele on the type and application ofsuch equipment.
Disposal of the old machine
When disposing of your old ma-chine first make it unusable. Dis-
connect from the mains power supply,cut off the cable and any plug from thecable. For environmental and safety reasons,ensure the machine is completelydrained of any residue water and clean-ing agent. (Observe safety regulationsand wear safety goggles and gloves). Make the door lock inoperative, so thatchildren cannot accidentally shut them-selves in. Make appropriate arrange-ments for the safe disposal of the ma-chine.For tank system machines ensure thatany water is emptied out of the tank.
The manufacturer cannot be held responsible for any damage causedthrough non-observance of theseWarning and Safety instructions.
Warning and Safety instructions
4

Programme selectionChoose your programme according tothe type of utensil being cleaned andthe degree of soiling.
The different programmes and theiruses are described overleaf in the Programme chart.
Programme selection
27
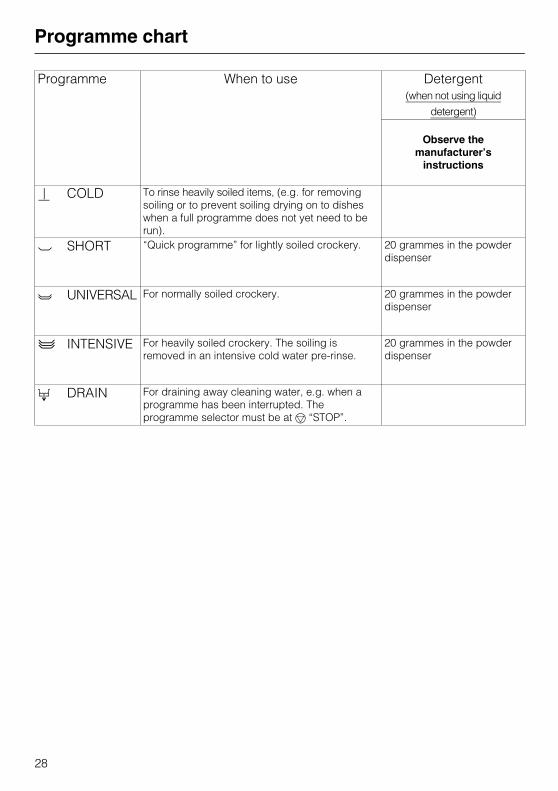
Programme chartProgramme When to use Detergent
(when not using liquid
detergent)
Observe themanufacturer’s
instructions
D COLD To rinse heavily soiled items, (e.g. for removingsoiling or to prevent soiling drying on to disheswhen a full programme does not yet need to berun).
p SHORT “Quick programme” for lightly soiled crockery. 20 grammes in the powderdispenser
q UNIVERSAL For normally soiled crockery. 20 grammes in the powderdispenser
r INTENSIVE For heavily soiled crockery. The soiling isremoved in an intensive cold water pre-rinse.
20 grammes in the powderdispenser
6 DRAIN For draining away cleaning water, e.g. when aprogramme has been interrupted. Theprogramme selector must be at f “STOP”.
Programme chart
28
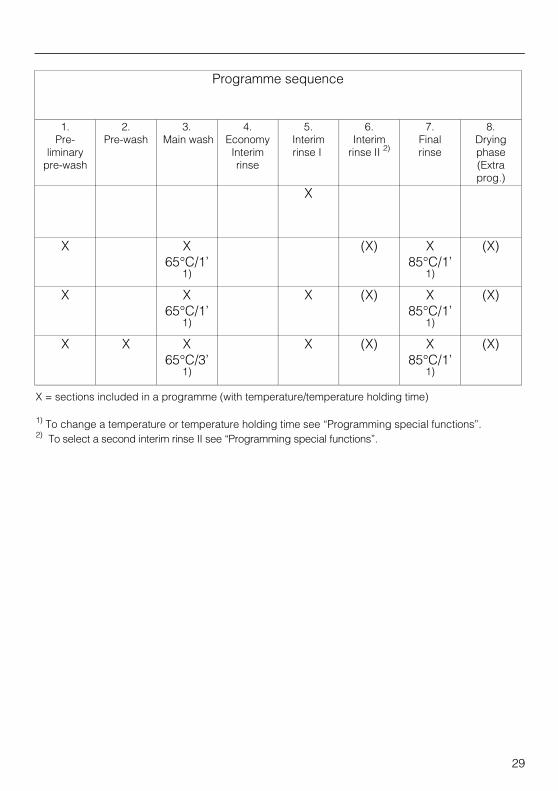
Programme sequence
1.Pre-
liminarypre-wash
2.Pre-wash
3. Main wash
4.EconomyInterimrinse
5.Interimrinse I
6.Interim
rinse II 2)
7.Finalrinse
8.Dryingphase(Extraprog.)
X
X X65°C/1’
1)
(X) X85°C/1’
1)
(X)
X X65°C/1’
1)
X (X) X85°C/1’
1)
(X)
X X X65°C/3’
1)
X (X) X85°C/1’
1)
(X)
X = sections included in a programme (with temperature/temperature holding time)
1) To change a temperature or temperature holding time see “Programming special functions”.2) To select a second interim rinse II see “Programming special functions”.
29
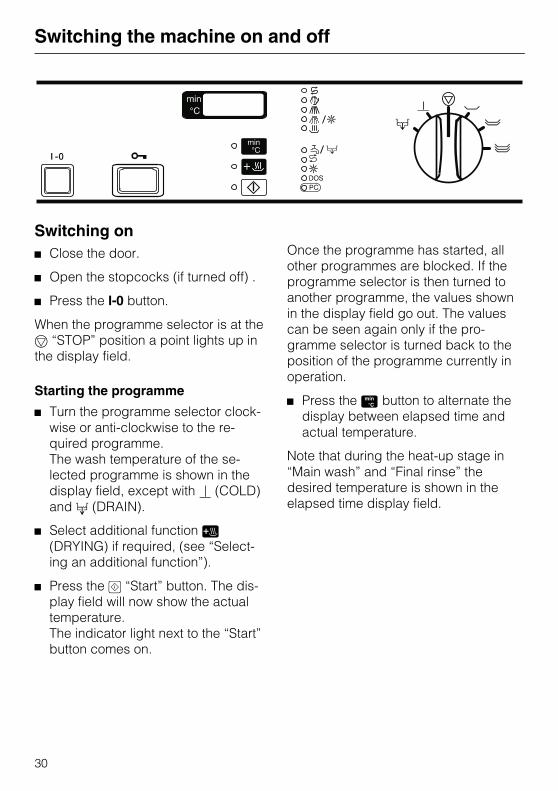
Switching the machine on and off
Switching onClose the door.
Open the stopcocks (if turned off) .
Press the I-0 button.
When the programme selector is at thef “STOP” position a point lights up inthe display field.
Starting the programme
Turn the programme selector clock-wise or anti-clockwise to the re-quired programme. The wash temperature of the se-lected programme is shown in thedisplay field, except with D (COLD)and 6 (DRAIN).
Select additional function 3(DRYING) if required, (see “Select-ing an additional function”).
Press the 6 “Start” button. The dis-play field will now show the actualtemperature.The indicator light next to the “Start”button comes on.
Once the programme has started, allother programmes are blocked. If theprogramme selector is then turned toanother programme, the values shownin the display field go out. The valuescan be seen again only if the pro-gramme selector is turned back to theposition of the programme currently inoperation.
Press the 4 button to alternate thedisplay between elapsed time andactual temperature.
Note that during the heat-up stage in“Main wash” and “Final rinse” thedesired temperature is shown in theelapsed time display field.
Switching the machine on and off
30
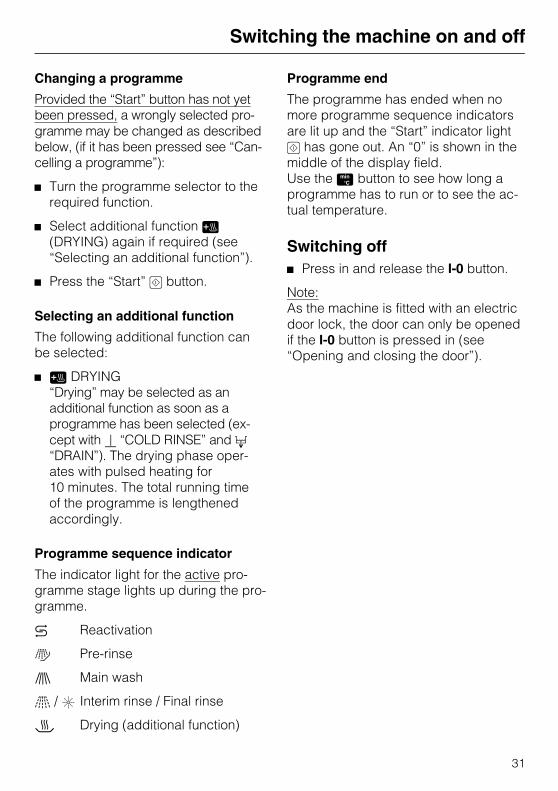
Changing a programme
Provided the “Start” button has not yetbeen pressed, a wrongly selected pro-gramme may be changed as describedbelow, (if it has been pressed see “Can-celling a programme”):
Turn the programme selector to therequired function.
Select additional function 3(DRYING) again if required (see “Selecting an additional function”).
Press the “Start” 6 button.
Selecting an additional function
The following additional function canbe selected:
3 DRYING“Drying” may be selected as an additional function as soon as a programme has been selected (ex-cept with D “COLD RINSE” and 6“DRAIN”). The drying phase oper-ates with pulsed heating for 10 minutes. The total running time of the programme is lengthened accordingly.
Programme sequence indicator
The indicator light for the active pro-gramme stage lights up during the pro-gramme.
k Reactivation
I Pre-rinse
l Main wash
m / H Interim rinse / Final rinse
c Drying (additional function)
Programme end
The programme has ended when nomore programme sequence indicatorsare lit up and the “Start” indicator light6 has gone out. An “0” is shown in themiddle of the display field.Use the 4 button to see how long aprogramme has to run or to see the ac-tual temperature.
Switching offPress in and release the I-0 button.
Note:As the machine is fitted with an electricdoor lock, the door can only be openedif the I-0 button is pressed in (see“Opening and closing the door”).
Switching the machine on and off
31
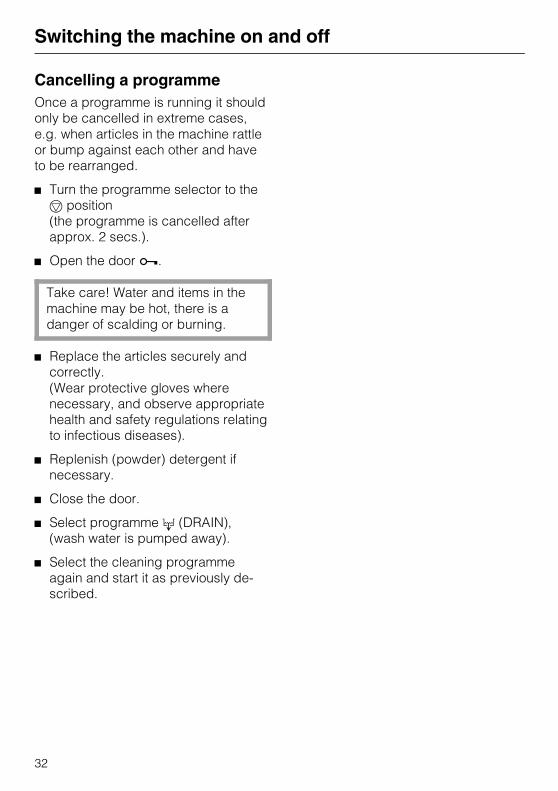
Cancelling a programmeOnce a programme is running it shouldonly be cancelled in extreme cases,e.g. when articles in the machine rattleor bump against each other and haveto be rearranged.
Turn the programme selector to thef position(the programme is cancelled afterapprox. 2 secs.).
Open the door a.
Take care! Water and items in themachine may be hot, there is adanger of scalding or burning.
Replace the articles securely andcorrectly.(Wear protective gloves wherenecessary, and observe appropriatehealth and safety regulations relatingto infectious diseases).
Replenish (powder) detergent ifnecessary.
Close the door.
Select programme 6 (DRAIN),(wash water is pumped away).
Select the cleaning programmeagain and start it as previously de-scribed.
Switching the machine on and off
32

Programming special functionsIn the event of a service call at a laterdate, any changes made to the fac-tory setting should be documentedhere.Make a note of any changes made inthe “Value set: ” box.
1. Setting the cold water inlet from:“Nominal water intake” to “Nominalwater intake + 1 l”.
The amount of water taken into the ma-chine at each intake can be increasedby 1 litre to a maximum of 9.5 litres.
Proceed as follows:Turn the programme selector to thef “STOP” position.
Switch off the machine.
Press 4 and 6 at the same time,hold them in and whilst doing soswitch the machine on with the I-0button.The current programme status “P...”appears in the display.The p / 6 indicator light comes on.
Press 3 once, “E01” (programminglevel 1) appears in the display.
Turn the programme selector to thep position,“10” or “11” appears in the display.“10” = Nominal water intake“11” = Nominal water intake + 1 l
Press 4 to change from “10” to“11” or vice versa.
Press 6. “SP” appears in the display.
Press 6 again. The change hasbeen recorded.
Value set:
2. Selecting a second interim rinse
A second interim rinse can be pro-grammed in to improve interim rinsingin all programmes (except D COLD).
Turn the programme selector to thef “STOP” position.
Switch off the machine.
Press 4 and 6 at the same time,hold them in and whilst doing soswitch the machine on with the I-0button. The current programme status “P...”appears in the display.The p / 6 indicator light comes on.
Press 3 once, “E01” (programminglevel 1) appears in the display.
Turn the programme selector to r , “30” or “31” appears in the display.“30” = One interim rinse.“31” = Two interim rinses.
Press 4 to change from “30” to“31” or vice versa.
Press 6. “SP” appears in the display.
Press 6 again. The change hasbeen recorded.
Value set:
Programming special functions
33
3. Delay start and setting the delaystart time
The start of a wash programme can bedelayed by up to 9 hours and 30 minutesin 30 minute stages.
Note:Delay start should only be selectedwith the Universal and Intensive pro-grammes. Items in the machine standfor a longer period before beingcleaned and residues can dry on if thestart time is delayed. Delaying the starttime in shorter programmes can impaircleaning results.
a) To activate delay start
Turn the programme selector to the f“STOP” position.
Switch off the machine.
Press 4 and 6 at the same time,hold them in and whilst doing soswitch the machine on with the I-0button. The current programme status “P...”appears in the display.The p / 6 indicator light comes on.
Press 3 once, “E01” (programminglevel 1) appears in the display.
Turn the programme selector to the8 o’clock position.“80” or “81” appears in the display.“80” = Delay start not selected.“81” = Delay start activated.
Press 4 to change from “80” to“81” or vice versa.
Press 6. “SP” appears in the display.
Press 6 again. The change hasbeen recorded.
Value set:
b) Setting the delay start period
The delay start period (from 30 minutesto 9 hours and 30 minutes) must be setbefore a programme is started.
After selecting a programme (see“Switching on”), press the 4 buttonor hold it in until the required value isdisplayed. The “Delay Start” indica-tor light comes on.
After the “Start” button 6 is pressed,the delay start period will count down inthe display until the programme auto-matically starts.
Programming special functions
34
4. Venting and setting the dosage on“DOS module G 60 or C 60” (specialversion)
Set the dosage selector on the DOSmodule to the “10” position (on DOSmodule C 60 only).
Turn the programme selector to thef “STOP” position.
Switch off the machine.
Press 4 and 6 at the same time,hold them in and whilst doing soswitch the machine on with the I-0button. The current programme status “P...”appears in the display.The p / 6 indicator light comes on.
Press 3 twice, “E02” (programminglevel 2) appears in the display.
Venting the dispensing system:
Turn the programme selector to thep position. “do1” appears in the dis-play.
Press 4 for 90 seconds.The dispensing system is vented.
If only venting is required:
Switch the machine off with the I-0button.
Immediately after this: start the D(COLD) programme, so that after vent-ing any agents in the wash cabinet arediluted before being drained away.
Setting the dosage:
Set the amount to dispense accordingto the detergent manufacturer’s recom-mendations.The machine needs 7 litres of water inthe “Main wash” programme stage.
Example:The detergent manufacturer recom-mends 4 ml cleaning agent per litre ofwater.7 l x 4 ml/l = 28 ml.2 ml . 1 sec. dispensing time; i.e. pro-gramming to 14 secs.
Turn the programme selector to theq position, the dispensing time inseconds appears in the display, e.g“10”.
Press 4 repeatedly or hold it in,until the number “14” appears in thedisplay (dispensing time 14 seconds. 28 ml - see example).The dispensing time/amount is set.
Having changed a value or allvalues:
Press 6. “SP” appears in the display.
Press 6 again. The change hasbeen recorded.
Value set:
If the dispensing system also needs tobe vented:
Start the D (DRAIN) programme, sothat after venting any agents in thewash cabinet are diluted beforebeing drained away.
Programming special functions
35

5. Altering the wash temperatureand/or the temperature holding timein the “Main wash” and “Final rinse”programme stages
In the event of a service call-out, as-sist the service technician by makinga note of any change to the washtemperature and / or the temperatureholding time in the “Programmechart”.
Factory settings for the main wash tem-perature and temperature holdingtimes and for the final rinse tempera-ture and its holding time are given inthe programme chart.The main wash and final rinse tempera-tures can be set from 30°C - 70°C andthe temperature holding time from 1 to10 minutes.
Turn the programme selector to thef “STOP” position (the programm-ing level is displayed only in thisswitch position).
Switch off the machine.
Press 4 and 6 at the same time,hold them in and whilst doing soswitch the machine on with the I-0button.The current programme status “P...”appears in the display.The p / 6 indicator light comes on.
“Main wash” temperature:Press 3 three times, “E03” (pro-gramming level 3) appears in the dis-play.
Turn the programme selector to theprogramme which needs to bechanged. The actual value appearsin the display after °C.
Press 4 or hold it in, until the re-quired value appears in the display.
“Main wash” temperature holdingtime:Turn the programme selector to thef “STOP” position (the programm-ing level is only displayed in thisswitch position).
Press 3 again, “E04” (programm-ing level 4) appears in the display.Then:
Turn the programme selector backto the programme which needs to bechanged. The actual value appearsin the display after min.
Press 4 until the required value ap-pears in the display.
“Final rinse” temperature:Turn the programme selector to thef “STOP” position (the programm-ing level is displayed only in thisswitch position).
Press 3 again, “E05” (programm-ing level 5) appears in the display.Then:
Programming special functions
36
Turn the programme selector backto the programme which needs to bechanged. The actual value appearsin the display after °C.
Press 4 or hold it in, until the re-quired value appears in the display.
“Final rinse” temperature holdingtime:Turn the programme selector to thef “STOP” position (the programm-ing level is only displayed in thisswitch position).
Press 3 again, “E06” (programm-ing level 6) appears in the display.Then:
Turn the programme selector backto the programme which needs to bechanged. The actual value appearsin the display after min.
Press 4 until the required value ap-pears in the display.
Having changed a value or allvalues:
Press 6. “SP” appears in the display.
Press 6 again. The change hasbeen recorded.
6. Re-setting all changes back to thefactory setting.
Turn the programme selector to thef “STOP” position.
Switch off the machine.
Press 4 and 6 at the same time,hold them in and whilst doing soswitch the machine on with the I-0button.The current programme status “P...”appears in the display.The p / 6 indicator light comes on.
Press 3 seven times, “E07” (pro-gramming level 7) appears in the dis-play.
Turn the programme selector to anysetting (except “STOP”).“00” or “PP” appears in the display.“00” = factory setting(the electronic unit has not been re-programmed).“PP” = the electronic unit has beenreprogrammed.
If “PP” is displayed, press 4 tochange from “PP” to “00”.
Press 6. “SP” appears in the display.
Press 6 again. Values which hadbeen changed are now reset.
ImportantIf the hardness level setting in thewater softener had been changed this will reset to the factory setting of340 mg/l (19 °d). This will need to bereset to suit the hardness level in yourarea.
Programming special functions
37
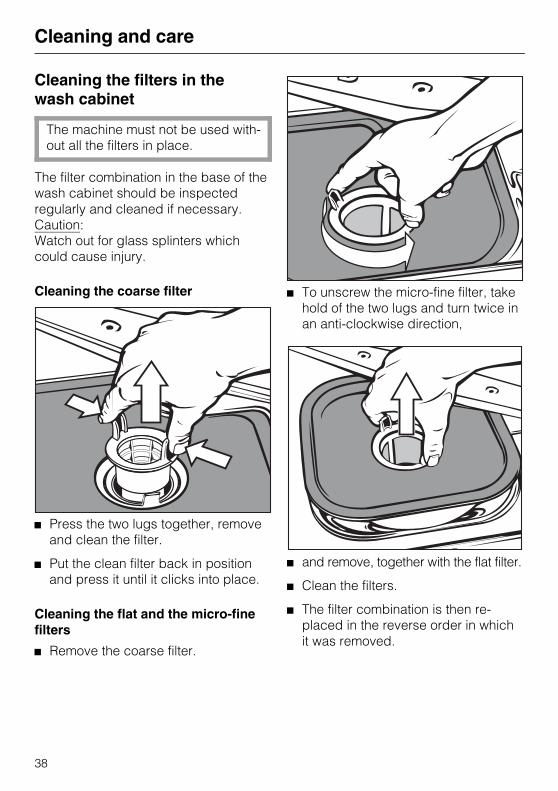
Cleaning and careCleaning the filters in thewash cabinet
The machine must not be used with-out all the filters in place.
The filter combination in the base of thewash cabinet should be inspectedregularly and cleaned if necessary.Caution: Watch out for glass splinters whichcould cause injury.
Cleaning the coarse filter
Press the two lugs together, removeand clean the filter.
Put the clean filter back in positionand press it until it clicks into place.
Cleaning the flat and the micro-finefilters
Remove the coarse filter.
To unscrew the micro-fine filter, takehold of the two lugs and turn twice inan anti-clockwise direction,
and remove, together with the flat filter.
Clean the filters.
The filter combination is then re-placed in the reverse order in whichit was removed.
Cleaning and care
38

Cleaning the spray armsWaste particles can lodge in the sprayarm jets.The spray arms should be inspectedand cleaned regularly (approx. every 6 months).
Use a sharp pointed object to pushparticles into the spray arm jets andrinse well under running water.
Remove the spray arms as follows:
Unscrew the upper spray arm.
Remove the middle spray arm (onthe top basket) by unscrewing theknurled nut.Important:The knurled nut has a left-handthread, and to unscrew it it must beturned clockwise with the spray arm.
Take off the lower spray arm. The lower basket must be removedfirst.
Particles in the lower spray arm are easier to rinse out if the cap is first opened.
Open the cap in the direction of thearrow. After cleaning, close up thecap again.
Important:After replacing the spray arms, checkthat they move freely.
Cleaning and care
39

Cleaning the drain pump andnon-return valveIf water has not been pumped away atthe end of a programme the drainpump or the non-return valve might beblocked. They are, however, easy toclean.
Take the filter combination out of thewash cabinet.
Release the locking clamp.
Lift up the non-return valve and rinseunder running water.
The drain pump is situated under thenon-return valve (see arrow).
Before replacing the non-returnvalve, check that the drain pump isfree of extraneous objects.
Carefully replace the ron-return valveand secure with the locking clamp.
Cleaning and care
40

Cleaning the filters in the waterinletFor the protection of the inlet valve, filters are incorporated in the screwconnection of the water inlet hose. The filters must be cleaned when dirty,otherwise insufficient water flows intothe wash cabinet.
The plastic housing of the water con-nection contains an electrical compo-nent. It must not be immersed in water.
To clean the filters
Disconnect the machine from themains supply (switch off at the mainsocket and pull out the plug, switchoff the appropriate circuit at the fusebox or switch off the mains fuse).
Turn off the stopcock and unscrewthe water inlet hose.
Clean the large area filter (1) and thefine filter (2) or replace if necessary.
Replace filter and seal. Make surethey are sitting correctly.
Screw back into place on the waterinlet, taking care that the connectiongoes back on straight.
Open the stopcock carefully. If thereis a leak, screw the connections onmore tightly.
Cleaning the fascia panelThis should only be cleaned with adamp cloth or a suitable cleaner foruse on plastic materials, or with a dis-infectant tested and recognised assuitable for this use.
Do not use an abrasive cleaner, aglass cleaner or an all-purposecleaner. Because of their chemicalcomposition they could causeserious damage to plastic surfaces.
Cleaning the front of the machine
Clean using a suitable proprietarycleaning agent.
Do not use any cleaner containingammonia or thinners.
1
2
Cleaning and care
41
Correcting minor faultsWith the aid of the following explanatorynotes, minor faults can be corrected with-out contacting the Miele Service Dept.
Any work on the electrical componentsof the machine should only be carriedout by a suitably qualified and compe-tent person in accordance with localand national safety regulations. Unauth-orised repairs could be dangerous.
Faults / possible causes
The machine does not start
– the door is not properly closed
– the plug is not properly inserted
– the fuse has blown
A few minutes after switching on, thep / 6 indicator light flashes (faultcode F..E appears in the display)
– the stopcocks are closed
– the filters in the water inlet hose aredirty
– water pressure is too low.
Turn the programme selector to thef “STOP” position (the fault codegoes out).
Switch the machine off (press I-0).
Open the stopcocks or clean the fil-ters (see “Cleaning and care”).
Switch on the machine again and re-select the programme.
The wash cycle finishes too earlyand the p / 6 indicator light flashes(fault code F A appears in the display)
– the drain hose is kinked
– the drain pump is blocked
Turn the programme selector to thef “STOP” position (the fault codegoes out).
Correct the fault.
Pump away the water and start theprogramme again (see additional pro-gramme “DRAIN” and “Switching on”).
Correcting minor faults
42
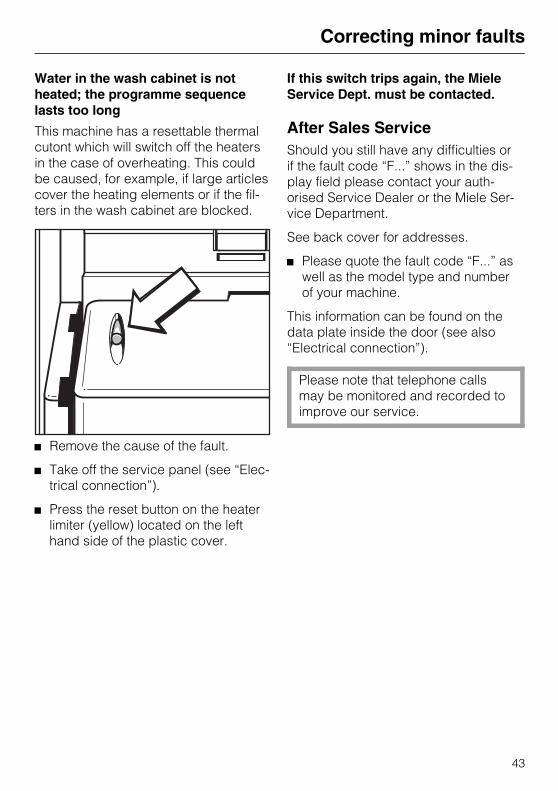
Water in the wash cabinet is notheated; the programme sequencelasts too long
This machine has a resettable thermalcutont which will switch off the heatersin the case of overheating. This couldbe caused, for example, if large articlescover the heating elements or if the fil-ters in the wash cabinet are blocked.
Remove the cause of the fault.
Take off the service panel (see “Elec-trical connection”).
Press the reset button on the heaterlimiter (yellow) located on the lefthand side of the plastic cover.
If this switch trips again, the MieleService Dept. must be contacted.
After Sales ServiceShould you still have any difficulties orif the fault code “F...” shows in the dis-play field please contact your auth-orised Service Dealer or the Miele Ser-vice Department.
See back cover for addresses.
Please quote the fault code “F...” aswell as the model type and numberof your machine.
This information can be found on thedata plate inside the door (see also“Electrical connection”).
Please note that telephone callsmay be monitored and recorded toimprove our service.
Correcting minor faults
43
InstallationPlease refer to the installation diagram supplied with the machine.
Furniture and fittings installed near themachine must be of a commercialstandard able to withstand the effectsof steam and condensed water.
The machine must be installed correctly and levelled.Any uneveness in the floor level can becompensated for and the height of themachine raised or lowered by adjustingthe four screw feet.
The machine can be installed in the following ways:
– Freestanding:
– Slot-in or at the end of a row:
The machine can be installed adjacentto other equipment or furniture or in arecess at least 60 cm wide and 60 cmdeep.
– Building under:
The machine should be positioned under a continuous worktop or sinkdrainer.The niche must be at least 60 cm wide,60 cm deep and 82 cm high.
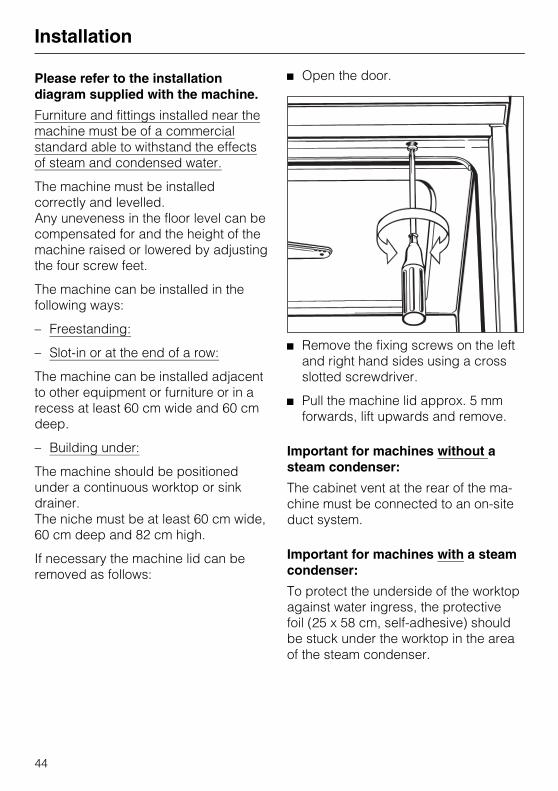
If necessary the machine lid can be removed as follows:
Open the door.
Remove the fixing screws on the leftand right hand sides using a crossslotted screwdriver.
Pull the machine lid approx. 5 mmforwards, lift upwards and remove.
Important for machines without asteam condenser:
The cabinet vent at the rear of the ma-chine must be connected to an on-siteduct system.
Important for machines with a steamcondenser:
To protect the underside of the worktopagainst water ingress, the protectivefoil (25 x 58 cm, self-adhesive) shouldbe stuck under the worktop in the areaof the steam condenser.
Installation
44
Position and secure the machine
To ensure stability the machine mustfirst be aligned and then screwed tothe worktop.
Open the door. Through each of thetwo holes in the front rim, left andright, screw the machine to the frontedge of the continuous worktop.
Do not use silicone sealant to sealthe gaps between the machine andany neighbouring units as this wouldhinder ventilation of the circulationpump.
Depending on the requirements forbuilding under, the following kit can beordered from the Miele Spare Parts Department:
Coverplate (protects the worktop)
The underside of the worktop is protected from water ingress by a stainless-steel plate.
Decor frame fitting kit
The machine front can be fitted with adecor panel to match kitchen units.The decor frame is supplied with itsown fitting instructions.
Installation
45
Electrical connectionAll electrical connection work must becarried out by a qualified electrician incompliance with local and nationalregulations.
For extra safety it is advisable to in-stall a residual current device (RCD)with a trip current of 30 mA.
Technical data is available on thedata plate or in the enclosed wiringdiagram.
The voltage, rated load and plug ratingmust correspond to that given on thedata plate.
Conversion can only be undertaken incompliance with the conversion andwiring diagrams and only on machineswithout a steam condenser.
A conversion diagram is to be found atthe back of the machine and on theback of the service panel.
The relevant wiring diagram is to befound on the left-hand side behind theplinth, attached to the base of the ma-chine.
The data plate with the relevant test cer-tification is on the rear of the machineand on the plinth (behind the servicepanel).
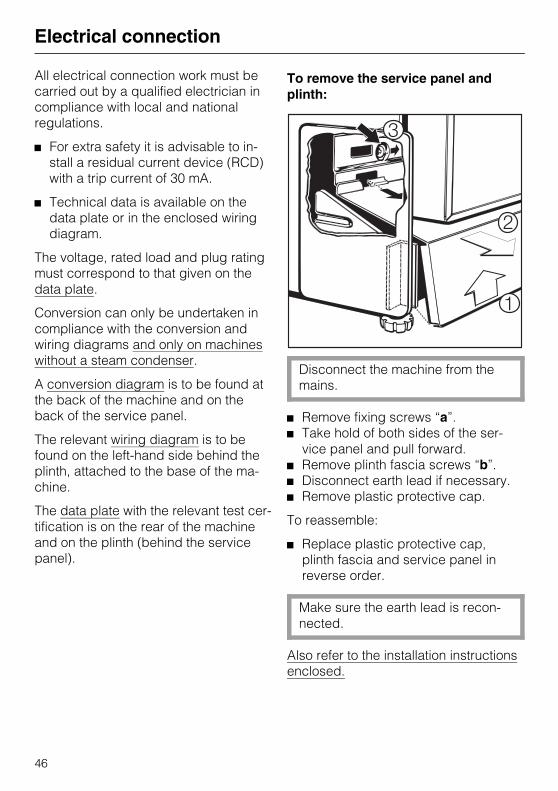
To remove the service panel andplinth:
Disconnect the machine from themains.
Remove fixing screws “a”.Take hold of both sides of the ser-vice panel and pull forward.Remove plinth fascia screws “b”.Disconnect earth lead if necessary.Remove plastic protective cap.
To reassemble:
Replace plastic protective cap,plinth fascia and service panel inreverse order.
Make sure the earth lead is recon-nected.
Also refer to the installation instructionsenclosed.
Electrical connection
46
PlumbingConnection to the water inlet
Water in the machine must not beused as drinking water.
The machine must be connected tothe water supply in accordance withlocal and national regulations.
The machine is constructed to com-ply with Australian regulations, andmay be connected to a suitable sup-ply without an extra non-return valveprovided that national regulationsallow this.
The water pressure (flow pressure)must be a minimum of 2 bar (200 kPa)and a maximum of 10 bar (1000 kPa). If it is below 2 bar (200 kPa) thewater intake time is automatically ex-tended.Should the water pressure (flowpressure) fall below 0.5 bar (50 kPa)the machine will not function. (Thep / 6 -indicator light may come onand the fault code “F2E” show in thedisplay field). Please consult theMiele Service Department with re-gard to corrective measures.
The machine is supplied as standardfor connection to a cold (codedblue) or a hot (coded red) water sup-ply up to a max. temperature of 70°C.The inlet hose should be connectedto the stopcocks for the hot or coldwater supply.
If a hot water supply is not available,the inlet hose (coded red) should alsobe connected to the cold water supply.In this case both inlet hoses are con-nected to the cold water supply.
A stopcock with 3/4 inch male threadmust be provided on site. It shouldbe easily accessible because thewater supply must be turned offwhen the machine is not in use.
The DN 10 inlet hose is approx.1.7 m long terminating in a 3/4 inchfemale thread. On no account maythe inlet filter be removed.
The large surface area filters (sup-plied with the machine) must be in-stalled between the stopcock andthe inlet hose. (For illustration see“Cleaning and Care” and “Waterinlet”).
The inlet hose must not be short-ened or damaged in any way.
See also the installation diagram sup-plied.
Plumbing
47
DrainageThe drainage system is fitted with anon-return valve which prevents dirtywater from flowing back into the machine.
The machine should preferably beconnected to a separate drainagesystem on-site.If no separate drainage system isavailable, contact the Miele ServiceDepartment.The on-site drain connection pointshould be located between 0.3 mand 1 m above the lower edge of themachine.If the connection is lower than 0.3 m,the hose should loop at a height of at least 0.3 m to ensure correctdrainage.The drainage system must have thecapacity to take a minimum drainageflow of 16 litres/minute.
The machine is supplied with approx. 1.4 m of flexible drain hosewith an internal diameter of 22 mm.Two hose clips are also supplied forconnection.The drain hose must not be shortened.
A longer drain hose (up to 4 m long)is available to order from the MieleSpare Parts Dept.
The drainage system must not ex-ceed 4 metres.
See also the installation diagram supplied.
Plumbing
48

Technical dataHeight: 85 (82) cm
Width: 60 cm
Depth: 60 cm
Voltage: see data plateRated load: see data plateFuse rating: see data plate
Connection cable: approx. 1.8 m
Water pressure (flow pressure): 0.5 - 10 bar (50 - 1000 kPa)
Cold or hot water connection: up to max. 70 °C
Drainage length: max. 4 m
Delivery head: min. 0.3 m , max. 1 m
Inlet hose: approx. 1.7 m
Drain hose: approx. 1.4 m
Noise level: Freestanding: 65 dB (A)Built under: 61 dB (A)
Test marks: Typetest Mark, C-Tick Mark
Electrically suppressedaccording to AS/NZS 1044
Technical data
49

50

51

Alteration rights reserved / 003 4500
This paper consists of cellulose which has been bleached without the use of chlorine.