ecomiser su-01 / su-02 undercount model...
TRANSCRIPT

Ecomiser SU-01 / SU-02 Undercount Model DISHWASHER
Safety Instruction ---------- 4-5
Dishwasher Features ------- 6-7
Installation Instructions---- 8-11
Machine Operation ------- 12-13
Care & Cleaning ----------- 14
Common Dishwashing Problems -------------------- 17
Trouble Shooting ---------- 18
Customer Service --------- 19
Purchase Date _______________
Serial No. ___________________
Wiring Diagram ------------ 20-21
Ecomiser SU-01 / SU-02 Manual 1/21 Page Rev.05

Ecomiser SU-01 / SU-02 Manual 2/21 Page Rev.05
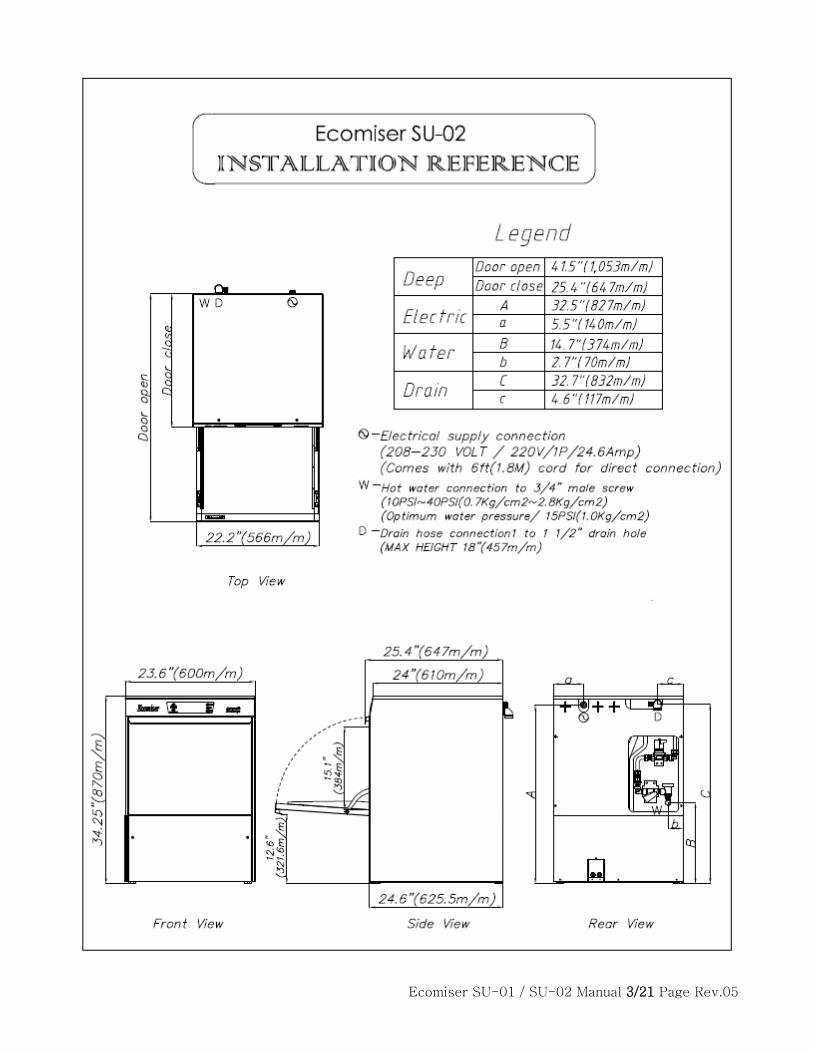
Ecomiser SU-01 / SU-02 Manual 3/21 Page Rev.05

Before using the commercial dishwasher, follow these basic precautions.
- Read all the instructions before using the Ecomiser SU-01 / SU-02 Model Commercial Dishwashers.
- Use the dishwasher only as instructed in this Owner’s Manual.
- This Manual does not cover every possible condition and situation that may occur. Use common
sense and caution when installing, operating, and maintaining the Ecomiser SU-Model Commercial
Dishwasher.
- The dishwasher must be electrically grounded. Read the Installation Instructions for details.
- The SU-01 / SU-02 model dishwashers are designed to operate on 208-230V, 60 Hz 1 P.
- Do not operate dishwasher, unless all enclosure panels are in their proper place.
WARNING
Do not use an extension cord for this machine.
WARNING
The dishwasher must comply with all applicable sanitary, safety, and plumbing codes in your area. It is
important that at least 1.0 gallon (3.8 liters) per 60sec’ must be supplied to the dishwasher.
WARNING
In order to prevent heat damage to the inlet valve, all solder connections must be made before the
water line is connected to the dishwasher.
WARNING
- To avoid entrapment and/or suffocation, remove door or door latch mechanism from any dishwasher
that is discarded or not in use.
- Do not abuse, sit, stand or play on door or racks of a machine.
- Use detergents and rinse agents recommended for optimum use in this machine.
- Do not wash plastic items unless marked “dishwasher safe” or the equivalent. Check with
manufacturer for recommendations, if not marked. Items that are not dishwasher safe may melt and
create a potential fire hazard.
- Disconnect electrical power to machine before servicing.
- Repairs should be done by a qualified technician.
- Do not touch the heating element during or right after use.
- When loading items to be washed:
Carefully load sharp items with the handles up to reduce the risk of injuries.
- Do not store or use combustible materials, gasoline or other flammable vapors and liquids in the
vicinity of this machine.
- Save these instructions for future reference.
Ecomiser SU-01 / SU-02 Manual 4/21 Page Rev.05

NOTE
- Never put animals into the machine.
- Don’t wash any food for consumption.
- Don’t wash things like clothes and shoes.
- Don’t place any objects on top of the machine.
- Don’t close the door before confirming the safety of other people or objects.
- Don’t open the door while the machine is operating, because it can cause serious scalds.
- Don’t wash dishware or containers stained with industrial fluid.
Ecomiser SU-01 / SU-02 Manual 5/21 Page Rev.05

Commercial dishwasher is:
□ Ecomiser SU-01 208-230 V AC / 60 Hz / 1 P
□ Ecomiser SU-02 208-230 V AC / 60 Hz / 1 P
BASIC FEATURES Ecomiser SU-01 / SU-02 Models introduce a state of the art patented technology with standard features and benefits currently unavailable in the undercounter type commercial dishwasher market. Adjustable rack capacity and low water consumption that not only reduce operating costs for the end user, but also provides enhanced performance and cycle flexibility. Other unique features including maximized energy efficiency, economizer heat exchanger equipped, so minimized energy cost is achieved. An advanced programmable controller is very effective in simplifying operation and service diagnostics. Together an internal electric heater and powerful rinse pump, provide a constant, guaranteed temperature and pressure for the wash and final rinse cycles, with the Ecomiser SU-01 / SU-02 Models engineering excellence manufacturing quality, and performance come to the forefront. FEATURES OF THE PROGRAMMABLE CONTROLLER Microcomputer technology for service diagnostics and end user dishwasher settings Microcomputer control panel allows easy selection of three different washing cycles to accommodate different types of dishes and levels of soiling. A digital display permits easy monitoring of operation. - Maximizes washing efficiency and provides a clean environment - Guarantees proper wash and rinse temperatures
- Controls amount of detergent and rinse agent used
- Controls time of drain cycle - Auto stop STANDARD FEATURES - Variable time cycles (25~207 seconds) - Maximum rack capacity of 40 racks per hour - Automatic water fill, automatic start, and automatic stop - An internal rinse pump ensures that the final rinse pressure is constant and powerful.
- Automatic pumped drain - Stainless steel non-clogging wash and rinse impeller - Front mounted LED indicator with digital cycle and temperature displays. - All 304L stainless steel construction - 3 preset wash cycle See comment in brochure. - Drain seals consist of a special O-ring for withstanding high temperatures. - Equipped with easily removable, large capacity, one-piece strainer that minimizes frequent removal
and cleaning. - 2 step screening system more effective to protect the washing pump - A low-noise and large output 1 Hp wash pump is installed for the Ecomiser models SU-01 / SU-02
for reliability and effective operation. - Equipped with revolving, interchangeable upper and lower wash/rinse stainless steel impellers
featuring easily removable nozzles for cleaning and inspection. - Automatic fill system is used giving the correct fill at variable flow water pressures. - Door actuated start - Self Service diagnostics
Ecomiser SU-01 / SU-02 Manual 6/21 Page Rev.05
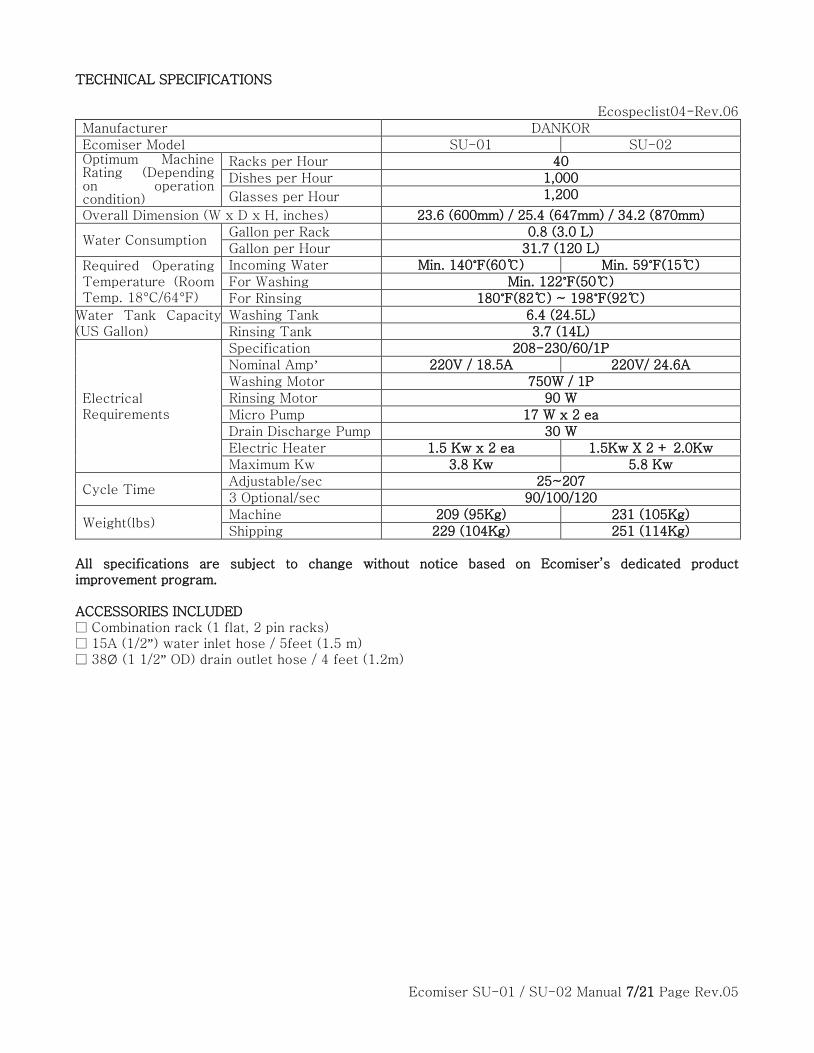
TECHNICAL SPECIFICATIONS
Ecospeclist04-Rev.06 Manufacturer DANKOR Ecomiser Model SU-01 SU-02 Optimum Machine Rating (Depending on operation condition)
Racks per Hour 40 Dishes per Hour 1,000
Glasses per Hour 1,200
Overall Dimension (W x D x H, inches) 23.6 (600mm) / 25.4 (647mm) / 34.2 (870mm)
Water Consumption Gallon per Rack 0.8 (3.0 L) Gallon per Hour 31.7 (120 L)
Required Operating Temperature (Room Temp. 18°C/64°F)
Incoming Water Min. 140℉(60℃) Min. 59℉(15℃) For Washing Min. 122℉(50℃) For Rinsing 180℉(82℃) ~ 198℉(92℃)
Water Tank Capacity (US Gallon)
Washing Tank 6.4 (24.5L) Rinsing Tank 3.7 (14L)
Electrical Requirements
Specification 208-230/60/1P Nominal Amp’ 220V / 18.5A 220V/ 24.6A Washing Motor 750W / 1P Rinsing Motor 90 W Micro Pump 17 W x 2 ea Drain Discharge Pump 30 W Electric Heater 1.5 Kw x 2 ea 1.5Kw X 2 + 2.0Kw Maximum Kw 3.8 Kw 5.8 Kw
Cycle Time Adjustable/sec 25~207 3 Optional/sec 90/100/120
Weight(lbs) Machine 209 (95Kg) 231 (105Kg) Shipping 229 (104Kg) 251 (114Kg)
All specifications are subject to change without notice based on Ecomiser’s dedicated product improvement program. ACCESSORIES INCLUDED □ Combination rack (1 flat, 2 pin racks) □ 15A (1/2”) water inlet hose / 5feet (1.5 m) □ 38Ø (1 1/2” OD) drain outlet hose / 4 feet (1.2m)
Ecomiser SU-01 / SU-02 Manual 7/21 Page Rev.05

INSTALLATION INSTRUCTIONS Read these instructions carefully and completely before you install the machine. The installation should be carried out by a qualified technician who is familiar with all local codes and ordinances for electrical and plumbing connections. If a commercial dishwasher is being installed in this area for the first time, most of the cabinet work, plumbing, and electrical has to be done before moving the machine into place. In the case of replacing an old dishwasher, check first the plumbing connections and wiring before moving the new dishwasher into place. Reasonable access to and around the dishwasher for service must be provided.
Installation Instructions
Ecomiser SU-01 / SU-02 Manual 8/21 Page Rev.05

1. ELECTRICAL CONNECTIONS Connect supply cable with a UL-listed strain relief bushing (if nonmetallic cable is to be used). A 208-230 volt, 60 Hz, 1 phase circuit is required for this machine. Despite the fact that the rating plate shows 220 volts, the unit is designed function properly on 208 volts to 230 volts. 1) Before working on wiring the machine, be sure the electrical power has been turned off at the
breaker/fuse box. 2) Electrical and grounding connections must comply with the applicable portions of the national
electrical code and/or other local electrical codes. GROUNDING INSTRUCTIONS This machine must be properly grounded. - Grounding instructions for a permanently connected machine - This machine must be grounded to operate properly. It must be connected to a grounded metal,
permanent wiring system or an equipment-grounding conductor must be run with the circuit conductors and connected to the equipment-grounding terminal or lead of the machine. When grounding the machine, connect the green line to the terminal provided.
Figure 1-1 Main electrical supply connection OVERVIEW OF INSTALLATION The owner should contract with qualified personnel to move the appliance to the installation location, unpack it, and prepare it for final utility connections. In most cases, local codes prevent the final utility connections from being made by any party other than a licensed electrician and plumber. NOTE It is the responsibility of the owner to ensure that all aspects of the installation comply with all applicable local and national codes. NOTE It is a good idea to inspect for any shipping damage upon receiving and before you proceed with the installation. If you find any damage, you should report it to your dealer freight company before accepting delivery. 2. WATER SUPPLY LINE CONNECTION Before connecting the water supply hose, the line must be flushed clean of all debris, including (but not limited to) pipe sealant, metal particles, solder, etc. This debris can damage the machine. - The water supply line could be connected to hot water or cold water and a shut-off valve should be
installed before connecting them. - Water supply pressure should be under 40 psi and temperature should be kept at a minimum
59℉/15℃. Adjust water supply time to 1 gal per cycle, using the water flow control valve inside the machine. Adjust so the fill indicating light stays on for 30 seconds.
Ecomiser SU-01 / SU-02 Manual 9/21 Page Rev.05

Figure 1-2 Fresh water connection NOTE In some cases, local codes dictate that water supply connections be made only by a certified professional. - Check that iron or other metal particles cannot contaminate the fresh water supplied to the machine. - Check that the incoming water pressure is within the acceptable range for the machine (10-40 psi,
0.6-2.7 bars). It may be necessary to reduce the pressure. - Check the incoming water temperature. Colder water will result in a longer preheat time (during
initial startup) and may extend the cycle time to allow the final rinse water to heat to minimum 180°F/82°C.
- Check the incoming water hardness. The Ecomiser SU-01 / SU-02 Models require a hardness of 4 grains per U.S. gallon or less. Over 4 grains the water should be treated.
- Note damage caused by scaling due to hard water is not covered under warranty. - When connecting the customer-supplied water line to the fitting on the end of the hose supplied, pay
attention to prevent from the hose being twisted or broken. 3. DRAIN CONNECTIONS - The Ecomiser SU-01 / SU-02 Models contain a 1 1/2” (38mm OD) drain hose for the end user’s
convenience. - The Ecomiser SU-01 / SU-02 Models are factory built with a drain pump. Recommended rough in
height is maximum 18” (457mm). - Check that the end of the drain hose will empty into a drain with a minimum diameter of 1-1/2”
(38mm). - Route the drain hose to the drain. In some cases, a grease trap (supplied by others) must be fitted
into the waste water line. If this trap is required for your installation, check that it is present. Figure 1-3 Drain connection
Max. Height 18” (457mm)
Ecomiser SU-01 / SU-02 Manual 10/21 Page Rev.05

NOTE - No portion of a wall drain system may be higher than 18” (457mm). - No part of the drain hose should be higher than 20” (508mm) from the bottom of the dishwasher. - Failure to provide the proper drain connection height (maximum of 20” (508mm)) above the bottom of
the dishwasher base) will result in improper drainage. - After connecting the drain hose to main drain line, make sure all connections are water tight. 4. DISPENSING SYSTEM CONNECTION The Ecomiser SU-01 / SU-02 Models are designed for use with a liquid rinse aid and detergent. The Ecomiser SU-01 / SU-02 Models equipped with liquid internal detergent and rinse aid pumps each have a tube exiting the machine at the lower rear. These tubes can simply be attached to detergent and rinse aid containers. - Commercial (not a domestic) detergent must be used. - Locate the red liquid detergent and blue liquid rinse aid tube at the lower rear of the machine.
Connect the tubes to the detergent and rinse aid container. Figure 3-4 Liquid rinse & detergent injection - This figure shows you how tubes are to be connected to
detergent / rinse containers. a) Make a hole about 3mm bigger than the tube diameter
on the container cap (No. 1) b) Insert the tube through the container cap into the sinker
cap (No. 2) c) Tighten the sinker cap on to the sinker (No. 3) d) Drop the sinker down to the bottom of the container to
supply chemical properly.
Ecomiser SU-01 / SU-02 Manual 11/21 Page Rev.05

IMPORTANT SAFETY INSTRUCTIONS WARNING Before using the machine, follow basic precautions including the following. - Read all instructions before using dishwasher. - Use dishwasher only as instructed in this manual. - This manual does not cover every possible condition and situation that may occur. Use common
sense and caution when installing, operating and maintaining any appliance. - Do not operate dishwasher unless all enclosure panels are in their proper place. NOTE Before using the machine, read the manual and keep in a convenient place for review. - Open the water supply valve - Turn the power on after turning on the breaker - Water will be filling in the tanks, but filling time of the water depends on the supply water pressure. - When the tank is full and the water has been heated to the preset temperature, the Ready LED lamp
on the front control panel will be on. The machine is now ready for operation. Cycle can be started by either pushing start button or opening and closing door.
. OPERATION 1. Push power button or open and close door to turn on. 2. Remove and clean strainer basket as necessary.
Remove any large food particles, scraps, sticks or bones from the strainer basket. Lift out the strainer basket and clean it thoroughly using a brush and warm water.
3. End of day push power button to turn off. The machine automatically enters a self-cleaning cycle when it is turned off. The interior will be sprayed with hot, fresh water for 10 seconds.
NOTE The daily cleaning is general recommendations based on typical soiling. Because of large quantity of food soiling present on many dishes, pots and pans, at times it may be necessary to clean the machine more often and more extensively. Extensive food soil deposits inside the machine work against optimal performance. Some items may not be cleaned as effectively, resulting in the need for either a longer cycle or repeat washing. WASHING PROCESS DIAGRAM
Machine Operation
Washing Pump
Detergent Supply
Rinsing Pump
Rinse Supply
Start Washing Waiting Rinsing
Ecomiser SU-01 / SU-02 Manual 12/21 Page Rev.05
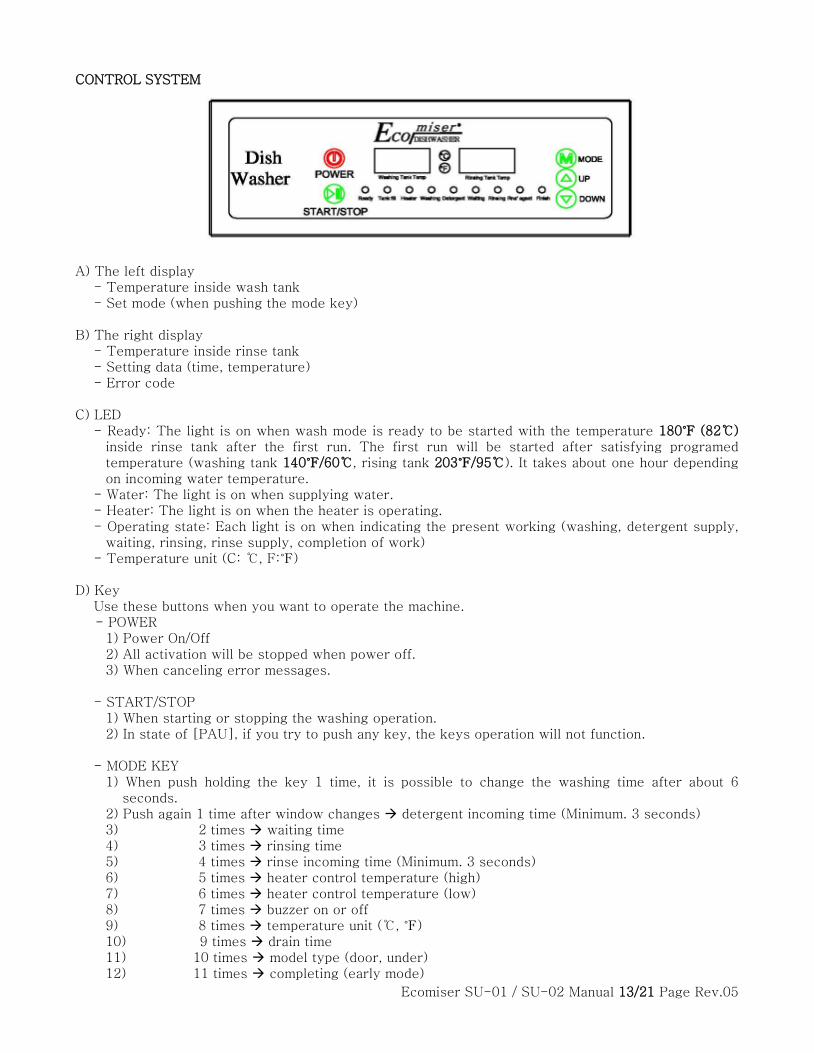
CONTROL SYSTEM A) The left display
- Temperature inside wash tank - Set mode (when pushing the mode key)
B) The right display
- Temperature inside rinse tank - Setting data (time, temperature) - Error code
C) LED
- Ready: The light is on when wash mode is ready to be started with the temperature 180℉ (82℃) inside rinse tank after the first run. The first run will be started after satisfying programed temperature (washing tank 140℉/60℃, rising tank 203℉/95℃). It takes about one hour depending on incoming water temperature.
- Water: The light is on when supplying water. - Heater: The light is on when the heater is operating. - Operating state: Each light is on when indicating the present working (washing, detergent supply,
waiting, rinsing, rinse supply, completion of work) - Temperature unit (C: ℃, F:℉)
D) Key
Use these buttons when you want to operate the machine. - POWER
1) Power On/Off 2) All activation will be stopped when power off. 3) When canceling error messages.
- START/STOP
1) When starting or stopping the washing operation. 2) In state of [PAU], if you try to push any key, the keys operation will not function.
- MODE KEY
1) When push holding the key 1 time, it is possible to change the washing time after about 6 seconds.
2) Push again 1 time after window changes detergent incoming time (Minimum. 3 seconds) 3) 2 times waiting time 4) 3 times rinsing time 5) 4 times rinse incoming time (Minimum. 3 seconds) 6) 5 times heater control temperature (high) 7) 6 times heater control temperature (low) 8) 7 times buzzer on or off 9) 8 times temperature unit (℃, ℉) 10) 9 times drain time 11) 10 times model type (door, under) 12) 11 times completing (early mode)
Ecomiser SU-01 / SU-02 Manual 13/21 Page Rev.05

- UP/DOWN 1) Possible to change the amount of time and temperature on each mode through the right display. 2) Continually pushing the key, the value of time and temperature will continue bigger or smaller
incrementally.
- WATER 1) Water fill is continuous before all of float switches equipped on the washing and rising tank
reach “ON” state. 2) When the tank float switch is off, incoming water stops.
- TEMPERATURE AT THE WAITING MODE
1) The left display shows the temperature inside washing tank and the right display shows it inside rinsing tank.
2) As long as the temperature is not going up to 180℉ (82℃), the Ready LED lamp is OFF and the machine does not work. But the temperature reaches to 180℉ (82℃), the Ready LED lamp is ON and the machine works.
- WASHING MODE
1) When the door will be closed from the open state, washing cycle starts in 2 seconds. 2) When the door will be closed, if you push the START/STOP key, the machine will work again. 3) It begins to supply detergent by using a specialized pump.
- WAITING MODE
After coming to an end of the wash mode, the machine goes into a waiting mode for draining waste water for the preset cycle.
- RINSING MODE
1) After waiting mode the rinse pump starts to work and the rinsing process begins. 2) It begins to supply rinse by using a specialized pump and comes to an end of the rinsing
process along the preset time.
- END MODE 1) All steps for doing dishes are completed along given options then the FINISH LED lamp will be
flashing. 2) When the finish LED displays the buzzer will sound 3 times.
- ERROR MASSAGE
An error will display in the LED window if a fault occurs while a program is in progress. The table below defines each error message.
1) Whenever an error happens, all functions stop automatically and the buzzer sounds 5 times. In
this mode call a service agent. 2) To cancel the error, push the POWER key.
a) [E1] washing temperature sensor is open/short or temperature is over 230℉ (110℃). b) [E2] temperature sensor (upper rinsing tank) is open/short or temperature is over 230℉
(110℃). c) [E3] temperature sensor (lower rinsing tank) is open/short or temperature is over 230℉
(110℃) in use of Eco-Type. d) [EF1] no new water has been supplied to the machine for 15 minutes. e) [EF2] under the condition of rinsing tank full, no water has been supplied to the washing
tank for 40 minutes. f) [ED1] when upper one of two ball water level sensor is on, all functions of the machine
will be stopped.
Ecomiser SU-01 / SU-02 Manual 14/21 Page Rev.05

For reader’s convenience, pictures as follows show that the rack is moving from left to right, but there are no restrictions in fact of moving the rack to any direction.
First prepare the rack loaded with dishes
then open the door
Gently push the rack to the inside guide of
the machine
Close the door then the machine starts after
3 seconds
When alarm sound begins, open the door and
take out the rack
Don’t forget that the bowls, spoons, etc., are not
to be stacked closely, so as not to affect washing
and drying performance.
Don’t let little objects like spoons, forks, chop-
sticks or knives stick out of the gaps between the
racks. It could deteriorate the performance of the
machine and could damage it.
Organize trays and plates on there side. Organize
in a way so the large dishes are on the outside,
and the small dishes are inside of the rack. It will
increase the machine’s performance.
When dishware is well organized, better
performance in productivity can be achieved per
rack.
Ecomiser SU-01 / SU-02 Manual 15/21 Page Rev.05
The interior of The Ecomiser SU-01 / SU-02 Models are made of quality stainless steel that has been electro polished to make it the smoothest surface available. The smooth surface prohibits the accumulation of dirt and bacteria inside the unit. If the water in your area is especially hard, however, lime deposits could form inside the machine. If this happens, you can remove them by putting 1000cc of scale remove aid in the wash tank and running a normal washing cycle 10 times. In extremely hard water areas you may need to repeat this process a few times to remove hard water deposits. CLEANING THE STRAINER BASKET For your convenience, we have placed the strainer within easy reach inside the tub. To clean the strainer, wash it gently in hot, soapy water and rinse it thoroughly 1 to 2 times everyday. CLEANING THE DOOR To clean the edge around the door, use only a soft warm, damp rag. To prevent penetration of water into the electrical components, do not use a spray cleaner of any kind. WARNING Never use a spray cleaner of any kind on the control panel. You could damage the electrical components. And never use abrasive cleaners or scouring pads on the outer surfaces because they will scratch the finish. Also, some paper towels can scratch or leave marks on the stainless steel surface. CLEANING THE IMPELLERS Impellers may sometimes become clogged with hard water deposits. To remove them, grip the center of impeller and wash it all over with soft rags. After removing all of them, don’t forget to check impellers and make sure it revolves easily. DELIMING Lime scale deposits will occur over time on the interior of the machine if it is operated using a hard water supply. The Ecomiser SU-01 / SU-02 Models recommend that a deliming or de-scaling process can be used to remove these deposits, as well as any accumulated food residue. When deliming the interior area, be sure to follow these guidelines. - Use deliming agents designed for use with commercial dishwashers. - Follow the instructions for the deliming agent that is used. NOTE After the deliming process - Run the machine through 2-3 regular cycles and sanitize the interior thoroughly. - Inspect the interior for any remaining deliming agent residue. If residue is present, remove it using a
soft cloth and hot water; then, run the machine through one final cycle. - Press the POWER OFF button. This will empty the tank, ensuring that any deliming agent still in the
tank will be flushed out of the machine. - Ensure that all residue of the deliming agent is removed. Residue from the agent can pose a health
hazard and damage seals and plastic components inside the machine.
Ecomiser SU-01 / SU-02 Manual 16/21 Page Rev.05

As with any new machine, it sometimes takes using it a few times to learn to operate it properly. If you are having minor performance problems with your dishwasher, read this section before calling for service. It may save you time and unnecessary expense. POOR WASHING PERFORMANCE - The dishes may not be loaded properly. Make sure that soiled surfaces are facing downward or
toward the center of the dishwasher. Also, make sure that the bowls, pots, etc., are not stacked so closely that water can’t reach the soiled surfaces.
- Make sure you are using the appropriate program settings for the dirtiness of the dishware. - An item may be obstructing the impellers rotation. With the rack loaded and in place, manually turn
impellers to make sure they move freely. - Dishwasher detergent should be fresh and stored tightly closed in a cool, dry place. Old or caked
detergent will not dissolve properly. - Dishwasher detergent may be inferior. Try a different brand. - If you have hard water in your area, try adding more detergent and increasing the amount of rinse aid
dispensed. Water hardness must be controlled to 4-6 grains for best results. - Check that the impeller jets are not clogged. POOR DRYING PERFORMANCE - Make sure the rinse aid is enough. - Do not overload the dishes and be careful to avoid nesting. - Load items with concave bottoms tilted so as much water as possible will run off. - Dishes washed in higher water temperatures will dry faster. - Certain plastics may need to be towel dried. Always check the manufacturer’s suggested care
instructions before washing plastic in your dishwasher. Even dishwasher-safe items should be loaded in the rack, away from the heating element.
- Check the amount of rinse aid is proper and it is fresh. WASHING ITEMS The Ecomiser SU-01 / SU-02 Models have no control over what is put in dishwasher once installed in a user’s place. You are solely responsible for what you wash in your Ecomiser SU-01 / SU-02 Models dishwasher. Most common dishware items can be safely washed in an automatic commercial dishwasher. If you have any doubts about a particular item, check with the manufacturer to see if it is dishwasher safe. - Some high-acid foods can discolor plastic. You should rinse these items. - When you load the dishware, be sure they’re securely in place and will not fall over or strike against
each other during the wash. - Load glasses between the tines, not straddling them. - Move the rack in and out slowly to avoid slamming the dishware together. - Make sure not to load dishware so high that the upper impeller could strike them. - Do not overload the dishwasher. STAINS AND DISCOLORATIONS Stains or discoloration on dishware could be caused by a number of things. - Too much iron or manganese in the water can cause yellow or brown marks on your dishware. You
should consider installing a water filtering system. - Coffee and tea stains usually have to be removed by hand washing. Be sure to rinse these items
thoroughly before putting them in the machine so there is no bleach residue on the dishware.
Ecomiser SU-01 / SU-02 Manual 17/21 Page Rev.05

If you should experience a problem with your dishwasher, you should review the following list of frequently encountered situations. Even though the product is under warranty, if the problem is not caused by defective product workmanship or materials, you will be charged for a service call. If you’re still not sure, contact Ecomiser regional agent before you call a service technician. NORMAL PROBLEMS - Always, fresh detergent should be used. - The amount of detergent needed for dishware depends on the hardness of the water in your area.
Contact your local utility company to learn the water hardness in your area. - Make sure the machine is level. - Dishwasher runs too long. If the temperature of the water entering the machine is below 59℉/15℃
(SU02) and 140℉/60℃ (SU01), the machine runs longer because it heats the water to the proper temperature by the memorized program.
DRAIN - Make sure that the cycle is complete before you open the dishwasher. If not, allow it to complete and check again. - Check the drain area for blockage. - Check for a kink in the drain hose. WATER FILL - Make sure the water supply is turned on. - Make sure the dishwasher is turned on and the door is closed securely. - Check for crimps in the water feed line. - Make sure the water inlet valve is not clogged. DOESN’T START - Make sure the dishwasher is turned on and the door is closed securely. - Check that the water supply is connected properly and the water is turned on. - Make sure the power cord is properly connected into the power supply box. - Check your fuse box for a blown fuse or tripped circuit breaker.
Check List
Nonconformity Check Corrective Action
Is the power not coming on?
Is the breaker on? Did you press the power button?
Turn the breaker on Press the power button
No water supply? Is the water supply valve open? Turn the water supply valve open
Makes a lot of noise?
Is the machine level to the ground? Is the spray arm touching the plates? Are chemical containers empty?
Install the machine parallel to the ground Don’t let the nozzle touch the machine Fill detergent and rinse into empty containers
No drain? Is the drain hose bent? Is the drain higher than the water level?
Make sure the hose isn’t bent Make sure the drain is installed at the bottom level
Poor washing?
Is the impellers clogged? Impellers not rotate? Is the dishware close together? Are you out of detergent? Are dried food bits stuck to the dishware?
Clean up impeller nozzles Do not load dishware too high Do not load dishware too close Refill the detergent Rinse off the dried food bits before putting into the machine
Poor rinsing? Are there stains on the dishware? Is the dishware slippery? Poor drying performance?
Check the temperature Check the amount of rinse detergent Check the temperature
Too much foaming?
Did you use the proper detergent? The wash temperature too low?
Use the proper detergent fir for the machine After confirming the water supply line, check the temperature
Ecomiser SU-01 / SU-02 Manual 18/21 Page Rev.05

PRODUCT WARRANTY In no event shall The Ecomiser SU-01 / SU-02 model be responsible for any incidental or consequential damages. Some states will not allow the exclusion or limitation of incidental or consequential damages, so this exclusion or limitation may not apply to you. This warranty gives you specific legal rights and you may also have other rights which vary from state to state. For warranty service, contact the dealer from whom you purchased the commercial dishwasher or an authorized The Ecomiser SU-01 / SU-02 model service agent. Service will be provided during normal business hours. Should you have a service problem that cannot be resolved locally, contact The Ecomiser SU-01 / SU-02 model service center. Before calling for service or contacting The Ecomiser SU-01 / SU-02 model regarding a warranty issue, find the serial number (see page 1). TRANSPORT AND SHIPPING Cosmetic damage must be reported to your dealer immediately before accepting order. After unpacking the dishwasher, thoroughly check it for cosmetic damage. - Observe any notices on the crating material that pertain to shipping. - Use care when transporting the equipment. - As you unpack the equipment, check that all components shown on the shipping invoice are present
and intact. Be sure to check for shipping damage. If shipping damage is present, call the dealer, providing full details, serial number and extent of damage present.
- In NO EVENT should a damaged appliance be installed or operated For The Ecomiser SU-01 / SU-02 model commercial dishwasher installations only, Two-year parts, one-year labor from date of purchase. The Ecomiser SU-01 / SU-02 model replace parts for the stainless steel tank if it fails to hold water due to a manufacturing defect, such as rusting or cracking. The Ecomiser SU-01 / SU-02 model replacement parts and/or repair labor to correct defect in materials or workmanship. Service must be provided by an authorized Ecomiser service agent during normal working HRs. Ecomiser SU-01 / SU-02 Models WILL NOT PAY FOR 1) Service calls to: 1.1) Correct the installation of the commercial dishwasher. 1.2) Repair damage due to shipment, delivery, installation, misuse or abuse 1.3) Instruct how to use the commercial dishwasher. 1.4) Replace fuses or correct wiring. 1.5) Correct plumbing, including drain problems related to improper installation 1.6) Clean or service air device in drain line 2) Repair and/or replacement parts for failure of product if the commercial dishwasher is used for
other than commercial use. 3) Damage resulting from accident, fire, floods, acts of nature, alteration, misuse, abuse, improper
installation, or installation not in accordance with local electrical or plumbing codes. 4) Repair labor costs for commercial dishwashers operated outside the area of Ecomiser SU-01 / SU-
02 model regional agent. 5) Pickup and delivery.
The Ecomiser SU-01 / SU-02 Models are designed to be repaired in the user’s place.
Customer Service
Ecomiser SU-01 / SU-02 Manual 19/21 Page Rev.05

Annex 1: SU-01 Wiring Diagram
Ecomiser SU-01 / SU-02 Manual 20/21 Page Rev.05

Annex 2: SU-02 Wiring Diagram
Ecomiser SU-01 / SU-02 Manual 21/21 Page Rev.05