operating and service manual hp 432a … and service manual hp 432a power meter serial numbers for...
TRANSCRIPT

OPERATING AND SERVICE MANUAL
HP 432A POWER METER
SERIAL NUMBERS
For important information about serial numbers see INSTRUMENT IDENTIFICATION in Section I.
Manual Part No. 00432-90079

Table of Contents Model 432A
ii
Section Page
I GENERAL INFORMATION. . . . . . . . . . . . . 1-11-1. Description . . . . . . . . . . . . . . . . . . . . . 1-11-5. Instrument Identification. . . . . . . . . . 1-11-7. Operating Environment . . . . . . . . . . . 1-31-11. Cooling Requirements . . . . . . . . . 1-31-13. Cleaning . . . . . . . . . . . . . . . . . . . . 1-3
II INSTALLATION . . . . . . . . . . . . . . . . . . . . . . 2-12-1. Initial Inspection. . . . . . . . . . . . . . . . . 2-12-2. Mechanical Check . . . . . . . . . . . . 2-12-4. Performance Checks . . . . . . . . . . 2-12-6. Damage Claims . . . . . . . . . . . . . . 2-12-9. Three-Conductor Power Cable . . . . . . 2-12-12. Primary Power Requirements . . . . . . 2-12-14. Internal Battery Operation . . . . . . . . 2-12-16. Battery Installation. . . . . . . . . . . 2-12-17. Battery Storage . . . . . . . . . . . . . . 2-12-19. Rack Mounting . . . . . . . . . . . . . . . . . . 2-12-21. Combining Case. . . . . . . . . . . . . . 2-12-23. Adapter Frames . . . . . . . . . . . . . . 2-22-25. Repacking for Shipment . . . . . . . . . . . 2-2
III OPERATING INFORMATION. . . . . . . . . . . 3-13-1. Introduction. . . . . . . . . . . . . . . . . . . . . 3-13-4. Controls, Connectors and Indicators . 3-13-12. Battery Operation. . . . . . . . . . . . . . . . 3-13-17. Microwave Power Measurement
Accuracy . . . . . . . . . . . . . . . . . . . . 3-23-23. Calibrator Factor and Effective
Efficiency . . . . . . . . . . . . . . . . . . . 3-23-27. Precision Power Measurement. . . . . . 3-23-28. General. . . . . . . . . . . . . . . . . . . . . 3-23-30. Measurement Procedure . . . . . . . 3-2
IV PRINCIPLES OF OPERATION . . . . . . . . . . 4-14-1. Simplified Description . . . . . . . . . . . . 4-14-5. Functional Block Diagram . . . . . . . . . 4-1
V MAINTENANCE . . . . . . . . . . . . . . . . . . . . . . 5-15-1. Introduction. . . . . . . . . . . . . . . . . . . . . 5-15-3. Content . . . . . . . . . . . . . . . . . . . . . . . . 5-15-4. Performance Tests . . . . . . . . . . . . 5-15-6. Adjustments . . . . . . . . . . . . . . . . . 5-15-10. Test Equipment . . . . . . . . . . . . . . 5-15-12. Service Information . . . . . . . . . . . 5-1
Section Page
V MAINTENANCE (Cont)5-14. 432A Performance Tests with
8477A Calibrator . . . . . . . . . . . . . . . 5-15-15. Initial Setup . . . . . . . . . . . . . . . . . 5-15-16. Meter Accuracy Test . . . . . . . . . . 5-15-17. Calibration Factor Test . . . . . . . . 5-25-18. Meter Linearity Check. . . . . . . . . 5-25-19. Zero Carryover Test . . . . . . . . . . . 5-25-20. Fine Zero Range Check . . . . . . . . 5-35-21. 432A Calibration Without
8477A Calibrator . . . . . . . . . . . 5-35-24. Calibration Procedure 1. . . . . . . . 5-35-26. Calibration Procedure 2. . . . . . . . 5-95-27. Cover Removal and Replacement. . . . 5-95-29. Top Cover Removal . . . . . . . . . . . 5-95-30. Top Cover Replacement. . . . . . . . 5-95-31. Bottom Cover Removal . . . . . . . . 5-95-32. Bottom Cover Replacement. . . . . 5-95-33. Adjustment Procedures. . . . . . . . . . . 5-105-34. Initial Setup . . . . . . . . . . . . . . . . 5-105-35. Mechanical Meter
Adjustment . . . . . . . . . . . . . . 5-105-36. Bridge Amplifier Tests. . . . . . . . 5-105-37. Meter and Recorder Output
Calibration. . . . . . . . . . . . . . . 5-105-38. Battery Charger Adjustment
(Option 01 Only) . . . . . . . . . . 5-115-39. Battery Removal . . . . . . . . . . . . 5-115-40. Isolating Trouble in Transistor
Circuits . . . . . . . . . . . . . . . . . . . . 5-115-46. Out-of-Circuit Testing . . . . . . . . 5-135-48. Component Replacement in
Etched Circuits . . . . . . . . . . . . . 5-135-50. Axial-Lead Components . . . . . . 5-135-52. Other Components . . . . . . . . . . . 5-14
VI REPLACEABLE PARTS . . . . . . . . . . . . . . . . 6-16-1. Introduction. . . . . . . . . . . . . . . . . . . . . 6-16-3. Ordering Information . . . . . . . . . . . . . 6-1
VII TROUBLESHOOTING, SCHEMATICS,AND COMPONENT LOCATIONS . . . . . 7-1
7-1. Introduction. . . . . . . . . . . . . . . . . . . . . 7-17-5. Troubleshooting. . . . . . . . . . . . . . . . . . 7-17-8. Schematics. . . . . . . . . . . . . . . . . . . . . . 7-17-12. A1A1 Auto Zero Assembly . . . . . . . . . 7-17-14. Test Conditions . . . . . . . . . . . . . . . . . . 7-1
TABLE OF CONTENTS

Model 432A List of TablesList of Illustrations
iii
Number Title Page
1–1. Specifications . . . . . . . . . . . . . . . . . . . . . . . . 1–11–2. Thermistor Mounts for the 432A . . . . . . . . . 1–25–1. Recommended Test Equipment . . . . . . . . . . 5–05–2. Meter Accuracy Test . . . . . . . . . . . . . . . . . . . 5–25–3. Calibration Factor Test . . . . . . . . . . . . . . . . 5–25–4. Performance Test Card. . . . . . . . . . . . . . . . . 5–55–5. Out-of-Circuit Transistor Resistance
Measurements . . . . . . . . . . . . . . . . . 5–115–6. Etched Circuit Soldering Equipment. . . . . 5–135–7. Safe Ohmmeter Range for Transistor
Resistance Measurements . . . . . . . . 5–146–1. Replaceable Parts . . . . . . . . . . . . . . . . . . . . . 6–26–2. Code List of Manufacturers . . . . . . . . . . . . . 6–67–1. Schematic Notes . . . . . . . . . . . . . . . . . . . . . . 7–2
Number Title Page
7–2. Overall Troubleshooting. . . . . . . . . . . . . . . . 7–57–3. RF Bridge Troubleshooting . . . . . . . . . . . . . 7–67–4. Compensation Bridge Troubleshooting . . . . 7–67–5. Auto-Zero Troubleshooting. . . . . . . . . . . . . . 7–77–6. Chopping and Summing Circuit
Troubleshooting . . . . . . . . . . . . . . . . . 7–77–7. 5 kHz Multivibrator Troubleshooting . . . . . 7–77–8. Range Amplifier Troubleshooting . . . . . . . . 7–77–9. Calibrator Factor Amplifier
Troubleshooting . . . . . . . . . . . . . . . . . 7–77–10. Pulse Width Modulator and Meter
Troubleshooting . . . . . . . . . . . . . . . . . 7–77–11. Battery Charger Troubleshooting . . . . . . . . 7–97–12. Power Supply Troubleshooting . . . . . . . . . . 7–9
LIST OF TABLES
LIST OF ILLUSTRATIONS
Number Title Page
1–1. HP Model 432A Power Meter. . . . . . . . . . . . 1–01–2. Instrument Identification. . . . . . . . . . . . . . . 1–12–1. Sub-module Installation in Rack Adapter
Frame . . . . . . . . . . . . . . . . . . . . . . . . . 2–22–2. HP Model 1051A Combining Case
Instrument Installation. . . . . . . . . . . 2–23–1. Precision Power Measurements . . . . . . . . . . 3–33–2. Front Panel Controls, Connectors and
Indicators . . . . . . . . . . . . . . . . . . . . . . 3–43–3. Rear Panel Controls and Connectors. . . . . . 3–63–4. Turn On and Zeroing Procedure . . . . . . . . . 3–84–1. Model 432A Simplified Block Diagram . . . . 4–04–2. Model 432A Block Diagram . . . . . . . . . . . . . 4–34–3. Model 432A RF Bridge Talking
Schematic . . . . . . . . . . . . . . . . . . . . . . 4–44–4. Model 432A Meter Logic Talking
Schematic . . . . . . . . . . . . . . . . . . . . . . 4–64–5. Model 432A Power Supply Talking
Schematic . . . . . . . . . . . . . . . . . . . . . . 4–85–1. Check and Adjustment Test Setup . . . . . . . 5–15–2. Zero Carryover Test Setup . . . . . . . . . . . . . . 5–35–3. Bridge Amplifier Test . . . . . . . . . . . . . . . . . 5–105–4. Transistor Biasing and Operating
Characteristics . . . . . . . . . . . . . . . . . 5–12
Number Title Page
7–1. Servicing Block Diagram . . . . . . . . . . . . . . . 7–37–2. Model 432A Top Internal View . . . . . . . . . . 7–47–3. Model 432A Waveforms . . . . . . . . . . . . . . . . 7–47–4. Model 432A Test Point Locations . . . . . . . . 7–57–5. Model 432A Bottom View, Component
Locations . . . . . . . . . . . . . . . . . . . . . . 7–67–6. Model 432A Front Panel Interior. . . . . . . . . 7–67–7. A1 Bridge Assembly, Component
Locations . . . . . . . . . . . . . . . . . . . . . 7–107–8. Model 432A Rear Panel Interior . . . . . . . . 7–107–9. RF and Compensation Bridge
Schematic Diagram . . . . . . . . . . . . . 7–117–10. Model 432A Switches . . . . . . . . . . . . . . . . . 7–127–11. A2 Meter Logic Assembly, Component
Locations . . . . . . . . . . . . . . . . . . . . . 7–137–12. Meter Logic Schematic Diagram . . . . . . . . 7–137–13. A2 Meter Logic Assembly, Power Supply
Component Locations . . . . . . . . . . . 7–157–14. A7 Battery Charging Circuit (Option 01)
Component Locations . . . . . . . . . . . 7–157–15. Power Supply, Schematic Diagram . . . . . . 7–157–16. Thermistor Cable Wiring Diagram . . . . . . 7–16

iv
Regulatory Information Model 432A
Declaration of Conformityaccording to ISO/IEC Guide 22 and EN45014
Manufacturer’s Name: Hewlett-Packard Ltd.
Queensferry Microwave DivisionSouth QueensferryWest Lothian, EH30 9TGScotland, United Kingdom
Manufacturer’s Address:
Declares that the product
Product Name: Thermistor Power Meter
Model Numbers: HP 432A
Product Options: This declaration covers only the standard option of theabove product.
Conforms with the protection requirements of European Council Directive 89/336/EEC on theapproximation of the laws of the member states relating to electromagnetic compatibility.
Against EMC test specifications EN 55011:1991 (Group 1, Class A) and EN 50082-1:1992
As Detailed in: Electromagnetic Compatibility (EMC)
Technical Construction File (TCF) No. A-5951-9852-02
Assessed by: DTI Appointed Competent BodyEMC Test Centre,GEC-Marconi Avionics Ltd.,Maxwell Building,Donibristle Industrial Park,KY11 5LBScotland, United Kingdom
Technical Report Number:6893/2200/CBR, dated 23 September 1997
Supplementary Information:
The product conforms to the following safety standards:
EN 61010-1(1993) / IEC 1010-1(1990) +A1(1992) +A2(1994)CSA-C22.2 No. 1010.1-93
The product herewith complies with the requirements of the Low Voltage Directive 73/23/EEC,and carries the CE-marking accordingly.
South Queensferry, Scotland 17 November 1997
Location Date R.M. Evans / Quality Manager

v
Model 432A Regulatory Information
Warranty
This Hewlett-Packard product is warranted against defects in materials and workmanship for aperiod of one year from date of shipment. During the warranty period, Hewlett-PackardCompany will, at its option, either repair or replace products which prove to be defective.
For warranty service or repair, this product must be returned to a service facility designated byHP. Buyer shall prepay shipping charges to HP and HP shall pay shipping charges to return theproduct to Buyer. However, Buyer shall pay all shipping charges, duties, and taxes for productsreturned to HP from another country.
HP warrants that its software and firmware designated by HP for use with an instrument willexecute its programming instructions when properly installed on that instrument. HP does notwarrant that the operation of the instrument, or software, or firmware will be uninterrupted orerror free.
Limitation of Warranty
The foregoing warranty shall not apply to defects resulting from:
1 Improper or inadequate maintenance, adjustment, calibration, or operation by Buyer;
2 Buyer-supplied software, hardware, interfacing or consumables;
3 Unauthorized modification or misuse;
4 Operation outside of the environmental and electrical specifications for the product;
5 Improper site preparation and maintenance; or
6 Customer induced contamination or leaks.
THE WARANTY SET FORTH IS EXCLUSIVE AND NO OTHER WARRANTY, WHETHERWRITTEN OR ORAL, IS EXPRESSED OR IMPLIED. HP SPECIFICALLY DISCLAIMS THEIMPLIED WARRANTIES OF MERCHANTABILITY AND FITNESS FOR A PARTICULARPURPOSE.
Limitation of Remedies and Liability
THE REMEDIES PROVIDED HEREIN ARE BUYER'S SOLE AND EXCLUSIVE REMEDIES.IN NO EVENT SHALL HP BE LIABLE FOR DIRECT, INDIRECT, SPECIAL, INCIDENTAL,OR CONSEQUENTIAL DAMAGES (INCLUDING LOSS OF PROFITS) WHETHER BASED ONCONTRACT, TORT OR ANY OTHER LEGAL THEORY.
Responsibilities of the Customer
The customer shall provide:
1 Access to the products during the specified periods of coverage to perform maintenance.
2 Adequate working space around the products for servicing by Hewlett-Packard personnel.
3 Access to and use of all information and facilities determined necessary by Hewlett-Packard toservice and/or maintain the products. (Insofar as these items may contain proprietary orclassified information, the customer shall assume full responsibility for safeguarding andprotection from wrongful use.)
4 Routine operator maintenance and cleaning as specified in this manual.
5 Consumables such as paper, disks, magnetic tapes, ribbons, inks, pens, gases, solvents, lamps,filters, fuses, seals, etc.

vi
Regulatory Information Model 432A
Certification
Hewlett-Packard Company certifies that this product met its published specifications at the timeof shipment from the factory. Hewlett-Packard further certifies that its calibration measurementsare traceable to the United States National Bureau of Standards, to the extent allowed by theBureau's calibration facility, and to the calibration facilities of other International StandardsOrganization members.
Assistance
Product maintenance agreements and other customer assistance agreements are available forHewlett-Packard products.
For any assistance, contact your Hewlett-Packard Sales and Service Office. Addresses areprovided at the back of this manual.
Notice
The information contained in this document is subject to change without notice.
Hewlett-Packard shall not be liable for errors contained herein or for incidental or consequentialdamages in connection with the furnishing, performance or use of this material.
This document contains proprietary information which is protected by copyright. All rights arereserved. No part of this document may be photocopied or reproduced without the prior writtenconsent of the manufacturer, Hewlett-Packard Ltd.
Restricted Rights Legend
Use, duplication, or disclosure by the government is subject to restrictions as set forth insubdivision (b)(3)(ii) of the Rights in Technical Data and Computer Software clause at 52.227-7013. Hewlett-Packard Company; 3000 Hanover Street; Palo Alto, California 94304.
Statement of Compliance
ElectromagneticCompatibility (EMC)Information
This product has been designed to meet the protection requirements of the EuropeanCommunities Electromagnetic Compatibility (EMC) directives:
EN55011:1991 (Group 1, Class A)EN50082-1:1992- IEC 1000-4-2 (1995) ESD- IEC 1000-4-3 (1995) Radiated Suseptibility- IEC 1000-4-4 (1995) EFT
In order to preserve the EMC performance of the product, any cable which becomes worn ordamaged must be replaced with the same type and specification.
Safety Information This instrument has been designed and tested in accordance with publication EN61010-1(1993) /IEC 1010-1(1990) +A1(1992) +A2(1994) / CSA C22.2 No. 1010.1(1993) Safety Requirements forElectrical Equipment for Measurement, Control and Laboratory Use, and has been supplied in asafe condition. The instruction documentation contains information and warnings which must befollowed by the user to ensure safe operation and to maintain the instrument in a safe condition.
vii
Model 432A Regulatory Information
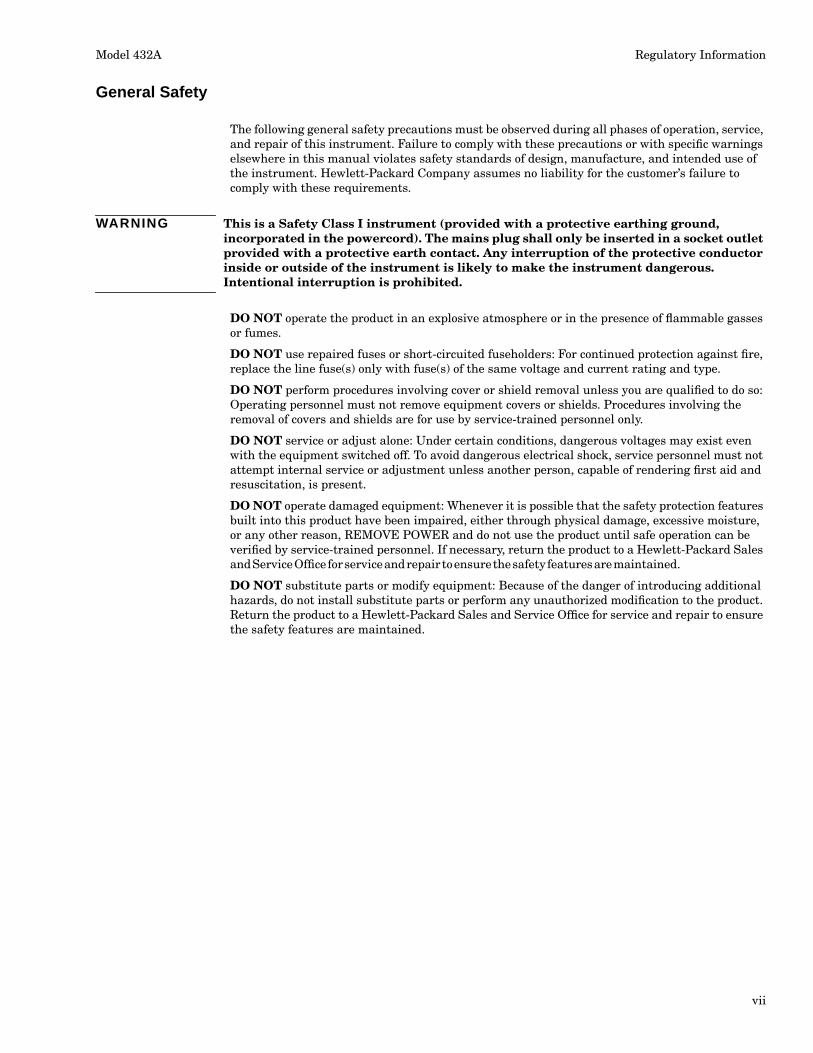
General Safety
The following general safety precautions must be observed during all phases of operation, service,and repair of this instrument. Failure to comply with these precautions or with specific warningselsewhere in this manual violates safety standards of design, manufacture, and intended use ofthe instrument. Hewlett-Packard Company assumes no liability for the customer’s failure tocomply with these requirements.
WARNING This is a Safety Class I instrument (provided with a protective earthing ground,incorporated in the powercord). The mains plug shall only be inserted in a socket outletprovided with a protective earth contact. Any interruption of the protective conductorinside or outside of the instrument is likely to make the instrument dangerous.Intentional interruption is prohibited.
DO NOT operate the product in an explosive atmosphere or in the presence of flammable gassesor fumes.
DO NOT use repaired fuses or short-circuited fuseholders: For continued protection against fire,replace the line fuse(s) only with fuse(s) of the same voltage and current rating and type.
DO NOT perform procedures involving cover or shield removal unless you are qualified to do so:Operating personnel must not remove equipment covers or shields. Procedures involving theremoval of covers and shields are for use by service-trained personnel only.
DO NOT service or adjust alone: Under certain conditions, dangerous voltages may exist evenwith the equipment switched off. To avoid dangerous electrical shock, service personnel must notattempt internal service or adjustment unless another person, capable of rendering first aid andresuscitation, is present.
DO NOT operate damaged equipment: Whenever it is possible that the safety protection featuresbuilt into this product have been impaired, either through physical damage, excessive moisture,or any other reason, REMOVE POWER and do not use the product until safe operation can beverified by service-trained personnel. If necessary, return the product to a Hewlett-Packard Salesand Service Office for service and repair to ensure the safety features are maintained.
DO NOT substitute parts or modify equipment: Because of the danger of introducing additionalhazards, do not install substitute parts or perform any unauthorized modification to the product.Return the product to a Hewlett-Packard Sales and Service Office for service and repair to ensurethe safety features are maintained.

Regulatory Information
Safety Symbols
Model432A
The following symbols on the instrument and in the manual indicate precautions which must be taken to maintain safe operation of the instrument.
Safety Symbols
~ The Instruction Documentation Symbol. The product is marked with this symbol when it is necessary for the user to refer to the instructions in the supplied documen-tation.
@ Indicates the field wiring terminal that must be connected to earth ground before operating the equipment - protects against electrical shock in case of fault.
rh OR J_ Frame or chassis ground terminal - typically connects to the equipment's metal frame.
~ Alternating current (AC)
--- Direct current (DC)
A Indicates hazardous voltages
WARNING Warning denotes a hazard. It calls attention to a proce-dure which, if not correctly performed or adhered to, could result in injury or loss of life. Do not proceed beyond a warning note until the indicated conditions are fully understood and met.
CAUTION Caution denotes a hazard. It calls attention to a proce-dure which, if not correctly performed or adhered to, could result in dan1age to or destruction of the instru-ment. Do not proceed beyond a caution note until the indicated conditions are fully understood and met.
( E The CE mark shows that the product complies with all relevant European Legal Directives.
ISM 1-A This is a symbol of an Industrial, Scientific, and Medical Group 1 Class A product.
<ti· The CSA mark is a registered trademark of the Cana-dian Standards Association, and indicates compliance to the standards layed out by them.
viii

ix
Model 432A Regulatory Information
Noise Declaration
LpA<70dB
am Arbeitsplatz (operator position)
normaler Betrieb (normal position)
nach DIN 45635 pt.19 (per ISO 7779)

Section I Model 432A
\ I 1 I
\ --< ' \ \ -~
I I / ,
• J ., I J ' ,, dBm
., ~ /
\
Figure 1-1. HP Model 432A Power Meter
1-0
Model 432A Section I
SECTION I
GENERAL INFORMATION
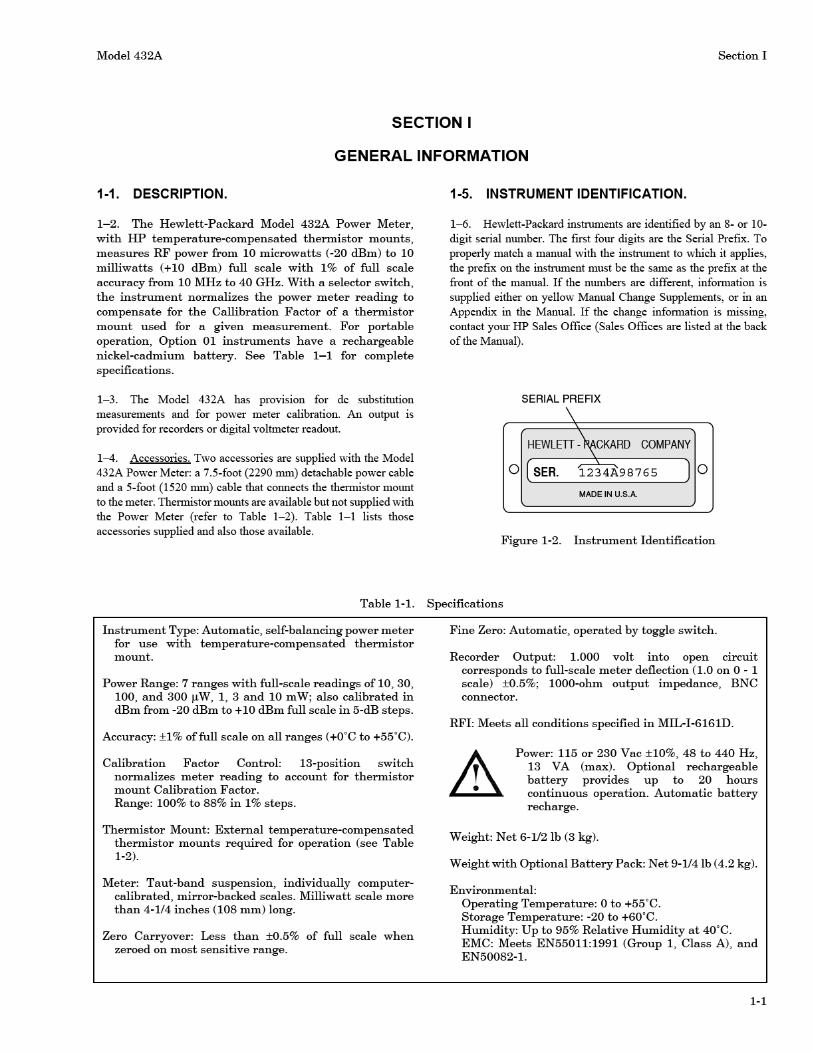
1-1. DESCRIPTION.
1- 2. The Hewlett-Packard Model 432A Power Meter, with HP temperature-compensated thermistor mounts, measures RF power from 10 microwatts (-20 dBm) to 10 milliwatts ( + 10 dBm) full scale with 1 % of full scale accuracy from 10 MH z to 40 GH z. With a selector switch, the instrument normalizes the power meter reading to compensate for the Callibration Factor of a thermistor mount used for a given measurement. For portable operation, Option 01 instruments have a rechargeable nickel-cadmium battery. See Table 1- 1 for complete specifications.
1-3. The Model 432A has provision for de substitution measm·ements and for power meter calibration. An output is provided for recorders or digital voltmeter readout.
1--4. Accessories. Two accessories are supplied with the Model 432A Power Meter: a 7.5-foot (2290 mm) detachable power cable and a 5-foot (1520 mm) cable that connects the thennistor motmt to the meter. Thennistor mounts are available but not supplied with the Power Meter (refer to Table 1-2). Table 1-1 lists those accessories supplied and also those available.
Table 1-1.
lnstrun1ent Type: Automatic, self-balancing power meter for use with temperature-compensated thermistor mount.
Power Range: 7 ranges with full-scale readings of 10, 30, 100, and 300 µW, 1, 3 and 10 mW; also calibrated in dBm from -20 dBm to +10 dBm full scale in 5-dB steps.
Accuracy: ±1% offull scale on all ranges (+o·c to +55.C).
Calibration Factor Control: 13-position switch normalizes meter reading to account for thermistor mount Calibration Factor. Range: 100% to 88% in 1 % steps.
Thermistor Mount: External temperature-compensated thermistor mounts required for operation (see Table 1-2).
Meter: Taut-band suspension, individually computercalibrated, mirror-backed scales. Milliwatt scale more than 4-1/4 inches (108 mm) long.
Zero Carryover: Less than ±0.5% of full scale when zeroed on most sensitive range.
1-5. INSTRUMENT IDENTIFICATION.
1-6. Hewlett-Packard instruments are identified by an 8- or 10-digit serial number. The first four digits are the Serial Prefix. To properly match a manual with the instrument to which it applies, the prefix on the instrument must be the same as the prefix at the front of the manual. If the munbers are different, information is supplied either on yellow Manual Change Supplements, or in an Appendix in the Manual. If the change info1mation is inissing, contact your HP Sales Office (Sales Offices are listed at the back of the Manual).
SERIAL PREFIX
\
HEWLEIT -~CKARD COMPANY
[SER. --'- Jo 0 1234A98765
MADE IN U.S.A.
Figure 1-2. Instrument Identification
Specifications
Fine Zero: Automatic, operated by toggle switch.
Recorder Output: 1.000 volt into open circuit corresponds to full-scale meter deflection (1.0 on 0 - 1 scale) ±0.5%; 1000-ohm output impedance, BNC connector.
RFI: Meets all conditions specified in MIL-l-6161D.
Power: 115 or 230 Vac ±10%, 48 to 440 Hz, 13 VA (max). Optional rechargeable battery provides up to 20 hours continuous operation. Automatic battery recharge.
Weight: Net 6-112 lb (3 kg).
Weight with Optional Battery Pack: Net 9-1/4 lb ( 4.2 kg).
Environmental: Operating Temperature: 0 to +55.C. Storage Temperature: -20 to +60' C. Humidity: Up to 95% Relative Humidity at 4o·c. EMC: Meets EN55011:1991 (Group 1, Class A), and EN50082-1.
1-1

Section I Model 432A
Table 1-1. Specifications (Cont.)
Dimensions: Combining Cases:
,.,
NOTE OtMEMSIONS itrt IHOES AHO lMILL!MtTE!tSl
!Al f"OA TOTAL 1.EHGTH !HCl..U()OrtG l(tf(IU AOC I IN;. (2' MM! tB! F"Oflf K€1GH'r lNCUJOOtl'l FUT Al» 1/16 tN. Ill MM!
SIDE
Le..... ~~---"1._.L f. I-
TOP
REAR
1051A, 11-1/4 in. (286 mm) deep. 1052A, 16-3/8 in. (416 mm) deep.
The combining cases accept the 1/3-module HP instruments for bench use or rack mounting. See 1051A data sheet for details.
Options: 001: Rechargeable battery installed, provides up
to 20 hours continuous operation.
002: Rear thermistor mount input connector wired in parallel with front panel input connector.
003: Input connector placed on rear panel instead of front.
Note
Accessories Furnished: 5-ft ( 1, 42 m) cable for HP temperature compensated thermistor mounts; 7-1/2 ft (2,29 m) power cable, NEMA plug.
Thermistor mount cable impedance is part of the 432A input bridge circuit. For cables 20 feet long and over, the bridge is matched to specific cable options, so the various cables should not be interchanged.
009: 10-foot (3, 05 m) cable for 100-ohm or 200-ohm mount.
Accessories Available: 010: 20-foot (6, 10 m) cable for 100-ohm or 200-ohm mount.
1-2
00432-6016 Rechargeable Battery Pack for field installation.
5060-0797 Rack Adapter Frame (holds three instruments the size of the 432A).
8477A Power Meter Calibrator.
11076A Carrying Case.
011: 50-foot (15,24 m) cable for 100-ohm or 200-ohm mount.
012: 100-foot (30,48 m) cable for 100-ohm or 200-ohm mount.
013:200-foot (60,96 m)cable for 100-ohm or 200-ohm mount.
Table 1-2. Thermistor Mounts for the 432A
HP Model Frequency Range (GHz) Operating Resistance (Ohms)
COAXIAL MOUNTS:
478A (Type N Connector) 0.01-10 200
8478B (Type N Connector) 0.01-18 200
8478B-0ption 11 (APC-7 Connector) 0.01-18 200
WAVEGUIDE MOUNTS:
S486A 2.6-3.95 100 G486A 3.95-5.85 100 J486A 5.3-8.2 100 H486A 7.05-10 100 X486A 8.2-12.4 100 M486A 10-15 100 P486A 12.4-18 100 K486A 18-26. 5 200 R486A 26. 5-40 200
WAVEGUIDE MOUNT ACCESSORIES:
11515A: Circular Flange Adapter for K486A. 11516A: Circular Flange Adapter for R486A.

Model 432A Section I
1-3
1-7. OPERATING ENVIRONMENT.
1–8. This instrument is designed for indoor use only.
1–9. The module may be operated at temperatures from0˚C to 55˚C at altitudes of up to 4,600 m (15,000 ft). Themodule may be operated in environments up to 95%relative humidity to 40˚C, but it should be protected fromtemperature extremes which may cause condensation.
1–10. To ensure adequate cooling do not obstruct airvents in the instrument cabinet.
1–11. COOLING REQUIREMENTS.
1–12. To provide adequate cooling, an air gap ofapproximately 75 mm should be maintained around theinstrument.
NOTE If the HP 432A is subject to HP Class Bcondensation it is recommended that theinstrument be powered up for at least 30minutes before normal operation ispossible.
CAUTION This instrument is designed for use inInstallation Category II and PollutionDegree 2 per IEC 1010-1 and 644respectively.
1–13. CLEANING.
1–14. To clean the module/instrument: Use a soft, cleandamp cloth to clean the front panel and side covers.
CAUTION Mains supply voltage fluctuations shouldnot exceed ±10% of the nominal selectedline voltage.
CAUTION Before switching on this instrument, makesure that the line voltage slide switch is setto the voltage of the power supply, and thecorrect fuse is installed (see Figure 3–3).Ensure the power supply voltage is in thespecified range.
WARNING Appliance coupler (mains inputpowercord) is the power disconnectdevice. Do not position theinstrument such that access to thecoupler is impaired.
WARNING For continued protection against firehazard, replace the line fuse only withthe same type and line rating(T100 mA 250 V). The use of otherfuses or materials is prohibited.
WARNING If this instrument is not used asspecified, the protection provided bythe equipment could be impaired.This instrument must be used in anormal condition only (in which allmeans for protection are intact).
WARNING No operator serviceable parts inside.Refer servicing to qualifiedpersonnel. To prevent electricalshock do not remove covers.


Model 432A Section IIInstallation
2-1
SECTION II
INSTALLATION
2-1. INITIAL INSPECTION.
2–2. MECHANICAL CHECK.
2–3. If damage to the shipping carton is evident, ask thatthe carrier’s agent be present when the instrument isunpacked. Inspect the instrument for mechanicaldamage. Also check the cushioning material for signs ofsevere stress.
2–4. PERFORMANCE CHECKS.
2–5. The electrical performance of the Model 432Ashould be verified upon receipt. Performance checkssuitable for incoming inspection are given in Section V,Maintenance.
2–6. DAMAGE CLAIMS.
2–7. If the instrument is mechanically damaged intransit, notify the carrier and the nearest Hewlett-Packard field office immediately. A list of field offices isat the back of this manual. Retain the shipping cartonand padding material for the carrier’s inspection. Thefield office will arrange for replacement or repair of yourinstrument without waiting for claim settlementsagainst the carrier.
2–8. Before shipment this instrument was inspectedand found free of mechanical and electrical defects. Ifthere is any deficiency, or if electrical performance is notwithin specifications, notify your nearest Hewlett-Packard Sales and Service Office.
2-9. THREE-CONDUCTOR POWER CABLE.
2–10. To protect operating personnel, the NationalElectrical Manufacturers Association (NEMA)recommends that the instrument panel and cabinet begrounded. All Hewlett-Packard instruments areequipped with a three-conductor power cable which,when plugged into an appropriate receptacle, groundsthe instrument. The offset pin on the power cable three-prong connector is the ground wire.
2–11. To preserve the protection feature whenoperating the instrument from a two-connector outlet,use a three-prong to two-prong adapter and connect thegreen pigtail on the adapter to ground.
2-12. PRIMARY POWER REQUIREMENTS.
2–13. The Model 432A operates from 115 or 230 volts acline voltage. Line frequency may vary from 48 to 440 Hz.A slide switch on the rear panel is moved to the correctposition for the line voltage available. Before operatingthe equipment, ensure that the fuse installed in theinstrument corresponds to the value marked on thepanel for the line voltage available (1/8 amp slo-blow).
2-14. INTERNAL BATTERY OPERATION.
2–15. Model 432A Option 001 instruments contain aninternal battery and a battery charging assembly. Byconnecting the 432A to an ac source, the battery may becharged overnight. The battery can be maintained in thecharging state indefinitely without damage. It willassume its full capacity, 1.25 ampere-hours, and will notcharge in excess of that. This enables the instrument tooperate for approximately 20 hours continuously withoutrecharging.
2–16. BATTERY INSTALLATION.
a. Set power switch to off and remove power plugfrom rear panel.
b. Remove top and bottom, and side instrumentcovers.
c. The battery is installed with the terminals towardthe right hand side of the instrument when faced fromthe front. The two terminals on the battery fit into spacesprovided on the circuit board.
d. Using the retaining nuts, fasten the battery firmlyin place. Be careful not to short the battery terminals atany time as this may cause battery cell damage.
e. Install assembly A7, battery charging board, inthe space provided for it just ahead of the battery.
f. Reinstall instrument covers and adjust circuit.Instrument is now ready for operation.
2–17. BATTERY STORAGE.
2–18. Store the battery at or below room temperature.Extended storage at high temperature will reduce thecell charge, but will not damage the battery if the storagetemperature is below 140°F. Install the battery in theinstrument and recharge before using Model 432A inbattery operation.
2-19. RACK MOUNTING.
2–20. Model 432A is narrower than full-rack width. It iswhat is termed a sub-modular unit. When used alone,the instrument can be bench mounted. When used incombination with other sub-modular units it may bebench or rack mounted. The HP 1051A and 1052ACombining Cases and Rack Adapter Frames aredesigned specifically for this purpose.
2–21. COMBINING CASE.
2–22. A model 1051A Combining Case is shown inFigure 2–1. This case is full rack width and acceptsvarying combinations of submodular instruments. Thecase, purchased separately, is provided with a rackmounting kit. The combining case will hold three
WARNING If this instrument is not used as specified, the protection provided bythe equipment could be impaired. This instrument must be used ina normal condition only (in which all means for protection areintact).

Section II Installation
SPACER CLAMP RETAINING SCREWS
CD ADAPTER
FRAME
\
Figure 2-1. Sub-module Installation ill Rack Adapter Frame
CD INSERT DIVIDER, ENGAGING TABS IN TOP AND BOTTOM
MOUNTING SLOTS
® TWIST DIVIDER TO VERTICAL
POSITION
@ PUSH IN TO LIMIT
© SLIDE LATCH TO LOCK
DIVIDER
Model 432A
mstruments the same size as the Model 432A. When mstruments are mstalled ill the combining case, they may be installed or removed mdividually.
2-23. ADAPTER FRAMES.
2-24. The 5060-0797 Adapter Frame is shown mFigure 2-2. The frame will accept a variety of submodular units in a manner suitable for rack mountmg. Submodular units, ill combination with any necessary spacers are assembled within the frame. A submodular unit cannot be removed mdividually.
2-25. REPACKING FOR SHIPMENT.
2-26. When returning an in st r u m e n t to HewlettPackard use the original packing material. If the original foam type packing material is not available, contact an authorized HP Sales Office for assistance. If this is not possible, first protect the instrument surfaces by wrapping in heavy kraft paper or with sheets of cardboard flat against the mstrument. Protect the instrument on all sides usmg approximately 4" of packing material and pack ill a durable contamer. Mark the contamer clearly for proper handling and insure adequately before shipping.
2-27. When an mstrument is returned to HP for service or repair, attach a tag to the instrument specifying the owner and desired action. All correspondence should identify the instrument by model number and full eight-digit serial number.
@ PUSH RETAINER OOWN
TO RELEASE
© SLIDE INSTRUMENT
INTO CASE
0 TO SET RETAINER BACK IN
PLACE, ENGAGE HOOKS FIRST ON ONE SIDE OF DIVIDER,
THEN ON OTHER
© PUSH RETAINER UP TO LOCK
Figure 2-2. HP Model 1051A Combining Case Instrument Installation
2-2

Model 432A Section Ill Operating Instructions
SECTION Ill
OPERATING INFORMATION
3-1. INTRODUCTION.
3-2. The Model 432APower Meter operates with HP temperature-compensated thermistor mounts such as the 8478B and 478A Coaxial, and 486A Waveguide series. The frequency range of the 432A with these mounts in 50-ohm coaxial systems is 10 MHz to 18 GHz; in waveguide systems it is 2. 6 GHz to 40 GHz. Full-scale power ranges are 10 microwatts to 10 milliwatts (-20 dBm to +10 dBm). Extended measurements may be made to 1 microwatt (-30 dBm). The total measurement capacity of the instrument is divided into seven ranges, selected by a front - panel RANGE switch.
3-3. This section describes general operating procedures and error analysis in microwave power measurement. Application Note 64, available on request from Hewlett-Packard, is a detailed analysis of microwave power measurement problems and techniques.
3-4. CONTROLS.CONNECTORS.AND INDICATORS.
3-4. The front and rear panel controls, connectors, and indicators are explained in Figure 3-2. The descriptions are keyed to the corresponding items which are indicated on the figure.
3-6. The COARSE ZERO and FINE ZERO controls zero the meter. Zero carry-over from the most sensitive range to the other six ranges is within ±0. 5%. When the RANGE switch is set to COARSE ZERO, the meter indicates thermistor bridge unbalance, and the front panel COARSE ZERO adjust is for initial bridge balance. For best results, FINE ZERO the 432A on the particular meter range in use.
3-7. The CALIBRATION FACTOR switch provides discrete amounts of compensation for measurement uncertainties related to SWR and thermistor mount efficiency. The Calibration Factor value permits direct meter reading of the RF Power delivered to an impedance equal to the characteristic impedance (Z0 )
of the transmission line between the thermistor mount and the RF source. Calibration Factor values are marked on the label of each 8478B, 478A or 486A Thermistor Mount. For further details, see Paragraph 3-23.
3-8. The MOUNT RESISTANCE switch on the front panel compensates for three types of thermistor mounts. Model 486A waveguide mounts can be used by setting the MOUNT RESISTANCE. switch to 10051 or 20051, depending on the thermistor mount used (refer to Table 1-2). The 20051 position is used with Models 478A and 8478B Thermistor Mounts.
3-9. The rear -panel BNC connected labeled RECORDER provides an output voltage linearly propor-
tional to the meter current; 1 volt into an open circuit equals full-scale meter deflection. This voltage is developed across a lK resistor; therefore, when a recorder with a lK input impedance is connected to the RECORDER output, approximately . 5 volt will equal full scale deflection. This loading of the RECORDER output has no effect on the accuracy of the 432A panel meter.
3-10. A digital voltmeter can be connected to the rear panel RECORDER output for more resolution of power meter readings. When a voltmeter with input impedance greater than 1 megohm is connected to the RECORDER output, 1 volt equals full scale deflection.
3-11. The 432A has two calibration jacks (VRF and V COMP) on the rear panel that can be used for precision power measurements. Instrument error can be reduced from ±1% to ±(0. 2% of reading +5µ.W) of reading, depending on the care taken in measurement and on the accuracy of auxiliary equipment. For further information, see Paragraph 3-27.
3-12. BATTERY OPERATION.
3-13. The Model 432AOption001instrumentscontain tery and conventional 115- or 230-volt line power. A rechargeable Nickel - Cadmium battery is factory -installed in Option 01 instruments. The same battery can be ordered and later installed on the basic instrument, thereby modifying the power meter to the Option 01 configuration. The battery installation kit, HPpart number 00432-6016 (including battery charging circuit) may be ordered from the nearest HP Sales Office.
3-14. It is recommended that the Model 432A be battery-operated for up to eight hours, and then allowed to recharge eight hours, or overnight. Continuous battery operation is possible for up to about 20 hours, but then the battery must be recharged for about 20 hours.
3-15. The 432A automatically operates on its internal battery whenever the ac line power is disconnected and the POWER switch is ON. When the battery terminal voltage decreases far enough to force the power supply voltage regulator out of regulation, then the meter stops working and the meter indicator points to the red RECHG BAT. To recharge the battery, simply connect the 432A to ac line power, and turn it ON.
3 -16. Battery Storage. Storage of the battery at or below room temperature is best. Extended storage at temperatures above room temperature will reduce cell charge, but will not damage the battery; however, the battery should not be stored where the temperature exceeds 60°C ( + 140°F).
3-1

Section III Operating Instructions
3-17. MICROWAVE POWER MEASUREMENT ACCURACY.
3-18. A number of factors affect the overallaccuracy of power measurement. The major sources of error are mismatch error, RF losses, and instrumentation error.
3-19. Mismatch Error. In a practical measurement situation, both the source and thermistor mount have SWR, and the source is seldom matched to the thermistor mount unless a tuner is used. The amount of mismatch loss in any measurement depends on the total SWR present. The impedance that the source sees is determined by the acutal thermistor mount impedance, the electrical length of the line, and the characteristic impedance of the line, Z0 •
3-20. Ingeneral, neither the source nor the thermistor mount has Zo impedance, and the actual impedances are known only as reflection coefficients, mismatch losses, or SWR. The power delivered to the thermistor mount - and hence the mismatch loss - can only be described as being somewhere between two limits. The uncertainty of power measurement due to mismatch loss increases with SWR. Limits of mismatch loss are generally determined by means of a chart such as the Mismatch Loss Limits charts in Application Note 64. The total mismatch 1 o s s uncertainty in power measurement is determined by algebraically adding the thermistor mount losses to the uncertainty caused by source and thermistor mount Zo match.
3-21. RF Losses. RF losses account for the power entering the thermistor mount but not dissipated in the detection thermistor element. Such losses may be in the walls of a waveguide mount, the center conductor of a coaxial mount, capacitor dielectric, poor connections within the mount, or due to radiation.
3-22. Instrumentation Error. The degree of inability of the instrument to measure the substitution power supplied tothethermistor mount iscalledpowermeter accuracy or instrumentation error. Instrumentation error of the Model 432A is ±1% of full scale, 0°C to +55°C.
3-23. CALIBRATION FACTOR AND EFFECTIVE EFFICIENCY.
3-24. Calibration factor and effective efficiency are correction factors for improving power measurement accuracy. Both factors are marked on every HP thermistor mount. Calibration factor compensates for thermistor mount VSWR and RF losses whenever the thermistor mount is connected to an RF source without a tuner. Effective efficiency compensates for thermistor mount RF losses when a tuner is used in the measurement system.
3-25. When the 432A CALIBRATION FACTOR selector is set to the appropriate factor indicated on the thermistor mount, the power indicated by the meter is the power that would be delivered by the source to
3-2
Model 432A
a load impedance equal to Z0 . More accurately, the relationship between indicated power and the power available to a Z0 load is given by the following equation:
where
P indicated ( 1 ± p p )2 s m
Po = -=c,_a.,,.lib=· -r-a-,-t.,..io-n-=F,,_a-c-,-to_r __
P = power available to a Z0 load 0
Ps source reflection coefficient
thermistor mount reflection coefficient
SWR -1 p=SWR+l
Calibration factor doe s not compensate for source VSWR, or for multiple reflections between the source and the thermistor mount.
3-26. To minimize mismatch between the source and the thermistor mount without a tuner, insert a low SWR precision attenuator in the transmission line between the thermistor mount and the source. Since the mount impedance (and corresponding SWR) deviates significnatly only at the high and low ends of a microwave band, it is generally unnecessary to use a tuner. A tuner or other effective means of reducing mismatch error is recommended when the source SWR is high or when more accuracy is required. For further details, there is a complete discussion of microwave power measurement with emphasis on modern techniques, accuracy considerations and sources of error available in Application Note 64.
3-27. PRECISION POWER MEASUREMENT.
3-28. GENERAL.
3-29. Using precision instruments and careful procedures, measurement error can be reduced to ±0.2% of reading +0.5 µW. The technique involves: 1) zeroing the bridge circuits and measuring the bridge amplifier output voltage difference with a digital voltmeter, then 2) connecting RF power to the thermistor mount and then measuring the bridge amplifier output voltage difference again, and 3) calculating the power from the two measurements. Figure 3-1 shows the instrument setup for de substitution measurement. Use an HP Model 3440A DVM, with a 3443A Plug- in Unit or a digital voltmeter with equivalent accuracy.
3-30. MEASUREMENT PROCEDURE.
a. Connect the DVM to the 432A rear panel Vcomp and VRF outputs. Be sure that the digital voltmeter input is isolated from chasses ground.
b. Turn off, or disconnect the RF power from the thermistor mount.

Model 432A
3440A/ 3443A
I
01 I • I - I \
VcOMP,
VRF(REAR)
I~ 432A
'. ®' -THERMISTOR MOUNT
R FIN._-CABLE
Figure 3-1. Precision Power Measurements
Section III Operating Information
c. Zero the 432A with the COARSE ZERO controls.
d. Depress the FINE ZERO toggle, and measure the differential voltage (Vo) between Vcomp and VRF·
Vo= VCOMP- VRF
e. Release the FINE ZERO toggle, and turn on, or reconnect the RF power to the thermistor mount.
f. Measure again the differential voltage ( V 1) be -tween V RF and V COMP·
V1 = VcoMP - VRF
g. Measure V COMP to ground.
h. Calculate incident RF power from the equation 1 - 2 2
4R l 2 V COMP (V 1 - Vo> + VO - V 1 ~ PRF = EFFECTIVE EFFICIENCY
where R is the thermistor mount resistance.
3-3

Section III General Information
5
4
2
432A POWER METER (]!pj HEWLETT • PACKARD
mW - RANGE - dBIW
.3 .I
-5
Figure 3-2. Front Panel Controls, Connectors and Indicators (Sheet 1 of 2)
3-4
Model 432A
6
7
8
9

Model 432A Section IIIOperating Information
3−5
1. POWER. Instrument power ON/OFF switch;connects either ac line voltage or internalbattery (Option 01 only) to internal voltageregulator circuits. When ac power is on, optionalbattery charging circuit operates.
2. COURSE ZERO. Meter zero adjustment; set theRANGE selector to COURSE ZERO, turn OFFthe RF power, and adjust to zero the meter.
3. RANGE. Power measurement range selector;selects ranges from 0.01 to 10 milliwatts (-20 to+10 dBm). COURSE ZERO setting is used tozero meter with no power applied to thermistormount.
4. FINE ZERO. Electronic zero that balances thecompensation bridge with zero RF input. Tozero meter during operation, close the switchmomentarily. Be sure that RF power is notapplied to the thermistor mount when the FINEZERO switch is depressed.
5. Meter. Indicates power input to thermistormount in milliwatts and dBm. To use the dBmscale, note the value in dBM of the range in use,and subtract from it the reading on the meterdBm scale.
6. Mechanical Meter Zero. Sets meter suspensionso that meter indicates zero. To adjust the zero:
a. Turn POWER switch off.b. Turn the adjustment screw clockwise until
the indicator falls below zero and comesback up to zero again.
c. Turn the adjustment very slightly counter-clockwise to free up the mechanism fromthe adjusting peg.
7. CALIBRATION FACTOR. Amplifier gaincompensation selector. Set to correspond to thecalibration factor printed on the thermistormount body. See paragraph 3−23 for moreinformation.
8. MOUNT RESISTANCE. Selects resistanceequal to that of mount in use to balance bridges.Table 1−2 lists Hewlett-Packard thermistormounts and resistances. Set with meter powerOFF, when mount is initially connected to themeter.
9. Thermistor Mount Cable Connector. Inputconnector for 5-1/2 foot cable that connects tothe 478A, 8478B, or 486A Thermistor Mounts.
Figure 3−2. Front Panel Controls, Connectors and Indicators (Sheet 2 of 2)
NOTE: The photograph opposite is forillustration purposes only.

Section III Model 432A Operating Information
7
2
Figure 3 -3 . Rear Panel Controls and Connectors (Sheet 1 of 2)
3-6

Model 432A Section IIIOperating Information
3−7
1. Line Fuse. For 115 Vac or for 230 Vac use 1/8amp fuse
2. Power Cord Input. Use power cord provided,HP 8120-0078. Line power limits are 115/230Vac, 48-440 Hz. Check FUSE rating andposition of line voltage slide switch beforeconnecting power.
3. Line Voltage Slide Switch: Set to line voltageavailable (115 or 230 Vac, 48-440 Hz).
4. Mounting Hole for Option 002 Model PowerMeters. Thermistor mount cable connectorinstalled and wired in parallel with front-panelconnector. Only one mount at a time may beused with the power meter.
5. VRF Input. Connected directly to RF bridge.Used for calibrating power meter withHP 8477A Power Meter Calibrator. Also usedfor precision power measurements.
6. VCOMP Input. Connected directly tocompensation bridge. Used for calibratingpower meter with HP 8477A Power MeterCalibrator. Also used for precision powermeasurements.
7. RECORDER OUTPUT. Voltage from metercircuit to be used for recorder or digital volt-meter. Output impedance is approx. 1000Ω.
Figure 3−3. Rear Panel Controls and Connectors (Sheet 2 of 2)
NOTE: The photograph opposite is forillustration purposes only.

Section III Operating Information
6
5
4
3-8
432A POWER METER HEWLETT • PACl<ARO
dBm
mW - RANGE - 48111
.3
-5 3
10 10
ro
Figure 3-4. Turn On and Zeroing Procedure (Sheet 1 of 2)
Model 432A
2
7

Model 432A Section IIIOperating Information
3−9
1. Connect thermistor mount and cable toTHERMISTOR MOUNT connector. Refer toTable 1−2 for recommended thermistor mountsand their frequency ranges.
2. Meter Mechanical Zero:
a. With the instrument turned off, rotate themeter adjustment screw clockwise until thepointer approaches the zero mark from theleft.
b. Continue the clockwise rotation until thepointer coincides with the zero mark. If thepointer overshoots, continue rotating theadjustment screw clockwise until thepointer once again approaches the zeromark from the left.
c. Rotate the adjustment screw about threedegrees counterclockwise to disengagescrew adjustment from the metersuspension.
3. Set the MOUNT RES switch to correspond tothe operating resistance of thermistor mountused.
4. Turn the 432A POWER switch ON. For batteryoperation, the AC LINE indicator does not turnon.
5. Set RANGE selector to COURSE ZERO andthen zero the meter with the COURSE ZEROscrewdriver adjustment.
Note
The power meter should be zeroed with theRF power source turned off, or the mountdisconnected from the source.
6. Set the range selector to the 0.01 mW range;then depress the FINE ZERO switch until themeter indicates zero.
Note
Range-to-range zero carryover is less than±0.5% if the meter zero has been adjusted(step 2 above), and the instrument has beenproperly zero-set on the sensitive range. Formaximum accuracy, zero-set the powermeter on the range to be used.
7. Set CALIB FACTOR switch to correspond toCalibration Factor imprinted on HP thermistormount label.
8. Apply RF power to the thermistor mount. Poweris indicated on the meter directly in mW or dBm.
Figure 3−4. Turn On and Zeroing Procedure (Sheet 2 of 2)
NOTE: The photograph opposite is forillustration purposes only.

Section IV Model 432A Principles of Operation
5 KHZ 5 KHZ .IlSL MUL Tl VIBRATOR
5KHZ l.fU
RF Hi
•• -j r PULSE WIDTH PROPORT JONAL
VcoMP + VRF VOLTAGE-TO <V COMP +V RF l
>-------RF JUL
VRF ~ TO-TIME BRIDGE ~
l .. CONVERTER
CHOPPING ~ & ELECTRON JC
r SUMMING
J ' SWITCH M
CIRCU!TS
COMP EN SAT ION T AMPLITUDE PROPORTIONAL BRIDGE VCOMP AMPUFIERS ' r-IU1 TO CVcoMP -VRF)
' VcoMP-VRF _l
/ 6 RANGE nJLT Q CALIBRATION FACTOR
AUTO-ZERO ,_ C!RCUIT ""
Figure 4-1. Simplified 432A Block Diagram
4-0

Model 432A Section IV Principles of Operation
SECTION IV
PRINCIPLES OF OPERATION
4-1. SIMPLIFIED DESCRIPTION
4-2. The HP 432A Power Meter consists of two major sections: the bridge and meter logic assemblies. The instrument also contains an auto zero circuit which provides for automatic zeroing on any range. A simplified block diagram of the HP 432A is shown in Figure 4-1.
4-3. The bridge section contains circuits which form two self - balancing bridge circuits when a suitable thermistor mount is connected to the 432A. Each bridge is automatically brought to balance by the action of a high gain de amplifier feeding power to the top of the bridge. The voltage at the top of the RF bridge, VRF is responsive to both input RF power and ambient temperature changes. The voltage at the top of the compensation bridge, V COMP is responsive only to ambient temperature changes. Knowing VRF and VCOMP, the RF power can be calculated.
4-4. The meter logic section processes VRF and V COMP to produce a meter current proportional to RF power. The sum (VRF + V COMP) controls the width of 5 kHz pulses. The difference (V COMP -VRF) is chopped, amplified and fed to an electronic switch actuated by the controlled width pulses. Therefore, the meter current is pulses of variable height and width with the meter indicating the average current. (This process produces a meter current proportional to (VRF + VCOMP) (VRF - VCOMP). Paragraph 4-10 explains why this is necessary.
4-5. FUNCTIONAL BLOCK DIAGRAM
4-6. A functional block diagram of the 432A power meter is shown in Figure 4-2. The instrument comprises two major assemblies: bridge assembly Al and meter logic assembly A2. Auto zero circuit AlAl, which provides for automatic zeroing of the instrument, is included as part of logic assembly Al.
4-7. The thermistor bridges are biased with direct current from the bridge amplifiers. Each bridge amplifier supplies enough heating current to bring the thermistor resistance to 100 or 200 ohms, depending upon the setting of the MOUNT RESISTANCE switch on the 432A. If one of the thermistor bridges is unbalanced due to incorrect thermistor resistance, an error voltage occurs and is amplified by the bridge amplifier. The error voltage is applied to the top of the bridge and changes the power dissipation of the negative temperature coefficient thermistor. The change of power dissipation causes the resistance to the thermistor to change in the direction required to balance the bridge. Application of RF power to the RF bridge heats ~he thermistor and lowers its resistance. The bridge circuit responds by reducing the de voltage applied to the top of the bridge thus maintaining bridge balance.
4-8. If ambient temperature causes changes in the thermistor resistance, the bridge circuits respond by applying an error voltage to the bridges to maintain bridge balance. The voltage at the top of the RF bridge is dependent upon both ambient temperature and the RF input. The voltage at the top of the compensation bridge is dependent upon the ambient temperature only. The power meter reading is brought to zero with no applied RF power by making VCOMP equal to VRF so (VCOMP - VRF) equals zero. Since ambient temperature causes both thermistors to respond similarly, there will be no net difference between the amplifier output voltages. Therefore, any difference in output volrages from the bridges is now due to RF power absorbed by the thermistor mount.
4-9. The RF bridge voltage, VRF, and the compensation bridge voltage, VcOMP, contain the "RF power" information. To provide a meter reading proportional to RF power the de voltages (VRF, V COMP) must be further processed by the meter logic circuits.
4-10. The required processing is derived as follows: P0 is absorbed power needed by the RF thermistor to bring its resistance to R ohms (100 or 200 ohms). P0 consists of two components: RF power anddc power suppliedbythe432A. The self-balancing action of the bridge circuit automatically adjusts the de power so that the total power in the thermistor is Po. This de power is relatedto the voltage VRF at the top of the bridge by (VRF/2)2/R. Thus
P RF power + DC power 0
VRF2 ::: RF power+~
4-11. RF power can be determined by measuring VRF withand without applied RFpower and then doing some arithmetic. But this power measuring scheme is neither convenient nor temperature compensated (since P0 changes with temperature). The 432A introduces another thermistor bridge circuit exposed to the same ambient temperature but not RF power. This circuit includes adjustments (COARSE and FINE ZERO) so that the de voltage V COMP at the top of its bridge can be set equal to VRF. Assuming matched RF and compensation thermistOrs, VRFO (with no RF power) and VCOMP remain equal with ambient tem -perature fluctuation. They differ only when the RF power to be measured is applied to the RF thermistor. Thus, we have
and
V COMP = V RF when RF power 0 0
p 0
VCOMP2 0 + 4R
4-1

Section IV Principles of Operation
Combining equations, we have:
or
VCOMP2 4R
RF power
VRF2 RF power+~
V COMP2 - V RF2 4R
1 = 4R (v COMP + VRF )(v COMP - VRF)
4-12. Thus an RF power measurement reduces to setting VCOMP = VRFO (with zero RF power) initially, measuring VCOMP and VRF, and computing with the above formula. The 432A carries out the computation by forming the indicated sum and difference, performing the multiplication and displaying the result on a meter.
4-13. The meter logic circuits change the two de voltages to two pulse signals which contain all the RF power information. One of the signals will be a square wave whose amplitude is proportional to VCOMP -VRF. The other signal will have a pulse width proportional to VcoMP + VRF.
4-14. The VCOMP - VRF signal is obtained bytaking the de voltage outputs from the Al assembly and applying them to a chopper circuit. This chopper circuit is driven by a 5-kHz multivibrator. The output of the chopper is a square wave signal whose amplitude is pr,Pportional to V COMP - VRF. The output of the chopper is coupled to the range amplifier and then to the calibration factor amplifier. The amplification that the signal receives in these two amplifiers depends upon the setting of the RANGE switch and the CALIBRATION FACTOR switch. The output of the calibration factor amplifier is V. This current is fed to the electronic switch. A square wave current with amplitude proportional to (VCOMP - VRF).
4-2
Model 432A
4-15. The VCOMP + VRF signal is obtained by taking the two de voltages from Al assembly through a summing circuit and feeding this voltage to a voltageto-time converter. The voltage-to-time converter is driven by a 5-kHz multi vibrator. The output of the voltage - to - time converter is a signal whose pulse width is proportional to the sum of VCOMP + VRF. This signal controls the electronic switch. From the VCOMP - VRF and VCOMP + VRF inputs, the electronic switch provides a 5-kHz pulse train whose amplitude is proportional to VCOMP - VRF and whose pulse width is proportional to VCOMP + VRF· The pulse width is always 90 msec or less.
4-16. The bias circuit switch and filter provides a zero current reference for the meter circuits. This is accomplished by controlling the de bias to the first stage of the calibration factor amplifier. This circuit, in effect, restores the de component to the square wave which has been amplified by ac coupled amplifiers.
4-17. The meter is a 0-1 mA, full-scale meter that has a capacitor across its terminals. The capacitor integrates the output pulses from the current switch so the current into the meter is proportional to the time average of the input pulses. That is, the input current to the meter is proportional to the product of
(v COMP + VRF) (v COMP - VRF)
= (v COMPJ 2
- (v RF)2
4-18. The output from the meter is further filtered so the voltage at the rear panel RECORDER output is suitable for use with either a digital voltmeter or X-Y recorder. The RECORDER output voltage is returned to the compensation bridge through the automatic zero circuit when the FINE ZERO switch is depressed. The automatic zero circuit holds a correction voltage at the input of the compensation bridge amplifier, so when the RF is zero, the meter indication will also be zero.

""' I ~
\
I \ \
\
I \
RF BRIDGE
COMPENSATION BRIDGE
IK
IK
••
VRf
VcoMP
I I
Al IRIDGI ASSYIA2 MHH LOGIC I I
: ·-i 1200~ I _ru-uc VcoMP-v•F I -,---I \ PULSE AMPl.JTUDE PROPORTIO .. AL I 10 Vcohl!P -vRF I
+j I > I Vfff
I : I CHOPPER I r•- - _J VcOllP
I I I I I I I I I I I
SUMMING C1RClJlT
(vcOMP+ VRF)
L, __ ,
I I I I
VcoMPI
1----------, I I I !FINE UROf I
l/OLTAG£-TO-TIME CONVERTER
5KHr MULTI
VI BR ATOR
-J i--zooµ.s .JUUL -1 l--V.:011p+VRF
lcdiill5E ze:fld If.I I 0 I PULSE WIDTH PROPORTIONAL
TO Vf":nMo + VRf
~ ELECTRONIC
CAl.IBRATiON FACTOR
SWITCH
r- 200µ.".____J
Juui..:~ ~ ~VcoMp+VRF
LOW-PASS FILTER
:fl[cii<£oIF!j
I ' I I I ~UTO ZERO I I '"'"' I CIRCUll t"--:,------------------------------__J
I I
AIAI AUTO %110 I I
Figure 4-2. Model 432A Block Diagram
~ 5· n .a· ~ IJ
g,
~ ~ ""' ~ I'-' >
~ gi ro g_ '1 .... Pl 0 ,.... ::i
§'<

"" J..
Al' Tli[ltfilf$TOff IPUOOE
+m-7.:) 0 F5§'
CD
TO -lOOM
-l$Y-----<
CD_===.--1!v lcoum:ttRGi ~-=~=nT: ll:M1'.~~n.~
CID
CID (][)
Al THE:RMISTOR BRIDGE AS~EMBLY WOf!l--600Z41
.. ,,.. •7'1
I ... , ..
... ~ ...
+ rv lSft lt0r£ 1J .. ~ ...
~~
~
•l.ZV
... ,,.
Qll, 15 ---i >l:Al
8RIDGE CURRENT I : ~.zv SOUfiCE Hv--3HF..rv
Qll L]CD ·m-· H~ .. I :oo
rer·fl I
' ' ' ' '
' ' ' I '
+?i.2'Y 0 'h=:m ;.:;.,."""' TO 1.2 6$$Y
[~
' ' ' : ' ' ' ' : ' ' ' I '
' ' '
I : - : ' I I I I Y +uv' l@ v )•Lt="'""'""'"" _ __j l,!RIOG( 5ll)H.6l
... " '" 21.~
I N.IT~-~R() ~VH I ~~":1 """""""'
----PRINMl:Y SIGNAL ----$£COHC'AltY $!Glt!AL ----rcn:it•CM SIGNAL
t S£E &AD~lllll:G, Al'flfflil.»X l
fO A2 ASS'f
l\il.3-, ~
1
Figure 4-3. Model 432A RF Bridge Talking Schematic (Sheet 1 of 2)
'i:! rn "1 (I>
s· l4. (") ....
>E' g ......... ::; < a ~ "1 a .... g
~ Ir .... "" (..:>
~
~ I
<.Jl
~
J .
.
. .!!!...
-HO::tl ·- I f@§
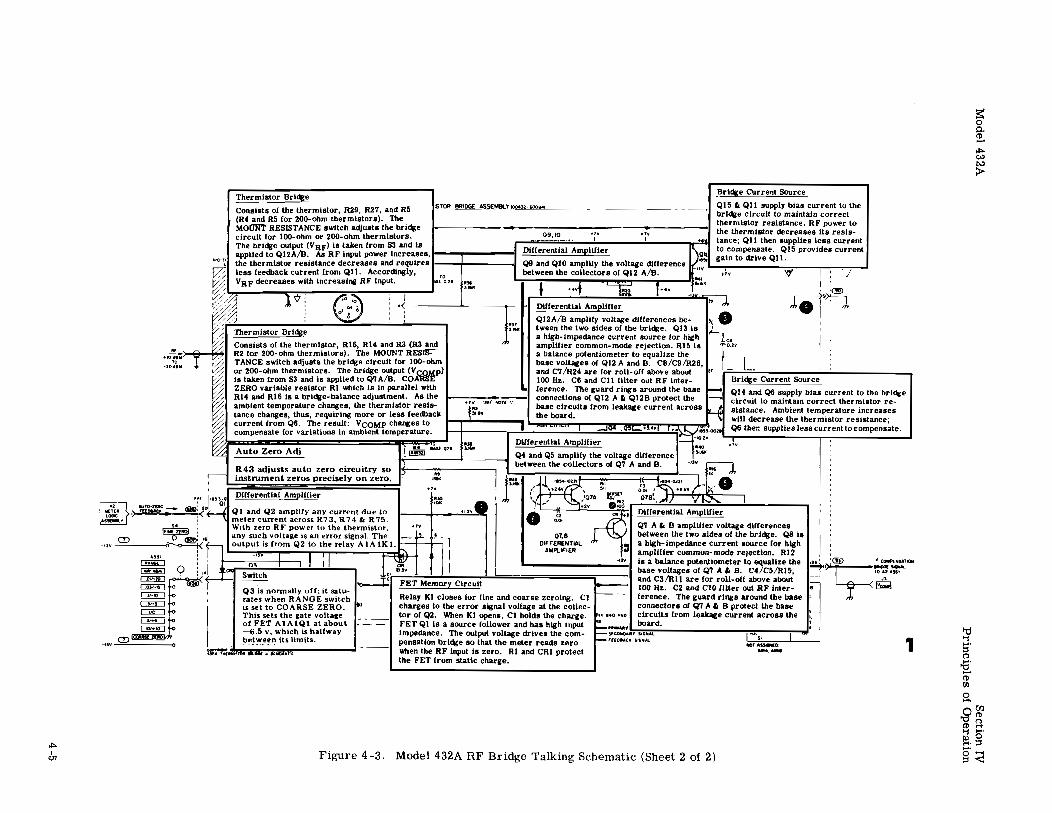
~ ,--
Thermistor Bridge
Consists of the thermi.stor, R29, R27, and RS (R4 and RS for 200-ohm thermistors. The
Sl'.,QA 8Rl~-~?E~r-~~ ------- - -- . Bridge Current Source
Ql5 C. QI I supPlY bias current to the bridge circuit to maintain correct thermistor resistance. RF power to MOUift RESISTANCE switch adjusts the bridge
circuit for 100-ohm or 200-ohm thermistors, 09.lO trv .nv the thermistor decreaeee its resis-
The bridge output CVaFl Is ta.ken from S3 a.nd Is ' ' lance; QI 1 then supplies less current
applied to Ql2A/B. As RF Input power Increases, I I the thermistor resistance decreases and requires I
Differential Amplifier lo compensate. Ql5 provides current gain to drive QI I.
less feedback current from Qll. Accordingly, VaF decrea&es with Increasing RF Input.
ro 1S!1J1<'•
~~
.;." "ti 1 , ;
1 ... I ·<El ' ""' ..::--! ~·:><-=, 117 (:~. ...
J
I •' Dllferentlal Amplifier
Ql2A/B ampllty voltage dit!erences be-Th lst B 1..,. 1;~ tween the two sides of the bridge. Ql3 Is
erm or r ~e a high-Impedance current .source lor high Consists of the thermistor, R16, R14 and R3 (R3 and amplifier common-mode rejection. Rl5 Is R2 for 200-ohm therml.stors). The MOUNT RESis:- a balance potentiometer to equalize the TANCE switch adjusts the bridge circuit for 100-ohm base voltages ol Ql2 A and B. C8/C9/R28, or 200-ohm therml.stors. The bridge output V COMP) and C7 /R24 are for roll-olf above about Is taken from S3 and Is applied to Q'I A/B. COARSE 100 Hz. C6 and en filter out RF Inter-ZERO variable resistor RI which is in parallel with ference. The guard rings around the base RH and Rl6 Is a bridge-balance adjustment. As the "" '"" """,, connections of Ql2 A It Q12B protect the ambient temperature changes, the thermistor reals- i"' base circuits from leakage current across
... ,,, ..J,. ! ' J,
~· fr .. .. h tr ,::.;---:=.
Bridge Current Source
lance changes, thus, requiring more or less feedback !'"' the board. current from Q6. The rellult: VcoMP changes lo r::::::::1~===;:J•~==::::::r:=;;;;i:!:]!~;!·!; ... ::!J:;~E;:~~ compensate for variations in ambient temperature. 1·
Ql4 and Q6 supply biaa current to the bridge circuit to maintain correct thermistor resistance. Ambient temperature Increases will decrease the thermistor resi.stance; Q6 then supplies leas current to compensate.
Auto Zero Adi
R43 adjusts auto zero circuitry so instrument zeros precisely on zero.
H IUf 01• ~lt.
t--._..,, .. -----, '"' .,,
Differential Amplifier , ,.
Q4 and Q5 ampllly the voltage dl!lerence between the collectors of Q7 A and B.
(),Qt I lu:. <• Jt•• I ,.u.o DUferenttai Ampltfler •:: 071~. --1
~ liU'fO-fUIO : iol QI j
,~ '™!"" ;- (iiil), < QI and Q2 amplify any current due to '"' Olflerentlal Amplifier
.. .!.!_ ! ~~11:',:~:R.': ;~~!; ~01 ~heRt~!.~!1:~· m Q7 A & B amplifier voltage dlf[erences I 1
"'011!!!!1 : ·• any sucb volta&e is an error signal. The' • • 01.e between the two sides ol the br!<lg.,. Q8 la ~ output is from Q2 to the relay A 1A1K1. DIFFERENTIAL a high-Impedance current source for high
: AMPt.1r1EI! ampltfter common-mode rejection. R12 ; I Is a balance potenUometer to equalize the l :<ID '~-·----r'Tt=--
CD
O : ,. base voltages of Q7 A &t 8. Ct/C5/Rl5, _j fOUU\l'
1 Q3 is normally off: it satu- l-00 Hz. C2 and Clo C!lter out RF Inter- IR ~ r, FET Memory Circuit and C3/RI! are for roll-off above about
' rates wh"n RANGE switeh Relay Kl closes for line and coarse zeroing. Cl ference. The guard rings around the base
I is set to COARSE ZERO. charges to the error signal voltage at the collec- connectors of Q7 A Ii 8 protect the base
1 This sets the 1ate voltage _ __ tor of Q2. When Kl opens, Cl holds the charge. circuits from leakage current across the '· of FET AlAlQl at about • - - FET QI Is a source follower and has high Input board. ! -6.5 v. V.:hich is halfway Impedance. The output voltage drives the com- I~·., I •• l;)et~_een its limits. pensatlon bri<lge so that the meter reads zero
~JIA& A& uWWWr·e 1
- when the RF Input Is zero. RI and CR! protect the FET from static charge.
Figure 4-3. Model 432A RF Bridge Talking Schematic (Sheet 2 of 2)
fll:IT lliUIMl:O A11114,AM 1 ~
5· n '5' ro-m g
~ 0
~ ~ c..:i N
>
.&1~ (l) ~ "'I ....
!!?.g g'<

""' I CT>
f)IO A2 METER LOGIC AS~~LY !0041l·601&1 t
,,.
•?V
• ... -
XA2 ------ -\',!ti' ~('f I I
r..=m: ·--~ ·~ ==®1 NOU I
tltf~.tHCt:i : 0 '
.,. IO
+i"C;H:
l""
030, Q:IZ CHOPPER
Vftf+Vt';(lMf'-
032 '-IS&-OCM\:t
lll"'
~ ~: ............. " ~,. =::::::$£-I" ..... L PATH
till>: I • C45 ---- ru:ottM.:K ~('~ Ei8 l l .. ~---~ -------- I m-·DAP"6,;,;.;:H0>,1 (Of>Yll>!IM'f ltU •1 MEWt£1T·HCkARO Co Ol" lolCU:R LOG!C US>' At SDitlii. "'11!~111' 957·
034-37 HY RANGE AMPLlflfll
I '
_,..,
I I "' I p'.:'i I ' ' .1,., )~
1
2 .,,.,... eo I : w•
' 1!8
' )u)!~~--~ ·"'"I :@ )""""' I :&$SCMllY
' ' ' '
l ·;r:~ ,.,it.;.;;-· •111 : c ....... ~;
... rr· ·@
~ft' .. ""' 043
CURRENT I -SOURCE
' ' ' !d !i!l .... •O
1fjttMr10NJ .. ., I fACTOM ., ! .&4$1 .... ' [ii) IO ' ' -: •0 : .... ' l1il •0
C.Zl-26 ftl-4,14 ' ' -· H-31 " ! :U-Mi .• 31·50
' ..... C'ltll-19 ' IO .1:1-n ' 020-2:4 ' - l6·3? ' ~·"·· ' .• " ' ., ' ... ,,, 11121-21 .. ' IE "' li•H
" ' H•4l '
I 4$-4-1 ' .... , 50-&1 ' "' .,
' ..... I ... ., 8&-·86 I cm •o I I -· ' '<D ...
2
Figure 4-4. Model 432A Meter Logic Talking Schematic (Sheet 1 of 2)
~~ f:j'~ (") 5· .a·= -.... ~< a ~ (I) .... a ..... g
~ fi -""' (..:> !>.:I
>

ii:. I -:i
Amplifier
Q24 is driven from saturation to cut-
~ LOGIC ASS~M~l!...!~
Switching Amplifier
Q27, Q28 and Q29 are fast de coupled swltches.
30 µA Current Source
Electronic Switch
Q44 switches output current Irom calibration factor ampliHer to the meter circuit for the duration of the drive pulse from Q29. CRJ 5 is normally back-biased. For Option Ol units when the battery is discharged~ meter voltage goes to -6V, so the meter RECHG BAT.
Meter Circuits
off. The square wave output ls 180° out-olphase from the signal from Q21. CR12 clamps the maximum positive level al +0.6 volts. C23 decouples the 5-kHz signal from the power supply.
Q20 supplies constant current to charge C25 to generate a ramp. The voltage ol the +7 volt supply controls the ramp, and Is adjusted for meter accuracy.
When the V COMP+ VRF signal is shorted to ground thru Q26, the base o[ Q27 Is pulled down below its emitter and turns off; Q28, which was turned off, is turned on and Q29, which was conducting, Js turned off. When the ramp at the base of Q27 forward biases the base-emitter junction of Q27, the opposite sequence occurs. As a result of the gain and timing of these stages, the ramp applied to the base of Q27 emerges as a rectangular wave at the collector of Q29. The period or this wave is 200 µsec (:>kHz) and its symmetry varles with the amplitude ol VCOMP +VRF'
·.-CKMG( SIGll!Al..
tV CAlS
022, 02~ ' Wm i;t; C~RENT --1ov I c111w ' I ..__ .. '8~~·~~1 ' S Switch f
Integrator capacitor C42 filters the current pulses so that meter current is proportional to (V COMP + V RF) (VcoMP - VRFl· R72, C43 and C44 form a low-pass Hiter. H74 cali
MULTIVIRRATOR .,, Amplifier ., ---. . . . --·- Q26 1s either cut-off or saturated, dependmg
"' I orates the RECORDER OUTPUT for 316 l volt at full-scale meter deflection.
Clock Mullivibrator Q21 Is driven from on the state of the multivibrator. When Q26 CR14 bypasses R73 for meter cur-"'.Lc.44 ~·~ Q22 and Q23 form an astable 5 kHz saturation to cut- , is cut-o!f, C25 charges to VcoMP + VRF·
multivlbrator. The output is a 7-volt off. The squ:re wave With Q2~ saturated, Its low impedance shorts ~;.:"I rents greater than about 50 µ.A. I
square wave (·6V to -13V). Both out-, output is 180 out-or- VcOMP + VRF to ground. Both sides of C25 h 0 """'b\ V I I t
puts are used (180° out-of-phase) to phase from the signal are pulled negative by an amount equal to V COMP drive other switching circuitry. from Q24. CRll + VRF• turning off Q27. C25 charges thru cur- ,,,.
021 I clamps the maximum rent source, Q20, generating a linear ramp which
Q38 conducts when Q44 is turned off. Any residual current flowing from Q42 (in excess
OIS•H)00$ pos1t1ve level at +0.6 holds off Q27 while it charges from the level set
16!>4d00!5 lt of that current drawn by current source Q43) is shunted thru Q38 and charges C38. This charge adjusts the bias on Q39, Q4l and Q42 and the current from Q42 is reduced. This adjustment of bias level provides good zero carryover.
AMPLIFIER R VO s. by VcoMP +VRFtoapproximately-12.5V. R86
AMPUFIE is adjusted so that Voltage-to-time Converter operates equally well for tow values ol V COMP •
Chopper
Q30 and Q32 are switches that are operated alternately by the 5 kHz Multivibrator signal. When Q30 conducts (Q32 non-conducting), the signal level at TP6 equals V COMP; the signal level at A2TP6 equals VRF when Q32 conducts. Therefore, the peak-to-peak amplitude al the output signal is equivalent
032 ltl!SS·~O~l
to V COMP V RF' I
-· r
,.,. : : i2m~()I( ~;,I
-~rr ~ft·
Calibrate /Operate Selector
A2R88 is connect across A2R43 in the CALIBRATE position. This reduces the charge time on A2C29 to provide for optimum frequency response and reduced test time when calibrating the 432A.
Summing Junction
V COMP and VRF are summed at the junction of R78 and R79. In the 200-ohm position, A2R78, A2R79, A2R50 and Rt4 provide a VcoMP + VRF/2 voltage to the Voltage-to .. time Converter.
Circuit Grounds
C45, CR22 and CR23 isolate the power supply common from the thermistor common conriection. C45 couples the grounds at 5-kHz but blocks de. CR22-CR23 are normally nonconducting but. keep tbe thermistor ground close to power grout1d in case they are not connected thru a thermistor mount and cable.
" 1Gllilll PAHi
Figure 4-4.
+ VRF as well as high values.
Range Amplifier
Feedback Amplifier
••1 Q39 and Q40 form a differential amplifier that converts input voltage pulses to output current pulses that drive the meter circuit. Q4 l is a common-emitter amplifier, and Q42 is the output current source. Q43 is a negative current source (about 1.3 mA) so that the meter zero circuits have adjustment range above and below zero.
The gain of the range amplifier is variable from 1 to 31.61 and ts controlled by varying the Ceedback voltage with the RANGE selector. The input section is a differential amplifier, and its output goes to two cascaded common-emitter amplifiers. Feedback is [rom the outptt (Q37 collector) to the base of Q35. C46 and C34 and R54 keep the amplifier from oscillating.
!ID
!ID
ITl [!ii]
Feedback Loop
... , .., ... , " ..... " .... ,. .... .. -!( .... " -•0
MRIQ
" Calibration Factor Selector
Cl!-26 29-31 H-315 $t-"1 4f-M;
CRH~1t
21-23 020·2•
16-30 31-U 34-44
ff:U·H 32-36 31-43
Selects the range amplifier in discrete steps from 1 to !or power ranges from 0.3 mW to 0.01 mW respectively). In all other ranges ampHUer gain equals 1, and the switch attenuates the output, Maximum attenuaUon is 31.6 in the 10 mW range.
A4Sl controls resistive feedback to amplifier to vary current gain in discrete Current output is Increased !or 88% cali-bration factor.
Model 432A Meter Logic Talking Schematic (Sheet 2 of 2)
I Al~ 4, 14
RI ~13
" CHASSI$
•1 .. "
2
~ =:r 0 it;· li) 00
~ c. <ti -ii:. C..:> N
>
a ~g1 tll g. '1 ..... ~g .... §<!

""' I o:>
-&0-400MI Lit« lflf'V'
" l t .. .. ... ·-
... '' t I
''
IATTERY M'.C!WtG( ....... ""' PIO A2 W:TER ll>GIC AS~Y _,,._ t _ _ - - - -~ ~ m ' -: ~ e: ! ~ ~~lfl ~ ! ' ' ! ! ' ' i i~ : iREGULAT~ ' l ' ' I :
! !
.it .. =~+· I 9 •' ·- ,. a:> '::m ~
<II> ' o, '
0
PIO Al fl£RMISTOR BRIDGE ASSEMBLY
I , J.. ~-~,
~tf I•
y I L___"' ____ _
.. M•
' : f<! llttl1' fhS llf9 :
l 'I :06 ... , • .Ok Zf5.: ! "'~-·""" ~s.?--,--,--,--,...-,--,--,-+-o ..... -i:ir--"'ii...-' t,..---tUMEm
A7 !OPTION Oil BATTERY CHAR<lER ASSEMBLY ,...,._...., -- -_----, QI '
t•!M-oD)fl: I SERIE$
AEQLJ.-
fl.,
_J NOTE:
Qll
OVER-Cl.REIT PROTB:TION SWITCH
YOl T&9U '$MO\ll'tll ll't LNE CJIP'£tiTlON IATTEA'I IOIG CM~
trf ,ACTOllT tf:Lf.t'f(O VALUE
t Kl UClldtAllfll4. APKNOlll t
lltt'.f'Ot(NCf. Of:S.~'flQNS .,,
At:
et-Q,<:e Cll!·~.Clf4-t
OHi Jlt·l,~·Ut ... co au-> .... .... lllOT ASS"1CO AlC4.AZR14
CHASS";
... ,, ... .... .. .. " ""
~,....,.HEW\.tn-"-CJl'*"co· •ATMlll'a tlil,UtT a MfTlll! Lo.tt AllilliT
3
Figure 4- 5. Model 432A Power Supply Talking Schematic (Sheet 1 of 2)
ldtl.l '"I (I)
!:i' g. (') --=· g ~< a ~ a ... g
I ..... .i:o. w
~

~ I
i:.o
O'!>!~XW 50·'4001-41 UN( INPUT
:
"" ooo• .. , •0
Switch
Q3 is normally ofC. IC the battery (Option 01 units only) is discharged, or the power
>ply drops out of regulation, Q5 turns more until Q3 saturates. This turns olf
the calibration factor amplifier and ' negative current to the meter, which cates RECHG BAT.
" ~ 1!nPlifler
, QI amplifies the error signal
~ Q
© '
(0002·60l5lt
1!1Al1'flh'ji,£O!AR;f S!GH4l
Comparison Amplifier Comparison Ampll_~!•.!
Q6 holds the emitter of Q5 slightly Q7 compares the power sup-positive with respect to ground ply ground to the voltage on and compensates for temperature the divider R12. and Rl3. This changes. Q5 monitors the voltage way -13 volts Is referenced to
·~ =;~ ~.~HVO( "' I : OJRAEHl
00 j ---------divider which consists ol RS, R6, +7V supply. I! the • l 3V supply Shunt R ulat
and R7, and compares that to shirts, Q'I conducts more or less. eg or ground. Any dl(ference ls ampll- CR7 compensates !or tempera- Q9 and QIO form a shunt fled and fed to Q4. R6 is the ture variations in the base- regulator that can pass cur-power supply adjustment poten- emitter voltage of Q'I. rent from either the +7V ~ o ! """' •• • from Q4 to control the base
@_ su• current of Q2. CR8 is nor-
f
0
Over current Protection Switch mally foi·ward biased. For
tiometer; it controls the power rl 1
supply or the • 13V supply
lw meter calibration. .---, to ground to bold the -13V
Qll turns on if current dra' battery operation, CRS is -----ceeds about 90 mA thru R2 l~~f~h rheverse biased, to prevent Ampli!ier Error Ampliller tends to tu ' t e battery from charging Cl . ------ ----,
-~~==:!::=:!!!::::;::c;;::::::;---,r:::' __ rJ. supply constant.
I
the curre rn Q2 of! and to limit each time the power is turned Q4 amplifies er_ror Q8 amplllles any voltage change I : PIO nt. on (Option 01 only). from Q5 and drives at the collector of Q'I. 0 :
I I ·~ ,;tQ_ ,~~~"' Overcurrent Protection Switch (Option 01 AmplHler and Series Regulator Voltage Reference
1
Only) ~ (OPtlon Ol oniy) Serles Voltage Regulator CR7 provides a ref·
Q3 is normally orr. If the current thru Ql regulates the battery charging Q2 ••driven by QI to erence voltage for R3 exceeds 60 mA (0:6V), Q3 turns on, current. Q2 amplilies error sig· hold the +7 volt supply +7V. R8 supplies which tends to turn Q2 on, This tends - nail; from the collector of Q4 and constant. bias current to CR7. to turn QI off & limit the charging current. varies base drive to QI to com
pensate. CR! bypasses QI for
OPTl Sri; Comparison Amplifier
!Option 0 l Only)
Q4 compares the voltage at the center arm of RS to the voltage at the anode o! CR2. Any change is amplified as an error voltage. Q4 also compensates for battery voltage variation with temperature.
battery operation of"the power meter.
"'"' t&51·00to
AMPLIFIER
\~~:ffl'f.~~.-:,~~~~-
NOTE· 'JOI t.llGUi $tt(IWN tft Ut<E: OPERATION 8Alf(R'i8fi)t<GCttA~
it FAC:TOJtY Sh.ECTEQ VALUE
t S££ &AtlH)Alll<iG, Af>f'E.t«»X l
Figure 4-5. Model 432A Power Supply Talking Schematic Sheet 2 of 2)
" Ci·C5.C4! CRt-4,GRfHll
~~H ~-= NOT 11.SSIG"IEO llZCll,AZft14
"'' " ... .., ~;· 2
"'
3
~ s· (")
.a· ii) (/)
is: 0
~ -~ \:,.:) N >
a ~~ ti) 14. '"1 ....
~g §'<

Section V Maintenance
Instrument Type
Power Meter Calibrator
DC Digital Voltmeter
Storage Oscilloscope
Vertical Plug- in
Cable Assembly (2 required)
Test Lead
Cable Assembly
Thermistor Mount
Filter Network
Oscilloscope Probes (2)
Differential Voltmeter
Resistor (2)
5-0
Model 432A
Table 5-1. Recommended Test Equipment
Critical Specifications Recommended Model
Range: 0.1to10 mW HP 8477A Accuracy: .1 to 10 mW ranges: 0.2%
.01 and .03 mW ranges: 0.5%
Range: 0.5 to 50 volts de HP 3440A with 3443A Accuracy: ±0.05% Plug-in Unit Input Impedance: 10 megohms, floating Resolution: 4 digits
Variable Persistence Display HP 141A with 1405A Bandwidth: de to 5 MHz and 1420A Plug-in Units Input Impedance: 1 megohm Sensitivity: 5 mV /division
Bandwidth: 400 kHz HP 1401A Input Impedance: 1 megohm Sensitivity: 1 mV /division
RG 58C/U coaxial cable with 2 each BNC HP 10503A male connectors
Insulated cable terminated with dual HP llOOlA banana plug and test clips
Shielded cable with one each BNC and dual HP llOOOA banana plug connectors
Operating Resistance: 100 ohm or 200 ohms HP 478, 8478
See Figure 5- 2
Division Ratio: 10:1 ±2% HP 10001A Bandwidth: de to 30 MHz Rise Time: 5 nsec
Accuracy: ±0.005% of reading HP 740B +0.0004% of range± 1 µV
lOK 1%, 1/8 watt 0757-0442

Model 432A Section V Maintenance
SECTION V
MAINTENANCE
5-1. INTRODUCTION.
5-2. This section provides information for performance testing, adjusting, troubleshooting and repairing the 432A Power Meter. Performance tests allow the instrument to be checked for conformance to specifications. If performance is not within specifications, adjust or troubleshoot the instrument.
5-3. CONTENT.
5-4. PERFORMANCE TESTS.
5-5. The procedures test power meter performance for incoming inspection, periodic evaluation, calibration and troubleshooting. Specifications in Table 1-1 are the performance standards. If the power meter fails to meet any of the performance test specifications, refer to the troubleshooting diagrams.
5-6. ADJUSTMENTS.
5-7. Procedures describe the adjustments necessary to calibrate the power meter. Adjust the power meter only when it is determined that the meter is out of adjustment and not malfunctioning due to a circuit failure.
5-8. To avoid errors due to possible ground loop currents, isolate the power meter from ground used for other auxiliary equipment. A power plug adapter that removes the ground connection at the line outlet can be used to isolate the power meter.
5-9. Several circuit components are factory-selected to meet specific circuit requirements. The factory selected parts are indicated on the schematic diagrams.
5-10. TEST EQUIPMENT.
5-11. Instruments and accessories required for adjusting and testing the power meter are listed and briefly described in Table 5-1. Instruments used to maintain the instrument must meet or exceed the specifications given.
5-12. SERVICE INFORMATION.
5-13. Service information in the form of troubleshooting, waveforms, schematics and component locations are given in Section VII. Also, an overall system block diagram is included which contains keyed numbers corresponding to the test points.
5-14. 432A PERFORMANCE TESTS WITH 8477A CALIBRATOR
5-15. INITIAL SET-UP.
a. Connect the 84 77A outputs to the 432A inputs as shown in Figure 5-1. Use appropriate test equipment as listed in Table 5-1.
3440A/3443A
8477A
\.
1
o I I 1 _._____.
""--~
THERMISTOR MOUNT CABLE
RECORDER OUTPUT !REAR)
Figure 5-1. Check and Adjustment Test Set-Up
b. If necessary, mechanically zero the meter movement as follows:
(1) With instrument turned off, rotate meter adjustment screw clockwise until pointer approaches zero mark from the left.
(2) Continue rotating clockwise until pointer coincides with zero mark. If pointer overshoots, continue rotating adjustment screw clockwise until pointer once again approaches zero mark from the left.
(3) Rdate adjustment screw about three degrees counterclockwise to disengage screw adjustment from meter suspension.
5-16. METER ACCURACY TEST.
a. Set the 8477A Calibrator controls as follows:
POWER (MW) FUNCTION .. ZERO/TEST.
b. Set the 432A controls as follows:
. 0.01 mW 20051
. .. ZERO
A.2Sl (on Meter Logic Assy) . . . . . . CA LIBRA TE MOUNT RESISTANCE. . . . . . . . . . . . . 2oon RANGE . . . . . . . . . . . . . . . . . . . . . . . . 0. 1 mW POWER ........................... ON CALIBRATION FACTOR . . . . . . . . . . . . . . . 100%
c. Adjust 8477A ZERO knob for 0 volts ±2 mV indication on the DVM.
5-1
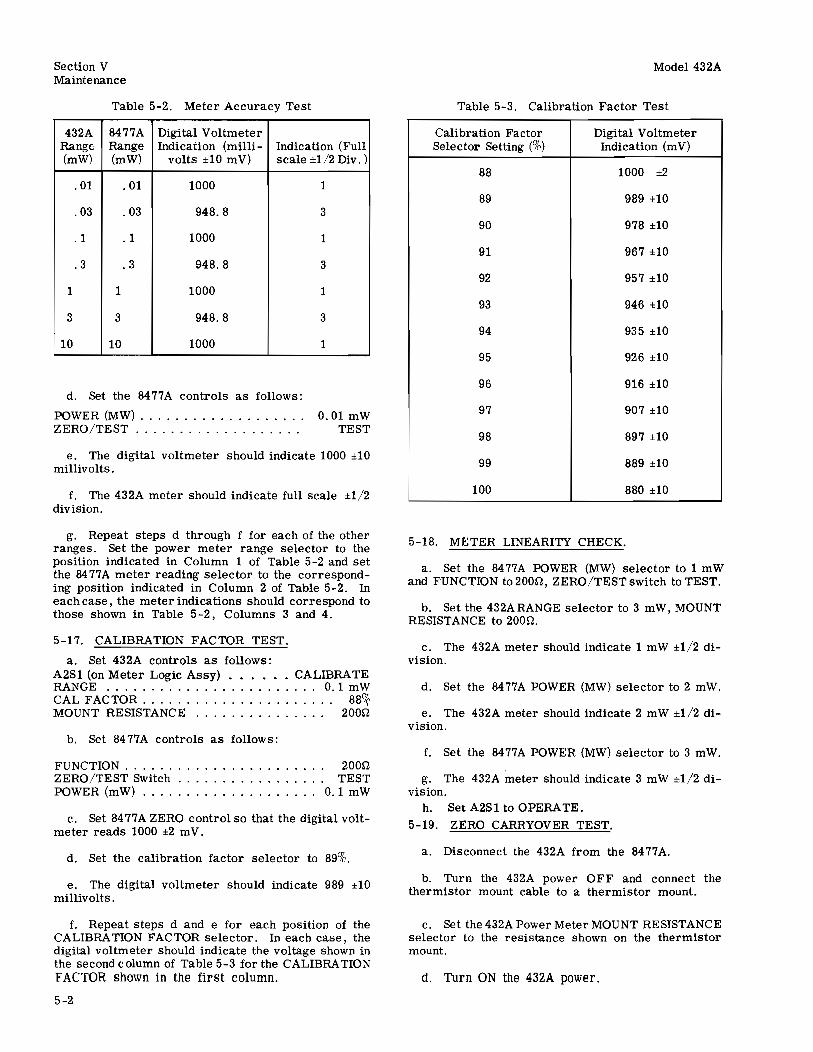
Section V Maintenance
Table 5-2. Meter Accuracy Test
432A 8477A Digital Voltmeter Range Range Indication (milli- Indication (Full (mW) (mW) volts ±10 mV) scale ±1/2 Div.)
.01 . 01 1000
.03 . 03 948.8
. 1 .1 1000
. 3 . 3 948.8
1 1 1000
3 3 948.8
10 10 1000
d. Set the 8477A controls as follows:
POWER (MW) .................. . ZERO/TEST .................. .
1
3
1
3
1
3
1
0.01 mW TEST
e. The digital voltmeter should indicate 1000 ±10 millivolts.
f. The 432A meter should indicate full scale ±1/2 division.
g. Repeat steps d through f for each of the other ranges. Set the power meter range selector to the position indicated in Column 1 of Table 5-2 and set the 8477A meter reading selector to the corresponding position indicated in Column 2 of Table 5-2. In each case, the meter indications should correspond to those shown in Table 5-2, Columns 3 and 4.
5-17. CALIBRATION FACTOR TEST.
a. Set 432A controls as follows: A2Sl (on Meter Logic Assy) ••.... CALIBRATE RANGE ........................ 0. 1 mW CAL FACTOR.. . . . . . . . . . . . . . . . . . . 88% MOUNT RESISTANCE . . . . . . . . . . . . . . . 2000
b. Set 8477A controls as follows:
FUNCTION . . . . . . . . . . . . . . . . . . 2000 ZERO/TEST Switch . . . . . . . . . . . . . . . TEST POWER (mW) .................... 0. 1 mW
c. Set 84 77A ZERO control so that the digital voltmeter reads 1000 ±2 mV.
d. Set the calibration factor selector to 89%.
e. The digital voltmeter should indicate 989 ±10 millivolts.
f. Repeat steps d and e for each position of the CALIBRATION FACTOR selector. In each case, the digital voltmeter should indicate the voltage shown in the second column of Table 5-3 for the CALIBRATION FACTOR shown in the first column.
5-2
Model 432A
Table 5-3. Calibration Factor Test
Calibration Factor Digital Voltmeter Selector Setting (%) Indication (m V)
88 1000 ±2
89 989 ±10
90 978 ±10
91 967 ±10
92 957 ±10
93 946 ±10
94 935 ±10
95 926 ±10
96 916 ±10
97 907 ±10
98 897 ±10
99 889 ±10
100 880 ±10
5-18. METER LINEARITY CHECK.
a. Set the 8477A POWER (MW) selector to 1 mW and FUNCTION to200r2, ZERO/TESTswitch to TEST.
b. Set the 432ARANGE selector to 3 mW, MOUNT RESISTANCE to 200Q.
c. The 432A meter should indicate 1 mW ±1/2 division.
d. Set the 8477A POWER (MW) selector to 2 mW.
e. The 432A meter should indicate 2 mW ±1/2 division.
f. Set the 8477A POWER (MW) selector to 3 mW.
g. The 432A meter should indicate 3 mW ±1/2 di-vision.
h. Set A2S 1 to OPERA TE. 5-19. ZERO CARRYOVER TEST.
a. Disconnect the 432A from the 8477A.
b. Turn the 432A power OFF and connect the thermistor mount cable to a thermistor mount.
c. Set the 432A Power Meter MOUNT RESISTANCE selector to the resistance shown on the thermistor mount.
d. Turn ON the 432A power.

Model 432A
HP 432A POWER METER RECORDER
OUTPUT IOK
THERMISTOR MOUNT o-f-----1
OSCILLOSCOPE HP-140A/1401A/1422A
Figure 5-2. Zero Carryover Test Setup
e. Connect 141A through filtering network to rear of 432A as shown in Figure 5-2. Set 141A controls as follows:
INPUT ........ . SENSITIVITY . . . . SWEEP TIME .... TRIGGER LEVEL .
................ DC
............ 1 mV/cm
............ 2 sec/cm max clockwise (free run)
f. Zero the 432A as follows:
(1) Set the RANGE selector maximum cw to COARSE ZERO.
(2) Set the COARSE ZERO screwdriver adjust so that the meter indicates z'ero.
(3) Set 432A RANGE switch to . 01 mW. Depress the FINE ZERO switch. The meter indication should go to zero without overshoot.
g. Rotate the RANGE switch clockwise, one step at a time, while the oscilloscope is sweeping. On each 432A range, the scope trace should be within . 01 mW division (±5 mW) from where it was on the . 01 mW range.
5-20. FINE ZERO RANGE CHECK.
a. Set the 432A RANGE selector to 0. 3 mW. Leave the thermistor mount connected to the cable and the MOUNT RESISTANCE selector set to correspond to the resistance of the mount used.
b. Depress the FINE ZERO switch.
c. Slowly turn the COARSE ZERO screwdriver adjustment counterclockwise until the meter will no longer zero. The FINE zero circuit is at one end of its range.
d. Release FINE ZERO.
e. Set the COARSE ZERO screwdriver adjustment so that the meter indicates full scale on the 0-3 scale (O. 3 mW range).
Section V Maintenance
f. Depress FINE ZERO switch (the fine zero circuit is at the other end of its range). Meter should indicate below 2 on the 0-3 scale. Record the indication.
g. Release FINE ZERO.
h. Rotate RANGE switch to COARSE ZERO position. The fine zero circuit is now in the center of its range. The meter reading should be 1. 5 + 1/2 reading of step f, ±0. 1 div. on the 0-3 scale .
5-21. 432A CALIBRATION WITHOUT 8477A CALIBRATOR.
5-22. The 432A Power Meter can be calibrated without an 84 77A Calibrator using a method similar to the precision power method outlined in Paragraph 3-27.
5-23. A major difference between the two measurements is that external power need not be applied when calibrating the instrument. Normally, in a stable environment, the VCQMP output voltage remains constant, not being affected by external RF power; only the VRF output varies during power measurement. Since the power that the meter indicates is propor -tional to V COMP and VRF, we can cause the meter to indicate a power also by holding VRF constant and varying V COMP. This is easily done on the 432A py turning the COARSE ZERO control. Two calibration procedures are given below. · Full scale readings are not possible on the 10 mW RANGE. Full scale readings are possible on the 3 mW RANGE depending on the mount characteristics.
5-24. CALIBRATION PROCEDURE 1.
a. Connect thermistor mount to power meter; let instrument warm up for at least ten minutes.
b. Select range which instrument is to be calibrated on.
Note
Ranges below 0. 3 mW require a precise differential voltmeter capable of resolving 1 µ V. The HP 740B DC Standard/ A Voltmeter, which has an accuracy of ±(0. 005% of reading + 0. 0004o/r of range :::1 µ V) is recommended. A digital voltmeter is adequate for the 1. 0 mW and higher ranges.
c. Connect Differential Voltmeter (or DVM differentially) between the VCOMP and VRF output jacks on the rear panel. See Figure 3-3 for location of VRF and V COMP outputs.
d. While pressing the FINE ZERO switch, measure and record Vo. (Vo is the difference of the bridge voltages with no power applied. )
e. Turn COARSE ZERO control (on front panel) clockwise to a convenient power, e.g. , 9 on the 0 to 10 scale or 2 on the 0 to 3 scale.
f. Differentially measure and record V1. V1 is the difference voltage between VCOMP and VRF with power applied.
5-3

Section V Maintenance
5-4
Model 432A
NOTES

Model 432A
INSTRUMENT SERIAL NO.
DATE
TABLE 5-4. PERFORMANCE TEST CARD
Data in this test card corresponds to Performance Tests in Paragraphs 5-16 through 5-20.
Section V Maintenance
------
5-5

Section V Maintenance
TABLE 5-4. PERFORMANCE TEST CARD
Para. Measurement Ref. Test Unit
5-16 METER ACCURACY
e 0.01 mW applied; measure RECORDER OUT voltage mVdc
f Meter indicates full-scale (0-1 scale) divisions
Re,eeat on remainin~ 432A ,EOWer ran~es:
e Power applied: 0. 03 mW mVdc
f Meter indication (0-3 scale) divisions
e Power applied: 0. 1 mW mVdc
f Meter indication (0-1 scale) divisions
e Power applied: O. 3 mW mVdc
f Meter indication (0-3 scale) divisions
e Power applied: 1 mW mVdc
f Meter indication (0-1 scale) divisions
e Power applied: 3 mW mVdc
f Meter indication (0-3 scale) divisions
e Power applied: 10 mW mVdc
f Meter indication (0-1 scale) divisions
5-17 CALIBRATION FACTOR
i Calibration Factor (%) DVM Readin~ (mVdc)
88 1000 mVdc
89 989 mVdc
90 978 mVdc
91 967 mVdc
92 957 mVdc
93 946 mVdc
94 935 mVdc
95 926 mVdc
96 916 mVdc
97 907 mVdc
98 897 mVdc
99 889 mVdc
100 880 mVdc
5-6
Model 432A
Min. Actual Max.
990 1010
-1/2 +1/2
938.8 958.8
-1/2 +1/2
990 1010
-1/2 +1/2
938.8 958.8
-1/2 +1/2
990 1010
-1/2 +1/2
938.8 958.8
-1/2 +1/2
990 1010
-1/2 +1/2
990 1010
979 999
968 988
957 977
947 967
936 956
925 945
916 936
906 926
897 917
887 907
879 899
870 890

Model 432A
TABLE 5-4. PERFORMANCE TEST CARD
Para. Measurement Ref. Test Unit
5-18 METER LINEARITY
c 1 mW applied, 3 mW scale: meter indicates 1 mW divisions
e 2 mW applied, 3 mW scale: meter indicates 2 mW divisions
g 3 mW applied, 3 mW scale: meter indicates 3 mW divisions
5-19 ZERO CARRY -OVER
d Zero carry-over:
Range (mW) ScoQe Indication
.01 0 ±5 mVdc mVdc
.03 O ±5 mVdc mVdc
.1 0 ±5 mVdc mVdc
. 3 0 ±5 mVdc mVdc
1 0 ±5 mVdc mVdc
3 0 ±5 mVdc mVdc
10 0 ±5 mVdc mVdc
5-20 FINE ZERO RANGE
f Meter indication on 0-3 scale: divisions
g Meter indication on 0-3 scale: 1. 5 '+ 1/2 reading divisions of step f, ±0. 1 div.
Min.
-1/2
-1/2
-1/2
-5
-5
-5
-5
-5
-5
-5
1. 75
0.1
Section V Maintenance
Actual Max.
+1/2
+1/2 ---+1/2 ---
+5 ---+5 ---+5 ---+5 ---+5 ---
+5 ---+5
2.0 ---0.1 ---
5-7

Section V Maintenance
5-8
Model 432A
NOTES

Model 432A
g. Measure and record VCOMP· Note that the VCQMP jack is isolated from chassis ground; measure from the center conductor of the BNC to the outer conductor.
h. Calculate the power using the following formula*:
p = 4k[2 VCOMP(v1 - vo) - v12J (l)
where R is the resistance of the thermistor mount and should be identical to the setting of the MOUNT RESISTANCE switch.
i. If calculated power is different from the value that was set with the COARSE ZERO control, adjust A2R6 so that the meter reads calculated power. If the range of A2R6 is insufficient to set new power, it will be necessary to change the value of A2R70.
j. Set COARSE ZERO so that meter reads 1 on the 0 to 1 scale. Set A2R72 for 1. OOOV ±10 mV at the RECORDER output jack on the rear panel.
5-25. There is a simpler form of the equation that was used to calculate power in step h above. This form ignores VO, the small voltage difference between the two bridges with no power applied. However, VO becomes negligible on the higher ranges, that is, 1 mVandabove, and can be ignored with little decrease in accuracy. The simpler form is as follows:
(2)
5-26. CALIBRATION PROCEDURE 2.
a. Connect thermistor mount to power meter; let instrument warm up for at least ten minutes.
b. Select 1, 3 or 10 mW range.
c. Turn the COARSE ZERO control clockwise to indicate some convenient on-scale reading.
d. Measure VcoMP and record. Notethat VcoMP jack is isolated from chassis ground; measure from the center conductor of the BNC to the outer conductor.
e. Measure VRF and record. Follow measurement procedure in step d.
f. Measure and record VcoMP - VRF· This term must be measured differentially, that is, one side of the DVM connected to V COMP and the other side connected to VRF· In this way the full resolution of the DVM can be used.
g. Substituting the measured values into the above formula, calculate the power.
*This formula is accurate for on - scale readings; however, with n0 power applied (i.e. , Vl = Vo) it does not solve to P = 0 because of a deleted term + VO. This term can be neglected for any on-scale reading.
Section V Maintenance
h. If calculated power is different from the power set with the COARSE ZERO control, adjust A2R6 so that meter indicates that power, If the range of A2R6 is not great enough to set new power level, the value of A2R70 will have to be changed.
i. Adjust COARSE ZERO so that meter reads 1 on the 0 to 1 scale. Set A2R72 for 1. OOOV ±10 mV at the RECORDER output jack on the rear panel.
5-27. COVER REMOVAL AND REPLACEMENT.
5-28. The side covers can be removed and replaced independently of the top and bottom covers. Each side cover is held in place by four screws retained by nuts which are fastened to the side frames.
5-29. TOP COVER REMOVAL.
a. At the rear of the instrument, remove the screw that retains the cover.
b. Grasp the cover from the rear, and slide it back 1/2 inch. Then tilt forward edge of the cover upward and lift the cover from the instrument.
5-30. TOP COVER REPLACEMENT.
a. Rest the cover flat on the cast guides projecting inward near the top of each side frame.
b. Slide the cover forward, allowing its forward edge to enter the groove in the front panel.
c. Replace the cover retaining screw.
5-31. BOTTOM COVER REMOVAL.
a. Remove the retaining screw at the rear of the cover.
b. Swing the tilt stand out to free the cover.
c. Slide the cover rearward far enough to free the forward edge.
d. Tilt the forward edge of the cover upward and lift the cover from the instrument.
5-32. BOTTOM COVER REPLACEMENT.
a. Set the tilt stand out of the way of the cover.
b. Rest the bottom cover flat on the case guides projecting inward near the bottom of each side frame.
c. Slide the cover forward on the guides so that the formed portion at the rear of the cover slides over the two short projections at the rear corner of each side frame.
d. Replace the retaining screw,
5-9

Section V Maintenance
5-33. ADJUSTMENT PROCEDURES.
5-34. INITIAL SETUP.
a. Remove the power meter side panels.
b. Connect the equipment as shown in Figure 5-1. Refer to Table 5-1 for equipment specifications.
5-35. MECHANICAL METER ADJUSTMENT.
a. When the meter is properly zero - set, the pointer rests over the zero mark on the meter scale when the instrument is:
(1) at normal operating temperature
(2) in its normal operating position
(3) turned off.
b. Set the pointer as follows to obtain best accuracy and mechanical stability:
(1) Turn instrument off.
(2) Rotate the meter mechanical adjustment screw clockwise until the meter is to the left of zero and moving up the scale toward zero. Stop when the pointer is exactly over the zero mark. If the pointer overshoots, repeat step 2.
(3) When the pointer is exactly on zero, rotate the adjustment screw approximately three degrees counterclockwise. This frees the adjustment screw from the meter suspension. If thepointer moves during this step, repeat steps 2 and 3.
5440A/5443A
0
8477A
• ©
•Ii TO AITP5 TO AITP6
THERMISTOR MOUNT CABLE
Figure 5-3. Bridge Amplifier Test
5-10
Model 432A
5-36. BRIDGE AMPLIFIER TESTS.
a. Connect equipment as shown in Figure 5-3.
b. Compensation Bridge.
(1) Connect 3440A/3443A between Al TP5 and Al TP6 (using lOK isolation resistors).
(2) Make the following settings:
432A
RANGE .................. 10 mW MOUNT RESISTANCE ......... 2000
8477A
FUNCTION ..... . SET
(3) Adjust A1Rl2 (OFFSET ADJUST) for 0. 0 ±0.1 mVdc reading on the digital voltmeter.
(4) Change 8477A FUNCTION to CHECK. The digital VM reading should not exceed ±0. 4 mVdc.
c. RF BRIDGE
(1) Connect DVM between AlTP3 and AlTP4 using lOK isolation resistors in series with the leads.
(2) Set8477AFUNCTION to SET. AdjustAlR15 (OFFSET ADJUST) for DVM reading of 0. 0 ±0.1 mVdc.
(3) Change 8477A FUNCTION to CHECK. The reading should not exceed ±0. 4 mVdc.
Note
Failure of the instrument to meet the specification of steps b (4) and c (3) above indicates insufficient bridge gain. Refer to Tables 7-3 or 7-4 in the troubleshooting section.
5-37. METER AND RECORDER OUTPUT CALIBRATION.
a. Connect the DVM to the 432A RECORDER output.
b. Set 8477A controls as follows:
FUNCTION ........................ 2000 ZERO/TEST . . . . . . . . . . . . . . . . . . . . . . ZERO POWER ............•............ 1 mW
c. Set 432A controls as follows: A2Sl (on Meter Logic Assy) : ..... CALIBRATE MOUNT RES . . . . . . . . . . . . . . . . . . . . . . . 2oon RANGE ......................... 1 mW CAL FACTOR . . . . . . . . . . . . . . . . . . . . . 100%

Model 432A
d. Adjust Zero control on 8477A for DVM indication of 0. 000 ±. 001 V.
e. ZERO/TEST on 8477A to TEST.
f. Adjust A2R6 in 432A for 432A meter reading of 1.0 mW ±.01 mW.
g. Adjust A2R74 in 432A for DVM reading of 1. OV ±. 001V.
h. Change the following settings :
432A RANGE to 10 mW 8477A POWER (mW) to 10 mW and ZERO.
Note
ZERO/TEST to
When switching 432A to 10 mW or switching from 10 mW to any other range, the meter will react slowly for a short period. This is due to time constants in the instrument and is normal.
i. Check zero and adjust as necessary.
j. Set ZERO/TEST to TEST and adjust A2R86 for DVM reading of 1. 00 ±. 001 V.
k. Return432A RANGE and 8477A POWER switches to 1 mW and zero as before.
1. Adjust A2R6 for DVM reading of 1. 000 ±. 001 V.
m. Perform the adjustments of steps h through 1 again until 432A reads 1 ±. OlOV (at recorder output) on both 1 mW and 10 mW ranges.
n. Set A2Sl to OPERATE. o. Turn to the beginning of this section; verify
that the instrument meets its specifications by completing the PERFORMANCE TESTS.
5-37A.AUTO ZERO ADJUSTMENT, AlR43t a. Remove the right side panel. b. Connect a mount to the 432A and adjust
COARSE ZERO.
Section V Maintenance
c. Switch RANGE to -20 dBm, push FINE ZERO down and adjust A 1R43 for a zero indication on the front panel meter.
d. Release FINE ZERO and replace the right side panel.
5-38. BATTERY CHARGER ADJUSTMENT (OPTION 01 ONLY).
a. Remove the power meter top panel.
b. Connect 432A to ac line power and turn ON.
c. Set A 7R8 fully counterclockwise for maximum battery charge rate.
d. With the digital voltmeter, measure the voltage between A7TP1 and A7TP2.
e. Adjust A 7R8 for digital voltmeter reading of 0. 2 to 0. 4 volt (20 to 40 mA through R3) when battery is fully charged.
f. Disconnect the test equipment and power, and replace the power meter top and side panels.
5-39. BATTERY REMOVAL. a. Remove the top cover.
b. Remove the two Phillips screws on the top rear of the battery cover.
c. Lift off the battery cover.
d. Loosen the nuts on the battery binding posts.
e. Lift out the battery. 5-40. ISOLATING TROUBLE IN TRANSISTOR
CIRCUITS. 5-41. General. The following information should help determine if a transistor works. There are tests for both in - circuit and out - of - circuit transistors, which help to determine if a particular trouble is due to a faulty transistor of some other component. See Figure 5-2.
Table 5-5. Out-of-Circuit Transistor Resistance Measurements
Connect Ohmmeter
Positive Lead to Negative Lead to Measure Resistance (ohms)
emitter base* 200 500 Small Signal
emitter collector lOK - lOOK PNP Germanium
emitter base* 30 - 50 Power
emitter collector several hundred
base emitter lK - 3K Small Signal
collector emitter very high (might read open NPN Silicon
base emitter 200 - 1000 Power
collector emitter high, often greater than lM
*To test for transistor action, add collector-base short. Measured resistance should decrease.
t See Back-Dating, Appendix I. 5-11

Section V Maintenance
DEVICE SYMBOL
COLLECTOR
NPN TRANSISTOR ~SE~ EMITTER
COLLECTOR
PNP TRANSISTOR BASE~ EMITTER
FIELD EFFECT TRANSISTORS METAL CASE BLACK EPOXY
(PLASTIC) METAL CASE
g w 11 n -1 ~ ~ ~
D 6 S Ill o Gs OR SGD y2
G D S OR G D S
s2,/Jl~s1 D2~ ~DI G2 GI
DIODES DIODE SYMBOL
ANODE CATHODE
[~ c~~grg"-! ~' / CATHODE
~ 89 CATHODE ~~THOrn(~ o~
' ~ i ~ )i' A THODE CATHODE
Model 432A
CUT OFF CONDUCTING
+20V +20V
~MA~ ov~ +.3V /RRENT (OR-) -::-
CON CURRENT """
-20V -20V
~MAIN ~~ __ 3 V /URRENT
(OR+) """
CON CURRENT -::-
Bl-POLAR TRANSISTORS BLACK EPOXY (PLASTIC) TRANSISTORS
f ECB
~i~
r ECB
EB C
METAL CASE TRANSISTORS
DUAL
Figure 5-4. Transistor Biasing and Operating Characteristics
5-12
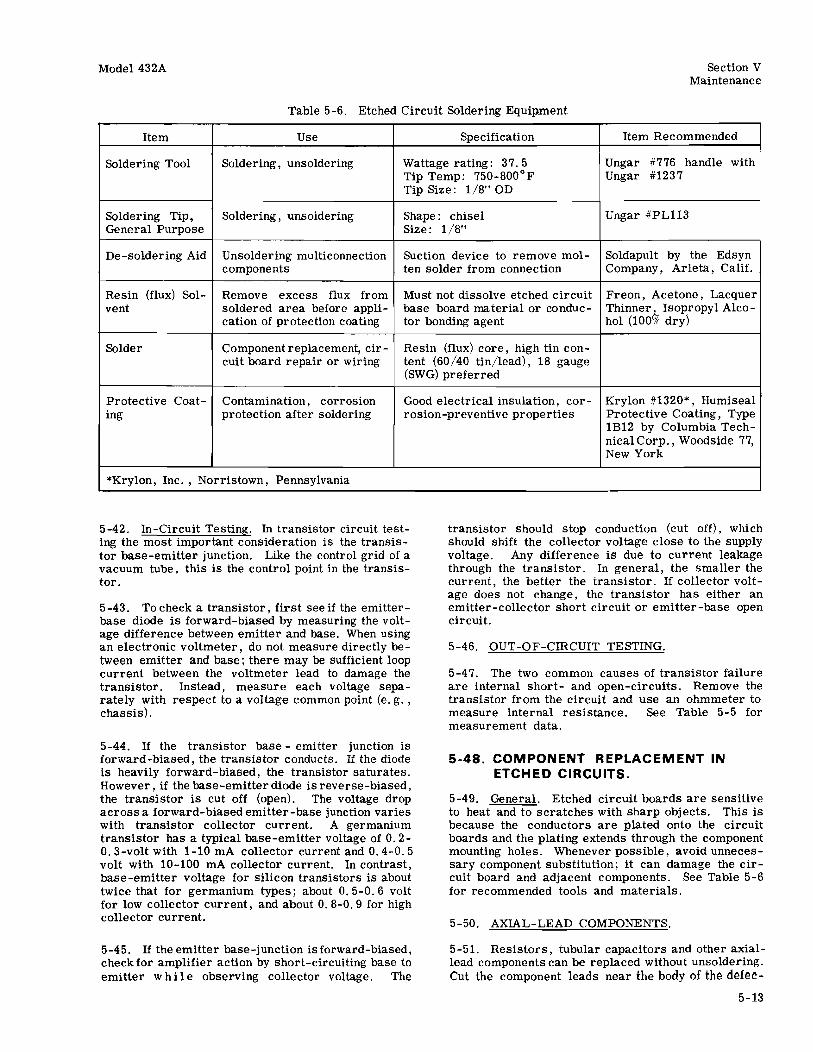
Model 432A Section V Maintenance
Table 5-6. Etched Circuit Soldering Equipment
Item Use Specification Item Recommended
Soldering Tool Soldering, unsoldering Wattage rating: 37. 5 Ungar #776 handle with Tip Temp: 750-800°F Ungar #1237 Tip Size: 1/8" OD
Soldering Tip, Soldering, unsoldering Shape: chisel Ungar #PL113 General Purpose Size: 1/8"
De-soldering Aid Unsoldering multiconnection Suction device to remove mol- Soldapult by the Ed syn components ten solder from connection Company, Arleta, Calif.
Resin (flux) Sol- Remove excess flux from Must not dissolve etched circuit Freon, Acetone , Lacquer vent soldered area before appli- base board material or conduc- Thinner, Isopropyl Alco-
cation of protection coating tor bonding agent hol (100% dry)
Solder Component replacement, cir- Resin (flux) core, high tin con-cuit board repair or wiring tent (60/40 tin/lead), 18 gauge
(SWG) preferred
Protective Coat- Contamination, corrosion Good electrical insulation, cor- Krylon #1320*, Humiseal ing protection after soldering rosion-preventive properties Protective Coating, Type
*Krylon, Inc. , Norristown, Pennsylvania
5-42. In-Circuit Testing. In transistor circuit testing the most important consideration is the transistor base-emitter junction. Like the control grid of a vacuum tube, this is the control point in the transistor.
5-43. To check a transistor, first see if the emitterbase diode is forward-biased by measuring the voltage difference between emitter and base. When using an electronic voltmeter, do not measure directly between emitter and base; there may be sufficient loop current between the voltmeter lead to damage the transistor. Instead, measure each voltage separately with respect to a voltage common point (e.g. , chassis).
5-44. If the transistor base - emitter junction is forward-biased, the transistor conducts. If the diode is heavily forward-biased, the transistor saturates. However, if the base-emitter diode is reverse-biased, the transistor is cut off (open). The voltage drop across a forward-biased emitter-base junction varies with transistor collector current. A germanium transistor has a typical base-emitter voltage of 0. 2-0. 3-volt with 1-10 mA collector current and 0. 4-0. 5 volt with 10-100 mA collector current. In contrast, base-emitter voltage for silicon transistors is about twice that for germanium types; about 0. 5-0. 6 volt for low collector current, and about 0. 8-0. 9 for high collector current.
5-45. If the emitter base-junction is forward-biased, check for amplifier action by short-circuiting base to emitter while observing collector voltage. The
1B12 by Columbia Tech-nical Corp., Woodside 77, New York
transistor should stop conduction (cut off), which should shift the collector voltage close to the supply voltage. Any difference is due to current leakage through the transistor. In general, the smaller the current, the better the transistor. If collector voltage does not change, the transistor has either an emitter-collector short circuit or emitter-base open circuit.
5-46. OUT-OF-CIRCUIT TESTING.
5-47. The two common causes of transistor failure are internal short- and open-circuits. Remove the transistor from the circuit and use an ohmmeter to measure internal resistance. See Table 5-5 for measurement data.
5-48. COMPONENT REPLACEMENT IN ETCHED CIRCUITS.
5-49. General. Etched circuit boards are sensitive to heat and to scratches with sharp objects. This is because the conductors are plated onto the circuit boards and the plating extends through the component mounting holes. Whenever possible, avoid unnecessary component substitution; it can damage the circuit board and adjacent components. See Table 5-6 for recommended tools and materials.
5-50. AXIAL-LEAD COMPONENTS.
5-51. Resistors, tubular capacitors and other axiallead components can be replaced without unsoldering. Cut the component leads near the body of the defec-
5-13

Section V Maintenance
Model 432A
Table 5-7. Safe Ohmmeter Range for Transistor Resistance Measurements
Open Circuit Safe Range(s) Voltage
HP 412 Rxlk 1. 0 v HP 427A Rx 10 K 1. 0 v
Rx 100 k 1. 0 v Rx lM 1. 0 v Rx 10M 1.0V
Rx 1 k 1. 3 v Rx 10 k 1. 3 v
HP 410C Rx 100 k 1. 3 v Rx lM 1. 3 v Rx 10M 1. 3 v
Rx 100 1.1 v Rxlk 1. 1 v
HP 410B Rx 10 k 1. 1 v Rx 100 k 1.1 v Rx lM 1.1 v
Simpson 260 Rx 100 1. 5 v
Simpson 269 Rxlk 1. 5 v
Triplett 630 Rx 100 1. 5 v Rxlk 1. 5 v
Rx 10 1. 5 v Triplett 310 Rx 100 1. 5 v
tive component, remove the component and straighten the leads left in the board. Wrap leads of the replacement component one turn around the original leads, solder the connection, and clip off the excess lead.
5-52. OTHER COMPONENTS.
5-53. Replace other components as follows:
a. Remove defective component from circuit board. Use a low - power soldering iron because excessive heat may lift a conductor or damage the board.
b. Remove solder from mounting holes with a suction device or a wooden toothpick. DO NOT USE A SHARP METAL OBJECT SUCH AS AN AWL OR TWIST DRILL. SHARP OBJECTS MAY DAMAGE THE PLATED-THROUGH CONDUCTOR.
c. Shape the leads of the replacement component to match the mounting-hole spacing.
5-14
Short Circuit Lead
Current Color Polarity
1 mA 100 µA Red + 10 µA
Black 1 µA -0.1 µA
0. 57 mA 57 µA Red 5.7 µA +
0.5 µA Black -0. 05 µA
1. 1 mA 110 µA
Black 11 µ.A +
1. 1 µA Red -0.11 µA
l mA Red + Black -
0. 82 mA Black + Red -
3. 25 mA 325 µA
Varies with Serial
750 µA Number
75 µA
d. Insert the component leads in the mounting holes and position it as the original was. DO NOT FORCE LEADS OF REPLACEMENT COMPONENT INTO MOUNTING HOLES. A sharp edge on the lead may damage the plated-through conductor.
e. Solder the component in place and remove excess flux from the soldered areas. Apply a protective coating to prevent contamination and corrosion. See Table 5-6 for recommendations.
CAUTION
Most ohmmeters can supply enough current or voltage to damage a transistor. Before using an ohmmeter to measure transistor forward or reverse resistance, check its open-circuit voltage and shortcircuit current output ON THE RANGE TO BE USED. Open-circuit voltage must not exceed 1. 5 volts and short-circuit current must be less than 3 mA.

Model 432A Section VI Replaceable Parts
SECTION VI
REPLACEABLE PARTS
6-1. INTRODUCTION.
6-2. This section contains information for ordering replacement parts. Table 6-1 lists parts in alphanumerical order of their reference designators provides the following information on each part:
a. Description.
b. Manufacturer of the part in a five-digit code; see list of manufacturers in Table 6-2.
c. Manufacturer's part number.
d. Total quantity used (TQ column).
6-3. ORDERING INFORMATION.
6-4. To obtain replacement parts, address order or inquiry to your local Hewlett-Packard Field Office (see list at rear of this manual for addresses). Identify parts by their Hewlett-Packard stock numbers.
6-5. To obtain a part that is not listed, include:
a. Instrument model number.
b. Instrument serial number.
c. Description of the part.
d. Function and location of the part.
REFERENCE DESIGNATORS
A assembly F !use MP mechanical part v vacuum, tube; neon B motor FL filter p " plug bulb, photocell, etc. BT battery IC integrated circuit Q transistor VR voltage regulator c capacitor J jack R resistor w cable CP coupler K relay RT thermistor x socket CR diode L inductor s switch y crystal DL delay lille LS loud speaker T " transformer z bmed cavity, OS device signaling (lamp) M meter TB " terminal board network E misc electronic pa.rt MK microphone TP test point
ABBREVlA TIONS A amperes H henries N/0 normally open RMO rack mount only AFC automatic frequency control HDW bard ware NPO = negative positive zero RMS root-mean square AMPL = amplifier HEX hexagonal (zero temperature RWV reverse working
HG mercury coefficient) voltage BFO beat frequency oscilla.tor HR bour(s) NPN negative-positive- S-B slow-blow BE CU beryllium copper HZ hertz negative BH = binder head NRFR not recommended for SCR screw
BP bandpass IF intermediate freq :field replacement SE selenium
BRS brass lMPG impregnated NSR not separately SECT section(s)
BWO backward wave oscillator INCD incandescent replaceable SEMICON ~ semiconductor
INCL inelude(s) SI silicon ccw counter-clockwise INS insulation(ed) OBD o:rder by description SlL silver CER ceramic INT internal SL slide CMO cabinet mount only OH oval bead SPG spring COEF coefficient K kilo= 1000 OX oxide SPL special COM common SST stainless steel COMP " composition LH left hand
p pea.I< SR split ring COMPL = complete LIN linear taper PC printed circuit
12 STL steel CONN connector LKWASH lock washer PF picofarads = 10-CP cadmium plate LOG logarithmic taper farads TA tantalum CRT cathode-ray tube LPF low pass filter PHBRZ phosphor bronze TD time delay cw clockwise PHL " Phillips TGL toggle
M milli = 10-3 PIV " peak inverse voltage THD thread DEPC deposited carbon
MEG meg = 1()6 PNP positive-negative- Tl titanium DR drive
MET FLM metal film positive TOL tolerance
ELECT electrolytic MET OX metallic oxide P/0 part of TRIM trimmer
ENCAP = encapsulated MFR manufacturer POLY polystyrene TWT traveling wave tube
EXT external MHZ mega hertz PORC porcelain u micro= 10-6 MINAT miniature POS position(s)
F farads MOM = momentary POT potentiometer VAR variable FH flat bead
MTG mounting pp peak-to-peak VDCW de working volts
FILH !illlster bead MY '1mylar" PT = point W/ with FXD fixed PWV peak working voltage w watts
G " giga (109) N nano (10-9) RECT rectUier WIV working inverse GE germanium N/C normally closed RF radio frequency voltage GL glass NE neon RH round head or WW wirewourul GRD ground(ed) NI PL nickel plate right hand W/O without
01194-19
6-1

Section VI Replaceable Parts Model 432A
Reference Designation
Al AlAl Al Cl AlC2 .AlC3
AlC4 AlC5 AlC6 AlC7 J11C8
AlC9 AlClO Altll A1Cl2 AlCB
AlC14 AlCRl AlCR2 AlCR3 .A1'11
"102 Al03 Al04 A1'l5 AlOI>
AHH Al08 "109 AlOl() AllHl
Al012 Al013 A1014 Al015 AlRl
AlR2 AlR3 AIRS AlR6 UR6
.t.1R7 AlR8 .t.1R9 AlRlO AlRU
A1R12 Allll2 AlRU AlR12 A1Rl2
A1Rl3 AlRU A1Rl3 AlRl3 .A1Rl3
AlR14 AlR15 AUU6 AlR11 Alll.18
AlRl9 AlR2(l HR21 AlR22 .AlR23
AlR24 AlR2S AlR26 AlR27 AlR28
AlR29 AlR30 Hll.31 AlR32 AllBZ
HP Part Number
00432-60024 00432-6011 0130-0374 0160-2055 0160-2055
0160-0380 0160-2055 0160-2055 Ol60-Z055 0160-0380
0160-2055 0160-3459 0160-3459 0180-0374 Ol6ChZ055
0160-2055 1901-0040
1901-0040 1853-00ZO
1853-0020 1853-0020 1854-0071 185'-0071 1853-00Cll
1854-0221 1854-0071 lll54-0071 1854-0071 1853-0001
1854-0221 185'-0071 1853-0020 1853-0020 0696-3260
0666-1055 0698-3160 0694-3160 0694-3160
0698-U56 0757-0465 0698-3136 0698-3441 0757-0401
2100-1770 0757-0439
0698-3449
0757-0461 0757-0443
0698-316.Z
0811-.2284 0757-0199 0811-22&4
0698-3441 0698-3160 069&-31oO 06118-3156 07S7-0465
0757-0401 2100-1710 0757-0461 0811-2284 0757-0199
Otlll-2284 0757-0199 0698-3260 0757-0289
Table 6-1. Replaceable Parts
Oty
l l 2 a
2
zz 3
2
9
l u
1 9 1 3 4
2 4
2
4 2
2
5 7
Description
BOAR!> ASSY:l!RIOGE ASSYIAUTO LERO t:FXO TANT. 10 Uf lO:C 20YOCW C•FXO CER 0.01 UF +60-20:C lOOYOC~ C :FXD CER O.Ol UF +80-20% 100.VOCll
C:FXO MY 0.22 UF 10% 200\IOQ; C :FXD CER O.Ol UF +80-2U lOOVDCW C:FXO CER 0.01 Uf +80-20:C lOOVDO! c •FXO CER 0.01 UF +ao-za:c lOOY~W C: f XO KY o. 22 UF lO:C 2DOVDCW
t:FXD CER 0.01 UF +80-2tl:C J.OQVDCW C:FXO CER 0.02 UF 201 lOOVOCW c •FXD CER a.oz UF 20% lOOVDCW CU'XO TANT• 10 UF lO'C 2QVDCW c :FXD CER 0.01 UF +80-20: lOOVOCW
t:FXD CER 0.01 UF +80-20¥ lOOVOCW ll lDDE : S ti.I CON 3014A 30WY NOT ASSIGNED OIOOE:SLL1CON 30M4 30WV TSTR:Sl PIWISElECrfO FROM 2N37021
TSTlUSI PNPISELECTEO FROM 2N3702l TSTR•Sl Plil'ISELECTEO FROM 211137021 TSTR•Sl NPNISELECTEO FROH 2N37D4l TSTR:SI Hl'NISELECTEO fROH 2N37041 TSTR:SI PNPISELECTEO FROM 2HU3ZI
TSTR:SI NPNIREPL.8Y 2Nllt0441 TSTIUSI NPNISELECTEO FROM 21137041 TSTR•Sl NPNISELECTED FROM 2!07041 TSTR•.SI l\IPNISElECTEO Faol! 2N3704l TSTR•Sl PNPISELECTEO FROM 21'11321
TSTR:Sl NPNIREPl..llY 211140441 TSTR•Sl NPNISELECTEO FROM ZN37041 TSTR•Sl PNPISELECfEO FROM 2N37021 TSTR•Sl PNPISELEC'fEO FROM 2N3702l R :fXD MET FLK llt64K OHM 1" 118W
R•FXO COMP 1 MEGOHM 5l l/2W R:Fxo MET FLM 31.~K OHM ll l/8W R:FXI) MET FLl4 3l.6K OHM U 1/811 R:FXO MET FlM 31.6K OHM U 1/8WNOT ASSIGNED
R:FXO MET FlM 14.7K OHM ll l/8W R•FXO MET FUI lOOK OHM U l/8W RIFXD MET FLll l7.8K OHM U 1/8W IUFXO MET FlM.215 OHM U: 1J8W IUFXO MET fLM 100 OHM l:C l/8W
R:VAR WW 100 OHK 5% TYPE H lW R•FXO llET FLK 6.au; OHM u: l/8W (f()R OPT 013) R:FlCO MET FLM Z8.7K OHM U -11811 IOPT 011)
R:FXD MET flM 68.lK Olill ll: 11811 R:FXO KET fLH U.OK OHM U -11811 CFOR OPT 0131 R:FXD MET FLM 46.4K OKM lit ll8W IOPT OlH
k>F)(O WW lK OHH O.l:C 1/40W R:FXO KET FLM 21.5K OHll IS l/8W R:FXD WW lK OHM 0.11 1"40W. NOT ASSl&NEO NOT ASSIGNED
R ;fXO MET FLM 215 OHM ii 118W R:FXO MET fLM 3l.6K OHM 11 1/8W R•FXO MET FUI 3l.6K OHM u: 1/8w R•FXO ME7 FLM 14.7K OHM ll: l/8W R:fXO MET fLll lOOK OHM lit l/8W
R:fXO MET fl.M 100 OHM U l/8W R:VAR WW 100 OHM 5S TYPE H lW R•FXO MH Flll 68.lK OHM lie -l/8W R<FXD WW 1K OHM O.l:C 1/4011 R:FXO MET FLM 2l.5K OHM l:C l/8w
IUFXO wW lK ()Iii! O.l:C l/40W R•FXO MET fl.II ;U.5K OHM 1% l/8W R•FXO MET FLM 41!>4K OHM ll 118>1 R:FXO MET Fll4 U.lK OHM 1t l/8W (FOR OPT 012)
See introduction to this section for ordering information
Mfr Mfr Part Number Code
.28480 00432-60024 28480 00432-6011 56289 150Dl06X902082-0YS 56289 C023F l01Fl03ZS22-COH 56289 C023fl.Olf103ZS2Z-COH
28480 0160-0380 56289 C023Fl01F103ZS22-CDH 56289 C023Fl01Fl03ZS22-COH 56289 C023Fl01Fl03ZS22-COH 28480 0160-0380
56289 C023fl01Fl03lS22-COH 56289 C023Fl01H203M5.22COH 56289 C023Fl01H203MS22COH 56289 1500106X902082-0YS 56289 COZ3Fl01Fl03ZS22-COH
56289 C023Fl01F 103ZS22-COH 07263 FDG1088
07263 FOG1088 28480 1853-0020
2811t80 1853-0020 28480 1853-0020 28480 1854-0071 ZB480 1854-0071 Z114BO 1853-0001
28480 l8511t-02Zl 28480 1854-0071 28480 1854-0071 28480 1854-0071 28480 1853-0001
28430 1854-0221 28480 1854-0071 28480 1853-0020 28480 1853-00ZO 28480 Ob'i!S-3260
01121 EB 1055 28480 0698-3160 28480 0698-3160 28480 069ih3l60
28480 0698--3156 28480 0757-0465 28480 0698-3l36 28480 0698-344"1 284.80 0757-0401
Z8480 2100-1770 26480 0757-0439
28480 0698-311t49
28480 0757-0461 28480 0757-0443
28480 0698-3162
Z84BO OSH-2284 28480 0757-0199 28480 01111-2Z84
28480 0698-3441 28480 0698-3160 28480 0698-3160 28480 ()698-3156 28480 0757-0465
28480 07.57-0401 28480 ;2100-1110 28480 0751-0461 28480 0811-2284 28480 0757-0199
28480 0811-2284 2S480 0757-019q 28480 0698-3200 28480 0757-0289

Section VI Model 432A Replaceable Parts
Reference Designation
Al1<32 AlR3Z A1R32 A1R32 AlR33
AlR3" AlP.35 AUBI> AlR37 AlR38
AlP.39 AlRltO AlR4l AlR42 .AlR42
.AlR42 AlR42 AlR42 AlR42 AlR,.2
.61R42 ,t.lR43 .AlR44 AlTPl AlTP2
AlTP3 lllTP"' AlTP5 AlTP6 AlTP7
AlTP8 AlTP9 AZ A2Cl A2C2
.A2C3 A2C4 A2C5 A2C6
A2C20 A2C21 .AZC22 A2C.23 A2C24
A2C.25 /l2C2o A2C21 A2C2!1 A2C29
.. 2c.>o A2C.U .A2C33 A2C34 A2C35
A2G36 A2C37 A2C38 A2C39 A2C40
A2C41 A2C42 "2C43 A2C4" A2C45
AZC45 A2C45 A2C4b A2C47 A2C46
A2C49 A2C50 A2CR1 A2CR2 A2CR3
THRU
HP Part Number
0757-1>439
Ol>98-3449
0757-0465
0757-0465 0757-0442 0757-0279 0757-0279 0757-0279
07!17-0279 0693-3160 06.96-"160 0757-0199
0698-3455
2100-1618 0683-1855 0360-0124 0360-0124
0360-0124
0360-0124 0360-0124
0360-0124 0360-0124 00432-6015 0180-1819 0180-0229
0160-2917
0160-2917
)140-0234 0140-0234 018!>-1746 0140-0210
0160-0918 0160-2930
1)180-2178
0160-2930 0180-1940 01110-0197 0160-2672 0180-0197
0160-2917
0160-2917 0160-2150 0180-0229
0160-2917 0180--0106 0180-0197 0180-0197 0180-0106
0180-1114
0160-2253 0160-2930
0180-0229 0100-2911 1901-0026 1901-0026 1901-0026
Table 6-1. Replaceable Parts
Qty
11 7
2 l
l1
l l 3
6
2
l 1
l 4
20
Description
R:FXO MET FUI 6.SlK OHM U: l/8W I FOR OPT 013) R:fXO MET Fl.M 28.7K OHM ti l/BW IOPT OU) RlfXO MET Fl.II lOOK OHM .u .11.8w
R•FlW Mel fLll lOOK OHM U 1/811 R<FXO llET fl..H 10.0K OHll l!l l/8W R:FXO MET FLll 3.16K OHM ti l/8W R:FXO llET FLM 3.16K OHM li l/8W R•FXO llH FUI 3.161<. OHM U ll8W
R:fXO '4ET flll 3.ll>K OHi! U 1/811 R :FXO llET FLM 3l.6K OHM li J./8W R:FXO MET FLM .U.6.K OHM U 1/8W R:FXO llET FUI Zl.511 OHM ll l/8W I FOR OPT 0121
R:FXD MET Fl.fl 11.0K OHM U 1181i I FOR OPT 0131 R•FXD '4ET FUI ltl>.4K OH'4 U: l/8W IOPT Olli R•FXD MET FL!\ Zf>lK OHM llC J./8W
IOPT 0101 F<.:VAR Fl.II 1 11EGOHll ZOl LIN l/ZW P.: FXO COMP l.8 MEGDHll 5t l/4W TEll.llINAL:SOLOER LUG TERlllNAUSOLDER LUG
PART OF PC 80Aao TERMINALlSDl.DER LUG PART OF PC llOARO TERHU!IALl SOLDER LUG TER'4lHAL:SOl.PER LUG
TERIUNAUSOLOER LUG TERMINAL•SOLOER LUG BtlARO o\SSY:t.OGIC C :FXO ELECT 100 UF +75-loi SOVDCW C:FXO. ELECT 33 UF 1.0i lQVllC.11
c:Fxo CER 0.05 Uf +Bll-ZO:C J.OOVOCW NOT ASSIG/\IED CIFXO CER 0.05 UF +80-20$ lOOVDC~ NOT ASSJGHED
NilT ASS IGNEO C:FXO MICA 500 PF U C:FXO MICA 500 PF U C:FXO ELECT 15 UF 101 2QVDCW C :FXO Ml CA 270 PF 51
C:FXO MICA 1530 PF U 5QOVOCW C :FXO CER O.Ol UF +80-20!11 lOOVOCW NOT ASSJGlllEO NOT ASSIGNEO C•FXD ELECT 220 UF 201 8YO<.W
C :H.O CEil. 0.01 Uf +80-20& lOOVDCW C:FXO HECT 33 Uf lOl; U\IOCW C:FXO ELECT 2.Z UF lOl; 20\lilCW C•FXO llY o.on UF St 80VOCW C :FXD ELECT z.z UF 10$ 20\/0CW
C:FXO CER o.as UF +80-201 lOOVOCW NOT ASSIGNED C :FXO CER 0.05 UF +80-20i lOOVOCW C:FXO >IICA 33 Pf 5% C:FXD ELECT Jl UF 10% lOVDCW
c:FKO CER o.os uF +80-zoi 1oovoc .. C:FXO ELECT 60 UF 20% 6VOCW C:Fl(O ELECT 2.2 UF lOZ ZOVOCW C<Fl(O ELECT 2.2 Uf 104 20VOCW C: fXO ELECT 60 I.If 20t bVOCW
C IFXO ELECT HO I.IF lO:C bYOCW IOPT 011,012,0131 c:FXO CER o.8 PF 500V[)CW C.:Fxo CER 0.01 UF +80-20; lOOYOCW NOT ASSIGNED
C:fXO ELECT 33 UF 10; lOVOCW C •FXO CER 0.05 UF +80-ZOZ lOOYOCW OIOOE:SILIC.ON 0.7SA 200P!V illOOE ISlllCON 0. 75A 200P.1V OIGOE:SILICON o.75A 200PIV
See introduction to this section for ordering information
Mfr Code
28480
28480
28480
28480 28480 28480 28480 28480
28480 28480 28480 28 ... 80
28480
28480
28480
28480 01121 21480 2.8480
28480
28480 28480
28480 28480 28480 28480 28480
84411
84"11
28480 28480 28480 28480
28480 9l'tl8
56289
91418 562.89 56289 28480 56289
84"11
84411 28'tll0 26480
84411 28480 56289 5b289 284110
26480
72982 91418
28480 84411 04713 04713 ()4713
Mfr Part Number
0757-0439
0698-3449
07§7-0465
0757-0465 0157-0442 0757-0279 0757-0219 0751-0279
0757-0279 0698-3160 0698-3160 0757-0199
0757-0443
0098-3162
0698-3455
2100-1618 C8 1855 0360-0124' 036Q-Qll!4
0360-0124
0360-0124 0360-0124
031>0-0124 0360-0124 00432-6015 Ol&0-1819 ouo-oz29
TYPE TA
TYPE TA
0140-023" 0140-0234 0180-17"6 0140-0210
0160-0918 TA
1090:.?27X0008F 2-0YP
TA 1090336X9015C2.-0YP 1500225X90.<!0A2-DYS 0160-2.672. 1500225X9020A2-DYS
TYPE TA
TVPE TA ()160-2150 0180-022'1
TYPE TA 0180-0106 15002.25X9020A2.-0YS 15002.Z5X9020A2-0YS 0180-0106
0160-1114
301-NP0-6. 8 PF TA
OHH>-0229 HPE TA SR1358-8 SR1358-8 SR1358-8

Section VI Replaceable Parts Madel 432A
Table 6-1. Replaceable Parts
Reference HP Part Number Oty Description Mfr Mfr Part Number Designation Code
A2CR4 1901-0026 OIOOE:SILICON 0.75A 200PlV 04713 SRUSS-8 AlCR5 1901-0026 OIOOE:SILICON 0.75A ZOOPlY 04113 SR.13511-8 A2CR6 l90Z-0509 l DIODE 8RfAKDOWNJ6.ZOV 21 04713 SZ50981t AZC.Rl 1901-0026 OIOOE:SlLlC.ON 0.75A 200PIV 04713 SRU58-8 A2CR8 1901-0026 OJODE:Sll.ICDN 0.75A ZOOPlY 04713 SRUSS-8
AZCR9 NOT ASSIGHEO AZC.11.10 NOT ASSIGNED AZCRH 1901-0026 OIOOE:S1l1CDH 0.75A 200PI\/ 04713 SR1358-8 A2CRl2 1901-0026 OIOOE•SlLICON o.75A 200PIV Olt713 SR1358-8 AZCR.U NOT ASSIGNED
A2CRl4 1901-0026 OJODE:SlllCON 0.75A 200PlV Oit713 SRUS8-8 AZCR15 1901-0026 DJtlQE:SILIUlf'I o.75A 200.PIV 04713 SR1358-8 A2CRl6 1901-0026 OlOOE:SlLICOl> o.75A 200PlV 04713 SR13511-8 A2CR1 7 1901-0026 OJGOE:SiUCON o.75A 200PlV 04713 SR1358-8 A2CR18 1901-0026 OlCIOE:SlllCON 0.75A 20DP1V Olt713 SR1358-6
AZCR19 1901-0026 DIDOE:SlllCON 0.75A 200PlV 04713 SR1358-8 A2CR20 1901-0026 OlOOE:SlllCON o.7$A 200PlV 04713 SR1358-8 A2CR21 1901-0021> OIOOE:SillCON 0. 75A ZOOPJV Oit7l3 SR1356-B A2CR22 1901-0021> O[ODE:SlLICON o.7SA 200PIV 04713 SRl358-8 AZCR23 1901-0026 OIOOE:SlllCON 0.75A 200PIV 04713 SR13S8-8
AZQl 1854-0071 TSTR:SI NPN(SELECTEO FROM ZN37041 Z8480 1854-0071 A202 18Slt-0062 l TSTR: SI NPN 80l3l 21'11701 A203 11154-0071 TSTR:Sl NPNlSfLECTEO flUlM 2N3704> 28480 U54-007l "204 1853-0012 l TSTR•Sl PNP 80131 2N2904A AZ05 1853-0020 TSTR:SI PNPtSELECTEO FRDM 2N37Q21 28480 1853-00.i!O
AZQo 1853-0020 TSTR:SJ PNP I SE LEC. TEO fROll 2N3702 l 21480 1853-00ZO 11207 1853-0020 TSTR:SI PNPISELECTEO FROM 2N370ZI 28480 1653-00.i!O A208 1854-0071 TSTR:SI NPNISELECTED FROM 2N37041 28it80 1854-0071 A209 185'>-0003 1 TSTR:SI NPtHSElECTED flUl/4 2Nl1lll 28480 1854-0003 AZ010 1853-0001 TS TR: SI PNPISELECTEO FROM 2Nl13ZI 28480 1853-000l
A<?Oll 1854-0071 TSTR:SI NPNISELECTEO FROM 2N37041 28480 1854-0071 A2Ql2 NOT ASSJGNEO 42\ll9 NOT ASSIGNEO A21l20 1653-0020 TSTR1St PNPISELECTEO FROM 2N3702) 28480 1853-0020 42021 1854-0005 2 TSTR:St NPN 80131 2111708
A2Q22 1854-0071 TSHUSI NPN<SELECTEO FROM 2N37041 281t80 1854-0()11 A2023 1$54-0071 TSTR:Sl NPNt SELECTED FROM 2N37041 28480 1854-0071 A2Q2't 185'>-0005 TSTIUSI NPN 60131 21'1708 AZQ25 NOT ASS! GNEO A2'121> 1854-0071 TSTR•SI NPNISELECTEO fROM ZN37041 28480 1854-0071
A2UZ7 1854-0011 TS TR: SI NPNISELECTEO FR.OM 2N37041 28480 1854-0071 A2028 1854-0009 2 TSTR: SI jojpN 80131 2N709 A2Q29 1854-0009 TS TRI SI NP'I 80131 ZN709 i12030 1855-0062 3 TSTR:SI FET 30V 012!'!5 21111595 42031 NOT ASS l&NEO
A2Ql2 1855-0062 TSTR•SI FCT 30V OU95 ZNLS<JS A2Qll NOT ASSIGNED AZ034 185 .. -0071 TSTR:SI NPNISELECTED FROM 2N3704l 28480 1854-00H A2Q'5 U154-007l TSTR:SI NPNISELECTED FRDM .2N:H04) 28480 l85't-0071 il2Q36 1853-0015 l TSTR:Sl PNP ao1:n .21'13640
A2037 1853-0020 TSTR:Sl PNPCSELECTEO FR.OM 2N37021 Z8480 1853-0020 AZQ38 1855-0062 TSTR:Sl FET 30¥ 01295 ZN1595 A2039 1854-0071 TSTR:SI NPNISELECTEO FRON 2N3101tl 28480 1854-0071 A2040 1854-0071 TSTR:Sl NPNCSELECTEO FR.OK 2N37041 Z8480 1854-0071 A20"1 1853-0020 TSTRISI PNPISElECTEO FROM 2N37021 281t80 1853-0020
AZ042 1853-0020 TSTR:Sl PNPISElECTEO FROM 2N37021 28480 1853-00ZO A2Cl43 1854-0071 TSTR:Sl NPNlSELECTEO FROK 2N37041 28480 1851t-001l A20"4 1854-0071 TSTRISI NPN(SELECTEO FRrn4 2113704) 28490 185't-007l A2R1 0757-0279 R:fXO KET FLK 3.ll>K OHK U .l/8W 28480 0757-0279 A2R2 0683-0685 1 R:Fxo COMP 6.8 OHM 5% 1/4)1 01121 C868G5
A2R3 0757-0835 1 RlFXO MET FlK 6.81K OHK 1:i: l/2W 28't8Q 0757-Q835 A2R4 NOT ASSl&f!IED A2R5 07!H-Oit47 2 R:FXu MET flM 16.ZK Oltll 11 1/8N 28480 0757-0447 A2RI> 2100-1773 l R: VAR NW lK QliM 5:1: 1'.YPE H hi 28480 2100-1173 .l2R7 0757-0289 R:FXD MET flit 13.3K OHM U l/8111 28~80 0757-0289
A2RS 0757-0280 4 R:FXO KET flit lK OHK U 11 llW 28480 0757-0280 A2R9 0757-0ltSS z R:Fxo KET flM 51.1~ OHM lg l/8W 281t80 0757-0458 A2Rl0 0757-0ltOl R:FXD KET Fl.M 100 OHM U 1/8W 28480 0757-0401 A21!H 0757-0lt6S lUFXO fo!ET Flit lOOK GHii l.i 1/811 Z8480 0757-041>5 A2Rl2 0757-0442 R:FXD KET FLM 10.0K OHM li l/aw 28480 0757-0442
A2Rl3 0757-0'>47 R:FXO llET FU! l6.2K OllN u 11aw Z8480 0757-0447 AZl!14 NOT ASSI&'IED A2tU~ 0757-0442 R:F XI.I MET F!.H 10.01< OHM n 11811 28480 0757-044Z A2Rl6 0757-0279 R•FXD HET fLM 3.1611 OHM ll l/8W Z6480 0757-0Z79 A2R17 0757-0198 2 R•FXO MET FLM 100 OHM U l/2W 28480 0757-0198
See introduction to this section for ordering information

Section VI Model 432A Replaceable Parts
Table 6-1. Replaceable Parts
Reference HP Part Number Oty Description Mfr Mfr Part Number Designation Code
A21U8 01>98-3401 l R•FXD llET FLM 215 OHM 1.1 1/.211 28480 ')698-3401 A2Rl9 NOT 4SSl6NEO .&2R20 NOT A.SSIGNEO A2i<2l 0698-3156 R<FXD MET FLll a.7K OHM U l/SW 28480 0!>98-3156 A2R22 0757-0442 R:FXO llfT FLll 10.0K OHM U .l/8W 28480 0757-0442
A2R23 0757-0442 R:FXO MEl FLM 10.0K Olill u .uaw 28480 0757-0442 A2R24 0698-3Z60 R<FXD MET FLM 464K OHM •U ll8W 28480 0698-3260 1'2R25 0698-3260 R:F.XO MET Fl.II 464K OHK .u l/8W 28480 0698-3260 1'2R2o 0757-04it2 R<FXO MET FLM 10.0K OHM U l/ 8W 28'>80 07'7-04'>2 A211.27 0757-0442 !UFXD ML'T FUI 10.0K OHM U l/8l4 28480 0757-0442
A2R28 0698-3156 R•FXO llET FLM 14. 7K Olil'I U 1/ 8W 28480 0698-3156 A2R29 0757-0397 l R:FXO HST fl.II c>S.1 OHM 11 ll8W 28480 0757-0397 112R30 !'IDT ASSIGNED 112R31 NOT ASSIGNED A2R32 0757-0199 R:FXO MET FLM 21.5K OHM U .l/8W 281'80 0757-0199
A2R33 0757-0442 R:FXO MET FLM 10.oK OHl'I U l./8W 28480 0757-0442 A2R34 0757-0465 R:FXD MET Fl.II lOOK OHM U 1/ 8W 28480 0757-0465 A2R35 0698-3266 1 RIFXll MET FU! 237K OHM U !/SW 28480 01>98-3266 A2R3o D757-0461 R!fl([) MET Fl..M 68.11( OHll U 1/8" 28480 0757-0461 ;12R37 0698-3160 !UFXD MET FLK n.i.11 OHM a; 1/8W 28480 0698-3160
112R38 0757-0405 R:FXO MET FLM lOOK OHM U l/8W 28480 0757-0405 A2R39 0698-3155 4 R:Fxo MET fU4 4.6411 OHll U: l/SW 2848D 0698-JU5 A2R1>0 0698-31!15 R:FXO MET FLM 4.6411 OHM U; l/8W 28480 0698-3U5 A2R4l 0757-0465 R:FXO MET FLM lDOK OHM U\ 1/8W 28480 0757-0465 112R42 0683-1065 3 R:FXD COMP lOM OHM 5l; l/4W 01121 C6 1065
A2R43 0757-1094 l R>FXO MET FUI l."7K OHM U l/8W 28480 0757-1094 A2R44 NOT ASSIGNED 1121<45 NOT ASSIGl><eO A2K46 0757-0465 R:FX!l MET FLM 10011 OHM J.t l/8W 28480 0757-0465 A2R47 0683-1065 R:FXD COMP 1011 OHM SC 1/4W 01121 cs 1065
A2R'>8 NOT ASS lGNED A2R49 NGT ASS lGNEO A2R50 0757-0280 R:FXil llET FLM lK OHM U l/llW 28480 0757-0280 A2RSl Ob91J-3Z6() 11.:FXO MET HM t,6t,I( OHM U l/8W 28460 0698-3260 1121<52 0757-0279 R•FXO MET FLM 3.l6K OHM lC l/8W 28480 0757-0279
A2R53 0698-311>0 J!:FXD f'IET FLH 3l.6K OHM U: l/BW 28'>80 0698-3160 A2R54 0698-3428 l R:FXD MET FLM 14.7 OHll U J./BW 28480 0698-3428 A2R55 0698-3160 R:FXD llET FLll 3l..4ll OHM lC l/BW 28480 0698-3160 A2R5<> 0698-3260 R:FXO llET FLM 4641( OHM U l/8W 26480 Oo98-326D A2R:i6 FAtTORV SELECTED PART
A21<5'7 0757-0442 il.:FXO llET FUI 10.0K OHM 11( 1/8W 28480 0757-0442 A2R58 0698-3260 RIFXD MET FUI "64K OHM U l/8W 28'-80 0698-3200 A2R59 0698-3260 l!:Fxo llET Fl.II 46t,K OHM u: 11811 28480 0698-3260 A2R60 0698-0084 2 R:FXD MET FLM 2.l5K OHM 11( 1/8W 28480 0698-008 ... AZRbl 01>83-1055 l IUFXD COMP l ,MEGOHM 5C l/4W 01121 CB 1055
AZR6l NOT AS.SIGl'IEO A2Rbl lllOT ASSIGNED A.!Ro3 0698-3260 R:FXO MET FLM '>~'+K OHM U: 1/8W 28480 OM18-3260 A2R.64 0757-0439 R:FXO HET FU! o.81K OHM UI l/8W 28480 0757-04J9 A2Rc5 07 57-0"'42 RlfXO MET Fl.JI 10.0K OHM U •l/8W 28480 0757-0442
A2R66 0757-0461 R:FXO >IET FLH 68. lK OHM u: l/80I 28480 0757-~61 A2R67 0098-3160 l\:FXO MET FLll 3l.6K OHll U l/SW 28480 0696-3160 A2R68 0757-0442 R:FXO MeT fLll 10.0K OHM U; l/8W 28480 0751-044Z A2R09 0698-3438 l R:FXO MET FLK 147 OHM U l/BW 28480 0698-3'>38 A2R70 0698-3156 R:FXO llET FLM 14. 7K OHM UC l/ SW 28480 0698-3156
AZR7l 0698-3160 lUFXi> MET FLM :U.6K OHM U J./ 8W Z8480 0098-3160 AZR72 0757-0401 R:fXD MET FL'! 100 OHM u vs• 28480 0757-0401 A2R73 0757-0199 R<FXO MET FLP! 21.5K OHM U: l/8W 28'>80 0757-0199 A:ZR7<t 2100-1769 l !\:VAR WW 50 OHM 5¥ TYPE H lW 28480 2100-1769 A:ZR75 0698-'<41>1> l R:Fxo MET FLM 976 OHM U l/8W 28480 Ob98-4'<66
A2R7b 0757-0346 14 l\:fXO MET FUI 10 OHM U 1/BW 28480 0751-0346 112R77 0698-3160 R:FXO MET FLll 3l.6K OHi! U 11 SW 28480 0698-3160 .t.:ZR78 01111-2277 3 R•FXO WW lOK OHM o.1c 1/40W 28480 0811-2277 A2R79 0811-2277 R<FX() ilW lOK OHM O.U ll40W 28480 0811-2277 1121l.HO 0811-2537 1 R:FXD ilW 5K OHM O.l~ l/40W 28480 0811-2537
112R61 NOT ASSlGlllEO A2R8Z NOT ASSlGNEO A2fd!3 0698-3441 R:FXO MET flM ll5 OHM U l/8W 28480 0698-3441 A2R84 NOT ASSIGNED il2k<IS NOT ASSIGNED
A2i<8o 2100-1018 R: VAi<. FLM 1 '4EGOHM 20:1: LIN l/2W 28480 2100-1618 A2R>i7 Obo3-l065 R1FXD COMP lOM IJHH 5~ l/4w 01121 ca 1065 A2Ri!S G757-0<>05 l R :FXO MET FlM 16Z OHM lt l/SW 28480 0757-0405 AlH 3101-0973 l SWITCH: SLIDE DPDT 0.5A i25\i AC/llC 19121 Gllb-0018 AZTPl G3o0-0124 TERM! NAL: SOLDER L\JG 28480 0360-0124
See introduction to this section for ordering information
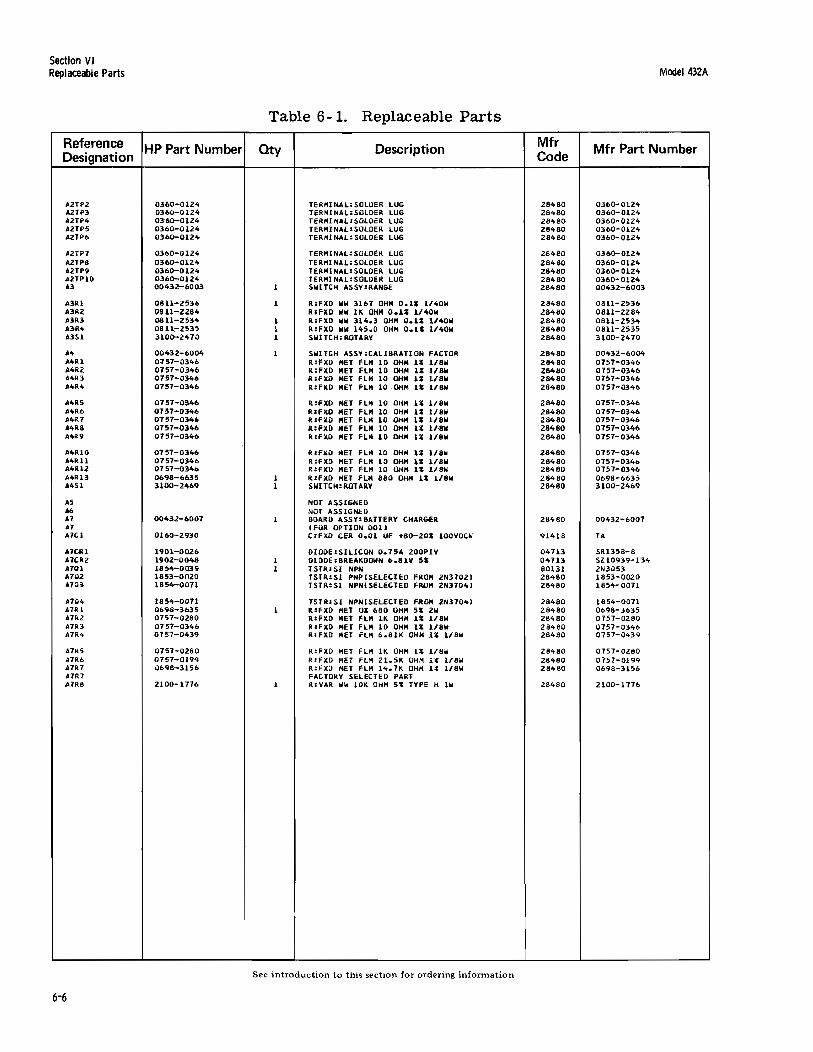
Section VI Replaceable Parts Model 432A
Reference Designation
AZTP2 A2TP3 A2TP4 A2TP5 AZTl>6
A2TP7 A2TP8 A2TP9 112TP10 113
A31U A3RZ Aii\Rl A3R4 113Sl
A4 A41U A4RZ A4R3 li4R4
,;i4RS li4R6 MtR7 A4R8 A4R9
A4Rl0 A4R11 A4Rl2. A4Rll .\4Sl
AS ji6
A7 /1.1 A7Cl
.ucu AlCRZ A70l A702 A70:i
11704 A7Rl A7R2 A7R3 A7R't
A7RS A7R6 />.7R7 nR7 A7R8
HP Part Number
0360-0124 0360-()124 0360-0124 0360-0124 0360-0124
Q360-0lZ4 0360-0124 O:il60-QlZ4 0360-0124 00432-6003
0811-2531> 081l-ZZ84 0811-25;:14 0811:-2535 3100-2't70
00432-oOO<t O:'f!l.7-0346 0757-03"6 0757-0346 0757-03"6
07S7-D3"6 071>7-0340 D757-0346 0757-0346 o757-o3<t6
0757-0346 0757-0346 0757-0l'to 0698-6635 3100-2~9
OO<t32-6007
Ol6Cl-2930
l901-0CIZ6 19 02-ll O<t8 185.r,-0039 1853-0020 1854-0071
1854-0071 01>98-3635 0757-0280 0757-o31to 0757-0439
0757-0280 0757-0199 0698-3156
2100-1776
Table 6-1. Replaceable Parts
Oty Description
TERMINAL:SOLOER LUG TERMINAL:SOLDER LUG TfRMINAL:SDLOt:R LUG TERHINALISOLOER LUG TERHINAl•SOlDER LUG
TERHINAL:SOl.OeR LUG TERMINAL:SOLOER LUG TERMINAL:SOLDER LUG TERMINAL:SOLDER LUG SWITCH ASSY :RANGE
R:FXD WW 3167 OHM O.li l/<tOW RtfXD WW lK OHll D.li l/'tOW R•FXO WW 314.3 OHM 0.11 l/40W RIFXD WW llt5.0 OHM O.U 1/A>OW SWITttt: ROTARY
SWITCH ASSHCAll&aATlON FACTOR RlFXO MET flM 10 OHM U l/&W R:FXD MET FlM 10 OHM l* l/SW IUFXD MET FLM 10 0HH U l/SW R:FXD MET fl.M 10 ,01U4 U l/l!W
R:FXD MET FLM 10 OHM U ll8W R:FXD MET FLM 10 OHM U 1/&W RIFXO MET FLH 10 OHM 11 l/8W R:FXD MET FLM 10 OHM U l/BW R:FXD MET FLll 10 OH!ol U l/8W
IUFXO MET fl.II 10 OHM ll lll!W R:FXO MET FLM 10 OHM tit ll8W R:FXO llET FLM lD OHM U l/8111 R•fXO NET fLll 8110 OHi! 1* ll8W SWITCH: ROTARY
NOT ASSIGNcO NOT ASSIGNED BOARD ASSY:flA1TfRY CHARGER IFOR OPTION OOH C•FXO CER 0.01 I.IF +eo-2oi 100VOCW
OIODE•SILICON 0.75A 200PIV DlilOE•8REAKl)OllN o...lllV n TSTR•Sl Nl'H TSTIUSI PNPISELECJEO FROM ZN370ll TSTR•SI NPNISELECTEO flWM 2N370itl
TSTR•SI NPHISELECTEll AAOll 2Nl704l R:fXO MET OX 680 OHM 51C 2W R:FXO MET FLM lK OHM U l/8W R•FXO MET FlM 10 OHM U l/SW R:FXO MET flM 6.81K OHM 11 1/SW
R:FXO MET FLM lK OHM 1' l/8ioi RtFXO MET fLM 21.~K OHM lt 1/6W R:FXO l'IET FlM 14. 7K OHM U l/8W FACTORY SELECTED PART R•VAR WW lOK OHM 51 TYPE H lw
See introduction to this section for ordering information
Mfr Code
28480 28'+80 28480 281t80 281t80
28480 281t80 281t8D 28't80 28480
28480 28480 .;!8460 28480 28480
28480 211480 28480 284110 28480
28"80 28480 28480 28itli0 28it80
28'<80 28480 28480 28'<80 28it80
28460
91418
O't71l 04713 8Dl31 21:1460 281t60
28480 28480 281t80 281tBO lBitSO
28480 281t80 28480
28480
Mfr Part Number
0360-0124 0360-0124 0360-0124 0360-0121t 03b0-0l2<t
Oll>0-0124 0360-0l21t 0360-0124 0360-0124 0Dit32-6003
0811-2536 0611-2284 0811-253"t 0811-2535 31D0-2it70
001t32-6004 07S7-031t6 0757-0346 0757-0lltb 0757-0346
0757-031t6 0757-03'+6 0757-0346 0757-0346 0757-0346
0757-0346 0757-034<> 0757-031t6 0698-6635 3100-2469
00432-6007
TA
SRl358-8 SZ10939-l34 2N3i>53 1853-0020 1854-0071
1654-0071 0698-31>35 0757-0280 0757-031tb 0757-0it39
0757-0280 0757-0199 0698-3156
2100-1111>

Section VI Madel 432A Replaceable Parts
Table 6-1. Replaceable Parts
Reference HP Part Number Qty Description Mfr Mfr Part Number Designation Code
CHASSIS ~ MISCELLANEOUS PARTS 81 1420-0062 1 BATTERY:RECHARGEABLE 24V 28480 1420-0062 el I OPT 0011 Cl 0160-3043 1 C:FXD CER Z X 0.005 UF 20& 250VAC 56289 29Cl4 7A-CDH CZ 0180-0197 c:Fxo Ei.ECT 2.2 UF 10& zovoc:w 56289 1500225X9020AZ-DYS
CZ IOPT 011, 012. 0131 DSl 2140-0244 l LAMP•GLOW MINIATURE 95V 87034 AlH Fl 2110-0.Z34 1 FUSE:O.l AMP 250V SLOW-BLOW 75915 313.100/S Jl 1251-1280 1 CONNECTOll:AUDlO b FEMALE COHTACTS 28480 1251-1280 Jl 00432-2005 1 NUT: CONNECTOR 28480 OO·BZ-2005
J2 1250-0118 3 CONNECTOIUBNC 24931 28JR 128-1 J3 12·50-0118 CONNECTOR•8NC 24931 28JR 128-1 J4 l25o-Oll8 C ONNE c Toa: 8NC 24931 28JR 128-1 J5 1251-2357 1 SOCKET:3-PIN MALE POWER RECEPTACLE 82389 EAC-301 J5 (PART OF REAR PANELi
Ml 1120-1497 1 METER 28480 1120-1497 MPl 0370-0077 1 KNOB:SKlRTED BAR FOR 0.250• DIA SHAFT 28480 0370-0077 ~Pl I RANGEi MPl 0370-0193 l KNOB:ROTARY POINTER SLACK 28480 .0370-0193 MPZ ICAL FACTOR)
MP3 0370-0432 1 IOI08: BLACK LEVER 28480 0370-0432 MP3 IMT. RES.I llP4 5040-0345 6 INSULATOR:CONNECTOR(L!GHT GRAY) 28480 5040-0345 llP4 504o-0702 6 INSULATOR:CONNECTOR(BLACK) 28480 5040-0702 llP5 0403-0131 2 GUIOE:P.C. BOARD, GREY 28480 0403-0131
MP6 0403-0026 1 GUOE:NYLON 28480 0403-0026 "Pb IOPT OOU llP6 00432-0005 l BRACKET :TRANSFORllER 28480 00432-0005 MP7 00432-0006 1 DECK: LOWER 28480 00432-0006 MPS 0002-0007 1 DECK: UPPER 28480 00432-0007
~P9 00432-0011 1 BRACKET:FRAME 28480 00432-11011 Al 2100-2849 l R:VAR WW 50K OHM 3% LIN 2W 28480 2100-2849 Al 2950-0034 1 NUT:HEX BRASS 3/8-32 X 1/2• 28480 2950-0034 Rl 00432-2004 1 BUSHING:PANEL. 28480 00432-2004 R2 0811-2538 4 R:FXO WW 100 OHM o.~z 1/lOW 28480 0811-2538
R3 0811-2538 R:Fxo WW 100 OHM O.U: l/lOW 28480 0811-2538 R4 0811-2538 R:Fxo WW 100 OHM O.l& l/.lOW 28480 0811-2538 R5 0811-2538 R:FXO WW 100 OHM o.1z l/lOW 28480 0811-2538 R6 0757-0984 2 R:FXO MET FLM 10.0 OHM 11 l/ZW 28480 0757-0984 R7 0757-0984 R•FXD HET FLM 10.0 OHM U l/2W 28480 0757-0984
AB 0757-0198 R:Fxo MET FLM 100 OHM U: lJ.2W 28480 0757-0198 R9 0757-0458 R:FXD HET FL'4 51.lK OHM lZ l/SW 28480 0757-0458 RlO 0757-0200 1 R:FXO MET FLH 5.62K OHM 11 l/8W 28480 0757-0200 RlO IFOR OPT Olli RlO 0698-3151 1 R:FXD MET FLM 2.87K OHM u l/8W 28480 0698-3151
RlO IOPT 0121 RlO 0757-0317 l R:FXD MET FLM l.33K OHM u l/8W 28480 0757-0317 RlO IFOR OPT Olli RH 0757-0288 1 R:FXO KET FLM 9.09K OHM u l/8W 28480 0757-0288 RU IFOR OPT Olli
Rll 0698-3155 R:FXO MET FLM 4.64K OHM u l/8W 28480 0698-3155 Rll I OPT 0121 Rll 0698-0084 R:FXO MET FLM Z.15K OHM u 11811 28480 0698-0084 Rll IOPT 0131
1U2 0698-3156 l<:FXO MET FLM 14.TK OHM u l/8W 28480 0698-3156 U2 IOPT 0121 Rl3 0698-3158 l R:FXD MET FLM 23.7K OHM u l/SW 28480 0698-3158 RB IOPT 0121 Rl4 0811-2277 R:FXO W~ lOK OHM O.U l/.40W 28480 0811-2277
Sl 3101-1395 l SWITCH:PUSH8UTTON OPDT-08 76854 53-67280-121/AlH Sl IPl)WERI S2 3101-1234 1 SW[ TCli: SLIDE DPOT 82389 llA-1242 52 I PART OF RE AR PANELi S3 3100-2485 l SWITCH:LEVEK SINGLE SECTION 76854 TYPE 184
S3 IHT. RES.I B 00432-00031 l SwITCH PLATE 28480 00432-00031 54 3101-1357 l SWITCH: TOGGLE SPOT ()9353 7109 54 IFINE ZEROI S4 00432-2003 l NvT:ORESS 28460 00432-2003
1'1 8120-1082 l CABLE ASSY:5 FT 28480 8120-1082 •l 8120-1083 l CABLE ASSY:SPECIAL PURPOSEllO FT I 28480 8120-1083 wl IOPT 0091 .. 1 8120-1084 l CAl!LE ASSY: SPECIAL PURPOSEl20 FTl 28480 8120-1084 •l I OPT 0101
See introduction to this section for ordering information

Section VI Replaceable Parts Model 432A
Table 6-1. Replaceable Parts
Reference HP Part Number Oty Description Mfr Mfr Part Number Designation Code
lol 8120-1359 l THERMO CABLE: SPECIAL PURPOSE I 50 FT I 28480 8120-1359 lol I OPT Olli kl 8120-13b0 1 THERMO CABLE:SPECIAL PURPOSE 1100 FTI 28480 8120-1360 lol IOPT 0121 Wl 8120-1361 l THE RHO CASL E:SPECIAL PUAPOSEl200 Ffl 28480 8120-1361
lol I OPT 0131 lo2 8120-1348 l CABLE ASSY:POWER, DETACHABLE 70903 KHS-7041 lo3 00432-6010 l CASLE ASSY:POWER SWITCH 28480 00432-6010 XAl 1251-0172 2 CONNECTOR:Pt EDGE 1 ROW 22 CONTACT 71785 250-22-30-210 XAl IPART OF LOWER OECKl
XA2 1251-0172 CONNECTOR:PC EDGE l ROW 22 CONTACT 71785 250-22-30-210 XA2 IPART OF LOWER OECKl Xlll 00432-0008 1 BRACKET:BATTERV UPPER 28'>80 00432-0008 XBl I OP.T 0011 XBl 00432-0009 l BRACKET:BATTERY LOWER 28480 00432-0009
(OPT 001)
XFl 1400-0084 1 FUSEHOLDER:EXTRACTOR POST IYPE 75915 342014
See introduction to this section for ordering information

Section VI MOdel 432A Replaceable Parts
Table 6-1. Replaceable Parts
Reference HP Part Number Qty Designation Description Mfr
Code
l 2 3 4
5 6
" 7 1
8 8 9
10
10 ll 11
4328
01121 Ol295 047l3 072ol oq353 ?4'Hl 78480 5043" 56289 70903 7l 7e5 7Z9A2 75915 768'i4 797?7 80131 823'\9 6441 l 87034 91416
5060-0703 1490-0031 5040-0700 5060-0727
502<>-0700 5000-0703 5000-8565 5060-0700 5000-85't9
5000-0711 5000-8571 00432-00022
0043Z-00021
00432-00033 5020-0704 5020-7433
CABINET PARTS FRAME ASSYto X 11 SM S TANIHTI LT HINGE FOOT ASSY
SPACER: CASI KET SlllE COVER-BLUE GRAY S l DE COl/ER-C'LIVE GRAY TOP COVER-BLUE GRAY TOP CO\IEll-ot.I\!E GRAY
BOTTOM COVER-BLUE GRAY BOTTOM COVER-OLIVE GRAY REAR PANEL
FRONT PANEL-LIGHT GRAY
FRONT PANEL - MINT GllAY METER TRHI: LIGHT GRAY METE!\ TRIM: Ml NT GRAY
28480 28480 28480 Z8480
281t80 28480 .talt&O ZIVtJIO 50lt36
28480 28480
50436 SO't36
S0..36 28"'80 28480
Table 6-2. Code List of Manufacturers MANUFACTJRERS :OlE LIST
ALLE~ H~aDLEY en. TEXAS PISHU~F~TS IN:. ~E'!ICJN)U:rn• CJ~?O'lo~rs ~Iv. MUTJR(<L A Sfl'IC~NOLIC TO< P~O) .! N:. FA!RCH!L!l CA'!E•A & l'IST. CJ•P. SEMlC!INDu:rn~ DIV. r l K COM?ON!NTS INC. SPfC !AL TY Ul'\INF:Tn~ :o. I 'I:. HFolfTT-PACK•Rn CD. CO<PO<ATE ~o HfwlFH-PACkAPO ro. ~ICROwAVE DIV SPUGUF Elff.TRIC en. Aft Of.N (~RP. Cl~CM ~FG. fJ. 11V TRW INC. ERIE TECHNJLJGICAL P<PJ. !'IC. L ITTEL FUSf !'IC. llAK MFc •• C'J. DIV. JA~ Hr:n;J/'\IETI:s C3•P. CONT!NFNTM -~!RT FLF:TRON!:S CJ~•. ELFCTPONIC l~()USTRIFS 4SSOC!AT!n'l S•lffflC~AFT INC. TR~ CAPACITO< O!V. ~AR:OAK !NOUSnTFS onrn 'IATERIALS co.
AS OF 06/ 03172
AOORESS
Ml LWAJKEE, ~IS, OALLAS, TEX, PHOENIX. AHZ. MOUNTAI~ VIEW, CALIF. '4EWTON, MASS. l~OIA~A•OLIS. nw. ?ALO t.LfO, CALIF. PALO Al TO, CAL IF N. ADAMS, 'iASS. Ct!ICAGO, !LL. ELK G~OVE VILLAGE, IU. ER.IE, PA. DES PLAl1ES, Ill• CRYSUL LAKE, ILL. tiAqf'II~ST!:•, PA. WASHI'lGTO'l O.C. C~!CA:>3. ILL. )GAllUA, ~E8R. ANAHEl11, CALIF. C.·HCAGO, lLL.
See introduction to $his section for ordering information
Mfr Part Number
SOt>0-0703 1490-0031 5040-0700 5060-0727
5020-0700 5000-0703 5000-8565 5000-0l)f, 5060-8549
5000-07ll S000-8571
00432-00022 00432-00021
00432-000.U 5020-070'> 5020-7633
HGE
ZIP CODE
53204 752:31 85008 94040 02158 46Z27 '14304 94304 OU47 60644
16512 60016 60014 16974 20006 60630 i>'H~3 92803 6064b


Model 432A Section VII Troubleshooting, Schematics
SECTION VII
TROUBLESHOOTING, SCHEMATICS, AND COMPONENT LOCATIONS
7-1. INTRODUCTION.
7 -2. This section contains trouble shooting instruc -tions, schematics, and component locations for th e power meter. Also included is an overall block diagram that indicates the location of test points in the instrument.
7 -3. Reference designations shown within circuit card outlines are abbreviated. To find the part in the Parts List, use the full reference designation. For example, R6 on the A2 Meter Logic Assembly is listed as A2R6.
7 -4. The Schematic Notes in Table 7 -1 pertain to all the schematics. Additional notes on the schematics indicate test conditions, and special information for use when maintaining the instrument.
7-5. TROUBLESHOOTING.
7 -6. Table 7 -2 is the Overall Troubleshooting chart for the power meter. Procedures for isolating circuit malfunctions to specific stages are based on the use of the HP 8477 A Power Meter Calibrator and the calibration procedures in Section V. The information obtained when calibration is attempted is u s e d to troubleshoot the instrument.
7 -7. Table 7 -2 contains references that direct the user to the detailed troubleshooting charts, Tables 7-3 through 7-11. The detailed charts refer the user to transistor stages. In a few instances, specific parts are called out as being possible causes of circuit malfunction, however, the troubleshooting charts are not intended to locate specific parts that have failed. They are intended to locate only malfunctioning stages.
7-8. SCHEMATICS.
7-9. The schematics contain signal routing information, nominal voltage levels, and notes that assist in understanding the circuit. They are laid out to show electrical operation, and are not intended as wiring diagrams.
7 -10. Component location photographs n ext to the sche:matic foldouts indicate the physical location of parts. Test points are also shown, and are marked on the schematic in the same manner as they are in the meter.
7-11. Factory selected parts are indicated by an asterisk. These are components that generally are installed to fulfill circuit operation requirements. They may be the nominal value, or they may be some value close to nominal. In any case, if the component fails, circuit operation should be verified after these components are replaced.
7-12. A1A1 AUTO ZERO ASSEMBLY.
7 -13. The Auto Zero circuit is encapsulated and must be replaced as a unit. A solder removing tool, such as the Soldapullit suction device listed in Section V, is required to remove solder around the leads. After solder is removed, the unit must be carefully removed from the circuit card in such a manner that the circuits on the card do not delaminate. After the Auto Zero assembly is replaced, perform the adjustment procedure given in Section V.
7-14. TEST CONDITIONS.
7-15. For most tests of circuit operation when troubleshooting the instrument, the troubleshooting charts call out control settings. In special cases, notes on the schematics indicate control settings required to measure voltage levels in circuits. Generally, the following control settings sh o u 1 d be selected, and ch an g e d on 1 y as the troubleshooting procedures indicate:
RANGE........................ . 3 mW (-5 dBm) MOUNT RESISTANCE ......... 200 (Mount installed) CALIBRATION FACTOR ....................... 100 COARSE ZERO ...... turn until meter is at full scale
7-1

Section VII Model 432A Troubleshooting, Schematics
7-2
Table 7-1. Schematic Notes
1. Resistance in ohms, capacitance in microfarads unless otherwise indicated.
2.
" Sbewdriver adjustment
0 Front panel control
3. D Front panel designation
.---, Rear panel designation I I
L---.J
4. ----- Printed circuit card border
Main signal path
Secondary signal path
Secondary feedback path
5. P/O = part of
6 . ~cw
7. • 8. -© 9.-®-10. (947)
XAI I
11. 7A1-
Wiper moves toward CW when control rotated clockwise
Test point. Number in circle matches number on printed circuit card.
Breakdown diode
Tunnel diode
Wire color code. Numerical color code same as resistor coding. For example,
947 denotes white, yellow, violet wire.
Indicates socket connections and pin numbers.

Model 432A
TEST POINT MEASUREMENT CONDITIONS AND VOLTAGES
MeasJ.rement Conditions
1. .3 mW
2. 200 ohm mount
3. 100% CAL FACTOR
4. COARSE ZERO turned to get full-scale deflection
5. Measurements made with respect to CHASSIS GROUJ\i"D
Test Point Voltages
Test Point
AlTPl
A1TP2
A1TP3
A1TP4
A1TP5
A1TP6
A1TP7
A1TP8
AlTP9
A2TP1
A2TP2
A2TP3
A2TP4
A2TP5
A2TP6
A2TP7
A2TP8
A2TP9
A2TP10
A7TP1
A7TP2
Voltage
+5.2
+5.2
+2.7
... 2.7
+2.7
-'-2.7
-'-1. 2
-6. 5
-'-4 mV
Waveform
Waveform
+7 Nominal
-13 Nominal
ov Waveform
Waveform
Waveform
Waveform
Waveform
+1 Variable
+ 1. 6 Variable
Notes
RANGE to COARSE ZERO, meter zeroed
Varies from 0 to -13 V under normal operating conditions
Thermistor ground
Figure 7-3
Figure 7-3
Chassis Ground
Figure 7-3
Figure 7-3
Figure 7-3
Figure 7-3
Figure 7-3


Mod el 432A
+2.7V
+5. 2V
+27V [
ASSY Al
ASSY A2 ASSY A7
Figure 7-4. Model 432A Test Point Locations


Model 432A
TABLE 7-5. AUTO ZERO CIRCUIT P/O A1 TROUBLESHOOTING
NO CHECK QLQ2, & ASSOCIATED CIR CU !TRY
SET RANGE SWITCH TO 10 MVI,
MEASURE VOLTS AT TP7, WHILE DEPRESS I NG FI NE
MEASURE VOLTAGE AT Al TP8, TURNCOARSE ZERO C\1 & CC\'I:
ZERO, ROTA TE REPLACE YES COARSE ZERO THRU --- BAD - SEALED FET
ITS RANGE· ASSEMBLY i\lAl VOLT @ TP8 LIMITS AT: cm -11.sv rn + .4V
SET RANGE CHECK Svl!TCH VOLTAGE
YES TO -AT COARSE AlTPS ZERO ~ -GV
CCW -6.5V rn +4. sv CSHOULD BE AT LEAST 8V VARIATIONJ
CHECK NO Q3
TABLE 7-6. CHOPPER P/0 A2 TROUBLESHOOTING
VRF & VcoMP OK SIG~IAL AT A2TP6 BAD
CHECK 5KHZ -AT GATE OF
Q30, Q32
BAD CHECK A2rP2 & COLLECTOR Q21
CHECK OK Q30, Q32
CHECK lOOK RESISTOR & .01 CAPACITOR OK BETWEEN BASE WHERE
~Q. WAVE IS BAD AND A2TP2 OR COLL Q21
MULTIVIBRATOR TROUBLESHOOTING BAD TABLE 7-7
SERVICE HINT: IF TROUBLESHOOTING CHOPPER FOR NOISE, LIFT END OF C29 & C31 AND SEE IF NOISE PERSISTS.


Model 432A **ADDED FOR LONG CABLE OPT IONS ( 11, 12 l
015
S2 115/230
R6
J5 LINE
INPUT
CV - .., 0 CV N C\I N a: a: a: a:
ti) QJO 0 ~ 09
'"" ~ l.)
in Cl) U> ,.... a: a: a: a;
Q5
' 02 : '3·
04
1, ot4
06
·~
CV a: u a:.
u
AIAI AUTO-ZERO
CIRCUIT
Figure 7- 7. Al Bridge Assembly Component Locations
RECORDER J4 RB
. . '
• R7
Figure 7-8. 432A Rear Panel Interior
~~~ a:.a:.o o::.
Q3 -0 .. 02 ~ ::l' Ir:
QI

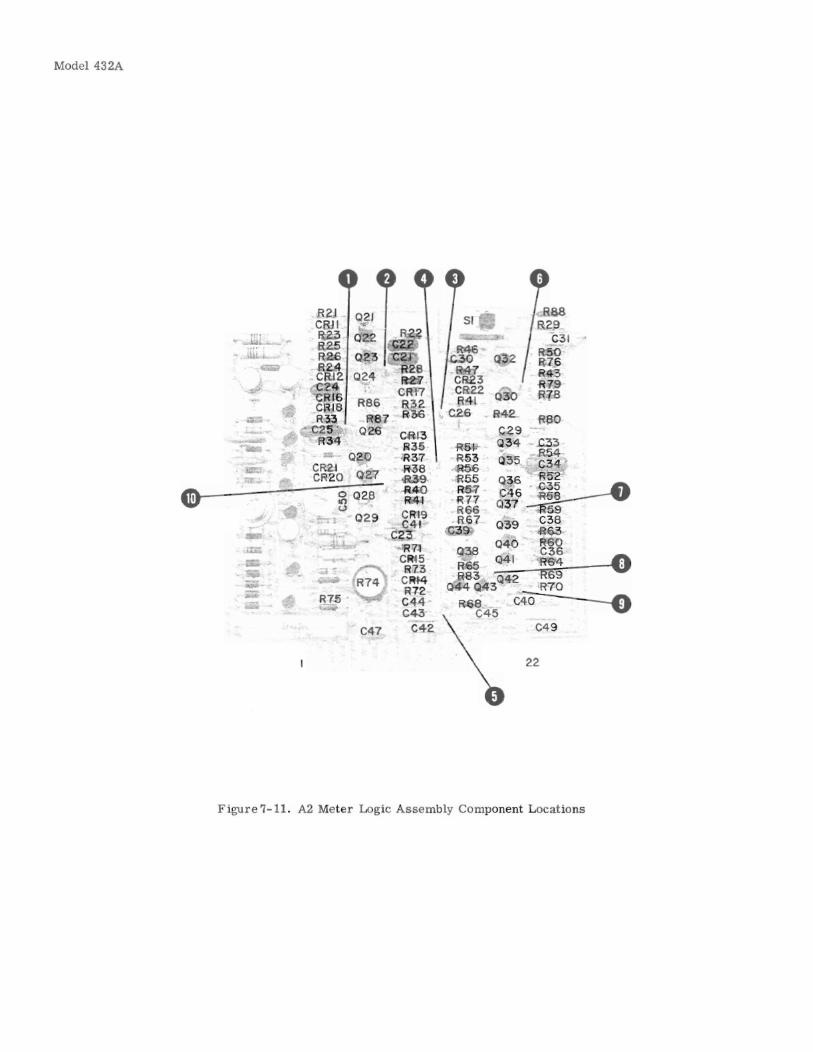
Model 432A
R2J 021 SI R68
CBJI - R29 _,. Q_ ~
w 02,2 R.C~ C31
~ a2.5 ~ R46 R.50 R2£ Q.23 'CU C30 Q~,2 ~76
~ ~ ~28 ~3 R43 024 tif ~ 'CM CR17 CR22 R'19
CRf.6 R86 ~~ R41 Q30 R78
CRIS C26 R42 "'° R~ R"87 Rao
C25 ' Q2;6 Cftl.3 C29 R34 lil35 R6v Q34 0.3
- ozo R37 RH Q35 R.5.4
CRLI R38 -.R56 C34 CR20 OZ7 4139 R65
Q3 6 J.1----e G>- ~ 028
..AJW R5.7 C46 -R58 R~U R77 0 37 59 u CR19 R66
029 C41 R67 039 C38 C2:3 C39 a63
om: -'Rn Q38 040 ~i
CR15 R65 Q41 R&4 0 873 ,.R83 Q42 R69 R74 c~
R72 Q44 Q43 R70 R7~ - -0 C44 R68 C40
C43 C45 C47 C42 C49
22
Figure 7-11. A2 Meter Logic Assembly Component Locations

AI–1
Model 432A Appendix I
APPENDIX I
MANUAL CHANGES
(22 OCTOBER 2007)
NotificationObsolescence of Model 432A- 100
The Reason for Obsolete Model 432A- 100Model 432A- 101 was obsolete in November 2005 due to parts depletion.
Replacement product for Model 432A- 100The Model 432A- 100 has been replaced with Model 432- 101 as this product supports 100 VAC line voltage input.
Ordering InformationCustomers should place order for Model 432A- 101 instead of Model 432A- 100.


Model 432A Appendix II
APPENDIX II
INSTALLATION OF LONG CABLE OPTIONS
AII-1. Information in this appendix describes installation of the long cable options used with the 432A Power Meters. Table AII-1 lists the options, cable length and stock numbers. After completion of the installation procedures, the power meter should be recalibrated using the procedures in Section V of this manual.
NOTE
These cable option kits are for mount resistances of either 100 or 200 ohms.
AII-2. Depending on the option selected, the following components are added or replaced with parts supplied with the option kits:
a. C2
b. RlO, Rll, R12 and R13
c. A1R32 and A1R42
d. A2C45
AII-3. The following equipment is required for the installation of the long cable options:
a. Soldering Tool, wattage rating: 37 .5
b. De-soldering aid
c. Pozidriv screwdriver (small)
d. Pozidriv screwdriver (medium)
Table AII-1. 432A Power Meter Long Cable Options
Cable Length Option Kit Number (feet)
009 00432-6018 10
010 00432-6019 20
011 00432-6020 50
012 00432-6021 100
013 00432-6022 200
AII-4. No substitution can be made for long cables listed in Table AII-1. Long cables from the older power meters, such as the 431 series, cannot be interchanged with 432A long thermistor cables because of resistance variations.
AII-5. If a long cable option of 20-feet or longer is used with a balanced thermistor mount such as the HP 8478B, pins 2 and 4 must be shorted at the mount end of the cable. This short can be accomplished with an 11527 A Adapter available from Hewlett-Packard. The 11527 A, connected between the mount and the cable, can be removed for instrument operation with an unbalanced mount.
NOTE
If a 432A has been modified for a particular cable option, it is incompatible with all other cable lengths.
AII-6. The parts required for the modification are listed in Table 6-1 and shown on the appropriate Service Sheet.
AII-7. OPTION 009 INSTALLATION.
AII-8. Option 009 (10-foot cable) requires no modification to the 432A Power Meter. The longer cable is substituted for the standard fivefoot thermistor cable.
AII-9. OPTION 010 INSTALLATION.
a. Remove the right side and top covers from the 432A. Remove the Al Bridge Assembly circuit board from the instrument.
b. Referring to Figure 7 -7, locate the board position where AlR42 is to be placed. Install the 261 K, 1 %, 0 .125W resistor, supplied with the kit, in that position.
c. Place the modification decal on the top center of the front panel.
d. This completes the Option 010 installation. Before replacing the top and side panels, connect the ten-foot cable and perform the bridge amplifier adjustments in Section V of this manual.
AII-1

Appendix II
AII-10. OPTION 011 THROUGH 013 INSTALLATION.
a. Remove both side, top and bottom covers. Remove the Al Bridge Assembly.
b. Locate the printed circuit board eyelets in which A1R32 and AlR42 are to be placed by referring to Figure 7 -7. Note that one end of these resistors will be placed inside the guard rings that attach to the bases of A1Ql2B and AlQ7B. There is a vacant eyelet provided inside the guard rings to make this connection.
c. Install the correct value AlR32 and AlR42 for the desired option.
d. Place the 432A on its top; Figure 7-5 reveals the location of bridge resistors R3 and R5 on terminal strip XAl. Select the proper values of resistors RlO and Rll from the option kit. Solder R11 across pins 3 and 5 of XAl in parallel with R5 and solder RlO across pins 6 and 8 of XAl in parallel with R3.
e. Locate the MOUNT RESISTANCE switch 83 on the back of the front panel. Bridge resistors R2 and R4 are wired to the rear oi S3
AII-2
Model 432A
(see Figure 7-6). Choose the resistors supplied with the option kit for Rl2 and R13. Solder R12 across R2 and Rl3 across R4.
f. Capacitor C2 (2.2 µF) is connected across the rear of the FINE ZERO switch 84 (see Figure 7-6). With the instrument resting on its top, wire the positive lead of C2 to the terminal of S4 with the white/black/violet (907) wire and the negative lead to the terminal with the violet (7) wire.
g. Remove the A2 Meter Logic Board. A2C45 by referring to Figure 7-11.
Remove the 60 µF capacitor and replace it with the 300 µF capacitor supplied with the option kit. Observe the polarity as marked on the circuit board.
h. Place the modification decal on the top center of the front panel.
i. This completes the modification. Install the Al and A2 boards back in the instrument. Perform the adjustment procedures in Section V of this manual with the long cable.

POST-SALES / SUPPORT ADDRESS LISTO
October 2007
If you need technical assistance with a Hewlett-Packard test and measurement product or application please contact theHewlett-Packard office or distributor in your country.
Asia Pacific:Hong Kong:(852) 2599 7889
India:(91-11) 682-6000
Japan:Hewlett-Packard Japan Ltd.Measurement Assistance Center9-1, Takakura-Cho, Hachioji-Shi,Tokyo 192-8510, JapanTel: (81) 426-56-7832Fax: (81) 426-56-7840
Korea:(82-2) 769 0800
Malaysia:(60-3) 291 0213
Philippines:(63-2) 894 1451
PRC:(86-10) 6505 0149
Singapore:(1800) 292 8100
Taiwan:(886-3) 492 9666
Thailand:(66-2) 661 3900
For countries in Asia Pacific notlisted, contact:Hewlett-Packard Asia Pacific Ltd17-21/F Shell Tower, Times Square,1 Matheson StreetCauseway BayHong KongTel: (852) 2599 7777Fax: (852) 2506 9285
Australia/New Zealand:Hewlett-Packard Australia Ltd.31-41 Joseph StreetBlackburn, Victoria 3130Australia1 800 629 485
Canada:Hewlett-Packard Canada Ltd.5150 Spectrum WayMississauga, OntarioL4W 5G1(905) 206 4725
Europe, Africaand Middle East:Austria:(0)1 25000-0
Belgium and Luxembourg:(02) 778 3417
Baltic Countries(358) 08872 2100
Czech Republic:420-2-4743111
Denmark:45 99 10 00
Finland:(90) 88 721
France:(0)1 69.82.60.60
Germany:(0180) 532 62-33
Greece:30-1-7264045
Hungary:36-1-4618219
Ireland:(01) 284 4633
Israel:972-3-5380333
Italy:02 - 92 122 241
Netherlands:(020) 547 6669
Norway:(22) 73 57 50
Poland:48-22-6087700
Portugal:(11) 482 85 00
Russia:(7/095) 928 6885Fax: (7/095) 916 9844
South Africa:27-11-8061000
Spain:(34) 1 631 1323
Sweden:(08) 444 22 77
Switzerland:(01) 735 7111
Turkey:90-212-2245925
United Kingdom:(01344) 366 666
For countries in Europe/Middle Eastand Africa not listed, contact:Hewlett-PackardInternational Sales EuropeGeneva, SwitzerlandTel: +41-22-780-4111Fax: +41-22-780-4770
Latin America:Hewlett-PackardLatin American Region Headquarters5200 Blue Lagoon Drive9th FloorMiami, Florida 33126U.S.A.Tel: (305) 267-4245
(305) 267-4220Fax: (305) 267-4288
United States:Hewlett-Packard CompanyTest and Measurement Organization5301 Stevens Creek Blvd.Bldg. 51L-SCSanta Clara, CA 95052-80591 800 452 4844

Document Part Number 5971-2668
Errata
This manual may contain references to HP or Hewlett-Packard. Please note that Hewlett-Packard's former test and measurement, semiconductor products and chemical analysis businesses are now part of Agilent Technologies. To reduce potential confusion, the only change to product numbers and names has been in the company name prefix: where a product number/name was HP XXXX the current name/number is now Agilent XXXX. For example, model number HP8648 is now model number Agilent 8648.
Ce manuel peut contenir des références à <<HP>> ou <<Hewlett-Packard.>> Veuillez noter que les produits de test et mesure, de semi-conducteur et d'analyse chimique qui avaient fait partie de la société Hewlett-Packard sont maintenent une partie de la société Agilent Technologies. Pour reduire la confusion potentielle, le seul changement aux noms de reference a été dans le préfixe de nom de société : là où un nom de référence était HP XXXX, le nouveau nom de référence est maintenant Agilent XXXX. Par example, le HP 8648 s'appelle maintenent Agilent 8648.
Diese Gebrauchsanweiseung kann Bezug nehmen auf die Namen HP oder Hewlett-Packard. Bitte beachten Sie, dass ehemalige Betriebsbereiche von Hewlett-Packard wie HP-Halbleiterprodukte, HP-chemische Analysen oder HP-Test- und Messwesen nun zu der Firma Agilent Technology gehören. Um Verwirrung zu vermeiden wurde lediglich bei Produktname und - Nummer der vo laufende Firmenname geändert: Produkte mit dem Namen/Nummer HP XXXX lauten nun mehr Agilent XXXX. Z.B, das Modell HP 8648 heißt nun Agilent 8648.
Questo manuale potrebbe contenere riferimenti ad HP o Hewlett-Packard. Si noti che le attività precedentemente gestite da Hewlett-Packard nel campo di Test & Misura, Semiconduttori, ed Analisi Chimica sono ora diventate parte di Agilent Technologies. Al fine di ridurre il rischio di confusione, l'unica modifica effettuata sui numeri di prodotto e sui nomi ha riguardato il prefisso con il nome dell'azienda : dove precedentemente compariva "HP XXXX" compare ora "Agilent XXXX". Ad esempio: il modello HP8648 è ora indicato come Agilent 8648.
Este manual puede hacer referencias a HP o Hewlett Packard. Las organizaciones de Prueba y Medición (Test and Measurement), Semiconductores (Semiconductor Products) y Análisis Químico (Chemical Analysis) que pertenecían a Hewlett Packard, ahora forman parte de Agilent Technologies. Para reducir una potencial confusión, el único cambio en el número de producto y nombre, es el prefijo de la compañía: Si el producto solía ser HP XXXX, ahora pasa a ser Agilent XXXX. Por ejemplo, el modelo HP8648 es ahora Agilent 8648.
Printed in Malaysia September 2004