one week molecular biology workshop 2008 - … · one week molecular biology workshop 2008 (july 21...
TRANSCRIPT

1
ONE WEEK MOLECULAR BIOLOGY WORKSHOP 2008 (JULY 21 - JULY 25, 2008) Prepared by David Ng With contributions from Li-Juan Sun Loida J. Escote-Carlson Jim Kronstad John Carlson Vindhya Amarasinghe Advanced Molecular Biology Laboratory Biotechnology Laboratory University of British Columbia All materials protected under the Creative Commons License. Any revenue procured from this workshop goes directly to our OUTREACH programs. For more information, on what these programs entail, please go to bioteach.ubc.ca .

2
1 WEEK FLOWCHART: p9 DAY 1: am: LAB A: Purification of genomic DNA using phenol
chloroform. pm: LAB A: Precipitation of DNA and dissolve in TE buffer. LAB B1: Set up digests. p13 DAY 2: am: LAB B1: Purification kits, CIP and ligation pm: LAB B2: Transformation procedures. p18 DAY 3: am: LAB B3: Look at plates and set up cultures LAB C1/C2: PAGE pouring and running protein samples. pm: LAB C2: Transfer of proteins. LAB C3: Western blot analysis p24 DAY 4: am: LAB B4: Mini Plasmid preparations am/pm: LAB D1: Total RNA prep LAB D2: Reverse Transcriptase + real time PCR. p29 DAY 5: am: LAB D2: look at real time data. am/pm: LAB E: DNA fingerprint assay (polymerase chain reaction).

3
CONTENTS BY STREAM: LAB A: PREPARATION OF GENOMIC DNA FROM CORN SHOOTS. LAB B: AN EXERCISE IN CLONING TECHNIQUES (INCLUDING
RESTRICTION DIGESTS, PURIFICATION KITS, CIP ASSAYS, LIGATIONS, TRANSFORMATION, PLASMID PREPS)
LAB C: DETECTION OF PROTEIN EXPRESSION FROM CLONED GENES BY WESTERN BLOTTING.
LAB D: RNA WORK: ISOLATION/PURIFICATION AND REVERSE
TRANSCRIPTASE ASSAY. REAL TIME PCR. LAB E: POLYMERASE CHAIN REACTION.

4
SAFETY REGULATIONS: 1 No eating, drinking, or smoking in the laboratory. 2 All accidents must be reported to the instructor. 3 Lab coats must be worn while in the lab. No open-toe sandals and barefeet
are allowed. 4 EXTREME CAUTION: must be taken when handling the following hazardous
chemicals/materials in the lab:
1. Ethidium Bromide (EtBr). Always wear gloves, and check gloves for leaks before handling. Handle only on covered countertops and EtBr staining of gels nust use designated equipment only. Workbenches must be monitored with UV light (wear UV shield) after using EtBr; contaminated workbench covers must be changed promptly. Dilute gel staining solutions must be flushed in the sink by letting tap water run for sufficient amount of time. EtBr contaminated wastes must be disposed of in designated containers only, liquid and solid wastes are segregated.
2. Phenol and chloroform. Leakproof gloves must be worn! Phenol-chloroform extractions should be done in the fumehood, and wastes must be disposed of in designated containers only.
3. Ultraviolet (UV) transilluminators. Protective goggles or face shields must
be worn before turning on any UV light source. Exposure must be kept a minimal.
4. Radioisotopes. Leakproof gloves and protective goggles must be worn.
Handling must be under the appropriate shielding. Disposal must be into designated containers only, with strict monitoring of possible spills.
5. Live cultures: Contaminated wastes must be disposed of into biohazard
waste containers only. Non-disposable wares used for cultures must be placed in designated trays for autoclaving.
6. Sharps (needles, broken glass, Pasteur pipets, etc). Disposal must be
into designated containers only. Do not recap needles. 5 Make sure all gas burners and hot plates are turned off after use. Do not
spray alcohol to disinfect the biosafety hood while the gas burner is on. 6 All nondisposable nonbiohazard glasswares must be rinsed at the sink before
leaving in soaking trays.

5
7 Take gloves off from hands before touching any fixtures in the lab (i.e. telephones, door knobs, common equipment unless designated otherwise, books, etc) whether or not you think the gloves are clean.
8 Wash hands thoroughly before leaving the laboratory.

6

7

8

9
Day 1: LAB A - “some basics - getting genomic DNA” PURIFICATION OF GENOMIC DNA FROM CORN SHOOTS. We’ll start the workshop using this tried and true procedure for nucleic acid purification, which will also provide a great interplay with some of the basic biochemical elements of working with DNA and RNA discussed throughout the course. The following procedure is modified from the Proteinase K digestion/phenol-chloroform purification process by Strauss (1987, pub. in Current Protocols in Molecular Biology. Ausubel et al. eds. pp2.2.1-2, which surprisingly is still in routine use for the preparation of genomic material from many organisms, and indeed is an imbedded element of a number of kits. Here, DNA will be isolated from corn shoots by lysis in Sarkosyl and proteinase K followed by phenol-chloroform extraction and ethanol precipitation. The DNA isolated by this procedure is sufficiently pure for restriction enzyme digestion. The organic phenol-chloroform component is also often an element of a number of purification kits, although may of these kits rely instead on silica based technologies. Stuff to know: - Phenol-Chloroform is bad for you. Note handling procedures discussed in class. - We are most interested in genomic DNA which can shear very easily. Although, we are not using strict techniques to prevent shearing, we want to be relatively gentle with our samples today. Procedure: 1. Harvest 2 grams of provided seedling tissue. First add liquid nitrogen (will be
dispensed by circulating instructors) to cover the shoots to refreeze the shoots, and grind the sample to a powder as rapidly as you can. Keep the sample frozen throughout this process by replenishing the liquid nitrogen in your mortar. Take care not to freezer burn your hand as you do this, and do wear protective eyeware.
2. Transfer the powder to a 50ml screwcap Nalgene Teflon tube. This is located
in your ice bucket and contains 4.5ml of cold Digestion Buffer. Try to dispersed the powdered tissue in the buffer by gently swirling the tube each time the sample is added – it will not initially resuspend nicely, but note that there is an agitated 2 hour step coming up.
3. Add 40ul of Proteinase K (25mg/ml stock solution) to give a final
concentration of 0.2mg/ml. Mix gently. Add 0.5ml of 10% sarkosyl to give a final concentration of 1%. Again, mix the sample very gently.

10
4. Incubate the mixture at 55oC with gentle shaking for about 2 hours (note that
generally people will do this step for much longer). 5. Take the sample to the fumehood. With gloved hands and protective
eyewear, add an equal volume of phenol mixture (about 5.0ml). CAUTION: Phenol is toxic and extremely caustic. Avoid contact with skin. Open containers and dispense solutions of phenol-chloroform in the fumehood only! Phenol is also buffer saturated so take a close look at the container. You will notice that there may be two layers of liquid. The bottom layer is the organic phenol layer. Cap the tube securely and mix the contents thoroughly but gently by inversion until the mixture is homogeneous.
6. Centrifuge at 10000rpm in a JA-14 rotor for 10 minutes at 4oC. Transfer the
aqueous phase (top layer) into a fresh tube with a p1000 pipettor and blue tip taking care not to minimize disturbance of the interface. Repeat the extraction of the aqueous phase with phenol mixture once more (or until the interface looks relatively clear). Transfer the last aqueous phase to a 15 ml screwcap conical FALCON tube.
7. Add an equal volume of a 24:1 mixture of chloroform:isoamyl alcohol. Mix
thoroughly but gently. Centrifuge in the tabletop BECKMAN centrifuge for 5 minutes at 3000rpm.
8. Note the volume of the aqueous phase by examining the gradations on the
tube. Transfer the aqueous phase to a sterile 50ml FALCON tube using a p1000 pipetteman. NOTE: Take extra care not to disturb the interphase at this step. In your final aqueous sample, you do not want any organic material to carry over.
9. Add 0.5 volume (relative to the original aqueous volume) of 7.5M NH4OAc.
Mix briefly, then add 2 volumes (relative to the original aqueous volume) of 100% ethanol. Screw shut the tube securely and mix the contents gently by inversion. A white stringy precipitate should appear, and will appear to tighten even more with repeated mixing by inversion.
10. Prepare a sealed pasteur pipette (do not use siliconized pasteur pipettes)
using a bunsen burner (there will be a quick demo), and allow the tip to cool. Once cool (wait a minute or two), you will use this pipette to carefully spool out your DNA.
11. Dip the spooled DNA into a solution of 70% ethanol. To do this, you can
aliquot 1.0ml of 70% ethanol in a microfuge tube. Then carefully swirl the pipette tip plus DNA in the microcentrifuge taking care not to dislodge your DNA. NOTE: the 70% wash will not dissolve the DNA pellet but will remove excess salts.

11
12. Place the pasteur pipette with the tip facing up for approximately 10 minutes.
This will allow our DNA pellet to dry so that all trace of ethanol has evaporated.
13. Dip the pipette tip in 1 ml TE (pH8) and resuspend until your DNA pellet has
been dislodged from the pasteur pipette and is now sitting in your solution NOTE you may need to use a sterile yellow tip to help dislodge the DNA. Incubate at 55oC until pellet is dissolved. Will take a minimum of 1 hour, but we will incubate for a full overnight step.
LAB B1 - “some cloning, some kits” CLONING OF GENOMIC DNA RESTRICTION FRAGMENTS: PREPARATION OF FRAGMENTS, DEPHOSPHORYLATION OF VECTOR, AND LIGATION STEPS. DNA cloning is a powerful technique in molecular biology to generate specific recombinant DNA molecules intended for a variety of uses:
a) To obtain large quantities of specific DNA sequences for use in studying gene structure and gene regulation, DNA/protein sequence determination, and for in vitro mutagenesis of nucleic acid sequence. b) To produce large quantities of proteins like growth hormones, cell surface receptors, enzymes, etc, for research or commercial use.
c) To modify the host cell’s genotype or phenotype.
In this section of the course, we will prepare fragments by digesting lambda DNA with HindIII. The fragments produced will represent our “insert.” We will also prepare a cut plasmid vector by digesting pUC18 with Hind III. With these two samples, we will attempt to ligate our “inserts” into our “cut vector.”
We will then detect the presence of successful ligations by transforming bacteria with our ligation mixture. Essentially only successful ligations (recirculized plasmid, or recircularize plasmid plus insert) will allow colonies to form upon transformation. Stuff to know:
- We will using the ChargeSwtich procedure, based primarily on pKa manipulation of a linker built on a magnetic bead . It is important to note that there are other kit systems as well as the phenol/chloroform procedure that work well to clean plasmid / insert DNA.
- Tomorrow morning, our gels will be run after the digestion (in the morning) to access degree of cutting. We will assume, cutting was successful and therefore continue with the rest of the experiment despite not waiting for the gel to finish.

12
LAB B1 – “and so it starts...” Procedure: 1. You have two microfuge tubes that contain the DNA to be digested. (one
with a plasmid called pUC18, and one with lambda DNA to be cut up for our inserts).
2. Add the various restriction digestion components to each tube as follows:
Tube H2O(ul) 10x REACT#2 DNA HindIII pUC18 23 5ul 20ul (pUC18) 2ul lambda 23 5ul 20ul (lambda) 2ul Note: both the volumes of pUC18 and lambda samples are at 20ul. Therefore, you will use these tubes to add the remaining reagents to.
3. Incubate ovenight in the 37oC waterbath. While the digestion is beginning,
you will need to prepare one 0.8% agarose gel before you leave today.
*While the DNA samples are incubating with restriction enzymes, prepare the agarose gel and electrophoresis setup (There will be a quick run through of the equipment used). You will pour a 0.8% agarose gel – this is a weight per volume measurement. Weigh out 0.8g of agarose and transfer to a 250ml flask. Add 100mls of 1x TBE buffer and swirl gently to disperse the agarose. Microwave the mixture on high power until it boils and the agarose is completely dissolved. Look for the occurence of “chunkies” in your mixture. The dissolving step is a fine line between boiling your sample enough to dissolve your material, but not boiling it too much so that liquid starts to evaporate. Allow the solution to cool to 60oC by incubating in a 60oC waterbath for about 10 minutes. Then add 1ul of 10mg/ml Ethidium Bromide stock WARNING: EtBr is a carcinogen! Do not handle without wearing gloves and avoid spills. *While the agarose is cooling off, prepare the gel plates on the casting setup. (This will be demonstrated) *Pour the cooled agarose into the plate – don’t forget the comb! The gel will take approximately 20 minutes to set. We will leave it overnight at 4C in the dark.

13
Day 2: LAB B1 - “purification, gels, and more enzymes” 1, Take out your digests (50ul total volume). From them, you will remove and
transfer 2ul of each sample into two new microfuge tubes. Each of these, you will add 8ul of distilled water and 2ul of DNA loading buffer (blue stuff). This will bring the new samples to a total volume of 12ul, which you will then load onto the gel you poured last night. NOTE: this gel is a visual check to compare and contrast your DNA samples (after digestion) with some control uncut DNA samples (in your ice bucket, 10ul of labeled control pUC18, 10ul control lambda, both blue in colour, to be loaded with your digests).
2. With the rest of your digest samples (i.e. the majority of your digest sample, ~48ul), you will perform nucleic acid purifications as according to the Chargeswitch procedure.
CHARGESWITCH: 3. To your pUC18 and lambda samples, add 50ul Purification Buffer (N5). 4. Add 10ul ChargeSwitch Magnetic Beads (you may need to resuspend with a
yellow tip first) to the tube and pipette up and down gently to mix without forming bubbles.
5. Incubate at room temperature for 1 minute. 6. Place the sample on MagnaRack for 1 minute or until beads have formed a tight pellet. 7. Without removing the tube from the MagnaRack, carefully remove and
discard the supernatent without disturbing pellet by angling the pipette such that the tip is away from pellet.
8. Remove the tube containing the pelleted magnetic beads from the
MagnaRack. 9. Add 150ul Wash Buffer (W12) to the tube and pipet up and down gently to
mix the sample without forming bubbles. 10. Place the sample on the MagnaRack for 1 minute or until beads have formed
a tight pellet.

14
11. Without removing the tube from the MagnaRack carefully remove and discard the supernatent without disturbing the pellet of beads.
12. Repeat steps 9 to 11 once. 13. Remove the tube containing the pelleted magnetic beads from the
MagnaRack. 14. Add 20ul Elution Buffer (E5: 10mM Tris-HCl, pH8.5) to the tube and pipet up
and down gently to mix the samples without forming bubbles. 15. Incubate at room temperature for 1 minute. 16. Place Rack on MagnaRack for 1 minute or until beads have formed a tight
pellet. 17. Without removing the tube from the MagnaRack, carefully transfer the
supernatent containing the purified DNA product to a sterile microcentrifuge tube without disturbing the pellet of beads. These are your purified products.
END OF CHARGESWITCH 18. Set aside the purified lamba digest in your ice bucket until the ligation step.
With your pUC18 plasmid sample, transfer 4ul into another microcentrifuge tube (THIS IS IMPORTANT: you will use this stuff in the ligations later. This will be your digested non-CIP pUC18 sample). NOTE: CIP is short for Calf Intestinal Phosphatase – the enzyme responsible for dephosphorylating your DNA.
19. With the remaining 16ul, begin a dephosphorylation assay with your purified
plasmid sample: To the pUC18 tube (you should have 16ul of it now), add 5ul of 10x CIP buffer, 28ul sterile dH2O, and 1ul of 0.1U/ul CIP (calf intestinal phosphatase)
20. Incubate at 37oC for 1 hour. 21. Purify the CIP’d or dephosphorylated plasmid by ChargeSwitch (step 3)
procedure as before. 22. O.K. a quick check of what you have for your ligations... You should have
purified dephosphorylated pUC18 (from step 21). You should have purified lambda DNA fragments (from step 18), and you should have purified pUC18 that has not been dephosphorylated (from step 18).
23. Label five tubes A to E (or give them descriptive names to help you keep
track of what they are.

15
To each tube, add the various ligation components as follows (numbers are in ul units). NOTE: make sure all components are mixed at the bottom of the tube before adding the ligase.
A B C D E nonCIP plasmid 1 1 0 0 0 CIP pUC18 0 0 2 2 0 lambda DNA cut 0 5 5 5 0 control pUC18 + CIP 0 0 0 0 3 control lambda DNA cut 0 0 0 0 4 5x ligase buffer 2 2 2 2 2 dH2O 6 1 0 0 0 T4 DNA ligase 1 1 1 1 1 NOTE: ligations C and D are duplicates. 27. Incubate 15 to 30 minutes at room temperature. LAB B2 - “getting DNA in bugs” TRANSFORMATION OF COMPETENT CELLS This week we will take a look at two methods of introducing DNA into bacterial cells (Heat shock and Electroporation). Both are in routine use with various advantages and disadvantages between them. Stuff to know: - Competent cells are very delicate. Be gentle when handling them. - The two transformation procedures have separate types of competent cells. It is absolutely crucial that you do NOT mix them up. Heat shock competent cells are labeled “M,” and electroporation competent cells are labeled “E.” Procedure: 1 Prepare 9 fresh microcentrifuge tubes and label them from A(t) to I(t) – these
will be the tubes where the heat shock transformation reactions take place. Keep on ice.
2 Competent cells (labeled “M”) will brought out and placed in ice bucket near
the start of the class. Carefully transfer 20ul of competent cells to each of your 9 transformation tubes. Be very gentle – heat shock competent cells are notoriously delicate.
3 - To tubes A(t) to E(t), add 5ul of the ligation mixes (from step 2);

16
- to tube F(t), add 5ul (0.05ng) of BRL control DNA (pUC19); - to tube G(t), add 5ul (0.5ng) of undigested pUC18 control; - to tube H(t), add 1ul unligated cut pUC18 (the purified nonCIP pUC18 that was saved from earlier); - to tube I(t), add 5ul sterile distilled H2O.
4 Leave the cell/DNA mixtures on ice for 30 minutes. Place SOC media in the
37oC waterbath to prewarm. During this time we will perform the electroporation procedure.
The following procedure is as recommended for use with our BIORAD electroporator. Electroporation will be done using only the same BRL control DNA as in our heat shock tube F(t). This way, a direct comparison between the two procedures can be done. - Thaw the cells on ice. For each sample to be electroporated, place a 1.5 ml microfuge tube and 0.1 cm cuvette on ice. - In a cold microfuge tube mix 40 ul of the cell suspension with 1 to 2 ul of DNA. Mix well and incubate on ice for 1 minute. - At this point, there will be a demonstration on how to use the electroporator and how to set up the cuvette. - Set the MicroPulser to “Ec1”. - Transfer the mixture of cells and DNA to a cold electroporation cuvette and tap the suspension to the bottom. Place the cuvette in the chamber slide. Push the slide into the chamber until the cuvette is seated between the contacts in the base of the chamber. Pulse once. - Remove the cuvette from the chamber and immediately add 1 ml of SOC medium to the cuvette. Quickly but gently resuspend the cells. (Delaying this transfer by 1 minute causes a 3 fold drop in transformation. This decline continues to a 20- fold drop by 10 minutes). - Transfer the cell suspension to a microfuge tube and incubate in a chaking incubator (in prep room) at 37oC for 1 hour.
5 NOW,... back to your original 9 tubes. .. After the 30minutes on ice, you will
need to heat shock your 9 samples for 60 seconds in the 42oC waterbath. Be careful not go significantly over this 60 seconds, and do not agitate cells!
6 Immediately transfer to ice. Then add 480ul of the prewarmed SOC media to
each tube. Mix gently. 7 Incubate at 37oC for about 1hr with shaking (this will roughly coincide with
your electroporated samples). 8 You now have a total of 10 tubes to take care of (nine of which were heat
shocked, and two of which were electroporated).

17
9 For your heat-shocked samples, place 50ul of the contents of each tube onto
correspondingly labelled LB agar plates containing 100ug/ml ampicillin and 40ug/ml X-gal. You will spread plate your sample using the turntable and “hockey sticks” (This will be quickly demonstrated).
10 For your electroporated samples, also plate 50ul of the culture onto
appropriately labeled LB plates containing ampicillin and X-gal. 11 Incubate all 10 plates overnight at 37oC in an inverted position (agar side up).

18
Day 3: LAB B3 - “set up culture for minipreps” Procedure: (this may be done in the afternoon)
1. Look at your plates and note the colonies. Data will be discussed in class. 2. Some of these colonies will be picked for plasmid characterization. Note 6
whites (from any plate of your choice) and one blue colony. Use these colonies to each inoculate 3mls of LB broth + 50ug/ml ampicillin with a single colony of transformed bacteria. NOTE: don't forget you will be inoculating a total of 7 cultures (see above). You may use the sterile toothpicks offered, by dipping the end of the toothpick into the colony and then throwing the entire toothpick into the broth.
3. Grow the culture overnight on the roller drum inside the 37oC incubator.
Remember to label the tubes and balance them properly in the apparatus.
LAB C - “Looking at proteins” DETECTION OF PROTEIN EXPRESSION FROM CLONED GENES BY WESTERN BLOTTING Proteins will be fractionated by electrophoresis in denaturing discontinuous polyacrylamide gels (Laemmli, 1970, Nature. 227: 680-685), blotted onto a membrane by an electrotransfer procedure, and probed with a specific antibody to the protein of interest. The detection procedure in this case is a two-step process using a primary antibody which is unlabeled and specific to the protein of interest, and a labeled secondary antibody which binds to the constant regions of the primary antibody. The secondary antibody that will be used for this exercise is enzyme-conjugated and will be detected by incubation with a chromogenic substrate. Stuff to Know: - Essentially, you will be running two polyacrylamide gels with the intent of performing a western blot on one of them. The samples that you will be running are three different bacterial cultures all containing a variant of the pGEX-2T vector. The vector is designed for the expression of recombinant fusion proteins. Here, one is able to express a protein of interest that includes an additional protein domain at its N-terminal side. In this case, the protein domain is called glutathione-S-transferase (or GST for short). The purpose of this additional domain is to allow your fusion protein to be purified easily by affinity chromatography. Presently, the GST system is one of the most popular fusion systems. The three bacterial cultures that you will be working with are as follows: i. pGEX-2T alone. This will express the GST domain protein by itself. (~26kDa)

19
ii. pGEX-2T LCK. This will express a GST / wildtype LCK fusion protein (~85kDa) iii. pGEX-2T N32. This will express a GST-LCK construct that contains amino acids –8 to
234 of p56lck (actually contains the N-terminal, the SH3 and SH2 domain of lck). (p56lck is a tyrosine kinase by the way...)
- You will be using that nasty neurotoxin, acrylamide. Please be careful with this stuff! Procedure:
LAB C1 - “pouring a protein gel” Gel Part: 1. You will first pour two polyacrylamide gels using the BioRad Mini Protean
system. There will be a quick demo on how to set up the apparatus. 2. When you have set up the apparatus and are ready to pour the resolving
gel section, you will need to prepare a 10ml solution of the resolving gel using the following recipe (good for one 12% gel):
5mls resolving buffer 4.0mls 30% acrylamide/0.8% bis-acrylamide 1.0ml water 100ul 10% ammonium persulfate 6.5ul TEMED
Don’t forget to add the TEMED and ammonium persulfate last, and just prior to gel pouring.
3. The resolving gel will be poured approximately 1cm below the well line
(this will make more sense after viewing the demonstration). Immediately after this step, you will need to pour an overlay using the water saturated butanol.
4. After approximately 10minutes, the resolving gel should be polymerized
enough to allow you to continue pouring the stacking gel. Prepare a 5ml solution of the stacking gel using the following recipe (good for one gel):
4.5ml stack buffer 0.5ml 30% acrylamide/0.8% bis-acyrlamide 25ul 10% ammonium persulfate 5ul TEMED
Again, don’t forget to add the TEMED and ammonium persulfate last! 5. Pour the stacking gel to the brim of the gel cassette and carefully place
the comb into the cassette. Do not worry about the slight overflow of acrylamide. The stack will need about 1hr to polymerize fully.

20
LAB C2 - “run and transfer our proteins” Procedure: 1. Take your protein gels out from the fridge. We will be running bacterial
samples in them today. Use the below instructions for sample preparation. a) You will have three microfuge tubes labeled “GST”, “N32” and “LCK.” In each
tube is 50ul of the aforementioned bacterial culture. b) To each tube, add 25ul of a 3x sample buffer (blue stuff) to each tube. Now, take
your three samples and your prestain standards (“STD” tube with pink liquid), and boil them for a minimum of 8 minutes.
2. Whilst your samples are boiling, prepare the gel running set up (this will be
demonstrated), such that (with the electrophoresis buffer) the upper buffer chamber is full, and the lower buffer chamber is filled up at least an inch over the bottom of the gel.
3. You are now ready to load your samples. You can load using your p20
pipetteman and yellow tips (you can also use the thin drawn-out tips provided). In general, place the tip directly into the well and slowly push the liquid out, taking care not to introduce bubbles. You can even use the same tip throughout the loading procedure if you rinse the tip out in the upper buffer chamber between samples. Essentially the following lane order is a guideline and applies to both gels (remember that one will be stained for total protein, and the other will be used for western analysis).
(both gels good)* (only one gel good)* lane 1 standard (10ul) standard (10ul)
2 GST (5ul) GST (20ul) 3 GST (10ul) N32 (20ul) 4 GST (20ul) LCK (20ul) 5 N32 (5ul) blank 6 N32 (10ul) standard (10ul) 7 N32 (20ul) GST (20ul) 8 LCK (5ul) N32 (20ul) 9 LCK (10ul) LCK (20ul) 10 LCK (20ul) blank
*lanes are dependant on the number of good gels produced per pair of students. If both gels are in good order, then use the first column for each gel. If only one gel is good, then use the second column, and the gel will be cut into two after the run.
4. Put the lid on the gel apparatus (stay colour coordinated) and set voltage
to 100V. The gel will probably take about 1 1/2 hours to run. You want to stop it when the dye has reached (but not past) the bottom of the gel.

21
5. Whilst the gel is running, prepare your transfer buffer by simply taking the supplied “transfer buffer” and adding methanol until it is ~ 20% - 25% methanol (this may be already done for you). About 10 minutes before the gel is ready, you will also need to prepare your PVDF membrane (immobulon P) by prewetting in 100% methanol for a few seconds in a small plastic container. Dump out the methanol (down the sink), and add a small volume of transfer buffer (+20% methanol) to cover the membrane. Let the membrane soak until transfer procedure is ready.
** at this point, one of your gels will be used to begin the transfer procedure, while the other will be stained in the following manner.
- carefully place the acrylamide gel into a plastic container filled with coomassie solution (you only need enough stain to cover the gel). Let the gel incubate, rocking, for a minimum of 20 minutes. After 20 minutes, pour the stain back into a special container marked “used stain.” Add destain solution to your gel and incubate for 20minutes to overnight. Repeat until the stain has gone from the gel.
Transfer Part: 6. When you set up your transfer you need to think a little. Basically, you
want the proteins in your gel to migrate onto the PVDF membrane. Sounds simple, but inevitably you may one day accidently mix things up, and your proteins will run away into the buffer.
7. Remember, your proteins are coated with SDS so they are essentially
negatively charged. Therefore, they will move towards the positive electrode, away from the negative electrode. BIORAD has been clever enough to make sure all their transfer systems are colour coordinated. The plastic transfer cassette ALWAYS has a black side. This does not represent evil. This represents negative charge: your proteins will migrate away from the black side.

22
So when you set up the transfer, do so in the following manner (this will be demonstrated). Put gloves on...
a) In the large plastic container, place your plastic transfer cassette with the black side flat. Add transfer/methanol buffer to submerse the cassette. Take one of the prewetted sponges (rinse in tap and then in distilled water), place on top of black side. In subsequent steps, make sure everything is submerged in transfer buffer.
b) Add two pieces of Whatman filter paper on top of the sponge. Place your gel next. AND THEN place your membrane on top of the gel. Place two more pieces of Whatman filter paper on top and make sure you get rid of bubbles in between this sandwiched set-up. Place other prewetted sponge on top of all of this, and close the cassette.
c) Place cassette in transfer holder (remember to make sure everything is colour coordinated). Add ice holder. Fill chamber up with transfer/methanol buffer (you may have to use the stuff in your big plastic container). Plonk the whole thing in your ice bucket. Put the lid on and set voltage at 100V. The transfer will take approximately 1 hour. During this time, it is appreciated if you wash the plates and gel apparatus with tap water rinsed with distilled water in the sink.

23
8. When an hour has passed, turn off the power supply, and carefully remove the membrane with a pair of tweezers. Place membrane, protein side up on a clean paper towel to dry for a minimum of 1 hour.
LAB C3 - “develop our westerns” Procedure: Western Part: (Quick Method devised by Millipore for use with Immobulon P membrane). 1. After drying your membrane, add your primary antibody solution (10mls of
anti-p56lck rabbit antisera “54-3B” at 1/2500 dilution in TBS+Tween20 and 5% BSA) to your membrane in a clean plastic container. Mix solution around so that the membrane is completely immersed. Place on shaker for about 1 hour. You may find that your membrane looks like its half wet and half dry – this is normal so don’t fret.
2. Pour back the antibody solution into the 15ml FALCON tube. This
antibody solution can probably be used 3 more times. Wash your membrane by addition of approximately 20mls (you can measure it the first time, and eyeball it from that point on) TBS+Tween. Shake by hand for about 10 seconds and dump the solution into the sink.
3. Add your secondary antibody solution to your membrane (10ml Goat anti-
rabbit IgG heavy and light chains w/ alkaline phosphatase conjugate @ 1/5000 dilution in TBS+Tween20 + 5% BSA). Incubate on shaker for about 30minutes.
4. Pour back secondary antibody solution back into 15ml tube. Wash membrane as above for at least 6 to 8 washes. Wash once in buffer that does not have Tween20 detergent (we will use 0.1M Tris pH9.5). Your membrane is now ready for substrate detection protocol which will be outlined in class (we will be using the ASBI-Fast Red).

24
Day 4:
LAB B4 - “quick miniplasmid preps” MINI PLASMID PREPARATIONS USING THE QIAprep SPIN MINIPREP KIT Today is a relatively easy day, where we will isolate plasmids obtained from our colonies to see what plasmid/insert molecules we have. This particular procedure is one of several methodologies to differentiate plasmid DNA from other nucleic acid species. Stuff to know: - This kit is essentially a revamp version of a common plasmid prep procedure is known as the alkaline lysis procedure. Many kit based assays rely on this particular chemistry which will be discussed in class. - In our case, this kit also incorporates a silica bead based affinity chromatography methology. Procedure: 1. Vortex each culture thoroughly (the ones you prepared yesterday from
picked colonies), and transfer 1ml of each culture into a clean microfuge tube. Store the rest of the culture in the refrigerator as backup.
2. Spin the cells down for 30 seconds at maximum speed in the
microcentrifuge. Remove all of the supernatent by pipeting out the last bit of media left.
3. Resuspend pelleted bacterial cells in 250ul Buffer P1 and transfer to a
microcentrifuge tube. The bacteria should be resuspended completely by vortexing or pipetting up and down until no cell clumps remain.
4. Add 250ul Buffer P2 and mix thoroughly by inverting the tube 4-6 times.
Mix gently by inverting the tube. Do not vortex, as this will result in shearing of genomic DNA. If necessary, continue inverting the tube until the solution becomes viscous and slightly clear. Do not allow the lysis reaction to proceed for more than 5 min. Mixing should result in a homogeneously blue colored suspension.
5. Add 350ul Buffer N3 and mix immediately and thoroughly by inverting the
tube 4-6 times. To avoid localized precipitation, mix the solution thoroughly, immediately after addition of Buffer N3. The solution should become cloudy and all trace of blue has gone and the suspension is colorless.

25
6. Centrifuge for 10 minutes at maximum speed in a table top microcentrifuge. A compact white pellet will form.
7. Apply the supernatants from step 4 to a the QIAprep spin column by
decanting or pipetting. Centrifuge for 1 minute. Discard the flow-through. 8. Wash QIAprep spin column by adding 0.75 ml Buffer PE and centrifuge for
1 minute. 9. Discard the flow-through, and centrifuge for additional 1 min to remove
residual wash buffer. Residual wash buffer will not be completely removed unless the flow-through is discarded before this additional centrifugation. Residual ethanol from Buffer PE may inhibit subsequent enzymatic reactions.
10. Place the QIA prep column in a clean 1.5 ml microcentrifuge tube. to elute
DNA, add 50ul Buffer EB to the center of each QIAprep spin column, let stand for 1 min, and centrifuge for 1 min. Your collected eluent is your purified “plasmid prep.”
11. You will now set up 7 restriction digests with the following recipe for each
digest: 12ul dH2O 2ul 10X React2 Buffer 5ul plasmid prep 1ul HindIII (10U/ul) Incubate for 1 hour in a 37oC waterbath. -NOTE: a common procedure for conducting large numbers of restriction digests is the
preparation of a "cocktail" mixture. In our case, you would prepare one main solution containing 8 times (since we have 7 samples) the amount of everything except the DNA. (i.e. 96ul of water, 16ul of the React Buffer, etc, etc,). This way, to your DNA you can just add 15ul of this "cocktail" mix. If you are performing digests where you have 18 or 36 samples to deal with, this method can save you a lot of pipetting time.
12. Prepare a 0.8% Agarose gel as previously outlined in Day 1 (don't forget
the ethidium bromide). 13. After the digest incubation, add 4ul of DNA loading buffer to each tube and
load samples - along with a lambda HindIII marker - to your agarose gel. Run gel at 100V for approximately 1 - 2 hours. Visualize and photograph gel.

26
LAB D - “Reverse Transcriptase/Real Time-PCR procedure” In this procedure you will perform a reverse transcriptase real time polymerase chain reaction experiment on total RNA purified using the commercially available Trizol reagent. We will then reverse transcribed an actin mRNA for PCR quantitation using BioRad’s chemistry and MyiQ real time thermal cycler. Stuff to know: - As mentioned before, RNA is extremely sensitive to degradation (We’ll get into this in class). Make a special effort to be as aseptic as possible – i.e. wear gloves all the time and change them regularly.
LAB D1 – “Total RNA preparation direct from cheek cells” Procedure: 1 You will perform a cheek cell rinse using the saline solution, cup, and
1500rpm centrifugation spin (flowchart shown in class). 2 Carefully decant the supernatent without disturbing the pellet. You want the
pellet and you want a tight pellet – our aim is to have at least one tight pellet per pair. After the supernatent has been removed, flick the bottom of the tube gently to loosen up the pellet – this will help in the resuspension of the pellet later.
3 Add 1ml of Trizol reagent to your pellet and mix by carefully pipetting up and
down for a minimum of 20 times with your p1000 – do this slowly to avoid uptake of TRIZOL into the barrel of the pipetteman. NOTE: Trizol contains phenol so take care! Incubate at room temperature for 5 minutes. Add 200ul of chloroform, vortex for 15seconds and incubate again at room temperature for about 3 minutes.
4 Centrifuge at 12000rpm at 4oC for 15 minutes. NOTE: after the centrifugation
step, you will notice two phases of liquid. The upper phase is aqueous and contains your RNA prep. The lower phase is the organic phase – you don’t want this.
5 Transfer the upper phase to a fresh microcentrifuge tube. Take care not to
disturb the interface when retrieving the aqueous phase. Note that it is at this step and thereafter that special care regarding RNAse free methodologies is

27
utilized (including handling, and use of RNAse free materials, as discussed and demonstrated in class).
6 Precipitate the RNA by adding 500ul of isopropanol (isopropyl alcohol),
mixing by inversion, and incubation on ice for 3 minutes. 7 Centrifuge at 12000rpm for 10 minutes at 4oC. Carefully discard pellet.
Wash the pellet with 1ml of DEPC treated (RNAse free) 75% ethanol and spin again at 12000rpm for 5 minutes.
8 Discard the supernatent and airdry the pellet for approximately 10 minutes
(Do NOT overdry). Dissolve the pellet in 100ul of DEPC treated (RNAse free) distilled water.
LAB D2 – “The RT-PCR part.” 1. Using BioRad’s iScript cDNA synthesis kit, each group will set up a
reverse transcriptase reaction using the following table.
TABLE: iScript Reaction/Reverse Transcriptase Mix 10ul RNA template (~100fg to 1ug total RNA) 10ul
2. There will be a demo at this point with the MyiQ thermal cycler, but note
that the assay will be performed under the following parameters:
5 minutes at 25C 30 minutes at 42C 5 minutes at 85C (hold at 4C)
3. Once the reverse transcriptase portion is finished, we can then set up our
real time PCR reactions. Roughly, we will use the following reaction set up but also utilizing a serial dilution set up - specific details will be announced in class. Note: There will be a demo on setting up the software on the MyiQ system, as well as an opportunity to analyse our data tomorrow.
Component Volume per reaction iQ SYBR Green Supermix + Primer Mix (100 nM–500 nM) 13.0 µl Reverse Transcriptase sample 10.0 µl ____________________________________________________
Total Volume 23.0 µl

28
NOTE: our Primer stocks contains 6.25 mM of each primer (Forward and Reverse), which have been added to our supermix with a dilution of 25x and an final concentration for each primer of 250 nM. The recommended amount of primer based on the MyiQ Supermix is 100 - 500 nM of each primer.
1. Load samples into MyiQ cycler programed in the following manner:
STEP 1 95C 3 minutes “hot start load” STEP 2 95C 20 seconds Denaturation STEP 3 55C 30 seconds Annealing STEP 4 72C 20 seconds Elongation STEP 5 repeat steps 2 – 4 (x 50) STEP 6 72C 1 minutes Final Elongation STEP 7 50C 30 seconds
MELT FUNCTION +1oC/30 seconds for 45oC

29
Day 5: LAB E - “who has the most crap” A SIMPLE FINGERPRINT ASSAY USING POLYMERASE CHAIN REACTION Last day! To ease off in our final day (apart from checking out yesterday’s real time data), today’s procedure will follow a simple handout that will be given in class. In short, we will be attempting to do a simplified fingerprint assay of our own genomic DNA. Have fun...

30
Buffers and solutions: Phosphate-buffer saline (PBS) pH7.3
137mM NaCl 2.7mM KCl 4.3mM Na2HPO4.7H2O 1.4mM KH2PO4 Digestion Buffer 100mM NaCl 20mM Tris-HCl, pH8 25mM EDTA, pH8 Added after resuspending cells: 1% SDS and 0.2mg/ml Proteinase K TE (pH8) 10mM Tris-HCl, pH8 1mM Na2EDTA Phenol-Chloroform Mixture: 25 parts buffer equilibriated phenol 24 parts chloroform 1 part isoamyl alcohol
Loading / Stop Buffer
50% Glycerol 0.1M EDTA 1% SDS (optional) 0.1% bromophenol blue 10x TBE Electrophoresis Buffer 108g Tris base 55g Boric acid 40ml of 0.5M EDTA (pH8) Water to 1L
Resolving Buffer: 0.75M Tris-base 0.21% SDS Adjust to pH8.8 with HCl
Stacking Buffer: 0.13M Tris-base 0.12% SDS Adjust to pH6.8 with HCl
31
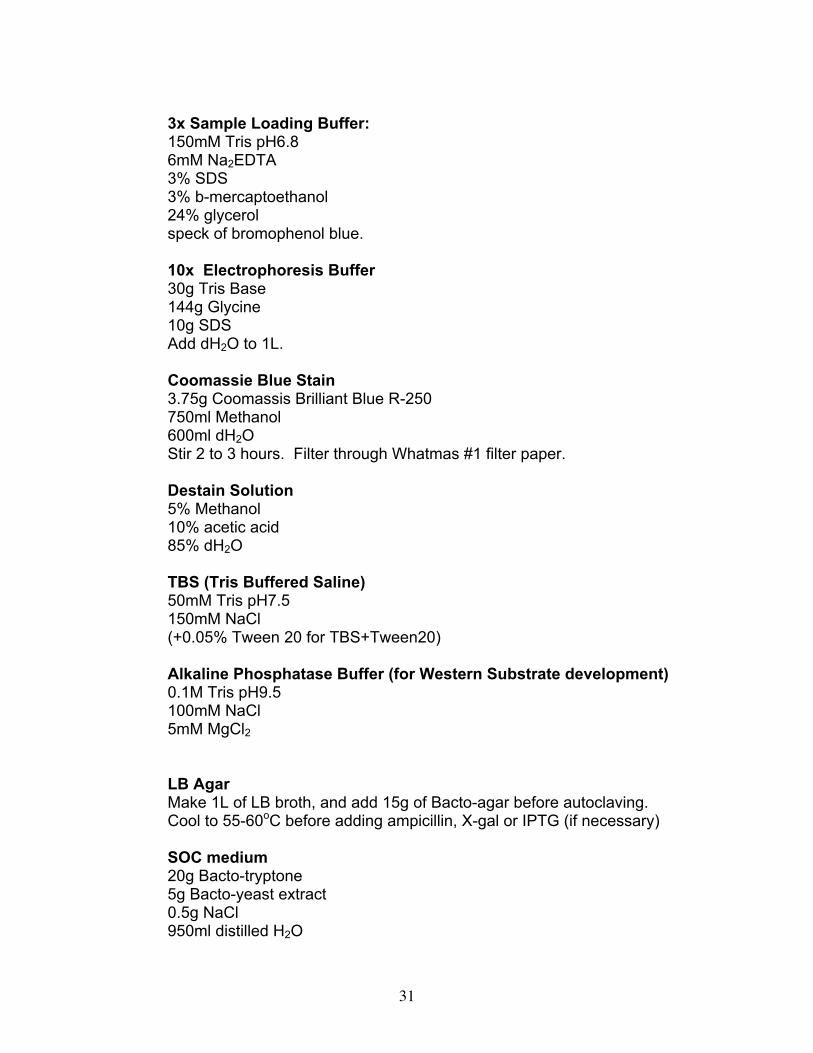
3x Sample Loading Buffer: 150mM Tris pH6.8 6mM Na2EDTA 3% SDS 3% b-mercaptoethanol 24% glycerol speck of bromophenol blue. 10x Electrophoresis Buffer 30g Tris Base 144g Glycine 10g SDS Add dH2O to 1L. Coomassie Blue Stain 3.75g Coomassis Brilliant Blue R-250 750ml Methanol 600ml dH2O Stir 2 to 3 hours. Filter through Whatmas #1 filter paper. Destain Solution 5% Methanol 10% acetic acid 85% dH2O TBS (Tris Buffered Saline) 50mM Tris pH7.5 150mM NaCl (+0.05% Tween 20 for TBS+Tween20) Alkaline Phosphatase Buffer (for Western Substrate development) 0.1M Tris pH9.5 100mM NaCl 5mM MgCl2
LB Agar Make 1L of LB broth, and add 15g of Bacto-agar before autoclaving. Cool to 55-60oC before adding ampicillin, X-gal or IPTG (if necessary) SOC medium 20g Bacto-tryptone 5g Bacto-yeast extract 0.5g NaCl 950ml distilled H2O

32
10ml of 250mM KCl Adjust pH to 7.0 with 5M NaOH Adjust volume to 1L
Autoclave. (Just before use, add 5ml sterile 2M MgCl2, and 20ml of filter-sterilized 1M glucose.