oms work orders user guide - home | kytc · wo-02 chapter 11/10 page 1 of 1 work orders user guide...
TRANSCRIPT

OMS WORK ORDERS USER GUIDE
DEPARTMENT OF HIGHWAYS Division of Maintenance
Revision November 2010
WO-01
11/10 Page 1 of 1
WORK ORDERS
User Guide
Chapter
INDEXES
Subject
Table of Contents
00 INDEXES 01 Table of Contents .......................................................................... 11/10 02 List of Figures................................................................................. 11/10
100 INTRODUCTION
101 Design of This Manual .................................................................. 11/10 102 Overview .......................................................................................... 11/10
200 SHORT LIST WINDOW
201 Overview .......................................................................................... 11/10 202 Establish a Short List .................................................................... 11/10
300 DAY CARDS WINDOW 301 Establish a Work Order ................................................................ 11/10
301-01 Snow and Ice/Disaster Work Orders ........................ 11/10 302 Day Card Overview ........................................................................ 11/10
302-01 Create a Day Card ........................................................ 11/10 302-02 Direct Costs and Accomplishments Entry ........................... 11/10
400 DAILY LOG WINDOW 401 Overview .......................................................................................... 11/10
401-01 Recording Leave Activities ......................................... 11/10
500 COMPLETION WINDOW 501 Completing a Work Order ........................................................... 11/10

WO-02
11/10 Page 1 of 1
WORK ORDERS
USER GUIDE
Chapter
INDEXES
Subject
List of Figures
200 SHORT LIST WINDOW
Figure 202-1: Access to Labor Short List Window ............................. 11/10 Figure 202-2: Roadway Labor Short List Window .............................. 11/10 Figure 202-3: Access to Equipment Short List Window .................... 11/10 Figure 202-4: Roadway Equipment Short List Window ..................... 11/10 Figure 202-5: Access to Material Short List Window ......................... 11/10 Figure 202-6: Roadway Material Short List Window .......................... 11/10
300 DAY CARDS WINDOW
Figure 301-1: Access to Day Cards Windows ...................................... 11/10 Figure 301-2: Select WO Attributes Window ....................................... 11/10 Figure 301-3: Edit Dates Option ............................................................ 11/10 Figure 301-4: Edit Dates Calendar ......................................................... 11/10 Figure 301-5: Edit Chartfield Option .................................................... 11/10 Figure 301-6: Edit Chartfield Pop-up Window .................................... 11/10 Figure 302-01-1: Employee Short List Sub-Window Tabs ................. 11/10 Figure 302-01-2: Assigned Employee Sub-Window ............................ 11/10 Figure 302-01-3: Employee Day Cards Sub-Window ......................... 11/10 Figure 302-02-1: Costs and Accomplishments Tab ........................... 11/10 Figure 302-02-2: Costs Sub-Window ..................................................... 11/10 Figure 302-02-3: Approved Costs and Accomplishments................ 11/10
400 DAILY LOG WINDOW
Figure 401-1: Access to Daily Log Window ......................................... 11/10 Figure 401-2: Labor Tab .......................................................................... 11/10 Figure 401-3: Disapprove Inaccurate Day Card Amounts ................ 11/10 Figure 401-4: Show Report Option ........................................................ 11/10
500 COMPLETION WINDOW
Figure 501-1: Access Completion Window .......................................... 11/10
WO-101
11/10 Page 1 of 2
WORK ORDERS
USER GUIDE
Chapter
INTRODUCTION
Subject
Design of This Manual
Organization & Numbering
Chapter Title—the subject matter in the manual is divided into chapters. The chapter title appears in the upper right-hand corner of the first page of a subject and in the upper left-hand corner of any subsequent page. Subject Title—the title of a subject appears in the upper right-hand corner of the first page of a subject and in the upper left-hand corner of any subsequent page. “WO” Prefix—preceding each subject number, this prefix stands for the manual title Work Orders User Guide. Date—the latest issuance date of a subject appears at the bottom of each page of the subject. This date agrees with the latest issuance date shown for the subject in the Table of Contents (). Page Numbering—each subject has its own page numbering, which appears at the bottom of each page.
Locating Information
Two indexes appear at the front of the manual, and one index appears at the back:
♦ Table of Contents—this index at the front lists the titles of the manual’s chapters and their subjects, as well as other information, in numerical order. It includes the latest issuance dates of all the subjects. As the manual matures, these dates may change.

INTRODUCTION
Design of This Manual WO-101
11/10 Page 2 of 2
Locating Information (Cont)
♦ List of Figures—this index at the front lists the titles of the
figures referenced in the manual. It includes the latest issuance dates of all the subjects. As the manual matures, these dates may change.
Cross References In Manual
Subject Numbers within Narrative—a subject number within the narrative on a page directs the user to more information about the subject.
Questions
Who to Contact—for answers to questions about the contents of the manual and copies, please contact:
Operations and Pavement Management Branch Division of Maintenance Transportation Cabinet Office Building Frankfort, KY 40622 (502) 564-4556

WO-102
11/10 Page 1 of 1
WORK ORDERS
USER GUIDE
Chapter
INTRODUCTION
Subject
Overview
Overview
All work that is performed by state forces must be entered into OMS in the form of a work order. This could include pothole patching, sign installation, ditching, or any other activity performed by a OMS Mgmt. Unit. Work orders describe the following:
When work is to be done Who is to perform the work What work is being done Where the work is to be done How the work will be paid for
Most of this work will be performed within the Roadway module in OMS. The Roadway module assists in the process of tracking in-house work and handles the entry of work accomplished on a daily basis through day cards. It also can provide versatile long or short term planning and scheduling capabilities for projects planned ahead of time. Critical to payroll, OMS will record daily time and attendance for OMS employees who perform work in the field.
By the completion of this manual, you will be able to:
Create and close work orders Create and approve day cards Edit accounting strip for work orders Produce a daily log (similar to the TC 31-396 form, Daily Report
of Time and Equipment Usage) report for time entry into TIPS.


WO-202
11/10 Page 1 of 4
WORK ORDERS
USER GUIDE
Chapter
SHORT LIST WINDOW
Subject
Establish a Short List
Procedure
1. Log into your management unit in OMS and access Roadway>Setup/Inventory>Short List>Labor Short list.
2. To select employees to be assigned to a work order click in the “Select” check box.
FIGURE 202-1: Access to Labor Short List Window

SHORT LIST WINDOW
Establish a Short List WO-202
11/10 Page 2 of 4
Procedure (Cont)
3. Save .
4. Access Roadway>Setup/Inventory>Short list>Equipment Short list.
FIGURE 202-2: Roadway Labor Short List Window
FIGURE 202-3: Access to Equipment Short List Window
SHORT LIST WINDOW
Establish a Short List WO-202
11/10 Page 3 of 4
Procedure (Cont)
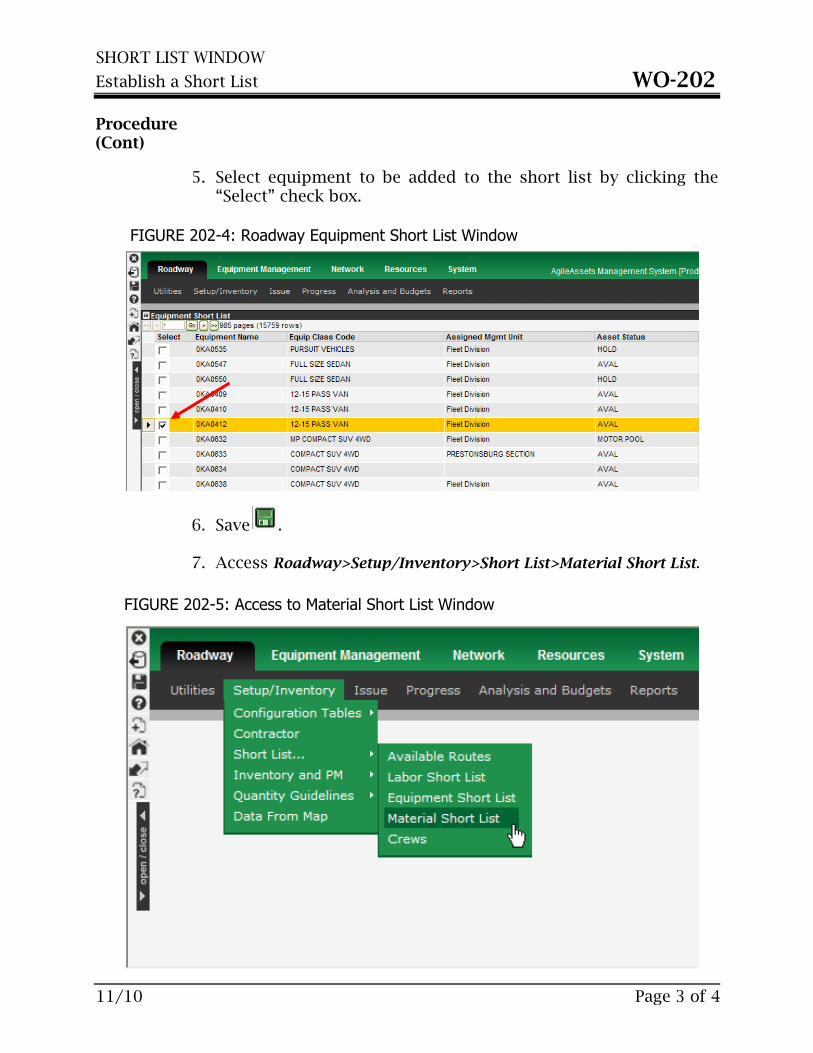
5. Select equipment to be added to the short list by clicking the “Select” check box.
6. Save .
7. Access Roadway>Setup/Inventory>Short List>Material Short List.
FIGURE 202-4: Roadway Equipment Short List Window
FIGURE 202-5: Access to Material Short List Window

SHORT LIST WINDOW
Establish a Short List WO-202
11/10 Page 4 of 4
Procedure (Cont)
8. Select materials to be added to the short list by clicking the
“Select” check box.
9. Save and exit .
NOTE: Sometimes labor, material, or equipment needed for a work order does not appear on your short list. This often happens when new material is purchased. To add this new material to your short list you would follow the same procedure as outlined in this chapter.
FIGURE 202-6: Roadway Material Short List Window
WO-301
11/10 Page 1 of 6
WORK ORDERS
USER GUIDE
Chapter
DAY CARDS WINDOW
Subject
Establish a Work Order
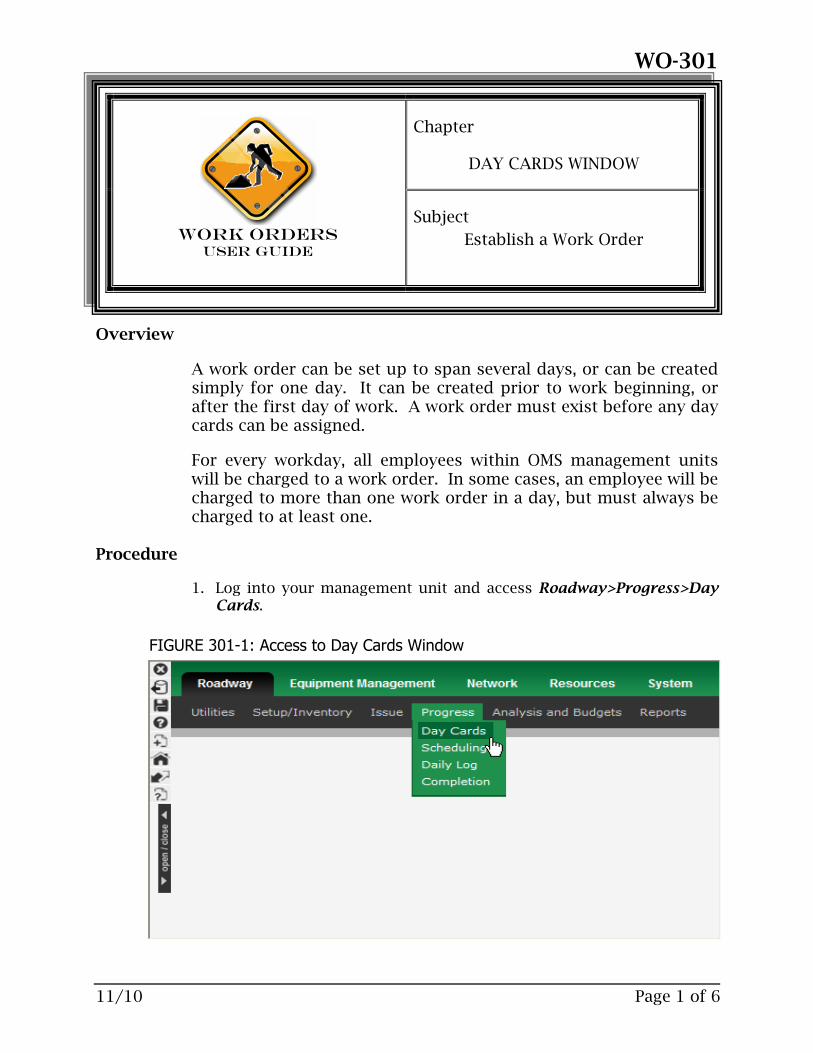
Overview
A work order can be set up to span several days, or can be created simply for one day. It can be created prior to work beginning, or after the first day of work. A work order must exist before any day cards can be assigned.
For every workday, all employees within OMS management units will be charged to a work order. In some cases, an employee will be charged to more than one work order in a day, but must always be charged to at least one.
Procedure
1. Log into your management unit and access Roadway>Progress>Day Cards.
FIGURE 301-1: Access to Day Cards Window
DAY CARDS WINDOW
Establish a Work Order WO-301
11/10 Page 2 of 6
Procedure (Cont)
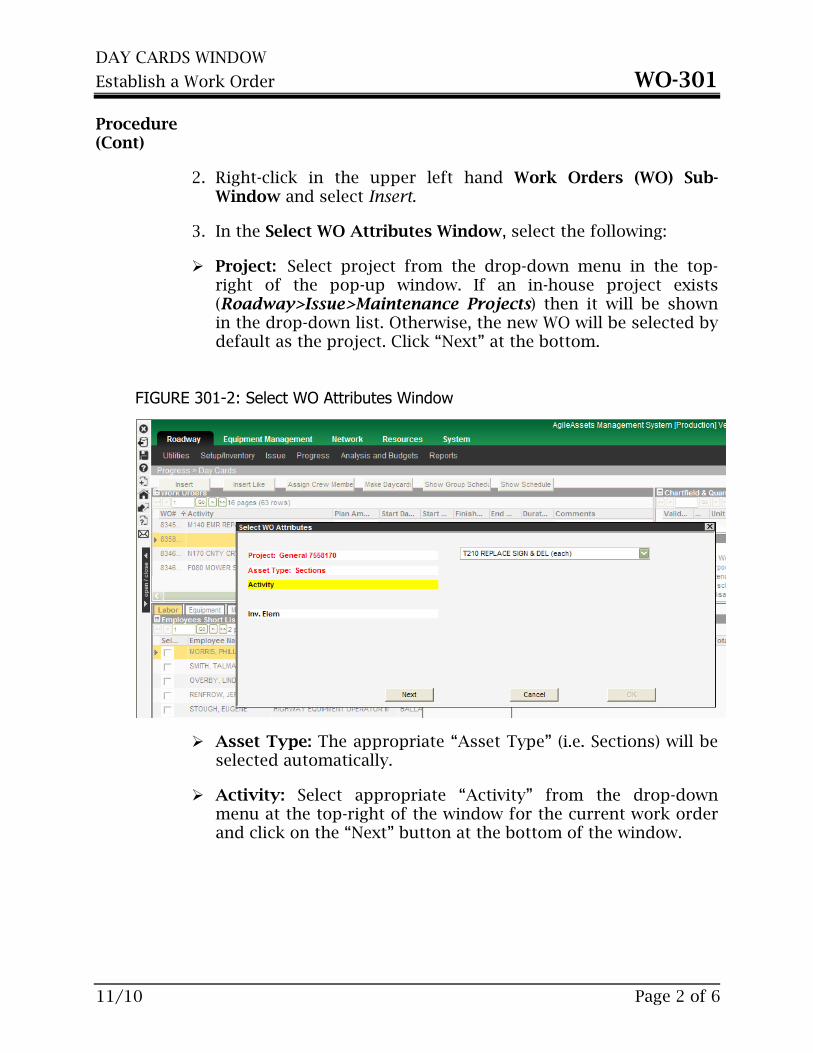
2. Right-click in the upper left hand Work Orders (WO) Sub-Window and select Insert.
3. In the Select WO Attributes Window, select the following:
Project: Select project from the drop-down menu in the top-right of the pop-up window. If an in-house project exists (Roadway>Issue>Maintenance Projects) then it will be shown in the drop-down list. Otherwise, the new WO will be selected by default as the project. Click “Next” at the bottom.
Asset Type: The appropriate “Asset Type” (i.e. Sections) will be
selected automatically.
Activity: Select appropriate “Activity” from the drop-down menu at the top-right of the window for the current work order and click on the “Next” button at the bottom of the window.
FIGURE 301-2: Select WO Attributes Window

DAY CARDS WINDOW
Establish a Work Order WO-301
11/10 Page 3 of 6
Procedure (Cont)
Inv. Element: Select the “Inv. Element” (road section) for the current work order where the work took place and click the “OK” button at the bottom of the window. If work took place on multiple locations, you can select multiple sections by clicking on Next (instead of OK) after each section where work took place.
If the work order is set up for multiple dates or a date different from today, right-click on the newly inserted work order in the upper left hand Work Orders Sub-Window and select Edit Dates.
Double click on Start and End fields to pull up calendar to select the appropriate start and end dates.
FIGURE 301-3: Edit Dates Option
Separating Road Sections Road sections are classified as MP and RS. Separate work orders must be created for each type of road section even if multiple road types exist within the same project.
DAY CARDS WINDOW
Establish a Work Order WO-301
11/10 Page 4 of 6
What if my work order is for an on-going activity? Some activities are performed daily such as patching and mowing. In instances like these, it may be more convenient to create a work order that lasts for several days or weeks. To do this, set the end date for the expected end of the work order and enter labor, equipment, and materials as it is used.
Procedure (Cont)
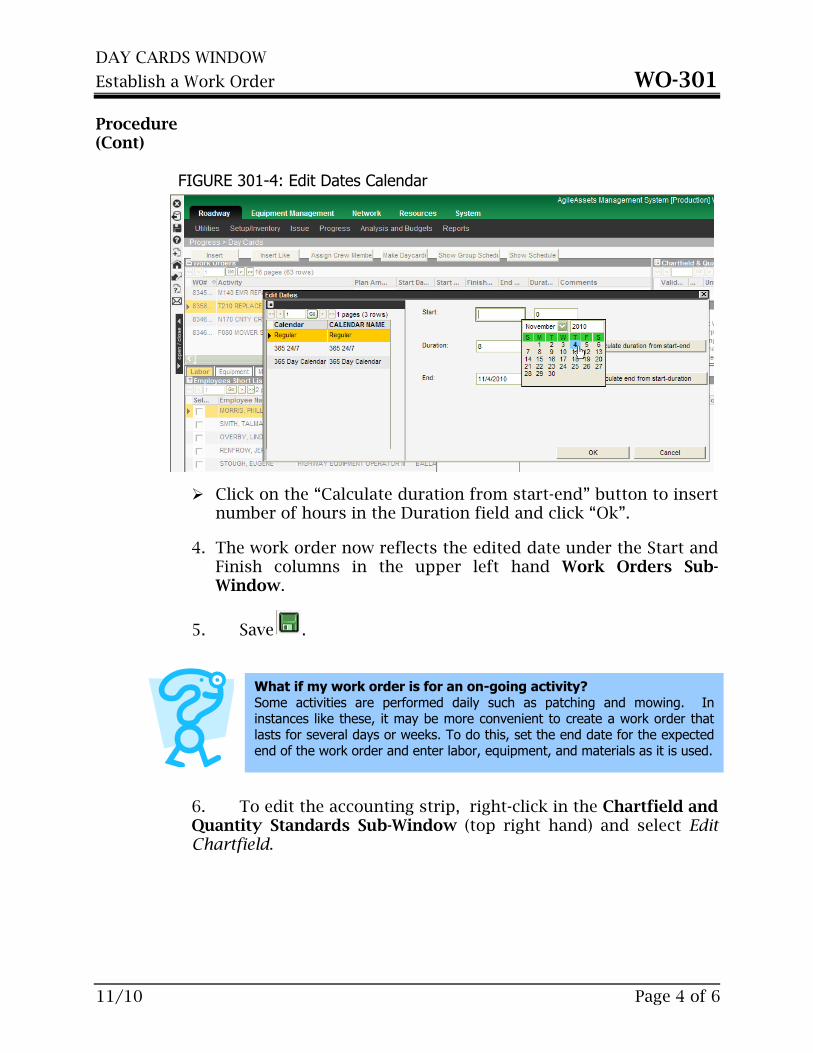
Click on the “Calculate duration from start-end” button to insert number of hours in the Duration field and click “Ok”.
4. The work order now reflects the edited date under the Start and Finish columns in the upper left hand Work Orders Sub-Window.
5. Save .
6. To edit the accounting strip, right-click in the Chartfield and Quantity Standards Sub-Window (top right hand) and select Edit Chartfield.
FIGURE 301-4: Edit Dates Calendar

DAY CARDS WINDOW
Establish a Work Order WO-301
11/10 Page 5 of 6
Procedure (Cont)
7. In the Edit Chartfield Pop-up Window enter the correct accounting information and select Ok.
NOTE: For each activity in the Chartfield and Quantity Standards Sub-Window, levels of resources are recorded. The type and quantities of labor, equipment, and materials are defined for each activity to act as a benchmark for future work.
FIGURE 301-5: Edit Chartfield Option
FIGURE 301-6: Edit Chartfield Pop-up Window

DAY CARDS WINDOW
Establish a Work Order WO-301
11/10 Page 6 of 6
Procedure (Cont)
8. Save .
NOTE: Once the work order is saved, any subsequent changes to the activity, section, termini, etc. needs to be reflected in the accounting strip. These accounting strips need to be updated in both the Roadway>Progress>Day Card Window and the Roadway>Progress>Daily Log Window to ensure accuracy.

WO-301-01
11/10 Page 1 of 2
WORK ORDERS
User Guide
Chapter
DAY CARDS WINDOW
Subject
Snow and Ice/Disaster Work Orders
Overview
After each day of snow and ice work is realized, employees for that management unit will have their time recorded against a designated snow and ice (K series) activity code. All day card usage on snow and ice work orders must be up-to-date by the close of the following business day. NOTE: Special attention must be given when snow and ice resources are used on a project that starts one day and carries over into the next business day. For example, if a snow and ice truck is used on roads from 6pm to 2am, it will be the responsibility of the management unit to effectively record the usage on day cards that represent two days. The management unit will be required to estimate how much of those resources were used on the first day (6pm-11:59pm) and how much were used on the second day (12am-2am).
State Forces
For each activity that was performed, create a separate work order for MP routes and RS routes.
Create labor, equipment, and material day cards for each of the work orders.
NOTE: As a shortcut, you may only create day cards for one work order, but you must be sure to enter the correct hours and material usage in the Daily Log Window. This shortcut is to be used per pay period only.
Fill out the Daily Log as usual, and enter time into TIPS.

DAY CARDS WINDOW
Snow and Ice/Disaster Work Orders WO-301-01
11/10 Page 2 of 2
Contract Forces
Follow the same steps as with state forces with the following exceptions:
Create material day cards for each work order. Contract labor
and trucks will be added later as a direct cost.
Do not complete the work order until the invoice from the contractor is received.
Once the invoice is received, the cost for labor and equipment should be added to the work order as a direct cost.
Disaster Work
When a disaster has been declared, all snow and ice related work should be charged to the appropriate snow and ice (K series) activity code. Central Office will provide management units with a department object code that will be used to isolate emergency work performed from regular snow and ice duties. It is the responsibility of the management unit to ensure that all emergency work is recorded with the provided department object code.
NOTE: Once a disaster has been declared and an object code submitted, it is a good rule of thumb to make an extra copy of the 396 form for each day during the event in order to easily capture driver information for FEMA reimbursement. Currently OMS does not have a field available for equipment operator name but FEMA will require this information to be eligible for reimbursement.
WO-302
11/10 Page 1 of 1
WORK ORDERS
USER GUIDE
Chapter
DAY CARDS WINDOW
Subject
Day Card Overview
Overview
A day card is part of a work order. Whenever material, equipment, or labor hours are used on a project, those items must be charged to the work order for that project. When project work is complete, the amounts for that day will be entered on a day card. If any materials (cold mix, rock, sign, etc.) are used, all the quantities will be entered on a materials day card for that work order. All hours worked on the project will be entered by each employee’s name in a labor day card. If equipment (backhoe, dump truck, etc.) or a fleet vehicle is used, hours or mileage for each piece of equipment is entered on the equipment day card. If a work order spans several days, there will be new day cards every day. For every project that takes place on a given day, there will only be 1 of each type of day card.
Note: If the Acct Strip Error column in the upper Work Orders Sub-Window says “No” then the accounting information is acceptable and the work order is eligible for completion. If that column says “Yes” then there is some error associated with the work order and you may need to click on the “Yes” link to determine how the error needs to be corrected.
Getting there: Roadway>Progress>Day Cards


WO-302-01
11/10 Page 1 of 4
WORK ORDERS
USER GUIDE
Chapter
DAY CARDS WINDOW
Subject
Create a Day Card
Scenario
Your manager called and requested that certain signs in your county be replaced. The Traffic Superintendent has assigned two employees to the job. They will be using a 1-Ton Truck Crew Cab along with several signs and posts. At the end of the day, the crew reports that they were able to finish the job. They had driven 75 miles and used the following materials:
Break In Pavement 30 x 30 sign
Road Work Ahead 30 x 30 sign
Date of Project: November 5, 2010 Assigned Employees: Pick two employees Activity: T210 Replace Sign and Del (each) Section: Pick any section Milepoints: Pick any applicable section
Procedure
1. Log into your management unit and access Roadway>Progress>Daycards.
2. In the lower left hand Employees Short List Sub-Window, you will see a tab for Labor, Equipment, Material, Costs + Acc, and Inv. Items. Click on each of these tabs to insert the appropriate day card information.

DAY CARDS WINDOW
Create a Day Card WO-302-01
11/10 Page 2 of 4
Procedure (Cont)
3. Click on the Labor tab in the bottom sub-window.
4. Click the “Select” check box next to the name of each employee assigned to the highlighted work order. Notice the employee name is populated in the Assigned Employee Sub-Window.
FIGURE 302-01-1: Employee Short List Sub-Window Tabs
FIGURE 302-01-2: Assigned Employee Sub-Window

DAY CARDS WINDOW
Create a Day Card WO-302-01
11/10 Page 3 of 4
Procedure (Cont)
5. Right-click in Assigned Employee Sub-Window and select Make Day Cards. Notice all employee names checked in the “select” checkbox are populated in the Employee Day Cards Sub-Window for today’s date (or the date(s) specified for the WO) and eight hrs per day (or less, depending on the duration of the WO. The duration on the WO is specified in the Edit Dates Window for the work order. If necessary edit the Total Hours column to reflect actual hours worked).
6. Click the “Approved” check box for each employee.
7. Save . 8. Click on the Equipment tab in the bottom sub-window.
9. Click the “Select” check box next to each piece of equipment you want assigned to the highlighted work order. Notice the equipment name is populated in the Assigned Equipment Sub-Window.
10. Right click in the lower middle Assigned Equipment Sub-Window and select Make Day Cards. Notice all equipment listed in the Assigned Equipment Sub-Window will auto-populate in the Equipment Day Cards Window for today’s date (or the date(s) specified for the WO) and total hours of eight per day (or less depending on the duration of the WO. The duration on the WO is specified in the Edit Dates Window for the work order).
NOTE: If you make a daycard for a fleet vehicle, you will need to enter the miles driven as well as the # of hours used in the “Total Hours” box.
FIGURE 302-01-3: Employee Day Cards Sub-Window
DAY CARDS WINDOW
Create a Day Card WO-302-01
11/10 Page 4 of 4
Procedure (Cont)
11. Once the appropriate mileage or hours used for each vehicle has been entered, click the “Approved” check box next to each piece of equipment.
12. Save .
13. Click on the Material tab in the bottom sub-window.
14. Click the “Select” check box for each material type to be assigned to the work order. Notice a line will be added to the middle Assigned Material Sub-Window.
15. Enter the amount of material used in the “Amount” box for each assigned material in the Assigned Material Sub-Window.
16. Right-click in the Assigned Material Sub-Window and select Make Day Cards. Notice a line is auto-populated in the Material Day Cards Sub-window with today’s date (or the date(s) specified for the WO) and the amount of material you entered in the last step.
17. Click the “Approved” check box.
18. Save .
WO-302-02
11/10 Page 1 of 4
WORK ORDERS
USER GUIDE
Chapter
DAY CARDS WINDOW
Subject
Direct Costs and Accomplishments Entry
Overview
There are times when KYTC creates a work order for a specific project or job. During a project, there may be a need for labor, equipment, or materials to be charged directly to the project. These charges would not be included as part of KYTC labor, equipment, or material day cards but are charges from external sources. Some examples of direct costs are:
Labor – temporary labor services or inmate labor Equipment – equipment rented from outside contractor Materials – materials ordered for and delivered to a specific
project Direct costs may be entered on work orders that may or may not have day cards associated with them however, direct costs must be reported whenever any of the management unit’s resources are used in conjunction with outside resources (i.e. contract labor, non-stockpiled materials charged directly to the project) prior to completing the work order. If a work order needs to be completed prior to receiving all direct cost information, the management unit must open a separate work order (with the same header and accounting information) and enter only direct cost information. All day cards associated with this project must be entered on the original work order. NOTE: Price contracts (including any associated materials not stockpiled in OMS) need to be entered on a work order as a direct cost in order to capture the cost of those resources against an activity and project through reporting. This is generally the responsibility of district personnel; however, a management unit can also be responsible for entering this information.

DAY CARDS WINDOW
Direct Costs and Accomplishments WO-302-02
11/10 Page 2 of 4
Overview (Cont)
This includes inputting the cost and accomplishments for each contract. Contact your designated OMS Coordinator for assistance with these price contracts. NOTE: Keep in mind that even though the Direct Cost charges are entered into OMS on a work order this process will not move the appropriate monies through Emars. Additional steps will possibly need to be made through accounts to handle the accounting associated with direct cost charges. The ability to capture direct project costs is included in the Costs and Accomplishments tab of the Day Cards Sub-Window. There are two options available under the Costs and Accomplishments tab:
Costs – Outside costs (labor, equipment, and/or materials usage) associated with a specific work order are entered.
Accomplishments – Amount of work completed for a specific day is entered. For example, suppose a project involved paint striping (by linear foot) over a 2-week period. Ten accomplishment day cards would be entered detailing the number of feet painted for a specific day for the associated work order. The work order reflects the estimated amount of activity that would be accomplished for the work order. The accomplishments day cards log the actual amount of activity completed.
FIGURE 302-02-1: Costs and Accomplishments Tabs

DAY CARDS WINDOW
Direct Costs and Accomplishments WO-302-02
11/10 Page 3 of 4
Procedure
1. Click on the Costs + Acc tab. If you have any direct costs associated with this work order, complete the following steps. If there are no direct costs, skip to step 5.
2. Right-click in the lower left hand Costs Sub-Window and select Insert.
3. Enter Work Date, Cost Type, Total Cost, Amount and any necessary comments.
4. Check the “Approved” check box.
5. Right-click in the lower right hand Accomplishments Sub-Window and select Insert.
6. Fill in Work Date, Amount (amount of accomplishment completed) and Unit.
7. Check the “Approved” check box.
8. Save .
FIGURE 302-02-2: Costs Sub-Window
FIGURE 302-02-3: Approved Costs & Accomplishments

DAY CARDS WINDOW
Direct Costs and Accomplishments WO-302-02
11/10 Page 4 of 4
Procedure (Cont)
NOTE: by clicking the “Approved” check box in the Day Cards Window, selected day cards will be approved. Day cards may also be approved in the daily log. (See WO-401)
CAUTION! Review each of the entries for every day card and ENSURE ACCURACY before approving each of the day cards.

WO-401
11/10 Page 1 of 5
WORK ORDERS
USER GUIDE
Chapter
DAILY LOG WINDOW
Subject
Overview
Overview
The Daily Log Window provides the timekeeper (or authorized personnel) with the ability to:
Insert and assign employees to leave work orders
View all work orders entered for a specific day, as well as the employees, equipment, materials, additional costs and accomplishments that were used to complete the work
Approve labor hours, equipment usage, materials, additional costs and accomplishments used on the selected work orders for any given day
Generate the WO Daily Report to assist payroll data entry
The Daily Log Window allows you to edit and approve day cards on all work orders that occur in a single day (including administrative support work orders). This window allows you to record all activities that take place in your management unit for a single day for both operations and administrative support. Conversely, the Day Cards Window allows you to edit all the day cards for any single operations work order across multiple days. The result is the same of any given work order regardless of the window you use to edit day cards. This window simply provides a different access to the same type of information. The Daily Log Window consists of the following:

DAILY LOG WINDOW
Overview WO-401
11/10 Page 2 of 5
Overview (Cont)
Work Orders Sub-Window - displays type of work completed
and start and end dates.
Labor Tab - displays employees who performed the work order and the time it took to complete the work order.
Equipment Tab - displays all equipment used on the work order and total hours or mileage charged to the equipment.
Material Tab - displays stock name of materials and the total amount used on the work order.
Costs and Accomplishments Tab - displays cost types and total
costs for any additional expenses and the amount of the work order that was completed.
Inv. Items Tab - displays the section(s) where the work order
took place. NOTE: The timekeeper must verify the accuracy of all work order information prior to entering the day’s information into TIPS. All accounting strip related errors (OMS or TIPS) and interface errors (i.e. WO# was not sent from OMS to TIPS) should be directed to the OMS Coordinator. All work orders from the Daily Log report shall be entered into TIPS with the exception of leave work orders. All daily log processing and TIPS entries must be complete before payroll runs.
DAILY LOG WINDOW
Overview WO-401
11/10 Page 3 of 5
Procedure
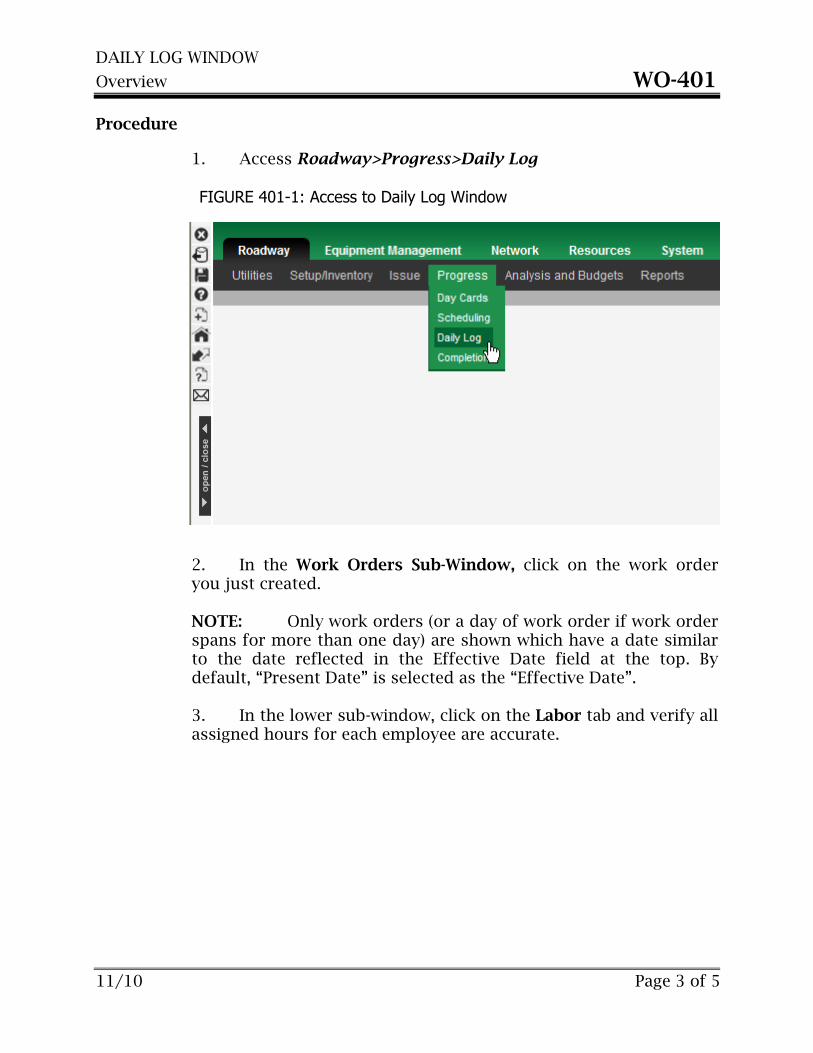
1. Access Roadway>Progress>Daily Log
2. In the Work Orders Sub-Window, click on the work order you just created. NOTE: Only work orders (or a day of work order if work order spans for more than one day) are shown which have a date similar to the date reflected in the Effective Date field at the top. By default, “Present Date” is selected as the “Effective Date”.
3. In the lower sub-window, click on the Labor tab and verify all assigned hours for each employee are accurate.
FIGURE 401-1: Access to Daily Log Window

DAILY LOG WINDOW
Overview WO-401
11/10 Page 4 of 5
Procedure (Cont)
4. Click on the Equipment tab and verify all assigned hours/miles for each piece of equipment are accurate. 5. Click on the Material tab and verify all assigned material and amounts are accurate.
6. Click on the Costs and Accomplishments tab and verify all direct costs and accomplishments are accurate.
NOTE: If any of the day card amounts displayed in the Daily Log are inaccurate, right-click on them and select Disapprove. This will change them from green (Approved) to white (Unapproved) and allow you to edit them to reflect the actual amounts. Once you are satisfied with your day card, right-click and select Approve.
FIGURE 401-2: Labor Tab

DAILY LOG WINDOW
Overview WO-401
11/10 Page 5 of 5
Procedure (Cont)
7. Right-click and select Show Report to display all daily work orders for time entry into TIPS. 8. If satisfied with the displayed report print and send to payroll to TIPS entry.
9. Save and Exit .
FIGURE 401-3: Disapprove Inaccurate Day Card Amounts
FIGURE 401-4: Show Report Option


WO-401-01
11/10 Page 1 of 1
WORK ORDERS
User Guide
Chapter
DAILY LOG WINDOW
Subject
Recording Leave Activities
Overview
All employees must have their time recorded against a particular activity. For an absence, the employee’s time will be recorded appropriately (sick, vacation, etc.). Leave codes exist to cover each type of absence they may encounter. Management units will create one work order for each leave activity as needed with an “End Date” of 6/30/FY. Leave work orders are only set up in the Roadway>Progress>Daily Log window. No equipment or material usage will be recorded in this window. Unlike non-leave work orders, leave work orders shall remain open for a period of time determined by Central Office but must be completed prior to a new fiscal year. After day cards are approved and the Daily Log has been completed, the timekeeper must enter the leave information in TIPS.

WO-501
11/10 Page 1 of 3
WORK ORDERS
USER GUIDE
Chapter
COMPLETION WINDOW
Subject
Completing a Work Order
Overview
Work orders shall be marked “completed” in the Completion Window by the management unit’s supervisor upon verification of accuracy of the following data:
Labor, equipment, and material usage
Activity
Project code
All other accounting information including termini and section
Direct costs and accomplishments
Start/End dates
Work performed on project is complete
Payroll entry for this work order is processed NOTE: If usage errors on the work order (equipment and materials) are discovered after it has been completed in OMS, reconciliation would need to occur in both eMARS and OMS. Management units shall contact their OMS Coordinator for assistance.
Work orders shall not span more than one pay period. If a project is going to start in one pay period and end in the next, the management unit shall end the work order on the last day of the current pay period and open a new one for the next period.

COMPLETION WINDOW
Completing a Work Order WO-501
11/10 Page 2 of 3
Getting there: Roadway>Progress>Completion
Overview (Cont) Procedure
1. Access Roadway>Progress>Completion
2. Click on the Work Order ready for completion and verify all amounts are accurate in the Costs and Accomplishments sub window.

COMPLETION WINDOW
Completing a Work Order WO-501
11/10 Page 3 of 3
Procedure (Cont)
3. Check the completed box.
4. Save and Exit.