north gis surveyor quick guide - north surveying gis surveyor software... · north gis surveyor...
TRANSCRIPT

North GIS Surveyor Quick Guide
NNoorrtthh GGrroouupp LLTTDD..
NORTH GIS SURVEYOR Quick Guide
2
No
rt
h G
ro
up
LT
D.
Copyright Copyright 2007-2012 North. © 2007 North Group LTD. All rights reserved. The North is trademark of North Group LTD. All other trademarks are the property of their respective owners, 2007. Trademarks All product and brand names mentioned in this publication are trademarks of their respective holders.

NORTH GIS SURVEYOR Quick Guide
3
No
rt
h G
ro
up
LT
D.
The current document presents the main information about the use for NORTHN GIS SURVEYOR
PROGRAM.
Some images would change according to the handheld device where it is installed.
INSTALLING THE NORTH GIS PROGRAM.
Before the installation, you need to synchronize your handheld device with your computer using the
ActiveSync (for WIN XP OS) or Windows Mobile Device Center (for WIN VISTA & 7 OS).
1. Find the installation file for NORTH GIS SURVEYOR and execute it. A window shall appear
introducing you to the installation process. Please proceed with OK.

NORTH GIS SURVEYOR Quick Guide
4
No
rt
h G
ro
up
LT
D.
2. After that we recommend to read LICENSE AGREEMENT, if you want to continue the installation
choose “Accept the terms” and Finish. Otherwise choose cancel.
3. As last step, the program will be installed on your Handheld device:

NORTH GIS SURVEYOR Quick Guide
5
No
rt
h G
ro
up
LT
D.
4. Please continue the installation from your Handheld device:
5. Before you run the first time NORTH GIS SURVEYOR, you need to copy the dict.txt file and paste
it on the DATA folder on the program installation directory. The dict.txt file contains information
that we could add to measurement points like code, text information, point feature; all this
information will be exported on *. SHP format.

NORTH GIS SURVEYOR Quick Guide
6
No
rt
h G
ro
up
LT
D.
USING THE NORTH GIS PROGRAM.
1. For execute the NORTH GIS go to Start button and press the quick access to the program.
2. The program will start showing the main interface where we can see the main menu, editing and
drawing tools, the map, coordinates area.

NORTH GIS SURVEYOR Quick Guide
7
No
rt
h G
ro
up
LT
D.
LANGUAGES:
The NORTH GIS allow us to choose between different operating languages:
In order to change the language, follow the next path: File->Language
SETTINGS.
This particular function allows you to configure the program operation, in order to make it able to work
properly, according to requirements for surveying.
MAP
MAP
Coordinates area
Drawing/editing tools
Status
Menu
NORTH GIS SURVEYOR Quick Guide
8
No
rt
h G
ro
up
LT
D.
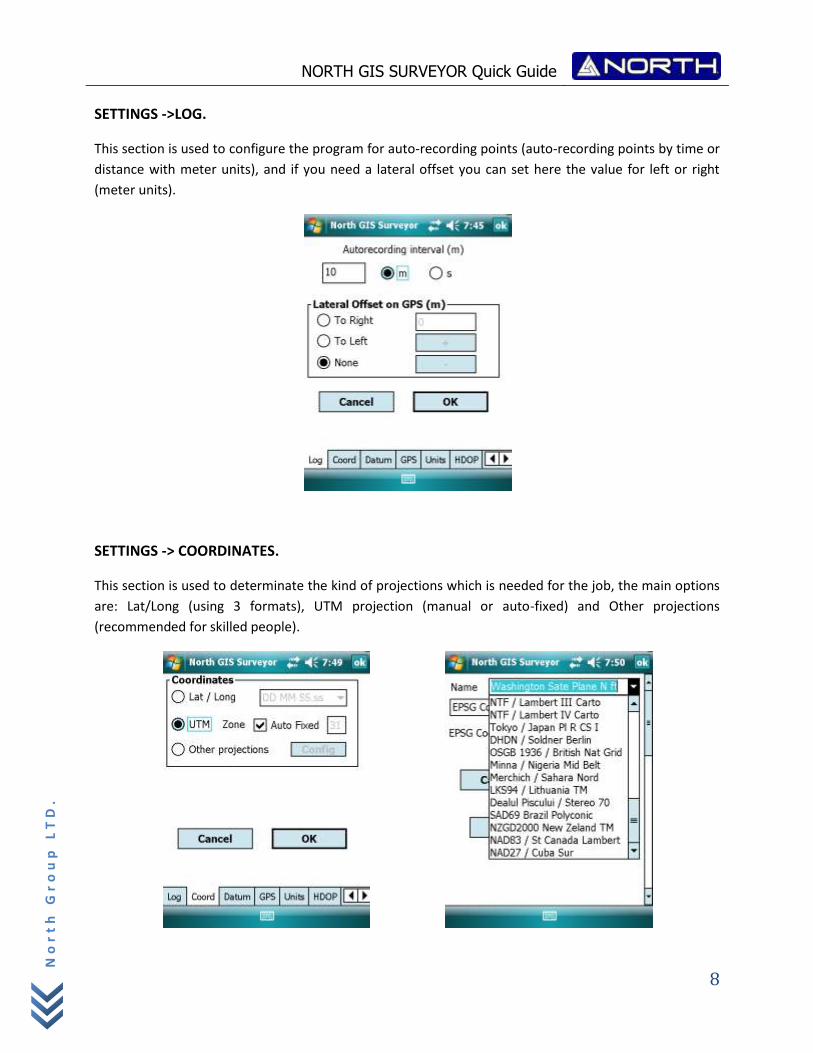
SETTINGS ->LOG.
This section is used to configure the program for auto-recording points (auto-recording points by time or
distance with meter units), and if you need a lateral offset you can set here the value for left or right
(meter units).
SETTINGS -> COORDINATES.
This section is used to determinate the kind of projections which is needed for the job, the main options
are: Lat/Long (using 3 formats), UTM projection (manual or auto-fixed) and Other projections
(recommended for skilled people).

NORTH GIS SURVEYOR Quick Guide
9
No
rt
h G
ro
up
LT
D.
SETTINGS -> DATUM.
This section is used to choose the necessary DATUM which is needed for the job, it is highly
recommended know the requirements for the job. By default the settled DATUM is WGS84/GRS80.
SETTINGS -> GPS.
This section is used to configure your GPS connection, there are two main options: Use GPS Windows
Mobile and Use GPS by Serial Port.
Use GPS Windows Mobile. In order to use this option you need first configure your GPS using the tool
External GPS on your Windows Mobile Settings System. After that you can choose the correct option.

NORTH GIS SURVEYOR Quick Guide
10
No
rt
h G
ro
up
LT
D.
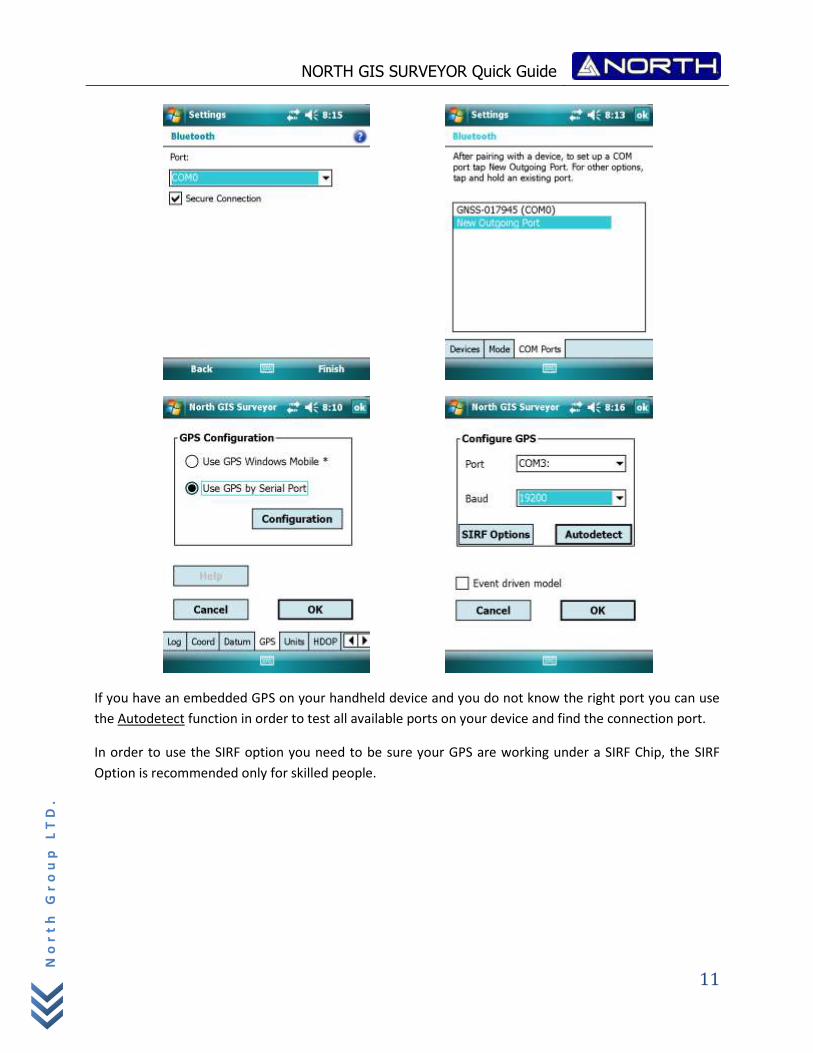
Use GPS by Serial Port. This options may change according the type of handheld you are using (if uses
any physical serial port or has embedded GPS), otherwise if you are using only Bluetooth connection,
first you need establish the connections ports and the service Serial Port on the settings device.
NORTH GIS SURVEYOR Quick Guide
11
No
rt
h G
ro
up
LT
D.
If you have an embedded GPS on your handheld device and you do not know the right port you can use
the Autodetect function in order to test all available ports on your device and find the connection port.
In order to use the SIRF option you need to be sure your GPS are working under a SIRF Chip, the SIRF
Option is recommended only for skilled people.

NORTH GIS SURVEYOR Quick Guide
12
No
rt
h G
ro
up
LT
D.
SETTINGS -> UNITS.
This section is used to choose the Azimuth and Measure Units (for lines and areas) units according to
your needs.
SETTINGS -> HDOP.
This section is used to active a HDOP Filter for measurements under variable conditions. You can apply
that filter to all elements by choose them. Otherwise you can ignore it.

NORTH GIS SURVEYOR Quick Guide
13
No
rt
h G
ro
up
LT
D.
SETTINGS -> WPT.
This section is used to define the way to name the measurement Waypoints.
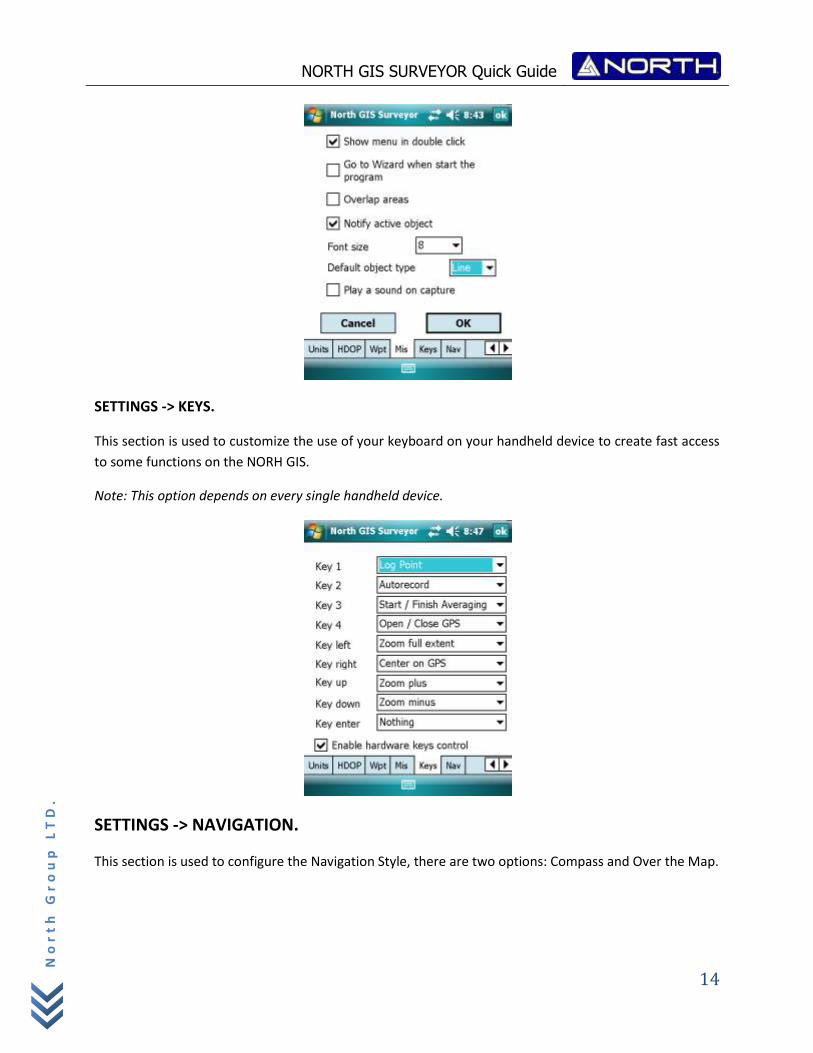
SETTINGS -> MISCELLANEOUS.
This section is used to customize some function on using the stylus on the map area, starting of program
and recording data.
NORTH GIS SURVEYOR Quick Guide
14
No
rt
h G
ro
up
LT
D.
SETTINGS -> KEYS.
This section is used to customize the use of your keyboard on your handheld device to create fast access
to some functions on the NORH GIS.
Note: This option depends on every single handheld device.
SETTINGS -> NAVIGATION.
This section is used to configure the Navigation Style, there are two options: Compass and Over the Map.

NORTH GIS SURVEYOR Quick Guide
15
No
rt
h G
ro
up
LT
D.
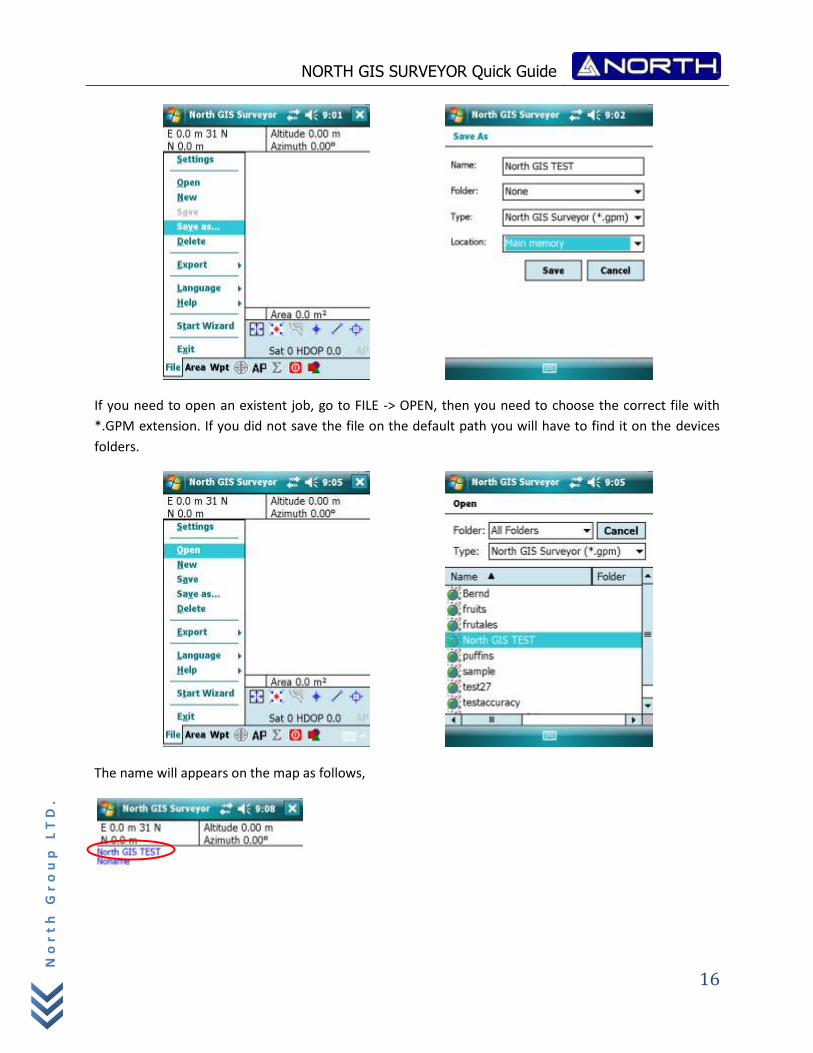
CREATING, SAVING & OPENING A JOB.
For creating a new job first we need to go to FILE-> NEW, automatically the screen turn into a new job (If
you already have a job opened the program will ask permission for saving any changes).
For saving an existent job, go to FILE -> SAVE AS.. (for saving new job or saving existing job with different
name), go to FILE -> SAVE for saving any changes.
For saving a new job, you will have to save it with a NAME and in a determined directory or path.
NORTH GIS SURVEYOR Quick Guide
16
No
rt
h G
ro
up
LT
D.
If you need to open an existent job, go to FILE -> OPEN, then you need to choose the correct file with
*.GPM extension. If you did not save the file on the default path you will have to find it on the devices
folders.
The name will appears on the map as follows,
NORTH GIS SURVEYOR Quick Guide
17
No
rt
h G
ro
up
LT
D.
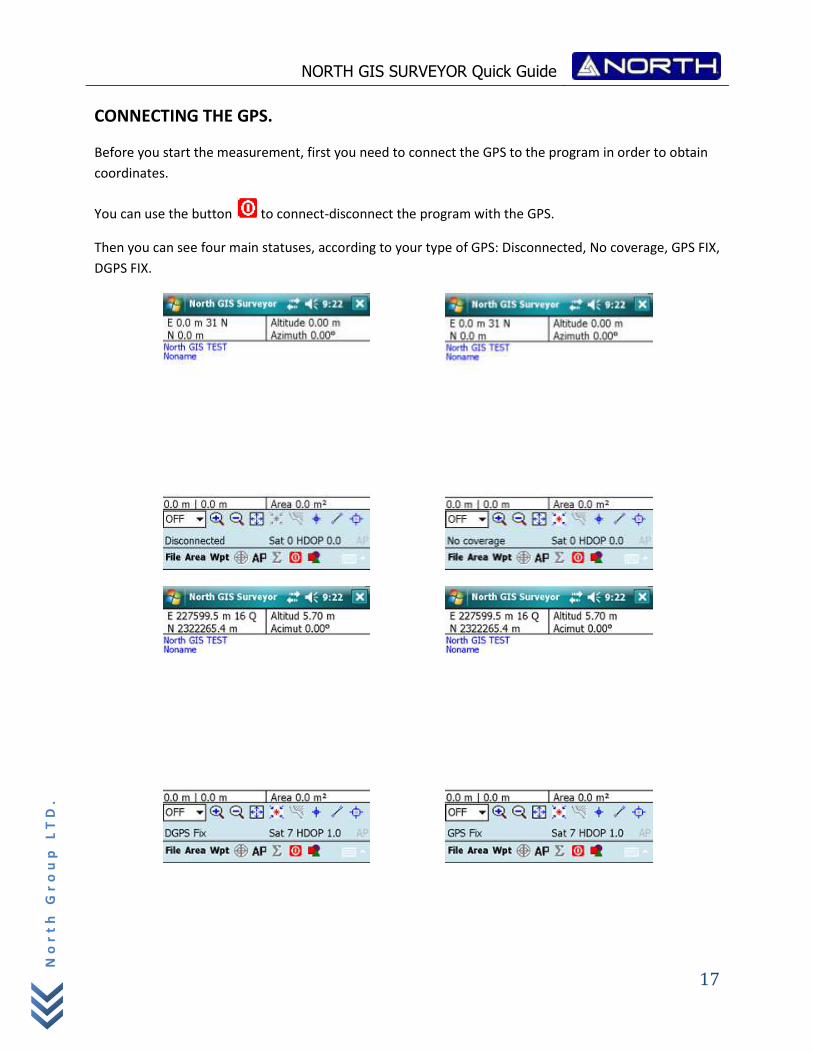
CONNECTING THE GPS.
Before you start the measurement, first you need to connect the GPS to the program in order to obtain
coordinates.
You can use the button to connect-disconnect the program with the GPS.
Then you can see four main statuses, according to your type of GPS: Disconnected, No coverage, GPS FIX,
DGPS FIX.

NORTH GIS SURVEYOR Quick Guide
18
No
rt
h G
ro
up
LT
D.
START MEASURING ELEMENTS.
Before start measuring points, we need to establish the type of elements we will identify on the
program:
A) Line B) Area C) Waypoint
Line. Each single line will be created in a different layer. Each line consists on a sequence of singles points
measured manual, automatic by time, automatic by distance.
You can create a different layer by Area -> Add New, after that you can choose the type of element you
want to measure: Line or Area.
Area. Each single area will be created in a different layer. Each area consists on a sequence of singles
points measured manual, automatic by time, automatic by distance. This kind of element will be always a
closed shape.
You can create a different layer by Area -> Add New, after that you can choose the type of element you
want to measure: Line or Area.
Waypoint. This kind of element will be not saved on any layer; it will be saved on a waypoint-list.
The next table show the different ways that the elements can be created using commands on the NORTH
GIS.
Object Feature Command
Waypoint Single coordinate point A) Wpt -> Add current position
B) Manual add (not recommended)
Line/Area Sequence of coordinate points building two different shapes: open line or closed shape.
A) Add current position B) by auto-recording
C) add point by average
Start measuring: Way point.
As we saw before this kind of element will not be assigned to any layer, it will be saved on a specific
waypoint list.
When you are creating a Waypoint, there will appear a window asking for features to add. This window it
is named DICTIONARY (see last title), while the user is filling the information the program will be
collecting measurements in order to make an average at the end and create the Waypoint.

NORTH GIS SURVEYOR Quick Guide
19
No
rt
h G
ro
up
LT
D.
The next example shows the two different ways to create a waypoint:
Using the command on the menu: Wpt -> Add current position.

NORTH GIS SURVEYOR Quick Guide
20
No
rt
h G
ro
up
LT
D.
And by pressing the button and picking on the map with the stylus.

NORTH GIS SURVEYOR Quick Guide
21
No
rt
h G
ro
up
LT
D.
Start measuring: Line.
Before start measuring the line, we need to create the layer which will correspond to a unique element
(line or area). After to create the layer, we can add points to object and if we want to verify/modify their
feature, we can go to Area -> List to get into Dictionary.
After you named the element, the name will appear under the Job name on the map.

NORTH GIS SURVEYOR Quick Guide
22
No
rt
h G
ro
up
LT
D.
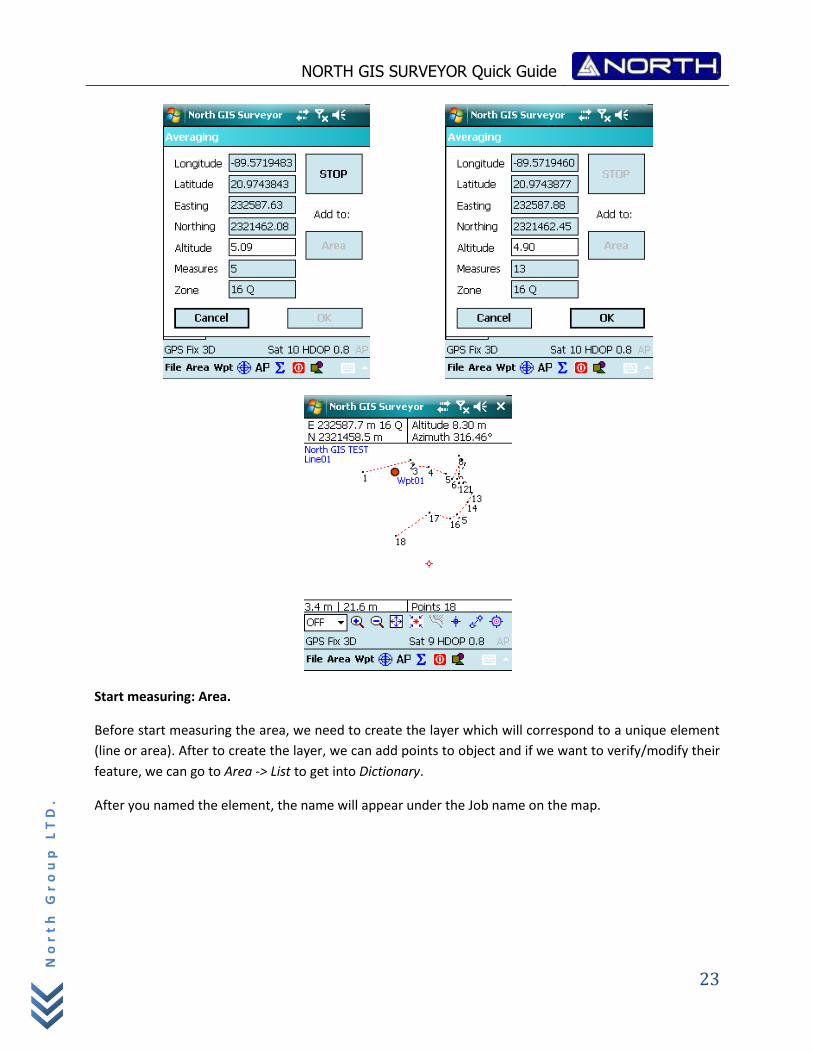
The name is already set; know you can add point to line using the different methods.
Add current position , by auto-recording points or average . For each point you add it will be
part of the objet which is being creating. When you active the auto-recording function by pressing the
button; you will see the warning while the function are working.
For using the average function, first press the button, after that the program will start collecting
points it will show the number of points, lat-long information, coordinates; when the user decide to end
the average, press the STOP button, after that choose the AREA button to add the point to the sequence
for line/area, and finally confirm with OK.
NORTH GIS SURVEYOR Quick Guide
23
No
rt
h G
ro
up
LT
D.
Start measuring: Area.
Before start measuring the area, we need to create the layer which will correspond to a unique element
(line or area). After to create the layer, we can add points to object and if we want to verify/modify their
feature, we can go to Area -> List to get into Dictionary.
After you named the element, the name will appear under the Job name on the map.

NORTH GIS SURVEYOR Quick Guide
24
No
rt
h G
ro
up
LT
D.
The name is already set; know you can add point to line using the different methods.
Add current position , by auto-recording points or average . For each point you add it will be
part of the objet which is being creating. When you active the auto-recording function by pressing the
button; you will see the warning while the function are working.
For using the average function, first press the button, after that the program will start collecting
points it will show the number of points, lat-long information, coordinates; when the user decide to end
the average, press the STOP button, after that choose the AREA button to add the point to the sequence
for line/area, and finally confirm with OK.
On other words the measurement of point is the same procedure with lines.

NORTH GIS SURVEYOR Quick Guide
25
No
rt
h G
ro
up
LT
D.
EDITING FEATURES.
For each element already created, you can access to their dictionary to add/modify the information of
register. There are two different paths for accessing:
Line/Area: Area -> List Waypoint: Wpt -> List
For each list of element, the way to access to enter on editing mode is pressing the option “+” on the
Data column.

NORTH GIS SURVEYOR Quick Guide
26
No
rt
h G
ro
up
LT
D.
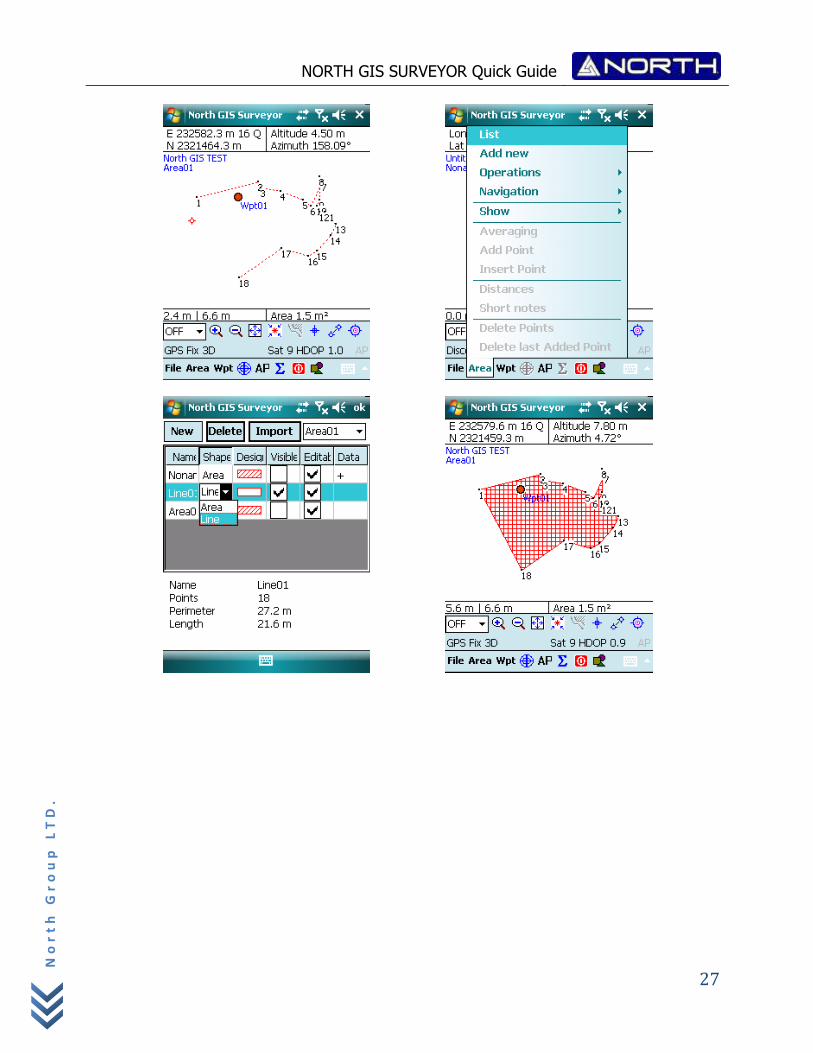
LINE/AREA SHIFTING VIEW.
The list has a tool which allows us to change the mode between line to area and area to line.
Go to Area -> List, the next step is choose the element to change, select it and change the SHAPE feature
from line to area or area to line. If you want to change it more, you can customize the element with the
Design tool.
If you want to make it disappear on the map you can select or not the Visible option.
NORTH GIS SURVEYOR Quick Guide
27
No
rt
h G
ro
up
LT
D.
NORTH GIS SURVEYOR Quick Guide
28
No
rt
h G
ro
up
LT
D.
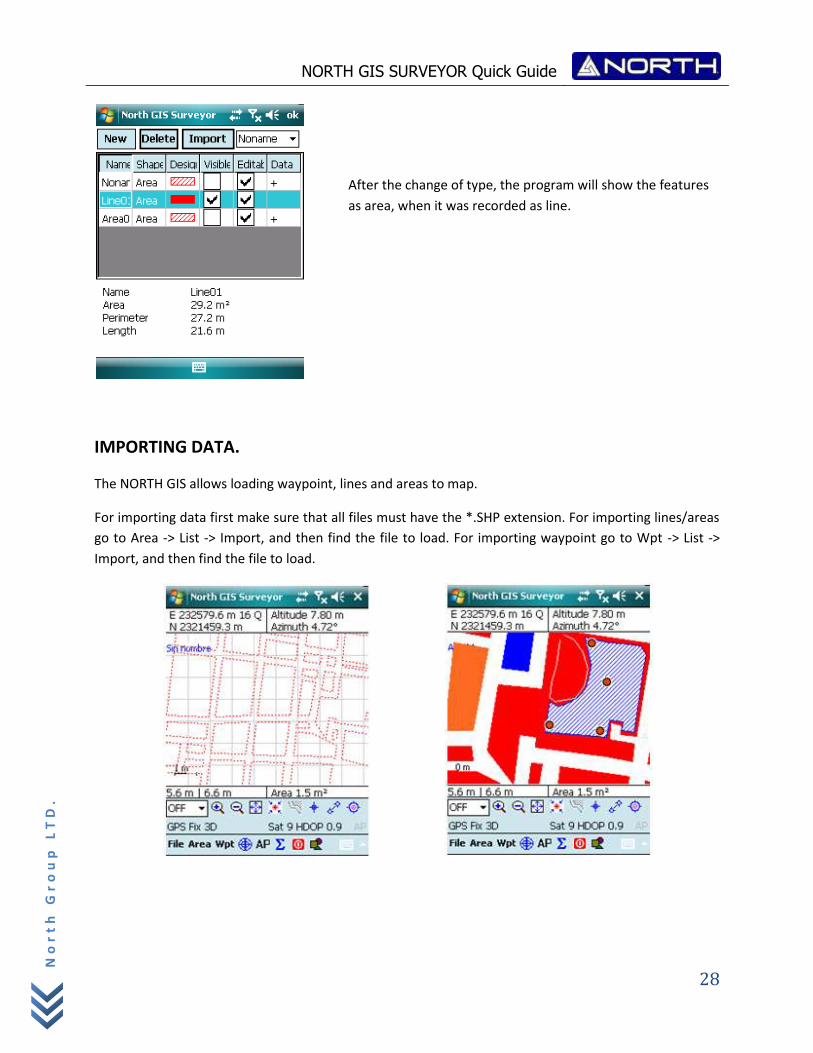
IMPORTING DATA.
The NORTH GIS allows loading waypoint, lines and areas to map.
For importing data first make sure that all files must have the *.SHP extension. For importing lines/areas
go to Area -> List -> Import, and then find the file to load. For importing waypoint go to Wpt -> List ->
Import, and then find the file to load.
After the change of type, the program will show the features
as area, when it was recorded as line.

NORTH GIS SURVEYOR Quick Guide
29
No
rt
h G
ro
up
LT
D.
EXPORTING DATA.
For export the result of the measurement, The NORTH GIS export the data on different formats, the next
image show all option to export:
Note: all features filled on the Dictionary will be exported only o the *.SHP data.
NAVIGATION TOOL.
The NORTH GIS Navigation tool allows to navigate to any point (waypoint, single point of line/area)
previously recorded. To star navigate go to Area -> Navigation -> Start, and then choose the point to
navigate. To modify the kind of navigation, make reference to Settings.

NORTH GIS SURVEYOR Quick Guide
30
No
rt
h G
ro
up
LT
D.

NORTH GIS SURVEYOR Quick Guide
31
No
rt
h G
ro
up
LT
D.
DISTANCE TOOL.
For accessing Distance tool go to Area -> Distance, and then choose the two points which you want to
calculate the distance.

NORTH GIS SURVEYOR Quick Guide
32
No
rt
h G
ro
up
LT
D.
The another Distance tool is a manual tool, you can find it with the button , when it is activated will
calculate the distance between 2 points A and B.

NORTH GIS SURVEYOR Quick Guide
33
No
rt
h G
ro
up
LT
D.
DICTIONARY.
NOTE: All features included on the Dictionary only can be seeing on *.SHP viewer or ArcGIS.
The dictionary consists on a sequence of structures called objects. Each object has a name, a linked
geometry and some features.
The first line on the dictionary will be assigned like the name of the dictionary.
The definition starts with the word “O”, followed by the kind of geometry (P-point, L-line, A-area) and
finally the name of the object; i.e.:
O,P,Corner
It defines one object linked to a point called Corner.
Features.
Text. Defines a text attribute with long; i.e.:
T,Comment,100
It defines a text attribute named “Comment” with a long of 100 words.
Integer. Defines an integer number attribute with range; i.e.:
I,Age (years),3,1,999
It defines an integer number named “Age (years)”, with width of 3 numbers, minimum value: 1,
maximum value: 999.
Double. Defines a double number attribute with range; i.e.:
D,Height (m),5,2,00.00,99.00
It defines a double number named “Height (m)”, with width of 5 parts (2 integer + decimal point +
decimal number), minimum value: 00.00, maximum value: 99.00.
Menu. Defines a sequence of predefined options to choose; i.e.:
M,Type GPS,RTK,SBAS,RTD,ETC
It defines a several choices linked to a one main description named “Type GPS”, the options to choose
are: “RTK”, “SBAS”, “RTD”, “ETC”.
Date. Defines the date of measurement:
F,Date

NORTH GIS SURVEYOR Quick Guide
34
No
rt
h G
ro
up
LT
D.
Hour. Defines the time of measurement:
F, Hour
Separator. Defines a blank line:
S
There is a full example of dictionary:
Dict. North GIS O,P,Point F,Date H,Hour M,OptMultip,option 1,option 2 T,Text,100 I,Num_integ,9,0,0 D,Num_comple,5,2,0.00,99.00 S O,L,Line F,Date H,Hour M,OptMultip,option 1,option 2 T,Text,100 I,Num_integ,9,0,0 D,Num_comple,5,2,0.00,99.00 S O,A,Area F,Date H,Hour M,OptMultip,option 1,option 2 T,Text,100 I,Num_integ,9,0,0 D,Num_comple,5,2,0.00,99.00 S
NORTH GIS SURVEYOR Quick Guide
35
No
rt
h G
ro
up
LT
D.
NORTH
Surveying and Positioning Systems
Information/Sales:
Technical Support:
Copyright 2007-2012 North. © 2007 North Group LTD. All rights reserved.