nipper studio user manual
DESCRIPTION
Guide on install Nipper Studio.Great tools for network equipment audit.TRANSCRIPT

2 © Titania Limited
Copyright Statement
© Titania Limited 2011. All Rights Reserved
This document is intended to provide advice and assistance for the installation and running of Nipper Studio software. While Titania takes care to ensure that all the information included in this document is accurate and relevant, customers are advised to seek further assistance from our support staff if required.
No part of this documentation may be copied or otherwise duplicated on any medium without prior written consent of Titania Limited, publisher of this work.
The use of Nipper Studio software is subject to the acceptance of the license agreement.
Titania (UK) Limited
St Mary’s Street
County House
Worcester
WR1 1HB
Telephone Number: +44 (0)1905 888785
E-mail: [email protected]
Issue Date: June 2011

3 © Titania Limited
Introduction
Welcome and thank you for purchasing our Nipper Studio software.
Nipper Studio enables you to perform comprehensive security audits on your own network
devices. Nipper Studio includes extensive customization and reporting options, enabling you
to tailor your reports for your own requirements.
Whether you are a long time Nipper Studio customer or a first time user, this manual is
designed to help you install, run and make the best of all Nipper Studio’s features. So read
on and discover how easy it is for you to produce your own Nipper Studio reports!
HAPPY AUDITING!

4 © Titania Limited
Contents
1. Setting Up Nipper
1.1-Downloading 5
1.2-Installation 6
2. Adding a License 8
3. Generating a Security Audit Report 10
4. Features
4.1-Multiple Configuration Reporting
4.2-Customizing Reports 13
4.2.1- Company Details 15
4.2.2-Rating System 17
4.2.3-Excluding Issues 20
4.2.4-Adding Issue Notes 22
4.3-Saving Your Reports 24
4.3.1-Saving Tables 24
4.4-Managing Licenses 25
5. Nipper Support 27

5 © Titania Limited
1. Setting Up Nipper
1.1 Downloading
This first section will help you with the initial installation of Nipper Studio. Nipper Studio can
be downloaded on a number of platforms including Windows, Apple Mac and Linux. A full
list of available platforms can be found on the Titania website at www.titania.com. All you
need to do is register and log into your account online and click on MY DOWNLOADS link in
the left sidebar.
Then simply choose the platform that you will be working on and click the download arrow.

6 © Titania Limited
1.2 First Time Installation
To install Nipper Studio for the first time, click on the Nipper Studio download and the
Welcome Wizard box will appear. Click NEXT to continue.
Read and agree to the license and click NEXT again.

7 © Titania Limited
The Nipper Studio Setup Page will pop up so you can select where to install Nipper Studio.
The default location will appear, if you would like to save it in a different location then you
can browse your computer for this. If you are happy with the default location then click
INSTALL.
Few seconds later, Nipper Studio will be installed on your computer. Once you see the
window below click FINISH.
Congratulations! You have just installed Nipper!

8 © Titania Limited
2. Adding a License
1. The first time you run Nipper Studio you will need to add your license. When the add
license wizard appears click NEXT.
Read and agree to the license and then click NEXT again.
9 © Titania Limited
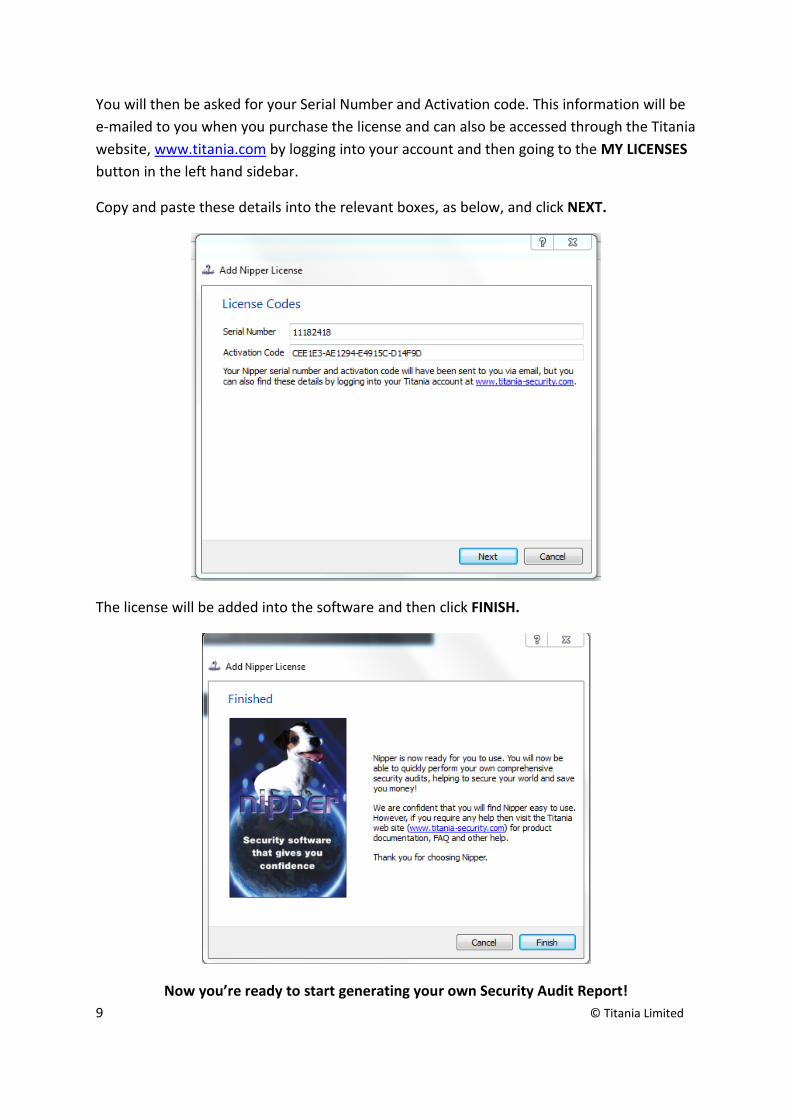
You will then be asked for your Serial Number and Activation code. This information will be
e-mailed to you when you purchase the license and can also be accessed through the Titania
website, www.titania.com by logging into your account and then going to the MY LICENSES
button in the left hand sidebar.
Copy and paste these details into the relevant boxes, as below, and click NEXT.
The license will be added into the software and then click FINISH.
Now you’re ready to start generating your own Security Audit Report!

10 © Titania Limited
2. Generating a Security Audit Report
Nipper Studio enables you to perform security audits for a wide variety of devices. To pull
out the configuration for a device you would usually log in using a web browser where there
will be a save configuration option, though this can vary according to the device. If you need
more help with this then please refer to Section 5 ‘Nipper Studio Support.’
Once you have saved out the device configuration you can use Nipper Studio to process the
configuration and perform the security audit.
Start by opening Nipper Studio on your computer and go to FILE and select NEW REPORT
The window below will appear, click the ADD FILE button.
You will then need to locate where you have saved your configuration file on your computer
and select the configuration for the device that you would like to perform the audit on.

11 © Titania Limited
For the purposes of this demonstration we have used a 3COM device which Nipper Studio
automatically detected. To continue click NEXT.
You will then have the opportunity to select reporting types (returned to in section 4) but
for the purpose of this section click FINISH.

12 © Titania Limited
In a few seconds your report will displayed on your screen.
Congratulations! You have just produced your first comprehensive security report using
Nipper Studio!

13 © Titania Limited
4. Features
4.1 Multiple Configuration Reports
Now we will show you how to go from generating a report for single device to a whole
directory!
The process is almost identical to the one followed when auditing a single device. Simply
select the ADD DIRECTORY option.
Select the directory of configurations that you would like to generate a report for and you
will see that Nipper Studio auto detects the devices from that directory,

14 © Titania Limited
Click NEXT and then FINISH as before and a new report will be generated containing all the
devices from the directory,
Wow! You have just produced a report for several devices!

15 © Titania Limited
4.2 Customizing Reports
Nipper Studio allows you to customize your reports in a number of ways so that you can
easily tailor your reports to your own requirements. This section will cover some of the
customizable features that you may want to implement.
4.2.1 Company Details
By clicking on TOOLS and then OPTIONS on the drop down menu the window below will
appear,
You are then given the option to enter your own company name, logo, report title and
classification. We have entered the Titania company name and logo but you can enter
whatever you like! Click OK to save the settings.

16 © Titania Limited
Then you simply select the REGENERATE REPORT option
from the REPORT dropdown menu.
Click YES to continue,
The new report is generated with the comapny name, logo, report title and classification.

17 © Titania Limited
Also the text has substituted the word Nipper with the company name Titania in the
summary and throughout the rest of the report.
4.2.2 Rating System
Using Nipper Studio you can produce a report using either the Nipper rating system or CVSS
v2, which is an industry standard vulnerability rating system.
When generating a new report go to the FILE drop down menu and select NEW REPORT
Then select ADD FILE or ADD DIRECTORY again to locate the configurations that you want
to audit (explained in section 1) then click NEXT

18 © Titania Limited
Once you have added the directory and reach the REPORTING TYPES window below select
SECURITY AUDIT SETTINGS to continue with more customization.
The CVSS v2 rating system allows you to prioritise and define what is important for your
network. The various areas that could be potentially important to you company can be
rated by importance.
To do this select the REPORTING tab at the top of the box and under GENERAL and RATING
SYSTEM click on the default NIPPER 2 where you will see the option of CVSS v2 as selected
below.

19 © Titania Limited
Then you can start tailoring the system to your own environment. For example if you are a
security agency then CONFIDENTIALITY would be very important to you therefore you
would select this as HIGH in importance.
This allows you to customize your report so you are informed of the vulnerabilities that are
most important to you, and therefore increase the relevance and functionality of your
report.
Once you have selected your setting for the CVSS v2 system click OK. You will then see that
the rating system has changed from the Nipper rating system to CVSS v2 rating system,

20 © Titania Limited
The CVSS v2 rating system includes your own Environmental Metrics, determined by how
you have customized the settings to suit your environment,
This particular issue has been located in 3 of the devices that have been audited in the
configuration file,
Nipper Studio displays all 3 of these in the same section so that insted of creating lots of
seperate reports Nipper Studio creates one report that compares and coherantly pulls
together devices that display the same vulnerability issues so that you save even more time.
4.2.3 Excluding Issues
When customizing the report some issues may be reported that you know are not issues for
your company, for example if a certain device is in a test environment, or you have already
located the problem and have decided that it is not a serious threat. Whatever the reason,
Nipper Studio allows you to easily remove any issue you like from a report.

21 © Titania Limited
Using the issue 2.8 as an example, used in the previous section, we will demonstrate how
easy it is to exclude an issue. Go to REPORT then EXCLUDE ISSUES
This will generate the window below, where you will see all the issues listed. By clicking on
the arrow next to the issue we are looking at, 2.8, we can see the 3 devices that have been
reported to have this issue. You have the option to exclude the whole issue or just the issue
for certain devices, which is what we have done by selecting Cisco Router.

22 © Titania Limited
Click OK and then YES in the REPORT UPDATE REQUIRED window,
You will then see that the report on that device has been removed from the report
4.2.4 Adding Issue Notes
If that wasn’t cool enough then check this out. You can also add your own customized notes
for each issue by going to REPORT and ADD ISSUE NOTES. Again simply select the issue and
then write what you would like to include. For this demonstration we have added a note
relating to the removal of the issue in the previous section.

23 © Titania Limited
The note is added to the issue at the very bottom of the page below,

24 © Titania Limited
4.3 Saving Your Reports
Nipper Studio reports can be saved out into a variety of formats, view the saving options by
selecting FILE then SAVE and the dropdown menu will appear.
4.3.1 Saving Tables
If you would like to save out all or some of the tables in the Nipper Studio report then you
can. Just go to the same drop down save menu and select TABLE TO CSV. You will then be
given the option of what section of tables that you would like to save out or you can select
individual table (shown below).
Simply click OK and save the files.

25 © Titania Limited
4.4 Managing Licenses
A handy feature of Nipper Studio is that you are able to add and view the features of your
license and manage multiple licenses at the same time. To do this go to the TOOLS the
MANAGE LICENSES and the window below will appear.
To add another license go to ADD and you will have to follow the same simple process as
the one you followed in section 2, Adding a License.
If you have multiple licenses it means that you can switch between them if you need to.

26 © Titania Limited
Once the licenses are added to can see an OVERVIEW which will help you track how much
usage you have left...
...So you can make sure that you always have Nipper Studio at your fingertips!

27 © Titania Limited
5.Nipper Studio Support
We want to make Nipper Studio as easy to use as possible so when you first launch Nipper
Studio you will be greeted with help options.
On the left of the screen there is a subset of the current protocols and configurations that
Nipper Studio supports.

28 © Titania Limited
On the right hand side there is a list of links that will help you to answer some frequently
asked questions.
Also you can go to the Help tab and click on ABOUT NIPPER STUDIO if you need to view the
Nipper Studio version details at any point while generating your report.

29 © Titania Limited
If you come across setting options that you are unsure of and would like a brief explanation
of their functions then you can simply hover your mouse over the issue and a short piece of
text will appear as below.
We hope that you have found our quick guide to Nipper Studio useful and now feel
confident in navigating your way around some of Nipper Studio’s features. However there
are still loads more cool features for you to find out about and experiment with. If you
would like to know more about how to get the most out of Nipper Studio or have any
questions then please feel free to contact our customer care team on;
Telephone Number: +44 (0) 1905 888785
E-mail: [email protected]
Further support documents can also be found on our website www.titania.com

30 © Titania Limited