niagara printer series site preparation guide · 1. overview. introduction. this site preparation...
TRANSCRIPT

PageWide XL
Site Preparation GuideVer 1.0
HP Confidential 7-15-15

© Copyright 2015 HP Development Company, L.P.
Edition 1
Legal notices
The information contained herein is subject to change without notice.
The only warranties for HP products and services are set forth in the express warranty statement accompanying such products and services. Nothing herein should be construed as constituting an additional warranty. HP shall not be liable for technical or editorial errors or omissions contained herein.
Trademarks
Microsoft® and Windows® are U.S. registered trademarks of Microsoft Corporation.
HP Confidential 7-15-15
Table of contents
1 Overview ...................................................................................................................................................... 1
Introduction ........................................................................................................................................................... 1Site preparation information ................................................................................................................................. 1Customer responsibilities ...................................................................................................................................... 2Installation time schedule ..................................................................................................................................... 2
2 Site preparation requirements ....................................................................................................................... 3
Physical space requirements ................................................................................................................................. 3Unloading route ................................................................................................................................... 3Unpacking and moving the printer ...................................................................................................... 3Load bearing ........................................................................................................................................ 5Floor surface ........................................................................................................................................ 5Designing the optimal print production area ...................................................................................... 6
Environmental specifications ................................................................................................................................ 8Ventilation and air conditioning ............................................................................................................................ 9HP SmartStream 2.0 minimum requirements for computer and software .......................................................... 9RIP software requirements .................................................................................................................................... 9Networking ............................................................................................................................................................ 9Electrical requirements ....................................................................................................................................... 10
Circuit breakers .................................................................................................................................. 10Electrical configuration ..................................................................................................................... 11
Powerline disturbances ....................................................................................................................................... 22Grounding ............................................................................................................................................................ 23
3 Site preparation checklist ............................................................................................................................ 24
ENWW iiiHP Confidential 7-15-15

iv ENWWHP Confidential 7-15-15
1 Overview
IntroductionThis site preparation guide is a document specifying the configuration and characteristics needed for installing or moving the printer, which is done by the reseller.
The printer is supplied ready to use after installation. It is important to read the information provided in this guide thoroughly and to ensure complete compliance with all installation and operation requirements, safety procedures, warnings, cautions, and local regulations. A well prepared site makes for a smooth and easy installation.
Site preparation information
Printer
HP PageWide 8000 Printer
HP PageWide 5000 MFP
HP PageWide 5000 Printer
HP PageWide 4500 MFP
HP PageWide 4500 Printer
HP PageWide 4000 MFP
HP PageWide 4000 Printer
Accessories purchased on installation day
HP DesignJet SD Pro Scanner
HP DesignJet HD Pro Scanner
HP PageWide XL High-Capacity Stacker
HP PageWide XL Drawer
1 extra
2 extra
ENWW Introduction 1HP Confidential 7-15-15
HP PageWide XL Top Stacker
HP PageWide XL Folder
HP PageWide XL PostScript/PDF Upgrade Kit
HP PageWide XL 4000 Speed Upgrade Kit
HP SmartStream
Customer responsibilitiesYou are responsible for preparing the physical site for the installation of the printer.
Prepare the building's electrical system to meet the printer's requirements and the Electrical Coderequirements according to the local jurisdiction of the country where the equipment is installed. SeeElectrical requirements on page 10.
NOTE: Make sure that a certified electrician reviews the setup and configuration of the electrical system used to power the printer. See Electrical requirements on page 10.
Meet temperature and humidity requirements and ensure proper ventilation for the printer. SeeEnvironmental specifications on page 8.
Meet all requirements for software and networking. See HP SmartStream 2.0 minimum requirements forcomputer and software on page 9 and Networking on page 9.
Prepare the unloading route so that the printer can be unloaded and maneuvered into place. SeeUnloading route on page 3.
If you are unable to do any of these things, contact your reseller.
Installation time scheduleAllow a minimum of three to four hours for the printer installation; depending on other factors, installation may take longer. Allow extra time for accessories. The installer may require the help of another person to perform certain tasks during installation. Installation time is based on the printer being at the location where it will be operat.
2 Chapter 1 Overview ENWWHP Confidential 7-15-15

2 Site preparation requirements
Physical space requirementsUnloading route
The route between the unloading area of the printer and the installation site, including any corridors and doorways through which the printer must be transported, is important to proper site preparation and must be checked before the arrival of the printer. This pathway must be clear when the printer arrives.
Table 2-1 Printer physical specifications with packaging
8000 printer series 5000/4500/4000 printer series
Width with packaging 2.18 m (85.8 in)
Depth with packaging 1.07 m (42.1 in)
Height with packaging 1.77 m (69.7 in)
Weight with packaging * 585 kg (1290 lb) 521 kg (1149 lb)
* Add 40 kg (88 lb) for an integrated stacker, and 25 kg (55 lb) for an integrated scanner.
Table 2-2 Accessories physical specifications with packaging
Dimensions Weight
Top stacker 1.61 × 0.904 × 0.76 m (63.4 × 35.6 × 29.9 in) 90 kg (198 lb)
High-capacity stacker 1.51 × 1.2 × 0.81 m (59.4 × 47.2 × 31.9in) 145 kg (320 lb)
Folder 1.85 × 1.4 × 1.05 m (72.8 × 55.1 × 41.3in) 400 kg (882 lb)
Folder with tab applicator 2.18 × 1.4 × 1.07 m (85.8 × 55.1 × 42.1 in) 408 kg (899 lb)
For the specifications without packaging, see Load bearing on page 5 and Designing the optimal print production area on page 6.
Doorways: Minimum width 0.8 m (31 in) without packaging, or 1.1 m (44 in) with packaging. Minimum height 1.8 m (71 in).
To move the packaged printer through a corridor with a right-angled bend, the width of the corridor must be at least 2 m (79 in); or 1.35 m (53 in) if you remove the packaging, the accessory hooks, and the basket.
The printer and/or accessories can be moved on the pallet up or down a ramp of no more than 10° inclination.
Unpacking and moving the printerYou are strongly recommended to unpack the printer where it will be used, or as close to that destination as possible.
ENWW Physical space requirements 3HP Confidential 7-15-15

IMPORTANT: The printheads should never be moved inside the printer, they should always be moved in their original packaging and installed at the final location.
The space required for assembly depends on whether you use a forklift.
Without forklift
The space required by the packaged printer, plus:
6 m (20 ft) at one end for the accessory ramp
1 m (3 ft) at the other end for unscrewing
6 m 1 mPrinter withpackaging2.18 × 1.01 m
With forklift
The space required by the packaged printer, plus:
3 m (10 ft) at one end for ramps and moving the printer off the pallet
1 m (3 ft) at the other end for unscrewing
2 m (7 ft) at the front for the forklift
2 m
3 m 1 mPrinter withpackaging2.18 × 1.07 m
Table 2-3 Forklift specifications
Short-side handling Long-side handling
Weight 3000 kg (6600 lb)
Fork length 1.8 m (71 in) 1.2 m (47 in)
Fork width (external) 500–700 mm (20–28 in) 900–1000 mm (35–39 in)
Forklift height 80 mm (3.1 in)
4 Chapter 2 Site preparation requirements ENWWHP Confidential 7-15-15
Other considerations
If you need to move the printer after unpacking, take into account the following considerations.
Ground installation: The printer can be moved on wheels up or down a ramp of no more than 12% or 6° inclination.
Above-ground installation:
Use an elevator if the printer can fit inside it while remaining horizontal, and if it can support the printer’s weight.
Otherwise, contact your reseller.
CAUTION: Unloading and moving the printer and all system components is the customer's responsibility and not HP's. Failure to provide the required moving and lifting equipment could result in personal injury or printer damage during installation.
CAUTION: The printer is heavy and can easily fall over. Moving the printer over a ramp or tilted floor increases the risk. Move the printer smoothly, maintain safety precautions for people in the vicinity, and secure the printer against overbalancing. Always move it parallel to its length.
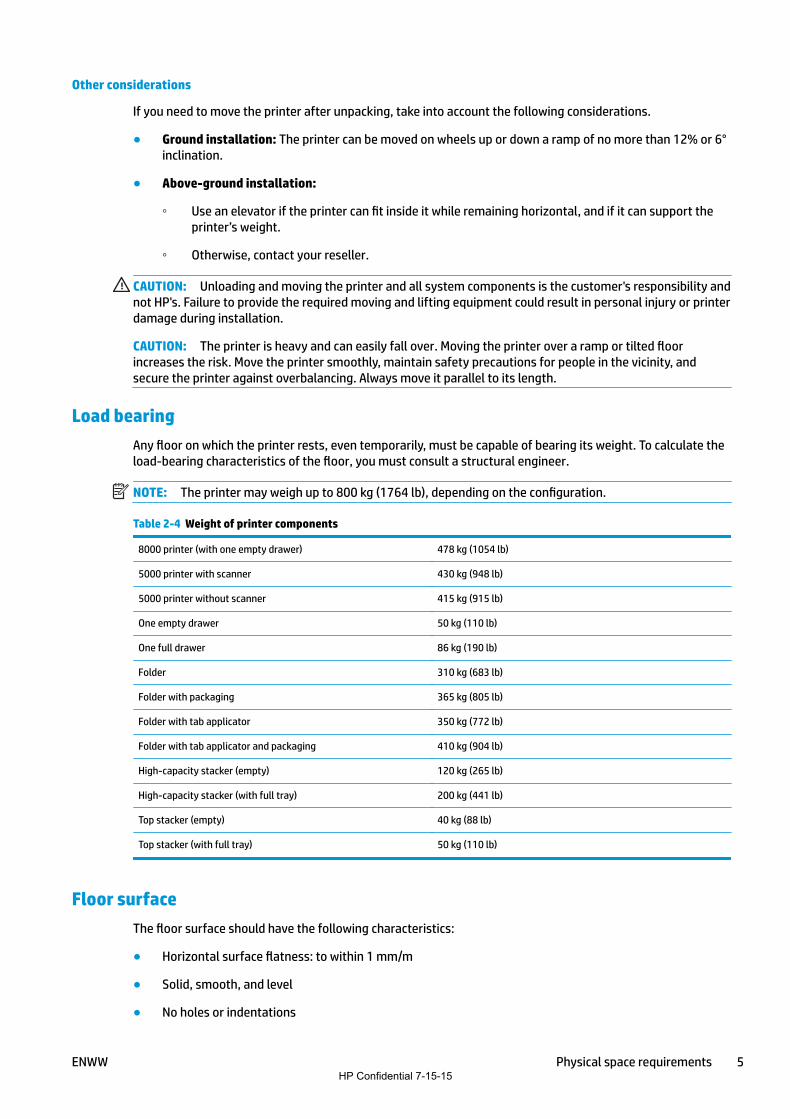
Load bearingAny floor on which the printer rests, even temporarily, must be capable of bearing its weight. To calculate the load-bearing characteristics of the floor, you must consult a structural engineer.
NOTE: The printer may weigh up to 800 kg (1764 lb), depending on the configuration.
Table 2-4 Weight of printer components
8000 printer (with one empty drawer) 478 kg (1054 lb)
5000 printer with scanner 430 kg (948 lb)
5000 printer without scanner 415 kg (915 lb)
One empty drawer 50 kg (110 lb)
One full drawer 86 kg (190 lb)
Folder 310 kg (683 lb)
Folder with packaging 365 kg (805 lb)
Folder with tab applicator 350 kg (772 lb)
Folder with tab applicator and packaging 410 kg (904 lb)
High-capacity stacker (empty) 120 kg (265 lb)
High-capacity stacker (with full tray) 200 kg (441 lb)
Top stacker (empty) 40 kg (88 lb)
Top stacker (with full tray) 50 kg (110 lb)
Floor surfaceThe floor surface should have the following characteristics:
Horizontal surface flatness: to within 1 mm/m
Solid, smooth, and level
No holes or indentations
ENWW Physical space requirements 5HP Confidential 7-15-15
Static-free surface (carpet not recommended)
Easy to clean
Durable
Free from floor vibration: for example, floor vibration is likely near a railway station, press machineroom, construction site, or heavy industry.
If such vibration cannot be avoided, suitable floor preconditioning to mitigate vibration may be neededfor optimal printer performance.
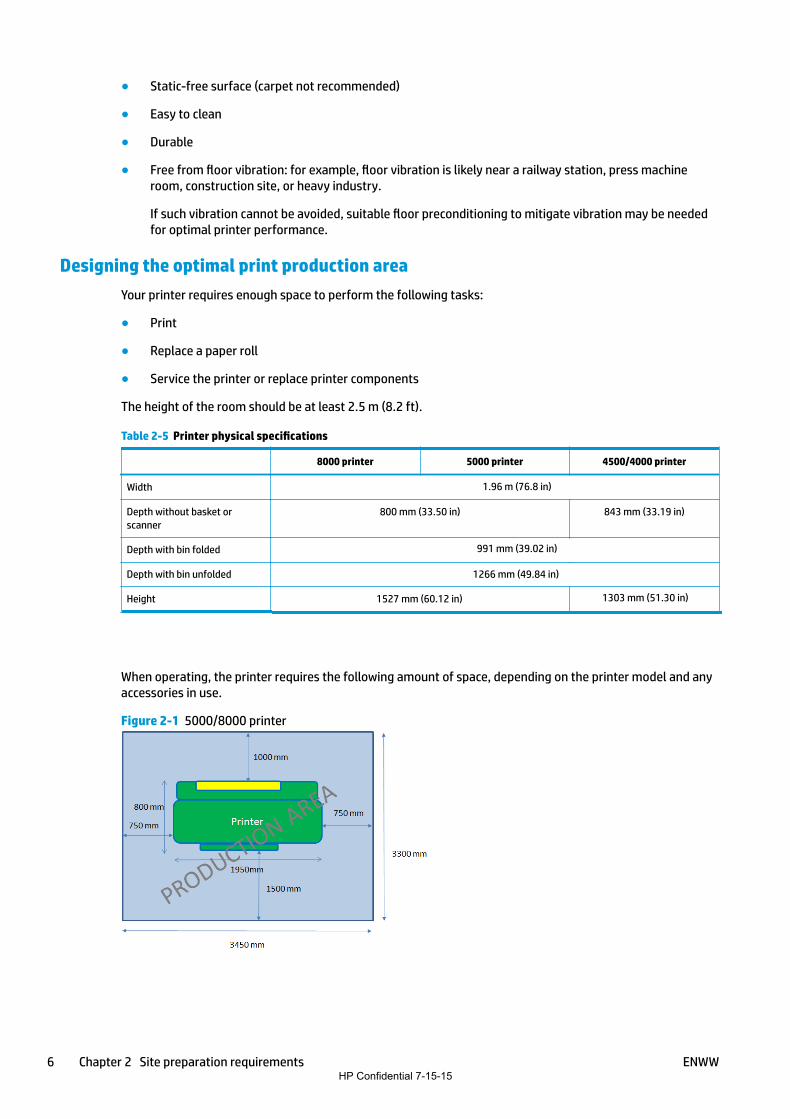
Designing the optimal print production areaYour printer requires enough space to perform the following tasks:
Replace a paper roll
Service the printer or replace printer components
The height of the room should be at least 2.5 m (8.2 ft).
Table 2-5 Printer physical specifications
8000 printer 5000 printer 4500/4000 printer
Width 1.96 m (76.8 in)
Depth without basket or scanner
800 mm (33.50 in) 843 mm (33.19 in)
Depth with bin folded 991 mm (39.02 in)
Depth with bin unfolded 1266 mm (49.84 in)
Height 1527 mm (60.12 in) 1303 mm (51.30 in)
When operating, the printer requires the following amount of space, depending on the printer model and any accessories in use.
Figure 2-1 5000/8000 printer
6 Chapter 2 Site preparation requirements ENWWHP Confidential 7-15-15

Figure 2-2 4000/4500 printer
If the printer is placed against a wall, the power socket in the wall must not be behind the printer.
The printer’s power socket and other sockets are located at the rear of the printer, on the opposite side from the front panel.
Figure 2-3 Printer with folder
ENWW Physical space requirements 7HP Confidential 7-15-15

Figure 2-4 Printer with high-capacity stacker
TIP: When using a folder or stacker, take care to keep the printer’s power cord clear of the folder or stacker wheels, which could damage it.
Environmental specificationsThese environmental conditions must be kept within the specified ranges to ensure the correct operation of the printer. Failure to do so may cause print-quality problems or damage sensitive electronic components.
Table 2-6 Printer environmental specifications
Temperature during installation 15 to 35°C (59 to 95°F)
Operating temperature 5 to 40°C (41 to 104°F)
Recommended operating temperature for best performance 15 to 35°C (59 to 95°F), depending on paper type
Storage and reshipping temperature –25 to 55°C (–13 to 131°F)
Printhead storage and reshipping temperature 5 to 40°C (41 to 104°F)
Recommended operating humidity 20 to 80% RH, depending on paper type
Storage humidity < 90% RH
NOTE: The printer must be kept indoors.
NOTE: If the printer or ink cartridges are moved from a cold location to a warm and humid location, water from the atmosphere can condensate on the printer parts and cartridges and can result in ink leaks and printer errors. In this case, HP recommends that you wait at least 3 hours before turning on the printer or installing the ink cartridges, to allow the condensate to evaporate.
In addition to controlling the temperature, humidity, and temperature gradient, there are other environmental conditions that must be met during site preparation.
Do not install the printer where it will be exposed to direct sunlight or a strong light source.
Do not install the printer in a dusty environment. Remove any accumulated dust before moving theprinter into the area.
8 Chapter 2 Site preparation requirements ENWWHP Confidential 7-15-15

Ventilation and air conditioningAs with all equipment installations, to maintain ambient comfort levels, air conditioning and ventilation in the work area should take into account that the printer produces heat. The printer's maximum power dissipation is 2.8 kW for 8000 printers (and 5000 MFP printers sold in Asia-Pacific and Japan), and 1.2 kW for the others.. Air conditioning and ventilation should meet local environmental, health, and safety (EHS) guidelines and regulations. The Safety Data Sheets for the consumables identify ink ingredients, and adequate ventilation needs to be provided to ensure that potential airborne exposures to these substances are adequately controlled. Consult your usual air conditioning or EHS specialist for advice on the appropriate measures for your location.
For a more prescriptive approach to adequate ventilation, you could refer to the ANSI/ASHRAE (American Society of Heating, Refrigerating and Air-Conditioning Engineers) 62.1-2007 Ventilation for Acceptable Indoor Air Quality. As an example, a minimum exhaust rate of 2.5 L/s.m² (0.5 cfm/ft²) of fresh air for "copy, printing rooms" is specified.
NOTE: The ventilation and air conditioning units should not blow air directly onto the printer.
NOTE: Maintaining positive air pressure in the print production room will help prevent dust from entering the room.
HP SmartStream 2.0 minimum requirements for computer and software
NOTE: The HP SmartStream software is optional.
Intel Core i3 2.4 GHz with 4 virtual cores/threads
4 GB of RAM
3.5 GB of free space on hard disk, plus 100 MB for each additional printer added
Screen resolution of 1280 × 1024 pixels, tuned or calibrated to sRGB for optimal HP Crystal Previewperformance
Ethernet, IPv4, 100 Mb/s
Microsoft Windows 7 or 8 (32- or 64-bit)
RIP software requirementsNOTE: RIP software is optional.
To send print jobs to your printer, you may decide to use Raster Image Processor (RIP) software, which should be run on a separate computer. RIP software is available from various different companies.
Each RIP has specific requirements. Check with your RIP vendor to find out the requirements for the computer that you will use for the RIP station. See http://www.hp.com/go/designjetrips for a complete list of certified RIP stations available for this printer. Make sure that the RIP station is fully functional and ready for installation.
NetworkingYou are responsible for all networking requirements, and you must complete the following tasks:
NOTE: In order to perform remote support, the printer must have access to the Internet using the LAN connection.
ENWW Ventilation and air conditioning 9HP Confidential 7-15-15
Have a Gigabit Ethernet LAN ready for the day of installation.
Provide CAT-6 LAN cables to connect the printer and workstations to your LAN.
To use all the features of your printer, it must be connected to the Internet. If a proxy is needed in order to access the Internet from your LAN, have the configuration details ready on the day of installation; they may include proxy server address and port. If in doubt, consult your IT manager for the proxy configuration details.
Electrical requirementsNOTE: If the configuration of the building electrical system used to power the printer needs to be modified to meet printer requirements, an electrician is required. Make sure that your electrician is appropriately certified according to local regulations and supplied with all the information regarding the electrical configuration.
Your printer requires the following electrical components to be supplied and installed by the customer, according to the Electrical Code requirements of the local jurisdiction of the country where the equipment is installed.
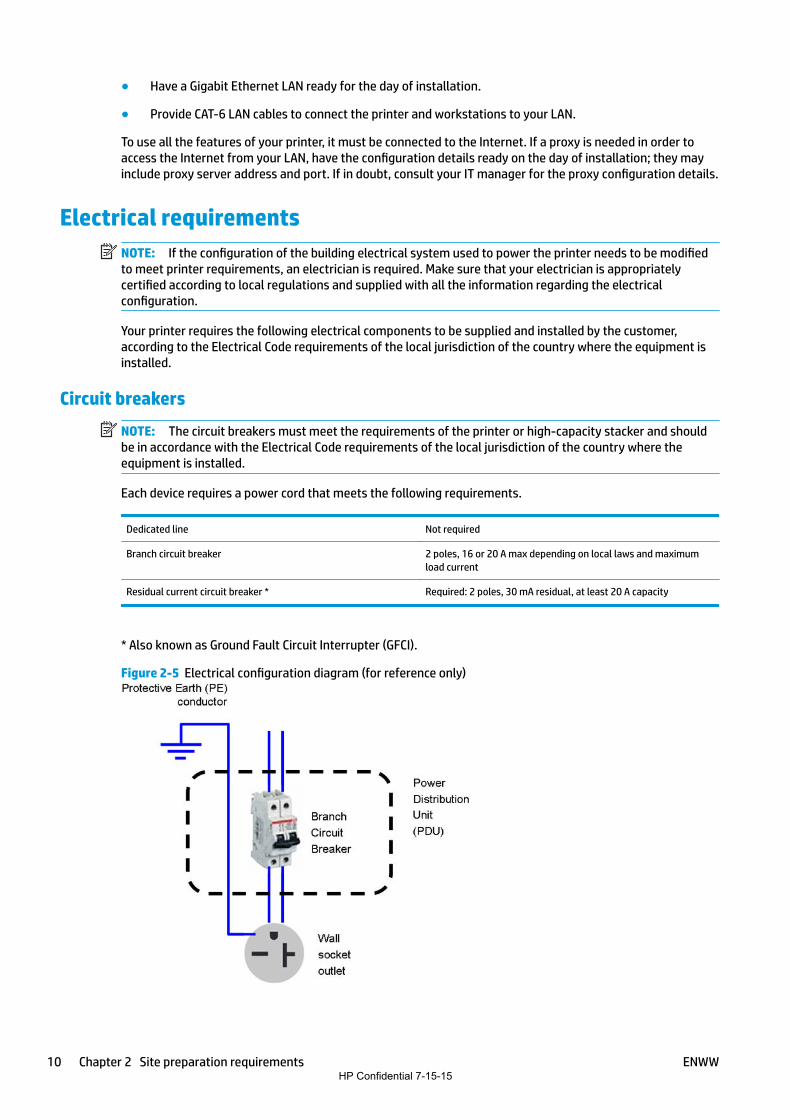
Circuit breakers
NOTE: The circuit breakers must meet the requirements of the printer or high-capacity stacker and should be in accordance with the Electrical Code requirements of the local jurisdiction of the country where the equipment is installed.
Each device requires a power cord that meets the following requirements.
Dedicated line Not required
Branch circuit breaker 2 poles, 16 or 20 A max depending on local laws and maximum load current
Residual current circuit breaker * Required: 2 poles, 30 mA residual, at least 20 A capacity
* Also known as Ground Fault Circuit Interrupter (GFCI).
Figure 2-5 Electrical configuration diagram (for reference only)
10 Chapter 2 Site preparation requirements ENWWHP Confidential 7-15-15
NOTE: The Power Distribution Unit (PDU) must be rated to meet the power requirements of the printer, and should be in accordance with the Electrical Code requirements of the local jurisdiction of the country where the equipment is installed.
WARNING! Do not use a power strip (relocatable power tap) to connect the power cord.
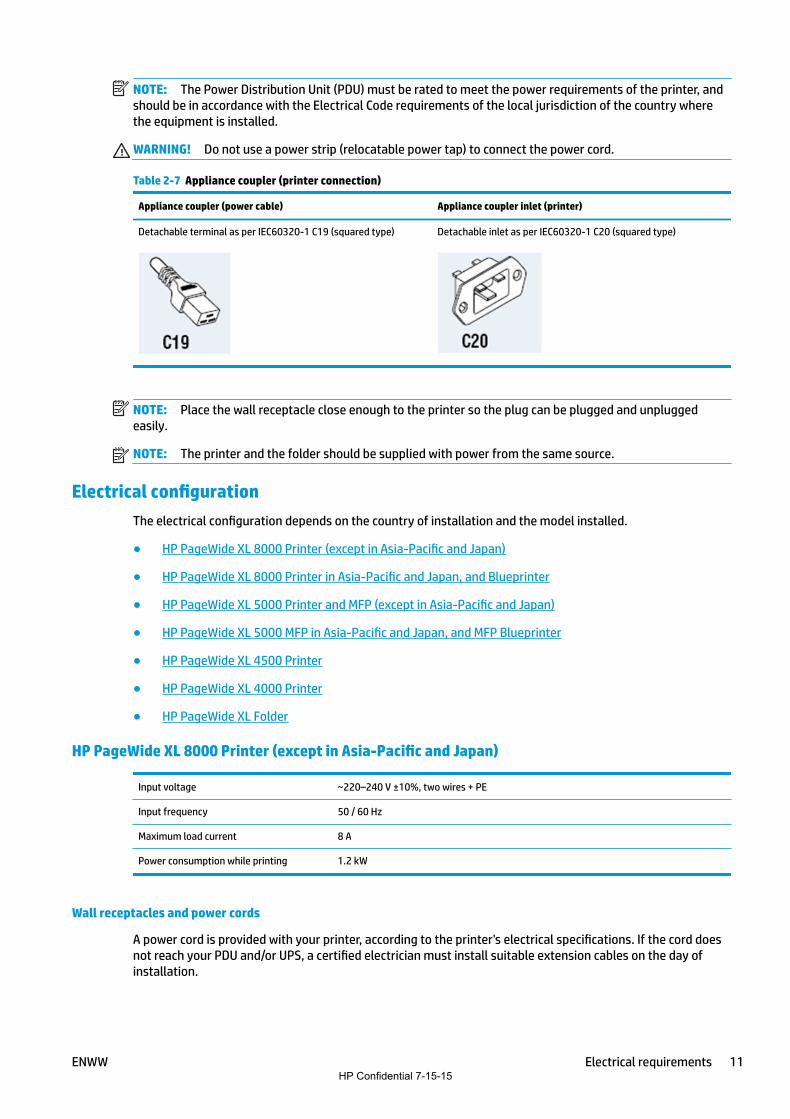
Table 2-7 Appliance coupler (printer connection)
Appliance coupler (power cable) Appliance coupler inlet (printer)
Detachable terminal as per IEC60320-1 C19 (squared type) Detachable inlet as per IEC60320-1 C20 (squared type)
NOTE: Place the wall receptacle close enough to the printer so the plug can be plugged and unplugged easily.
NOTE: The printer and the folder should be supplied with power from the same source.
Electrical configurationThe electrical configuration depends on the country of installation and the model installed.
HP PageWide XL 8000 Printer (except in Asia-Pacific and Japan)
HP PageWide XL 8000 Printer in Asia-Pacific and Japan, and Blueprinter
HP PageWide XL 5000 Printer and MFP (except in Asia-Pacific and Japan)
HP PageWide XL 5000 MFP in Asia-Pacific and Japan, and MFP Blueprinter
HP PageWide XL 4500 Printer
HP PageWide XL 4000 Printer
HP PageWide XL Folder
HP PageWide XL 8000 Printer (except in Asia-Pacific and Japan)
Input voltage ~220–240 V ±10%, two wires + PE
Input frequency 50 / 60 Hz
Maximum load current 8 A
Power consumption while printing 1.2 kW
Wall receptacles and power cords
A power cord is provided with your printer, according to the printer's electrical specifications. If the cord does not reach your PDU and/or UPS, a certified electrician must install suitable extension cables on the day of installation.
ENWW Electrical requirements 11HP Confidential 7-15-15
To make sure you have the right wall socket outlets (wall receptacles) ready for installation, check the following:
1. The wall socket outlets must be accessible to users of the device and within the range of the power cord.
2. The wall socket outlets must be suitable for printer input ratings. See Electrical configuration on page 11.
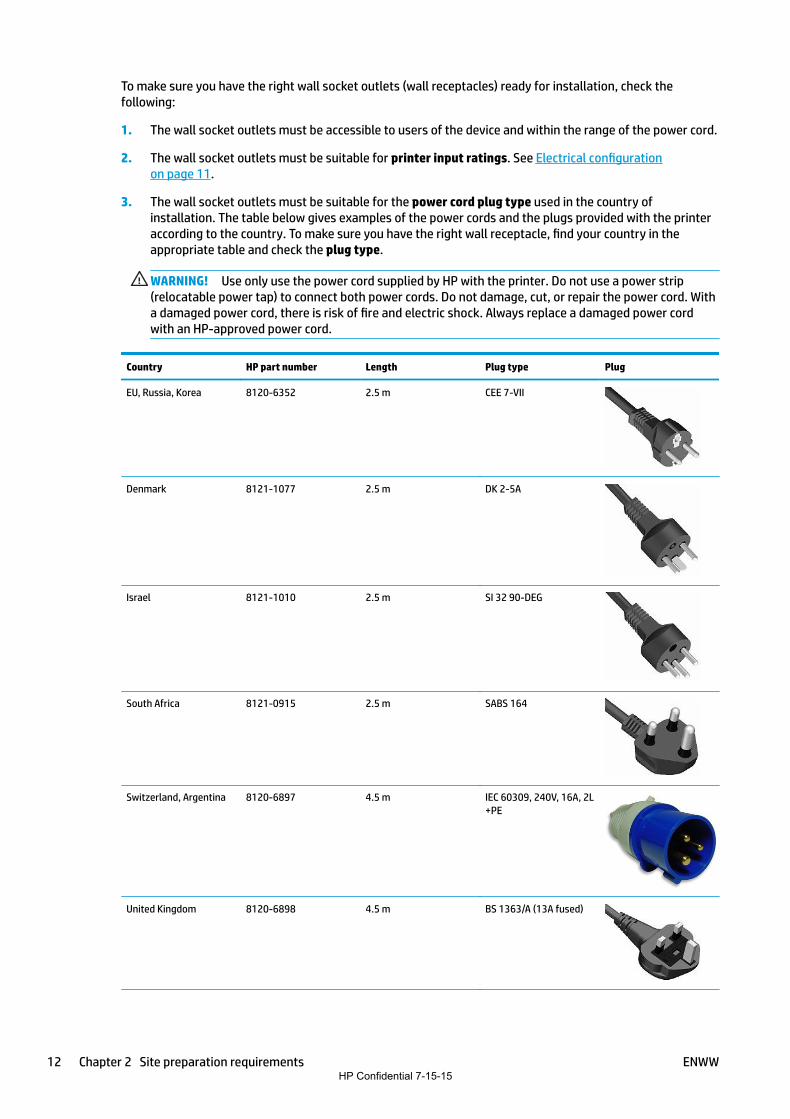
3. The wall socket outlets must be suitable for the power cord plug type used in the country of installation. The table below gives examples of the power cords and the plugs provided with the printer according to the country. To make sure you have the right wall receptacle, find your country in the appropriate table and check the plug type.
WARNING! Use only use the power cord supplied by HP with the printer. Do not use a power strip (relocatable power tap) to connect both power cords. Do not damage, cut, or repair the power cord. With a damaged power cord, there is risk of fire and electric shock. Always replace a damaged power cord with an HP-approved power cord.
Country HP part number Length Plug type Plug
EU, Russia, Korea 8120-6352 2.5 m CEE 7-VII
Denmark 8121-1077 2.5 m DK 2-5A
Israel 8121-1010 2.5 m SI 32 90-DEG
South Africa 8121-0915 2.5 m SABS 164
Switzerland, Argentina 8120-6897 4.5 m IEC 60309, 240V, 16A, 2L+PE
United Kingdom 8120-6898 4.5 m BS 1363/A (13A fused)
12 Chapter 2 Site preparation requirements ENWWHP Confidential 7-15-15

Country HP part number Length Plug type Plug
Middle East, USA, Canada, Mexico
8120-6360 2.5 m NEMA 6-20P, 240V, 20A, non-locking
Brazil 8121-1101 2.5 m NBR 14136
Chile, Uruguay 8121-0923 2.5 m CEI 23-50
Australia, New Zealand 8120-6351 2.5 m AS/NZS 3112 (15A)
HP PageWide XL 8000 Printer in Asia-Pacific and Japan, and Blueprinter
Input voltage ~220–240 V ±10%, two wires + PE
Input frequency 50 / 60 Hz
Maximum load current 13 A
Power consumption while printing 2.2 kW
Wall receptacles and power cords
A power cord is provided with your printer, according to the printer's electrical specifications. If the cord does not reach your PDU and/or UPS, a certified electrician must install suitable extension cables on the day of installation.
To make sure you have the right wall socket outlets (wall receptacles) ready for installation, check the following:
1. The wall socket outlets must be accessible to users of the device and within the range of the power cord.
2. The wall socket outlets must be suitable for printer input ratings. See Electrical configuration on page 11.
3. The wall socket outlets must be suitable for the power cord plug type used in the country of installation. The table below gives examples of the power cords and the plugs provided with the printer according to the country. To make sure you have the right wall receptacle, find your country in the appropriate table and check the plug type.
WARNING! Use only use the power cord supplied by HP with the printer. Do not use a power strip (relocatable power tap) to connect both power cords. Do not damage, cut, or repair the power cord. With a damaged power cord, there is risk of fire and electric shock. Always replace a damaged power cord with an HP-approved power cord.
ENWW Electrical requirements 13HP Confidential 7-15-15

Country HP part number Length Plug type Plug
Indonesia 8120-6352 2.5 m CEE 7-VII
Singapore, Hong Kong 8120–6898 4.5 m BS 1363/A (13A fused)
Japan, Philippines, Thailand
8120-6360 2.5 m NEMA 6-20P, 240V, 20A, non-locking
India 8121-1074 2.5 m IS 1293
China 8121-0924 2.5 m GB 1002 (16A)
Taiwan 8121-1033 4.5 m CNS 690 Type 2(4)
HP PageWide XL 5000 Printer and MFP (except in Asia-Pacific and Japan)
Input voltage ~100–127 / ~220–240 V ±10%, two wires + PE
Input frequency 50 / 60 Hz
Maximum load current 10 / 5 A
Power consumption while printing 0.8 kW
Wall receptacles and power cords
A power cord is provided with your printer, according to the printer's electrical specifications. If the cord does not reach your PDU and/or UPS, a certified electrician must install suitable extension cables on the day of installation.
To make sure you have the right wall socket outlets (wall receptacles) ready for installation, check the following:
14 Chapter 2 Site preparation requirements ENWWHP Confidential 7-15-15

1. The wall socket outlets must be accessible to users of the device and within the range of the power cord.
2. The wall socket outlets must be suitable for printer input ratings. See Electrical configuration on page 11.
3. The wall socket outlets must be suitable for the power cord plug type used in the country of installation. The table below gives examples of the power cords and the plugs provided with the printer according to the country. To make sure you have the right wall receptacle, find your country in the appropriate table and check the plug type.
WARNING! Use only use the power cord supplied by HP with the printer. Do not use a power strip (relocatable power tap) to connect both power cords. Do not damage, cut, or repair the power cord. With a damaged power cord, there is risk of fire and electric shock. Always replace a damaged power cord with an HP-approved power cord.
Country HP part number Length Plug type Plug
EU 8120-6352 2.5 m CEE 7-VII
Denmark 8121-1077 2.5 m DK 2-5A
Israel 8121-1010 2.5 m SI 32 90-DEG
South Africa 8121-0915 2.5 m SABS 164
Switzerland 8121-0916 2.5 m SEV 6534-2 Type 12
United Kingdom 8120–6898 4.5 m BS 1363/A (13A fused)
ENWW Electrical requirements 15HP Confidential 7-15-15
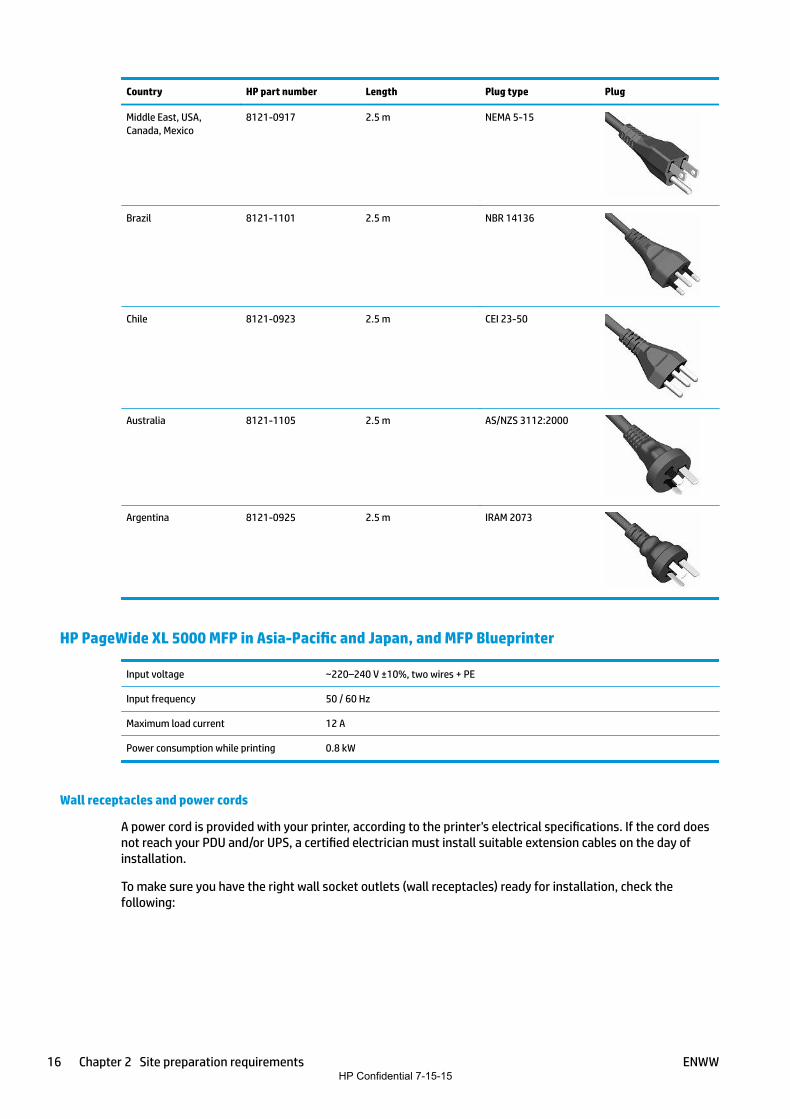
Country HP part number Length Plug type Plug
Middle East, USA, Canada, Mexico
8121-0917 2.5 m NEMA 5-15
Brazil 8121-1101 2.5 m NBR 14136
Chile 8121-0923 2.5 m CEI 23-50
Australia 8121-1105 2.5 m AS/NZS 3112:2000
Argentina 8121-0925 2.5 m IRAM 2073
HP PageWide XL 5000 MFP in Asia-Pacific and Japan, and MFP Blueprinter
Input voltage ~220–240 V ±10%, two wires + PE
Input frequency 50 / 60 Hz
Maximum load current 12 A
Power consumption while printing 0.8 kW
Wall receptacles and power cords
A power cord is provided with your printer, according to the printer's electrical specifications. If the cord does not reach your PDU and/or UPS, a certified electrician must install suitable extension cables on the day of installation.
To make sure you have the right wall socket outlets (wall receptacles) ready for installation, check the following:
16 Chapter 2 Site preparation requirements ENWWHP Confidential 7-15-15
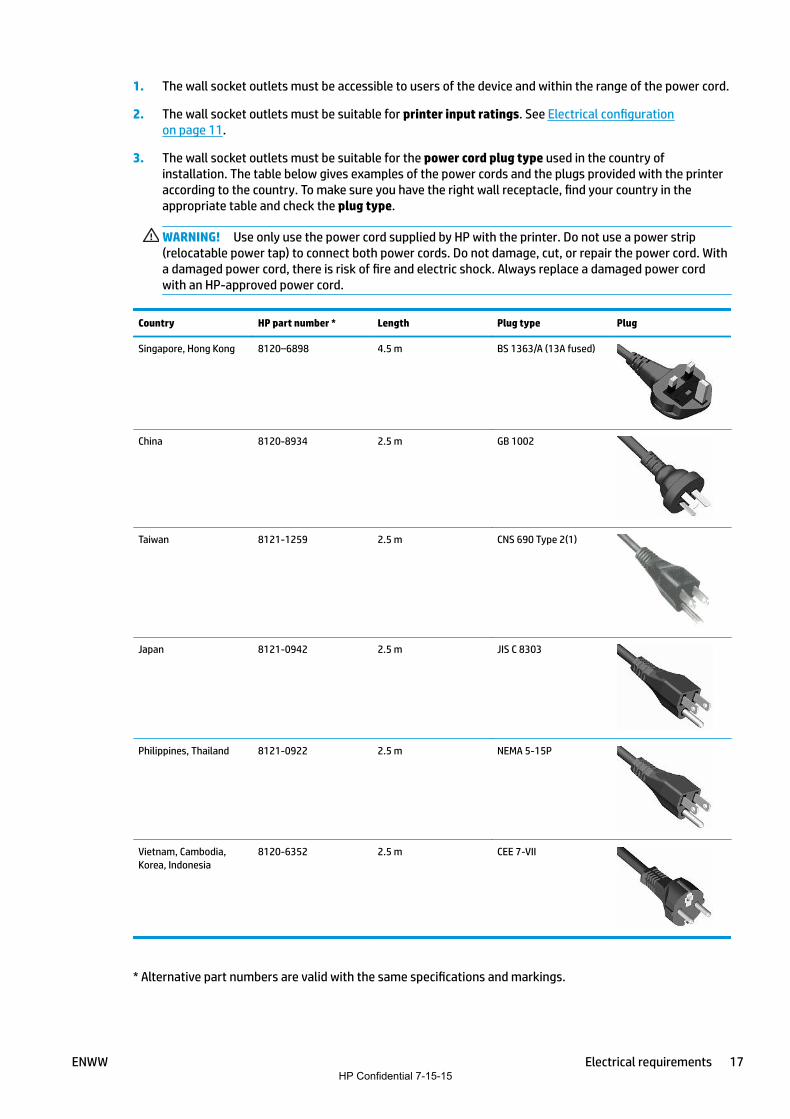
1. The wall socket outlets must be accessible to users of the device and within the range of the power cord.
2. The wall socket outlets must be suitable for printer input ratings. See Electrical configuration on page 11.
3. The wall socket outlets must be suitable for the power cord plug type used in the country of installation. The table below gives examples of the power cords and the plugs provided with the printer according to the country. To make sure you have the right wall receptacle, find your country in the appropriate table and check the plug type.
WARNING! Use only use the power cord supplied by HP with the printer. Do not use a power strip (relocatable power tap) to connect both power cords. Do not damage, cut, or repair the power cord. With a damaged power cord, there is risk of fire and electric shock. Always replace a damaged power cord with an HP-approved power cord.
Country HP part number * Length Plug type Plug
Singapore, Hong Kong 8120–6898 4.5 m BS 1363/A (13A fused)
China 8120-8934 2.5 m GB 1002
Taiwan 8121-1259 2.5 m CNS 690 Type 2(1)
Japan 8121-0942 2.5 m JIS C 8303
Philippines, Thailand 8121-0922 2.5 m NEMA 5-15P
Vietnam, Cambodia, Korea, Indonesia
8120-6352 2.5 m CEE 7-VII
* Alternative part numbers are valid with the same specifications and markings.
ENWW Electrical requirements 17HP Confidential 7-15-15

HP PageWide XL 4500 Printer
Input voltage ~100–127 / ~220–240 V ±10%, two wires + PE
Input frequency 50 / 60 Hz
Maximum load current 7 / 3.5 A
Power consumption while printing 0.7 kW
Wall receptacles and power cords
A power cord is provided with your printer, according to the printer's electrical specifications. If the cord does not reach your PDU and/or UPS, a certified electrician must install suitable extension cables on the day of installation.
To make sure you have the right wall socket outlets (wall receptacles) ready for installation, check the following:
1. The wall socket outlets must be accessible to users of the device and within the range of the power cord.
2. The wall socket outlets must be suitable for printer input ratings. See Electrical configuration on page 11.
3. The wall socket outlets must be suitable for the power cord plug type used in the country of installation. The table below gives examples of the power cords and the plugs provided with the printer according to the country. To make sure you have the right wall receptacle, find your country in the appropriate table and check the plug type.
WARNING! Use only use the power cord supplied by HP with the printer. Do not use a power strip (relocatable power tap) to connect both power cords. Do not damage, cut, or repair the power cord. With a damaged power cord, there is risk of fire and electric shock. Always replace a damaged power cord with an HP-approved power cord.
Country HP part number * Length Plug type Plug
EU 8120-6352 2.5 m CEE 7-VII
Denmark 8121-1077 2.5 m DK 2-5A
Israel 8121-1010 2.5 m SI 32 90-DEG
18 Chapter 2 Site preparation requirements ENWWHP Confidential 7-15-15

Country HP part number * Length Plug type Plug
South Africa 8121-0915 2.5 m SABS 164
Switzerland 8121-0916 2.5 m SEV 6534-2 Type 12
United Kingdom 8120–6898 4.5 m BS 1363/A (13A fused)
Middle East, USA, Canada, Mexico
8121-0917 2.5 m NEMA 5-15
Brazil 8121-1101 2.5 m NBR 14136
Chile 8121-0923 2.5 m CEI 23-50
Australia 8121-1105 2.5 m AS/NZS 3112:2000
Argentina 8121-0925 2.5 m IRAM 2073
HP PageWide XL 4000 Printer
Input voltage ~100–127 / ~220–240 V ±10%, two wires + PE
Input frequency 50 / 60 Hz
ENWW Electrical requirements 19HP Confidential 7-15-15

Maximum load current 7 / 3.5 A
Power consumption while printing 0.7 kW
Wall receptacles and power cords
A power cord is provided with your printer, according to the printer's electrical specifications. If the cord does not reach your PDU and/or UPS, a certified electrician must install suitable extension cables on the day of installation.
To make sure you have the right wall socket outlets (wall receptacles) ready for installation, check the following:
1. The wall socket outlets must be accessible to users of the device and within the range of the power cord.
2. The wall socket outlets must be suitable for printer input ratings. See Electrical configuration on page 11.
3. The wall socket outlets must be suitable for the power cord plug type used in the country of installation. The table below gives examples of the power cords and the plugs provided with the printer according to the country. To make sure you have the right wall receptacle, find your country in the appropriate table and check the plug type.
WARNING! Use only use the power cord supplied by HP with the printer. Do not use a power strip (relocatable power tap) to connect both power cords. Do not damage, cut, or repair the power cord. With a damaged power cord, there is risk of fire and electric shock. Always replace a damaged power cord with an HP-approved power cord.
Country HP part number * Length Plug type Plug
EU 8120-6352 2.5 m CEE 7-VII
Denmark 8121-1077 2.5 m DK 2-5A
Israel 8121-1010 2.5 m SI 32 90-DEG
South Africa 8121-0915 2.5 m SABS 164
20 Chapter 2 Site preparation requirements ENWWHP Confidential 7-15-15

Country HP part number * Length Plug type Plug
Switzerland 8121-0916 2.5 m SEV 6534-2 Type 12
UK, Singapore, Hong Kong
8120–6898 4.5 m BS 1363/A (13A fused)
Middle East, USA, Canada, Mexico
8121-0917 2.5 m NEMA 5-15
Brazil 8121-1101 2.5 m NBR 14136
Chile 8121-0923 2.5 m CEI 23-50
Australia 8121-1105 2.5 m AS/NZS 3112:2000
India 8121-1074 2.5 m IS 1293
China 8120-8934 2.5 m GB 1002
Taiwan 8121-1259 2.5 m CNS 690 Type 2(1)
ENWW Electrical requirements 21HP Confidential 7-15-15

Country HP part number * Length Plug type Plug
Japan 8121-0942 2.5 m JIS C 8303
Argentina 8121-0925 2.5 m IRAM 2073
Philippines, Thailand 8121-0922 2.5 m NEMA 5-15P
Vietnam, Cambodia, Korea, Indonesia
8120-6352 2.5 m CEE 7-VII
HP PageWide XL Folder
Input voltage ~100–127 / ~220–240 V ±10%
Input frequency 50 / 60 Hz
Maximum load current 10 A
Power consumption while folding
Powerline disturbancesAs with all computer and electronic equipment, reliable operation of your printer or high-capacity stacker depends on the availability of relatively noise-free AC power.
In order to ensure optimum performance and reliability, your device should be protected from variations in line voltage. Lightning, line faults, or the switching of lighting or machinery can generate line transients that far exceed the peak value of the applied voltage. If not reduced, these microsecond pulses can disrupt system operation and damage the device.
It is recommended to include overvoltage (OVP) and transient protection in the power supply to the device.
All electrical noise-generating equipment, such as fans, fluorescent lighting, and air-conditioning systems, should be kept separate from the power source used for your device.
22 Chapter 2 Site preparation requirements ENWWHP Confidential 7-15-15

GroundingThe printer or high-capacity stacker must be connected to a good-quality ground line in order to avoid electrical risk. Note your obligation to comply with the Electrical Code requirements of the local jurisdiction of the country where the equipment is installed.
The following grounding tasks must be fulfilled to meet the site preparation requirements:
Grounding wires must be insulated and at least equal in size to the phase conductors.
Ground impedance must be less than 0.5 Ω or comply with the Electrical Code requirements of the local jurisdiction of the country where the equipment is installed.
ENWW Grounding 23HP Confidential 7-15-15
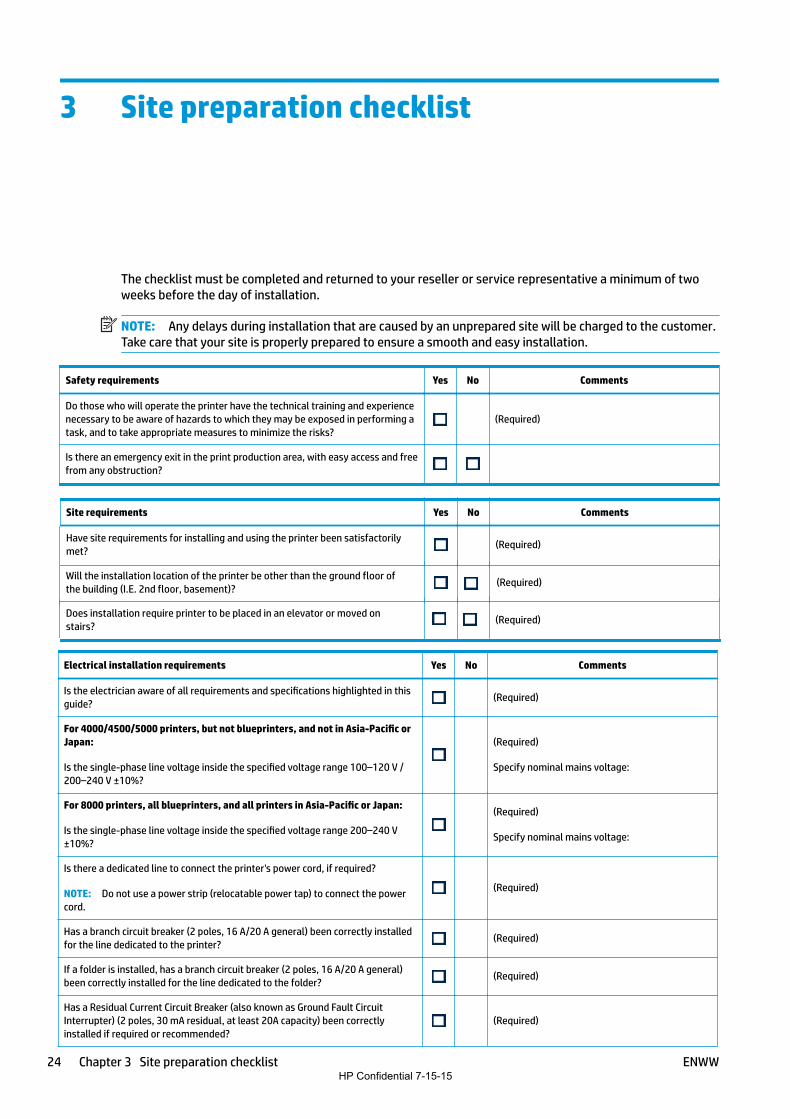
3 Site preparation checklist
The checklist must be completed and returned to your reseller or service representative a minimum of two weeks before the day of installation.
NOTE: Any delays during installation that are caused by an unprepared site will be charged to the customer. Take care that your site is properly prepared to ensure a smooth and easy installation.
Safety requirements Yes No Comments
Do those who will operate the printer have the technical training and experience necessary to be aware of hazards to which they may be exposed in performing a task, and to take appropriate measures to minimize the risks?
(Required)
Is there an emergency exit in the print production area, with easy access and free from any obstruction?
Site requirements Yes No Comments
Have site requirements for installing and using the printer been satisfactorily met? (Required)
Electrical installation requirements Yes No Comments
Is the electrician aware of all requirements and specifications highlighted in this guide? (Required)
For 4000/4500/5000 printers, but not blueprinters, and not in Asia-Pacific or Japan:
Is the single-phase line voltage inside the specified voltage range 100–120 V / 200–240 V ±10%?
(Required)
Specify nominal mains voltage:
For 8000 printers, all blueprinters, and all printers in Asia-Pacific or Japan:
Is the single-phase line voltage inside the specified voltage range 200–240 V ±10%?
(Required)
Specify nominal mains voltage:
Is there a dedicated line to connect the printer's power cord, if required?
NOTE: Do not use a power strip (relocatable power tap) to connect the power cord.
(Required)
Has a branch circuit breaker (2 poles, 16 A/20 A general) been correctly installed for the line dedicated to the printer? (Required)
If a folder is installed, has a branch circuit breaker (2 poles, 16 A/20 A general) been correctly installed for the line dedicated to the folder? (Required)
Has a Residual Current Circuit Breaker (also known as Ground Fault Circuit Interrupter) (2 poles, 30 mA residual, at least 20A capacity) been correctly installed if required or recommended?
(Required)
24 Chapter 3 Site preparation checklist ENWW
Will the installation location of the printer be other than the ground floor of the building (I.E. 2nd floor, basement)? (Required)
Does installation require printer to be placed in an elevator or moved on stairs? (Required)
HP Confidential 7-15-15

Electrical installation requirements Yes No Comments
Is the Power Distribution Unit (PDU) for the printer correctly installed? (Required)
If a folder is installed, is the Power Distribution Unit (PDU) for the folder correctly installed? (Required)
Are the grounding conductors properly installed for each wall receptacle (wall socket)? (Required)
Are the wall receptacles (wall sockets) suitable for the power cord plug type provided by HP? (Required)
Are the wall receptacles (wall sockets) and electrical installation suitable for the printer's and (if installed) for the folder’s rated current?
NOTE: See Electrical requirements on page 10 for specific information.
(Required)
Are the wall receptacles (wall sockets) placed close enough to the printer—and to the folder, if installed—that the plugs can be plugged and unplugged easily?
IMPORTANT: Do not use a power bar or extension power bar.
(Required)
Electrical configuration requirements Yes No Comments
Do you need an Uninterrupted Power Supply (UPS) or step-up transformer? If so, is it correctly installed?
Networking and computer requirements Yes No Comments
Are the HP SmartStream computer and software ready for installation?
Have network connections been supplied?
Do you need a proxy server? If so, write down proxy server name and port.
Do you have a LAN cable long enough to connect the printer to the network?
Environmental requirements Yes No Comments
Have the temperature and humidity requirements been satisfactorily met in the print production area, and is there adequate ventilation or air conditioning?
Have the temperature and humidity requirements been satisfactorily met in the storage area?
Is the print production area free from dirt and dust?
Does the print production area have sufficient lighting?
Other requirements Yes No Comments
Have you arranged for supplies such as paper and ink cartridges to be available on the day of installation?
Have you met the requirements specified in this guide? (Required)
ENWW 25HP Confidential 7-15-15

Date of site preparation completion
Site preparation guide edition number or copyright date
Customer signature
26 Chapter 3 Site preparation checklist ENWWHP Confidential 7-15-15