newtech infosystems, inc. - nti...
TRANSCRIPT

NEWTECH INFOSYSTEMS, INC. Dragon Burn™
Dragon Burn
User’s Guide

Dragon Burn User's Guide
NewTech Infosystems, Inc. 5 Mason, Suite 150 Irvine, CA 92618
Telephone 949.421.0720 • Fax 949.421.0750
Music recognition technology and related data are provided by Gracenote and the Gracenote CDDB Music Recognition ServiceSM. Gracenote is the industry standard in music recognition technology and related content delivery. For more information visit www.gracenote.com.
Gracenote is CDDB, Inc. d/b/a “Gracenote.” CD and music-related data from Gracenote CDDB Music Recognition ServiceSM © 2000, 2001, 2002 Gracenote. Gracenote CDDB Client Software © 2000, 2001, 2002 Gracenote. U.S. Patents Numbers #5,987,525; #6,061,680; #6,154,773, and other patents issued or pending.
CDDB is a registered trademark of Gracenote. The Gracenote logo and logotype, the Gracenote CDDB logo and logotype, and the “Powered by Gracenote CDDB” logo are trademarks of Gracenote. Music Recognition Service and MRS are service marks of Gracenote.
Copyright
The Dragon Burn™ software and the contents of this associated User Manual are the property of NEWTECH INFOSYSTEMS, INC. (NTI) and are protected by copyright. Any reproduction either in whole or in part is strictly prohibited. For additional copies of the software or this documentation, please contact NTI.
Software as well as many other types of works are protected by international copyright laws. Unauthorized copying of those works in any manner may violate the rights of the owner of the copyright in those works and may expose you to civil and criminal penalties.
You may not use Dragon Burn software to violate the copyright rights of others. NTI does not authorize you to use the Dragon Burn™ software for the purpose of violating the copyright rights of others.
Information in this document is subject to change without notice.
Trademarks
Dragon Burn™ is a registered trademark of NewTech Infosystems, Inc. NTI CD-Maker Elite, NTI CD-Maker Pro, NTI CD-Maker, NTI CD-Maker MM, NTI CD-Maker Video, NTI CD-Copy Tools, CDR Explorer, NTI JewelCase Maker, NTI FileCD, EasySteps, and Overburn are trademarks of NewTech Infosystems, Inc. Windows is a trademark of Microsoft Corporation. All other product names or trademarks are property of their respective owners.
License
Use of this software constitutes your acceptance of these terms and conditions and your agreement to abide by them. You, the original purchaser, are granted a non-transferable, non-exclusive personal license to use the software. You may neither transfer the software or otherwise make it available to anyone else, nor may you copy, modify, disassemble, decompile, reverse engineer, revise or enhance the software, electronically transfer, or lease the software or this user manual.
You may terminate this agreement at any time by destroying the software. This agreement will Use of this Software constitutes your acceptance of these terms and conditions and also terminate if you fail to comply with the terms and conditions of this agreement. You agree upon such termination to destroy the software.
Limited Warranty
NewTech Infosystems, Inc. warrants for a period of thirty (30) days from the date of delivery that, under normal use and without unauthorized modification, the program performs in substantial compliance with the User Manual and those set forth in NewTech Infosystems, Inc. authorized advertising material; that under normal use, the magnetic media upon which the software is distributed is substantially free from significant defects in materials and workmanship. Warranty claims must be made in writing during the Warranty Period and within seven (7) days of the observation of the defect, accompanied by evidence satisfactory to NewTech Infosystems, Inc. If NewTech Infosystems, Inc. is unable to correct it within ninety (90) days of the date you report the defect, you may return the software and accompanying materials to NTI distributor from where they were purchased (if not purchased directly from NewTech Infosystems, Inc.) and shall be shipped by the returning party with freight and insurance paid.
EXCEPT AS STATED ABOVE, THERE IS NO OTHER WARRANTY, EXPRESSED OR IMPLIED, REGARDING THE PRODUCT INCLUDING, BUT NOT LIMITED TO, THE IMPLIED WARRANTIES OF MERCHANTABILITY AND FITNESS FOR A PARTICULAR PURPOSE.

Limit Of NewTech Infosystems, Inc. Liability
NewTech Infosystems, Inc. entire liability for damages to you or any other party for any cause whatsoever, whether in contract or in tort, including negligence, shall not exceed the price you paid for the unit of the software that caused the damages or that are the subject matter of, or are directly related to, the cause of action. In no event will NewTech Infosystems, Inc. be liable for any damages caused by your failure to perform your obligations, or for any loss of data, profits, savings, or any other consequential and incidental damages, even if NewTech Infosystems, Inc. has been advised of the possibility of damages, or for any claims by you based on any third-party claim.
Changes
With reasonable efforts have been made in the preparation of this documentation to assure its accuracy, NTI assumes no liability resulting from errors or omissions in this document or from the use of the information contained herein. NOTICE
NTI’s Dragon Burn software is designed to assist you in reproducing material in which you own the copyright or have obtained permission to copy from the copyright owner.
NTI does not authorize you to use the software for the purpose of violating the copyright rights of others. Violating the copyright rights of others may result in severe civil and criminal penalties and may be prosecuted to the maximum extent possible under the law.
NEWTECH INFOSYSTEMS, INC. takes no responsibility for any illegal use of the product. If you are not sure about your rights, please consult your legal advisor before using NTI software. Termination Your failure to comply with the terms in this Agreement shall terminate your license and this Agreement. U.S. GOVERNMENT RESTRICTED RIGHTS. The Software and user documentation is provided with RESTRICTED RIGHTS AND LIMITED RIGHTS. Use, duplication, or disclosure by the Government is subject to restrictions as set forth in subparagraph (c)(1)(ii) of the Rights in Technical Data and Computer Software clause at DFARS 252.227-7013 or subparagraphs (c)(1) and (2) of the Commercial Computer Software--Restricted Rights at 48 CFR 52.227-19, as applicable. NewTech Infosystems, Inc., 5 Mason Avenue, Suite 150, Irvine, CA 92618 U.S.A.
Table of Contents CHAPTER 1
INTRODUCTION ...................................................................................................................1
GETTING STARTED.............................................................................................................3 HOW TO USE THIS GUIDE........................................................................................................3
Chapter 1: Introduction ......................................................................................................3 Chapter 2: Copying a CD/DVD ..........................................................................................3 Chapter 3: Creating your own CD/DVD.............................................................................3 Chapter 4: Reference ..........................................................................................................3
DRAGON BURN FEATURES ......................................................................................................3 SYSTEM REQUIREMENTS .........................................................................................................5 SOFTWARE INSTALLATION ......................................................................................................5 DRAGON BURN BASICS ...........................................................................................................6 DRAGON BURN MULTI-BURNING ENGINE...............................................................................6
Device Manager ..................................................................................................................6 WORKING WITH LAYOUTS.......................................................................................................7
Using Layout Filtering ........................................................................................................7 Setting the Layout Filter......................................................................................................7 Editing the Layout Filter List ..............................................................................................8 The Data CD/DVD Layout ..................................................................................................9 The Data CD/DVD Layout ..................................................................................................9 The Audio CD Layout........................................................................................................10 The Video CD Layout........................................................................................................11
PRINTING LABELS WITH DRAGON BURN ...............................................................................12 DRAGON BURN PREFERENCES...............................................................................................13
General Tab ......................................................................................................................13 Cache Tab .........................................................................................................................14 Progress Bar Tab ..............................................................................................................14 MP3 Tab............................................................................................................................15 Overburn Tab ....................................................................................................................15
OVERBURNING™ ..................................................................................................................16 NINETY-NINE (99) MINUTE MEDIA.......................................................................................16
CHAPTER 2
COPYING A CD/DVD..........................................................................................................17
GETTING STARTED...........................................................................................................19 STARTING DRAGON BURN.....................................................................................................19 ABOUT COPYING CDS AND DVDS........................................................................................19 CD/DVD COPY OVERVIEW ..................................................................................................20 CD/DVD COPY PROCEDURE ................................................................................................20
OPTIONS SETTINGS................................................................................................................22 MULTIPLE COPY PROCEDURE................................................................................................23 USING DISC IMAGE FILES......................................................................................................25
Creating an ISO Image File from a CD/DVD...................................................................25 Creating a NTI Disc Image File from a CD/DVD.............................................................26 Creating a CD/DVD from a Disc Image File....................................................................27
CHAPTER 3
CREATING YOUR OWN CD .............................................................................................29
GETTING STARTED...........................................................................................................31 SUPPORTED CD FORMAT TYPES ...........................................................................................31 CREATING A DATA CD/DVD ................................................................................................31 SPECIFYING FILE FORMATS ...................................................................................................34
File Format Options..........................................................................................................34 SAVING A CD/DVD LAYOUT................................................................................................35 OPENING A SAVED LAYOUT ..................................................................................................35 CREATING AN AUDIO CD ......................................................................................................36
Importing an iTunes Playlist .............................................................................................38 Entering CD Text Information...........................................................................................39 Using the Gracenote CDDB Service .................................................................................39 Registering with the Gracenote CDDB Service.................................................................39 Extracting Audio Files.......................................................................................................40
CREATING A VCD MOVIE CD...............................................................................................40 Changing the Play Sequence .............................................................................................42 Previewing a Video Clip....................................................................................................42
CREATING A SVCD MOVIE CD ............................................................................................43 CREATING A DVD-VIDEO DISC ............................................................................................45 CREATING A MP3 CD ...........................................................................................................47 CREATING A PICTURE CD .....................................................................................................49 CREATING A LIVE AUDIO CD................................................................................................52 CREATING A MIXED MODE CD .............................................................................................55 CREATING A CD EXTRA DISC ...............................................................................................58 DISPLAYING RECORDER INFORMATION.................................................................................61 DISPLAYING DISC INFORMATION ..........................................................................................62 ERASING RE-WRITABLE DISCS .............................................................................................63
CHAPTER 4
REFERENCE.........................................................................................................................64 INTRODUCTION......................................................................................................................65 INTRODUCTION......................................................................................................................66 CONTACTING NEWTECH INFOSYSTEMS, INC. ........................................................................66
Technical Support..............................................................................................................66 TROUBLESHOOTING...............................................................................................................67

GLOSSARY ...........................................................................................................................69 AIFF..................................................................................................................................69 Blank Media ......................................................................................................................69 CD-DA ..............................................................................................................................69 CD Extra ...........................................................................................................................69 CD Media..........................................................................................................................69 Disc-At-Once.....................................................................................................................69 Disc-At-Once.....................................................................................................................69 Hybrid ...............................................................................................................................69 ISO-9660 Format ..............................................................................................................69 Joliet..................................................................................................................................70 Lead-In Area .....................................................................................................................70 Lead-Out Area...................................................................................................................70 Mixed Mode CD ................................................................................................................70 MPEG-1, Layer 3 (.mp3)...................................................................................................70 MPEG-1 ............................................................................................................................70 MPEG-2 ............................................................................................................................70 Session...............................................................................................................................70 Session-At-Once ................................................................................................................70 Super Video CD.................................................................................................................70 Table of Contents (TOC) ...................................................................................................71 Track-At-Once...................................................................................................................71 Universal Disk Format (UDF) 1.5 ....................................................................................71 Video CD...........................................................................................................................71 Wave..................................................................................................................................71 Burn Disc ..........................................................................................................................71 Burn Session......................................................................................................................71
INDEX ....................................................................................................................................73


Introduction 1
Chapter
1
Introduction
I N T R O D U C T I O N
2 Introduction
Chapter 1 — Topics of discussion
First Things First How to Use This Guide Dragon Burn Features System Requirements Software Installation
Dragon Burn Basics Dragon Burn Multi-Burning Engine Device Manager Working with Layouts
Using Layout Filtering Setting the Layout Filter Editing the Layout Filter List The Data CD/DVD Layout
The Audio CD Layout The Video CD Layout Printing Labels with Dragon Burn Dragon Burn Preferences General Tab Cache Tab
Progress Bar Tab MP3 Tab Overburn Tab
Overburning™ Ninety-Nine (99) Minute Media

I N T R O D U C T I O N
Introduction 3
Getting Started Congratulations on your purchase of Dragon Burn. This User's Guide explains the features of Dragon Burn Version 4, its Macintosh® system requirements, and how to use Dragon Burn to create your own CDs.
How to Use This Guide This User's Guide includes four chapters, a Table of Contents, a Glossary, and an Index. Chapter 1: Introduction This chapter explains the features of Dragon Burn, system requirements, how to install the Dragon Burn software and some of the basics about the use of Dragon Burn. Chapter 2: Copying a CD/DVD This chapter explains how to copy an existing CD/DVD, and the options and settings that are available for the copy process. Chapter 3: Creating your own CD/DVD This chapter explains how to create a CD/DVD with your own custom contents, and all of the settings and options that correspond to your custom CD/DVD. Chapter 4: Reference This chapter includes a troubleshooting section and contact information in case you need additional help.
Dragon Burn Features Dragon Burn™ is a powerful, yet easy to use utility for creating CD and DVD mastering.
Create Audio, MP3, Data, Mixed-Mode and CD Extra discs.
Create Data DVD-ROM discs.
Burn DVD-Video discs from pre-authored DVD audio and video files.
Create Video CD (VCD) and Super VCD (SVCD) from pre-encoded MPEG-1 and MPEG-2 files.
Create a Picture CD from your favorite jpeg image files.
Verify data written on the CD/DVD against the source files contained in the data layout.
Create copies of your existing CDs and non-protected DVDs.
Copy multisession CDs/DVDs including Mixed-Mode and CD Extra (Enhanced CD) discs.
Burn multiple copies of your CDs/DVDs or images at once.
Burn your own Audio CDs from your favorite AAC, AIFF, CDDA, MP3, SD2 or wave files with CD Text support.
Create a MP3 CD from any supported audio track/file type.
Burn audio CDs from your favorite iTunes playlists
Record live audio to CD in real-time — record business meetings or archive classic LPs and cassette tapes
Create multisession CDs and DVDs for all supported file systems (ISO, HFS and UDF).
Multi-burning engine allows you to burn multiple CDs/DVDs at once.

I N T R O D U C T I O N
4 Introduction
Uses the Gracenote CDDB Music Recognition ServiceSM from Gracenote to display artist, and title information about the songs on an Audio CD.
Rip your favorite audio tracks to AIFF, WAV or MP3 files.
Auto Volume Adjust balances the volume level on all your songs for your audio CDs
Use layout filtering to easily burn CDs of specific file types.
Support for Track-At-Once (TAO), Session-At-Once (SAO) and Disc-At-Once (DAO) writing methods.
Extend the capacity of your data CDs/DVDs with Overburning™.
Supports BURN-Proof™ and other popular buffer-underrun protection technologies.
Support for ISO 9660 MS-DOS and Joliet, HFS (Mac O/S), HFS+ (Mac O/S Extended) file systems for Data CD/DVD mastering. Build Hybrid CD/DVDs using Mac O/S and ISO files system combinations.
Supports UDF 1.5 & 1.02 file systems including multisession on DVD+RW media.
Intuitive yet powerful user interface enables you to quickly step through the options available for creating your CDs/DVDs. Use Smart Decision to automatically select the best writing method for your layout. Dragon Burn easily recommends the best writing speed based on the interface (USB, FireWire, etc.), drive and media properties.
Fast “drag and drop” support enables you to use the Macintosh Finder to choose the files and folders that you want to include on your CD. Simply drag the Finder icons into the Dragon Burn window to choose the contents of your CD.
Create an ISO or NTI “image file” that represents the entire contents of a CD/DVD. An image file can be used to create additional copies of the CD/DVD during subsequent work sessions.
Burn CDs/DVDs from .BIN, .CUE, .CDR, .DMG (including compressed/encrypted), .ISO, . NCD and other 3rd party image files.
Create and save a Layout of your Dragon Burn settings, as well as particular files and folders to be copied. The Layout feature makes it quick and easy to use Dragon Burn for creating archive copies of your important data.
Eliminate CD drive compatibility problems with Dynamic Drive Support™ and Live Update
Supports DVD-R/-RW, DVD+R/+RW, DVD Dual, DVD Multi and DVD Super-Multi drives.
Support for internal or external SCSI, USB and FireWire CD and DVD drives.
Create labels for CDs, DVDs, mini-CDs, business card CDs, index cards, folding booklets, tray inserts, DVD cases and more

I N T R O D U C T I O N
Introduction 5
System Requirements To use Dragon Burn, your Macintosh system must consist of the following:
Macintosh computer with Power PC processor.
Macintosh OS X 10.1.5 or later.
128 MB of RAM.
20 MB of free disk space for software installation.
NTI-supported CD or DVD recorder. Please visit our web site at www.ntius.com for the latest list of NTI-supported CD and DVD recorders.
Software Installation The Dragon Burn software is included on the Dragon Burn Software CD. Installation is easy, and should take less than a minute.
To install the Dragon Burn software:
1. Close all programs, including virus-protection applications, and return to the desktop. 2. Insert the Dragon Burn Software CD-ROM into the CD drive. In a moment, an icon is
displayed on your desktop for the newly mounted volume. 3. Double-click the mounted Dragon Burn CD icon. 4. Open the “OS X” folder. 5. Double-click on the file named "DBX.dmg." A drive icon named “Dragon Burn” will be
created on your Desktop. 6. Double-click on the white “Dragon Burn” drive icon on your Desktop. A Dragon Burn
window is displayed. Note:
This window will be opened automatically on OS X versions 10.2 or higher. 7. Drag and drop the Dragon Burn icon to the desired location on your hard drive (usually
the Applications folder). 8. (Optional) Drag and drop the Dragon Burn User’s Guide to your hard drive. 9. (Optional) If you have Label software included in the Dragon Burn folder then drag
and drop the label software folder to your hard drive. You can place this folder anywhere on your hard drive but the application and art files inside it must remain in the same folder.
10. Close the Dragon Burn and OS X windows. 11. Drag and drop the white “Dragon Burn” icon from your Desktop to the Trash
can(Eject) to unmount the Dragon Burn image. 12. Drag and drop the mounted Dragon Burn CD-ROM icon to the Trash can(Eject) to
eject the CD-ROM. Note:
You can start Dragon Burn by double-clicking on the Dragon Burn icon now found in the installation folder (normally the Applications folder on your OS X system volume).

I N T R O D U C T I O N
6 Introduction
Dragon Burn Basics In this section, we will talk about some of the basics of the Dragon Burn program. Included in this discussion are the Dragon Burn Multi-Burning Engine, Working with Layouts and Dragon Burn Preferences.
Dragon Burn Multi-Burning Engine Dragon Burn is the first program designed from the ground up to run under the Macintosh OS X operating system. It incorporates the powerful new features like the Dragon Burn Multi-Burning Engine with the ease of use that Mac users demand. It is now possible to take advantage of as many CD/DVD burners as you have connected to your favorite Macintosh computer. Erase a disc on your USB burner, copy a disc image on your internal SuperDrive, burn your favorite MP3 audio collection on your new 52X FireWire drive, no problem with Dragon Burn.
Device Manager Making this all possible is Dragon Burn’s new device manager. The device manager keeps track of every CD and DVD device connected to your computer and acts as a traffic cop, directing traffic and avoiding conflicts so that Dragon Burn can take maximum advantage of the full resources of your machine. If you get too many things happening at once, don’t worry, the recorder status will report “Device in use” for any drive that is not available for burning.
Note: ∇ Multi-Burning is available in Dragon Burn, Retail Version only!
I N T R O D U C T I O N
Introduction 7
Working with Layouts Dragon Burn OS X has twelve basic layout types. The three main types are the audio, data and video layouts. There are three types of video layouts (Video CD, SuperVideo CD & DVD-Video). In addition, there are “CD/DVD Copy” and “Multiple Copy” layouts allowing you to copy to a single or multiple number of drives. The MP3 CD layout is a special purpose hybrid of the data and audio layouts allowing you to create a data CD containing audio tracks in MP3 format. The Mixed Mode and CD Extra layouts contain both audio and data portions in a single layout. When you are working in the audio portion of these layouts, Dragon Burn functions like it does in the Audio CD layout. The data portion operates just like the Data CD/DVD layout.
Next, there is the Live Audio layout. This specialized layout allows you to record sound inputs from a microphone or other line-in type devices and burn them to CD. Finally, there is the Picture CD layout that is a special purpose data layout allowing you to burn your favorite pictures to a single CD.
In this section, we will talk about the basics of the audio, data and video layouts. Specific information for each layout type is covered Chapter 3 of this guide.
Using Layout Filtering Layout filtering allows you to filter out specific file types to add to a layout. All audio layout types have predefined filters based on the type of audio files supported by that layout. Data layout types support custom filters. You can define your filters for all data type layouts. So now, you can easily archive files of specific types using layout filtering. Say you want to burn a CD or DVD containing your mp3 collection. Simply open a Data CD/DVD layout, set the filter to mp3, and let Dragon Burn do the dirty work of sorting out your mp3 files as you add folders to your layout. Once you have set the filter to mp3, simply drag and drop the entire volume on to your Data CD/DVD layout to add all the mp3 files from the selected volume to your layout and you are ready to burn your mp3 collection to CD/DVD.
Setting the Layout Filter Setting a layout filter is a very simple process. Simply use the Filter dropdown list at the top of the layout and select the desired filter.
To set a filter for your layout:
1. Open the layout. 2. Click the arrows to the right of the current filter setting. All new layouts are set to “All”
by default. 3. Choose the filter to be applied to this layout from the dropdown list. You can use the
Edit… item to create your own custom filters for all data layout types. Notes:
The layout filter is applied at the time a selection is dropped onto the layout.
Only one file type can be filtered at a time. You must create a new filter for each file type you wish to use. You can combine filters by applying Filter #1 and adding file(s)/folder(s) to your layout and then set the layout to use Filter #2 and then re-adding the file(s)/folder(s) to the same layout.
All folders in the directory structure are created in the layout even if they do not contain any of the file types specified by the layout filter.
I N T R O D U C T I O N
8 Introduction
Filter types must match the file extension exactly before a file is included in the layout.
The filter is set to “All” by default. All in this case means all file types that are supported by a specific layout type. For example, MP3 layouts only allow AAC, AIFF, CD-DA, MP3, SD2 & WAV file types regardless of the filter value.
Wildcard characters are not supported in a layout filter. All characters are taken literally when included in a layout filter definition.
Care must be taken not to overflow the capacity of the target media when adding an entire volume to a layout. Verify the number of files and either the total time or max size against the maximum capacity for the media type or other defined limits like 99 tracks per Audio CD.
Editing the Layout Filter List Dragon Burn’s data layouts support the creation and use of custom layout filters. Use the Edit… item from the filter dropdown list to add or remove your custom layout filters.
To create a layout filter definition:
1. Open one of the data type layouts (Data CD/DVD, Mixed-Mode and CD Extra).
2. Click the arrows to the right of the current filter setting.
3. Choose the Edit… item from the dropdown list.
4. Click the Add button on the File Types sheet.
5. Enter the file extension, usually three or four characters.
6. Click the Close button when you have finished editing the data filter list.
To remove a layout filter definition:
1. Open one of the data type layouts (Data CD/DVD, Mixed-Mode and CD Extra).
2. Click the arrows to the right of the current filter setting.
3. Choose the Edit… item from the dropdown list.
4. Select the filter to be removed.
5. Click the Remove button on the File Types sheet.
6. Click the Close button when you have finished editing the data filter list.
I N T R O D U C T I O N
Introduction 9
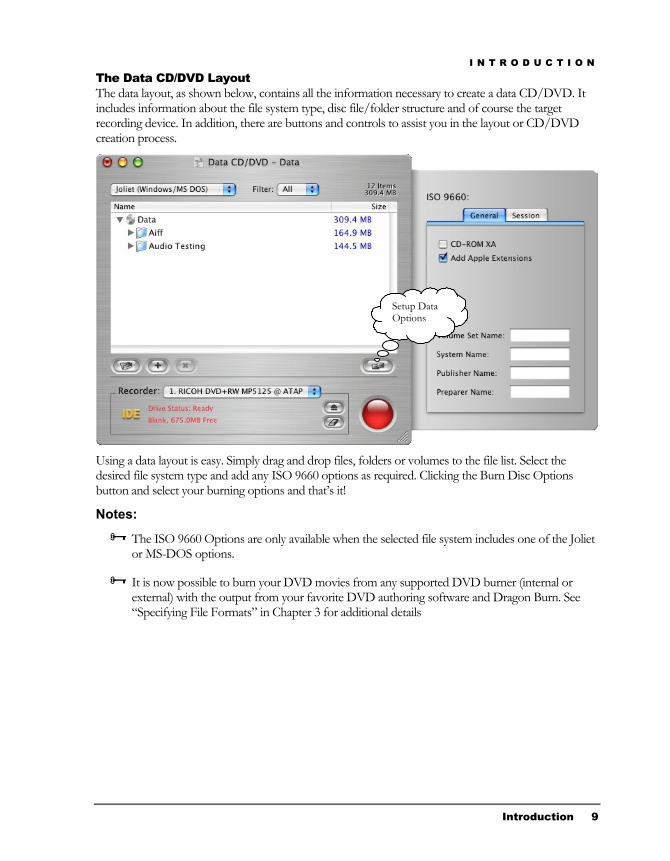
The Data CD/DVD Layout The data layout, as shown below, contains all the information necessary to create a data CD/DVD. It includes information about the file system type, disc file/folder structure and of course the target recording device. In addition, there are buttons and controls to assist you in the layout or CD/DVD creation process.
Setup Data Options
Using a data layout is easy. Simply drag and drop files, folders or volumes to the file list. Select the desired file system type and add any ISO 9660 options as required. Clicking the Burn Disc Options button and select your burning options and that’s it!
Notes:
The ISO 9660 Options are only available when the selected file system includes one of the Joliet or MS-DOS options.
It is now possible to burn your DVD movies from any supported DVD burner (internal or external) with the output from your favorite DVD authoring software and Dragon Burn. See “Specifying File Formats” in Chapter 3 for additional details

I N T R O D U C T I O N
10 Introduction
The Audio CD Layout The audio layout, as shown below, contains all the information necessary to create an Audio CD. It includes the track list, gap/pause control, audio extraction tools, track playback and the target recording device.
Convert Audio Format
Audio Player
Using an audio layout is easy. Simply drag and drop your favorite songs on to the track list. You can set the pause time to any value from 0 to 10 seconds. Moving a track is as easy as selecting the track with your mouse and dragging it to the desired position in the track list. Audio layouts accept AAC, AIFF, MP3, SD2 and Wave files or tracks directly from your favorite music CDs. It is also possible to add CD Text information for each track as well as the CD itself (Described in Chapter 3 below). Like the Data layout, click the Burn Disc Options button and select your burning options.
I N T R O D U C T I O N
Introduction 11
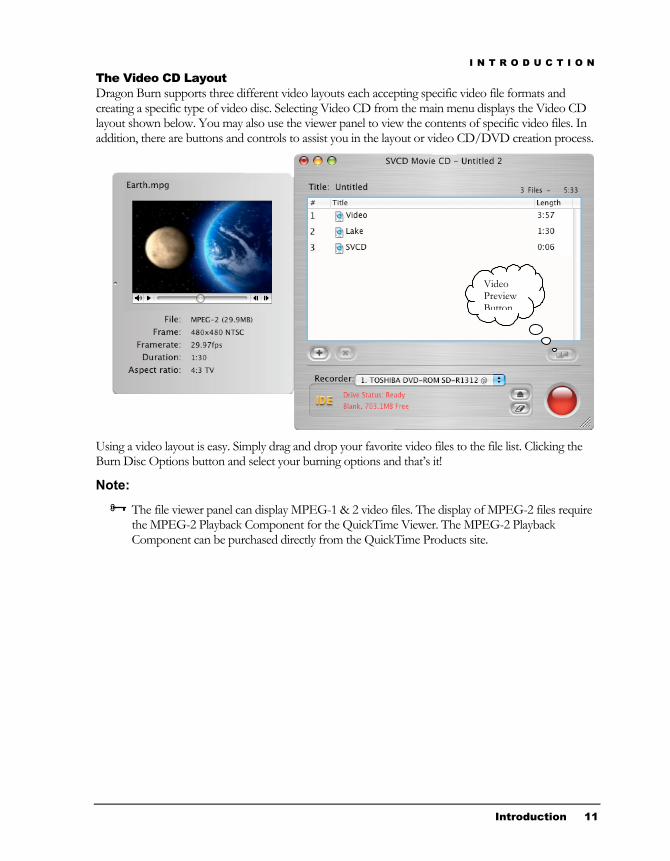
The Video CD Layout Dragon Burn supports three different video layouts each accepting specific video file formats and creating a specific type of video disc. Selecting Video CD from the main menu displays the Video CD layout shown below. You may also use the viewer panel to view the contents of specific video files. In addition, there are buttons and controls to assist you in the layout or video CD/DVD creation process.
Video Preview Button
Using a video layout is easy. Simply drag and drop your favorite video files to the file list. Clicking the Burn Disc Options button and select your burning options and that’s it!
Note:
The file viewer panel can display MPEG-1 & 2 video files. The display of MPEG-2 files require the MPEG-2 Playback Component for the QuickTime Viewer. The MPEG-2 Playback Component can be purchased directly from the QuickTime Products site.

I N T R O D U C T I O N
12 Introduction
Printing Labels with Dragon Burn Dragon Burn allows you to launch the label-making software after the completion of each successful burn. Simply click the “Print Label” button on the Burn Complete sheet and Dragon Burn will launch the label software, if installed, and export the information about the CD/DVD just created so that it can be used to print the label and inserts.
To print a label from Dragon Burn:
1. Create a layout and burn the disc. 2. At the completion of a successful burn, click the “Print Label” button. 3. Save the Dragon Burn Export file to your hard drive. 4. After the label-making software opens, select the type of label you wish to print. 5. Choose the “Track names from Dragon Burn exportfile…” item from the Import
Menu. 6. Select the Dragon Burn Export file saved in Step #3 above. 7. Finish the design of your label and print from the label program. Notes:
Some versions of the label making software may not contain the Dragon Burn export file option in Step #5. You may choose the “Track names from iTunes™ exportfile...” option for these versions of the label making program.
The Dragon Burn export file is compatible with the Plain Text version of the iTunes™ export file. You can use your Dragon Burn export file in other programs that support the importing of iTunes™ export files.
The label software is only available on the Retail CD-ROM version of Dragon Burn. A trial version of the program is available on OEM configurations of Dragon Burn.
Consult the program documentation and help for specific information on the use of the label-making software.
I N T R O D U C T I O N
Introduction 13
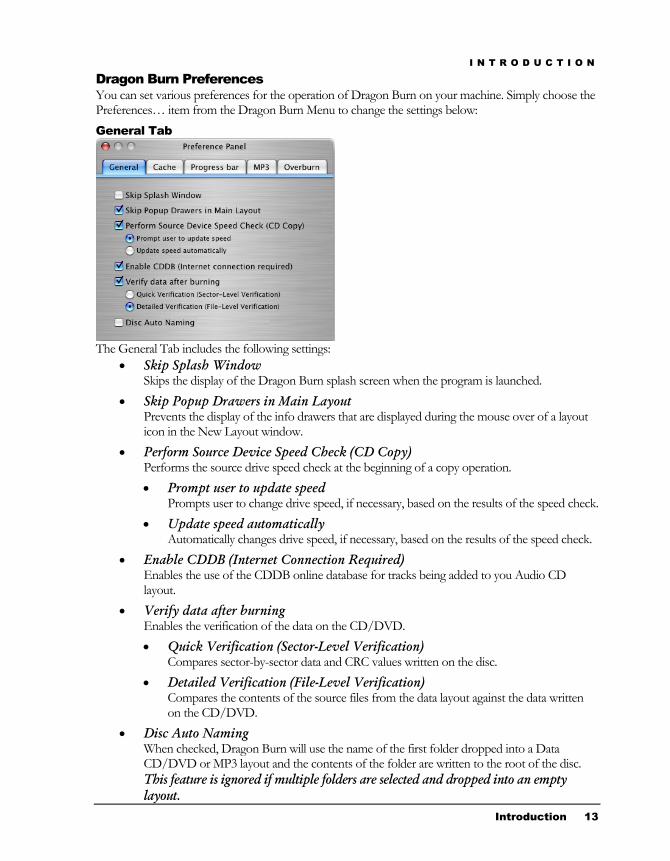
Dragon Burn Preferences You can set various preferences for the operation of Dragon Burn on your machine. Simply choose the Preferences… item from the Dragon Burn Menu to change the settings below: General Tab
The General Tab includes the following settings:
• Skip Splash Window Skips the display of the Dragon Burn splash screen when the program is launched.
• Skip Popup Drawers in Main Layout Prevents the display of the info drawers that are displayed during the mouse over of a layout icon in the New Layout window.
• Perform Source Device Speed Check (CD Copy) Performs the source drive speed check at the beginning of a copy operation. • Prompt user to update speed
Prompts user to change drive speed, if necessary, based on the results of the speed check. • Update speed automatically
Automatically changes drive speed, if necessary, based on the results of the speed check. • Enable CDDB (Internet Connection Required)
Enables the use of the CDDB online database for tracks being added to you Audio CD layout.
• Verify data after burning Enables the verification of the data on the CD/DVD. • Quick Verification (Sector-Level Verification)
Compares sector-by-sector data and CRC values written on the disc. • Detailed Verification (File-Level Verification)
Compares the contents of the source files from the data layout against the data written on the CD/DVD.
• Disc Auto Naming When checked, Dragon Burn will use the name of the first folder dropped into a Data CD/DVD or MP3 layout and the contents of the folder are written to the root of the disc. This feature is ignored if multiple folders are selected and dropped into an empty layout.

I N T R O D U C T I O N
14 Introduction
Cache Tab
The Cache Tab includes the following settings:
• RAM Select the amount of RAM to make available to the application cache. Choose from 1, 2 or 4 MB per X writing speed. Choosing “Best” will use a maximum of 40 MB for the application cache when writing at 10X.
• Disk Select which disk volumes to make available for temp buffer space. Choose the “Use All Available Volumes” option or select individual volumes mounted on your system.
Progress Bar Tab
The Progress Bar Tab includes the following settings:
• Border Set the border color of the progress bar. All changes are displayed on the sample progress bar but are not changed within the application until you click the Apply button.
• Fill Set the fill color of the progress bar. All changes are displayed on the sample progress bar but are not changed within the application until you click the Apply button.
• Text Set the text color of the progress bar. All changes are displayed on the sample progress bar but are not changed within the application until you click the Apply button.
• Default button Restores the Progress Bar back to the default color values.
• Apply button Applies the current changes to the Progress Bar.
I N T R O D U C T I O N
Introduction 15
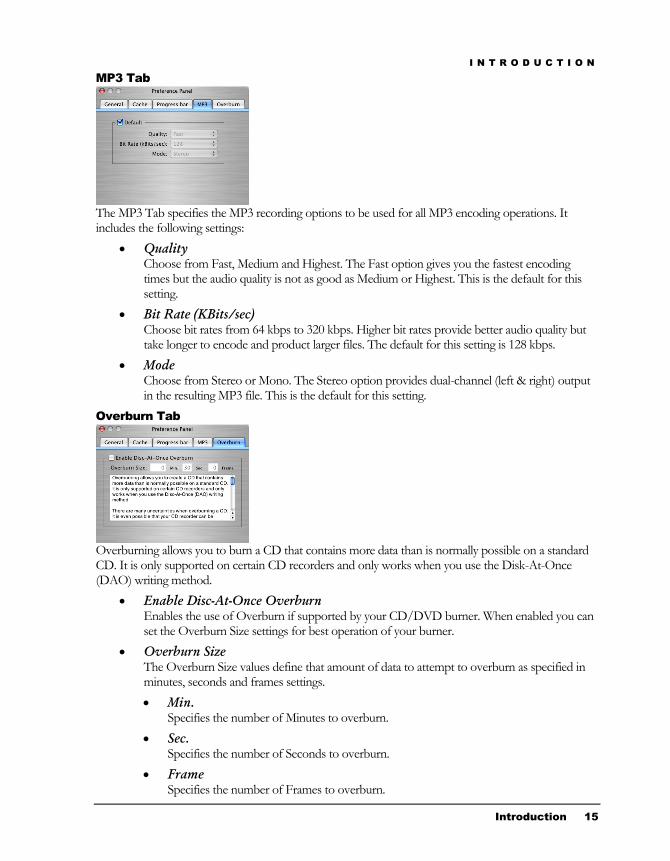
MP3 Tab
The MP3 Tab specifies the MP3 recording options to be used for all MP3 encoding operations. It includes the following settings:
• Quality Choose from Fast, Medium and Highest. The Fast option gives you the fastest encoding times but the audio quality is not as good as Medium or Highest. This is the default for this setting.
• Bit Rate (KBits/sec) Choose bit rates from 64 kbps to 320 kbps. Higher bit rates provide better audio quality but take longer to encode and product larger files. The default for this setting is 128 kbps.
• Mode Choose from Stereo or Mono. The Stereo option provides dual-channel (left & right) output in the resulting MP3 file. This is the default for this setting.
Overburn Tab
Overburning allows you to burn a CD that contains more data than is normally possible on a standard CD. It is only supported on certain CD recorders and only works when you use the Disk-At-Once (DAO) writing method.
• Enable Disc-At-Once Overburn Enables the use of Overburn if supported by your CD/DVD burner. When enabled you can set the Overburn Size settings for best operation of your burner.
• Overburn Size The Overburn Size values define that amount of data to attempt to overburn as specified in minutes, seconds and frames settings. • Min.
Specifies the number of Minutes to overburn. • Sec.
Specifies the number of Seconds to overburn. • Frame
Specifies the number of Frames to overburn.

I N T R O D U C T I O N
16 Introduction
Overburning™ Overburning allows you to burn a CD that contains more data than is normally possible on a standard CD. It is only supported on certain CD recorders and only works when you use the Disk-At-Once (DAO) writing method.
There are many uncertainties when overburning a CD. It is even possible that your CD recorder can be damaged in the process. Additionally, you may experience read or write errors at the end of the disc or other SCSI/ATAPI command failures.
There is no way to automatically determine how much additional capacity will be available on your CD recorder. In some cases, you may be able to write up to 04:00.00 but you might want to stop at 00:30.00 if you do not know the overburn capacity of your CD recorder.
Some CD burners report 99 min. as 80 min. You may use the overburn option to write to this type of disc by setting the overburn size to 19:00.00.
Warning!!! The use of this option is always at your own risk! We cannot guarantee its success or that damage will not occur to your recorder!!!
Ninety-Nine (99) Minute Media Dragon Burn supports the writing to ninety-nine (99) minute CDs under certain conditions. These CD-R discs use a tighter spiral and when combined with Overburning™ it is possible to achieve recording capacities up to ninety-nine minutes. It must be noted that only a very few drives can actually reach the ninety-nine minute limit and then only at the slower writing speeds of 2x or possibly 4X. In fact, many drives will not record beyond ninety minutes and again, the vast majority of drives do not recognize ninety-nine minute media at all. This is because this media is completely outside of the Red Book specification. If you are not able to use eighty-minute media then you are not likely to be able to use the ninety-nine minute media either.
Again, there can be many problems when using this type of media. In addition to the lack of support by most drives, many problems can be encountered when trying to play a ninety-nine minute CD as well. It will be up to you to find the best combination of media, recorder and player should you decide to use the ninety-nine minute media.

Copying a CD/DVD 17
Chapter
2
Copying a CD/DVD

C O P Y I N G A C D / D V D
18 Copying a CD/DVD
Chapter 2 — Topics of discussion
Getting Started Starting Dragon Burn About Copying CDs CD/DVD Copy Overview CD/DVD Copy Procedure Options Settings Multiple Copy Procedure Using Disc Image Files Creating an ISO Image File from a CD/DVD Creating a NTI Disc Image File from a CD/DVD Creating a CD/DVD from a Disc Image File

C O P Y I N G A C D / D V D
Copying a CD/DVD 19
Getting Started This chapter explains how to copy an existing CD/DVD, and all of the settings and options that you can choose for making a CD/DVD copy. Note:
This chapter assumes that you have installed the Dragon Burn software as described in the previous chapter. If you haven't installed the software, refer to the Software Installation section.
Starting Dragon Burn
To start the Dragon Burn application:
1. Open the Dragon Burn folder, and double-click the Dragon Burn icon. In a moment, the Dragon Burn window appears, as shown in the following diagram:
2. Click the CD/DVD Copy icon to open the “CD/DVD Copy” window.
The Dragon Burn application is now running and ready for use. The following sections of this chapter describe the procedure for copying a CD, and the features and options that are available.
About Copying CDs and DVDs Dragon Burn is designed to make a duplicate of your source CD/DVD. You should be aware that there are copyright laws that may apply when you make a copy of a CD or DVD especially a disc that contains material you have not personally created. You are solely responsible for complying with all applicable copyright and intellectual property laws associated with the content of any disc you choose to copy. Keep in mind the following:
Software CDs and DVDs. All commercial software is supplied with a Copyright License Agreement. You should carefully review the contents of this agreement before you make a copy of a software CD.
Music CDs. Music CDs that you buy in the store are also covered by copyright protection.
Copy Protection. Many software CDs/DVDs contain special data encoding that prevents their being copied even by advanced applications such as Dragon Burn. If you attempt to copy a software CD/DVD and receive error or warning messages, it is likely that the disc features copy protection. It may be impossible to create a copy of that CD/DVD.

C O P Y I N G A C D / D V D
20 Copying a CD/DVD
CD/DVD Copy Overview You will perform the following step when you use Dragon Burn to copy a CD or DVD:
1. Choose a Source. The Source list automatically lists all the CD/DVD players/recorders connected to your Macintosh system. You use this pane to choose the device that has the CD/DVD you want to copy. Dragon Burn will display the device type, status and track information for the selected drive. Note:
You can choose the CD/DVD/ISO Image Reader as the source drive to burn a previously saved Image File to a CD or DVD. For more information about this option, refer to the section entitled “Using Disc Image Files.”
2. Choose the Destination. The CD Writer pane lists all CD recorders connected to your Macintosh system. You use this pane to choose the recorder that will create the CD copy or choose CD/DVD Image Writer to create an NTI image file (.ncd) from your source CD.
CD/DVD Copy Procedure
To copy a CD or DVD:
1. If you haven't already done so, start the Dragon Burn application. When you first start Dragon Burn, the Dragon Burn window appears on the screen.
If the Dragon Burn window is not currently on the screen, choose New Layout from the File menu.
2. Click the “CD/DVD Copy” icon to open the CD/DVD Copy window.
3. Insert the source disc (the one you want to copy) into the source drive of your
Macintosh. 4. Select the Source Drive from the Source List. The Source list automatically lists all the
CD/DVD players/recorders connected to your Macintosh system. You use this pane to choose the device that has the CD/DVD you want to copy. Dragon Burn will display the device type, status and track information for the selected drive. Note:
You can choose the CD/DVD/ISO Image Reader as the source drive to burn a previously saved Image File to a CD/DVD. For more information about this option, refer to the section entitled “Using Disc Image Files.”

C O P Y I N G A C D / D V D
Copying a CD/DVD 21
5. Select the Destination Drive from the Recorder List. The Recorder List contains all of the CD/DVD recorders connected to your Macintosh system. Note:
You can choose the CD/DVD Image Writer as the destination drive to create a NTI Image File (*.ncd) to your hard drive for later use. For more information about this option, refer to the section entitled “Using Disc Image Files.”
6. Click the Eject button and insert a blank (recordable) piece of media into the drive tray. Click the Eject button a second time to close the drive tray, and make the blank media available for use. Notes:
Skip this step if you are using a single CD/DVD drive, do not insert the blank media at this time.
You can click the Erase button if you are using rewritable media and need to erase the disc before creating your copy.
7. Click the Burn Disc Options button to start the copy process. Note:
If you are using a single CD/DVD drive, you will be prompted to remove the source disc and replace it with a blank piece of recordable media after the source media's contents have been copied to your hard drive. At the prompt, replace the source media with a blank piece of recordable media and close the tray. Click the OK button to continue the copy process.
8. At this point, the Burning Options Sheet is displayed with the default options checked or highlighted in blue. See “Options Settings” for more information about specific option settings.
9. Click either the Burn Session or Disc button to begin the copy process. A progress window appears.
10. When Dragon Burn is finished creating your CD/DVD copy, the completed disc will eject from your recorder. Dragon Burn will display a Status Sheet with any error or other burning information. At this point, your CD copy is complete and ready for use. Make sure that Dragon Burn hasn't reported any Errors or Warnings that relate to the copy you've created.
This procedure is complete. Note:
To directly copy a CD, you need to have two CD drives connected to your Macintosh system: a CD-ROM drive (for the source CD), and a CD-writer (to make the copy). You can still make a copy if you only have one CD drive by selecting that drive from both the source and CD Writer tabs. Dragon Burn will make a temporary disc image and then prompt you to put a blank CD in your recorder. You will need to have enough free hard disk space to hold the temporary image file when copying a CD from a single drive.

C O P Y I N G A C D / D V D
22 Copying a CD/DVD
Options Settings This section describes the settings that are available in the Options Sheet.
Speed: Recommended. This option chooses the burning speed based on the selected recorder,
media and device type information. In most cases, the recommended speed will be the highest speed supported by your CD/DVD recorder. The recommended speed is reduced if the recorder’s maximum speed is not supported by the media being used or when the device’s interface does not have the data bandwidth to support the maximum speed supported by the recorder.
Speed Slider. Use this slider to select a writing speed other than the recommended recording speed.
Options: Smart. Check this box to allow Dragon Burn to use its recommended burning options.
Use Session-At-Once. This option determines the writing method used when you click the Burn Session button. When checked, it causes Dragon Burn to write to the disc using Session-At-Once. Dragon Burn will write the disc using Track-At-Once when you click the burn Session button and this option is unchecked.
Buffer Underrun Protection. This option enables or disables the buffer underrun error correction on the destination device. Drives supporting this technology will prevent the creation of bad discs due to insufficient data flow to the target drive.
Burn: Disc. Clicking this button causes Dragon Burn to finalize the media at the completion of the
copy operation. Once finalized, you can no longer write to this disc.
Session. Clicking this button causes Dragon Burn not to finalize the media at the completion of the copy operation. Since the media is not finalized, it is possible to write additional data to this disc.
Verify. When checked, Dragon Burn will verify the contents of the disc after it has been written. There are two available verification types selectable from the General Tab of the program preferences. Quick Verification verifies that the data on the disc is written correctly. Detailed Verification compares the data written on the disc with the original contents of the source file in the layout.
C O P Y I N G A C D / D V D
Copying a CD/DVD 23
Simulate. This option causes Dragon Burn to go through the process of creating an actual CD but no actual CD/DVD is created. Any potential errors encountered in the burning process will be reported in the status sheet at the end of the simulated burn. This setting is useful of you are having problems copying a particular CD, and want to experiment with different settings (such as a lower Recording Speed).
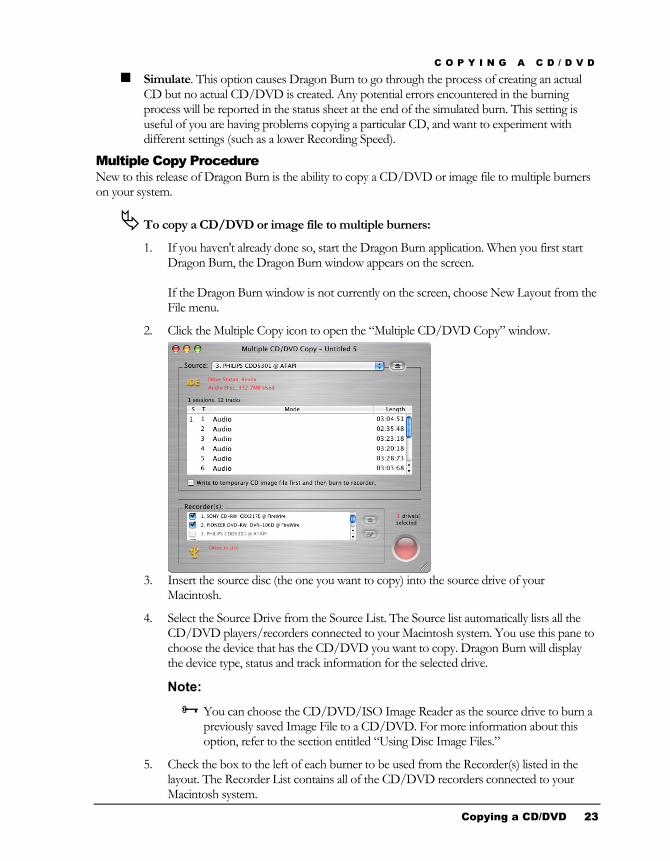
Multiple Copy Procedure New to this release of Dragon Burn is the ability to copy a CD/DVD or image file to multiple burners on your system.
To copy a CD/DVD or image file to multiple burners:
1. If you haven't already done so, start the Dragon Burn application. When you first start Dragon Burn, the Dragon Burn window appears on the screen. If the Dragon Burn window is not currently on the screen, choose New Layout from the File menu.
2. Click the Multiple Copy icon to open the “Multiple CD/DVD Copy” window.
3. Insert the source disc (the one you want to copy) into the source drive of your
Macintosh.
4. Select the Source Drive from the Source List. The Source list automatically lists all the CD/DVD players/recorders connected to your Macintosh system. You use this pane to choose the device that has the CD/DVD you want to copy. Dragon Burn will display the device type, status and track information for the selected drive.
Note:
You can choose the CD/DVD/ISO Image Reader as the source drive to burn a previously saved Image File to a CD/DVD. For more information about this option, refer to the section entitled “Using Disc Image Files.”
5. Check the box to the left of each burner to be used from the Recorder(s) listed in the layout. The Recorder List contains all of the CD/DVD recorders connected to your Macintosh system.

C O P Y I N G A C D / D V D
24 Copying a CD/DVD
6. Insert a blank (recordable) piece of media into each recorder selected in Step 5 above. Notes:
You cannot use a single drive as both the source and destination from this layout. Choose the “CD/DVD Copy” for single drive copy operations.
You can select a specific drive and click the Erase button if you are using rewritable media and need to erase the disc before creating your copy.
7. Click the Burn Disc Options button to start the copy process. The MultiCopy progress page is displayed should progress and status information for each copy being made.
8. When Dragon Burn is finished creating all copies, the completed disc will eject from your recorder. Dragon Burn will display a Status Sheet with any error or other burning information. At this point, your copies are complete and ready for use. Make sure that Dragon Burn hasn't reported any Errors or Warnings that relate to the copy you've created.
This procedure is complete.
Note: ∇ Available in Dragon Burn, Retail Version only!

C O P Y I N G A C D / D V D
Copying a CD/DVD 25
Using Disc Image Files Dragon Burn supports both NTI and ISO image files. The ISO image file format (.iso) supports data CDs and DVDs. NTI’s proprietary image format (.ncd) can contain audio, mp3, data, mixed-mode or CD Extra CD contents. A disc image file is a single (usually large) file created on your Macintosh that represents the entire contents of a CD.
Image files can also be made directly from CD/DVD. NTI images are made by selecting the CD/DVD Image Writer as the target device in any Dragon Burn layout or from the Copy CD/DVD layout. ISO images are made by selecting the ISO Image Writer from the Data CD/DVD layout. You can make an ISO image from an existing CD/DVD using the Disc Info tool found on the Recorder Menu.
The advantage to creating a disc image file is that it can be used to create subsequent disc copies without the source files. This is particularly useful if you will be making multiple copies of a CD, and may not have access to the original source disc. In addition, ISO images can be mounted directly by the OS X operating system.
Creating an ISO Image File from a CD/DVD
To create an ISO disc image file (.iso) from a CD/DVD:
1. Insert the source CD/DVD into the source drive. An icon for the source CD/DVD appears on the Finder desktop.
2. Make sure that you have enough space on your hard disk drive for the disc image file. The file will be as large as the entire contents of the source CD disc. To determine the size of the source media, click on the disc's icon in the Finder, and choose Get Info from the File Menu. You must have at least this much free space on a single hard disk drive in your Macintosh. Close the Get Info window when you are finished reviewing the disc information.
3. If you haven't already done so, start the Dragon Burn application. When you first start Dragon Burn, the Dragon Burn window appears on the screen. If the Dragon Burn window is not currently on the screen, choose New Layout from the File menu.
4. Click the “Disc Info…” item from the Recorder Menu.
5. Select the track to be saved as an ISO image. This is usually Session 1 Track 1 for most CD/DVD-ROMs. Note:
ISO images can only be made from data tracks. 6. Click the Extract button. 7. Enter the name of the ISO image file and click Save. This procedure is complete.
C O P Y I N G A C D / D V D
26 Copying a CD/DVD
Creating a NTI Disc Image File from a CD/DVD
To create a NTI disc image file (.ncd) from CD/DVD Copy:
1. Insert the source CD/DVD into the source drive. An icon for the source CD/DVD appears in the Finder desktop.
2. Make sure that you have enough space on your hard disk drive for the disc image file. The file will be as large as the entire contents of the source CD disc. To determine the size of the source media, click on the disc's icon in the Finder, and choose Get Info from the File Menu. You must have at least this much free space on a single hard disk drive in your Macintosh. Close the Get Info window when you are finished reviewing the disc information.
3. If you haven't already done so, start the Dragon Burn application. When you first start Dragon Burn, the Dragon Burn window appears on the screen. If the Dragon Burn window is not currently on the screen, choose New Layout from the File menu.
4. Click the “CD/DVD Copy” icon to open the CD/DVD Copy window.
5. Select the drive that contains the disc to be copied from the Source List.
6. Select the CD/DVD Image Writer from the Recorder List.
7. Click the Change Location button (to the right of the image file name). A “Save As” dialog box appears, prompting you to enter a name and location for the disc image file being created.
8. Enter a name for the disc image file, and then click on the Save button to continue.
You are returned to the CD/DVD Copy window.
9. Click the Burn Disc Options button to start the copy process.
10. When Dragon Burn is finished creating the image file, a Status Sheet with any error or other burning information is displayed.
At this point, your image file is complete and ready for use. Make sure that Dragon Burn hasn't reported any Errors or Warnings that relate to the image file that you've created. You are now ready to use the image file to create CDs/DVDs, as described in the following section.
This procedure is complete.

C O P Y I N G A C D / D V D
Copying a CD/DVD 27
Creating a CD/DVD from a Disc Image File
To use a disc image file to create a CD/DVD:
1. If you haven't already done so, start the Dragon Burn application. When you first start Dragon Burn, the Dragon Burn window appears on the screen. If the Dragon Burn window is not currently on the screen, choose New Layout from the File menu.
2. Click the “CD/DVD Copy” icon to open the CD/DVD Copy window.
3. Select the CD/DVD/ISO Image Reader from the Source List.
4. If necessary, navigate to the folder that contains the image file (.bin, .cue, .cdr, .dmg, .ncd or .iso). In some cases, even image files created by other 3rd party burning applications may work as well. When you've found the file, click to select it (so it's highlighted), and then click the Open button to continue.
Note:
Only supported image file types are selectable from the Open dialog. Some 3rd party image files may support multiple internal formats. Dragon Burn will display a warning should you try to open an image file that contains an unsupported internal format.
5. Select the Destination Drive from the Recorder List. The Recorder List contains all of the CD/DVD recorders connected to your Macintosh system.
6. Click the Eject button and insert a blank (recordable) piece of media into the drive tray. Click the Eject button a second time to close the drive tray, and make the blank media available for use.
Note:
You can click the Erase button if you are using rewritable media and need to erase the disc before creating your copy.
7. Click the Burn Disc Options button to start the copy process.
8. At this point, the Burning Options Sheet is displayed with the default options checked or highlighted in blue. See “Options Settings” above for more information about specific option settings.
9. Dragon Burn begins copy process. A progress window appears.
10. When Dragon Burn is finished creating your CD/DVD copy, the completed disc will eject from your recorder. Dragon Burn will display a Status Sheet with any error or other burning information.
At this point, your copy is complete and ready for use. Make sure that Dragon Burn hasn't reported any Errors or Warnings that relate to the copy you've created.
This procedure is complete.


Creating your own CD 29
Chapter
3
Creating your own CD

C R E A T I N G Y O U R O W N C D
30 Creating your own CD
Chapter 3 — Topics of discussion
Getting Started Supported CD Format Types Creating a Data CD/DVD Specifying File Formats File Format Options Saving a CD/DVD Layout Opening a Saved Layout Creating an Audio CD Importing an iTunes Playlist Entering CD Text Information
Using the Gracenote CDDB Service Registering with the Gracenote CDDB Service
Extracting Audio Files Creating a Video CD (VCD)
Changing the Play Sequence Previewing a Video Clip
Creating a SuperVideo CD (SVCD) Creating a DVD-Video Disc Creating a MP3 CD Creating a Picture CD Creating a Live Audio CD Creating a Mixed Mode CD Creating a CD Extra Disc Displaying Recorder Information Displaying Disc Information Erasing Re-Writable Discs

C R E A T I N G Y O U R O W N C D
Creating your own CD 31
Getting Started This chapter explains how to use Dragon Burn to create your own “custom CDs” meaning the content of the CD is based on files that you choose from the drives connected to your Macintosh system. With Dragon Burn, you simply create a layout file that contains the information about the CD you want to create and let Dragon Burn do the rest. These CD layouts can be saved and used again to create additional copies of any CD you create.
Supported CD Format Types Using Dragon Burn, you can create eight types of CD-R discs: Audio CD, MP3 CD, Data CD (CD-ROM), Video CD, Super VCD, Mixed-Mode CD and CD Extra.
A CD-ROM disc contains data only. For example, when you back up all the data files from your hard disk to CD, the disc that will be created is a CD-ROM disc. When creating a Data CD, you can also choose the file format for the completed CD. This can be the standard Macintosh file formats (HFS or HFS+), the ISO9660 file format (used by Windows-based computers), or even a combination of the two formats on the same CD.
An Audio CD disc contains only digital audio information. The sources of digital audio are Audio CD (music or songs) on a disc in a CD-ROM drive, Wave, SD2, MP3, AIFF and AAC files on your hard disk.
A MP3 CD disc contains multiple audio tracks in the form of MP3 files. The sources of digital audio are Audio CD (music or songs) on a disc in a CD-ROM drive, Wave, SD2, MP3 , AIFF and AAC files on your hard disk.
A Video CD disc may include video clips, converted from MPEG-1 files. Video clips must conform to the MPEG for Video CD 2.0 specification. A Super Video CD disc may include video clips, converted from MPEG-2 files. Video clips must conform to the MPEG-2 (ISO 13818-1, 1994) specification. A Mixed Mode CD contains both data and digital audio. Data is recorded on the first track, while audio is on tracks 2 to 99 of the same disc.
A CD Extra, also known as CD Plus or Enhanced CD, includes two sessions with the first session containing up to 98 audio tracks and the second session containing a data track written in the CD-ROM XA format.
Creating a Data CD/DVD With Dragon Burn, you can easily make copies of any files and folders on your Macintosh. You can use the Finder to drag-and drop your files and folders onto the Dragon Burn Layout window, or you can use the Add function to select the files and folders that you want.
To create a Data CD/DVD (CD-ROM/DVD-ROM):
1. If you haven't already done so, start the Dragon Burn application. When you first start Dragon Burn, the Dragon Burn window appears on the screen. If the Dragon Burn window is not currently on the screen, choose New Layout from the File menu.

C R E A T I N G Y O U R O W N C D
32 Creating your own CD
2. Click the Data CD/DVD icon to open the “Data CD/DVD” window. A new, Untitled Layout window appears.
3. Set the layout filter as desired. 4. Add the files and folders to your new layout. There are two ways to choose your files and
folders in the Data layout: Drag and drop files and folders from the Finder. Simply drag the files and folders that you want into the Data layout, and release the mouse button. The files and folders that you have selected appear as a scrolling list in the new layout.
or:
Click Add File(s)/Folder(s)button to select files and folders from the Finder. If necessary, click the Open button to add the selected file or folder in the Data layout.
5. When you have added the files and folders that you want to include on the CD/DVD, the Layout window will display a list of those items as shown below:
If you've accidentally added a file or folder that you do not want to include on the CD, select the item and then click the Remove File(s)/Folder(s) button. You may also add new folders to your layout by clicking the Create New Folder button. All folders added in this manner will have the default name of “New Folder” and will be inserted as a sub-folder of the currently selected folder. You can change the name of the new folder by selecting the folder to be renamed and then clicking the name area. An Edit box is displayed allowing you to change the name as desired.
Notes:
As you add files and folders to the list, the total combined size of the files and item count appears in the upper-right corner of the data layout window. Make sure that the combined size of the files and folders does not exceed the capacity of your CD/DVD media (generally, 1% less than the rated maximum capacity of the CD. For example, if the CD is rated for a maximum of 650MB, you should not try to write more than 644MB).
C R E A T I N G Y O U R O W N C D
Creating your own CD 33
The layout filter is applied when files are added to a layout. You can change the filter as needed and then add more files to your layout using the new filter setting.
6. Choose the file system format from the list at the top of any data layout area. See “Specifying File Formats” and “File Format Options” for more information on the file system setting.
7. If you have selected one of the Joliet or MS-DOS formats or a Hybrid format, click the “Setup Data Options” button to display the ISO-9660 options. Use the General Tab to add Apple Extensions, select the CD-ROM XA format, or specify the Volume Set Name, System Name, Publisher Name and Preparer Name information to the disc.
You can import data from previous sessions (ISO & UDF) from the Sessions Tab of the Options drawer. Select the session to import from the list and click the import button. Imported files will appear as red text in the data layout. Note:
Importing data from previous sessions on a CD/DVD is only necessary when for ISO or UDF discs. All sessions of an HFS/HFS+ disc will be mounted and displayed on the OS X desktop. You can open each session/volume and drag and drop data from them into your layout just as you would from any other mounted volume.
8. Select the Destination recorder from the Recorder List. Note:
Select the ISO Image Writer as the target drive to create an ISO image of this layout.
9. Click the Eject button and insert a blank (recordable) piece of media into the drive tray. Click the Eject button a second time to close the drive tray, and make the blank media available for use. Note:
You can click the Erase button if you are using rewritable media and need to erase the disc before creating your copy.
10. Click the Burn Disc Options button to start the burning process. 11. At this point, the Burning Options Sheet is displayed with the default options checked or
highlighted in blue. See “Options Settings” in the previous chapter for more information about specific option settings.
12. Click either the Burn Session or Disc button to begin the burning process. A progress window appears.
13. When Dragon Burn is finished creating your CD/DVD, the completed disc will eject from your recorder. Dragon Burn will display a Status Sheet with any error or other burning information. At this point, your CD/DVD is complete and ready for use. Make sure that Dragon Burn hasn't reported any Errors or Warnings that relate to the disc you've created.
This procedure is complete.
C R E A T I N G Y O U R O W N C D
34 Creating your own CD
If Errors or Warnings were reported in Step #13, refer to the Troubleshooting section (in Chapter 4: Reference).
Note:
If you close the layout window or quit Dragon Burn, you are prompted to save the settings you have made in the layout window. This is the same as saving a layout, as described in the following section.
Specifying File Formats With Dragon Burn, you can choose the file format that is used for the data on your custom CD/DVD. Choose the file system format from the list at the top of any data layout area.
File Format Options The following file format options are available:
Mac OS Extended (HFS+). This setting creates CDs compatible with the Macintosh HFS+ file system. The result is that the Macintosh can recognize Macintosh files in the usual manner (so that you can double-click on a file to launch its related application)
Mac OS (HFS). This setting uses the Macintosh Type and Creator information (associated with Macintosh files), and writes this information into a special area of the CD. The result is that the Macintosh can recognize Macintosh files in the usual manner (so that you can double-click on a file to launch its related application)
Joliet (Windows/MS-DOS). The Joliet file system was proposed and implemented by Microsoft. Joliet is based on the ISO9660 (1988) standard.
If a CD is created using the Joliet file system, it may only be read back under Windows 95/Windows NT 4.0 or later, and may not be read back on other platforms. Under the Joliet file system, the number of characters allowed in long file name is up to 64 and the allowed number in a long directory is up to 64 characters. However, the total number of characters for a file name plus its full path cannot exceed 120.
MS-DOS. This setting defines that the files and folders you have selected in the Data pane will be written in the 8.3 MS-DOS file format..
Hybrid (HFS/MS-DOS). This format contains the MS-DOS file information, as well as files in the Macintosh HFS file format. Dragon Burn will write the file data once and include two sets of header information: one in the MS-DOS file format and one in the Macintosh HFS file format.
Hybrid (HFS/Joliet). This format contains the Joliet file information, as well as files in the Macintosh HFS file format. Dragon Burn will write the file data once and include two sets of header information: one in the Joliet file format and one in the Macintosh HFS file format.
Hybrid (HFS+/MS-DOS). This format contains the MS-DOS file information, as well as files in the Macintosh HFS+ file format. Dragon Burn will write the file data once and include two sets of header information: one in the MS-DOS file format and one in the Macintosh HFS+ file format.
Hybrid (HFS+/Joliet). This format contains the Joliet file information, as well as files in the Macintosh HFS+ file format. Dragon Burn will write the file data once and include two sets of header information: one in the Joliet file format and one in the Macintosh HFS+ file format.
C R E A T I N G Y O U R O W N C D
Creating your own CD 35
UDF 1.5 (Universal Disk Format). The Universal Disk Format is a file system for optical media developed by the Optical Storage Technology Association (OSTA). It was designed for read-write interoperability between all the major operating systems as well as compatibility between rewritable and write-once media. UDF supports file names up to 255 characters long.
UDF 1.02 (Universal Disk Format). The Universal Disk Format is a file system for optical media developed by the Optical Storage Technology Association (OSTA). UDF 1.02 is used on DVD-Video discs.
DVD Movie. Select this option if you want to burn a DVD-Video disc. This option requires that you have added the VIDEO_TS folder containing the pre-authored DVD-Video files to your layout. You may also add the AUDIO_TS folder and any other file(s)/folder(s) generated from your DVD Authoring software to your layout before burning your DVD-Video disc.
Saving a CD/DVD Layout Once you've made any settings in a Layout window, you can save those settings for future use. For example, the previous procedure explained how to use Dragon Burn to backup data to a Data CD/DVD. You can save all of those settings as a Data CD/DVD Layout, and use them to quickly make future backup copies of the same files and folders. You can save as many different layouts as you want. For example, you might save a layout for backing up business files, and then specify different layout to backup image files.
To save your CD/DVD Layout:
1. With a Layout window on the screen, make changes to any of the settings as necessary. Note:
You do not actually have to record a CD/DVD. Simply make the settings that you want to use for recording a CD/DVD.
2. Choose Save or Save As… from the File menu. 3. Enter a name for the layout file. 4. If you want to save the layout in a different location, navigate to the volume and folder
where you want to save the layout. 5. Click the Save button.
At this point, all of the settings in the current layout window are saved, and can easily be opened and used for a future session with Dragon Burn.
Opening a Saved Layout
To open and use a saved layout file:
1. Choose Open… item from the File Menu. 2. Select the layout file that you want to use. If necessary, navigate to the folder that
contains the layout file. 3. Click the Open button. The corresponding layout window is displayed with all of the
settings you specified when you saved the layout. At this point, the layout window is open and ready for use. You can use the settings in your layout file, or you can make any changes you want for creating a new CD/DVD.

C R E A T I N G Y O U R O W N C D
36 Creating your own CD
Creating an Audio CD You can use an Audio CD layout to create a CD comprised of audio files in the AAC, AIFF, SD2, wave or mp3 file formats or tracks directly from your favorite Audio CD.
You can also use Dragon Burn to specify the pause between the individual audio tracks, and rearrange the order that the tracks are recorded onto the CD.
To use Dragon Burn to create an Audio CD:
1. If you haven't already done so, start the Dragon Burn application. When you first start Dragon Burn, the Dragon Burn window appears on the screen.
If the Dragon Burn window is not currently on the screen, choose New Layout from the File menu.
2. Click the Audio CD icon to open the “Audio CD” window. A new, “Untitled” layout window appears.
3. The Audio layout is used to define the audio files that will be copied to your Audio CD. There are two ways to choose the audio files that you want to add to the Audio pane: Drag and drop an audio file icon from the Finder. Simply drag the icon of the audio file onto the Audio pane, and release the mouse button. The audio files that you have selected appear as a scrolling list in the Audio pane. or: Click Add Audio Track(s) button to select files from the Finder. If necessary, click the Open button to add the selected file or folder in the Audio CD layout.
4. Repeat the previous step for all of the audio files that you want to include on your Audio CD. When you're finished, the Audio pane shows a list of the files you have selected, as shown in the following diagram:

C R E A T I N G Y O U R O W N C D
Creating your own CD 37
5. You can convert a selected audio track from the layout and save it to your hard drive in any of the supported formats (AIFF, MP3 and Wave). Highlight the track and click the Convert Audio Format button. You will be prompted for a new file name during the conversion process.
Note:
Currently you cannot convert other audio files into the SD2 or AAC audio file format. However, you can convert SD2 and AAC files into the AIFF, MP3 & Wave file formats.
6. You can play a track by selecting it and clicking the play button on the Audio Player. Note:
You can use the playback controls to adjust the volume, play/pause the track and fast forward/reverse the track playback position within the track.
7. Choose the order that you want for the audio files you have selected. To change the order, click on the name of an audio file, and drag it to a different position. Drag the file up to have it appear earlier on the CD; drag the file down to have it appear later on the CD. The audio file that appears at the top of the scrolling list will be the first track of the CD you create. If you want to remove an audio file that appears in the list, click to select the file, and then click the Remove Audio Track(s) button.
8. Next, choose the Pause time that you want for the individual audio tracks on your custom CD. Click the pop-up menu that appears with each audio track, and choose the Pause time. You can choose from 0 to 10 seconds Pause time between the selected track and the next track.
9. Enter the CD Text information if required. See “Entering CD Text Info” below for additional information on the CD Text capabilities of Dragon Burn.
10. Select the Destination recorder from the Recorder List. 11. Click the “Setup Audio Options” button and select the desired options.
Notes:
Select Volume Balancing to compute the average volume for all the audio tracks in the Audio layout and then adjust the volume level of each song accordingly.
Select the “Copy CD Audio to Hard drive” option for improved burning or for when you have included tracks from your CD drive in the layout (Audio Swapping) and you only have one CD drive in your system.
12. Click the Eject button and insert a blank (recordable) piece of media into the drive tray. Click the Eject button a second time to close the drive tray, and make the blank media available for use. Note:
You can click the Erase button if you are using rewritable media and need to erase the disc before creating your copy.
13. Click the Burn Disc Options button to start the burning process.

C R E A T I N G Y O U R O W N C D
38 Creating your own CD
14. At this point, the Burning Options Sheet is displayed with the default options checked or highlighted in blue. See “Options Settings” in the previous chapter for more information about specific option settings.
15. Click either the Burn Session or Disc button to begin the burning process. A progress window appears.
16. When Dragon Burn is finished creating your CD, the completed disc will eject from your recorder. Dragon Burn will display a Status Sheet with any error or other burning information. At this point, your CD is complete and ready for use. Make sure that Dragon Burn hasn't reported any Errors or Warnings that relate to the disc you've created.
This procedure is complete.
If Errors or Warnings were reported in Step #16, refer to the Troubleshooting section (in Chapter 4: Reference).
Note:
If you close the layout window or quit Dragon Burn, you are prompted to save the settings you have made in the layout window. This is the same as saving a layout, as described in the following section.
Importing an iTunes Playlist You can quickly burn an audio CD from a saved iTunes playlist. Dragon Burn will import all the tracks in your playlist directly into a new Audio CD layout. Export the playlist from iTunes in either the Plain Text, Unicode Text or XML formats and then let Dragon Burn take it from there.
To import an iTunes Playlist into an Audio CD layout:
1. Choose the Import iTunes Playlist item from the Dragon Burn File Menu.
2. Navigate to the desired playlist from the Open dialog.
3. Select the desired playlist and click the “Open” button.
Notes:
Dragon Burn supports the Plain Text, Unicode Text and XML playlist formats.
Dragon Burn will open a new Audio CD layout with all of the tracks on the playlist that are in one of the supported audio formats (AAC, AIFF, CD-DA, MP3, SD2, & WAV). Any tracks in your playlist that are not in one of these formats will not be in the resulting layout.
The Name, Artist and Album CD Text information for each track will be imported from the iTunes playlist if available.

C R E A T I N G Y O U R O W N C D
Creating your own CD 39
Entering CD Text Information Dragon Burn allows you to enter CD Text information for the album and each track in the audio layout. You can enter Title, Performer, Songwriter, Composer and Arranger info with Dragon Burn. This CD Text information is recorder to the audio CD and can be displayed by CD players with CD Text capability.
To add CD Text information to your Audio CD:
1. Double-Click on any audio track in the Audio CD layout to open the CD Text sheet.
2. Enter the CD Text information for the selected track.
3. Click the OK button to save the CD Text information for the selected track.
Notes:
You can click the disc tab to enter CD Text information for the album or use the < > buttons to add CD Text to other tracks in the layout.
You can click on the “Apply To All Tracks” button to copy the selected field information to all other tracks on the layout.
Using the Gracenote CDDB Service Dragon Burn uses the Gracenote CDDB Music Recognition ServiceSM from Gracenote to display artist, and title information about the songs on an Audio CD. Dragon Burn will request this information from the Gracenote service when you drop a track from an audio CD into your audio layout. In the case that the CD in the source drive has multiple entries or an exact match cannot be found, Dragon Burn will present a list of possible matches.
Notes: ∇ Available in Dragon Burn, Retail Version only!
Title and Artist information will automatically be transferred to the Title and Performer CD Text fields. CD Text information can be exported as a playlist for label and jewel case insert printing.
This service is FREE. The first time you use the service, you must register with Gracenote to use it.
Registering with the Gracenote CDDB Service You will be asked to register with the Gracenote service the first time Dragon Burn attempts to look up a song in your layout. In this case, the Gracenote CDDB Registration Wizard appears automatically. Follow the screens for a “New Registration” to select a “nickname” and password. The remaining information is optional, but does help Gracenote provide better service.
Once you register, you do not have to re-register, unless you want to change your registration information or settings. Use the CDDB menu for access to all CDDB services.
You can visit their web site at http://www.cddb.com/cddb2info/using.html.for more complete instructions on using the Gracenote CDDB service
C R E A T I N G Y O U R O W N C D
40 Creating your own CD
Extracting Audio Files You can create AIFF, MP3 or Wave sound files from any audio track on CD or from other sound file formats like AAC, MP3 and Wave.
To extract an audio file from an audio track or file:
1. Open an Audio CD layout.
2. Add the desired audio tracks to the layout.
3. Select the track to extract. 4. Click the Convert Audio Format button 5. Select the desired audio format from the “Save as Type” list. 6. Enter the name and location of the extracted file. 7. Click Save to begin the extraction process. 8. Click OK when the Audio Conversion Complete dialog is displayed.
This procedure is complete.
Creating a VCD Movie CD With Dragon Burn, you can easily make a Video CD from copies of your favorite MPEG-1 formatted video files. You can use the Finder to drag-and drop your video files onto the VCD Movie CD Layout window, or you can use the Add function to select the files and folders that you want.
To create a VCD Movie CD:
1. If you haven't already done so, start the Dragon Burn application. When you first start Dragon Burn, the Dragon Burn window appears on the screen. If the Dragon Burn window is not currently on the screen, choose New Layout from the File menu.
2. Click on the Video icon to display the Video Menu. 3. Select the VCD Movie item from the Video Menu to open the “VCD Movie CD”
window. A new, Untitled Layout window appears. 4. Add the desired video files to your new layout. There are two ways to choose your files
and folders in the VCD Movie CD layout: Drag and drop video files from the Finder. Simply drag the video clips that you want into the VCD Movie CD layout, and release the mouse button. The files you have selected appear as a scrolling list in the new layout.
or:
Click Add Video Tracks(s) button to select video files from the Finder. If necessary, click the Open button to add the selected file to the VCD Movie CD layout.
5. When you have added the files and folders that you want to include on your VCD Movie CD, the Layout window will display a list of those items as shown below:
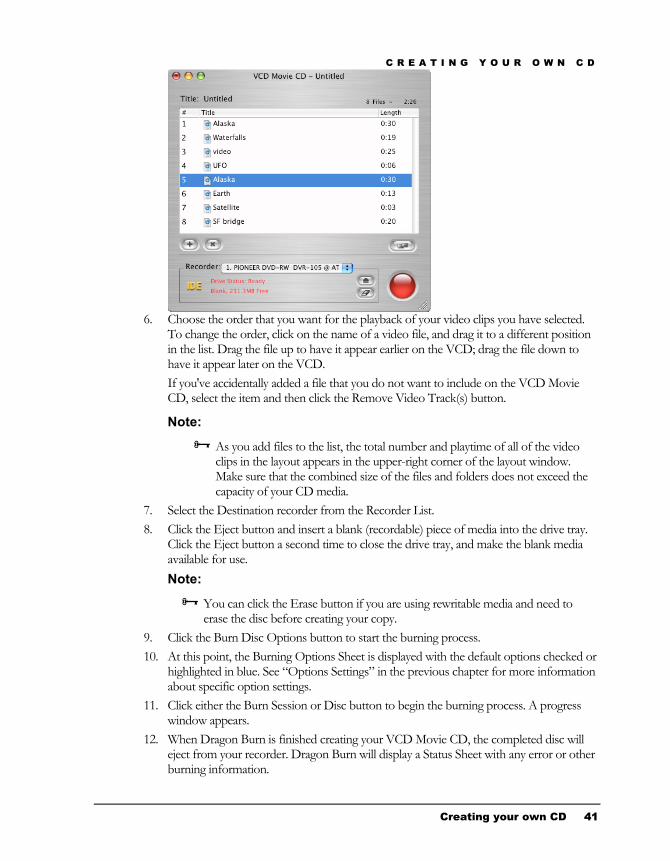
C R E A T I N G Y O U R O W N C D
Creating your own CD 41
6. Choose the order that you want for the playback of your video clips you have selected.
To change the order, click on the name of a video file, and drag it to a different position in the list. Drag the file up to have it appear earlier on the VCD; drag the file down to have it appear later on the VCD. If you've accidentally added a file that you do not want to include on the VCD Movie CD, select the item and then click the Remove Video Track(s) button.
Note:
As you add files to the list, the total number and playtime of all of the video clips in the layout appears in the upper-right corner of the layout window. Make sure that the combined size of the files and folders does not exceed the capacity of your CD media.
7. Select the Destination recorder from the Recorder List. 8. Click the Eject button and insert a blank (recordable) piece of media into the drive tray.
Click the Eject button a second time to close the drive tray, and make the blank media available for use. Note:
You can click the Erase button if you are using rewritable media and need to erase the disc before creating your copy.
9. Click the Burn Disc Options button to start the burning process. 10. At this point, the Burning Options Sheet is displayed with the default options checked or
highlighted in blue. See “Options Settings” in the previous chapter for more information about specific option settings.
11. Click either the Burn Session or Disc button to begin the burning process. A progress window appears.
12. When Dragon Burn is finished creating your VCD Movie CD, the completed disc will eject from your recorder. Dragon Burn will display a Status Sheet with any error or other burning information.

C R E A T I N G Y O U R O W N C D
42 Creating your own CD
At this point, your VCD Movie CD is complete and ready for use. Make sure that Dragon Burn hasn't reported any Errors or Warnings that relate to the disc you've created.
This procedure is complete.
If Errors or Warnings were reported in Step #11, refer to the Troubleshooting section (in Chapter 4: Reference).
Note:
If you close the layout window or quit Dragon Burn, you are prompted to save the settings you have made in the layout window. This is the same as saving a layout, as described in the following section.
Changing the Play Sequence After adding video clips to the Video CD layout, you can design the layout to create the play sequence. Video clips can be moved to any position in the video track list with a simple drag and drop. Select the clip to be moved by clicking the mouse button and then, while holding the button, drag the file to a new position in the video track list and drop it by releasing the left button. The selected clip will be moved and displayed in its new position.
To move a video clip to a new position in the video item list:
1. Select the video clip to move.
2. While holding down the mouse button, drag the selection to the desired position in the video track list.
3. Drop it in the new location by releasing the mouse button.
Note:
Dragon Burn displays a horizontal line across the video track list to indicate where the clip will be dropped.
Previewing a Video Clip You can preview selected video clips from your VCD/SVCD layout.
To preview a video clips from the VCD/SVCD layout:
1. Select the video clip from the video item list.
2. Click the Video Preview button.
3. Click the Play button from the preview pane.

C R E A T I N G Y O U R O W N C D
Creating your own CD 43
Creating a SVCD Movie CD With Dragon Burn, you can easily make a SVCD Movie CD from copies of your favorite MPEG-2 formatted video clips. You can use the Finder to drag-and drop your video clips onto the SVCD Movie CD Layout window, or you can use the Add function to select the video files that you want.
To create a SVCD Movie CD:
1. If you haven't already done so, start the Dragon Burn application. When you first start Dragon Burn, the Dragon Burn window appears on the screen. If the Dragon Burn window is not currently on the screen, choose New Layout from the File menu.
2. Click on the Video icon to display the Video Menu. 3. Select the SVCD Movie item from the Video Menu to open the “SVCD Movie CD”
window. A new, Untitled Layout window appears. 4. Add the desired video files to your new layout. There are two ways to choose your files
and folders in the SVCD Movie CD layout: Drag and drop video files from the Finder. Simply drag the video clips that you want into the SVCD Movie CD layout, and release the mouse button. The files you have selected appear as a scrolling list in the new layout.
or:
Click Add Video Tracks(s) button to select video files from the Finder. If necessary, click the Open button to add the selected file to the SVCD Movie CD layout.
5. When you have added the video clips that you want to include on your SVCD Movie CD, the Layout window will display a list of those items as shown below:
6. Choose the order that you want for the playback of your video clips you have selected.
To change the order, click on the name of a video file, and drag it to a different position in the list. Drag the file up to have it appear earlier on the SVCD; drag the file down to have it appear later on the SVCD.

C R E A T I N G Y O U R O W N C D
44 Creating your own CD
If you've accidentally added a file that you do not want to include on the SVCD Movie CD, select the item and then click the Remove Video Track(s) button.
Note:
As you add files to the list, the total number and playtime of all of the video clips in the layout appears in the upper-right corner of the layout window. Make sure that the combined size of the files and folders does not exceed the capacity of your CD media.
7. Select the Destination recorder from the Recorder List. 8. Click the Eject button and insert a blank (recordable) piece of media into the drive tray.
Click the Eject button a second time to close the drive tray, and make the blank media available for use. Note:
You can click the Erase button if you are using rewritable media and need to erase the disc before creating your copy.
9. Click the Burn Disc Options button to start the burning process. 10. At this point, the Burning Options Sheet is displayed with the default options checked or
highlighted in blue. See “Options Settings” in the previous chapter for more information about specific option settings.
11. Click either the Burn Session or Disc button to begin the burning process. A progress window appears.
12. When Dragon Burn is finished creating your SVCD Movie CD, the completed disc will eject from your recorder. Dragon Burn will display a Status Sheet with any error or other burning information. At this point, your SVCD Movie CD is complete and ready for use. Make sure that Dragon Burn hasn't reported any Errors or Warnings that relate to the disc you've created.
This procedure is complete.
If Errors or Warnings were reported in Step #12, refer to the Troubleshooting section (in Chapter 4: Reference).
Note:
If you close the layout window or quit Dragon Burn, you are prompted to save the settings you have made in the layout window. This is the same as saving a layout, as described in the following section.

C R E A T I N G Y O U R O W N C D
Creating your own CD 45
Creating a DVD-Video Disc With Dragon Burn, you an easily make copies of any files and folders on your Macintosh. You can use the Finder to drag-and drop your files and folders onto the Dragon Burn Layout window, or you can use the Add function to select the files and folders that you want.
You must add a valid VIDEO_TS folder to your layout when using the “DVD Movie” option to burn a DVD-Video Disc. The audio and video files must have been generated from a DVD Video authoring program.
To create a DVD-Video:
1. If you haven't already done so, start the Dragon Burn application. When you first start Dragon Burn, the Dragon Burn window appears on the screen. If the Dragon Burn window is not currently on the screen, choose New Layout from the File menu.
2. Click on the Video icon to display the Video Menu. 3. Select the VIDEO_TS item from the Video Menu to open the “Data CD/DVD”
window. A new, Untitled Layout window appears. Note:
This feature uses a special purpose Data CD/DVD layout to burn your pre-mastered DVD audio and video files to make a Video DVD.
4. Add the desired video files to your new layout. There are two ways to choose your files and folders in the Data CD/DVD layout: Drag and drop files and folders from the Finder. Simply drag the files and folders that you want into the data layout, and release the mouse button. The files and folders that you have selected appear as a scrolling list in the new layout.
or:
Click Add File(s)/Folder(s)button to select files and folders from the Finder. If necessary, click the Open button to add the selected file or folder in the data layout.
5. When you have added the files and folders that you want to include on the DVD, the Layout window will display a list of those items as shown below:
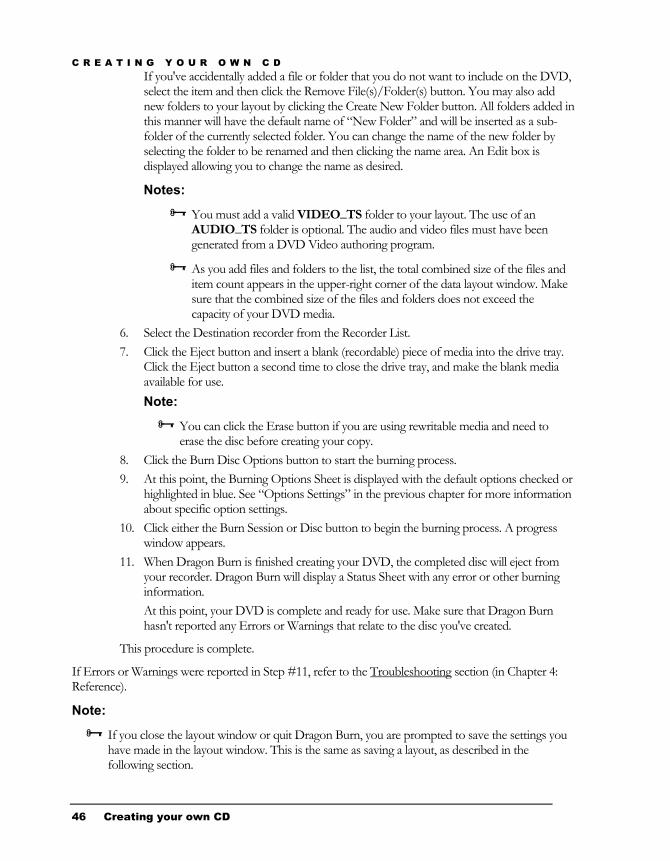
C R E A T I N G Y O U R O W N C D
46 Creating your own CD
If you've accidentally added a file or folder that you do not want to include on the DVD, select the item and then click the Remove File(s)/Folder(s) button. You may also add new folders to your layout by clicking the Create New Folder button. All folders added in this manner will have the default name of “New Folder” and will be inserted as a sub-folder of the currently selected folder. You can change the name of the new folder by selecting the folder to be renamed and then clicking the name area. An Edit box is displayed allowing you to change the name as desired.
Notes:
You must add a valid VIDEO_TS folder to your layout. The use of an AUDIO_TS folder is optional. The audio and video files must have been generated from a DVD Video authoring program.
As you add files and folders to the list, the total combined size of the files and item count appears in the upper-right corner of the data layout window. Make sure that the combined size of the files and folders does not exceed the capacity of your DVD media.
6. Select the Destination recorder from the Recorder List. 7. Click the Eject button and insert a blank (recordable) piece of media into the drive tray.
Click the Eject button a second time to close the drive tray, and make the blank media available for use. Note:
You can click the Erase button if you are using rewritable media and need to erase the disc before creating your copy.
8. Click the Burn Disc Options button to start the burning process. 9. At this point, the Burning Options Sheet is displayed with the default options checked or
highlighted in blue. See “Options Settings” in the previous chapter for more information about specific option settings.
10. Click either the Burn Session or Disc button to begin the burning process. A progress window appears.
11. When Dragon Burn is finished creating your DVD, the completed disc will eject from your recorder. Dragon Burn will display a Status Sheet with any error or other burning information. At this point, your DVD is complete and ready for use. Make sure that Dragon Burn hasn't reported any Errors or Warnings that relate to the disc you've created.
This procedure is complete.
If Errors or Warnings were reported in Step #11, refer to the Troubleshooting section (in Chapter 4: Reference).
Note:
If you close the layout window or quit Dragon Burn, you are prompted to save the settings you have made in the layout window. This is the same as saving a layout, as described in the following section.

C R E A T I N G Y O U R O W N C D
Creating your own CD 47
Creating a MP3 CD An MP3 CD is a special type of data CD that can be played from your computer or a stand-alone MP3 player.
To use Dragon Burn to create a MP3 CD:
1. If you haven't already done so, start the Dragon Burn application. When you first start Dragon Burn, the Dragon Burn window appears on the screen.
2. Click the MP3 CD icon to open the “MP3 CD” window. A new, “Untitled” layout window appears.
3. You can click the Setup MP3 Options button to display the MP3 options. You can have Dragon Burn create a playlist and include the autorun files if you wish to play your MP3 CD from a Windows based PC.
4. Add the files and folders to your new layout. You can select any supported audio file type (AAC, AIFF, CD-DA, MP3, SD2 or Wave). There are two ways to choose your files and folders in the Data layout:
Drag and drop files and folders from the Finder. Simply drag the files and folders that you want into the MP3 layout, and release the mouse button. The files and folders that you have selected appear as a scrolling list in the new layout.
or:
Click Add File(s)/Folder(s) button to select files and folders from the Finder. If necessary, click the Open button to add the selected file or folder in the MP3 layout.
When you have added the files and folders that you want to include on the CD, the layout window will display a list of those items, as shown in the following diagram:
If you've accidentally added a file or folder that you do not want to include on the CD, click to select the item, and then click the Remove button. You may also add new folders to your layout by clicking the New Folder button. All folders added in this manner will have the default name of “New Folder” and will be inserted as a sub-folder of the

C R E A T I N G Y O U R O W N C D
48 Creating your own CD
currently selected folder. You can change the name of the new folder by selecting the folder to be renamed and then clicking the name area. An Edit box is displayed allowing you to change the name as desired.
Note:
As you add files and folders to the list, the total combined size of the files and item count appears in the upper-right corner of the data layout window. Make sure that the combined size of the files and folders does not exceed the capacity of your CD media (generally, 1% less than the rated maximum capacity of the CD. For example, if the CD is rated for a maximum of 650MB, you should not try to write more than 644MB).
6. Click the “Setup MP3 Options” button should you want to create a playlist (m3u file) and autorun settings for playback on a Windows machine.
Note:
You can click the “Organize Playlist” button if you want to change the playback order in the playlist before burning the MP3 CD. Use the mouse to drag the tracks to their desired location in the playlist, otherwise the order that the files are added to the layout will be used to create the playlist when the MP3 CD is burned.
7. Select the Destination recorder from the Recorder List.
8. Click the Eject button and insert a blank (recordable) piece of media into the drive tray. Click the Eject button a second time to close the drive tray, and make the blank media available for use.
Note:
You can click the Erase button if you are using rewritable media and need to erase the disc before creating your copy.
9. Click the Burn Disc Options button to start the burning process.
10. At this point, all non-MP3 files are converted to the MP3 format and then the Burning Options Sheet is displayed with the default options checked or highlighted in blue. See “Options Settings” in the previous chapter for more information about specific option settings.
11. Click either the Burn Session or Disc button to begin the burning process. A progress window appears.
12. When Dragon Burn is finished creating your CD/DVD, the completed disc will eject from your recorder. Dragon Burn will display a Status Sheet with any error or other burning information.
At this point, your CD/DVD is complete and ready for use. Make sure that Dragon Burn hasn't reported any Errors or Warnings that relate to the disc you've created.
This procedure is complete.
If Errors or Warnings were reported in Step #12, refer to the Troubleshooting section (in Chapter 4: Reference).

C R E A T I N G Y O U R O W N C D
Creating your own CD 49
Notes: ∇ MP3 Encoding is available in Dragon Burn, Retail Version only!
All MP3 conversions use the settings specified on the MP3 Tab of the Dragon Burn Preferences.
If you close the layout window or quit Dragon Burn, you are prompted to save the settings you have made in the layout window. This is the same as saving a layout, as described in the following section.
Creating a Picture CD With Dragon Burn, you can easily create Picture CDs with all your favorite image files (.jpg). Your Picture CD can be viewed on DVD players capable of playing standard jpeg image files. You can use the Finder to drag-and drop your images and folders onto the Dragon Burn Layout window, or you can use the Add function to select the files and folders that you want.
To create a Picture CD:
1. If you haven't already done so, start the Dragon Burn application. When you first start Dragon Burn, the Dragon Burn window appears on the screen. If the Dragon Burn window is not currently on the screen, choose New Layout from the File menu.
2. Click the Picture CD icon to open the “Picture CD” window. A new, Untitled, Layout window appears.
3. Add the files and folders to your new layout. There are two ways to choose your files and folders in the Picture CD layout: Drag and drop files and folders from the Finder. Simply drag the files and folders that you want into the Picture CD layout, and release the mouse button. The files and folders that you have selected appear as a scrolling list in the new layout.
or:
Click Add File(s)/Folder(s)button to select files and folders from the Finder. If necessary, click the Open button to add the selected file or folder in the Picture CD layout.
4. When you have added the files and folders that you want to include on the CD, the Layout window will display a list of those items as shown below:
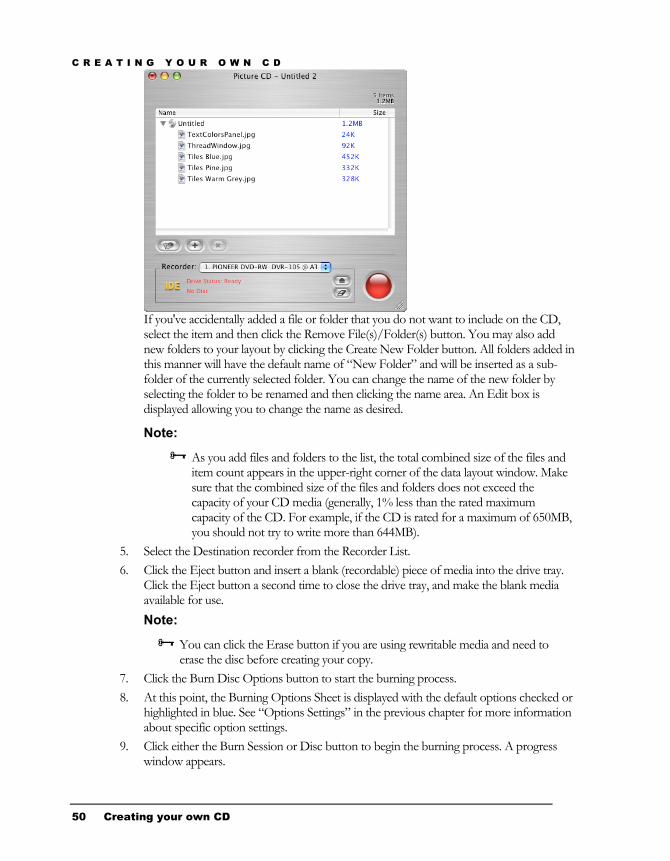
C R E A T I N G Y O U R O W N C D
50 Creating your own CD
If you've accidentally added a file or folder that you do not want to include on the CD, select the item and then click the Remove File(s)/Folder(s) button. You may also add new folders to your layout by clicking the Create New Folder button. All folders added in this manner will have the default name of “New Folder” and will be inserted as a sub-folder of the currently selected folder. You can change the name of the new folder by selecting the folder to be renamed and then clicking the name area. An Edit box is displayed allowing you to change the name as desired.
Note:
As you add files and folders to the list, the total combined size of the files and item count appears in the upper-right corner of the data layout window. Make sure that the combined size of the files and folders does not exceed the capacity of your CD media (generally, 1% less than the rated maximum capacity of the CD. For example, if the CD is rated for a maximum of 650MB, you should not try to write more than 644MB).
5. Select the Destination recorder from the Recorder List. 6. Click the Eject button and insert a blank (recordable) piece of media into the drive tray.
Click the Eject button a second time to close the drive tray, and make the blank media available for use. Note:
You can click the Erase button if you are using rewritable media and need to erase the disc before creating your copy.
7. Click the Burn Disc Options button to start the burning process. 8. At this point, the Burning Options Sheet is displayed with the default options checked or
highlighted in blue. See “Options Settings” in the previous chapter for more information about specific option settings.
9. Click either the Burn Session or Disc button to begin the burning process. A progress window appears.

C R E A T I N G Y O U R O W N C D
Creating your own CD 51
10. When Dragon Burn is finished creating your CD, the completed disc will eject from your recorder. Dragon Burn will display a Status Sheet with any error or other burning information. At this point, your CD is complete and ready for use. Make sure that Dragon Burn hasn't reported any Errors or Warnings that relate to the disc you've created.
This procedure is complete.
If Errors or Warnings were reported in Step #10, refer to the Troubleshooting section (in Chapter 4: Reference).
Note:
If you close the layout window or quit Dragon Burn, you are prompted to save the settings you have made in the layout window. This is the same as saving a layout, as described in the following section.

C R E A T I N G Y O U R O W N C D
52 Creating your own CD
Creating a Live Audio CD Dragon Burn’s Live Audio layout is a special-purpose version of the Audio CD layout. Most of the features and operations of the Audio CD layout are retained. In addition to the Audio CD functions, the Live Audio layout adds the ability to record sounds from a microphone or directly from the built-in audio controller of your Mac. Once you have recorded your track, play it with the QuickTime player or convert it to an MP3 file. It’s all up to you!
It is possible to record your meetings or play a song and record it while it is playing. You can turn the speakers off for silent recording, adjust the recording volume levels as necessary and mix and match other audio tracks just as you would in the Audio CD layout. Set CD Text information for each track and pass it off to the label-making program to print your labels and inserts. Rearrange the order of the tracks in your layout and when everything is just how you want it, burn your Live Audio CD.
To use Dragon Burn to create a Live Audio CD:
1. If you haven't already done so, start the Dragon Burn application. When you first start Dragon Burn, the Dragon Burn window appears on the screen.
If the Dragon Burn window is not currently on the screen, choose New Layout from the File Menu.
2. Click the Live Audio icon to open the “Live Audio CD” layout. A new, “Untitled” layout window appears.
3. Select the audio source device from the Audio Source List. Note:
Selecting the “Built-in audio controller” option from the list will allow you to record all audio processed by the audio controller on your Mac.
4. Check the Speaker box to route the audio to the speakers while it is being recorded or uncheck it for silent recording.
5. Click the Record button to start the recording process. 6. You can use the volume control to adjust the recording volume level. The Left and Right
channel volumes are indicated at the top of the Live Audio layout. 7. Click the Stop button

C R E A T I N G Y O U R O W N C D
Creating your own CD 53
8. Repeat steps 3 through 7 to create new tracks in the layout or add in other audio files directly into the layout. When you're finished, the Live Audio pane shows a list of the files you have added to your layout, as shown in the following diagram:
9. You can convert a selected audio track from the layout and save it to your hard drive in
any of the supported formats (AIFF, MP3 and Wave). Highlight the track and click the Convert Audio Format button. You will be prompted for a new file name during the conversion process.
10. You can play a track by selecting it and clicking the play button on the Audio Player. Note:
You can use the playback controls to adjust the volume, play/pause the track and fast forward/reverse the track playback position within the track.
11. Choose the order that you want for the audio files you have selected. To change the order, click on the name of an audio file, and drag it to a different position. Drag the file up to have it appear earlier on the CD; drag the file down to have it appear later on the CD. The audio file that appears at the top of the scrolling list will be the first track of the CD you create. If you want to remove an audio file that appears in the list, select the file and click the Remove button.
12. Enter the CD Text information if required. See “Entering CD Text Info” below for additional information on the CD Text capabilities of Dragon Burn.
13. Select the Destination recorder from the Recorder List. 14. Click the Eject button and insert a blank (recordable) piece of media into the drive tray.
Click the Eject button a second time to close the drive tray, and make the blank media available for use. Note:
You can click the Erase button if you are using rewritable media and need to erase the disc before creating your copy.
15. Click the Burn Disc Options button to start the burning process.

C R E A T I N G Y O U R O W N C D
54 Creating your own CD
16. At this point, the Burning Options Sheet is displayed with the default options checked or highlighted in blue. See “Options Settings” in the previous chapter for more information about specific option settings.
17. Click either the Burn Session or Disc button to begin the burning process. A progress window appears.
18. When Dragon Burn is finished creating your CD, the completed disc will eject from your recorder. Dragon Burn will display a Status Sheet with any error or other burning information. At this point, your CD is complete and ready for use. Make sure that Dragon Burn hasn't reported any Errors or Warnings that relate to the disc you've created.
This procedure is complete.
If Errors or Warnings were reported in Step #18, refer to the Troubleshooting section (in Chapter 4: Reference).
Notes: ∇ Available in Dragon Burn, Retail Version only!
If you close the layout window or quit Dragon Burn, you are prompted to save the settings you have made in the layout window. This is the same as saving a layout, as described in the following section.

C R E A T I N G Y O U R O W N C D
Creating your own CD 55
Creating a Mixed Mode CD Mixed-Mode refers to the combination of CD-ROM and Audio CD formats on the same disc. A Mixed-Mode disc contains one track of CD-ROM data followed by one or more Audio CD tracks. You can use the Mixed Mode CD Layout window to create a Mixed Mode CD.
The options available for the data and audio tracks are the same as the corresponding layout type. The Mixed Mode layout is comprised of a data tab and an audio tab similar to those you have already used when creating a data or audio CDs. While in the data pane you have the same choices of file formats and when creating the audio portion of the layout you have all the same options and control that you had while creating an audio CD.
To use Dragon Burn to create a Mixed Mode CD:
1. If you haven't already done so, start the Dragon Burn application. When you first start Dragon Burn, the Dragon Burn window appears on the screen. If the Dragon Burn window is not currently on the screen, choose New Layout from the File menu.
2. Click the Mixed CD icon on the Custom CD menu to open the “Mixed Mode CD” window. A new, untitled layout window appears.
3. In the Tabs that appear at the top of the Layout window, the Data tab is selected automatically. The Data portion of the layout is used to list the files and folders that will be written onto the CD. There are two ways to choose your files and folders in the Data pane: Drag and drop files and folders from the Finder. Simply drag the files and folders that you want into the Data layout, and release the mouse button. The files and folders that you have selected appear as a scrolling list in the new layout.
or:
Click Add File(s)/Folder(s) button to select files and folders from the Finder. If necessary, click the Open button to add the selected file or folder in the Data layout.
4. The Layout window will display a list of those items that you have added to your data track layout. If you've accidentally added a file or folder that you do not want to include on the CD, click to choose the item, and then click the Remove File(s)/Folder(s) button.
Note:
As you add files and folders to the list, the total combined size of the files and item count appears in the upper-right corner of the data layout window. Make sure that the combined size of the files and folders does not exceed the capacity of your CD media (generally, 1% less than the rated maximum capacity of the CD. For example, if the CD is rated for a maximum of 650MB, you should not try to write more than 644MB).
5. Choose the file system format from the list at the top of any data layout area. See “Specifying File Formats” and “File Format Options” above for more information on the file system setting.
6. If necessary, click the Setup Data Options button to display the ISO-9660 options. Use the General Tab to add Apple Extensions, select the CD-ROM XA format, or specify

C R E A T I N G Y O U R O W N C D
56 Creating your own CD
the Volume Set Name, System Name, Publisher Name and Preparer Name information to the disc.
7. When you are satisfied with the list of files and folders for your new CD, click the Audio tab. The Audio pane is used to define the audio files that will be included in the audio track portion of your Mixed Mode CD. There are two ways to choose the audio files that you want to add to the Audio pane: Drag and drop an audio file icon from the Finder. Simply drag the icon of the audio file onto the Audio pane, and release the mouse button. The audio files that you have selected appear as a scrolling list in the Audio pane. or: Click the Add Audio Track(s) button. Click to choose the file that you want to add, and then click the Open button to add it to the Audio pane.
8. Repeat the previous step for all of the audio files that you want to include on your Mixed Mode CD. When you're finished, the Audio pane shows a list of the files you have selected.
9. You can convert a selected audio track from the layout and save it to your hard drive in any of the supported formats (AIFF, MP3 and Wave). Simply highlight the track to be converted on the layout and click the Convert Audio Format button. You will be prompted for a new file name during the conversion process.
10. You can play a track by selecting it and clicking the play button on the Audio Player. Note:
You can use the playback controls to adjust the volume, play/pause the track and fast forward/reverse the track playback position within the track.
11. Choose the order that you want for the audio files you have selected. To change the order, click on the name of an audio file, and drag it to a different position. Drag the file up to have it appear earlier on the CD; drag the file down to have it appear later on the CD. The audio file that appears at the top of the scrolling list will be the first track of the CD you create.
If you want to remove an audio file that appears in the list, click to select the file, and then click the Remove Audio Track(s) button.
12. Next, choose the Pause time that you want for the individual audio tracks on your custom CD. Click the pop-up menu that appears with each audio track, and choose the Pause time. You can choose from 0 to 10 seconds Pause time between the selected track and the next track.
13. Enter the CD Text information if required. See “Entering CD Text Info” above for additional information on the CD Text capabilities of Dragon Burn.
14. Select the Destination recorder from the Recorder List.
15. Click the Eject button and insert a blank (recordable) piece of media into the drive tray. Click the Eject button a second time to close the drive tray, and make the blank media available for use.

C R E A T I N G Y O U R O W N C D
Creating your own CD 57
Note: You can click the Erase button if you are using rewritable media and need to erase the disc before creating your copy.
16. Click the Burn Disc Options button to start the burning process.
17. At this point, the Burning Options Sheet is displayed with the default options checked or highlighted in blue. See “Options Settings” in the previous chapter for more information about specific option settings.
18. Click either the Burn Session or Disc button to begin the burning process. A progress window appears.
19. When Dragon Burn is finished creating your CD, the completed disc will eject from your recorder. Dragon Burn will display a Status Sheet with any error or other burning information.
At this point, your CD is complete and ready for use. Make sure that Dragon Burn hasn't reported any Errors or Warnings that relate to the disc you've created.
This procedure is complete.
If Errors or Warnings were reported in Step #19, refer to the Troubleshooting section (in Chapter 4: Reference).
Note:
If you close the layout window or quit Dragon Burn, you are prompted to save the settings you have made in the layout window. This is the same as saving a layout, as described in the following section.

C R E A T I N G Y O U R O W N C D
58 Creating your own CD
Creating a CD Extra Disc A Mixed-Mode CD contains data in the first track followed by one or more audio tracks, in a single session. A normal audio CD player attempts to play all tracks in succession. This results in a very loud noise and possible damage when playing a Mixed-Mode CD in a normal CD player. CD Extra, also known as CD Plus or Enhanced CD, is the solution to the above problem. It contains two sessions. The first session contains up to 98 audio tracks and the second session contains a data track written in the CD-ROM XA format.
Playing a CD Extra disc in a normal Audio CD player plays the audio tracks in the first session, and never reads beyond the first session, so the data track is never played and the loud noise and possible damage are avoided. A CD-ROM drive that is able to read a multisession CD, however, reads the last session on the CD, so it finds the data track. The application can then be used to play back the sound.
Again, all options available for the data and audio tracks are the same as the corresponding layout type. A CD Extra layout is comprised of an audio tab and a data tab similar to those you have already used when creating a data or audio CDs. While in the data pane you have the same choices of file formats and when creating the audio portion of the layout you have all the same options and control that you had while creating an audio CD.
To use Dragon Burn to create a CD Extra disc:
1. If you haven't already done so, start the Dragon Burn application. When you first start Dragon Burn, the Dragon Burn window appears on the screen. If the Dragon Burn window is not currently on the screen, choose New Layout from the File Menu.
2. Click the CD Extra icon on the Custom CD menu to open the “CD-Extra” window. A new, untitled layout window appears.
3. The Audio pane is used to define the audio files that will be included in the audio track portion of your CD Extra disc and is selected by default. There are two ways to choose the audio files that you want to add to the Audio pane: Drag and drop an audio file icon from the Finder. Simply drag the icon of the audio file onto the Audio pane, and release the mouse button. The audio files that you have selected appear as a scrolling list in the Audio pane. or: Click the Add Audio Track(s) button. Click to choose the file that you want to add, and then click the Open button to add it to the Audio pane.
4. Repeat the previous step for all of the audio files that you want to include on your Mixed Mode CD. When you're finished, the Audio pane shows a list of the files you have selected.
5. You can convert a selected audio track from the layout and save it to your hard drive in any of the supported formats (AIFF, MP3 and Wave). Simply highlight the track to be converted and click the Convert Audio Format button. You will be prompted for a new file name during the conversion process.

C R E A T I N G Y O U R O W N C D
Creating your own CD 59
6. You can play a track by selecting it and clicking the play button on the Audio Player. Note:
You can use the playback controls to adjust the volume, play/pause the track and fast forward/reverse the track playback position within the track.
7. Choose the order that you want for the audio files you have selected. To change the order, click on the name of an audio file, and drag it to a different position. Drag the file up to have it appear earlier on the CD; drag the file down to have it appear later on the CD. The audio file that appears at the top of the scrolling list will be the first track of the CD you create.
If you want to remove an audio file that appears in the list, click to select the file, and then click the Remove Audio Track(s) button.
8. Next, choose the Pause time that you want for the individual audio tracks on your custom CD. Click the pop-up menu that appears with each audio track, and choose the Pause time. You can choose from 0 to 10 seconds Pause time between the selected track and the next track.
9. Enter the CD Text information if required. See “Entering CD Text Info” above for additional information on the CD Text capabilities of Dragon Burn.
10. When you are satisfied with the list of audio files for your new CD, click the Data tab. The Data pane is used to list the files and folders that will be written onto the CD. There are two ways to choose your files and folders in the Data pane:
Drag and drop files and folders from the Finder. Simply drag the files and folders that you want into the Data layout, and release the mouse button. The files and folders that you have selected appear as a scrolling list in the new layout.
or:
Click Add File(s)/Folder(s) button to select files and folders from the Finder. If necessary, click the Open button to add the selected file or folder in the Data layout.
11. The Layout window will display a list of those items that you have added to your data track layout. If you've accidentally added a file or folder that you do not want to include on the CD, click to choose the item, and then click the Remove File(s)/Folder(s) button.
Note:
As you add files and folders to the list, the total combined size of the files and item count appears in the upper-right corner of the data layout window. Make sure that the combined size of the files and folders does not exceed the capacity of your CD media (generally, 1% less than the rated maximum capacity of the CD. For example, if the CD is rated for a maximum of 650MB, you should not try to write more than 644MB).
12. Choose the file system format from the list at the top of any data layout area. See “Specifying File Formats” and “File Format Options” above for more information on the file system setting.

C R E A T I N G Y O U R O W N C D
60 Creating your own CD
13. If necessary, click the Setup Data Options button to display the ISO-9660 options. Use the General Tab to add Apple Extensions, select the CD-ROM XA format, or specify the Volume Set Name, System Name, Publisher Name and Preparer Name information to the disc.
14. Select the Destination recorder from the Recorder List.
15. Click the Eject button and insert a blank (recordable) piece of media into the drive tray. Click the Eject button a second time to close the drive tray, and make the blank media available for use.
Note: You can click the Erase button if you are using rewritable media and need to erase the disc before creating your copy.
16. Click the Burn Disc Options button to start the burning process.
17. At this point, the Burning Options Sheet is displayed with the default options checked or highlighted in blue. See “Options Settings” in the previous chapter for more information about specific option settings.
18. Click either the Burn Session or Disc button to begin the burning process.
19. When Dragon Burn is finished creating your CD, the completed disc will eject from your recorder. Dragon Burn will display a Status Sheet with any error or other burning information.
At this point, your CD is complete and ready for use. Make sure that Dragon Burn hasn't reported any Errors or Warnings that relate to the disc you've created.
This procedure is complete.
If Errors or Warnings were reported in Step #19, refer to the Troubleshooting section (in Chapter 4: Reference).
Note:
If you close the layout window or quit Dragon Burn, you are prompted to save the settings you have made in the layout window.
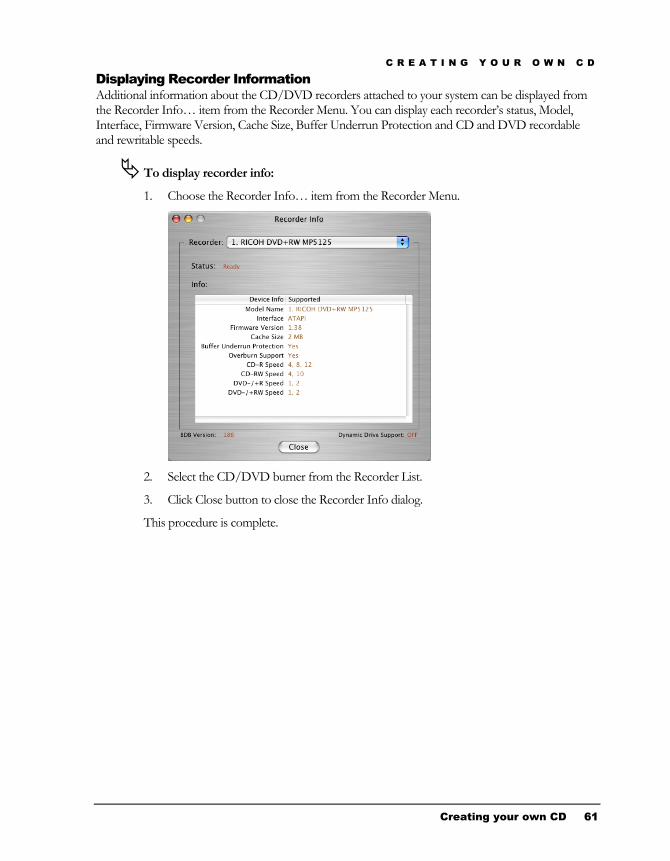
C R E A T I N G Y O U R O W N C D
Creating your own CD 61
Displaying Recorder Information Additional information about the CD/DVD recorders attached to your system can be displayed from the Recorder Info… item from the Recorder Menu. You can display each recorder’s status, Model, Interface, Firmware Version, Cache Size, Buffer Underrun Protection and CD and DVD recordable and rewritable speeds.
To display recorder info:
1. Choose the Recorder Info… item from the Recorder Menu.
2. Select the CD/DVD burner from the Recorder List.
3. Click Close button to close the Recorder Info dialog.
This procedure is complete.
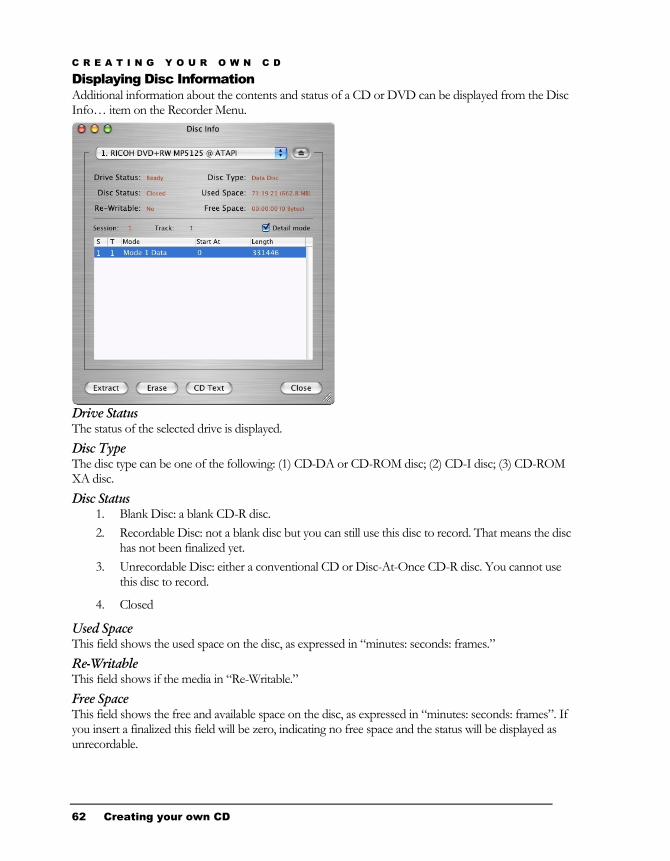
C R E A T I N G Y O U R O W N C D
62 Creating your own CD
Displaying Disc Information Additional information about the contents and status of a CD or DVD can be displayed from the Disc Info… item on the Recorder Menu.
Drive Status The status of the selected drive is displayed. Disc Type The disc type can be one of the following: (1) CD-DA or CD-ROM disc; (2) CD-I disc; (3) CD-ROM XA disc. Disc Status
1. Blank Disc: a blank CD-R disc. 2. Recordable Disc: not a blank disc but you can still use this disc to record. That means the disc
has not been finalized yet. 3. Unrecordable Disc: either a conventional CD or Disc-At-Once CD-R disc. You cannot use
this disc to record.
4. Closed
Used Space This field shows the used space on the disc, as expressed in “minutes: seconds: frames.” Re-Writable This field shows if the media in “Re-Writable.” Free Space This field shows the free and available space on the disc, as expressed in “minutes: seconds: frames”. If you insert a finalized this field will be zero, indicating no free space and the status will be displayed as unrecordable.

C R E A T I N G Y O U R O W N C D
Creating your own CD 63
Session and Track Info This field shows the session number, track number, mode, Start At location and length for each track on the disc.
To display the status of a CD/DVD disc:
1. Choose the Disc Info… item from the Recorder Menu.
2. Select the CD/DVD burner from the Recorder List that contains the disc you wish to check the status.
3. Check the Detail Mode box to see additional details about the disc.
4. Click Close to close the Disc Info dialog.
This procedure is complete.
Erasing Re-Writable Discs If you're working with a Re-Writable disc, Dragon Burn offers the option of erasing any previous data that may be on the disc before making your CD. Be aware that using this option may add considerable time to the process of creating a CD.
To erase the data on a rewritable disc:
1. Choose the Erase Disc… item from the Recorder Menu.
2. Select the Erase Method (Quick or Full).
3. Click the Erase button to erase the disc in the selected drive.
Note:
You can click the Erase button from the Recorder area of any layout type.
This procedure is complete.

Reference 64
Chapter
4
Reference

R E F E R E N C E
Reference 65
Chapter 4 — Topics of discussion
Introduction Contacting NewTech Infosystems, Inc. Troubleshooting
R E F E R E N C E
66 Reference
Introduction This chapter includes Troubleshooting information, a Glossary, and contact information in case you need additional help for using Dragon Burn.
Contacting NewTech Infosystems, Inc. If you have a problem that you cannot resolve, first be sure that you have checked the following:
Reviewed the contents of this User’s Guide
Checked the Troubleshooting section, and tried the suggestions for the various problems listed in that section.
Reviewed the contents of the ReadMe file that appears on the Dragon Burn Software CD-ROM.
If you have Internet access: Refer to our web site at: www.ntius.com
At this site, you will find information about the latest software upgrades and revisions that are available.
Technical Support
To request assistance from our Technical Support department:
1. Via Email: [email protected]
Hours: Monday - Friday, 8:00 AM - 5:00 PM (PST)
R E F E R E N C E
Reference 67
Troubleshooting This section includes troubleshooting information: a series of common questions that relate to the operation of Dragon Burn, and the answers to those questions.
Before you tackle any of the Troubleshooting issues that appear in this section, you should take a moment to review the procedures that appear in this User’s Guide. Frequently, what appears to be a problem can easily be solved by carefully following the directions that appear in the procedures.
My CD-writer doesn't appear in the list of available devices. Make sure that you have turned on the power for your CD-writer. Make sure that the CD-
writer is connected to an appropriate power source. Check to make sure that your CD-writer is correctly connected to your Macintosh system.
If you’re using an internal CD-writer, check that the ribbon cable is firmly seated onto the back of the CD-burner and that you have connected the power cable to the CD-writer. If you’re using an external CD-writer, check that the data cable is firmly connected to your Macintosh, and (the other end) to your CD-writer. With an external SCSI CD-writer, you also need to make sure that the SCSI ID number is set correctly, and that the SCSI termination is correct for your CD-writer. Refer to the Owner’s Manual supplied with your SCSI CD-writer for SCSI ID and SCSI termination information.
Disc is not ready Press the Eject button on your CD-writer, and make sure that a blank CD is inserted in the
CD-writer. Press the Eject button a second time to pull the blank CD into the CD-writer. Try a different blank CD. Sometimes, errors in the CD media can result in a “disc not ready”
message. Check the connections for your CD-writer. A loose connection can result in a “disc not
ready” message. Check the CD-writer. If the manufacturer of the CD-writer included diagnostic software, use
that software to confirm that the CD-writer is connected correctly, and is functioning properly.
Error Log Try the process again, with a blank CD media. Defective CD media can result in this type of
message. The CD-writer may be set at too high a speed. As you record a CD, the Progress window has
a green bar that shows the amount of memory buffer space available. If that bar recedes completely to the left and disappears, the CD-writer has written data to the disc faster than it could be replenished from the source. Recording at a lower speed usually solves this problem. You may need to use a lower recording speed if any of the following are different from your normal use of Dragon Burn: Different source device. If you choose a different data source device, the device may not be able to deliver data at the speed necessary to write to the CD. For example, an Iomega Zip drive transfers data at a much lower speed than a hard disk drive.
R E F E R E N C E
68 Reference
Different media. Different brands of blank CD media have different speed capabilities. Make sure the packaging indicates that the media is rated for the recording speed that you have set in the Options pane. Also, be aware that CD-RW (re-writable media) requires a much lower speed than CD-R
If you’re making a CD copy from your CD-ROM drive, try making a Disk Image File. The Disk Image File will be on your hard disk drive, which is many times faster than any CD-ROM drive.
If you’re making a copy of a CD, the source CD may be copy protected. In this case, Dragon Burn cannot make a copy of the source CD.
Glossary 69
Glossary AIFF AIFF stands for Audio Interchange File Format. It was developed by Apple Computer, Inc. for storing sounds on a computer. AIFF is a flexible file format, allowing for arbitrary sampling rates, sample size, number of channels, and application-specific formats that may be ignored by other file formats. Dragon Burn supports the AIFF file format only for 44KHz, 16-bit stereo sound files.
Blank Media Refers to CD media that can be recorded. Blank media is available in two types: CD-R (that can only be recorded once), and CD-RW (that can be recorded, and then re-recorded with different data).
CD-DA A CD-DA (Audio CD) disc contains tracks with Audio only. This type of disc is defined by the Red Book format standard.
CD Extra CD Extra, also known as CD Plus or Enhanced CD, includes two sessions with the first session containing up to 98 audio tracks and the second session containing a data track written in the CD-ROM XA format.
CD Media The CD media is the round plastic disc that fits into your CD-ROM or CD-writer drive.
Disc-At-Once With Disc-At-Once writing mode, the CD-Recorder laser will not stop until the whole disc recording is finished. In this writing mode, the disc will be closed and there are no link blocks between any two tracks.
Disc-At-Once A video format for displaying full-length digital movies. Unlike DVD-ROMs, the Digital-Video format includes a Content Scrambling System (CSS) to prevent users from copying discs. This means that older DVD-ROM players cannot play DVD-Video discs without a software or hardware upgrade to decode the encrypted discs.
Hybrid
A CD that contains two (or more) separate areas, where each area has a different file format. As used with CDs, this usually means an area with Windows-type files, and an area with Macintosh-type files. Such a disc can be used with either type of computer.
ISO-9660 Format
A standard CD format that is widely used by Windows-based computers. Macintosh computers can also read CDs that are written in this format.

G L O S S A R Y
70 Glossary
Joliet Microsoft implemented the Joliet file system. It is based on the ISO9660 level 3 standard. A CD created under the Joliet file system can only be read back under Windows 95 and Windows NT 4.0 or later. The number of characters allowed in a long file name is up to 64 and the number of characters allowed in a long directory is up to 64 characters. However, the total number of characters of the long file name plus its full path cannot exceed 120.
Lead-In Area This is a piece of information, laying before each session that contains the TOC (Table of Contents) and other miscellaneous information about the disc and about the recorded tracks.
Lead-Out Area To indicate the end of a session, it is closed with an ending, called the Lead-Out.
Mixed Mode CD A Mixed Mode CD contains a combination of CD-ROM tracks and CD-DA tracks. A Mixed Mode disc has a CD-ROM track as the first track and CD-DA on the following tracks.
MPEG-1, Layer 3 (.mp3) MPEG-1, Layer 3, or MP3 as it is more commonly known, is the portion of the MPEG-1 specification dealing with the recording of audio information to a file. This standard is gaining popularity on the Internet. Currently, most CD drives will not play this audio format directly.
MPEG-1 A video compression algorithm that is part of the Video CD standard. The algorithm was developed by the Motion Pictures Experts Group (MPEG). MPEG-1 effectively compresses the video picture to about 1/140 of its original size. The typical MPEG-1 video has parameters of 30 SIF pictures (352 pixels x 240 lines) per second and a bit rate less than 1.86 megabits/sec
MPEG-2 A video compression algorithm that is part of the DVD-Video, Digital Broadcast Satellite, and Digital TV (including HDTV) standard. The algorithm is developed by the Motion Pictures Experts Group (MPEG). MPEG-2 effectively compresses the video picture to about 1/40 of its original size. The MPEG-2 Video Standard specifies the coded bit stream for high-quality digital video. As a compatible extension, MPEG-2 Video builds on the completed MPEG-1 Video by supporting interlaced video formats and a number of other advanced features, including HDTV support.
Session Session refers to data written to a CD during the span of a single recording. It is an area on the disc that consists of a Lead-In Area, a Program Area and a Lead-out Area.
Session-At-Once With Session-At-Once writing mode, the CD-Recorder’s laser does not stop until the all data from the current session is written to disc. Session-At-Once is related to the process of recording multisession discs. See Multisession.
Super Video CD A Super Video CD disc may include video clips, converted from MPEG-2 files. Video clips must conform to the MPEG-2 (ISO 13818-1, 1994) specification.

G L O S S A R Y
Glossary 71
Table of Contents (TOC) The Table of Contents (TOC) contains information about the disc and tracks. When you close the current session, the Table of Contents will be written in the Lead-In Area. With an unfinished recording of the disc, however, the TOC cannot be written to the disc.
Track-At-Once With Track-At-Once writing mode, the CD-Recorder will record one track at a time. In between every track, the CD-Recorder’s laser stops while the hard disk prepares the contents of the next track.
Universal Disk Format (UDF) 1.5 The Universal Disk Format is a file system for optical media developed by the Optical Storage Technology Association (OSTA). It was designed for read-write interoperability between all the major operating systems as well as compatibility between rewritable and write-once media. UDF supports file names up to 255 bytes long (Up to 127 Unicode characters).
Video CD A Video CD disc may include video clips, converted from MPEG files. Video clips must conform to the MPEG for Video CD specification, as defined by the White book format standard.
Wave A Wave (.wav) file is a file that stores analog signals (sounds) in a digital format that can be interpreted by a computer.
Burn Disc With Dragon Burn, the Burn Disc button writes the selected files onto the CD media, and includes special coding so that the resulting CD is completely filled and cannot be used again. Even if you select only a few small files, the Burn Disc button will code the CD in such a way that it cannot hold any more data.
Burn Session Burn Session differs from Burn Disc in that it commands Dragon Burn to write the selected files as a “session” leaving space available on the CD for subsequent session(s). If a CD has multiple sessions, each session will appear in the Finder with a separate icon. With the Burn Session button, you can create any number of sessions on a CD (up to the limit of available free space on the media).


Index 73
Index Dragon Burn Basics ........................................6
A Dragon Burn Multi-Burning Engine ...............6 Dragon Burn Preferences ..............................13
About Copying CDs and DVDs.................... 19 E AIFF .............................................................69
B Editing the Layout Filter List ..........................8 Entering CD Text Information ......................39
Blank Media .................................................69 Erasing Re-Writable Discs............................63 Burn Disc......................................................71 Extracting Audio Files ..................................40 Burn Session .................................................71
F C Features...........................................................3
CD Extra.......................................................69 File Format Options ......................................34 CD Media .....................................................69
G CD/DVD Copy Overview.............................20 CD/DVD Copy Procedure ............................20
Glossary ........................................................69 CD-DA .........................................................69 Changing the Play Sequence.........................42
H Creating a CD Extra Disc .............................58 Creating a CD/DVD with a Disc Image File.27
How to Use This Guide...................................3 Creating a Data CD/DVD .............................31 Hybrid ...........................................................69 Creating a DVD-Video Disc.........................45
Creating a Live Audio CD ............................52 I Creating a Mixed Mode CD..........................55 Creating a MP3 CD ......................................47 Importing an iTunes Playlist .........................38 Creating a NTI Disc Image File from a
CD/DVD ...................................................26 ISO-9660 Format ..........................................69
J Creating a Picture CD...................................49 Creating a SVCD Movie CD ........................43
Joliet..............................................................70 Creating a VCD Movie CD...........................40 Creating an Audio CD ..................................36 L Creating an ISO Image File from a CD/DVD
..................................................................25 Lead-In Area .................................................70 Lead-Out Area ..............................................70 D
M Device Manager..............................................6 Disc Info Mixed Mode CD ...........................................70
Disc Status.................................................62 MPEG-1, Layer 3 (.mp3) ........................70, 71 Disc Type...................................................62 Multiple Copy Procedure ..............................23 Drive Status...............................................62
N Free Space.................................................62 Re-Writable ...............................................62 Used Space ................................................62 Ninety-Nine (99) Minute Media ...................16
Disc Info O Session and Track Info ..............................63
Disc-At-Once................................................69 Opening a Saved Layout ...............................35 Displaying Disc Information.........................62 Options Settings............................................22 Displaying Recorder Information .................61 Overburning™ ..............................................16

G L O S S A R Y
P Preferences
Cache Tab ................................................. 14 General Tab............................................... 13 MP3 Tab.................................................... 15 Overburn Tab ............................................ 15 Progress Bar Tab....................................... 14
Previewing a Video Clip............................... 42 Printing Labels with Dragon Burn................ 12
R Registering with the Gracenote CDDB Service
.................................................................. 39
S Saving a CD/DVD Layout............................ 35 Session.......................................................... 70 Session-At-Once........................................... 70 Setting the Layout Filter ................................. 7 Software Installation....................................... 5 Specifying File Formats................................ 34 Starting Dragon Burn.................................... 19 Super Video CD ........................................... 31 Supported CD Format Types ........................ 31 System Requirements ..................................... 5
T Table of Contents (TOC) .............................. 71 Technical Support ...................................... 66 The Audio CD Layout .................................. 10 The Data CD/DVD Layout ............................. 9 The Video CD Layout .................................. 11 Track-At-Once.............................................. 71 Troubleshooting............................................ 67
U Universal Disk Format (UDF) 1.5 ................ 71 Using Disc Image Files................................. 25 Using Layout Filtering.................................... 7 Using the Gracenote CDDB Service............. 39
V Video CD...................................................... 31
W Wave............................................................. 71 Working with Layouts .................................... 7
74 Glossary