neo angle shower enclosure - kitchen faucets, · neo angle shower enclosure limited warranty ......
TRANSCRIPT
1
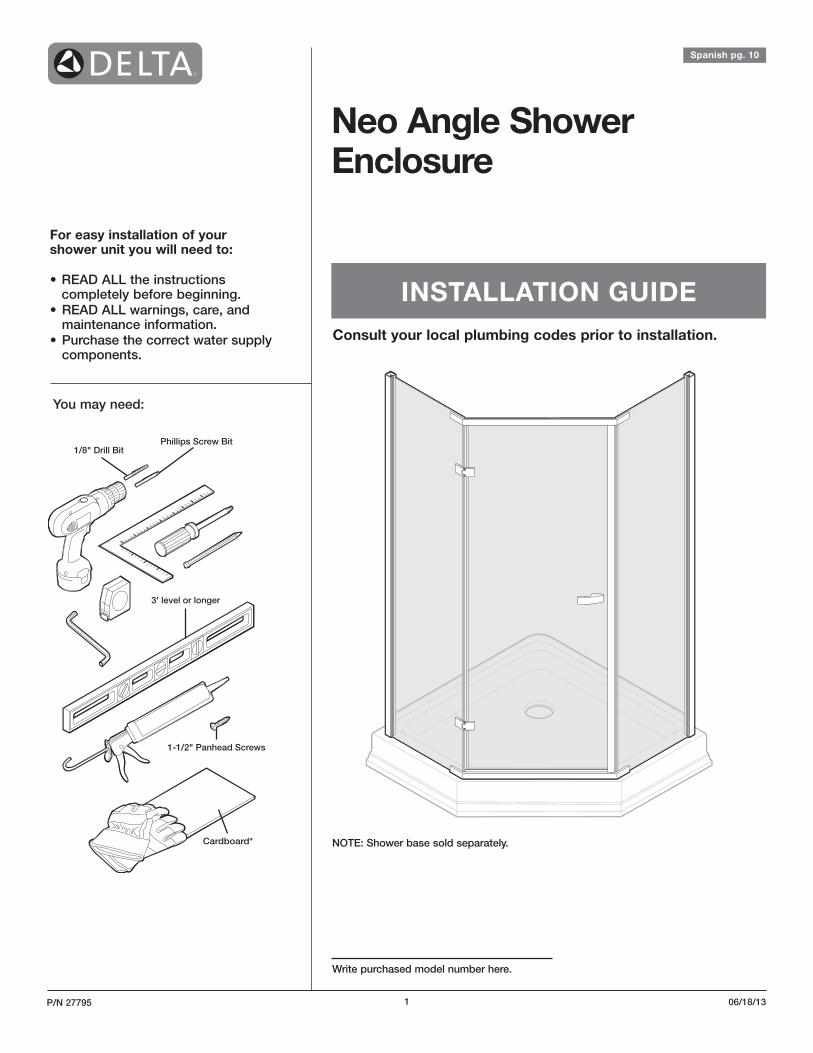
Neo Angle ShowerEnclosure
For easy installation of your shower unit you will need to:
• READ ALL the instructions completely before beginning.
• READ ALL warnings, care, and maintenance information.
• Purchase the correct water supply components.
Write purchased model number here.
06/18/13 P/N 27795
Consult your local plumbing codes prior to installation.
You may need:
1/8" Drill BitPhillips Screw Bit
3' level or longer
1-1/2" Panhead Screws
Cardboard*
INSTALLATION GUIDE
Spanish pg. 10
NOTE: Shower base sold separately.
2
Neo Angle Shower Enclosure Limited Warranty
All parts and finishes of the Delta® shower unit are warranted to the original consumer purchaser to be free from defects in material and workmanship for the time periods listed below. Delta recommends using a professional plumber for all installation and repair. Delta will replace, FREE OF CHARGE, during the warranty period, any part or finish that proves defective in material and/or workmanship under normal installation, use and service for the time period listed below: • Non-residential or commercial application - 3 years • Residential applications - 10 years
This warranty is extensive in that it covers replacement of all defective parts and even finish, but these are the only two things that are covered. LABOR CHARGES AND/OR DAMAGE INCURRED IN INSTALLATION, REPAIR, OR REPLACEMENT, AS WELL AS ANY OTHER KIND OF LOSS OR DAMAGE ARE EXCLUDED. Proof of purchase (original sales receipt) from the original consumer purchaser must be made available to Delta for all warranty claims. THIS IS THE EXCLUSIVE WARRANTY BY DELTA, WHICH DOES NOT MAKE ANY OTHER WARRANTY OF ANY KIND, INCLUDING THE IMPLIED WARRANTY OF MERCHANTABILITY.
Some states do not allow the exclusion or limitation of incidental or consequential damages, so the above limitation or exclusion may not apply to you. Any damages to this product as a result of misuse, abuse, or neglect WILL VOID THE WARRANTY.
This warranty gives you specific legal rights, and you may also have other rights which vary from state to state. It applies only to Delta® Shower Units installed in the United States of America, Canada and Mexico.
If you have any questions regarding technical support, installation or concerns regarding our warranty plan, please view our Warranty Frequently Asked Questions at www.deltafaucet.com/bathingsystems, email us at [email protected], or call 1-877-430-5315.
DISCLAIMER: IMPLIED WARRANTIES, INCLUDING THOSE OF MERCHANTABILITY AND FITNESS FOR PARTICULAR PURPOSE, ARE LIMITED TO THE DURATION OF THIS WARRANTY. Some states do not allow limitations on how long an implied warranty lasts, so the above limitation may not apply to you. TO THE EXTENT PERMITTED BY LAW, THIS WARRANTY DOES NOT COVER SPECIAL, INCIDENTAL OR CONSEQUENTIAL DAMAGES (SUCH AS LABOR EXPENSES) WHETHER ARISING OUT OF BREACH OF WARRANTY, BREACH OF CONTRACT, TORT, OR OTHERWISE. Some states do not allow the exclusion or limitation of incidental or consequential damages, so the above limitation of exclusion may not apply to you. This warranty gives you specific legal rights, and you also may have other rights which vary from state to state. This warranty is not transferable. This warranty does not cover damage or defects relating to misuse, abuse, negligence, normal wear and tear, accident, acts of God, repairs or alterations not authorized in writing by Delta, or improper installation, storage or handling.
2
IMPORTANT: Shower units are designed to be installed in new and/or existing construction. For the best protection of the unit, it is recommended that the unit not be removed from the packaging until ready for installation.
• When disassembling unit, save hardware and take care not to damage edges of unit.
For regular cleaning use ONLY mild detergents or warm, soapy water. Use ONLY non-abrasive cloth or sponge. ALWAYS rinse surfaces after cleaning.
Before cleaning this product with cleaning products, test a small, inconspicuous area.
CAUTION: Manufacturer does not recommend the use of cleaning products that contain any of the following chemicals. Use of products containing these chemicals can cause the products to crack or discolor and will void the warranty.
• Naphtha• Amyl Acetate• Hydrogen Peroxide Solution (common household peroxide)• Toulene• Ethyl Acetate• Lye (common in drain cleaner)• Acetone
For further inquiries, contact customer service at [email protected], or call 1-877-430-5315.
IMPORTANT: If the building owner or homeowner elects to use a RUBBER FLOOR MAT with suction cups or a standard RUBBER FLOOR MAT in their shower unit, it is recommended that the mat be removed after each shower, the shower wiped dry, and the rubber mat allowed to dry before re-use. A mat of this type may cause fungus or mold to grow under the suction cups, and damage in the form of surface blisters in the bottom of the shower following prolonged use if not dried properly.
LIMITED WARRANTY
BEFORE YOU START
CARE AND CLEANING

3
Stationary Glass Panelx2
Strike Side Magnetic Gasket
Magnetic Door Gasket
Door Hingex2
Door Hinge Gasketx2
Door Hinge Bracketx2
Wall Jambx2Glass Support
x2
Support Bracketx4
Inner Support Gasketx4
Outer Support Gasketx4
Handlex2
Hinge Side Gasket
Door SweepGasket
Glass Door
Handle Gasketx2
Shower eNCLoSUre ASSembLy
4
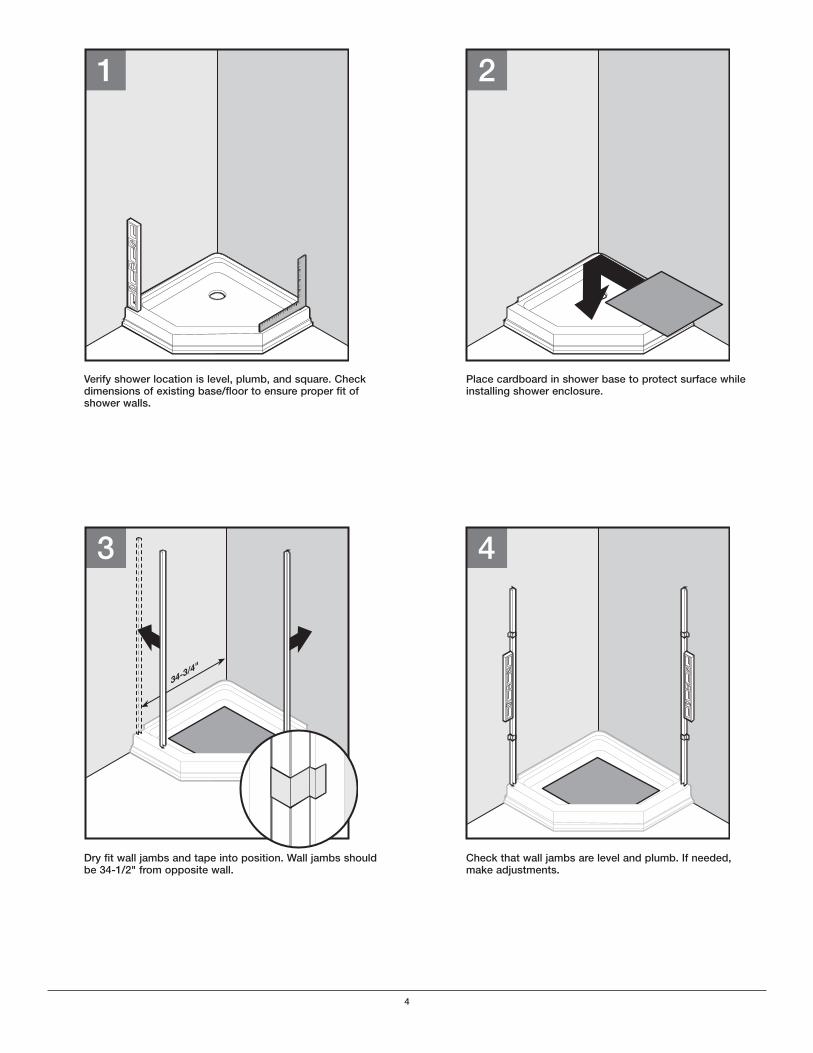
Check that wall jambs are level and plumb. If needed, make adjustments.
Dry fit wall jambs and tape into position. Wall jambs should be 34-1/2" from opposite wall.
Place cardboard in shower base to protect surface while installing shower enclosure.
Verify shower location is level, plumb, and square. Check dimensions of existing base/floor to ensure proper fit of shower walls.
4
34-3/4"
3
21
5
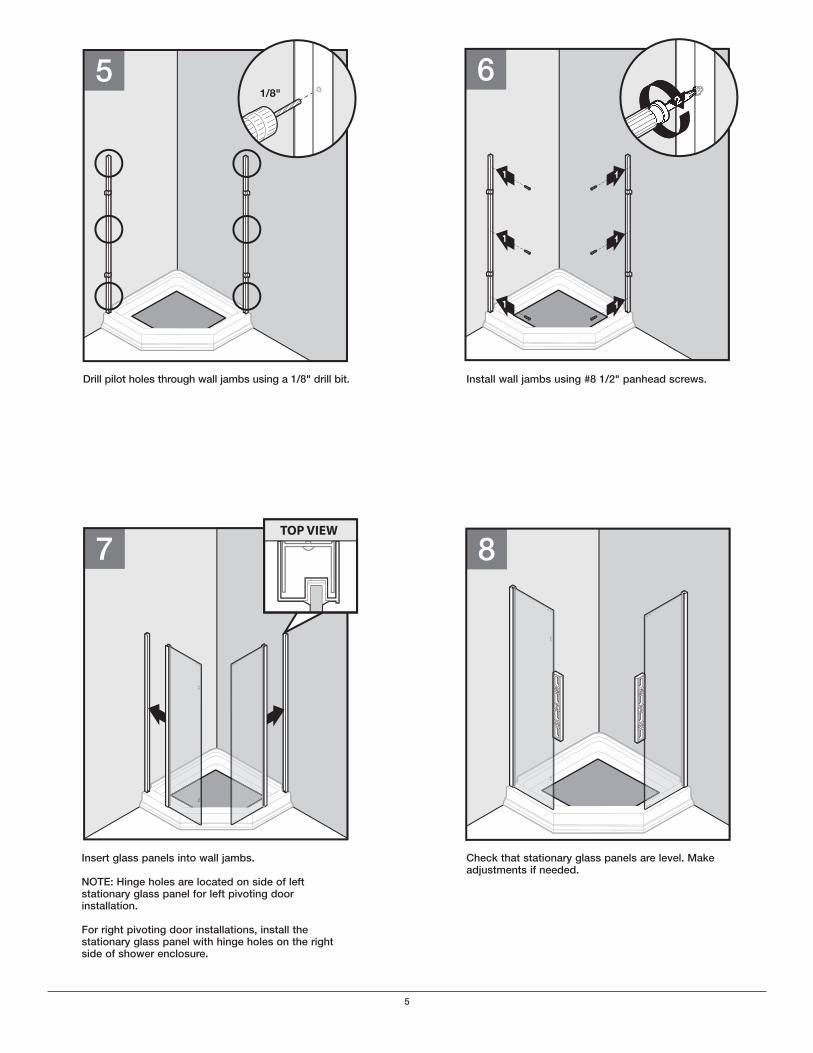
Drill pilot holes through wall jambs using a 1/8" drill bit. Install wall jambs using #8 1/2" panhead screws.
Insert glass panels into wall jambs.
NOTE: Hinge holes are located on side of left stationary glass panel for left pivoting door installation.
For right pivoting door installations, install the stationary glass panel with hinge holes on the right side of shower enclosure.
Check that stationary glass panels are level. Make adjustments if needed.
51/8"
7TOP VIEW
8
1
1
1
1
1
1
6

6
Attach hinges to stationary glass panel using a gasket on both sides of glass, two hinge brackets, and four screws.
Attach glass door to stationary glass panel using a gasket on both sides of glass, two hinge brackets, and four screws.
2
3
111
1
2
1
1
12
Install bottom glass support using a gasket on both sides of glass, two support brackets, and four screws.
NOTE: Apply a bead of caulk to the underside of the glass support prior to installing it.
Install top glass support using a gasket on both sides of glass, two support brackets, and four screws.
109

7
Attach magnetic door gasket to door. Make sure that the bottom of the magnetic gasket overlaps the sweep gasket.
Attach door sweep to bottom of glass door. Make sure that the ends of the gasket are flush with the glass.
Attach a gasket and the inner door handle to glass door. Tighten set screws in handle to secure.
Attach outer door handle to glass door using a gasket and two screws.
1
2
3
1615
1
14
2
1
13
2
8
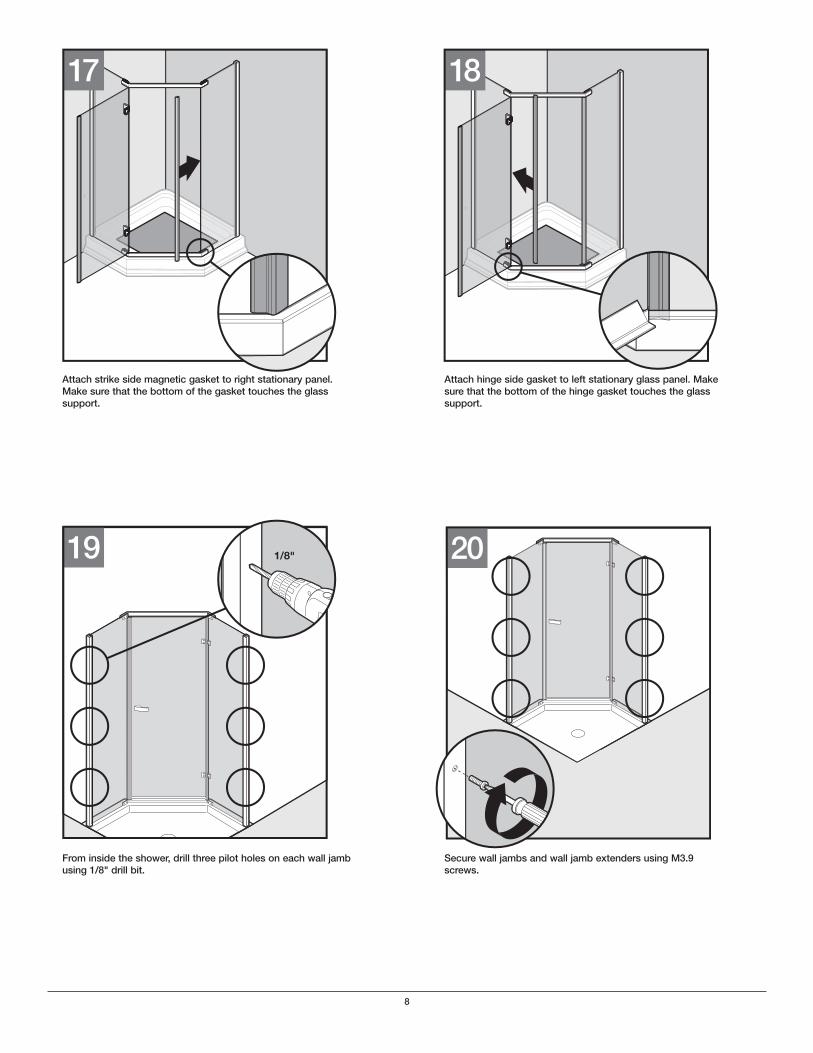
Secure wall jambs and wall jamb extenders using M3.9 screws.
From inside the shower, drill three pilot holes on each wall jamb using 1/8" drill bit.
Attach hinge side gasket to left stationary glass panel. Make sure that the bottom of the hinge gasket touches the glass support.
Attach strike side magnetic gasket to right stationary panel. Make sure that the bottom of the gasket touches the glass support.
19 1/8" 20
1817
9
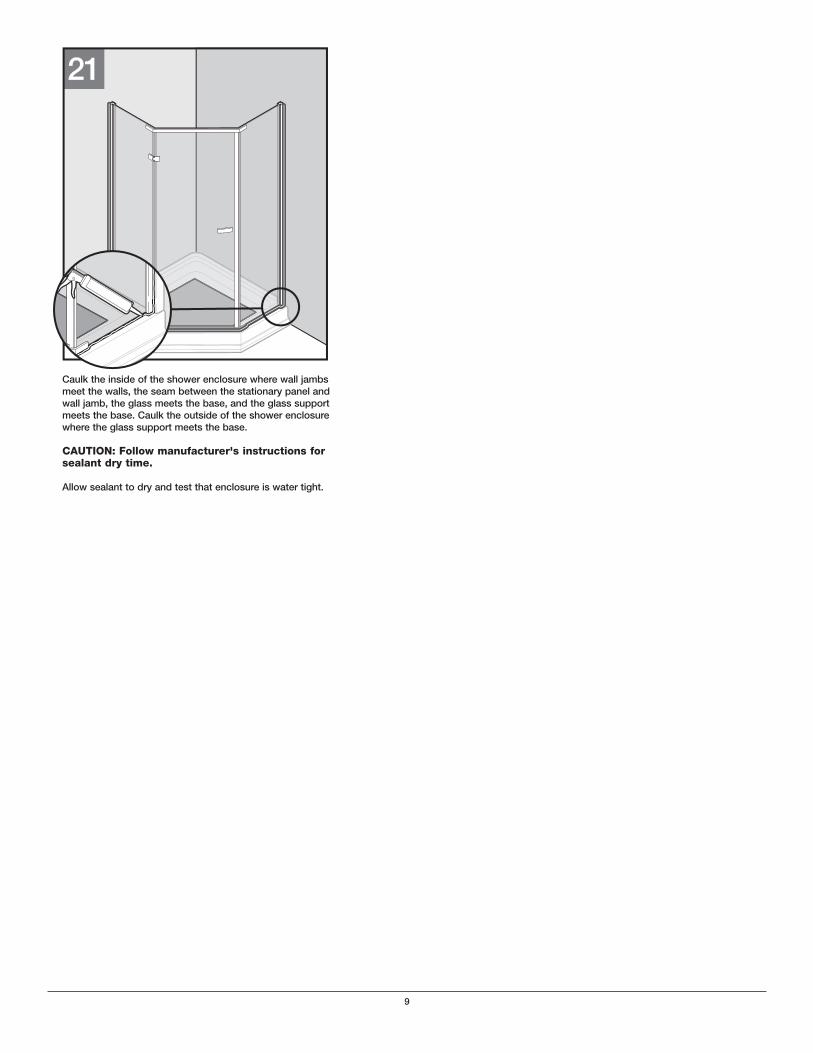
Caulk the inside of the shower enclosure where wall jambs meet the walls, the seam between the stationary panel and wall jamb, the glass meets the base, and the glass support meets the base. Caulk the outside of the shower enclosure where the glass support meets the base.
CAUTION: Follow manufacturer's instructions for sealant dry time.
Allow sealant to dry and test that enclosure is water tight.
21
10
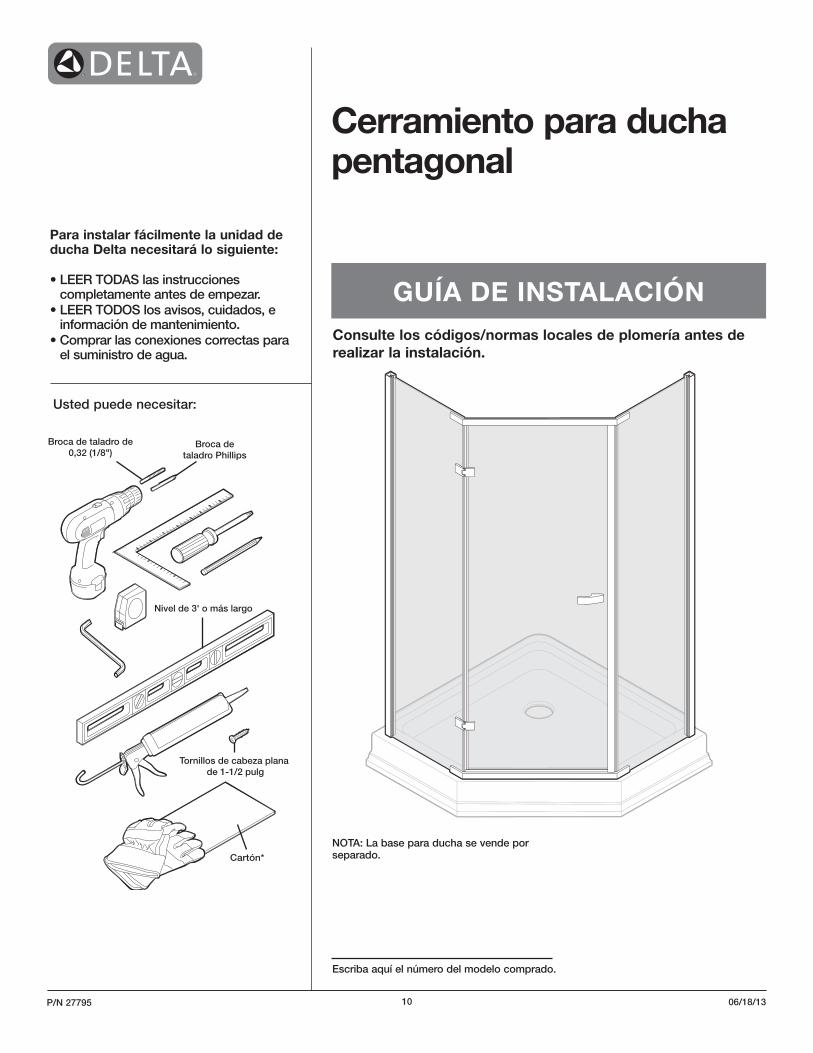
Cerramiento para ducha pentagonal
Para instalar fácilmente la unidad deducha Delta necesitará lo siguiente:
• LEER TODAS las instrucciones completamente antes de empezar.
• LEER TODOS los avisos, cuidados, e información de mantenimiento.
• Comprar las conexiones correctas para el suministro de agua.
Escriba aquí el número del modelo comprado.
06/18/13 P/N 27795
Consulte los códigos/normas locales de plomería antes de realizar la instalación.
Usted puede necesitar:
Broca de taladro de0,32 (1/8")
Broca detaladro Phillips
Nivel de 3' o más largo
Tornillos de cabeza plana de 1-1/2 pulg
Cartón*
GUÍA DE INSTALACIÓN
NOTA: La base para ducha se vende por separado.
11
Garantía limitada del cerramiento para ducha pentagonal
Toutes les pièces et finitions des douches Delta® acryliques avec technologie Innovex® sont garanties au client acheteur d’origine comme étant exemptes de défauts de matériel et de fabrication pendant les périodes indiquées ci-dessous. Delta recommande l’emploi d’un plombier professionnel pour toute installation ou réparation. Delta remplacera, GRATUITEMENT, pendant la durée de la garantie, toute pièce ou tout fini révélant un défaut de matériau et/ou de fabrication conformément à une installation, une utilisation et un entretien normaux pendant la période stipulée ci-dessous :
• Application commerciale ou non résidentielle - 3 ans • Applications résidentielles - 10 ans
Esta garantía es extensa, ya que cubre el reemplazo de todas las piezas e incluso de los acabados defectuosos, pero estos son los únicos dos aspectos cubiertos. SE EXCLUYEN DE LA GARANTÍA TODOS AQUELLOS GASTOS DE MANO DE OBRA Y/O LOS DAÑOS PRODUCTO DE LA INSTALACIÓN, LA REPARACIÓN O EL REEMPLAZO, ASÍ COMO TAMBIÉN CUALQUIER OTRO TIPO DE PÉRDIDA O DAÑO. En caso de presentar un reclamo cubierto por la garantía, el comprador (consumidor) original debe presentar una prueba de compra (recibo original de la compra) ante Delta. ÉSTA ES LA GARANTÍA EXCLUSIVA DE DELTA, QUE NO HACE NINGUNA OTRA GARANTÍA DE NINGUNA CLASE, INCLUIDA LA GARANTÍA IMPLÍCITA DE COMERCIALIZACIÓN.
Algunos estados no autorizan la exclusión o limitación de daños incidentales o derivados; por tanto, puede que las limitaciones o exclusiones anteriormente descritas no sean válidas en su caso. Todo da-ño que sea consecuencia del uso indebido, abuso o negligencia, ANULARÁ LA GARANTÍA.
Esta garantía le otorga al comprador del producto derechos legales específicos, y es posible que dicho comprador tenga otros derechos que varían de un estado a otro. Aplica sólo a las bases de bañera y ducha Delta instaladas en Estados Unidos, Canadá y México.
Si tiene dudas sobre el servicio técnico o la instalación, o tiene preocupaciones relativas al plan de garantía, vea nuestras Preguntas frecuentes sobre la garantía en www.deltafaucet.com, envíenos un mensaje de correo electrónico a [email protected] o llame al 1-877-430-5315.
EXENCIÓN DE RESPONSABILIDAD: LAS GARANTÍAS IMPLÍCITAS, INCLUIDAS AQUELLAS DE COMERCIALIZACIÓN E IDONEIDAD PARA UN FIN DETERMINADO, SE LIMITAN A LA DURACIÓN DE ESTA GARANTÍA. Algunos estados no autorizan las limitaciones en cuanto a la duración de una garantía implícita; por tanto, puede que las limitaciones anteriormente descritas no sean válidas en su caso. HASTA EL GRADO PERMITIDO POR LA LEY, ESTA GARANTÍA NO CUBRE DAÑOS ESPECIALES, INCIDENTALES NI RESULTANTES (TALES COMO LOS GASTOS DE MANO DE OBRA), PRODUCTO DEL INCUMPLIMIENTO DE LA GARANTÍA, INCUMPLIMIENTO DEL CONTRATO, PERJUICIO O INCUMPLIMIENTO SIMILAR. Algunos estados no autorizan la exclusión o limitación de daños incidentales o resultantes; por tanto, puede que las limitaciones o exclusiones anteriormente descritas no sean válidas en su caso. Esta garantía le otorga al comprador del producto derechos legales específicos, y es posible que dicho comprador tenga otros derechos que varían de un estado a otro. Esta garantía no es transferible. La presente garantía no cubre los daños o defectos que surjan del uso indebido, el abuso, la negligencia, el desgaste y las rasgaduras nor-males, los accidentes, los desastres naturales, las reparaciones o las modificaciones no autorizadas que no cuenten con una autorización por escrito de Masco Bath, ni de la instalación, el almacenamiento o la manipulación inadecuados.
ANTES DE COMENzAR
IMPORTANTE: Las unidades de ducha están diseñadas para instalarse en construcciones nuevas o existentes. Para una mejor protección de la unidad, se recomienda no quitarla del empaque hasta que esté lista para su instalación.
• Deben instalarse las cañerías y la base antes de instalar el panel.
CUIDADO Y LIMpIEzA
Para la limpieza periódica, use ÚNICAMENTE detergentes suaves o agua tibia con jabón. Aplíquelos ÚNICAMENTE con un paño o esponja no abrasivo. Siempre enjuague las superficies luego de la limpieza.
Antes de limpiar este artículo con productos de limpieza, haga una prueba en un área pequeña y poco visible.
PRECAUCIÓN: el fabricante no recomienda el uso de productos de limpieza que contengan cualquiera de las siguientes sustancias químicas. El uso de productos que contengan estas sustancias químicas puede hacer que los artículos se rompan o decoloren, lo que lleva a la anulación de la garantía.
• Nafta• Acetato de amilo• Solución de peróxido de hidrógeno (el peróxido común de uso doméstico)• Tolueno• Acetato de etilo• Lejía (se usa normalmente como limpiador de tuberías) • Acetona
Si tiene más consultas, comuníquese con el servicio de atención al cliente escribiendo a [email protected] o llamando al 1-877-430-5315.
IMPORTANTE: si el propietario de la vivienda o inquilino opta por utilizar una ALFOMBRA DE GOMA PARA PISO con ventosas o una ALFOMBRA DE GOMA PARA PISO estándar en la ducha, se recomienda quitar la alfombra luego de cada uso, secar la ducha y poner la alfombra a secar antes de un nuevo uso. Una alfombra de este tipo puede ocasionar la formación de hongos o moho debajo de las ventosas y dañar las ampollas de la superficie en la parte inferior de la ducha luego de un uso prolongado si no se seca adecuadamente.
11
GARANTíA LIMITADA
12
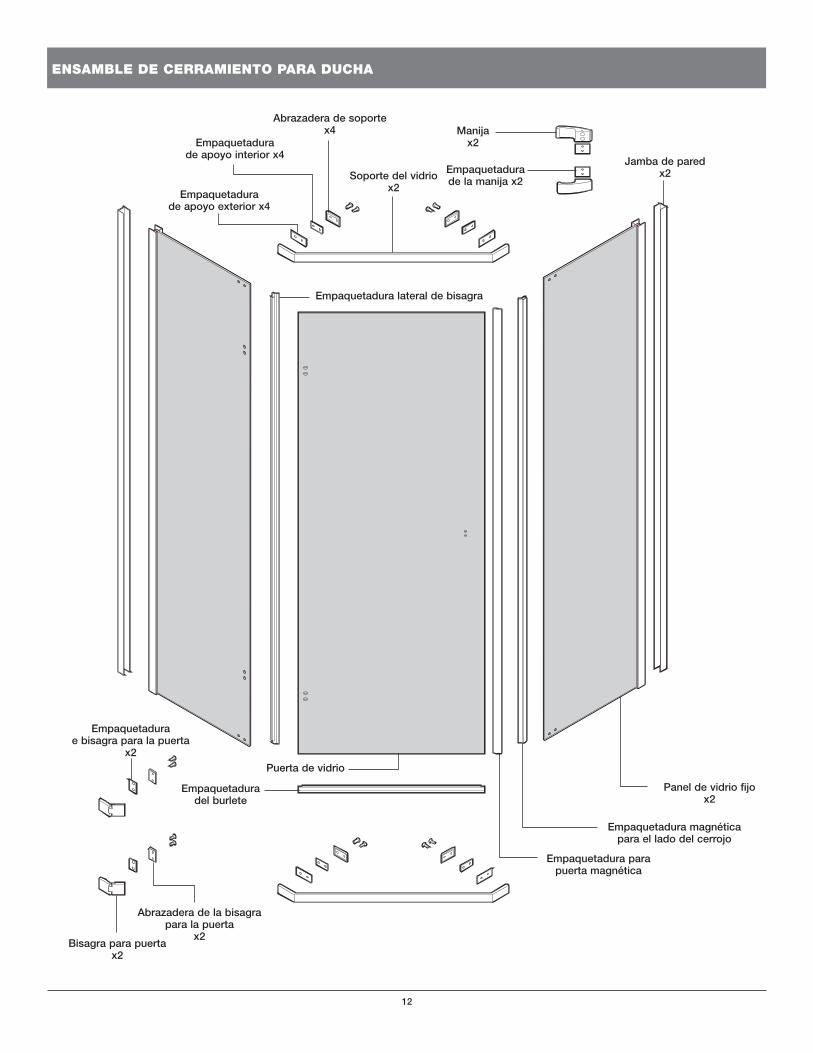
Panel de vidrio fijox2
Empaquetadura magnética para el lado del cerrojo
Empaquetadura para puerta magnética
Bisagra para puertax2
Empaquetadura e bisagra para la puerta
x2
Abrazadera de la bisagra para la puerta
x2
Jamba de pared x2Soporte del vidrio
x2
Abrazadera de soporte x4
Empaquetadura de apoyo interior x4
Empaquetadura de apoyo exterior x4
Manija x2
Empaquetadura lateral de bisagra
Empaquetadura del burlete
Puerta de vidrio
Empaquetadura de la manija x2
eNSAmbLe de CerrAmieNto pArA dUChA
13
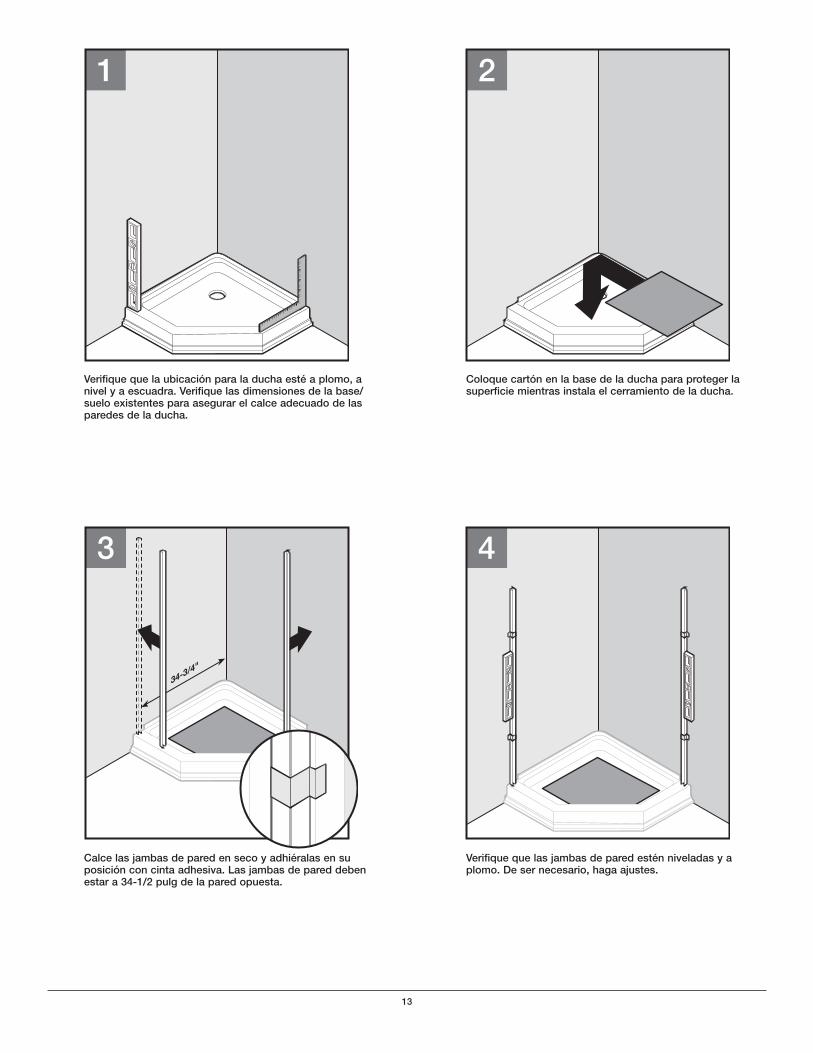
Verifique que las jambas de pared estén niveladas y a plomo. De ser necesario, haga ajustes.
Calce las jambas de pared en seco y adhiéralas en su posición con cinta adhesiva. Las jambas de pared deben estar a 34-1/2 pulg de la pared opuesta.
Coloque cartón en la base de la ducha para proteger la superficie mientras instala el cerramiento de la ducha.
Verifique que la ubicación para la ducha esté a plomo, a nivel y a escuadra. Verifique las dimensiones de la base/suelo existentes para asegurar el calce adecuado de las paredes de la ducha.
4
34-3/4"
3
21
14
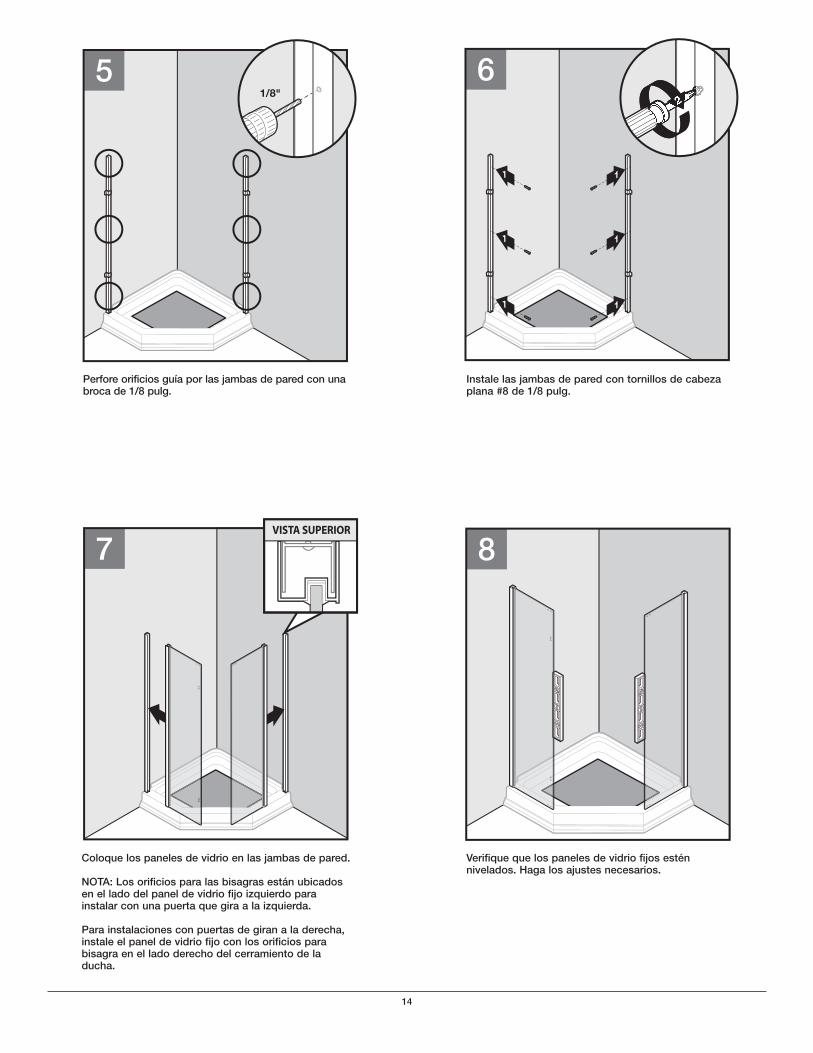
Perfore orificios guía por las jambas de pared con una broca de 1/8 pulg.
Instale las jambas de pared con tornillos de cabeza plana #8 de 1/8 pulg.
Coloque los paneles de vidrio en las jambas de pared.
NOTA: Los orificios para las bisagras están ubicados en el lado del panel de vidrio fijo izquierdo para instalar con una puerta que gira a la izquierda.
Para instalaciones con puertas de giran a la derecha, instale el panel de vidrio fijo con los orificios para bisagra en el lado derecho del cerramiento de la ducha.
Verifique que los paneles de vidrio fijos estén nivelados. Haga los ajustes necesarios.
51/8"
7VISTA SUPERIOR
8
1
1
1
1
1
1
6
15
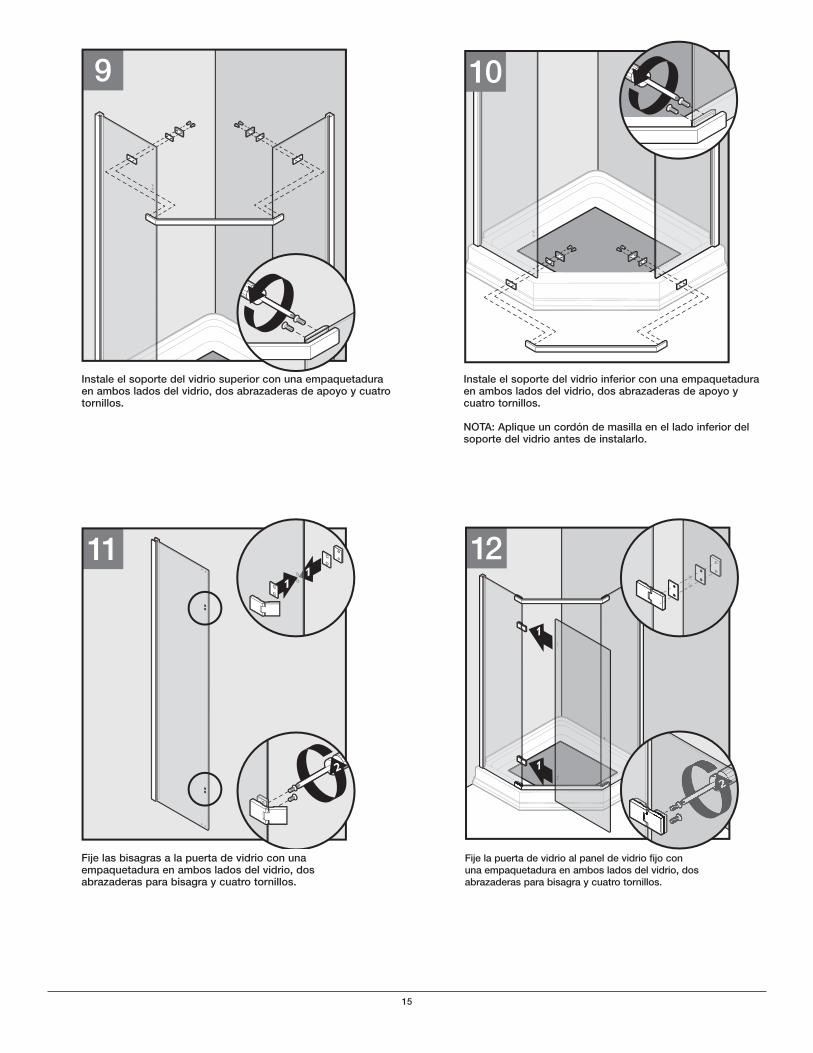
Fije las bisagras a la puerta de vidrio con una empaquetadura en ambos lados del vidrio, dos abrazaderas para bisagra y cuatro tornillos.
Fije la puerta de vidrio al panel de vidrio fijo con una empaquetadura en ambos lados del vidrio, dos abrazaderas para bisagra y cuatro tornillos.
2
3
111
1
2
1
1
12
Instale el soporte del vidrio inferior con una empaquetadura en ambos lados del vidrio, dos abrazaderas de apoyo y cuatro tornillos.
NOTA: Aplique un cordón de masilla en el lado inferior del soporte del vidrio antes de instalarlo.
Instale el soporte del vidrio superior con una empaquetadura en ambos lados del vidrio, dos abrazaderas de apoyo y cuatro tornillos.
109
16
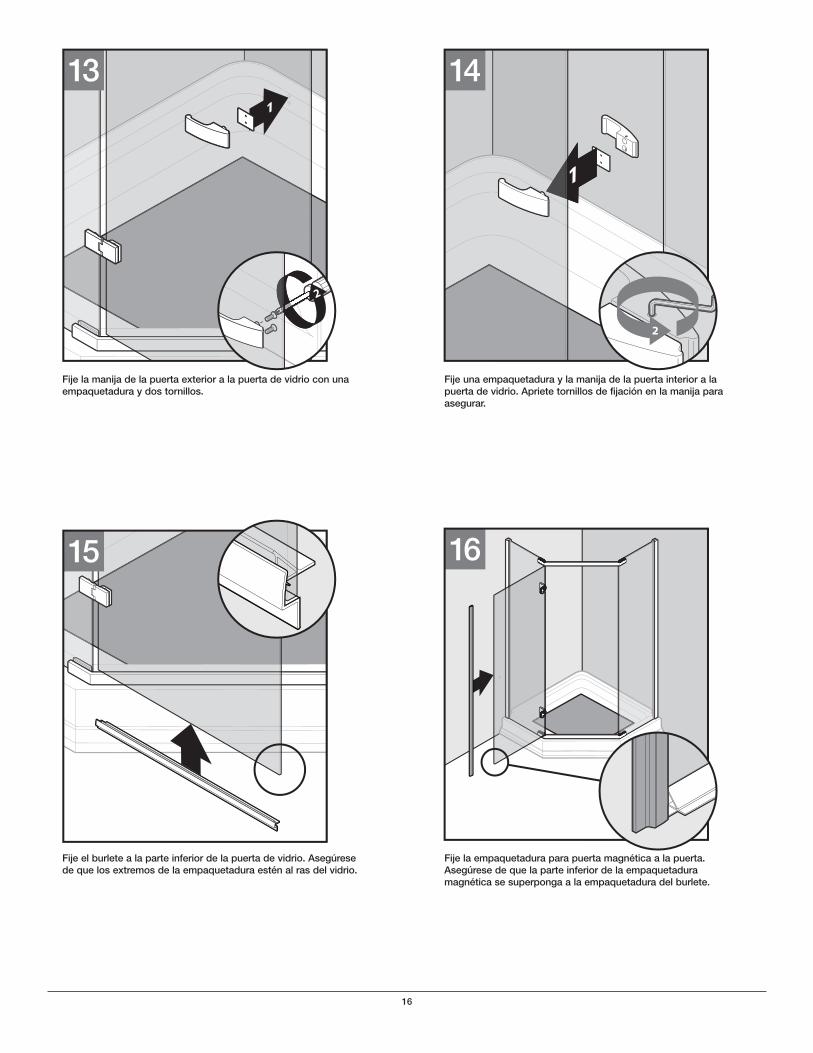
Fije la empaquetadura para puerta magnética a la puerta. Asegúrese de que la parte inferior de la empaquetadura magnética se superponga a la empaquetadura del burlete.
Fije el burlete a la parte inferior de la puerta de vidrio. Asegúrese de que los extremos de la empaquetadura estén al ras del vidrio.
Fije una empaquetadura y la manija de la puerta interior a la puerta de vidrio. Apriete tornillos de fijación en la manija para asegurar.
Fije la manija de la puerta exterior a la puerta de vidrio con una empaquetadura y dos tornillos.
1
2
3
1615
1
14
2
1
13
2
17
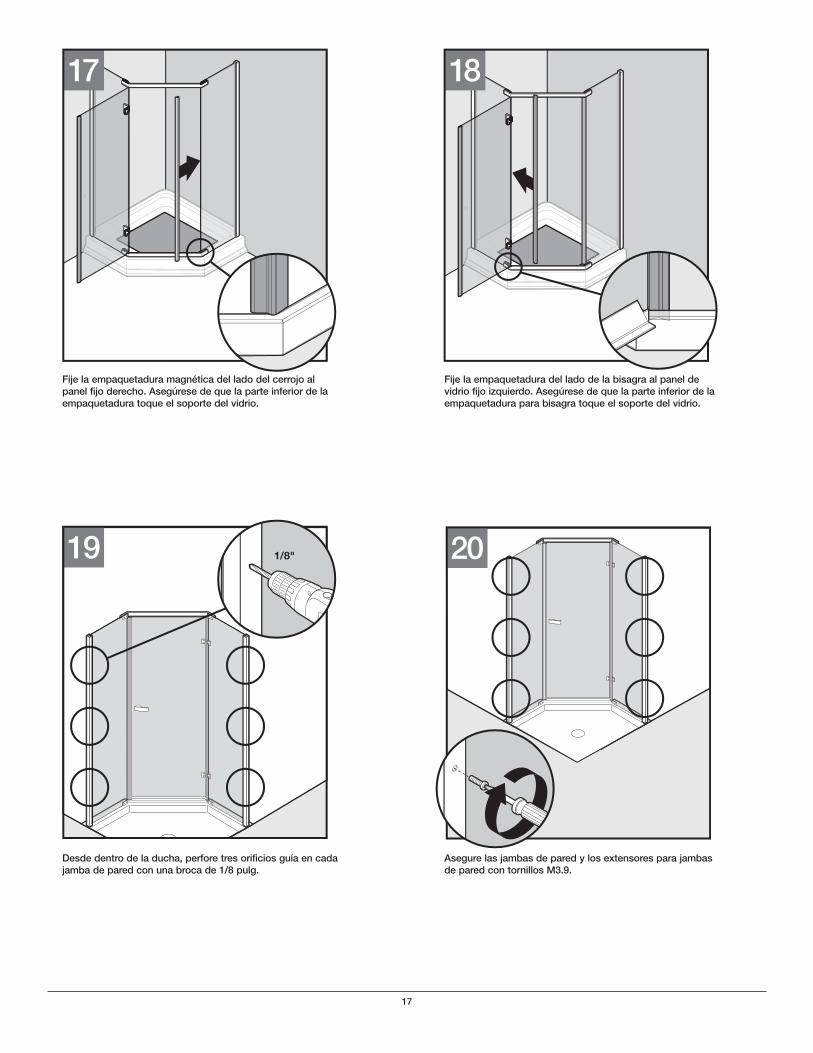
Asegure las jambas de pared y los extensores para jambas de pared con tornillos M3.9.
Desde dentro de la ducha, perfore tres orificios guía en cada jamba de pared con una broca de 1/8 pulg.
Fije la empaquetadura del lado de la bisagra al panel de vidrio fijo izquierdo. Asegúrese de que la parte inferior de la empaquetadura para bisagra toque el soporte del vidrio.
Fije la empaquetadura magnética del lado del cerrojo al panel fijo derecho. Asegúrese de que la parte inferior de la empaquetadura toque el soporte del vidrio.
19 1/8" 20
1817
18
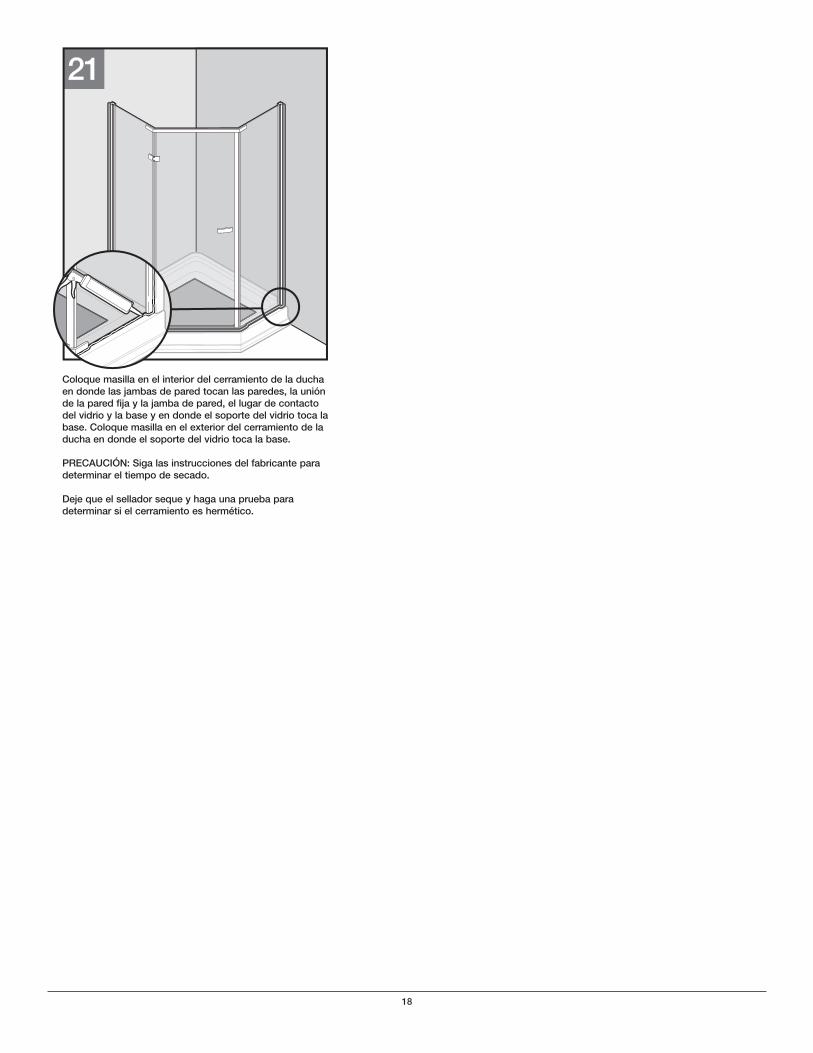
Coloque masilla en el interior del cerramiento de la ducha en donde las jambas de pared tocan las paredes, la unión de la pared fija y la jamba de pared, el lugar de contacto del vidrio y la base y en donde el soporte del vidrio toca la base. Coloque masilla en el exterior del cerramiento de la ducha en donde el soporte del vidrio toca la base.
PRECAUCIÓN: Siga las instrucciones del fabricante para determinar el tiempo de secado.
Deje que el sellador seque y haga una prueba para determinar si el cerramiento es hermético.
21

19

20