natural engineer installation guide - software ag documentation
TRANSCRIPT

Natural Engineer
Version 8.2
Installation Guide

Manual Order Number: NEE82-010ALL
Copyright © March 2014, Generation Systems Ltd., East Grinstead, UK.
This document applies to Natural Engineer version 8.2 and to all subsequent releases.
Specifications contained herein are subject to change, and these changes will be reported in
subsequent revisions or editions.
Readers’ comments are welcomed. Comments may be addressed to the Documentation Department at
the address on the back cover. Internet users may send comments to the following e-mail address:
Acknowledgements
Adabas, Natural and all other referenced Software AG products are either trademarks or registered trademarks of Software AG.
Microsoft, Windows, Windows NT, Visio and Visual Basic are either trademarks or registered
trademarks of Microsoft Corporation in the United States and/or other countries.
IBM, CICS, z/OS, z/VSE and WebSphere are either trademarks or registered trademarks of the IBM
Corporation in the United States and/or other countries.
Sun, iPlanet and Solaris are either trademarks or registered trademarks of Sun Microsystems
Corporation in the United States and/or other countries.
Netscape is a trademark or registered trademark of the Netscape Communications Corporation in the
United States and/or other countries.
All other trademarks and registered trademarks are the sole property of their respective owners.

I
TABLE OF CONTENTS
TABLE OF CONTENTS ........................................................................................ I
ABOUT THIS MANUAL ....................................................................................... 1
Purpose of this manual ............................................................................................................... 1 Target Audience ......................................................................................................................... 1 Typographical Conventions used in this manual .......................................................................... 2 How this manual is organized ..................................................................................................... 3 Terminology .............................................................................................................................. 4 Related Literature ....................................................................................................................... 7
INSTALLATION ON THE PC .............................................................................. 9
Chapter Overview ...................................................................................................................... 9 Installation Prerequisites........................................................................................................... 10 Installation Process................................................................................................................... 11 Natural Parameter Settings ....................................................................................................... 13 Remote Development Environments ......................................................................................... 14 Windows Terminal Services ..................................................................................................... 17
INSTALLATION ON THE MAINFRAME ........................................................ 19
Chapter Overview .................................................................................................................... 19 Installation Jobs on the Mainframe ........................................................................................... 20 Mainframe Prerequisites ........................................................................................................... 21 Installation Tape for Natural Engineer under z/OS .................................................................... 22 Installation Tape for Natural Engineer under z/VSE .................................................................. 25 Installation Tape for Natural Engineer under BS2000/OSD ....................................................... 27 Mainframe Installation Steps .................................................................................................... 30 Mainframe Customization ........................................................................................................ 42 Modifying Natural Engineer Batch Jobs.................................................................................... 43 Natural Engineer Processes and Related Jobs ............................................................................ 56
Natural Engineer Installation Guide
II
INSTALLATION ON UNIX ................................................................................ 63
Chapter Overview .................................................................................................................... 63 Installation Prerequisites ........................................................................................................... 63 Installing and Setting Up Software AG Products on UNIX ........................................................ 66 Setup and Installation of Natural Engineer on UNIX ................................................................. 73 Post-Installation Steps .............................................................................................................. 82 Unix Customization .................................................................................................................. 85 Natural Engineer Processes and Related Jobs ............................................................................ 89 Preparing your Natural/Adabas Environment for Working with Natural Engineer ...................... 91 After the Installation ................................................................................................................. 93
OPERATIONAL CONSIDERATIONS .............................................................. 95
Chapter Overview .................................................................................................................... 95 Environment Sizing .................................................................................................................. 96 Alternative Natural Keywords................................................................................................... 98
NATURAL ENGINEER WEB INTERFACE ................................................... 101
Chapter Overview .................................................................................................................. 101 Install IIE Directory ................................................................................................................ 102 Post Installation Configuration ................................................................................................ 103 NEA Server (NAS) Installation ............................................................................................... 108 Web Server Backend .............................................................................................................. 111 Additional Information ........................................................................................................... 119
INDEX ................................................................................................................ 121

1
ABOUT THIS MANUAL
Purpose of this manual
This manual contains the Installation details for Natural Engineer and the Natural Engineer
Web Interface (NEA).
It describes all aspects of installing Natural Engineer on supported platforms, namely
Microsoft Windows, z/OS, BS2000/OSD, z/VSE and UNIX.
This manual should be read carefully before installing and using the product.
Target Audience
The target audience for this manual is intended to be any User of Natural Engineer as well
as Systems Administrators responsible for installing and configuring the product.

Natural Engineer Installation Guide
2
Typographical Conventions used in this manual
The following conventions are used throughout this manual:
UPPERCASE
TIMES
Commands, statements, names of programs and utilities referred to in text paragraphs appear in normal (Times) uppercase.
UPPERCASE BOLD
COURIER In illustrations or examples of commands, items in uppercase bold courier must be typed in as they appear.
< > Items in angled brackets are placeholders for user-supplied information. For example, if asked to enter <file number>, you must type the number of the required file.
Underlined Underlined parts of text are hyperlinks to other parts within the online
source manual. This manual was written in MS-Word 97 using the “hyperlink” feature.
The following symbols are used for instructions:
Marks the beginning of an instruction set.
Indicates that the instruction set consists of a single step.
1. Indicates the first of a number of steps.

About this manual
3
How this manual is organized
This manual is organized to reflect the installation requirements for Natural Engineer in
the following chapters:
Chapter Contents
1 Describes how to install and customize Natural Engineer on your PC for the purpose of execution under Natural for the Windows operating system.
2 Describes the installation procedure on the supported mainframe platforms (z/OS, z/VSE, BS2000/OSD).
3 Describes the installation procedure on UNIX platforms.
4 Describes the environment considerations for sizing and architecture when using Natural Engineer for the Windows operating system.
5 Describes the installation of the Natural Engineer Web Interface (NEA).

Natural Engineer Installation Guide
4
Terminology
This section offers some of the terms that are specific to the Natural Engineer product.
Note: Familiarity is assumed with the general terminology of Natural, Adabas, Microsoft
and Mainframe operating systems.
Analysis
The Analysis process of Natural Engineer searches application data within the Natural Engineer Repository, according to specified Search Criteria and generates reports on the search results.
Application
An Application is a library or group of related libraries, which define a complete Application. In
Natural Engineer, the Application can have a one-to-one relationship with a single library of the same name, or a library of a different name, as well as related steplibs. The Application refers to all the source code from these libraries, which Natural Engineer loads into the Repository.
Browser
An Internet Browser such as Microsoft Internet Explorer or Netscape.
Category
Categories in Natural Engineer specify whether and how a Modification is applied to the Natural code. Valid categories are: Automatic change, Manual change, Reject the default Modification, No change to the data item, and the data item is in Generated Code.
A category is further broken down according to type of change (for example: Keyword, Literal, Data Item, Database Access, Definition).
Cobol
Abbreviation of Common Business Orientated Language. A programming language.
Cobol Link
A Cobol Link is the link between the individual Cobol modules and the executable Cobol program referenced in the JCL object.
Consistency
An option in the Analysis process that causes Natural Engineer to trace an Impact through the code, using left and right argument resolution to identify further code impacted by the code found.
Database Access Definition
A collective term used to identify DDMs, SQL Tables or Predict User Views.
About this manual
5
Data Item
A collective term used for any data fields within a programming object. These can be user-defined variables, DDM fields or System Variables. It is inter-changeable with the term ‘variable’.
Environment
The Environment process is the means by which Natural Engineer generates a structured view of the application code in the Natural Engineer Repository. This provides application analysis reports and inventory information on the application and is used as the basis for Impact Analysis.
Exception
An Exception is an Item identified as impacted that does not require a Modification. Where there are
a few similar Exception Items, they can be treated as Exceptions, and rejected in the Modification review process. Where there are many similar (therefore not Exceptions), consideration should be given to changing the Search Criteria so they are not identified as impacted in the first place.
Generated Code
This is code which has been generated by a Natural code generator, such as Construct, and which is not normally modified directly in the Natural editor.
Impact
An Impact is an instance of a Natural code Item; e.g., data item or statement (a “hit” scored by the Analysis process) that matches the defined Search Criteria used in the Analysis process.
Iteration
An Iteration is one examination cycle of a field identified according to the specified Search Criteria.
For example, one Iteration is reading the field right to left. Multiple Iterations are performed when the option of ‘Consistency’ or Multi Search is requested for Analysis, and Natural Engineer performs as many Iterations as necessary to exhaust all possibilities of expressing and tracing the field, and can be limited by a setting in the NATENG.INI file.
JCL
Job Control Language.
JCL object
A JCL object is a collection of Job Control statements in the order which they are to be executed in a mainframe batch environment. Commonly referred to as JCL.
Library
A single library of source code, which exists in the Natural system file.
Modification
A Modification is a change suggested or made to an object or data item resulting in the required
compliance of that object or data item. Modifications in Natural Engineer are classified according to Category and Type.

Natural Engineer Installation Guide
6
Refactoring
Improving a computer program by reorganizing its internal structure without altering its external behavior.
Soft Link
A Soft Link is where a link between two objects has been defined using an alphanumeric variable rather than a literal constant.
TLM
Text Logic Members are used to contain the code required to support inclusion of common code
into the application. An example of this is the code to include into an application before updating a database.
Type
The Type of Modification available, for example: Data Item, Keyword and Literal.
Variable
A collective term used for any data fields within a programming object. These can be user-defined variables, DDM fields or System Variables. It is inter-changeable with the term ‘data item’.

About this manual
7
Related Literature
The complete set of Natural Engineer manuals consists of:
1 Natural Engineer Concepts and Facilities (NEE82-006ALL)
The Concepts and Facilities manual describes the many application systems problems and
solutions offered by Natural Engineer, providing some guidelines and usage that can be applied to Natural applications.
2 Natural Engineer Release Notes (NEE82-008ALL)
The Release Notes describe all the information relating to the new features, upgrades to existing functions and documentation updates that have been applied to Natural Engineer.
3 Natural Engineer Installation Guide (NEE82-010ALL)
The Installation Guide provides information on how to install Natural Engineer on both PC and mainframe platforms.
4 Natural Engineer Administration Guide (NEE82-040WIN)
Natural Engineer Administration Guide (NEE82-040MFR)
The Administration Guide provides information on all the various control settings available to control the usage of the different functions within Natural Engineer.
5 Natural Engineer Application Management (NEE82-020WIN) Natural Engineer Application Management (NEE82-020MFR)
The Application Management manual describes all the functions required to add Natural applications into the Repository.
6 Natural Engineer Application Documentation (NEE82-022WIN)
Natural Engineer Application Documentation (NEE82-022MFR)
The Application Documentation manual describes all the available functions to document a
Natural application within the Repository. These functions will help enhance / supplement any existing systems documentation such as BSD / CSD / Specifications etc.
7 Natural Engineer Application Analysis and Modification (NEE82-023WIN) Natural Engineer Application Analysis and Modification (NEE82-023MFR)
The Application Analysis and Modification manual describes all the available functions to carry out analysis of Natural applications; including basic keyword searches. The
modification process is described and detailed to show how it can be applied to modify single selected objects within a Natural application, or the entire Natural application in one single execution.

Natural Engineer Installation Guide
8
8 Natural Engineer Application Restructuring (NEE82-024WIN)
Natural Engineer Application Restructuring (NEE82-024MFR)
The Application Restructuring manual describes the analysis and modification functionality required to carryout some of the more sophisticated functions such as Object Builder.
9 Natural Engineer Utilities (NEE82-080WIN) Natural Engineer Utilities (NEE82-080MFR)
The Utilities manual describes all the available utilities found within Natural Engineer and, when and how they should be used.
10 Natural Engineer Reporting (NEE82-025ALL)
The Reporting manual describes each of the reports available in detail, providing report
layouts, how to trigger the report and when the report data becomes available. The various report-producing mediums within Natural Engineer are also described.
11 Natural Engineer Batch Processing [Mainframes] (NEE82-026MFR)
The Batch Processing manual describes the various batch jobs (JCL) and their functionality.
12 Natural Engineer Messages and Codes (NEE82-060ALL)
The Messages and Codes manual describes the various messages and codes produced by Natural Engineer.
13 Natural Engineer Advanced Services (NEE82-017WIN)
The Advanced Services manual describes various advanced options such as the Refactoring of
Natural application source code with Natural Engineer, conversion of applications for Natural for Ajax and Business Rule processing.

9
1 INSTALLATION ON THE PC
Chapter Overview
This chapter explains how to install and customize Natural Engineer on your PC for the
purpose of execution under Natural.
This information is organized in the following sections:
Installation Prerequisites.
Installation Process.
Natural Parameter Settings.
Remote Development Environments.
Windows Terminal Services.

Natural Engineer Installation Guide
10
1
Installation Prerequisites
Before installing Natural Engineer, the following must already be installed on your PC:
Windows XP Professional, Windows 2008 Server or Windows 7.
Natural version 6.3.11 or above.
Any Natural Source should be saved with Line Numbers so that Natural Engineer can
tie up any potential modification with the Natural Source.
Adabas version 6.2 or above.
Microsoft Internet Explorer (version 4 or above) or optionally Netscape (version 4 or
above).
Microsoft Visio 2003 or above (optional).
If Microsoft Visio 2003 is to be used, it is essential that the VBA (Visual Basic for
Applications) option is included during the install. This option is part of the
installation options on the Microsoft Visio 2003 CD.
Microsoft Office Professional Edition 2003 or above (optional).
Microsoft Office Word 2003 or above (optional).
If you wish to make use of the report display option ‘Word’, you will need to have
either Microsoft Office Professional Edition 2003 or stand-alone Microsoft Office
Word 2003 installed. These provide the necessary support for XML documents
required for this option.
PDF Generation (optional).
If you wish to generate reports to PDF then a Formatting Objects Processor e.g.,
Apache FOP 1.1 and the Microsoft Command Line Transformation Utility
(MSXSL.EXE) will need to be installed. Configuration details can be found in the Natural Engineer Administration Guide for Windows.
In addition please ensure that the latest Java runtime is installed.
Note: To install Natural Engineer the User must have Administrator rights.

Installation on the PC
11
1
Installation Process
The installation process of Natural Engineer on the PC consists of installing the Natural
Engineer components and applying manual configurations to your run time environment.
The various installation and configuration requirements are described in the text document
README.TXT. This document should be used to help guide you through the installation
process.
Note: The README.TXT file can be located in the root folder on the product CD, or after
installation, in the X:\PROGRAM FILES\SOFTWARE AG\NATURAL ENGINEER\8.2
folder, where X: is the drive on which Natural Engineer has been installed.
The installation process of Natural Engineer on the PC consists of three main steps:
1. Natural Engineer components installed from the product CD.
The InstallShield process on the Natural Engineer product CD controls the installation
process. This will install the Natural Engineer components on the PC to the following
path: X:\PROGRAM FILES\SOFTWARE AG\NATURAL ENGINEER\8.2 where X: is
the drive on which Natural Engineer is to be installed.
2. A series of configurations administered on the target PC to supplement the
installation.
The various configurations required to complete the installation include:
Natural Security issues, if Natural Security is being used.
Create an Adabas database and Repository file using DBA Workbench.
Verify the Natural Parameter file NATENG.
Verify the Natural Engineer Initialization file NATENG.INI.
Verify the installation of GenTree Natural classes.
Any migration issues from previous versions of Natural Engineer.
Note: After completing the installation and configuration steps, it is recommended that you
reboot the PC.

Natural Engineer Installation Guide
12
1
3. Verify the installation and configuration.
It is recommended that you verify that the installation and configuration is correct before
using Natural Engineer. The following steps should be followed:
1. Start Natural Engineer by selecting the Natural Engineer icon on the desktop.
2. Start the Repository database. If you have utilized the NATENG.INI parameter
"DBID=" (found within the REPDB group) with the number of your Repository
database, then go to step 3. Natural Engineer will automatically start the database for
you. Otherwise, start the Repository database following your local site standards.
3. Using the supplied sample application HOSPITAL, test your installation by executing
the Application, Environment and Analysis processes.
Note: The sample application HOSPITAL is located in X:\PROGRAMDATA\
SOFTWARE AG\NATURAL ENGINEER\8.2\SYSOBJH\ HOSPITAL.SAG, where X: is
the drive on which Natural Engineer has been installed.
4. Check Microsoft Visio connectivity by first confirming that the product works
independently of Natural Engineer and then from Natural Engineer using the Structure
Flow Diagram option (accessed by using menu options Environment Object
ExplorerStructure Flow Diagram).
If it is not available, certain DLLs may be missing (the Visio interface requires Visual
Basic version 6).

Installation on the PC
13
1
Natural Parameter Settings
The Natural parameter settings are independent of the number of lines of code being
processed. In fact, Natural Engineer does not require the settings listed below. However,
for optimum performance they are the recommended minimum set for any Natural
Engineer session. The following parameters are relevant for Natural on the PC platforms.
Parameter Setting Comment
BPSIZE 2000K Set at least a 2MB Bufferpool.
BPSFI ON Set BPSFI on.
ZD OFF Set as ZD=off.
Note: Prevents NAT1302 error during the Load process.
Other Natural Parameter settings have to be set for Natural Engineer such as LFILE 96.
This depends on what Repository (DBID, FNR) has been created.
Note: For more information on the NATPARM settings required during installation refer
to the README.TXT file found in the X:\PROGRAM FILES\SOFTWARE AG\NATURAL
ENGINEER\8.2 folder, where X: is the drive on which Natural Engineer has been
installed.

Natural Engineer Installation Guide
14
1
Remote Development Environments
Natural Engineer offers compatible support for remote development environments using
Natural's Single Point of Development (SPoD) available with Natural version 6.3.
When using Natural Engineer in a SPoD environment the same version of Natural
Engineer must also be installed in both client and server environments.
Location of the Repository File
It is recommended that the location of the Repository file when utilizing the SPoD
environment for Natural Engineer is in the same location as the NDV server and the
Natural Source Code.
The Natural Parameter file used to map the remote environment needs to have the
correct settings for LFILE 96 (Repository file).

Installation on the PC
15
1
Mapping the Remote Mainframe Environment
To successfully utilize the SPoD environment for Natural Engineer, Natural parameter
settings need to be made which will be invoked when using the Map Environment function
in Natural version 6.3.
The key parameter settings for Natural Engineer are:
1. LFILE 95
To access the mainframe Natural Engineer Refactoring database file, LFILE 95 needs
to be defined with the required database id and file number.
2. LFILE 96
To access the mainframe Natural Engineer Repository, LFILE 96 needs to be defined
with the required database id and file number.
3. OVSIZE
If you are using an NDV Server that uses CICS Sub-tasks then the OVSIZE parameter
should be set to at least 10000.
4. CFICU=ON,CP=AUTO
To ensure correct display of Natural Source Code when running Natural Engineer in a
SPoD environment to a mainframe server these need to be set.
5. TABA1 (EBCDIC to ASCII Translation Table)
Used to translate any special characters between the mainframe and the PC. For
example:
TABA1=(7C,40)
This represents the '@' sign. The EBCDIC value is 7C and the ASCII value is 40.

Natural Engineer Installation Guide
16
1
6. TABA2 (ASCII to EBCDIC Translation Table)
Used to translate any special characters between the PC and the mainframe.
TABA2=(40,7C)
This represents the '@' sign. The ASCII value is 40 and the EBCDIC value is 7C.
Note: The TABA1 and TABA2 parameters only need to be specified if the standard SPoD
translation tables do not handle all special characters, for example umlauts, tilda sign
exclamation mark etc. Any translation problems that may occur are related to the SPoD
environment rather than Natural Engineer.
The parameter settings are applied using the 'Startup Session Parameters' specified in the
Map Environment function within Natural version 6.3.
The session parameters can be defined in one of three ways:
1. As a dynamic individual parameter. For example
LFILE=(00096,11177,01052)
2. As a defined profile using SYSPARM. This would then be referenced using the
'PROFILE=' parameter. For example:
PROFILE=NEESPOD
3. Use the NTSYS macro within NATPARM. This is compiled into the Natural
environment itself and will automatically invoke the correct settings. This would then
be referenced using the 'SYS=' parameter. For example:
SYS=NEESPOD

Installation on the PC
17
1
Windows Terminal Services
Natural Engineer offers compatible support for environments that make use of Windows
Terminal Services.
Use of Windows Terminal Services provides an easily maintained run time environment
with centrally deployed copies of Adabas, Natural and Natural Engineer residing on a
server machine. Users can log on to this environment and execute Natural Engineer tasks
as if they were running on their own separate machine.
Note: The use of Windows Terminal Services is available to both the Windows and
Natural's Single Point of Development (SPoD) environments.
Configuration
In order to execute Natural Engineer successfully in a Windows Terminal Services
environment the following configuration tasks are required.
Natural Parameter File for Natural Engineer
The Natural Parameter file NATENG, used to execute Natural Engineer under Windows,
needs to be modified to include a new environment variable USERNAME in the path
names for each work file referencing the Natural Engineer DATA folder.
The environment variable must have the delimiter character ‘%’ at the start and end of the
variable name, i.e. %USERNAME%.
This will provide each logged on User with their own DATA folder containing the Natural
Engineer files they are working with. This provides User integrity in the shared server
environment.
Example using work file 3 which is used to hold the extracted application data to be
loaded into the Repository:
X:\PROGRAMDATA\SOFTWARE AG\NATURAL ENGINEER\DATA\%USERNAME%\########.OUT
where X: is the drive on which Natural Engineer was installed.

Natural Engineer Installation Guide
18
1
Note: This change is only required on the server machine hosting Natural Engineer. If the
default Natural Parameter file NATENG has been renamed or copied, then these
modifications need to be applied to the renamed or copied version.
Natural Engineer INI File
The Natural Engineer initialization file NATENG.INI, used by Natural Engineer, needs to
be modified to include a new environment variable USERNAME in the path names for
each path referencing the Natural Engineer DATA folder.
The environment variable must have the delimiter character ‘%’ at the start and end of the
variable name, i.e. %USERNAME%.
This will provide each logged on User with their own DATA folder containing the Natural
Engineer files they are working with. This provides User integrity in the shared server
environment.
Example using the INI parameter “XLS=” which locates the Natural Engineer Excel
macro:
XLS=X:\PROGRAMDATA\SOFTWARE AG\NATURAL ENGINEER\DATA\%USERNAME%\
XLS\NATENG.XLS
where X: is the drive on which Natural Engineer was installed.
Note: This change is only required on the server machine hosting Natural Engineer.
User DATA Folders
To accommodate the new Natural Engineer User DATA folders, the User folders must
first be created in the Natural Engineer DATA folder.
Example for User = XGSLXX
X:\PROGRAMDATA\SOFTWARE AG\NATURAL ENGINEER\DATA\XGSLXX
where X: is the drive on which Natural Engineer was installed.
Note: This change is only required on the server machine hosting Natural Engineer.

19
2 INSTALLATION ON THE MAINFRAME
Chapter Overview
This chapter describes the installation procedure on the supported mainframe platforms
(z/OS, z/VSE, BS2000/OSD). This information is organized in the following sections:
Installation Jobs on the Mainframe.
Mainframe Prerequisites.
The z/OS Installation Tape.
The z/VSE Installation Tape.
The BS2000/OSD Installation Tape.
Mainframe Installation steps.
Mainframe Customization.
Modifying Natural Engineer Jobs.
Natural Engineer Processes and Related Jobs.

Natural Engineer Installation Guide
20
2
Installation Jobs on the Mainframe
The installation of Natural Engineer on mainframe platforms is performed by installation
jobs. These jobs are either adapted “manually” or generated by SYSTEM
MAINTENANCE AID (SMA).
For each step of the installation procedure described below, the job number of a job
performing the respective task is indicated. This job number refers to an installation job
generated by SMA. If you are not using SMA, a sample installation job of the same
number is provided in the job library on the installation tape; you must adapt this example
job to your requirements. Please note that the job numbers on the tape are preceded by a
product code (for example, NEEI061 or NEEI050).
Using SYSTEM MAINTENANCE AID
If you are using Software AG’s SYSTEM MAINTENANCE AID (SMA) for the
installation process, please note the following before generating jobs:
1. Load the SMA table data as described in the SYSTEM MAINTENANCE AID
manual (if you have not already done so).
2. Set NEE823 in the list of available products for your environment to “TO BE
INSTALLED”.
3. Set the following SMA parameters specific to Natural Engineer:
In group OPTION:
NEE-FIRST-INSTALL = Y (for first-time installation of Natural Engineer)
NEE-FIRST-INSTALL = N (for migration installation of Natural Engineer)
NEE-REFACT = Y (for migration installation of Natural Engineer
Refactoring)
NEE-REFACT-NEW = Y (for first-time installation of Natural Engineer
Refactoring)
In group FILNUM:
FNEE = <file number of Natural Engineer Refactoring>
FNEE1 = <file number of Natural Engineer Repository>
FNEE1-DBID= <database number of Natural Engineer Repository>

Installation on the Mainframe
21
2
Mainframe Prerequisites
The following products must be installed before you install Natural Engineer:
NATURAL
Natural version 4.2.7 or above.
Note: Under z/OS, Natural must be LE enabled to utilize the updated Extract engine.
ADABAS
Adabas version 8.2.2 or above.
Natural Development Server
Natural Development Server (NDV) version 2.2.7 or above.
Note: This is optional and is only required if you wish to execute Natural Engineer in a
remote development environment (SPoD). It is recommended to use an NDV Server using
batch subtasks if processing JCL and/or COBOL.

Natural Engineer Installation Guide
22
2
Installation Tape for Natural Engineer under z/OS
Tape Contents
The installation tape contains the data sets listed in the table below. The sequence of the
data sets is shown in the Report of Tape Creation that accompanies the installation tape.
The notation ‘vrs’ in Data Set Name represents the version number, release level and SM
level of the product.
Data Set Name Contents
NEEvrs.SRCE Source library, containing member CINI (initialization
parameters) and statement members for updated Extract engine.
NEEvrs.JOBS Job library with sample JCL for the Natural Engineer process.
NEEvrs.INPL Natural modules in INPL format.
NEEvrs.ERRN SYSERR messages for Natural Engineer.
NEEvrs.SYS1 Natural Engineer Repository file in ADAULD format.
NEEvrs.SYS2 Natural Engineer Refactoring file in ADAULD format.
NEEvrs.EXPL Example application library and miscellaneous sample objects library.
NEEvrs.HELP Natural Engineer Help File.
NEEvrs.LOAD C modules for Extract engine.
Copying the Tape Contents to a z/OS Disk
If you are using SMA, refer to the System Maintenance Aid documentation.
If you are not using SMA, follow the instructions described below.
This section explains how to:
Copy data set COPY.JOB from tape to disk.
Modify this data set to conform to your local naming conventions.

Installation on the Mainframe
23
2
The JCL in this data set is then used to copy all data sets from tape to disk.
If the data sets for more than one product are delivered on the tape, the data set
COPY.JOB contains the JCL to unload the data sets for all delivered products from the
tape to your disk.
After that, you will have to perform the individual install procedures for each component.
Step 1 - Copy data set COPY.JOB from tape to disk.
The data set COPY.JOB (Label 2) contains the JCL to unload all other existing data sets
from tape to disk. To unload COPY.JOB use the following sample JCL:
//SAGTAPE JOB SAG,CLASS=1,MSGCLASS=X
//*
//COPY EXEC PGM=IEBGENER
//SYSUT1 DD DSN=COPY.JOB,DISP=(OLD,PASS),UNIT=(CASS,,DEFER),
// VOL=(,RETAIN,SER=tape-volume),LABEL=(2,SL)
//SYSUT2 DD DSN=hilev.COPY.JOB,DISP=(NEW,CATLG,DELETE),
// UNIT=3390,VOL=SER=volume,SPACE=(TRK,(1,1),RLSE),
// DCB=*.SYSUT1
//SYSPRINT DD SYSOUT=*
//SYSIN DD DUMMY
//*
Where:
hilev is a valid high level qualifier.
tape-volume is the tape volume name, for example: T12345.
volume is the disk volume name.
Step 2 - Modify COPY.JOB on Your Disk.
Modify the COPY.JOB on your disk to conform to your local naming conventions and set
the disk space parameters before submitting this job.
There are three parameters that must be set before submitting the COPY.JOB:
Set HILEV to a valid high level qualifier.
Set LOCATION to a storage location.
Set EXPDT to a valid expiration date.

Natural Engineer Installation Guide
24
2
Step 3 - Submit COPY.JOB
Submit COPY.JOB to unload all other data sets from the tape to your disk.

Installation on the Mainframe
25
2
Installation Tape for Natural Engineer under z/VSE
Tape Contents
The installation tape contains the data sets listed in the table below. The sequence of the
data sets is shown in the Report of Tape Creation that accompanies the installation tape.
The notation ‘vrs’ in Data Set Name represents the version number, release level and SM
level of the product.
Data Set Name Contents
NEEvrs.LIBR Source library, containing member CINI (initialization parameters).
NEEvrs.LIBJ Job library with sample JCL for the Natural Engineer process.
NEEvrs.INPL Natural modules in INPL format.
NEEvrs.ERRN SYSERR messages for Natural Engineer.
NEEvrs.SYS1 Natural Engineer Repository file in ADAULD format.
NEEvrs.SYS2 Natural Engineer Refactoring file in ADAULD format.
NEEvrs.EXPL Example application library and miscellaneous sample objects library.
NEEvrs.HELP Natural Engineer Help File.
Copying the Tape Contents to a z/VSE Disk
If you are using SMA, refer to the System Maintenance Aid documentation.
If you are not using SMA, follow the instructions below.
This section explains how to:
Copy data set COPY.JOB from tape to disk.
Modify this data set to conform to your local naming conventions.
The JCL in this data set is then used to copy all data sets from tape to disk.

Natural Engineer Installation Guide
26
2
If the data sets for more than one product are delivered on the tape, the data set
COPYTAPE.JOB contains the JCL to unload the data sets for all delivered products from
the tape to your disk, except the datasets that you can directly install from tape, for
example, Natural INPL objects.
After that, you will have to perform the individual install procedures for each component.
Step 1 - Copy data set COPYTAPE.JOB from tape to disk.
The data set COPYTAPE.JOB (Label 2) contains the JCL to unload all other existing data
sets from tape to disk. To unload COPYTAPE.JOB use the following sample JCL:
* $$ JOB JNM=LIBRCAT,CLASS=0,
* $$ DISP=D,LDEST=(*,UID),SYSID=1
* $$ LST CLASS=A,DISP=D
// JOB LIBRCAT
* *****************************************
* CATALOG COPYTAPE.JOB TO LIBRARY
* *****************************************
// ASSGN SYS004,NNN
// MTC REW,SYS004
// MTC FSF,SYS004,4
// ASSGN SYSIPT,SYS004
// TLBL IJSYSIN,'COPYTAPE.JOB'
// EXEC LIBR,PARM='MSHP; ACC S=lib.sublib'
// MTC REW,SYS004
// ASSGN SYSIPT,FEC
/*
/&
* $$ EOJ
Where:
NNN is the tape address.
lib.sublib is the catalog library name.
Step 2 - Modify COPYTAPE.JOB to conform to local site standards.
Modify COPYTAPE.JOB to conform to local site standards and complete the disk space
parameters before submitting the COPYTAPE.JOB.
Step 3 - Submit COPYTAPE.JOB
Submit COPYTAPE.JOB to unload all other data sets from the tape to your disk.

Installation on the Mainframe
27
2
Installation Tape for Natural Engineer under
BS2000/OSD
Tape Contents
The installation tape contains the data sets listed in the table below. The sequence of the
data sets is shown in the Report of Tape Creation that accompanies the installation tape.
The notation ‘vrs’ in Data Set Name represents the version number, release level and SM
level of the product.
Data Set Name Contents
NEEvrs.JOBS Natural Engineer example installation jobs.
NEEvrs.INPL Natural modules in INPL format.
NEEvrs.ERRN SYSERR messages for Natural Engineer.
NEEvrs.SYS1 Natural Engineer Repository file in ADAULD format.
NEEvrs.SYS2 Natural Engineer Refactoring file in ADAULD format.
NEEvrs.EXPL Example application library and miscellaneous sample objects library.
NEEvrs.HELP Natural Engineer Help File.
Copying the Tape Contents to a BS2000/OSD Disk
If you are using SMA, refer to the System Maintenance Aid documentation.
If you are not using System Maintenance Aid (SMA), use the procedure described below.
In this procedure, the values specified below must be supplied.
To copy the data sets from tape to disk, perform the following steps:
Step 1 - Copy the library SRVvrs.LIB from tape to disk.

Natural Engineer Installation Guide
28
2
This step is not necessary if you have already copied the library SRVvrs.LIB from another
Software AG installation tape. For further information, refer to the element #READ-ME in
this library. The library SRVvrs.LIB is stored on the tape as a sequential file named
SRVvrs.LIBS containing LMS commands. The current version vrs can be obtained from
the Report of Tape Creation. To convert this sequential file into an LMS-library, execute
the following commands:
/IMPORT-FILE SUPPORT=*TAPE(FILE-NAME=SRVvrs.LIBS, -
/ VOLUME=volser, DEV-TYPE=tape-device)
/ADD-FILE-LINK LINK-NAME=EDTSAM, FILE-NAME=SRVvrs.LIBS, -
/ SUPPORT=*TAPE(FILE-SEQ=3), ACC-METH=*BY-CAT, -
/ BUF-LEN=*BY-CAT, REC-FORM=*BY-CAT, REC-SIZE=*BY-CAT
/START-EDT
@READ '/'
@SYSTEM 'REMOVE-FILE-LINK EDTSAM'
@SYSTEM 'EXPORT-FILE FILE-NAME=SRVvrs.LIBS'
@WRITE 'SRVvrs.LIBS'
@HALT
/ASS-SYSDTA SRVvrs.LIBS
/MOD-JOB-SW ON=1
/START-PROG $LMS
/MOD-JOB-SW OFF=1
/ASS-SYSDTA *PRIMARY
Where:
vrs is the current version number (see Report of Tape Creation).
volser is the VOLSER of the tape (see Report of Tape Creation).
tape-device is the device-type of the tape, for example: TAPE-C4

Installation on the Mainframe
29
2
Step 2 - Copy the Procedure COPY.PROC from Tape to Disk.
To copy the procedure COPY.PROC from tape to disk, call the procedure P.COPYTAPE
in the library SRVvrs.LIB:
/CALL-PROCEDURE (SRVvrs.LIB, P.COPYTAPE), -
/ (VSNT=volser, DEVT=tape-device)
Where:
vrs is the current version number (see Report of Tape Creation).
volser is the VOLSER of the tape (see Report of Tape Creation).
tape-device is the device-type of the tape, for example: TAPE-C4
If you use a TAPE-C4 device, you may omit the parameter DEVT.
Step 3 - Copy all Product Files from Tape to Disk.
To copy all Software AG product files from tape to disk, enter the procedure
COPY.PROC:
/ENTER-PROCEDURE COPY.PROC, DEVT=tape-device
Where:
tape-device is the device-type of the tape, for example: TAPE-C4
If you use a TAPE-C4 device, you may omit the parameter DEVT. The result of this
procedure is written to the file 'L.REPORT.SRV'.

Natural Engineer Installation Guide
30
2
Mainframe Installation Steps
Perform the following steps after copying the tape contents to disk.
1. Establish Natural Engineer Database Files
SMA Reference: Job I050, Step 7000
Load the Natural Engineer Repository file contained in data set NEEvrs.SYS1.
SMA Reference: Job I050, Step 7001
Load the Natural Engineer Refactoring file contained in data set NEEvrs.SYS2.
Note: This is optional and is only required if you wish to use the Natural Engineer
Refactoring function.
2. Apply changes to Repository FDT
The Jobs NEEI051 provided with the example job library contain the necessary Adabas
utility JCL required to apply each of the changes to the Repository FDT.
From Natural Engineer Version 8.2.1
If you are upgrading from Natural Engineer version 8.2.1 to Natural Engineer version
8.2.2 then there are no conversion tasks to be performed.
From Natural Engineer Version 8.2.2 Base Release
If you are upgrading from Natural Engineer version 8.2.2 to Natural Engineer version
8.2.2.1 you will need to perform the following task:
SMA Reference: Job I051, Step 7110
[i] Release the following Superdescriptor:
SQ= AA(1,8), AZ(1,1), AK(1,32), RC(1,1), AB(1,8)
[ii] Conversion is Complete

Installation on the Mainframe
31
2
From Natural Engineer Version 8.2.2.1
If you are upgrading from Natural Engineer version 8.2.2.1 to Natural Engineer version
8.2.2.2 you will need to perform the following task:
SMA Reference: Job I051, Step 7120-7170
[i] Add the following fields to the end of the REPOSITORY file:
01,NQ,65,A,NU
[ii] Invert the following Superdescriptor:
ST= AA(1,8), AB(1,8), NQ(1,65)
[iii] Decompress the Repository file.
[iv] Backup and then delete the existing Repository file.
[v] Compress and Load using the inline definitions in the Job.
[vi] Conversion is Complete
From Natural Engineer Version 8.2.2.2
SMA Reference: Job I082, Step 7004
[i] If you are upgrading from Natural Engineer version 8.2.2.2 to Natural Engineer version
8.2.3 and have JCL loaded into your repository you will need to run the following object
in the SYSNEE library:
NEEJXCNV
Note: This program is completely re-executable and should be executed in a Natural
session invoked using the Natural Parameter file: NATENG
From Natural Engineer Version 8.2.3 Base Release
SMA Reference: Job I082, Step 7005
[i] If you are upgrading from Natural Engineer version 8.2.3 to Natural Engineer version
8.2.3.1 you will need to run the following object in the SYSNEE library:
NEEEXCNV
Note: This program is completely re-executable and should be executed in a Natural
session invoked using the Natural Parameter file: NATENG

Natural Engineer Installation Guide
32
2
From Natural Engineer Version 8.2.3.1 Base Release
SMA Reference: Job I082, Step 7006
[i] If you are upgrading from Natural Engineer version 8.2.3 to Natural Engineer version
8.2.3.1 and have COBOL Links defined then you will need to run the following object in
the SYSNEE library:
NEECLCNV
Note: This program is completely re-executable and should be executed in a Natural
session invoked using the Natural Parameter file: NATENG

Installation on the Mainframe
33
2
3. Modify, Reassemble and Link the NATPARM Module
SMA Reference: Job I060, Step 0010 (BS2000/OSD, z/VSE), Step 0010 + 0015 (z/OS)
1. Modify the NATPARM module used for the Natural Engineer process as described in
the table below.
Note: As an alternative to this step, users can use dynamic parameters in their Natural environment. The size parameters are recommendations only. You may have to adapt these
values to your particular environment.
Parameter Setting
DATSIZE=512 This is the maximum value. It is recommended to cover all values that may have been in place when an object was compiled.
LFILE=(095,001,010) Location of the Natural Engineer Refactoring file.
Logical number is 095 Physical Database is 001. Modify as required for the environment. Physical File Number is 010. Modify as required for the environment.
LFILE=(096,001,011) Location of the Natural Engineer Repository file.
Logical number is 096 Physical Database is 001. Modify as required for the environment. Physical File Number is 011. Modify as required for the environment.
ZD=OFF This prevents NAT1302 error during the Load process.
XML=(ON,RODC=ON,PARSE=ON) Only required if the Bulk Extract & Load processes (BLKEXL and BLKEXX) are to be used.
NTWORK=((1-24),AM=STD,OPEN=ACC,CLOSE=CMD)
NTPRINT=((1-2),OPEN=ACC,AM=STD,CLOSE=FIN)
2. Assemble and link the NATPARM module.

Natural Engineer Installation Guide
34
2
4. Link the Batch NATURAL Nucleus
SMA Reference: Job I060, Step 0020 (z/OS, z/VSE) Step 3801 (BS2000/OSD).
1. Find the JCL used to link your current batch Natural nucleus.
This will ensure that all INCLUDE statements specified when you built your current
batch Natural nucleus are supplied in this step.
2. In the INCLUDE statement for the NATPARM, specify the name of the NATPARM
module that you reassembled in Step 3.
3. Link the Natural nucleus.
5. Load Natural Engineer System Programs SMA Reference: Job I061, Step 7000
The Natural Engineer system programs are contained in the data set NEEvrs.INPL. Load
them to your Natural FNAT and FUSER system files using the Natural utility INPL.
Note: If you have an existing Natural Engineer Installation and are upgrading to Natural
Engineer v8.2.3 or above from a previous version then please delete the RJE Text
Members prefixed JCL* from your SYSNEE library and the relevant SYSNEEx library
before loading the Natural Engineer system programs.
For z/OS, the JCL is supplied within library SYSNEEM.
For z/VSE, the JCL is supplied within library SYSNEEV.
For BS2000/OSD, the JCL is supplied within library SYSNEEB.
6. Load Natural Engineer SYSERR messages
SMA Reference: Job I061, Step 7001
The Natural Engineer SYSERR messages are contained in the data set NEEvrs.ERRN.
Load them to your Natural FUSER system files using the Natural utility ERRLODUS.

Installation on the Mainframe
35
2
7. Load Example Application and Miscellaneous Sample Objects
SMA Reference: Job I061, Step 7002
The Natural Engineer example application (HOSPITAL) and the miscellaneous sample
objects (NEEEXPG) are contained in the data set NEEvrs.EXPL. Load it to your Natural
FUSER system files using the Natural utility INPL.
8. Load the Natural Engineer Jobs z/OS
SMA Reference: Job I200, Steps 7001-7026.
7001 NEEDELAP DELAPP
7002 NEEEXTMI EXTMIS
7003 NEEEXTRA EXTRACT
7004 NEEIMPAC IMPACT
7005 NEELOAD LOAD
7006 NEEREPEN REPORTEN
7007 NEEREPGL REPORTGL
7008 NEEREPIM REPORTIM
7009 NEEREPMO REPORTMO
7010 NEEMODIF MODIFY 7011 NEETASK TASKSCH
7012 IMPFLD
7013 JCLANAL
7015 NEARPC
7016 NEASERV 7017 NEASERVC
7020 NEERPC NEERPC
7021 SQLEXT
7022 SQLLOD
7023 SOFTLINK
7024 DELLODLG
7025 BLKEXX
7026 BLKEXL

Natural Engineer Installation Guide
36
2
The Natural Engineer sample jobs are contained in the JOBS data set for z/OS. Load the
sample jobs to your designated Natural Engineer job library.
The sample jobs supplied are for running in Batch Mode when not using the Natural
Engineer RJE function.
9. Modify Sample Jobs
1. The Job card statement will need to be set up with the correct site standard Job Name
convention applicable at your site. The Job Class will also need to be set to a valid
class applicable at your site. (It is recommended that you set this to a class that
equates to a ‘medium’ run time as a default for ALL jobs.)
2. Each of the Work File data set names contains a reference to the Application being
run through Natural Engineer. This can be identified in the sample jobs by looking
for ‘AAAAAAAA’ within the data set names. It is recommended that you change
this for each Application that you are running through Natural Engineer to avoid
overwriting any of the data sets.
3. Work File 1 contains the Natural Engineer Initialization parameters (CINI) and is
required in ALL the sample Jobs provided. It is set up as a PDS member called ‘CINI’ (in NEEvrs.SRCE). For each Application you are running you will need to
edit CINI to reflect the correct Application Library name. This can be identified
within CINI as ‘LIBRARY=AAAAAAAA’.
10. Natural Engineer RJE Jobs
Any batch jobs submitted via the Natural Engineer RJE function utilize JCL text members
to build up the jobs. These are loaded as part of the install process.
The user must modify these jobs and the Natural text members according to their
requirements.
Note: For z/OS, the JCL is supplied within library SYSNEEM. These should be copied to
the SYSNEE library.
For BS2000/OSD, the JCL is supplied within library SYSNEEB. These should be copied to
the SYSNEE Library.
For z/VSE, the JCL is supplied within library SYSNEEV. These should be copied to the
SYSNEE Library. When running under z/VSE, the minimum partition recommended to
execute Natural Engineer batch jobs is 8MB.
Installation on the Mainframe
37
2
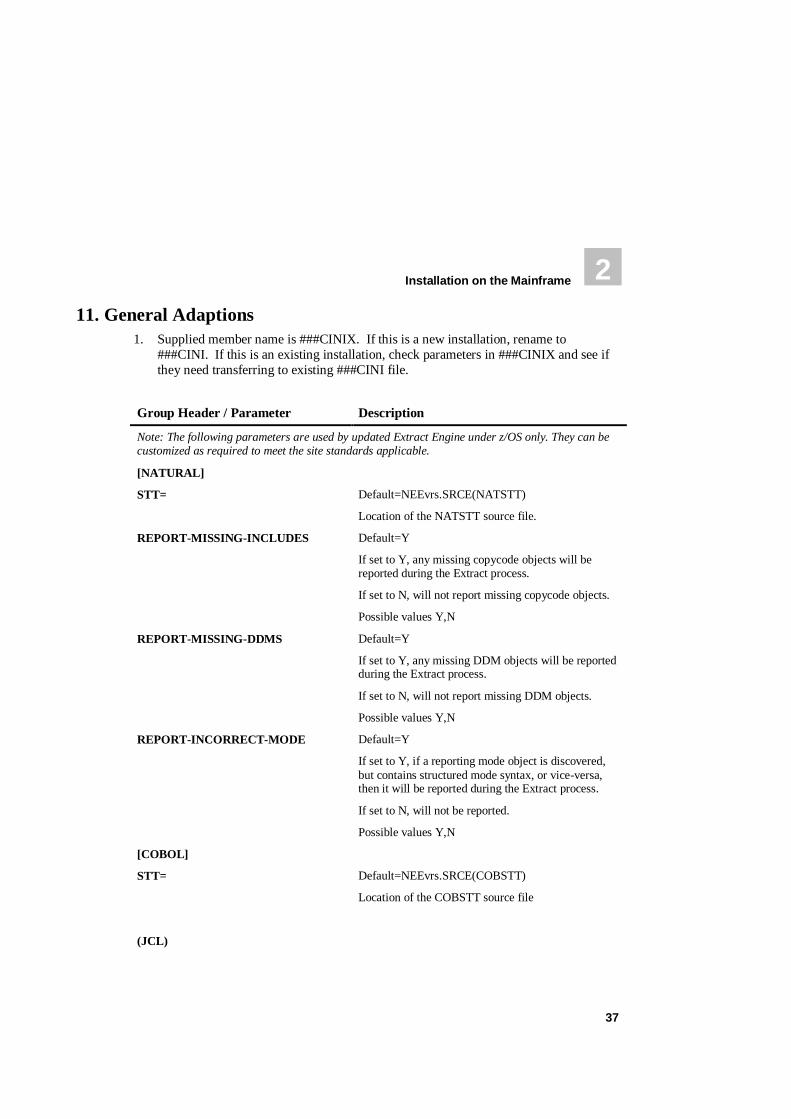
11. General Adaptions
1. Supplied member name is ###CINIX. If this is a new installation, rename to
###CINI. If this is an existing installation, check parameters in ###CINIX and see if
they need transferring to existing ###CINI file.
Group Header / Parameter Description
Note: The following parameters are used by updated Extract Engine under z/OS only. They can be customized as required to meet the site standards applicable.
[NATURAL]
STT= Default=NEEvrs.SRCE(NATSTT)
Location of the NATSTT source file.
REPORT-MISSING-INCLUDES Default=Y
If set to Y, any missing copycode objects will be reported during the Extract process.
If set to N, will not report missing copycode objects.
Possible values Y,N
REPORT-MISSING-DDMS Default=Y
If set to Y, any missing DDM objects will be reported during the Extract process.
If set to N, will not report missing DDM objects.
Possible values Y,N
REPORT-INCORRECT-MODE Default=Y
If set to Y, if a reporting mode object is discovered,
but contains structured mode syntax, or vice-versa, then it will be reported during the Extract process.
If set to N, will not be reported.
Possible values Y,N
[COBOL]
STT= Default=NEEvrs.SRCE(COBSTT)
Location of the COBSTT source file
(JCL)

Natural Engineer Installation Guide
38
2
Group Header / Parameter Description
STT= Default-NEEvrs.SRCE(JCLSTT)
Location of the JCLSTT source file
[EXTRACT]
CEE= Default=Y
If set to Y, will use the new Extract engine.
If set to N, will use the old Extract engine.
Possible values Y,N
NO-SECS= Default=N
If set to Y, when comparing timestamps, will include seconds, i.e. will use HH:MM:SS.
If set to N, when comparing timestamps, will not include seconds, i.e. will use HH:MM.
Possible values Y,N
JOBCLASS= Used by Bulk Extract and Load standalone job
(BLKEXL) to specify jobclass of the extract & load jobs.
2. Supplied member name ###DEFnn. If this is a new installation, rename to ###DEF01.
This contains the default values for the Multi-Search feature in Impact Analysis.
3. The supplied stand-alone batch jobs and Natural Engineer RJE JCL text members
need to be reviewed before any batch jobs are submitted. Modify as required to meet
your site standards.
Note: To make use of the new Extract engine, the RJE JCL text member JCLEXTR2
should point to the NEE Load library. This can be achieved by changing the CINI
parameter EXTRA-STEP1 to point to NEE.LOAD.
Note: For more information on modifying the batch jobs refer to section Modifying
Natural Engineer Batch Jobs.
4. The Application name associated with each Work File data set is handled
automatically by Natural Engineer RJE function.

Installation on the Mainframe
39
2
12. NATURAL SECURITY Considerations
To run Natural Engineer under Natural Security:
Define library SYSNEE to Natural Security for all Platforms.
Define library SYSNEEI to Natural Security for all Platforms.
Define library NEEEXPG to Natural Security for all Platforms.
Define library HOSPITAL to Natural Security for all Platforms.
Define library HOSPITAX to Natural Security for all Platforms.
Define library SYSNEEM to Natural Security for z/OS.
Define library SYSNEEV to Natural Security for z/VSE.
Define library SYSNEEB to Natural Security for BS2000.
13. Loading Natural Engineer Help System
SMA Reference: JOB I500, Step 7010
To run the load of the Natural Engineer Help System, execute member HELPLOAD from
the NEEvrs.JOBS data set. This will delete the existing Natural Engineer help and replace
it with the new version of the help from NEEvrs.HELP data set.
Note: For z/VSE, the member HELPLOAD is located in the NEEvrs.LIBJ data set.

Natural Engineer Installation Guide
40
2
14. User Exit Considerations
Natural User Exits
Natural Engineer utilizes various Natural user exits. These need to be made available to the Natural session where you are running Natural Engineer.
USR2021N
USR3005N
USR4206N
USR4209N
If you are using the Natural Engineer Web Interface then the following user exit also needs
to be made available.
USR1005N
Note: It is recommended that these User Exit objects are copied from SYSEXT to the
FNAT library SYSTEM.
Natural Engineer User Exits
Natural Engineer user exit modules are supplied named ‘NEEUEXnX’ where 'n' in the
number of the User Exit, on the Natural Engineer SYSNEE library supplied in the
NEEvrs.INPL data set. This is to avoid overwriting any existing (modified) versions on the
production SYSNEE library during Natural Engineer installation. If the user exit has not
been loaded before, then it will need to be renamed to ‘NEEUEXn’ e.g. NEEUEX2,
NEEUEX3 or NEEUEX4 accordingly before making use of the User Exit functionality.
N.B., NEEUEX5 and NEEUEX6 need to be present on the SYSNEE library before
starting Natural Engineer.
i. NEEUEX1 – Application Lock Password
NEEUEX1 is used if you wish to change the Application Lock Release Password from the
default value. The new value must be uppercase and contain no special characters.
ii. NEEUEX2 – RJE Job Submission
This is used to customize RJE online job submission.

Installation on the Mainframe
41
2
iii. NEEUEX3 - Modification
NEEUEX3 is used in modification.
The user exit module can be customized to replace selected items, which have been
impacted by the Impact Analysis process, within an object with up to 20 lines of new
source code.
iv. NEEUEX4 – NJX Processing
NEEUEX4 allows the dynamic generation of adapter and variable names in the Natural for
Ajax processing.
v. NEEUEX5 – Generate Application Names
NEEUEX5 allows for the dynamic generation of application names within Natural
Engineer.
vi. NEEUEX6 – Access to Applications
NEEUEX6 controls access to applications when Natural Security does not exist. This is
only used if you are running in a SPoD environment against a mainframe server.
Further information on the usage of these user exits are contained within the source of the
user exits themselves on the SYSNEE FNAT library.
15. Verify the Installation
To confirm that the installation was successful, follow the procedure described in the
Natural Engineer Application Management manual against the supplied example
application library.

Natural Engineer Installation Guide
42
2
Mainframe Customization
Setting Initialization Parameters
The various configuration options for Natural Engineer are held as initialization
parameters and are used to control both the online and batch processes within Natural
Engineer.
The initialization parameters are available in two locations:
1. Text member ###CINI located in the Natural Engineer library SYSNEE. This is used
by the online and Natural Engineer RJE batch job submission processes.
2. PDS Member CINI located in the installation tape data sets. This is used by any stand-
alone batch jobs only.
In both cases, the same initialization parameters can be applied.
Note: For more information on the various initialization parameters refer to Chapter 2 in
the Natural Engineer Administration Guide for Mainframes manual.

Installation on the Mainframe
43
2
Modifying Natural Engineer Batch Jobs
The Natural Engineer batch jobs need to be reviewed and administered to ensure that they
comply with your site standards before any batch job is submitted.
The Natural Engineer batch jobs are supplied in two formats:
1. Stand-alone batch jobs
The stand-alone batch jobs can be manually submitted after the appropriate online
selections and settings have been made.
For z/OS the JCL is supplied in the NEEvrs.JOBS data set on the installation tape.
2. Natural Engineer RJE JCL text members
The Natural Engineer RJE JCL text members are automatically submitted when a
batch function is selected online and the Natural Engineer RJE submission screen is
presented.
For z/OS, the JCL is supplied within library SYSNEEM. These should be copied to
the SYSNEE library.
For z/VSE, the JCL is supplied within library SYSNEEV. These should be copied to
the SYSNEE library.
For BS2000/OSD, the JCL is supplied within library SYSNEEB. These should be
copied to the SYSNEE library.

Natural Engineer Installation Guide
44
2
Supplied Natural Engineer Stand-alone Batch Jobs The following Natural Engineer stand-alone batch jobs are supplied:
Extract and Load Members Description
EXTMIS Extract Missing Objects.
EXTRACT Extract Application.
LOAD Load Repository.
BLKEXX Bulk Extract & Load Parameter Generator
BLKEXL Bulk Extract & Load Execution.
SQLEXT SQL Tables Extract.
SQLLOD SQL Tables Load.
Application Management Members
Description
JCLANAL JCL Analysis.
SOFTLINK Softlink Import.
Impact Member Description
IMPACT Impact Execution.
IMPFLD Impact Execution – Field Analysis.
Data Modification Member Description
MODIFY Execute Modification for all Objects.
Report Members Description
REPORTGL Global Reports.
REPORTIM Impact Reports.
REPORTMO Modification Reports.
REPORTEN Application Reports.

Installation on the Mainframe
45
2
Deletion Members Description
DELAPP Application Delete.
DELLODLG Delete Load Audit Log Records.
Natural Engineer Web Interface Members
Description
NEARPC NEA RPC Engine.
NEASERV NEA Server Start.
NEASERVC NEA Server Cancel.
Bulk Extract & Load
There are two supplied Natural Engineer stand-alone batch jobs that may be used to
provide automatic extract and load of one or more applications.
BLKEXX Bulk Extract & Load Parameter Generator
BLKEXL Bulk Extract & Load Execution.
BLKEXX is designed to run against an existing repository and will read all current extract
and load settings and produce an XML file that may be tailored by the user to their own
requirements. This XML file is then used by the Bulk Extract & Load Execution process
(BLKEXL).
If you wish to run the Bulk Extract & Load then the following Natural parameter should
be added to the session where you are running Natural Engineer:
XML=(ON,RODC=ON,PARSE=ON)

Natural Engineer Installation Guide
46
2
Bulk Extract & Load Parameter Generator
BLKEXX will produce an XML Template based on existing extract and load settings. It
requires three input parameters:
* #IN-OPT(A03) - TMP for template xml file
* - EXT for xml file containing application overrides
* #IN-OVERRIDES(A01) - Y = Individual application settings for extract
* languages, Sync flags & Natural Objects for
* Compilation & Called Objects will be included.
* #IN-APP-RANGE(A17) - Application Range (wildcards or range A:BB)
NB: Wildcard names for Application Range may be ‘starting from’ e.g., ABC* will process
all applications beginning with ABC or ‘ending a’t e.g., *XYZ will process all applications
ending in XYZ.
Sample Bulk Extract & Load XML template
If you wish to build your own template for input into the Bulk Extract & Load Execution
process then a text member BLKEXX-T is provided in the Natural Engineer SYSNEE
library explain the tags required. It contains;
<?xml version='1.0' ?>
<BLKEXL>
<GeneralParms>
<JobName></JobName> <!-- Mandatory. Defaults to 5 chars of *USER. Only
1st 5 chars used in job submission to allow
sequential numbering of jobnames -->
<JobClass></JobClass> <!-- Mandatory. -->
<JobSysid></JobSysid>
<ExtractParms>
<Applications></Applications> <!-- Mandatory. Wildcards & ranges
allowed e.g. A:BZZZZZZZ) Multiple
tags allowed. -->
<Languages></Languages> <!-- Mandatory. N,J and/or C -->
<NaturalSync></NaturalSync> <!-- Mandatory. Y/N -->
<CobolSync></CobolSync> <!-- Mandatory. Y/N -->
<JCLSync></JCLSync> <!-- Mandatory. Y/N -->
<NaturalObjCompilation></NaturalObjCompilation> <!-- Mandatory.Y/N->
<NaturalCalledObjects></NaturalCalledObjects> <!-- Mandatory.Y/N->
</ExtractParms>
<LoadParms>
<!—Following tags are mandatory. Y/N, Values obtained from ini file
if present -->
<CalculateMetrics></CalculateMetrics>
<ForceReplace></ForceReplace>
<ValidateObjects></ValidateObjects>
</LoadParms>
</GeneralParms>

Installation on the Mainframe
47
2 <AppOverrides> <!-- Optional section -->
<App>
<AppName></AppName>
<ExtractParms>
<Languages></Languages> <!-- If present, overrides General Parms
Languages. N J and or C -->
<Natural>
<ObjectTypes></ObjectTypes>
<!-- If present, overrides General Parms Y/N -->
<Sync></Sync>
<ObjCompilation></ObjCompilation
<CalledObjects></CalledObjects>
<InclObjectRange></InclObjectRange>
<UserDefFile></UserDefFile>
<EntryPointApp></EntryPointApp>
<EntryPointObject></EntryPointObject>
<EntryPointLevels></EntryPointLevels>
<ExclObjectRange></ExclObjectRange>
<ExclUserDefFile></ExclUserDefFile>
<ValidMissObjects></ValidMissObjects>
</Natural>
<Cobol>
<Sync></Sync> <!-- If present, overrides General Parms Y/N -->
<InclObjectRange></InclObjectRange>
<UserDefFile></UserDefFile>
<ExclObjectRange></ExclObjectRange>
<ExclUserDefFile></ExclUserDefFile>
<ValidMissObjects></ValidMissObjects>
</Cobol>
<JCL>
<Sync></Sync> <!-- If present, overrides General Parms Y/N -->
<InclObjectRange></InclObjectRange>
<UserDefFile></UserDefFile>
<ExclObjectRange></ExclObjectRange>
<ExclUserDefFile></ExclUserDefFile>
<ValidMissObjects></ValidMissObjects>
</JCL>
</ExtractParms>
<LoadParms>
<!-- If present, overrides General Parms Y/N -->
<CalculateMetrics></CalculateMetrics>
<ForceReplace></ForceReplace>
<ValidateObjects></ValidateObjects>
</LoadParms>
</App>
</AppOverrides>
</BLKEXL>

Natural Engineer Installation Guide
48
2
JCL Analysis
The supplied JCLANAL stand-alone job for JCL Analysis may be modified to process a
selection of applications and objects as required.
The parameters into the process are specified as follows;
Some examples:
JCEANA-P HOSPITAL,Y,N,XX*,,5
Will perform analysis on all unprocessed jobs in HOSPITAL in range XX* to object level
limit of 5.
JCEANA-P HOSPITAL,N,Y,,,0
Will perform analysis on all jobs in HOSPITAL with no limit check.
JCEANA-P HOSPITAL,Y,Y,,,5
Will perform analysis on all unprocessed jobs in HOSPITAL to object level limit of 5
. JCEANA-P HOSPITAL,N,N,XX00001,XX00100,5
Will perform analysis on all jobs in HOSPITAL with range XX00001-XX00100 to object
level limit of 5.

Installation on the Mainframe
49
2
Global Changes for z/OS
Stand-alone Batch Jobs
The supplied Natural Engineer stand-alone batch jobs for z/OS should be reviewed to
adapt them to your site standards. The following changes need to be addressed:
Value Description
UNIT=3390 Specify correct UNIT type.
VOL=SER=XXXXXX Specify correct DASD volume.
PGM=NATvrsBAT Specify correct batch Natural program.
DSN=NEEvrs.SRCE Specify name of supplied NEEvrs.SRCE.
DSN=NAT.LOAD Specify name of batch Natural steplib.
DSN=ADA.LOAD Specify name of Adabas steplib.
DB=025 Specify normal database for ADARUN parameters.
SVC=233 Specify correct SVC number for ADARUN parameters.
DEVICE=3390 Specify correct DEVICE for the database.
AAAAAAAA Specify name of application to be processed.
Additional Changes for Stand-alone Batch Jobs
Check that the environment settings for ‘MSGCLASS=’ and ‘MSGLEVEL=’ are correct
for your site standards.
A default Job Name and Job Class are supplied with each stand-alone batch job. These can
be modified to your site standards as required.

Natural Engineer Installation Guide
50
2
Natural Engineer RJE JCL Text Members
The supplied Natural Engineer RJE JCL text members for z/OS should be reviewed to
adapt them to your site standards. This can be done by reviewing the following
initialization parameters in the Natural Engineer text member ###CINI:
Group Header / Parameter Description
[JCL-MVS]
Note: The following parameters are used by the Natural Engineer RJE JCL text members only. They can be customized as required to meet the site standards applicable.
ADADB= Default=025
The Adabas database number.
ADASVC= Default=233
The Adabas SVC number.
ADADEVICE= Default=3390
The Adabas device type.
LOGON= Default=LOGON SYSNEE
The name of the Natural Engineer logon library.
Note: If Natural Security is being utilized then the
USER and PASSWORD information can be also be specified here. For example:
LOGON=SYSNEE,USER,PASSWORD
UNIT= Default=3390
The device type where the data set resides.
If the batch environment utilizes System Managed Storage (SMS), then UNIT=SMS can be specified.
Note: If UNIT=SMS is specified then the JCL line
containing this information is not included in the submitted JCL stack.
VOL= Default=DISK01
The volume name where the data set resides.

Installation on the Mainframe
51
2
Group Header / Parameter Description
NATBAT= Default=NATvrsBAT
The name of the batch Natural program used during batch job submission.
NATLOAD= Default=NATvrs.LOAD
The name of the Natural load library.
ADALOAD= Default=ADAvrs.LOAD
The name of the Adabas load library.
PARM= Any parameter data to be passed to the batch Natural program. For example:
PARM=’PROFILE=SYSNEE2’
Note: If PARM=is left blank, then the JCL line containing this information is not included in the submitted JCL stack.
EXTRA-STEP1= Default=NEEvrs.LOAD
Additional load library to be included for the batch Natural program.
Note: If EXTRA-STEP1=is left blank, then the JCL line containing this information is not included in the submitted JCL stack.
EXTRA-STEP2= Additional load library to be included for the batch Natural program.
Note: If EXTRA-STEP2=is left blank, then the JCL
line containing this information is not included in the submitted JCL stack.
HLQ= Default=NATENG
The high level qualifier name used for Natural Engineer data sets.
Note: Do not change the application name setting of ‘AAAAAAAA’, this is dynamically
replaced by the Natural Engineer RJE Job submission screen with the name of the
currently selected application.

Natural Engineer Installation Guide
52
2
Additional Changes for Natural Engineer JCL text member JCLSTART
Check that the environment settings for Job Class, ‘MSGCLASS=’ and ‘MSGLEVEL=’
are correct for your site standards.
Note: Do not change the job name setting of ‘NNNNNNNN’, this is dynamically replaced
by the Natural Engineer RJE Job submission screen.
Global Changes for z/VSE
Stand-alone Batch Jobs
The supplied Natural Engineer stand-alone batch jobs for z/VSE should be reviewed to
adapt them to your site standards. The following changes need to be addressed:
Value Description
VVVVVV,,,XXXX,YYYY Specify correct DASD volume, start track and number of tracks.
EXEC NATvrsBA Specify correct batch Natural program.
SAGLIB.NATvrs Specify name of batch Natural steplib.
SAGLIB.ADAvrs Specify name of Adabas steplib.
DB=002 Specify normal database for ADARUN parameters.
SVC=045 Specify correct SVC number for ADARUN parameters.
DEVICE=3390 Specify correct DEVICE for the database.
AAAAAAAA Specify name of application to be processed.
Note: The batch job CREATE.J creates the CINI (initialization parameters) file to be used
by subsequent stand-alone batch jobs. This must be run before any other stand-alone
batch jobs in order to correctly establish the CINI file.
Additional Changes for Stand-alone Batch Jobs
Check that the environment settings for ‘DISP=’ and ‘DEST=’ are correct for your site
standards.

Installation on the Mainframe
53
2
A default Job Name and Job Class are supplied with each stand-alone batch job. These can
be modified to your site standards as required.
Natural Engineer RJE JCL Text Members
The supplied Natural Engineer RJE JCL text members for z/VSE should be reviewed to
adapt them to your site standards. This can be done by reviewing the following
initialization parameters in the Natural Engineer text member ###CINI:
Group Header / Parameter Description
[JCL-VSE]
Note: The following parameters are used by the Natural Engineer RJE JCL text members only. They can be customized as required to meet the site standards applicable.
ADADB= Default=002
The Adabas database number.
ADASVC= Default=045
The Adabas SVC number.
ADADEVICE= Default=3390
The Adabas device type.
LOGON= Default=LOGON SYSNEE
The name of the Natural Engineer logon library.
Note: If Natural Security is being utilized then the USER and PASSWORD information can be also be specified here. For example:
LOGON=SYSNEE,USER,PASSWORD
Note: Do not change the application name setting of ‘AAAAAAAA’, this is dynamically
replaced by the Natural Engineer RJE Job submission screen with the name of the
currently selected application.

Natural Engineer Installation Guide
54
2
Additional Changes for Natural Engineer JCL text member JCLSTART
Check that the environment settings for Job Class, ‘DISP=’ and ‘DEST=’ are correct for
your site standards.
Note: Do not change the job name setting of ‘NNNNNNNN’, this is dynamically replaced
by the Natural Engineer RJE Job submission screen.
The supplied Natural Engineer RJE text member JCLSTART for z/VSE includes settings
for dynamic JCL parameters which are used throughout the Natural Engineer RJE JCL text
members for z/VSE. These are dynamically resolved at run time.
Review the following dynamic JCL parameters in JCLSTART:
Value Description
USRLIB=’SAGLIB.USRNATvrs’ Specify name of batch Natural steplib.
ADALIB=’SAGLIB.ADAvrs’ Specify name of Adabas steplib.
NATBAT=’NAT vrsBA’ Specify correct batch Natural program.
DEV001 Specify the disk name for the data set.
ssss,nnnn Specify the start track and number of tracks for the data set
Note: The disk name, start track and number of tracks information is repeated for each Natural Engineer data set required. They are identified by the ‘SETPARM’ JCL statement.
Global Changes for BS2000/OSD
Natural Engineer RJE JCL Text Members
The supplied Natural Engineer RJE JCL text members for BS2000/OSD should be
reviewed to adapt them to your site standards. This can be done by reviewing the
following initialization parameters in the Natural Engineer text member ###CINI:
Group Header / Parameter Description
[JCL-BS2000]

Installation on the Mainframe
55
2
Group Header / Parameter Description
Note: The following parameters are used by the Natural Engineer RJE JCL text members only. They can be customized as required to meet the site standards applicable.
NATBAT= Default=NATEXE
The name of the batch Natural program used during batch job submission.
LOGON= Default=LOGON SYSNEE
The name of the Natural Engineer logon library.
Note: If Natural Security is being utilized then the
USER and PASSWORD information can be also be specified here. For example:
LOGON=SYSNEE,USER,PASSWORD
Note: Do not change the application name setting of ‘AAAAAAAA’, this is dynamically
replaced by the Natural Engineer RJE Job submission screen with the name of the
currently selected application.
Additional Changes for Natural Engineer JCL text member JCLSTART
Check that the various environment settings are correct for your site standards.
Note: Do not change the job name setting of ‘NNNNNNNN’, this is dynamically replaced
by the Natural Engineer RJE Job submission screen.

Natural Engineer Installation Guide
56
2
Natural Engineer Processes and Related Jobs
This section illustrates the relationships between the Natural Engineer batch processes, the
stand-alone batch jobs and the Natural Engineer JCL text members.
Extract Missing Objects
Stand-alone Batch Job Equivalent Natural Engineer RJE JCL text members
EXTMIS JCLSTART
JCLINIWT JCLEXTMS JCLLAST
Extract Application
Stand-alone Batch Job Equivalent Natural Engineer RJE JCL text members
EXTRACT JCLSTART JCLINIWT JCLEXTRT
Load Repository
Stand-alone Batch Job Equivalent Natural Engineer RJE JCL text members
LOAD JCLSTART
JCLINIWT JCLLOAD JCLLAST

Installation on the Mainframe
57
2
Extract and Load
Stand-alone Batch Job Equivalent Natural Engineer RJE JCL text members
EXTRACT LOAD
JCLSTART
JCLINIWT JCLEXTLD
Extract, Load and Impact
Stand-alone Batch Job Equivalent Natural Engineer RJE JCL text members
EXTRACT LOAD IMPACT
JCLSTART JCLINIWT
JCLEXLDI
Impact Execution
Stand-alone Batch Job Equivalent Natural Engineer RJE JCL text members
IMPACT JCLSTART
JCLINIWT JCLIMPCT JCLLAST
Impact Execution Field Analysis
Stand-alone Batch Job Equivalent Natural Engineer RJE JCL text members
IMPFLD JCLSTART
JCLINIWT JCLIMPWZ JCLLAST

Natural Engineer Installation Guide
58
2
Execute Modification for all Objects
Stand-alone Batch Job Equivalent Natural Engineer RJE JCL text members
MODIFY JCLSTART
JCLINIWT JCLREMDY JCLLAST
Global Reports
Stand-alone Batch Job Equivalent Natural Engineer RJE JCL text members
REPORTGL JCLSTART
JCLINIWT JCLREPGL JCLREPCT JCLLAST

Installation on the Mainframe
59
2
Application Reports
Stand-alone Batch Job Equivalent Natural Engineer RJE JCL text members
REPORTEN JCLSTART
JCLINIWT JCLREPAP JCLREPCT JCLLAST
Impact Reports
Stand-alone Batch Job Equivalent Natural Engineer RJE JCL text members
REPORTIM JCLSTART JCLINIWT JCLREPIM JCLREPCT JCLLAST
Modification Reports
Stand-alone Batch Job Equivalent Natural Engineer RJE JCL text members
REPORTMO JCLSTART
JCLINIWT JCLREPRM JCLREPCT JCLLAST

Natural Engineer Installation Guide
60
2
Application Delete
Stand-alone Batch Job Equivalent Natural Engineer RJE JCL text members
DELAPP JCLSTART
JCLINIWT JCLDELET
Application Management
Stand-alone Batch Job Equivalent Natural Engineer RJE JCL text members
JCLANAL JCLSTART
JCLINIWT JCLJCEAN
JCLLAST
SQL Tables Extract
Stand-alone Batch Job Equivalent Natural Engineer RJE JCL text members
SQLEXT JCLSTART
JCLINIWT JCLSQLEX
SQL Tables Load
Stand-alone Batch Job Equivalent Natural Engineer RJE JCL text members
SQLLOD JCLSTART JCLINIWT JCLSQLLD

Installation on the Mainframe
61
2
Soft Links Import
Stand-alone Batch Job Equivalent Natural Engineer RJE JCL text members
SOFTLINK JCLSTART
JCLINIWT JCLSOFT
JCLLAST
Delete Load Audit Log Records
Stand-alone Batch Job Equivalent Natural Engineer RJE JCL text members
DELLODLG JCLSTART
JCLINIWT JCLLOGDL
JCLLAST


63
3 INSTALLATION ON UNIX
Chapter Overview
This chapter explains how to install and customize Natural Engineer on Unix for the
purpose of execution under Natural.
This information is organized in the following sections:
Installation Prerequisites.
Installation and Setting Up Software AG Products Under Unix.
Setup and Installation of Natural Engineer on Unix.
Preparing your Natural/Adabas Environment for working with Natural Engineer.
After the Installation.
Installation Prerequisites
This section contains general information on the prerequisites needed before installing and
setting up Natural Engineer on a UNIX platform.
Note: The information contained in this section is independent of hardware type and
platform.
This section covers the following topics:
Supported UNIX Platform
Installation Package
Space Requirements
Product Requirements
Product-specific installation, configuration and installation verification procedures are
described in the section Setup and Installation of Natural Engineer on UNIX.

Natural Engineer Installation Guide
64
3
Supported UNIX Platform
The supported UNIX platforms are AIX6.1 and 7.1, SUSE Linux Enterprise Server 11 64-
bit, RedHat Linux 6 64-bit and Solaris 10.
Installation Package
The installation package containing Software AG products is available on ISO 9660 CD-
ROM in cpio format.
Space Requirements
For the Natural programs, you require approximately 48 MB of disk space, plus an
additional 66 MB of disk space for the installation.
For the database, you require at least the following for an application of 4000
objects.:
Repository File
ASSO 100 Meg
DATA 100 Meg
Component File
ASSO 10 Meg
DATA 10 Meg
Note: WORK must be at least 50 MB, Blksize minimum of 5k.

Installation on UNIX
65
3
Product Requirements
The products listed below must be installed in order to use Natural Engineer 8.2.
Product Name
(Product ID)
Requirements
Natural (NAT)
Natural 6.3.1 or above.
The following parameter settings are recommended during the installation
of Natural Engineer 8.2:
MADIO=0
MAXCL=0 MT=0
The Natural buffer pool must be available.
For information on the recommended Natural parameter settings after a
successful Natural Engineer installation see Natural Parameters in the section Preparing your Natural/Adabas Environment for Working with Natural Engineer.
Adabas (ADA)
Adabas 6.1.8 or above.
For information on the recommended Adabas parameter settings after a
successful Natural Engineer installation see Adabas Parameters in the
section Preparing your Natural/Adabas Environment for Working with Natural Engineer.

Natural Engineer Installation Guide
66
3
Installing and Setting Up Software AG Products on
UNIX
This document contains general information which applies when installing and setting up
any Software AG product on a UNIX platform. The following topics are covered:
General Information
Before Installing Your Software AG Product
Installing the Contents of the Installation Medium to Disk
General Information
Installation Package
The installation package containing Software AG products is provided on an installation
medium conforming to the ISO 9660 standard.
The installation medium contains a complete directory structure which clearly specifies
product and platform.

Installation on UNIX
67
3
Software AG Environment
The following figure shows the general directory structure generated during installation
and the environment variables which reference the specified directories:
The environment variable $SAG defines the root directory for all Software AG products. It
is recommended to define SAG=/opt/softwareag.
For each product, the variable $prodDIR is set to the path of the main directory of the
product specified, where prod is a three-letter product code in upper-case letters. For
example, all files for Natural, whose product code is "NAT", are contained in the directory
$NATDIR.
However, there are exceptions to this convention. For example, the product code for
Predict is "PRD" but the environment variables use the prefix "DIC" instead.

Natural Engineer Installation Guide
68
3
The name of the main directory is usually the same as the product code in lower-case
letters. For example, the main directory for Natural is named "nat".
Version-independent parts of the product, such as examples or data, are stored in a
subdirectory of the product main directory. For example, all Adabas demonstration data is
contained in the directory $ADADIR/adademo.
Version-dependent components of the product are kept in the version directory
$<prod>DIR/$<prod>VERS. For example, the current version of Natural is stored in the
directory $NATDIR/$NATVERS.
The environment variables prodDIR and prodVERS for all products specified during
installation are defined via the file sagenv.new. The same applies for any other
environment variables needed for the various products.
It is recommended that you use /opt/softwareag as one common root directory for all of
your Software AG products. For Linux systems, this location is the registered name with
LANANA.
The default search path for dependent libraries of some Software AG products is
/opt/softwareag. They are loaded from this location or using the environment variable
$LD_LIBRARY_PATH ($SHLIB_PATH on HP-UX systems). If you install the product
to a different location (for example, /usr/SAG instead of /opt/softwareag), you may create
a symbolic link to your $SAG directory to get a valid default search path:
su
cd /opt
ln -s $SAG softwareag
The following activities must be performed if you are installing a Software AG product for
the first time, or if your environment is not yet set correctly due to any other causes.
This section covers the following topics:
Creating the Administrator's Account and Group
Backing Up Your Current Product Version
Logging in as User "sag"

Installation on UNIX
69
3
Creating the Administrator's Account and Group
You must create one administrator account and one group for all Software AG products
when you install your first Software AG product.
1. Define an administrator account to which all of the Software AG products installed at
your site belong. Since all environment definition files for the products are written in
Bourne shell syntax, the Bourne (or Korn) shell is recommended as the login shell for
the administrator account. This section assumes that the administrator account is
called "sag".
2. Define a group to which the administrator belongs. This section assumes that this
group is also called "sag".
3. Create a login directory for the user "sag" (for example, /opt/softwareag).
4. Make sure that the group "sag" is defined in the system file /etc/group and the user
"sag" is defined in the system file /etc/passwd.
Note: To perform these steps, use an appropriate system administration tool.
Backing Up Your Current Product Version
When upgrading a product, it is strongly recommended that you back up your current
product version.
Logging in as User "sag"
This description assumes that the user "sag" is the administrator for Software AG
products. It is recommended to log in as the user "sag".
Installing the Contents of the Installation Medium to Disk
Before performing the following steps, make sure that the administrator user and group
have been created and defined.

Natural Engineer Installation Guide
70
3
To Install the contents of the installation medium to disk
1. Load the installation medium and mount it if this is not done automatically.
Command Description
su - root To mount an installation medium you may need to be
root.
mkdir /mount-dir You may need to create a mount directory for the
installation medium.
mount platform-specific_mount_options device-name /mount-dir
Execute the mount command (see the table below for
operating system-specific mount commands).
exit Return to "sag" user.
2. Platform-specific mount command and options to mount the installation medium as
ISO9660 or High-Sierra file system:
Platform Mount Command
AIX /etc/mount -v-cdrfs -o ro device-name /mount-dir
HP-UX /usr/sbin/mount -F cdfs -o cdcase device-name /mount-dir
Solaris /usr/sbin/mount -F hsfs -o ro device-name /mount-dir
Linux /bin/mount -t iso9660 -o ro device-name /mount-dir
3. On Solaris, the volume management daemon vold might be active. This daemon mounts
the installation medium automatically.

Installation on UNIX
71
3
4. Example for Linux:
/bin/mount -t iso9660 -o ro /dev/cdrom /mnt
5. Check the directory structure of the UNIX part of the installation medium. When you run
an ls(1) command on the installation medium, you will see a structure like the
following:
Note: Depending on the mount options used, the files will be all upper case or all lower
case. If you mount the installation medium as a pure ISO 9660 Interchange Level I CD,
you will also see a version number ";1" appended to all files. Please note this for the
following steps and use the correct name format.
6. For Linux S/390, a single archive is provided for your convenience (for example, for
Natural this is the file NATv621n.tgz). The following steps can be performed after you

Natural Engineer Installation Guide
72
3
have loaded the installation medium on a Windows or UNIX machine that has a network
connection to the Linux S/390 system:
a. Copy the archive file (<file-name>.tgz) that is located in the root directory of the
installation medium to a temporary area such as /tmp/cdrom in your Linux S/390
environment, using for example ftp in binary mode.
b. Unpack the archive using the command tar -xzvf file-name.tgz.
c. Read the installation instructions for details on how to start the installation from
this media in the file setup.txt in this directory. Instructions of how to proceed after
installing the software will be displayed at the end of the installation and also
copied onto your hard disk.
7. Please continue reading the step-by-step installation instructions for the Software AG
product being installed.

Installation on UNIX
73
3
Setup and Installation of Natural Engineer on UNIX
This document describes how to set up and install Natural Engineer 8.2 on a UNIX
platform. The following topics are covered:
Installation Steps
Post Installation Steps
Unix Customization
Natural Engineer Processes and Related Jobs
Installation Steps
The following steps are required when installing Natural Engineer. Some of the steps
described below or options available in some of the steps described, only apply to either a
new or partly installation or an upgrade installation. Such steps or options are marked with
corresponding annotations or notes. See the following list for an overview of the
installation steps:
Step 1: Mount Your CD-ROM Drive
Step 2: Choose Character or Graphical Mode
Step 3: Start the Installation Process
Step 4: Welcome
Step 5: Software License Agreement
Step 6: Destination Location
Step 7: License File
Step 8: Installation Information
Step 9: Installation Status
Step 10: Select Post installation Steps
Step 11: Environment Check
Step 12: Parameter File Template

Natural Engineer Installation Guide
74
3
Step 13: FNAT System File Settings
Step 14: Natural Engineer Repository File Selection
Step 15: Natural Engineer Component File Selection
Step 16: Load Natural Engineer Modules into Natural
Step 17: Load Data to Natural Engineer Repository System File
Step 18: SAG Environment Script
Step 19: Installation Complete
Step 1: Mount Your CD-ROM Drive
If your CD-ROM drive has not yet been mounted, mount it now as described in the section
Installing the Contents of the CD-ROM to Disk of the steps common to all Software AG
products.
When the installation is started, the setup procedure will check the hardware platform and
operating system version and then start the appropriate installation program.
Step 2: Choose Character or Graphical Mode
The installation procedure examines the environment variable DISPLAY to determine
whether to run in graphical or character mode.
To use graphical mode, the environment variable DISPLAY must be set. If it is not
yet set in your environment and you want to use graphical mode, set it using the
following commands:
DISPLAY="machine_name:0"
export DISPLAY
Character mode will be used automatically if the environment variable DISPLAY is
not set. If DISPLAY has been set in your environment but you want to use character
mode, you can use the -nw option when you start the installation.
At the end of an installation process, in either mode, a batch script is generated and
written to $SAG/nee/v822/INSTALL. It lists the parameters specified for that
particular installation. Adapt the script to your needs.
You can use the -help option to display a list of all supported parameters.

Installation on UNIX
75
3
To display the Natural Engineer-specific batch mode parameters, enter the following
command:
setup.ux nee version -help
where version represents the version of the current Natural Engineer CD; for
example, "v823".
Step 3: Start the Installation Process
To perform this step, you must be either the user "sag" or a member of the group "sag" to
which the administrator and all users of Software AG products are assigned. Do not
perform this step as the user "root".
Start the installation procedure from a writable working directory.
We recommend $SAG/INSTALL. Enter the command:
sh /mount_dir/setup.ux [-nw]
where mount_dir is the starting directory on your product CD-ROM. Upper/lower
case usage is possible depending on your local settings.
Note: The following descriptions of installation steps assume that the graphical
installation mode is used. The step sequence is the same in character mode.
The setup program is started and guides you through the installation. During
installation you have to provide the license key.
Notes:
1. Once the installation has been successfully completed, you can remove the
working directory and all of its contents.
2. The installation procedure creates the file sagenv.new. This file contains the
settings for all required environment variables. Insert these settings into your
profile (for example, .profile).
Step 4: Welcome
In this screen, the variant of Natural Engineer that is to be installed is displayed.
Choose Next to proceed.

Natural Engineer Installation Guide
76
3
Step 5: Software Legal Notice
In this screen, the license agreement is displayed.
Choose the I Accept button to proceed.
Note: If you run the installation procedure in character mode, at each command prompt,
you must type in the exact wording (for example: "accept" for "accept", not just "y" or the
ENTER key).

Installation on UNIX
77
3
Step 6: Destination Location
In this screen, you can change the value of the $SAG environment variable, which is the
path of the directory tree where all Software AG products are installed.
By default, the content of the current $SAG variable is displayed.
1. If required, enter a different path.
Or:
Choose the Browse button to select a different path.
2. Choose Next to proceed.
Step 7: License File
In this screen, you can specify the directory of the license file.
Note: By default, your-current-directory/common/LKey/nee82.xml is displayed.
1. If you do not want to use the displayed license file, specify the path to your license
file.
Or:
Choose the Browse button to select the license file.
2. If you choose the View button, the content of your license file is displayed in a
separate screen. Choose OK or Quit to go back to the License File screen.
3. Choose Next to proceed.
Step 8: Installation Information
In this screen, the selected features are displayed.
1. To review or change your settings, choose the Back button.
2. Choose Next to begin extracting files.
Step 9: Installation Status
This screen, which contains a progress indicator, informs you about the installation status.
Please wait until the selected components have been installed.
When all files have been extracted, choose Next to proceed.

Natural Engineer Installation Guide
78
3
Step 10: Select Post Installation Steps
In this screen, you can specify which steps are performed during post installation.
1. You can specify that the Natural Engineer System File shall be created
Or:
You can specify that you want the Natural Engineer modules to be installed.
Or:
You can specify both of the above options.
Notes:
1. You are recommended to keep the default settings.
2. When performing an upgrade installation, you can only specify, whether or not
the Natural Engineer modules are loaded into Natural.
2. Choose Next to proceed.
Step 11: Environment Check
In this screen, you can specify the version of either your Natural ($NATVERS) or Adabas
($ADADIR/$ADAVERS) environment or specify both.
1. You can use the displayed environment settings.
Or:
Choose the Browse (...) button to change the path.
2. You can specify a remote database by checking the box Use remote database.
If you want to use a remote database, you need to make sure that the database you
want to use has been configured correctly and the Natural Engineer repository file
already exists.
Adabas databases outside of the current $SAG directory (that is: in another $SAG
directory) must be defined as remote.
3. Choose Next to proceed.
Notes:
1. Natural Engineer requires either a Natural or an Adabas environment (or both)
present before the installation.

Installation on UNIX
79
3
2. If only a Natural environment is present, only Natural Engineer programs are
available. The installation then assumes that the Natural Engineer system file is
available in a remote environment.
3. If only an Adabas environment is present, only the Natural Engineer system
file can be installed.
Step 12: Parameter File Template
In this screen, you can specify an existing Natural parameter module which will be used as
template for a new Natural Engineer parameter module.
1. Select NATPARM from the selection box if you want to use the NATPARM module
without changing FNAT/FUSER settings.
Note: You can choose the command button displaying a magnifying glass to display
the contents of the currently selected parameter file.
2. Choose Next to proceed.
Step 13: FNAT System File Settings
1. Select your FNAT settings.
2. Choose Next to proceed.
Step 14: Natural Engineer Repository File Selection
In this screen, you can select the database ID (DBID) and you can enter the file number
(FNR) for your main Natural Engineer Repository system file.
1. You can choose an existing FNR from the selection box.
Or:
Enter an unused file number if you want to create a new main Natural Engineer
Repository file.
2. Choose Next to proceed.
3. Either confirm the settings made by choosing Yes or decline them by choosing No in
the following screen.

Natural Engineer Installation Guide
80
3
Step 15: Natural Engineer Component File Selection
If you are using the Refactoring function within Natural Engineer then in this screen, you
can select the database ID (DBID) and you can enter the file number (FNR) for your
Natural Engineer Component system file.
1. You can choose an existing FNR from the selection box.
Or:
Enter an unused file number if you want to create a new Component file.
2. Choose Next to proceed.
3. Either confirm the settings made by choosing Yes or decline them by choosing No in
the following screen.
Step 16: Load Natural Engineer Modules into Natural
This screen, which contains a progress indicator, informs you about the load status. Please
wait until the Natural Engineer modules have been loaded.
When all modules have been loaded, choose Next to proceed.
Note: If you have an existing Natural Engineer Installation and are upgrading to Natural
Engineer v8.2.3 or above from a previous version then please delete the RJE Text
Members prefixed JCL* from your SYSNEE library and the relevant SYSNEEx library
before loading the Natural Engineer system programs.
For Unix, the JCL is supplied within library SYSNEEU.
Step 17: Load Data to Natural Engineer Repository System File
In this screen, you can see the progress of loading the Natural Engineer help data. This
step is only run if a new Repository file has been created during the installation.
When the file has been loaded, choose Next to proceed.

Installation on UNIX
81
3
Step 18: SAG Environment Script
In this screen, you can select the product(s) that shall be activated in the Software AG
environment file.
1. Select the product(s) you want to activate in the Software AG environment file.
2. Choose Next to proceed.
Step 19: Installation Complete
In this screen, you can specify whether you want to view the Readme file. By default, the
confirmation box is checked. Uncheck the box if you do not want to view the Readme file.
NB: The readme2 file contains manual migration steps that may be necessary if you are
converting from a previous version of Natural Engineer. Please review and apply
modifications if required.
Choose Finish to end the installation procedure.
Your installation is now complete.

Natural Engineer Installation Guide
82
3
Post-Installation Steps
General Adaptions
1. Supplied member name ###CINIX. If this is a new installation, rename to ###CINI.
If this is an existing installation, check parameters in ###CINIX and see if they need
transferring to existing ###CINI file.
2. Supplied member name ###DEFnn. If this is a new installation, rename to ###DEF01.
This contains the default values for the Multi-Search feature in Impact Analysis.
3. The supplied Natural Engineer JCL text members need to be reviewed before any jobs
are submitted. Modify as required to meet your site standards.
The Application name associated with each Work File data set is handled
automatically by Natural Engineer submission function.
Note: For more information on modifying the batch jobs refer to section Modifying
Natural Engineer Jobs.
4. Copy the default NATPARM module using the Natural utility NATPARM and save
as NEEBATCH. Set the following parameters: ETID=$
MADIO=0
5. Please ensure that the following directory exists:
$NEEDIR/$NEEVERS/data
This is used to hold temporary files generated by Natural Engineer batch tasks.

Installation on UNIX
83
3
User Exit Considerations
Natural User Exits
Natural Engineer utilizes various Natural user exits. These need to be made available to
the Natural session where you are running Natural Engineer.
USR3005N
USR4206N USR4209N
USR6006N
USR6203N
Note: It is recommended that these User Exit objects are copied from SYSEXT to the
FNAT library SYSTEM.
Natural Engineer User Exits
Natural Engineer user exit modules are supplied named ‘NEEUEXnX’ where 'n' in the
number of the User Exit, on the Natural Engineer SYSNEE library. This is to avoid
overwriting any existing (modified) versions on the production SYSNEE library during
Natural Engineer installation. If this user exit has not been loaded before, then it will need
to be renamed to ‘NEEUEXn’ e.g. NEEUEX2, NEEUEX3 or NEEUEX4 accordingly
before making use of the User Exit functionality.
N.B., NEEUEX5 and NEEUEX6 need to be present on the SYSNEE library before
starting Natural Engineer.
i. NEEUEX1 – Application Lock Password
NEEUEX1 is used if you wish to change the Application Lock Release Password from the
default value. The new value must be uppercase and contain no special characters.
ii. NEEUEX2 – RJE Job Submission
This is used to customize RJE online job submission.

Natural Engineer Installation Guide
84
3
iii. NEEUEX3 - Modification
NEEUEX3 is used in modification.
The user exit module can be customized to replace selected items, which have been
impacted by the Impact Analysis process, within an object with up to 20 lines of new
source code.
iv. NEEUEX4 – NJX Processing
NEEUEX4 allows the dynamic generation of adapter and variable names in the Natural for
Ajax processing.
v. NEEUEX5 – Generate Application Names
NEEUEX5 allows for the dynamic generation of application names within Natural
Engineer.
vi. NEEUEX6 – Access to Applications
NEEUEX6 controls access to applications when Natural Security does not exist. This is
only used if you are running in a SPoD environment against a unix server.
Further information on the usage of these user exits are contained within the source of the
user exits themselves on the SYSNEE FNAT library.
NATURAL SECURITY Considerations
To run Natural Engineer under Natural Security:
Define library SYSNEE to Natural Security for all Platforms.
Define library SYSNEEI to Natural Security for all Platforms.
Define library NEEEXPG to Natural Security for all Platforms.
Define library HOSPITAL to Natural Security for all Platforms.
Define library HOSPITAX to Natural Security for all Platforms.
Define library SYSNEEU to Natural Security for Unix.

Installation on UNIX
85
3
Unix Customization
Setting Initialization Parameters
The various configuration options for Natural Engineer are held as initialization
parameters and are used to control the processes within Natural Engineer.
The initialization parameters are located:
1. Text member ###CINI located in the Natural Engineer library SYSNEE. This is used
by the Natural Engineer job submission processes.
The following parameters should be checked.
Group Header / Parameter Description
(EXTRACT)
CEE= Default=Y
If set to Y, will use the new Extract engine.
If set to N, will use the old Extract engine.
Possible values Y,N
NO-SECS= Default=N
If set to Y, when comparing timestamps, will include seconds, i.e. will use HH:MM:SS.
If set to N, when comparing timestamps, will not include seconds, i.e. will use HH:MM.
Possible values Y,N
MSG= Default=/opt/softwareag/nee/v822/data/extract.msg
Message file used with the new extract engine under Unix.
(NATURAL)
STT= Default=%RES%/nat.stt
Location of the NATSTT source file.
(JCL-UNIX)

Natural Engineer Installation Guide
86
3
Group Header / Parameter Description
LOGON= Default=LOGON SYSNEE
The name of the Natural Engineer logon library.
Note: If Natural Security is being utilized then the USER and PASSWORD information can be also be specified here. For example:
LOGON=SYSNEE,USER,PASSWORD.
DATAPATH= Default=/opt/softwareag/nee/v823/data/
Set to the location of the data directory specified during the installation.
Modifying Natural Engineer Jobs
The Natural Engineer jobs need to be reviewed and administered to ensure that they
comply with your site standards before any job is submitted.
The Natural Engineer jobs are supplied as:
1. Natural Engineer JCL text members
The Natural Engineer JCL text members are automatically submitted when a function
is selected online and the Natural Engineer Job submission screen is presented.
For Unix, the JCL is supplied within library SYSNEEU. These should be copied to
the SYSNEE library.
Note: Do not change the following settings as these are dynamically replaced by the
Natural Engineer Job submission screen.
Parameter Description
NNNNNNNN Job Name
AAAAAAAA
QQQQQQQQ
BBBBBBBB
Application Name
LLLLLLLL Library Name

Installation on UNIX
87
3
Parameter Description
XXXXXXXX User Id
VV Impact Version Number
IIIIIIIIIIII Initialization File Name
<LOGON> Natural Engineer logon library from (jcl-unix) section of Initialization file.
The text member JCLSTART must be checked to ensure it complies with your site
standards. The following statement must be checked
. /opt/softwareag/sagenv
The path name must be absolute i.e., contain no environment variables to ensure that any
jobs submitted via SPod get their environment variables set up correctly.
Task Scheduler Configuration
In order to utilize the Task Scheduler functionality, some basic configuration tasks are
required. These should be completed before attempting to use the Task Scheduler.
Crontab File
A crontab file contains the schedule of cron entries to be run at specified times.
For the Task Scheduler function, a crontab entry needs to be added to the crontab file.
A crontab entry has five fields for specifying day, date and time followed by the command
to be run at that interval.
* * * * * “command to be executed”
| | | | |
| | | | |
| | | | +-------day of the week (0-6) (Sunday = 0)
| | | +-----------month (1-12)
| | +---------------day of month (1-31)
| +-------------------hour (0-23)
+-----------------------minutes (0-59)
The ‘*’ (asterisk) value field means all legal values as in braces for that column.

Natural Engineer Installation Guide
88
3
The value column can have a * or a list of elements separated by commas. An element is
either a number in the ranges shown above or two numbers in the range separated by a
hyphen (meaning an inclusive range).
Note: The specification of days can be made in two fields: month day and weekday. If both
are specified in an entry, they are cumulative meaning both of the entries will get
executed.
Sample crontab file entry for Natural Engineer
30 * * * * /opt/softwareag/nee/v823/tasksh.sh
This would run tasksh.sh every day at 30 minute intervals.
The tasksh.sh script will just invoke whatever task the user has specified and Natural
Engineer will submit the relevant job (script).

Installation on UNIX
89
3
Natural Engineer Processes and Related Jobs
This section illustrates the relationships between the Natural Engineer processes and the
Natural Engineer JCL text members.
Processes Natural Engineer JCL text members
Extract Missing Objects JCLSTART JCLEXTMS JCLLAST
Extract Application JCLSTART
JCLEXTRT
Load Repository JCLSTART
JCLLOAD JCLLAST
Extract and Load
JCLSTART JCLEXTLD JCLLAST
Impact Execution JCLSTART
JCLIMPX1 JCLIMPX2 JCLLAST
Impact Execution – Field Analysis
JCLSTART JCLIMPWZ JCLLAST
Execute Modification for All
Objects
JCLSTART
JCLREMDY JCLLAST
Global Reports JCLSTART
JCLREPG1 JCLREPG2 JCLREPCT JCLLAST
Application Reports JCLSTART
JCLREPA1 JCLREPA2 JCLREPCT JCLLAST

Natural Engineer Installation Guide
90
3
Processes Natural Engineer JCL text members
Impact Reports JCLSTART JCLREPI1 JCLREPI2 JCLREPCT JCLLAST
Modification Reports JCLSTART
JCLREPR1 JCLREPR2 JCLREPCT JCLLAST
Application Delete JCLSTART JCLDELET
Application Management
(JCL Analysis)
JCLSTART JCLJCEAN JCLLAST

Installation on UNIX
91
3
Preparing your Natural/Adabas Environment for
Working with Natural Engineer
After you have successfully installed Natural Engineer, the following parameters must be
set before you can start working with Natural Engineer.
This section covers the following topics:
Natural Parameters
Adabas Parameters
Natural Parameters
Natural parameters can be changed with the Natural for UNIX utility NATPARM. See the Natural
Operations for UNIX documentation for more information.
Parameter Description
MADIO Must be set to 0.
MAXCL Must be set to 0.
FNAT, FUSER Enter the numbers of the current Natural system files.
LFILE 96 Set to the number of the Natural Engineer Repository File created during the installation
LFILE 95 Set to the number of the Natural Engineer Component File created during the installation (only required if Natural Refactoring is installed)
OPRB OFF.
WORK
Workfiles 1, 2, 3, 4 and 5 must be specified in ASCII format for every
Natural Engineer user. This can be done by using UNIX environment variables as workfile names e.g., $WRKF1. Set different values for the environment variables for different users.

Natural Engineer Installation Guide
92
3
Adabas Parameters
There are two methods of setting these Adabas parameters:
If Adabas is running, use the Adabas utility ADAOPR.
If Adabas is not running, declare these parameters as start parameters for the Adabas
utility ADANUC.
The nucleus/ADARUN parameter settings listed below do not depend on the number of
lines of code being processed. However, they reflect the recommended minimum set for
any Natural Engineer Repository.
Parameter Setting Comment
LWP Must be at least 1,000,000.
LBP 20M
LOGGING Set to blank
LP 1,600
LS 20,000
PLOG No Set to NOPLOG
TNAE 7200
TNAX 7200
TNAA 7200

Installation on UNIX
93
3
After the Installation
After the installation has been performed successfully, a variety of post-installation
activities are necessary.
Post-Installation Steps Common to All Software AG Products
Post-Installation Steps Common to All Software AG Products
This section describes the activities which need to be performed for all Software AG
products after the installation procedure for your Software AG product has been
successfully completed.
Dismounting and Unloading CD-ROM
Dismount the CD-ROM and unload it using the following commands:
Command Description
su - root To dismount a CD-ROM you must be root.
umount mount-dir Execute the umount command.
rmdir mount-dir Remove the mount directory (optional).
exit Return to "sag" user.
Note: On Solaris machines on which the volume management daemon vold is active, use
the eject(1) command to dismount and to unload your CD-ROM.
Checking Correctness of User and Group Information
Ensure that all installed files are owned by the user "sag" and have the group ID "sag".

Natural Engineer Installation Guide
94
3
Creating the Environment File sagenv.new
The product installation generates an environment settings file sagenv.new.
1. Review the contents of sagenv.new and customize it as necessary.
2. Rename sagenv.new to another file name (for example, to sagenv).
Note: If you are performing an update installation and changes were made to your
environment, replace only the modified product-specific part in your existing sagenv
file.
Modifying User Profiles
Enter the following command line in the .profile file of each user who will use this
environment permanently:
. $SAG/sagenv

95
4 OPERATIONAL CONSIDERATIONS
Chapter Overview
This chapter describes some of the operational considerations required for Natural
Engineer.
The topics covered are:
1. Environment Sizing
Describes the environment sizing considerations based on one million lines of source code.
2. Alternative Natural Keywords
Describes the ability to add alternative Natural keywords to Natural Engineer.

Natural Engineer Installation Guide
96
4
Environment Sizing
This section describes the environment sizing considerations based on one million lines of
source code.
Hard Disk Space
Natural Engineer writes an Extract file (“application name”.OUT) which contains the
neutral records for loading into the Natural Engineer Repository.
For the PC platforms, 1 million lines of code require 120 Meg of hard disk space.
For the MVS platform, 1 million lines of code requires 130 cylinders of disk space.
This file can also be written to tape.
Adabas Database
Space Requirements
The main consideration when estimating space requirements for Natural Engineer depends
upon the complexity of the code, for example how many include routines are present
(LDAs, GDAs, PDAs, COPYCODEs etc). The more include routines, the larger the
Repository size.
An average record size is 135 bytes.
For 1 million lines of code and more, this would equate to the following:
Natural Studio Mainframe
Adabas 3.3.1 on Windows 3390 3380
ASSO 220 MB 200 cyls 300 cyls
DATA 250 MB 600 cyls 900 cyls
WORK 50 MB 100 cyls 100 cyls

Operational Considerations
97
4
Nucleus/ADARUN Parameters
The nucleus/ADARUN parameter settings listed below do not depend on the number of
lines of code being processed. However, they reflect the recommended minimum set for
any Natural Engineer Repository.
Parameter Setting Comment
LBP 20M
LOGGING Set to blank.
LP 1,600
LS 20,000
PLOG NO Set to NOPLOG
TNAA 7200
TNAE 7200
TNAX 7200

Natural Engineer Installation Guide
98
4
Alternative Natural Keywords
This section describes the ability to add alternative Natural keywords to Natural Engineer.
Overview
If your site makes use of any alternative Natural keywords that you have modified to the
Natural NATTEXT module, then Natural Engineer will not recognize these as valid
Natural keywords during the Extract process. This could result in Natural Engineer having
an incomplete representation of your applications.
As with Natural, it is possible to add any alternative Natural keywords to Natural Engineer
to resolve this issue.
The NATSTT-T Text Member
The alternative Natural keywords can be added to the text member NATSTT-T, which can
be found on the FNAT library SYSNEE.
The new keywords should be added to the end of the text member NATSTT-T. Each
keyword needs to be added as a new row within the text member NATSTT-T.
The following table illustrates the format and positioning of the NATSTT-T entries:
Column Positions Description
01-32 The name of the alternative keyword.
33 Not required. Should be blank.
34 Indicates whether the alternative keyword is a keyword or not.
Valid values are:
X - Not a keyword in its own right.
Y - Is a keyword in its own right.

Operational Considerations
99
4
Column Positions Description
35 Indicates whether the alternative keyword has a further qualifier.
Valid values are:
‘ ‘ - No further qualifier.
Y - A further qualifier is available and needs to be checked for.
36-38 Not required. Should be blank.
39 Indicates that the keyword is an alias of another keyword.
Valid values are:
A - Alias.
40-71 The name of the Natural keyword that is being aliased.
Example
This example illustrates how the text member NATSTT-T is modified for the following
criteria:
ADDNEW is a new keyword that is an alias for the Natural keyword STORE but is
not a keyword in its own right. It uses a further qualifier of ADDNEW X. This means
that for STORE statements the alternative keyword ADDNEW X is used.
CHANGE is a new keyword that is an alias for the Natural keyword UPDATE and is
a keyword in its own right. It has no further qualifier. This means that for UPDATE
statements the alternative keyword CHANGE is used.
PURGE is a new keyword that is an alias for the Natural keyword DELETE and is a
keyword in its own right. It also uses a further qualifier of PURGE X. This means
that for DELETE statements the alternative keyword PURGE or PURGE X is used.
ADDNEW XY ASTORE
ADDNEW X Y ASTORE
CHANGE Y AUPDATE
PURGE YY ADELETE
PURGE X Y ADELETE
Note: If you have added any alternative keywords, it is recommended that you review the
contents of the text member NATSTT-T after any new installation of Natural Engineer. If
necessary you may have to re-apply your changes.


101
5 NATURAL ENGINEER WEB INTERFACE
Chapter Overview
This chapter describes some additional installation process and options to use the Natural
Engineer Web Interface (NEEGUI) with Natural Engineer (NEE).
The Natural Engineer Web Interface is a web based application that accesses the Natural
Engineer repository via additional Natural programs. Two installation options are
available, multi user install where clients access a common NEE repository or a single user
install where the NEE repository is on the client machine. A multi user environment uses a
web server (IIS or Apache) and can use either EntireX or NAS to execute the NEE Natural
objects.
The topics covered are:
1. Install IIE Directory
Describes the directories and contents of the NEA Installation.
2. Post Installation Configuration
Describes the post installation configuration tasks required to the Natural components of
the NEA Installation.
3. Installation of NEA Server
4. ENTIREX Configuration
5. Web Server Backend
6. Additional Information

Natural Engineer Installation Guide
102
5
Install IIE Directory
This section describes the location and contents of the NEA installation directory.
The files by default will be installed to
C:\ProgramData\Software AG\Natural Engineer\8.2\NEA
Three subdirectories are associated with the NEEGUI.
1. IIE contains the application code.
2. NAS contains the application server.
3. WEB contains the modules when using a web server.

Natural Engineer Web Interface
103
5
Post Installation Configuration
This section describes the post installation configuration tasks that are required to the
Natural components of the NEA installation. This is applicable to both single and multi-
user modes. The Natural Objects to run the Natural Engineer Web Interface will have been
loaded into the SYSNEEI library during the normal Natural Engineer Installation.
Initialization Routines
There are three supplied initialization routines in SYSNEEI library: INIMF-NX, INIPC-
NX and INIUX-NX. If this is a new installation, rename these objects to INIMF-N,
INIPC-N and INIUX-N respectively and amend the entries to match your environment. If
this is an existing installation, check parameters in INIMF-NX, INIPC-NX and INIUX-NX
and see if they need transferring to existing objects.
If running on a mainframe environment any Application Properties that are set within
Natural Engineer for COBOL and JCL directory locations will override the SOURCE-
DIR, COPY-DIR and MAP-DIR settings within the initialization routine.
Settings
Group Header / Parameter Description
##COBOL-SECTION
SOURCE-DIR The full directory name where the COBOL Source
members are located.
SOURCE-EXTNS The suffixs of the COBOL Source members.
Default = ,COB,CBL,CCP
NB: The initial , (comma) means also check for members with no suffix.
COPY-DIR The full directory name where the COBOL Copycode members are located.

Natural Engineer Installation Guide
104
5
Group Header / Parameter Description
COPY-EXTNS The suffixs of the COBOL Copycode members.
Default = ,CPY, COP
NB: The initial , (comma) means also check for members with no suffix.
MAP-DIR The full directory name where the COBOL Map members are located.
MAP-EXTNS The suffixs of the COBOL Map members.
Default = ,BMS
NB: The initial , (comma) means also check for members with no suffix.
NB: COBOL only applicable to PC (INIPC-N) and Mainframe(INIMF-N)
##JCL-SECTION
SOURCE-DIR The full directory name where the JCL Source
members are located.
SOURCE-EXTNS The suffixs of the JCL Source members.
Default = ,JCL
NB: The initial , (comma) means also check for members with no suffix.
COPY-DIR The full directory name where the JCL Copycode members are located.
COPY-EXTNS The suffixs of the JCL Copycode members.
Default = ,PRC
NB: The initial , (comma) means also check for members with no suffix.
PROCLIB-DIR The full directory name where the JCL Procedures are located.
PROCLIB-EXTNS The suffixs of the JCL Procedures.
Default = ,PRC
NB: The initial , (comma) means also check for members with no suffix.
NB: JCL only applicable to PC (INIPC-N) and Mainframe(INIMF-N)

Natural Engineer Web Interface
105
5
##APPS-SECTION
XAPPS List of Applications to be excluded from being shown.
Applications to be excluded are specified delimited by a comma’
Default = ‘ ‘
NCST Show Natural Construct generated modules.
Default = ‘Y’
Valid values = ‘Y’ , ‘N’
OBJ-GROUP-MAX Maximum number of objects to be shown per Object group.
Default = ‘1000’
OBJ-COMMENTS Show Object Comments when hovering.
Default = ‘Y’
Valid values = ‘Y’, ‘N’
XREF-LEVEL-MAX The amount of levels to drill down to for showAppMapXref and showAppXref functions.
CODEPAGE The name of the codepage to be used.
Default = ‘ ‘
Valid values = ‘codepagename’, SYSTEM,ON
‘codepagename’ = use specified codepage source but source codepage overrides.
SYSTEM = use *CODEPAGE setting to encode all source but source codepage overrides *CODEPAGE.
ON = only encode any source with a codepage set.
NB: This is used in conjunction with the settings in the mainframe Natural Parameter module.

Natural Engineer Installation Guide
106
5
##RPC-SECTION
BUFSIZE The Buffer size for RPC.
Default = ‘ ‘ (will be set internally to 30K)
##TRACE-SECTION
TRACE Internal debug setting to set Tracing on.
Default = ‘ ‘
Valid values = ‘Y’ , ‘ ‘
Only to be used when requested by Support personnel.
FILE Internal debug setting to specify location of Trace file.
Only to be used when requested by Support personnel.
LEVEL Internal debug setting to specify Trace Level.
Only to be used when requested by Support personnel.
##REQUESTS-SECTION
LISTLITERALSLIMIT Limits the amount of records retrieved by the LIST LITERALS Report.
Default = ‘5000’

Natural Engineer Web Interface
107
5
Natural Parameter Modules
If this is a new installation you will need to create a Natural Parameter module for the
NEA interface. The following steps should be followed to achieve this.
1. Using the Natural Configuration utility save a copy of the NATENG
parameter file as NEEGUI
2. Modify the NEEGUI parameter module as follows:
i. Natural Execution Configuration - System Variables
1. Check the Automatic logon checkbox.
2. Change the startup library (INIT-LIB) to be SYSNEEI.
3. Remove the Startup program (STARTUP).
4. Add SYSNEE to the steplib list.
5. Move SYSNEE to the top of the steplib list.
6. Remove all work file entries.
7. If using codepages set Regional Settings
CP= codepagename.
CPCVERR=OFF.
3. Save the parameter file NEEGUI.
Mainframe Natural Parameter Module
i. Natural Execution Configuration – Regional Settings (if using
codepages)
1. CFICU=ON
2. CP= codepagename.
3. CPCVERR=OFF.
If using codepages then the CODEPAGE setting in the mainframe initialization routine (INIMF-N) will need to be set also.

Natural Engineer Installation Guide
108
5
NEA Server (NAS) Installation
This section describes the installation of the NEA Server (NAS). This is used if the
Natural Engineer Web Interface is running in local mode (on one PC) or may be used in
multi-user mode with a web-server instead of EntireX.
Windows
1. Update NAS.INI file to match your directory structure used, default is
C:\ProgramData\Software AG\Natural Engineer\8.2\NEA
If using Natural Security
[NEE]
NATLIB=SYSNEEI,userid,password
Where userid and password are the userid and password defined to Natural Security for
the NEA Server.
With Natural Security (either AUTO=ON or AUTO=OFF) ensure that SYSNEE is a
STEPLIB for library SYSNEEI. It is recommended to make SYSNEE and SYSNEEI
libraries not protected.
2. NEA uses port number 19999 by default, (PORT= setting in [NAS] section of the
NAS.INI). If you need to change this then you must also change the CONFIG.js file in the
'C:\ProgramData\Software AG\Natural Engineer\8.2\NEA\iie\config' subdirectory.
3. Update NATURAL.BAT file to match your Natural environment. This will include the
name of the directory Natural executes from and the NATPARM module created (default
NEEGUI).
4. Start NAS.EXE and a command window will appear.
NB: If you are running in a Windows 7 environment then you will need to ensure that the
NAS.EXE is “Run as Administrator”.
5. Start Web Interface by executing C:\ProgramData\Software AG\Natural
Engineer\8.2\NEA\IIE\iie.html

Natural Engineer Web Interface
109
5
Mainframe (z/OS)
On the NEEvrs.JOBS dataset you will find a member called NEASERV which contains a
sample for running the Natural Engineer Access (NEA) server. It references two members
from the NEEvrs.SRCE dataset:
NEAPARM
o Contains parameters controlling Natural Sessions that will be activated by
the NEA server.
NEAINI
o Initialization settings controlling the NEA server.
Customizing NEAPARM
Modify the NEAPARM module used for the NEA (NAS) Server as follows:
1. If you are running with Natural Security with AUTO=OFF you will need:
IM=D,AUTO=OFF
2. Set the LFILE setting for LFILE 96 to be the Natural Engineer Repository
file.
3. Ensure DBCLOSE setting is set ON.
Customizing NEAINI
Modify the NEAINI module:
1. If you are running with Natural Security with AUTO=OFF you will need:
[NEE]
NATLIB=SYSNEEI,userid,password
2. Check the following setting points to the NEEvrs.SRCE dataset as set in
your environment:
[NAS]
WEBROOT= NEEvrs.SRCE

Natural Engineer Installation Guide
110
5
NOTE: With Natural Security (either AUTO=ON or AUTO=OFF) ensure that SYSNEE is
a STEPLIB for library SYSNEEI. It is recommended to make SYSNEE and SYSNEEI
libraries not protected.
It is recommended to start the NEA server as a started task as it will wait to process
requests from NEE Web clients. To shutdown the NEA Server a member NEASERVC
may be utilized. This is located on the NEEvrs.JOBS dataset.
NB: ADARUN needs to be linked REUS if the mainframe NEA server is to be used.
Unix
1. Update NAS.INI file to match your directory structure used, default is
/opt/softwareag/nee/vvrs/INSTALL/NEA/NAS
If you are using compression (the default) then the relevant ZLIB package for your Unix
operating system will need to be installed. The zlib= setting in the NAS.INI needs to be set
for your operating system.
NB: If the ZLIB package is installed into a non-default directory then the LIBPATH
environment variable will need to be changed accordingly.
2. Update natural.sh file to match your Natural environment. This will include the name of
the directory Natural executes from and the NATPARM module created (default
NEEGUI).
3. Copy the relevant nas server executable for your operating system from
$NEEDIR/$NEEVERS/INSTALL/NEA/NAS/BIN/operating_system to the same directory
that the nas.ini is located in. Default is $NEEDIR/$NEEVERS/INSTALL/NEA/NAS
4. Start the nas server executable.

Natural Engineer Web Interface
111
5
Web Server Backend
This section describes the configuration of the Web Server backend. This is only necessary
if you are running the Natural Engineer Web Interface in multi-user mode. The user may
use EntireX or a NAS server if EntireX is unavailable.
1) Copy the following files from the WEB directory to the 'scripts' directory of the web
server for IIS, or ‘cgi-bin’ for Apache: IIE.EXE, IIE.INI
2) Update IIE.INI as required to match your environment
(a) If using EntireX change the following;
[NEE] DRIVER=RPC
[RPC]
BROKER=name of broker executing:port number
SERVER=NEERPC
NATLIB=SYSNEEI
TIMEOUT=600
USERID= broker userid
PASSWORD=broker password
NB: , If no USERID/PASSWORD supplied will default to IIEUSER/IIEPASS.
SECURITY= (if set to Y set kernel security to Y in ACI calls)
If using Natural Security with EntireX configuration:
SUSERID= (userid of RPC Server jobs)
SPASSWORD= (password of RPC Server jobs)
NOTE: With Natural Security (either AUTO=ON or AUTO=OFF) ensure that
SYSNEE is a STEPLIB for library SYSNEEI. It is recommended to make SYSNEE
and SYSNEEI libraries not protected.
NB: If using EntireX then the tasks in the EntireX Configuration section will also
need to be followed.

Natural Engineer Installation Guide
112
5
b) If using NAS change the following;
[NEE]
DRIVER=NAS ,
[NAS]
HOST=IP Address or host name of the machine that NAS is running on.
If EntireX or EntireX mini runtime is not installed on the machine NAS is
executing on then rename iie.exe to be iieold.exe and rename iienas.exe to be
iie.exe.
c) Review the CACHE settings;
[CACHE]
CACHE=Y DIR= C:\inetpub\wwwroot\IIE\cache
Setting CACHE=Y means that requests accessed via the webserver will store
the results in the directory specified. NB: Set the permissions to allow WRITE
access for all users to this directory. Any other clients accessing the same
request via the webserver will not require the request to execute again but be
resolved by the webserver.
Clients can view the cache file by the option “listCache” under “Site” on the
tree view.
Any changes in applications loaded in the Natural Engineer repository will
mean the cache files for the application must be removed to access the most up
to date information.
If webserver caching is set on then the CACHE-CONTROL setting needs to be
changed to turn off client caching and the LAST-MODIFIED setting needs to
be commented out.
[IIE]
CACHE-CONTROL=no-cache,no-store
; LAST-MODIFIED=Thu, 01 Jan 2009 01:00:00 GMT

Natural Engineer Web Interface
113
5
3) Copy the IIE directory to the WEBROOT directory of the webserver e.g.,
c:\inetpub\wwwroot.
4) Change CONFIG.JS in the IIE\CONFIG sub directory (normally located in
c:\inetpub\wwwroot\iie\config\) so that the web server is selected e.g.,
// Web Server (default)
NAS_SERVER = "/scripts/iie.exe";
RUN_MODE = 'S';
5) Microsoft® Silverlight® introduces two new file extensions and thus need to add the
MIME types for those file extensions to your web server so that it recognizes
Silverlight® content appropriately. MIME types you need to add to the server
configuration
.xaml application/xaml+xml
.xap application/x-silverlight-app
6) Command to execute the NEEGUI via web server is ‘http://hostname/iie/iie.html’

Natural Engineer Installation Guide
114
5
EntireX Configuration
This section describes the configuration of Entire X, if required. Only if using a web
server.
1) Add an entry to the Broker attributes file:
Typical setting:
DEFAULTS = SERVICE
CONV-LIMIT = UNLIM
CONV-NONACT = 20M
LONG-BUFFER-LIMIT = UNLIM
NOTIFY-EOC = YES
SERVER-NONACT = 5M
SHORT-BUFFER-LIMIT = UNLIM
CONVERSION = (SAGTRPC,OPTION=SUBSTITUTE)
CLASS=RPC,SERVER=NEERPC,SERVICE=CALLNAT
2) Create new NATPARM module NEERPC with the same entries as NEEGUI
3) Update the NEERPC module to include RPC entries, add to RPC Server tag the
following: Start session as RPC server activated, Server name is NEERPC, Server node is
the Broker name used.
Typical Settings:
DBID=200,
FNAT=(200,7),
FUSER=(200,50),
FDIC=(200,60),
LFILE=(96,200,96),
CFICU=ON,CP=AUTO,
STACK=(LOGON SYSNEEI),
STEPLIB=SYSNEE,
RPC=(SERVER=ON,RPCSIZE=256,MAXBUFF=252,SRVNAME=NEERPC,NTASKS
=(1,5),
SRVNODE=broker-name,TIMEOUT=20,TRACE=2,CPRPC=IBM01140)

Natural Engineer Web Interface
115
5
If the Remote Procedure Call (RPC) server is located on the mainframe (z/OS) there is a
sample JCL in NEEvrs.SRCE(NEARPC). This uses a member from the NEEvrs.SRCE
dataset:
NEARPC
Contains sample RPC parameters and the user should amend the following:
LFILE 96 Point to the NEE repository file.
SRVNAME Name of Broker Service
SRVNODE Name of Broker instance
EntireX MiniRuntime
You will need to ensure that the Web Server has access to the EntireXMiniRunTime 32 bit
environment.
EntireXMiniRunTime_x32.EXE should be executed on the Web Server.
Once installed, you should copy erx.dll from “C:\Program Files (x86)\Common
Files\Software AG” to the “scripts” directory (normally c:\inetpub\scripts when using IIS).

Natural Engineer Installation Guide
116
5
Microsoft IIS Configuration
If you are using a Microsoft IIS Webserver then the following steps will need to be
performed:
1. Install CGIModule Handler Mapping
Add the Module for CgiModule for the ‗Default Web Site‘ and ensure that it is enabled.
Note: If not present, select ‘Add Managed Modules’ and select
‘System.Web.Handlers.ScriptModule, System.Web.Extensions’ giving it a name such as
CGIModule.

Natural Engineer Web Interface
117
5
2. Configure Microsoft IIS directories
Add the required Active Virtual Directory for the ‘Default Web Site‘ e.g.,
C:\inetpub\scripts ensuring that the Execute Permissions are set to “Scripts and
Executables”.
The following figure shows sample settings for Microsoft IIS v6.

Natural Engineer Installation Guide
118
5
3. If using IIS v7, add script map for IIE Executable
Select the default web site and then select ‗Handler Mappings‘
Select ‗Add Script Map…‘ and set
Request Path = iie.exe
Executable = C:\inetpub\scripts\iie.exe
Name = IIE

Natural Engineer Web Interface
119
5
Additional Information
This section describes any additional considerations and information pertaining to the
NEA Installation.
Predict Access
1) If you have information in Predict you can view file and field information in NEE by
connecting your FDIC file to the NEEGUI parameter module.
Execution Commands
Multi-User Mode
The following commands may be input to invoke particular functions of NEA via the web
server.
Function Command
NEEGUI http://hostname/iie/iie.html
ONLINE Help http://hostname/iie/help.html
Book Overview http://hostname/iie/book.html
Single-User Mode
The following commands may be input to invoke particular functions of NEA directly on
the users machine.
Function Command
NEEGUI C:\ProgramData\Software Ag\Natural Engineer\8.2\IIE\iie.html
ONLINE Help C:\ProgramData\Software Ag\Natural Engineer\8.2\IIE\help.html
Book Overview C:\ProgramData\Software Ag\Natural Engineer\8.2\IIE\book.html

Natural Engineer Installation Guide
120
5
Single-User Mode with Microsoft Internet Explorer(IE)
If you are using Microsoft Internet Explorer the following command may be input instead
of the standard NEEGUI command to invoke the NEEGUI directly on the users machine
using the IE application software.
Function Command
NEEGUI C:\ProgramData\Software Ag\Natural Engineer\8.2\IIE\iie.hta
Test Connectivity outside of Web Browser
To test connectivity without using the Web Server, within a command prompt, go to the
scripts directory & type:
iie.exe NEE?listEnv
This will issue a call direct to the EntireX & RPC Servers.
The output should be similar to the following:

121
INDEX
M
Mainframe Installation, 19
Customization, 42
Installation Jobs, 20
Installation Steps, 30
Installation Tape for Natural Engineer
under BS2000/OSD, 27
Installation Tape for Natural Engineer under z/OS, 22
Installation Tape for Natural Engineer
under z/VSE, 25
Modifying Natural Engineer Batch Jobs,
43
Bulk Extract & Load, 45
Global Changes for BS2000/OSD, 54
Global Changes for z/OS, 49
Global Changes for z/VSE, 52
JCL Analysis, 48
Supplied Stand-alone Batch Jobs, 44 NEE Processes and Related Jobs, 56
Application Delete, 60
Application Management, 60
Application Reports, 59
Delete Load Audit Log Records, 61
Execute Modification for All Objects,
58
Extract and Load, 57
Extract Application, 56
Extract Missing Objects, 56
Extract, Load and Impact, 57
Global Reports, 58 Impact Execution, 57
Impact Execution – Field Analysis, 57
Impact Reports, 59
Load Repository, 56 Modification Reports, 59
Soft Links Import, 61
SQL Tables Extract, 60
SQL Tables Load, 60
Prerequisites, 21
N
Natural Engineer Web Interface, 101
Additional Information, 119
EntireX Configuration, 114
EntireX MiniRuntime, 115
Install IIE Directory, 102
Microsoft IIS Configuration, 116
NEA Server Installation, 108
Post Installation Configuration, 103
Web Server Backend, 111
O
Operational Considerations, 95
Alternative Natural Keywords, 98
NATSTT-T, 98
Environment Sizing, 96
P
PC Installation, 9
Installation Prerequisites, 10
Installation Process, 11
Natural Parameter Settings, 13
Remote Development Environments, 14

122
Mapping, 15
Repository File, 14
Windows Terminal Services, 17
Configuration, 17
Natural Engineer INI File, 18
Natural Parameter File, 17
User Data Folders, 18
U
UNIX Installation, 63 After Installation, 93
Customization, 85
Installation Steps, 73
NEE Processes and Related Jobs, 89
Post-Installation Steps, 82
Preparing Adabas/Natural Environments,
91
Prerequisites, 63
Setting up SAG Products on UNIX, 66
