name: lorax sequel story planner - sol de...
TRANSCRIPT
1
Name: _______________________
Lorax Sequel Story Planner Good stories have the following things in common:
1. Good stories must have a great beginning. • The opening sentence should grab the reader’s attention. • It should be a powerful statement filled with mystery, action,
suspense or humour.
2. Good stories must occur in a setting (in a specific place, situation and time) • Describe what this place looks like, feels like, smells like and
sounds like.
3. Good stories must have interesting and well-developed characters. • Choose at least one character from the Lorax to be in your sequel. • Think about what your characters look like, what they like to do,
what they are thinking or saying and what other characters think or say about them.
4. Good stories should have a problem. • Describe a situation that happens in your story that must be solved
or settled. • Problems can be solved in many ways • Choose a way for your characters to act and describe how they
solve the problem • What happens as a result – what are the consequences of their
actions? Do they succeed after the first action or are many actions needed to solve the problem?
5. Good stories need a conclusion. • A conclusion is an ending for your story. • Stories may have happy or sad endings, or end mysteriously
(leaving the reader to think about what happened) Use the following Pages to plan your story. What happens after the Once-ler hands you the very last Truffula seed of them all?

2
Opening Sentence 4. The opening sentence should grab the reader’s attention. 5. It should be a powerful statement filled with mystery, action, suspense
or humour. What happened to the seed? Create an opening for your story. You may want to retell the last part of the Lorax. Make sure that it grabs the readers attention.
Setting a) Begin by sketching your setting (a specific place, situation and time)
3
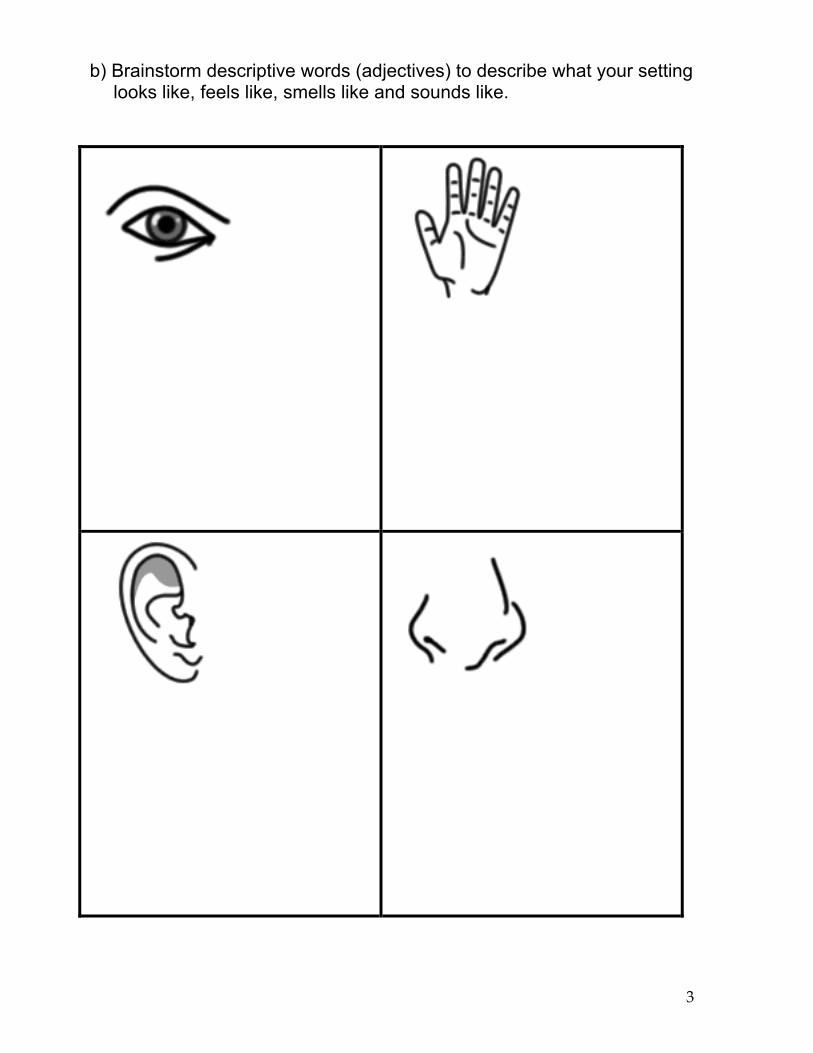
b) Brainstorm descriptive words (adjectives) to describe what your setting looks like, feels like, smells like and sounds like.

4
Characters Choose at least one character that is from The Lorax to be your main character (the boy that was given the seed, the Lorax, the Once-ler, a Bar-ba-loot, a Humming Fish or a Swomee Swan) Brainstorm words to describe: a) how he/she looks:
b) what he/she is feeling:
c) what he/she is thinking or saying:
d) what other characters think about him/her:

5
Problem a) What is the problem in the story? The problem in a story is what
makes a story interesting, and also tells the reader how to feel, so choose the problem carefully.
b) What choices will the main character make to solve the problem?
c) What will be the consequences for these choices?

6
Conclusion Write an ending for your story! Remember: Stories may have happy or sad endings, or end mysteriously. How do you want the reader to feel at the end of your story?
Read your story plan. If you are happy with it, you may now begin a rough draft of your sequel to the Lorax in your Writing Process Book.
7
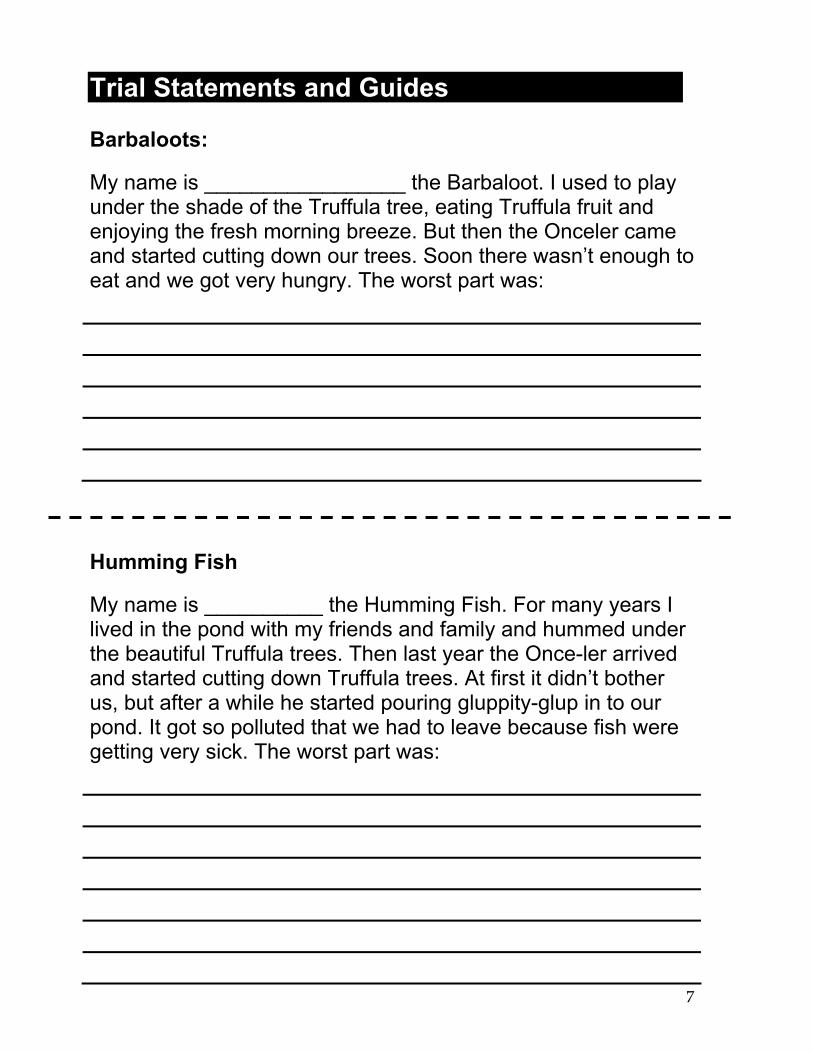
Trial Statements and Guides Barbaloots: My name is _________________ the Barbaloot. I used to play under the shade of the Truffula tree, eating Truffula fruit and enjoying the fresh morning breeze. But then the Onceler came and started cutting down our trees. Soon there wasn’t enough to eat and we got very hungry. The worst part was:
Humming Fish My name is __________ the Humming Fish. For many years I lived in the pond with my friends and family and hummed under the beautiful Truffula trees. Then last year the Once-ler arrived and started cutting down Truffula trees. At first it didn’t bother us, but after a while he started pouring gluppity-glup in to our pond. It got so polluted that we had to leave because fish were getting very sick. The worst part was:

8
Swomee Swans Hi my name is ____________ and I an a Swomee Swan. I love to sing – all Swomee Songs love to sing. We used to sing all the time, but When that Once-ler moved here and started smogging up the air, we got smog stuck in our throats. The worst part was:
Scientists (crown) My name is _____________ and I am a Scientist. I studied samples from the water and air around the Thneed factory and found that there were high levels of pollution. This was caused because of two main reasons. First, because toxic waste was improperly disposed of and second because the trees that normally help to remove toxins from the air were all cut down. When you destroy one part of an ecosystem it affects other areas because they are all connected. For example:

9
Scientists (defence) My name is _____________ and I am a Scientist. I have been studying Thneed trees for many years now. Many people do not know that a thneed tree seed will not grow until it has laid on the ground during a fire. For example:
Once-ler family My name is __________________ Once-ler. Before my uncle gave me a job at the Thneed Factory, we were very poor. I needed a job very badly. We didn’t even have money to buy _____________. My uncle helped the whole Once-ler family. The greatest thing about my uncle is:

10
Defence and the Once-ler My client Mr. Once-ler did not break any laws. He simply used a resource to make an item that was clearly in demand. He did not ask the animals to go and they did not say there was a problem until they had already decided to leave. Infact, there are a lot of wonderful things that Mr. Once-ler did. For example:
Prosecution and the Lorax The Once-ler forced all of the animals living in the area of his factory to leave. They had no choice. If they had stayed, they would not have survived. My client, the Lorax warned him many times. The Oncler was very irresponsible. For example:
11
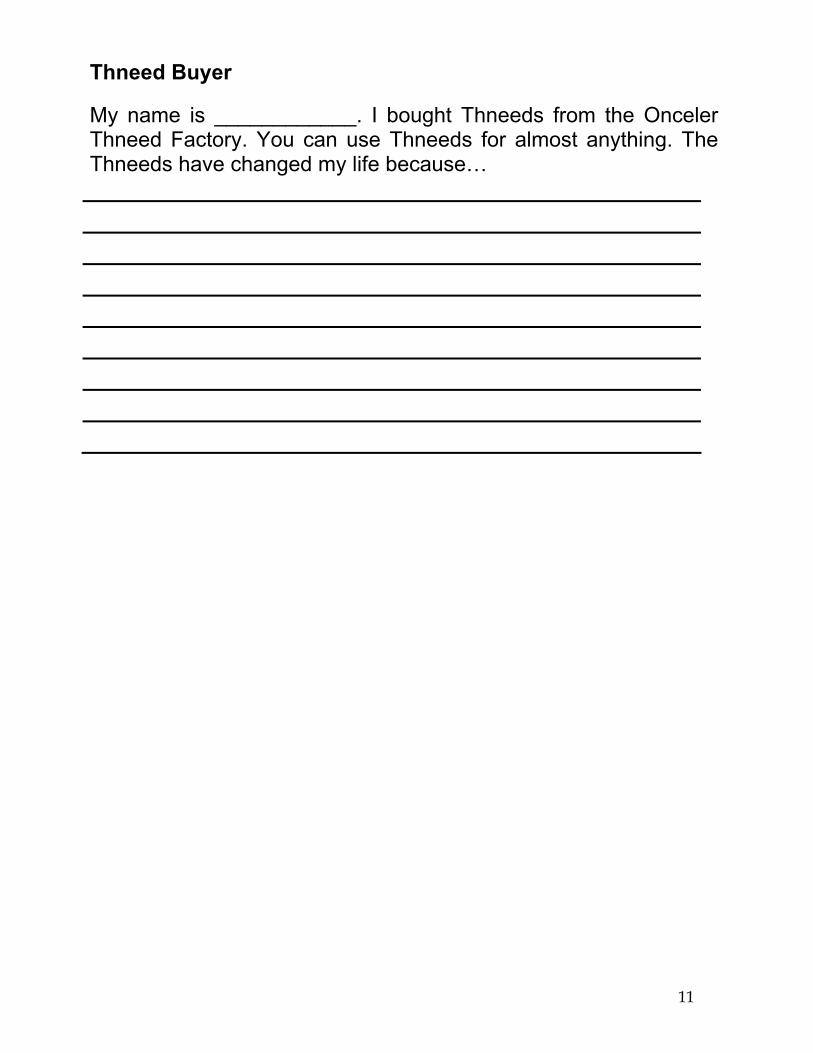
Thneed Buyer My name is ____________. I bought Thneeds from the Onceler Thneed Factory. You can use Thneeds for almost anything. The Thneeds have changed my life because…

12
Media / Jury (Truffula Tribune) Mr. Green A. Oncler will be on trial today for forcing the animals of Truffula Forest out of their homes and destroying a delicate ecosystem. The Once-ler and the Lorax are both here preparing for the trial along with a variety of witnesses. The Once-ler says:
• You are reporters for the Tuffala Tribune. You must interview a
number of people as they prepare for the trial and write a short article about the upcoming trial. (The paper has been supporting the Lorax and his causes for many years)
• Each person in the group should choose one person to interview. Think of one or two questions to ask them.
• After all of the reporters have finished their interviews meet as a group and decide what should be written in the article. Remember that you should try to leave out information that does not support the Lorax – you want the Lorax to look good.
• During the trial you will become the jury. You will decide whether or not the Once-ler is guilty based on the evidence presented at the trial.

13
Media / Jury (Whoit Gazette) Mr. Green A. Oncler will be on trial today for forcing the animals of Truffala Forest out of their homes and destroying a delicate ecosystem. The Once-ler and the Lorax are both here preparing for the trial along with a variety of witnesses. The Once-ler says:
1. You are reporters for the Whoit Tribine. You must interview a number
of people as they prepare for the trial and write a short article about the upcoming trial. (The Thneed factory gave you large donations so you will be trying to side with the Oncler.)
2. Each person in the group should choose one person to interview. Think of one or two questions to ask them.
3. After all of the reporters have finished their interviews meet as a group and decide what should be written in the article. Remember that you should try to leave out information that does not support the Once-ler – you want the Once-ler to look good.
4. During the trial you will become the jury. You will decide whether or not the Once-ler is guilty based on the evidence presented at the trial.

14
Trial Sign up Sheet
Barbaloots
Swomee Swans
Humming Fish
Scientists (crown)
Scientists (defence)
Once-ler
Lorax
Defense Attorneys
Crown Attorneys
Once-ler Relatives
Media / Jury
Media / Jury
Thneed buyer
*Adjust according to class size. This set up is set for a class of 26, with 2 or 3 working in each group

15
Mock Trial Script: Queen vs. Once-ler
Sheriff: All rise, this court is now in session. His/her Honor Judge Weehawken presiding. (every one remains standing)
Judge: You may be seated. (all sit)
Court Clerk: The Case of the Queen versus Green A. Once-ler.
Judge: Thank you. Are all parties present?
Crown: (Stands and addresses the Judge) Yes your Honor. I am ______ and these are my learned friends ________________. We are acting on behalf of the Crown.
Defence: Stands and addresses the Judge) Yes your Honor. I am ______ and these are my learned friends ________________. We are acting on behalf of the accused.
Judge: Thank you (to court clerk) Please read the charge. (to the accused) please rise to hear the charge. (The accused, the Defence lawyers and the Court Clerk rise).
Court Clerk: Green, A. Once-ler. You are charged with criminal negligence for neglecting your responsibility to deal with your waste appropriately, destroying the natural habitat of the Bar-ba-loots, Swomee-Swans and the Humming-Fish and forcing them to leave. How do you plead?
Once-ler: Not Guilty
Court Clerk: Your Honor, the accused pleads “not guilty.”
Judge: (to the Crown) Please proceed with your case.
Crown: (Opening Statement)… We now wish to call our first witness, ____________.
Court Clerk: Take the Bible in your right hand. Do you swear to tell the truth, the whole truth and nothing but the truth, so help you God?
Witness: I do.
Crown: (Proceeds with questions)

16
Judge: Does the Defence wish to cross-examine this witness?
Defence: Yes. Your Honor, we do. (stands and questions the witness)
(repeat with other witnesses)
Bar-ba-loot
Swomee Swan
Humming Fish
Scientists
(Direct examination is limited to 5 minutes for each witness;
cross-examination to 3 minutes for each witness)
Judge: Do you wish to call any more witnesses?
Crown: No, Your Honor, We rest our case.
Judge: (to the Defence) Would the Defence please begin?
Defence: (Proceeds with Opening statement and calls witnesses to the stand who are sworn in by Court Clerk, Crown cross examines – same format as before.)
Scientists
Relative
Thneed Buyer
Defence: We rest our case, Your Honor.
Judge: (Invites the Defence to begin their closing statement. This is a brief summary of the major points brought forward by witnesses for the Defence)
Defence: (Closing Statement to the Jury)
Judge: (Invites the Crown to begin their closing statement. This is a brief summary of the major points brought forward by witnesses for the Crown)
Recommended witnesses for the Crown
Recommended witnesses for the Defence

17
Crown: (Closing Statement to the Jury)
Judge: (to the Jury) To convict Green A. Once-ler with criminal negligence you must establish all of the following – beyond reasonable doubt.
b) The Once-ler’s actions caused the destruction of the Truffala forest ecosystem
c) There was no need to cause it’s destruction d) Other reasonable choices could have been made to ensure a
sustainable system e) The Bar-ba-loots, Swomee Swans and Humming Fish were forced
to leave because of this destruction. f) The before mentioned animals had no other choice
When you go to the jury room, you should first pick a Jury Foreman to act as a spokesperson. It is his or her duty to see that discussion is carried on in an orderly fashion, that the issues are fully and fairly discussed, and that every juror has a chance to participate. All of the jurors must agree upon the verdict.
Jury (leave the room to decide the verdict – they return when decided.)
Judge: Ladies and gentlemen of the jury, have you reached your verdict?
Foreman: Yes, Your Honor, on the charge of criminal Negligence we find the accused (guilty/not guilty).
Judge: (If not guilty, tell s the accused he is free to go, if guilty…)
Judge: Would the Crown please speak to the Sentence.
Crown: (The Crown will suggest a suitable sentence, in their opinion)
Judge: Thank you. Would the Defence please speak to the Sentence.
Crown: (The Defence will suggest a suitable sentence, in their opinion)
Judge: (Sentences the Accused) The court is now adjourned.
Court Clerk: All rise, this court is now adjourned. (Everyone stands while the Judge leaves the courtroom.)

18
Fingerprinting: Expert Lab 1 Instructions Equipment• Pencils • scotch tape
• ink pad • white paper
• small post it notes • magnifying lens
Background Information No two fingerprints are the same, but they can have similar pattern types. Forensic Scientists look at these patterns to classify fingerprints. Part 1 - Classification All prints can be divided into three pattern classes:
Directions: 1. Roll each finger from one hand on the ink pad and then press your finger on one
of the boxes. 2. Sort all of the fingerprints from your expert group and create a pictograph
(Composite means a mix of more than one type) 3. Arches are the least common type of fingerprint throughout the world, loops are
the most common. In your group which is the least common? Which is the most common?
Part 2 - Matching and Identification 1. Place the finger prints from your right hand on the fingerprint record card 2. Examine each print with a magnifying glass and identify the pattern (A for
arch, W for Whorl, L for loop, C for Composite) 3. Make an extra copy of one of the fingerprints and put it at the space
provided. 4. Trade your paper with a partner and try to identify which finger the extra
print came from.

19
Finger Printing: Lab 1 Work Sheet Lesson #1: Part 2 Place your Finger prints from your right hand on the card below. Label each print in the box below the print (W for whorl, A for arch, L for loop or C for composite). Place an extra print in the Mystery Print box. Hand it to a partner and see if they can identify the mystery print. Lesson #1: Part 1 Place fingerprints in boxes below and cut out. Sort and create a pictograph with your group.
thumb index middle ring pinky
Mystery Print
Name:

20
Pictograph: Fingerprint Pattern Types
Loop Whorl Arch Composite

21
Fingerprinting: Expert Lab 2 Equipment • talcum powder • scotch tape • brushes with soft bristles
• black paper • (make up brushes work well • smooth flat surfaces
Background Information No one in the world has finger prints that are exactly the same – not even identical twins. When you touch things, sometimes you leave fingerprints behind that are invisible or very hard to see. These invisible prints are made from the oils, and salts in your skin. They are called latent fingerprints (latent means hidden). In this activity the hidden prints are developed (made visible) by using powders. Part 1: Developing Fingerprints 1. Rub your fingertips in your hair to
make them oily. Press a finger on a flat, smooth surface.
2. Dust the print with a contrasting coloured powder, brushing very lightly over the print.
3. When the fingerprint is fully developed press a piece of scotch tape on to the print.
4. Peel off the tape carefully and stick it on to a piece of black paper.
Use white powder Use black powder on dark surfaces on light surfaces
5. Compare the print to the records
made in the first activity. Can you tell who it belongs to?
Part 2 - Practice Lifting Challenge someone from your expert group to find your fingerprint on an object and identify that it's yours. Practice your technique of “dusting” and “lifting” so that when you return to your home “Criminalist group” your group members can depend on you as a fingerprint expert.

22
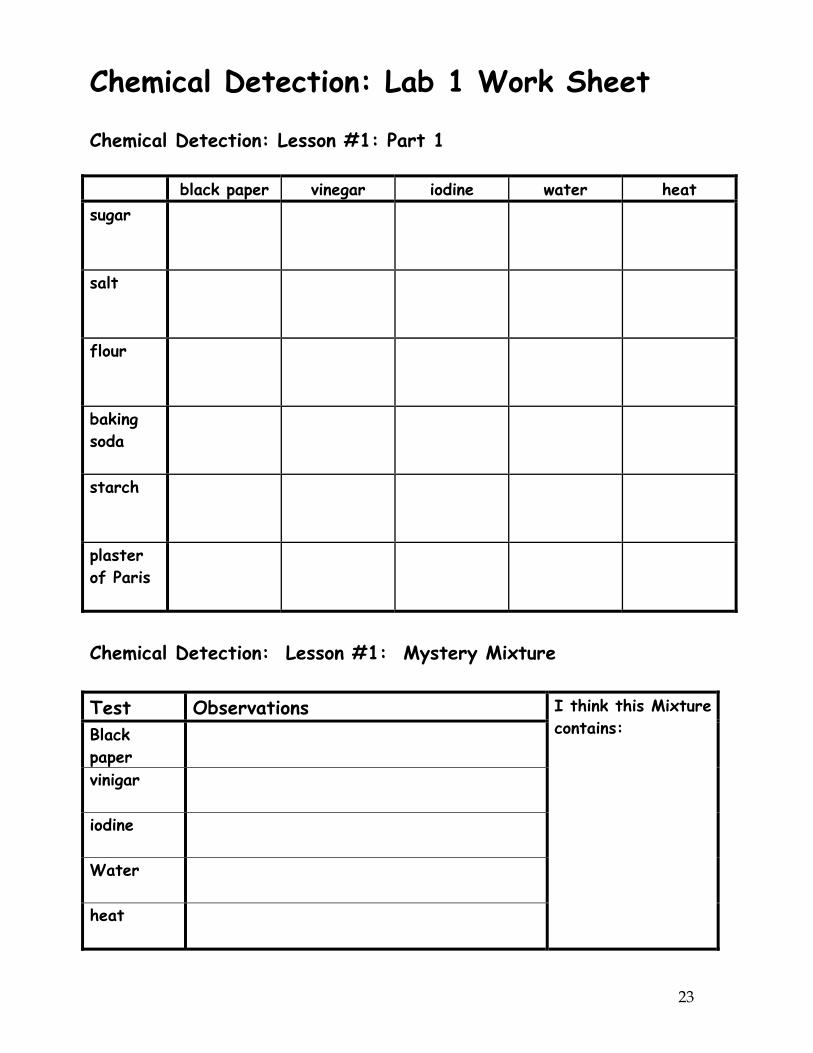
Chemical Detection: Expert Lab 1 Equipment • sugar • iodine solution • magnifying lens • salt • vinegar • clothespin • corn starch • water • black paper • baking soda • candle • tin foil • plaster of Paris • candle holder (jar lid) Background Information The white powders might look the same at first, but if you test them carefully, you will see that they react differently to heat, rubbing and other chemicals. Part 1 - Powder Characteristics 1. Add a drop of vinegar to a small
sample of each powder and record the results in the table.
2. Add a drop of iodine solution to a small sample of each powder and record the results in the table.
3. Add a small amount of water (one or two drops) to each powder and record the results in the table.
4. Spread a small portion of each powder on the black paper and observe with the magnifying lens. Record the results in the table.
5. Heat a small amount of each powder in a tin foil cup (with a clothespin handle). Be sure to tie back long hair and roll up baggy shirt and sweater sleeves. Record the results in the table.
Part 2 - Detecting Mixed Powders
1. Make a “mystery mixture” by combining a little of two or more powders.
2. Now, give the mystery mixture to another student in your expert group to see is he or she can detect the powders that are in it.
23
Chemical Detection: Lab 1 Work Sheet Chemical Detection: Lesson #1: Part 1
black paper vinegar iodine water heat sugar
salt
flour
baking soda
starch
plaster of Paris
Chemical Detection: Lesson #1: Mystery Mixture Test Observations Black paper
vinigar
iodine
Water
heat
I think this Mixture contains:

24
Chemical Detection Lesson 2: Chromatography Equipment • one permanent black pen • a variety of black, non permanent
(water soluble) pens • strip of filter paper for each pen
• cup of water • pencil • tape
Background information Sometimes you can determine who wrote a letter just by examining their style of writing, but did you know it is possible to determine the pen that wrote it? Inks and dyes usually contain a mixture of many different colours. Every brand uses a different colour mixture to make black. You can separate these colours using chromatography. Part 1 - Separating Black Ink Steps: 1. Place a dot of ink near the
bottom of each strip. Be sure to identify which strip belongs to which pen,
2. Dip the end of the strip into a container of water, just below the dot. Make sure the ink stays above the water, but that the strip stays dipped into the water. (you can tape the strip to a pencil and lay it across the rim of a glass of water.)
3. Allow the water to soak up the strip – watch what happens to the ink as the water reaches the spot.
4. Compare each strip when they are all finished. Repeat the experiment to see if the results are the same.
5. Let the strips dry and tape them into your book. Label the strips and keep as a record of the various pens

25
Part 2 - Forgery Challenge Instructions: 1. Cut out the letter below. 2. Make small changes to one with a non permanent pen. (add extra zeros to
the number, change Mr. Mac to Mr. Mad by adding a line to the “c”. Also change “Voc” to Mad in the last sentence)
3. Hand the papers to anther student and ask them to guess which is the forgery. You may need to prove a forgery by analyzing the ink.
Dear Mom,
I will be late after school today because the Water-Animal Club is having a meeting. Please give Mr. Mac $10 from my piggy bank. I bought his turtle on the way to school yesterday and he will be coming to pick up the money. I have two new fish on my dresser in separate bowls. I wrote their names under the bowls. One is named Voc, the other is Mad (named after Mr. Mad from down the road.). Please feed my fish Voc. Don’t feed the other, he has eaten already. Dear Mom,
I will be late after school today because the Water-Animal Club is having a meeting. Please give Mr. Mac $10 from my piggy bank. I bought his turtle on the way to school yesterday and he will be coming to pick up the money. I have two new fish on my dresser in separate bowls. I wrote their names under the bowls. One is named Voc, the other is Mad (named after Mr. Mad from down the road.). Please feed my fish Voc. Don’t feed the other, he has eaten already.
26
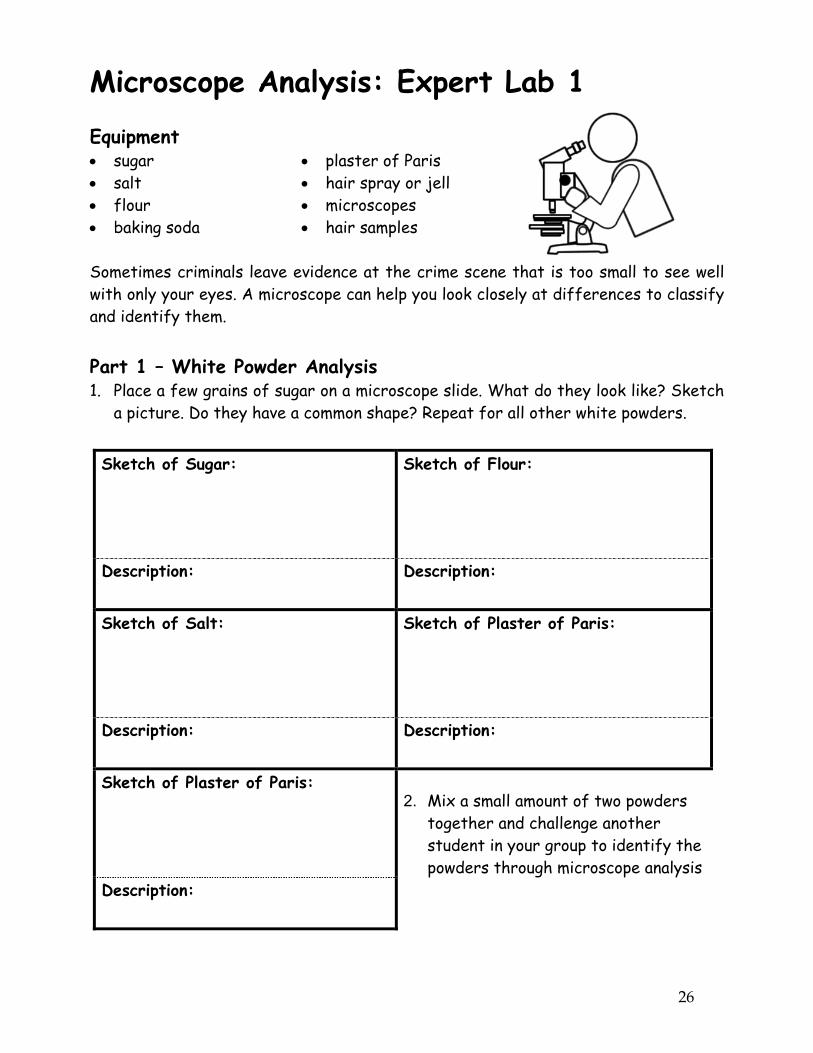
Microscope Analysis: Expert Lab 1 Equipment • sugar • salt • flour • baking soda
• plaster of Paris • hair spray or jell • microscopes • hair samples
Sometimes criminals leave evidence at the crime scene that is too small to see well with only your eyes. A microscope can help you look closely at differences to classify and identify them. Part 1 – White Powder Analysis 1. Place a few grains of sugar on a microscope slide. What do they look like? Sketch
a picture. Do they have a common shape? Repeat for all other white powders. Sketch of Sugar: Sketch of Flour:
Description: Description:
Sketch of Salt: Sketch of Plaster of Paris:
Description: Description:
Sketch of Plaster of Paris:
Description:
2. Mix a small amount of two powders
together and challenge another student in your group to identify the powders through microscope analysis

27
Part 2 - Hair Analysis
1. Pull a few hairs from your head and put them on a microscope slide. Keep the hairs in place with a drop of water and a cover slip.
2. Use the microscope under low and high power to examine the ends
of the hairs. Draw a picture of what you observe.
3. Now cut some hair from your head with a pair of scissors and examine the end. Draw a picture of what you observe.
4. . Hair with Hair-Spray
Pulled Hairs Cut Hairs
4. Put some hair spray on a small part of your hair and pull a few hairs to examine under the microscope. Do you see anything on the cuticle of the sprayed hairs?
5. Compare your hairs to the hairs of other students in your expert group. See if you can get some of your teacher's hair to compare. How could you make notes and records of the descriptions of the different hairs as you see them under the microscope?
6. Use the chart to practice drawing diagrams of the different hairs as you see them under the microscope

28
Lab 2: “Putting the Pieces Together” Equipment • tin foil • gum wrappers • paper matches • black light • hand lenses • microscopes • microscope slides Background Information One of the ideas behind forensic science is that a criminal always takes something away from the scene of a crime and leaves something behind. This might be something as simple as a part of a gum package. If the rest of the gum package found on a suspect matches the piece left at the scene of a crime, then a fairly convincing case can be put forward. Perhaps there would be a ripped piece of tin foil that would convict a suspect of a crime. Part 1 - Matching Torn Tin Foil Steps: 1. Tear a small piece of tin foil into two
pieces. 2. Carefully examine the torn surfaces of
each half to determine if you can make a match.
3. Take a look at the edges under a microscope. How would you record your observations and evidence in a convincing way?
Can you match the two pieces of torn tin foil?
Does using the microscope help in
the “tough” areas?
Sketch the two halves as seen under the microscope:
29
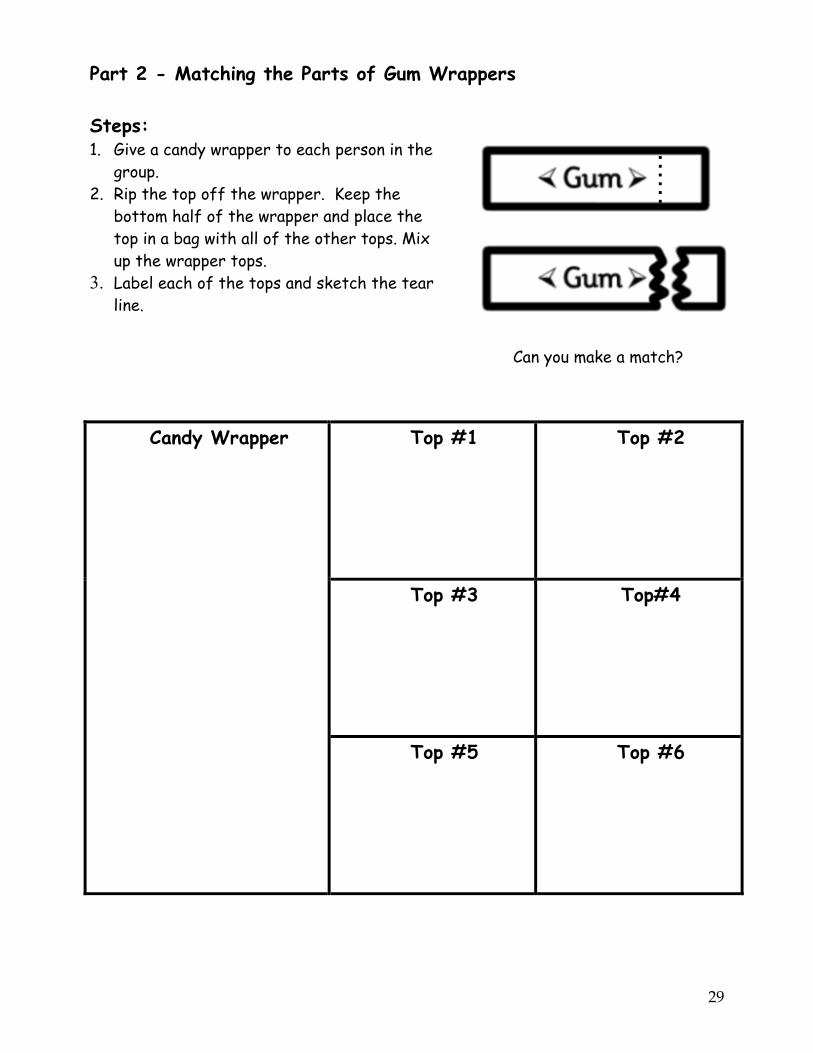
Part 2 - Matching the Parts of Gum Wrappers Steps: 1. Give a candy wrapper to each person in the
group. 2. Rip the top off the wrapper. Keep the
bottom half of the wrapper and place the top in a bag with all of the other tops. Mix up the wrapper tops.
3. Label each of the tops and sketch the tear line.
Can you make a match?
Top #1 Top #2
Top #3 Top#4
Candy Wrapper
Top #5 Top #6

30
Track and Soil Analysis: Expert Lab 1 Equipment • white paper • test tubes • tin foil • filter paper • test tube racks • water • pH paper • funnels • vinegar • magnifying lenses • magnifying glass • ammonia • a variety of soil types Background information Many crimes involve contact between the criminal and the victim resulting in soil from footwear and footprints being left at the scene of the crime. Sometimes the soil from the scene of a crime (say, a garden) can be found and identified on the suspect later. Part 1 - Soil Analysis Steps: 1. Collect soil samples from around
the school (outside, from potted plants, from playground, etc) .
2. Use the magnifying glass to find the colour(s) of the soil samples provides and the ones from around the school.
3. Check the size of the soil particles, and any plant or animal life that is present.
4. Check for other materials (paint chips, plastic, styrofoam etc.)
5. Feel if the soil is damp or dry. 6. Compare your soil to that of
another student in your expert group. In what ways are the soils the same? In what ways are they different?
7. Record all information on soil in the table
Observations Your Soil Partner’s Soil colour Particle size Plant life Animal life Other material dampness pH (part 2)

31
Part 2 - The Acidity of Soil Steps: 1. Set up three test tubes. Add 2mL
of water to the first, 2mL of acid (vinegar) to the second, and 2 mL of base (ammonia) to the third.
2. Dip a piece of pH paper (litmus paper) into each of the liquids in the test tubes.
3. Observe what happens to each of the pieces of test paper. Record your observations on the chart.
Liquid Sample
Colour of pH paper
Acid
Base
Neutral
4. Put a small amount of the soil
into a test tube. Add 10 mL of water and shake thoroughly to mix the soil and water together.
5. Fold a piece of filter paper as shown.
6. Place the filter paper in the
funnel and filter the soil and
water mixture into another test tube.
7. Test the liquid that comes
through the filter paper with the pH paper (litmus paper) to see whether it is acid, base or neutral. Record your findings.
Soil: acid base neutral Soil: acid base neutral
Soil: Soil:
Soil: Soil:
Soil: Soil:

32
Part 3 - Footprints Analysis Steps: 1. Push the print of your shoe into a
piece of tin foil. Practice taking the measurement of the footprint and describing and drawing the pattern on the sole of the shoe.
2. Compare your footprint with that of another student in your expert group. Can you describe the differences and similarities in the two footprints in a convincing way?
3. Record your observations of
footprints in the following chart. 4. Practice comparing footprints again if
you have extra time.
Foot print Sketch # 1 Description:
Footprint Sketch #2 Description: