my guide to total hip joint replacement - · pdf filegeneral information about your hip and...
TRANSCRIPT

My Guide to
Total Hip Joint
Replacement
NS8401-8504 (Rev. 2013/05/16)

The following people are acknowledged
for their contributions to the development
and revision of this guide:
Pathway to Recovery: My Guide to Total Hip Joint Replacement published by
Copyright 1997
(Revised 2013)
No part of Pathway to Recovery: My Guide to Total Hip Joint Replacement
may be copied or reproduced in any form or by any means without written permission from
London Health Sciences Centre, University Campus, London, Ontario, Canada
Exception: Organizations that have purchased the Guide have permission to
reproduce parts of the Guide for internal use only.
ISBN 0-9690619-7-8
Additional copies may be purchased from
The office of the Director of Surgery
339 Windermere Road, London, Ontario, Canada N6A 5A5
Telephone: 519-685-8500 ext. 76770
M Y G U I D E T O T O T A L H I P J O I N T R E P L A C E M E N T
Mary-Helen Adams, Physiotherapy
Barbara Berg Troyer, Nursing
Dr. R.B. Bourne, Orthopaedic Surgeon
Hazel Celestino, Clinical Educator Orthopaedics
Laurie Flodrowski, Occupational Therapy
Bob Harris, Nurse Practitioner
Dr. J. Howard, Orthopaedic Surgeon
Donna Kalman, Manager Orthopaedics
Kate Lanis, Occupational Therapy
Lina Martins, Nurse Educator
George Moogk, Graphic Artist
Allan Murray, Physiotherapy
Steve Newman, Nursing
Tia DiPasquale, Occupational Therapy
Joey Pipicelli, Occupational Therapy
Corinne Richards, Physiotherapy
Sylvia Simon, Coordinator Orthopaedics
Michelle Smart, Physiotherapy
Cheryl Talbot, Nurse Practitioner
Marg Vaz, Clinical Specialist, Physiotherapy

INTRODUCTION
Research shows that people who are well prepared and fully participate in their care have a
smoother and faster recovery after joint replacement surgery. This guide will give you and your
family information about your total hip joint replacement. It is divided into five sections:
Section 1: General Information About Your Hip and Total Hip Joint Replacement
Section 2: What to Expect Before and After Surgery
Section 3: Activities of Daily Living Following Total Hip Joint Replacement
Section 4: Exercises Following Total Hip Joint Replacement
Section 5: Final Remarks
Please read this guide and write down any questions you may have
in the spaces provided. Please remember to bring this guide with
you for your hospital stay and follow-up visits.
Important: If your surgeon or health care team gives you different
advice than what has been provided in this booklet, please follow the
individualized direction you receive.
For the most current information on Total Hip Joint Replacement,
please visit the web-site at
http://www.lhsc.on.ca/jointreplacement
M Y G U I D E T O T O T A L H I P J O I N T R E P L A C E M E N T
INTRODUCTION
i


TABLE OF CONTENTS
Introduction ...................................................................................................................... i
Section 1: General Information About Your Hip and Total Joint Replacement
- Structure of the Hip Joint.............................................................................. 1
- Function of the Hip Joint .............................................................................. 1
- Hip Pain ........................................................................................................ 2
- What is a Total Hip Joint Replacement (Arthroplasty)?................................ 2
- Why Have a Total Hip Joint Replacement?.................................................. 2
- Risks and Benefits of Total Hip Joint Replacement .................................... 3
- What Happens in Surgery? .......................................................................... 3
- How Long Will I Be in Hospital? .................................................................. 3
- What is a Revision Total Hip Replacement? ................................................ 4
- What Results Can I Expect? ........................................................................ 4
- What are the Risks of Revision Total Hip Replacement? ............................ 4
- What Happens in Revision Surgery? .......................................................... 5
- What Happens After Revision Surgery? ...................................................... 5
Section 2: What to Expect Before and After Surgery
- My First Pre-Admission Clinic (PAC) Visit .................................................... 7
- Day Before Surgery...................................................................................... 8
- Day of Surgery ............................................................................................ 9
- Arriving at the Hospital ................................................................................ 9
- Surgical Preparation Area ............................................................................ 8
- Operating Room .......................................................................................... 10
- Post-Anesthetic Care Unit (PACU) .............................................................. 10
- Day of Surgery-Post-Operative. .................................................................. 10
- Day of Discharge (Post-Operative Day 2-3) ................................................ 13
- At Home........................................................................................................ 16
- Problems to Watch for When at Home ........................................................ 17
- Care of Your Incision at Home .................................................................... 18
- Return Visits ................................................................................................ 19
- Further Return Visits .................................................................................... 20
- Long Term Care of Your Hip ........................................................................ 20
M Y G U I D E T O T O T A L H I P J O I N T R E P L A C E M E N T
Section 3: Activities of Daily Living Following Total Hip Joint Replacement
- Basic Rules for Protecting Your Hip ............................................................ 21
- Activities of Daily Living................................................................................ 23
- Lying Down .................................................................................................. 23
- Sitting............................................................................................................ 24
- Using the Toilet ............................................................................................ 24
- Bathing ........................................................................................................ 25
- Dressing ...................................................................................................... 26
- Sexual Relations .......................................................................................... 27
- Driving and Riding in the Car ...................................................................... 27
- Safety Proofing Your Home.......................................................................... 28
- Homemaking ................................................................................................ 28
- Equipment .................................................................................................... 29
Section 4: Exercises Following Total Hip Joint Replacement
- Exercises During the First Two Weeks After Surgery .................................. 31
- Exercises Two Weeks After Surgery ............................................................ 34
- Exercises Four Weeks After Surgery .......................................................... 36
- Exercises Six Weeks After Surgery.............................................................. 37
Section 5: Final Remarks
- Telephone Directory...................................................................................... 39
- Supporting Our Program .............................................................................. 41
- Joint Replacement Surgery Patient Checklist .............................................. 43
M Y G U I D E T O T O T A L H I P J O I N T R E P L A C E M E N T

SECTION 1
GeneralInformation

General Information About Your Hipand Total Hip Joint Replacement
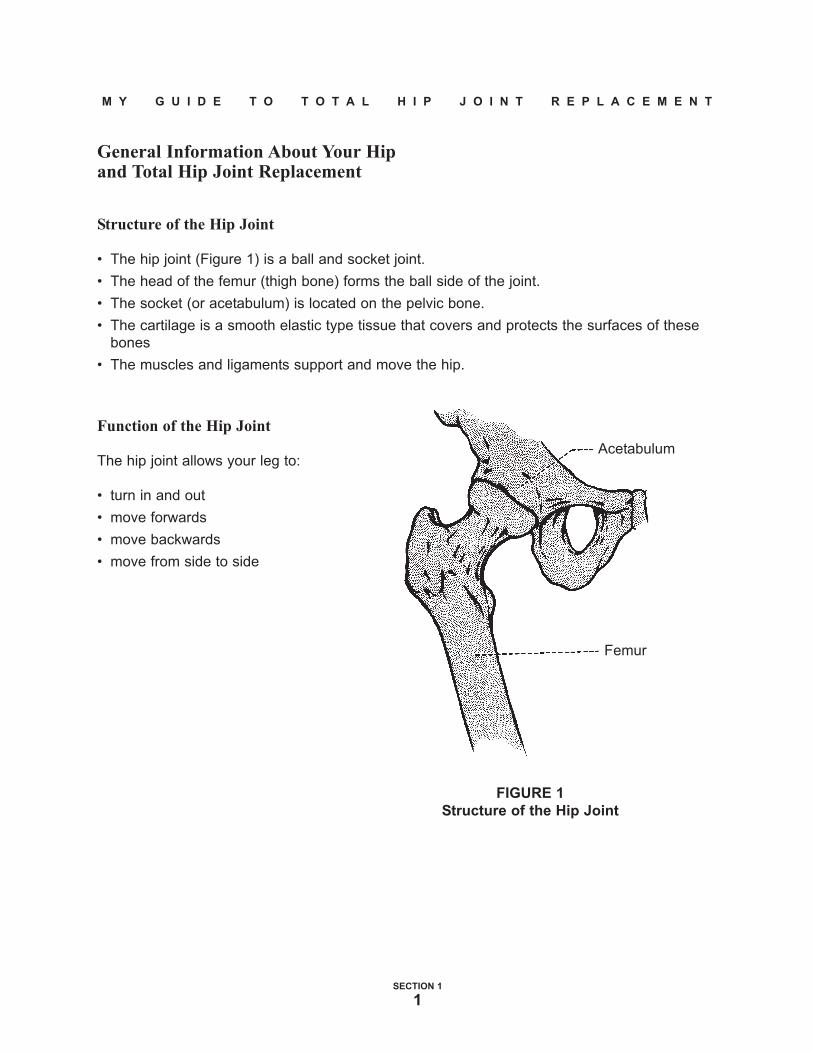
Structure of the Hip Joint
• The hip joint (Figure 1) is a ball and socket joint.
• The head of the femur (thigh bone) forms the ball side of the joint.
• The socket (or acetabulum) is located on the pelvic bone.
• The cartilage is a smooth elastic type tissue that covers and protects the surfaces of these
bones
• The muscles and ligaments support and move the hip.
Function of the Hip Joint
The hip joint allows your leg to:
• turn in and out
• move forwards
• move backwards
• move from side to side
M Y G U I D E T O T O T A L H I P J O I N T R E P L A C E M E N T
SECTION 1
1
Acetabulum
Femur
FIGURE 1
Structure of the Hip Joint

Hip Pain
Arthritis is a common age-related disease leading to hip pain.
The hip becomes painful when:• cartilage is destroyed
• irregular bone surfaces appear
• muscles weaken and the joint becomes stiff
These changes in the hip joint often result in:• pain, especially when walking
• aching felt in the groin and/or the knee, and loss of hip movement
What is a Total Hip Joint Replacement (Arthroplasty)?
It is the replacement of both sides of the
hip joint with
• a plastic and metal socket, or all
metal socket
• a metal or ceramic ball and stem (Figure 2)
Why Have a TotalHip Joint Replacement?
• to end or reduce your pain
• to improve your hip movement and function
• to improve your quality of life
M Y G U I D E T O T O T A L H I P J O I N T R E P L A C E M E N T
SECTION 1
2
Plastic and
Metal Socket
(Acetabulum)
Stem
Metal Ball
FIGURE 2
Total Hip Arthroplasty

Risks and Benefits of Total Hip Joint Replacement
With your decision to proceed with total hip joint replacement, you will have already discussed
the benefits and risks of this surgery with your surgeon. To date, over six million hip joint
replacements have been performed worldwide. They have proven to be extremely durable.
Ninety to ninety-five percent success rates at ten to twenty year check-ups are common.
As with any operation, total hip joint replacement has a number of potential risks.
These include:
• Anesthetic complication
• Deep vein thrombosis and pulmonary embolism (blood clot in leg or lungs)
• Death (0.7%)
• Infection (approximately 0.5%)
• Slow healing
• Technical complication (i.e. damage to skin, muscle, bone, nerve or blood vessel)
• Post-operative dislocation (0.4%)
• Leg length discrepancy (occasional occurrence)
• Late wear and loosening of the implant needing revision (between 0.5 and 1% per year)
• Thigh pain
• Limp
Your surgeon will review these with you before your surgery and answer any of your questions.
What Happens in Surgery?
Your hip surgery will take about two hours. The surgeon:
• removes damaged bone from your hip joint
• selects and fits your new joint according to your individual size
• may use surgical bone cement to anchor your new hip to the bone
How Long Will I Be in Hospital?
The goal for our patients is to be able to go home 1-3 days after a total hip joint replacement
and 2-4 days after a revision total hip replacement.
M Y G U I D E T O T O T A L H I P J O I N T R E P L A C E M E N T
SECTION 1
3

Revision Total Hip Joint Replacement
What is a Revision Total Hip Replacement?
In patients over age 60 years, it is hoped that a total hip replacement will last the lifetime of the
patient. Occasionally, implants fail for a variety of reasons such as polyethylene (plastic) wear,
loosening, dislocation or deep infection. A revision total hip replacement often involves
removing the implants put in during the first operation, and replacing these with new total hip
devices.
What Results Can I Expect?
Revision total hip replacement is a more difficult and lengthy operation than the initial total hip
replacement, but can offer extremely good results in terms of pain relief and restoration of
function. The chances of an excellent result are slightly lower than those of the primary
procedure, but still in the range of 80-90%.
What Are the Risks of Revision Total Hip Replacement?
As with any operation, a revision total hip replacement has a number of potential risks. These
would include:
• Anesthetic complication
• Flaring up of medical condition(s)
• Deep vein thrombosis and pulmonary embolism (blood clot in leg or lungs)
• Death (0.7%)
• Infection (approximately 2-5%)
• Slow healing
• Slow convalescence
• Technical complication (ie. damage to skin, muscle, bone, nerve or blood vessel)
• Post-operative dislocation of the hip (1-3%)
• Leg length discrepancy (an occasional occurrence)
• Late wear and loosening of the implant needing revision (approximately 1% per year)
• Limp
• Thigh pain
Your surgeon will review these with you before your surgery, and answer any of your
questions.
M Y G U I D E T O T O T A L H I P J O I N T R E P L A C E M E N T
SECTION 1
4

What Happens in Revision Surgery?
A revision total hip replacement usually takes 3-4 hours to perform. The surgeon must:
• expose and remove the failed implant
• insert all or part of a new total hip replacement
What Happens After Revision Surgery?
The information in the Guide will generally apply to you. However, after a revision total hip
replacement your weight bearing and exercises may be more restricted than with your first hip
replacement. Your physician, nurse, physiotherapist and occupational therapist will discuss
these restrictions with you.
M Y G U I D E T O T O T A L H I P J O I N T R E P L A C E M E N T
SECTION 1
5

SECTION 2
What to ExpectBefore and
AfterSurgery


Helpful Information to Be Prepared for Your Visit to X-ray:
● there may be a significant wait for your x-ray
● bring any medication, food or hydration you may require
● bring any mobility aids that you may normally use or require to move in x-ray ie. walker,
cane, etc.
● wear comfortable, loose clothing without metal components
ie. if you wear jeans with rivets and zippers, you will be asked to change to a hospital gown
● you will be required to stand to have the knee x-ray views completed
Post-Operative X-rays for Clinic Appointments:
● do NOT come earlier than the appointment time you were given.
These are booked to preceed your clinic appointment times.
● arriving early to x-ray WILL NOT speed up your clinic visit
M Y G U I D E T O T O T A L H I P J O I N T R E P L A C E M E N T
SECTION 2
6
WHAT TO EXPECT BEFORE AND AFTER SURGERY
The following may be used as a checklist.
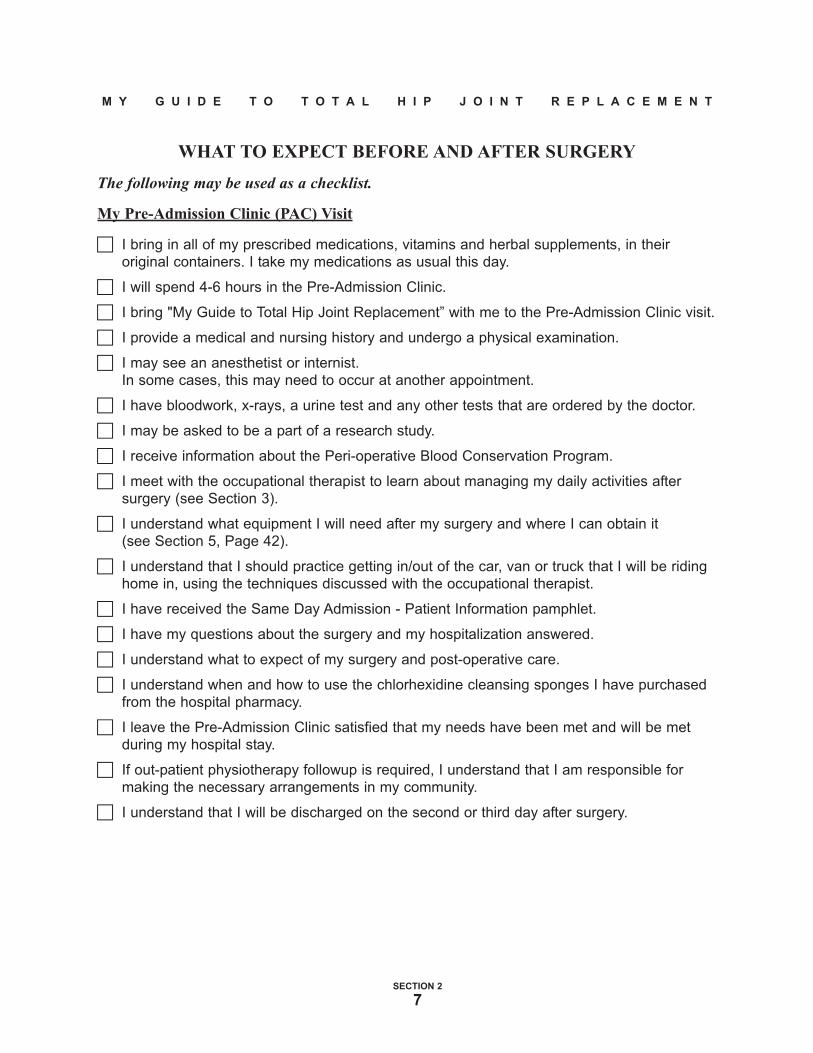
My Pre-Admission Clinic (PAC) Visit
c I bring in all of my prescribed medications, vitamins and herbal supplements, in their
original containers. I take my medications as usual this day.
c I will spend 4-6 hours in the Pre-Admission Clinic.
c I bring "My Guide to Total Hip Joint Replacement” with me to the Pre-Admission Clinic visit.
c I provide a medical and nursing history and undergo a physical examination.
c I may see an anesthetist or internist.
In some cases, this may need to occur at another appointment.
c I have bloodwork, x-rays, a urine test and any other tests that are ordered by the doctor.
c I may be asked to be a part of a research study.
c I receive information about the Peri-operative Blood Conservation Program.
c I meet with the occupational therapist to learn about managing my daily activities after
surgery (see Section 3).
c I understand what equipment I will need after my surgery and where I can obtain it
(see Section 5, Page 42).
c I understand that I should practice getting in/out of the car, van or truck that I will be riding
home in, using the techniques discussed with the occupational therapist.
c I have received the Same Day Admission - Patient Information pamphlet.
c I have my questions about the surgery and my hospitalization answered.
c I understand what to expect of my surgery and post-operative care.
c I understand when and how to use the chlorhexidine cleansing sponges I have purchased
from the hospital pharmacy.
c I leave the Pre-Admission Clinic satisfied that my needs have been met and will be met
during my hospital stay.
c If out-patient physiotherapy followup is required, I understand that I am responsible for
making the necessary arrangements in my community.
c I understand that I will be discharged on the second or third day after surgery.
M Y G U I D E T O T O T A L H I P J O I N T R E P L A C E M E N T
SECTION 2
7

c Hospital stays are becoming shorter all the time with improved surgeries. The length of time
you spend in hospital depends upon the type of joint replacement you have and your overall
health. Some people go home the day after surgery and most go home Day 2 or 3. Those
with serious health concerns may stay a little longer. People tend to heal best and most
safely in their own home.
c I will arrange for transportation home and for any help that I may require. Discharge time
by 11:00 o'clock.
Following surgery, you will use crutches or a walker for at least 6 weeks. Some surgeons may
allow you to advance to a cane in this time period. If you have crutches at home, please have
them brought into the hospital after your surgery. Crutches may also be purchased at the
hospital. If you need a walker or cane, rental can be arranged from services in your community.
Doctors recommend that you do not drive your car for at least 6 weeks following surgery. It is
therefore important that you arrange a ride to physiotherapy by family, friends, or public
transportation. Depending on your medical and physical status, physiotherapy may be arranged
through the Community Care Access (CCAC) program.
What Happens if I Do Not Feel Well?
c I call my surgeon immediately if I develop a cold or my health changes in ANY way as I get
closer to my surgery.
Day Before Surgery
c My surgeon’s office will call between noon and 3:00 p.m. to confirm the time of surgery. If Ihave not heard from the surgeon’s office by 3:00 p.m., I will call the surgeon’s office to
confirm the surgery time.
c I remove polish from fingernails and toenails.
c I shower or bathe the night before and the day of surgery.
c I use the cleansing sponges, following the instructions given to me by my pre-admission
clinic nurse. There are also printed instructions that come with the cleansing sponges.
c I have nothing to eat or drink after midnight the night before my surgery and on the day of
surgery.
c I do not chew gum, have candy or smoke after midnight the night before my surgery and on
the day of surgery.
c I follow any special instructions given to me by the doctor or nurse to prepare for surgery.
c I remember not to shave my legs less than 48 hours before surgery.
M Y G U I D E T O T O T A L H I P J O I N T R E P L A C E M E N T
SECTION 2
8

Day of Surgery
c I pack a small overnight case or bag with 2-3 sets of night clothes, bath robe, slippers,crutches, hip guide booklet and personal care items (toothbrush, toothpaste, mouthwash,soap, lotion, razor, comb, deodorant, tissues and feminine hygiene products). I ask a familymember to keep this bag and bring to my room after my surgery.
c I have had nothing to eat or drink after midnight the night before my surgery.
c I pack clothing to wear home, which may also be used to practice dressing techniques withthe occupational therapist.
c I do not take any medications unless told to do so with a sip of water.
c I may wear dentures, glasses, hearing aids, or hair pieces, but they will be removed beforesurgery. I will bring containers for these.
c I may brush my teeth the morning of surgery, being careful not to swallow any water.
c I do not bring large amounts of money, jewellery, or other valuables.
c I do not wear makeup.
c I do not wear contact lenses.
c I follow any special instructions given to me by the doctor or nurse to prepare for surgery.
c _______________________________________________________________________________
c _______________________________________________________________________________
Arriving at the Hospital
c I report to the Pre-Admission Clinic area and then I will be directed to go to the SurgicalPreparation Area, where I will be prepared for my surgery.
c I arrive 2½ - 3 hours before my scheduled surgery time as instructed by the doctor’s
secretary.
Surgical Preparation Area
c I get dressed in a hospital gown.
c I have my blood pressure, pulse and breathing rate checked.
c I will have an intravenous started.
c The nurse will ask me if I have any new medications added to my home list.
c The nurse will ask me about medications taken today.
c I may have preoperative medications given to me. This may include a rectal suppository tohelp control my pain after surgery.
c I will speak to my anesthetist or delegate.
c I will speak to my surgeon or delegate.
c I will have my leg marked by my surgeon or delegate.
c I am taken to the operating room.
M Y G U I D E T O T O T A L H I P J O I N T R E P L A C E M E N T
SECTION 2
9

Operating Room
c My surgery takes 1-1/2 to 4 hours depending on the surgery being performed.
c I am taken to the Post-Anesthetic Care Unit (PACU) in my bed.
Post-Anesthetic Care Unit (PACU)
c I have my blood pressure, pulse, and breathing rate checked.
c I receive medication for my pain by pushing the PCA (pain pump) button or pain
medication may be given to me by the nurse.
c I have my circulation, sensation, and pulses, checked and I am asked to move my foot.
c I will have an x-ray done of my hip.
c I will have a large gauze bandage over my hip, which the nurse will check regularly.
c I will be moved to the Inpatient Unit to be monitored closely for my first post-operative
night.
Day of Surgery - Post-Operative
c I am provided with a call bell and shown how to call for the nurse.
c My surgeon speaks with me or my family about the surgery.
c I have my foot, gauze bandage, blood pressure, pulse and breathing rate checked often.
c I ask for and receive pain medication as I need it. I may control this by pushing a Pain
Pump button.
c I use a bedpan or urinal the day and night of my surgery. I may have a urinary catheter
in place.
c I have a pillow placed between my legs and am helped to lie on my back or my side.
c I may start to drink if I wish.
c I ask for medications to settle my stomach if needed.
c I may be given oxygen overnight.
c My family is welcome to stay with me until visiting hours are over, recognizing my need for
rest after surgery.
c I may be assisted to sit at the side of my bed and may walk a short distance.
M Y G U I D E T O T O T A L H I P J O I N T R E P L A C E M E N T
SECTION 2
10
The following may be used as a checklist.
First Day After Surgery (Post-Operative Day 1)
c Visiting may be interrupted to provide appropriate patient care and therapy or restricted ifsafety and privacy rights need to be protected.
c I will begin to eat solid food today.
c I am assisted to sit up, given a basin of water and helped to bathe while sitting up.
c My physiotherapist and/or nurse reviews how much weight I may put on my leg.
c My physiotherapist and/or nurse shows me how to use an appropriate gait aid(see pages 11-12).
c My physiotherapist and/or nurse reviews how to protect my hip when moving.
c My physiotherapist and/or nurse may help me to sit in a chair.
c My physiotherapist and/or nurse may help me to walk to the hallway.
c I am reminded of the basic rules for protecting my hip (see Pages 21-22) and activityrestrictions.
c My nurse changes my initial bandage. This may produce mild discomfort for a short time.
c I have blood taken.
c My intravenous is taken out if I am drinking well. If I have had a revision hip replacement,my intravenous may be left in for a few more days.
c My oxygen may be removed.
c I receive the medications that I was taking at home.
c I ask for and receive medication as needed for pain, nausea, and vomiting.
c My nurse teaches me how to give myself a blood thinner by injection or explains the bloodthinner tablet I may be given.
c My temperature, pulse, breathing rate and blood pressure are taken regularly throughoutthe day and night.
c My circulation, sensation, and pulses are checked. I am asked to move my foot.
c I am asked to deep breathe and cough regularly.
c I am asked to do foot and ankle exercises regularly.
c I have my hip bandage checked regularly for any drainage.
c I am helped to turn from side to side with a pillow placed between my legs.
c I ask for help to walk to the bathroom and use a versa frame over the toilet.
c I start exercises (#1-5) for my hip, as instructed by my physiotherapist.
c I am encouraged to sit up in the chair for dinner.
c My pain begins to ease over the first day or two.
c I may go home today. I will review the instructions for Post-operative Day 2-3.
M Y G U I D E T O T O T A L H I P J O I N T R E P L A C E M E N T
SECTION 2
11

Mobility
I will be helped by my nurse or physiotherapist.
Lying to Sitting:
c I move my body to the edge of the bed with the non-
operated side leading.
c I keep my body straight, and my
operated leg out to the side.
c I move from lying to sitting at the
edge of the bed. I do not twist
my leg. I may use a strap to
assist with this movement.
Bed to Chair:
c I sit on the edge of the bed with my operated leg straight out in front.
c I place my hands on the bed. I use my hands and the non-operated leg to push myself up
from sitting to standing and then reach for the walker. I do not lean forward when
moving from sitting to standing.
c I move the walker forward first making sure that all
four of its legs are down, I move the operated leg
forward into the walker maintaining appropriate
weight bearing. I follow with my non-operated side to
meet the operated leg.
1. Walker
2. Sore (Operated) Leg
3. Good (Non-Operated) Leg
This sequence is repeated for walking with the
walker (ie. to the bathroom, in hallway)
M Y G U I D E T O T O T A L H I P J O I N T R E P L A C E M E N T
SECTION 2
12

c I feel for the back of the chair with my non-
operated leg. If the chair is lower than my
knee, I will need a higher chair or a cushion
to increase the height. I slide my operated
leg forward reaching for the arms of the chair
behind me. I lower myself down into the
chair. My knee should always be lower
than my hip. I do not twist to look behind
me.
c I follow the same steps when sitting on a
commode chair or raised toilet seat.
c I never sit down on anything that is lower
than my knee.
The following may be used as a checklist.
Second Day After Surgery (Post-Operative Day 2-3)
c I may go home today.
c I may have blood taken.
c I bathe at the side of the bed..
c I eat my meals sitting in the chair.
c I demonstrate how to give my blood thinner by injection or my nurse reviews my blood
thinner tablet.
c My physiotherapist and nurse help me to progress my walking with the walker or crutches,
as able.
c I walk in the hall and/to the bathroom today, as much as possible.
c I use a raised toilet seat with arms for at least six weeks.
c My nurse removes my hip bandage, cleans my incision, and puts a new bandage on.
c I receive a laxative at bedtime as needed.
c I practice getting in and out of bed without having the head of the bed elevated or using
bed-rails.
c My occupational therapist reviews how to protect my new hip and manage my daily
activities safely.
c My occupational therapist confirms that I have arranged the equipment I will need at home.
M Y G U I D E T O T O T A L H I P J O I N T R E P L A C E M E N T
SECTION 2
13

My plans for discharge are reviewed and I am aware of my responsibilities:
c Outpatient Physiotherapy appointment - arrangements made prior to surgery
c Exercise
c Dressings/obtaining gauze for dressings
c Equipment
c Supports
c Transportation
I confirm my ride home and am aware of the 11:00 o'clock discharge time.
c My physiotherapist instructs me on how to climb and descend the stairs.
c My occupational therapist reviews how to manage car transfers safely.
c I make sure that my driver is aware of any modifications needed to ensure proper
positioning of my hip (eg. a firm cushion on the passenger seat).
c My occupational therapist gives me the opportunity to practice getting dressed using the
appropriate devices.
M Y G U I D E T O T O T A L H I P J O I N T R E P L A C E M E N T
SECTION 2
14

Using Crutches:
When using crutches, I put my weight on my palms, not my
armpits. I do not twist to turn - I take small steps instead. I am
sure to follow the advice given to me about how much weight I
can put on my hip.
I follow the sequence of
1. Crutches
2. Sore (Operated) Leg
3. Good (Non-Operated) Leg
My physiotherapist will check my crutches to ensure
proper fit and safety before I use them.
Crutches on Stairs:
Instructions whether to use one crutch or two on
stairs will be given by my physiotherapist
depending on my individual home setting or
needs.
c To go up the stairs, using my crutches:
1. I put my non-operated leg on the stair.
2. I put my operated leg on the stair.
3. I put my crutches on the stair.
Crutches on Stairs:
c To go down the stairs, using my crutches:
1. I put my crutches on the stair below.
2. I put my operated leg on the stair.
3. I put my non-operated leg on the stair.
M Y G U I D E T O T O T A L H I P J O I N T R E P L A C E M E N T
SECTION 2
15

c I have made arrangements for equipment for my home (see Section 5, Page 42).
c I am told about problems to watch for at home (see Section 2, Page 17).
c I am given a prescription for pain medication and my blood thinner.
c If I have any questions about my medication, I ask my nurse.
c I am given an appointment to come to the orthopaedic clinic on the main floor, if I do not
already have one.
c I may be given a staple remover and letter to give to my doctor.
c I am given a card for my wallet which says I have had a total joint replacement.
c I am taken to the front door in a wheelchair when my ride arrives.
c I am helped to get into my car.
The following may be used as a checklist.
At Home
c I use gait aids when walking as I have been instructed.
c I use my walker or crutches at all times when up.
c I will be instructed on my 2 week follow up visit. I will receive a letter to take to my
GP and a staple remover or a return appointment to my surgeon.
c My pain and swelling should continue to improve over the next few weeks.
c I do my hip exercises twice a day as taught.
c I see a physiotherapist within 2 weeks of my discharge as arranged.
c I do not drive until my surgeon sees me at the 6-week appointment.
c I follow my hip restrictions associated with my surgery for at least 6 weeks.
c I will be given instructions when I can shower by my surgeon.
c I do not get in or out of a bathtub for at least six weeks unless I use a bath transfer
bench as discussed with my occupational therapist.
c I call my surgeon with any questions or concerns I have. My surgeon’s number is
provided on my wallet card.
M Y G U I D E T O T O T A L H I P J O I N T R E P L A C E M E N T
SECTION 2
16

Prevention of Constipation:
Pain pills, reduced activity and changes in your diet can lead to constipation. Adding fibre to
your diet such as fruits, vegetables and bran, as well as increasing your fluid intake can all
help to prevent this. Some patients may need to take Metamucil, stool softeners, laxatives or
even enemas. If you continue to have difficulties, please contact your family doctor or
pharmacist.
Problems to Watch For When at Home
If I experience any of the following symptoms or have any concerns, I will call my
surgeon or family physician.
1. Increased pain in calf or thigh of either leg.
2. Increased pain in leg and leg appears shorter.
3. Increased swelling, tenderness, or redness in either leg.
4. Temperature above 38••C taken at least 30 minutes after eating or drinking.
5. Increased drainage from the incision, redness, or opening of incision edges.
6. Increased difficulty with walking.
7. If I develop shortness of breath or chest pain/tightness, I will go to my local
Emergency Department.
Prevention of Edema (Swelling) :
Edema or swelling occurs as a natural response to surgery and tissue injury. Swelling tends to
increase in the affected leg when sitting or standing, but should decrease over time and should
be less upon waking in the morning. Pain and redness should not be present. If you
experience pain or redness contact your physician. To minimize swelling lie down several times
per day with your leg slightly elevated. Continue the foot and ankle pumping exercises while
lying down. Avoid prolonged periods of sitting with your legs in a dependent position. Doing
your exercises as instructed by your physiotherapist should also reduce the swelling.
M Y G U I D E T O T O T A L H I P J O I N T R E P L A C E M E N T
SECTION 2
17
CARE OF YOUR INCISION AT HOME
1. Follow the wound care instructions provided to you in hospital. A shower is
acceptable but do not submerge in water (baths, whirlpool or swimming pool) for 6
weeks after surgery.
2. Look at the incision every other day and watch for any redness, drainage or
opening of the edges. Your nurse will provide specific dressing instructions should
you go home with a wound that still has drainage.
3. Change the bandage when necessary and replace it with a new sterile bandage.
Bandages can be bought at a pharmacy. Do not touch the incision with your hands.
Remember: Wash hands before and after incision care.
4. Have the staples removed by your family doctor or surgeon two weeks after
your surgery.
5. NO lotions, ointments or creams should be applied over or around the incision area
until you have your 6 week follow-up appointment with your surgeon.
M Y G U I D E T O T O T A L H I P J O I N T R E P L A C E M E N T
SECTION 2
18

The following may be used as checklist.
Return Visits
c I return to see my surgeon about 6 weeks after my surgery, in some cases earlier visits will
be scheduled.
c I go to the orthopaedic out-patient clinic on the 1st floor.
c See x-ray instructions at the beginning of this section of the booklet.
c I may be asked to go to the x-ray department on the 2nd floor after I have registered
(½ hour before my clinic appointment).
c I bring a list of questions/concerns that I might have.
c I may be asked to fill out a questionnaire while I am waiting to see the surgeon.
c I bring any note from my therapist to my surgeon.
c I am told by the surgeon if I need to follow my hip restrictions any longer.
c I may no longer need a pillow placed between my legs when in bed.
c I may no longer need to use a raised toilet seat.
c I may now be allowed to bend down to put my shoes and socks on.
c I may now be allowed to put more weight through my leg.
c I may now be allowed to drive. c Yes c No
c I may be given a note by the surgeon to give to my physiotherapist.
c I am given an appointment for my next return visit.
c I will ask my surgeon about return to specific activities (ie: golf, tennis, gardening, etc.).
c At 6 weeks post-operative, I will receive new information from my doctor to give to my
physiotherapist concerning my rehabilitation.
The London Health Sciences Centre Foundation usually calls discharged patients within
6 weeks of discharge for donations. Please consider directing any donations to the
Orthopaedic Program (see Page 41).
M Y G U I D E T O T O T A L H I P J O I N T R E P L A C E M E N T
SECTION 2
19

The following may be used as checklist.
Further Return Visits
c I return to see my surgeon 3 months, and 1 year after my surgery.
c I am seen every 1 to 2 years thereafter.
c I may have x-rays done at each visit.
c I may contact my surgeon for earlier visits if I develop any problems or have concerns.
Examples: increased pain lasting more than a few days, developing a limp or unable
to weight bear through the surgical leg, a loss of range of motion, signs and symptoms
of infection.
Long Term Care of Your Hip
1. Do not lift objects more than 50 pounds repeatedly.
2. There is usually no limit to walking, bicycling, or swimming.
3. Certain high level activities are not recommended with a hip replacement.
Please discuss these with your surgeon. Examples include but are not limited to
tennis, jogging and contact sports. Please discuss with your surgeon.
4. Remind your doctors and dentists you have had a total hip replacement. You will
need to take a prophylactic (preventative) antibiotic before dental work or surgery
for at least 2 years. In some cases, life-long prevention may be recommended by
your surgeon.
M Y G U I D E T O T O T A L H I P J O I N T R E P L A C E M E N T
SECTION 2
20


M Y G U I D E T O T O T A L H I P J O I N T R E P L A C E M E N T
SECTION 3
Activities of Daily Living FollowingTotal Hip JointReplacement
.


Dependent upon the surgical approach your surgeon has used, the "rules" for
activity and protection of your hip may vary. Your surgeon and support team will
identify the specific instructions you will need to follow.
If you are having a lot of difficulty managing your everyday activities (such as
walking, getting on/off a toilet) before the surgery, you may benefit from using
some of the equipment and strategies outlined in this section.
Activities of Daily Living Following Total Hip Joint Replacement
For at least six weeks following your operation you will have to be careful not to bend or twist
your new hip too much. The following rules will help to keep your hip in place while you are
healing. Your surgeon will tell you when you can increase your hip movement.
BASIC RULES FOR PROTECTING YOUR HIP
Rule 1:
DO NOT bend your hip more than 90°. For example, when sitting, your knee
should not be raised above the level of your hip and you should not bend
forward at the waist. Do not crouch or squat.
M Y G U I D E T O T O T A L H I P J O I N T R E P L A C E M E N T
SECTION 3
21
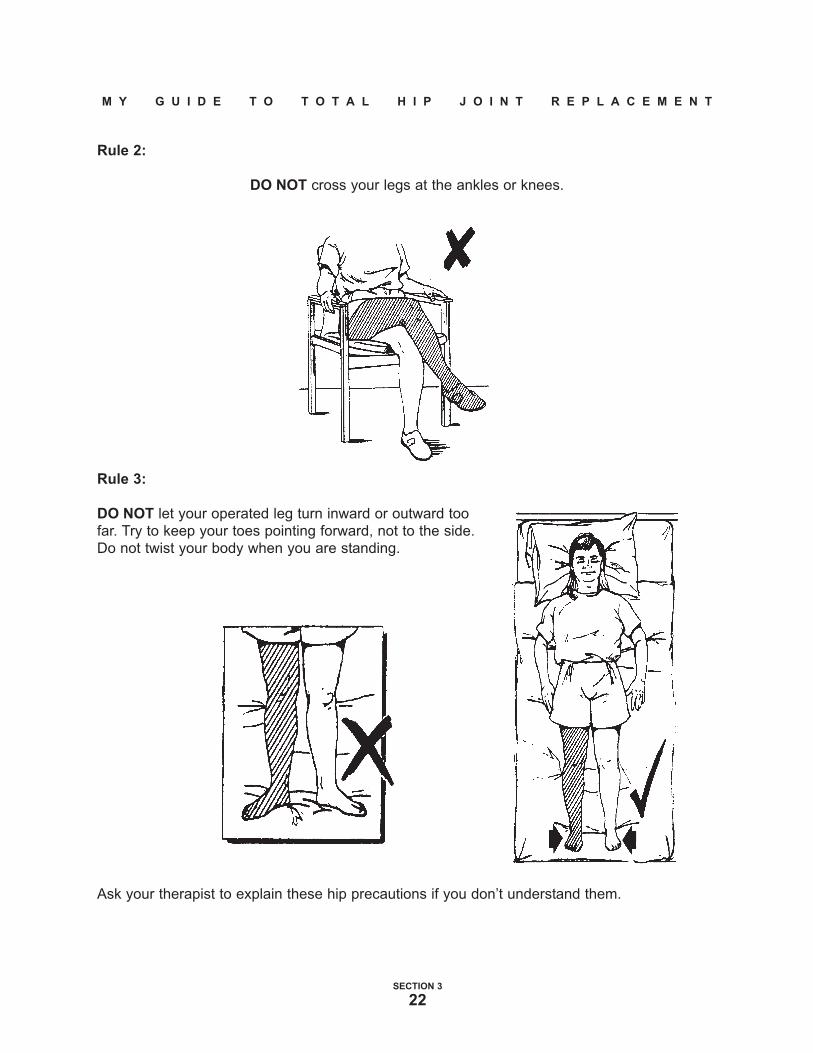
Rule 2:
DO NOT cross your legs at the ankles or knees.
Rule 3:
DO NOT let your operated leg turn inward or outward too
far. Try to keep your toes pointing forward, not to the side.
Do not twist your body when you are standing.
Ask your therapist to explain these hip precautions if you don’t understand them.
M Y G U I D E T O T O T A L H I P J O I N T R E P L A C E M E N T
SECTION 3
22

Activities of Daily Living (A.D.L.s)
Now that you understand the basic rules for protecting your new hip, you must look at how
they apply to everyday activities. Your occupational therapist (O.T.) will review the safest way
to manage these activities.
You must be careful whenever you change positions. This is the time when you are most at
risk for dislocating your hip.
Always think about how you are going to move and the position your hip will be in.
Lying Down
Make sure your bed is high enough so that when you sit down your knees are lower than
your hips. The best way to lie in bed is on your back with a pillow between your legs.
You may lie on your side but
be sure to have pillows
between your legs to prevent
them from crossing.
Your nurse or therapist will show you how to turn onto your side safely.
M Y G U I D E T O T O T A L H I P J O I N T R E P L A C E M E N T
SECTION 3
23
Sitting
Use chairs with firm straight seats and arms. Do not use rocking chairs. Chairs which have
angled seats, such as recliners, should also be avoided as they may put your knees up higher
than your hips.
Check the height of any seat before you sit down. When you stand in front of a chair, the seat
should be at least as high as your knees.
If you need to raise the height of a chair, you can place a firm cushion on the seat. You may
also put special blocks under the chair legs. Your occupational therapist can explain this
further.
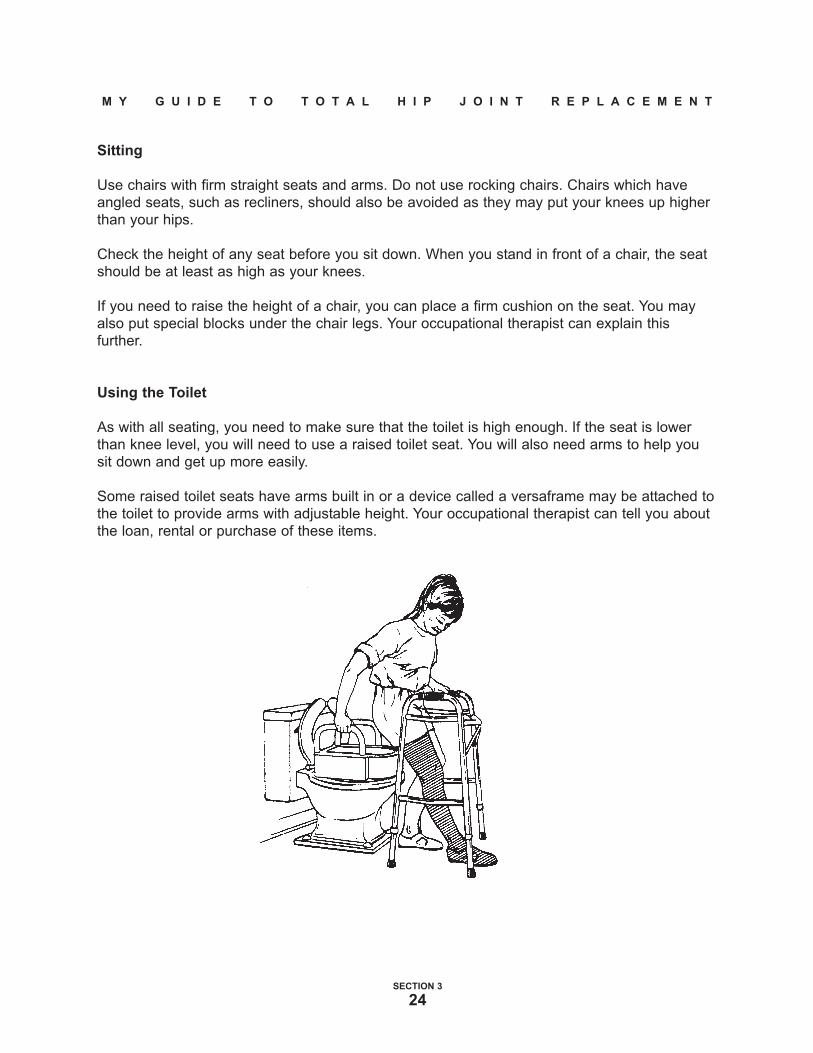
Using the Toilet
As with all seating, you need to make sure that the toilet is high enough. If the seat is lower
than knee level, you will need to use a raised toilet seat. You will also need arms to help you
sit down and get up more easily.
Some raised toilet seats have arms built in or a device called a versaframe may be attached to
the toilet to provide arms with adjustable height. Your occupational therapist can tell you about
the loan, rental or purchase of these items.
M Y G U I D E T O T O T A L H I P J O I N T R E P L A C E M E N T
SECTION 3
24
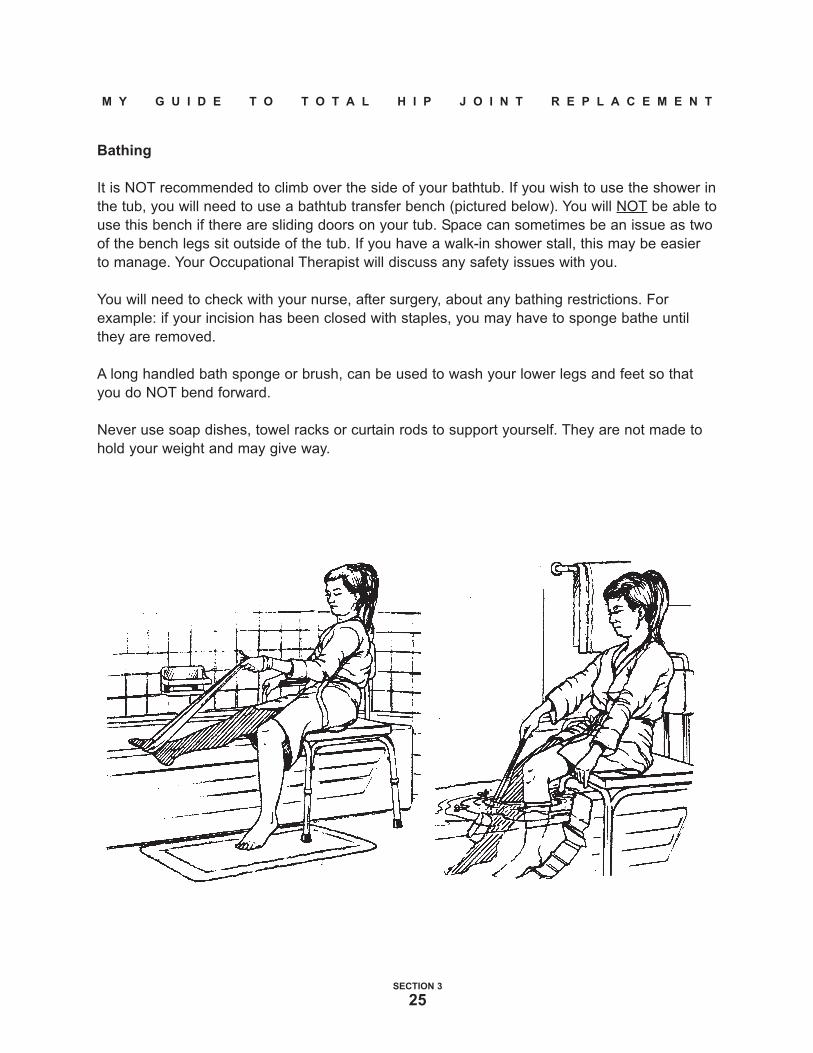
Bathing
It is NOT recommended to climb over the side of your bathtub. If you wish to use the shower in
the tub, you will need to use a bathtub transfer bench (pictured below). You will NOT be able to
use this bench if there are sliding doors on your tub. Space can sometimes be an issue as two
of the bench legs sit outside of the tub. If you have a walk-in shower stall, this may be easier
to manage. Your Occupational Therapist will discuss any safety issues with you.
You will need to check with your nurse, after surgery, about any bathing restrictions. For
example: if your incision has been closed with staples, you may have to sponge bathe until
they are removed.
A long handled bath sponge or brush, can be used to wash your lower legs and feet so that
you do NOT bend forward.
Never use soap dishes, towel racks or curtain rods to support yourself. They are not made to
hold your weight and may give way.
M Y G U I D E T O T O T A L H I P J O I N T R E P L A C E M E N T
SECTION 3
25

Dressing
Your occupational therapist will show you how to get dressed safely and independently. There
are several assistive devices that can help you put your socks, shoes, and pants on and off.
By using these devices, you will find it easier to follow the “Basic Rules for Protecting Your
Hip”. If there is someone at home who can help you to get dressed, you may not need to use
these devices.
Steps to Dressing
• Choose loose clothing if possible.
• Sit on the side of the bed or on a
firm chair.
• Have your equipment near you
(reacher, sock-aid, etc.)
• Dress your operated leg first,
undress it last.
Remember:
• DO NOT lift your knee up higher than
your hip.
• DO NOT bend forward.
• DO NOT cross your legs.
M Y G U I D E T O T O T A L H I P J O I N T R E P L A C E M E N T
SECTION 3
26

Sexual Relations
As with any activity, it is important to remember the “Basic Rules for Protecting Your Hip”. (See
Pages 21-22). The safest position will be lying on your back. You may be on your side as long
as your operated leg is supported. Avoid turning your leg outward too far. Ask your
physiotherapist or occupational therapist for a guide titled “Sex after Joint Replacement” or
view on-line at www.lhsc.on.ca/jointreplacement .
Vehicle Transfers
You should not drive a vehicle for at least six weeks after your operation. Your surgeon will
advise you further at your six-week check-up.
To get into the vehicle as a passenger:
• Back up to the passenger seat.
• Make sure the seat is pushed back as far as possible to provide maximum leg room.
• If the seat is low, use a firm cushion to raise the height.
• Stand with your back to the seat so that you feel it touching your legs.
• Lower yourself slowly keeping the operated leg forward.
• Slide well back in the seat.
• Recline the back of the seat a little
so that you won’t bend >90•• as you
turn and swing your legs
• Swing your legs into the vehicle
gently as you turn to face forward.
• You may find it easier to transfer if
you place a ‘slippery’ material over
the seat or cushion (eg. green
garbage bag).
To get out of the vehicle, use the same
steps, in the opposite order.
M Y G U I D E T O T O T A L H I P J O I N T R E P L A C E M E N T
SECTION 3
27
To Avoid Falls, Safe Proof Your Home
1. Install railings along stairs.
2. Remove scatter rugs.
3. Move telephone wires and electrical cords out of the way.
4. DO NOT wax your floors.
5. Use night lights, especially between your bedroom and the bathroom.
6. DO NOT try moving too quickly. Let people know that it will take you longer to get
to the phone or the door.
7. Keep a clear path between frequently used areas.
8. Wear non-skid, supportive footwear at all times.
9. Wear your eye glasses as required.
Homemaking - Plan Ahead
Because you will be using crutches or a walker, you may require help with meal preparation
and homemaking tasks. If you are able, try preparing meals ahead of time. You will need help
from family or friends for about 12 weeks for chores which involve heavy lifting, bending or
twisting. Chores to avoid are, carrying laundry or garbage, vacuuming, cleaning floors,
changing bed linen. To reach items in the kitchen safely, you may need to re-organize. Try to
store items you use often at a level between your waist and shoulders. For items higher or
lower, you may be able to use a reacher. Rather than bending down to the oven, try using a
microwave or toaster oven at counter height. Many jobs in the kitchen can be managed more
safely and easily by sitting on a high stool or chair. For example, preparing food at the counter
or carrying things from one place to another is difficult when using crutches or a walker. Your
occupational therapist may be able to make some helpful suggestions.
If help from family or friends is limited or unavailable, you may be able to access services such
as Meals on Wheels or private homemaking. Please call your local Community Care Access
Centre (CCAC) for information on home support services and related costs.
M Y G U I D E T O T O T A L H I P J O I N T R E P L A C E M E N T
SECTION 3
28

Equipment
Dependent upon the surgical approach your surgeon has used, the equipment for activity and
protection of your hip may vary. Your surgeon and support team will identify the specific
instructions you will need to follow.
The following equipment is required/recommended for the six weeks following your surgery.
You may rent or purchase items from your local home health store. If you plan to obtain any of
the equipment to use before the surgery, you may want to consider purchase because an
ongoing rental fee may cost more. Also, if you have any extended health coverage (eg.
benefits from an employer), consider looking into whether it may cover a portion of the cost of
the equipment. Some service clubs will loan equipment at no charge.
You must have:
● a standard walker (no wheels)
● crutches (may be required for stairs)
● a raised toilet seat with arms or a stationary commode which can be used over
your toilet (adjustable height)
● a chair at home which has a firm, level seat and arms. It must be high enough
that your knees stay lower than your hips when you sit down.
You might need:
● a versaframe (if your raised toilet seat does not have arms)
● a bath transfer bench
● a bed side rail (if you find getting in/out of bed difficult)
Assistive Devices
You will either need to have assistance with lower extremity bathing and dressing or you will
need to use some, or all, of the following devices:
● a long handled reacher (usually 32 inches is best)
● a long handled shoehorn
● sock-aid
● long handled bath sponge or brush
These devices may be purchased at your local home health store or from the Occupational
Therapist who sees you in the Pre-admission Clinic.
Remember that getting in/out of a car, truck or van after surgery can be difficult.Decide ahead of time what vehicle you will be going home in and practice yourtransfers, making sure you don’t bend or twist your hip.
SECTION 3
29


M Y G U I D E T O T O T A L H I P J O I N T R E P L A C E M E N T
SECTI ON 4
ExercisesFollowing
Total Hip JointReplacement

Dependent upon the surgical approach your surgeon has used, the exercises you
participate in may vary. Your surgeon and support team will identify the specific
exercises you require for your rehabilitation.
EXERCISES FOLLOWING TOTAL HIP JOINT REPLACEMENT
The following exercises will be reviewed with you by your physiotherapist (P.T.). They are
designed to improve your mobility and your muscle strength following your total hip joint
replacement. These exercises will be started on Day 2 of your hospital stay. You need to
continue doing these exercises when you go home.
All exercises should be carried out just as they are written. Any questions should be referred to
your physiotherapist.
Exercises should be done
two (2) times daily.
Repeat each exercise ten (10) times.
Continue to exercise at home.
M Y G U I D E T O T O T A L H I P J O I N T R E P L A C E M E N T
SECTION 4
30

EXERCISES DURING THE FIRST TWO WEEKS AFTER SURGERY
Exercises #1 to #5 are done lying on the bed on your back.
Exercise #1:
This exercise encourages proper positioning of the operated leg and strengthens the muscles
that control your leg rotation. It is important to begin all of the following exercises with your
operated leg in this neutral position.
Lying on your back -
1. Roll your operated leg to the neutral position so that your knee cap and toes are pointed
towards the ceiling.
2. Hold for a count of 10 seconds. Relax.
3. Do this as often as you can.
1. Keep your ankles moving to prevent them from getting stiff and to help the circulation.
Move your feet in a clockwise and counter-clockwise direction. You can do this sitting or
lying.
2. Repeat 10 times every hour.
M Y G U I D E T O T O T A L H I P J O I N T R E P L A C E M E N T
SECTION 4
31

Exercise #2:
*This exercise is to strengthen your thigh and buttock muscle.
Lying on your back -
1. Pull your toes up (operated leg) pointed towards the ceiling.
2. Tighten your thigh muscle.
3. Squeeze your buttocks.
4. Press the back of your knee
down into the bed.
4. Hold for 5 seconds.
5. Relax.
6. Repeat the exercise 10 times.
Exercise #3:
*This exercise stretches the muscles on the back of your lower leg and ankle.
1. Loop your strap around the ball of your foot.
2. Keep your heel down and your knee straight. Do not lift your leg off the bed.
3. Pull on the strap (you should feel a stretch along the back of your leg and calf).
4. Hold for 5 seconds.
5. Relax.
6. Repeat the exercise 10 times.
M Y G U I D E T O T O T A L H I P J O I N T R E P L A C E M E N T
SECTION 4
32

Exercise #4:
Lying on your back with the leg in neutral position -
1. Bend your knee by sliding your heel on the bed.
2. You may use a plastic bag under your heel to help you slide.
3. You may use the strap to assist with the bending if you are having difficulties.
4. Repeat the exercise 10 times.
DO NOT BEND YOUR HIP BEYOND 90••
Exercise #5:
*This exercise is to strengthen your thigh muscle.
Lying on your back -
1. Place a rolled towel (6 inches in diameter or use a 48 oz. juice can) under your knee of the
operated leg.
2. You may use the strap wrapped around your
foot to assist with this
exercise.
3. Pull your toes up and lift
your heel off the bed
straightening your knee.
Your thigh must remain
supported on the roll.
4. Hold your heel up for 5 seconds..
5. Relax.
6. Repeat the exercise 10 times.
M Y G U I D E T O T O T A L H I P J O I N T R E P L A C E M E N T
SECTION 4
33

POINTS TO REMEMBER:
- use your walking aid as instructed until you return to the clinic or until your physiotherapist
indicates a change
- use a normal heel toe gait - pick your foot up and take a normal step - keep your big toe
pointing forward
Exercises Two Weeks After Surgery
At two weeks after your surgery your physiotherapist may introduce exercises A to D.
Exercise A:
Lying on your stomach:
1. Place your foot (operated leg) so that the toes are supporting the weight of your leg.
2. Tighten the muscles on the back of that leg.
3. Lift the knee (operated leg) off the bed.
4. Hold for 5 seconds.
5. Relax.
6. Repeat the exercise 10 times.
M Y G U I D E T O T O T A L H I P J O I N T R E P L A C E M E N T
SECTION 4
34
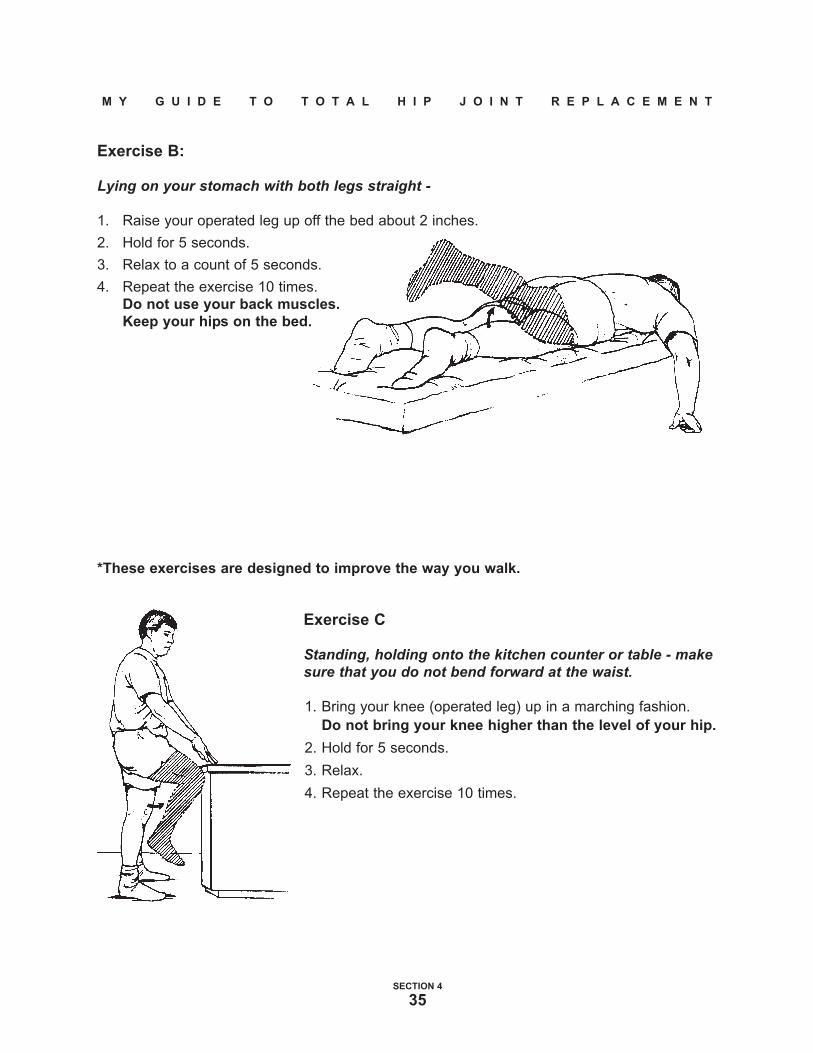
Exercise B:
Lying on your stomach with both legs straight -
1. Raise your operated leg up off the bed about 2 inches.
2. Hold for 5 seconds.
3. Relax to a count of 5 seconds.
4. Repeat the exercise 10 times.
Do not use your back muscles.
Keep your hips on the bed.
*These exercises are designed to improve the way you walk.
Exercise C
Standing, holding onto the kitchen counter or table - makesure that you do not bend forward at the waist.
1. Bring your knee (operated leg) up in a marching fashion.
Do not bring your knee higher than the level of your hip.
2. Hold for 5 seconds.
3. Relax.
4. Repeat the exercise 10 times.
M Y G U I D E T O T O T A L H I P J O I N T R E P L A C E M E N T
SECTION 4
35

Exercise D
Standing, holding onto the kitchen counter or table, with yourknee straight -
1. Bring the operated leg out behind you.
Do not bend forward at the waist.
2. Hold for 5 seconds.
3. Relax.
4. Repeat the exercise 10 times.
Exercises Four Weeks After Surgery
At four weeks after your surgery your physiotherapist may introduce exercises A and B.
Exercise A:
Lying on your back with your big toe (operated leg) pointedtoward the ceiling -
1. Slide your operated leg out to the side.
2. Hold for 5 seconds.
3. Bring the operated leg back beside the other leg - do not cross the
midline.
4. Relax.
5. Repeat the exercise 10 times.
Exercise B
Standing, holding onto the kitchen counter or table, with your kneestraight (operated leg) -
1. Move your operated leg out to the side.
Try to keep your hips level.
2. Relax.
3. Repeat the exercise 10 times.
M Y G U I D E T O T O T A L H I P J O I N T R E P L A C E M E N T
SECTION 4
36
Exercises Six Weeks After Surgery
Exercise A:
*These exercises are designed to improve your range of motion and strength.
Lying on your back -
1. Bend your operated leg, sliding your heel towards you along the bed. Lift your heel off the
bed. Hold 5-10 seconds, then relax and repeat.
2. Bend your non-operated leg and slide it along the bed and lift it up towards your chest.
Hold it against your chest. At the same time, push your operated leg down against the bed.
Hold 5-10 seconds, then relax and repeat.
Exercise B:
Lying on your non-operated side -
• With your operated hip facing the ceiling lift your operated leg up sideways towards the
ceiling (keep your knee straight). Hold your leg up 5 seconds.
• Relax.
• Repeat the exercise 10 times.
To progress this exercise, place a weight above your knee. You may gradually move it down to
your ankle.
To increase resistance, increase your weights by one pound as tolerated.
Exercise C:
Standing -
• Hold onto a kitchen counter. Balance your body weight equally between both your legs.
Standing on your operated leg, bend your opposite knee up. Hold for 5 seconds. Try and
hold your hips level.
• Relax.
• Repeat the exercise 10 times.
Exercise D:
• Balance your body weight equally between both your legs. Take all your weight on your
operated leg. Lift your non-operated leg out sideways. At the same time, try to maintain your
hips on a level. Hold 5 seconds.
• Relax.
• Repeat the exercise 10 times.
M Y G U I D E T O T O T A L H I P J O I N T R E P L A C E M E N T
SECTION 4
37

Exercise E:
Standing a few feet away from the wall, facing it -
• Place your operated leg behind the other leg.
• Place your hands on the wall.
• Keep your back heel on the ground and bend this
knee slightly.
• Lean forward.
• Hold for 5 seconds.
• Relax.
• Repeat the exercise 10 times.
Exercise F:
*This exercise stretches your calf muscle and heel cord.
Standing a few feet away from the wall, facing it -
• Place your operated leg behind the other leg.
• Place your hands on the wall.
• Keep your back leg straight and heel on the ground.
• Lean forward, keeping your back straight - you should
feel a stretch in the back of your calf muscles.
• Hold for 5 seconds.
• Relax.
• Repeat the exercise 10 times.
If you have any questions, please contact your Physiotherapy Department.
M Y G U I D E T O T O T A L H I P J O I N T R E P L A C E M E N T
SECTION 4
38


M Y G U I D E T O T O T A L H I P J O I N T R E P L A C E M E N T
SECTION 5
Final
Remarks

TELEPHONE DIRECTORY
Here is a list of phone numbers that you might find helpful.
Dr. J. Howard’s office ............ 519-663-3551
Dr. B. Lanting's office ............ 519-663-3335
Dr. S. MacDonald's office ...... 519-663-3689
Dr. J. McAuley’s office ........... 519-663-3307
Dr. R. McCalden's office........ 519-663-3049
Dr. D. Naudie's office............. 519-663-3407
Dr. E. Vasarhelyi's office........ 519-663-4123
Orthopaedic Inpatient Area. . . . . . . . . . . . . . . . . . . . . . . 519-685-8500 ext. 32454
Orthopaedic Outpatient Area . . . . . . . . . . . . . . . . . . . . 519-685-8500 ext. 32487
Occupational Therapy Department . . . . . . . . . . . . . 519-663-3502
Physiotherapy Department . . . . . . . . . . . . . . . . . . . . . . . 519-663-3503
Pre-Admission Clinic . . . . . . . . . . . . . . . . . . . . . . . . . . . . . . 519-685-8500 ext. 35422
Nurse Practitioners
Robert Harris . . . . . . . . . . . . . . . . . . . . . . . . . . . . . . . . . . . 519-685-8500 ext. 32409
Terry Lyne McLaughlin. . . . . . . . . . . . . . . . . . . . . . . . 519-685-8500 ext. 36843
Ann Whitley . . . . . . . . . . . . . . . . . . . . . . . . . . . . . . . . . . . . . 519-685-8500 ext. 34859
Maribeth Witteveen. . . . . . . . . . . . . . . . . . . . . . . . . . . . 519-685-8500 ext. 36315
Manager Orthopaedics
Carla Cormack . . . . . . . . . . . . . . . . . . . . . . . . . . . . . . . . . 519-685-8500 ext. 34886
Coordinator Orthopaedics
Sylvia Simon. . . . . . . . . . . . . . . . . . . . . . . . . . . . . . . . . . . . 519-685-8500 ext. 34942
Clinical Educator Orthopaedics
Hazel Celestino . . . . . . . . . . . . . . . . . . . . . . . . . . . . . . . . 519-685-8500 ext. 36309
Community Care Access Centre (London). . . . 519-473-2222
Arthritis Society. . . . . . . . . . . . . . . . . . . . . . . . . . . . . . . . . . . . . 519-433-2191
M Y G U I D E T O T O T A L H I P J O I N T R E P L A C E M E N T
SECTION 5
39

M Y G U I D E T O T O T A L H I P J O I N T R E P L A C E M E N T
SECTION 1
40

SUPPORTING OUR PROGRAM
With the help of our generous community members, the Orthopaedics Program at University
Hospital is on the leading edge of medical advances, living its mission of excellence in
research, education and patient care.
Government funding is not enough to meet all our needs in advancing health care. We count
on generous donations from our community to buy equipment, help improve facilities, advance
research and introduce new programs.
Many people give to the London Health Sciences Centre, Orthopaedics Program to say thank-
you for the wonderful treatment they or the people they love have received at the Hospital.
Others give because they want to know that outstanding health care will be available when
they or others need it. To make this easy for you we have developed the form below. Pleaseplace a check P in the appropriate box ( c ) below and enter the amount in the columnprovided on the right.
Amount ($)
Orthopaedic Patient Care:
c Nursing ______________________________
c Occupational Therapy ______________________________
c Physiotherapy ______________________________
Orthopaedic Research
c Dr. J. Howard
c Knee c Hip ___________________________
c Dr. B. Lanting
c Knee c Hip ___________________________
c Dr. S. MacDonald
c Knee c Hip ___________________________
c Dr. J. McAuley
c Knee c Hip ___________________________
c Dr. R. McCalden
c Knee c Hip ___________________________
c Dr. D. Naudie
c Knee c Hip ___________________
c Dr. E. Vasarhelyi
c Knee c Hip ___________________________
c Operating Room Equipment ______________________________
c Outpatient Clinic Equipment ______________________________
Please complete this form and return it with your commitment:
London Health Sciences Foundation
c/o Arthroplasty Program, University Hospital
747 Baseline Road East, London, Ontario N6C 2R6
Telephone: 519-685-8409
Thank you for your continued support.If there is any more that we can do for you please let us know
M Y G U I D E T O T O T A L H I P J O I N T R E P L A C E M E N T
SECTION 5
41

M Y G U I D E T O T O T A L H I P J O I N T R E P L A C E M E N T
SECTION 5
42
With joint replacement surgery, the surgery itself is just one component of the whole process. In order for your surgery to be successful, there are things that you can and should do to be adequately prepared.
It is important to discuss with your family and friends your decision to have surgery and how they may be of assistance to you before, during, and after surgery. Things to consider and arrange are:
I am aware discharge is 2-3 days after surgery. Discharge is by 11:00 AM
I have made arrangements for transportation in an appropriate vehicle to take me home and
to my appointments ie. With your family physician, physiotherapist and surgeon
I have practiced car transfers so that I can follow the movement restrictions I may have after
surgery
I have arranged for help at home following discharge ie. Assistance with grocery shopping,
meal preparation, house cleaning, laundry, and general errands after surgery
If I am unable to manage at home, I have made arrangements for an alternate discharge
destination ie. Convalescent or respite bed, relatives or friends home
As discussed with the Occupational Therapist, I have arranged the following:
Crutches
Standard walker with no wheels
Raised toilet seat with arms or raised toilet seat with a versa frame
Commode chair
Tub transfer bench or shower chair
Long-handled bath sponge
Long-handled reacher
Long-handled shoe horn
Sock-aid
A chair higher than knee height with arm rests and a firm and level seat
Your bed should be higher than knee height
Other:_________________________________________________
________________________________________________________________________
Joint Replacement Surgery Patient Checklist
www.lhsc.on.ca/jointreplacement
SECTION 5
43
I am aware discharge is 1-3 days after surgery.
I am unable to manage at home, I have made arrangements for an alternate discharge
destination i.e. respite bed, relatives or friends home
