municipal support information system (msis) external user
TRANSCRIPT

Municipal Support Information System
(MSIS)
External User Application Guide Capital Works
Last Updated: June 15, 2015

TABLE OF CONTENTS
1 Municipal Support Information System (MSIS) Overview ------------------------------------------- 3
1.1 Capital Works Program -------------------------------------------------------------------------------------------- 3
1.1.1 Overview -------------------------------------------------------------------------------------------------------------------------- 3
1.2 General System Parameters ------------------------------------------------------------------------------------- 3
1.2.1 Document Storage -------------------------------------------------------------------------------------------------------------- 3
1.2.2 Document Virus Scanning----------------------------------------------------------------------------------------------------- 3
1.2.3 Browser Compliance ----------------------------------------------------------------------------------------------------------- 3
1.2.4 Standards / General Notes --------------------------------------------------------------------------------------------------- 4
1.3 First Time Connection Setup ------------------------------------------------------------------------------------- 5
1.3.1 Start Municipal Support Information System (MSIS) ------------------------------------------------------------------ 5
1.3.2 Password Administration and Security ------------------------------------------------------------------------------------ 5
2 External Application Menu ---------------------------------------------------------------------------------- 6
2.1 Log In ------------------------------------------------------------------------------------------------------------------- 6
2.2 Home Page ----------------------------------------------------------------------------------------------------------- 10
2.3 External Dashboard / Capital Works Screen --------------------------------------------------------------- 11
2.4 Add Application ---------------------------------------------------------------------------------------------------- 13
2.4.1 Add Application - Multi-Year Capital Works -------------------------------------------------------------------------- 13
2.4.2 Add Application - Municipal Capital Works --------------------------------------------------------------------------- 24
2.4.3 Add Application - Waste Management---------------------------------------------------------------------------------- 34
2.5 Project Summary --------------------------------------------------------------------------------------------------- 43
2.6 Project Consultant Agreement (PCA) ------------------------------------------------------------------------- 47
2.7 Status Reports ------------------------------------------------------------------------------------------------------ 52
2.8 Documents----------------------------------------------------------------------------------------------------------- 58
2.9 Change Password -------------------------------------------------------------------------------------------------- 60

1 MUNICIPAL SUPPORT INFORMATION SYSTEM (MSIS) OVERVIEW
1.1 CAPITAL WORKS PROGRAM
1.1.1 OVERVIEW
The Department of Municipal Affairs & Environment Municipal Support Information System (MSIS) captures application information for Capital Works funding for municipalities within the province as well as Waste Management applications for Regional Service Boards. The system allows for the full tracking of application submissions and approvals, project and funding tracking as well as reporting and letter generation.
The system is accessible to departmental users as well as the Municipality (MUN), Local Service District (LSD), Inuit Community Government (ICG) or Regional Service District (RSB) which require MSIS to apply for Municipal Capital Works projects online, track approved projects, attach documents and submit claims.
1.2 GENERAL SYSTEM PARAMETERS
1.2.1 DOCUMENT STORAGE
For the external interface, MetaScan is used to verify that the file contains no viruses. For the upload, only documents in Microsoft Word, PDF, Excel or TIF images are allowed. A maximum size is enforced on the file to ensure extra-large documents will not affect the scanning and upload processes and make the system unusable.
1.2.2 DOCUMENT VIRUS SCANNING
Since municipalities are required to attach documents to their applications and status reports, a process to scan the documents has been put in place. Documents submitted by the municipalities are temporarily stored in a directory on the application server where Metascan picks up the document and runs the MacAfee scanning software already installed on the server.
If a virus is found, the file will be moved to a quarantined area of the server where it will be automatically deleted. The user submitting the document will be notified in real time that the document contained a virus and will be asked to resubmit a clean version of the document. The user will be able to save the application to later come back and submit the clean document.
1.2.3 BROWSER COMPLIANCE
For the external environment, supported browsers include Internet Explorer 9 and 10 as well as the current versions of Firefox (8.0), Google Chrome, and Safari for Windows 5.1.1. Internet Explorer 8 and 11 are currently not supported by MSIS.

1.2.4 STANDARDS / GENERAL NOTES
Web Application Usage
It is important to make use of the navigation contained within MSIS. The user should click on buttons on the screen and click on the blue menu to the left and the tabs near the top of the Application / Project. Usage of ENTER or BACKSPACE on the keyboard as well as the back button in the browser should be avoided.
It is also noteworthy to point out that some screens contain a Submit button and a Save for Later button. As a user makes additions to a screen and would like to save the information, but is not yet finished with the screen, the “Save for Later” button should be clicked. Once a user has finished entering all data on a screen the Submit button should be clicked. In the majority of cases, once a Submit button is clicked the screen will no longer be editable for that user. It is important to only click Submit when the user has finished working on that screen.
Date Format
The standard date format for the Capital Works application is “YYYY-MM-DD”. This format is currently used within MIMS and will be standard throughout the MA modules.
External User Passwords
Standard rules are to be followed when creating user passwords.
There must be a minimum of 8 characters and a maximum of 30.
There has to be at least one: Capital Letter, Lowercase letter, and Number
Special Characters are not allowed.
The password cannot be the same as the previous three passwords.
Passwords must be reset every 60 days.
Upon the first log in or after having the password modified by the system administrator, theuser will automatically be asked to change their password.
Users can change their own passwords using the Change Password functionality.
Timeout and Incorrect Passwords
After a time of inactivity in the system the user will be logged out.
If an incorrect password is entered on the login screen, the user will receive an error message.
If the user logged into the MSIS system does not have a role that defines access to a particular screen, the user will be logged out of the system.

1.3 FIRST TIME CONNECTION SETUP
1.3.1 START MUNICIPAL SUPPORT INFORMATION SYSTEM (MSIS)
To start the Municipal Support Information System (MSIS), type or copy the following in
the browser: http://msis.gov.nl.ca/MSIS/
1.3.2 PASSWORD ADMINISTRATION AND SECURITY
For External Users, the username and password can be obtained or reset by the Information
Management group within Municipal Affairs. External Users can change their own passwords.
Please contact the Municipal Affairs, Information Management Policy and Support Division at [email protected] for:
Adding New Users
Updating Users
Password Resets (change password)

2 EXTERNAL APPLICATION MENU
2.1 LOG IN
All users of the external system are required to log into the application. External users for Capital Works include staff members from the Municipalities (MUN), Regional Service Boards (RSB), Inuit Community Government (ICG) or Local Service Districts (LSD), or Consultants that have been hired to manage the projects on their behalf.
The external interface does not use an active directory to validate users. User validation and verification is done through the Capital Works application. All external users will have a user id and password assigned (per individual user) to access to the system. These users will be submitting applications and claims via the external web interface.
External user accounts are created by the System Administrator at the Department upon receipt of an account request form. Account request forms are available on the Municipal Affairs website. The System Administrator is able to add and edit the user accounts and will be responsible for assigning the user ids and passwords as required. They can also inactivate accounts if necessary.
Note: Consultants only need to represent one local government, and submit an account request for said local government, in order to gain access to the system. However, in order to have new local governments added to their profile, Consultants will need to submit an application for each local government represented. They will only gain access to projects once the consultant company is indicated on the Prime Consultant Agreement.
On accessing the web page, the user will be asked to enter their assigned User ID and Password. Click the “Login” button to submit the login request. The user is permitted 5 unsuccessful login attempts and then the user account is made inactive. If the user account is made inactive, the user must contact the Department staff to have his/her user account reset to an active status.
The page illustrated below is the External Login page.

Initial Login / Set Password and Security Questions
Upon the initial login with the temporary password provided by the System Administrator, the user must set their new password and choose three security questions and indicate answers for those questions.
Each security question chosen must be a unique question; you cannot have the same question twice. Each time the user logs into the Capital Works application, as an additional security feature, the user will be requested to respond to one of the security questions identified on this page.
The page illustrated below is the Password Reset and Security Questions.
The following buttons are available: “Submit” and “Cancel”.

Submit
Upon the click of the “Submit” button, the user is requested to confirm their intent to save the record. The user can respond by providing a “Yes” or “No” response. A response of “No” will keep the user on the active page and will not save the recorded changes in the database. A response of “Yes” will save the recorded changes in the database and redirect the user to the Login page. A message will be displayed indicating the password was changed successfully.
Cancel
Upon the click of the “Cancel” button, the user is requested to confirm their intent to cancel any revisions to the current record. The user can respond by providing a “Yes” or “No” response. A response of “No” will keep the user on the active page and refresh the page. A response of “Yes” will keep the user on the active page and refresh the without saving any changes in the database.
Once successfully set, the system travels back to the login screen so the user can login with the new password.
Login with New Password and Security Questions
The user enters their user id and password. The user will be presented with one of the three security questions.
The page illustrated below is the Security Question.
If a question is answered incorrectly the user will be presented with another question until a correct response is provided. If the questions presented are repeatedly incorrectly answered, the user is redirected to the “Login” page which displays the system message: “Due to 3 Invalid Login Attempts - Account is locked - Please Contact Administrator”. The system sends an email to the user informing him/her of their locked user account. See below a sample email.

Sample Locked Account email
If a question is answered successfully, the user is directed to the “Welcome” page.
Forgot Password
If the user forgets their password, he/she will be able to click on the “Forgot Password” button to reset their password. If the “Forgot Password” button is selected, the user is requested to enter his/her User Name. To reset the password, the user must select the “Reset Password” button.
The page illustrated below is the Forgot Password.
Once the “Reset Password” button is selected, the user’s password is sent to the registered email address for the user. The email will be similar to the email shown below.

Sample Reset Password Email
Once the email is sent to the user, the user will have a limited time to respond as specified in the email. The user must follow the link as instructed in the email to complete the reset password process.
The user will be presented with the password reset page to enter his/her new password. The password must be entered a second time to confirm the password previously entered.
Note: If the user does not respond to the email in the specified timeframe, the user must follow the “Forgot Password” process again.
2.2 HOME PAGE
This is a common page within the Municipal Affairs application that is available to all external users. On the top of the page, the user’s first name is displayed. To the left is a blue menu bar that provides the following user options:
• Home - This option redirects the user to the Welcome page.
• Capital Works - This option directs the user to his/her Dashboard.
• Change Password - This option directs the user to the Change Password page.
• Logout - This option logs the user out of the Capital Works system and redirects him/her tothe Login page.

2.3 EXTERNAL DASHBOARD / CAPITAL WORKS SCREEN
The External Dashboard / Capital Works Screen displays information dependent on the Applicant type affiliated with the user logged into the application.
If the external user is affiliated with a Municipality (MUN), Regional Service Boards (RSB), Inuit Community Government (ICG) or Local Service Districts (LSD), the information displayed is relative to the Municipality, Regional Service Board, Inuit Community Government, Local Service District the user represents. If the user is identified as a consultant the information displayed is relative to the community or communities the consultant represents.
This page is divided into three sections: Welcome, Applications, and Projects.
The page illustrated below is the External Dashboard.
Applications
The applications section displays a listing of the Applicant’s applications in a table format. A maximum of 10 records will be displayed per page. If more than 10 records are found, the number navigation links will allow the user to scroll through all the retrieved records. On the click of the 1 link, the search results will show the first 10 records. On the click of the 2 link, the search results will show the next 10 records.

To edit/view an Application, click an Application shown on the list of Applications. The user is redirected to the Application page. If the application status is “In Progress”, the Application will be editable. If the status is “Submitted” or “Reviewed”, the Application will be display only.
The page illustrated below is the Applications section of the External Dashboard.
Projects
The projects section displays a listing of the applicant’s approved projects. If the user is affiliated with an applicant type of “MUN”, “LSD” or “ICG”, all projects that have been approved (“Approved EDI”, “Approved – Full”) will be displayed. If the user is a consultant representing a municipality, all projects that have been approved (“Approved EDI”, “Approved – Full”) will be displayed where the consultant is assigned as the prime project consultant.
The projects section displays a listing of the Projects in a table format. A maximum of 10 projects will be displayed per page. If more than 10 records are found, the number navigation links will allow the user to scroll through all the retrieved records. On the click of the 1 link, the search results will show the first 10 records. On the click of the 2 link, the search results will show the next 10 records.
To edit/view a Project, click a Project shown on the projects grid display. The user is redirected to the Project Summary page.
The page illustrated below is the Projects section of the External Dashboard.

2.4 ADD APPLICATION
The Add Application page allows users to add new applications for an applicant whom they represent. Applications can be for one of three programs including: Municipal Capital Works, Multi-Year Capital Works and Waste Management. Some of data fields have default values based on the user login credentials.
2.4.1 ADD APPLICATION - MULTI-YEAR CAPITAL WORKS
The application information is divided into nine sections: Application, Applicant Information, Project Summary, Project Information, Project Screening Criteria, Project Benefits, Project Costs, Cash Flow, and Documents.
Application
This section displays/captures data related to the Application Program. The Program chosen determines the type of application that will appear in the following sections. The Application Number and Status will automatically be populated by the system once the application is saved. When the Program is selected a corresponding funding application is displayed on the screen and the Year drop down is populated with the active “start year” – “end year” values identified for the program. Once the Year is selected, if the user is from a community, the community information will be populated on the screen. Both the Program and Year fields need to be selected before moving on to other sections of the application. Required fields to perform a “Save for Later” are marked with a red asterisk.

Note: Only the Application tab will be available until an application has been submitted. Clicking on another tab before submitting an application will result in an error message being displayed as seen below.
The page illustrated below is the Application.
Applicant Information
The Applicant Information section identifies which Municipality (MUN), Local Service District (LSD), Inuit Community Government (ICG) or Regional Service District (RSB) that is looking for funding.
The applicant information is populated based on the Municipality associated with the login user or the Applicant chosen on the Dashboard if the user is a Consultant.
The next portion of the Application Information section provides the opportunity for the Applicant community to indicate a specific contact for the Application with the entry of a Contact Name and Contact Position. The following address fields are available in the event that the Contact identified in the Contact Name field lives at a different address than the address that is contained with MIMS. The Postal Code field accepts the format “X1X 1X1”. The Telephone and Fax Number fields accept the format “111-111-1111”. The Email Address field accepts the format “[email protected]”. Required fields to perform a “Save for Later” are marked with a red asterisk.
The page illustrated below is the Applicant Information section of the Application.


Project(s) Summary
This section will only be available if the program is a Multi-Year Capital Works (MYCW) and there has already been at least one project added for the application. Under the “MYCW” program, each application can have multiple projects.
If multiple projects exist for the application, the affiliated projects are displayed in a table format. To view the detailed project information related to a project, the user can select the project by clicking the project record. The detailed project information for the project selected will be displayed in the Project Information section below the Project(s) Summary section. The “Add Project” button will allow the user to add the project information pertaining to another project.
The page illustrated below is the Project Summary section of the Application.
Project Information
This section captures some basic data on the application. The Project Category drop down is populated with the project categories affiliated with the Program chosen in the application section above. The Cost Share Ratio value is the Cost Share Ratio identified with the applicant and the applicant’s corresponding population.
Some of the data captured is conditional upon the value in the Program Type:
The Resolution of Council Date is captured if the program type is “MYCW”.
The Resolution of Council Passed is captured if the program type is “MYCW”.
There will be three questions displayed at the end of the section requiring a Yes / No response using radio buttons.
1. “The proposed upgrade or repair of an existing physical infrastructure?”
2. “Public/Private Partnership?”
3. “Regionalization Project?”

If the answer to the question “Public/Private Partnership” is “Yes”, the user can enter the partners in the space provided. For the purposes of this question, a Public/Private Partnership is established by a formal agreement between a community and a private sector firm for the funding, construction and operation of infrastructure for public benefit. The user can identify an unlimited number of partners by clicking the “Add Partner” button.
If the answer to the question “Regionalization Project” is “Yes”, two additional pieces of information is captured.
The question will be asked: “Has an MOU been signed between the municipalitiesinvolved?” A “Yes” or “No” response must be provided using the radio buttons.
The user can select the Municipalities, Local Service Districts, Inuit CommunityGovernments and Regional Services Boards that will benefit. The section provides the userwith the ability to choose a value from the community drop down. The user can identify anunlimited number of “MUNs”, “RSBs”, “ICGs”, or “LSDs” by clicking the “Add Communities”button.
Note: If “Regionalization Project” has a “Yes” response at least one regional communitymust be selected.
The page illustrated is the Project Information section of the Application.

Project Screening Criteria
This section contains a list of screening questions that are applicable to the Project Category selected in the Project Information section of the application. The screening questions are valid for the Multi-Year Capital Works (MYCW) programs.
The questions displayed are the active project screening questions affiliated with the Project Category or those questions that are common to all Project Categories for the Multi-Year Capital Works programs.
A user response of “Yes” or “No” using a radio button is required for each question. If the Project Category is “Recreation” a new question “Will you be charging admission to this facility Y/N?” will be displayed at the bottom of Project Costs section.
The page listed below is the Project Screening Criteria section of the Application.

Project Benefits
This section gives the user the ability to choose which benefits are applicable to the project and indicate how they will be measured. A project benefit can only be selected once per project within the application.
When the program chosen is Multi-Year Capital Works (MYCW) there is a benefits drop down in this section to identify the project benefits. The drop down box is populated with a set of active predetermined Capital Works benefits. By clicking the “Add Benefit” button, the user can add project benefits.
There are two additional fields in this section: Number of Services and Cost per Service.
Note: Number fields do not accept commas or dollar signs (enter 100000 vs $100,000).
The page illustrated below is the Project Benefits section of the Application (Multi-Year Capital Works (MYCW) Project Benefits).

Project Costs
This section captures/displays the application financial information. A number of Cost Estimate Areas are captured in the “Project Cost Estimate (including HST):” area. If there are “Other Costs”, the user must enter details to explain the “Other Costs”.
Note: At least one of the costs in this area must have a value. The Project Total dollars is a calculated amount illustrating the total costs.
A separate section will capture “Other Funding Sources and Amounts”. If there is a value entered for Other Funding, the user is requested to enter the Source(s) of the funding. The Total Required Amount is the calculated amount of the Project Total less the Other Funding amount.
The Municipal Cost Share and the Provincial Cost Share are dependent on the Applicant’s population. If the program type is Multi-Year Capital Works (MYCW), the cost share amounts are calculated using the Project Total and the applicable percent ratios.
If the Project Category is set to “Recreation” the application is eligible for an HST Rebate. The HST Rebate will be automatically calculated by the system. If the Project Category is set to anything other than “Recreation” the application is eligible for a GST Rebate. The GST Rebate will be automatically calculated by the system.
Data is also captured for the estimate details. If Consultant was chosen in response to the question “Who Prepared Costs?” the “Who Prepared Cost Estimate” is a drop down and populated with the list of Consultants from the Consultant page. If either of the other two fields is chosen, the “Who Prepared Cost Estimate” is a text box where the user can enter a name.
The following three questions complete this section:
1. Do you propose to use Gas Tax funding for this project? If a “Yes” response is chosen theAmount and Gas Tax Project Number must be entered.
2. Are you applying Gas Tax funding towards your portion of the contribution?
Note: If No is answered to #2, the Amount is taken off the Total Required Funding. If Yes isanswered to #2, then no other project costs are affected.
3. Permission obtained from Gas Tax Secretariat?
The page illustrated below is the Project Costs section of the Application.

Once all the project data is captured for the “MYCW” project, the user can save the data by clicking the “Save Project” button. Upon clicking the “Save Project” button, basically the same processes occur as with the “Submit” button. The Project Summary section is displayed with the “Add Empty Project” button allowing the user to add a new project to the application.
Cash Flow
This section captures cash flow information. It will have three text fields for data entry: Total Estimate Budget (Year 1), Total Estimate Budget (Year 2), and Total Estimate Budget (Year 3). Year 1, 2 and 3 will be populated by the system based on the current year. Year 1 is the current year while Year 2 and Year 3 are the following two years. Total cash flow must equal requested application total. External users should input how much of the requested application total they intend to spend for the year associated with the field.
The page illustrated below is the Cash Flow section of the Application.

Cash Flow
Documents
This section captures the documents that are applicable to the Application process. The user can choose which documents they are submitting.
The documents affiliated with the current application are displayed in a table format. If there are no uploaded documents, a message will be displayed indicating there are no uploaded documents.
Initially there is one set of document fields that can be used to enter document data. An “Add Document” button is available and provides the ability to add document lines.
Users have a Document Type drop down populated with the document name values shown on the Document Type Administration page and filtered by the document types affiliated with the application program group.
A “Document Uploaded” text box with a “Browse” button allows the user to browse his/her PC and choose the file to be uploaded. The user has the option of recording the TRIM Number rather than uploading the document. The file size limit for document uploads is 5 MBs. The types of documents that can be uploaded are (.txt,.doc, .docx, .xls, xlsx,.pdf, .tif, .jpg, .gif).

The following screen shows the message indicating that the user tried to upload a document that was not one of the valid file types indicated above.
The following buttons are available: “Submit”, “Save for Later”, and “Cancel”. Refer to the button captions illustrated for an overview of their functionality.
Submit
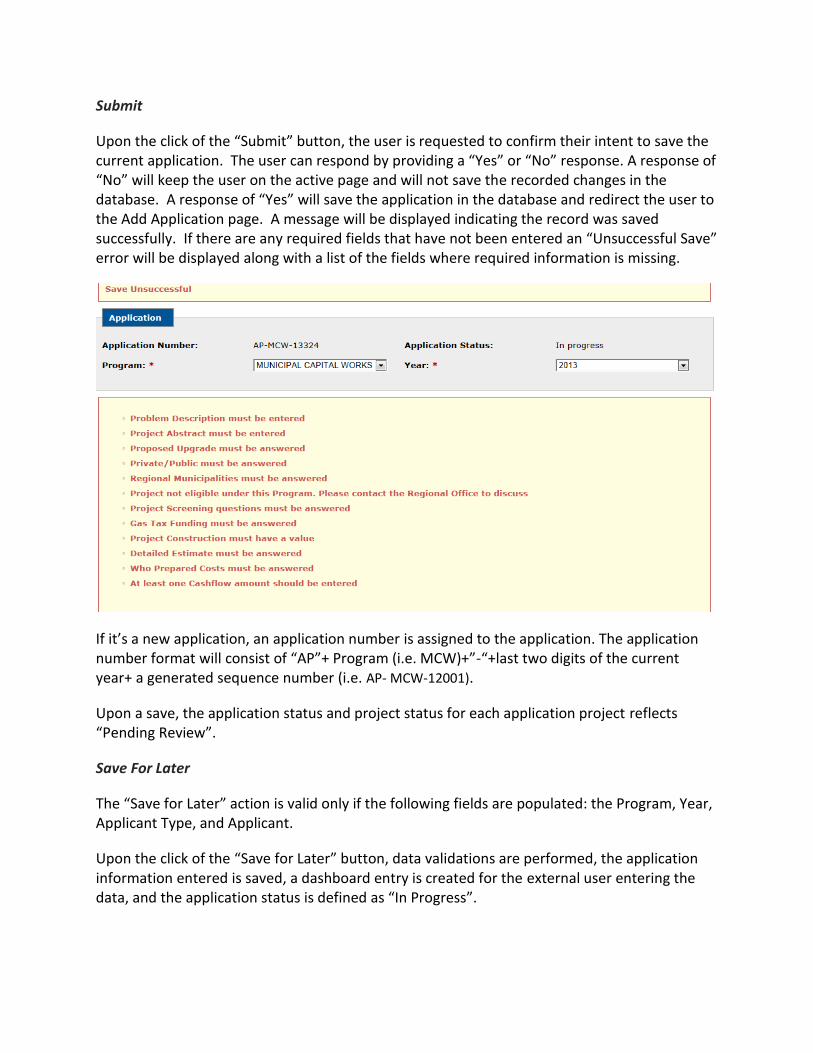
Upon the click of the “Submit” button, the user is requested to confirm their intent to save the current application. The user can respond by providing a “Yes” or “No” response. A response of “No” will keep the user on the active page and will not save the recorded changes in the database. A response of “Yes” will save the application in the database and redirect the user to the Add Application page. A message will be displayed indicating the record was saved successfully. If there are any required fields that have not been entered an “Unsuccessful Save” error will be displayed along with a list of the fields where required information is missing.

If it’s a new application, an application number is assigned to the application. The application number format will consist of “AP”+ Program (i.e. MYCW)+”-“+last two digits of the current year+ a generated sequence number (i.e. AP- MYCW-12001).
At least one project record must exist for the application (MYCW). Upon a save, the application status and project status for each application project will reflect “Pending Review”. The Regional Engineer’s Dashboard will reflect an assignment for him/her to create the Engineer Review assignments.
Save For Later
The “Save for Later” action is valid only if the following fields are populated: the Program, Year, Applicant Type, and Applicant.
Upon the click of the “Save for Later” button, data validations are performed, the application information entered is saved, a dashboard entry is created for the external user entering the data, and the application status is defined as “In Progress”.
If all validations are performed successfully, the user will be presented a message indicating the application was saved successfully. The user will remain on the current page and the assigned application number is displayed in the Application section located at the top of the page.
If it’s a new application, an application number will be assigned to the application. The application number format will consist of “AP”+ Program (i.e. MYCW)+”-“+last two digits of the current year+ a generated sequence number (i.e. AP- MYCW-12001).
Cancel
Upon the click of the “Cancel” button, the user is requested to confirm their intent to cancel any revisions to the current application. The user can respond by providing a “Yes” or “No” response. A response of “No” will keep the user on the active page. A response of “Yes” will redirect the user to the Add Application page without saving any changes in the database.
2.4.2 ADD APPLICATION - MUNICIPAL CAPITAL WORKS
The application information is divided into seven sections: Application, Applicant Information, Project Information, Project Screening Criteria, Project Benefits, Project Costs, and Documents.
Application
This section displays/captures data related to the Application Program. The Program chosen determines the type of data captured in the following sections. The Application Number and Status will automatically be populated by the system once the application is saved. The Program drop down is populated with the active program names. Once a Program is selected, the Year drop down is populated with the active “start year” – “end year” values identified for the program.

The page illustrated below is the Application.
Applicant Information
The Applicant Information section identifies which Municipality (MUN), Local Service District (LSD), Inuit Community Government (ICG) or Regional Service District (RSB) that is looking for funding. Since the applicant has been identified, some of this data is pre-populated.
The applicant information is populated based on the Municipality associated with the login user or the Applicant chosen on the Dashboard if the user is a Consultant.
The page illustrated below is the Applicant Information section of the Application.

Project Information
This section captures some basic data on the application. The Project Category drop down is populated with the project categories affiliated with the Program chosen in the application section above. The Cost Share Ratio value is the Cost Share Ratio identified with the applicant and the applicant’s corresponding population.
Some of the data captured is conditional upon the value in the Program Type:
The Resolution of Council Date is captured if the program type is “MCW”.
The Resolution of Council Passed is captured if the program type is “MCW”.
There will be three questions displayed at the end of the section requiring a Yes / No response using radio buttons.
1. “The proposed upgrade or repair of an existing physical infrastructure?”
2. “Public/Private Partnership?”
3. “Regionalization Project?”
If the answer to the question “Public/Private Partnership” is “Yes”, the user can enter the partners in the space provided. For the purposes of this question, a Public/Private Partnership

is established by a formal agreement between a community and a private sector firm for the funding, construction and operation of infrastructure for public benefit. The user can identify an unlimited number of partners by clicking the “Add Partner” button.
If the answer to the question “Regionalization Project” is “Yes”, two additional pieces of information is captured.
The question will be asked: “Has an MOU been signed between the municipalities involved?” A “Yes” or “No” response must be provided using the radio buttons.
The user can select the Municipalities, Local Service Districts, Inuit Community Governments and Regional Services Boards that will benefit. The section provides the user with the ability to choose a value from the community drop down. The user can identify an unlimited number of “MUNs”, “RSBs”, “ICGs”, or “LSDs” by clicking the “Add Communities” button.
Note: If “Regionalization Project” has a “Yes” response at least one regional community must be selected.
The page illustrated is the Project Information section of the Application.

Project Screening Criteria
This section contains a list of screening questions that are applicable to the Project Category selected in the Project Information section of the application. The screening questions are valid for the Municipal Capital Works (MCW) programs.
The questions displayed are the active project screening questions affiliated with the Project Category or those questions that are common to all Project Categories for the Municipal Capital Works programs.
A user response of “Yes” or “No” using a radio button is required for each question. If the Project Category is “Recreation” a new question “Will you be charging admission to this facility Y/N?” will be displayed at the bottom of Project Costs section.
The page listed below is the Project Screening Criteria section of the Application.

Project Benefits
This section gives the user the ability to choose which benefits are applicable to the project and indicate how they will be measured. A project benefit can only be selected once per project within the application.
When the program chosen is Municipal Capital Works (MCW) there is a benefits drop down in this section to identify the project benefits. The drop down box is populated with a set of active predetermined Capital Works benefits. By clicking the “Add Benefit” button, the user can add project benefits.
There are two additional fields in this section: Number of Services and Cost per Service.
The page illustrated below is the Project Benefits section of the Application (Municipal Capital Works (MCW) Project Benefits).
Project Costs
This section captures/displays the application financial information. A number of Cost Estimate Areas are captured in the “Project Cost Estimate (including HST):” area. If there are “Other Costs”, the user must enter details to explain the “Other Costs”.

Note: At least one of the costs in this area must have a value. The Project Total dollars is a calculated amount illustrating the total costs.
A separate section captures “Other Funding Sources and Amounts”. If there is a value entered for Other Funding, the user is requested to enter the Source(s) of the funding. The Total Required Amount is the calculated amount of the Project Total less the Other Funding amount.
The Municipal Cost Share and the Provincial Cost Share are dependent on the Applicant’s population. If the program type is Multi-Year Capital Works (MYCW), the cost share amounts are calculated using the Project Total and the applicable percent ratios.
If the Project Category is set to “Recreation” the application is eligible for an HST Rebate. The HST Rebate is automatically calculated by the system. If the Project Category is set to anything other than “Recreation” the application is eligible for a GST Rebate. The GST Rebate is automatically calculated by the system.
Data is also captured for the estimate details. If Consultant was chosen in response to the question “Who Prepared Costs?” the “Who Prepared Cost Estimate” drop down will populate with the list of Consultants from the Consultant page. If either of the other two fields is chosen, the “Who Prepared Cost Estimate” is a text box where the user can enter a name.
The following three questions complete this section:
1. Do you propose to use Gas Tax funding for this project? If a “Yes” response is chosen, twonew fields will be available: Amount and Gas Tax Project Number. The Amount field isrequired.
Note: If No is answered to #2, the Amount is taken off the Total Required Funding. If Yes isanswered to #2, then no other project costs are affected.
2. Are you applying Gas Tax funding towards your portion of the contribution?
3. Permission obtained from Gas Tax Secretariat?
The page illustrated below is the Project Costs section of the Application.

Documents
This section captures the documents that are applicable to the Application process. The user can choose which documents they are submitting.
The documents affiliated with the current application are displayed in a table format. If there are no uploaded documents, a message will be displayed indicating there are no uploaded documents.

Initially there is one set of document fields that can be used to enter document data. An “Add Document” button is available and provides the ability to add document lines.
Users have a Document Type drop down populated with the document name values shown on the Document Type Administration page and filtered by the document types affiliated with the application program group.
A “Document Uploaded” text box with a “Browse” button allows the user to browse his/her PC and choose the file to be uploaded. The user has the option of recording the TRIM Number rather than uploading the document. The file size limit for document uploads is 5 MBs. The types of documents that can be uploaded are (.txt,.doc, .docx, .xls, xlsx,.pdf, .tif, .jpg, .gif).
The following screen shows the message indicating that the user tried to upload a document that was not one of the valid file types indicated above.
The following buttons are available: “Submit”, “Save for Later”, and “Cancel”. Refer to the button captions illustrated for an overview of their functionality.
Submit
Upon the click of the “Submit” button, the user is requested to confirm their intent to save the current application. The user can respond by providing a “Yes” or “No” response. A response of “No” will keep the user on the active page and will not save the recorded changes in the database. A response of “Yes” will save the application in the database and redirect the user to the Add Application page. A message will be displayed indicating the record was saved successfully. If there are any required fields that have not been entered an “Unsuccessful Save” error will be displayed along with a list of the fields where required information is missing.
If it’s a new application, an application number is assigned to the application. The application number format will consist of “AP”+ Program (i.e. MCW)+”-“+last two digits of the current year+ a generated sequence number (i.e. AP- MCW-12001).
Upon a save, the application status and project status for each application project reflects “Pending Review”.
Save For Later
The “Save for Later” action is valid only if the following fields are populated: the Program, Year, Applicant Type, and Applicant.
Upon the click of the “Save for Later” button, data validations are performed, the application information entered is saved, a dashboard entry is created for the external user entering the data, and the application status is defined as “In Progress”.

If all validations are performed successfully, the user is presented a message indicating the application was saved successfully. The user will remain on the current page and the assigned application number is displayed in the Application section located at the top of the page.
If it’s a new application, an application number is assigned to the application. The application number format will consist of “AP”+ Program (i.e. MCW, etc.)+”-“+last two digits of the current year+ a generated sequence number (i.e. AP- MCW-12001).
Cancel
Upon the click of the “Cancel” button, the user is requested to confirm their intent to cancel any revisions to the current application. The user can respond by providing a “Yes” or “No” response. A response of “No” will keep the user on the active page. A response of “Yes” will redirect the user to the Add Application page without saving any changes in the database.
2.4.3 ADD APPLICATION - WASTE MANAGEMENT
The application information is divided into six sections: Application, Applicant Information, Project Information, Project Benefits, Project Costs, and Documents.
Application
This section displays/captures data related to the Application Program. The Program chosen determines the type of data captured in the following sections. The Application Number and Status will automatically be populated by the system once the application is saved. The Program drop down is populated with the active program names. Once a Program is selected, the Year drop down is populated with the active “start year” – “end year” values identified for the program.
The page illustrated below is the Application.
Applicant Information
The Applicant Information section identifies which Municipality (MUN), Local Service District (LSD), Inuit Community Government (ICG) or Regional Service District (RSB) that is looking for funding. Since the applicant has been identified, some of this data is pre-populated.
The applicant information is populated based on the Municipality associated with the login user or the Applicant chosen on the Dashboard if the user is a Consultant.

The page illustrated below is the Applicant Information section of the Application.
Project Information
This section captures some basic data on the application. The Project Category drop down is populated with the project categories affiliated with the Program chosen in the application section above. The Cost Share Ratio value is the Cost Share Ratio identified with the applicant and the applicant’s corresponding population.
Some of the data captured is conditional upon the value in the Program Type:
The Local Government Resolution Date is captured when the program type is “WM”.
The Resolution of Local Government is captured when the program is “WM”.
There will be three questions displayed at the end of the section requiring a Yes / No response using radio buttons.
1. “The proposed upgrade or repair of an existing physical infrastructure?”
2. “Public/Private Partnership?”
3. “Regionalization Project?”
If the answer to the question “Public/Private Partnership” is “Yes”, the user can enter the partners in the space provided. For the purposes of this question, a Public/Private Partnership is established by a formal agreement between a community and a private sector firm for the funding, construction and operation of infrastructure for public benefit. The user can identify an unlimited number of partners by clicking the “Add Partner” button.
If the answer to the question “Regionalization Project” is “Yes”, two additional pieces of information is captured.
The question will be asked: “Has an MOU been signed between the municipalities involved?” A “Yes” or “No” response must be provided using the radio buttons.
The user can select the Municipalities, Local Service Districts, Inuit Community Governments and Regional Services Boards that will benefit. The section provides the user with the ability to choose a value from the community drop down. The user can identify an unlimited number of “MUNs”, “RSBs”, “ICGs”, or “LSDs” by clicking the “Add Communities” button.
Note: If “Regionalization Project” has a “Yes” response at least one regional community must be selected.
The page illustrated is the Project Information section of the Application.


Project Benefits
This section gives the user the ability to choose which benefits are applicable to the project and indicate how they will be measured. A project benefit can only be selected once per project within the application.
When the Program is Waste Management (WM) there are four check boxes available in this section:
1. Increased Waste Diversion
2. Reduced Number of Waste Sites
3. Elimination of Open Burning and Incinerators
4. Other
If “Reduced Number of Waste Sites” is checked, the user is required to identify the number of sites that will close. If “Other” is chosen, the user has the ability to enter other benefits in a text area.
The page illustrated below is the Project Benefits section of the Application (Program is Waste Management).
Project Costs
This section captures/displays the application financial information. A number of Cost Estimate Areas are captured in the “Project Cost Estimate (including HST):” area. If there are “Other Costs”, the user must enter details to explain the “Other Costs”.
Note: At least one of the costs in this area must have a value. The Project Total dollars is a calculated amount illustrating the total costs.
A separate section will capture “Other Funding Sources and Amounts”. If there is a value entered for Other Funding, the user is requested to enter the Source(s) of the funding. The Total Required Amount is the calculated amount of the Project Total less the Other Funding amount.
The Municipal Cost Share and the Provincial Cost Share are dependent on the Applicant’s population. If the program type is Multi-Year Capital Works (MYCW), the cost share amounts are calculated using the Project Total and the applicable percent ratios.
If the Project Category is set to “Recreation” the application is eligible for an HST Rebate. The HST Rebate will be automatically calculated by the system. If the Project Category is set to anything other than “Recreation” the application is eligible for a GST Rebate. The GST Rebate will be automatically calculated by the system.
Data is also captured for the estimate details. If Consultant was chosen in response to the question “Who Prepared Costs?” the “Who Prepared Cost Estimate” drop down will populate with the list of Consultants from the Consultant page. If either of the other two fields is chosen, the “Who Prepared Cost Estimate” is a text box where the user can enter a name.
The following three questions complete this section:
1. Do you propose to use Gas Tax funding for this project? If a “Yes” response is chosen, two new fields will be available: Amount and Gas Tax Project Number. The Amount field is required.
2. Are you applying Gas Tax funding towards your portion of the contribution?
Note: If No is answered to #2, the Amount is taken off the Total Required Funding. If Yes is answered to #2, then no other project costs are affected.
3. Permission obtained from Gas Tax Secretariat?
The page illustrated below is the Project Costs section of the Application.

Documents
This section captures the documents that are applicable to the Application process. The user can choose which documents they are submitting.
The documents affiliated with the current application are displayed in a table format. If there are no uploaded documents, a message will be displayed indicating there are no uploaded documents.

Initially there is one set of document fields that can be used to enter document data. An “Add Document” button is available and provides the ability to add document lines.
Users have a Document Type drop down populated with the document name values shown on the Document Type Administration page and filtered by the document types affiliated with the application program group.
A “Document Uploaded” text box with a “Browse” button allows the user to browse his/her PC and choose the file to be uploaded. The user has the option of recording the TRIM Number rather than uploading the document. The file size limit for document uploads is 5 MBs. The types of documents that can be uploaded are (.txt,.doc, .docx, .xls, xlsx,.pdf, .tif, .jpg, .gif).
The following screen shows the message indicating that the user tried to upload a document that was not one of the valid file types indicated above.
The following buttons are available: “Submit”, “Save for Later”, and “Cancel”. Refer to the button captions illustrated for an overview of their functionality.

Submit
Upon the click of the “Submit” button, the user is requested to confirm their intent to save the current application. The user can respond by providing a “Yes” or “No” response. A response of “No” will keep the user on the active page and will not save the recorded changes in the database. A response of “Yes” will save the application in the database and redirect the user to the Add Application page. A message will be displayed indicating the record was saved successfully. If there are any required fields that have not been entered an “Unsuccessful Save” error will be displayed along with a list of the fields where required information is missing.
If it’s a new application, an application number will be assigned to the application. The application number format will consist of “AP”+ Program (i.e.WM)+”-“+last two digits of the current year+ a generated sequence number (i.e. AP- WM-12001).
Upon a save, the application status and project status will reflect “Pending Review”.
Save For Later
The “Save for Later” action is valid only if the following fields are populated: the Program, Year, Applicant Type, and Applicant.
Upon the click of the “Save for Later” button, data validations are performed, the application information entered is saved, a dashboard entry is created for the external user entering the data, and the application status is defined as “In Progress”.

If all validations are performed successfully, the user will be presented a message indicating the application was saved successfully. The user will remain on the current page and the assigned application number is displayed in the Application section located at the top of the page.
If it’s a new application, an application number will be assigned to the application. The application number format will consist of “AP”+ Program (WM)+”-“+last two digits of the current year+ a generated sequence number (i.e. AP- WM-12001).
Cancel
Upon the click of the “Cancel” button, the user is requested to confirm their intent to cancel any revisions to the current application. The user can respond by providing a “Yes” or “No” response. A response of “No” will keep the user on the active page. A response of “Yes” will redirect the user to the Add Application page without saving any changes in the database.
2.5 PROJECT SUMMARY
The Project Summary page displays an overall snapshot of the project data for the project chosen from the Project Search Results page. All data on the page is view only.
This page display is divided in a seven sections: Project Information, Project Budget, Budget Allocation, Expenditures to Date, Cash Flow Estimates, Schedule and Project Benefits, and Project Contacts.
Project Information
This section provides project tombstone data.
The page illustrated below is the Project Information.
Project Budget
This section displays Project Budget information. The data source is the Project Status Reports and Project Costing in the Oracle application.
The projected cash flows section identifies the cost shares, both the original and future cost shares. The table displays the cost shares as broken down from the approved project as well as

from Project Costing. The total is the sum of the Provincial Share, the Municipal Share, the Federal Share, and the Other Share minus the GST/HST Rebate.
The page illustrated below is the Project Budget.
Budget Allocation
The Budget Allocation section displays the budget allocations for the four main areas (Consultant, Construction, Council Costs and Non-Shareable) as well as a Total Overall Budget.
Totals will be displayed for the Original Allocation as well as the Revised Contract. Two additional Totals will be displayed at the bottom of the table. These values include: Current Approved Budget (as per Project Costing) and the Balance Available from Budget (calculated as Current Approved Budget minus the Total Revised Contract).
The page illustrated below is the Budget Allocation.

Expenditures to Date
This section gives an overview of the Expenditures incurred to date on the project. The mapping of the rows in the table matches the individual rows in the budget allocation section. This data is derived from the latest submitted project status report.
The page illustrated below is the Expenditures to Date.
Cash Flow Estimates
This section displays the current approved and anticipated cash flows required for the project. Two fields are initially displayed the Revised Budget Total which is the same as the Current Approved Budget in the Budget Allocation section and the Expenditure’s Prior Years. A cash flow table will be displayed showing the cash flow Current Year as well as the cash flow for the next 5 Fiscal Years. The Total Current plus Future will be available at the bottom of the table with totals for the three columns.
The Federal, Provincial and Municipal cash flows display a breakdown of the cash flows for the Provincial Share, Federal Share and Municipal Share for previous years, the current year and future years. At the bottom of the grid, there will be a Total line to display the Current plus Future Totals for the Federal Cost Share, Provincial Cost Share and Municipal Cost Share.
The page illustrated below is the Cash Flow Estimates.

Schedule and Project Benefits
This section displays the anticipated schedule for the project as well as the project description and a list of benefits. The Anticipated Project Completion Date and the Actual Completion Date are taken from the latest project status report. The project benefits and the measure will be displayed if applicable.
The page illustrated below is the Schedule and Project Benefits.

Contacts
This section displays the project contacts as identified via the project pages. If the Project Representative is not shown that means the project has not yet been assigned to a Project Representative.
The page illustrated below is the Project Contacts.
2.6 PROJECT CONSULTANT AGREEMENT (PCA)
The Project Consultant Agreement (PCA) page captures data on the PCA. This includes schedule information based on the type of project undertaken. The assigned Project Representative or the municipality is responsible for completing the data on this page. Once submitted, the PCA will be available to the assigned Project Representative for review. More than one PCA can be submitted per project.
On the initial load of the page, the user sees a number of sections related to the project chosen from the Project Search Results page that will either display data or be available for data entry. If the user has been assigned to the project and has been assigned the Project Representative role, he/she will be able to edit all data fields. If the user is not assigned, they will be able to view the data only.

Note: If the user logged into the Capital Works system does not have a role that defines access to this page, the user will be logged out of the system.
This page display is divided into two sections: Project Information and PCA Summary.
Project Information
This section displays the project tombstone information.
The page illustrated below is the Project Information.
Project Consultant Agreement (PCA) Summary
This section lists the PCAs that have been completed for the Project in a table format. To view a PCA, click on the PCA record. If no PCAs exist for the Project, this section will be empty and the user will have the ability to add a new PCA. A new PCA can be added by clicking the “ADD PCA” button located below the table.
The page illustrated below is the PCA Summary.
The Prime Consultant Agreement (PCA) Information
Upon selecting a PCA displayed from the PCA Summary page or by clicking the “Add PCA” button, the Prime Consultant Agreement (PCA) Information page is displayed. This section captures the PCA details, including the applicable schedule information.

The Schedule Information displayed is dependent on the user selection of the “Add Other Schedule” checkbox. If the user checks the “Water, Sewer and Municipal Roads” schedule type, the following sections are displayed: Schedule II – Water, Sewer and Municipal Roads and Schedule III – Water, Sewer and Municipal Roads. If the user checks the “Buildings and Treatment Facilities” schedule type, the following sections are displayed: Schedule II – Buildings and Treatment Facilities and Schedule III – Buildings and Treatment Facilities. Each schedule type has a Schedule II and a Schedule III. One or both of the schedules must be checked
If the “Buildings and Treatment Facilities” schedule is checked, the Total Service Fee (including HST) on the Schedule II – Building and Treatment Facilities must be greater than 0.
If the “Water, Sewer and Municipal Roads” schedule type is checked, the Total Service Fee (including HST) on the Schedule II – Water, Sewer and Municipal Roads must be greater than 0.
The page illustrated below is the Prime Consultant Agreement (PCA) Information.
Schedule II – Water, Sewer and Municipal Roads
This section shows all data related to the Schedule Type: Schedule II - “Water, Sewer and Municpal Roads”.
The page illustrated below is the Schedule II - “Water, Sewer and Municpal Roads”.

Schedule III– Water, Sewer and Municipal Roads
This section shows all data related to the Schedule Type: Schedule III - “Water, Sewer and Municpal Roads”.
The page illustrated below is the Schedule III - “Water, Sewer and Municpal Roads”.

Schedule II – Buildings and Treatment Facilities
This section shows all data related to the Schedule Type: Schedule II - “Buildings and Treatment Facilities”.
The page illustrated below is the Schedule II - “Buildings and Treatment Facilities”.
Schedule III – Buildings and Treatment Facilities
This section shows all data related to the Schedule Type: Schedule III - “Buildings and Treatment Facilities”.
The page illustrated below is the Schedule III - “Buildings and Treatment Facilities”.

Located at the bottom of the PCA page, two buttons are available to the user: “Submit” and “Cancel”. Refer to the captions illustrated for an overview of the button functionality.
Submit
Upon the click of the “Submit” button, the user is requested to confirm their intent to save the data entered. The user can respond by providing a “Yes” or “No” response. A response of “No” keeps the user on the active page and no database updates are performed. A response of “Yes” will perform the database updates, provide the user with a message indicating the record(s) were updated successfully and the user is redirected to the PCA page displaying only the first two page sections.
Prior to saving changes to the database, the system performs all data validations. If the system validations fail, the user is provided an error message indicating the reason for the failure.
Cancel
Upon the click of the “Cancel” button, the user is requested to confirm their intent to cancel. The user can respond by providing a “Yes” or “No” response. A response of “No” keeps the user on the active page. A response of “Yes” redirects the user to the PCA page displaying only the first two page sections.
2.7 STATUS REPORTS
Status Reports are submitted by project owners on a monthly basis or by consultants hired to manage the projects for the project owners. The status reports must be completed and submitted online using the external interface.
This page is used to review the reports and submit the documents on a monthly basis. The page lists all current and previous status reports that have been submitted and gives the

municipality the ability to add status reports. Externally submitted reports can be modified once they have been submitted. Audit logs are retained for status report revisions.
On the initial load of the page, the user sees a number of sections related to the project chosen from the Project Search Results page that will either display data or be available for data entry. If the user has been assigned to the project, he/she will be able to edit all data fields.
Note: If the user logged into the Capital Works system does not have a role that defines access to this page, the user is logged out of the system.
The page is broken into a number of sections. Initially the user can view the first two sections: Project Information and the Status Report List.
Project Information
This section displays general project information.
Note: The label denoting the region is displayed as “Waste Management Region” if the program is Waste Management; otherwise the label displayed is “Region”.
The page illustrated below is the Project Information.
Status Report List
This section lists all current and previous Status Reports submitted in a table format. The Status Reports are listed by Status Report Number in descending order with the most recent submitted report showing first in the list. To view/edit a Status Report, the user can click one of the Status Reports displayed. If there are no Status Reports for the selected project, a message will be displayed indicating there are no Status Reports for the selected project. To add a Status Report, select the “Add Status Report” button. If the status report is “Approved”, the project status report will be display only.
The page illustrated below is the Status Report List.

Each status report is divided into the following sections: Project Information, Monthly Costs, Project Schedule, Cash Flow, Consultant Submission, Comments, and Documents.
Project Information
There are two fields in this section for data entry. The Period Ending Date is a required field.
The page illustrated below is the Project Information section of the Status Report.
Monthly Costs
This section displays the project monthly cost for each of the different contracts/areas where costs are incurred. The contracts types listed are: Consultant Contracts, Construction Contracts, Municipality Contracts, and Non-Sharable Contracts. Each contract type is listed in the table display as a separate line item.
The page illustrated below is the Monthly Costs of the Status Report.

Project Schedule
This section captures the project schedule information.
The page illustrated below is the Project Schedule of the Status Report.
Cash Flow
This section captures current/revised estimated Cash Flows for the project over several years.
The page illustrated below is the Cash Flow section of the Status Report.

Consultant Submission
This information captures data on the Submission by the Consultant.
The page illustrated below is the Consultant Submission section of the Status Report.
Comments
This section is available for existing Status Reports only. If a user is adding a Status Report, this section is not available. For Status Report editing, this section displays all previously entered comments. Each comment will be displayed on a line to itself.
The page illustrated below is the Comments section of the Status Report.

Documents
This section captures invoice documents to be submitted with the status report. They are linked directly to a report.
Initially there is one set of document fields that can be used to enter document data. An “Add Document” button is available to add additional document lines.
A “Document Uploaded” text box with a “Browse” button allows the user to browse his/her PC and choose the file to be uploaded. The file size limit for document uploads is 5 MBs. The types of documents that can be uploaded are (.txt,.doc, .docx, .xls, xlsx,.pdf, .tif, .jpg, .gif).
If there are existing documents uploaded, they are displayed in the document table.
The page illustrated below is the Documents section of the Status Report.
Located at the bottom of the Documents section, three buttons are available to the user: “Submit”, “Cancel”, and “Print Report”. Refer to the captions illustrated for an overview of the button functionality.
Submit
Upon the click of the “Submit” button, the user is requested to confirm their intent to save the data entered. The user can respond by providing a “Yes” or “No” response. A response of “No” will keep the user on the active page and no database updates are performed. A response of “Yes” performs the database updates and provides the user with a message indicating the record(s) were updated successfully. The user will be redirected to the Status Report page illustrating the Project Information and Status Report List.
Prior to saving changes to the database, the system performs all data validations. If the system validations fail, the user will be provided an error message indicating the reason for the failure.
Cancel
Upon the click of the “Cancel” button, the user is requested to confirm their intent to cancel. The user can respond by providing a “Yes” or “No” response. A response of “No” keeps the user on the active page. A response of “Yes” redirects the user to the Status Report page illustrating the Project Information and Status Report List.
2.8 DOCUMENTS
The Project Documents tab provides the Municipality and/or Consultant a place where they can upload documents without having to go to a specific page in the project process. This does not replace the document upload requirements on each of the individual pages instead it serves as an additional access point for documents.
The page also serves as a common point where all project documents are accessible for viewing.
Note: Documents for the Application stage will not be able to be viewed here.
On the initial load of the page, the user sees a number of sections related to the project chosen from the Project Search Results page that will either display data or be available for data entry. If the user has been assigned to the project, he/she is able to edit all data fields.
Note: If the user logged into the Capital Works system does not have a role that defines access to this page, the user will be logged out of the system.
The page consists of two primary sections: Project Information and Document Upload.
Project Information
This section displays the project tombstone information.
The page illustrated below is the Project Information.

Documents
This section captures data related to the uploaded document. If a document is uploaded, a value must be selected from the document type drop down list. The Document Type drop down is populated with the document name values from the Document Type file that are affiliated with the project’s Program Type. The Date Uploaded is populated with the system date upon a successful submit of the data.
A “Document Uploaded” text box with a “Browse” button will allow the user to browse his/her PC and choose the file to be uploaded. The user has the option of recording the TRIM Number rather than uploading the document. The file size limit for document uploads is 5 MBs. The types of documents that can be uploaded are (.txt,.doc, .docx, .xls, xlsx,.pdf, .tif, .jpg, .gif).
The page illustrated below is the Documents.
Located at the bottom of the Documents section, two buttons will be available to the user: “Submit” and “Cancel”. Refer to the captions illustrated for an overview of the button functionality.
Submit
Upon the click of the “Submit” button, the user is requested to confirm their intent to save the data entered. The user can respond by providing a “Yes” or “No” response. A response of “No” keeps the user on the active page and no database updates are performed. A response of “Yes”

performs the database updates and provides the user with a message indicating the record(s) were updated successfully. The user is redirected to the Documents page illustrating the Project Information and Documents.
Prior to saving changes to the database, the system performs all data validations. If the system validations fail, the user is provided with an error message indicating the reason for the failure.
Cancel
Upon the click of the “Cancel” button, the user is requested to confirm their intent to cancel. The user can respond by providing a “Yes” or “No” response. A response of “No” keeps the user on the active page. A response of “Yes” redirects the user to the Documents page illustrating the Project Information and Documents.
2.9 CHANGE PASSWORD
The Change Password page is used by the user to change his/her password. The Change Password option is available from the blue menu bar on the page’s left panel.
The user is prompted to enter his/her new password and to confirm the password entered by entering the same password in the Confirm Password field. The entry for the New Password and Confirm Password fields must be the same. The password identified must follow the standard rules described above.
As an added security feature, the user is requested to select three security questions and provide answers to each question selected. Neither one of the questions selected can be a repeat of a previously selected question.
The page illustrated below is the Change Password.

At the bottom of the Change Password page, the following buttons are available: “Submit” and “Cancel”. Refer to the button captions illustrated for an overview of their functionality.
Submit
Upon the click of the “Submit” button, the user is requested to confirm their intent to save the record. The user can respond by providing a “Yes” or “No” response. A response of “No” keeps the user on the active page and will not save the recorded changes in the database. A response of “Yes” saves the recorded changes in the database and redirects the user to the Login page. A message is displayed indicating the password was changed successfully.
Cancel
Upon the click of the “Cancel” button, the user is requested to confirm their intent to cancel any revisions to the current record. The user can respond by providing a “Yes” or “No” response. A response of “No” keeps the user on the active page and refreshes the page. A response of “Yes” keeps the user on the active page and refreshes the page without saving any changes in the database.