mundial-4 condensed manual -...
TRANSCRIPT

32
NOTE:
This
NOTE:
This
NOTE:
This
NOTE:
This
NOTE:
This
is a
�place
is a
�place
is a
�place
is a
�place
is a
�place
marker�
cover.
marker�
cover.
marker�
cover.
marker�
cover.
marker�
cover.
The color
The color
The color
The color
The color
cover graphics
cover graphics
cover graphics
cover graphics
cover graphics
is a separate
is a separate
is a separate
is a separate
is a separate
file. T
he
file. T
he
file. T
he
file. T
he
file. T
he
following p
late
following p
late
following p
late
following p
late
following p
late
is t
o b
e p
rinted
is t
o b
e p
rinted
is t
o b
e p
rinted
is t
o b
e p
rinted
is t
o b
e p
rinted
on the
on the
on the
on the
on the
back of
back of
back of
back of
back of
the
the
the
the
the
cover.
cover.
cover.
cover.
cover.
1
MODELO: K9-MUNDIAL-4 MODELO: K9-MUNDIAL-4 MODELO: K9-MUNDIAL-4 MODELO: K9-MUNDIAL-4 MODELO: K9-MUNDIAL-4
MANUAL DELPROPIETARIO
COPYRIGHT: OMEGA RESEARCH & DEVELOPMENT 2005
1
K9-MUNDIAL-4K9-MUNDIAL-4K9-MUNDIAL-4K9-MUNDIAL-4K9-MUNDIAL-4
OWNER’SMANUAL
COPYRIGHT: OMEGA RESEARCH & DEVELOPMENT 2001
Mundial-4 Condensed Manual.p651/1/2009, 1:50 PM 1
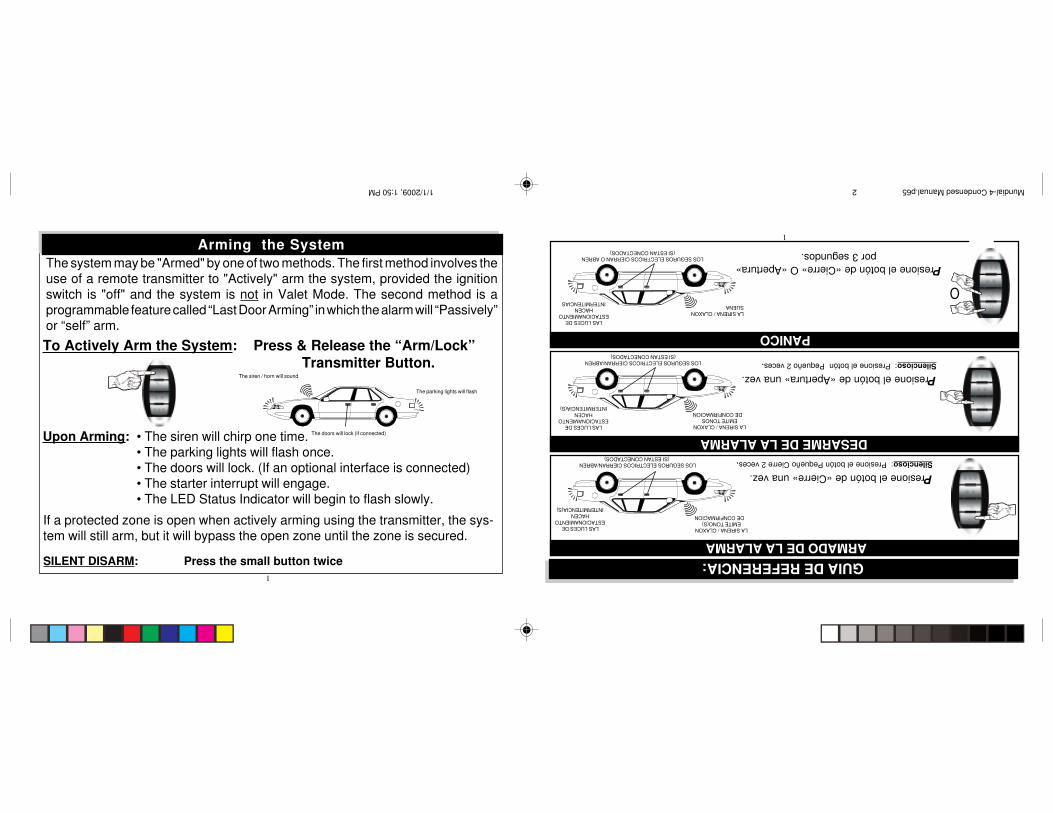
ARMADO DE LA ALARMA
Presione el botón de «Cierre» una vez.Silencioso: Presione el botón Pequeño Cierre 2 veces.
LA SIRENA / CLAXONEMITE TONO(S)
DE CONFIRMACION
LAS LUCES DEESTACIONAMIENTO
HACENINTERMITENCIA(S)
LOS SEGUROS ELECTRICOS CIERRAN/ABREN (SI ESTAN CONECTADOS)
DESARME DE LA ALARMALA SIRENA / CLAXON
EMITE TONOS DE CONFIRMACION
LAS LUCES DEESTACIONAMIENTO
HACENINTERMITENCIA(S)
LOS SEGUROS ELECTRICOS CIERRAN/ABREN(SI ESTAN CONECTADOS)
Presione el botón de «Apertura» una vez.Silencioso: Presione el botón Pequeño 2 veces.
1
PANICO
Presione el botón de «Cierre» O «Apertura»por 3 segundos.
LA SIRENA / CLAXONSUENA
LAS LUCES DEESTACIONAMIENTO
HACENINTERMITENCIAS
LOS SEGUROS ELECTRICOS CIERRAN O ABREN(SI ESTAN CONECTADOS)
GUIA DE REFERENCIA:
1
Arming the SystemThe system may be "Armed" by one of two methods. The first method involves theuse of a remote transmitter to "Actively" arm the system, provided the ignitionswitch is "off" and the system is not in Valet Mode. The second method is aprogrammable feature called “Last Door Arming” in which the alarm will “Passively”or “self” arm.
To Actively Arm the System: Press & Release the “Arm/Lock” Transmitter Button.
If a protected zone is open when actively arming using the transmitter, the sys-tem will still arm, but it will bypass the open zone until the zone is secured.
SILENT DISARM: Press the small button twice
The parking lights will flash
The doors will lock (if connected)
The siren / horn will sound
Upon Arming: • The siren will chirp one time.• The parking lights will flash once.• The doors will lock. (If an optional interface is connected)• The starter interrupt will engage.• The LED Status Indicator will begin to flash slowly.
O
Mundial-4 Condensed Manual.p651/1/2009, 1:50 PM 2

2
Upon Disarm: • The siren will chirp twice. (4 chirps if alarm has activated & reset)• The parking lights will flash twice. (4 times if alarm has activated)• The doors will unlock. (If an optional interface is connected)• The starter interrupt will disengage.• The LED Status Indicator will turn “Off”, or begin flashing rapidly if the Automatic Rearming feature is programmed on or flash a Zone Violation code if the alarm was activated.
SILENT DISARM: Press the small button twice
Disarming the System
To Disarm the System: Press & Release the “Disarm/Unlock”Transmitter Button.
Safety Disarm: If the system is disarmed while it is activated, it will disarm, butnot unlock the doors. This is the Safety Disarm feature; to unlock the doors in thissituation, simply press the Disarm/Unlock Button again. Should the transmitter be
The parking lights will flash
The doors will unlock (if connected)
The siren / horn will sound
2
MODO “VALET”ENTRAR A VALET: Con la alarma Desarmada, Presioneel botón de Valet por 3 segundos.- La luz LED se enciende confirmando la entrada al modo “Valet”
En el modo de “Valet” todas las funciones deseguridad quedan apagadas y solamente lasfunciones de conveniencia se pueden ope-rar.
El modo de Valet esta diseñado para ocasio-nes en el cual seria inconveniente que laalarma este operando, por ejemplo en el casoque el vehículo este en el mecánico.
SALIR DE VALET: Presione el botónde Valet una vez- La luz LED se apaga confirmando la salida
CANAL AUXILIAR
Presione el botón Pequeño por 3 segundos.
OPERAR UN MODULO PARAARRANCAR EL VEHICULOABRIR EL MALETERO/BAUL
OPERAR UN MODULO PARA CERRARLAS VENTANAS
Enciende la ignición del vehículo con la llave Y Presione el botón de Valet una vez.
DESARME DE EMERGENCIA
Mundial-4 Condensed Manual.p651/1/2009, 1:50 PM 3
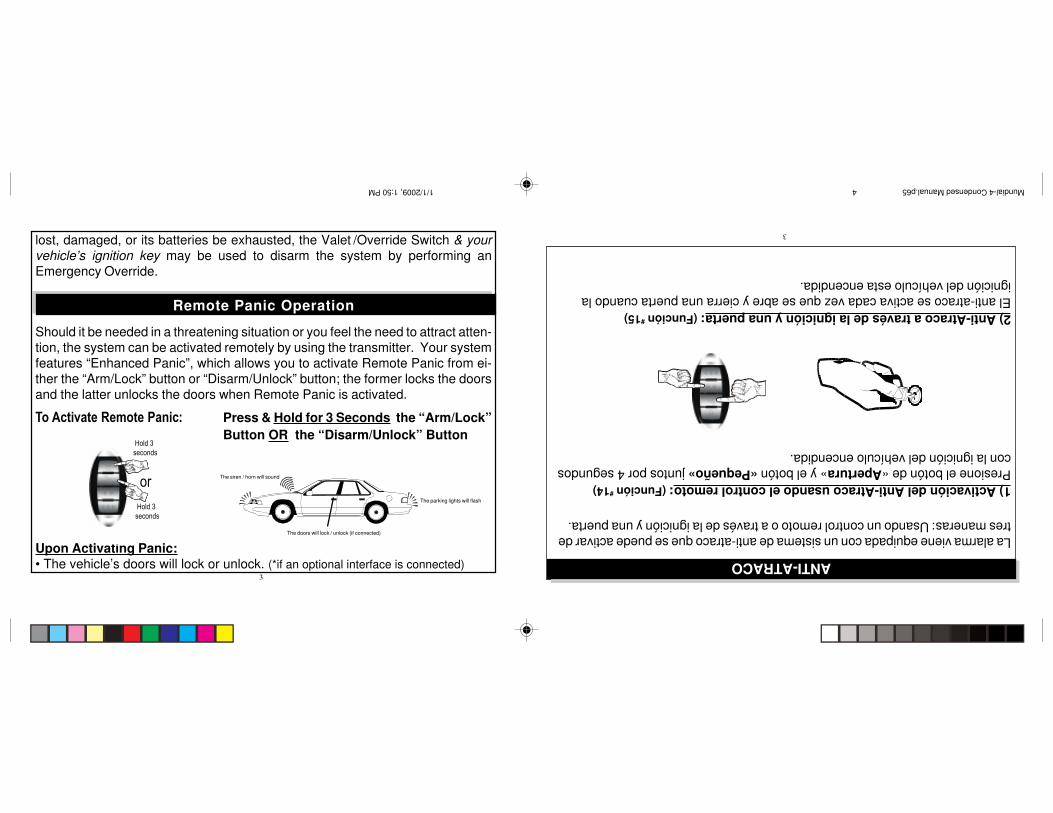
La alarma viene equipada con un sistema de anti-atraco que se puede activar detres maneras: Usando un control remoto o a través de la ignición y una puerta.
1) Activación del Anti-Atraco usando el control remoto: (Función #14)
Presione el botón de «Apertura» y el botón «Pequeño» juntos por 4 segundoscon la ignición del vehículo encendida.
2) Anti-Atraco a través de la ignición y una puerta: (Función #15)
El anti-atraco se activa cada vez que se abre y cierra una puerta cuando laignición del vehículo esta encendida.
3
ANTI-ATRACO
3
Remote Panic Operation
Should it be needed in a threatening situation or you feel the need to attract atten-tion, the system can be activated remotely by using the transmitter. Your systemfeatures “Enhanced Panic”, which allows you to activate Remote Panic from ei-ther the “Arm/Lock” button or “Disarm/Unlock” button; the former locks the doorsand the latter unlocks the doors when Remote Panic is activated.
Upon Activating Panic:• The vehicle’s doors will lock or unlock. (*if an optional interface is connected)
lost, damaged, or its batteries be exhausted, the Valet /Override Switch & your
vehicle’s ignition key may be used to disarm the system by performing anEmergency Override.
To Activate Remote Panic: Press & Hold for 3 Seconds the “Arm/Lock”Button OR the “Disarm/Unlock” Button
Hold 3
seconds
Hold 3
seconds
The parking lights will flash
The doors will lock / unlock (if connected)
The siren / horn will sound
or
Mundial-4 Condensed Manual.p651/1/2009, 1:50 PM 4

4
Deactivating Remote Panic from the “Arm/Lock” button results in the system be-ing in the Armed state with locked doors. If the “Disarm/Unlock” button is used todeactivate Remote Panic the system will be in the Disarmed state, with unlockeddoors.
To Deactivate Panic: Press & Release either the “Arm/Lock”OR the “Disarm/Unlock” Button
Remote Panic can be activated anytime, whether the vehicle’s ignition is turnedon or off, and has a 60 second duration (regardless of the 30 or 60 second activa-tion setting) unless a transmitter is used to stop it. At the end of the 60 secondcycle, the system will reset and be in either the armed state (if activated by the“Arm/Lock” button) or in the disarmed state (if activated by “Disarm/Unlock”).
The Auxiliary Channel
The Auxiliary Channel may be used to operate an optional function. Possibilitiesinclude remote trunk release, remote car starting, or an on-demand remote win-dow roll-up interface. Please see your Omega dealer for details on available op-tions. continued next page
• The siren will sound.• The vehicle’s exterior parking lights will flash.
4
3) Anti-Atraco a través de la ignición: (Función #16)
El anti-atraco se activa cada vez que se enciende la ignición del vehículo.
DESACTIVACION DEL ANTI-ATRACO: Para desactivar el anti-atracopresiona el botón de "Valet" antes que transcurran 63 segundos desde elmomento de la activación.
Si el botón de "Valet" no se presiona el sistema de alarma comienza a pulsar laSirena/Claxon a los 55 segundos por 8 segundos para avisarle al conductor queel Anti-Atraco esta por dispararse.
Si el botón de "valet" no se presiona durante los 63 segundos, el anti-atraco sedispara. La Sirena/Claxon comienza a sonar, las luces de estacionamientocomienzan una intermitencia, y a los 95 segundos el corte de arranque seactiva.
Para desactivar el Anti-Atraco después de que fue disparado: a) Apaga la ignición del vehículo.
Mundial-4 Condensed Manual.p651/1/2009, 1:50 PM 5

5
La luz LED tiene cuatro funciones principales:
1) Muestra el “Estado” de la alarma:Intermitencia lenta = Armada.Intermitencia rápida = Armado/Rearme automático comenzado.Apagado = Desarmada sin Auto Armado/Rearme Fijo = “Valet”.
2) Verifica cuantos controles están programado: (Protección “ATV”) Por 10 segundos después de enciender la ignición, el LED hace una serie deintermitencias, que corresponden al numero de controles que están programado.
3) Advierte que hubo un disparo y confirma cual zona fue violada: Si durante el tiempo en cual la alarma esta Armada sucede un disparo, la luz LED indicaexactamente cual zona fue violada. La memoria del disparo mantiene las ultimascuatro violaciones hasta que se encienda la ignición del vehículo.
1 intermitencia = consumo 2 intermitencias = Capo o Maletero
3 intermitencias = Puertas 4 intermitencias = Sensor.
4) Prueba de Zonas: Cuando la Alarma esta Desarmada, la Luz LED indica cual zona o zonas están violadas.El LED muestra las zonas violadas en la secuencia en cual se violaron.
1 intermitencia = consumo 2 intermitencias = Capo o Maletero
3 intermitencias = Puertas. 4 intermitencias = Sensor.
LUZ LED: (INDICADOR)
5
Valet Mode & Emergency Override
To Activate the Auxiliary Channel: Press & Hold the Transmitter Small Button for 3 Seconds
The Valet/Override Switch can perform two distinct functions: accessing ValetMode and performing an Emergency Override of an armed and activated system.
For safety, the Auxiliary Channel cannot be activated if the vehicle's ignition is"On". If the system is armed when the Auxiliary Channel is used, it will alsodisarm; or, there is also has a special programmable feature, Start Mode, which isdesigned to allow the addition of an optional remote starter module to start thevehicle while leaving the system armed. The Auxiliary Channel has output for aslong as the Small Button is held.
Hold 3
seconds
The trunk will open (if connected)
The windows will close (if connected)
The siren / horn will sound
Mundial-4 Condensed Manual.p651/1/2009, 1:50 PM 6
6
Valet Mode prevents any active arming, from the transmitter, or passive arming, asin Last Door Arming. Valet Mode is designed for situations in which it is notconvenient for the alarm portion of the system to be operational; for example duringextended stopovers for vehicle servicing, loaning others your vehicle, mainte-nance, valet parking, washing, etc. The convenience features such as keylessentry, the auxiliary channel, and ignition-activated doorlocks can still be operated.
To Enter Valet Mode: Press & Hold the Valet(System MUST be Disarmed) Switch for 3 Seconds.
- The LED Status Indicator will light solid Red to confirm Valet Mode. Now thesystem cannot become armed.
The vehicle's ignition may be "On" or "Off" when entering Valet Mode.
To Exit Valet Mode: Simply Press & Release theValet Switch.
- The LED Status Indicator will turn off to confirm that the system has exitedValet Mode and returned to a “standby” mode. Normal arming operations maybe resumed.
Again, the vehicle's ignition may be "On" or "Off" when exiting Valet Mode.
6
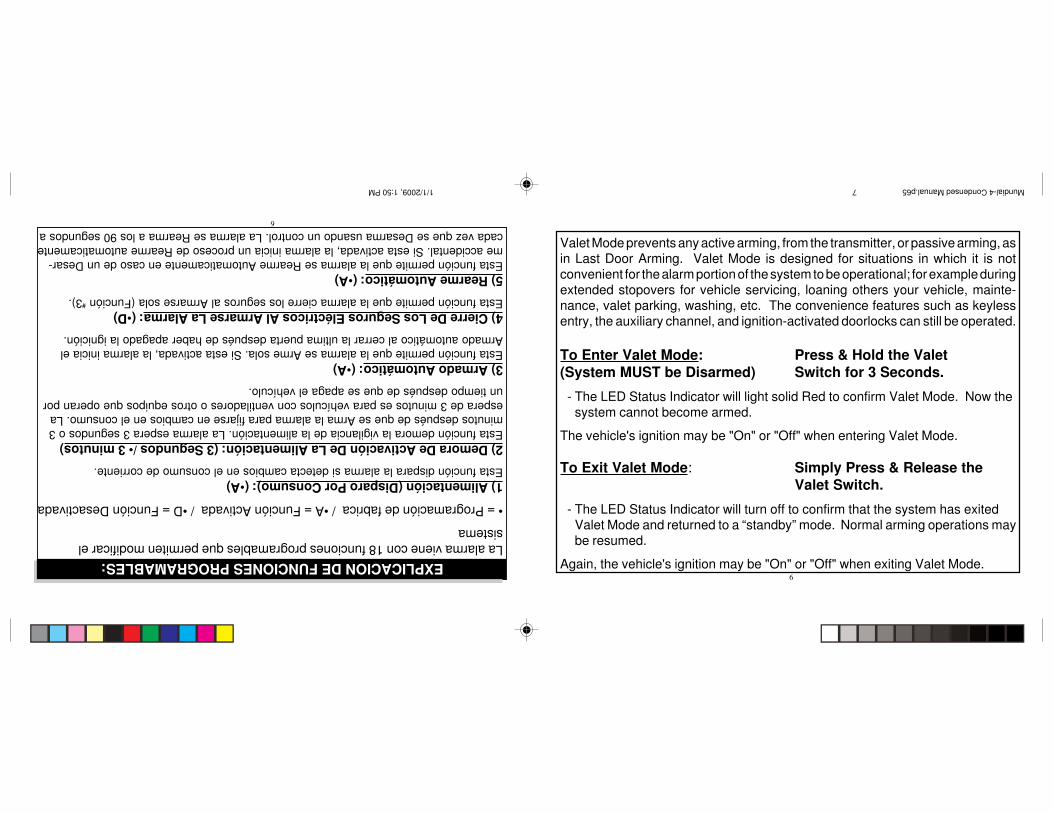
La alarma viene con 18 funciones programables que permiten modificar elsistema
• = Programación de fabrica / •A = Función Activada / •D = Función Desactivada
1) Alimentación (Disparo Por Consumo): (•A)Esta función dispara la alarma si detecta cambios en el consumo de corriente.
2) Demora De Activación De La Alimentación: (3 Segundos /• 3 minutos)Esta función demora la vigilancia de la alimentación. La alarma espera 3 segundos o 3minutos después de que se Arma la alarma para fijarse en cambios en el consumo. Laespera de 3 minutos es para vehículos con ventiladores o otros equipos que operan porun tiempo después de que se apaga el vehículo.
3) Armado Automático: (•A)Esta función permite que la alarma se Arme sola. Si esta activada, la alarma inicia elArmado automático al cerrar la ultima puerta después de haber apagado la ignición.
4) Cierre De Los Seguros Eléctricos Al Armarse La Alarma: (•D)Esta función permite que la alarma cierre los seguros al Armarse sola (Función #3).
5) Rearme Automático: (•A)Esta función permite que la alarma se Rearme Automaticamente en caso de un Desar-me accidental. Si esta activada, la alarma inicia un proceso de Rearme automaticamentecada vez que se Desarma usando un control. La alarma se Rearma a los 90 segundos a
EXPLICACION DE FUNCIONES PROGRAMABLES:
Mundial-4 Condensed Manual.p651/1/2009, 1:50 PM 7
7
no ser que la ignición del vehículo se encienda.
6) Cierre De Seguros Eléctricos Automático Al Rearmarse La Alarma: (•D)Esta función permite que la alarma cierre los seguros eléctricos al Rearmarseautomaticamente (Función
#5).
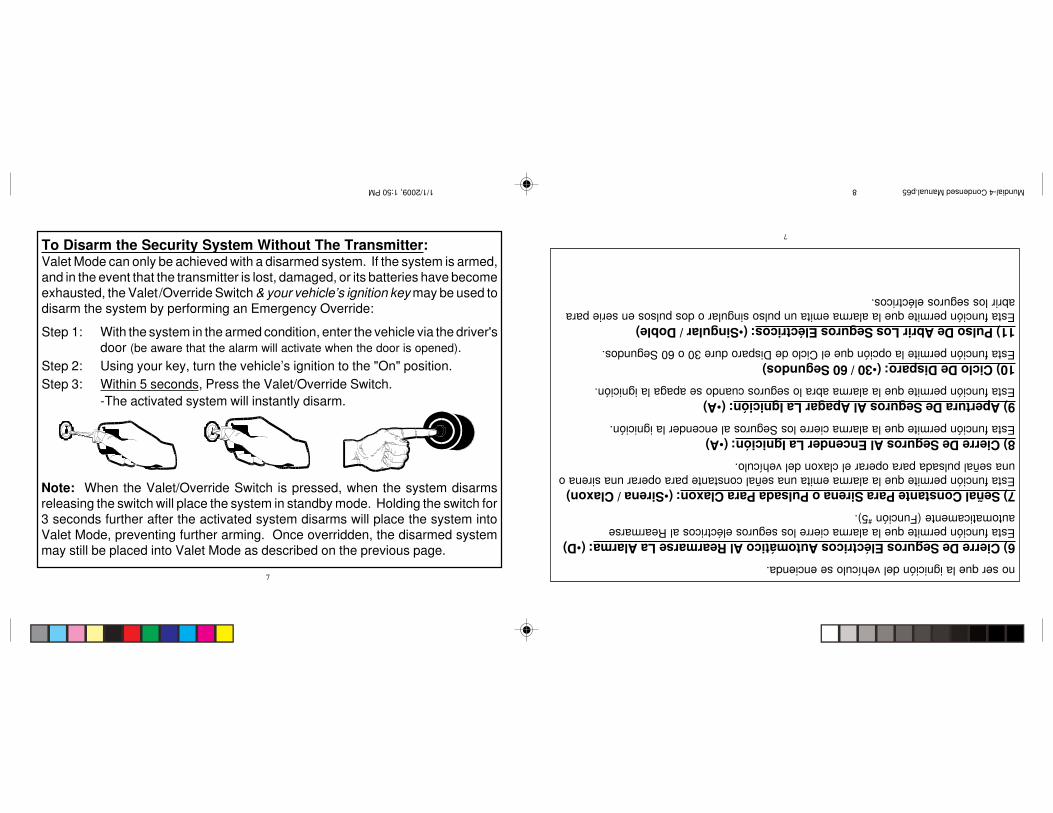
7) Señal Constante Para Sirena o Pulsada Para Claxon: (•Sirena / Claxon)Esta función permite que la alarma emita una señal constante para operar una sirena ouna señal pulsada para operar el claxon del vehículo.
8) Cierre De Seguros Al Encender La Ignición: (•A)Esta función permite que la alarma cierre los Seguros al encender la ignición.
9) Apertura De Seguros Al Apagar La Ignición: (•A)Esta función permite que la alarma abra lo seguros cuando se apaga la ignición.
10) Ciclo De Disparo: (•30 / 60 Segundos)Esta función permite la opción que el Ciclo de Disparo dure 30 o 60 Segundos.
11) Pulso De Abrir Los Seguros Eléctricos: (•Singular / Doble)Esta función permite que la alarma emita un pulso singular o dos pulsos en serie paraabrir los seguros eléctricos.
7
To Disarm the Security System Without The Transmitter:Valet Mode can only be achieved with a disarmed system. If the system is armed,and in the event that the transmitter is lost, damaged, or its batteries have becomeexhausted, the Valet /Override Switch & your vehicle’s ignition key may be used todisarm the system by performing an Emergency Override:
Step 1: With the system in the armed condition, enter the vehicle via the driver'sdoor (be aware that the alarm will activate when the door is opened).
Step 2: Using your key, turn the vehicle’s ignition to the "On" position.Step 3: Within 5 seconds, Press the Valet/Override Switch.
-The activated system will instantly disarm.
Note: When the Valet/Override Switch is pressed, when the system disarmsreleasing the switch will place the system in standby mode. Holding the switch for3 seconds further after the activated system disarms will place the system intoValet Mode, preventing further arming. Once overridden, the disarmed systemmay still be placed into Valet Mode as described on the previous page.
Mundial-4 Condensed Manual.p651/1/2009, 1:50 PM 8

8
The LED Status Indicator
The Red LED Status Indicator visually shows the status of the system and alsoprovides a high level of visual deterrence. The Red LED Status Indicator Light isnormally mounted in a location where it can be easily seen by the driver, as wellas from outside the vehicle.
Security System Status: The primary function of the Red LED Status IndicatorLight is to indicate the normal operating status of the security system: Off = The system is disarmed and not performing any automatic functions. On Constant = The system is in the Valet Mode. Flashing Slow = The system is fully Armed. Flashing Fast = The system is Last Door Arming or Automatic Rearming.
Automatic Transmitter Verification: For the first 10 seconds after the vehicle’signition is turned "On", the LED Status Indicator will flash a number of times equalto the number of transmitters which are programmed in the system’s memory andwhich can operate the security system. This indication can be from 1 Flash /pauseup to 4 Flashes /pause, as the system can be operated by just one, or as many asfour remote transmitters. A related feature, Unauthorized Transmitter Alert, warnsyou of recent transmitter programming, and protects your system from unauthorizedtransmitters being coded to operate it your without your knowledge.
8
13) Canal Auxiliar Desarma La Alarma / Modo De Arranque: (•Desarma)Esta función permite que el Canal Auxiliar Desarme la alarma o inicie el modo dearranque.
14) Anti-Atraco Activado Usando El Control Remoto: (•D)Esta función permite la activación del Anti-Atraco usando el control remoto.
15) Anti-Atraco Activado A Través De Las Puertas Y La Ignición: (•D)Esta función permite la activación del Anti-Atraco a través de las puertas y la ignicióndel vehículo.
16) Anti-Atraco Activado A Través De La Ignición: (•D)Esta función permite la activación del Anti-Atraco a través de la ignición del vehículo.
17) Confirmación De La Sirena/Claxon Al Armar/Desarmar La Alarma: (•A)Esta función permite activar/cancelar la confirmación de la Sirena/Claxon al Armar oDesarmar la alarma.
18) Tipo De Control Remoto: (Control de 2-Botones / •Control de 3-boto-nes)Esta función permite la opción que la Alarma funcione con controles remotos de 2 o 3-botones. La Alarma viene equipada con dos controles de 3-botones, pero puedefuncionar con controles remotos especiales de 2-botones que usan un botón paraArmar/Desarmar la Alarma y el segundo botón para operar el canal auxiliar.
Mundial-4 Condensed Manual.p651/1/2009, 1:50 PM 9

9
PROGRAMACION DE FUNCIONES:
La alarma tiene 18 funciones que son prográmales a través del modo deprogramación.
1) Encienda y Apague la ignición del vehículo.
2) Antes que pasen 10 segundos desde el momento que se apaga laignición, presione el botón de “Valet” 5 veces.
- La Sirena/Claxon emite un tono largo y corto confirmando la entrada al modo.
3) Antes que pasen 7 segundos desde el momento de la entrada al modode programación, presione el botón de "Valet” un numero de veces quecorresponde al numero de la función por programar.
----- La Sirena/Claxon emite el mismo numero de tonos para confirmar cualfunción fue escogida.
Ejemplo: Para cambiar la función #3, presiona el botón de “Valet” 3 veces y laSirena/Claxon emite 3 tonos.
Para entrar al modo de programación de funciones:
Programación:
9
Zone Testing & Zone Violation: Are related visual indicators, via the LED StatusIndicator; the first shows currently violated zones while the system is disarmed,and the second, should the system be activated, shows which zone caused theactivation after the fact. These are the codes for both operations:
1 Flash /Pause = is the current sensing zone circuit. 2 Flashes /Pause = is the hood or trunk zone circuit. 3 Flashes /Pause = is the door zone circuit. 4 Flashes /Pause = is the sensor zone circuit, including Prewarning Detection.
Zone Testing operates while the system is disarmed, and shows if a protectedzone is in a violated state. In using Zone Testing, for example, while the systemis disarmed, whenever a door is open the LED Status Indicator will flash 3 timesbetween pauses. Should multiple protected zones be violated at the same time,all will be shown in sequence.
Zone Violation operates if the system has been armed, and then activated. Duringthe activation, the LED Status Indicator will flash the Violation, and then revert tothe normal slow flash when the system rests itself, then, upon disarming, the LEDwill change to flash the Violation Code, and will continue to do so until the ignitionswitch is turned “On”. Should multiple activations occur during a single armedperiod, up to four Zone Violations will be shown upon disarming.
Mundial-4 Condensed Manual.p651/1/2009, 1:50 PM 10
4) Después de haber escogido la función por programar, presione el botóndel control remoto que corresponde a la opción deseada:
- Presione el botón de «Cierre» y La Sirena/Claxon emite 1 tono.- Presione el botón de «Apertura» y La Sirena/Claxon emite 2 tonos.
NOTA: Es posible “Encender” y “Apagar” y volver a “Encender” y “Apagar” lafunción usando los botones del control remoto.
5) Para programar otra función, repitan las líneas #3-4.
- Para escoger otra función es necessario volver a presionar el botón de "Valet" el numero de veces que corresponde a el numero de la función por programar.
Ejemplo: Para programar la función #1, presiona el botón de “Valet" una vez y
la Sirena/Claxon emite 1 tono.
6) Si pasan 7 segundos sin entrada de programación o si se enciende laignición del vehículo, la alarma automaticamente sale del modo de progra-mación.
- La Sirena/Claxon confirma la salida del modo con un dos tonos.10
10
Programmable Anti-Carjacking Protection
The system is equipped with 3 levels of programmable Anti-Carjacking protection.
First Level: Anti-Carjacking activated using the transmitter:If feature #14 is “On”, Anti Car-Jacking may be activated by pressing & holding thetransmitter’s Disarm & Small Buttons together for 4 seconds while the ignition is “On”.
Second Level: Anti-Carjacking activated by a door: If feature #15 is “On”, Anti-Carjacking initiates when a door is opened & closed with the ignition “On”.
Third Level: Anti-Carjacking activated by the ignition:If feature #16 is “On”, Anti-Carjacking initiates every time the ignition is turned “On”.
Once the Anti-Carjacking process has begun, the user has 63 seconds to press the Va-let/Override Switch in order to cancel. If not, at 55 seconds the siren will begin to chirp for8 seconds to alert the user that the system is about to enter into an activated condition. Ifnot cancelled before the 63 second countdown expires, the system will fully activate. Inthe activated condition the siren/horn will sound, the lights will flash, and at 95 secondsthe starter interrupt will engage. Once the system is activated in the Anti-Carjack mode,the transmitters will NOT stop the operation, nor will the system reset. Once it is fullyactivated, the Anti-Carjacking operation can only be deactivated by:
First Step: Turning the vehicle’s ignition “Off”.
Second Step: Turning the vehicle’s ignition back “On”.
Third Step: Within 5 seconds Pressing the Valet/Override Switch.
Mundial-4 Condensed Manual.p651/1/2009, 1:50 PM 11

11
• = Significa programación de fabrica.
1) Alimentación (Disparo Por Consumo): (•A) Activada = Presione el botón de CIERRE: (1 tono de Sirena/Claxon) Desactivada = Presione el botón de APERTURA: (2 tonos de Sirena/Claxon)
2) Demora De Activación De La Alimentación: (3 Segundos / •3 minutos) 3 Segundos = Presione el botón de CIERRE: (1 tono de Sirena/Claxon) 3 Minutos = Presione el botón de APERTURA: (2 tonos de Sirena/Claxon)
3) Armado Automático: (•A) Activado = Presione el botón de CIERRE: (1 tono de Sirena/Claxon) Desactivado = Presione el botón de APERTURA: (2 tonos de Sirena/Claxon)
4) Cierre De Los Seguros Eléctricos Al Armarse La Alarma: (•D)Cierre Activado = Presione el botón de CIERRE: (1 tono de Sirena/Claxon)Cierre Desactivado = Presione el botón de APERTURA: (2 tonos de Sirena/Clax)
5) Rearme Automático: (•A)Rearme Activado = Presione el botón de CIERRE: (1 tono de Sirena/Claxon)Rearme Desactivado = Presione el botón de APERTURA: (2 tonos de Sirena/Clax)
LISTA DE FUNCIONES PROGRAMABLES:
11
Programmable FeaturesThe system has 18 programmable features. • = Default Factory Setting
1. Current Sensing: (•On / Off) - Enables the system to be activated should thesystem detect a voltage spike in the vehicle’s electrical system.
2. Current Sensing Activation Delay: (3 Seconds / •3 Minutes) - Allows optionof a longer delay before current sensing can activate.
3. Last Door Arming: (On / •Off) - Configures the system to automatically arm itself30 seconds after the last of the vehicle’s doors is closed.
4. Doors Lock With Last Door Arming: (On / •Off)- Adds the automatic locking of the vehicle's doors to the previous feature.
5. Automatic Rearming: (On / •Off) - Configures the system to automatically rearmitself 90 seconds after it has been disarmed by the transmitter.
6. Doors Lock With Automatic Rearm: (On / •Off)- Adds the automatic locking of the vehicle's doors to the previous feature.
7. Steady Siren Output Or Pulsed Horn Honk Output: (•Siren / Horn) - Allowsselection of a constant siren output or a pulsed horn output. If programming, press theTransmitter Arm/Lock Button for the Siren setting or the Disarm Button for the Horn setting.
8. Ignition Controlled Door Lock: (•On / Off) - Configures the system to lock thevehicle's doors when the ignition is turned on. Also works in Valet mode.
Mundial-4 Condensed Manual.p651/1/2009, 1:50 PM 12
12
9. Ignition Controlled Door Unlock: (•On / Off) - Configures the system to unlockthe vehicle's doors when the ignition is turned off.
10. System Activation Cycle Duration: (•30 / 60 Seconds) -Configures thesystem’s activation duration cycle to be either 30 seconds or 60 seconds. If programming,press the Transmitter Arm/Lock Button for the 30 Second setting or press the Disarm/Unlock Button for the 60 second setting.
11. Double Unlock Pulse: (On / •Off) - Configures system to change the single unlockoutput pulse into a double pulse. Some vehicles require a double pulse to unlock the doors;when needed this feature saves the expense of optional parts.
12. Open Door Bypass Alert: (On / •Off) - Configures the system to chirp the siren3 times upon arming, instead of 1 time, to warn the user if a door is still open.
13. Aux Channel Disarm Or Engages Start Mode: (•Disarms / Start Mode) -This feature changes the Aux Channel’s operation so that it is compatible with a remotestarter unit. When set for the Start Mode, Aux does not disarm the alarm. Additionally, thecurrent sensing & sensor zones will be bypassed. This allows a start module to start thevehicle without activating the system. If the door and trunk zones are violated the unit willturn the vehicle’s engine off. If programming, press the Disarm/Unlock Button for StartMode or the Lock/Arm Button for Disarm.
14. Transmitter Activated Anti-Carjacking: (On / •Off)
15. Door Activated Anti-Carjacking: (On / •Off)12• = Significa programación de fabrica.
6) Cierre De Seguros Eléctricos Automático Al Rearmarse La Alarma: (•D) Cierre Activado = Presione el botón de CIERRE: (1 tono de Sirena/Claxon) Cierre Desactivado = Presione el botón de APERTURA: (2 tonos de Sirena/Clax)
7) Señal Constante Para Sirena o Pulsada Para Claxon: (•Sirena / Claxon) Sirena = Presione el botón de CIERRE: (1 tono de Sirena/Claxon) Claxon = Presione el botón de APERTURA: (2 tonos de Sirena/Claxon)
8) Cierre De Seguros Al Encender/Apagar La Ignición: (•A) Activado = Presione el botón de CIERRE: (1 tono de Sirena/Claxon) Desactivado = Presione el botón de APERTURA: (2 tonos de Sirena/Claxon)
9) Apertura De Seguros Al Encender/Apagar La Ignición: (•A) Activado = Presione el botón de CIERRE: (1 tono de Sirena/Claxon) Desactivado = Presione el botón de APERTURA: (2 tonos de Sirena/Claxon)
10) Ciclo De Disparo: (•30 / 60 Segundos) 30 segundos = Presione el botón de CIERRE: (1 tono de Sirena/Claxon) 60 segundos = Presione el botón de APERTURA: (2 tonos de Sirena/Claxon)
11) Pulso De Abrir Los Seguros Eléctricos: (•Singular o Doble) Pulso Singular = Presione el botón de CIERRE: (1 tono de Sirena/Claxon) Pulso Doble = Presione el botón de APERTURA: (2 tonos de Sirena/Claxon)
12) Confirmación Que Existe Una Puerta Abierta Al Armar La Alarma: (•D) Activada = Presione el botón de CIERRE: (1 tono de Sirena/Claxon) Desactivada = Presione el botón de APERTURA: (2 tonos de Sirena/Claxon)
Mundial-4 Condensed Manual.p651/1/2009, 1:50 PM 13

13
16. Ignition Activated Anti-Carjacking: (On / •Off)
17. Confirmation Chirp: (•On / Off) - This feature turns off the arm & disarmconfirmation chirps. The system will only chirp with Last Door Arming & Rearm.
18. 1 or 2 Button Arm/Disarm: (1 Button/•2 Button)
How to Program Features
Step 1: Turn the vehicle's ignition "On" then "Off".
Step 2: Within 10 seconds of turning the ignition "Off", press the Valet/OverrideSwitch 5 times. A siren burst, then a single chirp will confirm entry.
Step 3: Within 7 seconds of entering Features Programming Mode, press the Valet/Override Switch a number of times equal to the number of the feature to be programmed.- The system will repeat the feature number with same number of siren chirps.
Step 4: After the system acknowledges the feature to be programmed, presseither the Transmitter Arm/Lock Button to turn the feature on (1 chirp confirmation), or theDisarm/Unlock Button to turn the feature off (2 chirps confirmation).
NOTE: To program more features, simply repeat Steps 3 and 4. If seven seconds expirewithout any programming activity or if the ignition is turned “On”, the system will automati-cally exit Features Programming Mode. Two siren bursts confirm exit.
13
13) Canal Auxiliar Desarma La Alarma / Modo De Arranque: (•Desarma)Auxiliar con Desarme = Presione el botón de CIERRE: (1 tono de Sirena/Claxon)Modo De Arranque = Presione el botón de APERTURA: (2 tonos de Sirena/Claxon)
14) Anti-Atraco Activado Usando El Control Remoto: (•D) Activado = Presione el botón de CIERRE: (1 tono de Sirena/Claxon) Desactivado = Presione el botón de APERTURA: (2 tonos de Sirena/Claxon)
15) Anti-Atraco Activado A Través De Las Puertas Y La Ignición: (•D) Activado = Presione el botón de CIERRE: (1 tono de Sirena/Claxon) Desactivado = Presione el botón de APERTURA: (2 tonos de Sirena/Claxon)
16) Anti-Atraco Activado A Través De La Ignición: (•D) Activado = Presione el botón de CIERRE: (1 tono de Sirena/Claxon) Desactivado = Presione el botón de APERTURA: (2 tonos de Sirena/Claxon)
17) Confirmación De Sirena/Claxon Al Armar o Desarmar La Alarma: (•A) Activada = Presione el botón de CIERRE: (1 tono de Sirena/Claxon) Desactivada = Presione el botón de APERTURA: (2 tonos de Sirena/Claxon)
18) Tipo De Control Remoto: (Control de 2-Botones / •Control de 3-boto-nes)2-Botones = Presione el botón de CIERRE: (1 tono de Sirena/Claxon)3-Botones = Presione el botón de APERTURA: (2 tonos de Sirena/Claxon)
• = Significa programación de fabrica.
Mundial-4 Condensed Manual.p651/1/2009, 1:50 PM 14

14
La alarma esta equipada con PROTECCIÓN ATV y ALERTA DE PROGRAMA-CION. La protección ATV usa la luz LED para mostrar cuantos controles quepueden operar la alarma. La Alerta De Programación le avisa al usuario que uncontrol remoto ha sido programado en las ultimas 48 horas.
Nota: Al programar un control nuevo, todos los controles en la memoria seborran. Si existe algún control anterior cual desean mantener, es necessariovolver a programarlo junto con los nuevos.
1) Enciende la ignición del vehículo.
2) Antes que pasen 10 segundos, presione el botón de “Valet” 5 veces- La Sirena/Claxon emite un tono confirmando la entrada al modo.
3) Antes que pasen 10 segundos, presione el botón «PEQUEÑO» de cadacontrol remoto por programar:- Se pueden programar hasta cuatro controles remotos.- La Sirena/Claxon emite un tono cada vez que un control se ha programado.
4) La alarma automaticamente sale del modo de programación al Apagarla ignición o si pasan 17 segundos sin entrada de programación.- La Sirena/Claxon confirma la salida del modo con un tono largo.
PROGRAMACION DE LOS CONTROLES REMOTOS:
Para programar controles remotos:
14
How to Program Transmitters to the System
Step 1: Turn "On" the vehicle's ignition.
Step 2: Within 10 seconds press the Valet/Override Switch 5 times. The systemresponds with 1 siren burst to confirm Transmitter Programming Mode.
Step 3: Within 10 seconds, press the Small Button on each transmitter to be pro-grammed. The response to each is 1 and 1, 1 and 2, etc., chirps.
If 17 seconds expire without any programming activity the system will automati-cally exit Transmitter Programming Mode. Turning off the ignition switch will alsoexit the system from Transmitter Programming Mode; in either case the systemsignals the exit with 1 long siren chirp.
Unauthorized Transmitter Alert: For the next 48 hours after transmitterprogramming, every time the vehicle’s ignition is turned “On”, the system will emita series of siren chirps, and the LED Status Indicator will show the number ofprogrammed transmitters for 90 seconds instead of 10 seconds.
Whenever a transmitter, new or existing, is programmed to the system, all exist-ing codes are erased for security. So all of the transmitters which are to operatethe system, which can be up to four, must be programmed at the same time.
Mundial-4 Condensed Manual.p651/1/2009, 1:50 PM 15

StarterMotor
Relay
7.5 Amp
Siren
Pin-Switch (+)
Battery
+ Pin-Switch (-)
Pin-Switch (-)
Relay
12345678901123456789011234567890112345678901
1234567890123456789012345678901234567890
123456789011234567890112345678901
1234567890123456789012345678907.5 Amp
15 Am
p
Left Parking Lights
Right Parking Lights
Orange = Starter Kill -Grey = Auxiliary Output -Red/White = Flashing Light Input (+/-)White = Flashing Light OutputWhite = Flashing Light OutputBrown = Siren / Horn (+/-)Violet = Door Input +Black = GroundBlue = Trigger Input -Yellow = Accessory +12VGreen = Door Input -Red = +12 Volts
Door Lock Port
Sensor PortValet/OverrideSwitch
LED StatusIndicator
Siren / Horn Jumper
Bas
e(-
)H
orn
/C
laxo
n
Jumper
Bas
e(1
2 V
)S
iren
/S
irenaJumper
Mundial-4 Condensed Manual.p651/1/2009, 1:50 PM 16