multifunctional digital color systems /...
TRANSCRIPT

MULTIFUNCTIONAL DIGITAL COLOR SYSTEMS /
MULTIFUNCTIONAL DIGITAL SYSTEMS
Software Troubleshooting Guide

©2016 TOSHIBA TEC CORPORATION All rights reserved
Under the copyright laws, this manual cannot be reproduced in any form without prior written permission of TTEC.

Preface 3
Preface
Thank you for purchasing TOSHIBA Multifunctional Digital Systems or Multifunctional Digital Color Systems.
This manual describes how to troubleshoot the problems that could occur while you are using the equipment.
Some models provide the scanning/printing function as an option.
How to read this manual
Symbols in this manual
In this manual, some important items are described with the symbols shown below. Be sure to read these items
before using this equipment.
Target audience for this manual
This is a manual that is aimed at general users and administrators.
Model and series names in this manual
In this manual, each model name is replaced with a series name as shown below:
Optional equipment
For the available options, refer to the Quick Start Guide.
Screens in this manual
The details on the screens may differ depending on how the equipment is used, such as the status of the installed
options, the OS version and the applications.
The illustration screens used in this manual are for paper in the A/B format. If you use paper in the LT format, the
display or the order of buttons in the illustrations may differ from that of your equipment.
Abbreviations in this manual
In this manual, “Dual Scan Document Feeder” (DSDF) and “Reversing Automatic Document Feeder” (RADF) are
collectively referred to as “Automatic Document Feeder” (ADF).
Indicates a potentially hazardous situation which, if not avoided, could result in death, serious
injury, or serious damage, or fire in the equipment or surrounding objects.
Indicates a potentially hazardous situation which, if not avoided, may result in minor or
moderate injury, partial damage to the equipment or surrounding objects, or loss of data.
Indicates information to which you should pay attention when operating the equipment.
Describes handy information that is useful to know when operating the equipment.
Pages describing items related to what you are currently doing. See these pages as required.
Model name Series name in this manual
e-STUDIO2000AC/2500AC e-STUDIO5005AC Series
e-STUDIO2505AC/3005AC/3505AC/4505AC/5005AC
e-STUDIO2008A/2508A/3008A/3508A/4508A/5008A e-STUDIO5008A Series
e-STUDIO5506AC/6506AC/7506AC e-STUDIO7506AC Series
e-STUDIO5508A/6508A/7508A/8508A e-STUDIO8508A Series

4 Preface
Trademarks
For trademarks, refer to the Safety Information.

CONTENTS 5
CONTENTS
Preface................................................................................................................................................. 3
How to read this manual ............................................................................................................................................ 3
Chapter 1 CONFIRMING JOB STATUS ON THE TOUCH PANEL
Confirming Job Statuses of Printing/Copying/Scanning/Faxing................................................................. 8
Confirming jobs in progress or ones in waiting.......................................................................................................... 8
Confirming job history ............................................................................................................................................... 13
Confirming the status of drawers.............................................................................................................................. 14
Confirming amount of toner remaining ................................................................................................................... 15
Chapter 2 TROUBLESHOOTING FOR COPYING
Copying Problems ............................................................................................................................... 18
Chapter 3 TROUBLESHOOTING FOR PRINTING
Print Job Problems.............................................................................................................................. 24
Clearing print job errors ............................................................................................................................................ 24
Cannot remember the document password for a Private Print job........................................................................ 25
Printing a document including many graphics takes time...................................................................................... 25
Does not output even when you enter your department code on Mac OS............................................................. 25
Printer Driver Problems....................................................................................................................... 26
Cannot print (port setting problems) ....................................................................................................................... 26
Cannot print (SNMP Community Name problems).................................................................................................. 26
Command line options not processed...................................................................................................................... 26
Retrieval of printer configuration failed ................................................................................................................... 27
Cannot change settings on the [Device Settings] tab .............................................................................................. 27
Network Connection Problems............................................................................................................. 28
Cannot print with the equipment (network connection problems) ....................................................................... 28
Cannot print with SMB print...................................................................................................................................... 28
Client Problems .................................................................................................................................. 29
Checking the client status ......................................................................................................................................... 29
Hardware Problems ............................................................................................................................ 30
Print jobs not output ................................................................................................................................................. 30
Chapter 4 TROUBLESHOOTING FOR SCANNING
Scanning Problems.............................................................................................................................. 32
Cannot E-mail my scans ............................................................................................................................................ 32
Cannot find the data saved in the shared folder...................................................................................................... 32
Cannot perform scanning from a PC with Office 2013 ............................................................................................. 32
OCR does not work well............................................................................................................................................. 33
Chapter 5 TROUBLESHOOTING FOR e-Filing
e-Filing Web Utility Problems ............................................................................................................... 36
e-Filing Web Utility terminates the session .............................................................................................................. 36
Numerous sub windows repeatedly appear ............................................................................................................ 36
Displaying the items in the Contents Frame takes a long time ............................................................................... 36
Error messages........................................................................................................................................................... 37

6 CONTENTS
Chapter 6 TROUBLESHOOTING FOR NETWORK CONNECTIONS
Locating the Equipment in the Network ................................................................................................ 40
Cannot locate the equipment in the network .......................................................................................................... 40
Cannot locate the equipment with Local Discovery ................................................................................................ 41
Equipment does not respond to ping command ..................................................................................................... 42
LDAP Search and Authentication Problems............................................................................................ 43
Network shutdown occurs or touch panel disabled after LDAP search.................................................................. 43
LDAP authentication takes a long time .................................................................................................................... 43
Printing Problems (Network Related) ................................................................................................... 44
SMB print in a Windows operating system environment......................................................................................... 44
Raw TCP or LPR print in a Windows operating system environment...................................................................... 45
IPP print in a Windows operating system environment .......................................................................................... 45
Novell print in a NetWare environment .................................................................................................................... 46
Mac OS environment ................................................................................................................................................. 46
UNIX/Linux environment ........................................................................................................................................... 47
Network Fax (N/W-Fax) Driver Problems ............................................................................................... 48
N/W-Fax driver installation error messages ............................................................................................................. 48
N/W-Fax driver general errors ................................................................................................................................... 49
Client Software Authentication Problems ............................................................................................. 50
Cannot log in using client software........................................................................................................................... 50
Printing can be made even with incorrect user name and password..................................................................... 50
Wireless LAN Connection Problems....................................................................................................... 51
Cannot connect to the MFP ....................................................................................................................................... 51
Chapter 7 TROUBLESHOOTING FOR FAXING
Faxing Problems ................................................................................................................................. 54
Error codes ................................................................................................................................................................. 54
Error messages........................................................................................................................................................... 54
Transmission/reception trouble ............................................................................................................................... 55
Chapter 8 CHECKING THE EQUIPMENT STATUS WITH TopAccess
Hardware Status Icons on TopAccess [Device] Tab ................................................................................. 58
Error Messages ................................................................................................................................... 60
Error Codes......................................................................................................................................... 62
Error codes on print jobs ........................................................................................................................................... 62
Error codes on transmission and reception ............................................................................................................. 64
Error codes on scan jobs............................................................................................................................................ 67
Chapter 9 WHEN SOMETHING IS WRONG WITH THE EQUIPMENT
When You Think Something Is Wrong With the Equipment ...................................................................... 76
General operations .................................................................................................................................................... 76
INDEX .......................................................................................................................................................... 79

1.CONFIRMING JOB STATUS ON THE TOUCH
PANEL
This chapter describes how to confirm the processing status and the history of jobs performed, and the amount of
toner remaining in the toner cartridges.
Confirming Job Statuses of Printing/Copying/Scanning/Faxing..............................................8Confirming jobs in progress or ones in waiting....................................................................................................8
Confirming job history .........................................................................................................................................13
Confirming the status of drawers........................................................................................................................14
Confirming amount of toner remaining .............................................................................................................15

8 Confirming Job Statuses of Printing/Copying/Scanning/Faxing
0.Confirming Job Statuses of Printing/Copying/Scanning/Faxing
You can confirm print/copy/scan/fax jobs in progress or ones in waiting on the touch panel. Also, you can delete,
pause or resume jobs in waiting, and change their order.
You can also confirm the history of jobs performed, the status of drawers and the amount of toner remaining in the
toner cartridges.
When this equipment is managed with the user management function or the department management function,
you can only check jobs or the status of this equipment if you are not logging into this equipment.
When this equipment is managed with the user management function, jobs in waiting only for a user who has
logged in can be deleted, paused or their order changed, and the job history only for such a user is displayed on the
print log list.
However, if the user has an administrator privilege, all jobs in waiting can be deleted, paused or their order
changed, and the entire job history is displayed on the print log list.
Confirming jobs in progress or ones in waitingYou can confirm the jobs in progress or the ones in waiting on the touch panel.
1 To view them, press [Job Status].
2 Press the job type you want to check on the [Jobs] tab.The job list appears. Copy jobs appear on the print job list as well as print jobs.
[Print] : The print job list appears. On the print job list, you can confirm the icon of the job type, the name of the
user who sent the job, the date and time the job was sent, the paper size, the number of pages and copy/print
sets and the processing status. In the [Status] column for the scheduled print job, “Scheduled” is displayed.
[Fax] : The fax job list appears. In the list, you can view the file No., destination, date and time, number of pages
and current status.
[Scan] : The scan job list appears. In the list, you can view the destination/file name of each job, agent (scan
function), date and time, number of pages, and current status.
You can view up to 1000 jobs. Press [Close]. The menu returns to the one shown before you pressed [Job Status].

1.CONFIRMING JOB STATUS ON THE TOUCH PANEL
Confirming Job Statuses of Printing/Copying/Scanning/Faxing 9
CO
NF
IRM
ING
JO
B S
TA
TU
S O
N T
HE
TO
UC
H P
AN
EL
Depending on your login status or job setting, the list above may not display the jobs that require authentication,
including private print or fax Secure Receive.
To view these jobs, go to the [Print Mode] screen.
For more instruction, refer to the Printing Guide or the GD-1370 Fax Guide.
For job authentication setting, refer to the TopAccess Guide.
Deleting jobs
You can delete jobs that you no longer need.
1 Select the desired job on the job list, and then press [Delete].
You can select more than one job.
2 Press [Delete].
The job is now deleted.

1.CONFIRMING JOB STATUS ON THE TOUCH PANEL
10 Confirming Job Statuses of Printing/Copying/Scanning/Faxing
Pausing jobs
Jobs whose status is “Wait” can be held in the queue (Pausing).
Select the desired job on the job list, and then press [Pause].
You can pause a job which is positioned at the eleventh or later place from the running job and whose status is “Wait”.
The job is now paused. The paused job is not printed even when its turn comes. Printing of the next job starts.
Resuming the paused job
Select the desired job, and then press [Resume].
1.CONFIRMING JOB STATUS ON THE TOUCH PANEL
Confirming Job Statuses of Printing/Copying/Scanning/Faxing 11
CO
NF
IRM
ING
JO
B S
TA
TU
S O
N T
HE
TO
UC
H P
AN
EL
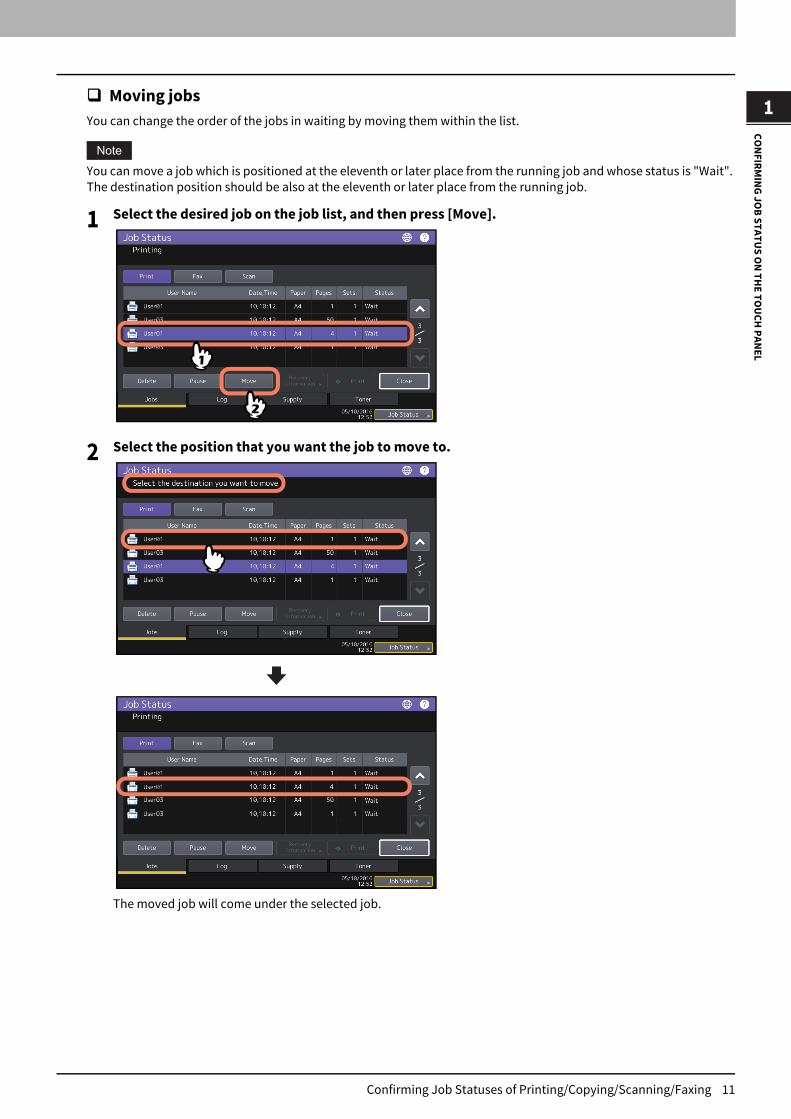
Moving jobs
You can change the order of the jobs in waiting by moving them within the list.
You can move a job which is positioned at the eleventh or later place from the running job and whose status is "Wait".
The destination position should be also at the eleventh or later place from the running job.
1 Select the desired job on the job list, and then press [Move].
2 Select the position that you want the job to move to.
The moved job will come under the selected job.

1.CONFIRMING JOB STATUS ON THE TOUCH PANEL
12 Confirming Job Statuses of Printing/Copying/Scanning/Faxing
Confirming the information of a skipped job
Jobs may not be performed for the reason including the shortage of specified paper or staples. These will be
automatically skipped and the next job will be performed (Job Skip function). Check on the touch panel how you can
recover the suspended jobs. For how to set the Job Skip function, refer to the MFP Management Guide.
1 Select the skipped job in the job list, and press [Recovery Information].
2 Resolve the cause of the skip following the instructions on the screen.
If multiple causes exist, the second cause is displayed after you resolve the first one. Resolve all causes
accordingly.
In addition to the Job Skip function, the equipment provides you with some settings to avoid frequent job
suspends. For example, the Automatic Change of Paper Source function (Feeding the same size of paper from a
different drawer even if the specified drawer from which paper is being fed is empty) makes printing continue
even when paper runs out. Moreover, if staples run out or the punch waste tray becomes full, you can continue
printing without stapling or hole punching. For more details, refer to the MFP Management Guide.

1.CONFIRMING JOB STATUS ON THE TOUCH PANEL
Confirming Job Statuses of Printing/Copying/Scanning/Faxing 13
CO
NF
IRM
ING
JO
B S
TA
TU
S O
N T
HE
TO
UC
H P
AN
EL
Confirming job historyYou can confirm the history of jobs performed on the touch panel.
1 Press [Job Status] > the [Log] tab.
2 Select the type of job you want to confirm.
The log list appears. Copy jobs appear on the print log list as well as print jobs. Concerning fax and internet fax,
Send and Receive are displayed individually.
On the log list, you can confirm the icon of the job type, the name of the user who performed the job, the date and
time the job was printed, the paper size and the number of pages or copy/print sets. To print the history
displayed on [Send Log] or [Receive Log], press [Journal].
To add the information to the address book including phone number or E-mail address displayed on [Send Log],
[Receive Log] or [Scan Log], press [Entry]. For more instructions, refer to the MFP Management Guide.

1.CONFIRMING JOB STATUS ON THE TOUCH PANEL
14 Confirming Job Statuses of Printing/Copying/Scanning/Faxing
When you finish the confirmation, press [Close] so that the menu returns to the one in step 2, and then press
[Close]. The menu returns to the one shown before you pressed [Job Status].
For details on the job history displayed on the log screen, refer to the TopAccess Guide.
For details on the error codes displayed in [Status], see the following section:
P.62 “Error Codes”
You can export the job history to USB. For more details, refer to the MFP Management Guide.
Confirming the status of drawersYou can confirm the size and type-setting of the paper or the amount remaining in the drawers. During printing you
can confirm which drawer is feeding paper.
1 Press [Job Status] > the [Supply] tab.
During printing, the button for the drawer from which the paper is fed is highlighted.
Press [Close] when you finish the confirmation. The menu returns to the one shown before you pressed [Job
Status].
When [Job Status] blinks
When the paper in the drawer has run out during printing, [Job Status] on the touch panel blinks. In this case, press
[Job Status] so that the menu for displaying the printing status will appear and the button for the drawer whose paper
has run out will blink on this menu. Printing resumes when you add paper to this drawer.

1.CONFIRMING JOB STATUS ON THE TOUCH PANEL
Confirming Job Statuses of Printing/Copying/Scanning/Faxing 15
CO
NF
IRM
ING
JO
B S
TA
TU
S O
N T
HE
TO
UC
H P
AN
EL
Confirming amount of toner remainingYou can confirm the approximate amount of toner remaining in the toner cartridge.
1 Press [Job Status] > the [Toner] tab.
Press [Close] when you finish the confirmation. The menu returns to the one shown before you pressed [Job
Status].

1.CONFIRMING JOB STATUS ON THE TOUCH PANEL
16 Confirming Job Statuses of Printing/Copying/Scanning/Faxing

2.TROUBLESHOOTING FOR COPYING
This chapter describes how to troubleshoot copying and copy output problems.
Copying Problems ............................................................................................................18
18 Copying Problems
0.Copying Problems
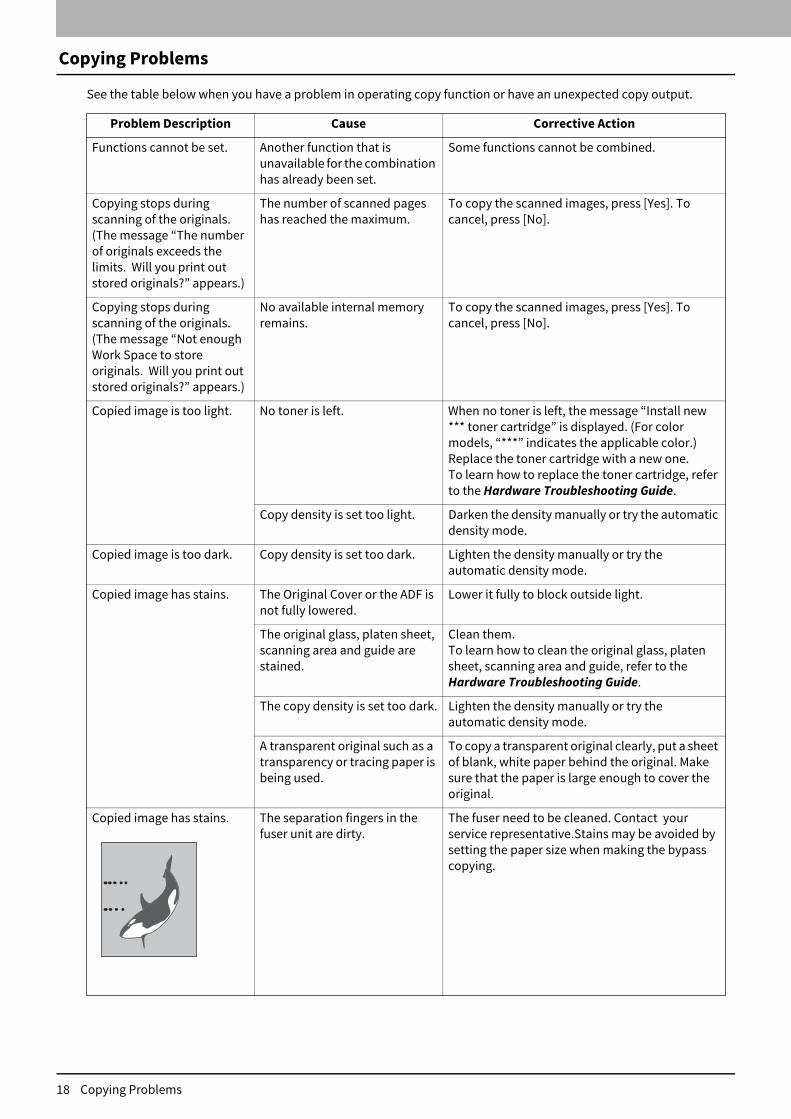
See the table below when you have a problem in operating copy function or have an unexpected copy output.
Problem Description Cause Corrective Action
Functions cannot be set. Another function that is
unavailable for the combination
has already been set.
Some functions cannot be combined.
Copying stops during
scanning of the originals.
(The message “The number
of originals exceeds the
limits. Will you print out
stored originals?” appears.)
The number of scanned pages
has reached the maximum.
To copy the scanned images, press [Yes]. To
cancel, press [No].
Copying stops during
scanning of the originals.
(The message “Not enough
Work Space to store
originals. Will you print out
stored originals?” appears.)
No available internal memory
remains.
To copy the scanned images, press [Yes]. To
cancel, press [No].
Copied image is too light. No toner is left. When no toner is left, the message “Install new
*** toner cartridge” is displayed. (For color
models, “***” indicates the applicable color.)
Replace the toner cartridge with a new one.
To learn how to replace the toner cartridge, refer
to the Hardware Troubleshooting Guide.
Copy density is set too light. Darken the density manually or try the automatic
density mode.
Copied image is too dark. Copy density is set too dark. Lighten the density manually or try the
automatic density mode.
Copied image has stains. The Original Cover or the ADF is
not fully lowered.
Lower it fully to block outside light.
The original glass, platen sheet,
scanning area and guide are
stained.
Clean them.
To learn how to clean the original glass, platen
sheet, scanning area and guide, refer to the
Hardware Troubleshooting Guide.
The copy density is set too dark. Lighten the density manually or try the
automatic density mode.
A transparent original such as a
transparency or tracing paper is
being used.
To copy a transparent original clearly, put a sheet
of blank, white paper behind the original. Make
sure that the paper is large enough to cover the
original.
Copied image has stains. The separation fingers in the
fuser unit are dirty.
The fuser need to be cleaned. Contact your
service representative.Stains may be avoided by
setting the paper size when making the bypass
copying.

2.TROUBLESHOOTING FOR COPYING
Copying Problems 19
TR
OU
BL
ES
HO
OT
ING
FO
R C
OP
YIN
G
Copy image is skewed. The original is sent from the ADF
at a skew.
Replace the original while aligning the side
guides of the ADF to its width so that it will be
placed straight.
The gap between the paper and
the side guides in the drawer or
the bypass tray is too large.
Adjust the gap between the paper and the side
guides so that it becomes appropriate.
For details, refer to the Paper Preparation Guide.
Copied image is partially
missing.
The size or orientation of the
copy paper and that of the
original are not consistent. The
reduction ratio is not properly
set.
Fit the copy paper size to the original or set the
reduction ratio for the copy paper.
The binding margin is too wide. Set the binding margin width to fully cover the
original.
For details, refer to the Copying Guide.
The original is larger than the
printable area.
The outside part of the printable area cannot be
copied. The Full Image function enables you to
copy the whole image of the original in the 95 -
99% reduction ratio.
Copied image is blurred. There is a gap between the
original glass and the original.
Lower the Original Cover or the ADF fully so that
the original fully contacts the platen glass.
The copy paper is damp. Replace it with dry copy paper.
Copied image has
unevenness in the
horizontal direction.
The main charger is stained. Clean the main charger.
To learn how to clean the main charger, refer to
the Hardware Troubleshooting Guide.
Problem Description Cause Corrective Action
2.TROUBLESHOOTING FOR COPYING
20 Copying Problems
Copied image has black
streaks in the horizontal
direction.
The scanning area or guides are
stained.
Clean them.
To learn how to clean the scanning area or
guides, refer to the Hardware Troubleshooting Guide.
Fine dust can cause
conspicuous scan noise on
images while scanning originals
with the ADF at copying.
Set ADF Noise Reduction to reduce scan noise
which can be caused while scanning originals.
For details, refer to the Copying Guide and the
MFP Management Guide.
Copied image has white
streaks or color streaks in
the horizontal direction.
The main charger, LED print
head or slit glass is stained.
Clean the main charger, LED print head or slit
glass.
To learn how to clean them, refer to the
Hardware Troubleshooting Guide.
When copying from the
bypass tray, the area around
a solid color image is
slightly stained in images
located on the back side of a
2-sided copy.
A misalignment occurred in the
output of the back side because
of dry sheet as a result of low
humidity.
For thick paper, copy the back side by selecting
“(BACK)” for paper type.
For plain paper, make 2-sided copy using the
automatic duplexing unit.
For details on the paper types when copying from
the bypass tray, refer to the Copying Guide.
A color original is copied in
black and white even if
[Auto Color] is selected for
the color mode.
Some color originals may be
copied in black and white:
Originals with very little
colored part
Overall blackish originals
Originals in light color
Set the color mode to [Full Color].
You can change the criterion for determining
whether an original is black and white or color.
For further information, refer to the MFP Management Guide.
A black-and-white original is
copied in color even if [Auto
Color] is selected for the
color mode.
Some black and white originals
may be copied in color:
Yellowed originals
Originals with background
color
Set the color mode to [Black].
You can change the criterion for determining
whether an original is black and white or color.
For further information, refer to the MFP Management Guide.
Problem Description Cause Corrective Action

2.TROUBLESHOOTING FOR COPYING
Copying Problems 21
TR
OU
BL
ES
HO
OT
ING
FO
R C
OP
YIN
G
Copied images are skewed
against the paper.
The paper in the drawer is fed
on the skew.
Check and adjust the space between the paper
and the side guides not to take much space.
Copied paper is wrinkled. The paper in the drawer is fed
on the skew.
Check and adjust the space between the paper
and the side guides not to take much space.
The paper in the drawer is
damp.
Place paper newly opened from the wrapping.
Note the following points in storing the excess
paper.
Wrap the paper in its wrapping to keep it free
from dust.
Avoid direct sunlight.
Store in a damp-free space.
To prevent paper from being folded or bent,
store it in a flat place.
Problem Description Cause Corrective Action

2.TROUBLESHOOTING FOR COPYING
22 Copying Problems

3.TROUBLESHOOTING FOR PRINTING
This chapter describes how to troubleshoot printing problems.
Print Job Problems...........................................................................................................24Clearing print job errors ......................................................................................................................................24
Cannot remember the document password for a Private Print job..................................................................25
Printing a document including many graphics takes time................................................................................25
Printer Driver Problems ....................................................................................................26Cannot print (port setting problems) .................................................................................................................26
Cannot print (SNMP Community Name problems)............................................................................................26
Command line options not processed................................................................................................................26
Retrieval of printer configuration failed .............................................................................................................27
Cannot change settings on the [Device Settings] tab ........................................................................................27
Network Connection Problems ..........................................................................................28Cannot print with the equipment (network connection problems) .................................................................28
Cannot print with SMB print................................................................................................................................28
Client Problems................................................................................................................ 29Checking the client status ...................................................................................................................................29
Hardware Problems..........................................................................................................30Print jobs not output ...........................................................................................................................................30

24 Print Job Problems
0.Print Job Problems
This section describes how to clear the print jobs errors.
Clearing print job errors
Problem Description
A print job error occurs and [Job Status] blinks when the paper specified by the computer is not set in the drawers of
the equipment.
Corrective Action
Clear the error following the procedure below.
To print by placing paper on the bypass tray
1 Press the [Job Status] which is blinking.
2 Place paper of the size specified with the computer on the bypass tray, and press the [START] button.Printing is performed. Press [Job Status] when printing has been completed.
Printing by selecting a paper size already placed in another drawer
You can perform printing with the paper already placed in the drawers. Some part of the image may not be printed,
however, if the paper size in the drawer is smaller than the one you have specified.
1 Press the drawer button you intend to use on the touch panel.
2 Press the [START] button.

3.TROUBLESHOOTING FOR PRINTING
Print Job Problems 25
TR
OU
BL
ES
HO
OT
ING
FO
R P
RIN
TIN
G
Cannot remember the document password for a Private Print job
Problem Description
I cannot remember the document password for my Private Print job.
Corrective Action
The document password for a Private Print job is never shown, once the job has been sent to the equipment.
To print the failed Private Print job, submit the document again as a new Private Print job.
The failed Private Print job remains unprinted in the job queue. To delete it, either way below is required. Contact the
administrator of the equipment.
Enter the administrator’s password in the Private Print job list on the touch panel and delete the job.
For details, refer to the Printing Guide.
Log in to TopAccess with the administrator’s password and delete the job in the Print Job list.
For details, refer to the TopAccess Guide.
Printing a document including many graphics takes time
Problem Description
It takes time to print a document including many graphics from a Universal Printer Driver (PCL6).
Corrective Action
Since this may happen occasionally, clear the [JPEG Compression] check box of the [PDL Settings] tab in
[Customization] of the [Device Settings] tab before printing such documents.
Does not output even when you enter your department code on Mac OS
Problem Description
Print jobs are not output even when you enter your department code and print it on Mac OS.
Corrective Action
The entered department code may not be correct. Confirm your department code.
If the department code is not correct, print jobs are processed according to the settings ([Department Setting] -
[Invalid Department Code Print Job] from TopAccess). For details, refer to the TopAccess Guide.

26 Printer Driver Problems
0.Printer Driver Problems
This section describes the troubleshooting for the printer drivers.
For the error messages that appear during the installation of the printer drivers, refer to the Software Installation Guide.
Cannot print (port setting problems)
Problem Description
I cannot perform printing with the equipment.
Corrective Action
If the printer driver on the client computer points to a wrong network port, jobs neither appear in the current jobs
queue nor are printed. Fix the problem following the procedure below:
1 Open the Printers folder from the Control Panel.
2 Right-click the printer driver icon.
3 Select Printer properties from the shortcut menu.
4 Select the [Ports] tab, and then check the port is properly configured.
5 Click the [General] tab and click [Print Test Page] to confirm that the settings are correct.
Cannot print (SNMP Community Name problems)
Problem Description
I cannot perform printing with the equipment.
Corrective Action
Check if the SNMP community names are the same in the following 3 settings.
Equipment
TCP/IP port of the [Ports] tab in the printer driver
[SNMP Settings] dialog box of the [Others] tab in the printer driver
Command line options not processed
Problem Description
All the print options are sent to the equipment at the beginning of the print job. If the print file already contains print
commands, they overwrite the command line options you set. For example, if the print file specifies A4 paper, and you
specify A3 paper with the lp command, the document is printed on A4 paper.
Corrective Action
Change the properties of the document you intend to print to create another print file. Submit the print job using the
lp command without setting additional parameters.

3.TROUBLESHOOTING FOR PRINTING
Printer Driver Problems 27
TR
OU
BL
ES
HO
OT
ING
FO
R P
RIN
TIN
G
Retrieval of printer configuration failed
Problem Description
When accessing the printer properties, the message “Retrieval of printer configuration failed” is displayed.
Corrective Action
The printer driver cannot communicate with the equipment. Try the steps in the checklist below.
Cannot change settings on the [Device Settings] tab
Problem Description
The [Device Settings] tab is grayed out and their settings cannot be changed.
Corrective Action
Users who do not have the privilege to change the printer driver setting cannot change the options in the [Device
Settings] tab. Please log in with the Administrator.
No. Check... Yes No Corrective Action
1 Is the equipment turned on? Next
Step
Turn on the equipment.
2 Can you connect the computer to the
equipment via TopAccess?
Next
Step
Restart the equipment.
3 Does the same message appear again
when you access the property of the
printer driver? End
1. Press [Refresh] on the [Device Settings]
tab to search the printer.
2. If the printer is not found, check the
printer driver port assignment and
make sure that it is correct.

28 Network Connection Problems
0.Network Connection Problems
This section describes the troubleshooting for printing in the network connection environment.
See also the checklists by types of printing and operating systems on P.44 “Printing Problems (Network Related)”
Cannot print with the equipment (network connection problems)
Problem Description
I cannot perform printing with the equipment.
Corrective Action
See the checklist below to determine if the cause of the problem is related to a network.
If it is, see P.44 “Printing Problems (Network Related)”. In that section, several OS- and printing method-based
check lists are provided to help you find the appropriate action to take.
Cannot print with SMB print
Problem Description
When an attempt is made to print a document using an SMB connection, the job cannot be printed and such messages
continuously appear as “No more connections can be made to this remote computer” or “Your file could not be
printed due to an error”.
Corrective Action
SMB print is supposed to be utilized in a small network. If you can use Windows Vista, Windows 7, Windows 10,
Windows Server 2008, or Windows Server 2012 as a print server, printing via the Windows Print Server is
recommended.
If you cannot use the Windows Print Server in your network, use LPR print instead.
No. Check... Yes No Corrective Action
1 Have you set the protocol settings so they
are compatible with your network and
client protocol settings?
Next
Step
Set up the proper protocol.
2 Have you set up the appropriate type(s) of
print services that should be supported?
Next
Step
Check the settings required for your
printing environment.
3 Have you checked the gateway and
subnet settings to make sure that the
equipment is part of the same network
gateway as the client from which you are
trying to print?
Next
Step
Set up the TCP/IP correctly.
4 Are other services and communications
performed over the network behaving in
the normal and expected manner? End
See P.44 “Printing Problems (Network
Related)” or refer to your network
documentation.
Use a network diagnostic utility to identify
the network problem.

TR
OU
BL
ES
HO
OT
ING
FO
R P
RIN
TIN
G
Client Problems 29
0.Client Problems
This section describes how to identify and correct the problems caused by the clients* connected to the equipment.* One of the common examples of clients is a computer that sends a print job to the equipment and makes it perform printing.
Checking the client statusThe printing problems are caused by the printer driver settings, network settings, errors in the network connections,
and so forth. First, contact the administrator of the equipment to see if there is one of these kinds of problems, or see
the following sections:
P.26 “Printer Driver Problems”
P.28 “Network Connection Problems”
P.44 “Printing Problems (Network Related)”
Another possible cause is one related to a client. If the print jobs sent from a specific client within a network fail, the
problem may be caused by the client.
Problem Description
The jobs sent from a client cannot be printed.
Corrective Action
The checklist below will help you identify the cause of the error and direct you to information resolving the problem. If
the problem persists after you have followed all of the steps, contact your service representative.
No. Check... Yes No Corrective Action
1 Does the equipment work properly? Are
copy jobs output properly?Next
Step
Check the device status displayed in the
Device page of TopAccess.
P.58 “Hardware Status Icons on
TopAccess [Device] Tab”
2 See the Device page of TopAccess. Are the
options specified for the job supported by
the hardware configuration?
Next
Step
If not, delete the job, install the required
components, and try again. Contact your
service representative for further
information.
3 Can you print the jobs from other clients?Next
Step
See the following section to fix the
problem.
P.28 “Cannot print with the equipment
(network connection problems)”
4 Have you ever printed successfully from
this client?Next
Step
See the following section to fix the
problem.
P.26 “Cannot print (port setting
problems)”
5 Did you set up the printer driver other
than by an SMB connection?
Next
Step
See the following section to fix the
problem.
P.28 “Cannot print with SMB print”
6 (For Mac OS only)
Is the equipment displayed in Printers &
Scanners?
Next
Step
Refer to the Software Installation Guide.
7 The problem is most likely to be related to a client-side error. Refer to the Printing Guide to fix the problem.

30 Hardware Problems
0.Hardware Problems
This section describes troubles caused by the hardware device (the equipment).
If an icon or a message indicating an error is not displayed, or the problems in the printer drivers or the network
connection cannot be specified, a hardware problem is a possible cause of the trouble.
The following are common factors involved in the hardware problems:
System board, cables, and connectors
The equipment, and its components such as the duplexing unit or the Finisher
System software or firmware of the equipment
For more details, refer to the Hardware Troubleshooting Guide.
Print jobs not output
Problem Description
All the clients within a network fail to make the equipment output the print jobs.
Corrective Action
There remains a possibility that improper settings of the software such as printer drivers caused the problem.
However, a hardware error is possible, if none of the clients can print the jobs. Try the steps on the checklist below. If
the problem persists after you have followed all of the steps, contact your service representative.
Also refer to the Printing Guide for more information on resolving output errors caused by printer driver settings.
No. Check... Yes No Corrective Action
1 Is printing prohibited from all connected
client computers?
Next
Step
See the following section to fix the
problem:
P.28 “Network Connection Problems”
2 Can you see the job from TopAccess or
another print monitoring utility, such as
PCONSOLE or Print Manager?
Next
Step
See the following section to fix the
problem:
P.40 “Locating the Equipment in the
Network”
3 Can you identify the problem with the
error message or the error code and
resolve it?End
See the following sections to fix the
problem:
P.60 “Error Messages”
P.62 “Error Codes”

4.TROUBLESHOOTING FOR SCANNING
This chapter describes how to troubleshoot scanning problems.
Scanning Problems...........................................................................................................32Cannot E-mail my scans ......................................................................................................................................32
Cannot find the data saved in the shared folder................................................................................................32
Cannot perform scanning from a PC with Office 2013 .......................................................................................32
OCR does not work well.......................................................................................................................................33

32 Scanning Problems
0.Scanning Problems
This section describes troubleshooting for using scan data.
Cannot E-mail my scans
Problem Description
I have scanned a document and sent the copy as an E-mail attachment, but the E-mail does not reach the specified e-
mail address.
Corrective Action
Check the following points:
The correct E-mail addresses are specified.
The equipment is correctly configured for and connected to the network.
For the SMTP Client settings, the SMTP server address is correctly set.
For the SMTP Client settings, the Port Number is correctly set.
For the SMTP Client settings, the settings for SSL and/or authentication are correctly set.
The data size of the attached file is smaller than/equal to the maximum data size receivable on the recipient’s side.
For details on the network settings, refer to the TopAccess Guide.
For details on E-mailing the scanned image, refer to the Scanning Guide.
Cannot find the data saved in the shared folder
Problem Description
I have scanned a document and saved the copy in the shared folder of the equipment, but cannot locate the saved file.
Corrective Action
For Windows OS, search the network for the equipment using the search function of Explorer. The data are stored
in the equipment’s shared folder named “FILE_SHARE.”
For Mac OS, make sure that the OS version is Mac OS X 10.6.8 or later.
If you cannot find the equipment on the network, make sure that the SMB Server Protocol setting is enabled on
TopAccess.
For details on the network settings, refer to the TopAccess Guide.
For details on storing the scanned image, refer to the Scanning Guide.
Cannot perform scanning from a PC with Office 2013
Problem Description
I cannot perform scanning from the equipment in a PC with Office 2013.
Corrective Action
Install an addin to invoke a scan driver for the equipment.
For details on how to install the addin, refer to the Software Installation Guide.
If the addin is not included in your DVD, contact your service technician.

4.TROUBLESHOOTING FOR SCANNING
Scanning Problems 33
TR
OU
BL
ES
HO
OT
ING
FO
R S
CA
NN
ING
OCR does not work well
Problem Description
OCR does not work after scanning an original.
Corrective Action
Check the following points:
The OCR option is installed in the equipment.
The OCR setting is enabled.
Fix the OCR settings as follows:
Set the language setting for OCR to fit the original language.
Enable auto rotation for OCR.
Increase the scanning resolution.
When scanning documents using the ADF, set the scanning density to be lower than the middle.
For the OCR option, contact your service representative.
To learn how to enable OCR or set the scanning resolution/density, refer to the Scanning Guide.
OCR results may be incorrect depending on the conditions of your originals or scanning conditions regardless of the
settings on this equipment.

4.TROUBLESHOOTING FOR SCANNING
34 Scanning Problems
5.TROUBLESHOOTING FOR e-Filing
This chapter describes how to troubleshoot e-Filing problems.
e-Filing Web Utility Problems ............................................................................................36e-Filing Web Utility terminates the session ........................................................................................................36
Numerous sub windows repeatedly appear ......................................................................................................36
Displaying the items in the Contents Frame takes a long time .........................................................................36
Error messages.....................................................................................................................................................37

36 e-Filing Web Utility Problems
0.e-Filing Web Utility Problems
This section describes troubleshooting for the web browser-based e-Filing web utility. You will also find the error
messages and the corrective actions for each message.
e-Filing Web Utility terminates the session
Problem Description
The message “This operation will end your e-Filing session.” appears and e-Filing Web Utility returns to its top page.
Corrective Action 1
Clicking the [Return], [Refresh], and [home] button or [login] link leads to this message and e-Filing Web Utility returns
to its top page. In this case, try again to do the operation you intended.
Corrective Action 2
Closing the window by clicking the [x] button of the browser leads to the message “This operation will end your
e-Filing session.” and the e-Filing session ends.
Finish your current operation before you close the window.
Corrective Action 3
Operating the main window while the sub window is displayed leads to the message “This operation will end your
e-Filing session.” and the processing displayed on the sub window ends.
Do not operate the main window until the processing on the sub window has been completed.
Numerous sub windows repeatedly appear
Problem Description
Numerous sub windows repeatedly appear and e-Filing becomes uncontrollable.
Corrective Action
Close all the windows and exit from the web browser. Then restart the browser and clear the cookie files from
“Internet Option” (for Internet Explorer).
Displaying the items in the Contents Frame takes a long time
Problem Description
Displaying the items in the Contents Frame takes a long time.
Corrective Action
Displaying more than 100 items in the Contents Frame may take a long time. A smaller number of items shortens the
time for displaying.

5.TROUBLESHOOTING FOR e-Filing
e-Filing Web Utility Problems 37
TR
OU
BL
ES
HO
OT
ING
FO
R e
-Filin
g
Error messagesSee the table below to troubleshoot the problem if a message appears.
Message Corrective Action
Internal error occurred. Please restart e-Filing. Turn the power of the equipment OFF and then ON and
then try again. If the error message is still displayed,
contact your system administrator or contact your
dealer for support.
Your e-Filing Session has Timed Out. Please Restart. Exit from e-Filing and change the session timer setting
to be longer on the Setup page of the TopAccess
Administrator mode. Then restart it.
The items have been modified. The items are currently being modified by another user.
Try again after the other user has finished.
Cannot start e-Filing Session. The Disk is Full. Erase unnecessary data. For instructions, refer to the
e-Filing Guide.
Cannot create a Box. The Disk is full. Erase unnecessary data using the administrative
function or deleting the data in boxes for making hard
disk space.
Cannot create a Folder. The Disk is full. Erase unnecessary data using the administrative
function or deleting the data in boxes for making hard
disk space.
Cannot edit the Document. The Disk is full. Erase unnecessary data using the administrative
function or deleting the data in boxes for making hard
disk space.
Cannot insert Page. The Disk is full. Erase unnecessary data using the administrative
function or deleting the data in boxes for making hard
disk space.
Cannot archive Documents. The Disk is full. Erase unnecessary data using the administrative
function or deleting the data in boxes for making hard
disk space.
Cannot upload archived file. The Disk is full. Erase unnecessary data using the administrative
function or deleting the data in boxes for making hard
disk space.
Cut failed. Disk is full. Erase unnecessary data using the administrative
function or deleting the data in boxes for making hard
disk space.
Copy failed. Disk is full. Erase unnecessary data using the administrative
function or deleting the data in boxes for making hard
disk space.
Paste failed. Disk is full. Erase unnecessary data using the administrative
function or deleting the data in boxes for making hard
disk space.
Save failed. Disk is full. Erase unnecessary data using the administrative
function or deleting the data in boxes for making hard
disk space.
Cannot create a Folder. Maximum number of folders
has been reached.
Delete unnecessary folders and create a new folder. You
can create up to 100 folders in each box.
Cannot create a Document. Maximum number of
documents has been reached.
Delete unnecessary documents and create a new
document. You can create up to 400 documents in each
box and folder.

5.TROUBLESHOOTING FOR e-Filing
38 e-Filing Web Utility Problems
Cannot insert Page. Maximum number of pages has
been reached.
Delete unnecessary pages and insert a new page. A
document can contain up to 200 pages.
Paste failed. Maximum number of page range is
reached.
Delete unnecessary pages and paste pages in the
document. A document can contain up to 200 pages.
Cut failed. The items have been deleted or modified. Refresh the page and make sure that the item was
deleted or is currently being modified.
Copy failed. The items have been deleted or modified. Refresh the page and make sure that the item was
deleted or is currently being modified.
Paste failed. The items have been deleted or modified. Refresh the page and make sure that the item was
deleted or is currently being modified.
Delete failed. The items have been deleted or modified. Refresh the page and make sure that the item was
deleted or is currently being modified.
Please enter valid password. Enter the correct password.
A folder with the name you specified already exists.
Please try again.
Use a name that does not exist in the box.
Another user is archiving or uploading. Please try again
later.
The document is being archived or uploaded by
another user. Try again after the other user has
finished.
The Maximum Possible Archive Size exceeded.
Archiving is not Possible.
An archive file larger than 2 GB cannot be created. Make
sure that the archive file will be less than 2 GB by
archiving smaller groups of files instead of a large one.
The Box cannot be erased. A document contained in
Box is being used.
A document contained in the box is being used by
another user. Try again after the other user has
finished.
The document is being used. Please try again later. The selected document is being used by another user.
Try again after the other user has finished.
File format doesn’t correspond. Please contact
Administrator.
Contact your administrator to convert the archive file
and try again.
e-Filing is not ready. Please try again later. e-Filing has not yet been activated. Try again later.
Message Corrective Action

6.TROUBLESHOOTING FOR NETWORK
CONNECTIONS
This chapter describes how to troubleshoot the problems on network connections.
Locating the Equipment in the Network .............................................................................40Cannot locate the equipment in the network ....................................................................................................40
Cannot locate the equipment with Local Discovery ..........................................................................................41
Equipment does not respond to ping command ...............................................................................................42
LDAP Search and Authentication Problems.........................................................................43Network shutdown occurs or touch panel disabled after LDAP search............................................................43
LDAP authentication takes a long time ..............................................................................................................43
Printing Problems (Network Related) ................................................................................44SMB print in a Windows operating system environment...................................................................................44
Raw TCP or LPR print in a Windows operating system environment................................................................45
IPP print in a Windows operating system environment ....................................................................................45
Novell print in a NetWare environment ..............................................................................................................46
Mac OS environment ...........................................................................................................................................46
UNIX/Linux environment .....................................................................................................................................47
Network Fax (N/W-Fax) Driver Problems ............................................................................48N/W-Fax driver installation error messages .......................................................................................................48
N/W-Fax driver general errors .............................................................................................................................49
Client Software Authentication Problems...........................................................................50Cannot log in using client software.....................................................................................................................50
Printing can be made even with incorrect user name and password...............................................................50
Wireless LAN Connection Problems ....................................................................................51Cannot connect to the MFP .................................................................................................................................51

40 Locating the Equipment in the Network
0.Locating the Equipment in the Network
Cannot locate the equipment in the network
Problem Description
I cannot locate the equipment in the network.
Corrective Action
Improper settings may cause problems in locating the equipment in the network. Try the checklist below to detect the
cause of the problem. If the problem remains unsolved, contact your service representative.
No. Check... Yes No Corrective Action
1 Is the startup page printed out? If not, wait
until the communication comes online.
Examine the protocol settings listed on
the startup page. Are they correct?
Next
Step
Set up the proper protocols.
2 Print out a configuration page. Make sure
that there are not any discrepancies or
inconsistencies between the current
network settings and your network
environment. Change the network
settings, if necessary. Use the Find
Computer utility from your Windows
computer to locate the equipment by its
device name. Can you find the
equipment?
Next
Step
Set up the proper protocol if required.
Once you have located the equipment,
configure the port that it is mapped
correctly to the device.
3 Can you locate other computers
connected to the same network?Next
Step
Check the network settings on the client
computer to make sure that they are
compatible with the network settings on
the equipment.
4 Check the link LED activity on the hub
and/or NIC of the equipment and the
client machine. Do the hardware
components appear to be functioning
properly?
Next
Step
Contact your service representative.
5 Confirm whether the Ethernet cable is
normal. Does the current Ethernet speed
appear on the Ethernet setting screen
([User Functions -User-] - [Admin] -
[Network] - [Ethernet]) ?
Next
Step
If “Link not detected” is displayed on the
Ethernet setting screen, a contact failure
or disconnection may be occurred in the
cable.
In this case, check the cable, and replace it
with a new one, if required.
6 Make sure that the device name for the
equipment is unique and verify that the
WINS and/or DNS server database are not
causing potential naming conflicts with
the network settings on the equipment. If
necessary, change the network settings on
the equipment. After the communication
comes back online, can you see the
equipment in the network?
Next
Step
Set up the NetBIOS name of the device
correctly.
7 If the network environment is using
complex subnet or supernet structures, is
the IP address used by the equipment
within the network structures range of
valid addresses?
End
Contact your local network support
specialist for further assistance.

6.TROUBLESHOOTING FOR NETWORK CONNECTIONS
Locating the Equipment in the Network 41
TR
OU
BL
ES
HO
OT
ING
FO
R N
ET
WO
RK
CO
NN
EC
TIO
NS
Cannot locate the equipment with Local Discovery
Problem Description
Local Discovery cannot detect the equipment.
Corrective Action
The equipment is normally located automatically by SNMP. When the TWAIN driver, File Downloader, Address Book
Viewer, Backup/Restore Utility, Remote Scan driver, N/W-Fax driver or printer driver cannot automatically discover
the equipment over the network, the most likely cause is limitations of the protocols supported by the computer. In
some cases, you need to add or update network components; however, first see the checklist below to fix the
problem.
No. Check... Yes No Corrective Action
1 Is SNMP enabled on the equipment? Next
Step
Enable the SNMP (MIB).
2 Are the SNMP setting of the equipment
and that of the software the same?Next
Step
SNMP V1/V2: Check if the community
names of the equipment and the software
are the same.
SNMP V3: Check if each item of the SNMP
setting of the equipment and the software
is the same.
3 Confirm that the protocol suite installed
on the client computer has been updated
with the latest software for the given
operating system. If your network only
supports the IPX/SPX protocol, make sure
that the most current version of Novell
Client software is installed.
Next
Step
See the vendor’s website for information
about product updates and technical
supports.
4 Print an NIC Configuration page from the
equipment. Does the equipment support
the same protocol as the network?
Next
Step
Configure the proper protocol.
5 Change the protocol settings from
TopAccess, if necessary, and reboot the
equipment for the changes to take effect.
Repeat step 2. Was the device discovered?
End
Next
Step
6 Check the NIC Configuration page. Are the
IP address and subnet mask settings
correct?
Next
Step
Setup the TCP/IP settings correctly.
7 Check the router to make sure that it is not
filtering out the equipment packets. Is the
router processing equipment packets
correctly?
Next
Step
Adjust the router settings.
8 Can another computer within the same
network segment discover the
equipment?
Next
Step
See the following section to fix the
problem:
P.40 “Locating the Equipment in the
Network”
9 Check the NIC Configuration page. Is the
Unit Serial Number part of the device
name?
Next
Step
Contact your service representative.
10 Check link activities on the port being
used by the equipment and the integrity of
the network cable, hub, or switch that
connects the equipment to the network.
Replace any network components that
you can tell or suspect are faulty.
End

6.TROUBLESHOOTING FOR NETWORK CONNECTIONS
42 Locating the Equipment in the Network
Equipment does not respond to ping command
Problem Description
The equipment does not respond to a ping command.
Corrective Action
Check the network settings following the checklist below.
No. Check... Yes No Corrective Action
1 Confirm that the TCP/IP protocol suite is
installed on the client computer.
Next
Step
Refer to the networking section of your
operating system documentation.
2 Look at the NIC configuration page and
confirm that the TCP/IP settings are
correct. Is the IP address entered and
valid? Are the Gateway and Subnet
settings correct?
Next
Step
Enter the correct TCP/IP settings.
3 Reboot the equipment. Check the NIC
Configuration page that is printed out. Are
the TCP/IP settings correct?
Next
Step
The settings are not binding, contact your
service representative.
4 Try to ping the equipment again. Did the
equipment respond to the ping? End
Next
Step
5 Can you ping the equipment from any
other computer within the same network?
If not, the equipment might have an IP
address that is out of range or invalid.
Next
Step
Contact your network specialist for a valid
IP address for the equipment.
6 Can you ping to another computer within
the same network?
Next
Step
Check the computer’s protocol settings to
make sure the gateway and subnet
settings are correct.
7 If you have customized the device name,
you can check if the NIC is functional by
restoring the default settings. When the
equipment automatically reboots and an
NIC Configuration page is printed, does
the device name include the NIC’s unit
serial number?
Next
Step
The NIC is faulty or improperly installed.
Contact your service representative.
8 Check link activities on the port being
used by the equipment and also the
integrity of the network cable, hub, or
switch that is connecting the equipment
to the network. Replace any network
components that you suspect are faulty.
Can you ping the equipment now?
End
Contact your service representative.

TR
OU
BL
ES
HO
OT
ING
FO
R N
ET
WO
RK
CO
NN
EC
TIO
NS
LDAP Search and Authentication Problems 43
0.LDAP Search and Authentication Problems
Network shutdown occurs or touch panel disabled after LDAP search
Problem Description
After performing the LDAP search, the network shutdown occurs or the touch panel is disabled.
Corrective Action
Try the checklist below. If the problem remains unsolved, contact your service representative.
LDAP authentication takes a long time
Problem Description
It takes a long time to perform LDAP authentication on the touch panel.
Corrective Action
Try the checklist below. If the problem remains unsolved, contact your service representative.
No. Check... Yes No Corrective Action
1 Is the LDAP server correctly running? Next
Step
Confirm that the LDAP server is correctly
running.
2 Is the LDAP server setting correctly set?
End Enter the correct LDAP setting. Re-enter
the correct password carefully because it
is displayed by asterisks.
No. Check... Yes No Corrective Action
1 Is the LDAP server correctly running? Next
Step
Confirm that LDAP server is correctly
running.
2 Is the LDAP server setting correctly set?
End Enter the correct LDAP setting. Reenter
the correct password carefully because it
is displayed by asterisks.

44 Printing Problems (Network Related)
0.Printing Problems (Network Related)
Among the several ways to use the equipment in the network, the simplest one is to set the equipment in the TCP/IP
environment using a DHCP server to assign IP addresses dynamically to devices. Using the default settings also
assures an easier network implementation, although you may be required to customize the settings to accommodate
them in your particular environment.
Some common network configurations are shown below, along with the steps required to configure the equipment. If
you perform all the steps in the applicable checklist and still cannot print satisfactorily with the equipment, contact
your service representative.
You can change the network protocol settings on the touch panel of the equipment or with TopAccess (the
Administration page).
For the error messages that appear during the installation of the printer drivers, refer to the Software Installation Guide.
SMB print in a Windows operating system environment
No. Check... Yes No Corrective Action
1 Are the IP address properties correctly
set?
Next
Step
Set up the IP address correctly.
2 Is the Microsoft computer name (device
name) unique?
Next
Step
Set up the device name correctly.
3 Is the workgroup name valid and correctly
entered?
Next
Step
Set up the workgroup correctly.
4 Is LLMNR enabled? Next
Step
Enable LLMNR referring to the TopAccess Guide.
5 When IPv4 is supported: Is the WINS server
address correctly set?Next
Step
When IPv4 is supported: Set up the WINS
server address correctly, or enter “0.0.0.0”
for the WINS server address to disable the
WINS service.
6 When IPv4 is supported: If the client
computers are located in different
segments, is the WINS service correctly
provided?
Next
Step
When IPv4 is supported: Set up the WINS
server and enable it on the equipment to
allow users access from a different
segment.
7 Can you see the equipment in Windows
Network Neighborhood?Next
Step
See the following section to fix the
problem:
P.40 “Cannot locate the equipment in
the network”
8 Were the proper printer drivers installed? Next
Step
Refer to the Software Installation Guide
to install the proper printer drivers.
9 Is the driver’s port name valid? Next
Step
Refer to the Software Installation Guide
to configure the proper port.
10 Can you print with the equipment?
End
See the following section to fix the
problem:
P.28 “Cannot print with the equipment
(network connection problems)”

6.TROUBLESHOOTING FOR NETWORK CONNECTIONS
Printing Problems (Network Related) 45
TR
OU
BL
ES
HO
OT
ING
FO
R N
ET
WO
RK
CO
NN
EC
TIO
NS
Raw TCP or LPR print in a Windows operating system environment
IPP print in a Windows operating system environment
No. Check... Yes No Corrective Action
1 Are the IP Address properties correctly
set?
Next
Step
Set up the IP address correctly.
2 Is Raw TCP print correctly set? Next
Step
Set up the Raw TCP print service correctly.
3 Is LPR/LPD print correctly set? Next
Step
Set up the LPD print service correctly.
4 Were the proper printer drivers installed? Next
Step
Refer to the Software Installation Guide
to install the proper printer drivers.
5 Is the Raw TCP or LPR port configured with
the correct IP address?
Next
Step
Refer to the Software Installation Guide
to configure the proper port.
6 Can you print to the equipment?
End
See the following section to fix the
problem:
P.28 “Cannot print with the equipment
(network connection problems)”
No. Check... Yes No Corrective Action
1 Are the IP address properties correctly
set?
Next
Step
Set up the IP address correctly.
2 Is the HTTP server on the equipment
enabled?
Next
Step
Enable the HTTP server in the HTTP
Network Service.
3 Is the IPP print correctly set? Next
Step
Set up the IPP print service correctly.
4 Were the proper printer drivers installed? Next
Step
Refer to the Software Installation Guide
to install the proper printer drivers.
5 Is the IPP port configured with the correct
URL?
Next
Step
Refer to the Software Installation Guide
to configure the proper port.
6 Can you print to the equipment?
End
See the following section to fix the
problem:
P.28 “Cannot print with the equipment
(network connection problems)”

6.TROUBLESHOOTING FOR NETWORK CONNECTIONS
46 Printing Problems (Network Related)
Novell print in a NetWare environment
Mac OS environment
No. Check... Yes No Corrective Action
1 Did you configure the equipment for a
NetWare connection?
Next
Step
Set up the NetWare network settings
correctly.
2 Did you configure the equipment for
NetWare print service?
Next
Step
Set up the NetWare print service correctly.
3 Were the proper printer drivers installed? Next
Step
Refer to the Software Installation Guide
to install the proper printer drivers.
4 Is the IPP port configured with the correct
URL?
Next
Step
Refer to the Software Installation Guide
to configure the proper port.
5 Can you see the equipment in Windows
Network Neighborhood?
Next
Step
Check that the SMB protocol is enabled in
the client computers.
6 Can you print to the equipment?
End
See the following section to fix the
problem.
P.28 “Cannot print with the equipment
(network connection problems)”
No. Check... Yes No Corrective Action
1 Are the IP address properties correctly
set?
Next
Step
Set up the IP address correctly.
2 Can you access any other network device
from the Mac OS computer?
Next
Step
Refer to your Mac OS networking
documentation or contact Apple support.
3 Can another Mac OS computer on the
network print to the equipment? If so,
compare the settings to determine which
need to be changed to support print from
this equipment.
End
Refer to your Mac OS networking
documentation or contact Apple support.

6.TROUBLESHOOTING FOR NETWORK CONNECTIONS
Printing Problems (Network Related) 47
TR
OU
BL
ES
HO
OT
ING
FO
R N
ET
WO
RK
CO
NN
EC
TIO
NS
UNIX/Linux environment
No. Check... Yes No Corrective Action
1 Are the IP address properties correctly
set?
Next
Step
Set up the IP address correctly.
2 Is the LPR/LPD print correctly set? Next
Step
Set up the LPD print service correctly.
3 Did you successfully install the UNIX/Linux
filters?
Next
Step
Refer to the Software Installation Guide
to install UNIX/Linux filters.
4 Did you successfully create and set up a
print queue?
Next
Step
Refer to the Software Installation Guide
to configure the print queue.
5 Can you print to the equipment using LPD
as the root? Next
Step
Set up UNIX/Linux access for the
equipment to enable other users to print
from the Bourne shell. Refer to your UNIX/
Linux documentation for more
information.
6 Can you ping the equipment from your
computer? Next
Step
Try a remote ping from another server. If
you can reach the equipment from that
server, check for conflicts between the
equipment and your current network
segment.
7 Is the LP Daemon functioning? Next
Step
Reload Daemon or restart the system.
8 Can you print to the equipment? End Contact your service representative.

48 Network Fax (N/W-Fax) Driver Problems
0.Network Fax (N/W-Fax) Driver Problems
This section describes the troubleshooting for the Network Fax (N/W-Fax) driver.
N/W-Fax driver installation error messages
Replace “Printer” with “N/W-Fax” as required in the troubleshooting description.
For information on the installation of the N/W-Fax driver, refer to the Software Installation Guide.
Setup needs to copy Windows NT files
Problem description
The wrong port type was selected from the Printer Ports dialog.
Corrective action
1 Click Cancel until the Add Printer Wizard terminates.
2 Select [Add Printer] from the [File] menu in the Printers folder to start the Add Printer Wizard, and then perform the installation again.
3 When the screen for selecting a port is displayed, select [Local port] to add a printer.
Client software DVD now required
Problem description
When adding a new printer driver, the end user did not choose the Have Disk option; instead, the user selected the
printer name from the Add Printer list.
Corrective action
1 Cancel the Add Printer Wizard.
2 Select [Add Printer] from the [File] menu in the printer folder to start the Add Printer Wizard, and perform the installation again.
3 When the screen for selecting a printer is displayed, select [Have Disk].
4 Select [Use Existing Driver] to add another copy of an existing driver or browse to the subdirectory that contains the appropriate *.inf file.
File *.DRV on client DVD could not be found
Problem description
When adding a new printer driver, the user did not choose the Have Disk option but selected the printer name from
the Add Printer list.
Corrective action
1 Cancel the Add Printer Wizard.
2 Select [Add Printer] from the [File] menu in the printer folder to start the Add Printer Wizard, and perform the installation again.
3 When the screen for selecting a printer is displayed, select [Have Disk].
4 Browse to the subdirectory that contains the appropriate *.inf file.
Location does not contain information about your hardware
Problem description
The path to the *.inf file selected during driver installation is too far away. In other words, there are too many
characters in the directory path.
Corrective action
Copy the directory containing the *.inf file to the local drive and resume installation.

6.TROUBLESHOOTING FOR NETWORK CONNECTIONS
Network Fax (N/W-Fax) Driver Problems 49
TR
OU
BL
ES
HO
OT
ING
FO
R N
ET
WO
RK
CO
NN
EC
TIO
NS
This port is currently in use
Problem description
The driver was either opened, printing a job, or in use by another printer or application, when you attempted to delete
it.
Corrective action
Make sure all print jobs have been completed before deleting a port. If there are still problems, exit all
applications and try again. Check each driver to see if another driver is using the same port. If so, first change the
driver’s port setting and delete the port.
Problem with the current printer setup
Problem description
The driver was not set up properly, possibly because the installation procedure was not completed.
Corrective action
Delete the driver and either reinstall it from the Client Utilities/User Documentation DVD or download it from this
equipment.
N/W-Fax driver general errors
“Could not connect to the MFP device” appears
Problem description
When users are trying to access to the properties of the N/W-Fax driver, an error message “Could not connect to the
MFP device” appears.
Corrective action
Communication between the N/W-Fax driver and this equipment failed. Make sure that this equipment is operating. If
not, turn its power ON.
Connect the N/W-Fax driver with this equipment through the TopAccess. If the connection fails, reboot the computer
and this equipment.
The fax jobs are not listed on the “Logs - Transmission” screen in TopAccess
Problem description
When confirming the fax job logs on the “Logs - Transmission” screen in TopAccess, the fax jobs that are sent are not
displayed.
Corrective action
If the relevant fax job is not included in the Log list, your transmission job may not have been performed. In this case,
search for jobs without the department code in the “Job Status-Fax” on the control panel. Then select the relevant fax
job and press [Send] to resend it.
Fax transmission cannot be performed with a cover sheet
Problem description
In a N/W-Fax driver which is set to the IPP port, no cover sheet is output and an XL error occurs in the fax transmission
when a printer driver whose file name consists of 54 letters or more is specified for the default printer and a Fax is sent
with a cover sheet added from Microsoft Excel.
Corrective action
Set the file name of the printer driver in 30 letters or less.

50 Client Software Authentication Problems
0.Client Software Authentication Problems
Cannot log in using client software
Problem Description
I cannot log into the equipment using client software.
Corrective Action
If you cannot log into the equipment using client software, contact the administrator of the equipment. Since the user
name and password registered in the client software are used for authentication in the case of automatic login, the
log-in screen may not be displayed.
Printing can be made even with incorrect user name and password
Problem Description
Even when an incorrect user name and password are entered in the log-in screen of the client software, printing can
be made.
Corrective Action
If the client software version is earlier than the system one in the equipment, printing may be performed even when
an incorrect user name and password are entered.
Install the latest client software.

TR
OU
BL
ES
HO
OT
ING
FO
R N
ET
WO
RK
CO
NN
EC
TIO
NS
Wireless LAN Connection Problems 51
0.Wireless LAN Connection Problems
Cannot connect to the MFP
If you cannot establish a connection to the equipment, restart it*. If the problem still persists, check the following
points:
Is your user certificate (client certificate and CA certificate) valid?
Are the access point and network settings correct?
Select [WEP] or [None] from [Security] in infrastructure mode, and confirm that the touch panel indicates the status
of wireless LAN connection as "connected". If you still cannot establish the wireless LAN connection, the SSID or
WEP encryption key entered may be incorrect. Check the wireless LAN connection settings.
When the encryption mode of the access point you are connecting is a TKIP mode, set the encryption mode of the
equipment to TKIP+AES.
When the encryption mode of the access point you are connecting is a WPA mode, set the encryption mode of the
equipment to WPA/WPA2.
When the encryption mode of the access point you are connecting is a WPAPSK mode, set the encryption mode of
the equipment to WPA/WPA2PSK.
When you use both an infrastructure mode and a Wi-Fi Direct, set the same channel for both the wireless access
point as the connection destination in the infrastructure mode and the group owner in the Wi-Fi Direct.
Is your wireless LAN disabled? The wired LAN and the infrastructure mode of wireless LAN cannot be used at the
same time.
* Press the [POWER] button to shut down the equipment, and then press the [POWER] button again.

6.TROUBLESHOOTING FOR NETWORK CONNECTIONS
52 Wireless LAN Connection Problems

7.TROUBLESHOOTING FOR FAXING
This chapter describes how to troubleshoot faxing problems.
Faxing Problems ..............................................................................................................54Error codes ...........................................................................................................................................................54
Error messages.....................................................................................................................................................54
Transmission/reception trouble .........................................................................................................................55

54 Faxing Problems
0.Faxing Problems
Error codesTo learn the meanings of the error codes described in the lists or reports, see the following section:
P.64 “Error codes on transmission and reception”
Error messagesBelow is a list of error messages that might appear on the touch panel. When any message in the list appears on the
touch panel, press [FUNCTION CLEAR] on the control panel to clear it, and then take action suggested in the
“Remedy” column.
Never attempt to repair, disassemble or modify the equipment by yourself.
You could cause a fire or get an electric shock. Always contact your service representative for maintenance or repair of
the internal parts of the equipment.
Message Cause Remedy
Memory overflow Memory overflowed when scanning
documents to the memory.
Either wait for memory to be cleared, or check
the jobs and delete reserved jobs on the [Job
Status] screen.
Communication error Communication error occurred during
direct TX.
Retry communications.
Job reservation full The number of reserved jobs exceeded the
maximum.
Either wait for job reservations to be
completed, or check the jobs and delete
reserved jobs on the [Job Status] screen.
Job memory full The total number of destinations for
reserved jobs exceeded the maximum.
Either wait for job reservations to be
completed, or check the jobs and delete
reserved jobs on the [Job Status] screen.
Sorry not possible On-hook or direct TX was attempted
during communications.
Wait for communications to end and retry
communications.
Not allowed now Further polling transmission reservation
was attempted even though polling
transmission was already reserved.
Either wait for polling transmission jobs to be
completed, or check the jobs and delete
reserved jobs on the [Job Status] screen.
Too Many Tel # Digits 128 digits or more were registered for a
chain dial communication.
Confirm the number of digits dialed and
register the numbers again.
Fax line1 is out of
order./Fax line2 is out
of order.
An error occurred with the Fax unit. Turn the power OFF and then back ON. If the
error still persists, contact your service
representative.

7.TROUBLESHOOTING FOR FAXING
Faxing Problems 55
TR
OU
BL
ES
HO
OT
ING
FO
R F
AX
ING
Transmission/reception troubleBelow is a list of trouble you might encounter during the transmission/reception.
Transmission troubles
Trouble Check Point
Transmit is not displayed even if
the [START] button is pressed. Did you replace the handset before you pressed the [START] button? When
you are making a call on the handset to send a fax, do not replace the
handset until you press the [START] button.
Is the modular cord disconnected?
Is the power plug unplugged from the power outlet?
Can you receive telephone calls?
Is there any problem at the remote fax? Check this with the party trying to
receive the original.
Originals are fed diagonally. Are the side guides of the ADF adjusted to the width of the original that you
are sending?
Does the original that you are sending match the conditions of the original
that is available for sending?
2 originals are fed together. Have you placed more than the maximum number of originals that can be
placed at one time?
Does the original that you are sending match the conditions of the original
that is available for sending?
Have you pushed the originals into the ADF too hard?
The original is not being printed on
the paper of the remote fax even
though it has been sent.
Are the direction of the placed originals correct?
When placing the original on the original glass, specify the original size.
Black lines are shown in the image
that was sent.
Is the scanning area of the ADF clean?
Clean it with a soft cloth.
Originals are not sent even if
operations are carried out
normally.
Is the remote fax compatible with your system?
This system supports G3 communications but not G2 or G4 communications.
Originals cannot be sent overseas. Specify Quality TX and resend.
For more details, refer to the GD-1370 Fax Guide.

7.TROUBLESHOOTING FOR FAXING
56 Faxing Problems
Reception troubles
If the suggested action does not solve the trouble or you encounter trouble not listed above, contact your service
technician or service representative.
Trouble Check Point
Originals cannot be received even
if “Receive” is displayed and the
[START] button is pressed.
Did you replace the handset before you pressed the [START] button? When
you answer a call on the handset to receive a fax, do not replace the handset
until you press the [START] button.
Is the modular cord disconnected?
Is there a problem at the remote fax? Check this with the party trying to send
the original.
Paper is not output. Is the equipment out of paper?
The received original is printed
dark and is illegible or black
stripes are printed on the original.
Make a local copy and confirm proper printing.
Is the original being sent a dirty copy? Check this with the party trying to
send the original.
Is the trouble due to a problem or operation error at the remote fax? Check
this with the party trying to send the original.
Paper is output but not printed. Is there enough toner?
Is the original placed correctly on the remote fax? Check this with the party
trying to send the original.
Paper often misfeeds. Is the paper drawer size setting correct?
Is the paper drawer properly inserted?
Is the specified paper type being use?

8.CHECKING THE EQUIPMENT STATUS WITH
TopAccess
This chapter describes how to check the status of the equipment with TopAccess.
Hardware Status Icons on TopAccess [Device] Tab ..............................................................58
Error Messages................................................................................................................. 60
Error Codes......................................................................................................................62Error codes on print jobs .....................................................................................................................................62
Error codes on transmission and reception .......................................................................................................64
Error codes on scan jobs......................................................................................................................................67

58 Hardware Status Icons on TopAccess [Device] Tab
0.Hardware Status Icons on TopAccess [Device] Tab
When the equipment requires maintenance or when an error occurs with the equipment, the icons indicating the
status information appear near the graphic image of the equipment on the TopAccess [Device] tab. The following are
the icons displayed and their descriptions.
For details of the [Device] tab of TopAccess, refer to the TopAccess Guide.
Printer Error 1
This icon indicates a non-recommended toner cartridge is used and that the equipment has stopped printing.
To learn how to replace the toner cartridge, refer to the Hardware Troubleshooting Guide.
Printer Error 2
This icon indicates:
You need to remove paper from the exit tray of the equipment.
You need to remove paper from the receiving tray of the Finisher.
You need to remove the staples jammed in the Finisher.
To learn how to remove the jammed staples, refer to the Hardware Troubleshooting Guide.
You need to remove the staples jammed in the Saddle Stitch unit.
To learn how to remove the jammed staples, refer to the Hardware Troubleshooting Guide.
You need to clear the hole punch paper bits from the Hole Punch Unit.
To learn how to clear the hole punch paper bits, refer to the Hardware Troubleshooting Guide.
The recommended toner cartridge is not being used.
To learn how to replace the toner cartridge, refer to the Hardware Troubleshooting Guide.
You tried to perform saddle stitching for a printing on mixed paper sizes.
The equipment cannot load paper from the drawer of the External Large Capacity Feeder.
The equipment cannot eject the paper to the exit tray of the equipment.
Cover Open
This icon indicates the front cover is open.
Toner Empty
This icon indicates no toner is left. It also indicates which color is empty:
To learn how to replace the toner cartridge, refer to the Hardware Troubleshooting Guide.
Waste Toner Full
This icon indicates the waste toner box is full and requires replacing.
To learn how to replace the waste toner box, refer to the Hardware Troubleshooting Guide.
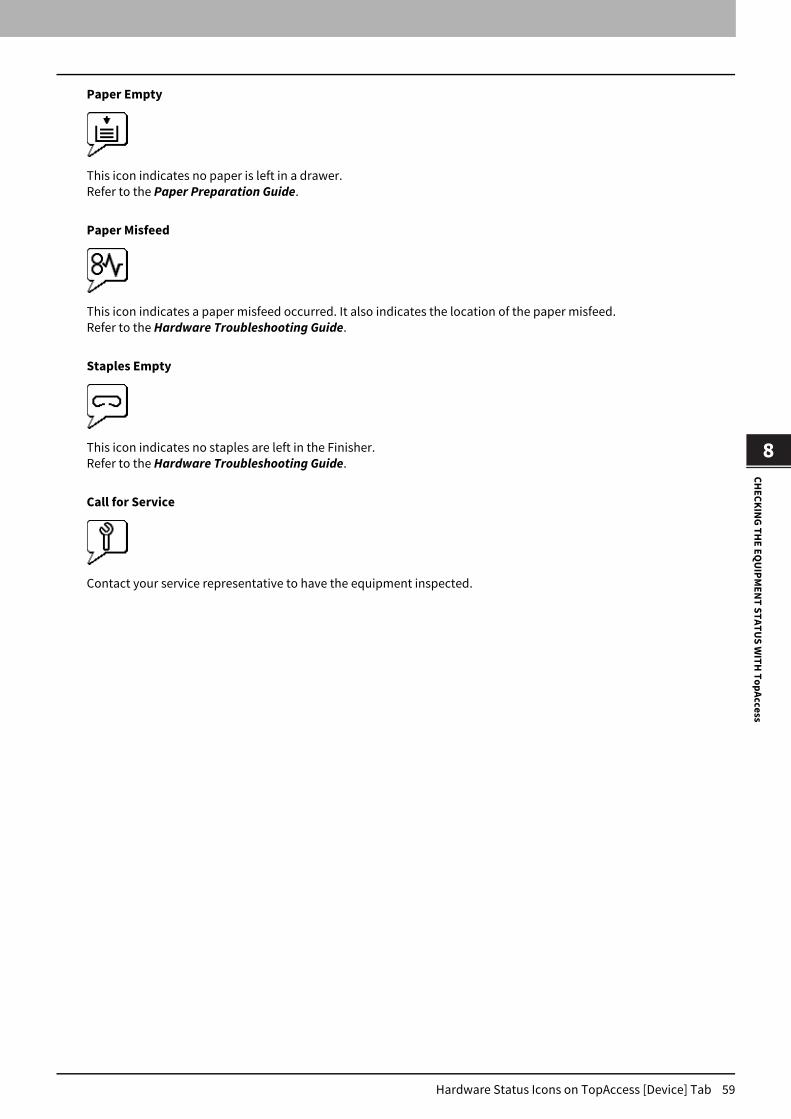
8.CHECKING THE EQUIPMENT STATUS WITH TopAccess
Hardware Status Icons on TopAccess [Device] Tab 59
CH
EC
KIN
G T
HE
EQ
UIP
ME
NT
ST
AT
US
WIT
H T
op
Acce
ss
Paper Empty
This icon indicates no paper is left in a drawer.
Refer to the Paper Preparation Guide.
Paper Misfeed
This icon indicates a paper misfeed occurred. It also indicates the location of the paper misfeed.
Refer to the Hardware Troubleshooting Guide.
Staples Empty
This icon indicates no staples are left in the Finisher.
Refer to the Hardware Troubleshooting Guide.
Call for Service
Contact your service representative to have the equipment inspected.

60 Error Messages
0.Error Messages
When a message appears on the [Device] Tab of TopAccess, see the table below for the corrective action.
TopAccess Message Corrective Action
Cover Open - Please Close Cover. Close the front cover.
Paper Feeding Cover Open - Please Close Cover. Close the paper feeder cover.
Transfer/Transport unit Cover Open - Please Close
Cover.
Close the transfer/transport unit.
Bypass Cover Open - Please Close Cover. Close the bypass cover.
Exit Cover Open - Please Close Cover. Close the exit cover.
Toner Cover Open - Please Close Cover. Close the toner cover.
Platen Cover Open - Please Close Cover. Close the platen cover.
Lower Tray Transport Cover Open - Please Close Cover Close the lower tray transport cover.
Inserter Cover Open - Please Close Cover. Close the Inserter cover.
External Large Capacity Feeder Disconnect - Please
Joint it to Copier.
Connect the External Large Capacity Feeder to the
equipment.
LCF Cover Open - Please Close LCF Cover. Close the Large Capacity Feeder cover.
Drawer 1 Open - Please Close Drawer 1. Close the drawer.
Drawer 2 Open - Please Close Drawer 2. Close the drawer.
Drawer 3 Open - Please Close Drawer 3. Close the drawer.
Drawer 4 Open - Please Close Drawer 4. Close the drawer.
Automatic Duplexing Unit Cover Open - Please Close
Cover.
Close the automatic duplexing unit cover.
Relay Unit Cover Open - Please Close Cover. Close the Bridge Unit cover.
Finisher Joint Cover Open - Please Close Cover. Close the Finisher joint cover.
Finisher Door Open - Please Close Door. Close the Finisher door.
Lower Tray Delivery Cover Open - Please Close Cover Close the lower tray delivery cover.
Lower Tray Front Cover Open - Please Close Cover Close the lower tray front cover.
Punch Unit Front Cover Open - Please Close Cover Close the Punch unit front cover.
Standard Output Tray Paper Full - Please Remove
Paper.
Remove the paper from the tray.
Upper Tray Paper Full - Please Remove Paper. Remove the paper from the tray.
Lower Tray Paper Full - Please Remove Paper. Remove the paper from the tray.
Saddle Tray Full - Please Remove Paper. Remove the paper from the tray.
Job Separator 1 Full - Please Remove Paper. Remove the paper from the tray.
Job Separator 2 Full - Please Remove Paper. Remove the paper from the tray.
Paper Empty in Drawer 1 - Please Add Paper. Set the paper in the drawer.
Paper Empty in Drawer 2 - Please Add Paper. Set the paper in the drawer.
Paper Empty in Drawer 3 - Please Add Paper. Set the paper in the drawer.
Paper Empty in Drawer 4 - Please Add Paper. Set the paper in the drawer.
Paper Empty in Large Capacity Feeder - Please Add
Paper.
Set the paper in the Large Capacity Feeder.
Paper Misfeed in Job Separator - Please Clear Paper
Path.
Refer to the guidance on the touch panel to remove
misfed paper.

8.CHECKING THE EQUIPMENT STATUS WITH TopAccess
Error Messages 61
CH
EC
KIN
G T
HE
EQ
UIP
ME
NT
ST
AT
US
WIT
H T
op
Acce
ss
Paper Misfeed in Automatic Duplexing Unit - Please
Clear Paper Path.
Refer to the guidance on the touch panel to remove
misfed paper.
Paper Insertion Misfeed - Please Clear Paper Path. Refer to the guidance on the touch panel to remove
misfed paper.
Paper Misfeed in Printer - Please Clear Paper Path. Refer to the guidance on the touch panel to remove
misfed paper.
Paper Misfeed in Finisher - Please Clear Paper Path. Refer to the Hardware Troubleshooting Guide to
remove the paper.
Used Toner Container Full - Please Replace. Refer to the Hardware Troubleshooting Guide to
remove the paper.
Staple Empty - Please Set Staple Cartridge Refer to the Hardware Troubleshooting Guide to
remove the paper.
Open the front cover, and clean the slit glass and main
charger.
Clean the slit glass and the main chargers.
Toner Not Recognized - Please Check Toner. Check and adjust the toner bottle.
Black Toner Empty - Please Install New Toner Cartridge. Refer to the Hardware Troubleshooting Guide to
replace the black toner cartridge.
Cyan Toner Empty - Please Install New Toner Cartridge. Refer to the Hardware Troubleshooting Guide to
replace the cyan toner cartridge.
Magenta Toner Empty - Please Install New Toner
Cartridge.
Refer to the Hardware Troubleshooting Guide to
replace the magenta toner cartridge.
Yellow Toner Empty - Please Install New Toner
Cartridge.
Refer to the Hardware Troubleshooting Guide to
replace the yellow toner cartridge.
Black Toner Near Empty - Please Prepare New Toner
Cartridge.
Prepare the new toner cartridge.
Cyan Toner Near Empty - Please Prepare New Toner
Cartridge.
Prepare the new toner cartridge.
Magenta Toner Near Empty - Please Prepare New Toner
Cartridge.
Prepare the new toner cartridge.
Yellow Toner Near Empty - Please Prepare New Toner
Cartridge.
Prepare the new toner cartridge.
Confirm waste toner bottle is attached and close waste
toner bottle cover.
Confirm the waste toner box is securely attached and
close the waste toner box cover.
Close duplexing unit cover Close the duplexing unit cover.
Close receiving tray low cover Close the low cover of the receiving tray.
Prepare new waste toner box Prepare a new waste toner box.
Fatal Error - Please Contact Service Technician. Contact your service representative.
Main Motor Error - Please Contact Service Technician. Contact your service representative.
Printer Input Error. Contact your service representative.
Scanner Error - Please Contact Service Technician. Contact your service representative.
Fuser Error - Please Contact Service Technician. Contact your service representative.
TopAccess Message Corrective Action

62 Error Codes
0.Error Codes
TopAccess has the pages for the job lists; print, transmission, reception, and scan jobs. The following error codes are
shown on these pages in the [Logs] tab (successful jobs have no codes). These codes help you specify the cause of an
error you might encounter.
The error codes are also shown on the [Log] screen of the touch panel. See the following lists when you find an error
code on the touch panel. If the error code displayed is not in the following tables, contact your service representative.
Error codes on print jobs
Error Code Problem Description Corrective Action
4011 Job canceled The job was canceled.
4021Power failure Check whether the power cable is connected properly and is
inserted securely.
4031HDD full error Delete unnecessary private print jobs and invalid department
print jobs.
4032Too many jobs registered The number of registered jobs for Multi Station Print has exceeded
the upper limit. Reduce the jobs.
4033Network setting error The Multi Station Print job cannot be registered due to a network
setting error. Fix the settings for Multi Station Print.
4041User authentication error The user performing the printing has not been authenticated or
registered. Perform user authentication or user registration.
4042Department code
authentication error
Check the information about the department code registered in
this equipment.
4043Project code
authentication error
Check the information about the project code registered in the
equipment.
4045
There is something wrong
with the connection with
the LDAP server or its
authority setting.
Ask your LDAP server administrator about it.
4111
The number of prints has
become “0”
The number of prints specified in department and user
management has become “0” at the same time. Set the number
again or perform initialization.
4112The number of prints has
become “0”
The number of prints specified in user management has become
“0”. Set the number again or perform initialization.
4113The number of prints has
become “0”
The number of prints specified in department management has
become “0”. Perform initialization.
4121
Job cancellation due to the
external counter error1. Put in a coin, or insert a card and perform printing again, or
contact your administrator.
2. Connect the Key Counter and perform printing again.
3. Clear the Schedule Print setting and perform printing again.
4211
Printing data storing
limitation error
Printing with the data being stored to the HDD temporarily (Proof
print, Private print, Scheduled print, etc.) cannot be performed.
Use normal printing.
4212e-Filing storing limitation
error
Printing with the data being stored to the HDD (print and e-Filing,
print to e-Filing, etc.) cannot be performed. Use normal printing.
4213File storing limitation error The file storing function is set to “disabled”. Check the setting of
the equipment.
4214Fax/iFax transmission
failure
The Fax/iFax transmission or N/W-Fax/iFax function is set to
“disabled”. Check the setting of the equipment.

8.CHECKING THE EQUIPMENT STATUS WITH TopAccess
Error Codes 63
CH
EC
KIN
G T
HE
EQ
UIP
ME
NT
ST
AT
US
WIT
H T
op
Acce
ss
4221Private-print-only error Jobs other than Private printing cannot be printed. Perform
Private printing.
4243 No license error Install the license for Multi Station Print.
4244 Function disabled error Enable the Multi Station Print function with TopAccess.
4245OCR function is not
enabled
Install the OCR license.
4311No authority to execute a
job
The user has not been authorized to perform this operation. Ask
your administrator.
4312Not authorized to store a
file
The user has not been authorized to perform this operation. Ask
your administrator.
4313Not authorized to store in
e-Filing
The user has not been authorized to perform this operation. Ask
your administrator.
4314Not authorized to send a
Fax/iFax
The user has not been authorized to perform this operation. Ask
your administrator.
4321
Not authorized to perform
printing in the specified
setting
The user has not been authorized to perform this operation. Ask
your administrator.
4411Image data generation
failure
Check if the file to be printed is broken. Perform printing again or
use another printer driver.
4412
Double-sign encoding error A double-sign encoding error occurred because the PDF file is
encrypted in unsupported script. Printing the file in this function is
impossible.
4511Connection timeout After checking the communication environment, reattempt the
communications.
4521Reach the max number of
connections
Wait for a while and reattempt the communications.
4522
Registered print job
number reached to limit at
data reception
Wait for a while and reattempt the communications.
4523HDD full at data reception A job reception is limited since the HDD does not have enough
space. After deleting unnecessary data in the HDD, perform a job.
4611Font download failure Since the available number of fonts is exceeded, the font cannot
be registered. Delete at least one font.
4612Font download failure Since there is no space in HDD, the font cannot be registered.
Delete at least one font.
4613Font download failure Since an error has occurred, the font cannot be registered.
Perform downloading again or regenerate the font data first.
4621Downloaded font deletion
failure
Check if the font to be deleted is registered.
4F10
Print failure Perform the printing again. If the error still persists, turn the power
OFF and then back ON, and perform the printing again. If the error
still persists, contact your service representative.
Error Code Problem Description Corrective Action
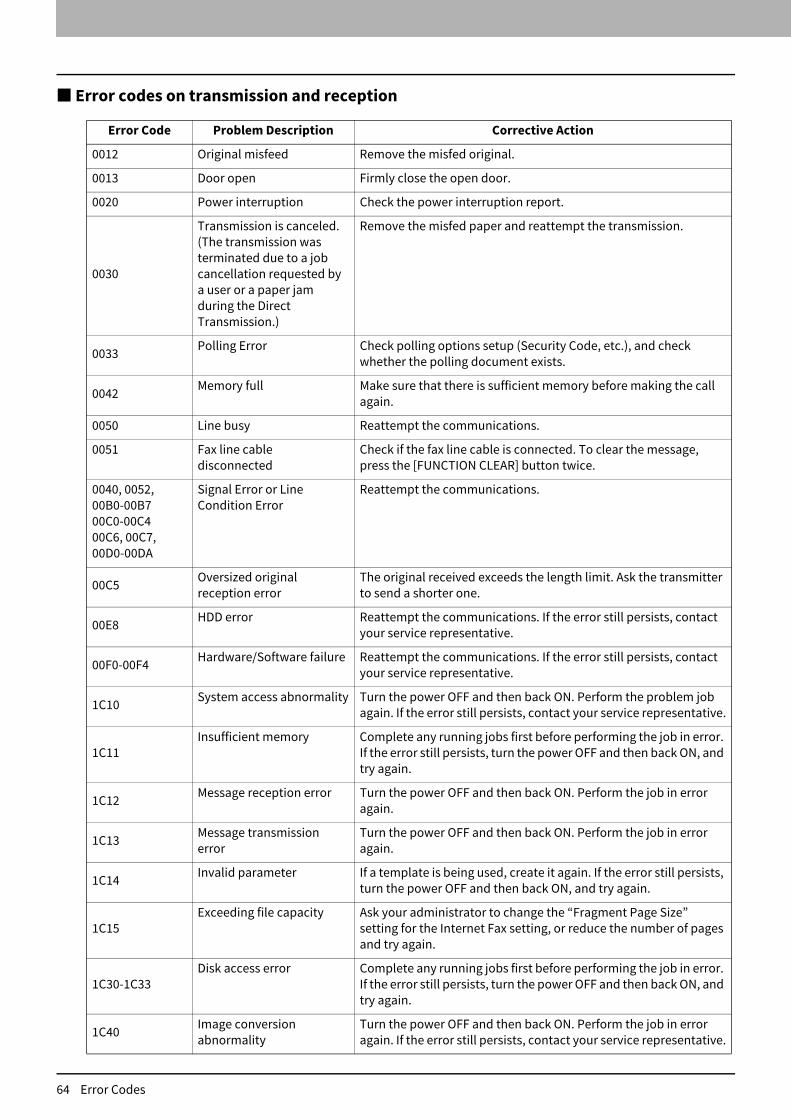
8.CHECKING THE EQUIPMENT STATUS WITH TopAccess
64 Error Codes
Error codes on transmission and reception
Error Code Problem Description Corrective Action
0012 Original misfeed Remove the misfed original.
0013 Door open Firmly close the open door.
0020 Power interruption Check the power interruption report.
0030
Transmission is canceled.
(The transmission was
terminated due to a job
cancellation requested by
a user or a paper jam
during the Direct
Transmission.)
Remove the misfed paper and reattempt the transmission.
0033Polling Error Check polling options setup (Security Code, etc.), and check
whether the polling document exists.
0042Memory full Make sure that there is sufficient memory before making the call
again.
0050 Line busy Reattempt the communications.
0051 Fax line cable
disconnected
Check if the fax line cable is connected. To clear the message,
press the [FUNCTION CLEAR] button twice.
0040, 0052,
00B0-00B7
00C0-00C4
00C6, 00C7,
00D0-00DA
Signal Error or Line
Condition Error
Reattempt the communications.
00C5Oversized original
reception error
The original received exceeds the length limit. Ask the transmitter
to send a shorter one.
00E8HDD error Reattempt the communications. If the error still persists, contact
your service representative.
00F0-00F4Hardware/Software failure Reattempt the communications. If the error still persists, contact
your service representative.
1C10System access abnormality Turn the power OFF and then back ON. Perform the problem job
again. If the error still persists, contact your service representative.
1C11
Insufficient memory Complete any running jobs first before performing the job in error.
If the error still persists, turn the power OFF and then back ON, and
try again.
1C12Message reception error Turn the power OFF and then back ON. Perform the job in error
again.
1C13Message transmission
error
Turn the power OFF and then back ON. Perform the job in error
again.
1C14Invalid parameter If a template is being used, create it again. If the error still persists,
turn the power OFF and then back ON, and try again.
1C15
Exceeding file capacity Ask your administrator to change the “Fragment Page Size”
setting for the Internet Fax setting, or reduce the number of pages
and try again.
1C30-1C33
Disk access error Complete any running jobs first before performing the job in error.
If the error still persists, turn the power OFF and then back ON, and
try again.
1C40Image conversion
abnormality
Turn the power OFF and then back ON. Perform the job in error
again. If the error still persists, contact your service representative.

8.CHECKING THE EQUIPMENT STATUS WITH TopAccess
Error Codes 65
CH
EC
KIN
G T
HE
EQ
UIP
ME
NT
ST
AT
US
WIT
H T
op
Acce
ss
1C60
Failed to process your job.
Insufficient Storage space.
Reduce the number of pages of the job in error and perform it
again. Check whether the server or local disk has sufficient space
in its disk capacity.
1C61
Address Book reading
failure
Turn the power OFF and then back ON. Perform the job in error
again. Reset the data in the Address Book and perform the job
again. If the error still persists, contact your service representative.
1C63 Terminal IP address unset Ask your administrator to set the IP address of the equipment.
1C64Terminal mail address
unset
Ask your administrator to set the Email address of the equipment.
1C65 SMTP address unset Ask your administrator to set the SMTP server address.
1C66 Server time-out error Check whether the SMTP server is operating properly.
1C69
SMTP server connection
error
Ask your administrator to set the login name or password of the
SMTP server and try again. Check whether the SMTP server is
operating properly.
1C6B
Terminal mail address
error
Ask your administrator to check the SMTP Authentication method
or if there is an unpermitted character in the Terminal mail
address. Set the correct SMTP Authentication method or delete
the unpermitted character in the Terminal mail address.
1C6C
Destination mail address
error
Check if there is an unpermitted character in the Destination Email
address. Delete the unpermitted character and reset the
appropriate Destination Email address, then try again.
1C6DSystem error Turn the power OFF and then back ON. Perform the job in error
again. If the error still occurs, contact your service representative.
1C70SMTP client OFF Ask your administrator to enable the SMTP Client and perform the
job again.
1C71SMTP authentication error Confirm that the login name and password are correct. If SSL is
enabled, make sure that SSL port number is correctly set.
1C72POP Before SMTP error Confirm that the POP Before SMTP settings and POP3 settings are
correct.
1CC0 Job canceled The job was canceled.
1CC1Power failure Check whether the power cable is connected properly and is
inserted securely. Check whether the power voltage is stable.
3A10 MIME format error Ask the sender to resend the Email in the MIME1.0 format.
3A20 Email process error Ask the sender to resend the Email.
3A30Partial Email timeout error Ask the sender to resend the Email, or change the Partial Wait time
setting.
3A40Invalid partial Email
received
Ask the sender to resend the partial Email in the RFC2046 format.
3A50
HDD full error Ask the sender to resend the Email by separating it into several
Emails. If this error occurs due to running out of paper and too
many waiting jobs being stored in the hard disk, add paper to
activate the other jobs.
3A70Interrupt partial Email
reception
Ask your administrator to enable the Enable Partial Email setting
and ask the sender to resend the Email.
3A80Partial Email disabled Ask your administrator to enable the Enable Partial Email setting
and ask the sender to resend the Email.
3B10 Email format error Ask the sender to resend the Email.
Error Code Problem Description Corrective Action

8.CHECKING THE EQUIPMENT STATUS WITH TopAccess
66 Error Codes
3B20Content-Type error Ask the sender to resend the Email with attached files that are TIFF
format.
3B40 Email decode error Ask the sender to resend the Email.
3C10, 3C13TIFF analysis error Ask the sender to resend the Email with attached files that are TIFF
format.
3C20TIFF compression error Ask the sender to resend the Email with attached TIFF files in the
MH, MR, MMR, or JBIG compression.
3C30
TIFF resolution error Ask the sender to resend the Email with attached TIFF files whose
resolution is either 200 x 100, 200 x 200, 200 x 400, 300 x 300, or 400
x 400 dpi.
3C40TIFF paper size error Ask the sender to resend the Email with attached TIFF files that
can be printed on paper permitted for the equipment.
3C50Offramp transmission error Ask the sender to specify the correct fax numbers and resend the
Email.
3C60
Offramp security error Confirm that the specified fax numbers are registered in the
address book of the equipment. If not, register the fax numbers in
the address book and ask the sender to resend the Email with the
correct fax numbers.
3C70Power failure Confirm that the job is recovered or not. If not, ask the sender to
resend the Email.
3C90Offramp Fax transmission
disable error
Confirm if the Fax Send Function of MFP setting is disable or not.
3D10
Destination address error Ask your administrator whether the DNS and mail server settings
are correctly set. If they are, ask the sender to confirm that the
destination address is correct.
3D20
Exceeding maximum
offramp destinations
Ask the sender to specify up to 40 destinations for one offramp
gateway job. The equipment cannot perform offramp gateway
transmission for more than 40 destinations.
3D30 Fax unit is not installed Make sure that the Fax unit is installed, or connected correctly.
3E10
POP3 server
communication error
Ask your administrator whether the POP3 server address is
correctly set, and whether the POP3 server works properly. If SSL
is enabled, make sure that SSL port number is correctly set.
3E20POP3 server
communication timeout
Ask your administrator whether the POP3 server works properly
and the LAN cable is connected to the server.
3E30POP3 login error Ask your administrator whether the POP3 user name and
password are set correctly.
3E40POP3 login type error Ask your administrator whether the POP3 login type (Auto, POP3,
APOP) is set correctly.
3F10, 3F20File I/O error Ask the sender to resend the Email. If the error still occurs, contact
your service representative.
Error Code Problem Description Corrective Action

8.CHECKING THE EQUIPMENT STATUS WITH TopAccess
Error Codes 67
CH
EC
KIN
G T
HE
EQ
UIP
ME
NT
ST
AT
US
WIT
H T
op
Acce
ss
Error codes on scan jobs
The error indications on scan jobs are as follows:
On the log list of TopAccess, messages indicating the status are displayed.
On the log list of the touch panel, error codes are displayed. See the listings below for the details of the error code.
Error Code Problem Description Corrective Action
2C10, 2C12,
2C13,
2C20-2C22
Wrong Job status A system error has occurred during the sending
of an Email. Try it again. If the error still
persists, contact your service representative.
2C11, 2C62
Not enough memory Complete any running jobs first before
reperforming the job in error. If the error still
persists, turn the power OFF and then back ON,
and then try again.
2C14
Invalid parameter specified If you are using a template, create it again. If
the error still persists, turn the power OFF and
then back ON, and then try again.
2C15Mail size exceeded limit or maximum size You are sending too many documents at a
time. Send them separately.
2C30-2C33
Disk access error Complete any running jobs first before
reperforming the job in error. If the error still
persists, turn the power OFF and then back ON,
and then try again.
2C40
Failed to convert image file format This error occurs when conversion to a highly
compressed PDF format fails. Do the scanning
again. If the error still persists, use the normal
PDF format. When this error occurs in
conversion other than to a highly compressed
PDF format, turn the power OFF and then back
ON. Then try to scan again. If the error still
persists, contact your service representative.
2C43
Encryption error. Failure to create a file If the error still persists after reattempting, turn
the power OFF and then back ON, and try
again.
2C44
Creating a file was not allowed Creating an unencrypted file was not allowed.
Configure the encryption settings and try
again. To create an unencrypted file, consult
the administrator.
2C45
Failure in making meta data Make sure that the template setting is correct,
and do the scanning again. If the error still
persists, turn the power OFF and then back ON,
and then try again.
2C60
HDD full failure during processing Reduce the number of pages of the problem
job and try again. Check whether the server or
local disk has sufficient space in its capacity.
2C61
Failure to read Address Book Turn the power OFF and then back ON. Try the
problem job again. Reset the data in the
Address Book and reattempt it. If the error still
persists, contact your service representative.

8.CHECKING THE EQUIPMENT STATUS WITH TopAccess
68 Error Codes
2C63Terminal IP address unset Ask your administrator to set the IP address of
the equipment.
2C64Terminal mail address unset Ask your administrator to set the Email address
of the equipment.
2C65, 2C66,
2C69
Failure to connect to SMTP server Make sure that the SMTP server is correctly
working or the SMTP server address has been
set correctly.
2C6A
Failure to send Email message Turn the power OFF and then back ON. Try
scanning again. If the error still persists,
contact your service representative.
2C6B
Invalid address specified in From: field Ask your administrator to check the SMTP
Authentication method or if there is an
unpermitted character in the Terminal mail
address. Set the correct SMTP Authentication
method or delete the unpermitted character in
the Terminal mail address.
2C6C
Invalid address specified in To: field Make sure that there is no unpermitted
character in the Destination mail address.
Delete any unpermitted character and reset
the appropriate Destination mail address, then
try again.
2C70SMTP service is not available Ask your administrator whether the SMTP
service is enabled.
2C71
SMTP authentication error Confirm that the login name and password are
correct. If SSL is enabled, make sure that the
SSL port number is correctly set.
2C72POP Before SMTP error Confirm that the POP Before SMTP settings and
POP3 settings are correct.
2CC0 Job canceled The job was canceled.
2CC1
Power failure occurred Make sure that the power cable is connected
properly and is inserted securely. Resend the
job.
Save as File
2D10, 2D12,
2D13
Wrong Job status Turn the power OFF and then back ON. Try it
again. If the error still persists, contact your
service representative.
2D11
Not enough memory Wait for a while and try again. If the error still
persists, turn the power OFF and then back ON,
and make another effort.
2D14
Invalid parameter specified If you are using a template, create it again. If
the error still persists, turn the power OFF and
then back ON, and then try again.
2D15Exceeding maximum file capacity Divide the file into several files, or try again in a
single-page format.
Error Code Problem Description Corrective Action

8.CHECKING THE EQUIPMENT STATUS WITH TopAccess
Error Codes 69
CH
EC
KIN
G T
HE
EQ
UIP
ME
NT
ST
AT
US
WIT
H T
op
Acce
ss
2D30
Failure to create directory Make sure that the access privilege to the
storage directory is writable and also that the
disk in the directory has enough space, and
then try again. If more than one job is
performed simultaneously, the error may occur
because the disk temporarily runs out of space.
In this case, wait for a while and try again. If the
error still persists, turn the power OFF and then
back ON, and try again.
2D31, 2D33
Failure to create file Make sure that the access privilege to the
storage directory is writable and also that the
disk in the directory has enough space, and
then try again. If more than one job is
performed simultaneously, the error may occur
because the disk temporarily runs out of space.
In this case, wait for a while and try again. If the
error still persists, turn the power OFF and then
back ON, and try again.
2D32
Failure to delete file Make sure that the access privilege to the
storage directory is writable and then try the
job again. If the error still persists, turn the
power OFF and then back ON, and then try
again.
2D40
Failure to convert image file format This error occurs when conversion to a highly
compressed PDF format fails. Do the scanning
again. If the error still persists, Use the normal
PDF format. When this error occurs in
conversion other than to a highly compressed
PDF format, turn the power OFF and then back
ON. Then try to scan again. If the error still
persists, contact your service representative.
2D43
Encryption error. Failure to create a file If the error still persists after reattempting, turn
the power OFF and then back ON. Then try
again.
2D44
Creating a file was not allowed. Creating an unencrypted file was not allowed.
Configure the encryption settings and try
again. To create an unencrypted file, consult
the administrator.
2D45
Failure in making meta data Make sure that the template setting is correct,
and do the scanning again. If the error still
persists, turn the power OFF and then back ON,
and then try again.
2D62
Failure to connect to network destination
Check destination path.
Make sure that the network folder is shared in
your network and try scanning again. If the
error still persists, ask your administrator to
check whether the IP address or path of the
server is correct. Also make sure that the server
is operating properly.
2D63Specified network path is invalid. Check
destination path.
Make sure that you specify the correct network
folder and try scanning again.
2D64
Log on to file server failed. Check user name
and password.
Make sure that you specify the correct user
name and password to log on the file server, or
you specify the correct file server. Then try
scanning again.
Error Code Problem Description Corrective Action

8.CHECKING THE EQUIPMENT STATUS WITH TopAccess
70 Error Codes
2D65There are too many documents in the folder.
Failure in creating a new document
Delete the data in the local storage folder in the
equipment and try scanning again.
2D66
Failed to process your job. Insufficient Storage
space.
Reduce the number of pages of the problem
job and try again. Check whether the server or
local disk has sufficient space in its capacity.
2D67FTP service is not available Ask your administrator whether the FTP service
is configured correctly.
2D68File Sharing service is not available Ask your administrator whether the SMB
protocol is enabled.
2D69NetWare service is not available Ask your administrator whether the NetWare
protocol is enabled.
2DA6
Failure to delete file Delete the files in the shared folder with
Explorer, turn the power OFF and then back
ON, and reattempt the problem job. If the error
still persists, contact your service
representative.
2DA7
Failure to acquire resource Turn the power OFF and then back ON. Perform
the job again. If the error still persists, contact
your service representative.
2DC0 Job canceled The job was canceled.
2DC1
Power failure occurred Make sure that the power cable is connected
properly and is inserted securely. Resend the
job.
Store to USB
2E10, 2E12,
2E13
Wrong Job status Turn the power OFF and then back ON. Perform
the job again. If the error still persists, contact
your service representative.
2E11
Not enough memory Wait for a while and try again. If the error still
persists, turn the power OFF and then back ON,
and try again.
2E14
Invalid parameter specified If you are using a template, create it again. If
the error still persists, turn the power OFF and
then back ON, and then try again.
2E15Document size exceeded limit or maximum
size
Divide the file into several files, or reattempt in
a single-page format.
2E30
Failure to create directory Make sure that the access privilege to the
storage directory is writable and also that the
disk in the directory has enough space, and
then try again. If more than one job is
performed simultaneously, the error may occur
because the disk temporarily runs out of space.
In this case, wait for a while and try again. If the
error still persists, turn the power OFF and then
back ON, and try again.
Error Code Problem Description Corrective Action

8.CHECKING THE EQUIPMENT STATUS WITH TopAccess
Error Codes 71
CH
EC
KIN
G T
HE
EQ
UIP
ME
NT
ST
AT
US
WIT
H T
op
Acce
ss
2E31, 2E33
Failure to create file Make sure that the access privilege to the
storage directory is writable and also that the
disk in the directory has enough space, and
then try again. If more than one job is
performed simultaneously, the error may occur
because the disk temporarily runs out of space.
In this case, wait for a while and try again. If the
error still persists, turn the power OFF and then
back ON, and try again.
2E32
Failure to delete file Turn the power OFF and then back ON. Perform
the job again. If the error still persists, contact
your service representative.
2E40
Failure to convert image file format This error occurs when conversion to a highly
compressed PDF format fails. Do the scanning
again. If the error still persists, Use the normal
PDF format. When this error occurs in
conversion other than to a highly compressed
PDF format, turn the power OFF and then back
ON. Then try to scan again. If the error still
persists, contact your service representative.
2E43
Encryption error Failure to create a file If the error still persists after reattempting, turn
the power OFF and then back ON. Then try
again.
2E44
Creating a file was not allowed Creating an unencrypted file was not allowed.
Configure the encryption settings and try
again. To create an unencrypted file, consult
the administrator.
2E45
Failure in making meta data Make sure that the template setting is correct,
and do the scanning again. If the error still
persists, turn the power OFF and then back ON,
and then try again.
2E65There are too many documents in the folder.
Failure in creating a new document
Delete the data in the local storage folder in the
equipment and try scanning again.
2E66
Failed to process your job. Insufficient Storage
space.
Reduce the number of pages of the problem
job and try again. Check whether the server or
local disk has sufficient space in its capacity.
2EC0 Job canceled The job was canceled.
2EC1
Power failure occurred Make sure that the power cable is connected
properly and is inserted securely. Resend the
job.
Remote Scan, WS Scan, File Downloader
2A20
Failure to acquire resource Reattempt the problem job. If the error still
persists, turn the power OFF and then back ON,
and try again.
2A31WS Scan function is not available Check if the WS Scan function is enabled. If not,
change it to “enabled”.
2A40System fatal error Turn the power OFF and then back ON. Try
scanning again.
2A50 Job canceled. The job was canceled.
Error Code Problem Description Corrective Action

8.CHECKING THE EQUIPMENT STATUS WITH TopAccess
72 Error Codes
2A51
Power failure occurred Make sure that the power cable is connected
properly and is inserted securely. Resend the
job.
2A60
Authentication for WS Scan failed When Fax & Scan of Windows is used with the
WIA driver, check if the user name for the login
is registered. When the control panel or EWB
of the equipment is used, check if the user
name for the login is registered.
2A70Insufficient permission to execute Remote
Scan
Check if the user is authorized to perform this
job.
2A71Insufficient permission to execute WS Scan Check if the user is authorized to perform this
job.
2A72Insufficient permission to access e-Filing box
using scan utility
Check if the user is authorized to perform this
job.
2A73The user who attempted to export or import
the address book has no permission
Check if the user is authorized to perform the
operation.
Store to e-Filing
2B11
Job status failed Turn the power OFF and then back ON. Perform
the job again. If the error still persists, contact
your service representative.
2B20
Failure to access file Turn the power OFF and then back ON. Perform
the job again. If the error still persists, contact
your service representative.
2B30Insufficient disk space Delete unnecessary documents in e-Filing and
try again.
2B31
Failure to access Electronic Filing Turn the power OFF and then back ON. Retry
the job in error. A folder with the same name as
an already existing document in the box cannot
be created. Retry by changing the folder name.
Delete the specified e-Filing or folder and reset
them. If the specified e-Filing or folder cannot
be deleted, contact your service
representative.
2B50
Failure to process image Turn the power OFF and then back ON. Try
scanning again. If the error still persists,
contact your service representative.
2B51
Failure to process print image Make sure that the Function List can be printed
out. Try printing again. If the error still persists,
contact your service representative.
2B71
The storage period of e-Filing documents will
expire
Check whether any necessary documents are
stored in e-Filing. The documents will be
deleted in a few days.
2B80The HDD for storing e-Filing data is running out
of space.
Delete all unnecessary documents in e-Filing.
2B90
Insufficient memory Turn the power OFF and then back ON. Try
scanning again. If the error still persists,
contact your service representative.
Error Code Problem Description Corrective Action

8.CHECKING THE EQUIPMENT STATUS WITH TopAccess
Error Codes 73
CH
EC
KIN
G T
HE
EQ
UIP
ME
NT
ST
AT
US
WIT
H T
op
Acce
ss
2BA0
Invalid box password specified Make sure that the password is correct and try
scanning again, or first reset the password and
then reattempt the scan. When this error
occurs in the printing of the data in e-Filing, do
this with the administrator’s password. If
recovery is still not completed or in case of an
invalid password for the operation of other
printing (opening the file, etc.), contact your
service representative.
2BA1
Incorrect paper size, color mode or resolution This size, color mode or resolution is not
supported by e-Filing. Please check the paper
size, color mode or resolution.
2BB0 Job canceled The job was canceled.
2BB1
Power failure occurred Make sure that the power cable is connected
properly and is inserted securely. Resend the
job.
2BC0
System fatal error Turn the power OFF and then back ON. Try
scanning again. If the error still persists,
contact your service representative.
2BD0
Power failure occurred during e-Filing restore Make sure that the power cable is connected
properly and is inserted securely. Resend the
job.
2BE0Failure to obtain the machine parameters Turn the power OFF and then back ON. Try
scanning again.
2BF0Reached the maximum number of pages Reduce the number of pages of the job in error
and perform the job again.
2BF1Reached the maximum number of documents Delete the documents from the boxes or
folders.
2BF2 Reached the maximum number of folders Delete the folders from the boxes.
Network Settings
2500
Syntax error, command unrecognized Check whether the Terminal mail address and
Destination mail address are correct. Check
whether the mail server is operating properly.
Turn the power OFF and then back ON. Perform
the job again.
2501
Syntax error in parameters or arguments Check whether the Terminal mail address and
Destination mail address are correct. Check
whether the mail server is operating properly.
Turn the power OFF and then back ON. Perform
the job again.
2503
Bad sequence of commands Check whether the mail server is operating
properly. Turn the power OFF and then back
ON. Try the problem job again. If the error still
persists, contact your service representative.
2504
Command parameter not implemented Check whether the mail server is operating
properly. Turn the power OFF and then back
ON. Try the problem job again. If the error still
persists, contact your service representative.
2550
Mailbox unavailable Confirm that the destination Email addresses
are correct. Check the access privilege for the
mailbox in the mail server.
Error Code Problem Description Corrective Action

8.CHECKING THE EQUIPMENT STATUS WITH TopAccess
74 Error Codes
2551
User not local Confirm that the destination Email addresses
are correct. Check whether the mail server is
operating properly.
2552
Insufficient system storage The file is too large for the mailbox. Confirm the
mailbox size on the mail server. Transmit again
in text mode or with a lower resolution. If the
error still persists, divide the document and
transmit again.
2553Mailbox name not allowed Check if there is an unpermitted character in
the mailbox name in the mail server.
Error Code Problem Description Corrective Action

9.WHEN SOMETHING IS WRONG WITH THE
EQUIPMENT
Try the troubleshooting tips in this chapter when you think there is something wrong with the equipment.
This chapter also describes the daily care for the equipment.
When You Think Something Is Wrong With the Equipment ...................................................76General operations ..............................................................................................................................................76

76 When You Think Something Is Wrong With the Equipment
0.When You Think Something Is Wrong With the Equipment
If you think there is something wrong with the equipment, check the following items.
To see the functions of the equipment such as copy or print, refer to their operator’s manuals (Copying Guide and
Printing Guide respectively).
Checking the operations or procedures may help you solve the problems. When something is unclear in the
operation of the equipment or you think there is something is wrong with it, the operator’s manual for the function
you are using will be helpful.
General operations
Problem Description Cause Corrective Action
The equipment does not
work at all.
The main power switch is OFF. Turn the main power switch ON.
The power cord is not securely
inserted into the outlet.
Insert the power cord into the outlet until it
comes to a stop.
No icons or signs are
displayed on the touch
panel.
(The MAIN POWER lamp, the
ON/OFF lamp and the
[ENERGY SAVER] button
light.)
The equipment is in the Sleep
mode.
Press the [ENERGY SAVER] button to recover from
the Sleep mode.
Refer to the Quick Start Guide.
No icons or signs are
displayed on the touch
panel.
(Only the MAIN POWER lamp
lights.)
The power of the equipment is
not turned ON.
Press and hold the [POWER] button until the ON/
OFF lamp lights.
The equipment is in the Super
Sleep mode.
Press and hold the [ENERGY SAVER] button until
the ON/OFF lamp lights to recover from the
Super Sleep mode.
Refer to the Quick Start Guide.
The touch panel is dim. The contrast of the touch panel
is adjusted lower.
Adjust the contrast lighter.
Refer to the MFP Management Guide.
The button does not
respond to my operation.
(“Saving energy Press
START button” appears on
the touch panel.)
The equipment is in the energy
saving mode.
Press the [ENERGY SAVER] button to recover from
the energy saving mode.
Refer to the Quick Start Guide.
The button does not
respond to my operation.
(The MAIN POWER lamp, the
ON/OFF lamp and the
[ENERGY SAVER] button
light.)
The equipment is in the Sleep
mode.
Press the [ENERGY SAVER] button to recover from
the Sleep mode.
Refer to the Quick Start Guide.
The button does not
respond to my operation.
(Only the MAIN POWER lamp
lights.)
The power of the equipment is
not turned ON.
Press and hold the [POWER] button until the ON/
OFF lamp lights.
The equipment is in the Super
Sleep mode.
Press and hold the [ENERGY SAVER] button until
the ON/OFF lamp lights to recover from the
Super Sleep mode.
Refer to the Quick Start Guide.
The window “Enter
Department Code” appears.
The equipment is managed
under the department
management function.
Enter your department code. If you do not know
it, contact the administrator of the equipment.
The window “Enter the user
name and Password”
appears.
The equipment is managed
under the user management
function.
Enter your user name and password. If you do
not know them, contact the administrator of the
equipment.

9.WHEN SOMETHING IS WRONG WITH THE EQUIPMENT
When You Think Something Is Wrong With the Equipment 77
WH
EN
SO
ME
TH
ING
IS W
RO
NG
WIT
H T
HE
EQ
UIP
ME
NT
A message is displayed on
the touch panel.
Some trouble occurred in the
equipment (or the message is
displayed just for an ordinary
operation).
See the meaning of the message referring to the
listing below.
To learn more about the messages displayed on
the touch panel, refer to the Hardware Troubleshooting Guide.
The equipment reboots
automatically.
The auto-recovery function
works because a memory or
operation abnormality has been
detected.
Due to rebooting, the equipment has been
recovered to the normal condition. You can
operate the equipment as usual.
Problem Description Cause Corrective Action

9.WHEN SOMETHING IS WRONG WITH THE EQUIPMENT
78 When You Think Something Is Wrong With the Equipment

INDEX 79
INDEX
A
A/B format ......................................................................... 3
ADF..................................................................................... 3
C
Clients.............................................................................. 29
Command line option..................................................... 26
Copying
blurred image .............................................................. 19
color/black and white ................................................. 20
copying stops............................................................... 18
density.......................................................................... 18
image missing .............................................................. 19
setting functions.......................................................... 18
skewed image .............................................................. 19
stained image .............................................................. 18
streaked image ............................................................ 20
uneven image .............................................................. 19
D
Department code ............................................................ 76
[Device Settings] tab....................................................... 27
Document password....................................................... 25
E
e-Filing Web Utility
contents frame ............................................................ 36
error messages ............................................................ 37
session ends................................................................. 36
sub windows ................................................................ 36
Energy saving mode........................................................ 76
Error codes ................................................................. 54, 62
print jobs ...................................................................... 62
scan jobs ...................................................................... 67
transmission and reception ........................................ 64
Error messages................................................................ 54
e-Filing Web Utility ...................................................... 37
TopAccess .................................................................... 60
H
Hardware problems ........................................................ 30
I
Icons on TopAccess
call for service .............................................................. 59
cover open ................................................................... 58
paper empty................................................................. 59
paper misfeed .............................................................. 59
printer error 1 .............................................................. 58
printer error 2 .............................................................. 58
staples empty .............................................................. 59
toner empty ................................................................. 58
waste toner full ............................................................ 58
IPP print........................................................................... 45
J
Job history....................................................................... 13
Jobs
confirming ...................................................................... 8
deleting........................................................................... 9
moving.......................................................................... 11
pausing / resuming ...................................................... 10
recovery information ................................................... 12
skipped ......................................................................... 12
L
LDAP authentication ....................................................... 43
LDAP search ..................................................................... 43
Local Discovery................................................................ 41
Locating the equipment............................................ 40, 41
Log.................................................................................... 13
LPR print .................................................................... 28, 45
LT format ........................................................................... 3
N
N/W-Fax driver ................................................................. 48
Network Fax driver .......................................................... 48
Novell print ...................................................................... 46
P
ping command ................................................................ 42
Port
printer driver ................................................................ 26
Print job errors................................................................. 24
Printer configuration - retrieving.................................... 27
Printing environment
Linux ............................................................................. 47
Mac OS .......................................................................... 46
NetWare........................................................................ 46
Novell print................................................................... 46
UNIX .............................................................................. 47
Windows ................................................................. 44, 45
Printing problems (network related) ............................. 44
Private print job............................................................... 25
R
Raw TCP print .................................................................. 45
S
Scan data
E-mailing scan data ..................................................... 32
saving in the shared folder .......................................... 32
Sleep mode...................................................................... 76
SMB print ................................................................... 28, 44
Super Sleep mode ........................................................... 76
T
Toner remaining amount................................................ 15
Trouble............................................................................. 55
U
User information ............................................................. 76

80 INDEX

FC-2000AC/2500AC
FC-2505AC/3005AC/3505AC/4505AC/5005AC
DP-2008A/2508A/3008A/3508A/4508A/5008A
FC-5506AC/6506AC/7506AC
DP-5508A/6508A/7508A/8508A
OME150049A0

1-11-1, OSAKI, SHINAGAWA-KU, TOKYO, 141-8562, JAPAN
MULTIFUNCTIONAL DIGITAL COLOR SYSTEMS / MULTIFUNCTIONAL DIGITAL SYSTEMS
Software Troubleshooting Guide
©2016 TOSHIBA TEC CORPORATION All rights reserved
Patent; http://www.toshibatec.co.jp/en/patent/
R150620Q6301-TTEC
Ver01 F Issued in Mar. 2016