moving data folders for windows small business server 2003
TRANSCRIPT
5/14/2018 Moving Data Folders for Windows Small Business Server 2003 - slidepdf.com
http://slidepdf.com/reader/full/moving-data-folders-for-windows-small-business-server-2003 1/13
3/7/12 MovingDataFoldersforWindowsSmallBusinessServer2003
Moving Data Folders for Windows Small Business Server 2003
12outof 19ratedthishelpful Ratehistopic
Updated: Novel'Tber 12, 2009
Applies To: Windows SBS 2003
Objective
There are several reasons why you might want to move the data folders for the Microsoft® Windows® Small Business Server
system. These folders include: Users Shared Folders, the Windows SharePoint® Services and Monitoring databases, Exchangelog files, Sent Faxes folder, and ClientApps shared folder. The reasons you might want to move these folders include:
Ihe drive where the data folders for Windows Small Business Server 2003 are stored is running out of hard disk space.
Iou decide to add a higher performance disk or RAID array (redundant array of independent disks) to your server to use
storage. In this case, you want to install the disk(s) and then move the data folders to the new disk(s).
Ihe server was preinstalled by an Original Equipment Manufacturer (OEM) using one partition and you want to move the
drive.
Iou want the operating system on a separate drive than your data drive to make backup easier.
Iou want to move data to a separate partition to optimize performance of the volume where shadow copy is enabled.
The following key terms are associated with moving data folders for Windows Small Business Server 2003:
Source partition The partition from which you are moving data folders.
Destination partition The partition to which you are moving data folders.
Drive An area of storage on a hard disk drive that is formatted with a files system and has a driver letter.
Partition A portion of a physical disk that functions as if it were a physically separate disk. After you create a partition, you
and assign it a drive letter before you can store data on it. Once the partition is formatted, it is referred to as a partition. On
partitions are known as basic volumes, which include primary partitions and logical drives. On dynamic disks, partitions are kno
volumes, which include simple, striped spanned, mirrored, and RAID-Svolumes.
Volume An area of storage on a hard disk. A volume is formatted by using a file system, such as file allocation table (FAT)
system, and has a drive letter assigned to it. A single hard disk can have multiple volumes, and a volume can also span multip
WMSDE SQL Server?" 2000 Desktop Engine (Windows) (WMSDE). Setup installs an instance of WMSDEfor the Windows Sha
database. WMSDE is a protected system database that is usable only by Windows components. There is no size limitation for
database. A WMSDEdatabase cannot be used by other applications and non-Microsoft applications.
MSDE2000 SQL Server 2000 Desktop Engine (MSDE 2000). Setup installs an instance of MSDE2000 for the Monitoring data
2 gigabyte (GB) size limitation for a MSDE2000 database. An MSDE2000 database can be used by other applications and non
applications.
Overview of Moving Data Folders
This document provides step-by-step instructions for moving each of the data folders for Windows Small Business Server 200
choose to move one or all of the data folders. For example, you can choose to move only the Users Shared Folders and no oth
Additionally, it is not necessary to move the data folders in the order presented in this document. For example, you can choos
Exchange databases and log files on one day and then the Users Shared Folders on another. However, it is strongly recommen
always complete and verify a full backup before moving any data folders.
Consider the following before completing this document:
Io complete the procedures in this document, you must be logged on as a member of the Domain Admins security group
Ihis document assumes that if you are moving the data folders to a new disk or new RAIDarray, the disk(s) are already
installed in the computer running Windows Small Business Server 2003.
IWhen moving data folders, the resource that uses the data folder will not be available. For example, while moving the E
databases and log files, users will not be able to send or receive e-mail. It is recommended that you move data folders
not connected to the network. However, if you must move folders while users are connected to the network, you must
close resources that are affected by the moving of data folders
Moving data folders on the computer running Windows Small Business Server 2003 includes the following steps:
Itep 1: Complete and Verify a Full Backup. The evening prior to moving data folders, back up the computer running
Business Server 2003 to protect your data from accidental loss in the unlikely event of an error occurring while moving
Itep 2: Notify Users that Resources will be Unavailable. When moving data folders, the resource that uses that dat
technet.microsoft.com/en-us/library/cc708031v=ws.1O}.aspx
5/14/2018 Moving Data Folders for Windows Small Business Server 2003 - slidepdf.com
http://slidepdf.com/reader/full/moving-data-folders-for-windows-small-business-server-2003 2/13
3/7/12 MovingDataFoldersfor WindowsSmallBusinessServer2003
be available.
IStep 3: Move the Users Shared Folders. The Users Shared Folders is the folder where each user's individual data fold
addition, if redirection of My Docurrents is enabled, the My Docurrents are stored in each user's data folder. Moving the
Folders requires several steps.
IStep 4: Move the Windows SharePoint Services Databases. The Windows SharePoint Services databases use an ins
WMSDE. This is where the Company Web site docurrents are stored. Moving the databases requires several steps.
Note
This decurrent provides step-by-step instructions for moving the databases when using the instance of WMSDE. If yo
instance to use SQL Server 2000, see article 224071, "INF: Moving SQL Server Databases to a New Location with Det
the Microsoft Knowledge Base (http://go.microsoft.corrv'fwlink/?LinkId=4441).
If you are using SQL Server 2000 or SQL Server 2005, you can use the SQL Server Enterprise Manager to back up, de
attach a database. For more information about SQL Server Enterprise Manager, see "SQL Server Enterprise Manager" a
Web site (http://go. microsoft .corrv'fwlink/?LinkId=102362).
For more information about backing up a database, see "How to create a database backup (Enterprise Manager)" at th
Web site (http://go. microsoft .corrv'fwlink/?LinkId=102363).
For more information about attaching and detaching a database, see "How to attach and detach a database (Enterpris
at the Microsoft Web site (http://go.microsoft.corrv'fwlink/?LinkId=102364).
For more information about moving SharePoint databases, see "Moving Windows SharePoint Services Databases" at th
Web site (http://go. microsoft .corrv'fwlink/?LinkId=102365).
IStep 5: Move the Monitoring Instance of MSDE 2000. The Monitoring database uses an instance of MSDE2000. This
information for the monitoring reports is stored. Moving the Monitoring instance of MSDE2000 requires several steps.
IStep 6: Move the Exchange Databases and Log Files. There are two Exchange databases, the mailbox store and pu
where users' mailboxes and folders are stored. The information about if rressages are being transferred correctly and in
amount of tlrre by the rressage transfer agent (MTA) is stored in the log files. To move the Exchange databases and lo
Knowledge Base article referenced in the procedure.
IStep 7: Move the Sent Faxes Folder. The Sent Faxes folder is where outgoing faxes are archived. To move the Sent
need to change the location where sent faxes are archived, and then copy the existing sent faxes to the destination lo
IStep 8: Move the ClientApps Data Folder. By default, the ClientApps shared folder takes up approximately 1 gigabyte
However, if you have added several applications to this folder that you are deploying using the Assign Applications Wiza
might have grown considerably in size. In this case, you might want to move the ClientApps shared folder to another loc
IStep 9: Move the Windows Server Update Services Folder. Updates are divided into two parts: a rretadata part tha
update, and the files required to install the update on a computer. Although rretadata that describes updates is storedServer Update Services (WSUS) database, the update files that are used to install the updates are stored in a folder on
will use the Wsusutil.exe command to move the update files to a different location.
IStep 10: Complete the Process. After moving the data folders, you should notify users that the resources are again a
Additionally, you should complete a full backup.
Step1:Complete and Verify a Full Backup
To protect your data from accidental loss in the unlikely event of an error occurring while moving data folders, back up the coWindows Small Business Server 2003 the evening prior to moving data folders.
To complete and verify a full backup
• The evening prior to moving data folders, perform a full system backup. For more information about completing a backup
Up and Restoring Windows Small Business Server 2003" at the Microsoft Web site (http://go.microsoft.corrv'fwlink/?LinkId=19
• Verify that the backup ran successfully. To test the integrity of the backup, select random files from your backup, resto
altemate location, and then confirm that the backed up files are the sarre as the original ones. If you used the Window
Server 2003 Backup Wizard, you can verify that the backup ran successfully through Server Managerrent. (Click Start,
Management, and then click Backup. Information about the backup appears in the details pane.)
Step2: Notify Usersthat Resourceswill be Unavailable
When moving each data folder, the resource that uses that data folder will not be available. If you plan to move any data fold
are still connected to the network, you should notify them regarding which resources will be unavailable. For example, you cou
mail to users several days prior to moving the data folders to let them know what resources will be unavailable. You could the
the day of the move.IWhile moving the Users Shared Folders, the users will not be able to save to their existing user folders. Additionally, if u
technet.microsoft.com/en-us/library/cc708031v=ws.1O}.aspx
5/14/2018 Moving Data Folders for Windows Small Business Server 2003 - slidepdf.com
http://slidepdf.com/reader/full/moving-data-folders-for-windows-small-business-server-2003 3/13
3/7/12 MovingDataFoldersfor WindowsSmallBusinessServer2003
Documents are being redirected to their user folders, they will not be able to access documents.
IWhile moving the databases, the Company Web site will not be available to users. Users must save any open documents
and close any browser windows open to the Company Web site.
IWhile moving the Exchange databases and log files, users will not be able to send or receive e-mail.
IWhile moving the Sent Faxes folder, the archived faxes will not be available.
IWhile moving the ClientApps shared folder, administrators will not be able to deploy applications and users will not be ab
applications.
Step 3: Move the UsersSharedFolders
The Users Shared Folders is the folder where each user's individual data folder is located. In addition, if redirection of My Doc
enabled, the My Documents are stored in each user's data folder. Moving the Users Shared Folders requires the following step
Ilosing connections for Users Shared Folders
Insuring the destination partition is formatted as NTFS
Inabling quotas on the destination partition
Ixporting and importing quota settings
IMoving the Users Shared Folders to the destination partition
Iharing the Users folder on the destination partition
Inabling file version retention on the destination partition
To close connections to Users Shared Folders
• Click Start, and then click Server Management.
• In the console tree, click Shares (Local).
• In the details pane, locate the # Client Connections for the Share Name of Users.
• If there are connected users, in the details pane, click View Connected Users.
• Right-click a user, and then click Disconnect.
Important
When you disconnect a user session, all sessions to all shares (not just the Users share) are closed.
To ensure the destination partition is formatted as NTFS
Verify that the partition (also referred to as a volume) or drive where you plan to move the Users Shared Folders is formatted
provides additional security and enables you to continue to use disk quotas on the Users Shared Folders.
• Click Start, point to Administrative Tools, and then click Computer Management.
• In the console tree, click Disk Management.
• In the details pane, verify that the File System for the destination partition is formatted as NTFS.
If the partition is not formatted, you should format it as NTFS. To do so, right-click the free space, and then click New
Follow the instructions to complete the New Partition Wizard.
If the partition is formatted as FAT or FAT32, you should convert the partition to NTFS. Converting the partition (rather
reformatting it) enables you to keep any existing data on the partition. For more information about converting a partition
Start, click Help and Support, and then search for "Reformatting or converting a partition to use NTFS." The topic will
the Help Topics section of Help and Support.
• Keep the Computer Management console open, and then continue to the next step.
To enable quotas on the destination part ition
technet.microsoft.com/en-us/library/cc708031v=ws.1O}.aspx
5/14/2018 Moving Data Folders for Windows Small Business Server 2003 - slidepdf.com
http://slidepdf.com/reader/full/moving-data-folders-for-windows-small-business-server-2003 4/13
3/7/12 MovingDataFoldersforWindowsSmallBusinessServer2003
So that adninistrators can rronitor and control the arrount of disk space used by individual users, you must enable quotas on
partition.
Note
If you have other folders and files on the partition that you plan to rrove the Users Shared Folders, enabling quotas also affe
folders and files.
• Right-click the destination partition, and then click Properties.
• Click the Quota tab.
• Click Enable quota management, and then click Deny disk space to users exceeding quota limit.
• Select Limit disk space to, and then set it to 1 GB. For Set warning level to, use 900 MB.
• Select Log event when a user exceeds the quota limit, and Log event when a user exceeds their warning level.
• Click OK when you receive the message about enabling disk quotas.
• Leave the Computer Management console open, and then continue to the next step.
To export and import quota settings
You must export the quota settings from the source partition and then import the settings to the destination partition.
• In the console tree, click DiskManagement.
• Right-click the source partition, and then click Properties.
• Click the Quota tab.
• Click Quota Entries.
• From the menu, click Edit, and then click Select all.
• From the menu, click Quota, and then click Export. Save the file as Original_quotas to the My Documents folder.
• Right-click the destination partition, and then click Properties.
• Click the Quota tab.
• Click Quota Entries .
• From the menu, click Quota, and then click Import. Select Original_quotas in the My Documents folder, and then cl
• When a message appears asking if you want to replace the existing entry for the BUILTIN\Administrators quota, click Ye
To move the Users Shared Folders folder to the destination partition
Use the Xcopy command to copy the Users Shared Folders folder from the source partition to the destination partition. This m
the file ownership settings and discretionary access control list (DACL) information.
• Click Start, click Run, and then type Cmd.
• At a command prompt, type the following, where C is the source partition and D is the destination partition:
X co py C :\ Us er s S ha re d F ol de rs D :\ Us er s S ha re d F ol de rsI e 1 0 I d I h I v I c » C : \ C o p y r e s u l t s . t x t
Note
For an explanation of each parameter, see the table at the end of the procedure.
• Press ENTER, and then the cursor will pause. Type D for Directory.
Note
When the output of the Xcopy command is redirected to a file, the following prompt is not displayed: Does D:\Users
Folders specify a file name or directory name on the target (F=file, D
=directory)? Although the prompt is no
technet.microsoft.com/en-us/library/cc708031v=ws.1O).aspx

5/14/2018 Moving Data Folders for Windows Small Business Server 2003 - slidepdf.com
http://slidepdf.com/reader/full/moving-data-folders-for-windows-small-business-server-2003 5/13
3/7/12 MovingDataFoldersforWindowsSmallBusinessServer2003
you rrust type D to complete the command.
• Using Windows Explorer, open C:\Copyresults.txt and verify if any errors occurred during the file copy. You can also com
and size of the files that were in the Users folder in the source partition with the number of files that are in the destinat
Note
You will delete the original Users Shared Folders in the next procedure, "To share the Users Shared Folders."
Command Line Parameters
Parameter Description
C The original location of the Users Shared Folders. The default location is C:\Users Shared Folders, wher
directory (the top-level folder or directory on a computer).
D The partition on the disk where you plan to move the Users Shared Folders.
/e Copies all subdirectories, even if they are empty.
/0 Copies file ownership and discretionary access control list (DACL) information.
/d Copies only those files whose source time is newer than the destination time.
To copy files changed on or after a specified date, type /d: m-d-y, where m-d-y is the specified date,
year format, to begin checking for file changes.
/h Copies files with hidden and system file attributes. By default, Xcopy does not copy hidden or system f
/v Verifies each new file.
/c Ignores errors
»C:\Copyresults.txt Appends the results of the copy to a file named Copyresults.txt.
Note
For more information about Xcopy, type Xcopy /? at the command prompt.
An alternative to Xcopy is RoboCopy, which is available at the Microsoft Web site (http://go.microsoft.com/fwlink/?LinkId=20249
To share the Users Shared Folders
You mist share the Users Shared Folders on the destination partition so that users can access their individual data folders. Th
shared with the share name of Users or the folder will not be backed up by the Windows Small Business Server 2003 Backup W
Additionally, if you share the folder as a name other than Users and have My Documents Redirection enabled, you will have to
share name referenced by the redirection in the Client Document Redirection task.
• Click Start, and then click Server Management.
• In the console tree, click Shares.
• In the details pane, right-click Users, and then click Stop Sharing.
• Click Yes when the message appears asking if you are sure you want to stop sharing the folder.
• In the details pane, click Add a Shared Folder.
• In the Share a Folder Wizard, configure your server by using the information provided in Table 1:
Table 1-Share a Folder Wizard
I Wizard Page I Actiontechnet.microsoft.com/en-us/library/cc708031v=ws.1O}.aspx
5/14/2018 Moving Data Folders for Windows Small Business Server 2003 - slidepdf.com
http://slidepdf.com/reader/full/moving-data-folders-for-windows-small-business-server-2003 6/13
3/7/12 MovingDataFoldersforWindowsSmallBusinessServer2003
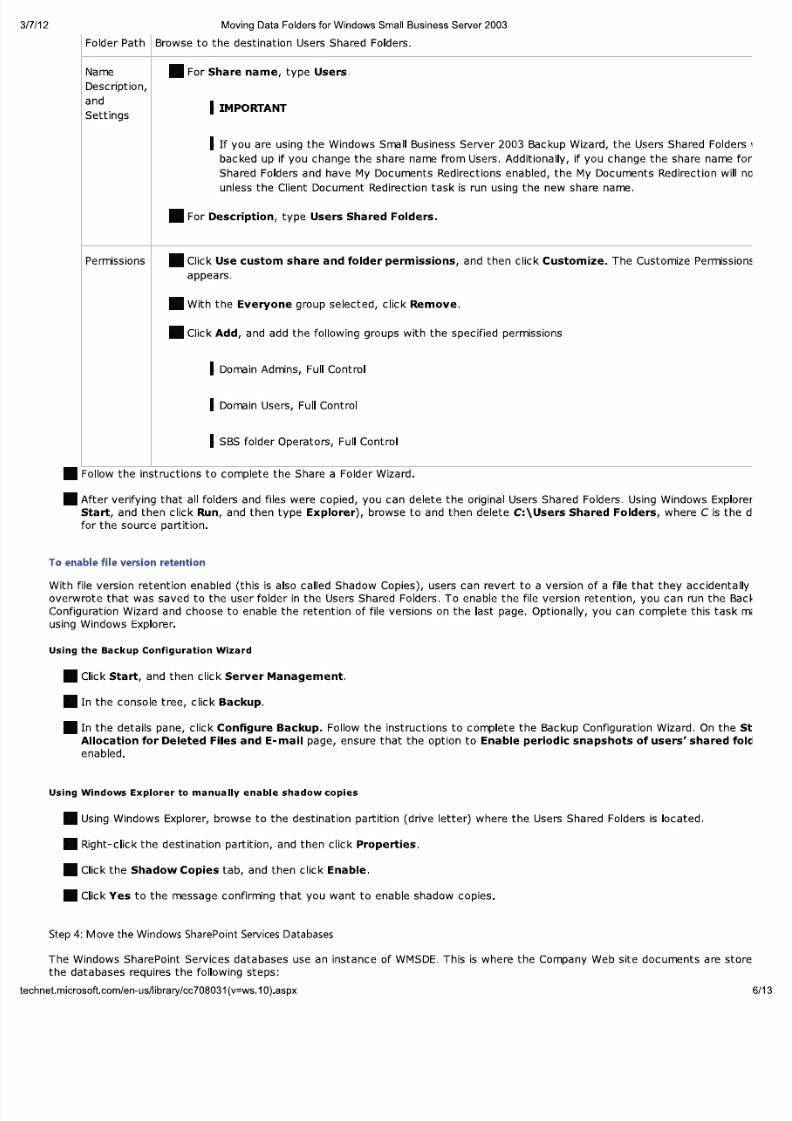
Folder Path Browse to the destination Users Shared Folders.
Name
Description,
and
Settings
• For Share name, type Users.
IMPORTANT
If you are using the Windows Small Business Server 2003 Backup Wizard, the Users Shared Fo
backed up if you change the share name from Users. Additionally, if you change the share nam
Shared Folders and have My Documents Redirections enabled, the My Documents Redirection
unless the Client Document Redirection task is run using the new share name.
• For Description, type Users Shared Folders.
Perrrissions
• Follow the instructions to complete the Share a Folder Wizard.
• After verifying that all folders and files were copied, you can delete the original Users Shared Folders. Using Windows Ex
Start, and then click Run, and then type Explorer), browse to and then delete C:\Users Shared Folders, where C is
for the source partition.
• Click Use custom share and folder permissions, and then click Customize. The Customize Perm
appears.
• With the Everyone group selected, click Remove.
• Click Add, and add the following groups with the specified permissions
Iomain Admins, Full Control
Iomain Users, Full Control
IBS folder Operators, Full Control
To enable file version retention
With file version retention enabled (this is also called Shadow Copies), users can revert to a version of a file that they accidenoverwrote that was saved to the user folder in the Users Shared Folders. To enable the file version retention, you can run the
Configuration Wizard and choose to enable the retention of file versions on the last page. Optionally, you can complete this ta
using Windows Explorer.
Using the Backup Configuration Wizard
• Click Start, and then click Server Management.
• In the console tree, click Backup.
• In the details pane, click Configure Backup. Follow the instructions to complete the Backup Configuration Wizard. On t
Allocation for Deleted Files and E-mail page, ensure that the option to Enable periodic snapshots of users' shared
enabled.
Using Windows Explorer to manually enable shadow copies
• Using Windows Explorer, browse to the destination partition (drive letter) where the Users Shared Folders is located.
• Right-click the destination partition, and then click Properties.
• Click the Shadow Copies tab, and then click Enable.
• Click Yes to the message confirming that you want to enable shadow copies.
Step 4: Move the Windows SharePoint ServicesDatabases
The Windows SharePoint Services databases use an instance of WMSDE. This is where the Company Web site documents are
the databases requires the following steps:
technet.microsoft.com/en-us/library/cc708031v=ws.1O).aspx
5/14/2018 Moving Data Folders for Windows Small Business Server 2003 - slidepdf.com
http://slidepdf.com/reader/full/moving-data-folders-for-windows-small-business-server-2003 7/13
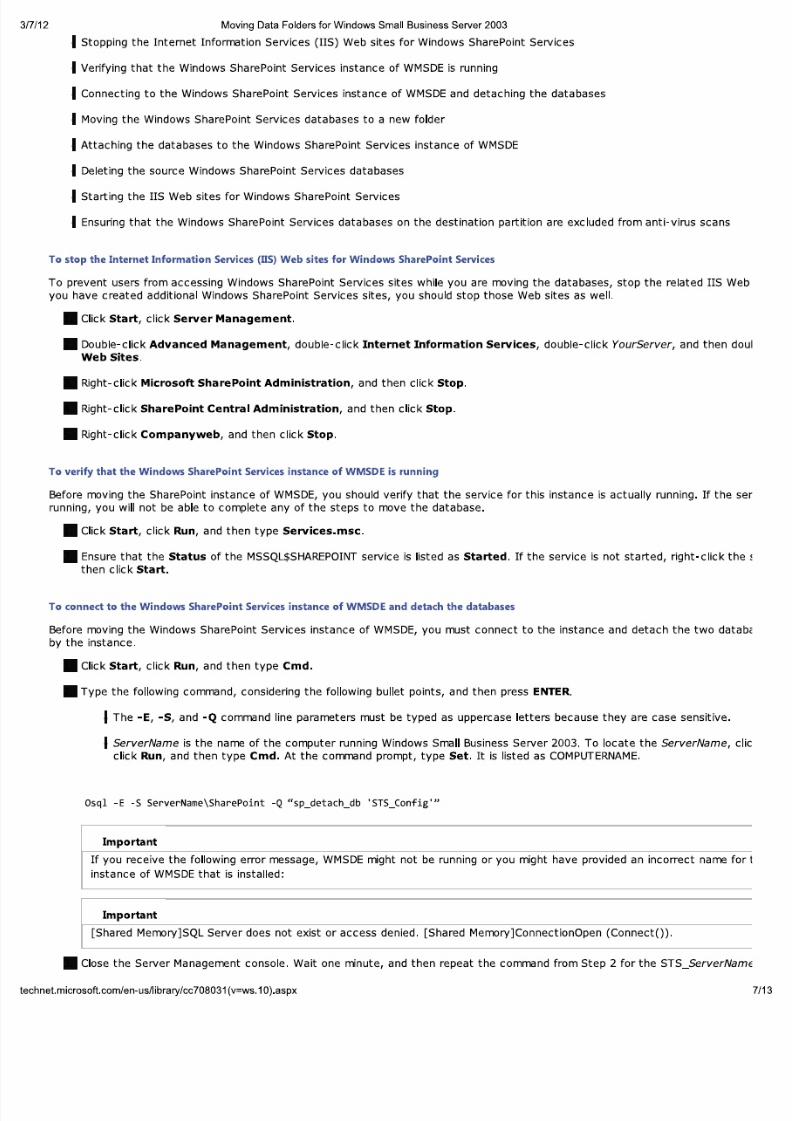
3/7/12 MovingDataFoldersforWindowsSmallBusinessServer2003Itopping the Internet Information Services (115)Web sites for Windows SharePoint Services
Ierifying that the Windows SharePoint Services instance of WMSDE is running
Ionnecting to the Windows SharePoint Services instance of WMSDEand detaching the databases
IMoving the Windows SharePoint Services databases to a new folder
Ittaching the databases to the Windows SharePoint Services instance of WMSDE
Ieleting the source Windows SharePoint Services databases
Itarting the 115Web sites for Windows SharePoint Services
Insuring that the Windows SharePoint Services databases on the destination partition are excluded from anti-virus scan
To stop the Internet Information Services (115)Web sites for Windows SharePoint Services
To prevent users from accessing Windows SharePoint Services sites while you are moving the databases, stop the related 115
you have created additional Windows SharePoint Services sites, you should stop those Web sites as well.
• Click Start, click Server Management.
• Double-click Advanced Management, double-click Internet Information Services, double-click YourServer, and then
Web Sites.
• Right-click Microsoft SharePoint Administration, and then click Stop.
• Right-click SharePoint Central Administration, and then click Stop.
• Right-click Companyweb, and then click Stop.
To verify that the Windows SharePoint Services instance of WMSDE is running
Before moving the SharePoint instance of WMSDE, you should verify that the service for this instance is actually running. If th
running, you will not be able to complete any of the steps to move the database.
• Click Start, click Run, and then type Services.msc.
• Ensure that the Status of the MSSQL$SHAREPOINTservice is listed as Started. If the service is not started, right-click
then click Start.
To connect to the Windows SharePoint Services instance of WMSDE and detach the databases
Before moving the Windows SharePoint Services instance of WMSDE, you must connect to the instance and detach the two d
by the instance.
• Click Start, click Run, and then type Cmd.
• Type the following command, considering the following bullet points, and then press ENTER
Ihe -E, -5, and -Q command line parameters must be typed as uppercase letters because they are case sensitive
IerverName is the name of the computer running Windows Small Business Server 2003. To locate the ServerName
click Run, and then type Cmd. At the command prompt, type Set. It is listed as COMPUTERNAME.
Osql -E -S ServerName\SharePoint -Q "sp_detach_db 'STS_Config'"
Important
If you receive the following error message, WMSDEmight not be running or you might have provided an incorrect nam
instance of WMSDEthat is installed:
Important
[Shared Memory]SQL Server does not exist or access denied. [Shared Memory]ConnectionOpen (Connectfj).
• Close the Server Management console. Wait one minute, and then repeat the command from Step 2 for the STS_ServerN
technet.microsoft.com/en-us/library/cc708031v=ws.1O}.aspx
5/14/2018 Moving Data Folders for Windows Small Business Server 2003 - slidepdf.com
http://slidepdf.com/reader/full/moving-data-folders-for-windows-small-business-server-2003 8/13
3/7/12 MovingDataFoldersforWindowsSmallBusinessServer2003
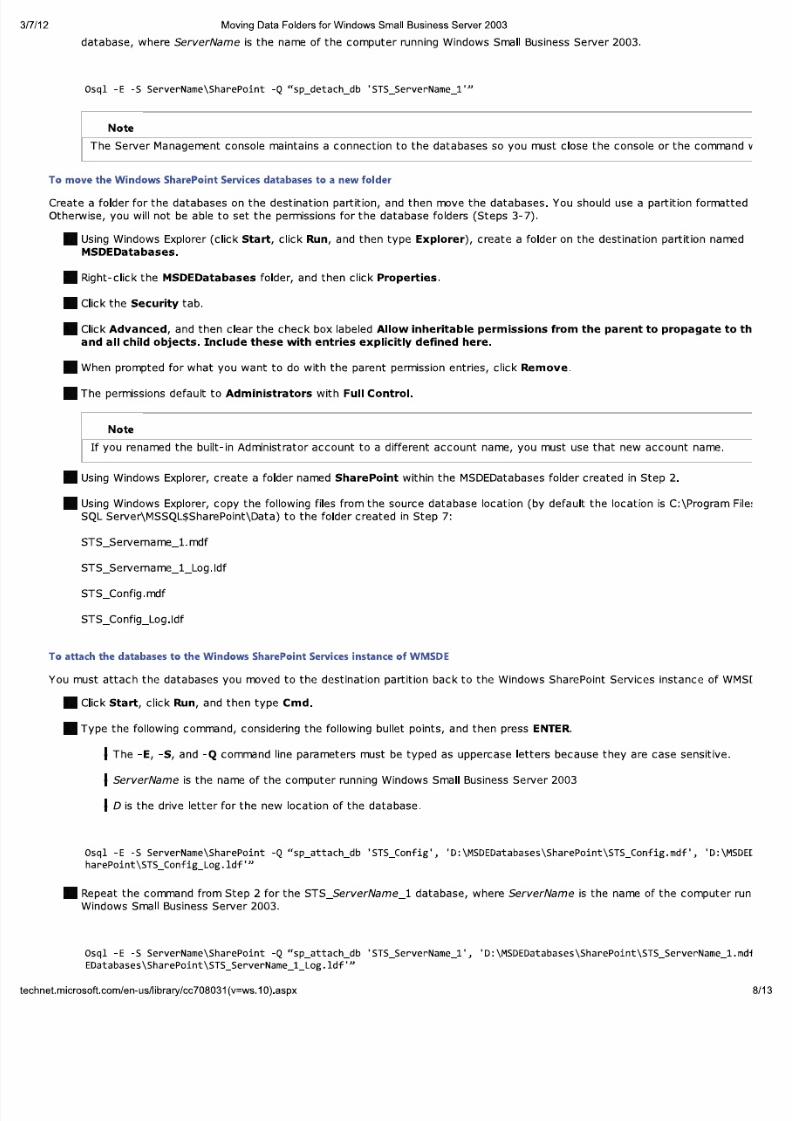
database, where ServerName is the narre of the computer running Windows Small Business Server 2003.
O s q l - E - S S er v e rN am e\ S h ar eP o i nt - Q " s p_ d et a ch _ db ' S TS _ Se r ve r Na m e_ l '"
Note
The Server Managerrent console maintains a connection to the databases so you must close the console or the comm
To movetheWindowsSharePointServicesdatabasesto a newfolder
Create a folder for the databases on the destination partition, and then move the databases. You should use a partition forma
Otherwise, you will not be able to set the permissions for the database folders (Steps 3-7).
• Using Windows Explorer (click Start, click Run, and then type Explorer), create a folder on the destination partition na
MSDEDatabases.
• Right-click the MSDEDatabases folder, and then click Properties.
• Click the Security tab.
• Click Advanced, and then clear the check box labeled Allow inheritable permissions from the parent to propagate
and all child objects. Include these with entries explicitly defined here.
• When prompted for what you want to do with the parent permission entries, click Remove.
• The permssions default to Administrators with Full Control.
Note
If you renamed the built-in Administrator account to a different account name, you must use that new account name
• Using Windows Explorer, create a folder narred SharePoint within the MSDEDatabases folder created in Step 2.
• Using Windows Explorer, copy the following files from the source database location (by default the location is C:\Program
SQL Server\MSSQL$SharePoint\Data) to the folder created in Step 7:
STS_Servema rre_l. mdf
STS_Servema rre_l_Log .Idf
STS_Config.mdf
STS_Config_Log .Idf
To attachthe databasesto the WindowsSharePointServicesinstanceof WMSDE
You must attach the databases you moved to the destination partition back to the Windows SharePoint Services instance of
• Click Start, click Run, and then type Cmd.
• Type the following command, considering the following bullet points, and then press ENTER
Ihe -E, -5, and -Q command line parameters must be typed as uppercase letters because they are case sensitive
IerverName is the narre of the computer running Windows Small Business Server 2003I is the drive letter for the new location of the database.
O s q l - E - S S er v e rN am e\ S h ar eP o i nt - Q " s p _a tt a c h_ db ' ST S _ Co nf i g ', · O: \M S O EO at a b as es \S h a re Po i n t\ ST S_ C o nf ig . m df ·, ' O:h a r e P o i n t \ S T S _ C o n f i g _ L o g . l d f · "
• Repeat the command from Step 2 for the STS_ServerName_l database, where ServerName is the narre of the compute
Windows Small Business Server 2003.
O s q l - E - S S e r v e r N a m e \ S h a r e P o i n t - Q " s p _ a t t a c h _ d b ' S T S _ S e r v e r N a m e _ l ' , ' O : \ M S O E O a t a b a s e s \ S h a r e P o i n t \ S T S _ S e r v e r N a m e _ lE O a t a b a s e s \ S h a r eP o i n t \ S T S _ S e r v e r Na m e _ l _ L o g . l d f ' "
technet.microsoft.com/en-us/library/cc708031v=ws.1O).aspx
5/14/2018 Moving Data Folders for Windows Small Business Server 2003 - slidepdf.com
http://slidepdf.com/reader/full/moving-data-folders-for-windows-small-business-server-2003 9/13
3/7/12 MovingDataFoldersforWindowsSmallBusinessServer2003
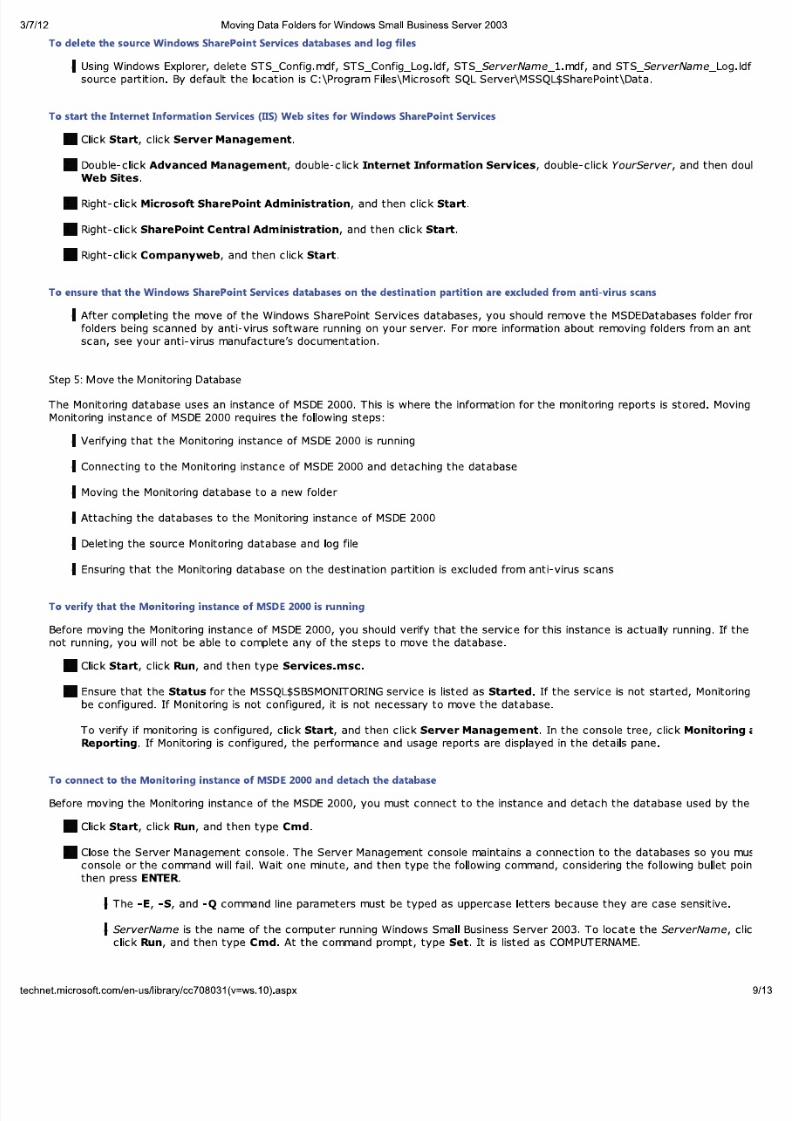
To delete the sourceWindows SharePoint Servicesdatabasesand log files
Ising Windows Explorer, delete STS_Config.mdf, STS_Config_Log.ldf, STS_ServerName_l.mdf, and STS_ServerName_Lo
source partition. By default the location is C:\Program Files\Microsoft SQL Server\MSSQL$SharePoint\Data.
To start the Internet Information Services(115)Web sites for Windows SharePoint Services
• Click Start, click Server Management.
• Double-click Advanced Management, double-click Internet Information Services, double-click YourServer, and then
Web Sites.
• Right-click Microsoft SharePoint Administration, and then click Start.
• Right-click SharePoint Central Administration, and then click Start.
• Right-click Companyweb, and then click Start.
To ensure that the Windows SharePoint Servicesdatabaseson the destination partition are excluded from anti-virus scans
Ifter cormletlnq the move of the Windows SharePoint Services databases, you should remove the MSDEDatabases folde
folders being scanned by anti-virus software running on your server. For more information about removing folders from a
scan, see your anti-virus manufacture's documentation.
Step 5: Move the Monitoring Database
The Monitoring database uses an instance of MSDE2000. This is where the information for the monitoring reports is stored. M
Monitoring instance of MSDE2000 requires the following steps:
Ierifying that the Monitoring instance of MSDE2000 is running
Ionnecting to the Monitoring instance of MSDE2000 and detaching the database
IMoving the Monitoring database to a new folder
Ittaching the databases to the Monitoring instance of MSDE2000
Ieleting the source Monitoring database and log fi le
Insuring that the Monitoring database on the destination partition is excluded from anti-virus scans
To verify that the Monitoring instanceof MSDE2000 is running
Before moving the Monitoring instance of MSDE2000, you should verify that the service for this instance is actually running.
not running, you will not be able to complete any of the steps to move the database.
• Click Start, click Run, and then type Services.msc.
• Ensure that the Status for the MSSQL$SBSMONITORINGservice is listed as Started. If the service is not started, Moni
be configured. If Monitoring is not configured, it is not necessary to move the database.
To verify if monitoring is configured, click Start, and then click Server Management. In the console tree, click Monitor
Reporting. If Monitoring is configured, the performance and usage reports are displayed in the details pane.
To connect to the Monitoring instanceof MSDE2000 and detach the database
Before moving the Monitoring instance of the MSDE2000, you must connect to the instance and detach the database used b
• Click Start, click Run, and then type Cmd.
• Close the Server Management console. The Server Management console maintains a connection to the databases so yo
console or the command will fail. Wait one minute, and then type the following command, considering the following bulle
then press ENTER
Ihe -E, -S, and -Q command line parameters must be typed as uppercase letters because they are case sensitive
IerverName is the name of the computer running Windows Small Business Server 2003. To locate the ServerName
click Run, and then type Cmd. At the command prompt, type Set. It is listed as COMPUTERNAME.
technet.microsoft.com/en-us/library/cc708031v=ws.1O}.aspx
5/14/2018 Moving Data Folders for Windows Small Business Server 2003 - slidepdf.com
http://slidepdf.com/reader/full/moving-data-folders-for-windows-small-business-server-2003 10/13
3/7/12 MovingDataFoldersforWindowsSmallBusinessServer2003
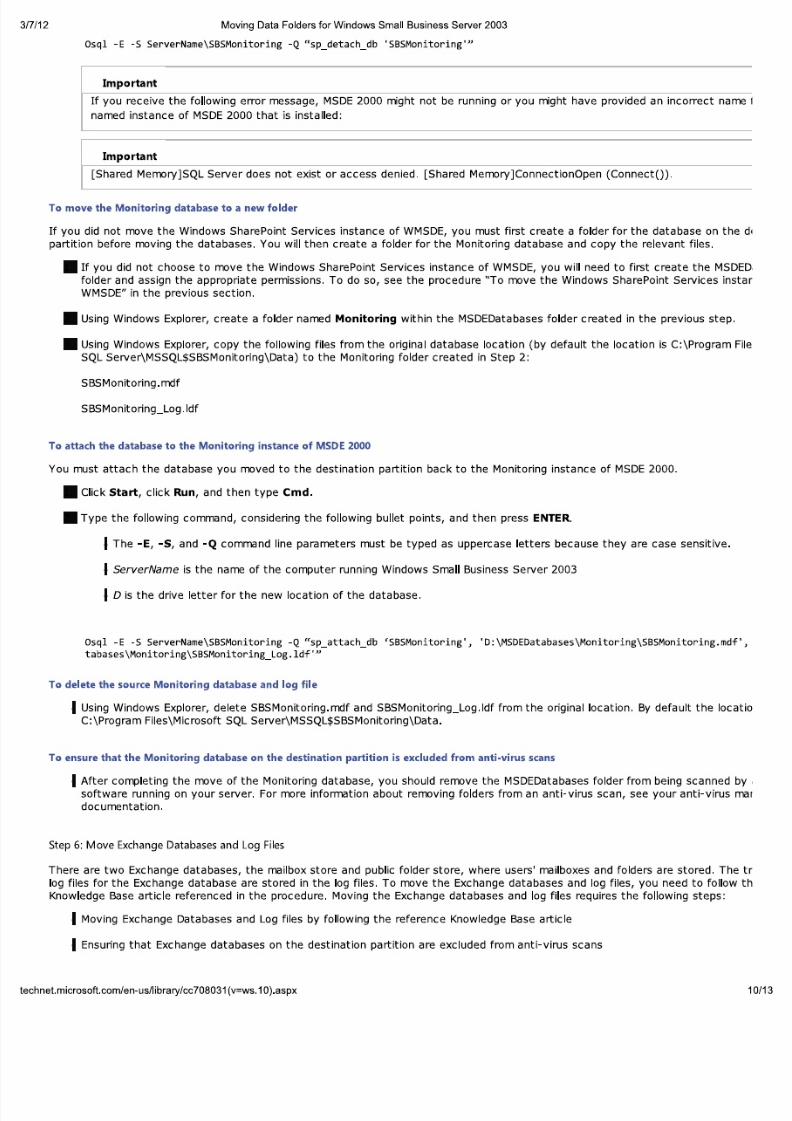
O sq l - E - S S er ve rN am e\ SB SM on it or in g - Q " s p_ d et a ch _ db ' S BS M o ni t or i ng ' "
Important
If you receive the following error message, MSDE2000 might not be running or you might have provided an incorrect n
named instance of MSDE2000 that is installed:
Important
[Shared Memory]SQL Server does not exist or access denied, [Shared Memory]ConnectionOpen (connecttj).
To move the Monitoring database to a new folder
If you did not move the Windows SharePoint Services instance of WMSDE, you must first create a folder for the database on
partition before moving the databases, You will then create a folder for the Monitoring database and copy the relevant files,
• If you did not choose to move the Windows SharePoint Services instance of WMSDE, you will need to first create the M
folder and assign the appropriate permissions, To do so, see the procedure "To move the Windows SharePoint Services
WMSDE" in the previous section.
• Using Windows Explorer, create a folder named Monitoring within the MSDEDatabases folder created in the previous ste
• Using Windows Explorer, copy the following files from the original database location (by default the location is C:\Program
SQL Server\MSSQL$SBSMonitoring\Data) to the Monitoring folder created in Step 2:
SBSMonitoring. mdf
SBSMonitoring_Log .Idf
To attach the database to the Monitoring instance of MSDE2000
You must attach the database you moved to the destination partition back to the Monitoring instance of MSDE2000.
• Click Start, click Run, and then type Cmd.
• Type the following command, considering the following bullet points, and then press ENTER
Ihe -E, -S, and -Q command line parameters must be typed as uppercase letters because they are case sensitive
IerverName is the name of the computer running Windows Small Business Server 2003
I is the drive letter for the new location of the database.
O sq l - E - S S er ve rN am e\ SB SM on it or in g - Q " s p _ a tt a c h _ db ' S B S M on i t o r in g ' , ' D : \ M SD E D a t ab a s e s \M o n i t o ri n g \ S BS M o n i to r i n gt a b a s e s \ M o n i t o r i n g \ S B S M o n i t o r i n g _ L o g . l d f ' "
To delete the source Monitoring database and log file
Ising Windows Explorer, delete SBSMonitoring.mdf and SBSMonitoring_Log.ldf from the original location. By default the l
C:\Program Files\Microsoft SQL Server\MSSQL$SBSMonitoring\Data.
To ensure that the Monitoring database on the destination partition is excluded from anti-virus scans
Ifter completing the move of the Monitoring database, you should remove the MSDEDatabases folder from being scannesoftware running on your server. For more information about removing folders from an anti-virus scan, see your anti-virus
documentation.
Step6: Move ExchangeDatabasesand Log Files
There are two Exchange databases, the mailbox store and public folder store, where users'mailboxes and folders are stored. T
log files for the Exchange database are stored in the log files. To move the Exchange databases and log files, you need to foll
Knowledge Base article referenced in the procedure. Moving the Exchange databases and log fi les requires the following steps:
IMoving Exchange Databases and Log files by following the reference Knowledge Base article
Insuring that Exchange databases on the destination partition are excluded from anti-virus scans
technet.microsoft.com/en-us/library/cc708031v=ws.1O}.aspx
5/14/2018 Moving Data Folders for Windows Small Business Server 2003 - slidepdf.com
http://slidepdf.com/reader/full/moving-data-folders-for-windows-small-business-server-2003 11/13
3/7/12 MovingDataFoldersforWindowsSmallBusinessServer2003
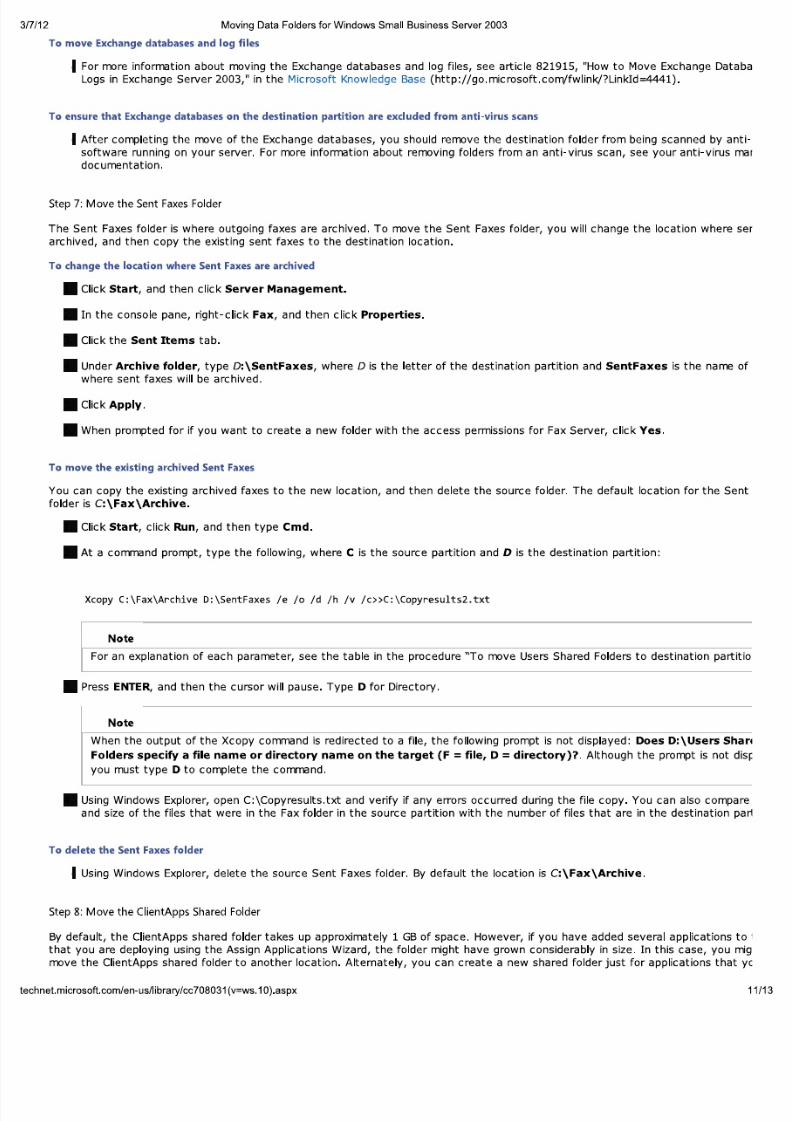
To move Exchange databases and log files
Ior more information about moving the Exchange databases and log fi les, see article 821915, "How to Move Exchange D
Logs in Exchange Server 2003," in the Microsoft Knowledge Base (http://go.microsoft.con1fwlink/?LinkId=4441).
To ensure that Exchange databases on the destination partition are excluded from anti-virus scans
Ifter completing the move of the Exchange databases, you should remove the destination folder from being scanned by
software running on your server. For more information about removing folders from an anti-virus scan, see your anti-virus
documentation.
Step7: Move the Sent FaxesFolder
The Sent Faxes folder is where outgoing faxes are archived. To move the Sent Faxes folder, you will change the location whe
archived, and then copy the existing sent faxes to the destination location.
To change the location where Sent Faxes are archived
• Click Start, and then click Server Management.
• In the console pane, right-click Fax, and then click Properties.
• Click the Sent Items tab.
• Under Archive folder, type D:\SentFaxes, where D is the letter of the destination partition and SentFaxes is the nam
where sent faxes will be archived.
• Click Apply.
• When prompted for if you want to create a new folder with the access permissions for Fax Server, click Yes.
To move the existing archived Sent Faxes
You can copy the existing archived faxes to the new location, and then delete the source folder. The default location for the
folder is C:\Fax\Archive.
• Click Start, click Run, and then type Cmd.
• At a command prompt, type the following, where C is the source partition and D is the destination partition:
Xcopy C:\Fax\Archive D:\SentFaxes /e /0 /d /h /v /c»C:\Copyresults2.txt
Note
For an explanation of each parameter, see the table in the procedure "To move Users Shared Folders to destination p
• Press ENTER, and then the cursor will pause. Type D for Directory.
Note
When the output of the Xcopy command is redirected to a file, the following prompt is not displayed: Does D:\Users
Folders specify a file name or directory name on the target (F = file, D = directory)? Although the prompt is no
you mist type D to complete the command.
• Using Windows Explorer, open C:\Copyresults.txt and verify if any errors occurred during the file copy. You can also com
and size of the files that were in the Fax folder in the source partition with the number of files that are in the destination
To delete the Sent Faxes folder
Ising Windows Explorer, delete the source Sent Faxes folder. By default the location is C:\Fax\Archive.
Step8: Move the ClientApps SharedFolder
By default, the ClientApps shared folder takes up approximately 1 GBof space. However, if you have added several application
that you are deploying using the Assign Applications Wizard, the folder might have grown considerably in size. In this case, yo
move the ClientApps shared folder to another location. Alternately, you can create a new shared folder just for applications th
technet.microsoft.com/en-us/library/cc708031v=ws.1O}.aspx
5/14/2018 Moving Data Folders for Windows Small Business Server 2003 - slidepdf.com
http://slidepdf.com/reader/full/moving-data-folders-for-windows-small-business-server-2003 12/13
3/7/12 MovingDataFoldersfor WindowsSmallBusinessServer2003
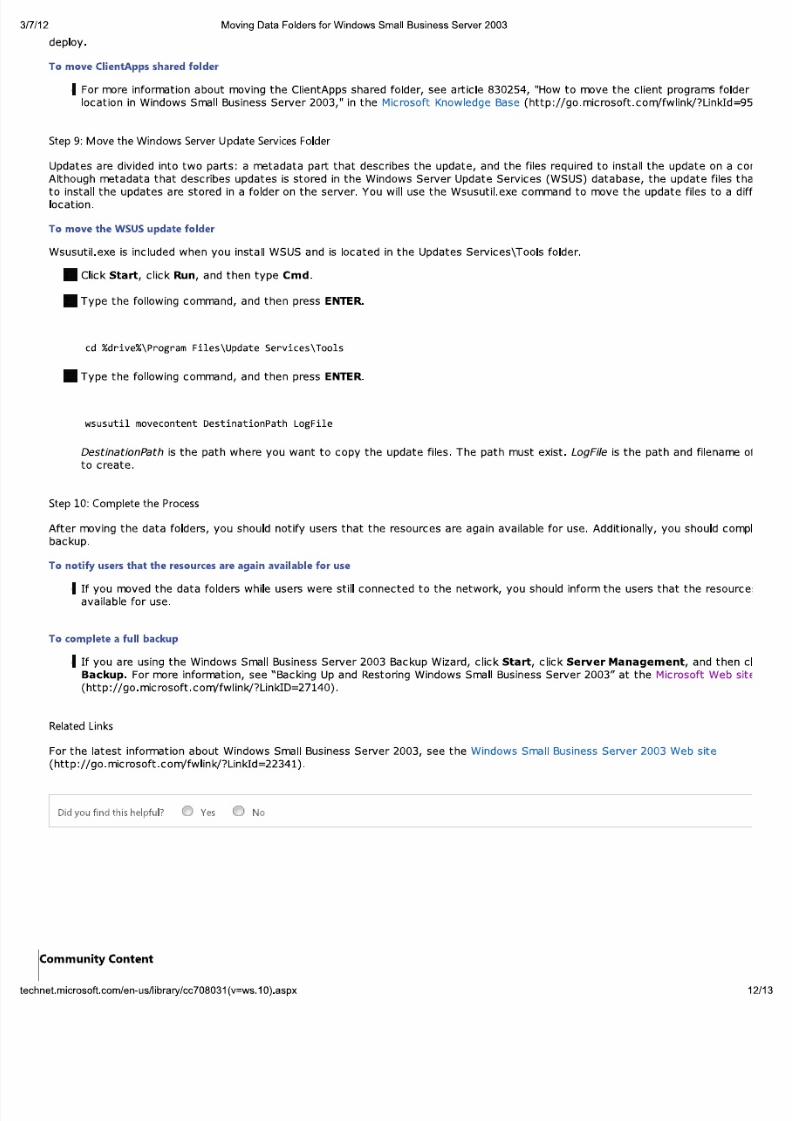
deploy.
To move ClientApps shared folder
Ior more information about moving the ClientApps shared folder, see article 830254, "How to move the client programs f
location in Windows Small Business Server 2003," in the Microsoft Knowledge Base (http://go.microsoft.com/fwlink/?LinkId=9
Step9: Move the Windows ServerUpdate ServicesFolder
Updates are divided into two parts: a metadata part that describes the update, and the files required to install the update on
Although metadata that describes updates is stored in the Windows Server Update Services (WSUS) database, the update fi le
to install the updates are stored in a folder on the server. You will use the Wsusutil,exe command to move the update files tolocation.
To move the WSUS update folder
Wsusuti l.exe is included when you install WSUS and is located in the Updates Services\Tools folder.
• Click Start, click Run, and then type Cmd.
• Type the following command, and then press ENTER
cd %drive%\Program Files\Update Services\Tools
• Type the following command, and then press ENTER
wsusutil movecontent DestinationPath LogFile
DestinationPath is the path where you want to copy the update files. The path must exist. LogFile is the path and filena
to create.
Step 10: Complete the Process
After moving the data folders, you should notify users that the resources are again available for use. Additionally, you should
backup.
To notify users that the resources are again available for use
If you moved the data folders while users were still connected to the network, you should inform the users that the resavailable for use.
To complete a full backup
If you are using the Windows Small Business Server 2003 Backup Wizard, click Start, click Server Management, and th
Backup. For more information, see "Backing Up and Restoring Windows Small Business Server 2003" at the Microsoft We
(http://go.microsoft .com/fwlink/?LinkID=27140).
RelatedLinks
For the latest information about Windows Small Business Server 2003, see the Windows Small Business Server 2003 Web site
(http://go. microsoft. com/fw link/?LinkId =22341).
I Didyoufind thishelpful? IE ) Yes IE ) No
Icommunity Content
technet.microsoft.com/en-us/library/cc708031v=ws.1O}.aspx

5/14/2018 Moving Data Folders for Windows Small Business Server 2003 - slidepdf.com
http://slidepdf.com/reader/full/moving-data-folders-for-windows-small-business-server-2003 13/13
3/7/12 Moving Data Folders for Windows Small Business Server 2003
XCOpy command has incorrect syntax
Incorrect
Xcopy C:\"Users Shared Folders" D:\"Users Shared Folders" Ie 1 0 Id Ih Iv Ic»C:\Copyresults.txt
Correct (two "-signs moved three steps to the left, and space missing before »)
Xcopy "C:\Users Shared Folders" "D:\Users Shared Folders" Ie 1 0 Id Ih Iv tc »C:\Copyresults.txt
Bengt Nilsson DAT
Moving Monitoring
I used Step 5 to guide me through the process and disconnecting worked fine.
After the move had use the "Copy code" command to paste into notepad for modifcation.
When pating it to the command line howerver, IT DOES NOT WORK.
You MUSTTYPEthe line in the command window for it to work.
(I have seen this for many command in Windows)
© 2012 Microsoft. All rights reserved.
technet.microsoft.com/en-us/library/cc708031 (v=ws.1O}.aspx