modesto junior college course originator guide
TRANSCRIPT
1
Modesto Junior College
Course Originator Guide Guidance for Curriculum Management for Originator
of Courses
This training will guide the discussion and give specific directions for using Curriculum for roles that will originate proposals for the creation, revision, or inactivation of courses or programs.
Navigating the Curriculum System 3
Curriculum Dashboard 4
Course Curriculum Dashboard 5
Workflow Template 6
Workflow Status 6
Days in Stage 6
Chair Report 6
Actions Menu 6
View Workflow 6
View Status 6
View COR 7
View Impact Report 7
View Change Report 7
2
Delete Workflow 7
Program Curriculum Dashboard 7
Curriculum Library 8
Course Library 8
Course Outline of Record and Show History 9
Comparison Report 10
Program Library 10
Program Outline of Record Report and Show History 11
Course Management 11
Creating or Revising a Course 11
Select a Workflow Type 12
Assistance While Completing the Workflow 14
Navigation 15
Saving and Submitting or Deleting a Workflow 15
Returning to a Workflow in Progress 15
Guidance on Specific Areas of the Course Workflow 15
Cover Info 15
Cross List 16
Additional Contributors 16
Attachments 17
Notes for Submission 18
Course Development Options 19
Associated Programs 19
Transferability & Gen. Ed. Options 19
Units and Hours 20
Credit/Non-Credit Options 21
Variable Credit Courses 21
Auto-calculation 21
Additional Profiles 22
Weekly Specialty Hours 23
Course Student Hours 23
Faculty Load 23
Pre-Requisites and Entrance Skills 23
3
Pre-requisites, Co-requisites, Anti-requisites, and Advisories 23
Creating "And" Rules 24
Creating "Or" Rules 24
Entrance Skills 25
Limitations on Enrollment 25
Specifications 25
Methods of Instruction and Methods of Evaluation 25
Assignments 26
Textbooks 26
Other Instructional Materials 27
Learning Outcomes 28
Course Objectives 28
CSLOs 28
Outline 29
Curriculum Technician 29
Part or Step Templates 29
Custom Part Template 29
Custom Step Template 30
Deactivating a Course 30
After Submitting a Course Workflow 31
Notifications 32
Views and Reports 32
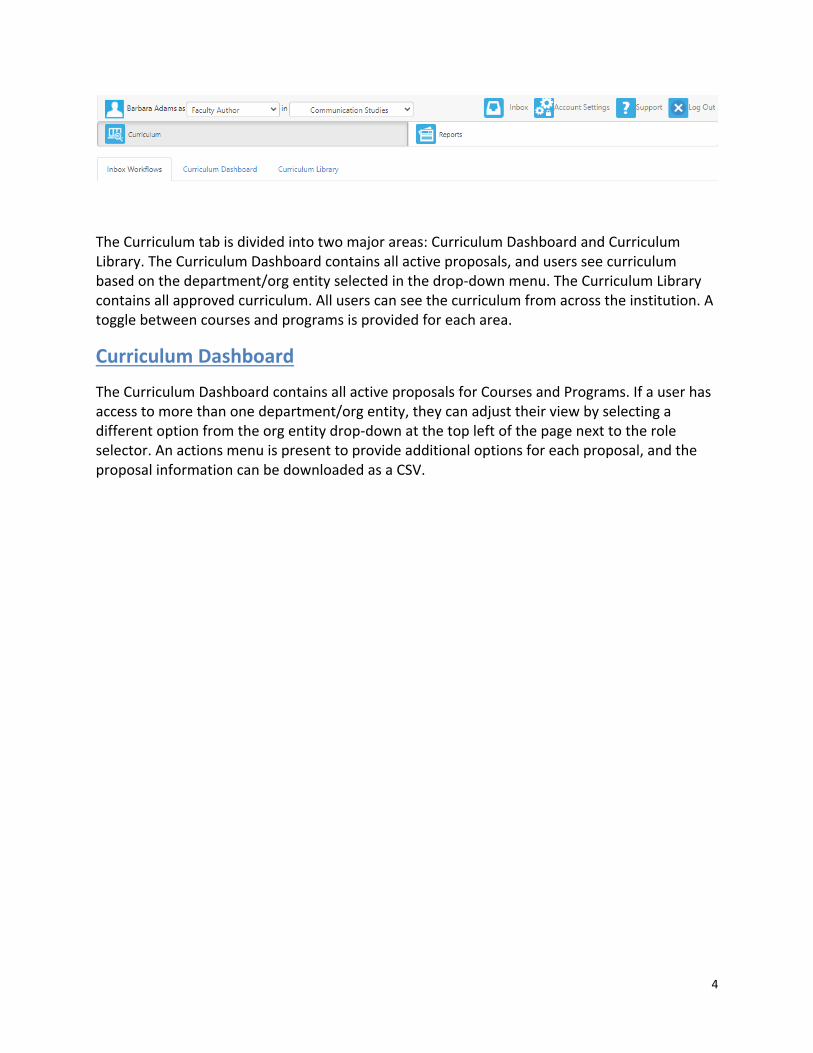
Navigating the Curriculum System
eLumen is an integrated system for managing Curriculum, Assessment, and Continuous Improvement. This guide will focus on the Curriculum section for users who will be proposing the creation, revision, or inactivation of courses or programs. As such, the areas this guide describes are under the Curriculum section.
4
The Curriculum tab is divided into two major areas: Curriculum Dashboard and Curriculum Library. The Curriculum Dashboard contains all active proposals, and users see curriculum based on the department/org entity selected in the drop-down menu. The Curriculum Library contains all approved curriculum. All users can see the curriculum from across the institution. A toggle between courses and programs is provided for each area.
Curriculum Dashboard
The Curriculum Dashboard contains all active proposals for Courses and Programs. If a user has access to more than one department/org entity, they can adjust their view by selecting a different option from the org entity drop-down at the top left of the page next to the role selector. An actions menu is present to provide additional options for each proposal, and the proposal information can be downloaded as a CSV.
5
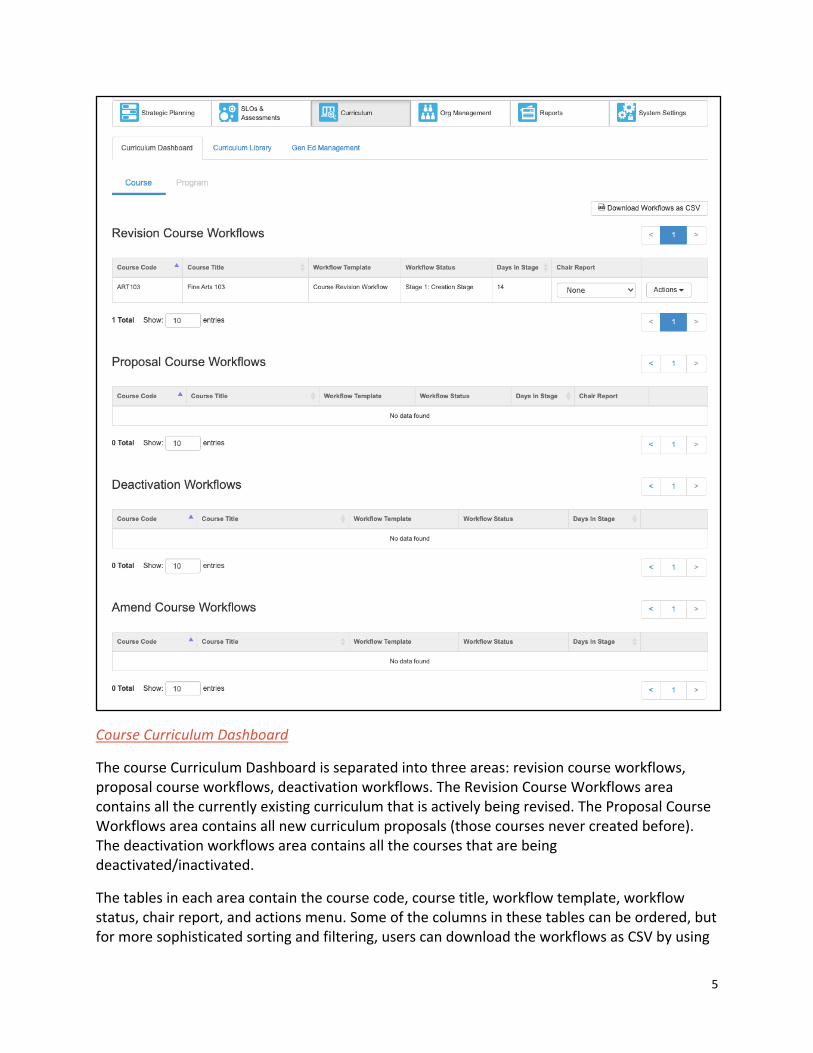
Course Curriculum Dashboard
The course Curriculum Dashboard is separated into three areas: revision course workflows, proposal course workflows, deactivation workflows. The Revision Course Workflows area contains all the currently existing curriculum that is actively being revised. The Proposal Course Workflows area contains all new curriculum proposals (those courses never created before). The deactivation workflows area contains all the courses that are being deactivated/inactivated.
The tables in each area contain the course code, course title, workflow template, workflow status, chair report, and actions menu. Some of the columns in these tables can be ordered, but for more sophisticated sorting and filtering, users can download the workflows as CSV by using
6
the button at the top right of the Dashboard area.
Workflow Template The workflow template indicates which workflow was selected when launching the proposal.
Workflow Status The workflow status can be used to monitor the progress of a particular course workflow. This status updates in real time.
Days in Stage The Days in Stage count provides information on the length of time lapsed since the course workflow entered the given stage.
Chair Report The chair report is an optional report that can be utilized by the Curriculum administrator. If it is used, this area will inform users which report holds the particular course revision or creation workflow.
Actions Menu The Actions menu provides additional information on each workflow. This includes: view workflow, view status, view COR, View Change Report, View Impact Report, and Delete Workflow.
View Workflow
Selecting View Workflow will allow a user to open a workflow, and read or leave comments on any area.
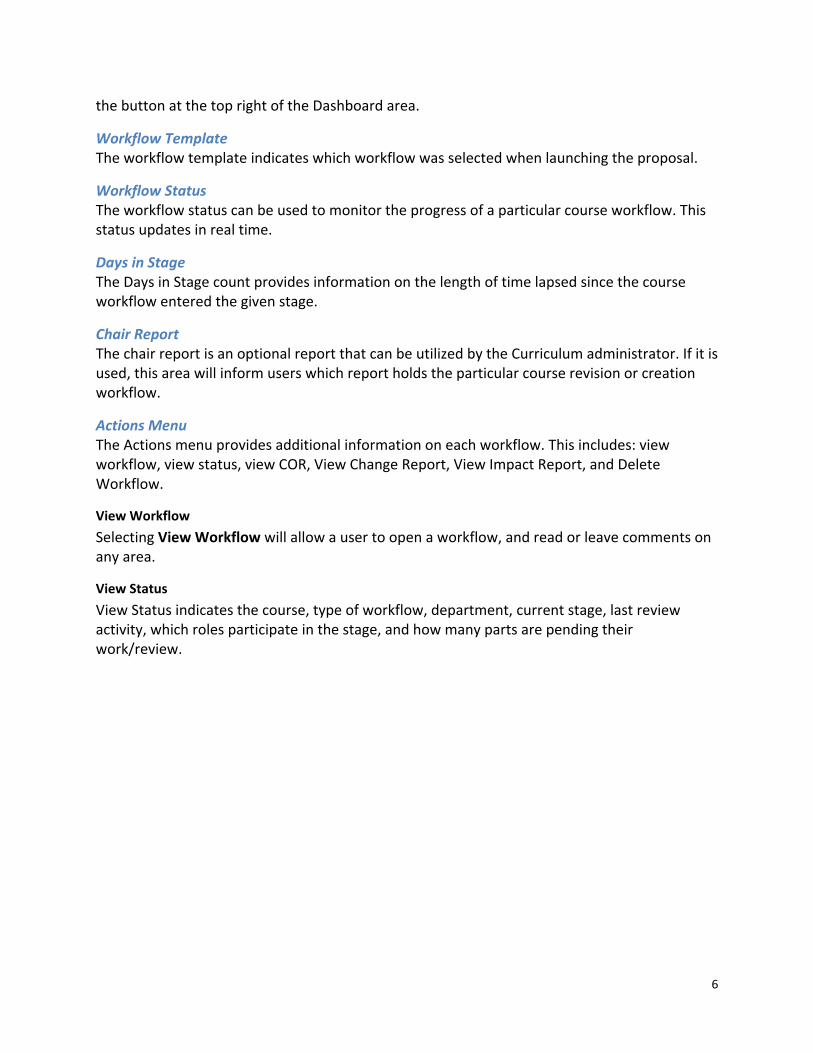
View Status
View Status indicates the course, type of workflow, department, current stage, last review activity, which roles participate in the stage, and how many parts are pending their work/review.
7
View COR
This option allows users to generate a Course Outline of Record report for the course as it is in workflow status. This means users will see all the new updates when selecting the COR from this area.
View Impact Report
The View Impact Report option allows users to see the impact of the course workflow. This includes: courses that use the workflow course as a requisite, courses that are requisites of the workflow course, and programs that use the workflow course.
View Change Report
To see the changes from the latest approved version of a course to the newest revision of a course, navigate to the Curriculum Dashboard and select the Change Report from the Action menu. The change report begins with a summary table of all changes to the course, then displays a side by side view of all fields. Red strikethrough indicates something that has been removed, and green underlining indicates content that has been added.
Delete Workflow
The delete workflow option is active for the role that launched the course workflow when the workflow is in the first stage only. After it passes Stage 1, the workflow must be returned to Stage 1 before it can be deleted. The Curriculum Specialist role (curriculum administrator) or the role that proposed the course can delete it from Stage 1.
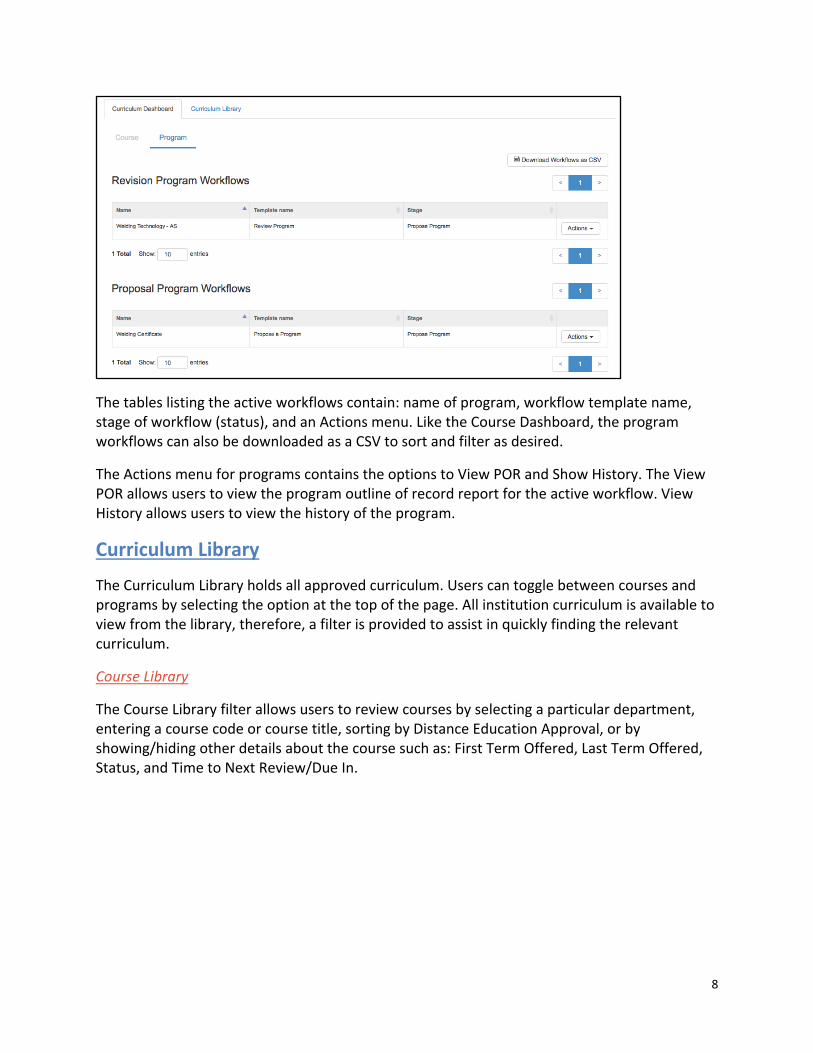
Program Curriculum Dashboard
The Program Curriculum Dashboard is accessed by toggling the top Course/Program selector to Program. All active workflows for programs are listed in two areas: revision program workflows and proposal program workflows.
8
The tables listing the active workflows contain: name of program, workflow template name, stage of workflow (status), and an Actions menu. Like the Course Dashboard, the program workflows can also be downloaded as a CSV to sort and filter as desired.
The Actions menu for programs contains the options to View POR and Show History. The View POR allows users to view the program outline of record report for the active workflow. View History allows users to view the history of the program.
Curriculum Library
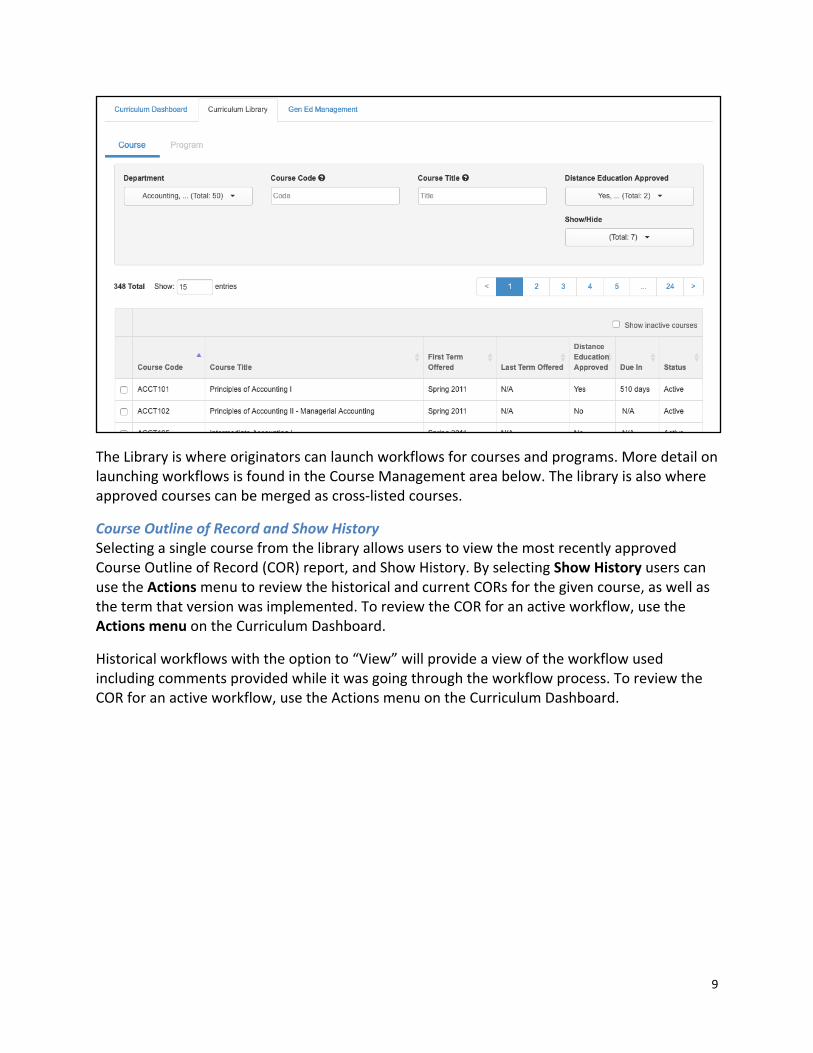
The Curriculum Library holds all approved curriculum. Users can toggle between courses and programs by selecting the option at the top of the page. All institution curriculum is available to view from the library, therefore, a filter is provided to assist in quickly finding the relevant curriculum.
Course Library
The Course Library filter allows users to review courses by selecting a particular department, entering a course code or course title, sorting by Distance Education Approval, or by showing/hiding other details about the course such as: First Term Offered, Last Term Offered, Status, and Time to Next Review/Due In.
9
The Library is where originators can launch workflows for courses and programs. More detail on launching workflows is found in the Course Management area below. The library is also where approved courses can be merged as cross-listed courses.
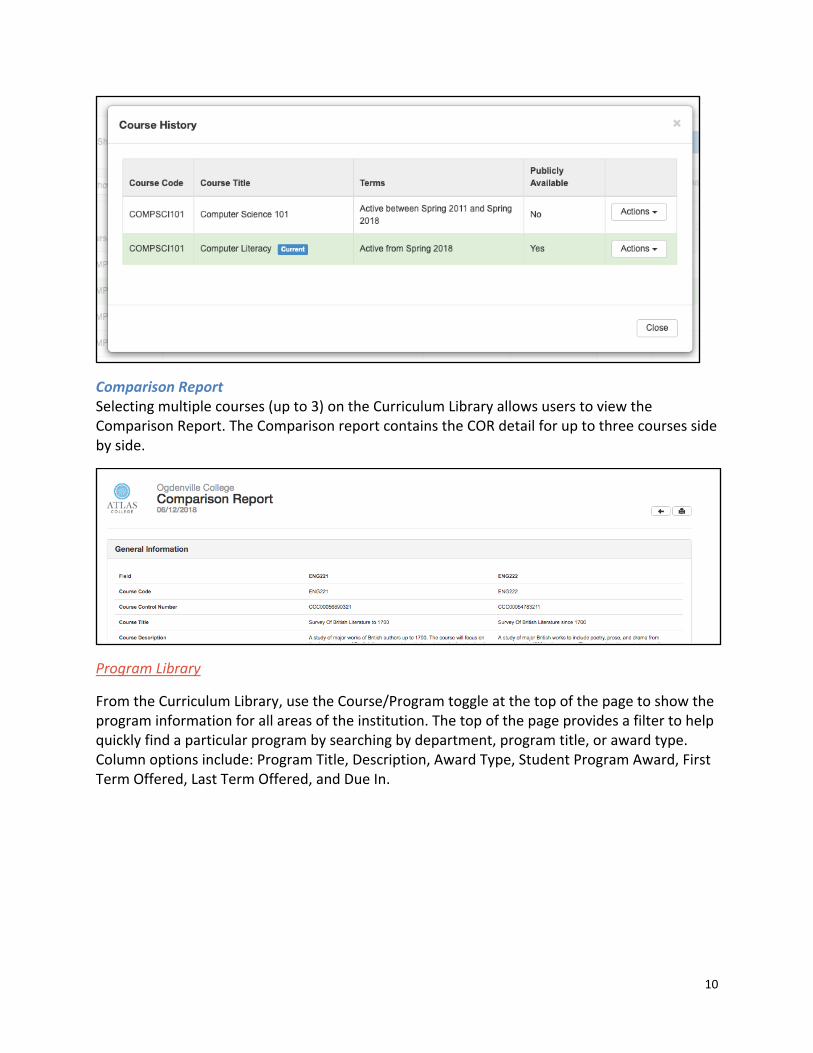
Course Outline of Record and Show History Selecting a single course from the library allows users to view the most recently approved Course Outline of Record (COR) report, and Show History. By selecting Show History users can use the Actions menu to review the historical and current CORs for the given course, as well as the term that version was implemented. To review the COR for an active workflow, use the Actions menu on the Curriculum Dashboard.
Historical workflows with the option to “View” will provide a view of the workflow used including comments provided while it was going through the workflow process. To review the COR for an active workflow, use the Actions menu on the Curriculum Dashboard.
10
Comparison Report Selecting multiple courses (up to 3) on the Curriculum Library allows users to view the Comparison Report. The Comparison report contains the COR detail for up to three courses side by side.
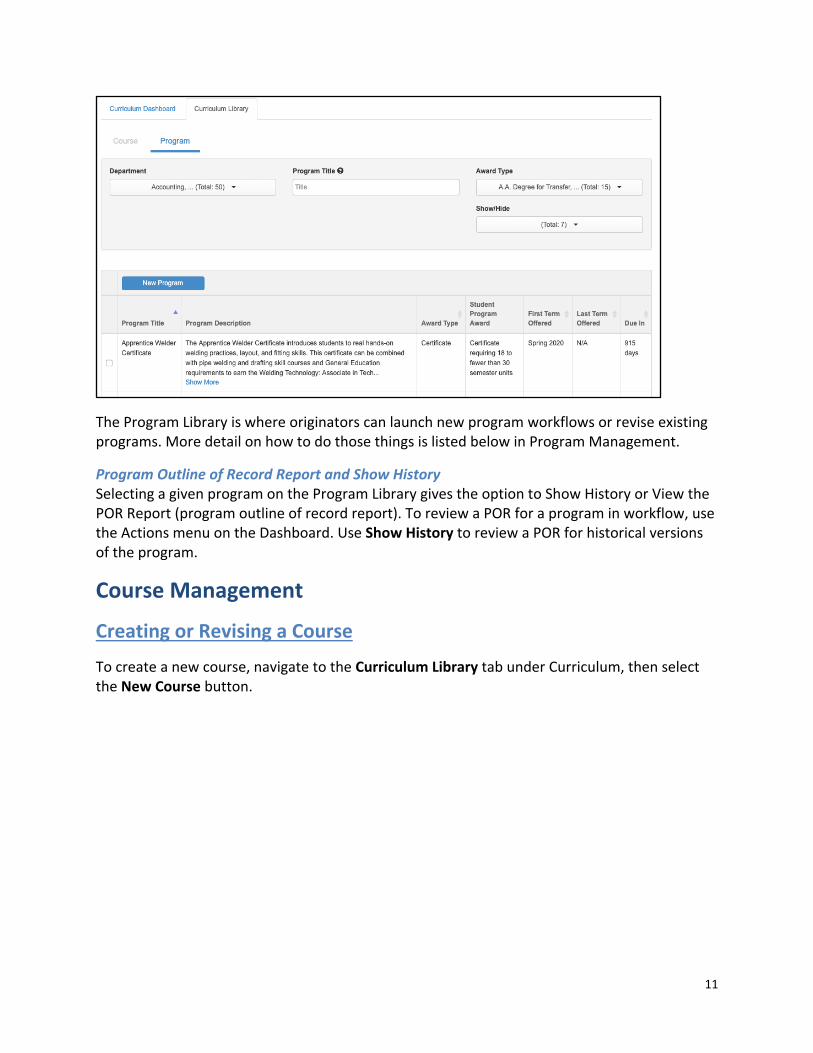
Program Library
From the Curriculum Library, use the Course/Program toggle at the top of the page to show the program information for all areas of the institution. The top of the page provides a filter to help quickly find a particular program by searching by department, program title, or award type. Column options include: Program Title, Description, Award Type, Student Program Award, First Term Offered, Last Term Offered, and Due In.
11
The Program Library is where originators can launch new program workflows or revise existing programs. More detail on how to do those things is listed below in Program Management.
Program Outline of Record Report and Show History Selecting a given program on the Program Library gives the option to Show History or View the POR Report (program outline of record report). To review a POR for a program in workflow, use the Actions menu on the Dashboard. Use Show History to review a POR for historical versions of the program.
Course Management
Creating or Revising a Course
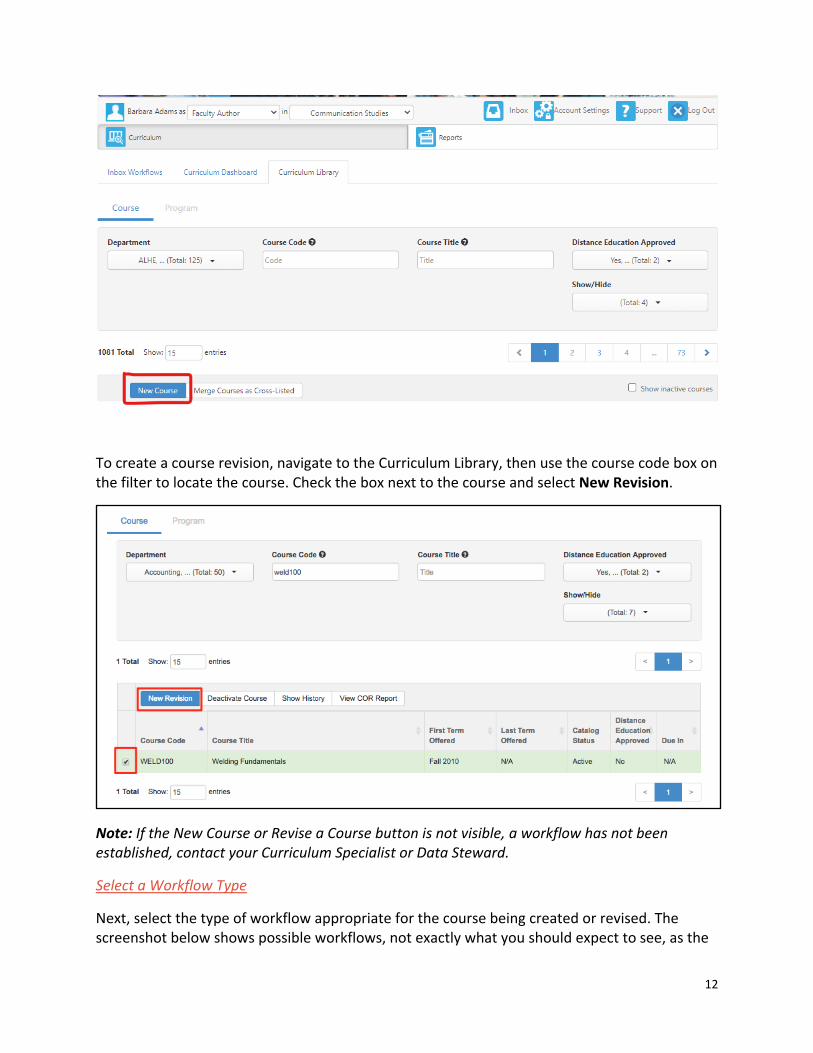
To create a new course, navigate to the Curriculum Library tab under Curriculum, then select the New Course button.
12
To create a course revision, navigate to the Curriculum Library, then use the course code box on the filter to locate the course. Check the box next to the course and select New Revision.
Note: If the New Course or Revise a Course button is not visible, a workflow has not been established, contact your Curriculum Specialist or Data Steward.
Select a Workflow Type
Next, select the type of workflow appropriate for the course being created or revised. The screenshot below shows possible workflows, not exactly what you should expect to see, as the
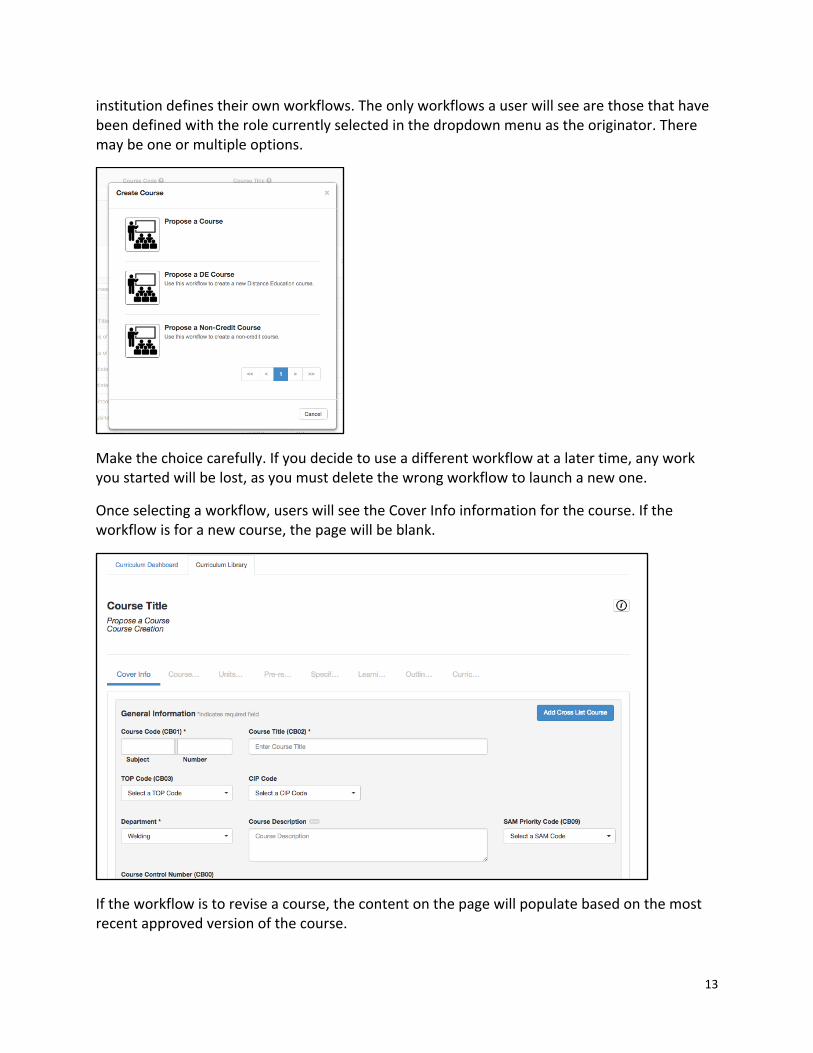
13
institution defines their own workflows. The only workflows a user will see are those that have been defined with the role currently selected in the dropdown menu as the originator. There may be one or multiple options.
Make the choice carefully. If you decide to use a different workflow at a later time, any work you started will be lost, as you must delete the wrong workflow to launch a new one.
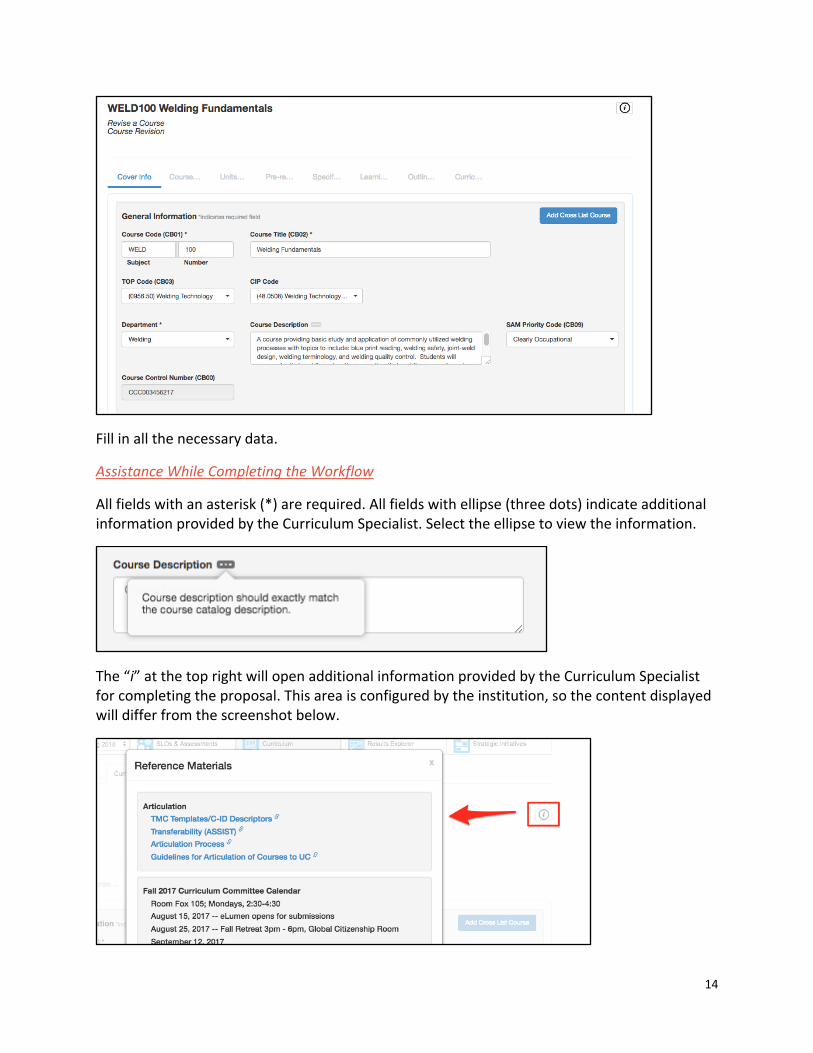
Once selecting a workflow, users will see the Cover Info information for the course. If the workflow is for a new course, the page will be blank.
If the workflow is to revise a course, the content on the page will populate based on the most recent approved version of the course.
14
Fill in all the necessary data.
Assistance While Completing the Workflow
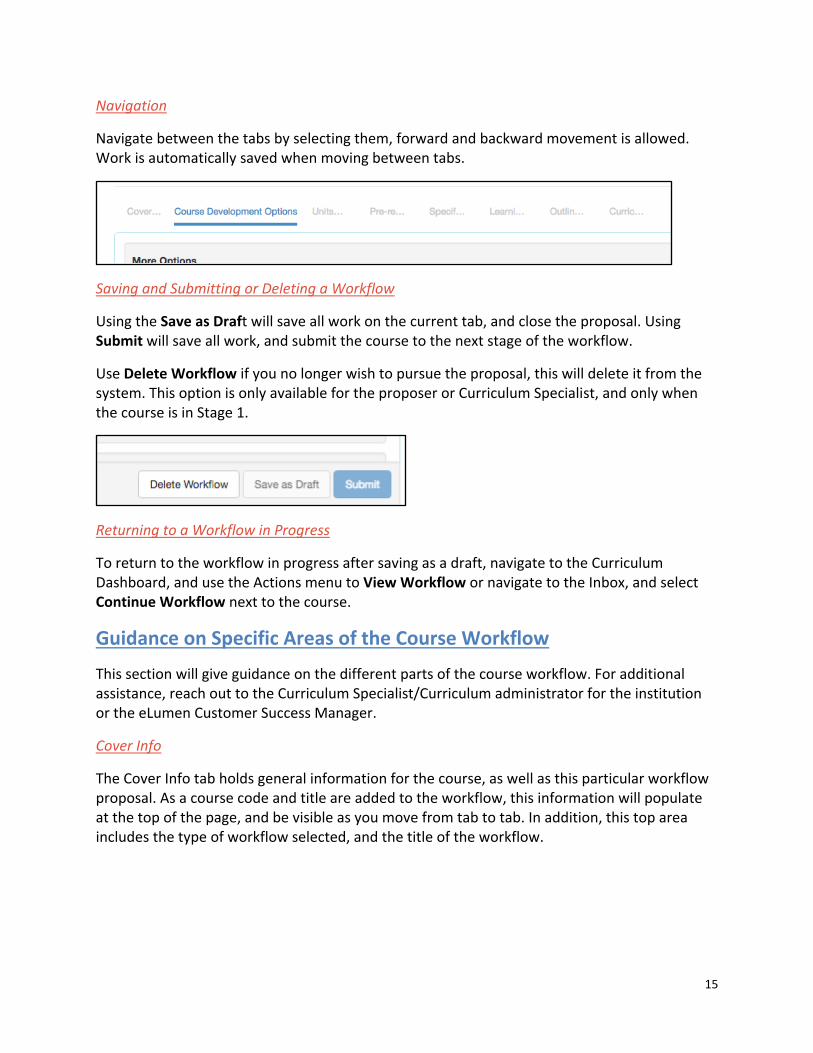
All fields with an asterisk (*) are required. All fields with ellipse (three dots) indicate additional information provided by the Curriculum Specialist. Select the ellipse to view the information.
The “i” at the top right will open additional information provided by the Curriculum Specialist for completing the proposal. This area is configured by the institution, so the content displayed will differ from the screenshot below.
15
Navigation
Navigate between the tabs by selecting them, forward and backward movement is allowed. Work is automatically saved when moving between tabs.
Saving and Submitting or Deleting a Workflow
Using the Save as Draft will save all work on the current tab, and close the proposal. Using Submit will save all work, and submit the course to the next stage of the workflow.
Use Delete Workflow if you no longer wish to pursue the proposal, this will delete it from the system. This option is only available for the proposer or Curriculum Specialist, and only when the course is in Stage 1.
Returning to a Workflow in Progress
To return to the workflow in progress after saving as a draft, navigate to the Curriculum Dashboard, and use the Actions menu to View Workflow or navigate to the Inbox, and select Continue Workflow next to the course.
Guidance on Specific Areas of the Course Workflow
This section will give guidance on the different parts of the course workflow. For additional assistance, reach out to the Curriculum Specialist/Curriculum administrator for the institution or the eLumen Customer Success Manager.
Cover Info
The Cover Info tab holds general information for the course, as well as this particular workflow proposal. As a course code and title are added to the workflow, this information will populate at the top of the page, and be visible as you move from tab to tab. In addition, this top area includes the type of workflow selected, and the title of the workflow.
16
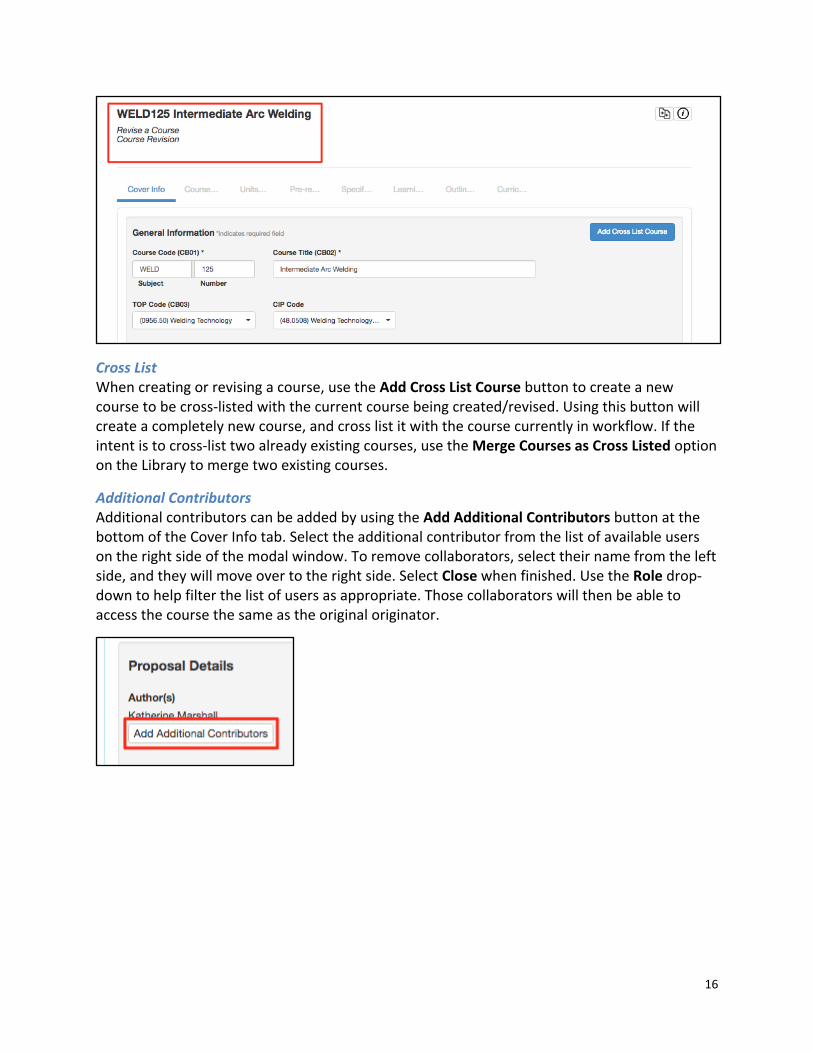
Cross List When creating or revising a course, use the Add Cross List Course button to create a new course to be cross-listed with the current course being created/revised. Using this button will create a completely new course, and cross list it with the course currently in workflow. If the intent is to cross-list two already existing courses, use the Merge Courses as Cross Listed option on the Library to merge two existing courses.
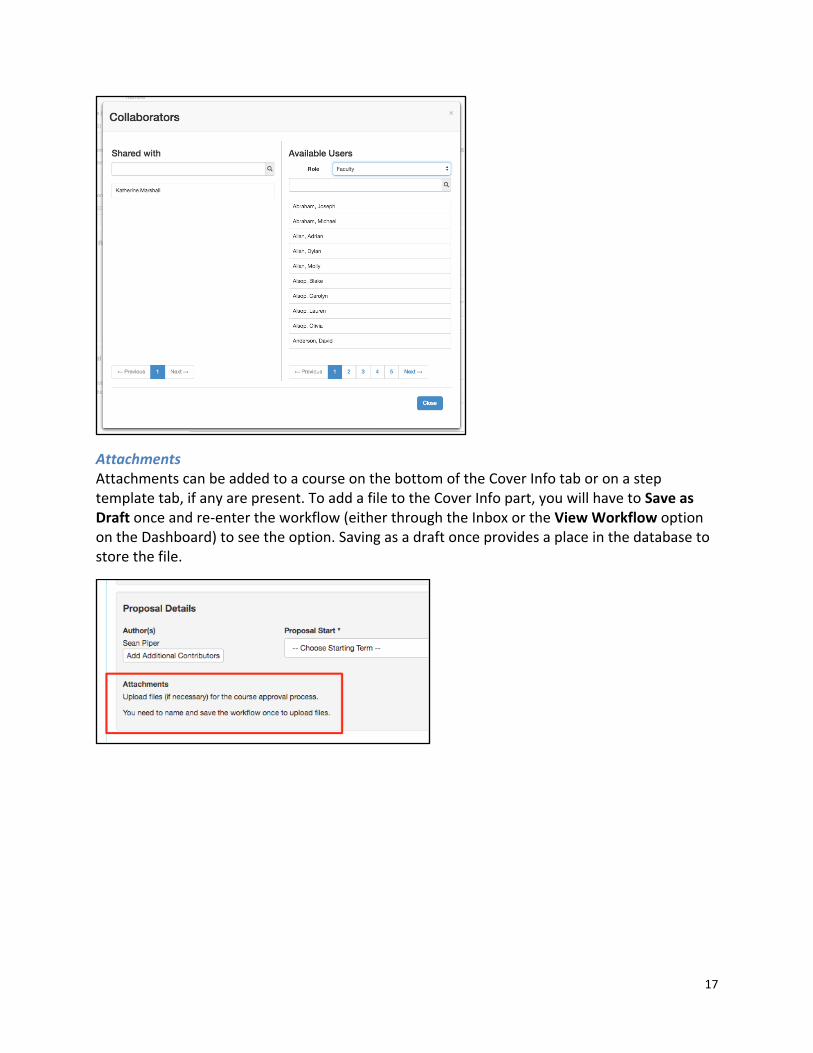
Additional Contributors Additional contributors can be added by using the Add Additional Contributors button at the bottom of the Cover Info tab. Select the additional contributor from the list of available users on the right side of the modal window. To remove collaborators, select their name from the left side, and they will move over to the right side. Select Close when finished. Use the Role drop-down to help filter the list of users as appropriate. Those collaborators will then be able to access the course the same as the original originator.
17
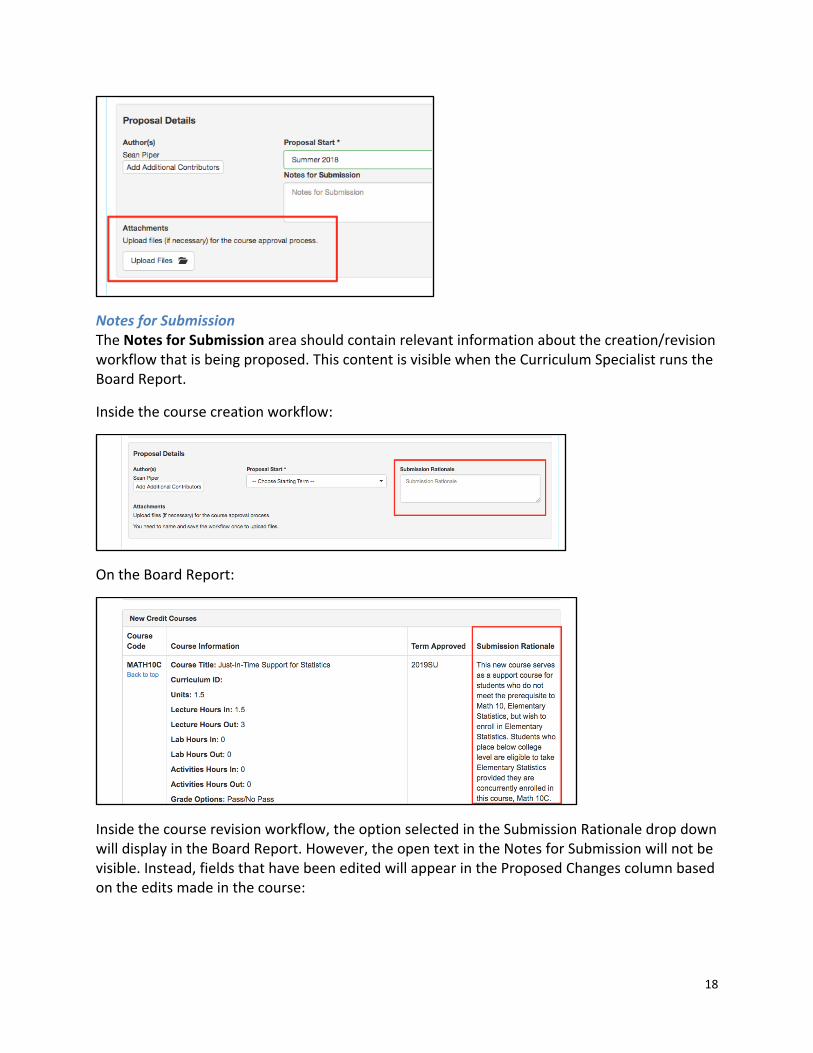
Attachments Attachments can be added to a course on the bottom of the Cover Info tab or on a step template tab, if any are present. To add a file to the Cover Info part, you will have to Save as Draft once and re-enter the workflow (either through the Inbox or the View Workflow option on the Dashboard) to see the option. Saving as a draft once provides a place in the database to store the file.
18
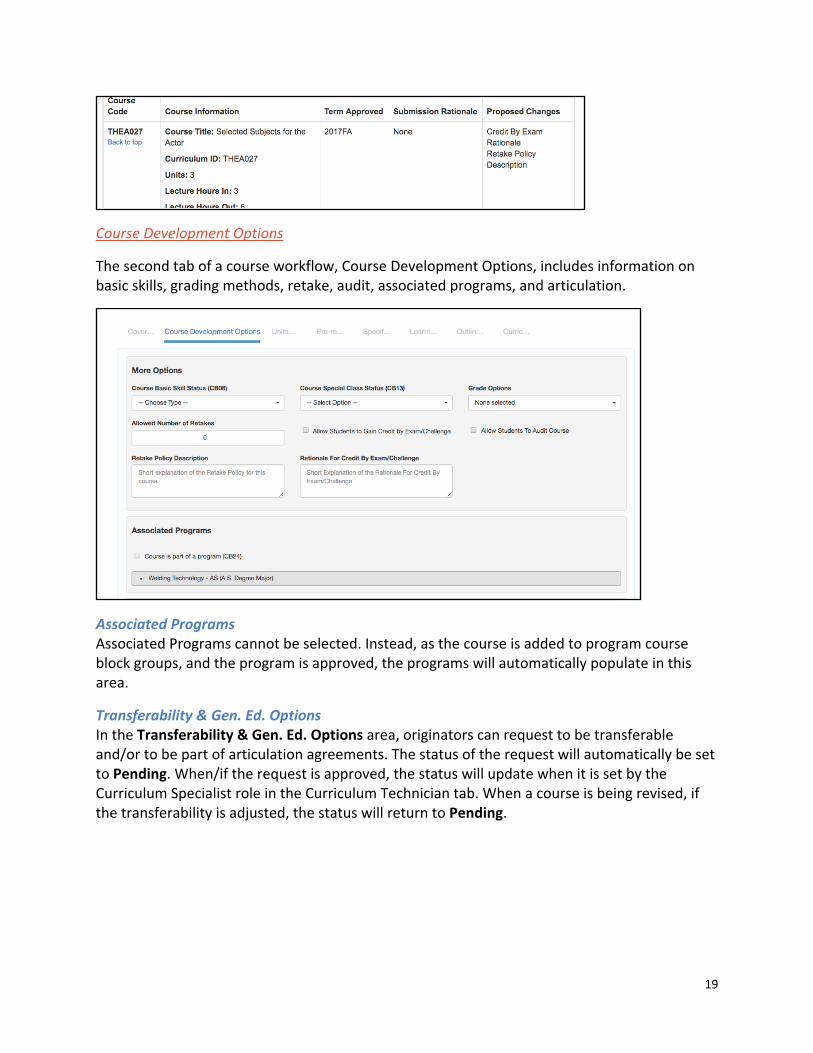
Notes for Submission The Notes for Submission area should contain relevant information about the creation/revision workflow that is being proposed. This content is visible when the Curriculum Specialist runs the Board Report.
Inside the course creation workflow:
On the Board Report:
Inside the course revision workflow, the option selected in the Submission Rationale drop down will display in the Board Report. However, the open text in the Notes for Submission will not be visible. Instead, fields that have been edited will appear in the Proposed Changes column based on the edits made in the course:
19
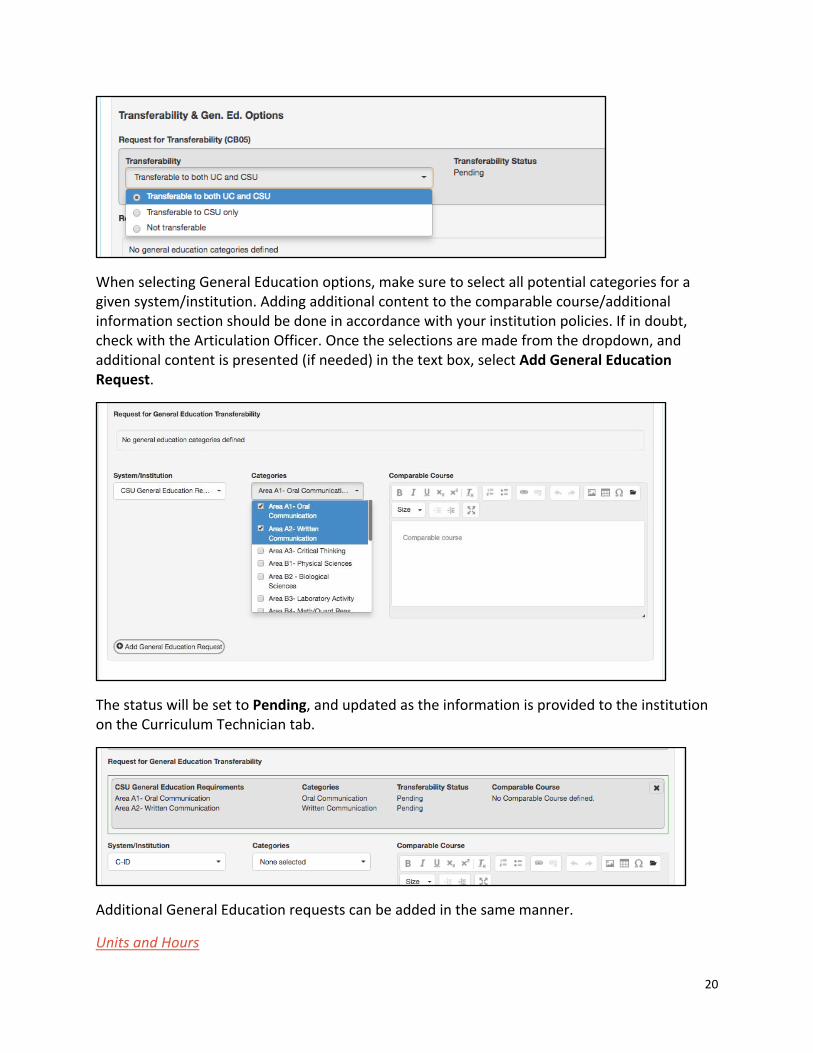
Course Development Options
The second tab of a course workflow, Course Development Options, includes information on basic skills, grading methods, retake, audit, associated programs, and articulation.
Associated Programs Associated Programs cannot be selected. Instead, as the course is added to program course block groups, and the program is approved, the programs will automatically populate in this area.
Transferability & Gen. Ed. Options In the Transferability & Gen. Ed. Options area, originators can request to be transferable and/or to be part of articulation agreements. The status of the request will automatically be set to Pending. When/if the request is approved, the status will update when it is set by the Curriculum Specialist role in the Curriculum Technician tab. When a course is being revised, if the transferability is adjusted, the status will return to Pending.
20
When selecting General Education options, make sure to select all potential categories for a given system/institution. Adding additional content to the comparable course/additional information section should be done in accordance with your institution policies. If in doubt, check with the Articulation Officer. Once the selections are made from the dropdown, and additional content is presented (if needed) in the text box, select Add General Education Request.
The status will be set to Pending, and updated as the information is provided to the institution on the Curriculum Technician tab.
Additional General Education requests can be added in the same manner.
Units and Hours
21
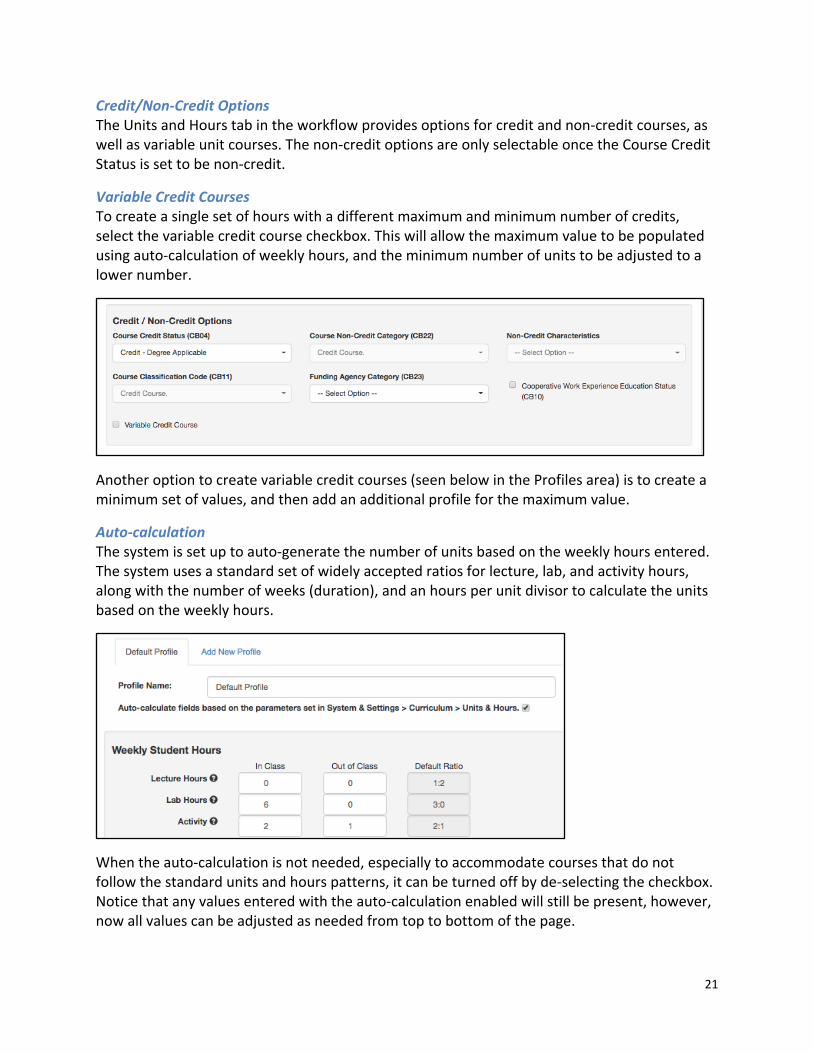
Credit/Non-Credit Options The Units and Hours tab in the workflow provides options for credit and non-credit courses, as well as variable unit courses. The non-credit options are only selectable once the Course Credit Status is set to be non-credit.
Variable Credit Courses To create a single set of hours with a different maximum and minimum number of credits, select the variable credit course checkbox. This will allow the maximum value to be populated using auto-calculation of weekly hours, and the minimum number of units to be adjusted to a lower number.
Another option to create variable credit courses (seen below in the Profiles area) is to create a minimum set of values, and then add an additional profile for the maximum value.
Auto-calculation The system is set up to auto-generate the number of units based on the weekly hours entered. The system uses a standard set of widely accepted ratios for lecture, lab, and activity hours, along with the number of weeks (duration), and an hours per unit divisor to calculate the units based on the weekly hours.
When the auto-calculation is not needed, especially to accommodate courses that do not follow the standard units and hours patterns, it can be turned off by de-selecting the checkbox. Notice that any values entered with the auto-calculation enabled will still be present, however, now all values can be adjusted as needed from top to bottom of the page.
22
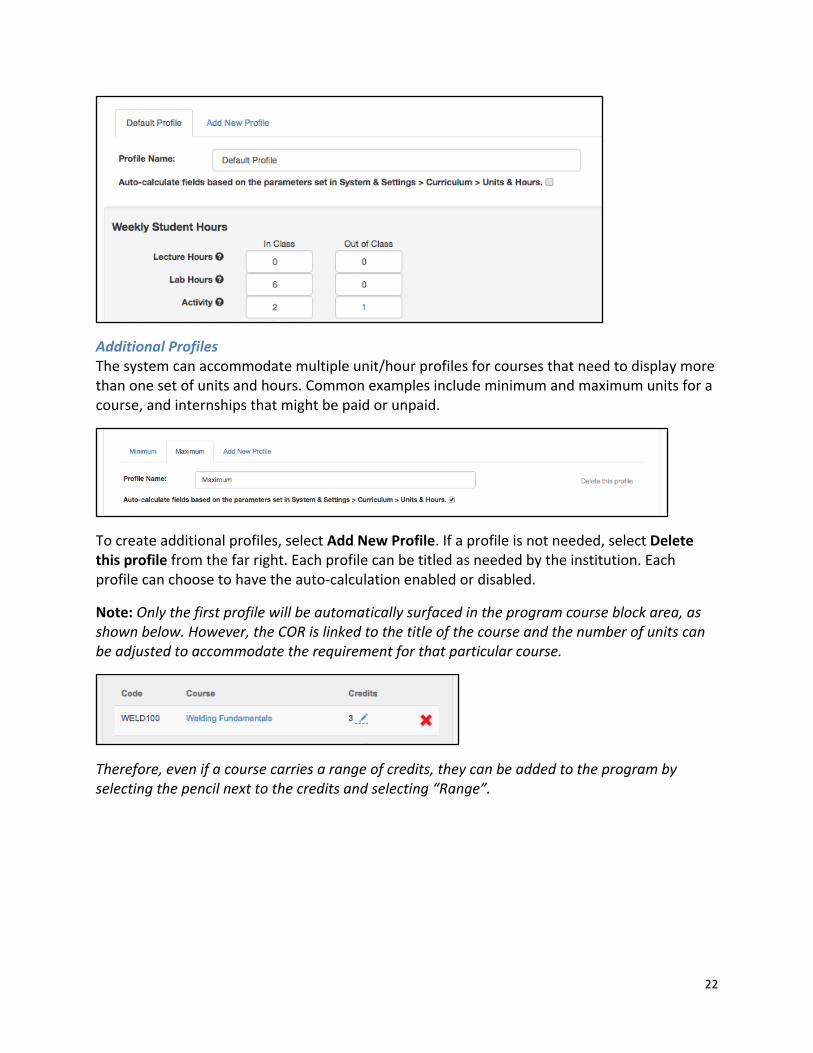
Additional Profiles The system can accommodate multiple unit/hour profiles for courses that need to display more than one set of units and hours. Common examples include minimum and maximum units for a course, and internships that might be paid or unpaid.
To create additional profiles, select Add New Profile. If a profile is not needed, select Delete this profile from the far right. Each profile can be titled as needed by the institution. Each profile can choose to have the auto-calculation enabled or disabled.
Note: Only the first profile will be automatically surfaced in the program course block area, as shown below. However, the COR is linked to the title of the course and the number of units can be adjusted to accommodate the requirement for that particular course.
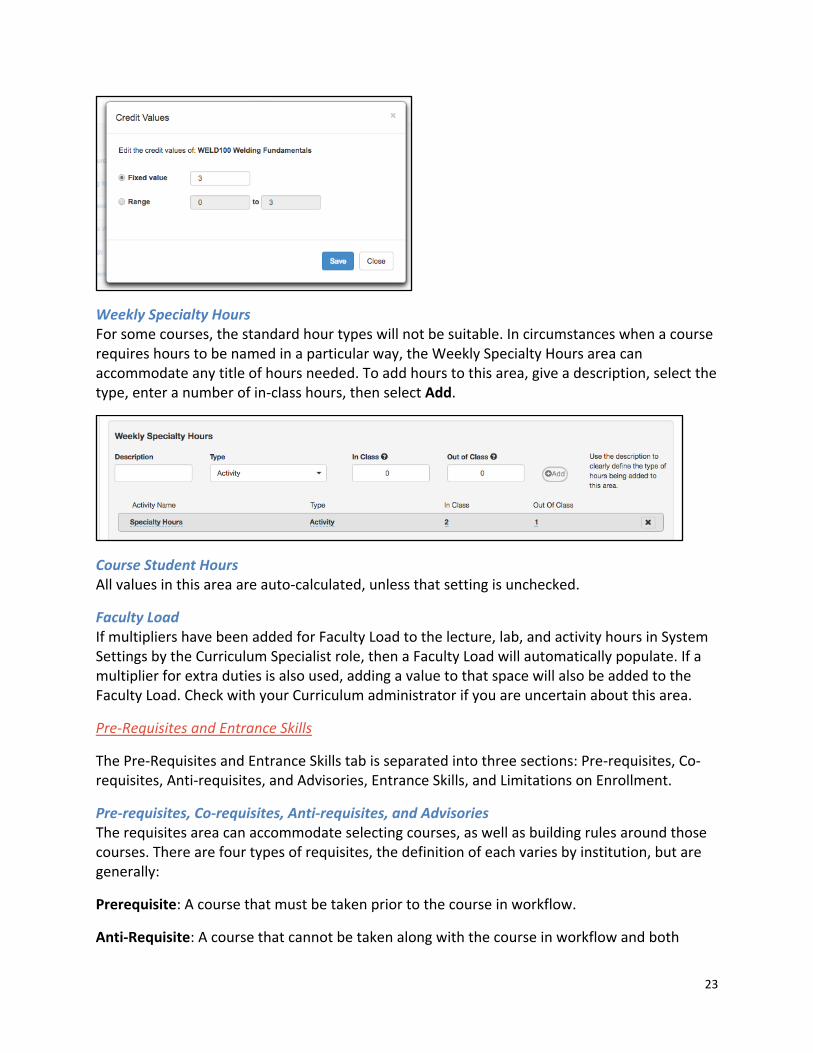
Therefore, even if a course carries a range of credits, they can be added to the program by selecting the pencil next to the credits and selecting “Range”.
23
Weekly Specialty Hours For some courses, the standard hour types will not be suitable. In circumstances when a course requires hours to be named in a particular way, the Weekly Specialty Hours area can accommodate any title of hours needed. To add hours to this area, give a description, select the type, enter a number of in-class hours, then select Add.
Course Student Hours All values in this area are auto-calculated, unless that setting is unchecked.
Faculty Load If multipliers have been added for Faculty Load to the lecture, lab, and activity hours in System Settings by the Curriculum Specialist role, then a Faculty Load will automatically populate. If a multiplier for extra duties is also used, adding a value to that space will also be added to the Faculty Load. Check with your Curriculum administrator if you are uncertain about this area.
Pre-Requisites and Entrance Skills
The Pre-Requisites and Entrance Skills tab is separated into three sections: Pre-requisites, Co-requisites, Anti-requisites, and Advisories, Entrance Skills, and Limitations on Enrollment.
Pre-requisites, Co-requisites, Anti-requisites, and Advisories The requisites area can accommodate selecting courses, as well as building rules around those courses. There are four types of requisites, the definition of each varies by institution, but are generally:
Prerequisite: A course that must be taken prior to the course in workflow.
Anti-Requisite: A course that cannot be taken along with the course in workflow and both

24
count toward a given degree/certificate.
Co-Requisite: A course that should be taken at the same time as the course in workflow.
Advisory: A course that it is highly recommended to be taken before or with the course in workflow.
Creating "And" Rules
1. Select Add Rule Group.
2. Select Add Rule.
3. Choose Requisite Type, then Course, complete the Content Review area if needed, then select Add Requisite.
4. Choose Select Objectives and Outcomes, choose from the provided lists, and then select Add.
5. Select Add Rule to add “AND” for the second course.
6. Select Requisite Type and Course as before.
7. Continue the same process, choose Requisite Type, then Course, complete the Content Review area if needed, then select Add Requisite.
8. Continue the same steps to keep adding “AND” between courses.
Creating "Or" Rules
1. Select Add Rule Group.
2. Select Add Rule.
3. Choose Requisite Type, then Course, complete the Content Review area if needed, then select Add Requisite.
4. Choose Select Objectives and Outcomes, choose from the provided lists, and then select Add.
5. Select Add Rule to add “OR” for the second course.
25
6. Select Requisite Type and Course as before.
7. Continue the same process, choose Requisite Type, then Course, complete the Content Review area if needed, then select Add Requisite.
8. Continue the same steps to keep adding “OR” between courses.
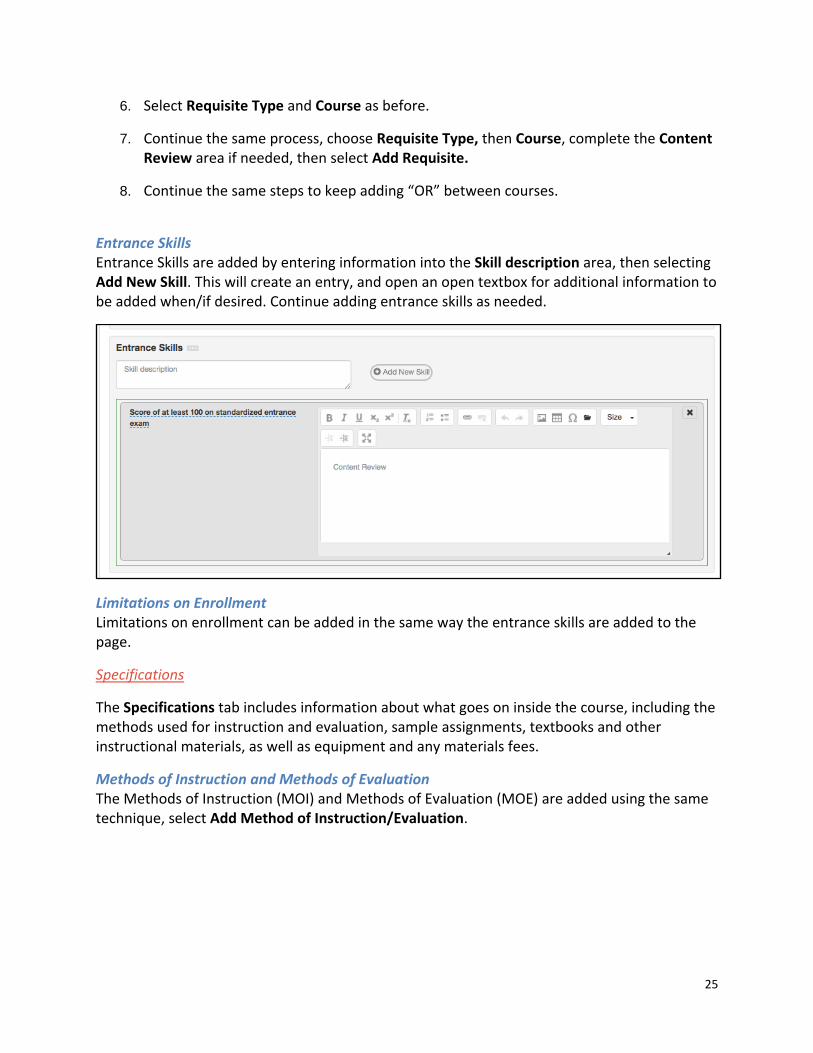
Entrance Skills Entrance Skills are added by entering information into the Skill description area, then selecting Add New Skill. This will create an entry, and open an open textbox for additional information to be added when/if desired. Continue adding entrance skills as needed.
Limitations on Enrollment Limitations on enrollment can be added in the same way the entrance skills are added to the page.
Specifications
The Specifications tab includes information about what goes on inside the course, including the methods used for instruction and evaluation, sample assignments, textbooks and other instructional materials, as well as equipment and any materials fees.
Methods of Instruction and Methods of Evaluation The Methods of Instruction (MOI) and Methods of Evaluation (MOE) are added using the same technique, select Add Method of Instruction/Evaluation.
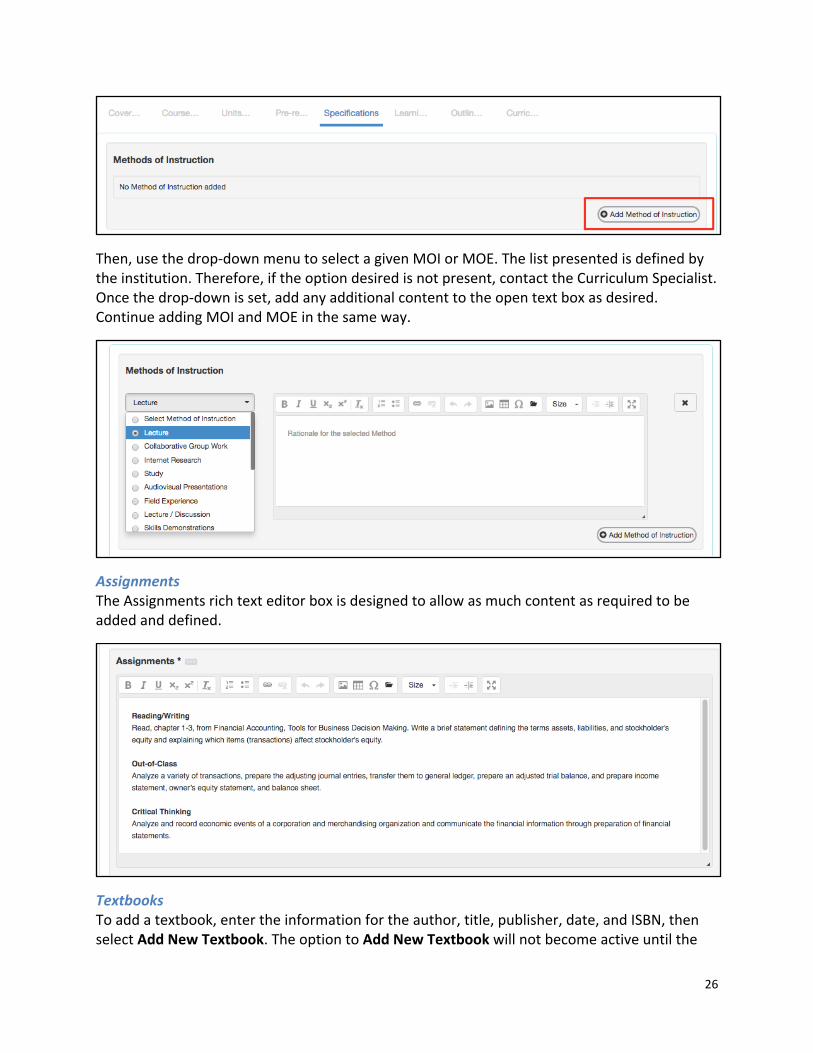
26
Then, use the drop-down menu to select a given MOI or MOE. The list presented is defined by the institution. Therefore, if the option desired is not present, contact the Curriculum Specialist. Once the drop-down is set, add any additional content to the open text box as desired. Continue adding MOI and MOE in the same way.
Assignments The Assignments rich text editor box is designed to allow as much content as required to be added and defined.
Textbooks To add a textbook, enter the information for the author, title, publisher, date, and ISBN, then select Add New Textbook. The option to Add New Textbook will not become active until the
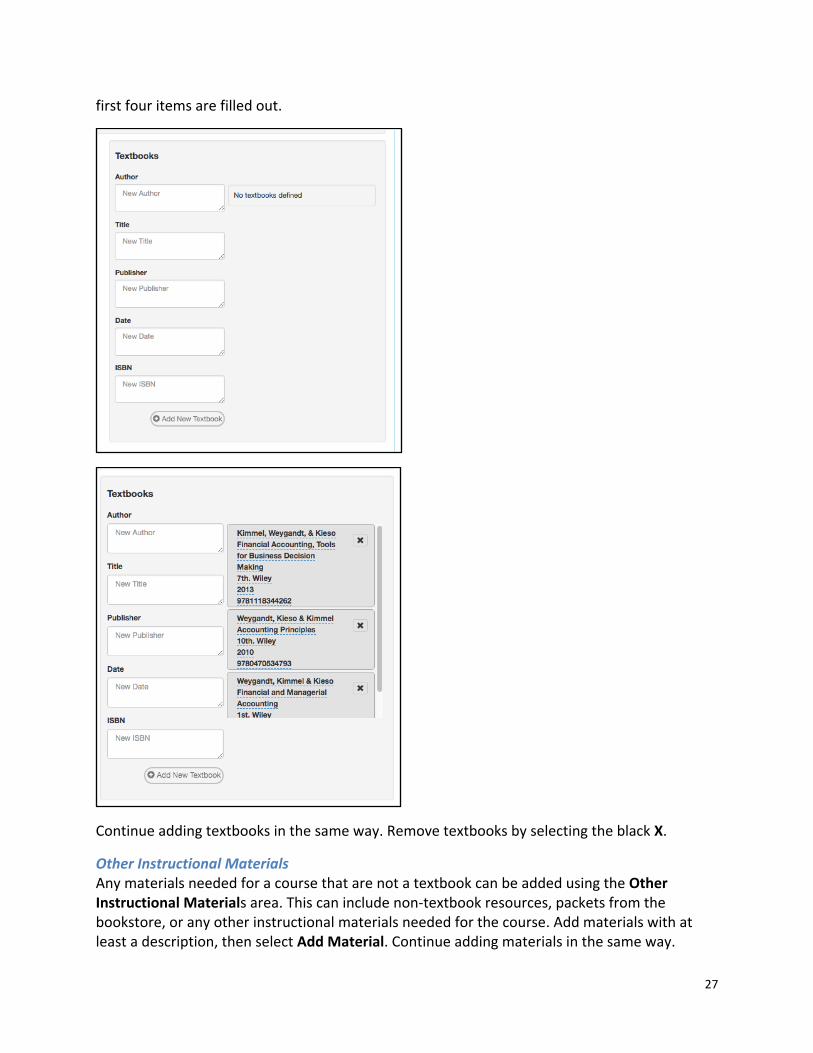
27
first four items are filled out.
Continue adding textbooks in the same way. Remove textbooks by selecting the black X.
Other Instructional Materials Any materials needed for a course that are not a textbook can be added using the Other Instructional Materials area. This can include non-textbook resources, packets from the bookstore, or any other instructional materials needed for the course. Add materials with at least a description, then select Add Material. Continue adding materials in the same way.

28
Learning Outcomes
The Learning Outcomes tab includes both objectives and student learning outcomes for the course.
Course Objectives To add course objectives, begin writing in the textbox, then select Add New Course Objective. Continue this method to add as many objectives as required. Once added, objectives can be re-ordered using the arrows on the right side of the entry. To remove an objective, select the black X. To edit the text of the objective, select the text. An editor will appear. Select the blue check mark to save your change.
CSLOs The Course Student Learning Outcomes can be added in the same way the objectives were added. Enter the text of the SLO in the box, then select Add New CSLO. If CSLOs are already listed, select the text to create a new version of the CSLO. Select the black X to remove the CSLO from the course. Once the workflow is approved, the change made to the CSLO in Curriculum will be seen in the SLOs listing page when viewing it for the proposal start term that
29
was approved for the course.
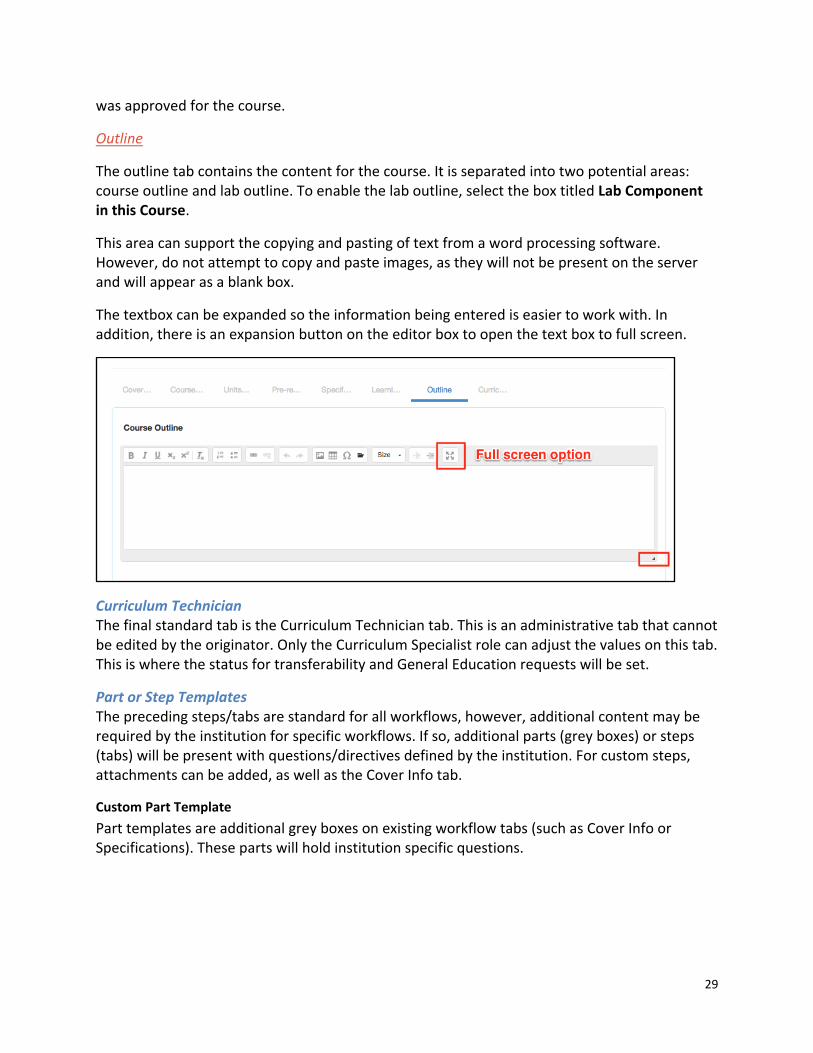
Outline
The outline tab contains the content for the course. It is separated into two potential areas: course outline and lab outline. To enable the lab outline, select the box titled Lab Component in this Course.
This area can support the copying and pasting of text from a word processing software. However, do not attempt to copy and paste images, as they will not be present on the server and will appear as a blank box.
The textbox can be expanded so the information being entered is easier to work with. In addition, there is an expansion button on the editor box to open the text box to full screen.
Curriculum Technician The final standard tab is the Curriculum Technician tab. This is an administrative tab that cannot be edited by the originator. Only the Curriculum Specialist role can adjust the values on this tab. This is where the status for transferability and General Education requests will be set.
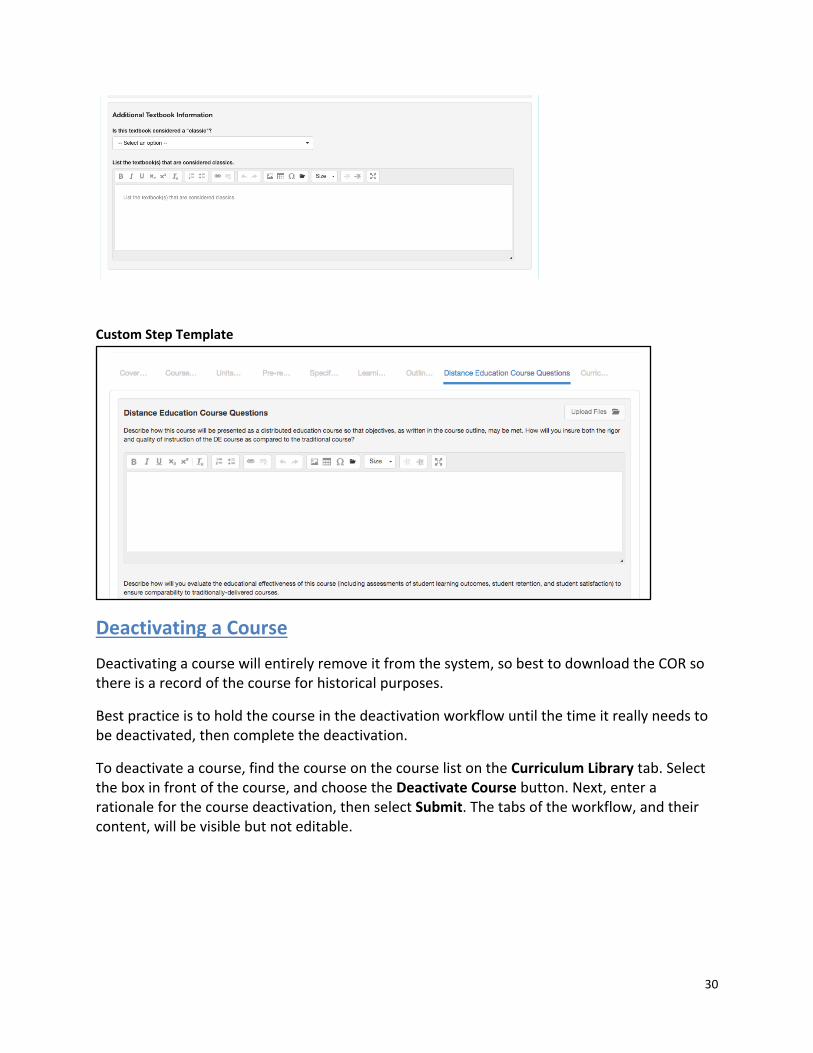
Part or Step Templates The preceding steps/tabs are standard for all workflows, however, additional content may be required by the institution for specific workflows. If so, additional parts (grey boxes) or steps (tabs) will be present with questions/directives defined by the institution. For custom steps, attachments can be added, as well as the Cover Info tab.
Custom Part Template
Part templates are additional grey boxes on existing workflow tabs (such as Cover Info or Specifications). These parts will hold institution specific questions.
30
Custom Step Template
Deactivating a Course
Deactivating a course will entirely remove it from the system, so best to download the COR so there is a record of the course for historical purposes.
Best practice is to hold the course in the deactivation workflow until the time it really needs to be deactivated, then complete the deactivation.
To deactivate a course, find the course on the course list on the Curriculum Library tab. Select the box in front of the course, and choose the Deactivate Course button. Next, enter a rationale for the course deactivation, then select Submit. The tabs of the workflow, and their content, will be visible but not editable.

31
After Submitting a Course Workflow
Once a course is submitted it will go through an institutionally specified workflow. Once Submit is selected a box will appear to confirm the submission, and indicate where the course will go once it has been submitted.
Workflows are broken into stages and each stage can have one or more roles assigned to edit, review, and/or approve the content submitted in the workflow. Roles with the review ability can read over the course proposal, mark areas as reviewed, and leave comments on each section. Roles with the approve ability can read over the course proposal, leave comments, and additionally can mark an area for adjustments and send the proposal back to the Originator. Roles with the edit ability can open the area for which their edit ability was assigned and make changes. For questions on the workflows that have been defined for your institution, contact your curriculum administrator.
Watch the progress of the proposal on the Curriculum Dashboard. Originators can review and respond to comments in the workflow by entering the course workflow through the Inbox or the View Workflow option on the Curriculum Dashboard.
32
Notifications
eLumen will send notifications to curriculum roles when a course enters their stage. Notifications are not sent for program proposals. Notifications are sent as a summary email twice per day, and are sent to the email address stored in eLumen for the particular user.
View and Reports
eLumen offers several reports and dashboards for your Curriculum data.
Course Outline of Record or Program Outline of Record
Course and Program outline of record reports are available through the Curriculum Dashboard, and the Curriculum Library. Approved versions and historical versions are available on the Curriculum Library. A COR that shows the updates from a workflow are available by running the COR from the Curriculum Dashboard. To see a full overview of the curriculum information for a Course or Program, select that Course or Program and select View COR Report or View Program Outline Report at the top of the table. Choose the sections you wish to view from drop-down menu in the pop up then select Go to Report. From the report screen select the printer icon to print the Outline or to use the print dialogue box to save as a PDF.
Change Report
To see the changes from the latest approved version of a course to the newest revision of a course, navigate to the course side of the Curriculum Dashboard and select the Change Report from the Action menu. The change report begins with a summary table of changes to the course, then displays a side by side view of all fields. Red strikethrough indicates something that has been removed, and green underlining indicates content that has been added.
Comparison Report
From the Curriculum Library, this report will create a side by side comparison of up to three Courses. To create this report, select two or three courses and select Compare at the top of the table. From the report screen select the printer icon to print the Comparison or to use the print dialogue box to save as PDF.
Impact Report
The impact report is available from the Curriculum Dashboard when a course is in development. It will identify the courses that use the development course as a requisite, those courses that are requisites of the development course, and the programs in which the development course is located.