model-making - royal institute of the architects of ireland
TRANSCRIPT

MODEL-MAKING
Shaping Space
MODEL-MAKING GUIDELINES
Materials Choosing the right materials for your model makes it much easier to get a good result.
Read the sections "Making your model" and "Colour and texture in models". Think
carefully about the scale of your model before making up your mind. Use materials that
"go together". Cardboard and paper usually look well together; so do MDF and cork.
Useful hint
Use as few materials a s you can in any one model. If you mix too many different
materials, the result can look tacky and unconvincing.
Chipboard, plywood and MDF
These are useful for making a rigid base for your model. The bigger the base is, the
thicker it needs to be. The base should not warp or bend. MDF can be used to make
large models of buildings where you want to show the rooms inside. Chipboard has the
coarsest finish. MDF has a very fine finish and needs no sanding.
All of these materials are available from any builders' suppliers and most DIY shops.
Sheets measure 2400 x 1200 mm and come in various thicknesses. A builders' supplier
can cut the sheet and sell you the exact amount you need for your model. Many DIY
shops sell small, pre-cut sheets. Thicknesses and approximate prices for full sheets are
given below.
Chipboard 1 2 mm, 18 mm A 12 mm thick sheet costs 21 1.50.
MDF 3 mm, 6 mm, 1 2 m m , 1 5 m m , 1 8 m m A 12 mm thick sheet costs S18.00
Plywood 3 mm, 6 mm, 1 2 mm, 18 mm A 12 mm thick sheet costs 226.00
Softwood sections
Lengths of white deal can be sawn into small pieces, then shaped and sanded to make
small-scale buildings for a model of a whole street or part of a neighbourhood.
Combined with a rigid base, these will make a very sturdy model.
50 x 25 mm sections will cost approximately 20p per 300 mm.
7 5 x 25 mm sections will cost approximately 30p per 300 mm.
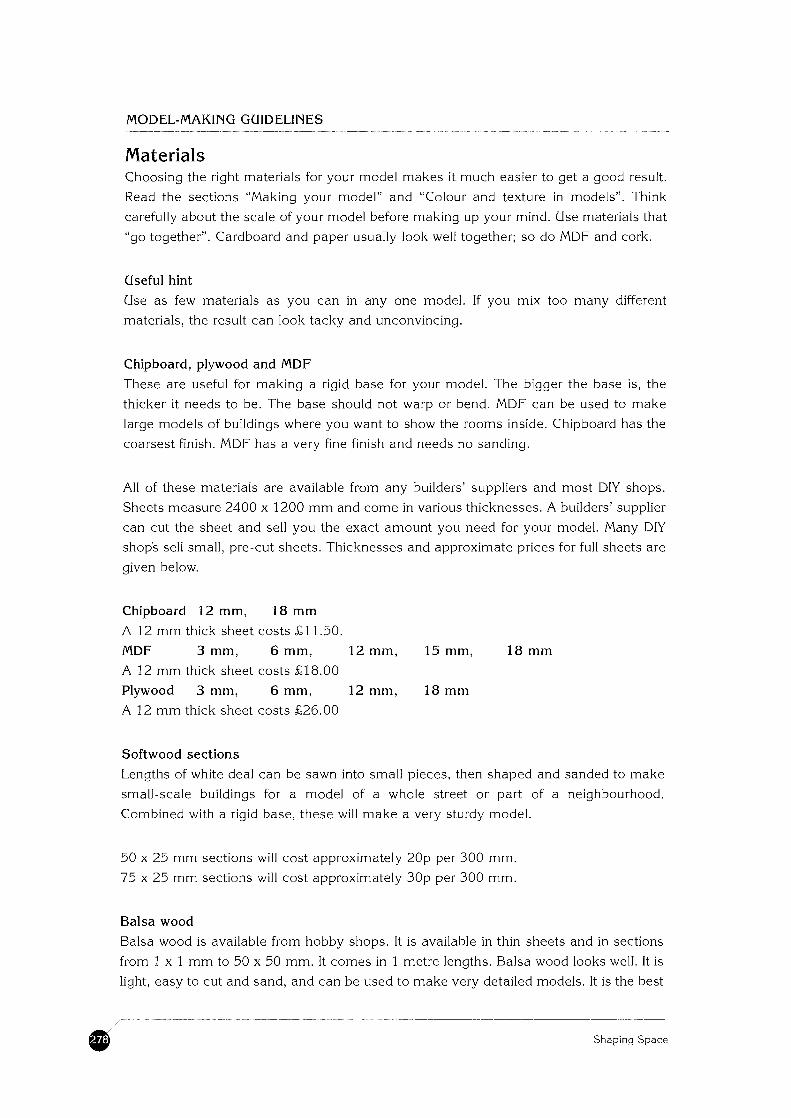
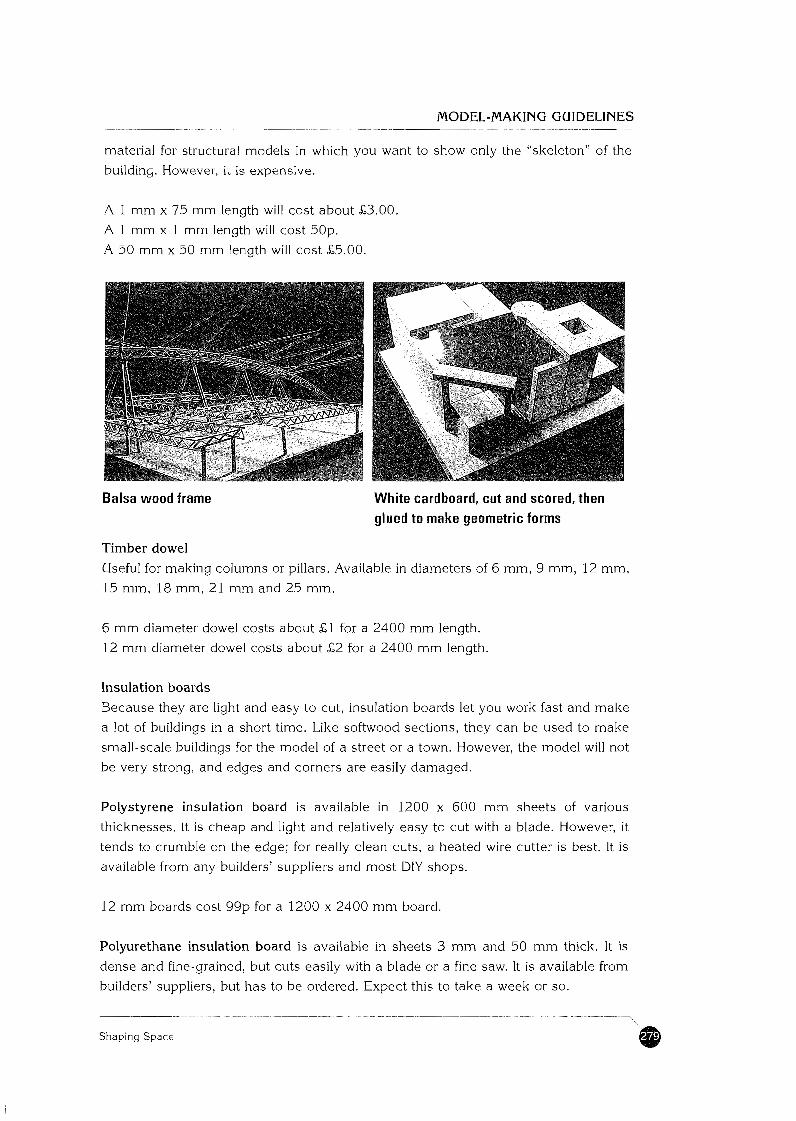
Balsa wood
Balsa wood is available from hobby shops. It is available in thin sheets and in sections
from 1 x 1 mm to 50 x 50 mm. It comes in 1 metre lengths. Balsa wood looks well. It is
light, easy to cut and sand, and can be used to make very detailed models. It is the best
Shaping Space
MODEL-MAKING GUIDELINES
material for structural models in which you want to show only the "skeleton" of the
building. However, it is expensive.
A 1 mm x 75 mm length will cost about 23.00.
A 1 mm x 1 mm length will cost 50p.
A 50 mm x 50 mm length will cost £5.00.
Balsa wood frame White cardboard, cut and scored, then glued to make geometric forms
Timber dowel Useful for making columns or pillars. Available in diameters of 6 mm, 9 mm, 12 mm,
1 5 mm, 18 mm, 21 mm and 2 5 mm.
6 mm diameter dowel costs about £1 for a 2400 mm length.
12 mm diameter dowel costs about £2 for a 2400 mm length.
Insulation boards Because they are light and easy to cut, insulation boards let you work fast and make
a lot of buildings in a short time. Like softwood sections, they can be used to make
small-scale buildings for the model of a street or a town. However, the model will not
be very strong, and edges and corners are easily damaged.
Polystyrene insulation board is available in 1200 x 600 m m sheets of various
thicknesses. It is cheap and light and relatively easy to cut with a blade. However, it
tends to crumble on the edge; for really clean cuts, a heated wire cutter is best. It is
available from any builders' suppliers and most DIY shops.
12 mm boards cost 99p for a 1200 x 2400 mm board.
Polyurethane insulation board is available in sheets 3 m m and 50 m m thick. It is
dense and fine-grained, but cuts easily with a blade or a fine saw. It is available from
builders' suppliers, but has to be ordered. Expect this to take a week or so.
Shaping Space
MODEL-MAKING GUIDELINES
Kingspan Shelterwall 30 mm sheets 450 x 1200 mm £3.00
50 mm sheets 450 x 1200 mm 24.50
Kingspan Shelterfloor 30 mm sheets 2400 x 1200 mm £19.25 6' <( 50 mm sheets 2400 x 1200 mm £27.90
Cork Cork flooring tiles are available in packs from DIY stores. They are easy to cut with a
fine blade and have a "natural" feel. They are good for modelling landscapes and can
be built up in layers to model hilly sites.
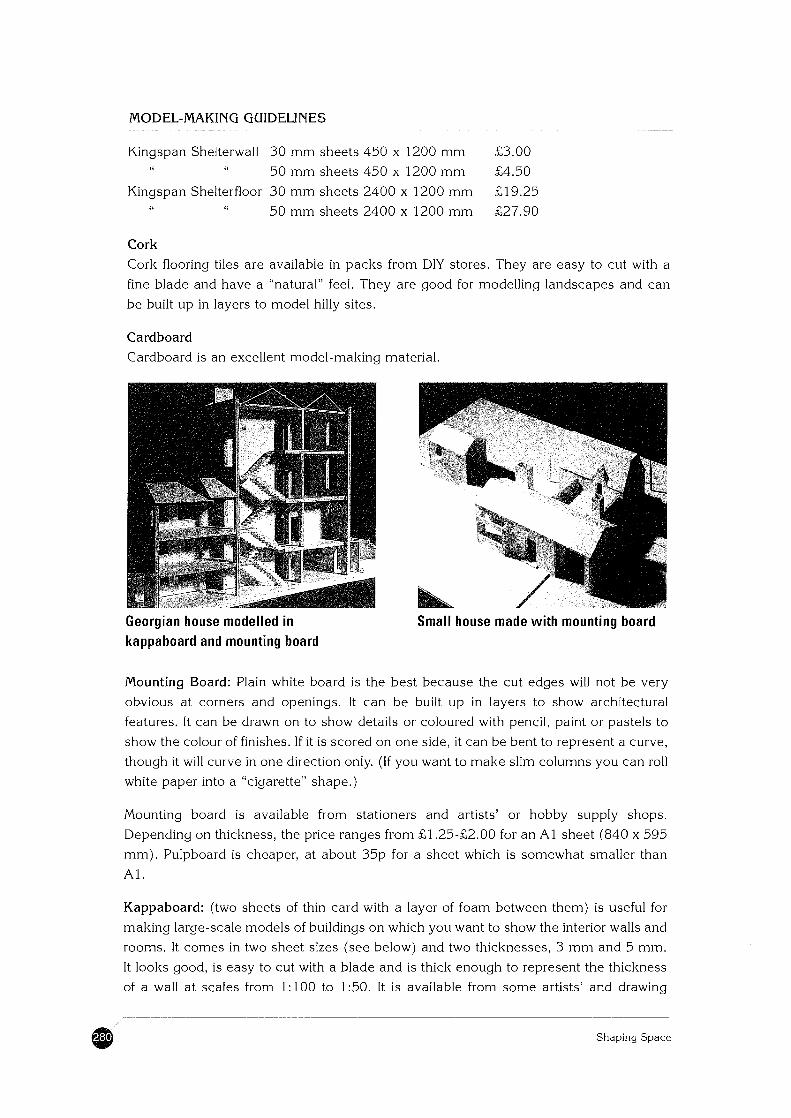
Cardboard
Cardboard is an excellent model-making material.
Georgian house modelled in kappaboard and mounting board
Small house made with mounting board
Mounting Board: Plain white board is the best because the cut edges will not be very
obvious at corners and openings. It can be built up in layers to show architectural
features. It can be drawn on to show details or coloured with pencil, paint or pastels to
show the colour of finishes. If it is scored on one side, it can be bent to represent a curve,
though it will curve in one direction only. (If you want to make slim columns you can roll
white paper into a "cigarette" shape.)
Mounting board is available from stationers and artists' or hobby supply shops.
Depending on thickness, the price ranges from 2 l.25-S2.OO for an A1 sheet (840 x 595
mm). Pulpboard is cheaper, at about 35p for a sheet which is somewhat smaller than
A l .
Kappaboard: (two sheets of thin card with a layer of foam between them) is useful for
making large-scale models of buildings on which you want to show the interior walls and
rooms. It comes in two sheet sizes (see below) and two thicknesses, 3 m m and 5 mm.
It looks good, is easy to cut with a blade and is thick enough to represent the thickness
of a wall at scales from 1: 100 to 1 :50. It is available from some artists' and drawing
Shaping Space
MODEL-MAKING GUIDELINES
supply shops, but is expensive. (MDF can do the same job much more cheaply, but
it has to be cut and shaped with a saw.)
Sheets 200 x 300 mm. 3 mm thick, £2.90. 5 m m thick, S4.50
Sheets 400 x 400 mm. 3 mm thick, £5.75 5 m m thick, £8.50
Corrugated cardboard can be used to make trial models or rough models which do
not need a lot of detail. A big advantage is that it is free, if you can find some strong,
undamaged cardboard boxes.
Clay and plasticine
These are useful for modelling sites, landscapes and buildings, and can be used for
small- or large-scale models. Blocks of clay or plasticine can be shaped to make
small-scale buildings, with openings represented by cut-out recesses. Rolled into
thick sheets, they can be cut to make walls for large-scale models. Mouldings and
other details can be built up in clay or plasticine and applied to the walls to model
elaborate facades.
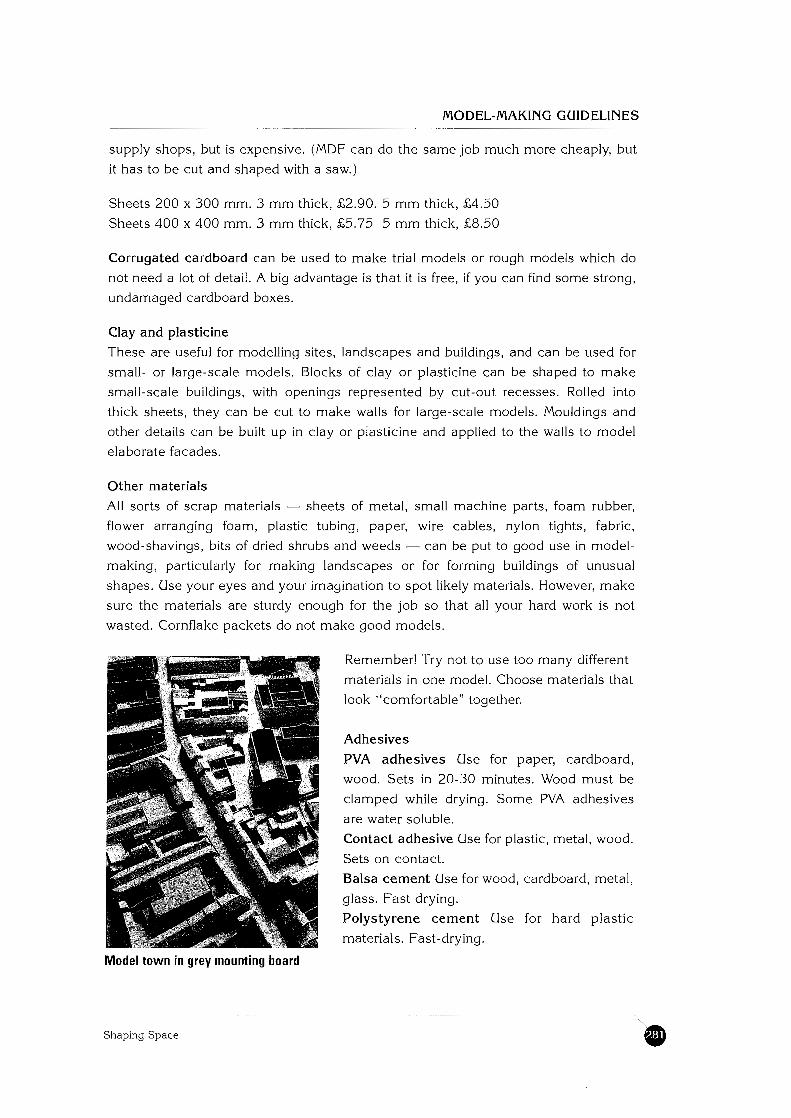
Other materials
All sorts of scrap materials - sheets of metal, small machine parts, foam rubber,
flower arranging foam, plastic tubing, paper, wire cables, nylon tights, fabric,
wood-shavings, bits of dried shrubs and weeds - can be put to good use in model-
making, particularly for making landscapes or for forming buildings of unusual
shapes. Use your eyes and your imagination to spot likely materials. However, make
sure the materials are sturdy enough for the job so that all your hard work is not
wasted. Cornflake packets do not make good models.
Remember! Try not to use too many different
materials in one model. Choose materials that
look "comfortable" together.
Adhesives
PVA adhesives Use for paper, cardboard,
wood. Sets in 20-30 minutes. Wood must be
clamped while drying. Some PVA adhesives
are water soluble.
Contact adhesive Use for plastic, metal, wood.
Sets on contact.
Balsa cement Use for wood, cardboard, metal,
glass. Fast drying.
Polystyrene cement Use for hard plastic
materials. Fast-drying.
Model town in grey mounting board
Shaping Space
MODEL-MAKING GUIDELINES
Model-making equipment A solid board. Plywood or MDF will do. Do not work directly on a table top or on a
drawing board - you will damage them.
Scissors for cutting paper, fabric etc. 0 A heavy knife with a retractable blade, for cutting cardboard (Stanley knife, or
similar).
A light hobby knife (Exacto, scalpel or similar) for cutting paper, plasticine, balsa
wood, light cardboard etc.
A steel straight-edge to guide your blade while you are cutting. 1 m is a useful length.
Do not try to use a wood or plastic ruler. Your blade will damage it, but, more seriously,
it may snag on the edge and cut your hand.
A pair of heavy builder's gloves. Always wear a glove on the hand you use to hold the
straight-edge in place. This will help protect your hand if the blade slips.
Depending on what materials you are using, you may also need:
A fine-toothed saw, for cutting timber or MDF
A hot-wire cutter. Not essential, but useful for cutting thick foam rubber or insulating
board
SAFETY TIP! When you are cutting cardboard with a blade, do not try to cut through it in one cut.
First, score the line lightly with your blade, then cut a little deeper. Then cut deeper
again. Keep cutting like this until your blade goes right through the card.
Making your model You have already surveyed your building, street or other site, checked that all the
measurements tally, and made a final set of accurate drawings. Make the drawings to
the scale you plan to use for your model.
Then transfer all the measurements onto the cardboard, board or other modelling
material. Remember to allow for joints and for the thickness of your modelling material.
The base if your site is flat, or nearly flat, you can just draw or paint roads, paths, grass etc. onto
the cardboard or board you are using a s your base. Mark out all the boundaries and the
positions of buildings, trees and any other objects that you plan to place on it. You may
be able to get a lot of this information from an Ordnance Survey ( 0 s ) map of the area.
Cardboard or cork: Use cardboard or cork tiles built up in layers to show roads,
pathways and changes in level. The number of layers depends on the thickness of the
cardboard or cork, the scale of the model, and the heights you are trying to represent.
If you need very few layers, each layer can simply be cut and glued to the layer below.
Shaping Space
MODEL-MAKING GUIDELINES
If you need a lot of layers, this will use up too much material. Instead, cut out only the
edges of each layer. This kind of "landscape" will need propping underneath. Use
cardboard fins, off-cuts of wood or stacks of cardboard scraps glued together.
Surround the base with a rim to hide the supports.
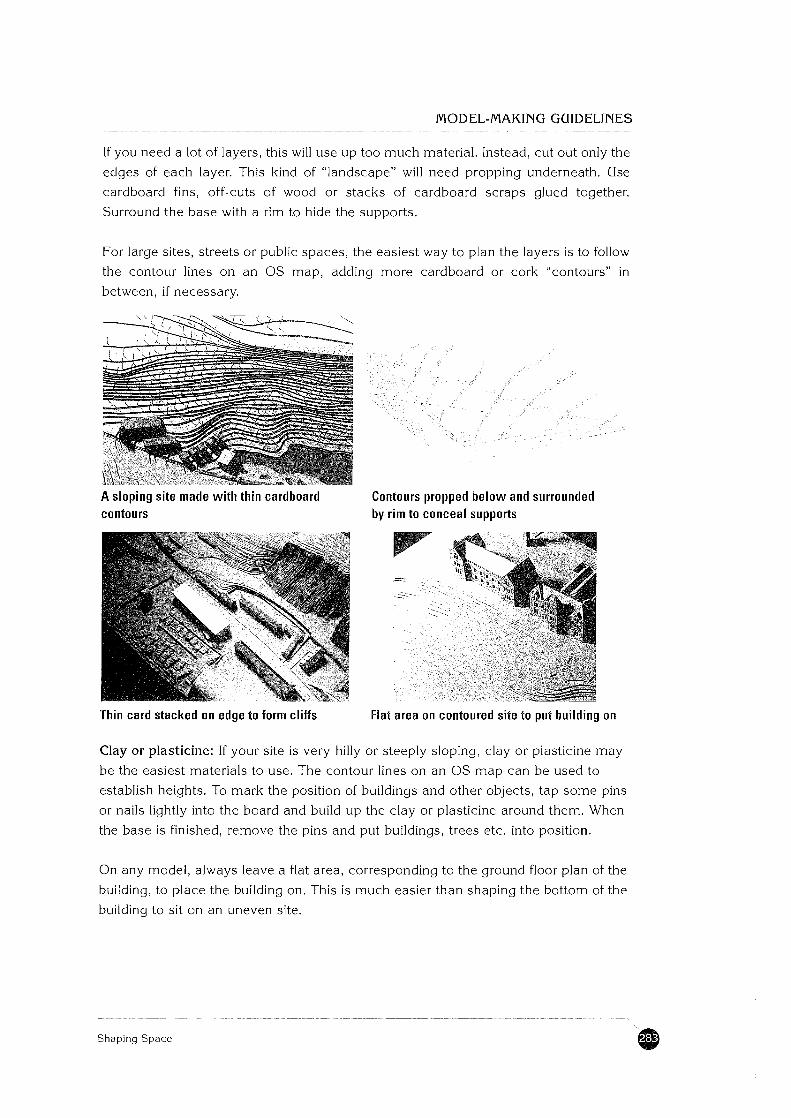
For large sites, streets or public spaces, the easiest way to plan the layers is to follow
the contour lines on an OS map, adding more cardboard or cork "contours" in
between, if necessary.
A sloping site made with thin cardboard contours
Contours propped below and surrounded by rim to conceal supports
Thin card stacked on edge to form cliffs Flat area on contoured site to put building on
Clay or plasticine: If your site is very hilly or steeply sloping, clay or plasticine may
be the easiest materials to use. The contour lines on an OS map can be used to
establish heights. To mark the position of buildings and other objects, tap some pins
or nails lightly into the board and build up the clay or plasticine around them. When
the base is finished, remove the pins and put buildings, trees etc. into position.
On any model, always leave a flat area, corresponding to the ground floor plan of the
building, to place the building on. This is much easier than shaping the bottom of the
building to sit on an uneven site.
Shaping Space
MODEL-MAKING GUIDELINES
The buildings
What you do next
you plan to use.
depends on what kind of model you are making and what materials
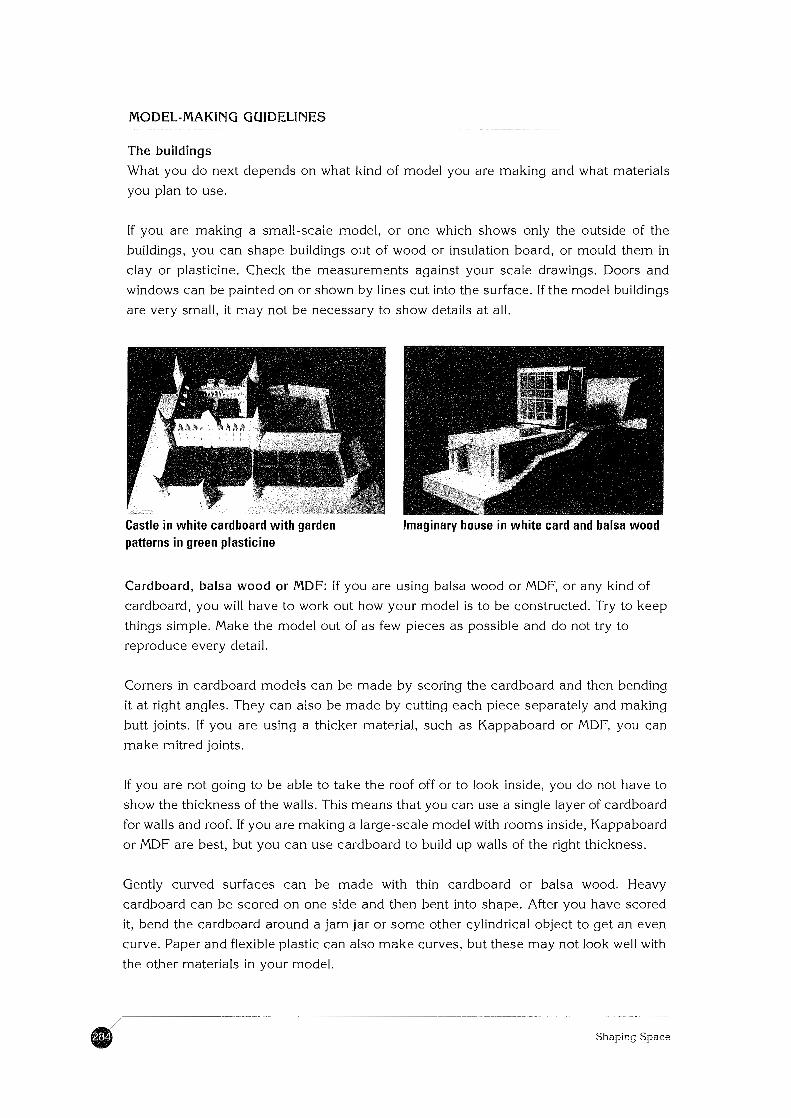
If you are making a small-scale model, or one which shows only the outside of the
buildings, you can shape buildings out of wood or insulation board, or mould them in
clay or plasticine. Check the measurements against your scale drawings. Doors and
windows can be painted on or shown by lines cut into the surface. If the model buildings
are very small, it may not be necessary to show details at all.
Castle in white cardboard with garden patterns in green plasticine
Imaginary house in white card and balsa wood
Cardboard, balsa wood or MDF: If you are using balsa wood or MDF, or any kind of
cardboard, you will have to work out how your model is to be constructed. Try to keep
things simple. Make the model out of a s few pieces as possible and do not try to
reproduce every detail.
Corners in cardboard models can be made by scoring the cardboard and then bending
it at right angles. They can also be made by cutting each piece separately and making
butt joints. If you are using a thicker material, such a s Kappaboard or MDF, you can
make mitred joints.
If you are not going to be able to take the roof off or to look inside, you do not have to
show the thickness of the walls. This means that you can use a single layer of cardboard
for walls and roof. If you are making a large-scale model with rooms inside, Kappaboard
or MDF are best, but you can use cardboard to build up walls of the right thickness.
Gently curved surfaces can be made with thin cardboard or balsa wood. Heavy
cardboard can be scored on one side and then bent into shape. After you have scored
it, bend the cardboard around a jam jar or some other cylindrical object to get an even
curve. Paper and flexible plastic can also make curves, but these may not look well with
the other materials in your model.
Shaping Space
MODEL-MAKING GUIDELINES
Once you have decided how to construct your model, draw the shapes of the pieces
onto the cardboard or board. Remember to allow for the thickness of the material at
corners and joints. Then cut out the pieces. Windows, doors and other openings
should be cut now, before you assemble the pieces. When cutting windows out of a
piece of cardboard, always start your cuts at the corners of the windows. This will give
you neater corners.
Work carefully!
Time spent planning your model, tracing the outlines accurately onto the material and
making clean cuts will save endless frustration when you come to assemble it.
Now you can assemble the pieces. Start with the outer walls, add any interior walls
and upper floors, then put on the roof.
Clay or plasticine: Clay and plasticine are good for modelling buildings which have
a lot of curved shapes, or which are rough in character - like a ruined castle, for
example.
Work out how you are going to construct the model. Trace the shapes of all the pieces
on paper and cut them out. Cut out all doors, windows and any other openings. Roll
out the clay or plasticine into sheets of the right thickness for the walls. Now lay your
paper "patterns" on the clay or plasticine. Cut out the walls with a knife. Cut out
doors, windows and other openings at the same time. Do the same for floors, roofs
and any other parts of the building.
Show details - like brickwork, mouldings or an interesting door surround - by
cutting into the surface or applying small pieces of clay or plasticine to it. It will
probably be easier to do this while the walls are still flat on the work surface.
Now assemble your model.
Windows In most models, it is not necessary to use anything to represent the glass in windows.
Just cut an opening and people will "imagine" the glass. Even in a large-scale model,
you can show the window frames and mullions (see Information Sheet 4 "House
Facades") but leave out the glass itself. If you want to use some material for the glass,
it must be rigid - any curves or wrinkles will destroy the effect completely.
Shaping Space
MODEL-MAKING GUIDELINES
r r r r r r r r r r r r r r r
..?,,< . , :'. . . y:,;!;,::)" s,,.,,:, . : . . ' .
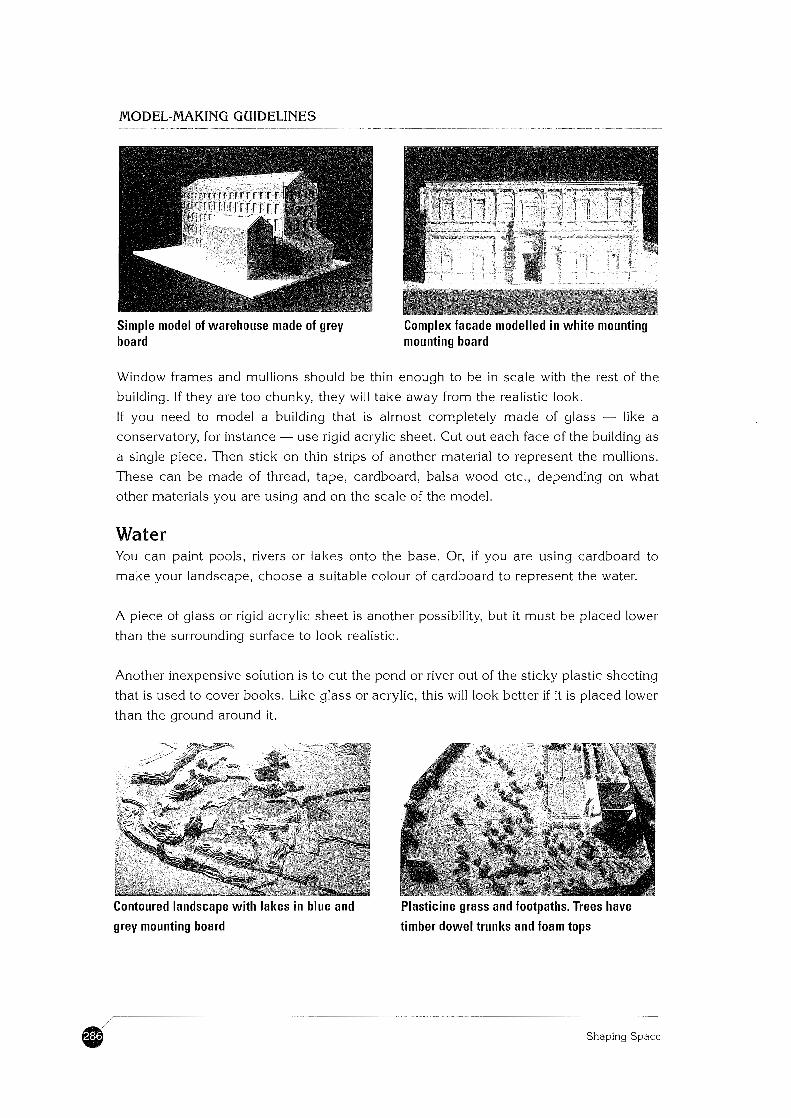
Simple model of warehouse made of grey Complex facade modelled in white mounting board mounting board
Window frames and mullions should be thin enough to be in scale with the rest of the
building. If they are too chunky, they will take away from the realistic look.
If you need to model a building that is almost completely made of glass - like a
conservatory, for instance - use rigid acrylic sheet. Cut out each face of the building a s
a single piece. Then stick on thin strips of another material to represent the mullions.
These can be made of thread, tape, cardboard, balsa wood etc., depending on what
other materials you are using and on the scale of the model.
Water You can paint pools, rivers or lakes onto the base. Or, if you are using cardboard to
make your landscape, choose a suitable colour of cardboard to represent the water.
A piece of glass or rigid acrylic sheet is another possibility, but it must be placed lower
than the surrounding surface to look realistic.
Another inexpensive solution is to cut the pond or river out of the sticky plastic sheeting
that is used to cover books. Like glass or acrylic, this will look better if it is placed lower
than the ground around it.
Contoured landscape with lakes in blue and
grey mounting board
Plasticine grass and footpaths. Trees have
timber dowel trunks and foam tops
Shaping Space
MODEL-MAKING GUIDELINES
These should be added last because they are usually fairly fragile. There are lots of
materials you can use - most of them free. Bits of dried plants are often the best, but
foam rubber, wire, paper and wood-shavings work well too. Don't feel that tree trunks
have to be brown and tree tops green - as long as they are the right shape and scale,
they will look convincing.
Colour and texture in models Colour in models works in the same way as it does in drawings. When you make a
model of a building, it is as though you were looking at the building from a distance.
This imaginary distance has an effect on colours and textures. Colours are more
subdued than they are in real life and textures may be hardly visible at all.
There is usually no point in trying to show the effect of pebble-dash or "tyrolean"'
plaster on a model. The natural finish of the cardboard or wood you are using for the
model is enough. If the building has some very shiny surfaces, and you think that this
is an important feature, use a different material or finish to represent these.To show
the joints of brickwork or stonework, the best way is to score them with a knife. This
gives a much more realistic effect.
You cannot show a lot of detail on small-scale models. Bright colours which might
look fine on a big model of a house will look garish if they are used for the same house
modelled at a scale of 1:200. Often it is not necessary to use any added colour at all.
The natural colours of your modelling materials may be enough.
Shaping Space

--
Shaping Space