mobilevue user's guide - harris symphony cdm · mobilevue provides situational awareness to...
TRANSCRIPT

MobileVue Version 1.0 User’s Guide

Last Updated: August 31, 2015
Harris Corporation
12930 Worldgate Drive
Herndon, Virginia 20170-6008
i
CONTENTS INTRODUCTION .............................................................................................. 1
LOGGING IN ............................................................................................................................. 1 USING THE INTERFACE ............................................................................................................. 3 DISPLAYING THE MOBILEVUE VERSION ...................................................................................... 4 NOTE TO MOBILE DEVICE USERS .............................................................................................. 5
THE MAP ...................................................................................................... 6 EXPANDING THE MAP PANEL ..................................................................................................... 7 PANNING THE MAP ................................................................................................................... 7 ZOOMING TO AIRPORT .............................................................................................................. 8 ZOOMING IN/OUT ..................................................................................................................... 8 CHANGING THE MAP LAYER AND ICONS DISPLAYED .................................................................... 9
Changing the Map Layer ....................................................................................................13 Changing the Objects Displayed ........................................................................................14
FINDING YOUR LOCATION .........................................................................................................14 VIEWING A FLIGHT'S PROPERTIES ............................................................................................15 CENTERING THE FLIGHT ON THE MAP .......................................................................................16 FOLLOWING A FLIGHT ..............................................................................................................17
DATA TABLES .............................................................................................. 19 SORTING ................................................................................................................................19 FILTERING DATA .....................................................................................................................20 REMOVING FILTERS .................................................................................................................21 CENTERING OBJECT ON MAP ...................................................................................................22
TOOLS ........................................................................................................ 23 VIEWING WEATHER .................................................................................................................23
HISTORICAL REPLAY .................................................................................... 24 REPLAYING EVENTS ................................................................................................................24 PLAYBACK CONTROLS .............................................................................................................26 VIEWING A FLIGHT'S TRACK .....................................................................................................27
CUSTOMIZING MOBILEVUE ............................................................................ 28 CUSTOMIZING FLIGHT ICONS ....................................................................................................28 CUSTOMIZING THE MAP DISPLAY ..............................................................................................29 CUSTOMIZING DATA TABLE DISPLAY FIELDS .............................................................................31
NOISE MODULE ............................................................................................ 33 VIEWING A NOISE MONITORING TERMINAL'S PROPERTIES ..........................................................34 CENTERING THE MAP ON AN ADDRESS .....................................................................................35

MobileVue v1.0 User’s Guide Contents
ii
SPECIFYING A HOME ADDRESS ................................................................................................36 VIEWING A FLIGHT'S SLANT RANGE ..........................................................................................37 CREATING A COMPLAINT ..........................................................................................................38 CREATING AN AIRSCENE/NOMS LOGIN ....................................................................................41

1
INTRODUCTION MobileVue provides situational awareness to all aviation stakeholders including airport, airlines, and air navigation service providers. The map displayed is specific to a given airport and displays a 15NM radius around the airport.
Logging In To log into MobileVue:
1. Using your web browser, navigate to your MobileVue URL.
2. In the account field, enter the name airport's account name.
3. In the username field, enter your user name.
4. In the password field, enter the password associated with your user name.
5. Click Log In.
Figure 1: Login
The default MobileVue interface displays.

MobileVue v1.0 User’s Guide Introduction
2
Figure 2: MobileVue

3
Using the Interface The default interface is comprised of three distinct panels. The panel on the left displays the Options, Help, and About buttons along with three tabs: Details, Tools, and Replay. A map of your airport is the largest of the three panels. By default, the map displays any flights in the system. Below the map is a panel containing the Flights and Noise tabs. These tabs display flight and noise data in tabular format.
Figure 3: Three Panels

MobileVue v1.0 User’s Guide Introduction
4
Displaying the MobileVue Version To view the version number of MobileVue, click the About button in the left pane (Figure 4).
Figure 4: About Button

5
Note to Mobile Device Users MobileVue is fully supported on computers and mobile devices. Mobile device users should note that while this manual often uses terminology that may seem specific to computers (e.g., click), the functionality is available to mobile devices by performing the comparable action (e.g., tap).
MobileVue v1.0 User’s Guide The Map
6
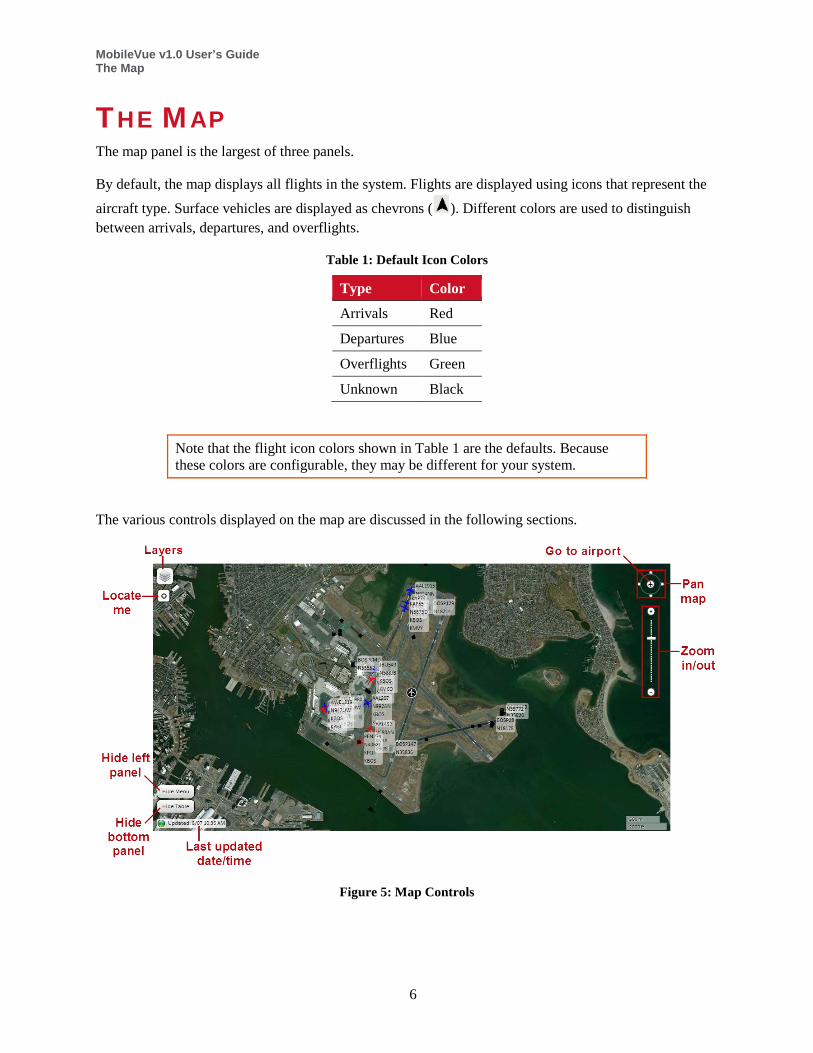
THE MAP The map panel is the largest of three panels.
By default, the map displays all flights in the system. Flights are displayed using icons that represent the aircraft type. Surface vehicles are displayed as chevrons ( ). Different colors are used to distinguish between arrivals, departures, and overflights.
Table 1: Default Icon Colors
Type Color
Arrivals Red
Departures Blue
Overflights Green
Unknown Black
Note that the flight icon colors shown in Table 1 are the defaults. Because these colors are configurable, they may be different for your system.
The various controls displayed on the map are discussed in the following sections.
Figure 5: Map Controls

7
Expanding the Map Panel The map panel is always displayed, but you may hide the other two panels by using the and
buttons located in the map's lower, left. To hide the left panel click the button.
To hide the panel containing the data table(s), click the button.
Figure 6: Buttons to Expand Map
Panning the Map There are two options to pan the map. The first is to click on the map and drag. The second option is to use the compass control in the upper, right corner of the map. Click the four points of the compass to pan the map in that direction. For example, click the bottom point to pan down.
Figure 7: Panning with Compass Control
Mobile users may also tap and drag to pan the map.

MobileVue v1.0 User’s Guide The Map
8
Zooming to Airport To reset the map so that your airport is displayed at the center at the original zoom level, click the center of the compass control.
Figure 8: Zoom to Airport
Zooming In/Out The zoom control enables you to change the scale of the map. The zoom control is located on the right side of the map, below the compass control. Click the buttons to zoom in, or drag the slider up and down.
Figure 9: Zoom Controls
Mobile device users may also use pinch and zoom functionality on their device.

9
Changing the Map Layer and Icons Displayed By default, MobileVue displays the Bing Maps Aerial map layer (Figure 10).
Figure 10: Bing Aerial Layer
MobileVue also includes several other layers:
Layer Name Example
Bing Maps Streets

MobileVue v1.0 User’s Guide The Map
10
Layer Name Example
Bing Maps Labeled Aerial
Open Street Maps
IFR High

11
Layer Name Example
IFR Low
VFR

MobileVue v1.0 User’s Guide The Map
12
The map also displays icons for the following object types by default:
• Arrivals
• Departures
• Overflights
• Unknown
• Surface vehicles
• Noise monitoring sites
• Live weather

13
Changing the Map Layer To change the map layer:
1. Click the layer control located in the upper right of the map.
Figure 11: Layer Control
2. Select the layer you would like to display.
Figure 12: Available Layers

MobileVue v1.0 User’s Guide The Map
14
Changing the Objects Displayed You may control the objects displayed on the map using the layers control.
To change the objects displayed on the map:
1. Click the layers control.
2. To display an object on the map, ensure the object's checkbox is selected. To hide an object, de-select the object's checkbox.
Figure 13: Map Objects
Finding your Location If your browser or device supports GPS location tracking, the map will include a Locate Me feature that centers your current location on the map. To find your location on the map, click the Locate Me button that is located below the layers control.
Figure 14: Locate Me Control
Your location is centered on the map and displayed with a blue circle.

15
Viewing a Flight's Properties To view the properties of a flight, click the flight's icon on the map.
A popup displays basic information about the flight. The Details tab in the left panel displays additional information about the flight.
Figure 15: Object Popup and Details
To customize the fields displayed in a flight's popup, refer to page 31 for details.

MobileVue v1.0 User’s Guide The Map
16
Centering the Flight on the Map To zoom in on and center a flight on the map:
1. Click the flight's icon on the map.
2. Click the Zoom To button located at the bottom of the left pane's Details tab.
Figure 16: Zoom To Button

17
Following a Flight Following a flight automatically pans the map so that the flight displays at the center of the panel until you stop following the flight.
To follow a flight:
1. Click the flight's icon on the map. A popup displays information for the flight.
2. Do one of the following:
• Click the button that displays in the upper left of the popup.
• Click the Follow button located at the bottom of the left pane's Details tab.
Figure 17: Follow Button
3. An indicator with the flight's ID displays.

MobileVue v1.0 User’s Guide The Map
18
Figure 18: Following a Flight
To stop following the flight, click the button that displays in the indicator.

19
DATA TABLES The panel below the map displays tables containing flight and noise data.
To change the columns displayed in the table, refer to page 31.
Sorting To sort the data in the tables by a particular column, click the column header to sort on. An arrow beside the column header indicates the sort column and order.
Figure 19: Sort Column
MobileVue v1.0 User’s Guide Data Tables
20
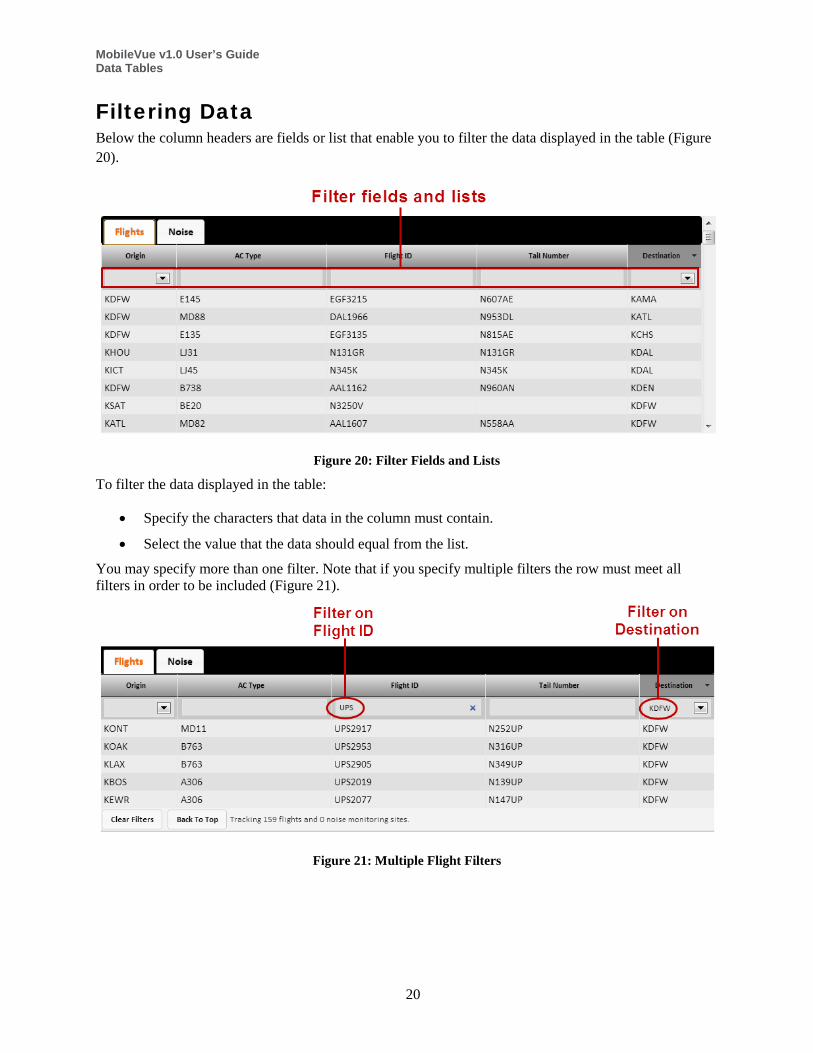
Filtering Data Below the column headers are fields or list that enable you to filter the data displayed in the table (Figure 20).
Figure 20: Filter Fields and Lists
To filter the data displayed in the table:
• Specify the characters that data in the column must contain.
• Select the value that the data should equal from the list.
You may specify more than one filter. Note that if you specify multiple filters the row must meet all filters in order to be included (Figure 21).
Figure 21: Multiple Flight Filters

21
Removing Filters There are several ways to remove filters from the data tables:
• To remove all filters from a data table, click the Clear Filters button located below the table.
• To remove a filter on a text entry field, click the X in the field.
• To remove a filter from a list, select the blank entry that is located at the top of the list's values.
Figure 22: Removing Filters

MobileVue v1.0 User’s Guide Data Tables
22
Centering Object on Map To center the map on a particular flight or noise monitoring terminal, click the flight's row in the Flights table. The selected flight's details also displays in the left pane's Details tab.
Figure 23: Centering Flight on Map
Clicking the row a second time displays the flight's details in a popup.

23
TOOLS
Viewing Weather If you are in live mode, the weather displays the current weather. If you are in replay mode, the weather displayed is the weather at the replay time.
To view the current weather:
1. Select the Tools tab from the left panel.
2. Click Weather Display.
Figure 24: Weather Display
The Weather window displays the current weather.
Figure 25: Weather

MobileVue v1.0 User’s Guide Historical Replay
24
HISTORICAL REPLAY Historical flight mode enables you to replay data from previous dates in one hour increments. After specifying the start time, MobileVue replays the events occuring one hour after the specified time.
Replaying Events To replay events from a previous date:
1. Select the Replay tab from the left panel.
2. From the Flight Mode section, select Historical Flights (Replay). The Time Window and Playback Controls sections display.
Figure 26: Replay Tab and Historical Mode
3. Click the Start Time field. A calendar displays.

25
Figure 27: Calendar
4. From the calendar:
a. Select the date for which you would like to replay events.
b. Use the Hour and Minute sliders to specify the time at which to start the replay.
c. Click Done.
5. Click Go. The replay data is cached and replayed on the map.
6. When the end of the one hour increment is reached, you will be asked if you want to start a new replay starting with the current time. To continue the replay, click Continue.
Figure 28: Continue Replay

MobileVue v1.0 User’s Guide Historical Replay
26
Playback Controls To display the playback controls, click the Show Replay Playback Controls button on the Replay tab.
Figure 29: Show Replay Playback Controls Button
The Current Time displays the playback time currently being shown on the map and data tables. The Replay Speed list enables you to select how fast the replay occurs.
Figure 30: Replay Controls
You may drag the slider control left to rewind the playback, or right to forward the replay. The -1m button rewinds the playback one minutes, while the +1m button forwards the playback one minutes.

27
Viewing a Flight's Track This feature is only available in historical replay mode. To enable historical replay, refer to page 24 for details.
To view a flight's track:
1. Ensure you are in historical replay mode.
2. Click the flight on the map. A popup displays information for the flight.
3. Click the button in the popup.
Figure 31: Flight Track Button
The flight's trail displays in the same color as the flight. For example, if the flight is colored blue, its track also displays in blue.

MobileVue v1.0 User’s Guide Customizing MobileVue
28
CUSTOMIZING MOBILEVUE MobileVue enables you to customize icons, the map display, and the data fields displayed. These options are saved with your user profile so that your configuration settings are used each time you log into MobileVue.
Customizing Flight Icons To customize the flight icons:
1. From the left panel, click Options. The Options window displays.
2. Ensure that the Flight tab is selected.
3. To change the size of the icons, drag the Icon Size slider. To make the icons smaller, drag the slider to the left. To make the icons larger, drag the slider to the right.
4. To change the colors used for the icons, select the color beside the flight type category.
5. To display flight track trails, check the Show Flight Track Trails checkbox. If you enable flight track trails, you will also need to specify length of the trails in the Flight Track Trail Length field.
Figure 32: Flight Options

29
Customizing the Map Display Various aspects of the map may be customized.
To customize the map display:
1. From the left panel, click Options. The Options window displays.
2. Select the Map tab (Figure 33).
Figure 33: Map Tab
3. To display the update timestamp in the lower, left of the map (Figure 34), check the Show Update Timestamps checkbox.
Figure 34: Update Status
4. To display a high resolution map, check the High Resolution Maps checkbox. If your device supports higher resolution maps (e.g., the Apple iPad's Retina display), you will want to select this option so that maps are displayed at a higher quality.
5. To display the airline logo in flights' popups (Figure 35), check the Show Airline Logos on Selection checkbox.

MobileVue v1.0 User’s Guide Customizing MobileVue
30
Figure 35: Airline Logo in Popup
6. To display the airport marker at the airport, check the Show Airport Markers checkbox.
Figure 36: Airport Marker
7. Click Close. The Options window closes.

31
Customizing Data Table Display Fields The fields displayed in the data tables may be customized.
To customize the fields displayed in a data table:
1. From the left panel, click Options. The Options window displays.
2. Select the Data tab.
Figure 37: Data Tab
If your system includes multiple data tables, you may need to scroll down to the list to view the fields for the data table you would like to modify.
3. To include a field in the flight labels (Figure 38), check the field name in the Label column. The label is the text displayed beside the flight icon on the map.
Figure 38: Flight Label

MobileVue v1.0 User’s Guide Customizing MobileVue
32
4. To include a field in the flight popups (Figure 39), check the field name in the Popup column.
Figure 39: Flight Popup FIelds
5. To include a field in the Flights data table, check the field name in the Table column.
Figure 40: Flights Table Fields
6. Click Close. The Options window closes.

33
NOISE MODULE The Noise module enables you to view data from noise monitoring sites and perform functions such as viewing a flight's slant range in relation to your home address and creating a complaint.
Noise monitoring terminals (NMTs) are displayed as circles on the map. The current noise level detected by the NMT is displayed at the center of the circle.
Figure 41: Map with Noise Monitoring Terminals
NMTs are also colored so that you can distinguish the noise level at the NMT.
Table 2: Default NMT Colors
Noise Level Color
Low Yellow
Medium Orange
High Red
Note that the NMT icon colors shown in Table 2 are the defaults. Because these colors are configurable, they may be different for your system.

MobileVue v1.0 User’s Guide Noise Module
34
Viewing a Noise Monitoring Terminal's Properties To view the properties of a noise monitoring terminal (NMT), click the icon of the NMT.
A popup displays a graph of the event time histories.
Figure 42: NMT Graph
You may mouse over any bar on the graph to view the noise level.
Figure 43: NMT Graph with Mouseover

35
Centering the Map on an Address To center the map on a specific address:
1. From the left panel, select the Tools tab.
2. In the Find Address section, enter the address that you would like to center the map on.
Figure 44: Find Address
The Address Lookup popup displays.
3. From the Address Lookup window, click the button beside the address to center the map on the address.

MobileVue v1.0 User’s Guide Noise Module
36
Specifying a Home Address Your home location is used to calculate a flight's slant range from the home location's address.
1. From the left panel, select the Tools tab.
2. In the Find Address section, enter the address that you would like to use as your home location. The Address Lookup popup displays.
Figure 45: Address Lookup
3. From the Address Lookup window, click the button beside the address specify it as your
home location. The icon displays on the map at the specified address.

37
Viewing a Flight's Slant Range MobileVue enables you to view a flight's slant range from the home location.
You must have your home location specified in order to view the slant range. For details on specifying your home location, refer to page 36.
To view a flight's slant range:
1. Click the flight's icon on the map. A popup displays information for the flight.
2. Click the button in the popup. A popup displays the flight's slant range relative to your home location.
Figure 46: Slant Range

MobileVue v1.0 User’s Guide Noise Module
38
Creating a Complaint To create a complaint:
1. Do one of the following:
• From the Tools tab, click Create Complaint.
Figure 47: Create Complaint from Tools Tab
• Display a flight's popup and click the button. Creating the complaint from the popup automatically populates the complaint window with the flight's ID and tail number.
Figure 48: Create Complaint from Flight Popup
The Create Complaint window displays.

39
Figure 49: Create Complaint Login
2. Enter your Airscene/NOMS username and password and click Log In.
If you do not have an Airscene/NOMS user account, refer to page 41.
The Create Complaint window displays.
Figure 50: Create Complaint Window

MobileVue v1.0 User’s Guide Noise Module
40
3. Select the type of disturbance from the Disturbance Type list.
4. Click the Start Time field. A calendar displays.
Figure 51: Create Complaint Calendar
5. From the calendar:
a. Select the date for which you would like to replay events.
b. Use the Hour and Minute sliders to specify the time at which to start the replay.
c. Click Done.
6. Click the End Time field and specify the end time.
7. Enter any text you want to include with the complaint in the Complaint field.
8. If you know the flight information associated with the complaint, enter the flight ID and tail number.
9. Click Create.

41
Creating an Airscene/NOMS Login To create an account:
1. From the Create Complaint Login window, click Register New Account. The Create User window displays.
Figure 52: Create User
2. Complete the Account Information section of the form with your information.
3. In the Validation section, enter the characters that you see in the field.
4. Click Create User.