microsoft word tutorial word document (.docx) for the correct file extension. 2. saving the document...
TRANSCRIPT

Microsoft Word Tutorial

2
Microsoft Word is one of the most popular word processing programs supported by both Mac and PC platforms. Microsoft Word can be used to create documents, brochures, leaflets, outlines, resumes, lists, and simple web pages.
1. Getting Started Pg. 3
2. Saving the Document Pg. 4
3. Toolbars Pg. 4
4. Formatting Pg. 6
5. Inserting and Adding Objects Pg. 9
6. Printing Pg. 12
7. Other Helpful Functions Pg. 14
8. Shortcut Keys for Microsoft Office Pg. 14
GETTING STARTED
TABLE OF CONTENTS

3
To launch Microsoft Word, go to Finder > Applications > Microsoft Word (Figure 1). A blank Word document will open.
Figure 1. Opening Microsoft Word
1. GETTING STARTED
Once you open word, you will see a screen to select which type of document you would like to launch. You can choose the Blank Document option for a blank sheet of paper. You also can choose from one of the template options that match what you are planning to working on (Figure 2).
Figure 2. Selectiong your document type

4
Computers crash and documents are lost all the time, so it is best to save often.
Saving InitiallyBefore you begin to type, you should save your document. To do this, go to File > Save As (Command + Shift + S). Microsoft Word will open a dialog box (Figure 3) where you can specify the new file’s name and location where you want it saved. Once you have specified a name and a place for your new file, press the Save button.
NOTE: If you want to save your document on a Mac and then open it on a PC you must specify a file extension (i.e. .doc). Usually your computer will do this for you, but if it does not you must do this process while in Save As. Once you have titled your document, you can give it a file extension by clicking in the File Format box. Click Word Document (.docx) for the correct file extension.
2. SAVING THE DOCUMENT
Figure 3. Save Dialog Box
Saving LaterAfter you have initially saved your blank document under a new name, you can begin writing your paper. However, you will still want to periodically save your work as insurance against a computer freeze or a power outage. To save, click File > Save (Command + S).
3. TOOLBARSMicrosoft Word uses a toolbar and a main ribbon to allow you to modify your document. Within this ribbon, you can switch between tabs to determine what you would like to do. These tabs include Home, Insert, Design, Layout, References, Mailing, Review, and View. These The tool bar and these tabs are discussed in more detail below.

5
The Home Tab (Figure 5) is Microsoft Word’s standard view. This is the view most widely used and allows you to format text by Font Style, Font Size, Bold, Italic, Underline, Alignment, Numbered List, Bulleted List, Indentation, Spacing, and Font Color.
Figure 5. Home Tab
Figure 4. Toolbar
Figure 6. Insert Tab
Figure 7. Design Tab
The Insert Tab (Figure 6) contains any additives you want to place in your document, including but not limited to: Tables, Online Picture/Clip Art searches, Headers, and Footers. These icons are convenient and will bring up a dialogue box to give you further options when clicked.
The Design Tab (Figure 7) contains different styles of page formatting. When you type, your layout will automatically match the format selected. It also allows you to change the color scheme, watermark, and paragraph spacing of the document.
The Toolbar (Figure 4) is located at the top of your computer screen. It displays various sections thatgive you options for formatting, styling, and saving your document. These include File, Edit, View, Insert, Format, Tools, Table, Window, and Help. As a majority of these sections will be found on your main ribbon, there are some that you only can access from this toolbar.

6
Figure 10. Mailings Tab
Figure 11. Review Tab
Figure 12. Review Tab
The Mailings Tab (Figure 10) is for post-office related uses. If you wanted to create custom Envelopes or Labels, this is where you would find such actions.
The Review Tab (Figure 11) is where one can find Spelling & Grammar, the built in Thesaurus and Dictionary, you can Track Changes, Check Word Count, and Show/Add Comments.
The View Tab (Figure 12) allows you to change the views of your document.
Figure 8. Layout Tab
Figure 9. References Tab
The Layout Tab (Figure 8) contains icons for page setup and paragraph actions, such as Margin, Orientation, Size and Columns.
The References Tab (Figure 9) makes it especially simple to add Table of Contents, Footnotes, Bibliographic Information, Indexes and Citations.
7
Formatting ParagraphsTo format your paragraph, first highlight the paragraph you wish to format. To highlight ore than one paragraph, click at the beginning of the paragraph and drag the mouse over the text. To apply changes to the entire document select all by pressing Command + A. To specify Alignment, Line Spacing, Indentation, and Page Break utilize the various options of the Home Tab or go to Format > Paragraph. This will Open up the Paragraph menu (Figure 14).
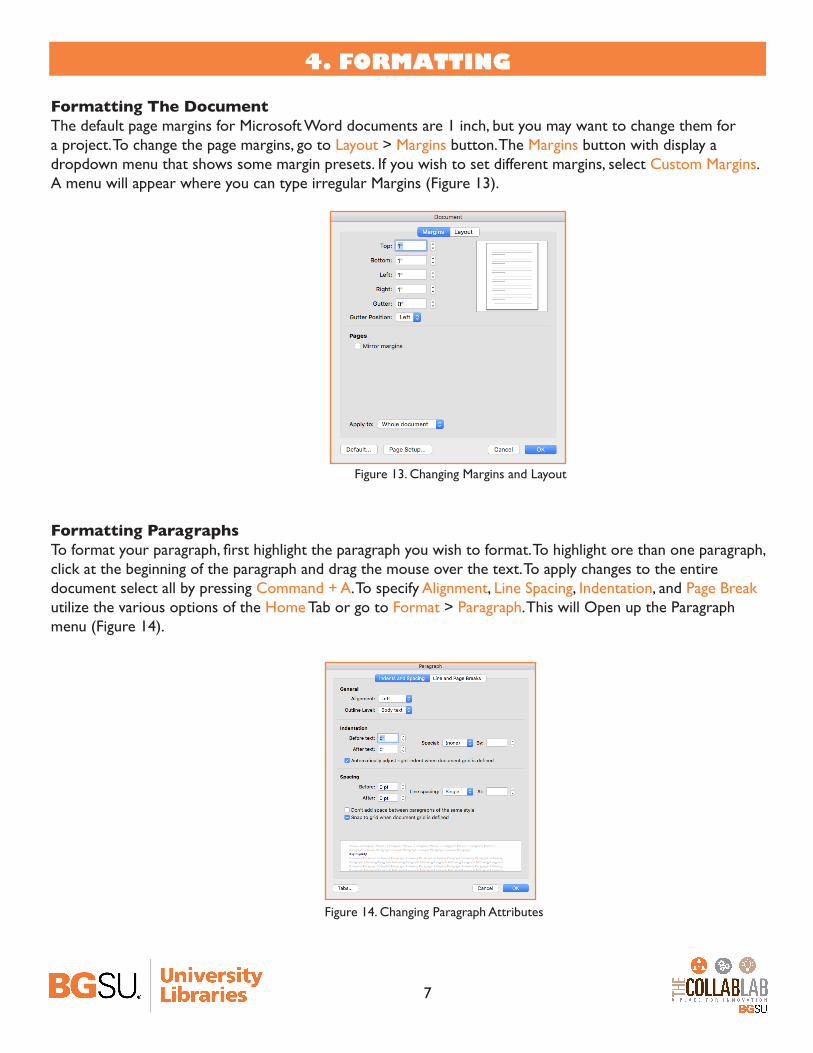
Figure 14. Changing Paragraph Attributes
Figure 13. Changing Margins and Layout
4. FORMATTING
Formatting The DocumentThe default page margins for Microsoft Word documents are 1 inch, but you may want to change them for a project. To change the page margins, go to Layout > Margins button. The Margins button with display a dropdown menu that shows some margin presets. If you wish to set different margins, select Custom Margins. A menu will appear where you can type irregular Margins (Figure 13).

8
Formatting TextBefore you type, you should select your font style, size, color and attributes (such as bold, italic and underline) in the Home Tab. You can expand the Font Menu box to get more options by clicking Format > Font (Command + D) (Figure 16). However, if you wish to change text that has already been typed, click and drag over the text to be changed to highlight it and change it as before.
Figure 16. Changing the font attributes in the Font Menu
Figure 15. Clipboard box within the Home Tab
Cut, Copy, and PastYou can use the Cut, Copy, and Paste features of Word to change the order of sections within your document, to move sections from other documents into new documents, and to save yourself the time of retyping repetitive sections in a document. Cut will actually remove the selection from the original location and allow it to be placed somewhere else. Copy allows you to leave the original selection where it is and insert a copy elsewhere. Paste is used to insert whatever has been cut or copied.
To Cut or Copy:Highlight the text by clicking and dragging over the text to be cut or copied. Go to Home Tab > Clipboard Box > Copy (Command + C) or Home Tab > Clipboard Box > Cut (Command + X). Click the location where theinformation should be placed. To go Home Tab > Clipboard Box > Paste (Command + V). The clipboard box isshown in Figure 15.

9
Adding ColumnsColumns can be used for a variety of documents types, such as a tri-fold brochure. To do this, go to Layout Tab > Columns. The Columns button will drop down a list of preset columns. If you wish to see other options, click the More Columns button (Figure 18). Here you can set column width and spacing. Once you select your preferred design, it will show up in the Preview box. This is a nice feature because it allows you to see what you are selecting before applying it to your word document. when you are content with how your document looks, click OK.
Figure 18. Columns Menu
Numbered and Bulleted ListsTo create a simple nubered or bulleted list, click on the Numbering or Bullet button on the Paragraph toolbar in the Home Tab (Figure 17). To have more control over the format of your list, click the down arrows beside each style of list. Type the first item in the list and press Return to move to the next number or bullet. Press Return twice to exit the list. Press Tab to indent and move to the next level of your list. Press Shift + Tab to move back a level.
Figure 17. Paragraph toolbar in the Home Tab
10
5. INSERTING AND ADDING OBJECTS
There are many different elements that could be added to your word document. To find these various options, go to the Insert Tab. Some of the most commonly used elements are Tables, Pictures, Shapes, Charts, and Word Art. How to use these elements will be discussed in more detail below.
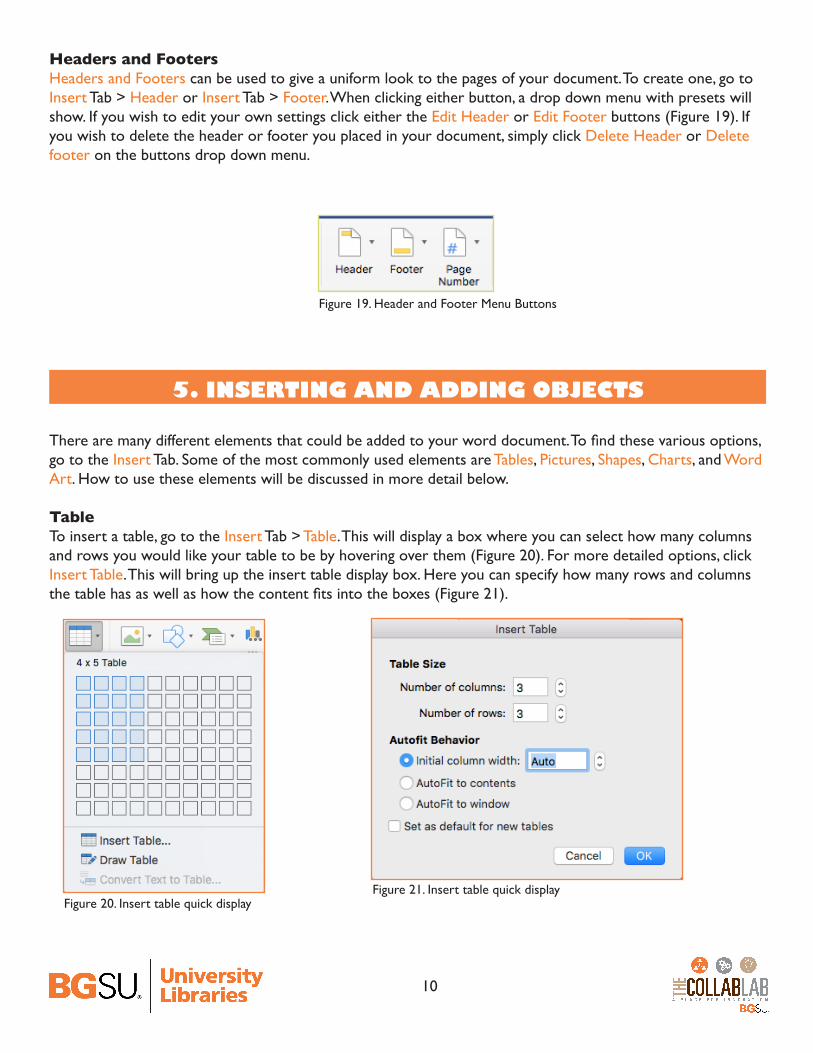
TableTo insert a table, go to the Insert Tab > Table. This will display a box where you can select how many columns and rows you would like your table to be by hovering over them (Figure 20). For more detailed options, click Insert Table. This will bring up the insert table display box. Here you can specify how many rows and columns the table has as well as how the content fits into the boxes (Figure 21).
Headers and FootersHeaders and Footers can be used to give a uniform look to the pages of your document. To create one, go to Insert Tab > Header or Insert Tab > Footer. When clicking either button, a drop down menu with presets will show. If you wish to edit your own settings click either the Edit Header or Edit Footer buttons (Figure 19). If you wish to delete the header or footer you placed in your document, simply click Delete Header or Delete footer on the buttons drop down menu.
Figure 19. Header and Footer Menu Buttons
Figure 20. Insert table quick displayFigure 21. Insert table quick display

11
PicturesTo insert a picture, go to the Insert Tab > Pictures > Picture from File. This will bring up a file locator where you can navigate to where the picture you would like to insert is saved (Figure 22). Once you have found your photo, select the file and then click Insert.
Figure 22. Insert Picture File Locator
ShapesTo insert a shape, go to the Insert Tab > Shapes. This will bring up a menu of shapes that you can select from (Figure 23). Once you have found the shape you would like to insert, single click the shape to select it. Then you will click and drag in the document to draw your shape.
Figure 23. Shape Selection Menu

12
ChartsTo insert a chart, go to the Insert Tab > Then click on the small box with 3 ColumsThis will bring up subcategories of chart types. When you hover over a category, the charts avaliable will display on the right side with a new pop out menu. When you have found the chart you would like to insert, single click the chart (Figure 24). This will place a chart in word that displays. It will also open up Microsoft Excel with the data for you to go in and change the content. As you change the content in Excel, the content in Word will change automatically.
Figure 24. Chart Selection Menu
WordArtMicrosoft Word has a library of stylized text called WordArt. To insert WordArt, go to the Insert Tab > WordArt. This will bring up a quick menu of all the styles you can choose from (Figure 25). Select one of the options and single click it. This will place an editable text box in your document.
Figure 25. WordArt Selection Menu
13
6. PRINTINGIt is important to always save your document before you print!
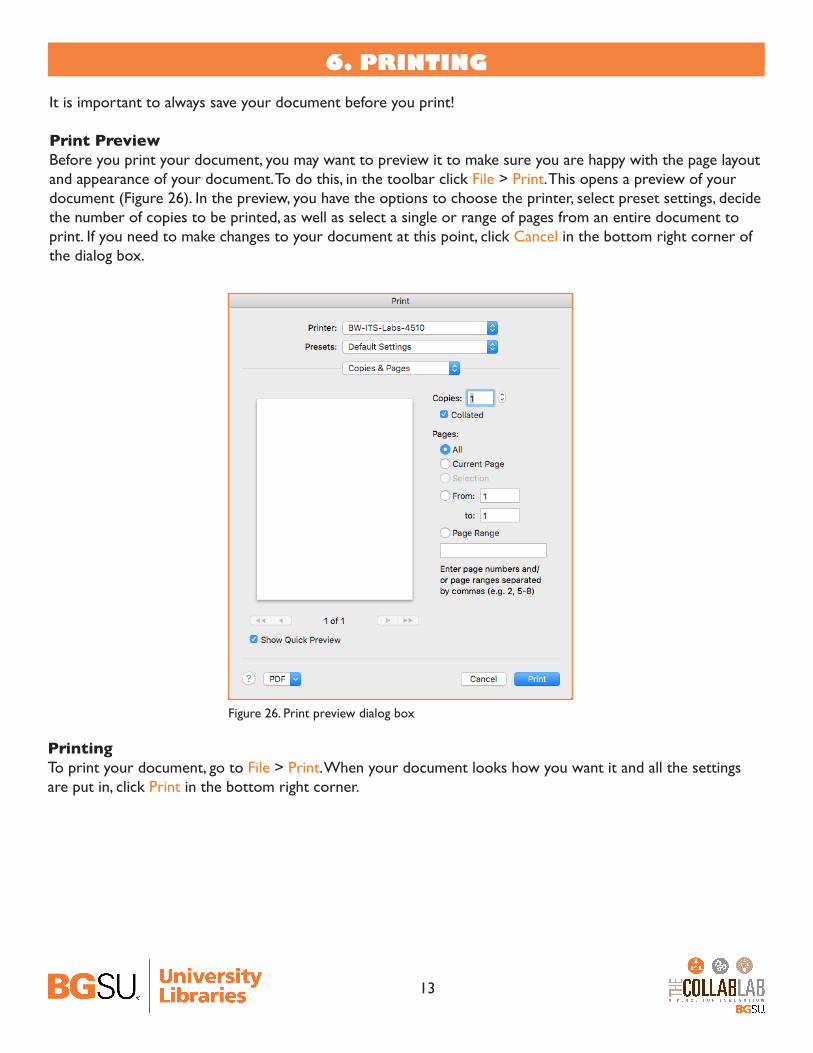
Print PreviewBefore you print your document, you may want to preview it to make sure you are happy with the page layout and appearance of your document. To do this, in the toolbar click File > Print. This opens a preview of your document (Figure 26). In the preview, you have the options to choose the printer, select preset settings, decide the number of copies to be printed, as well as select a single or range of pages from an entire document to print. If you need to make changes to your document at this point, click Cancel in the bottom right corner of the dialog box.
Figure 26. Print preview dialog box
PrintingTo print your document, go to File > Print. When your document looks how you want it and all the settings are put in, click Print in the bottom right corner.

14
Saving as a PDFTo save your document in the PDF file format, go to File > Save As. The saving dialog box (Figure 27) will appear where you can rename your document, select the saving destination, and select the file format of the document.
Figure 27. Saving dialog box
Click on Word Document (.docx) to access the file format drop down menu. In this drop down menu, select PDF. Once PDF is visible in the file format selection box, click Save.
7. OTHER HELPFUL FUNCTIONS
Undo and RedoThe easiest way to undo an action is with the key commands Command + Z and to redo an action with Command + Y. It is important to note that not all actions are undoable, thus it is important to save before you make any major changes in your document. You also can find the Undo and Redo icons (figure 28) above the Main Ribbon. The left icon is Undo and the right icon is Redo.
Figure 28. Undo and Redo
Word CountTo get an accurate word count of your document, go to Review Tab > Word Count. This will gie you the total number of words in your document (Figure 29). If you need to word-count a specific section, highlight that section first by clicking and dragging over it and then go to Review Tab > Word Count.
Figure 29. Word Count
15
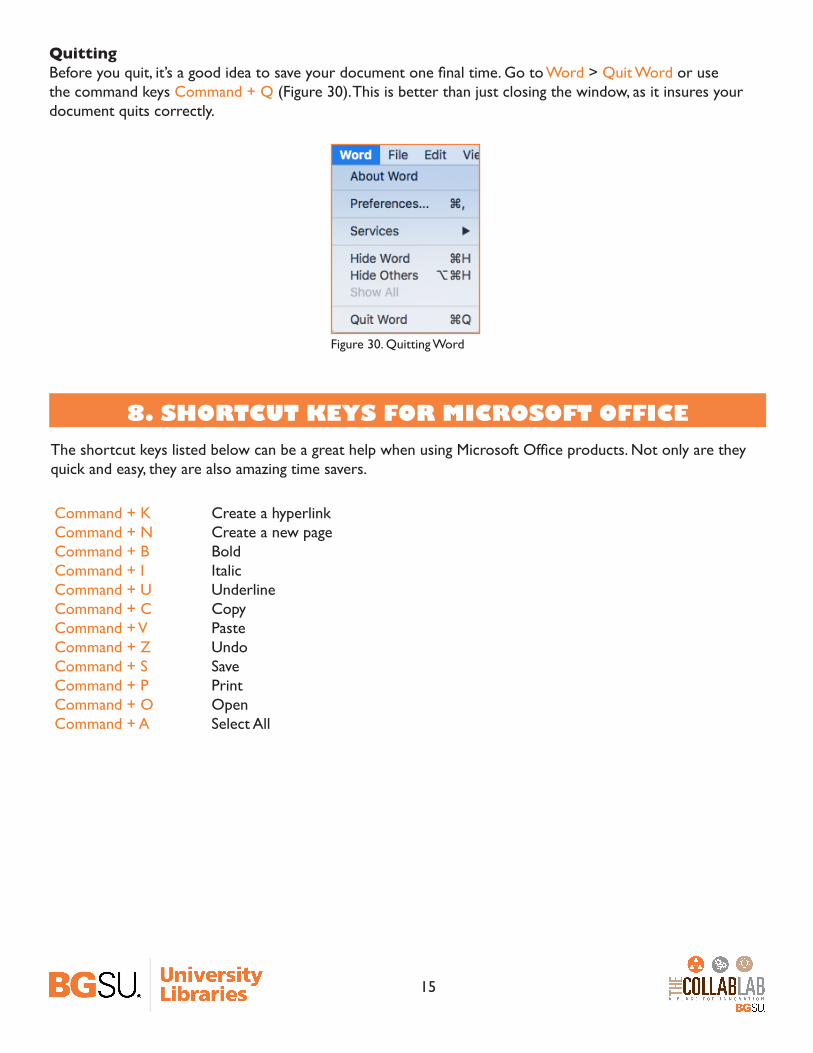
QuittingBefore you quit, it’s a good idea to save your document one final time. Go to Word > Quit Word or use the command keys Command + Q (Figure 30). This is better than just closing the window, as it insures your document quits correctly.
Figure 30. Quitting Word
8. SHORTCUT KEYS FOR MICROSOFT OFFICEThe shortcut keys listed below can be a great help when using Microsoft Office products. Not only are they quick and easy, they are also amazing time savers.
Command + KCommand + NCommand + BCommand + ICommand + UCommand + CCommand + VCommand + ZCommand + SCommand + PCommand + OCommand + A
Create a hyperlinkCreate a new pageBoldItalicUnderlineCopyPasteUndoSavePrintOpenSelect All