michigan electronic grant system plus€¦ · michigan electronic grant system plus (megs+) user...
TRANSCRIPT

Michigan Electronic Grant System Plus (MEGS+)
User Guide to Submitting a SIG (School Improvement Grant)
APPLICATION
School Improvement Support Unit Office of Education Improvement and Innovation
Michigan Department of Education
May 2016

Users’ Guide for Submitting a School Improvement Grant (SIG) Application
Contents
MEGS Login Information and Helpful Tips .............................................................................................. 3
MEG S+ System Requirements............................................................................................................ 3
Welcome Screen Overview .................................................................................................................... 4
Application Initiation.............................................................................................................................. 4
Application Menu Overview ................................................................................................................... 5
Assigning Users to the SIG Application ................................................................................................... 5
SIG Forms .............................................................................................................................................. 6
Forms Screen Overview ...................................................................................................................... 6
Verifying Cover Page Information ....................................................................................................... 6
Uploading District Information ............................................................................................................... 7
Uploading Building Information ............................................................................................................. 8
Additional Building Applications ......................................................................................................... 8
Uploading Baseline Data Collection ........................................................................................................ 9
Additional Data Collection .................................................................................................................. 9
Global Errors ........................................................................................................................................ 10
Application Submission ........................................................................................................................ 11
Contact Information............................................................................................................................. 12

MEGS Login Information and Helpful Tips School Improvement Grant application can be downloaded at www.michigan.gov/sig
In order to use MEGS+ (Michigan Electronics Grant System Plus), and potentially other State of Michigan systems, you must first obtain a MEIS account. This can be done by going to the following URL and clicking Create a MEIS Account: https://mdoe.state.mi.us/MEIS
MEG S+ System Requirements
• Internet Access Web Browser• Internet Explorer 8 (preferred)• Firefox 2.0+• Safari 3.0+• Adobe Acrobat Reader 4.0+
To login to the MEG+ system go to https://mdoe.state.mi.us/MEGSPlus/Login2.aspx?APPTHEME=MIMDE_MEGSPLUS&ReturnURL=/megsplus/
Use the Login and Password obtained from the MEIS registration process to login. Please note, MEIS password is case sensitive.
You CANNOT log in to MEGS+ until your MEIS Account is established and activated. Your district’s Authorized Official must then give you access to the application within MEGS+.
It is highly recommended that users use the navigation provided within the application and to avoid the web browser’s Back and Forward buttons. The Quick Links are recommended to navigate within MEGS+.
By using the browser’s Back button, the user is not getting the latest information from the website, but rather an “older” saved version of the screen. The browser’s Back button will simply load the cached (or saved) version of the screen that exists on the local hard drive as it was the last time the screen was accessed.
When saving information, always wait for the icon indicating that the information has been saved before proceeding to the next task. A screen typically take several minutes to Save.
All items with an asterisk (*) are required fields.

Welcome Screen Overview The Welcome screen should recognize you and welcome you by name.
• Note there are Instructions at the top. • View Available Applications/Tasks is where new applications and tasks are listed which you are
eligible to apply. • My Inbox will show messages; for example, “Your funds are available” or “Modifications to
your application requested by MDE consultant.” • My Application/Tasks section will take you directly to an application needing LEA action.
Application Initiation
Only a Level 5 MEGS+ user may initiate an application.
To initiate the application, click View Available Applications/Tasks to open the available applications. Scroll down until you come to the School Improvement Grant application and click Initiate.
At the Application Agreement screen, click I Agree.
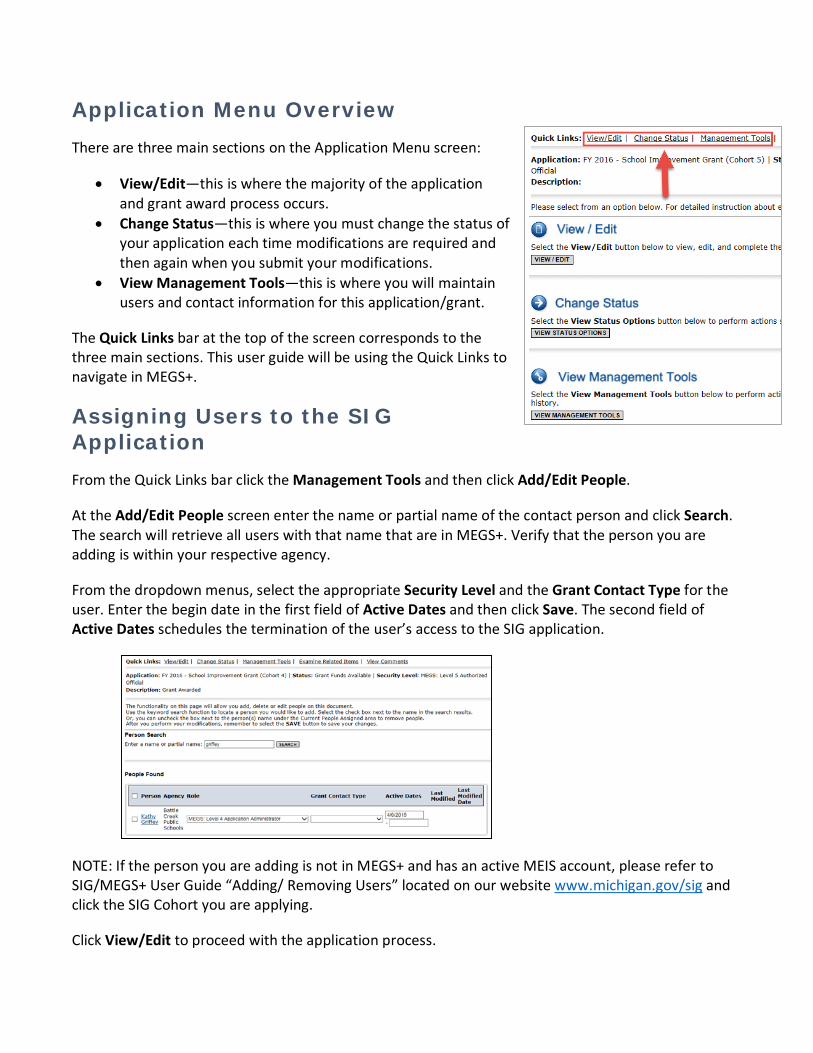
Application Menu Overview There are three main sections on the Application Menu screen:
• View/Edit—this is where the majority of the application and grant award process occurs.
• Change Status—this is where you must change the status of your application each time modifications are required and then again when you submit your modifications.
• View Management Tools—this is where you will maintain users and contact information for this application/grant.
The Quick Links bar at the top of the screen corresponds to the three main sections. This user guide will be using the Quick Links to navigate in MEGS+.
Assigning Users to the SIG Application From the Quick Links bar click the Management Tools and then click Add/Edit People.
At the Add/Edit People screen enter the name or partial name of the contact person and click Search. The search will retrieve all users with that name that are in MEGS+. Verify that the person you are adding is within your respective agency.
From the dropdown menus, select the appropriate Security Level and the Grant Contact Type for the user. Enter the begin date in the first field of Active Dates and then click Save. The second field of Active Dates schedules the termination of the user’s access to the SIG application.
NOTE: If the person you are adding is not in MEGS+ and has an active MEIS account, please refer to SIG/MEGS+ User Guide “Adding/ Removing Users” located on our website www.michigan.gov/sig and click the SIG Cohort you are applying.
Click View/Edit to proceed with the application process.

SIG Forms
Forms Screen Overview
The Forms screen is where each section of the application information are accessible/stored/ uploaded. We recommend completing each item in the following order:
1. Cover Page 2. LEA—Application 3. Building—Application 4. Building Data Collection
Click Cover Page to verify the agency and contact information.
Verifying Cover Page Information
At the Cover Page screen there are two sections which need verification. The Agency Information section is automatically populated by the Educational Entity Master (EEM). To correct any discrepancies, contact your district authorized user for the EEM.
The Contact Person section is populated by the information you previously entered at the Add/Edit People screen.
• If your email is incorrect you must login to your MEIS account to make corrections as necessary. • If your agency information is incorrect please contact your district authorized user for the EEM.
Click View/Edit to return to the Forms screen.

Uploading District Information Located in the LEA Information section of the Forms screen, click the LEA— Application link to open the application screen.
At the LEA - Application screen follow the instructions listed to upload your district’s application. In the Title field, enter the name of the uploaded document(s).
Naming convention example(s): LEA Application—ABC123 School District
Click SAVE at the top of the screen and then click View/Edit to return to the main Forms screen.
IMPORTANT: Only one document can be stored on this screen, if you upload another document it overwrites the existing document.

Uploading Building Information Located in the Building Information section of the Forms screen, click the Building—Application link.
At the Building—Application screen follow the instructions on the screen to upload each building application. In the Title field, enter the name of the uploaded document(s).
Naming convention example(s): Building App—ABC Middle School Building App—XYZ High School
Click SAVE at the top of the screen.
Building information attachments must be converted into one document per building.
Additional Building Applications
If additional buildings are to be uploaded, click the ADD button at the top of the screen and repeat the steps for uploading building applications. After the second upload, a Page Title field will appear on the screen indicating the documents which have been added.
Remember to use the naming convention and to SAVE after each upload.
Upon completing building application uploads, click View/Edit to return to the main Forms screen.

Uploading Baseline Data Collection Located in the Building Information section of the Forms screen, click the Baseline Data Collection link.
IMPORTANT: The Baseline Data Collection document should be uploaded as an EXCEL file.
At the Baseline Data Collection screen, follow the instructions listed to upload each data collection spreadsheet. In the Title field, enter the name of the uploaded document(s).
Naming convention example(s): Data Collection—ABC Middle School Data Collection—XYZ High School
Additional Data Collection
If additional data collections are to be uploaded, click the ADD button at the top of the screen and repeat the steps for uploading baseline data collection.
One Baseline Data Collection must be uploaded for each building submitting an application. After the second upload, a Page Title field will appear on the screen indicating the documents which have been added.
Use the same naming convention and to Save after each upload. Upon completing all building data collection uploads, click View/Edit to return to the main Forms screen.

Global Errors After you have entered all of the required information and uploaded documents, you will need to verify no errors are found. Click the Global Errors button at the top of the screen.
NOTE: The Global Errors button can be found at the top right corner on most screens throughout MEGS+.
On the Global Error page, links are provided to the relevant application pages that have errors. Click on the error link to open and edit the page as necessary.
Once you have made the necessary edits, you will need to click the Global Error button again to verify no errors are found.
After you have determined that no errors in your application have been found, click Change Status from the Quick Links bar.

Application Submission At the Change Status screen click Submit Application.
NOTE: MEGS+ will check for incomplete information and/or errors before allowing you to submit the application.
Errors
• If you receive an error, you will see an octagon with the hand in it. This indicates to stop and correct errors within the application.
• Select the provided link and make the requested changes by following the directions listed on that page.
• Once changes have been made, attempt to submit the application again.
No Err or s
• If the application had no errors or missing information, you will be directed to the Agreement screen.
The Agreement screen will present conditions to which you must agree upon when submitting the application. After reading the conditions, you may enter notes in the field provided. Click the I Agree button to continue.
MEGS+ will notify the Level 5 users and the application designated main contacts by email that the application has been received.

Contact Information
School Improvement Grant (SIG) Office of Education Improvement and Innovation (517) 373-4872 or email [email protected]
MDE Grants and MEGS+ Office of Grand Coordination and School Support Office (517) 373-1806 or email [email protected]
Education Entity Master (EEM) Center for Educational Performance and Information (517) 335-0505 x3 or email [email protected]