“memories in leather”
TRANSCRIPT

Materials needed: 1mm leather cowhide cord, embroidery needle, metal crimps, clasp and E6000 or other fast drying gel glue is recommended (not liquid). Flat nose pliers, scissor and memory wire cu er.
Memory wire: With the glue, add the 4mm half-drilled silver steel ball to one end of the memory wire. Set aside.
Preparing the leather: Uncoil the leather cord and cut into 6- to 7-foot lengths. Check the cords to see if there are any obvious breaks or cracks in the leather. If so, do not include those areas in the weave.
Op�onal: Leather is porous and can become bri�le. Add a few drops of olive oil onto your hands. Apply a light coa�ng of oil onto the cording. Allow the oil to set for about 20 minutes. Wipe off any excess.
Note: There are six loop holes on the Daizee head. This project is made with four loops. Refer to the Viking Knit basics instruc�on sheet for the looping technique and weave. Before star�ng, you may find it helpful to watch the free instruc�on videos at StephanieEddy.com. Viking Knit Weave: Insert one end of leather cord into the anchor hole about 1-inch. A Form a loop (by hand). B Form a second loop. Skip a hole on the Daizee head, then con2nue forming (by hand) two more loops, for a total of four loops. Use flat nose pliers to fla en about 1-inch of leather at the long end of the cord. Insert into the needle about 1-inch only. C-D Begin the Viking Knit weave around the base of the tool. E Weave two rows then pull the anchor hole cord out the top of the Daizee head. F-G Trim to 1”.
Con2nue weaving un2l about 1 1/2” of cord remains. H
Adding/Splicing addi&onal cord: The splice is made on the rung, which is the space between two loops.
Insert the remaining 1 1/2” cord and 1 1/2” of
a new 6 to 7-foot cord into a crimp. Align so the
crimp sits in the rung space between two loops. I
Lightly press the crimp closed using flat nose
pliers. Press too 2ght and the crimp may cut the cord.
Cut both of the cords leaving about 1/8”. J-K
Viking Knit with Leather
Design & Instruc2ons
by Stephanie J Eddy
©2017
“Memories in Leather”“Memories in Leather”“Memories in Leather”“Memories in Leather”
A B E F G
H
I J K
D
C
4-Loop pa ern
Design by Stephanie J Eddy ©2017
splice
Insert 1-inch
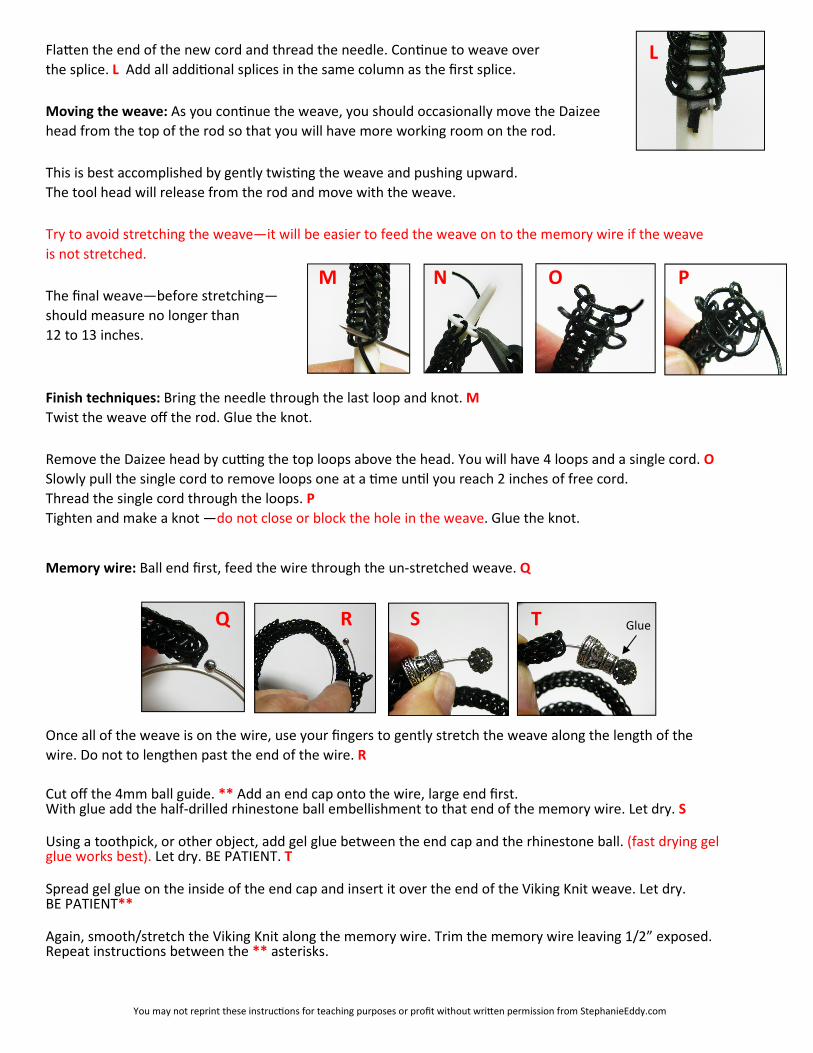
Fla en the end of the new cord and thread the needle. Con2nue to weave over
the splice. L Add all addi2onal splices in the same column as the first splice.
Moving the weave: As you con2nue the weave, you should occasionally move the Daizee
head from the top of the rod so that you will have more working room on the rod.
This is best accomplished by gently twis2ng the weave and pushing upward.
The tool head will release from the rod and move with the weave.
Try to avoid stretching the weave—it will be easier to feed the weave on to the memory wire if the weave
is not stretched.
The final weave—before stretching—
should measure no longer than
12 to 13 inches.
Finish techniques: Bring the needle through the last loop and knot. M
Twist the weave off the rod. Glue the knot.
Remove the Daizee head by cuGng the top loops above the head. You will have 4 loops and a single cord. O
Slowly pull the single cord to remove loops one at a 2me un2l you reach 2 inches of free cord.
Thread the single cord through the loops. P
Tighten and make a knot —do not close or block the hole in the weave. Glue the knot.
Memory wire: Ball end first, feed the wire through the un-stretched weave. Q
Once all of the weave is on the wire, use your fingers to gently stretch the weave along the length of the
wire. Do not to lengthen past the end of the wire. R
Cut off the 4mm ball guide. ** Add an end cap onto the wire, large end first. With glue add the half-drilled rhinestone ball embellishment to that end of the memory wire. Let dry. S Using a toothpick, or other object, add gel glue between the end cap and the rhinestone ball. (fast drying gel glue works best). Let dry. BE PATIENT. T Spread gel glue on the inside of the end cap and insert it over the end of the Viking Knit weave. Let dry. BE PATIENT** Again, smooth/stretch the Viking Knit along the memory wire. Trim the memory wire leaving 1/2” exposed. Repeat instruc2ons between the ** asterisks.
L
M N O P
Q R S T Glue
You may not reprint these instruc2ons for teaching purposes or profit without wri en permission from StephanieEddy.com