maya 6 killer tips - pearsoncmg.comptgmedia.pearsoncmg.com/images/9780132933025/samplepages/... ·...
TRANSCRIPT


®

M A Y A 6 K I L L E R T I P S
Published by New Riders Publishing / Peachpit Press
Copyright © 2005 by New Riders Publishing
First edition: August 2004
All rights reserved. No part of this book may be reproduced ortransmitted in any form, by any means, electronic or mechanical,including photocopying, recording, or by any information stor-age and retrieval system, without written permission from thepublisher, except for inclusion of brief quotations in a review.
Composed in Myriad and Helvetica.
Trademarks
All terms mentioned in this book that are known to be trademarksor service marks have been appropriately capitalized. New RidersPublishing / Peachpit Press cannot attest to the accuracy of thisinformation. Use of a term in the book should not be regarded asaffecting the validity of any trademark or service mark. Maya is aregistered trademark of Alias, Inc.; Windows is a registered trade-mark of Microsoft Corporation in the United States and/or othercountries.
Warning and Disclaimer
This book is designed to provide information about Maya 6 tips.Every effort has been made to make this book as complete and asaccurate as possible, but no warranty of fitness is implied.
The information is provided on an as-is basis. The authors andNew Riders Publishing / Peachpit Press shall have neither liabilitynor responsibility to any person or entity with respect to any lossor damages arising from the information contained in this bookor from the use of the discs or programs that may accompany it.
ISBN 0-321-27853-4
9 8 7 6 5 4 3 2 1
Printed and bound in the United States of America
www.peachpit.comwww.scottkelbybooks.com
ii
Maya 6 Killer Tips Team
EDITORKaryn Johnson
PRODUCTION EDITORConnie Jeung-Mills
CONTRIBUTORSErick Miller
Eric Pender
TECHNICAL EDITORSGreg Berridge
Adrian Dimond
COPY EDITORNancy Reinhardt
PROOFREADERHaig MacGregor
INDEXERRebecca Plunkett
COVER DESIGN AND CREATIVE CONCEPTSFelix Nelson
COVER PRODUCTIONAren Howell
COMPOSITOROwen Wolfson

iii
To the three girls, source of all things good in my world.
—ERIC HANSON
To my mom, who inspires and supports me in all I do; my dad, for his love;
and my brother Steve, who makes me proud.
—KENNETH IBRAHIM
To my wonderful wife and son, who bring nothing but happiness into my life.
—ALEX NIJMEH

iv
Eric Hanson is a visual effects artist specializing in digital environments andeffects for feature films. Originally an architect, he established early 3D visualiza-tion studios for some of the country’s largest architectural firms, including TheCallison Partnership, in Seattle and Gensler, in Los Angeles. An expanding interestin film led to a move into visual effects work, resulting in senior CG artist posi-tions with leading visual effects houses Digital Domain, Sony Imageworks, DreamQuest Images, Walt Disney Feature Animation, and SimEx Digital Studios. His workcan be seen in Spider-Man, Cast Away, Hollow Man, Mission to Mars, BicentennialMan, Fantasia 2000, Atlantis, and The Fifth Element, as well as many large-format,special-venue films worldwide.
Eric specializes in 3D work with Maya, RenderMan, and Shake, and is an activeteacher of those packages. He has taught for several years, having instructedcourses on advanced 3D techniques at SGI’s Silicon Studio and Gnomon Schoolof Visual Effects, and is currently leading a curriculum on visual effects at theUniversity of Southern California’s School of Cinema-TV. He frequently speaks andholds workshops at various trade shows and schools domestically, as well as inJapan, even though he is not sure what to eat while there.
Eric is a member of ACM/Siggraph and the Visual Effects Society and holds a professional degree in Architecture from the University of Texas at Austin.
Eric can be reached at his web site, www.visuraimaging.com.
A B O U T T H E A U T H O R S

v
A B O U T T H E A U T H O R S
Kenneth Ibrahim began his career in visual effects as an Alias|Wavefront application
engineer in Tokyo, Japan in 1994, just as Maya was entering its alpha phase. After
returning to the U.S. and spending a total of three years at A|W demonstrating and
supporting Maya, Ken moved into production proper by joining PDI’s C.A.F.E. group
and working on a number of TV spots during which he helped integrate Maya into
the PDI pipeline. Ken has since worked at a number of production companies on such
films as Shrek, Final Fantasy, Matrix Revolutions, X2, Peter Pan, and I, Robot. He has focused
on FX animation/development and lighting and spends a good deal of time MEL-
scripting and API coding. Ken graduated from Santa Clara University with a degree in
computer engineering before moving to Japan with the goal of becoming fluent in
Japanese. While there, he taught English, programmed Macintosh computers, and
went to work for SEGA, writing software tools and creating graphics in the AM3 R&D
department. His voice was also featured in a number of arcade games including the
hit SEGA Rally Championship and Virtua Cop. When not at the office, he likes to keep
busy with various hobbies including music composition and recording, language
study, reading, working out, and traveling. He recently spent two months studying
Italian in Rome and is preparing another trip somewhere after his current project is
complete. Ken has also recently published a Japanese vocabulary building book
based on words he learned watching the Japanese anime Akira. Ken has created a
number of items that are available at shop.shuri-ken.com. He can be reached at his
Web site www.shuri-ken.com.
Alex Nijmeh is currently a digital artist at Digital Domain, based in Los Angeles,CA. Specializing in 3D modeling and lighting, Alex recently finished working onRoland Emmerich’s blockbuster film The Day After Tomorrow, where he con-tributed to the ambitious effort to digitally model a large portion of NYC, andmoved on to his next feature film I, Robot. Even before working in visual effects,Alex has been a long time Maya user, since version 2.0. He worked for severalyears as Lead Modeler and Senior Designer at a San Francisco–based companythat produced immersive film-like quality environments and cinematics for aunique virtual reality venue. He has also used Maya to produce work for televi-sion commercials, a TV pilot for a police drama series, as well as illustrations forPC games and professional software packages. Alex grew up and attendedschool in San Jose, California and has a BFA in computer graphics. Alex can bereached via email at [email protected].

vi
A B O U T T H E C O N T R I B U T O R S
Erick Miller is currently a lead technical director at Digital Domain, the AcademyAward–winning visual effects company responsible for digital effects in recent block-busters such as I, Robot,The Day After Tomorrow, Lord of the Rings, and X-Men. Since Erickhas been at DD, he has contributed to many projects: a plug-in pose-based eformationsystem, a proprietary muscle/skin deformation plug-in system, and a crowd animationand rendering system, just to name a few. After wrapping up on the Maya-based facialrigging for a photo-realistic CG that Michael Jordan used in Gatorade’s 2002 SuperBowl commercial, Erick created a Maya-based crowd pipeline for Roland Emmerich’sapocalyptic end-of-the-world feature film The Day After Tomorrow. After that, Erickmoved on to build a Character TD team for the feature film, I, Robot. As a lead technicaldirector, Erick was responsible for the hero facial rigging of the fully CG, photo-realisticmain character, "Sonny," as well the character-based Maya pipeline, scripts, plug-ins,and character tools. Some of Erick’s favorite duties include advanced character setup,facial rigging and complex skin deformations. Besides character setup, Erick also oftenenjoys connecting his creative knowledge with MEL scripting, Maya's API, and otherexternal programming languages and C/C++ APIs to further advance a character-based pipeline. Erick is a Maya Master Class presenter, has contributed to the authoringof two books on Maya (Inside Maya and Maya 5 Killer Tips), is Alias|Wavefront certifiedin Character Setup, has a Bachelor of Fine Arts degree in Computer Graphics from theAcademy of Art College, and has been a Maya user since its inception at version 1.0.
Eric Pender has been creating 3D effects animation on feature films since 1996. Hehas worked on movies such as Alien Resurrection, Batman and Robin, Hard Rain, AirForce One, Sphere, Gone in Sixty Seconds, Mission to Mars, and Kangaroo Jack, as well asthe opening sequence for Wonderful World of Disney on ABC. He started out workingfor Alias|Wavefront in Santa Barbara and specializing in Dynamation, which was theoriginal dynamics package created by Wavefront. Dynamation was used as the frame-work for the dynamics package in Maya. Eric has been using Maya in productionsince the first version.

vii
Without rambling on endlessly like a weepy Oscar acceptance speech, I would like to briefly wisha warm thanks to many of those who laid the train tracks down in front of me or added coal to
the engine along the way. First and foremost, much love must go to my beautiful wife Kari and our little love buckets, Taylor and Shelby. 3D artists often mistake the world as one big rendering, and Kariconstantly keeps me in check by reminding me that it is indeed much more. She has endured mycrazed and relentless obsession with CGI for many years with amazing tolerance and support. Kari, ithas been noted by management and you are in line for a modest bonus soon!
Professionally, I have had many fellow adventurers on this train ride, but huge thanks go out to thetruly supportive ones, like brother Bill Hanson of Apple Computer, FX animator extraordinaire CodyHarrington, and design maestro Joe Cordelle. I can attribute much of my success to their well-timedmutual prodding and encouragement. There have been numerous, enjoyable fellow travelers alongthe way, such as Mark Lefitz, Alex Nijmeh, Pat Finley, Chris Nichols, Travis Price, Ben Procter, ChrisCunningham, John Goodman, Allen Yamashita, and Eric Beggs, where it all started. Much has beenlearned (and laughed) from all.
Thanks go out to the quality team at New Riders and Peachpit, including Elise Walter and KarynJohnson. I had four great contributors for this edition, Alex Nijmeh, Kenneth Ibrahim, Erick Miller, andEric Pender. Thanks to my two eagle-eyed tech editors, Greg Berridge and Adrian Dimond. Lastly,great thanks go out to Scott Kelby for the Killer Idea of the Killer Tips series- onwards and upwards!
Then there is the inevitable thanks and love going out to my parents, who got the train out of thestation and continue to support my constantly unfolding path while moving down the tracks.
—Eric Hanson
I would like to start by saying that none of this would have been possible for me without the lovingsupport of my beautiful wife Susan and our adorable son Tyler, who believed in me and stood by
my every decision. Susan, I can’t even begin to describe my appreciation for you. I can’t imagine whereI would be now if it weren’t for my good friend Eric Hanson who helped grease the wheels for me,and helped to get me where I am today with my career. A special thanks to my coworkers at DigitalDomain who help make each day enjoyable. Pavel Prane, John Decker, Esdras Varagnolo, Ryan Vance,Andy Wilkoff, Paul George, Daniel Fazel, Patrick Finley, Melanie Okamura, Chris Nichols, Kevin Jackson,Dan Fowler, and I can’t forget Charles Abou Aad, who endures the brunt of my sense of humor as hesits beside me, and who really suffers the most. Thanks, Charles, and great big thanks to my lovingparents for always encouraging me to follow my dreams and to never settle for second best. A bigthanks goes out to my brother Gabriel, and my Sister Elena, for their continued encouragement.
—Alex Nijmeh
A C K N O W L E D G M E N T S

viii
These reviewers contributed their considerable hands-on expertise to the entire developmentprocess for Maya 6 Killer Tips. As the book was being written, these dedicated professionalsreviewed all the material for technical content, organization, and flow.Their feedback was critical toensuring that Maya 6 Killer Tips fits our readers’ need for the highest-quality technical information.
A B O U T T H E T E C H N I C A L R E V I E W E R S
Greg Berridge is currently the head instructor of the Digital CharacterAnimation program at Vancouver Film School. He is a certified MayaInstructor holding accreditation in several areas of Maya expertise. Greghas completed work for several local Vancouver companies, includingLorax International. He has also spent time teaching Maya to content cre-ators at Mainframe Entertainment. Greg has completed work for the NIAC(NASA Institute for Advanced Concepts) on the international front. Firstand foremost an instructor, Greg has been teaching Maya since it arrivedsix years ago. In addition to his professional endeavors, Greg is also work-ing as an independent producer and is currently developing several con-cepts for television and film. He is also an aspiring author, hoping to havehis own book published soon on the intricacies of Maya. Above all else, heis engrossed in Maya and breathes 3D content creation at every possiblemoment.
Adrian Dimond, an animator and designer currently residing in LosAngeles, works on a wide range of projects spanning the last decade.Recent projects include a flying bottle cap for Budweiser, visual effects for Harold and Kumar go to White Castle and a music video for an electro-clash band called Lemans. Adrian shares his vast experience at http://www.highend3d.com, http://www.cgtalk.com and at his website http://www.gmask.com/tutorials

CHAPTER 1 1Deciphering the Hieroglyphics
Unearthing the Secrets of the Maya
Hey, Split It 2
Use the Fields, Luke 2
Strawberry Outliner Fields Forever 3
Trash That Pref 3
Field Operators Are Standing By 4
Nudge ’em 4
Annotate Away 5
Outliner Revealed at Last 6
Get in Line, Lowly Vertices 6
Scrub It 7
Tumble Camp 7
Got Spreadsheets? 8
Panel Hopping 8
It’s the Right Thing to Do 9
Drag-Drop Fever 10
Last Action Hero 10
Last Command Hero 11
Marquee Zooming 11
Gestural Transforms 12
Incremental Saves 12
Rotation Snapping 13
Clip It, Clip It Good 13
Tools Versus Actions 14
RMB Selection Menus 15
Slip-Sliding Away 16
Revealing the Inner Outliner 16
Surfing in a Panel 17
Layer This, Layer That 18
ix
T A B L E O F C O N T E N T S
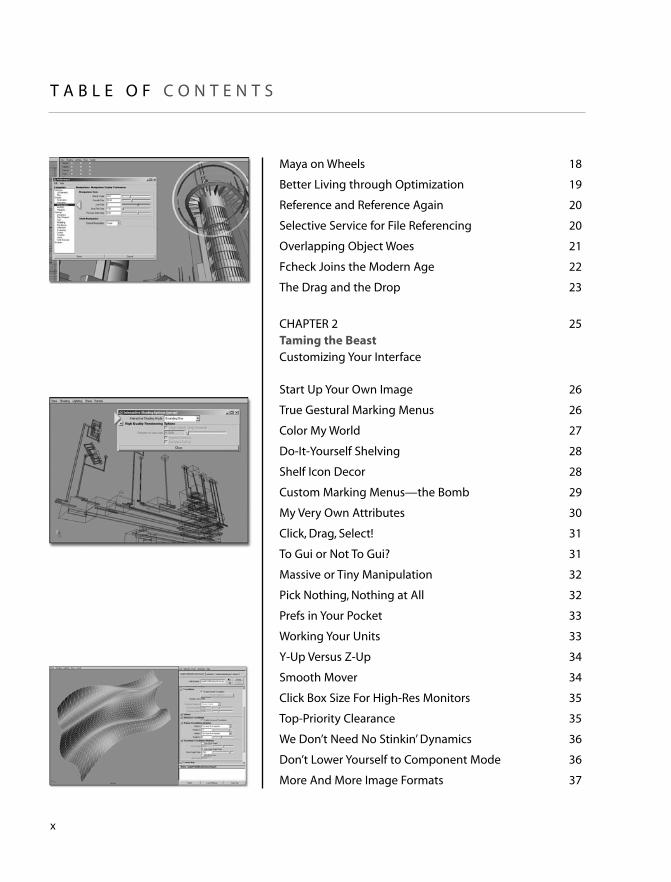
Maya on Wheels 18
Better Living through Optimization 19
Reference and Reference Again 20
Selective Service for File Referencing 20
Overlapping Object Woes 21
Fcheck Joins the Modern Age 22
The Drag and the Drop 23
CHAPTER 2 25Taming the Beast
Customizing Your Interface
Start Up Your Own Image 26
True Gestural Marking Menus 26
Color My World 27
Do-It-Yourself Shelving 28
Shelf Icon Decor 28
Custom Marking Menus—the Bomb 29
My Very Own Attributes 30
Click, Drag, Select! 31
To Gui or Not To Gui? 31
Massive or Tiny Manipulation 32
Pick Nothing, Nothing at All 32
Prefs in Your Pocket 33
Working Your Units 33
Y-Up Versus Z-Up 34
Smooth Mover 34
Click Box Size For High-Res Monitors 35
Top-Priority Clearance 35
We Don’t Need No Stinkin’ Dynamics 36
Don’t Lower Yourself to Component Mode 36
More And More Image Formats 37
x
T A B L E O F C O N T E N T S

Putting On Your Best Face 38
Loading Project Default Scenes 38
Cool New Hotkeys 39
A New Perspective on Translating 40
Compare and Contrast 41
Control Freak 42
Toggling between Object and Component Mode 42
Use Boxes to Keep Things Light 43
CHAPTER 3 45The Glamorous World of Modeling
Work Smarter, Not Harder
Aligned Image Planes 46
Alpha Onion Skins 47
Maya Card Tricks 48
Mapping Versus Modeling 49
Insert Here While Drawing Curves 49
Explicit, R-Rated Nurb Tessellation 50
Tessellation Versus CVs 51
Linear Versus Cubic Heroics 52
Constrain Those Unruly Curves 52
The Revolutions Will Not Be Televised 53
Bi-Railing the Missing Glass Slipper 54
Slipper Rebuilding 55
Shady, Undesirable Elements in Maya 56
Randomize Those CVs 57
Junkyard Dumping Simulation 58
Use of Photoshop as a Modeling Tool 59
Autotracing for Fun and Profit 60
Photoshop Paths to Maya Curves 61
Wrestling with Displacement 62
xi
T A B L E O F C O N T E N T S

Animate Your Modeling 63
Set Subtleties 64
Transform Tools Shortcut 64
Interrogating Points as to Where They Live 65
Face Propogation Via Shell in Poly Selection Constraints 66
Fast Interactive Display 67
Fancy-Pants Directional Selection 68
Vertice Selection For Artistes 69
Better Model Optimization 70
Transform Your Duplication 71
Unlocking Vertex Normals 72
Bevel Your Way to Better Highlights 73
Custom Curve Mods 74
Fresh-Baked Lattices 75
Brushing up Your Image 76
Instant Muybridge 77
Aligning Objects in a Snap 78
Nurbs Now Convert to Single Mesh 79
Keeping Scale When Working with Uvs 80
Auto Mapping Move and Sew 81
Mirror Cutting 82
Align to UV Space 83
What’s in a Name? 84
Surface Parameterization for Rebuilding 85
Soft Modification Tool 86
Get Rid Of Those Stealthy, Hidden Vertices 87
Smooth Your Proxy 88
Set Those Face Normals Straight 89
xii
T A B L E O F C O N T E N T S

CHAPTER 4 91Embracing the Revolution
Lighting Your Way
Tweaking Lots O’ Lights 92
Reuse Those Depth Maps 92
Cookies and Gobos 93
Lighting With Paint 94
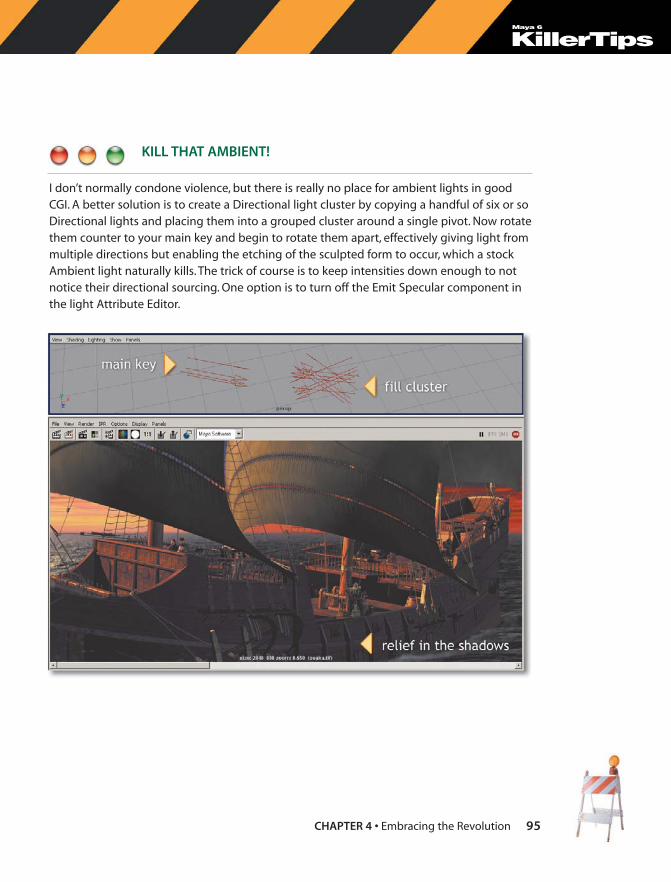
Kill That Ambient! 95
Cubic Point Arrays 96
Fear of Point Light Shadow Maps 97
Light Color Mapping Versatility 98
Poor Man’s Global Illumination 99
HDR GI CGI TLA 100
Paint Those Shadows 101
Shadow Platters 102
Glows, Fogs, and Flares, Oh My! 103
Shadow Map Woes 104
Use of Thresholded Shader Glows 105
Dancing Fire Light 106
Link Those Lights 106
Shadow Lights 107
Light Cycles 108
Spotlight Decay Regions 109
Consulting Sun Charts 110
Directional Shadow Maps 111
See Your Shadows 112
Hard Or Soft Light 113
Be Warm and Cool 114
Cheapo Fog Particles 115
Directional Light Shadow Mapping 116
xiii
T A B L E O F C O N T E N T S

CHAPTER 5 119Rags to Rendering
Getting a Grip on Shading
Imperfection Is Your Goal 120
Procedural Mapping Versus Scanned Files 121
Multilister Versus Hypershade—Que es Mas Macho? 122
Baking the Light 123
Color Offset and Gain—the Key to Shader Networks 124
The Joy of Ramps 125
The Underdog of Specular Mapping 126
Heavy Metal Rendering 127
Green Screen Playblasting 127
Embracing Dirt and Grime 128
Triplanar Projection to the Rescue 129
Layer it On 130
Pass That Shadow Please 131
Striking a Chord Length 132
Glow Flickering No More 132
Determining Texture Resolution 133
Sampler Info Facing Ratio Mania 134
Render Scripts Rule! 135
Layered Shaders To Go 136
To Premult or Not to Premult 137
Getting Wet 138
Color Remapping 139
A Head of the Game 140
Return to Normalcy 141
Shading Group Selection Tool 142
Fade into the Background 143
High Quality Shading 144
xiv
T A B L E O F C O N T E N T S

Test Textures 145
RGB Lighting Passes 146
Photoshop and Maya Get Married 147
CHAPTER 6 149From Home Movies to Hollywood
Camerawork Basics
Rule of Thirds 150
Perspective Basics 151
Perceptual Perspective Correction 152
Panel View Versus Film Back Versus Resolution 153
Creating Natural Camera Motion 154
Professional Camera Animation Setup 155
Camera Projection Magic 156
No Auto Anything (Especially Camera Clipping) 157
Simplify, Simplify for Animation 158
Undos the Views 158
Film Formats for Newbies 159
Animated Image Planes Gone Wild 160
Wresting Control of Fcheck 161
Image Plane Speedup 161
Snapping to the Elusive Camera Pivot 162
Streamlining Depth of Field 162
Motion Blur Choices 163
3d Stereoscopic Rendering 164
Level of Detail Trickery 165
Building a 3d Camera Envelope 166
Going the Distance 167
You’re Crossing the Line There, Buddy 168
xv
T A B L E O F C O N T E N T S
CHAPTER 7 171Building Character (Animation, That Is)
More Than Skin-Deep
Getting Oriented with Your Joints 172
FK, IK, OK? 173
Smooth Skinning Hotkeys for Painting Weights 174
Please Constrain Yourself 175
Not Your Grandfather’s Utility Nodes 176
Squash and Stretch Expressions 177
Scripting Your Setup 178
Bulging Biceps with Sculpt Deformers 179
Blendshape Facials 180
Wrap Deformers 181
Flowing Down the Path 182
Cycle Those Curves 183
Free Then Break Your Tangents 183
Flap Your Wings with Expression 184
Graph Editor Expressions 185
Finding Those Reclusive Local Axes 185
Prompting Multiple Keyframes 186
Breakdown Your Keys 186
Driving Miss Driven Key 187
Texture Map Your Animation 188
Time Slider Tricks 188
Recording Your Mouse 189
Prefix Your Joints 190
Make It Live 191
Playblast Selected Frames 191
Redirecting Motion 192
Paint FX Brush for Hair 193
xvi
T A B L E O F C O N T E N T S

Using Pointposition to Track Objects to Components 194
Constrain One Object to Another Using the Xform Command 195
Animation Retargeting 196
History Is Only Skin Deep 197
Deform Points Outside the Deformer 197
Lattice Deform Your Graph Editor 198
Color Your Anim Curves 199
CHAPTER 8 201Dangerous Effects Animation
Things You Can Do at Home
Dynamic Window Layouts 202
Use Playblasting to Check Motion 203
A One-Minute Ocean 203
Soft Body Rope Tricks 204
All Soft Bodies Must Rest 205
Jump That Rope 206
A Simple Rigid Body Animation 207
A Simple Expression To Move a Passive Rigid Body 207
Using Particles To Visualize Noise Versus Random 208
Randomly Sized Particles 209
Bigger Particles Fall Faster 210
Playback Every Frame or Else 210
Making Particles Collide With a Floor 211
Particle Looping 211
Kill Particles When They Go Below a Certain Height 212
Working on the Chain Gang 213
Battle Two Turbulence Fields Together 213
xvii
T A B L E O F C O N T E N T S

Swarming Bugs or Attaching Fields to Individual Particles 214
Make a Particle Emit a Trail of Particles 215
Emit Particles from an Image or Texture 216
Know Your Field Options 217
Get Your Turbulence On 217
Emit More Particles as the Emitter Goes Faster 218
Particle Replacement 219
Invasion of The Blob 220
Cache and Cache Again 221
Whirling Dervishes 222
Holy Smokes! 223
Holy Smokes! (Continued) 224
Fading In and Fading Out 225
Ring of Fire 226
Interactive Playback 228
Particle Deformation 229
Using Numeric Display Mode 230
Birthing Particles into Noise Space 231
Creepy Crawly Particles 232
Conserve Yourself! 234
Interpenetration?! What Did I "Collide" With? 235
Deactivating Particle Collisions 236
Running Multiple Rigid Body Simulations 236
Row, Row, Row Your Sim Gently Down Number Streams 238
Rendering Hardware-Based Particle Types in Software 239
xviii
T A B L E O F C O N T E N T S

CHAPTER 9 241Getting Under the Hood
Mud Wrestling with MEL
Huh? Using Whatis and Help 242
Variables and Eval This, Eval That 243
Acting Conditionally 244
The Sheer Excitement of Array Variables 245
Doing the Loop 246
Writing Custom Procedures 247
Oops: Warning, Error, and Catch 248
Using Createnode, Nodetype, and LS 249
Adding, Getting, Setting, and Connecting Attributes 250
Array Attribute or Attribute Array? 251
Object Display Juggling 252
Image On, Image Off 253
Birds of a Feather Can Be Processed Together 254
The Executeforeachobject and Selectednodes Commands 256
Hey, Break It Up! 257
FBM in the AM for a Render in the Pm 258
How Far Apart Are They? 259
Yum Enum 260
Clean Up Those Dirty Nodes 260
Expand Your Horizons and Your Filter 261
To Backtick or Not To Backtick 262
Lost & Found 263
Tracking Your Customers 264
Avoiding Global Variables with Interface Widgets 265
Losing Weight with The Pound Character 266
Are You Sure You Want To Do That?! 267
xix
T A B L E O F C O N T E N T S

Switching on Your Bud, the Hud 268
Keeping Your Variables Handy 269
Scoping Out the Script Editor 270
When in Doubt, See What the Node’s About 271
Golly G, We’re Matching 272
CHAPTER 10 275Real World Production Methods
Otherwise Known as Stress
Taming the RAM Beast 276
Minimizing Texture Aliasing 277
Pre and Post MEL 277
Lock Down Those Shadows 278
General Speed Improvement 278
Reducing Motion Blur Artifacts 279
Check Your Release Notes 279
Setting up Mattes 280
Render Diagnostics 280
Z Depth Renders 281
Rendering Larger than 8K 282
A Final Render Checklist 283
INDEX 285
xx
T A B L E O F C O N T E N T S

Maya 6 Killer TipsEdited by Scott Kelby
Welcome to Maya 6 Killer Tips. As Editor for the Killer Tips series, I can't tellyou how excited and truly gratified I am to see this concept of creating abook that is cover-to-cover nothing but tips, extend from my original book(Photoshop Killer Tips) into Maya 6 Killer Tips.
The idea for this series of books came to me when I was at the bookstorelooking through the latest Photoshop books on the shelf. I found myselfdoing the same thing to every book I picked up: I'd turn the page until Ifound a paragraph that started with the word "Tip." I'd read the tip, thenI'd keep turning until I found another sidebar tip. I soon realized I washooked on tips, because I knew that if I were writing the book that's whereI'd put all my best material. Think about it: If you were writing a book, andyou had a really cool tip, an amazing trick, or an inside secret or shortcut,you wouldn't bury it among hundreds of paragraphs of text. No way! You'dmake it stand out: You'd put a box around it, maybe put a tint behind it,and if it was really cool (and short and sweet), you'd get everybody'sattention by starting with the word "Tip!"
That's what got me thinking. Obviously, I'm not the only one who likesthese tips, because almost every software book has them. There's onlyone problem: There's never enough of them. And I thought, "Wouldn't itbe great if there were a book that was nothing but those cool little tips?"(Of course, the book wouldn't actually have sidebars, since what's in thesidebars would be the focus: nothing but cool shortcuts, inside secrets,slick ways to do the things we do everyday, but faster—and more fun—than ever!) That was the book I really wanted, and thanks to the wonderfulpeople at New Riders, that's the book they let me write (along with mycoauthor and good friend Felix Nelson). It was called Photoshop Killer Tips,and it became an instant bestseller because Felix and I were committedto creating something special: A book where every page included yetanother tip that would make you nod your head, smile, and think "Ahhh,so that's how they do it."
xxi
F O R E W O R D
If you were writing abook, and you hada really cool tip, anamazing trick, or aninside secret or shortcut,you wouldn't bury itamong hundreds ofparagraphs of text.You'd make it stand out:You'd put a box aroundit, maybe put a tintbehind it, and if it wasreally cool (and shortand sweet), you'd geteverybody's attentionby starting with theword "Tip!"
T I P

If you've ever wondered how the pros get twice the work done in half the time,it's really no secret: They do everything as efficiently as possible. They don't doanything the hard way. They know every timesaving shortcut, every workaround,every speed tip, and as such they work at full speed all the time. They'll tell you,when it comes to being efficient, and when it comes to staying ahead of the competition: Speed Kills!
Well, what you're holding in your hand is another Killer Tips book: A book packedcover-to-cover with nothing but those cool little sidebar tips (without the sidebars).Eric Hanson has captured the spirit and flavor of what a Killer Tips book is all about.I can't wait for you to get into it, so I'll step aside and let him take the wheel, becauseyou're about to get faster, more efficient, and have more fun in Maya 6 than youever thought possible.
Have fun and enjoy the ride!
All my best,
Scott Kelby, Series Editor
xxii

xxiii
Not for the Faint of Heart
3D artists have it tough. They have to wade through seemingly endless amountsof technical minutia from dreary manuals, off-the-shelf books thicker than the
yellow pages in a grimy Manhattan phone booth, and well-intentioned but oftenawkward online tutorials. Then they navigate bleary-eyed through the endless layers of cryptic commands in their applications, wrestling with such terms as“Directed Acyclic Graph,”“Non-Rational Uniform B-Spline,” and “Non-ManifoldTopology.” If you can recite the meaning of these terms without forethought, youhave already been there! We endure this toil just to satisfy our implacable creativeurges to muster up fascinating imagery out of the deep well of technology. 3D ani-mation and rendering is certainly the high ground of computer graphics, pushingone’s capacity for technical concepts and jargon to the limit. And, like your grand-father in his youth, mythically trudging through miles of snow making his way toschool, we actually LIKE it that way! So, what better reason than to create a bookthat assembles concise technical tips to speed understanding of the terms, accel-erate your workflow to superhuman speeds, and peer into techniques profession-als use daily in the visual effects field? When I learned of Scott Kelby’s Killer Tipsseries, I recognized that it would be an instant fit in the 3D CGI* world, like beerand pretzels, or in our case, hot pockets and programmers.
Why Maya?Maya has had an interesting ride into the annals of CGI history in the last fewyears. It has pounded its way like Mike Tyson into the forefront of professional 3D,and is now considered the standard for 3D work at most of the major visualeffects facilities, such as Acme Animagraphics and Industrial FX R Us. Seriouslythough, it has swept the field, and if there is anything good about that, it is thatartists can now carry their expertise and well-earned training with them as theydrift from project to project, like the best migrant beanfield workers.
Maya began life as three competing products (Alias, Wavefront, and TDI) thatSilicon Graphics had the good sense to purchase and then fuse, Frankenstein-like,into the ultimate über-3D software. Think of it as Einstein’s Grand UnificationTheory applied to 3D. Or dogs and cats happily romping together. Or Steve Jobsand Bill Gates taking a buddy road trip through the southwestern desert to-gether. In any case, it consolidated many of the separately evolved features that3D artists had grown envious of. It reduced the prevalent 3D application “camp”mentality somewhat and joined the tribes.
But what secured the success of Maya in the high-end world was that it wasthe first 3D package to “open the hood” for standard users, allowing amateur
I N T R O D U C T I O N
* First “TLA,” or three-letter acronym, that 3D artists seem to prefer for basic conversation to each other; in this case,“computer graphics imagery.”
xxiv
weekend mechanics (non-programmers) to rummage around in the engine andtransmission. So rather than offering an ultimately dead-end tunnel of predeter-mined GUI* commands, Maya reveals all command structure in text format, allow-ing clever custom tools to be created (or bumbling stupid ones). Some hardcoreMaya users balk at using a GUI at all and type everything. The same crowd wouldprobably prefer punch cards if they were still around, but the option does exist.
Maya also delivers cutting-edge performance in most of the areas it is knownfor, such as extensive modeling, rich character animation, highly developeddynamic simulation, and a multitude of deformations, as well as offering uniquetechnology like fluid effects, cloth simulation, 3D paint effects, and non-linear ani-mation. Ultimately, Maya has become the “Swiss army knife” of visual effects. Ofcourse, Swiss army knives are not exactly sleek and are fairly cumbersome, andMaya can be seen similarly. Thus, a good understanding is needed to “tame thebeast” and coax it into doing your bidding. Alias’s early advertising campaigninvolving a circus lion tamer is not too far off in that regard.
Is This Book for Me?Absolutely. This book is designed for the advancing intermediate Maya artist, butit will offer gems to all levels. Beginners will find it valuable to clear up some ofthe arcane mystery of the program, intermediates will use it to add to their grow-ing bevy of techniques, and old dogs will learn a few new tricks to polish off theirexpertise. The book contains coverage on Maya 6 for users on Windows, Mac, andLinux platforms; however, the screenshots and hot buttons are shown only inWindows. All the tips are applicable for any platform.
Can I Get a Job Working with Steven Spielberg or Jim CameronAfter I Read It?Sure, why not? Stranger things have happened in Hollywood. Steven Spielbergstarted as a squatter in a studio lot, and Jim Cameron was a truck driver. I wouldsay with that in mind, you could certainly make your mark in Hollywood, armedwith the aid of Maya Killer Tips. One of the truly great aspects of the visual effectsfield is that ultimately it is only about your talent. Well, sure, there are SOMEpower lunches involved, but mastering a difficult package like Maya is a surefireand road-tested route to contribute to the history of the silver screen, and not abad 8–5 gig if you ask me. Or there’s always the beanfield….
* Another TLA; in this case,“graphic user interface,” affectionately known as “gooey.”

This page intentionally left blank
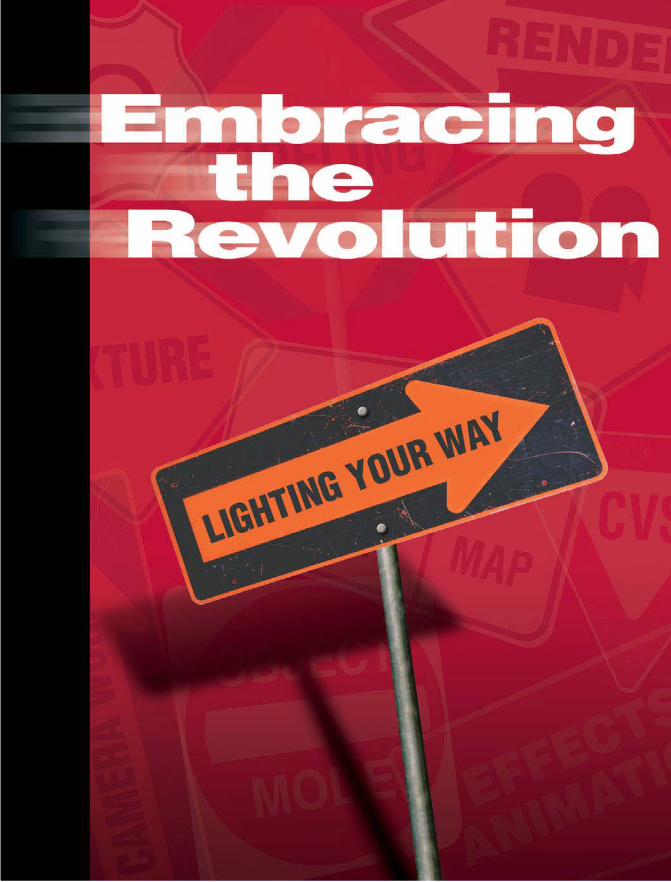

Lighting in Maya is, ironically enough, a
“dark” art—there just aren’t any cookbook
recipes to follow. If you gave 100 Maya
artists the same task to light a space or character,
you would probably end up with 100 different
91CHAPTER 4 • Embracing the Revolution
Embracing the Revolutionlighting your way
results. Of course on a big project this could pose
a major problem, so teams spend time creating
standard rigs and approaches, but in general
lighting is more an intuitive art than a standard-
ized craft. It is responsible for the success of a
scene more than any other factor, but above all
it is just plain difficult. Adding to that difficulty is
the fact that of all CGI technologies, it has been
the most difficult to create photorealism with
lighting because of the crudeness of the tools
available. However, a major revolution is under-
way—Global Illumination. With version 6.0,
Mental Ray now offers the richest opportunity
for GI lighting in Maya. GI offers a simulation-
based approach to lighting that is light years
ahead in terms of accuracy, though it sacrifices
a bit of the carefully sculpted lighting of the
artist. Whereas most 3D development is evolu-
tionary, GI is revolutionary, and it is rewriting all
our long-standing methods. We are currently in
the middle of this revolution, so luckily older and
well-proven approaches are still valid because
the new ones are being put into serious produc-
tion stresses. Therefore, you will find Killer Tips
on both sides of the lighting movement in this
chapter. Viva la revolucion!

KillerTipsMaya 6
92 CHAPTER 4 • Embracing the Revolution
TWEAKING LOTS O’ LIGHTS
Undoubtedly you havecreated vast multitudesof lights (Maya artistsLOVE lights) and had toglobally change them forsome reason or another.Rather than progressivelyaltering them individual-ly in the Attribute Editor,try the Attribute Spread
Sheet. OK, maybe you have tried that, but what if you need to change all the more obscureattributes, such as Shadow Map Resolution? You may have found those attributes are miss-ing. The trick is to use the down arrow key to select the Shape nodes and load all the previ-ously hidden attributes under the All tab of the Attribute Spread Sheet.
REUSE THOSE DEPTH MAPS
Maya has gotten very quick at calculating ShadowMaps, but over the course of thousands of frames,all that calculating can add up. If nothing movessubstantially in your scene or background, considerDepth Map Shadow Attributes, Disk Based Dmaps,Reuse Existing Dmap(s) in the Attribute Editor ofthe light. This will write out the maps intoYour_project\renderData\depth directory. They willnot be deleted, as is the norm, and they will bereused for every frame. This can substantially cutdown your renders if the shadow can stay still. Fora character that moves, consider a linked light,which calculates on every frame. Lastly, rememberthat these depth maps can be inspected withFcheck and the “z” key, which is very handy whentrying to debug shadows.

KillerTipsMaya 6
93CHAPTER 4 • Embracing the Revolution
COOKIES AND GOBOS
Sounding like something yummy from your childhood, these are rather old Hollywoodterms for ways of manipulating the spread of light. Cookies and Gobos are actually paddlesor cards with random holes cut out to deflect key lights into a draping of light and shadowor to soften the spread. Defining the signature look of the Film Noir period, they are useful for dramatic effects or simply for enriching a scene. Cardinal Rule #1 in CGI is thatImperfection Is Your Goal, so here is a great way to emulate that technique using a simpleCGI Spot light. First, paint a few random black and white organic patterns in Photoshop andsave out as a TIFF file. Now create a Spotlight in Maya, and in the Attribute Editor, map a FileTexture to the Color channel. Choose a Gobo file of your choice and adjust Filter Offset inthe Spotlight Attribute Editor to add blur and softening to the sharp contrast. Adding warmhue into the Texture File Color Gain and cool hue to Color Offset can create further interest-ing effects.

KillerTipsMaya 6
94 CHAPTER 4 • Embracing the Revolution
LIGHTING WITH PAINT
Allen Daviau is one of Hollywood’s top directors of photography. An interesting statementhe once made is that he often not only “paints with light” as the saying goes but also “lightswith paint,” using stage painters to attenuate surfaces into proper exposure. Conceptually,we do the same thing with our shaders. Lighting is inseparably intertwined with our surfaceproperties. One shader attribute that has great usefulness to lighting is IncandescenceMapping. This is a terrific method to add or replace the appearance of lights. It is limitedthough because it doesn’t offer a lighting solution for objects per se but is simply an illu-sion or painting of light appearing in the scene. The Incandescence attribute channel of ashader simply takes the color map and renders it at full (or at a potentially partial) value.The trick here is to use a painting program such as Photoshop to pre-paint the lighting ontoa simple render or screen grab of the surface. In Photoshop, the Render Lighting filter isvery useful; just keep the Ambient slider set to zero in that plug-in. For architectural scenes,it is a great way to simulate the appearance of hundreds of lights without even containing a single one, as the almost entirely incandescent mapped example shows.
KillerTipsMaya 6
95CHAPTER 4 • Embracing the Revolution
KILL THAT AMBIENT!
I don’t normally condone violence, but there is really no place for ambient lights in goodCGI. A better solution is to create a Directional light cluster by copying a handful of six or soDirectional lights and placing them into a grouped cluster around a single pivot. Now rotatethem counter to your main key and begin to rotate them apart, effectively giving light frommultiple directions but enabling the etching of the sculpted form to occur, which a stockAmbient light naturally kills. The trick of course is to keep intensities down enough to notnotice their directional sourcing. One option is to turn off the Emit Specular component inthe light Attribute Editor.

KillerTipsMaya 6
96 CHAPTER 4 • Embracing the Revolution
CUBIC POINT ARRAYS
Another great way to avoid the evils of Ambient lights is to use an array of cubic decayPoint lights. In the case of lighting an interior space, Ambient light will unify everything intoa monotonous flattening. A collection of Spot lights can accentuate certain forms butdoesn’t really offer a way to do an overall space. Area lights are best for this task, but theycan drastically increase render times. A good compromise that offers more flexibility and aGI look is to fill the space with overlapping spheres of quickly decaying light provided byPoint sources. Effectively a manual setup of an Area light that is tailored to the space, thismethod almost always provides a good solution for roughing out an interior scheme. Beginby placing an array of Point sources vertically midway from the ceiling to floor and spacedat that same distance apart. You may end up with rows of lights to fill the room, perhaps upto 20 or 30 lights. Adjust the intensity to equal a net level of 1.0, that is, 10 lights at intensity0.1 for each. The key here is to use the highest rate of decay—Cubic. The intensities will run very high (about 2000), but they are abstract. With the fast falloff, pockets of shadowwill accumulate in the corners, mimicking a GI render with a fraction of the render time.Additional Spot lights can be added for warm or cool shifts and accents on interior ele-ments. A weak Directional light can be used to pull forward any wall that may need accent-ing over others. Note we have used no Ambient lights in this strategy. Lastly, don’t turn onShadow Maps on these Point lights, which is explained in the next Killer Tip!
KillerTipsMaya 6
97CHAPTER 4 • Embracing the Revolution
FEAR OF POINT LIGHT SHADOW MAPS
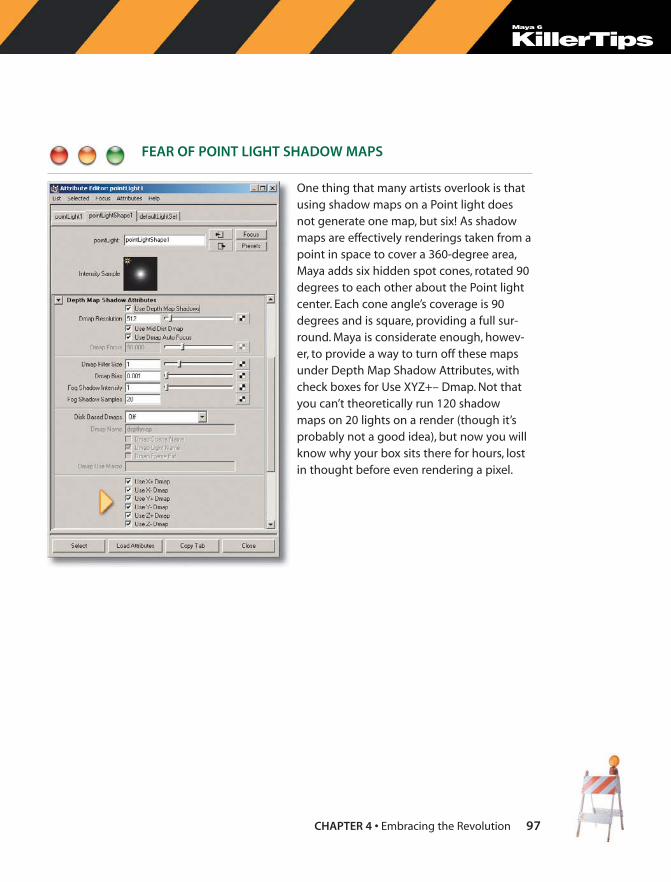
One thing that many artists overlook is thatusing shadow maps on a Point light doesnot generate one map, but six! As shadowmaps are effectively renderings taken from apoint in space to cover a 360-degree area,Maya adds six hidden spot cones, rotated 90degrees to each other about the Point lightcenter. Each cone angle’s coverage is 90degrees and is square, providing a full sur-round. Maya is considerate enough, howev-er, to provide a way to turn off these mapsunder Depth Map Shadow Attributes, withcheck boxes for Use XYZ+– Dmap. Not thatyou can’t theoretically run 120 shadowmaps on 20 lights on a render (though it’sprobably not a good idea), but now you willknow why your box sits there for hours, lostin thought before even rendering a pixel.

KillerTipsMaya 6
98 CHAPTER 4 • Embracing the Revolution
LIGHT COLOR MAPPING VERSATILITY
A valuable aspect of Maya lights is the capability tomap the Color channel in the Attribute Editor. Thissimply places an orthographic section cut of yourSpot light’s color pixels with a rectangular or solidmap of your choice, and it offers potential for manyvaried effects. First, it is useful for custom-designedpenumbras. Apply a 2d Ramp Texture node to theColor channel of the light and create a grayscalecircular ramp. This acts as a secondary means ofcontrolling the falloff of light within the penumbraalready set by changing the effective light colorout from the center. Another common use is toassign a 2d Fractal Texture node to the color butadjust for low contrast, so that the even light is ran-domized to a slight “blotching.” If done subtly, thisintroduces a scale factor and rich irregularity tocast light. The next obvious use of this is to connecta 2d File Texture node, acting as a slide projector ofsorts. Lastly, the look of multiple lights can be simu-lated with one light by mapping a 2d Grid or BulgeTexture or a repeated circular ramp to give the
appearance of a light passing through a diffuser. If Shadow Mapping is turned on togetherwith Light Fog, multiple beams will be defined, giving you an instant disco!

KillerTipsMaya 6
99CHAPTER 4 • Embracing the Revolution
POOR MAN’S GLOBAL ILLUMINATION
In the constant quest toachieve the look ofGlobal Illuminationwithout the associatedexorbitant render costs,many have adopted theuse of hemisphericallayouts of traditionalSpot or Directionallights. Web sites such asHighend3d.com havesome excellent rigsavailable for download,such as GI Joe. If you feelambitious enough tomake your own, create apoly sphere with aSubdivision Axis of 8and a SubdivisionHeight of 6. Delete the
lower faces to leave a dome. Create a Spot light, scale to .1, and then snap to one of the ver-tices. Turn on the Manipulator Tool in the Toolbox and grid snap the focus point to 0,0,0.Copy the light to the next highest vertex and reposition its focus back to 0,0,0. Center eachlight’s pivot back to 0,0,0 and use Edit, Duplicate to copy the two Spot lights 7 times with a45-degree Y rotation. Group the Spot lights, delete the sphere, and turn on ShadowMapping with 1024 Map Resolution. Now export the dome as active and import into ascene. Scale up the top node of the lights while choosing Panels, Looking Through Selectedon a single Spot light to maximize the area covered by the Shadow Map. Render away, andyou get a poor man’s version of GI shading. For a middle-income version, try GI Joe, wherean environment map can inform each light’s color for a High Dynamic Range (HDR) fake,and the number of lights used is far higher for smoother shadowing. For an upper-crustearner, try true GI and HDR rendering in Mental Ray. Expect to pay for the privilege, though.
KillerTipsMaya 6
100 CHAPTER 4 • Embracing the Revolution
HDR GI CGI TLA
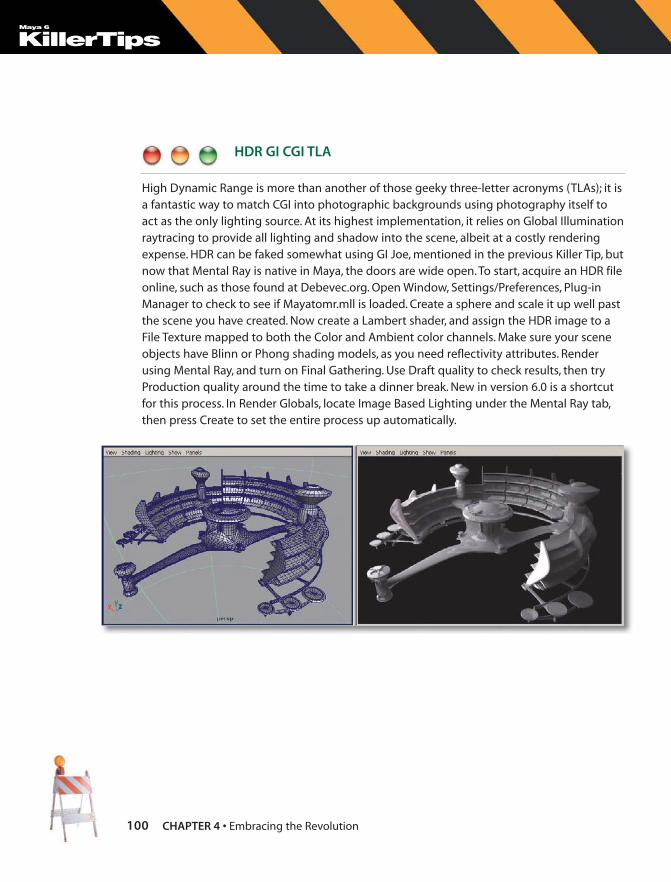
High Dynamic Range is more than another of those geeky three-letter acronyms (TLAs); it isa fantastic way to match CGI into photographic backgrounds using photography itself toact as the only lighting source. At its highest implementation, it relies on Global Illuminationraytracing to provide all lighting and shadow into the scene, albeit at a costly renderingexpense. HDR can be faked somewhat using GI Joe, mentioned in the previous Killer Tip, butnow that Mental Ray is native in Maya, the doors are wide open. To start, acquire an HDR fileonline, such as those found at Debevec.org. Open Window, Settings/Preferences, Plug-inManager to check to see if Mayatomr.mll is loaded. Create a sphere and scale it up well pastthe scene you have created. Now create a Lambert shader, and assign the HDR image to aFile Texture mapped to both the Color and Ambient color channels. Make sure your sceneobjects have Blinn or Phong shading models, as you need reflectivity attributes. Renderusing Mental Ray, and turn on Final Gathering. Use Draft quality to check results, then tryProduction quality around the time to take a dinner break. New in version 6.0 is a shortcutfor this process. In Render Globals, locate Image Based Lighting under the Mental Ray tab,then press Create to set the entire process up automatically.
KillerTipsMaya 6
101CHAPTER 4 • Embracing the Revolution
PAINT THOSE SHADOWS
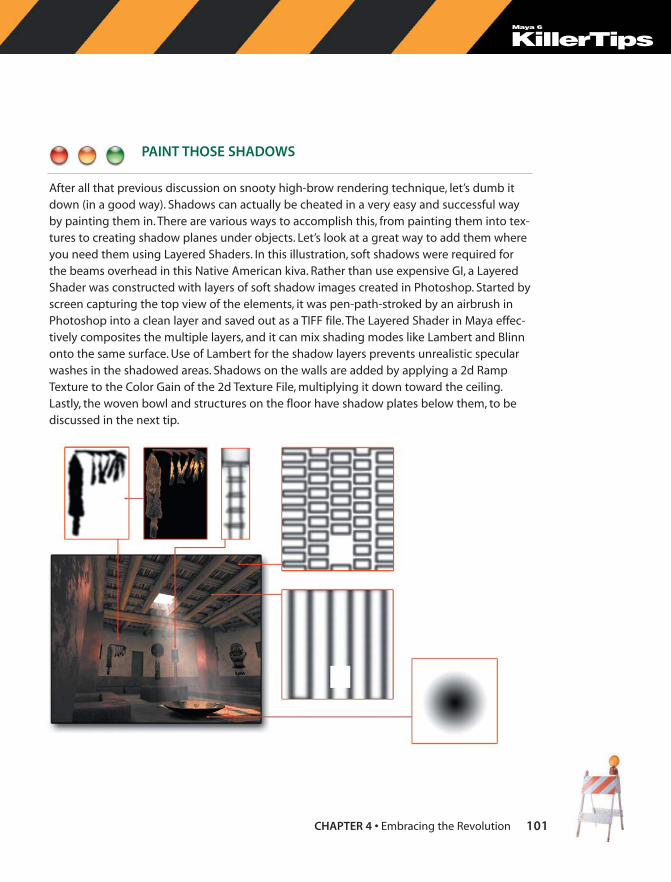
After all that previous discussion on snooty high-brow rendering technique, let’s dumb itdown (in a good way). Shadows can actually be cheated in a very easy and successful wayby painting them in. There are various ways to accomplish this, from painting them into tex-tures to creating shadow planes under objects. Let’s look at a great way to add them whereyou need them using Layered Shaders. In this illustration, soft shadows were required forthe beams overhead in this Native American kiva. Rather than use expensive GI, a LayeredShader was constructed with layers of soft shadow images created in Photoshop. Started byscreen capturing the top view of the elements, it was pen-path-stroked by an airbrush inPhotoshop into a clean layer and saved out as a TIFF file. The Layered Shader in Maya effec-tively composites the multiple layers, and it can mix shading modes like Lambert and Blinnonto the same surface. Use of Lambert for the shadow layers prevents unrealistic specularwashes in the shadowed areas. Shadows on the walls are added by applying a 2d RampTexture to the Color Gain of the 2d Texture File, multiplying it down toward the ceiling.Lastly, the woven bowl and structures on the floor have shadow plates below them, to bediscussed in the next tip.

KillerTipsMaya 6
102 CHAPTER 4 • Embracing the Revolution
SHADOW PLATTERS
Pronounced Shadow “Plaa-tairs” in French, this highly advanced tip will challenge even themost astute Ph.D. (another TLA). Okay, here we go, try to follow: Create a NURBS or polyplane, position it just above the floor surface and below your shadowing object, and attacha Lambert shader. Make the color black and map a 2d Ramp texture to the Transparencychannel. Make the ramp circular or boxed, add a bit of Noise in Ramp Attributes, and renderaway. You are left with a beautiful soft shadow with virtually no render overhead. If yourgeometry is complex like this pile of boulders, render it from top view and use a blurredalpha channel instead of the 2d Ramp Texture. Remember to turn off Casts Shadows in theshadow plate’s Render Stats in the Attribute Editor. Tough, huh?

KillerTipsMaya 6
103CHAPTER 4 • Embracing the Revolution
GLOWS, FOGS, AND FLARES, OH MY!
Maya lighting has the unique capability to simulate optical properties such as Glows, Fog,and Flares. These are quite useful in digital sets for their capability to simulate atmosphereand add presence to a scene. The use of fog to cast a visible spread of a spot, coupled withradial Flares or Glows onto the light, adds a great subtlety that contributes to the realism ofthe scene. Careful use of these effects is necessary, as they do have some pitfalls. First off,Fog effects are always preferable to Glows for a few reasons. Glows and Flares are a post-process render step, which can require large amounts of RAM and additional render times. IfFog effects are set up correctly, they can often match the look of more expensive Gloweffects but result in fewer problems due to their true 3D world space description. Also,Glows can flicker on small objects annoyingly due to eye space auto-exposure calculationerrors. A setup combination of dummy lights not casting light but contributing Flare, Fog,or Glow components can add greatly to the scene. Often these can be pre-rendered andmapped onto a card using Incandescence Mapping. Or keyframe some animated 2d FractalNoise into the Color attribute of the Fog, and a convincing atmosphere is guaranteed.

KillerTipsMaya 6
104 CHAPTER 4 • Embracing the Revolution
SHADOW MAP WOES
Shadow Maps (Dmaps) are a necessaryevil in 3D. They are often fraught withinstability and artifact issues, but theirlow impact on render times makesthem necessary bedfellows. The defaultsettings of a Spot light Dmap in Mayaproduce fast, soft, but not very accurateshadowing. To establish harder or moreaccurate shadow edges, it is necessaryto adjust the parameters of Cone Angle,Dmap Resolution, and Dmap Filter Size.Typically start by narrowing the ConeAngle as small as possible, and thenincrease Dmap Resolution. If a softerlook is required, try to increase theDmap Filter Size, but beware of longrender increases. Realize also that RAMuse will rise dramatically with higherresolutions. For more accurate startpoints of the beginning of the shadow,or to reduce shadow artifacts, try a larg-er or smaller value of Dmap Bias. Forgreater stability in animations, alwaysturn off Use Dmap Auto Focus and
enter the cone angle value here. Often a certain combination is required with these set-tings, so render only on a selected few objects to test on and arrive at these settingsquickly.

KillerTipsMaya 6
105CHAPTER 4 • Embracing the Revolution
USE OF THRESHOLDED SHADER GLOWS
Shader Glow is a common effect added to a surface that aids the appearance of self-illumination, such as a glowing television screen or car headlight. It adds the appearance ofthe “blooming” of light due to high contrast or strong intensity. The problem arises as theentire surface equally glows by default, creating the look of an unfortunate nuclear accidenton that to which you apply it. A little-known control exists in the Shader Glow global attrib-utes, found as an extra shader ball in the Multilister or Hypershade. Locate Threshold in theCommon Shader Glow Attributes, and you will find that as it is raised, only the specularhighlights will then bound the apparent glow effect. The end benefits of this technique areto show a light blooming effect in your renders and impress others at cocktail parties.
KillerTipsMaya 6
106 CHAPTER 4 • Embracing the Revolution
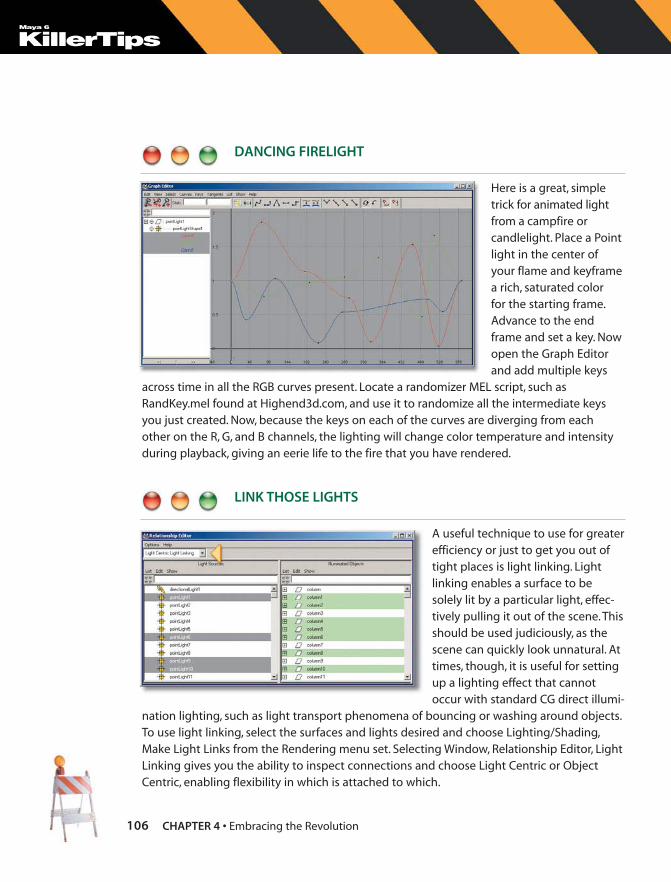
DANCING FIRELIGHT
Here is a great, simpletrick for animated lightfrom a campfire orcandlelight. Place a Pointlight in the center ofyour flame and keyframea rich, saturated color for the starting frame.Advance to the endframe and set a key. Nowopen the Graph Editorand add multiple keys
across time in all the RGB curves present. Locate a randomizer MEL script, such asRandKey.mel found at Highend3d.com, and use it to randomize all the intermediate keysyou just created. Now, because the keys on each of the curves are diverging from eachother on the R, G, and B channels, the lighting will change color temperature and intensityduring playback, giving an eerie life to the fire that you have rendered.
LINK THOSE LIGHTS
A useful technique to use for greaterefficiency or just to get you out oftight places is light linking. Lightlinking enables a surface to besolely lit by a particular light, effec-tively pulling it out of the scene. Thisshould be used judiciously, as thescene can quickly look unnatural. Attimes, though, it is useful for settingup a lighting effect that cannotoccur with standard CG direct illumi-
nation lighting, such as light transport phenomena of bouncing or washing around objects.To use light linking, select the surfaces and lights desired and choose Lighting/Shading,Make Light Links from the Rendering menu set. Selecting Window, Relationship Editor, LightLinking gives you the ability to inspect connections and choose Light Centric or ObjectCentric, enabling flexibility in which is attached to which.

KillerTipsMaya 6
107CHAPTER 4 • Embracing the Revolution
SHADOW LIGHTS
Possibly one of the most useful lighting tech-niques I use, Shadow lights are indispensableonce you get used to them. They effectivelyenable you to place shadows independentlyof your lighting, something that a more flexi-ble renderer such as RenderMan excels at.They also are very easy to set up and use.Start by creating a Directional light to pro-vide the general key lighting. Next, create aSpot light of Intensity 1 and turn on ShadowMapping. Adjust the Cone Angle andPenumbra Angle as you might want it forshadow purposes. Duplicate this light in thesame position, but turn off Shadow Mappingand put –1 for intensity. The light compo-nents cancel each other out, leaving only the shadow. Group the two together and throwshadows exactly where you want them atany resolution. This is an excellent tip forlarge scenes where the Shadow Map getstoo diffuse for the scale involved. Lastly, tryMatt Wood’s MWShadowLight.mel fromHighend3d.com; he has made it plug andplay by writing expressions between the keyAttributes of the two lights. Shadow on!
KillerTipsMaya 6
108 CHAPTER 4 • Embracing the Revolution
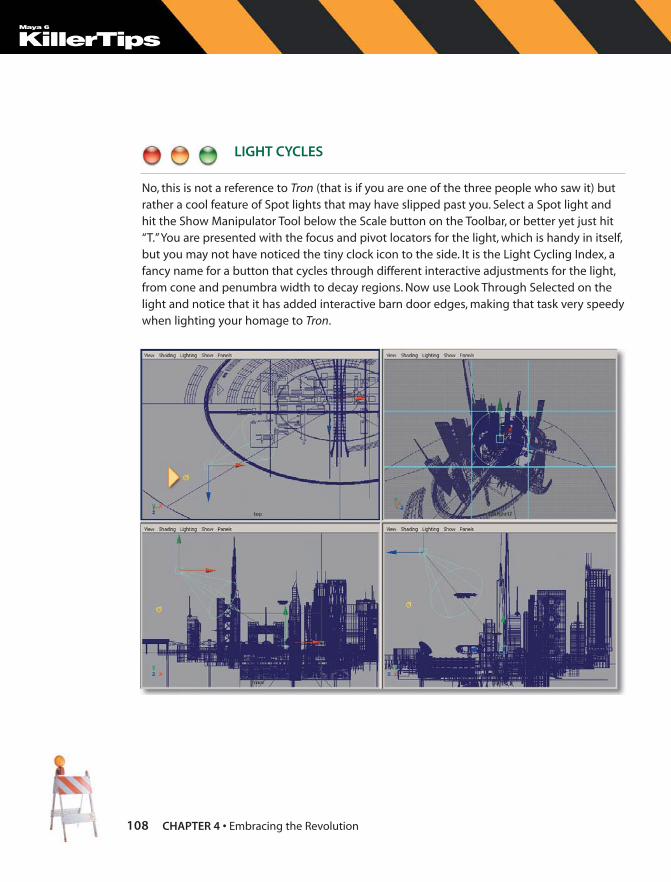
LIGHT CYCLES
No, this is not a reference to Tron (that is if you are one of the three people who saw it) butrather a cool feature of Spot lights that may have slipped past you. Select a Spot light andhit the Show Manipulator Tool below the Scale button on the Toolbar, or better yet just hit“T.”You are presented with the focus and pivot locators for the light, which is handy in itself,but you may not have noticed the tiny clock icon to the side. It is the Light Cycling Index, afancy name for a button that cycles through different interactive adjustments for the light,from cone and penumbra width to decay regions. Now use Look Through Selected on thelight and notice that it has added interactive barn door edges, making that task very speedywhen lighting your homage to Tron.

KillerTipsMaya 6
109CHAPTER 4 • Embracing the Revolution
SPOTLIGHT DECAY REGIONS
Spotlight Decay Regions are handy when you need well-defined foggy searchlights to lightfrom lampshades. Use the Light Cycling Index mentioned in the previous Killer Tip to dis-play an interactive series of rings that define the borders of where light will occur. Adjustthem so that the light begins outward of the origin of the cone so that light and fog are notrevealed until appropriate.

KillerTipsMaya 6
110 CHAPTER 4 • Embracing the Revolution
CONSULTING SUN CHARTS
In film work, we are constantly combining CGI with photographic backgrounds, or “plates.”Matching up the lighting so that it is seamless is the real work. It all starts by determiningwhere the sources were during the shoot. On a stage, this can be found by analyzing all ofthe measurements and survey data usually recorded. But what if the shoot took place out-doors, with the sun as the primary available light source? Some packages have coded in theability to enter time of day, year, and location to re-create the sun vector direction, but Mayahas not added that feature yet. In the meantime, use what architects use to determine solarangles—a sun chart. These can be found online or in solar energy guidebooks. Follow thetime of day and year to locate the associated bearing and azimuth angles, and then usethose to set the rotation of your key light. Shadows and highlights should now play wellwith each other. This is an inevitable MEL script to be written—any takers?

KillerTipsMaya 6
111CHAPTER 4 • Embracing the Revolution
DIRECTIONAL SHADOW MAPS
The use of Shadow Maps with Directionallights poses a problem. They look good, asthe shadows look more uniform and parallel,but it is often very hard to get decent reso-lution. It is not hard to see why if you realizethat the spread of the map is applied basedon the largest object in your scene. It youare rendering a still life of a bowl of fruit,that is fine, but if you are rendering theisland of Manhattan, one shadow pixel mayspread across a street. Luckily, Maya gives usan option to apply a reduced cone angle tothe spread, Use Dmap Auto Focus. Uncheckit and key in a smaller number, based indegrees from the centerline of the direction-al. The Directional light now begins to actlike a Spot light, so position matters forproper application of shadows. The UseLight Position switch uses the location of thelight to determine if objects behind or infront are considered in the shadow map. Iflack of resolution still poses a problem, con-sider using the Shadow light techniquedescribed in a previous Killer Tip in thischapter instead.

112 CHAPTER 4 • Embracing the Revolution
KillerTipsMaya 6
SEE YOUR SHADOWS
When lighting a scene, it’s often difficult to see how your lights are behaving in your actualscene until you go to render it. More often than not you will have to readjust your lightsbecause the shadows being cast are working against your well-earned composition. Howgreat would it be if you could see your shadow in real time in your viewport so you couldmake all those crucial adjustments beforehand? Look no further, hit 7 (use hardware light-ing), then choose Lighting, Shadows from your Panel drop-down menu. Your graphics cardwill do the rest, and project hardware shadows from your lights, thus eliminating all the guess-work from shadow composition. Now swing your lights around in real time for the real fun.Just remember that more expensive cards will really come into play here.

113CHAPTER 4 • Embracing the Revolution
HARD OR SOFT LIGHT
One of the primary tasks of a Directorof Photography, aside from settingproper film exposure levels, is to definethe feel and quality of the light, inorder to reflect the emotional inten-tions of a script. The primary way this isdone is to establish whether the lightis seemingly soft or hard in its behav-ior. In CG terms, this relates to a senseof diffuse or specular light. For physicalstage work, this can be controlled bygobos, cookies, scrims, and diffusers.You don’t have the luxury of suchdevices, but certain Maya 6.0 tricks canmimic these qualities. The earlier tip“Cookies and Gobos” in this chapterdescribes ways to mimic a gobo lightdistribution, but these do little for asense of softness. There are a numberof ways to achieve soft qualities withnormally all-specular CG lights: First,you can manipulate shadow maps;next, you can play with light decays,area lights, or light domes; last, you can
use the correct simulation of true global illumination. GI can still be prohibitive, so let’s lookat standard CG lights. For basic softer shadows, shadow map resolution can be turned down,but there will be an innate loss of accuracy and aliasing. It is better to turn Dmap Filter Size to3 or 4 in the Depth Map Shadow Attributes, but be ready for a hit in render time. This will alsonot establish a transition of hard to soft at a shadow’s terminus, so use of an area light maybe in order. Area lights are nothing more than a close-knit group of point lights, so the shad-ow implications are severe (see the tip “Fear of Point Light Shadow Maps” in this chapter). Agreat alternative to area lights are cubic arrays, explored in the tip “Cubic Point Arrays,” also inthis chapter. Next down the line is the use of light domes (see the tip “Poor Man’s GlobalIllumination” in this chapter), which is usually a good solution to general soft illumination. Forthe brazen and bold, true raytraced GI using Mental Ray or the like is the most accurate andconvincing, but nothing comes for free, especially GI, come render time.
KillerTipsMaya 6

114 CHAPTER 4 • Embracing the Revolution
KillerTipsMaya 6
BE WARM AND COOL
This is one tip where we can learn from the boldest and simplest graphics in commercial art,comic books. Comic artists are limited in the range of color or tonal options they have to workfrom, so they rely on the oldest principle in art, that of warm/cool color opposition. Thisapproach states that the key light should be warm in hue, while the shadows should gocool. This diametric opposition psychologically establishes a feeling of depth to an other-wise 2D image. The nice thing about applying this principle in CG is that you have lots ofavenues in which to integrate it. The easiest is to add a yellow-orange hue into your primarykey, and cool blue into your fill sources or shadow color. This is certainly something to alwaysadd to your scenes to some degree, but much more subtle ways of implementing this dynamichue shift exist. To give your specular sheens much more life, map a basic 2D Fractal Map tothe Specular Color in a shader’s Attribute Editor. Turn the UV repeats down to 0.12, 0.12 forbetter scaling, and then turn the fractal Amplitude to somewhere around 0.4 to reduce con-trast. Now open Color Balance and open the color editor for Color Gain. Put a saturated warmhue on it and a saturated cool hue on Color Offset. Now the specular highlight will maintainto white, but will transition into warm then cool, creating richly hued specular behavior whenthe object moves. Another area to implement warm/cool is in global illumination, where theHDR fill lighting sphere is held cool, while an added key light can be made warm.
115CHAPTER 4 • Embracing the Revolution
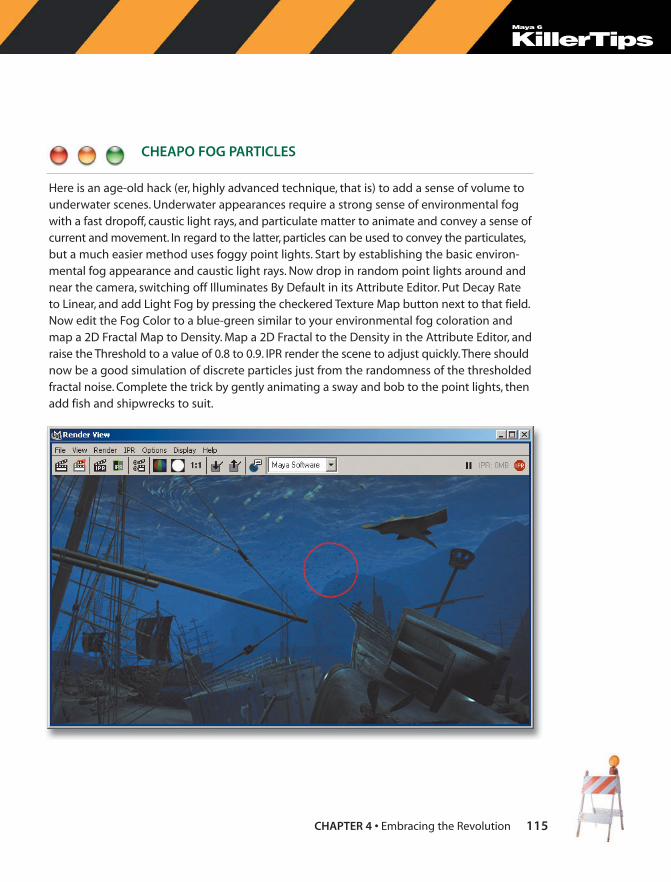
CHEAPO FOG PARTICLES
Here is an age-old hack (er, highly advanced technique, that is) to add a sense of volume tounderwater scenes. Underwater appearances require a strong sense of environmental fogwith a fast dropoff, caustic light rays, and particulate matter to animate and convey a sense ofcurrent and movement. In regard to the latter, particles can be used to convey the particulates,but a much easier method uses foggy point lights. Start by establishing the basic environ-mental fog appearance and caustic light rays. Now drop in random point lights around andnear the camera, switching off Illuminates By Default in its Attribute Editor. Put Decay Rateto Linear, and add Light Fog by pressing the checkered Texture Map button next to that field.Now edit the Fog Color to a blue-green similar to your environmental fog coloration andmap a 2D Fractal Map to Density. Map a 2D Fractal to the Density in the Attribute Editor, andraise the Threshold to a value of 0.8 to 0.9. IPR render the scene to adjust quickly.There shouldnow be a good simulation of discrete particles just from the randomness of the thresholdedfractal noise. Complete the trick by gently animating a sway and bob to the point lights, thenadd fish and shipwrecks to suit.
KillerTipsMaya 6
116 CHAPTER 4 • Embracing the Revolution
KillerTipsMaya 6
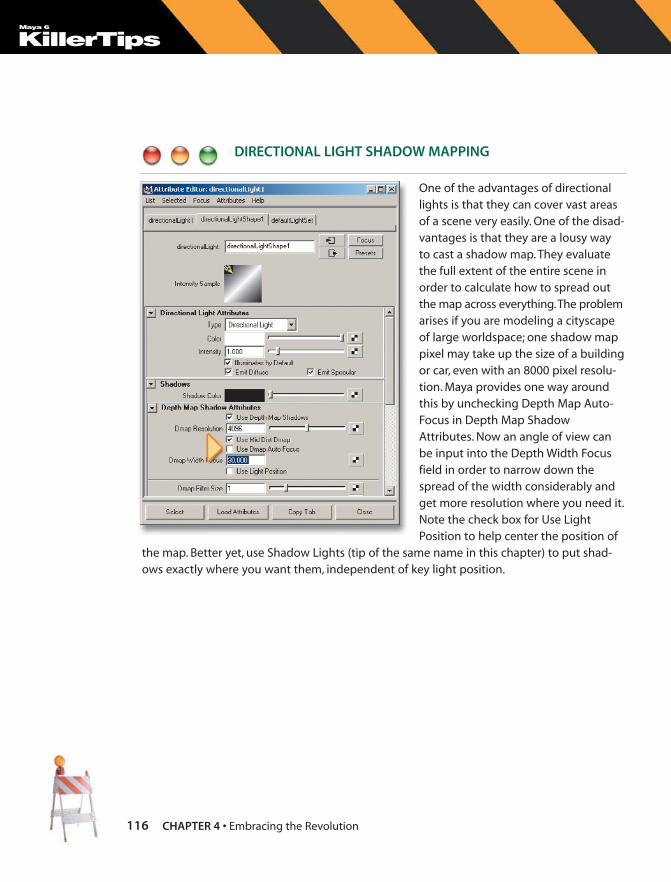
DIRECTIONAL LIGHT SHADOW MAPPING
One of the advantages of directionallights is that they can cover vast areasof a scene very easily. One of the disad-vantages is that they are a lousy wayto cast a shadow map. They evaluatethe full extent of the entire scene inorder to calculate how to spread outthe map across everything.The problemarises if you are modeling a cityscapeof large worldspace; one shadow mappixel may take up the size of a buildingor car, even with an 8000 pixel resolu-tion. Maya provides one way aroundthis by unchecking Depth Map Auto-Focus in Depth Map ShadowAttributes. Now an angle of view canbe input into the Depth Width Focusfield in order to narrow down thespread of the width considerably andget more resolution where you need it.Note the check box for Use LightPosition to help center the position of
the map. Better yet, use Shadow Lights (tip of the same name in this chapter) to put shad-ows exactly where you want them, independent of key light position.

This page intentionally left blank

IndexSymbols[ ] (bracket) keys, 158# (pound) character, 266
` (backtick) character, 262
: character, 84{ } (curly braces), 270
Numbers2D motion blur, 163, 2793D
developing 3D camera envelope, 166
file formats for rendering, 153motion blur, 163, 279moving objects precisely in, 43D stereoscopic rendering, 164
Aactions, 14addAttr command, 250, 251Adobe Streamline, 60aliasing, texture, 277aligning
image planes, 46objects by snapping to second
object, 78points in UV space, 83vertices on axis, 6
alpha channel
extracting, 127premultiplication of, 137
alpha onion skins, 47ambient lighting alternatives,
95–96animation. See also
character animation; effects
animation
Animated Snapshot andAnimated Sweep, 63
applying custom colors tocurves, 199
character vs. effects, 201creating 3D camera
envelope, 166
using, 8attributes
array attributes vs. attributearrays, 251
-asString flag, 260controlling in Mel, 250polling value of enum, 260
Auto Render Clip Plane, 157,278, 279
Automatic Mapping texture
coordinate system, 81autotracing, 60, 61
Bbackgrounds
camera projection techniquesfor, 156
rendering, 143backtick (`) characters, 262Baked Simulation Index
attribute, 236baking light, 123beveling edges, 73billboards, 38Birail command, 54blendshapes for faces, 180Blinn shading modes, 101bounding boxes
increasing refresh times with, 43simplifying scenes with, 158
bracket keys ([]), 158Breakdown keys, 186bug swarms, 214–215Bump mapping, 49
Ccaching
particles, 221writing textures to hard disk
cache, 276camera clipping
Auto Render Clip Plane, 157, 278, 279
expanding default, 13camera pivot, 162camera projection, 156camerawork, 149–168
building 3D camera envelope, 166
cycling curves, 183deleting non-skin history for, 197evaluating, 127Flow Paths for path, 182loading frames in tandem
with, 160recording mouse actions, 189retargeting joints, 196reverse engineering, 191RGB lighting passes, 146setting multiple keyframes, 186setup for professional
camera, 155simplifying scenes for, 158soft-bodied Blob-like, 220texture maps for, 188
Animation Snapshot, 63, 77Animation Sweep, 63annotating objects, 5arithmetic operators for fields, 4arrays
array attributes vs. attributearrays, 251
cubic point, 96stringArray, 251using, 245
arrow keys, 4Artisan hotkeys, 174Artisan tool, 76aspect ratios, 153, 159-asString flag in MEL, 260Attach Multiple Output Meshes
checkbox, 79attenuation, 217attribute arrays, 251Attribute Editor, 30
color mapping in, 98Color Remapping, 139comparing values for multiple
objects, 41creating ramp values in, 225illustrated, 16reusing depth maps, 92scrubbing values in, 7Shadow Maps with directional
light, 111, 116turbulence fields, 213, 217turning off shadow maps, 97
Attribute Spread Sheet
adjusting lights via, 92
285

camerawork (continued)camera projection
techniques, 156constraining Distance Tool to
lights, 167creating natural camera
motion, 154crossing the line, 168depth of field, 162deselecting Auto Render Clip
Plane, 157, 278, 279fcheck controls, 22, 161file formats for 3D rendering, 153film formats, 159image composition, 150importance of, 149improving image plane
performance, 161level of detail models, 165motion blur, 163perspective, 151–152professional camera animation
setup, 155simplifying scenes for
animation, 158snapping to camera pivot, 1623D stereoscopic rendering, 164undoing and redoing views, 158
cards
augmenting scenes with, 48Cookies and Gobos, 93
catch command, 248Channel Box, 42character animation, 171–199.
See also joints
about, 171adding prefixes to names, 190applying custom colors to
curves, 199blendshapes for faces, 180Breakdown keys, 186constraints, 175, 195controlling lattice deforming,
197–198conversation line, 168cycling curves, 183deleting non-skin history for, 197effects animation vs., 201expressions, 177, 184, 185Flow Paths for path
animation, 182
hair, 193IK, 173joints, 172, 196Make Live, 191modifying local axis for, 185point constraining, 194recording mouse actions, 189redirecting motion for, 192scripting setup for, 178sculpt deformers, 179selecting frames to view in
Playblast, 191Set Driven Key, 187setting multiple keyframes, 186smooth skinning, 174tangent tools in, 183texture maps for, 188timeline options for, 188utility nodes, 176wrap deformers, 181
checklist for final rendering, 283chord length, 132Click Box Size option (Preferences
dialog), 35Click-Drag-Select option
(Preferences dialog), 31collision layers, 235
collisions
deactivating particle, 236simulating particle, 211
color
rendering RGB lighting passes, 146
specular, 126warm/cool opposition, 114
Color Offset and Color Gain, 124Color Remapping, 139Colors dialog, 27component mode, 42composition of images, 150conditional statements in MEL, 244confirmDialog command, 267connectAttr command, 250constraints
about, 175constraining CVs to curves, 52constraining Distance Tool to
lights, 167point constraining, 194selection, 68
xform command for constrainingobjects, 195
Control Bar, 22control vertices. See CVs
conversation line, 168Convert NURBS To Polygons
Options dialog, 79Convert to File Texture Options
dialog, 123Copy Tab button (Attribute
Editor), 41Create Active Rigid Body
command, 58Create Character Set Options
dialog, 192Create Passive Rigid Body
command, 58Create PSD Texture Options
dialog, 147Create Render Node dialog, 176createNode command, 249Cubic decay, 96cubic point arrays, 96curly braces ({ }), 270Curve Editing Tool, 74curves. See also NURBS
changing profiles across twoguide rails, 54
constraining next CV to, 52converting Photoshop paths
into, 61cycling, 183modifying NURBS curves as you
draw them, 49modifying with Curve Editing
Tool, 74“y” key for completing, 10
customizing
face selection, 38marking menus, 29Maya startup image, 26writing custom MEL
procedures, 247CVs (control vertices)
constraining to curves, 52finding coordinate locations
for, 65finer tessellation vs. adding, 51MEL shelf item for manipulating
in Object mode, 36
286

randomizing, 57reducing CV count, 52reducing revolve sections, 53using filterExpand command
with CV mask, 261
Ddangling chain, 213decay
Cubic, 96Spotlight Decay Regions, 109
deforming particles, 229deleting
non-skin history, 197userPrefs.mel file, 3
dependency graph nodes, 271depth maps
Depth Map Shadow Attributes, 97
reusing, 92depth of field, 162depth shaders, 281dgdirty -a command, 260directional lights
Directional light cluster, 95directional light shadow
mapping, 111, 116replacing ambient with, 95
directional selection, 68dirt and grime, 128disabling Dynamics or Paint
Effects, 36Displacement mapping, 49displacements
selecting brush types for, 76tessellation vs., 62
Display Layer Options dialog, 18Distance Tool, 167Dmaps, 97, 104Duplicate with Transform tool, 71dust simulations, 223–224Dwg Translator plug-in, 60DXF importing, 60Dynamics module, 36
Eediting standard user scripts, 37effects animation, 201–239.
See also animation
error command, 248executeForEachObject
command, 256Expression Editor, 30, 184expressions
learning to use, 184using, 177viewing in Graph Editor, 185
F“f” key, 11faces
customizing selection of, 38Planar, 56propagating via Shell
Propagation, 66setting normals straight, 89
facial animation, 180Facing Ratio, 134Fast Interaction, 67FBM (Fractional Brownian
Motion), 258fcheck controls, 22, 161Feature Displacements, 62fields
arithmetic operators for, 4picking elements in, 2wildcards for selecting, 3
file referencing, 20file textures, 121files
deleting userPrefs.mel, 3dragging to viewport for
importing, 23loading project default file as
new scene, 38preventing loading of
reference, 20Film Back, 153film formats, 159Film Gate, 153, 159Film Offset, 152filterExpand command, 261final rendering. See rendering
fire
firelight, 106simulating, 226–227smoke simulation, 223–224
FK, 173
about, 201accelerating particles, 210adjusting attributes with
Interactive Playback, 228animating ocean scenes, 203attaching fields to individual
particles, 214birthing particles into noise
space, 231caching with, 221checking motion with
Playblast, 203crawling particles, 232–233deactivating collisions, 236deforming particles, 229emitting particles from images or
texture, 216emitting trail of particles, 215field options for, 217fire simulation, 226–227interpenetration errors for
particles, 235killing particles, 212looping particles, 211managing particle velocity, 234multiple rigid body simulations,
236–237noise fields in, 208numeric display of particle
attributes, 230opacity of particles, 225particle replacement, 219particle size variation, 209random number streams with
particle simulation, 238rendering dangling chain, 213rendering hardware-based
particles, 239rigid-bodied, 207rotating particles, 222saving dynamic window layouts
for, 202simulating particle collision with
floor, 211smoke and dust simulation,
223–224soft-bodied, 204–206, 220turbulence fields, 213, 217varying particle emission rates
with velocity, 218
287

flares, 103Flow Paths, 182focal length, 153fog
lighting effects using, 103simulating, 115
for loops, 246Fractional Brownian Motion
(FBM), 258frame extension, 160frames
freeze-frame effects, 77loading in tandem with
animation, 160playing all, 210selecting for viewing in
Playblast, 191
G“g”/”G” key, 11gestural transformations, 12getAttr command, 250getenv command, 257getFileList, 257GI Joe, 99, 100gimal lock, 172global color schemes, 27Global Illumination (GI), 91, 99
about, 91Layered Shaders vs., 101substituting hard or soft lights
for, 113global variables, 265glows
eliminating flickering shader, 132lighting effects using, 103Shader Glows, 105
gmatch command, 272Gobo lighting, 93, 113Graph Editor
applying custom colors to animation curves, 199
Breakdown keys, 186controlling lattice deforming
in, 198creating natural camera
motion, 154viewing expressions in, 185
Grow command, 15
GUI (graphics user interface), 25–43attribute customization, 30Click-Drag-Select option, 31comparing values for multiple
objects, 41conserving RAM by turning off
modules, 36custom marking menus, 29customizing Maya startup
image, 26editing standard user scripts, 37face selection, 38hiding all elements of, 31hiding attributes in Channel
Box, 42increasing refresh times with
bounding boxes, 43loading project default file as
new scene, 38manipulating CVs in Object
mode, 36marking menus with gestural
behavior, 26monitor resolution
preferences, 35new hotkeys, 39NURBS display options, 34Pick Nothing command, 32priorities for overlapping
objects, 35scaling size of manipulators, 32selecting Y-up or Z-up
coordinate system, 34setting global color schemes, 27shelves, 28switching between object and
component modes, 42transporting custom Preference
files, 33using translate manipulator, 40working unit preferences, 33
Hhair, 193hard lighting, 113hardware planes, 161Hardware Render Buffer, 224HDR (High Dynamic Range), 100Heads Up Display (HUD), 87, 268
help command, 242hiding
attributes in Channel Box, 42GUI elements, 31
High Dynamic Range (HDR), 100High Quality Shading, 144Hotbox, 26hotkeys
Artisan, 174new, 39smooth skinning, 174
HUD (Heads Up Display), 87, 268Hypershade, 122
Iicons, adding to shelves, 28IK (Inverse Kinematics), 173image composition, 150image planes
aligning, 46improving performance of, 161smudging with motion blur, 163toggling display on/off, 253
images, emitting particles from, 216imperfections and inconsistencies
creating natural camera motion, 154
providing, 120Import Options dialog, 84importing
objects by dragging and dropping, 23
sound, 22Incandescence Mapping, 94, 103incremental saves, 12Interactive Playback, 228Interactive Shading Options
dialog, 43Inverse Kinematics (IK), 173inverted normals, 141
Jjoints
adding prefixes to file names, 190binding wrap deformers to, 181creating, 172retargeting, 196sculpt deformers and, 179
288

Kkeyframes
setting multiple, 186timeline options for, 188
keys
arrow, 4Artisan hotkeys, 174Breakdown, 186“f,” 11“g”/”G,” 11precise movements with Alt and
arrow, 4Set Driven Key, 187smooth skinning hotkeys, 174“w,” 6, 12“y,” 10“z,” 22
killing particles, 212
LLambert shading modes, 101, 128lattice deformers, 197–198lattices, 75Layer Editor, 130Layered shaders, 101, 136layers
matte rendering for element on, 280
options for using, 18rendering in, 130
left mouse button. See mouse
level of detail (LOD) models, 165Light Cycling Index, 108, 109light linking, 106lighting, 91–116
adjusting all lights via AttributeSpread Sheet, 92
Ambient light, 95, 96baking light, 123color mapping in Attribute
Editor, 98constraining Distance Tool to
lights, 167cubic point arrays, 96determining solar angles, 110Directional lights, 95, 111, 116directional light shadow
mapping, 111, 116
effects of, 49Incandescence, 94procedural, 121specular, 126
marking menus
creating with gestural behavior, 26
setting up custom, 29marquee zooming, 11Matte Opacity, 280mattes, 280Max Distance option (Attribute
Editor), 217Maya
checking Release Notes, 279customizing startup image, 26integrating Photoshop texturing
process into, 147listing node types, 249
MayaRes.dll, 26MAYASTARTUPIMAGE.XPM.bmp, 26MEL, 241–272
about, 241addAttr command, 250, 251arrays, 245-asString flag, 260avoiding global variables, 265backtick characters in, 262calculating distance between
objects, 259catch command, 248cleaning up nodes with
dgdirty -a command, 260conditional statements in, 244confirmDialog command, 267connectAttr command, 250converting string data to
element list, 257differences between expressions
and, 177error command, 248executeForEachObject
command, 256expanding default clipping, 13filterExpand command, 261finding objects not in current
namespace, 263getAttr command, 250gmatch command, 272help command, 242
emulating firelight, 106flares, 103fogs, 103Global Illumination, 91, 99glows, 103Gobos, 93, 113hard or soft, 113High Dynamic Range, 100Light Cycling, 108, 109light linking, 106lighting with paint, 94painting in shadows, 101Point light shadow maps, 97rendering RGB lighting
passes, 146replacing ambient with
directional, 95reusing depth maps, 92Shader Glows, 105Shadow lights, 107Shadow Maps, 104, 107shadow platters, 102simulating fog effects, 115Spot lights, 93, 99, 104, 107, 108Spotlight Decay Regions, 109using warm/cool color
opposition in, 114viewing shadows in real time, 112
loading project default file as new
scene, 38local axes, 185LOD (level of detail) models, 165loops
looping particles, 211MEL, 246
ls command, 249, 255
Mmagnitude, 217Make Live, 191manipulators
scaling size of, 32translate, 40
Map Chaining, 124mapping
auto, 81color, 98directional light shadow,
111, 116
289

MEL (continued)implementing FBM, 258invoking commands from Web
pages, 17listing node types, 249looking up nodes in online
documentation, 271loops, 246manipulating CVs in Object
mode, 36point constraining, 194pre render and post render, 277processing embedded
commands, 254–255randomizer script creating
natural camera motion, 154randomizing lighting for
firelight, 106recording mouse actions, 189retrieving values with #
character, 266scripting character animation
setup, 178scripting display of objects, 252selectedNodes command, 256selecting elements with, 2setAttr command, 250, 251setting scope for Script Editor, 270storing variables with optionVar
command, 269switching on HUD with, 268toggling Image Plane display
on/off, 253tracking users with, 264using randomizing scripts in, 57variables in, 243warning command, 248whatIs command, 242writing custom procedures, 247
memory. See RAM
menus
locating right-click, 9marking menus, 26, 29marking with gestural
behavior, 26scripting display of objects, 252Selection Mask, 15
metallic surfaces, 127middle mouse button. See mouse
mirror cutting, 82model view, selecting overlapping
in, 21modeling, 45–89
about, 45aligning objects by snapping to
second object, 78aligning points in UV space, 83alternatives to Trimmed Surfaces
tool, 56Animation Snapshot, 63, 77Animation Sweep, 63augmenting scenes with
cards, 48autotracing, 60, 61beveling edges, 73brushing displacement
images, 76constraining next CV to curve, 52converting NURBS to single
mesh, 79converting Photoshop paths into
NURBS curve, 61creating alpha onion skins, 47creating multiple objects with
“g”/”G” key, 11curves across two guide rails, 54deleting hidden vertices, 87displacements, 62Duplicate with Transform tool
for, 71face propagation, 66facial shapes, 180finding coordinate locations for
CV or poly vertex, 65finer tessellation vs. adding
CVs, 51image plane alignment, 46lattices for complex shapes, 75linear vs. cubic modeling for
managing size of NURBSmodels, 52
mapping vs., 49mirror cutting, 82modifying curves, 49, 74naming objects, 84Photoshop Wave filter for, 59randomizing CVs, 57rebuilding surfaces, 55
reducing polygon count, 70reducing revolve sections, 53selection constraints and direc-
tional selection, 68sets and partitions for, 64setting face normals straight, 89shortcuts for displaying
transform tools, 64simulating junk yards, 58Soft Modification tool, 86surface parameterization, 85unlocking vertex normals, 72using auto mapping with Move
and Sew, 81vertex selection, 69working with Fast Interaction, 67“y” key for completing curves, 10
monitor resolution preferences, 35motion
checking animation withPlayblast, 203
redirecting character, 192turbulence fields, 213, 217
motion blur, 163, 279mouse
adjusting attribute values withCtrl key and, 7
choosing types of selectionmasks with, 15
dragging and dropping nodes, 10
dragging and dropping objectswith, 23
finding right-click menus, 9recording actions, 189selecting panels with, 8sliding objects gesturally, 12wheel-assisted scrolling, 18
Move and Sew tool, 81Move Transform options, 6moving characters on flow
paths, 182Multilister
Convert to File Texture Options, 123
converting to file texture with, 121
Hypershade vs., 122selecting shader from, 142
290
NnamespaceInfo command, 272namespaces
finding objects not in current, 263
Maya, 84naming
adding hierarchy of prefixes tonames, 190
objects, 84widgets on creation, 265
navigating Outliner, 16New Scene Options dialog box, 38nodes
dragging and dropping, 10listing node types, 249looking up in documentation, 271navigating Outliner, 16selecting in Outliner, 2, 6viewing all attributes of, 8
nodeType command, 249noise
birthing particles into noisespace, 231
implementing FBM, 258noise fields in effects
animation, 208Ramp Texture and, 125
Non-Uniform Rational B-Splines.
See NURBS
normals
inverted, 141setting straight, 89
NURBS (Non-Uniform Rational
B-Splines)
converting Photoshop paths intocurve, 61
converting to single mesh, 79modifying curves as you draw
them, 49rebuilding surfaces, 55rendering tessellation, 50setting preferences for, 34UV vs. parameterized
texturing, 132
OObj format, 87object mode, 42
caching, 221colliding, 211controlling opacity of, 225crawling, 232–233deactivating collisions, 236deforming, 229displaying attributes
numerically, 230emitting from images or
texture, 216emitting trail of, 215interpenetration errors for, 235killing, 212looping, 211managing velocity of, 234playback of, 210random number streams in
simulations, 238random size variation of, 209rendering hardware-based, 239replacing, 219rotating, 222smoke and dust simulation,
223–224varying velocity of emission, 218
particleSamplerInfo utility
node, 239partitions, 64paths
capturing return value of widgetcreation calls, 265
converting into NURBS curve, 61performance
Animation Snapshot andAnimation Sweepimprovements, 63
deleting non-skin history forcharacter animation, 197
image plane improvements, 161improving rendering speed, 278minimizing texture aliasing, 277NURBS tessellation for, 50reducing rendering load, 276refresh times increased with
bounding boxes, 43reusing depth maps, 92
perspective, 151–152Perspective Projection, 156Perspective view, 4
objects
annotating, 5calculating distance between, 259controlling movement of, 16finding those not in current
namespaces, 263gestural transformations of, 12importing, 23marquee zooming for, 11moving precisely in 3D space, 4naming, 84revealing in Outliner, 6rotation snapping for, 13saving, 12scripting display of, 252selecting overlapping, 21
ocean scenes, 203one-point perspective, 151Open Options dialog box, 20optimizing scene size, 19optionVar command, 269orthagraphic panel tumbling, 7Outliner
dragging and dropping nodes in, 10
illustrated, 2navigating in, 16revealing selected objects in, 6selecting nodes in, 2, 6splitting, 2wildcards for selecting fields, 3
overlapping objects, 21
Ppaint
lighting with, 94painting in shadows, 101smooth skinning hotkeys for
painting weights, 174Paint Effects module, 36Paint FX brush for hair, 193panels
selecting with mouse, 8Web browser functions within
working, 17particles
acceleration of, 210attaching fields to individual, 214birthing into noise space, 231
291
Photoshop
converting paths into NURBScurve, 61
integrating texturing processinto Maya, 147
modeling with Wave filter, 59Render Lighting filter, 94
Pick Nothing command, 32Planar face, 56Play Every Frame (Preferences
dialog), 210Playblast
checking animation motion with, 203
evaluating animation in, 127selecting frames for viewing
in, 191plusMinusAverage utility
node, 249point constraining, 194Point lights
cubic point arrays, 96shadow maps and, 97
pointPosition command, 194, 195points, transforming, 64Polygon Bevel Options dialog, 73Polygon Reduce Options dialog, 70Polygon Set Vertex Normal
Options dialog, 72polygons
finding coordinate locations forpoly vertices, 65
reducing count of, 70Popup Menu Selection option, 21pound (#) character, 266preferences
choosing priorities for overlapping objects, 35
Click Box Size option, 35Click-Drag-Select option, 31customizing face selection, 38deleting, 3Popup Menu Selection option, 21setting NURBS display options, 34setting Web browser, 17transporting custom
Preference files to nextworkstation, 33
working unit, 33Preferences dialog, 14
prefixes, 190prefs window, 3premultiplication of alpha, 137Premultiply Threshhold, 137procedural textures, 121, 145processing embedded commands,
254–255production methods, 275–283
about, 275checking Release Notes, 279final rendering checklist, 283improving rendering speed, 278locking down shadow maps, 278matte rendering, 280minimizing texture aliasing, 277pre render and post render MEL
functions, 277reducing motion blur, 279Render Diagnostics, 280rendering larger than 8k, 282rendering load reduction, 276Z depth pass, 281
projection maps, 129promptDialog command, 267
QQuadrangulate Face Options
dialog, 70
R-r flag, 263RAM (Random Access Memory)
conserving by turning offDynamics or Paint Effects, 36
reducing rendering load, 276ramp values, 225random number streams, 238Randomize Keyframes dialog, 154randomness, 208, 209Rebuild Surfaces Options
dialog, 55redirecting motion for character
animation, 192redoing views, 158reference files, 20Release Notes, 279Render Diagnostics, 280
Render Global Settings dialog, 277Render Lighting filter
(Photoshop), 94render scripts, 135Render View dialog, 146rendering, 119–147
about, 119applying Facing Ratio, 134backgrounds, 143baking light, 123checklist for final, 283Color Offset and Color Gain, 124Color Remapping, 139creating render scripts, 135dangling chain, 213defining file format for
structuring 3D, 153determining texture
resolution, 133eliminating shader glow
flicker, 132file textures, 121hardware-based particles, 239High Quality Shading, 144inverted normals, 141Layered shaders, 136in layers or passes, 130locking down shadow maps, 278matte rendering, 280metallic surfaces, 127Multilister and Hypershade tools
for, 122Playblast for evaluating
animation, 127pre render and post render MEL
functions, 277premultiplication of alpha, 137providing imperfections and
inconsistencies, 120PSD textures, 147Ramp Texture, 125reducing motion blur, 279reducing rendering load, 276Render Diagnostics, 280resolution larger than 8k, 282RGB lighting passes, 146shading group selection tool, 142shadows in separate pass, 131simulating dirt and grime, 128
292

specular mapping and specularcolor, 126
speed of, 278surfaces with wet
appearance, 138Test Textures, 1453D stereoscopic, 164transferring UVs to human head
model, 140triplanar projection maps, 129Z depth pass, 281
resolution
rendering larger than 8k, 282setting for viewing panel, film
back, and output, 153setting preferences for
monitors, 35Retain Component Spacing
option, 6revolve sections, 53right mouse button. See mouse
right-click menus, 9rigid bodies
active and passive, 58, 207animating, 207rendering dangling chain, 213running simulations of, 236–237
ropes, animating, 204–206rotation snapping, 13rule of thirds, 150
SSave Screen Options dialog, 12saving
dynamic window layouts, 202incremental saves, 12startup cache for particles, 221
scale, keeping UVs in, 80scanned files vs. procedural
mapping, 121Script Editor
-asString flag in MEL, 260creating confirmation dialogs
in, 267executeForEachObject command
in, 256finding coordinate locations for
CV or poly vertex, 65setting scope in, 270
shelves, 28shortcuts, displaying transform
tools, 64Shrink command, 15Shrink surface option (Tool Setting
dialog), 56skeleton
building joints for, 172setting up IK for, 173
smoke and dust simulations,
223–224Smooth Proxy Options dialog, 88smooth skinning, 174Snap Align Objects, 78snapping to camera pivot, 162soft lighting, 113Soft Modification Options
dialog, 86soft-bodies, animating,
204–206, 220specular mapping and specular
color, 126Specular Rolloff, 138Spot lights, 93, 99, 104, 107, 108
Spotlight Decay Regions, 109spreadsheets, attribute, 8startup image, 26stringArray, 251strings, 257sun charts, 110Surface Editing Tool, 74surface parameterization, 85switching between object and
component modes, 42
Ttangent tools, 183tessellation
adding CVs vs. finer, 51displacements vs., 62rendering NURBS, 50
Test Textures, 145texture maps, 188textures
determining resolution of, 133emitting particles from, 216file, 121minimizing aliasing, 277procedural, 121, 145
writing custom MEL procedures, 247
scripts
character animation setup, 178conditional statements in
MEL, 244creating natural camera
motion, 154editing standard user, 37MEL randomizing, 57render, 135scripting display of objects, 252
scrolling, wheel-assisted, 18sculpt deformers, 179selectedNodes command, 256selecting
elements from fields, 2, 3overlapping objects, 21panels with mouse, 8selection constraints and
directional selection, 68selection mask with right mouse
button, 15vertices, 69
selection handles, 162Selection Mask Menus, 15Selective Preload option (Open
Options dialog), 20Set Driven Key, 187Set Key Options dialog, 186setAttr command, 250, 251sets, 64Shader Glows, 105, 132shaders
Facing Ratio with, 134Layered, 101, 136selecting from Multilister, 142
Shadow lights, 107Shadow Maps
configuring, 92, 104directional light with, 111, 116locking down, 278turning off, 97
shadow platters, 102shadows
creating separate rendering passfor, 131
viewing in real time, 112warm/cool color opposition
in, 114
293

textures (continued)PSD, 147Ramp, 125Test, 145writing to hard disk cache, 276
3D
developing 3D camera envelope, 166
file formats for rendering, 153motion blur, 163, 279reducing motion blur, 2793D stereoscopic rendering, 164
three-point perspective, 151thresholded Shader Glows, 105timeline keyframe options, 188Tool Setting dialog, 56tools, 14tracking users with MEL, 264Transform Attributes options
(Attribute Editor), 16transform handles, 7transform nodes, 42transform tools, 64translate manipulator, 40Transparency mapping, 49Trimmed Surfaces, 56triplanar projection maps, 129Tumble Tool, 7turbulence fields, 213, 2172D motion blur, 163, 279two-point perspective, 151
Uundoing views, 158unlocking vertex normals, 72Use Cache option (Attribute
Editor), 276Use Frame Extension option (Image
Plane Attributes), 160userPrefs.mel file, 3utility nodes, 176
plusMinusAverage, 249UV Texture Editor, 80–81, 83UVs
keeping in scale, 80transferring to human head
model, 140UV texturing, 132
Vvanishing point, 151variables
arrays, 245avoiding global, 265in MEL, 243storing with optionVar
command, 269velocity
managing particle, 234varying particle emission rates
with, 218vertices. See also CVs; UVs
selecting, 69unlocking vertex normals, 72
Visor, 193
W“w” key
aligning vertices with, 6gestural transformations with, 12
warm/cool color opposition, 114warning command, 248Wave filter (Photoshop), 59Web browsers, 17wet surface appearance, 138whatIs command, 242wheels, scrolling with, 18while loops, 246working units, 33World Coordinate System, 34wrap deformers, 181writing custom MEL
procedures, 247
Xxform command, 195, 259
Y“y” key, 10Yaw-Pitch Tool, 152Y-up coordinate system, 34
ZZ depth pass, 281“z” key, 22zooming, marquee, 11Z-up coordinate system, 34
294